
UXpin's Blog, page 120
December 12, 2016
Up Your Typography Game with Typekit in UXPin

Typophiles rejoice: we’re pleased to announce that we’re among the first in a new partnership with Adobe Typekit that brings hundreds of web fonts into UXPin, depending on their paid Typekit plan. Now you can integrate your account with our prototyping tool to create typographically great designs.

It’s said that typography is the “voice” of content, and choosing the right type family is just as critical to conveying a message as the text itself. Many designers, both in print and in web sites — and web apps — rely on font services to make their text more clear or more expressive. Why should that skip between high-res Photoshop comps and final production? We don’t think it should.
We recently integrated Google Fonts into the Editor. Now designers will have access to their Typekit web fonts within the UXPin Editor, bringing consistency across an entire workflow. That includes text added to designs started in Photoshop or Sketch and import into UXPin, as well as those you start with our Editor’s built-in element libraries. Now you can choose from both libraries to make your UXPin prototypes more closely match the finished products.

Your entire Typekit web font library is available — if you choose. After you link your UXPin and Typekit accounts together, you can decide which font families you want, and prune out the ones you don’t through our Typography panel.
Learn more about how it works, then get access to your entire Typekit library of web fonts with UXPin’s integration and use them in any prototype.
Join the world's best designers who use UXPin.Sign up for a free trial.Your e-mailTry it for free!
The post Up Your Typography Game with Typekit in UXPin appeared first on Studio by UXPin.


December 7, 2016
How Autodesk Tackles UX Design Challenges

At Autodesk, the design teams are as global as the company’s customer base. The $2.5 billion software giant is powered by 7,700 employees across seven continents.
In the Tel Aviv office, Uri Ashano serves as the senior UX manager for AutoCAD 360, the mobile application of the company’s flagship product. Ashano and his team of five (two UX designers, two visual designers, and one researcher) collaborate closely with Autodesk’s San Francisco headquarters to practice user-centered design within an Agile process.
As Ashano explains, the company sees itself as a knowledge house, not just a software provider. All designers train and work with the Luma Innovation Institute, which teaches 36 different methods for user-centered design. The design process Ashano and team follow each time they get new feature requests illuminates the power of collaborative design, especially in the discovery stage.
Research the Problem
The Tel Aviv team’s process begins when they get a request from the larger AutoCAD 360 team for a new feature.
The request usually presents itself as a user scenario such as: “An architect needs an AutoCAD drawing at his job site. He’s bringing along an iPad (or other tablet) and wants to view his drawings, modify, and annotate. Afterwards, he wants to share the updates with colleagues.”
In response, the team first opens a new project in Slack to start investigating the problem the feature aims to solve. This initial research consists of interviewing local architecture firms, reviewing customer support tickets for ideas, and reviewing online data in MixPanel. The team also consults data from the greater Autodesk’s research, mostly around multiplatform use of AutoCAD and the flows related to these products.
“We always examine incoming requests from a user-centric mind-set,” Ashano explains. “We pull out the low-hanging fruit and then focus on the riskier elements that we can go after. These user stories are always our starting point to design.”
Deeper Discovery
Once a vision for the feature(s) emerge, the team moves quickly into the discovery mode. This period of design is one of the most intense and collaborative for the team. As Ashano says, “We don’t want to lose any creative minds in the process.”
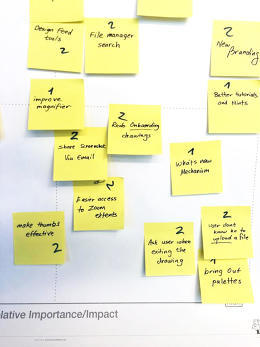
Rather than sending designers off with specific projects, Ashano engages all team members together to explore ideas. By exploring these ideas in half- or full-day workshops, the team collectively decides which are worth actually moving forward with. “Working together, we can get 20 great ideas in 20 minutes,” Ashano says. “Our collaborative brainstorming is far more effective than if we sent designers off to think on their own.”
Using bull’s-eye diagrams, pains vs. gains charts, and impact vs. feasibility matrices, the team starts to map out customer needs and prioritize ideas. As the ideas populate the different diagrams and charts, team members (including product managers and developers) also add smiley or sad faces next to the concepts.
Ashano notes that the earlier they can embed developers and product managers in the decision-making process, the better. In fact, this is why the teams are also physically located near each other, sharing meeting spaces and much time together.
From the team’s work with Luma Institute, they also use up to 10 other brainstorming methods, such as affinity maps and eyeball diagrams. At this point in the process, sketching remains minimal with all the focus on idea generation through sticky notes.
Only when there is firm agreement on the overall feature set will a designer start to sketch in greater detail. And, following the Agile UX process, the team will leave the stage of deep discovery with epics, user stories, and a backlog that they can revisit for more ideas.
Designing the Solutions
Once the rough feature sets are decided, the team holds a formal kickoff. From there, long brainstorms are replaced by focused daily stand-ups that involve only people essential to the work being done.
Once the team members divide to conquer their specific tasks, the group starts designing collaboratively with early wireframes and user flows for each user story. To speed up the process for his team, Ashano created templates to easily show the flow between five to six screens at a time.
As the designers start mapping out their flows, the developers will also be wrapping up their technical research. To consolidate their knowledge, the AutoCAD 360 product team now creates a lightweight PRD that focuses on guidelines over prescriptions. The technical details are contained in Dropbox and Zeplin links, while the interactive details are reflected in the links to the user flows.
“Annotating our user flows is very useful because it lets us get great feedback even in the early stages of conceptual design,” he says. “Everyone can go in — including developers and product managers–-and see how things are created in real time. Also, since it is extremely hard to create mockups that show the behavior of an iPad, annotations are very helpful for our multi-device storytelling.”
For feedback on the PRD and early concepts, the Tel Aviv team will also share their user flows with the larger AutoCAD 360 team in the U.S., Singapore, and Germany. As the Tel Aviv team iterates their wireframes into higher fidelity mockups, they will also hold remote design reviews within the platform.
Problem Solving With Prototypes
For most designs, the AutoCAD 360 team iterates wireframes into static hi-fi mockups and then directly to code. In the interest of time, the team only creates prototypes for new interaction models or potentially problematic flows (like ones with multiple transitions).
The fidelity of the prototype depends on the design question. For example, Ashano’s team will create lo-fi prototypes if they’re testing a totally new interaction model. On the other hand, they’ll create a hi-fi prototype if they’re testing branding or different color palettes.
For usability testing, the AutoCAD 360 team generally tests with 5 to 10 people. Since Ashano and his team’s work focuses on specific features within an existing product, the prototyping, testing, and iterating process continues until the system feels refined and complete.
Once a prototype is ready for development, the team will update the PRD again with mentions of any major changes to the interaction models and any links to new prototypes. As the developers build out the feature, the design team revisits the epics, user stories, and backlog for their next sprint.
Conclusion
Autodesk’s Tel Aviv team shows us that enterprise design doesn’t need to be bogged down by poor communication and mountains of documentation. Here are the big takeaways:
Validate feature requests with early qualitative research (reviewing support tickets and user interviews) and quantitative research in analytics tools and surveys.
Dedicate time up front for discovery and ideation with half- to full-day workshops aimed at defining the rough feature set.
Treat documentation as a knowledge portal rather than a paper trail by linking out to further details.
Prioritize prototyping for the most difficult interaction models.

Learn more about real-life design processes with our free e-book.
Originally posted on FastCo. Design
The post How Autodesk Tackles UX Design Challenges appeared first on Studio by UXPin.
December 6, 2016
Introducing Product Tribes: A Slack Community of Product Makers

Until today, we’ve only invited webinar attendees to our exclusive Slack community known as Product Tribes.
We started with simple question: how might we improve cross-functional knowledge across product teams? Since we all use and love Slack, Product Tribes was born. Fast forward a month and we are now over 1000 designers, developers, and PMs.

The community has channels dedicated to discussing leadership, Lean/Agile processes, front-end development, product management, user research, and everything UX and UI related. People give advice, ask questions, and share useful resources for all things product, UX, and development.
Members include folks from hundreds of startups, agencies, and organizations like:
Accenture
Allianz
Anthropologie
Autotrader
Bloomberg
Bottomline Technologies
Capital One
Citrix
Clorox
Concur
Core Logic
Dell EMC
eHarmony
Emirates
Groupon
Hewlett Packard
IBM
Infusionsoft
Ingram Micro
Lexmark
Monsanto
Phillips
PriceWaterhouse Cooper
SAP
Staples
T. Rowe Price
Transperfect
Unilever
VM Ware
White House Digital Team
Yahoo
The community continues to grow each day, so we’re excited for the future. To maintain the quality of membership and discussion, we review every application. If you’re an experienced member of a product team, we’d love for you to join us.
The post Introducing Product Tribes: A Slack Community of Product Makers appeared first on Studio by UXPin.
December 5, 2016
A Design Review Template for Balancing Desirability, Viability, and Feasibility
Design and experience reviews are meant to help stakeholders strike the balance between human desirability, commercial viability, and technical and legislative feasibility.
These sessions don’t always work out as we imagine, however, due to subjective discussions and competing priorities.
The net result is a convoluted human experience – not taking full advantage of the great work done by experience research and design, and an ongoing challenge to meet key business objectives.
If this reflects your reality, here’s an immediately actionable solution: an experience review template that captures key desirability, viability and feasibility criteria. This will help satisfy experience design teams needs and ground experience design practices in strong commercial principles – making the rest of the business very happy.
Thanks to the good folk at Intercom, we’re going to use their design review template as a starting point. From this, I’ve made a few adaptations based on my own work at Meeco.
Setting the stage
To help set the scene, let’s imagine the following scenario:
You’re an experience leader or experience designer at a bank.
Currently, the bank is facing challenges with its onboarding process. You believe that a Digital ID will help solve some of the on-boarding challenges the bank you work for is currently facing.
You’ve framed your hypothesis based on ongoing research, customer collaboration, as well as both pencil and pixel pushing.
So what now?
You have a few options, like talking to a coworker to gain further insight. You could conduct some research yourself, and try to make meaningful progress before exposing your ideas to anyone on your team. You could call a quick collaborative session to workshop the option. You could even add it to a product backlog, flagging it requires further exploration.
In this example, you’re going to call an experience review session with your team, time box your effort, and put pen to paper in an attempt to crunch out your thinking quickly.
After a few hours, you’ll hopefully end up with something of value. To do that, a consistent and balanced structure is vital.
What to include in your review template
To ensure objectivity and structure in your design review, include the below sections in your review template (scroll down for the completed visual example):
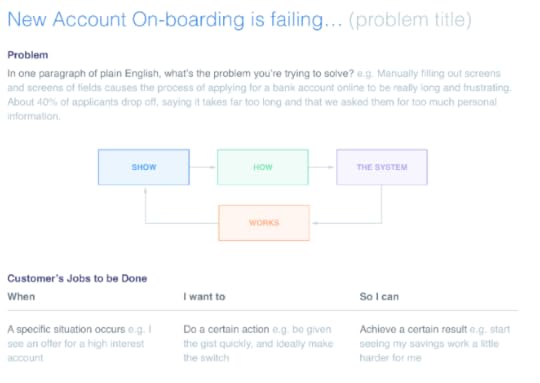
The problem: State the problem succinctly. The design and business teams will build a shared understanding from this foundation.
The system (current state): Show how the system currently works (if it’s an existing product) to help put the problem in context. Later, you can show show how the system could work with your proposed experience.
The job to be done: A shared understanding of what motivates your customers is pretty darn important. Succinctly mapping out the customer jobs helps build this understanding, and also helps stakeholders understand how customers decide whether to hire or fire your solution.
The business objective (NEW): State why the business should care about the customer problem in commercial terms.
The metrics that matter (NEW): You can’t improve what you don’t measure. These metrics should enable you to quantify the business and customer value that’s being created through your new experience.
The proposed experience: Summarize the proposal in a sentence. Make it clear and comprehensible. The people in the room need to understand how this proposal relates to the problem you’ve previously articulated.
The implications of your proposal: How will your proposal impact other parts of the business? Maybe you don’t know. Developing an understanding of this early in the experience design process is critical to achieving balance in desirability, viability and feasibility.
Basic experience design: Give people a feel for what you’re proposing with some wireframes. Sketch these on paper or create them together quickly in your design tool of choice. Think of the minimum amount of effort that enables you to clearly showcase how a human being will engage with your experience. In this context, this is your first MVP.
Insights informing the design (NEW): What led you to develop this experience? What were the insights, hypotheses etc.? Show your depth of thought in a few bullet points.
Hypotheses about new experience (NEW): What are your hypotheses about the new experience? Where did these come from? How can you align these hypotheses to the metrics you believe matter? These should be clear and testable. By conducting tests with clear pass/fail metrics, these hypotheses should also give you a strong foundation for measuring the incremental progress you’re making.
The team’s collaborative focus (NEW): Why are you all in the room? What do you need the businesses help with? This new section of the experience review template helps set a very clear context and focus for the business stakeholders ultimately responsible for the success of the product. This is a team effort and requires team focus.
A complete visual example
Working off this Sketch template, let’s look at the finished asset:
Part 1

Part 2

These core principle here is that these two pages capture the context of your hypothesis. They also succinctly capture the business relevance of solving this problem.
Both are equally important for a commercial design team. So what do you do once you manage to get the right people in the room?
Running the design review session
During the experience review session, work with your team to ask the tough questions, and then get outside that room. Regardless of the collective intelligence present, you won’t find all your answers in this session.
Here’s a few guidelines:
1. Circulate the finished template prior to the session
Everyone’s busy, but working through this in real time without the necessary context won’t produce the results you need. Send the completed template 24-48 hours before your review session. No exceptions.
2. Time box the session
This is non negotiable. If you work in a Scrum environment, you’re familiar with timeboxing. Once you’ve clarified objectives and invited the right people, set aside one hour.
3.Document commitments
Products that are desirable, viable and feasible can’t just be built by research, design and engineering teams. They require ruthless focus and commitment from various people and departments across the business.
In this session, define your collaborative focus and get the right people from within the business to commit to clear next steps.
Use this template as a foundation for an experience design culture that consistently produces valuable experiences. Over time, you’ll decrease cost and/or increase revenue.
Your customers will love you, and the CEO will too.
For more practical UX process advice, download the free Agile UX Ebook Bundle.

The post A Design Review Template for Balancing Desirability, Viability, and Feasibility appeared first on Studio by UXPin.
December 2, 2016
Help Santa Claus Manage His Letters and Win the UXPin Giveaway!

With the end of the year and Christmas just around the corner, we want to help Santa Claus with all his incoming communication.
Can you imagine how many letters he must receive daily? He needs a great email agent to sort through all the Christmas letters coming his way — one that he can open on his mobile phone and tablet. ;)
We’re holding a contest to help the jolly ol’ elf get a prototype for Santa Claus’ Inbox! The best prototype will win a single user annual subscription on our Pro plan (or its equivalent of $313.20 in subscription time for current customers).

How to Enter our UXPin Giveaway
To enter our contest, follow us on Twitter and tweet a link to your Santa’s Email Inbox prototype using the hashtag #UXPinGiveaway.
If you do not have a Twitter account, visit Twitter and follow the instructions to get on board. In case you don’t own a UXPin account, you can create a free trial.*
Requirements
The prototype must include the following:
– Have two breakpoints (mobile phone and tablet);
– Constitute at least three interactive views, including all listed below:
Inbox overview with new and read emails
Email sorting view where Santa can apply the labels “Naughty” or “Nice”
Message view with a reply field
These requirements are the absolute minimum to qualify for a chance to win our giveaway. We’ll award bonus points for entries with a post detailing your process and inspiration.
The promotion period begins 6 a.m. PST on December 5, 2016 and runs until 11:45 p.m. on December 14, 2016. The last entry must be received by Sponsor by 11:59 p.m. PST December 14, 2016. The winner will be announced via Twitter on December 19, 2016.
Can’t wait to see where your creativity comes to life!
*No purchase necessary to enter or win this contest.
The post Help Santa Claus Manage His Letters and Win the UXPin Giveaway! appeared first on Studio by UXPin.
November 30, 2016
A Developer’s Tale: of Design Education and Interactive SEALs

No one said enterprise-level design was easy. But few realize how much of a difference good collaboration and communication can make — especially between designers and developers. While sometimes they seem to live in different worlds, their common goals put them firmly on the same team.
We talked with web developer Chad Wooten of GDC Marketing and Ideation about working with designers in an enterprise environment. With more than 20 years of experience in web development, systems administration, and graphic design, Chad approaches projects with careful attention to both technical development and creative execution.
Because of his hybrid background in front-end and back-end development, he has wide-ranging and valuable insight in regards to UI/UX testing, responsive design, and digital best practices.
How is developing for enterprise customers different than smaller companies?
There are more layers for approval so you have to be very conscientious about timelines. Testing takes longer in some circumstances because of an overzealous IT guy.
What information is often missed at the beginning of a project with a major client? What do you wish you’d known later in the development cycle?
In my experience, the little things get overlooked. The client loves the design on paper and they don’t think about hover states or the interactivity. It is also hard to communicate the subtle differences in UX/UI on a mobile device for responsive sites. Like the lack of hover states, etc …
What miscommunications have you encountered when working with a design team?
Because I work in a traditional advertising agency, most of the designers I work with are used to print design or broadcast. This leads to missing interactive function in the design. Animations are hard to convey on a print out. Sometimes little changes in the visual design are huge changes in the code and sometimes the opposite is true. Communicating the differences can be a challenge and may lead to designer shell shock if you are an aggressive developer.
I have a background in IT so I am used to many questions that I consider to be trivial but the user is truely clueless. You can either get annoyed by this or you can embrace their curiosity and use it as a teaching opportunity. The same holds true with development. Questions that seem simple to the developer may be completely Greek to a designer.
“You can either get annoyed by this or you can embrace their curiosity and use it as a teaching opportunity.”
One time I developed a site that needed a “simple” webform. They just wanted to collect a user’s information with four basic questions: name, phone, email and zip code. By their answers, specifically the zipcode, they would receive information that was geographically based.
The simple change they requested was stated, “Can we have them fill in their zip code first and, based on this information, have a form that routes to a specific person?” Uh, yes, that can be done, but it is more complex than a “simple” webform.
How early do you think developers should get involved in the design process?
Developers should be involved from the brainstorming on and there should be regular check-ins to ensure the designers or the client aren’t encouraging scope creep.
What advice would you give developers about making design decisions? How about clients or managers?
Keep the budget in mind and know how long it will take to achieve the client’s goals. Don’t be afraid to give your opinion on the design but remember the designer and the client are in charge if the design. Like it or not, we are in a service industry and we are here to develop, not to design.
What should developers know about design?
This is a tough question. Developers should have an open mind about design. I think they should have a basic concept of good design. They should be able to spot good composition, know about the “rule of threes” and understand the concept of negative space.
On the other hand, designers should know basic programming concepts. On the favorite team I was ever on, we liked to think of ourselves as interactive SEALs. We all had our specialty, but we knew enough about each other’s jobs that we could do it if that person was missing in action. That is an effective team model.
What do you find rewarding about working in an enterprise environment?
The larger and more recognizable the brand, the better your resume will look. The code isn’t always more challenging but there is almost always more of it, haha. I thrive on working under pressure and large clients love last-minute changes.
And, above all, when your friends and family say, “I just went on so-and-so’s website and it was so easy to use” and you say, “I developed that @! site!” Well … yeah, that’s awesome.
If you were in charge of an enterprise-level project, what would you like to change?
I would have an initial meeting with the client that involved everyone on the team. I would make sure there was complete agreement on the intent and scope of the project before it started on all sides. I would make sure there were regular team check-ins to ensure the project was on track and within scope.
I would also make sure that once the mobile and desktop design was complete, the developer and designer hashed out all of the interactive elements before client approval. Finally, I would make sure to hold regular developer/designer check-ins during the programming to ensure creative integrity.
How do you work with team members in different disciplines? Have your say in the forum.
The post A Developer’s Tale: of Design Education and Interactive SEALs appeared first on Studio by UXPin.
November 29, 2016
Building and Managing UX Teams: A 360 Degree Guide

At some point, people will follow you, listen to you, or otherwise be engaged with what you’re trying to achieve.
Leadership comes naturally to some. The other 99% of us have to work hard at it.
How Design Leaders Build Teams
Building a team that scales over time is one of the biggest challenges for any leader.
As I explained in The Guide to UX Leadership, The first order of business is to understand the factors at play and imagine the future.
1. Visualize your team’s future
Block out some time to sit and focus on the big picture—to sketch out your team vs. the workload vs. imagined changes to the rest of your organization.
Work with collaborators to ensure the vision is feasible (given the workload and organization). Accept that the only constant in the future is that it isn’t predictable.
Start off by looking at roadmaps across your organization’s portfolio of products and services, then drill down into each one to understand the tasks requested of you and your future team. From there, work with your collaborators to create broad estimates and roughly determine the scope of work required, plus the number of UX team members you’ll need.
At some point you need to start with an estimate of the resource required against that roadmap.
Let’s say you see 6 projects emerging over the next 6 months to a year. You take that map and layer over it your recruiting durations. How long does it take you to recruit and ramp up a new hire? What resource can you attach to each project?

If time is a problem because projects surprise you, you should supplement hiring with contractor availability. Sticking with the same contractors shortens ramp up time.
2. Break out the skills you need
Once you have a picture of the future, you then deconstruct the skills required to achieve that vision.
Some skills may not be in your domain, but you need to list them just so you know you’ve got them all. Create an affinity chart of the skills broken down by category. Ask for cross-functional leaders to evaluate them, add to them, and re-categorize as you all see fit.
Lay out the skills (not the roles) you need because our attempts at categorizing what we do (especially in our world of digital design, titles, roles) has been a complete failure (ironic, I know).

As you can see in the above image, I laid out the skills first in an “unattributed skills” list. Then I use my expected roles and ensure that all the skills line up to titles that I’m confident I can hire for. This is incomplete on purpose since the details and role groups depend on your context.
Clearly document all the skills you need. Some may seem like universal skills, but you’ll find it will make a difference later on as an evaluation checklist.
3. Start your recruiting
Now, you build job descriptions.
Consider how roles will change during the time of the vision you set out. You also need to imagine how people will be promoted and gain leadership for themselves. Finally, you need to consider how you’ll need to change and grow as a leader to keep up with your team.
The trick is hiring for short term needs with an eye for longer term needs.
When you hire your first 3–5 people, you’ll most likely hire broad generalists (since no single function will have enough work to separately hire, say, a visual designer, an interaction designer, and a researcher). You may even need people who do all three of those things—plus front-end development.
The question is how and when you prepare to start specializing within the organization. Like the evolution of any organism, at some point, cells need to specialize more and more. Specialization needs clear pathways for career growth and promotion, too.
4. Evaluate and hire the right candidates
When it comes to actual candidate evaluation, the best methods do two things: focus on skills and outcomes, and consider the needs of everyone working with this individual.
How does a candidate tell their story about how their skills lead to direct outcomes/results in their work?
When looking for a culture fit, beware that you don’t make the mistake of “hiring people like me”.
For this purpose, the book Hire With Your Head is a great read.
Managing and Coaching Designers
Once you have a team, leadership boils down to how well you oversee and develop direct reports.
1. Become a buffer
Give air cover. Take the heat about negative team perception, and defend the team without them knowing.
Remember that translating messages from executives is about making it relevant. A strategy about meeting margin growth through reducing redundancy needs to translate into something that directly affects how the design team changes workflow. For example, you can explain that the team needs to now create a design system to help developers scale code over time.
Often as designers we get fixated with the answers we came up with. Then we feel demoralized when we are told, “But that doesn’t work for the business.”
When I was managing the design team at Intralinks, we were trying to increase our offering into new spaces. By explaining the constraints of the design problems as a business driver, instead of something we should feel victim to, we energized the team and worked towards some pretty neat designs that didn’t cost nearly as much.

2. The One-on-One (1:1)
There are three types of 1:1 meetings you should be holding on a regular basis that include (but may not be not limited to) your team:
With your direct reports.
With your peers.
With your supervisor.
Meet weekly with each member of your team and bi-weekly with your peers. (You can add other people, should you feel regular contact is important.)
Direct reports should own this meeting. The agenda of the meeting needs to focus on how their current work addresses their short and long term career needs—it’s not a status update. This is a coaching session, first and foremost.
Meeting with peers on a regular basis helps you limit surprises, not to mention uncover situations where you can help. Control the pace and own these meetings.
For 1:1s with your manager, take what your direct reports said, then flip the roles. Everyone needs coaching and you’re not excluded—no matter how senior you are. Hold yourself responsible for making sure that your manager doesn’t highjack the meeting.
You’ll also want to meet with these roles on a regular basis:
Technology heads
Key cross-functional people
Human resources representatives.
i. Technology heads (monthly)
Stay up-to-date on the technology of the business, its progress, and trends. Meeting with people inside the technology groups of the organization will help you prepare for what is coming your way. Own the agenda of these meetings, but let them pivot in reaction with the conversation flow.
Consider asking the following questions:
What are the expected upcoming roadblocks? (Especially between your teams and theirs).
As a manager, what issues do you face related to your team’s development? Is there any way I can help?
ii. Key cross-functional people (monthly)
Whether this is product management, sales & marketing, or customer service/engagement, you must connect yourself to the pulse of the organization.
Each one of these departments helps you develop insight into the business and keep ahead of problems. They will also help you set your team’s long-term agenda.
Here is a generalized list of questions to stay on track with each department:
How can my team help with any problems your team is experiencing?
What is your schedule? (Does it line up as expected with your own?)
What issues are keeping you awake at night?
iii. Human resources representatives (monthly or bi-weekly)
Most leaders seem to forget these meetings. Believe it or not, HR is an amazing resource for you.
Reviewing your staffing, current performance, and future needs against the business demands gives you a source of reflection from a key advisor available to you. Too few managers really use their HR team in this strategic way.
This is less about questions and more about a chance to get good council. Consider discussing the following points:
My team is having these pains, do you have any suggestions for helping us get back on track?
Here are my recruiting needs. How can we meet those needs more quickly?
Is there anything coming down the pike that I’ll need to be communicating to my team soon? What can I do to prepare now?
Grab design ebooks created by best designers
All for free
 Download
 Download
 Download
 DownloadDo you want to know more about UI Design?
Download 'The Guide to UX Leadership' FOR FREE!
Download e-book for freeCloseDeveloping Your Designers
There’s a half-true statement bandied about among managers: “People don’t leave jobs. People leave their managers.”
Personally, I’ve left jobs even when I loved my managers, so I know this statement is only partially true. A good manager is actually at the heart of why people stay.
The managers we remember most are the ones who helped us grow.
Focus on these two areas on when developing your team.
Short-term tactics.
Long-term development.
1. Short Term Tactics
Discuss assignments in full detail, then have them lead you through the places where they expect the work to be easy, or possibly a stretch. Dig down and understand what they mean with each answer and whether or not that maps against your own experience.
There is even an entire framework developed for this purpose that I highly recommend called Situational Leadership II (Don’t forget the “II”—it matters.) The framework helps a leader and a team member assess their situation and figure out the right level, type of guidance, and support they need.
1:1 meetings also help you hold each other accountable through its shared language. This will set up the near-inevitable periodic evaluations that inform bonuses and pay increases.
2. Long-Term Development
For your junior direct reports, long-term development is about helping them understand possibilities.
Whenever I work with someone new, I always ask them “What do you want to do in 5 years?” It’s a nice time frame, one where hopefully a new employee still sees themselves at the company, yet also far enough out where the level of achievement is really up to them.
In these conversations, you need to create a job matrix (see below) that outlines the levels of each employee against the skills, behaviors, and outcomes expected from someone at that level. This way, everyone in the organization sees their growth path. They know what’s needed to move from step 1 to 3 in a period of time.

A few details to note in the above image:
Each role has number of years experience, but also number of years expected in that position before growth to next level.
I’ve plotted out where core qualities should fall on a spectrum of proficiency.
I’ve summarized each core quality with a simple quote that represents mastery.
Like any strategic agenda, the patterns are the same:
Understand the vision.
See the possible paths for achievement.
Pick the initial steps along the way.
Set clear goals explaining impact on the individual and business.
Evaluate and adjust as you go.
Managing Up & Across
I’m sure many people are familiar with the phrase “managing up.” In my experience, what it means is owning your relationship with your manager.
But how do you do that? Well, leading is making sure things go well, right?
Here are some basic tips (that you’ll also find helpful with cross-functional peers).
1. Don’t make people guess what you mean
There’s a training opportunity for you here—it’s called Precision Q&A. The gist of it is that you can always better clarify your words and intent.
If I say I need a tall building, that’s great, but how tall is tall? Shouldn’t I give scale? Isn’t there a big difference between a 10-story building and a 100-story building? Or, if I ask for something, perhaps I should mention who it’s for and why it’s required?
In other words, be crystal clear when making requests.
Being a leader also means listening to requests. Own the responsibility of clarity there, as well. Ensure you fully understand what you think you heard. If nothing else, repeat the request back to the person in your own words to double-check.
2. Be visible in what you and your team do
People usually don’t notice what happens in their peripheral awareness, especially if it doesn’t catch their attention.
That’s why it’s so essential to highlight your contributions, promote your team, and speak up about their business value. (And especially, don’t ever take credit for other people’s work.)
Conclusion
Leading requires followers. These followers need to respect and value you. The best way to do this is to build them up, protect them, and forge new paths so they can grow.
Like everything I described in The Guide to UX Leadership, this requires specific actions:
Analysis
Vision
Planning
Evaluation
Communication
To see that anything goes well at scale requires good people next to you, behind you, and in front of you. Taking ownership of your 360 degrees of relationships is the strongest guiding principle for success.
For more advice based on 20+ years of UX experience, download the free Guide to UX Leadership by Dave Malouf.

The post Building and Managing UX Teams: A 360 Degree Guide appeared first on Studio by UXPin.
November 28, 2016
Custom Styles: Use CSS to style Elements in UXPin

UXPin elements are getting a lot more customizable. If you know CSS, you can make it happen.
Custom Styles allow you to quickly style elements in UXPin using CSS. Whether you want to use your existing CSS or if you want to add new effects like text-transform properties, shadows, or blur effects, we’ve got you covered.

From box fills to navigation links, many UXPin elements have their own custom features in the Editor’s “properties” panel. But we wanted to give code-savvy designers more control over the look and feel of many visual properties. Here’s how it works:
Select an element.
Click to the aptly-named “custom styles” section of the Editor’s property panel.
Add your CSS properties, such as font, color, border, and padding.
Properties at your fingertips
What can you change? Turns out, quite a bit. The editable properties include:
background
background-attachment
background-clip
background-color
background-image
background-origin
background-position
background-repeat
background-size
border
border-bottom
border-bottom-color
border-bottom-left-radius
border-bottom-right-radius
border-bottom-style
border-bottom-width
border-color
border-image
border-image-outset
border-image-repeat
border-image-slice
border-image-source
border-image-width
border-left
border-left-color
border-left-style
border-left-width
border-radius
border-right
border-right-color
border-right-style
border-right-width
border-style
border-top
border-top-color
border-top-left-radius
border-top-right-radius
border-top-style
border-top-width
border-width
color
opacity
height
width
font-size
font-size-adjust
font-stretch
font-style
font-variant
font-weight
padding
padding-bottom
padding-left
padding-right
padding-top
direction
tab-size
text-align
text-align-last
text-decoration
text-decoration-color
text-decoration-line
text-decoration-style
text-indent
text-justify
text-overflow
text-shadow
text-transform
line-height
vertical-align
letter-spacing
word-spacing
white-space
word-break
word-wrap
box-shadow
filter
Whew. That’s a lot of possibilities.
Going forward
Designers need more power to customize the look of design elements in UXPin while matching what’s possible in web browsers. CSS is the obvious choice. Now they have it with Custom Styles: tailor any UXPin element with CSS.
Join the world's best designers who use UXPin.Sign up for a free trial.Your e-mailTry it for free!
The post Custom Styles: Use CSS to style Elements in UXPin appeared first on Studio by UXPin.
November 15, 2016
Time For Collaboration: Working With (Very) Remote Teams

We have an ongoing challenge. With more than half of the UXPin team in Poland, and the rest in California, communication issues were only a matter of time — or rather, time zones.
It pops up in meetings. And in scheduling company events. And in clarifying who’s responsible for what. To solve this daily problem we’ve had to develop strategies for communicating across both time zones and cultures.
Based in California, Vice President of Product Sunita Reddy has had ample experience working with our Polish developers. We asked her how she tackles communication challenges across the Atlantic.
Describe your role in UXPin.
I provide product leadership for UXPin, which includes balancing long term product strategy & vision with execution. Prioritizing the roadmap and coming up with marketable product updates. Making sure that the processes are well defined to build a predictable agile model for software development. Help build a quality product with high CSAT that helps drive UXPin's growth strategy.
What did you do before UXPin?
I ran a company called ChiQasa, a visual commerce company with customer base in Southeast Asia. We had a team of 20 with two dev offices in India and product management in Mountain View, California. Before that I was head of mobile product and engineering @Accellion with a dev teams in Singapore and Palo Alto. I have led remote teams multiple times in career.
How involved are you with day-to-day operations in the Polish office?
Very involved. I keep in touch with all the product owners and designers on a daily basis and sync with our VP Projects & CTO multiple times a week. I attend every sprint demo and sit in on some sprint retros.
What tools do you use to communicate with the team?
Slack, Zoom, email, phone calls. Sometimes I send a written message, then we talk about it on the call so that nothing gets lost in translation.
What communication problems have you and your team overcome?
One of the biggest issues coming into UXPin was lack of structure. We have created a structure that works in the product org. They know what I am optimizing for in our product team and I get notified. One of the challenges we have overcome is spoken English. If I don't understand them on the phone, I ask the team to send me something ahead of time so that I can follow along. Many times when they write stuff down, it becomes contextual and then easy to understand.
What would you like to improve with coordinating with your team?
Be more organized and more proactive, open up more — not just with me, but rest of the team so that we can solve problems fast. Think through solutions more before presenting.
What did you learn about your team on your first trip to Poland?
I was nervous going to Poland because I did not know what to expect. People were courteous and polite but reserved. So the conversations were way too structured. I had to break the walls, start conversations (take the first step) understand their emotions, likes and dislikes to eventually have water cooler conversations on Slack.
What do you miss about working with people in person?
I have a ton of water-cooler conversations with folks on Slack. But I do miss having a nerdy conversation or solving a super-technical problems with our developers, as they do not open up much about microservices or security across the entire platform or bringing Kubernetes vs. Mesos.
What advice would you offer a manager dealing with teams in another part of the world?
Be super organized. Communicate the process you expect them to follow and over communicate. Get to know people so that you can care, mentor and work with the entire person as opposed to a Persona on Slack. Use the channels that work for the teams. No one channel is right. If you have introverts on the team give them short questions so that they can open up. Make it a comfortable and safe virtual environment for them to express themselves.
The post Time For Collaboration: Working With (Very) Remote Teams appeared first on Studio by UXPin.
November 10, 2016
Styleguide: All Your Prototype Assets in One Place
We’re pleased to announce a new addition to our popular new Spec Mode feature: Style Guide.

Styleguide allows UXPin users to download properties for color, typography, and image assets to their computers. From there they can open the text files — or copy/paste the code — into their code editor of choice.
Need images and fonts? No problem. Bitmaps are also part of the download, as are SVGs of UXPin’s built-in elements.

In addition to viewing individual elements’ specifications in Spec Mode, downloading an entire set of assets gives developers a boost when building local components in, say, GitHub. Soon designers and developers will be closer than ever, making your team’s workflow faster and more efficient. See it in action!
The post Styleguide: All Your Prototype Assets in One Place appeared first on Studio by UXPin.
UXpin's Blog

- UXpin's profile
- 68 followers

