Heather Baird's Blog, page 78
October 7, 2014
Dairy-Free Pumpkin Cakelettes with Coconut Whipped Cream

I hadn't planned on blogging this recipe, but it's just so darn good that I decided to go ahead and share. Last week I was asked to create a smash cake for a baby's first birthday, and it had to be dairy-free. I used a simple egg-free vanilla cake recipe with vegetable oil as the fat instead of butter. I was uncertain that the cake would rise well because of the lack of eggs, but a combination of baking soda and vinegar as leaven worked like a charm. End result? Pretty good. It tasted best straight from the oven, but over time (and without frosting) it became dry.

I decided to completely re-work the recipe as pumpkin spice cake. I felt sure that the added pumpkin would completely change the cake's texture for the better - and it did! It's moist and tender, and so good with - also dairy free - coconut whipped cream. I baked the batter in a ruffled cakelette pan, but you can also divide it between paper liners and make cupcakes. The cakes crown as they bake (meaning they get that cute little "bump" on top) so they'll support a nice big dollop of frosting.

I'm no expert on dairy-free or vegan baking (which I suppose is why I was hesitant to share these) but I feel these little cakes are every bit as good as their butter-filled counterparts. And I love that they are made with pantry staples - no weird substitutes or hard-to-find ingredients. I hope you'll try them!
Dairy-Free Pumpkin Cakelettes with Coconut Whipped Cream
[click for printable recipe]
Yields about 15 cakelettes or cupcakes
Prep: 15 minutes, total time 40 minutes
Please note that the coconut milk in the recipe requires overnight refrigeration. This is not accounted for in the prep time.
Cakes
1 3/4 cup/220 g all-purpose flour
3/4 cup/175 g pumpkin puree (I used canned pumpkin)
1 cup/200g granulated sugar
1/2 teaspoon baking powder
1 teaspoon baking soda
1/2 teaspoon salt
2 teaspoons vanilla extract
1/3 cup/60 g extra virgin olive oil
1/2 cup/125 ml cold water
Coconut whipped cream
1 can (14 ounce) full fat coconut milk, refrigerated overnight
1 tablespoon granulated sugar
Seeds from one vanilla bean, or 1 teaspoon vanilla extract
1/2 cup chopped pecans
Cinnamon for dusting
Make the cakes: Position an oven rack in the upper third part of the oven.
Preheat the oven to 350 degrees F.
If using a cakelette pan as I have, grease the pans with vegetable shortening and dust them with flour. Tap the excess flour out of the cavities. If making cupcakes, line a cupcake pan with papers.
Stir together all the cake ingredients in a large bowl. I simply used a large balloon whisk to combine the ingredients well, but you could also use an electric mixer on the lowest speed. Fill the cavities 3/4 full and bake for 20 to 25 minutes, or until the cakes spring back when pressed in the center. Allow the cakes to cool in the pan for 5 minutes, and then place them on a wire rack to cool completely.
Make the coconut whipped cream: Open the can of chilled coconut milk. There will be a firm layer of coconut cream on top. Scoop out the solidified cream and place it in a medium bowl (do not include the coconut water, save it for smoothies or another use). Beat the cream with an electric mixer until soft peaks form, then beat in the sugar and vanilla seeds.
Dollop each cake with coconut whipped cream and sprinkle with chopped pecans. Dust cakes with cinnamon before serving. Refrigerate leftover coconut whipped cream.


October 1, 2014
Baby Chocolate Bundt Cakes for Fair Trade Month!


Hello October! After a humid summer here in the southern US, temperatures have finally cooled. To me, the world feels more awake and invigorated! The sky seems bluer, the landscape sharper, and the pugs are frisking in the brisk fall air. We are truly in our happy place!
Along with cool weather and mini specters, October brings us Fair Trade month. It seems like everywhere we look - in all corners of the world - there are needs to be met. It can be overwhelming to think about, but doing something small like buying Fair Trade Certified coffee and chocolate can positively impact someone's life. It's a good thing for you, too. Fair trade products are grown and prepared with care, using no pesticides, no GMO's, and with practices that will protect the environment. Add to this list a slew of awards and accolades for outstanding flavor, and you can be sure that buying Fair Trade Certified products for your baking is a good decision!

These baby bundts were made using Lake Champlain baking cocoa and Guittard extra semisweet baking chips. Both are Fair Trade Certified and are known for their superior quality. Together they give this cake a chocolaty flavor that is deep and lingering; a quality I also attribute to the dose of Equator coffee added to the batter.


Speaking of coffee!
This year the folks at BeFair.org invited a handful of bloggers to be paired with a Fair Trade farmer, to tell their story. As a self-professed coffee connoisseur, I was thrilled to meet Basingwa Maria, a coffee grower from Rwanda.
Basingwa Maria started farming in 1974 and she says that after her husband died in the war she poured her heart into her coffee trees. Coffee was her family's sole source of income, and she had to make it profitable. She joined the Dukunde Kawa cooperative in 2000, and with the increased income she has received from her fair trade coffee over the years, she has been able to bring running water to her home and invest in solar panels on her roof. She hopes to bring electricity to her house soon.
She has also been able to diversify her family's nutrition. They used to eat potatoes and beans everyday with no change, and they could not afford food at the market or oil for cooking. Now her family is able to buy food from the market and they do not have to solely rely on growing everything they eat.
While she never attended school, she says that because of the cooperative all of her children were able to attend school and two of them are currently in university. She beams when saying that her children have good ideas, and that now they have the ability to fulfill their visions.
"After the war I never believed we could get this kind of life. Having this beautiful house, sitting with my children having discussions of how to improve our lives." - Basingwa Maria
She has twice won the cup of excellence award from her cooperative, which is pretty amazing! These farmers put so much care and love into their coffee growing, and knowing that inspired me to make a dessert worthy of such an ingredient - and what's better than chocolate-chocolate cake with a big dose of coffee in the batter?

I'm so excited to also be hosting a giveaway for the chocolate and coffee I used to make these little cakes - and more!
a Rafflecopter giveaway
 This prize package includes:
Equator coffee, whole beanGuittard extra semisweet baking chipsBarkThins snacking chocolatesLake Champlain baking cocoa (my new favorite cocoa!)LaraBar gluten free snack barsTraditional Medicinals green teaDang Foods, chocolate covered toasted coconut chips (so good!)Numi Gold Turmeric teaEcoLips organic lip balmAlter Eco dark salted brown butter chocolate bar (ohemgee.)Third Street green teaCelesteial Seasonings pure green teaSunspire dark coconut-almond dark chocolate barNourish Organic pure organic shea butterWhere Am I Eating? by Kelsey Timmerman
Big thanks to all the brands who generously donated these products to make this giveaway possible!

One more thing! The participating Fair Trade Month bloggers are having a friendly Recipe Rally pinning competition. Check out our Pinterest Board to find new delicious recipes, and pin your favorites!
Baby Chocolate Bundt Cakes
[click for printable version]
Yields 8 small bundt cakes or 1 twelve cup bundt cake
These baby bundt cakes took about 40 minutes to bake, which really surprised me. I expected them to bake in half of that time. My advice is to keep an eye on them so they don't over-bake. They are done when the cakes spring back when pressed in the centers.
My bundt pans were metal, and about 3/4 cup capacity. If you don't have small bundt pans, then a jumbo muffin tin can be used. This batter will also make one standard 12 cup bundt cake.
CakeBaking spray with flour 1 cup/280 ml strongly brewed hot coffee1 cup/120 g Lake Champlain unsweet cocoa powder1 cup/240 g sour cream3 cups/380 g all-purpose flour 1/4 teaspoon fine sea salt1 teaspoon baking powder1 teaspoon baking soda2 1/4 cups/450 g sugar
1 1/2 cups/282 g unsalted butter, softened4 large eggs1 tablespoon pure vanilla extract
Coffee glaze1/2 cup/125 ml strongly brewed coffee10 ounces Guittard extra semi-sweet chocolate chips
Chocolate Leaves2 ounces semisweet chocolate, melted
Make the cake: Preheat oven to 325 degrees. Coat 8 mini bunt pans (approximately 3/4 cup capacity each) or one 12 cup capacity bundt pan with baking spray with flour.
In a medium bowl, whisk hot brewed coffee into the cocoa powder until smooth; whisk in sour cream. In a large bowl, whisk together flour, salt, baking powder, and baking soda. Beat butter and sugar together in the bowl of a standing mixer until light and fluffy. Beat in eggs, one at a time, until incorporated and then beat in the vanilla. Add flour mixture in three additions, alternating with 2 additions of cocoa mixture and beat until combined.
Pour the batter into the prepared pans, filling the small bundt pans no more than 3/4 full. Place the mini bundt pans on a baking sheet and place them in the oven. Bake the mini bundts for 35- 40 minutes, or until the cake springs back when pressed in the center. If making one standard bundt cake, bake for 1 hour to 1 hour 15 minutes. Transfer to a wire rack set over a waxed paper lined baking sheet. Let cool 15 minutes, then turn out onto a rack and let the cakes cool completely.
Make the glaze: In a medium bowl, pour the hot brewed coffee over the chocolate and let stand 5 minutes. Whisk until well combined. Dip the top of each mini bundt cake into the glaze and then turn it upright and place it on the cooling rack set over waxed paper. For the standard size bundt cake, pour the glaze over the cake allowing the glaze to drip down sides and cover cake. Let set 3 hours at room temperature or 1 hour in refrigerator.
Make the chocolate leaves: To make the chocolate leaves, you’ll need chemical-free nontoxic fresh leaves – try min, lemon, ivy, rose, or strawberry leaves – and a clean, small paintbrush.
Using the paintbrush, brush one or two coats of chocolate on the underside of each leaf. Wipe away any chocolate from the top side of the leaf. Then place the leaves, chocolate side up, on a baking sheet lined with waxed paper or a curved surface (such as a rolling pin or the bottom edge of a pie plate) and place in the refrigerator until set. While the chocolate is cold, peel the leaf away from the chocolate. Store the leaves in the refrigerator until ready to use. Garnish each baby bundt with one or two chocolate leaves.

September 24, 2014
Caramel Bourbon Brownie Milkshakes


My favorite thing to do most evenings is to curl up with a good cookbook, a snack, and my two canine bookends. It's something I've always loved to do even before I started blogging, and not much has changed except that many of the cookbooks in my bedside pile are from my blogging peers!
One of my recent favorites is from my pal Jessica of How Sweet It Is. Her new cookbook is called Seriously Delish
 and it is outstanding. It's full of beautiful glossy images and Jessica's friendly relatable voice really shines through the written word. There's all kinds of recipes - certainly decadent desserts, but also lighter fare and what I call "solid food" (meaning food that isn't buttercream and has actual nutritional value - something I need to work on learning more about -ha!).
To Enter! The contest is now closed - thanks to all who participated!
PS. This milkshake tastes extra good while wearing fuzzy socks.PPS. I made the brownies for this recipe in my mini doughnut pan,
 which made them way too easy to eat!
Fleur de Sel Caramel Bourbon Brownie Milk Shakes [click for printable version]
Yields: 2 servings 2 cups whole milk2 cups vanilla bean ice cream1/2 cup bourbon2 brownies, plus extra for crumbling on top1 cup caramel sauce, plus extra for drizzling1/2 teaspoon fleur de sel plus extra for sprinklingWhipped cream for topping
Combine the milk, ice cream, bourbon, brownies, 1/2 cup of the caramel sauce and salt in a blender and puree until smooth. Fill two glasses with 1/4 cup of caramel each and pourthe shakes into the glasses. Top the shakes with the whipped cream, an extra drizzle of caramel and another pinch of salt.Crumble a brownie on top.
Recipe by Jessica Merchant

Caramel Bourbon Brownie Milkshakes and a Seriously Delish Cookbook Giveaway!
My favorite thing to do most evenings is to curl up with a good cookbook, a snack, and my two canine bookends. It's something I've always loved to do even before I started blogging, and not much has changed except that many of the cookbooks in my bedside pile are from my blogging peers!
One of my recent favorites is from my pal Jessica of How Sweet It Is. Her new cookbook is called Seriously Delish
and it is outstanding. It's full of beautiful glossy images and Jessica's friendly relatable voice really shines through the written word. There's all kinds of recipes - certainly decadent desserts, but also lighter fare and what I call "solid food" (meaning food that isn't buttercream and has actual nutritional value - something I need to work on learning more about -ha!).Would you like a copy? I thought so!
To Enter! Leave a comment telling me what your favorite sweet snack is - mine just might be the Fleur de Sel Caramel Bourbon Brownie Milkshakes from Jessica's cookbook - holy cow! Now there's something to cozy up with!
PS. This milkshake tastes extra good while wearing fuzzy socks.PPS. I made the brownies for this recipe in my mini doughnut pan,
which made them way too easy to eat!Fleur de Sel Caramel Bourbon Brownie Milk Shakes [click for printable version]
Yields: 2 servings 2 cups whole milk2 cups vanilla bean ice cream1/2 cup bourbon2 brownies, plus extra for crumbling on top1 cup caramel sauce, plus extra for drizzling1/2 teaspoon fleur de sel plus extra for sprinklingWhipped cream for topping
Combine the milk, ice cream, bourbon, brownies, 1/2 cup of the caramel sauce and salt in a blender and puree until smooth. Fill two glasses with 1/4 cup of caramel each and pourthe shakes into the glasses. Top the shakes with the whipped cream, an extra drizzle of caramel and another pinch of salt.Crumble a brownie on top.
Recipe by Jessica Merchant
September 23, 2014
Apple Cider Caramel Bars with Smoked Maldon Salt

This morning I was roused from sleep by a little pug burying himself under our bed linens. For the first time in many months the air in our bedroom was chilly. It was such a strong and obvious change, that I shouldn't have been surprised to discover that today is the autumnal equinox - happy first day of fall!
Today is one of two days that (reportedly) have equal portions of daylight and dark (the other being spring equinox). I've been told that it's a good time to evaluate priorities and strive for more balance in life. Since that's a bit overwhelming for me to think about -I fall short in several areas- I'll work on finding balance in my baking; a little victory to help me on the way to balancing other, bigger things in life.

To me, this treat is symbolic of today because it's all about contrast and balance. The crumbly shortbread crust is a nice counter to all that chewy caramel, and a sprinkling of smoked Maldon salt perfectly balances the sweetness.

I got the idea for these caramel bars after making cider caramels for the Etsy blog (see here). It's amazing how similar they taste to apple pie, so naturally I felt inspired to add a crust. After researching a few caramel bar recipes online, I decided to do some experimenting. I have to say, I love the results! These candies taste so much like apple pie.
To get that deliciously strong apple flavor, you'll need to buy a bottle of boiled cider. You can find it at kitchen specialty stores and online at King Arthur Flour. Or, if you're inclined to make your own, a substitute can be made from 2 1/2 cups sweetened apple cider simmered on the stove top until reduced to 1/2 cup. The flavor will be more subtle than the purchased boiled cider, but the caramels will still have a recognizable apple flavor.

Since the caramel is so soft and delectable, these bars need to be kept refrigerated or they will lose their shape. Alternatively, you can wrap the bars individually in wax paper as you would normally wrap caramels, and they can be stored at room temperature.
If you've never used Maldon flake salt before, then I urge you to get a small pinch tin.
 It's delicious on everything. The smoked variety gives caramel rich, sophisticated flavor. I'm hooked!
Apple Cider Caramel Bars with Smoked Maldon Salt [click for printable recipe] Yields about 15 bars
Shortbread crust1/2 cup plus 2 tablespoons/141 g unsalted butter, softened1/2 cup/100 g granulated sugar1/2 teaspoon fine grain sea salt1 egg yolk1 2/3 cups/210 g all purpose flour
Caramel1 cup/210 g unsalted butter1 cup/220g dark brown sugar3/4 cup/235g light corn syrup1 teaspoon fine grain sea salt1/4 cup/50 g granulated sugar1/4 cup/80g sweetened condensed milk (not evaporated milk)1/2 cup/150 g plus 1 tablespoon boiled apple cider, divided1 teaspoon powdered cinnamon1/8 teaspoon grated nutmegMaldon Smoked sea salt

Grease a 9x9-inch baking pan and line it with parchment paper so that two edges of the paper overhang the sides of the pan.
In a large bowl, mash the butter, sugar and salt together with a pastry blender or with a fork. Blend in the egg yolk. Blend in the flour until fine crumbs form. Pour the mixture into the bottom of the prepared pan and press it down evenly with your hands. Refrigerate for 30 minutes.
Preheat the oven to 350 degrees Farenheit.
Bake the crust for 25 to 30 minutes, or until the edges of the crust are golden brown. Remove from the oven and let the crust cool completely.
To make the caramel, combine the butter, brown sugar, corn syrup, salt, sugar, sweetened condensed milk and 1/2 cup boiled cider in a large pot. Clip a candy thermometer to the side of the pot bring the mixture to a boil over medium-high heat. Reduce heat to medium and cook, stirring constantly, until the candy thermometer reads 248 degrees Fahrenheit. Remove from the heat and stir in the remaining 1 tablespoon of boiled cider, cinnamon and nutmeg. Pour the caramel on top of the shortbread and refrigerate until firm, about 3 hours. Run a thin knife around the outer edge of the caramel and lift the block out using the two overhanging edges of parchment paper. Cut the block into bars or squares using a large sharp knife. Sprinkle with Maldon smoked flake sea salt before serving. Wrap caramels so that they keep their shape, or keep the bars chilled in the refrigerator.
September 20, 2014
How to Bake Hard Candy Shot Glasses

I know a lot of people who shy away from making hard candy, and I understand why. First, there's the boiling hot syrup that sticks to skin like napalm (been there, not fun!). And second, clean up isn't exactly easy. Pots and pans with stuck-on hard candy will sometimes take hours to soak clean.
That's why I love this little project so much. It's a no-brainer: no candy thermometer, and no dangerously hot sugar syrup involved. All you need is a bag of hard candy discs and a silicone shot glass mold.
I got the idea for these candy shots a couple of weeks ago when Wilton sent me a box of products to test. Tucked inside, between mini loaf pans and sprinkles, I spotted an 8-cavity silicone shot glass mold. The packaging featured a shot glass made of Starlight mints, and I wondered if any hard candy could be used to bake shot glasses.
Since then, I've tried all kinds: butterscotch discs, cinnamon discs, and assorted fruit discs (pictured). They all worked beautifully. My favorite result was with the ones made with assorted fruit discs. They bake into a vibrant rainbow swirl - so fun!

To get started, you'll need to buy the silicone mold. You can find it here, or wherever Wilton products are sold (like the baking aisle in the craft store). You'll also need a big bag of assorted fruit-flavored discs. I used most of a 21 ounce bag (1 lb 5 oz) to make eight shot glasses.

In the pictures above, you can see how I layer the candies into the cavities evenly.
First, push 5 candies into the bottom of a cavity in this rainbow color order: red, orange, yellow, green, violet. It might be a tight fit to get all the candies in, but be bossy about it. It won't hurt for the silicone mold to stretch a little. Push another 5 candies into the mold in rainbow order, staggering them so that a candy rests between two bottom pieces. Finally, place four candies of any color on top of the mold to create the bottom of the shot glass. It's okay if the candies stick up over the top of the shot glass mold. They'll melt down in the oven.
After baking, use a metal spoon to tamp down the melted candy. This will force out any air bubbles and make sure the candy has no gaps when unmolded.

Allow the candy to set at room temperature. After the candy is cooled, pop the shot glasses out from the bottom of the silicone mold, and twist the glass so the middle releases. Voilà! Instant candy shot glass.

Like any hard candy, these should be made on a non-humid day. Humidity can cause the candy to weep and become sticky. Anything you put inside the glasses will take on the flavor of the candy. In just minutes the whipped cream I filled the glasses with was permeated with fruity candy flavor.
Aside from the obvious adult use for the shot glasses, I could see this being fun project for kiddos too. Small hands can unwrap candies and help place them in the cavities. The transformation from hard candy discs to edible cups feels a little like magic, so it's entertaining, too. I could see juice or orange soda being served in these with stripey straws for a Candyland-themed birthday.
Hard Candy Shot Glasses
[click for printable version]
Prep: 20 minutes, total time 1 hour with cooling
When shopping for mints to use in this recipe, be sure to choose hard candy discs. Avoid crumbly, soft peppermints. Butterscotch discs, and Starlight mints are a good choice for baking.
1 bag (21 oz.) hard candy discs
Wilton 8 cavity Round Shot Glass Silicone Mold
Unwrap candies. Preheat oven to 375 degrees Fahrenheit.
Push 5 candies into the bottom of a shot glass cavity. It might be a tight fit to get all the candies in, but be bossy about it. It won't hurt for the silicone mold to stretch a little. Push another 5 candies into the mold on top of the first layer, staggering them so that a candy rests between two bottom pieces. Finally, place four candies on top of the mold to create the bottom of the shot glass. It's okay if the candies stick up over the top of the shot glass mold. They'll melt down in the oven. Repeat the process with remaining candies.
Place the silicone mold onto a level baking sheet and bake for 12-15 minutes. After baking, use a metal spoon to tamp down the melted candy (and try to make the bottom as even as possible). This will force out any air bubbles and make sure the candy has no gaps when unmolded.
Allow the candy to set at room temperature. After the candy is cooled, pop the shot glasses out from the bottom of the silicone mold, and twist the glass so the middle releases. Voilà! Instant candy shot glass.
Notes: It's important that the candies bake long enough to become one solid mass. If you remove your glasses and they have holes or gaps in them, then return them to the silicone pan and bake them for 5 to 7 minutes longer.
Any liquid placed inside the glasses will take on the flavor of the candy. If, for some reason, you want to avoid this, you can coat the inside of the shot glasses with a layer of chocolate or melted candy.
September 17, 2014
Homemade Vanilla Extract in Wax-Sealed Bottles


There must nine hundred and ninety-eleven recipes for homemade vanilla extract online, and I suppose that's why I've never seriously considered posting a recipe for it here. But I've had a change of heart, because it's something I make regularly and use in almost every sweet thing I bake.
The reason why I love homemade vanilla extract so much is because I know it's pure (I control the ingredients), it costs less to make and - most importantly - the flavor is superlative. As far as staple ingredients go, it's pretty important to me.
This year everyone on my holiday gift list is getting a bottle of homemade vanilla extract - not just the avid bakers in my circle, but also the occasional chocolate chip cookie makers and even my pal who uses her oven as a make-shift magazine rack (she likes vanilla in her hot cocoa and coffee). Everyone can benefit from the loving touch of a little vanilla, if you ask me.
The bean pods need to steep for several weeks, so if you get started now (right now!) the extract will be ready in early December.
 It's best if the pods can steep for at least 8 weeks. In the picture above, you can see how the extract develops over time.
You'll need just two ingredients and bottles with tightly fitting lids to make the extract. My personal touches to the bottles are wax-sealed caps and botanical washi tape "labels". Here's a run-down of everything I used, and a few links to the specialty products.
Vodka 35-40% alcohol (70-80 proof): Opinions are sure to vary on this, but I say there's no need to buy top shelf. I usually buy an inexpensive variety of vodka, and make sure to steep the vanilla pods for a full 8 weeks before using the extract in a recipe. As long as the vodka isn't too harsh or bitter on the tongue, then it should be fine for extract making. I sometimes use Smirnoff because it can often be found on sale, or read the virtues of $8 Nikolai vodka , and I've never had a bad batch. I usually get a few more than their promised 22-24 beans. My last shipment held 27 fat bean pods. I use these beans specifically for extract making, and save the more pricey Tahitian vanilla beans for custards and frostings. Edit: There are some negative reviews of these beans on Amazon, but I personally have never received any that were subpar. If you're not inclined to buy from this seller, Beanilla is also a supplier, and Frontier Co-op sells Fair Trade beans, which is always a good choice. Lidded 5 ounce bottles: These
 are actually sold as hot sauce bottles, but their size was spot-on for gifting. They're bigger than the usual 2 ounce grocery store bottles, and tall enough to accommodate most whole beans. I only wish these came in amber or green bottles, because dark bottles will obscure sunlight and prevent the flavor from being sapped over time - although that's not a real concern for me, I go through bottles of vanilla extract very quickly.Sealing wax: I used burgundy sealing wax on the bottles I'm gifting. This
 kind of wax, in bead form, melts easily. I heated it in a small metal measuring cup over medium heat on the stove-top. You could also use a small aluminum disposable pan in which to melt the wax, for easier clean-up. Filament tape: If you plan to cap the bottles in wax, you'll need to wrap a little filament tape around the bottom edge of the bottle cap to make a pull tab. (Filament tape has fibers running through it to give it strength, if you didn't know that already.) This makes the wax cap easy to remove. (See pictures for further explanation.)Decorative washi tape: This is not essential, but it is quite pretty. I found a forest botanical print tape at Terrain Shop. Something about those little mushrooms made me feel happy.

First thing - wash the bottles! Some people like to sanitize them in a dishwasher, but I say there's no better way to sanitize than a dip in boiling water. I suggest keeping a large pot of boiling water on the stove top, that way you can dip the bottles one at a time as you work. Fish them out of the hot water with tongs to avoid burns. The hot water evaporates quickly from the bottles after they are removed from the water, so there's no extended wait for the bottles to air-dry.

Capping the bottles in wax is easy peasy. I strongly suggest making the filament tape tab for easy opening of the bottles, otherwise they will be a pill to open. Filament tape can be found at discount stores, office supply stores, home centers - just about anywhere.

Sealing wax is different than regular wax; it's harder, and more plastic-y. You can melt it in a double boiler or on the stove-top in a small saucepan as recommended, but I used a 1 cup metal measuring cup to melt it in over the range. As I mentioned before, I think a small disposable aluminum pie plate would work well for heating and make for the easiest clean up (maybe recycle frozen pot pie pans?).
The wax needs to be heated to 160 to 170 degrees F, before it can be used for sealing. About 3 ounces of wax will seal 10 to 12 bottles. I dipped each bottle about three times to create a firm cap. Make sure the wax is in a small deep container so it will completely cover the bottle cap when dipped. If you like the drippy effect on my bottles, then turn the bottle upright immediately after the final dip. The wax will run down the sides of the bottle. If you prefer a non-drippy wax cap, hold the bottle upside down until all the excess wax has dripped back into the melting pot.
Remember when I made chocolate wax seals? I used those same stamps on the wax bottle caps, and they turned out so nice! I found my wax stamps here, if you're looking to buy.
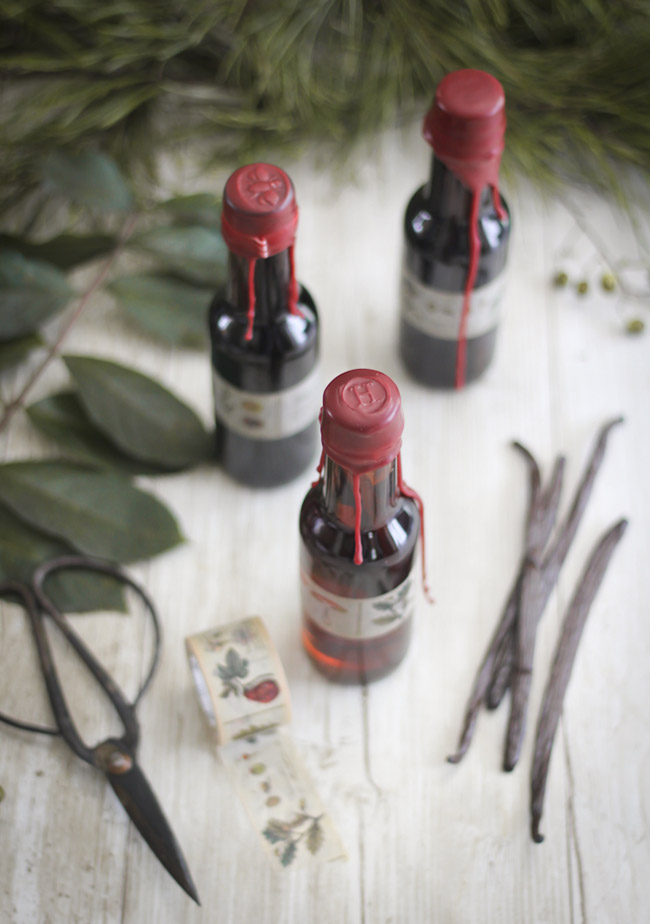
Aside from the wax sealing, this homemade gift takes very little effort. The most work you'll do is shaking the bottles once a week to release and disperse the vanilla throughout the liquid. With all my purchased supplies, each of my 12 gift bottles came out to about $5.80, which is pretty inexpensive gift-wise (disclaimer: I already had the filament tape and wax stamps). And I'd say you could lower the cost if you're an environmentally-conscious bottle recycle-er!
Homemade Vanilla Extract with Wax Sealed Caps
[click for printable version]
Yields: Twelve 5-ounce bottles
Prep time, 30 minutes, steep time 8+ weeks
Neutral-tasting vodka is my usual pick for making vanilla extract at home, but bourbon and rum can be used in place if you prefer.
12 bottles (5 ounce capacity) with tightly fitting lids
24 to 36 vanilla beans
3 bottles (750 ml each) Vodka 35-40% alcohol (70-80 proof)
Filament tape
3 ounces bottle sealing wax
Labels or washi tape
Bring a large stock pot of water to a full boil over high heat. Place a large absorbent dish towel over a work surface. Using grippy tongs or a canning lifter, submerge the bottles, one at a time, in the water. Let the bottle stay in the water for 10 seconds, then remove with tongs, allowing the water inside the bottle to pour back into the pot. Place the bottle on the dish towel to dry; Repeat with remaining bottles. After the bottles are done, sanitize all the caps in the water at once. Remove them with a slotted spoon and let them dry on the towel. Let the bottles cool before using.
Split each vanilla bean lengthwise with a small sharp knife. Place 2 or 3 split beans in each sanitized bottle (The Kitchn suggests 3 to 5 beans per 8 ounces of vodka, and I've found that 3 beans per 5 ounces of vodka usually yields a nice, strong result that is obvious in baked goods).
Fill each bottle with vodka using a measuring cup with a pour spout. Screw the bottle caps on tightly. Place the bottles in a cook dark place and shake them about once a week for 2 months or longer.
You can cap the bottles with wax right after they're bottled, or you can wait until closer time for gifting. I'm in favor of doing this early, because the holidays are always so busy. Here's how you do it.
Place a small length of filament tape around the bottom edge of the bottle cap, so that the tape covers the gap between the bottle cap and the bottle neck. Fold the end of the tape back onto itself to create a pull tab. Repeat with all the bottles.
Melt the sealing wax in your smallest saucepan or use a metal (heatproof) 1 cup measure. You could also use a butter warmer with a tea light underneath but this will take much longer for the wax to melt (also see my disposable mini pie pan recommendation in this post). When the wax is melted (at approximately 160 to 170 degrees F), remove from heat. Pour the wax into a small, deep container. Dip the bottle caps into the wax past the filament tape pull-tab. Lift the cap and allow the excess wax to drain; dip again. Turn the bottle upright immediately for drippy effect, and immediately place a wax stamp on top of the bottle cap, if using. For non-drippy effect, hold the wax-dipped bottle over the container until all the wax has dripped off. When the wax stops dripping, turn the bottle upright.
Label the bottles, or decorate them with washi tape, if desired.
Vanilla extract will keep at room temperature indefinitely.
September 9, 2014
Baklava Pull-Apart Bread

I can't tell you how many times I've drooled over the thought of making pull-apart bread in my own kitchen. I've seen all different varieties - sweet and savory, lemony and cheesy- from my blog buddies and beyond. I've been itching to put a new spin on the recipe, and that's the only reason I've waited so long to make it.
Perhaps you remember the time I made Baklava Cheesecake. All that nutty goodness seemed to improve upon something that is hard-pressed to be made better (because, cheesecake alone is pretty darn good!). I felt in the same quandary with this bread. After some meditation, I dug out my baklava filling recipe.

Here's where I lose my modicum of correct grammar: YOU GUYS. This bread is all kinds of major. Those delicate layers of cinnamon-sugared bread? They hold pockets of nutty baklava filling. It all bakes up so perfectly together. And if that wasn't enough, it also gets a douse of honey syrup.

I have but one complaint with most yeast dough recipes, and that's yield size. If I'm going to spend the better part of a day babysitting dough, then I don't want a measly dozen buns, or just one loaf of bread. So, I've developed this recipe to yield two loaves - one for you, and one for a friend (or one for the freezer, if you're not feeling particularly charitable).
Here's a look at how to assemble the bread. It doesn't take long because it doesn't have to be perfect. This bread is a rustic beauty so it's really difficult to get wrong!

This recipe yields a large amount of dough, so break out your largest bowl for raising. The nut mixture is ground fine in a food processor, then zest and spices are added. Two to four pulses later, the mixture turns into a paste that clings together.

Divide the dough in half. Each half will make one loaf of pull-apart bread.

Gently flatten half of the dough with your fingers.

Roll the dough out to about 20x12-inches. As you can see, my dough is far from a perfect rectangle.

Cover the rolled out dough in an insane amount of butter. Feel weird about it for exactly zero seconds.

After a generous sprinkle of cinnamon-sugar, grab a handful of the nut mixture and crumble it over the dough evenly.

Cut the dough vertically into six even strips.

Stack the strips on top of each other. This can be a little tricky, because the dough will want to stretch as you pick it up, so I lift part of the dough with my bench scraper. You could also use a spatula.

Cut the stacked strips into 6 square-ish pieces, and layer them standing upright in a loaf pan.

Repeat the steps with the remaining dough half, and then let the dough rise in a warm place for about 45 minutes. When the dough is puffed and fills the pan, then it's time for baking.

The bread needs to stand in the pan for a little while so all the layers will stay together when you remove it from the pan. This can feel like an eternity, especially when the toasty aroma of cinnamon and nuts is permeating ev-er-y-thing. But it's worth the wait!

This bread definitely satisfies my autumn frame of mind, but I think it would be great for gift-giving holidays. It's rich and dense with nutmeats and syrup, so it'd be a suitable (more delicate, more inspired) replacement for fruitcake. This bread is rich indeed, and I've been told by my taste-testers that a little goes a long way, but I'll leave that up to you to decide.
Baklava Pull-Apart Bread
[click for printable version]
Source: The bread base was adapted from more than a dozen sites around the web, all using a similar recipe.
Yields 2 loaves, 9x5-inches
Prep: about 4 hours from start to finish
Before you start, two things: 1. I love using black walnuts in this recipe. Use them if you can find them (and if you like them, they are an acquired taste.) And, 2. you may divide this recipe to make only 1 loaf of bread.
Activate the yeast
6 tablespoons warm water (between 105 to 115 degrees F)
4 1/2 teaspoons active dry yeast
1 teaspoon granulated sugar
Dough
1/2 cup/113 g unsalted butter
2/3 cup/160 ml milk
6 cups/750 g all-purpose flour
1/2 cup/100 g granulated sugar
1 teaspoon sea salt
4 large eggs, beaten
2 teaspoons vanilla extract
Filling
2 cups/390 g granulated sugar
5 teaspoons ground cinnamon (this will be divided, see instructions)
1 cup/100 g pistachios
1 cup/110 g black walnuts
1/2 cup/60 g almonds
Zest of 1/2 lemon
1/2 teaspoon sea salt
1 tablespoon vanilla extract
1 cup/220 g unsalted butter, melted
Honey syrup
1 cup/340 g wildflower honey
1 cup/240 ml water
Pinch of sea salt
Activate the yeast: In the bowl of a standing mixer fitted with a dough hook, combine the water, yeast and sugar. Stir gently and briefly. Let the mixture stand until foamy, about 5 minutes.
Make the dough: In a small saucepan, combine the butter and milk. Place over medium heat and cook until the butter is just melted. Remove from the heat and let the mixture cool to 115 to 125 degrees F.
In a large bowl, whisk together 4 cups of flour, the sugar and salt. Pour the dry mixture into the bowl with the activated yeast. Add the milk mixture, eggs and vanilla; stir together on low speed for 2 minutes, and then increase the speed to medium and mix until the ingredients are well incorporated (this may take a few minutes, the eggs can be stubborn to join the party). Add the remaining 2 cups of flour a little at a time. After the flour is incorporated knead for 2-3 minutes.
Place the dough in a large greased bowl and cover with plastic wrap. Let the dough rest in a warm place (for me, that's usually in my kitchen on the stove-top). Since this dough make two loaves, raising time may take a little longer than usual. 50 minutes is the norm, but my dough doubled right at 1 hour 15 minutes.
While the dough is raising, prep the filling and honey syrup.
Stir together the sugar and cinnamon in a large bowl and set aside.
In the bowl of a food processor combine the pistachios, walnuts, almonds, lemon zest and sea salt. Process until the nuts are ground fine. Add the vanilla extract and process until the mixture forms large moist clumps. Set the mixture aside with the bowl of cinnamon sugar.
For the honey syrup, combine the honey, water and salt in a small saucepan. Bring to a boil over medium-high heat, then reduce the heat to medium-low and simmer, stirring occasionally until the mixture had reduced by 1/3. Let the syrup cool slightly then transfer it to a jar with a pour spout to cool further.
When the dough is raised, turn it out onto a floured surface and divide it in half. Each half will make one loaf of pull-apart bread. Gently flatten half of the dough with your fingers. Roll the dough out with a rolling pin to about 20x12-inches. Don't stress if it isn't perfect, remember, rustic. Cover the dough with half of the melted butter and sprinkle on half of the cinnamon-sugar mixture. Crumble half of the nut mixture over the surface of the dough, sprinkling it on as evenly as possible. Cut the dough vertically into six even strips. Stack the strips on top of each other. This can be a little tricky, because the dough will want to stretch as you pick it up, so I lift part of the dough with my bench scraper. You could also use a large spatula. Cut the stacked strips into 6 square-ish pieces, and layer them standing upright in a loaf pan. Repeat the steps with the remaining dough half. Cover the loaf pans with plastic wrap and let them rise in a warm place for about 45 minutes.
Preheat the oven to 350 degrees F. Grease two standard-size loaf pans and line them with parchment so that the paper overhangs two edges.
When the dough is puffed and fills the pan, then it's time for baking. Bake for 30 to 40 minutes, or until the top of the bread is deep golden brown. Don't be tempted to remove the loaf too soon just because it looks done on top - it could be under cooked in the center. My loaves cooked perfectly at about 32 minutes.
Allow the bread to cool in the pan for 20 minutes. Remove the bread by lifting it out by the two overhanging parchment edges. Drizzle honey syrup over each loaf, or serve the syrup on the side if you prefer.
Keep the bread in a container that seals air-tight.
September 5, 2014
Homemade Stroopwafels

.jpg)
I've always wanted a waffle cone maker, but admittedly, there's very little space in my cabinets for one to live. I talked myself out of buying one many times, but the desire came back anew when I walked into my favorite ice cream parlor. I can testify that the warm fragrance of freshly made vanilla waffle cones is strongly persuasive (not that I needed much arm-twisting in the first place). So, I got one.
I fully expected the machine to be single purpose (waffle cone iron = only waffle cones) but I've found it has a second, and maybe even better use for making one of my favorite coffee time treats - stoopwafels!

For those not familiar, stroopwafles are thin cookie-like waffles with a chewy caramel syrup in the center. They hail from the Netherlands, and recently my friend Darla (who happens to live in Nederland) sent me a care package with all kinds of delicious Dutch treats inside. To my delight, authentic stroopwafels were included. They were better, more dense with filling, than the ones I can find locally. That made me curious enough to seek out a stroopwafel recipe. Until now, I'd never dreamed you could make them at home. I'd pondered their thinness while eating one, and figured it defied any tool that inhabited my utensil drawer. To my great surprise, scratch-made stroopwafels are achievable.

If you're interested in making them too, you can find the waffle maker I own here. It's not so awful to store if you keep it in its original box (square things are easier to stack than roundish footed things). Or, if you're a die-hard stroopwafel fanatic, you can buy the genuine article here (though stroopwafel makers seem to be more expensive than their waffle cone counterparts).
The batter is really easy to whip up. It's made with yeast, so it has to stand about 45 minutes before you use it. The dough doesn't raise much, but the yeast definitely adds flavor and helps keep the super thin waffle from tearing when you cut it in half.

It took me a few tries to get the right quantity of dough for the waffle cone maker. Most of the waffles were a little lopsided, so I used a large pastry ring to cut them into 6-inch rounds.

Perhaps the most challenging part of the endeavor is cutting the already thin waffle into two even thinner pieces. You need to do this while the waffle is still hot. I used a large serrated bread knife, and with gentle sawing motions, cut the waffle in two. I found it easiest to position a waffle at the corner of a work surface, that way you can manipulate the movement of the knife easily as you cut.

The filling is easy enough to make in a saucepan on the stove top. I used molasses, though treacle is called for in the recipe (use whichever you prefer, but be forewarned that molasses is a bit stronger-tasting). When mixed with brown sugar and butter, it yields a deliciously rich and chewy filling. I was eating it warm from the saucepan with a spoon.

I love these so much, I already have plans for a cookie butter and caramel-filled version. I urge you to try them if you have the opportunity - or the waffle cone maker - or both.
Homemade Stroopwafels
[click for printable version]
Source: adapted from allrecipes.com
Prep: 1 hour, total time about 2 hours
This is a delicious Dutch treat that goes well with afternoon tea or coffee. The recipe calls for treacle, which is a European ingredient similar to molasses. I used molasses, but it is bolder and darker-tasting than treacle. If you can't find treacle, and would like a milder tasting filling, golden molasses or sorghum syrup may be used instead.
Waffles
4 1/4 cups/500 g all-purpose flour
1 cup/250 g unsalted butter, melted
1 1/4 cups/150 granulated sugar
4 1/2 teaspoons active dry yeast
1/4 cup/ 60 ml lukewarm milk
1 large egg
Filling
1 cup/350 g treacle or molasses
3/4 cup/200 g dark brown sugar
2 tablespoons unsalted butter
Pinch of salt
1 teaspoon ground cinnamon
Make the waffles: In the bowl of a standing mixer, combine the flour, butter, sugar, yeast, milk and egg. Knead with the dough hook attachment until you have a smooth consistent dough. This mixture can also be kneaded in the bowl by hand if you don't have a stand mixer. Transfer the dough to a greased bowl and loosely covered it with plastic wrap. Set it in a warm place to rise (it won't rise much) for 45 minutes.
Make the filling: Heat the treacle or molasses, brown sugar, butter and cinnamon in a saucpan over medium heat. Bring the mixture to a bubble. When the mixture thickens slightly and the sugar is melted, remove it from the heat.
Preheat a shallow waffle iron (such as a waffle cone, pizzelle, or stroopwafel iron) as directed by the manufacturer's instructions. Knead the dough briefly and divide it into balls the size of a tennis ball (adjust this according to the size of your waffle iron - mine took slightly more dough). Place the ball in the waffle iron and flatten it slightly, then close the lid to cook the waffles until no more steam escapes and the waffle is golden brown.
Remove the waffle carefully with a fork or spatula. Use a round cutter to cut off the edges to make a perfect circle. Carefully split the waffle into two rounds while still hot. Don't wait too long! They'll tear or break if you let them cool before cutting them.
Spread 1 to 2 tablespoons of filling on one of the halves and top with the other half. Repeat with remaining waffles.
Serve the waffles with tea or coffee. Store them in a container that seals air-tight.
August 30, 2014
Pastel Layer Cake and a Blog Birthday!


Sprinkle Bakes just turned 5 years old! When I look back at all the sweet things I've made - the cakes, the friends, the memories -I feel truly blessed. This little corner of the web has brought me more happiness than I ever dreamed possible, and I appreciate everyone who stops by for a peek at what I'm doing. Your support means everything to me!
Because I heart you big time (and because no blog birthday is complete without a gift) I'm giving away a pretty pink mixer. Over the years I've tried several brands of standing mixers, and while some are quite good (I really like my Bodum and Sunbeam) few are truly as great as a KitchenAid. That's not an advertisement, that's just my working experience. I believe every avid baker needs one!

Enter below for a chance to win this KitchenAid Artisan stand mixer. Open worldwide.
Please include your name or username as entered on the Rafflecopter widget with your comment.
Note: You will not be selected as a winner without commenting on the blog post.
a Rafflecopter giveaway

As for the cake, it's unapologetically tall and profusely sprinkled on the outside. Slice it, and you'll find a rainbow of pastel color inside. It makes a fun birthday cake, and I think it's especially appropriate for a Sprinkle Bakes birthday celebration! The white cake recipe was new to me, and after baking it, I found the texture was perfect for layering. It's sturdy enough to stack, yet remains soft and palatable to eat. The recipe makes about 12 cups of batter, so if you have a standing mixer then I'd recommend using it for this very cake.
I used vanilla Swiss meringue buttercream for frosting on this cake - mostly because I love the silky texture, but also because the confetti sprinkles stick so well to it.

In related news, I recently opened a little online baking-themed retail shop. Maybe you noticed the "Shop Sprinkle Bakes" sign in the sidebar? For a long while, I've wanted a place to curate my favorite baking items, and to make them available to others. You can find the multicolor confetti sprinkles I used for this cake here (Princess Mix). They are slightly sweet and vanilla scented - really ideal for this cake. Most of the time, sprinkles are so waxy and tasteless, but not these! I love them, and sometimes I eat them like candy.
You can also find the star cupcake toppers here (I used three on top of this cake), and the skinny primary birthday candles here. We're still working on a plan for international shipping, and currently we're only shipping to the contiguous 48 states. It's a work in progress, but I'm so excited to be able to offer you things I use in my own kitchen.

When I sliced this cake, a sweet vanilla fragrance filled the entire house! I kept finding my way back to the dining room table and sneaking little nibbles. It's so good!
Admittedly, there's no way I can eat an entire 6-layer piece of this cake, unless it is sliced in thin slivers, and even then it's so tall you'd have to eat it off of a full-sized dinner plate. For easier service, consider dividing the slices into 2 or 3 layer pieces (see the picture above). The slices can then be served standing upright on smaller dessert plates.
One more important note - add two dozen eggs on your grocery list for this cake alone. White cake and meringue frosting recipes both use many egg whites!
Pastel Layer Cake with Swiss Meringue Buttercream
[click for printable version]
Yields 20 servings
Source: Martha Stewart layer cake, Sprinkle Bakes frosting
Prep: 2 hours, total time about 4 hours
Cake
6 1/2 cups/789 g cake flour (not self rising), sifted
3 tablespoons baking powder
1/2 teaspoon fine grain sea salt
2 1/4 cups/500 ml whole milk
2 tablespoons pure vanilla extract
1 1/2 cups plus 4 tablespoons/395 g unsalted butter, room temperature
2 1/2 cups/490 g granulated sugar
10 large egg whites
A few drops of each: McCormick neon food color, in purple, green, pink and blue
and standard yellow and orange liquid or gel food color
Swiss meringue buttercream
12 egg whites
2 1/2 cups/500g sugar
1/4 teaspoon salt
2 1/2 pounds unsalted butter, softened
1 tablespoon clear vanilla extract
1 1/2 cups/ roughly 8 oz. assorted sizes of pastel confetti sprinkles
Star cake toppers and birthday candles
Make the cake layers: Preheat the oven to 350 degrees. Grease six 8-inch round cake pans, and line the bottoms with parchment. If you don't have six pans (understandably so) use as many as you have, and plan to wash them between baking cake layers.
Sift the flour, baking powder and salt into a large bowl. Combine milk and vanilla. Beat butter with a mixer on medium speed until smooth. With the mixer running, gradually add the sugar and beat until the mixture turns pale and fluffy, about 3 minutes.
Reduce speed to low, and add the flour mixture in 3 additions, alternating with the milk. Begin and end with the flour mixture. Beat until just combined. Do not over-mix.
Beat the egg whites in a clean mixer bowl on medium speed until stiff peaks form, about 5 minutes. Gently fold the egg whites into the batter in three additions.
Place two cups of batter in six separate bowls. Tint each bowl of batter with a little of the food color. Add food color a little at a time until the desired pastel tint is achieved. Fold the color in well with a rubber spatula until no streaks of white cake batter remains.
Spread the batter into the prepared pans and bake for 18 to 20 minutes. Let the layers cool completely on a wire rack. Run a knife around the edges of the cakes and the pans before turning them out.
Level the tops of the cake with a serrated knife or a cake leveler. Save the cake scraps for breakfast (smile).
Make the frosting: Set a saucepan filled one-third full of water over medium-high heat and bring to a simmer.
Whisk together the egg whites, sugar, and salt in a large heatproof bowl ( I suggest a stainless bowl). Set over the simmering water and whisk until the mixture is hot to the touch and the sugar has dissolved (120-140 degrees on a candy thermometer, to be sure).
Transfer the mixture to the bowl of a stand mixer fitted with the whisk attachment.
Beat on low speed for 2 minutes. Increase to medium-high until stiff peaks are formed.
Continue beating at medium-high speed until the mixture is fluffy and has cooled (the mixing bowl should feel cool to the touch).
Turn the mixer off and switch from the whisk attachment to the paddle. Turn the mixer on medium-low and add the butter, a few cubes at a time, beating until well incorporated before the next addition.
Add the vanilla extract. Beat until the frosting on high speed until it is thick and completely smooth.
Important note about Swiss buttercream frosting! After a few pieces of butter are added to the whipped whites, the mixture will deflate. It may look like soup or even look curdled - do not let this discourage you. This is just one ugly stage the buttercream must pass through before becoming fluffy whipped frosting. You may read more about Swiss meringue buttercream here, and view my video tutorial.
Frost the cake: Transfer 2/3 cup of frosting to a piping bag fitted with a small star tip; set aside.
Fill each cake layer with 1/3 to 1/2 cup of the frosting. Begin with the violet cake layer on the bottom, followed by the blue, green, yellow orange and pink. Cover the entire cake with frosting using an off-set spatula. Place the cake in a large baking pan and toss on the confetti sprinkles, allowing the excess to fall back into the baking pan. Using the reserved frosting in the piping bag, pipe stars around the top edge of the cake and decorate each star with a large confetti sprinkle. Place the star toppers in the center of the cake, and add the birthday candles around the top edge of the cake near the piped stars.
Serve the cake: Cut a standard wedge of cake and divide it with a knife at the halfway point so that you have two pieces of cake. The first slice will be a triple layer of pink, orange and yellow, the second slice will be green, blue and violet. Or, divide the wedge into double layers, to serve three people.
Cover the leftover cake loosely with plastic wrap and store at room temperature.