Heather Baird's Blog, page 85
July 31, 2013
Chocolate-Butterfinger Overflow Cheesecake and Some News!

Gosh. It's been two whole weeks since my last blog post and honestly, I don't know how time got away from me.
Well, yes I do.
I've been building sand castles with ice cream here , and doing all kinds of fun things with sugar here . I've also been testing this cheesecake recipe for a solid week. It was tricky making my Butterfinger-cheesecake dreams come true, and finally (after four-ish tries) a result was earned that I so ardently desired.

Before we talk about love and cheesecake (because those two things always go together in my vocabulary) I have some news to share!
I've accepted an offer from Running Press to write a second cookbook! We're still working through all the details, so I don't have many specifics to share, but I can tell you that it will be a little different from my first book. You can also expect a photo for every recipe and in addition to American measurements, metric will be provided.
I'm so grateful to have this opportunity again. My heart is so happy it's bursting at the seams! And I'm truly thankful to everyone who's supported my first book. Love and love and love to you!

Speaking of love - let's talk about this cheesecake! It's another crazy hybrid of two desserts made into one. A chocolate-Butterfinger cheesecake is sandwiched between two chocolate-Butterfinger brownie layers. It's covered in peanut butter-cream cheese frosting and then smothered with chocolate glaze that overflows the cake's edges.
One thing I learned through testing this recipe, the Butterfinger bars should be chopped finely before folding it into the batters. Any large chunks will make the baked cake difficult and messy to slice. One very neat thing about the cheesecake portion is, you can trade the chocolate chips used in the batter for peanut butter chips. So if you prefer a peanut butter cheesecake center, go for it! I made the cake both ways, and both versions are delicious. I ultimately decided to go with a chocolate center because the peanut butter frosting was enough peanutty flavor for me. But this is your cheesecake, so make it as peanutty as you wish!

I added a little orange food color to the peanut butter frosting to give the cake that signature look of a Butterfinger bar's interior, but that's completely optional. It would be just as yummy without.
I probably don't have to tell you that this cake is major. Brew a pot of coffee, or have a glass of milk handy. You'll need it!
Chocolate-Butterfinger Overflow Cheesecake
[click for printable version]
Source: Brownie and cheesecake recipes adapted from Hershey's
Yield: One 9-inch cheesecake, about 12 servings
Prep: 2 hours; total about 6-7 hours with chill time
This cheesecake can be made over the course of two days. The cheesecake layer can be made on the first day, and the other elements on the second day. Be sure to chop the Butterfinger bars finely. Large chunks will hinder the baked cake from cutting smoothly. Equal weight of peanut butter chips can be used in place of the chocolate chips for a peanut butter cheesecake center.
Cheesecake
1/4 cup/ 50g granulated sugar
3 8oz. packages cream cheese, softened
14 oz. sweetened condensed milk (not evaporated milk)
1 2/3 cups/ 10 oz. semisweet chocolate chips, melted
4 eggs, room temperature
2 teaspoons vanilla extract
10 mini Butterfinger bars finely chopped/ about 200g total
Brownie layers
3/4 cup/ 96g unsweetened cocoa powder
1/2 teaspoon baking soda
2/3 cup/150g unsalted butter, melted and divided
1/2 cup/ 4oz boiling water
2 cups/ 400g granulated sugar
2 eggs
1 1/3 cups/ 171g all-purpose flour
1 teaspoon vanilla extract
1/4 teaspoon salt
10 mini butterfinger bars finely chopped/ about 200g total
Frosting
8 oz package cream cheese, room temperature
1 cup/ 226g unsalted butter, softened
2/3 cup/ 178g smooth peanut butter
4 cups/ 440g confectioners' sugar
1/2 teaspoon vanilla extract
Orange gel food coloring *optional
Chocolate glaze
4 oz semisweet chocolate, chopped
1/2 cup/ 117 ml heavy cream
1/4/ 85g cup dark corn syrup
1 teaspoon vanilla extract
2 mini Butterfinger bars, about 40g
For the cheesecake, grease a 9x3-inch spring-form pan with vegetable shortening and line the bottom with parchment. Preheat the oven to 300F. Beat sugar and cream cheese together until smooth. Gradually beat in sweetened condensed milk, then melted chips. Add eggs and vanilla; beat well. Fold in chopped Butterfinger bars. Pour into pan and bake for 60-70 minutes. the cheesecake will puff up over the top of the pan, but will gradually sink back down over time after removed from the oven. Let cheesecake cool in the pan. Run a knife around the edge before removing the spring-form collar. Chill thoroughly before removing the base and parchment circle. Level the top of the cheesecake with a serrated knife or cake leveler. Keep chilled until ready to use.
For the brownie layers, preheat oven to 350F. Grease two 9-inch round cake pans and line the bottoms with parchment circles. Stir together cocoa and baking soda in a large bowl; stir in 1/3 cup butter. Add boiling water; stir until mixture thickens. Stir in sugar, eggs and remaining 1/3 cup butter; stir until smooth. Add flour, vanilla and salt; blend well. Fold in chopped Butterfinger bars. Divide batter evenly between the two pans and bake for about 20 minutes, or until a toothpick tester comes out clean when inserted in the center of the brownies. Let brownies cool in pan. Run a knife around the edge and turn out onto wire rack. Set aside while you make the frosting.
For the peanut butter frosting, combine cream cheese, butter and peanut butter in a large bowl. Beat together on high speed until combined with an electric hand mixer. Beat in confectioners' sugar 1 cup at a time. Beat in vanilla. Add food color if desired.
Place a brownie layer on a cake stand or serving plate. Stack cheesecake on top and press gently (they should stick together without icing). Finally, top with the remaining brownie layer. Press down gently but firmly until layers are slightly compressed and adhered to one another. Cover cake with a thick layer of frosting using an off-set spatula. Save a little frosting for later (1/2 cup or so) if you'd like to pipe decorative rosettes around the top of the cake.
For the chocolate glaze, combine chocolate and heavy cream in a small saucepan and heat over medium-high until the milk begins to steam. Remove from heat and let stand 2-3 minutes; whisk until chocolate and cream and smooth and combined. Add corn syrup and vanilla. Whisk again until smooth. Place mixture in the refrigerator for 5-10 minutes or until slightly thickened. Pour over top of cake and allow it to overflow and run down the sides of the cake. Refrigerate. When set, pipe on frosting rosettes, if desired. Finely chop the two mini Butterfinger bars and sprinkle over the top edge of the cake.


July 15, 2013
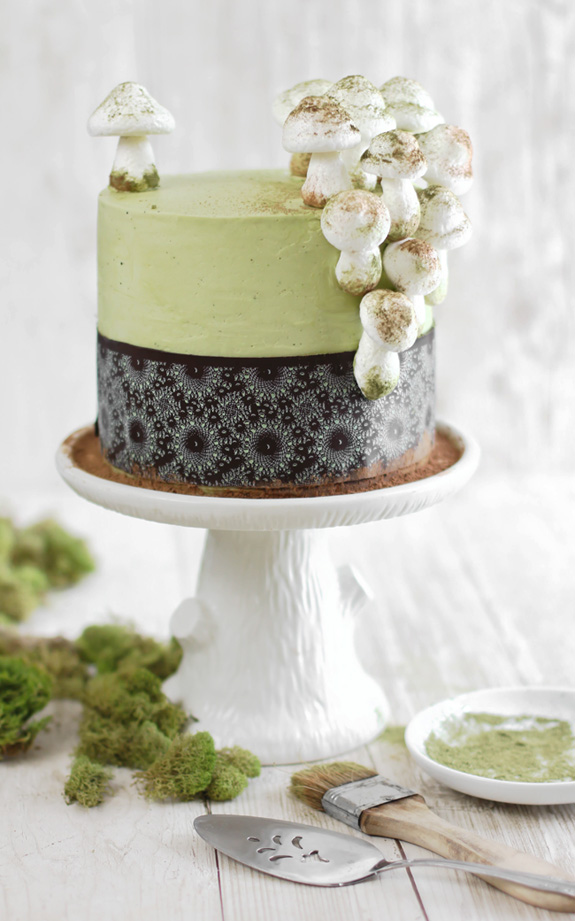
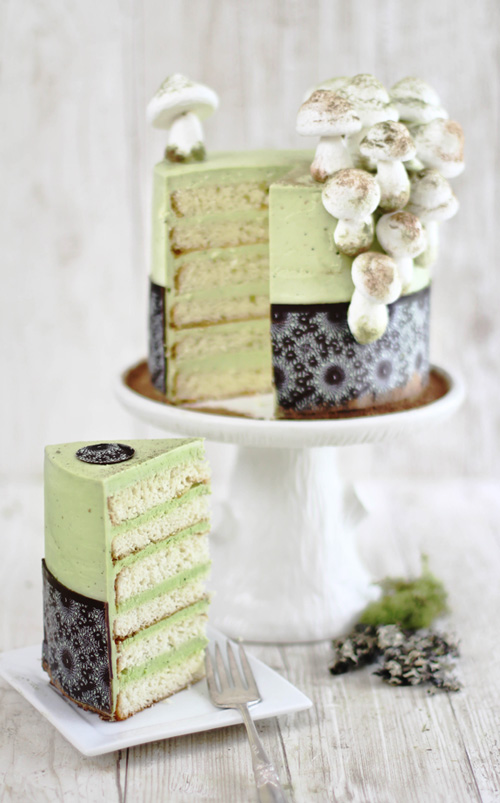
Matcha-Almond Layer Cake with Meringue Mushrooms
I've been having disorganized pantry shame for a few months now, so last Friday I decided to do something about it. I went in armed with a roll of garbage bags and an indiscriminate attitude (let's get rid of it all!), but soon found that my pantry was more like an archaeological dig into the past two years of my life.
Cake boards and tuile stencils (once lost) were found flattened against a wall. A binder of dessert sketches and scribbles lay open with bent pages under a pile of cookbooks. A grocery bag held gold plastic eggs for an Easter post that never happened. Flattened cupcake papers would surface every now and again, along with stocking stuffers that never made it to the mantel at Christmastime. Last unearthed, a box of miscellany; cookie cutters, ribbon, rock candy and chocolate transfer sheets.

After everything was considerably more organized (though not much diminished), I pulled out a chocolate transfer sheet that had caught my eye. The delicate pattern was almost indistinguishable with airy spirals and green flecks... but what I managed to see reminded me a little of mushroom spore prints - an art-slash-science project I'd had fun with as a kid.
That's all it took. I spent the rest of the day with my head in the clouds. I was dreaming of my own species of mushroom (Boletus saccharo - sugar mushroom?) and sketching ideas for a cake teeming with them.


It's been ages since I've made meringue mushrooms. I first made them for this Buche de Noel, in my early blogging days, but who says you have to wait until Christmas to make these guys? They are delightful any time of year!

It's also been a while since I've made anything with matcha tea powder, which is surprising because it's one of my favorite ingredients of all time. It's really perfect for this cake - not bitter at all, especially when paired with almond - and with just a hint of earthiness. I whipped these flavors into silky Swiss buttercream to coat layers upon layers of almond-scented butter cake.
If you're a newbie at using transfer sheets, you can find additional instructions here and here. I usually find my transfer sheets at Fancy Flours, though some may be found locally at specialty cake shops.
I had so much fun immersing myself in every aspect of this cake, albeit the inspiration was a little weird and unconventional (spores, mushrooms... who makes a cake with that in mind?). In the end it turned out pretty cute and woodsy-looking, but above all - it's mighty tasty.
Matcha-Almond Layer Cake with Meringue Mushrooms
[click for printable version]
Yield: 8-10 servings
Recipes adapted from the SprinkleBakes book
Prep 2 hours 30 minutes; total time about 5 hours
Cake
1/4
pound (1 stick) butter, softened
1 3/4
cups (350g) sugar
3
eggs, at room temperature
2
teaspoons (8g) vanilla extract
1/2 teaspoon
(2g) almond extract
2 1/4
cups (270g) all-purpose flour
3 1/2
teaspoons (10g) baking powder
1
teaspoon (7g) salt
1 1/4
cups (292g) full fat sour cream
Swiss
buttercream frosting/ chocolate transfer
6 egg
whites
1 cup
(118g) sugar
Pinch
of salt
1 1/4
pounds (5 US sticks) unsalted butter, cubed, at room temperature
2
teaspoons (8g) vanilla extract
1/2
teaspoon (2g) almond extract
1
tablespoon (10g) matcha green tea powder
1 1/2
tablespoons (22g) hot water
4 oz.
semisweet chocolate chips
Chocolate
transfer sheet of your choice
Meringue
mushrooms
2 egg
whites, at room temperature
1/4
teaspoon (1g) cream of tartar
1/2
cup (100g) granulated sugar
4 oz.
chocolate chips or candy coating
2
tablespoons (20g) cocoa powder
2
tablespoons (20g) matcha green tea powder
Make the cakes. Preheat
the oven to 350°F. Grease the bottom and sides of three 7-inch springform pans (if
you don’t have 3, you can reuse the ones you have or use two 9-inch pans). Line
the bottom and sides with parchment paper, and then grease the paper.
In
the bowl of a standing mixer fitted with the paddle attachment, cream the
butter and sugar together. Add
the eggs, vanilla and almond extracts, and beat until combined. Combine
the flour, baking powder, and salt and add to the mixer bowl in three batches, alternating
with the sour cream and beginning and ending with the flour mixture. Scrape
down the bowl and beat on high speed for 3 minutes. Divide the batter evenly into
pans, or if reusing a pan, fill each pan two-thirds full.
Bake
for 25 to 30 minutes, or until a toothpick comes out clean when inserted into
the middle of the cakes. Let
the cakes cool slightly in the pans. Remove and let them cool completely on a
wire rack. Level cakes with a large serrated knife or cake leveler. Torte each
cake so that there are six layers.
For
the matcha-almond Swiss buttercream, set a
saucepan filled one-third full of water over medium-high heat and bring to a
simmer.
Whisk
together the egg whites, sugar, and salt in a large heatproof bowl. Set over
the simmering water and whisk until the mixture is hot to the touch and the
sugar has dissolved.
Transfer
the mixture to the bowl of a stand mixer fitted with the whisk attachment.
Beat
on low speed for 2 minutes. Increase to medium-high until stiff peaks are
formed.
Continue
beating at medium-high speed until the mixture is fluffy and has cooled (the
mixing bowl should feel cool to the touch).
Turn
the mixer off and switch from the whisk attachment to the paddle. Turn the
mixer on medium-low and add the butter, a few cubes at a time, beating until
well incorporated before the next addition. The egg whites will deflate and thin
with the first few additions – don’t let this discourage you – keep going. It may also look curdled, but don’t fret. Beat
on high speed when all the butter has been added. The mixture will thicken and
become smooth after several minutes of beating. Beat in the vanilla and almond extracts.
Place matcha tea powder and hot water in a small bowl and stir until a smooth
paste forms. If mixture is very thick, add additional hot water until it is
very smooth but not too liquid. Add the matcha paste to the batter and beat
until the frosting is completely smooth and consistently green.
Reserve
1/4 cup frosting for later use. Place a cooled cake layer on a cake stand and
top with 1/3 cup frosting; top with another cake layer and repeat frosting with
remaining layers. Cover cake with a thin coat of frosting (crumb coat) and
refrigerate until firm, about 15 minutes. Remove cake from refrigerator and coat
cake in a thick even layer with the remaining frosting. Refrigerate until firm.
For
the chocolate transfer, measure and cut a 4x16-inch band from the transfer
sheet. Place it smooth-side-down on a large piece of parchment (you should be
able to feel the raised chocolate pattern on the side facing upward). Melt
chocolate at 30 second intervals until it can be stirred smooth. Place a large spoonful of melted chocolate at
one short end of the cut transfer sheet band, and smooth it over using an
off-set spatula. Try to smooth the chocolate over the entire area in one fluid stroke;
this will decrease the chances of the pattern shifting. Holding the coated transfer
sheet at both ends, press the middle of the sheet onto the cake and wrap the
ends around the cake. Refrigerate until the chocolate is firm, about 15
minutes. Once the chocolate is firm, remove the acetate coating. Measure and cut another piece of the transfer
sheet to fill in the remaining gap. Coat with chocolate, and press onto cake as
before. Let chill and remove acetate when the chocolate is firm.
For
the meringue mushrooms, prepare
two baking sheets by lining them with parchment paper. Preheat the oven to 200
degrees.
Place
room temperature egg whites in the bowl of an electric mixer fitted with a
whisk attachment. It is important that the bowl and whisk both be very clean,
so that the egg whites whip properly. Begin
beating the egg whites on medium speed. Once they are very frothy, stop the
mixer and add the cream of tartar. Start the mixer again and continue to beat
the egg whites. Once they form soft peaks, increase the speed to high and
gradually add the sugar, a tablespoon at a time. Beat the whites until they are
very shiny and hold stiff peaks, but are not dry or crumbly.
Spoon
the meringue into a large pastry bag fitted with a 1/2-inch round tip. First,
pipe the mushroom caps: hold the pastry bag at a 90-degree angle about 1/2 inch
from the parchment paper. Using firm and even pressure, squeeze out a round
meringue disc about 2 inches in diameter and 1 inch high. Stop squeezing, then
twist the bag and lift it from the meringue to get a clean break from the cap.
Repeat in regular intervals on the baking sheet until you have approximately 2
dozen mushroom caps. The mushroom caps will most likely have peaks on top, so smooth
the tops by wetting your index finger and lightly pressing the peaks down into
the caps.
Next,
pipe the mushroom stems. Again position the bag perpendicular about 1/2-inch
from the baking sheet. Begin squeezing the bag to form a 1-inch round base.
Continue to squeeze as you slowly and evenly draw the bag up, then release
pressure (causing a break) to form a tapering stem about 2 inches tall. The
stems will have peaks on top, but do not smooth them down as before with the
caps. Use the remaining meringue to pipe as many stems as possible—allow some
stems to tilt and collapse to the side, these mushrooms will be applied to the
side of the cake in a “climbing” manner.
Bake
the meringues at 200 degrees for about 90 minutes, turning them halfway through
the cooking time to ensure an even bake. The meringues should be hard and dry
to the touch, and you should be able to easily lift one from the parchment.
Once the meringues are done, let them cool completely before assembling. If
time allows, you can also turn off the oven and let them sit in the oven for
several hours or overnight.
To
assemble the mushrooms, melt the chocolate in a small bowl in the microwave,
stirring after every 30 seconds to prevent overheating. Use a toothpick to carve
a small hole in the bottom of a mushroom cap. Dip the top (pointed end) of a
stem in the chocolate, and stick the chocolate-covered stem top in the carved hole
of the mushroom cap. Place the mushroom on a baking tray and leave to set, and
repeat with remaining caps and stems.
Place
the cocoa and matcha powder in separate small bowls. Dip the bottoms of the mushroom stems in the matcha
powder, then in the cocoa; tap to remove excess powders. Load a dry pastry
brush with the matcha powder and brush the caps. You may also use a sifter to
sift matcha and cocoa over the mushrooms.
Use
the reserved 1/4 cup frosting to attach the mushrooms to the side of the cake.
Group them together as tightly as possible. Place a group of mushrooms standing upright on
top of the cake. Randomly place one or two mushrooms away from the groups of
mushrooms on top of the cake.
Store
cake loosely covered at room temperature for up to 24 hours. To increase longevity,
store cake loosely covered in the refrigerator. Mushrooms will most likely
wilt, but the cake will keep for a few days longer refrigerated. Bring to room temperature before serving.
Note: Mushrooms can be stored for up to a month in an airtight container in a cool,
dry room. Humidity can make the mushroom soft and they will collapse. Mushrooms
will become soft after 12 hours on the cake at room temperature, but they
should still hold their shape relatively well. Do not assemble mushrooms on cake more than 24
hours before serving.
July 11, 2013
Peaches and Cream Panna Cotta Shots and My Favorite Gelatin Alternative


Friends, I know it seems like I'm always saying "[...] is one of my all-time favorite desserts", and before those words lose their polish, I'd ask you to hear me out once more. Panna cotta is (truly) one of my all-time favorite desserts. In fact, I think it's just about the most perfect sweet thing for summer. It's rich but not heavy. It's cold and refreshing, and you don't have to do much work aside from stirring a few ingredients together on the stove top.
This version is served in shot glasses and topped with schnapps-spiked peach puree (yu-um!). I finished the shots with fresh mint leaves and beautiful little spheres of gourmet sugar from Chambre de Sucre.


Whenever I make a dessert that contains gelatin, I can count on someone asking for a vegan/vegetarian substitution. I've been looking for a good vegetable-based gel for a while now, for 1.) those dear readers, and 2.) myself. Even though I'm no purist, I'd rather use non animal-derived gelatin for my baked goods and desserts. Why? -mostly because standard powdered gelatin has an unpleasant odor when bloomed and heated - an animal by-product smell that is not appetizing at all.
 I recently picked up a box of dessert jel that exclaims, Gluten Free! Vegan! Unsweetened! All Natural! All those exclamation points made me a little wary, but it's the best substitute I've tried thus far. It's made from vegetable starches and very easy to use. You stir the jel powder into two cups of cold liquid, then bring it to a boil on the stove-top; pour the liquid into a mold (or glasses) then refrigerate to set. It's that easy! There are a few cons that I should point out, too. Much like agar-agar, high acid fresh fruits will inhibit gelling - like pineapple, mango or grapefruit (for which I can personally attest).
 I'm still experimenting with this gel in other desserts, like mousses and jelly candies, but I really loved it in this panna cotta. You can find boxes of Natural Desserts Unflavored Jel Dessert at some organic food shops, here online, or in bulk on Amazon
 . I can't say I will completely stop using gelatin in my baking, but if the vegan jel can do the job, I will certainly opt to use it instead.
*This is not a sponsored post, I just really like the product.

The sugar pearl on top of this dessert is optional, but it's a neat element because it soaks up some of the peach juice from the puree. When eaten, it sort of falls apart on the tongue and releases a hit of super-sweet-peachy flavor. If you can't find spherical sugar, then cubed sugar should work just the same (and it's easier to find!).
Sucre stripey spoons can be purchased from Hey Yo Yo.
Peaches and Cream Panna Cotta Shots
[click for printable version]
Source: SprinkleBakes original recipe
Prep: 30 minutes; chill 1-2 hours
Yield: twelve 30 ml shots or six 60 ml shots
I found that the larger (60 ml) shots are best served with a little spoon, but smaller shots can be served with a wooden pick to help release the panna cotta from the sides of the glass - then the whole dessert can be taken as one shot. I personally like to savor dessert for as long as possible, so eat both large and small versions with a spoon.
Panna cotta
1 1/2 cups (363g, 12 3/4 oz.) milk or full-fat half and half
1/2 cup (115g, 4 1/2 oz.) heavy cream
0.3 oz (10g) packet Natural Desserts Unflavored Jel Dessert
or 1/4 oz. package powdered gelatin (**see bottom of recipe for prep with gelatin)
1/3 cup (67g) granulated sugar
1/2 teaspoon (2.5 ml.) vanilla extract
Place the milk and heavy cream in a medium saucepan. Beat dessert jel into the cold cream mixture with a whisk until dissolved and no lumps remain. Whisk in granulated sugar.
Place saucepan over medium-high heat and cook until boiling. Let boil for 1 minute and remove from heat. Stir in vanilla. Immediately transfer liquid to a 4 cup measure with a spout.
Divide the liquid evenly between the shot glasses - do this quickly, as the dessert jel is quick-setting. Transfer glasses to the refrigerator and chill until firm.
**If using regular gelatin, place 1/4 cup of the milk in a small bowl. Sprinkle gelatin
over the milk and let set for 5 minutes. In a saucepan, combine the remaining milk,
cream and sugar in a saucepan and bring to a simmer over medium heat until very
hot. Remove the saucepan from heat and
add vanilla and gelatin mixture. Whisk
gently until gelatin is dissolved. Transfer mixture to a 4 cup measure with a spout and divide between shot
glasses; refrigerate until firm.
Spiked peach puree/toppings
12 oz. sliced peaches, fresh or frozen and thawed
2 tablespoons (1 oz.) peach schnapps
2 tablespoons (24g) granulated sugar *optional
6-12 mint leaves for garnish
6 -12 sugar spheres or cubes
Place peaches and peach schnapps in a blender or food processor and blend until pureed. Taste-test the puree for sweetness; if sugar is needed, add 1 tablespoon at a time until desired sweetness is achieved (if using in-season peaches, you may not need any extra sugar). Process mixture again until sugar granules are completely dissolved.
Spoon peach puree over the set panna cotta in the shot glasses. Garnish each shot with a mint leaf and sugar sphere/cube. Keep refrigerated until ready to serve. Cover leftovers with plastic wrap and refrigerate.
July 4, 2013
Red Velvet Bundt Cake Royale

Happy July 4th, friends!
It's shaping up to be a rainy holiday, so our fireworks-watching will have to wait. No matter. We'll save the barbecuing for later and carry on indoors with a big slice of red velvet bundt cake! It's a little less literal than my red + white + blue concoction from last year's 4th, but silver crystal sugar on dark chocolate ganache will always remind me of fireworks against a night sky.

The usual topping for this cake is made with cream cheese (no surprise there, right?), but this time I decided to break tradition and completely enrobe the cake in dark chocolate ganache. I can never leave well enough alone, so on went a crown of whipped cream and bunches of chocolate curls (and that's the royale part!).


If you're new to making chocolate curls, then clickety-click over to my video. With a little practice, you'll be curling like a pro! Nowadays, it's one of my favorite pastimes (along with crystallizing rose petals and stamping chocolate ).
(It's the little things- always and ever!)

There's something about the look, feel, and flavor of this cake... It makes me want to throw a midnight dessert tasting and invite my three closest girlfriends anyone who understands the magic of dark chocolate and the drama of red velvet together. Care to join me?
Red Velvet Bundt Cake Royale
[click for printable version]
Source:Cake portion adapted from the cookbook Kiss My Bundt

Yield: 12 servings
Prep: 1 hour 30 minutes; total time about 2 hours 15 minutes
Red velvet
bundt
1 1/4 cups vegetable
oil
1 cup
buttermilk
2 eggs
3 tablespoons
red food coloring
1 teaspoon
white vinegar
2 teaspoons
vanilla extract
2 1/2 cups
flour
1 3/4 cups granulated
sugar
1 teaspoon
baking soda
3/4 teaspoon
salt
1 tablespoon
unsweetened cocoa powder
Glaze
9 oz. dark
chocolate, finely chopped
1 cup
heavy whipping cream
1 tbsp.
corn syrup (light or dark)
Toppings
2 cups
whipped cream
Chocolate
curls
Silver
crystal sugar
Preheat
oven to 350°F. Grease and flour a large
bundt pan, or spray it with a flour-based cooking spray such as Bake Easy or
Baker’s Joy.
In a large
bowl, beat together the oil, buttermilk, eggs, food coloring, vinegar and
vanilla with an electric hand mixer at medium speed.In a separate bowl whisk
together the flour, sugar, baking soda and cocoa powder.
Add the
dry ingredients to the wet ingredients, in three additions. Pour the batter
into the prepared pan and bake for 45-50 minutes in an aluminum pan or about 40
minutes in a dark non-stick pan. The cake is ready when a toothpick tester
comes out clean. Remove from oven and let
cool in pan 10 minutes. Turn out onto a wire rack to cool completely. Place wire rack inside a large jelly roll pan
with a lip. Let stand at room
temperature while you make the glaze.
For the
glaze, place heavy cream in a large microwaveable bowl. Heat in the microwave at 40 second intervals
until very hot but not boiling (you can do this on the stove top if you don’t
have a microwave). Stir in chopped chocolate.
Let stand for 3 minutes then begin gently stirring mixture. You can use a whisk, but do not whisk
vigorously as it will create air bubbles in the finished glaze. When chocolate and cream are thoroughly mixed
and smooth, add corn syrup. Stir until
combined. Transfer to a 4-cup measure with a pour spout. *Note: Corn syrup can
be omitted if desired. It is used to
give the glaze an extra glossy appearance.
Pour glaze
over entire surface of the cake. Allow the cake to stand until the glaze
dripping subsides. Lift the rack from the jelly roll pan and pour excess
chocolate in the pan back into the 4-cup measure. Rewarm glaze for 20-30 seconds in the
microwave if it has thickened. Stir, then pour a second coat over the entire
surface of the cake. When dripping
subsides repeat warming and pouring process a third time (the more times you
cover with chocolate, the thicker the surface becomes). Transfer the cake to a serving plate or cake
stand using a large spatula on one side of the dessert and a hand supporting it
on the other side.
Pile whipped cream
into the center of the bundt cake and top with chocolate curls and silver
crystal sugar, if desired. Store covered loosely in the refrigerator. Allow slices to stand at room temperature 5-10 minutes before serving.