Heather Baird's Blog, page 84
October 14, 2013
Pumpkin Tassies with Salted Bittersweet Chocolate Drizzle and a Fair Trade Giveaway!

The past weekend was spent picking out pumpkins for every purpose - sugar pumpkins for roasting, mini pumpkins for the mantel, great pumpkins for carving and one little white pumpkin just because. The next logical step was to make a delicious pumpkiny something, and these pumpkin tassies were just the treat. They're like mini pumpkin pies, but better!

Better because they're drizzled with chocolate - and not just any old chocolate, Guittard, a Fair Trade chocolate!
October is Fair Trade month, and the kind folks from the nonprofit organization reached out to me to help spread the word. So, what is Fair Trade?
"Fair Trade goods are just that. Fair. From far-away farms to your shopping cart, products that bear our logo come from farmers and workers who are justly compensated."
Knowing that will make your chocolate taste even sweeter!

And that brings me to another sweet thing. They're giving away a goodie bag of Fair Trade products to one Sprinkle Bakes reader. Inside is a selection of teas, coffees, chocolate bars, lip balms and a cute canvas tote to help spread the message.
Contest is open to US residents.
a Rafflecopter giveaway


There are all kinds of good things to learn about Fair Trade on their website here , and I really loved the simplicity of the message in their new PSA . Take a moment to see how you can make a difference!
I hope you'll try to pumpkin tassies, too. I love the crust-to-filling ratio (I'm a crust girl!) and they are exactly two bites apiece, which means you should at least eat four in one sitting.
Pumpkin Tassies with Salted Bittersweet Chocolate Drizzle
[click for printable recipe]
Yield: 24 mini pies
Source: Adapted from Cooks.com
Prep: 20 minutes, total time with chilling and baking 1 hour 45 minutes
You'll need a 24 cavity mini muffin tin for this recipe.
Crust
1/2 cup/ 113g unsalted butter, softened
3 oz. cream cheese, room temperature
1 cup/ 125g all-purpose flour
Pinch of salt
Pumpkin filling
1/2 cup/ 132g pumpkin puree (canned packed pumpkin puree is fine)
1/4 cup/53g granulated sugar
1/4 cup/ 60g heavy cream
1 large egg
1 teaspoon/ 2g pumpkin pie spice
Topping
2 oz. bittersweet chocolate, melted
Fleur de sel
For the crust, combine the butter and cream cheese in a large bowl. Mix using an electric hand mixer on low speed until just combined, about 5 seconds. Don't overwork dough or it will greatly shrink during baking. Mix in half the flour and pinch of salt on low speed until crumbly. Mix in remaining flour until well combined. Cover and refrigerate for at least 1 hour.
Preheat oven to 350F.
Remove dough from refrigerator and knead one or two times. Shape into a 6x4-inch rectangle. Cut dough into 24 cubes. Press each cube into a mini muffin cup. Use your fingers to press the dough up the sides of the cups making the crust edges as tall as the top of the muffin cup. Refrigerate filled muffin tin while you prepare the filling.
In a medium bowl mix together the filling ingredients using the electric hand mixer on medium speed. Filling will be very liquid. Remove muffin tin from refrigerator and divide the filling between the crusts (I used a 1/4 cup measure with a pour spout). Bake for 5 minutes at 350F then reduce temperature to 325F and bake for 10 more minutes. Tassies are done when the filling is set, and it shouldn't jiggle when you move the pan.
Let pies cool completely in the pan. Place a wire cooling rack over a length of wax paper. Transfer tassies to the cooling rack. Place melted chocolate in a zip-top bag with a very tiny hole snipped in the corner. Pipe chocolate onto the tops of the pies in three to four quick passes over each pie. Top with fleur de sel just before serving.


October 11, 2013
Corpse Bride Blue Velvet Cake - Complete Tutorial


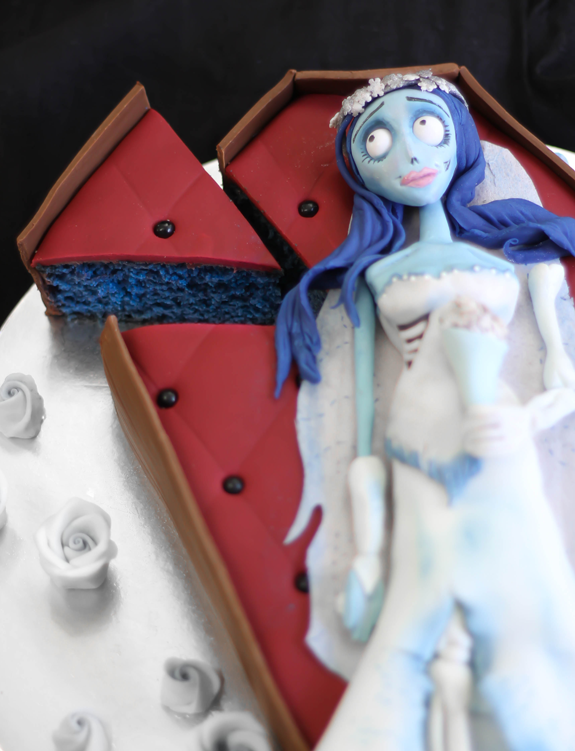
Hello October! This month brings out the kid in me like no other (even more so than Christmas!), and I get positively giddy for all things spooky. This year I decided to start celebrating early with a Halloween cake project. I'll admit - I got carried away with this tutorial. There are tons of step-by-step photos and lots of instruction for all the tiny details - it's almost like a mini e-course in gum paste sculpture. It's probably the biggest tutorial in all of Sprinklebaking history!
As you may know, I love Tim Burton's stop-motion-animation characters (remember my Sparky cake from last year?) and I've recently re-watched Corpse Bride. I have a huge soft spot in my heart for the main character, Emily, so I decided she needed to be cake-ified in blue velvet and chocolate frosting.
(Spoiler alert!) I mean, if she can't have true love she should at least have chocolate frosting. It's kind of the same thing, right?

Ready to see how I made her?
Materials
1/2 lb. ready-made gum paste tinted blue with Wilton sky blue gel food color and a dot of black food color
2 white Sixlets candies
Blue pearl dust
Silver pearl dust
Black gel food color
White liquid food color
Pink gel food color
Artist's brush with a fine tip
Light corn syrup
Plastic pointed fondant tool or unused wood cuticle stick
1/4 lb. ready-made black or dark chocolate fondant
White nonpareils
Blue velvet cake baked in 9x13 sheet (recipe link)
1/4 lb. ready-made chocolate fondant
1/2 lb. ready -made red fondant
1/2 lb. ready-made white fondant
18-20 Sixlets black pearls
Royal blue food color
White pearl dust
1 sheet rice paper or wafer paper
Blue food coloring marker
1/8 lb. white gum paste
Toothpicks
White flower or snowflake confetti quins
Royal blue gel food color

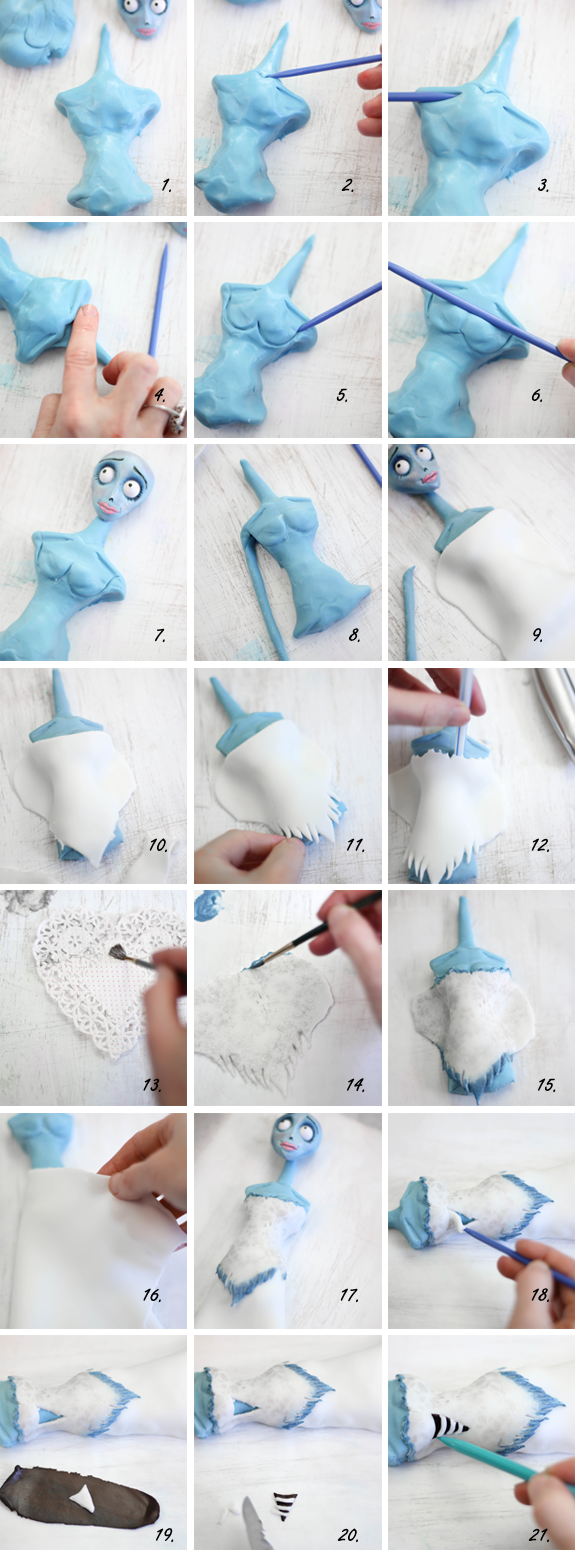
A s I worked and compared images of Emily to my sculpture, I found her head to be very skull-like, which makes sense -she's dead after all. And her nose is teeny-tiny! A Michael Jackson-sort-of-nose, except twice as small, if you can imagine that. Her big round eyes are an important detail, and white Sixlets candies are a perfect uniform size. You can find them at bulk candy shops online and in some craft stores in the baking aisle.
Head instructions
1. You'll start with a large gumball-sized piece of the blue tinted gumpaste.
2. Pinch one end to a point to form a chin shape.
3. Press the two white Sixlets candies into the paste about 1/3 of the way down from the rounded end.
4. Turn the head to the side.
5. Make a diagonal line across the side of the head from the top third downward to the chin with a paring knife.
6. Cut the bottom piece away leaving a teardrop-shaped head. It should be about 2 1/2-inches from forehead to chin.
7. Place the head cut-side down.
8. Holding the fondant tool horizontally, (you could also use the handle of a small artists' brush) roll it between the eye holes to create a slight slope for the nose.
9. Press the fondant tool's end on either side of the nose slope just under the eye holes to create a flat cheek area.
10. Push the pointed end of the fondant tool upward at the bottom of the nose slope.
11. Make two tiny nose holes in an upside down "v" shape with the pointed end of the tool.
12. Just below the nose, delineate the mouth with the pointed end of the fondant tool. Use the blue pearl luster powder and a dry artist's brush to shade the eye holes.
13. Replace the eye. Add a dot of corn syrup to each candy before pressing them in if they do not want to adhere naturally. Shade the sides of the head with the blue pearl dust. Delineate eyebrow lines on the forehead with pointed end of the fondant tool.
14. Using the fine-tipped artists' brush, paint one small dot on each of the Sixlets candies. Allow them to dry for 5-10 minutes.
15. Further shade above each eye with the blue pearl dust. Shade all the way up to the eyebrow lines.
16. Paint on the eyebrows using black gel food color and a fine-tipped artists' brush.
17. Lightly "sketch" lips around the mouth line using the pointed end of the fondant tool.
18. Paint lips using a small artists' brush and pink gel food color mixed with a drop of white liquid food color. Allow head to stand until dry.
The torso. Admittedly, things will look a little strange in the beginning. The most important part of the torso is the décolleté. Emily is extremely withered and thin and one of her most defining features is very prominent collar bones. As you sculpt this part of the body, think of its shape as a coat hanger. The rest of the torso will be covered with a dress made of fondant, so don't worry as much about the detail on the rest of the body.
Body instructions
1. Use about 1/8 lb. of the blue tinted gum paste for the torso; roughly shape it into a 4-inch rectangle. Keep the head on your work board to keep in mind he correct body proportions. Roughly sculpt a waist by squeezing the gum paste rectangle in the center. Shape shoulders with your fingers and pull a long piece of gum paste up from the middle of the shoulders, creating a very long neck. The end sculpture of the neck and torso should measure about 5 to 5 1/2 inches in length.
2. Make a "v" shape at the base of the neck using the fondant tool. This indicates where the sternum and collarbone meet.
3. Press the pointed end of the fondant tool into the gum paste just under each shoulder. The pointed end should be facing inward toward the center of the chest. These indentations create the prominent collar bone.
4. Smooth the neck area away from the collar bone using your fingers. Gently press so that the collar bone becomes more prominent.
5. Create two "cups" using the pointed end of the fondant tool. Start at one shoulder at the collar bone and end at the opposite shoulder.
6. Holding the fondant tool horizontally, roll it downward from the collar bone to create a slope on the breast.
7. Periodically check the head in proportion to the rest of the body. Here I've pinched the waist and hips in a little smaller.
8. Roll a piece of blue gum paste into a long rope. This will be the arm. Orient the arm to the body to check for the correct thickness. Her arms are bone-thin, so make sure the rope is, in turn, very thin. Remove the arm from the body and set aside for later use.
9. Roll a out a small piece of white fondant to 1/8-inch thickness, large enough to cover the body.
10. Cut the bottom of the fondant piece into a large "v" with the point resting just below the bottom edge of the torso.
11. Fringe the "v" with scissors or a small knife.
12. Use the end of a straw to cut away small half circles from the top of the dress. Keep in mind that her dress has a sweetheart neckline.
13. I used a paper doily to cover the fondant piece, and then I dry-brushed on some silver pearl luster dust to create a lacy effect. This is optional.
14. Mix blue pearl dust and a few drops of water to create an edible wet paint, and brush it on the top edge of the sweetheart neckline and on the bottom fringe. Allow this to dry for a few minutes.
15. Lay the fondant piece over the torso to make sure paint and lace shading looks acceptable. Remove and touch up any bare spots on the bodice if needed.
16. Roll out a 12x12-inch piece of white fondant to 1/4-inch thickness.Wrap this piece around the torso piece at the waist so that the bottom of the fondant flares out slightly. Cut away excess white fondant if necessary. Use fondant scraps to pad dress to about 3-inches below the torso.
17. Wrap the bodice around the torso. Secure with a dot of corn syrup if needed.
18. Cut out a small rectangular piece from the left side of the bodice just under the breast. Reserve the removed piece.
19. Use the reserved white triangle piece as a template to cut out a same-size piece of black fondant.
20. Cut the reserved white triangle piece into pieces horizontally to make "ribs". Attach them to the black triangle using a tiny dot of corn syrup to adhere, if needed (mine stuck on without syrup).
21. Fit the "ribs" triangle into the hole in the bodice. Press with a fondant tool to secure.

The blue velvet batter was baked into a 13x9-inch sheet cake. It's easy enough to cut into a coffin shape free-hand, so I didn't use a template. I used chocolate icing to coat this cake, but you could use cream cheese if you want to go the traditional route as with red velvet cake.
Cake covering instructions
For the fondant covering, I used red ready-made fondant kneaded with a little black fondant to give it slightly less "cheery" color. Measure the cake and then cut a same-sized piece of the red fondant to fit the top of the cake (roll to 1/4-inch thick, as per usual). Score quilt lines into the fondant using the back of a knife - just make a line, don't cut all the way through. Place a black Sixlets pearl on each point that the lines intersect. For the wood plank sides, roll chocolate fondant to 1/4-inch thickness. Measure sides of cake and cut chocolate fondant strips to stand about 1/2-inch taller than the top of the cake. Striate chocolate fondant pieces down the length of the strips creating a wood grain appearance. Press them onto the icing on the sides of the cake. Let cake stand while you finish the Emily sculpture.


Emily's arms and legs were probably the hardest elements for me to figure out. I wondered how on earth I'd make something so delicate-looking that would actually hold together without an armature. In the end I had a little help from toothpicks.
Veil, bouquet, arms and legs instruction
1. Her veil is made from a single sheet of edible wafer paper. You can find this at cake supply shops or order a few sheets online. In the movie her veil is worn and ragged with age, so it can be cut into an organic shape without using a template. The only guideline I can give is to cut it about 8-inches in length.
2. Dry brush the edges of the veil with blue pearl luster dust. Draw "stitchings" of curlicues around the edges of the veil with the blue food color marker.
3. Lay the veil on the cake, then lay Emily's body on top of the veil. The bottom of the dress should hang off the bottom edge of the cake.
4. For Emily's skeletal leg, roll a length of gum paste into rope. Cut away a three-inch long piece and gently roll between your palms so the piece is uniform.
5. Cut a small slit into each end of the piece, creating the appearance of bone ends.
6. Roll a much thinner 3-inch piece of gum paste and attach it to the side of the larger bone using corn syrup. Let dry.
7. Roll a small dime-size piece of blue gum paste into a ball, then pinch one side flat so that it fans out. Lay this piece over the bottom of the leg bone, covering a bone end.
8. Wrap the piece around the leg bone and pinch closed on the back side.
9. Scrunch the piece down, so that it has the appearance of a slouchy sock around the leg bone.
10. Wrap a small scrap piece of white fondant around the bottom of the "sock" to form a white shoe.
11. Shape the toe into a point.
12. Fashion a small piece of white gum paste into a 1/2-inch bone end and thread it onto a toothpick. Roll a small scrap piece of gum paste into a ball to form a knee bone and thread that onto the toothpick also.
13. Finally, thread the large leg bone onto the toothpick so that the knee bone butts up against it creating one long skeletal leg, about 5-inches in length.
14. Attach the leg by inserting the toothpick end into the fondant under the dress. I don't have a pictorial for her other leg, but you'll essentially make a long rope (about 5-inches) out of blue gum paste, and then attach the white shoe portion as before with the skeletal leg. Insert a toothpick into the top of the leg and then attach it under the dress as before.
15.To make the skeletal hand, roll a small scrap of white gum paste into a ball and then flatten in with your palm. Make 4 slits to fashion "fingers" in the gum paste.
16. Trim fingers so they are slim and cut them in graduated finger sizes.
17. Create a the lower arm bones in the same way the lower leg bone was created, except make it smaller, about 1 1/2 inches in length. Attach the hand to the bone using a toothpick.
18. Her bouquet wrap is made using a small square of gum paste.
19. Wrap the square into a cone shape. Use a dot of corn syrup if the cone does not hold together naturally.
20. Shape the fingers of the skeletal hand around the cone, and then remove and set the hand aside.
21. Place a drop of corn syrup on a piece of wax paper and cover the syrup with flower or snowflake confetti quins. Stir the corn syrup and quins together using a fondant tool.
22. Pour a little silver pearl dust over the quins and spread the dust with a dry brush.
23. Scoop up the quins with a small spoon and pour them into the bouquet cone. Let this set until the "flowers" are set and stable enough to move without them falling out.
24. Create an upper arm bone about 1 3/4-inches long and adhere it onto the veil with corn syrup beside the left shoulder (your right, her left). Place the forearm upright so that the hand rests on her bodice. Place a dot of corn syrup on the "elbow" portion of the skeletal forearm to adhere it to the veil. Place a dot of corn syrup on the back side of the bouquet wrap and place it under the skeletal hand.
25. Make a hand out of blue gum paste as before with the skeletal hand.
16. Roll out a 1 1/2-inch length of white gum paste and attach the blue hand to the gum paste using a toothpick.
27. Press the white gum paste onto and around the long blue arm. Use a tiny triangle of gum paste over the hand to create the illusion of a bridal glove. Use corn syrup or a tiny dot of shortening to make it stick. Place a dot of corn syrup on the underside of the arm and lay it beside the body on the veil. Butt the top of the arm against the shoulder.

Emily's hair. It's kind of a mess, but that only helps with the execution of this detail. It doesn't have to be perfect. The more ragged, the better!
Hair instruction
1. Begin with a large gumball-sized piece of fondant that has been tinted royal blue.
2. Pull the piece into a long 6-inch length. Attach it to the head with a little corn syrup at the center.
3. Emily has a slight side part to the left, so make the part line first using the pointed end of the fondant tool. Make hair striations down the length of the royal blue fondant piece.
4. Increase pressure as you move the tool down the length of the hair so that the bottom portion of the "hair" is fringed. Place Emily's head on the neck and arrange the hair around her face and over her shoulders.
5. To make her floral head piece, roll out a skinny rope piece of scrap fondant or gum paste, about 4-inches long. Brush it with silver pearl dust. Place dots of corn syrup in the center of the rope and sprinkle over confetti quins. Brush the quins with more silver dust.
6. Wrap the head piece around the top of her head. Press it gently so it adheres. Let stand until set and stable.
A few more details to consider.
I tore the fondant at the bottom of her dress so that it looks worn. I also dry brushed the bottom edges of the dress with blue pearl dust. And don't forget to add the slit in the front of her dress, too. This exposes her skeletal leg - a very important detail! I added a few curlicue stitchings around the bottom of her dress with the blue food marker - this matches the stitching on her veil.
Emily has some decay on one side of her face, exposing some of her teeth. I painted this on with a fine artist's brush and black gel food color.
I used some ready-made royal icing white roses around the sides of the cake board. If I were to repeat this project, I might use some black drippy candles around the coffin. I think that might look even better!


S o , how long did it take for all this sculpting and baking? Around 8 hours total spread over the course of two days. Five hours were used on the first day for sculpting most of the figure and baking/covering the cake. The remaining hours were spent figuring out the skeletal leg and scrutinizing some finishing touches. Writing this tutorial probably took longer than the making of the entire cake!
Even if you don't make the cake, I hope you've enjoyed seeing my process. The blue velvet cake recipe can be found here (in cupcake form). I promise it's just as delicious as red velvet!
Happy October, friends!
September 30, 2013
Rice Krispie Treat Sprinkle Cake - Sprinkle Bakes is Four!


It's a very Happy Blog Birthday!
Today I'm celebrating four years of blogging. Sometimes I look back at the work I've done over these past years and wonder - who did that? Did I really bake all those things? Did I really write a book? And am I really writing another one? Yes!
It's a little surreal getting to do the thing you love every day. It's a blessing. I still can't believe it's only been a year since I quit my day job to pursue Sprinkle-Baking full time. I've never been more grateful for this life I have. I thank you for being part of it. ♡

This year's birthday cake definitely spreads the sprinkle-love, but it's no ordinary cake. It's made from one of my favorite sweets on the planet - Rice Krispie treats. I whipped up the biggest batch ever (ever, ever!) to make this triple-layer confection.
It's an easy birthday cake alternative, just make sure to grab your biggest stock pot for the task. I'll admit, it feels a little messy to make (buttering up hands to press the candy into cake pans) but in the end clean-up was a snap. And that's always a good thing!

To spread even more birthday cheer, I'm giving away a KitchenAid Artisan Stand Mixer in a color I've been crushing on - pistachio! Isn't it pretty? Sigh.

a Rafflecopter giveaway
*This giveaway is open worldwide.

This sprinkle cake is sure to bring a smile with its burst of color, and who doesn't love delicious vanilla-scented marshmallow Rice Krispie treats? It's really fun for something different birthday-wise. Hope you'll give it a try!
Rice Krispie Treat Sprinkle Cake
[click for printable version]
Source: Martha Stewart crispy rice recipe, SprinkleBakes frosting recipe
Yield: One 7-inch triple layer cake or one 9-inch double layer cake
Prep: 45 minutes, total time about 2 hours 30 minutes
10 tablespoons unsalted butter
12 cups/716 g mini marshmallows
2 teaspoons/12 g vanilla extract
13 1/2 ounce box Rice Krispies cereal
Pinch of salt
1 cup/ 220g of unsalted butter, softened
2 1/2 cups/ 275 g confectioners’ sugar - the finest you can find
(usually 10x)
2 teaspoons/ 12g. vanilla bean paste or vanilla extract
Milk or heavy cream, optional
2 cups/436g multicolor jimmies
Multicolor Sixlets candies (about 20 pieces) for decoration
Grease three 7-inch spring-form pans or two 9-inch pans
with butter; set aside.
For the Krispie treat portion, melt butter in a large pot
over low heat (I used my 20 quart lobster pot). Add marshmallow; stir until
melted. Add vanilla extract and stir to combine. Add Rice Krispies cereal to the marshmallow mixture. Stir
together with a large wooden spoon until all the cereal is coated with
marshmallow. Quickly press the cereal
into the pans with well-buttered hands. Use a length of wax paper or parchment paper on top of the Krispie mixture to pack it down into the pans. Refrigerate cakes until well chilled and set,
about 2 hours.
For the frosting, mix together the butter and
confectioners’ sugar in a stand mixer fitted with the whisk attachment. Begin mixing on low speed until crumbly, and
then increase to high and beat for 3 minutes.Add vanilla bean paste (or extract) and beat again for
another minute until light and fluffy. If
you find the buttercream is too stiff, you may add milk or heavy cream 1
tablespoon at a time until the mixture is spreading consistency.
Transfer 1/3 cup frosting to a piping bag fitted with a
large star tip; set aside.
Unmold Krispie treat cakes from the spring-form pans and
frost the tops of two cake layers. Stack layers with the unfrosted layer on top;
gently press layers together. Pour
jimmies into a baking pan with a lip and spread evenly. Frost the sides of the cake
with buttercream using an off-set spatula and roll the sides of the cake in the sprinkles. Hold
the stacked cake at each unfrosted end as you turn and roll. Stand cake upright in the baking pan. Frost
top of cake and sprinkle on jimmies. Press handfuls of jimmies into the top of
the cake to coat completely. Allow the excess to fall back into the baking pan.
Transfer the cake to a cake stand or serving platter
using a large metal spatula or cake lifter.
Pipe stars along the top edge of the cake with the reserved frosting in
the piping bag. Place a Sixlets candy in
the center of each piped star. If
birthday candles are being used, pipe more frosting onto the center of the cake
and stand candles upright in the frosting. Let cake come to room temperature before cutting. Use a large chef's knife to cut the cake into slices.

September 25, 2013
Chocolate Chip Cookie Dough Caramel Apples

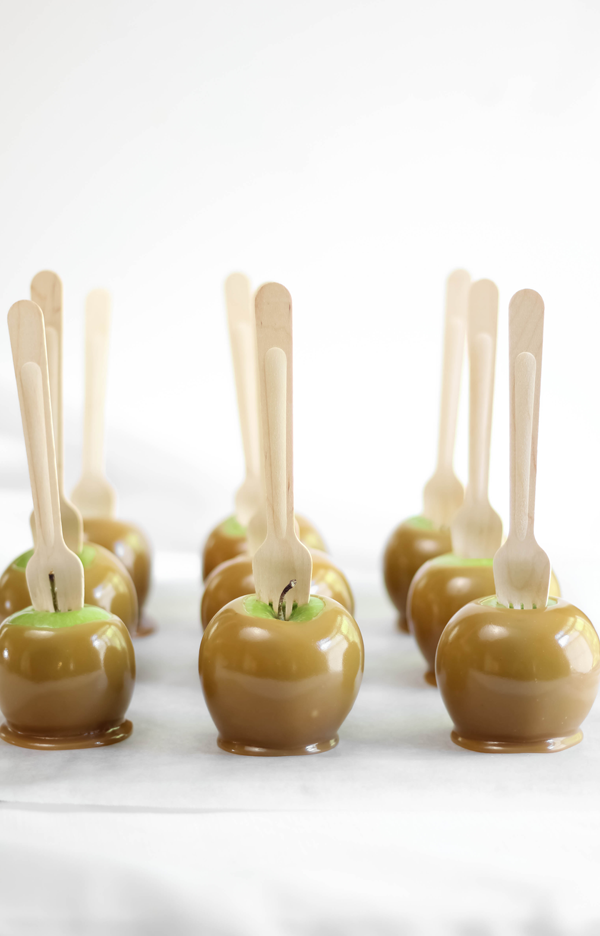
Lately my home has been filled with the scent of warm vanilla and cooked sugar. I've been making every incarnation of caramel I can think of. I can't help it. It's something I love to enjoy during the fall months. I've been leaving a trail of crumpled wax paper squares everywhere I go. Why do I even bother wrapping homemade caramels, honestly?!
This is a caramel recipe that I've been dying to share. It makes the glossiest, most perfect caramel apples I've ever seen! And, as if that weren't enough to soothe a fierce sweet tooth, I've added a layer of chocolate chip cookie dough.
I regret nothing.


Begin by rolling the cookie dough between sheets of wax paper. Chill the dough then cut into strips. To get a clean line when cutting, don't drag your knife through the dough - the chips will drag and make a very ragged edge. Instead, cut strait down with a sharp knife. This will cut through the chocolate chips and make a more precise edge.
Next, place the dough onto the caramel apple and press it on firmly. The dough will spread around the apple as you press. Tuck the excess dough under the apple.
Serve in cute cupcake papers. Refrigerate leftovers - that's it!

Is it just me, or do these guys kinda look like they're wearing leopard print?
Even if you're not starry-eyed over the cookie dough coating, I hope you'll try the caramel recipe for covering apples. It's one of the tastiest I've tried!
Chocolate Chip Cookie Dough-Covered Caramel Apples
[click for printable version]
Source: SprinkleBakes/ Vintage church fundraiser cookbook
Yield: 12-15 apples
Prep: 45 minutes, total 2 hours
Caramel apples
12 small apples
Ice pop sticks or Birchware forks (shown)
1 can/ 14 oz. sweetened condensed milk (not evaporated milk, these are sometimes confused)
2/3 cup/ 148g. heavy whipping cream
1 cup/ 310g. light corn syrup
1 cup/ 204g. dark brown sugar, lightly packed
1 cup/ 210g. granulated sugar
1/2 cup/ 113g. unsalted butter
1 tsp./ 6g. vanilla extract
Cookie dough
3 cups/ 418g. all-purpose flour
3/4 tsp./ 3g salt
1 1/4 cups/ 273g. light brown sugar, packed
1 cup/ 226g. unsalted butter, melted and cooled
1 1/4 tsp./ 7g. vanilla extract
1 cup/ 174g. mini chocolate chips
1/4 cup/ 52g. whole milk
Place a large sheet of parchment paper on a work surface, or grease a large jelly roll pan with shortening. Set aside.
Clean and dry the apples well. Remove the apple stems and carefully punch a guide hole for the ice pop sticks with a knife or skewer. Insert sticks into guide holes. Lift each apple to make sure each can securely be picked up.
For the caramel, stir together the condensed milk and heavy cream in a 4-cup measure with a spout. Combine corn syrup, dark brown sugar and granulated sugar in a large pot. Bring to a bubble over high heat. When mixture boils, add butter. Stir until butter is melted and reduce heat to medium-high. Add milk mixture in a small, steady stream while whisking continually so that the caramel keeps a slight boil. Reduce heat to medium and attach a candy thermometer. Bring to 250F. Remove from heat and stir in vanilla extract. Wait until bubbling subsides and the caramel has a smooth, glassy surface that is bubble-free. Tilt pan slightly so the caramel pools to one side. Dip apples and place them on parchment. Allow them to set completely, about 1 hour.
For the cookie dough, stir together flour, salt, brown sugar and granulated sugar in a large mixing bowl. Pour in butter and vanilla extract. Mix until a dry dough forms. Add chocolate chips and mix on lowest speed. When chocolate chips are evenly dispersed, add milk 1 tablespoon at a time with machine on low speed. Turn the cookie dough out onto a large sheet of wax paper. Top with a same-sized piece of wax paper and roll dough to 1/4-inch (or as thinly as the chocolate chips will allow). Chill the dough for 20 minutes then cut into strips. To get a clean line when cutting, don't drag your knife through the dough - the chips will drag and make a very ragged edge. Instead, cut strait down with a sharp knife. This will cut through the chocolate chips and make a more precise edge.
Next, place the dough onto the caramel apple and press it on firmly. The dough will spread around the apple as you press. Tuck the excess dough under the apple. Serve in cute muffin-sized cupcake papers. Refrigerate leftovers.
Note: the cookie dough application is a very forgiving process. If your dough tears or crumbles, simply pick up dough pieces and patch them onto the apple. The apples can be perfectly and seamlessly smoothed with your hands/fingers.
September 12, 2013
Apple Pie Caramels for the Etsy Blog

Okay. So maybe I told a little white lie in my last post about holding off on fall baking until my return from the beach (we're still here, and loving every minute!). In my defense, this is candy (which isn't exactly baking, right?) and it's so darn easy to make I had no trouble whipping it up before we scooted off to the Carolinas.
These caramels are bursting with baked apple flavor and truly evoke the essence of fall. Get all the details with step-by-step instructions HERE on the Etsy blog!
September 6, 2013
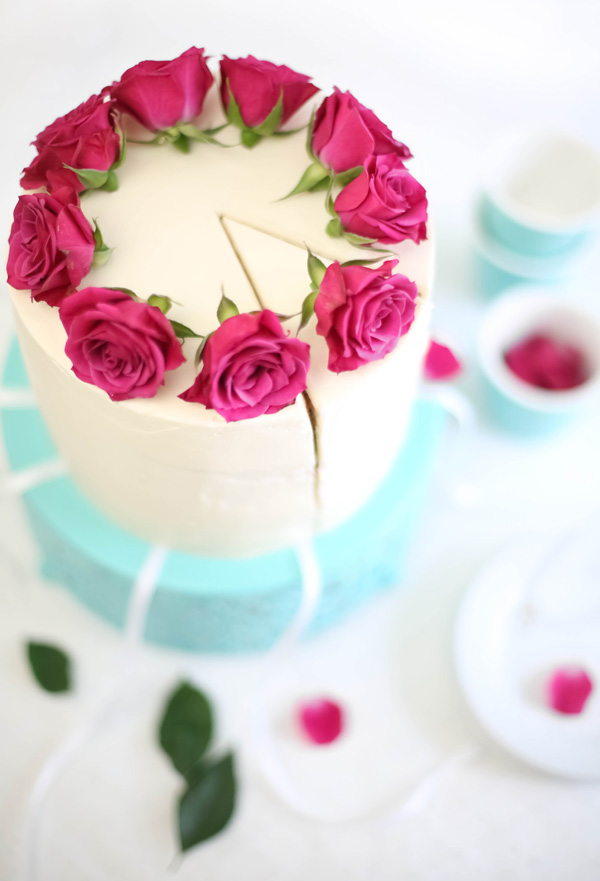
Raspberry-Champagne Layer Cake with Victorian Cake Pulls
Sometimes the gravity of how fast time passes hits me all at once. It knocks me flat. I find myself lying on the floor eye-to-eye with Churro-the-pug. "Did you have a good summer?" I ask. "Did you stop to smell the roses?" He probably did (he spends a good deal of time outside sniffing things), but I fell a little short of the task. Now summer is almost over and I'm not quite ready for it to end. That's why we're packing our things (pups included) and heading to the ocean tomorrow. We're grabbing on to the very last bit of summer with both hands!
Although I'm itching to get started on fall baking, I've decided to hold off until my return home. For now, I'm sticking to what feels right, and that's champagne cake layers filled with tangy raspberry Swiss meringue buttercream. I found some gorgeous raspberry colored roses at the market and that sealed the deal. This cake was meant to be, I tell ya!

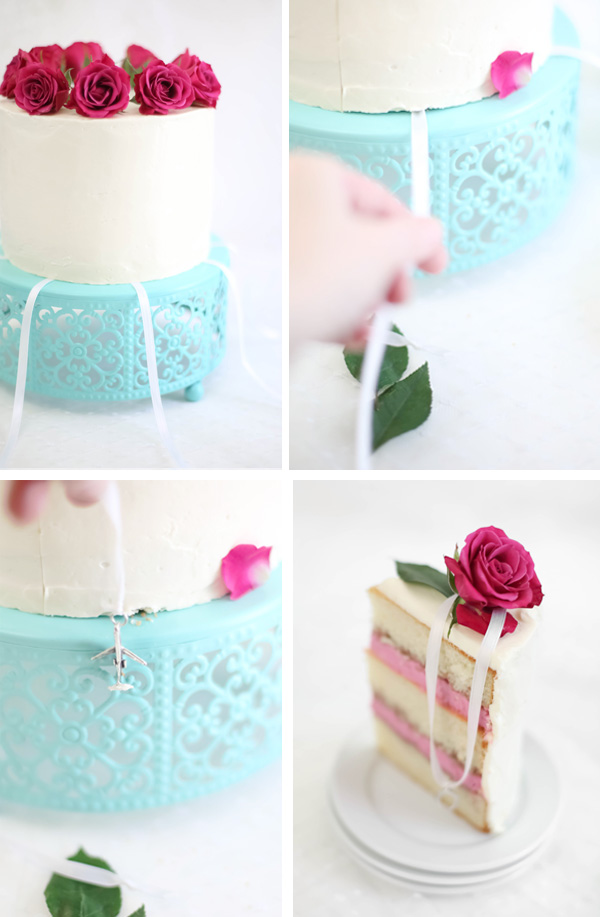
Since this cake is celebratory in flavor, I decided to go ahead and use the Victorian cake pulls I've been saving for a bridal-themed post. Have you heard of cake pulls? They're little sterling silver charms attached to lengths of ribbon. The charms are placed under the cake (by the baker) with only the ribbon visible, then the cake is frosted and decorated. Party guests (usually a group of bridesmaids) each choose a ribbon to pull before the cake is cut. The assorted charms have different meanings, so that brings a bit of fortune telling-novelty to the party.


I've never used cake pulls before, so I'd hoped to find some instruction on how to apply them to the cake. Information on this is extremely limited (online, at least), so I had to make up my own method. I taped a piece of baker's acetate to the center of a cake stand and placed the charms underneath the clear plastic. I dotted the underside of a cake layer with icing and pressed it down onto the acetate and cake stand. To frost the cake neatly (and not get frosting all over the ribbon) I put strips of wax paper just under the cake layer and over the ribbon. I filled and frosted the cake as usual. After a good chill in the refrigerator the wax paper strips pulled away neatly.
If you can't find baker's acetate you could use a small corrugated cake board from the craft store, just be sure to anchor it to the cake stand. You don't want the cake sliding around on its base when the charms are pulled.


If you're looking to try the cake pulls for yourself, you can find them online at Sterling Trends. They are sold in sets and the shop has a nice selection of individual charms, too.
This cake is my champagne toast to summer's end, and you can be sure that I'm packing a few of slices for the road. If you'd like to see what I'm up to at the ocean you can follow me here on Instagram!
Raspberry and Champagne Layer Cake
[click for printable version]
Yield: One 9-inch double layer cake or one 7-inch triple layer cake
Source: adapted from Booze Cakes and SprinkleBakes
Prep: 1 hour 30 minutes, total 3 hours
The filling in this cake gets its tangy raspberry flavor from seedless raspberry jam and Framboise liqueur. The champagne cake layers have a dense, moist crumb that's loaded with fruity flavor.
Champagne cake layers
3 cups/443g all purpose flour
3 tsp./13g baking powder
1/2 tsp/ 14g salt
1 cup/226g unsalted butter, softened
2 cups/ 214g granulated sugar
6 egg whites
2 cups/15.4 oz champagne or sparkling white wine
Frosting/filling
6 egg whites
1 cup/118g sugar
Pinch of salt
1 pound/4 US sticks unsalted butter, cubed, at room temperature
2 teaspoons/8g vanilla extract
1/4 cup/76g red seedless raspberry jam, room temperature
2 tablespoons/ 70g Framboise (raspberry) liqueur, room temperature
Wilton gel food color "Rose"
Preheat oven to 350F. Grease and flour two 9-inch round cake pans (or three 7-inch as I did); set aside.
Whisk together flour, baking powder and salt in a large bowl. In a separate mixing bowl or the bowl of a standing mixer, beat together the unsalted butter and sugar. Add egg whites one at a time and beat well after each addition.
Beat in flour mixture and champagne mixture in three additions, beginning and ending with flour. Scrape down bowl edges with a rubber spatula and mix again briefly. Divide batter between prepared pans. Bake for 30-35 minutes or until a toothpick tester comes out clean. Let cakes cool in pans for a few minutes before turning out onto a wire rack. Let cool completely before frosting.
For the frosting, whisk together the egg whites, sugar, and salt in a large heatproof bowl. Set over a pot of simmering water and whisk until the mixture is hot to the touch and the sugar has dissolved.
Transfer the mixture to the bowl of a stand mixer fitted with the whisk attachment.
Beat on low speed for 2 minutes. Increase to medium-high until stiff peaks are formed.
Continue beating at medium-high speed until the mixture is fluffy and has cooled (the mixing bowl should feel cool to the touch).
Turn the mixer off and switch from the whisk attachment to the paddle. Turn the mixer on medium-low and add the butter, a few cubes at a time, beating until well incorporated before the next addition. The egg whites will deflate and thin with the first few additions – don’t let this discourage you – keep going. It may also look curdled, but don’t fret. Beat on high speed when all the butter has been added. The mixture will thicken and become smooth after several minutes of beating. Beat in the vanilla extract.
Transfer the frosting to a bowl, and return 1 1/2 cups of frosting to the bowl of the stand mixer. Beat in the raspberry jam. Gradually beat in the raspberry liqueur a little at a time. Beat in a little rose food color until a consistent color is achieved Fill cooled cakes with the raspberry Swiss buttercream and coat cake in a thin crumb coat of the vanilla frosting. Chill until set. Apply a final thick layer of vanilla Swiss meringue buttercream using a large off-set spatula. Store cake in refrigerator. Bring to room temperature before serving.
Fresh organic roses may be added to the top of the cake for decoration just before serving.
Just one more thing. I found the cake stand at Home Goods.
August 30, 2013
Allsorts Sugar Cookies


I guess by now you know I'm absolutely crazy about Allsorts candies. I used them as a colorful topping for this cake when I celebrated my first year of blogging, and then recently on top of these mini cakes. I love their stripey graphic appeal and they're so full of happy color, I feel I should designate them as the new Sprinkle Bakes mascot.
I came up with the idea for these sugar cookies when I was developing an all-in-one cookie dough recipe for an upcoming holiday project. I started playing around with layering techniques and ended up with a stacked, stripey, slice-and-bake chocolate and vanilla dough. Just a trim here and a slice there - voila! An Allsorts twin!

These are pretty simple to make, and most of the real labor is in dividing and coloring the dough. At the end you'll probably have 12+ dozen bite-size cookies. That sounds like a lot but since the cookies are so small they don't take too much time to bake. You can also fit about 50 on a standard baking sheet.

At first I cut the stacked dough into squares. Some cookies baked up fine, others wilted and leaned sideways. I cut them a little thinner and discovered they turn out best when cut to 1/4-inch width (as above).
I tinted the white portion of dough with white liquid food color which you can find here
 . You could also leave the dough untinted. It will still have a nice contrast without white food color. If you'd like these to have an authentic Allsorts flavor, add a few drops of anise oil
 to the batter. If you're not a fan of licorice flavor then stay the normal sugar cookie course with vanilla extract.

I used the sugar cookie dough recipes from the SprinkleBakes cookbook for these cookies. The white portion is the vanilla dough (or anise if you prefer), and the black stripe is the chocolate dough variation. I knew that without any chemical leaven it would hold it's shape well during baking, especially when chilled beforehand. I did change one thing though. I swapped the all-purpose flour for bread flour. Sometimes cookies will spread if over-beaten, and with all the mixing-in of food color in this recipe, the bread flour held it's shape best during baking. It also makes these little buttery morsels chewy, which is quite appropriate. I think.
Allsorts Sugar Cookies
[click for printable version]
Yield: I lost count. At least 12 dozen. Probably more.
Source: Adapted from the SprinkleBakes cookbook
Prep 1 hour, about 4 hours total with chilling
Vanilla dough
1 cup (1/2 lb) unsalted butter, softened
1 cup/ 200g granulated sugar
1 egg
1 tsp./ 5g vanilla extract or a few drops of anise oil/flavoring
3 cups/ 420g bread flour
Pinch of salt
Green liquid food color
Pink liquid food color
Yellow liquid food color
White liquid food color
Corn syrup
Multicolor or blue nonpareils
In a stand mixer fitted with the paddle attachment, mix
the butter and sugar together until just incorporated.
Add the egg and vanilla extract (or anise oil). Mix again on low speed,
stopping to scrape down the sides of the bowl intermittently as needed.
In a medium bowl, whisk together the bread flour and salt. Add to the butter and egg mixture. Mix on low speed until a dough is formed and
there are no longer any streaks of butter in the mixing bowl. The dough will
clump around the paddle attachment while being mixed. If your mixture does not
come together and is crumbly, add ice cold water 1 tbsp. at a time until the
dough clumps. Divide and tint dough with a few drops of food color into the following colors - green, pink, yellow. If using the white food color, place a 10 oz. portion of dough (about 1 cup) into the mixing bowl with 2 tablespoons of the white color. Mix well; add additional bread flour 1 tablespoon at a time until dough is stiff and not sticky. You may choose to leave the white portion untinted if desired.

Turn out each dough onto a sheet of wax paper and top with
a second sheet. Roll dough into an
oblong disc between the papers with a rolling pin. Transfer dough - wax paper and all - to a
large cookie sheet. Wrap the dough
tightly onto the cookie sheet with plastic wrap and refrigerate for 1 hour.
Make the chocolate dough variation. Repeat all recipe ingredients except replace 1 cup bread flour with 1 cup unsweetened cocoa powder. Omit dividing/tinting instructions for this dough. Continue with rolling/chilling instructions as before.
Remove top sheet of wax paper from the chilled dough(s) and roll each dough a little
thinner. It should not be sticky. Roll dough to approximately ¼-inch thickness.
To stack dough into Allsorts colors, cut a strait edge on one of the tinted doughs (green, yellow, pink). Cut a 3-inch wide long strip of chocolate dough, place on top of the tinted dough with the strait edges lining up evenly. Top with a same-size length of white (or plain) dough (see picture below). Trim away excess tinted dough and place stacked strip on a parchment or Silpat-lined baking sheet. Repeat stacking with remaining dough colors. We'll be freezing these, so make room in your freezer for a cookie sheet or two.

To make the round Allsorts, take a scrap piece of chocolate dough and roll into a long rope. Place onto a piece of pink dough that has been rolled to 1/4-inch thickness. Roll pink dough around chocolate rope. Trim away excess pink dough. Place roll on the lined baking sheet with the other stacks of dough.

For the nonpareil covered Allsorts, make a long rope of any leftover dough and cut into round buttons. Place these on a baking sheet. Place all dough stacks, rounds and buttons on the cookie sheet(s) in the freezer for 30 minutes or until very firm. When dough is chilled, cut stacks with a sharp non-serrated knife into 1x1/2-inch pieces with a thickness of 1/4-inch. This doesn't have to be perfect, and you can make cookies bigger or smaller to your liking - have fun with it! Cut the pink roll into coins 1/4 to 1/2-inch thickness.

Freeze the cut pieces for 30 minutes. This will help
the cookies maintain a crisp shape during baking.
Preheat the oven to 350°F.
Bake the cookies for about 8 minutes. Do not overcook, they should stay pale to keep their vibrant colors.
Let cool on the baking sheet for 5 minutes. Transfer to a
cooling rack. Roll plain buttons in corn syrup and then in nonpareils. Allow nonpareil-covered cookies to dry/set for 30 minutes.
Package cookies in cellophane goodie bags or other clear packaging.
August 22, 2013
Blackberry Cobbler Mugs


My friend Christen and I recently went blackberry picking on a sweltering summer day. We made the best of it though, finding shade where we could and admiring ancient-looking trees on Beauchene's Berry Farm. It's a beautiful piece of land that's just a stone's throw from my house. They have neatly groomed rows of vines and that makes for the easiest pickin'!
I love to make cobbler with freshly foraged berries (second only to muffins). My favorite way to serve cobbler is in individual portions, baked in little heat-proof mugs with buttermilk drop biscuits for crust.


Here's where I differ from a lot of folks on cobbler-making. When it comes to biscuit-topped cobblers, I like to partially bake my biscuits on a baking sheet until they are just set but still pale. I take them out of the oven, brush them well with melted butter, then place them on top of the cobbler filling and bake until the biscuits turn golden.
I'm pretty picky when it comes to biscuits, and I just can't abide a doughy biscuit bottom- which can happen when the biscuit dough is dropped on top of the filling and baked. Some people prefer that doughy dumpling texture -and they prefer to make it all in one big casserole dish - so I've provided the traditional preparation instructions in addition to my own method.

These little mugs of cobbler make me feel like I've had an authentic summer! They're bursting with sweetness and the buttermilk biscuit does a good job of soaking up that beautiful magenta berry sauce. I'd urge you to try them even if you do your berry picking at the grocery store.
Blackberry Cobbler Mugs
[click for printable version]
Source: Sprinkle Bakes original recipe
Yield: eight servings when served in 6 oz. mugs
Prep: about 30 minutes total
I bake these individual cobblers in mugs, but you could also use 6 oz. ramekins. I've included instructions for a 9x13 casserole preparation as well. If you're using fresh blackberries, keep a few to the side to garnish the mugs. It makes them look nice since the berries cook down and lose their shape.
Cobbler filling
1 cup/200g granulated white sugar
2 tablespoons/17g cornstarch
8 cups/ 2 lbs fresh blackberries (or frozen, but thaw them before using)
1/4 cup/61g water
2 teaspoons/12g lemon juice
Drop buttermilk biscuits
1 cup/158g all purpose flour
2 teaspoons/8g baking powder
1/8 teaspoon/.6g baking soda
1/4 teaspoon/2g salt
4 tablespoons/61g unsalted butter, cubed and kept cold
1/2 cup/115g buttermilk, cold
1 tablespoon/20g unsalted butter, melted
Heather's method
Line a baking sheet with a piece of parchment paper. Preheat oven to 400F.
For the filling, place sugar and cornstarch in a large saucepan. Stir in blackberries, water and lemon juice. Place saucepan over medium-low heat and let cook while you prepare the drop biscuits.
For the biscuits, whisk together flour, baking powder, soda and salt in a medium mixing bowl. Cut the butter into the flour mixture using a pastry blender until fine crumbs form. Add the buttermilk and stir until a wet dough forms. If biscuit dough feels dry, add 1-2 additional tablespoons of buttermilk.
Drop biscuit dough on the prepared baking sheet in heaping tablespoons, you should have eight or nine drop biscuits when all the dough is used.
Bake for 12 minutes, or until biscuits are set but still pale. Remove from the oven and brush with melted butter.
Stir the berry filling and increase heat to medium-high. When mixture bubbles, remove from heat and divide filling evenly between eight 6 oz. mugs (about 1/2 cup filling in each mug). Place mugs on a large baking sheet with a lip (in case the filling bubbles out like mine did) and place a biscuit on top of the filling in each mug. Bake at 400F for an additional 10-12 minutes, or until biscuits are golden brown.
Serve warm with whipped cream or vanilla ice cream.
Traditional method
Prepare berry filling as directed above. Pour filling into a greased casserole dish (9x13-inch). Double biscuit recipe and prepare dough as directed but do not bake on a baking sheet. Drop dough by the spoonfuls over the hot berry mixture in the casserole dish. Bake at 400F for 20-25 minutes or until biscuits are golden brown.

August 16, 2013
Black Pepper Caramel Chocolates (Little Volcanoes)


I recently received the book The Elements of Dessert
 as a birthday gift, and I've found it to be a goldmine of inspiration. At first glance I knew the recipes would be aspirational for the home baker. There are formulas and techniques therein that I may never use, (remember my feelings re: molecular gastronomy?) but the desserts are so utterly gorgeous, so playful. It made me seek out answers to new questions (pre-desserts? anhydrous butter? douglas fir milk?) and better, it made me want to reach for something outside my comfort zone.
One thing used throughout the book is chocolate texture spray. Professional pastry chefs use this mix of cocoa butter, chocolate and pigment to create the most beautiful velvety texture on confections. I fell in love. I had to try it, but alas, during my research and forum-stalking I decided that I wasn't quite ready to commit to buying a paint sprayer and air compressor for the task.

So, I found the next best thing. Velvet texture in a can! It's so much fun to use, but it is a little pricey - anywhere from $18-$38 per container depending on where you shop. Due to expense, the paint sprayer may be worth the investment. It's likely in my future because I'm head-over-heels for the aesthetic.

A few things to remember if you try the spray for yourself - 1) The dessert must be frozen before you cover it with the texture. 2) Use a large cardboard box in which to spray your dessert. Turn the box on its side with the open end facing toward you. Place cellophane tape over all holes and crevices in the box. As you can see above, the stuff goes everywhere. 3) A lazy susan will help with 360-degree turning so you can easily spray the entire surface of the dessert(s). 4) Consider covering the floor in front of the box with newspaper. Even though I felt sure my spray was contained, my shoe found a cocoa butter slick just below the box opening.

A little less than half the can was used for two dozen chocolates. A good bit of the texture fell on the plate the chocolates were sitting on (I cautiously sprayed 6 at a time), so next time I think I'll use it on a larger dessert like cheesecake or mousse cake - something with a little more surface area. That said, these were so much fun to make! The red spray is a nod to the heat inside, and I placed a little "blaze" of gold leaf on top.

Now, as far as chocolate bon-bons are concerned, caramel-filled is my favorite. If you're a caramel-lover like me, then I urge you to try black pepper caramel (even if it's just on top of ice cream!). It's zingy without being too hot or overly spicy. The caramel firms with refrigeration, but at room temperature it becomes soft and will spill out of the chocolate shell when bitten.
You'll need a mold -like this inexpensive one
 from FreshWare- and a pound of chocolate for the shells. I suggest using milk chocolate for this particular caramel filling. Semi/bittersweet and dark chocolates may mask the subtlety of the black pepper.
(Product sources listed below recipe.)
Black Pepper Caramel-Filled Chocolates
[click for printable recipe]
Source: Sprinkle Bakes original recipe
Yield: 24 chocolates, cavity size: 0.4-inch x 1.4-inch, 384 ml
Prep: 3 hours
It may not be absolutely necessary to temper the
chocolate for these bon-bons if using the texture spray, but I really love the
snap tempered chocolate gives when you bite into it. It also yields a thinner shell, which makes
more room for all that glorious caramel. Below you’ll find the tempering method
from the SprinkleBakes book.
Tempering
1 pound bar or block milk chocolate, finely chopped
Accurate chocolate or instant-read thermometer
Double boiler or a bowl fitted on top of a saucepan
Rubber spatula
Chocolate mold or silicone candy mold
Electric heating pad (optional)
Place two-thirds of the chocolate in a metal bowl and place
the bowl over a saucepan of barely simmering water. The water should be gently simmering,
not boiling, and the bottom of the metal bowl should not touch the water. Avoid
getting water into the chocolate as you melt it over the simmering water. One
accidental drop and the chocolate will seize—that is, turn grainy and harden in
a chunky mass.
Insert a candy or chocolate thermometer into the
chocolate. Carefully fold the chocolate with a rubber spatula to ensure even
heating as it melts.
Bring the chocolate to 110°F (120°F for semisweet and
dark). Do not let it exceed this temperature, or the chocolate will bloom. When
chocolate blooms, the butterfat rises to the surface as the chocolate
solidifies, creating an unsightly white coating.
Remove the metal bowl from the simmering water and wipe
the condensation from the bottom of the bowl with a dishtowel.
Add the remaining chocolate a little at a time. Stir,
waiting until each addition is melted before adding the next. Continue adding
the chocolate, stirring until smooth.
When the chocolate’s temperature drops to 82°F, return the
metal bowl to the simmering water and bring the temperature to 88°F. This will
only take 5-10 seconds, so move the bowl quickly from the bain marie and fold
well with the rubber spatula before gauging the final temperature.
Pour chocolate into the cavities in the silicone mold.
Place the mold on a baking sheet and rap on a work surface one or two times to
release trapped air bubbles. Turn mold over and pour excess chocolate back into
the metal bowl. Scrape excess chocolate off the flat surface of the mold with a
large off-set spatula. Allow chocolate shells to set at room temperature. Leftover chocolate can be kept warm with a
heating pad placed under the metal bowl and set to “low”, otherwise, reheating
over the simmering water will be necessary. Be sure to reserve additional
chocolate for closing the caramel-filled shells.
Black pepper caramel
I use this caramel as a filling for chocolates, but it's also good poured over vanilla ice cream.
1 cup/200g granulated sugar
1/2 cup/ 113g unsalted butter, cubed
1/2 cup/ 111g heavy cream
1 teaspoon/ 5g vanilla extract
1/4-1/2 teaspoon/ 3-5g coarsely ground black pepper
Melt the sugar over medium-high heat in a large pot. Gently
prod sugar with a wooden spoon as it melts, and cook until it becomes a deep
amber color.
Add the butter and stir it in until melted.
Pour in the heavy cream (the mixture will foam) and whisk
until the mixture becomes a smooth sauce. Note: If lumps form, keep stirring
over gentle heat until they have melted.
Remove from heat and stir in vanilla extract. Stir in
black pepper. Transfer to a heat-proof glass bowl for cooling. Allow caramel to cool until barely warm but
still pourable.
Fill chocolate cavities with caramel. Gently reheat
leftover chocolate (over a bain marie as before if you did not use a heating
pad) and pour over filled caramels. Scrape excess chocolate off the surface of
the mold with a large off-set spatula. Allow chocolate to stand until set, or
if using chocolate velvet texture spray, place mold in the freezer. Unmold chocolates and garnish as desired. If
using texture spray, follow directions on the can and see the above blog post
for my spraying method.
Store caramel-filled chocolates in the refrigerator.
Freshware 24-Cavity Mini Volcano Chocolate Silicone Mold
The Elements of Dessert by Francisco J. Migoya
Edible Gold Leaf for Cakes & Chocolates 25 Leaves 23kt

Chocolate Velvet Spray 150 ml - Red

Crescendo Velvet Texture Spray Set (SprinkleBakes tested and approved!)
Taylor 1470 Digital Cooking Thermometer/Timer

August 9, 2013
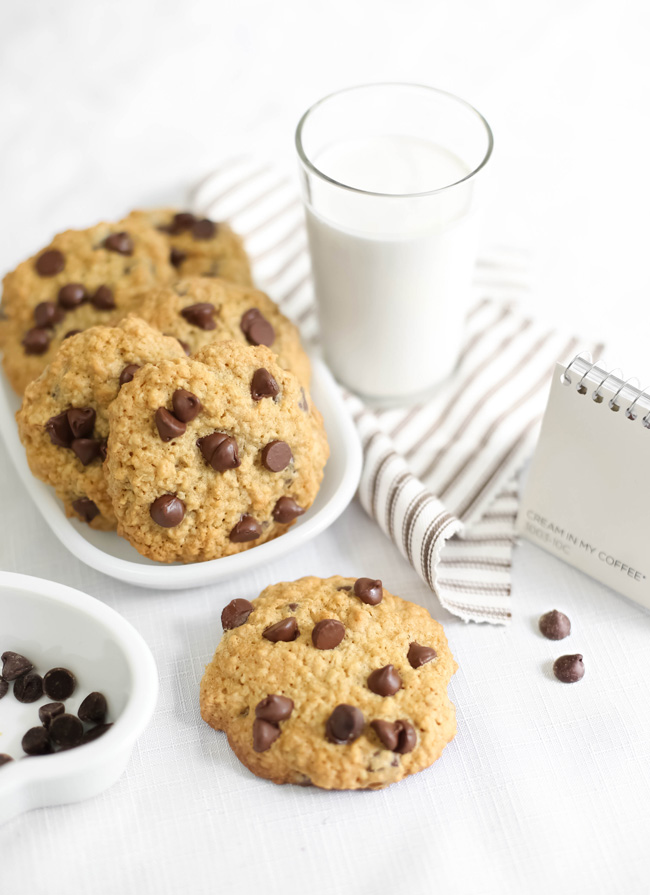
Puffy Oatmeal Chocolate Chip Cookies
Today my honey and I are celebrating 10 years of marriage! It's hard to believe that a decade has passed since I married my polar opposite, but somehow this life we've made together works.
Over the years I've learned to appreciate his laser focus on safety and practical footwear. He's learned to accept my cookbook sprawl and turbulence in the kitchen. While there are some things we'll never agree on (best to-go coffee, keychain flotsam [I collect, he hates], who loves our dogs more) there are some very strong and present alikes that keep our hearts tied together.
One of those things - cookies. We both agree they're super important for a happy marriage. His favorite cookie in all the land is homemade oatmeal-chocolate chip, so this post is for him.
His/Hers


Since I'm all about getting creative with cookie add-ins, I made these two ways. My version has cashews, soft caramel and a sprinkling of fleur de sel. I was pleasantly surprised when I saw Mark sampling my souped-up version. He's usually such a purist, but he loves the cashew-caramel version, too!

These cookies are buttery, vanilla-scented and slightly puffy with crisp edges. If you decide to go the cashew-caramel route, I suggest using block soft caramel, like this kind from King Arthur Flour. It spreads and pools during baking and it remains soft and chewy after the cookies are cooled.

So, there you have it. One of the great secrets to a happy marriage. I know it's not easy living with me, especially during cookbook-writing phase. And sometimes I just wish hubby would stop popping his toes repeatedly when I'm trying to read at night. But if that's the worst of it, we'll be right on track for 10 more years.
At least.
I love you, husband.
Puffy Oatmeal Chocolate Chip Cookies
[click for printable version]
Source: adapted from Quaker Oats
Yield: 22-24 cookies
Prep: 30 minutes, total time about 55 minutes
1/2 cup plus 6 tablespoons/197g unsalted butter, softened
3/4 cup/156g light brown sugar, tightly packed
1/2 cup/100g granulated white sugar
2 large eggs
1 tsp/5g vanilla extract
1 1/2 cups/210g all-purpose flour
1 teaspoon/7g baking soda
1/2 teaspoon/4g fine sea salt
3 cups/242g quick cooking oats
1 cup/177g semisweet chocolate chips
Additional semisweet chips, up to 1/2 cup/88g
Heat oven to 350F. Line two baking sheets (or four, if you have them) with parchment paper.
In a large bowl, beat butter and sugars together at medium speed with an electric hand mixer until creamy.
Add eggs and vanilla; beat until combined.
In a medium bowl, whisk together flour, baking soda and salt. Add to butter mixture and beat until just combined.
Add oats and chocolate chips. Mix on low speed until oats are incorporated and chips are evenly dispersed.
Place one tablespoon of dough on a lined baking sheet and then place another tablespoon directly on top (this will be approximately 26g total). Stud dough with additional chocolate chips. Repeat process, spacing cookies 3-inches apart and place no more than 6 cookies total on each baking sheet.
Bake for 15 minutes or until light golden brown. Allow cookies to cool on pans for 5 minutes before transferring to a wire rack.
Cashew-caramel variation
1 dough recipe Puffy Oatmeal-Chocoalte Chip Cookies (above)
100g block soft caramel cut into 1/2-inch pieces
3 oz. whole unsalted roasted cashews
Fleur de sel
Make cookie batter and place on baking sheets as directed. Stud tops of cookies with caramel pieces and cashews in addition to the 1/2 cup chocolate chips. Bake for 12-15 minutes and sprinkle with pinches of fleur de sel directly after removing from the oven. Cool as previously directed.