
Heather Baird's Blog, page 77
November 20, 2014
Classic Apple Pie


Thanksgiving day preparations are in full swing around these parts, and the Mister and I have more dinner invites than we can shake a stick at. My contribution to the feast(s) will likely be dessert, so I figure now is a great time to brush up on my pie-making technique. It's also feels good to add a classic recipe to the blog roster.
Is there anything better than buttery, cinnamon-kissed, classic apple pie? Maybe apple pie à la mode? Apple buttermilk pie? It's hard to say.

I'd like to tell you that I slaved over the leaf cut-out crust, but it's really quick work when you use these little gizmos. If you have experience cutting out sugar cookies, then you can certainly make this fancied-up pie crust. It's all a matter of layering the cut-outs near the edge of the pie, and working your way inward.
Making pie crust in the food processor is a snap, but if you consider it a chore then you can certainly substitute a ready-made crust. If you opt for the cut-outs then you'll need at least three refrigerated pie crusts (that's 1 1/2 boxes of refrigerated roll-out dough). That's a good thing to keep in mind when making your shopping list.

You'll need three large apples for this pie. I went for the largest, firmest apples I could find, which turned out to be Gala apples at my grocery store. Granny Smith is also an excellent choice for pies.
There are many ways to vary this pie, but I like it best with a dollop of whipped cream or vanilla ice cream. A drizzle of salted caramel never hurt anything, either.
Classic Apple Pie
[click for printable version]
Yields one 9-inch pie
Pie crust (yields 2 crusts)2 1/2 cups/310 g all-purpose flour, plus more for dusting1 teaspoon salt1 teaspoon sugar16 tablespoons/226 g cold unsalted butter, cubed4 tablespoons ice water, additional as needed
In a food processor combine the flour, salt, and sugar; pulse several times to combine. Add butter and pulse until mixture resembles coarse meal, with just a few pea-size pieces remaining.Remove the lid and sprinkle 2 tablespoons ice water over the mixture. Re-attach lid and pulse until the dough is crumbly but holds together when squeezed with fingers (if needed, add up to 2 tablespoons more ice water, a little at a time). Turn dough out onto a work surface and divide in two equal pieces. Form each piece of dough into a 3/4-inch-thick disk. Wrap tightly in plastic, and refrigerate until firm, at least 1 hour.Unwrap dough; place on a floured surface. Flour a rolling pin and roll the dough to a 14-inch round. Roll the dough onto the rolling pin and carefully unroll over a 9-inch pie plate. Gently fit into bottom and up sides of plate.
Trim overhang to 1 inch; fold overhang under itself. Re-roll the scraps into one long piece and cut into three even strands (use some of the reserved pie dough if you don’t have enough scrap dough); braid the strands together. Brush the edge of the fitted pie crust with water and lay the braid on top of the damp edge. Press gently to adhere. Refrigerate while you prepare the filling.

Pie filling1/2 cup/100 g sugar1/2 cup/65 g all-purpose flour1/2 teaspoon ground cinnamon1/4 teaspoon ground nutmeg5 cups thinly sliced peeled apples (about 3 large apples)1 tablespoon unsalted butterEgg wash: 1 egg beaten with 1 tablespoon water
Preheat the oven to 425 F. Stir together the sugar, flour, cinnamon and nutmeg in a large bowl. Add the sliced apples and toss to coat. Pour the mixture into the prepared pie crust and dot with butter. Return to the refrigerator.
Remove the second pie crust from the refrigerator and roll to 1/4-inch thickness. Using a small cookie cutter (1 1/2 to 2-inch) cut as many shapes as you can from the dough. Re-roll crust and cut out more shapes; repeat until all the dough is used. Remove the pie from the refrigerator and layer the shapes on top of the pie starting at the outer edge and working inward. Using a pastry brush, lightly cover the entire crust with egg wash.Bake 30 to 35 minutes or until the crust is golden brown and the juice is bubbling.
Note: If you find the edge of the pie crust is becoming too brown, cover it gently with aluminum foil or a pie crust shield.


November 18, 2014
Adorable Acorn Cookies for the Etsy Blog!

Hi friends! I hope everyone is having a lovely autumn and baking up a storm. I've been a busy baker myself, finding inspiration in steaming mugs of cider, leathery fallen leaves and watching scant snow flurries dance around in the porch light.
I love finding inspiration close to home, and these acorn cookies were inspired by a hop over the fence and a walk through the woods behind our house. They're super easy to make and so season-appropriate. If you have little ones, they'll love helping you add "caps" to the acorns.
You can find the recipe along with step-by-step instructions here on the Etsy blog.


November 13, 2014
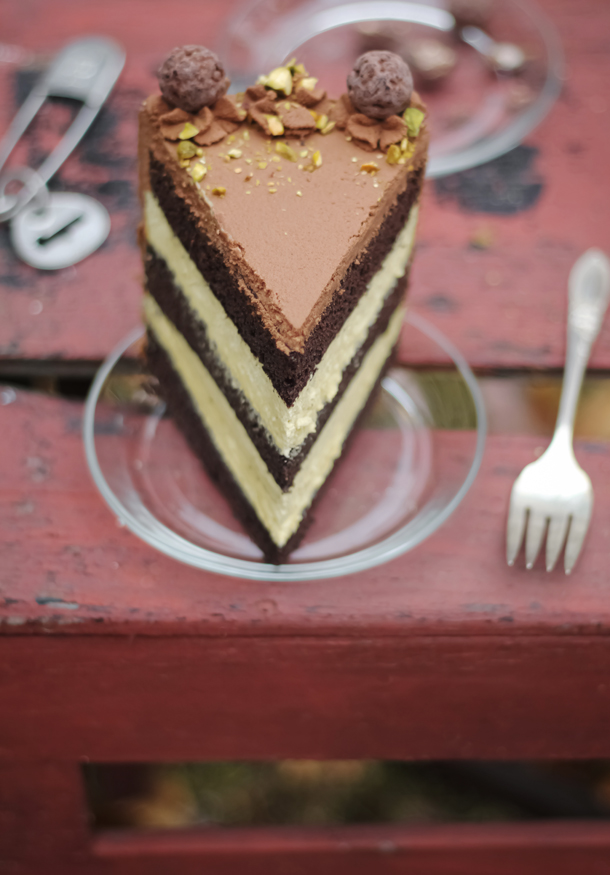
Black Truffle-Pistachio Chocolate Cake

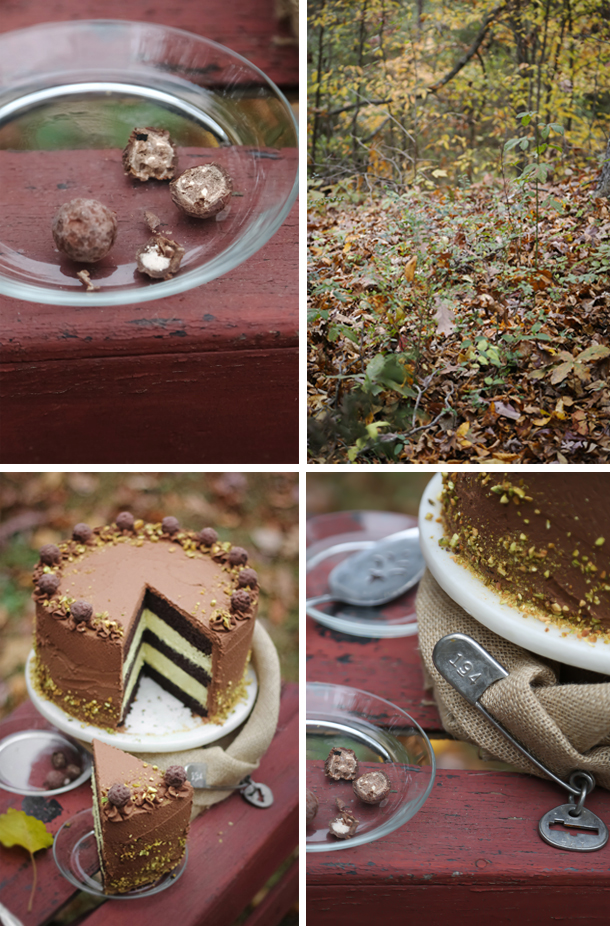
There's no shortage of inspiration when it comes to using classic fall flavors in my baking. I love cinnamon spiced apples, anything pumpkin-filled and I've been dreaming of what to do with a fat butternut squash that's been sitting on my kitchen counter for a good two weeks now. But after sampling some unique chocolates, I was inspired to make something a little less traditional this week.
Black truffles are most commonly used in savory dishes, but chocolatiers (such as the handsomely bearded Mast Brothers) have been incorporating them into chocolate. After sampling some, I was instantly smitten. Black truffles have a deep, earthy flavor that, to me, evokes feelings of the fall season. Depending on the variety, they've been described as "reminiscent of undergrowth, wet earth ... or dried fruit with a hint of cocoa". The trouble is, truffles are expensive, but luckily there are less expensive ways to incorporate them into your confectionery.
First of all, the cake is topped with Urbani's black truffle bonbons (I bought mine here
 ). They're small, dense little candies filled with black truffle pieces, nuts and chocolate. They're rich and earthy, and after tasting one I knew they were destined to adorn a chocolate cake filled with pistachio cream.
Secondly, the chocolate frosting is infused with a small amount of black truffle oil. Now, as far as I know, da Rosario is the only brand of truffle oil that is 100% organic and natural. Most other truffle oils contain no real truffles and instead are made with synthetic flavoring. That said, only a very small amount of truffle oil is used in the frosting, so purchase what your budget will allow. In general, real is always better than fake, but I view using the oil in the same way I view using artificial candy flavorings. It's okay to use in small quantities, and when options are limited.

The pistachio filling is one of my favorite elements of this cake. It's hugely rich with pistachio flavor, and that's thanks to 11 ounces of pure pistachio paste. I couldn't find it locally, so I ordered it online. You can find it here or in bulk here
 . It's truly worth seeking out!
I really love the way this cake turned out. In fact, I told my husband I might enter it in the Tennessee State Fair next year. The black truffle flavors mixed with pistachio makes me think it'd be right at home at a fine Italian restaurant. Yesterday I had a slice with strong coffee, and let me tell you, I'm having trouble imagining anything better!
If you're new to the flavor of black truffles, I suggest you familiarize yourself with it before embarking upon this cake. It's an acquired taste for some people. Kitchen specialty shops often have oil tasting stations, which is a good way to explore their savory notes as the oils are usually served with garlicky seasonings and baguette rounds. To get an idea of how the flavor will taste in chocolate frosting, seek out a small chocolate bar or bonbons with black truffle shavings incorporated.
Black Truffle-Pistachio Chocolate Cake
[click for printable version]
Source: Recipe by Heather
Yields one 9-inch triple layer cake
I recommend da Rasario 100% organic black truffle oil for the frosting. Truffle Hunter black truffle oil is also good and made with real black truffles, but be aware its flavor is also enhanced synthetically. Pungent oils must be used sparingly. If your truffle oil is mild, then the amount of oil added to the frosting can be increased to taste.
Dark chocolate cake8 ounces dark chocolate, chopped1/2 cup/216 g butter, softened2 cups/440 g light brown sugar, firmly packed3 eggs1 teaspoon vanilla extract2 cups/380 g all-purpose flour1/4 cup/30 g dark cocoa powder2 teaspoons baking soda1/2 teaspoon sea salt1/2 cup/121 g buttermilk1 cup/235 ml piping hot water
Preheat oven to 350°F.Grease three 9-inch cake pans and line the bottoms with circles of parchment paper.Melt chocolate in a small saucepan over low heat, or melt in the microwave in a microwave-safe bowl at 30 second intervals. Set aside.Beat the butter with an electric mixer until creamy. Add sugar and beat until combined. Add eggs one at a time, beating each until just incorporated. Stir in melted chocolate and vanilla.Sift together the flour, cocoa powder, baking soda and sea salt; add to the butter mixture alternately with the buttermilk, beginning and ending with the flour mixture. With the mixer running, gradually add in the hot water. Mix until the batter in consistent (batter will be thin).Pour batter into prepared pans and bake for 30 minutes, or until a toothpick tester comes out clean. Cool in the pans on wire racks 10 minutes; remove cakes from the pans and cool completely on wire racks.
Pistachio filling1/4 cup/32g all-purpose flour1 teaspoon fine grain sea salt2 cups/460g buttermilk or whole milk2 cups/1 pound unsalted butter, softened1 cup/200g granulated sugar1 can (11 ounces) pistachio nut paste
In a medium saucepan, whisk together flour and 1/2 cup of the milk until smooth. Set over medium heat and let cook for 3 minutes, or until slightly hot. Whisk in remaining milk and salt. Whisk constantly until the mixture is thickened (almost like pudding). Remove from heat and pour into a separate bowl. Place in the refrigerator until completely chilled. When cool, mixture will be thick like set custard.In a large bowl (or bowl of a stand mixer, if you have one) beat the butter and sugar together until fluffy. Beat in chilled flour mixture one tablespoon at a time on medium-high speed. When all the flour mixture is added beat on high speed until light and fluffy, about 6 minutes. Rub a little frosting between your fingers, if sugar granules remain, beat for 4 more minutes, or until granules cannot be detected with fingers. Beat in the pistachio paste a little at a time until well incorporated.Place a chocolate cake layer on a cake stand or serving plate and top with three cups of pistachio filling. Top with another cake layer and spread the remaining 3 cups of filling over the second layer. Top with the third and final layer. Refrigerate the filled cake while you make the frosting.
Black Truffle Chocolate Frosting8 ounces semisweet chocolate, chopped1 1/2 cups heavy whipping cream1/4 teaspoon black truffle oil (add more to taste, but be careful – it’s strong stuff!)12 black truffle bonbons (such as Urbani) or black truffle chocolate squares (such as Mast Brothers)4 ounces ground pistachios
Combine the chocolate and whipping cream in a saucepan. Cook over medium heat, whisking occasionally. When the mixture is steaming and the chocolate is melted remove from the heat. Add the truffle oil (add more to taste, but be careful – it’s strong stuff!). Whisk the mixture until the chocolate is completely melted and incorporated into the cream. Pour into a shallow dish and chill until the mixture reaches a pudding-like consistency, about 1 hour. Beat the mixture with an electric mixer until it is thick and spreadable. Transfer 2/3 cup of frosting to a piping bag fitted with a large star tip. Frost the cake evenly with the remaining icing and pipe rosettes around the top edge of the cake. Top every other piped rosette with a black truffle bonbon. Sprinkle the top with ground pistachios. Place the cake on a large baking sheet and toss ground pistachios along the bottom edge of the cake, allowing the excess to fall back into the pan.
Store the cake in the refrigerator. Serve chilled or let slices come to room temperature before serving – it’s good both ways!
November 4, 2014
Confetti Cupcakes with Cake Batter Frosting for Three!


I'm super excited about today's blog post because, not only do I get to share confetti cupcakes with you (which are my favorite!), but we're also having a virtual baby shower! My blog buddy Jessica of How Sweet It Is will welcome her new baby in December, so a whole bunch of us food bloggers are throwing her an online shindig. I know she'll be the best mama ever, and good gracious will that child ever be well fed!

The theme of the shower is trashed up foods - and who doesn't love a good homemade Funfetti cupcake with too many (and I mean waaaay too many) sprinkles. So no, It wasn't difficult to decide what to make for Jessica. We share an intense (insane?) love of sprinkles and confetti cupcakes seemed just perfect to me. This recipe is a riff on her One Bowl Vanilla Cupcakes for Two. Since her family is increasing from two to three (er, I'm assuming), I decided to develop a recipe that makes exactly three cupcakes.
Now, I realize it will be a good long while before the baby will be eating cupcakes, but it's good to think ahead, right? And something tells me this kid will be introduced to sprinkles early on.

As for the cake batter frosting? It was also inspired by Jessica's magic, specifically this sprinkled Cake Batter treat. I try to avoid eating buttercream straight from the bowl (hehe, yeah right) but this one is irresistible! I already have plans to shmear it over a batch of Rice Krispy treats.
Also, friends, please take a gander at all the fabulous trashed up (read: freaking delicious) foods that my blog buddies have created. You'll find the entire list with links just below the cupcake recipe.
The only important thing I have left to say is - Congratulations Jessica! We're all so excited for you!
Confetti Cupcakes with Cake Batter Frosting for Three
[click for printable version]
Yields 3 standard-size cupcakes
Total time 25 minutes
I like a lot of frosting on my cupcakes, especially when it tastes like cake batter. If you're less inclined to eat so much frosting, the recipe can be halved.
Cupcakes
1 large egg
3 tablespoons sugar
3 tablespoons vegetable oil
1 teaspoon vanilla extract
1/2 cup/60 g all-purpose flour, sifted
1/2 teaspoon baking powder
pinch of salt
2 tablespoons milk
2 tablespoons confetti sprinkles, plus more for garnish
Cake batter frosting
1/2 cup/113 g unsalted butter, softened
1 cup/120 g confectioners' sugar
1 teaspoon vanilla extract
pinch of salt
2 1/2 tablespoons French Vanilla cake mix (I use Betty Crocker, of course!)
1 to 2 tablespoons milk, if needed
Make the cupcakes: Preheat oven to 350 degrees F. Line a muffin pan with three cupcake papers.
In a large bowl, combine the egg, sugar and vanilla using a whisk. Whisk in the oil. Add the flour, baking powder and salt; stir together until just combined, then add the milk. Fold in the two tablespoons of confetti sprinkles. Divide the batter between the three cupcake liners, filling them no more than 3/4 full.
Bake for 12 to 14 minutes, or until the cupcakes have fully crowned and spring back when pressed in the center. Let cool completely.
Make the frosting: Cream the butter in a large bowl with an electric mixer. Add the confectioners' sugar and beat to combine. Beat in the vanilla.
Add the pinch of salt and cake mix; beat together. Add milk one tablespoon at a time until the mixture is lax enough to pipe. Transfer the frosting to a piping bag fitted with a large star tip and pipe onto cooled cupcakes. Garnish with sprinkles.
-13.jpg)
trashed up salads
Gimme Some Oven - Asian Broccoli Salad with Peanut SauceThe Lemon Bowl - Brussels Slaw with Tahini Dressing and Za'atar Crostini With Style & Grace - Kale Salad with Apple, Hazelnuts & Bacon
trashed up cocktails
Dine & Dish - Hot Buttered Rum CocktailFood For My Family - Cranberry Orange Dark and Stormy CocktailMinimalist Baker - Bourbon Pumpkin MilkshakesStylish, Stealthy & (sometimes) Healthy - Apple Cider ShandyA Spicy Perspective - Preggy Punch MocktailGirl vs. Dough - Boozy Maple Peanut Butter Cup MilkshakeHonestly Yum - Maple Bacon Pisco SourCookin Canuck - Pink Grapefruit MargaritasA Thought For Food - Mezcal Citrico CocktailA House in the Hills - Pomegranate Rosemary SpritzerThe Novice Chef - Ginger Bourbon Apple CiderBran Appetit - Citrus Cider Punch Floats
trashed up burgers
Edible Perspective - Meatloaf Veggie Burgers with Mashed Potatoes + Gravy The Little Kitchen - Salmon BLT Sliders with an Avocado Aioli & BrieDaisy At Home - Balsamic Beef Burger with Mac and CheeseCookies & Cups - Candied Bacon Maple Cheddar BurgerClimbing Grier Mountain - Trashed-Up Steak Burger with Chicken Fried Bacon & Dijon GravyDessert For Two - Bleu Cheese Burgers + Sweet Potato FriesCountry Clever - Fig Rosemary Roast Chicken Brie Brussels Sprout PaniniFoodie Crush - The Best Cheeseburger SoupLady and Pups - Spicy Sambal Chicken Meatball Sub with EggsTwo Peas & Their Pod - Sweet Potato and Kale Grilled CheeseBake Your Day - Ultimate Breakfast Sandwich
trashed up tacos
Spoon Fork Bacon - Crunchy Ground Beef and Cheesy TacosThe Fauxmartha - Boozy Beef and Butternut TacosWith Food + Love - Harvest Hash Breakfast TacosMountain Mama Cooks - Crispy Kale and Brussels Sprout Tacos with BaconHeather Christo - Bahn Mi Tacos with Spicy Sriracha Honey SauceA Couple Cooks - Loaded Huevos Rancheros TacosFitnessista - San Diego Lobster Street Tacos
trashed up desserts
Table for Two - Salted Caramel, Dark Chocolate, and Brown Butter Shortbread Bars with SprinklesMy Name is Yeh -
trashed up pizza
Bev Cooks - Beer Battered Fried Calamari PizzaRachel Cooks - Apple and Chicken Sausage Pizza with Macaroni and Cheese Stuffed CrustFoodie With Family - Trashed Up Barbecue Turkey PizzaShutterbean - Pesto Potato Bacon Pizzai am a food blog - Grilled Cheese PizzaMy Life as a Mrs - Chili Cheese Dog PizzaSimply Scratch - Steak + Blue Cheese Pizza with Crispy Fried Shallots and Honey Balsamic DrizzleThe Beeroness - Beer Cheese Tater Tot PizzaYes I Want Cake - Roasted Pumpkin PizzaTwo Red Bowls - Bacon Mashed Potato PizzaDula Notes - Pork Bahn Mi PizzaWeelicious - Trashed Up Mexican Pizza PocketsTake a Megabite - Roasted Beet Pizza Hungry Girl Por Vida - Hard Cider Braised Pork with Sour Cherries and Cheesy Polenta Bakers Royale - Trash’d Street Tacos
November 3, 2014
Candy Bar Cheesecake Brownie Mountain
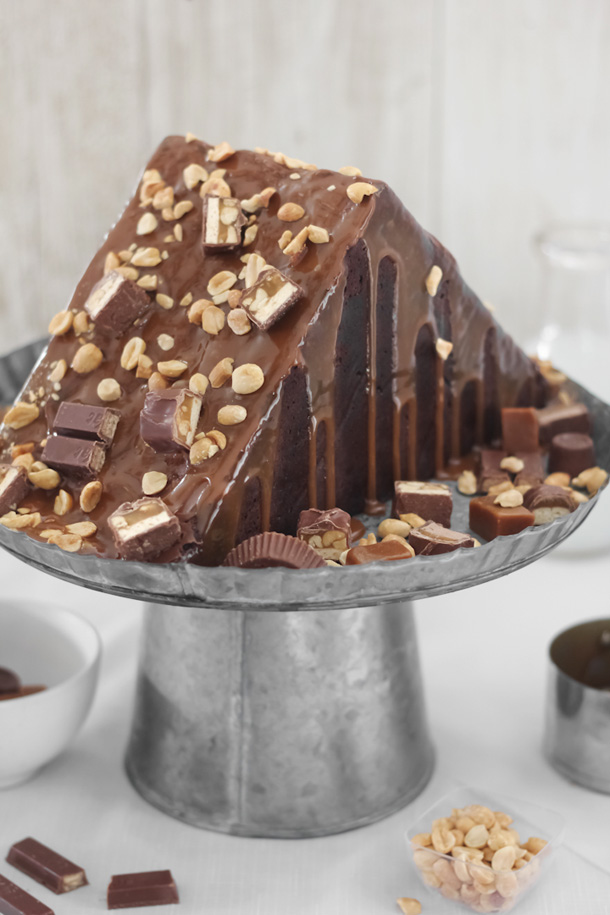
It's that time of year again when we're all staring down a bowlful leftover Halloween candy and feeling some ambivalence. We certainly can't eat it all, right? But tossing out perfectly good candy is not an option. This year I decided to put my leftovers to good use and make something that's truly share-worthy. I present to you, Candy Bar Cheesecake Brownie Mountain.

I often gush about new recipes, but I'm not exaggerating when I say this one is TOPS. It's so easy to make and crazy town delicious. The brownie and cheesecake both have mini chocolate bars baked inside. You can use just about any fun-size chocolate bar you have on hand. My brownie mountain contains a medley of Reese's Cups, Snickers, Milky Ways, Kit Kats and Rolo's (clearly, I have no self-restraint when it comes to these things... sorry not sorry).

The entire dessert is finished with caramel sauce, roasted salted peanuts and more mini candy bars. Cutting this "Mountain" into pieces is half of the fun, because it's like a candy bar treasure hunt. Each slice is a little different. My first piece had half a Reese's cup and part of a Snickers bar, mmmm-mmm!
I took plenty of step-by-step pictures to show you how to make your own. Like I said, it's easy - easier than you'd think! You'll need an 8x8-inch square pan to get started.

First, make the brownie layer. After you mix up the brownie batter, spread half of it in a pan and top with your choice of mini candy bars (I used about 10). Top with the remaining batter and bake!

Bake the cheesecake layer in the same pan, or in an identical pan to the one you used to bake the brownie layer. Mix up the cheesecake batter, pour it in the pan and press in about 10 mini candy bars. Bake!

You'll notice I line the pans with parchment paper - this is a must. Make it so that the edges of the parchment overhang all four sides, then you can lift the brownie and cheesecake out of the pan easily. I removed the brownie layer from the pan when it cooled completely, but the cheesecake layer needs to cool in the pan and then in the refrigerator overnight to ensure that it removes in one flawless piece.
I suggest chilling both layers overnight so that they cut easily and you can handle them without fear of them falling apart.

I love this cheesecake recipe because it requires no water bath. But that means it'll puff up during baking and sink down when it's removed from the oven, leaving a puffy edge when it's completely cooled. Cut off the puffy edge to level the cheesecake before assembling.

The amount removed isn't much, but it's enough to crumble over a bowl of ice cream!

After you've leveled the cheesecake, cut it in half diagonally.

Cut the brownie layer in half diagonally.

Mmm, hidden treasure!

To begin assembly, place about 2 or 3 tablespoons chocolate-hazelnut spread on one piece of cheesecake and spread evenly. If you're not into Nutella, then you could use chocolate ganache or even cookie butter.

Press the two pieces together.

Hold for a few seconds and then release. The two pieces should stand upright on their own.

Transfer the cheesecake portion to a 10-inch serving plate (or cake stand) with an edge. Cover the sides of the cheesecake with the chocolate spread.

Press a brownie layer on each side of the cheesecake layers.

Cover the exposed cheesecake edges with Nutella; fill in any gaps between the layers. Leave the front and back unfrosted.

Drizzle on the caramel sauce and top with everything but the kitchen sink!

This Brownie Mountain requires some creative cutting as you travel toward the center. Cut vertical slices, and then divide them into manageable pieces before plating them. The first piece yields one very large piece, or two pieces divided at the middle. Trust me, it's not difficult to figure out once you get started, and it becomes more intuitive as you go.

I found the best candies to use inside the layers are the softer sort, like Reese's cups, Milky Way bars and Rolo's. They make for neater slices. The Kit Kat wafers and peanut Snickers bars were a little more resistant to the knife and made slicing messy. I suggest placing those bars on top of the dessert, so that you can clearly see where to cut around them.
I can't help but imagine this as a centerpiece on a holiday table. The shape reminds me of a Christmas tree, which gives me all kinds of ideas for new variations. I'm thinking gingerbread or peppermint would make a mighty fine mountain worth scaling!
Candy Bar Cheesecake Brownie Mountain
[click for printable version]
Yields 16 servings
Start one day ahead. The brownie and cheesecake layers need to chill overnight before assembly. This recipe requires prepared caramel sauce. Avoid using the prepared caramel in squeeze bottles, as it's too thin. Go for the jars of thick caramel in the ice cream aisle - OR, if you have homemade salted caramel at the ready, then definitely use it!
Brownie layer
4 eggs
1 cup granulated sugar
1 cup brown sugar
1 cup/ 226g unsalted butter, melted
1 1/4 cups unsweet cocoa, sifted
2 teaspoons vanilla extract
1/2 cup all-purpose flour, sifted
1/2 teaspoon sea salt
10-12 fun-size candy bars (approximately 1 to 1.5 oz. each) Note! soft varieties like Reese's cups, Milky Way, Three Muskateer and Rolos work best.
Cheesecake
24 ounces full fat cream cheese, softened
1 cup granulated sugar
5 large eggs
1/4 teaspoon salt
1/2 teaspoon vanilla extract
10 fun-size candy bars (approximately 1 to 1.5 oz. each) Note! AGAIN, soft varieties like Reese's cups, Milky Way, Three Muskateer and Rolos work best.
Assembly
8 to 10 ounces prepared caramel syrup
2/3 cup chopped peanuts
10 ounces Nutella chocolate-hazelnut spread (or prepared chocolate ganache)
Assorted chocolate bars of all kinds, as much as you like; Snickers, KitKat, M&M's etc.- no rules!
Make the brownie layer: Preheat oven to 300 degrees F. Grease an 8x8 square pan with vegetable shortening and line it with parchment so that the paper overhangs to edges. Grease the bottom portion of the parchment paper and place another sheet of parchment, crosswise, so that the paper overhangs the other two edges of the pan.
In a mixer fitted with a whisk attachment, beat the eggs at high speed until lightened and fluffy, about 5 minutes. Add both sugars. Add the remaining ingredients and mix on medium speed to combine. Scrape down the bowl as needed.
Pour half of the batter into the prepared pan and spread evenly. Press the candy bars, evenly spaced, into the brownie batter. Cover with the remaining brownie batter and smooth the top with an off-set spatula; bake for 45-50 minutes. The brownie layer is done when a toothpick tester inserted in the center comes out clean. Remove from the oven and allow to cool completely. Remove the brownie by gently lifting it out by the four overhanging parchment corners. Transfer the brownie to a large plate and cover with plastic wrap. Refrigerate.
Wash the pan and line as previously instructed with the brownie layer.
Make the cheesecake layer: Preheat the oven to 325 degrees F.
Cream together the cream cheese and sugar until fluffy. Add the eggs, one at a time, beating well as they are added. Add the salt and vanilla extract. Pour the batter into the prepared pan and top with candy bars, evenly spaced. Using your index finger, press the candy bars down into the batter until they are completely submerged. Bake for 1 hour to 1 hour 20 minutes (check at 1 hour), or until the cheesecake is firm in the center and well-browned on top. Allow the cheesecake to cool completely in the pan. Cover the pan and transfer to the refrigerator. Allow both brownie layer and cheesecake layer to chill overnight.
Assemble! Cut off the puffy edge to level the cheesecake before assembling.
After you've leveled the cheesecake, cut it in half diagonally. Cut the brownie layer in half diagonally.
Place about 2 or 3 tablespoons chocolate-hazelnut spread on one triangular piece of cheesecake and spread evenly. If you're not into Nutella, then you could use chocolate ganache or even cookie butter. Press the two cheesecake pieces together and hold for a few seconds and then release. The two pieces should stand upright on their own.
Transfer the cheesecake portion to a 10-inch serving plate (or cake stand) with an edge. Cover the sides of the cheesecake with the chocolate spread. Press a brownie layer on either side of the cheesecake layers. Cover the exposed cheesecake edges with Nutella; fill in any gaps between the layers. Leave the front and back unfrosted.
Drizzle on the caramel sauce and top with nuts and chopped candy bars.
To serve, cut the cheesecake in vertical slices and divide larger pieces into smaller servings before plating. Store leftovers in the refrigerator.
October 30, 2014
How to Make Sugar Skulls for Day of the Dead

I adore all things Halloween - the costumes, the candy, the spooky decor - so each year I try to post something special here to celebrate. The past two years I've created movie-inspired cakes (see here and here), but this year I'm doing something a little different. Recently my best friend created the most beautiful ofrenda skull, and it inspired me to make one of my own!
If you're not familiar with sugar skulls and their meanings, then here's the gist of it: Day of the Dead (Dia de los Muertos) is a Mexican holiday that takes place October 31, November 1st and 2nd. During this time, spirits are welcomed back to their homes with decorated altars made by their loved ones. Sugar skulls are an important part of this decor and they commonly bear metallic embellishments, brightly colored icings and the name of the deceased loved one being honored.
I'd never made sugar skulls before, so I thought it'd be fun to document my first attempt with a video (you can find that a little later in this post). It was a fun process, and reading all the history and tradition behind the holiday really made it meaningful.
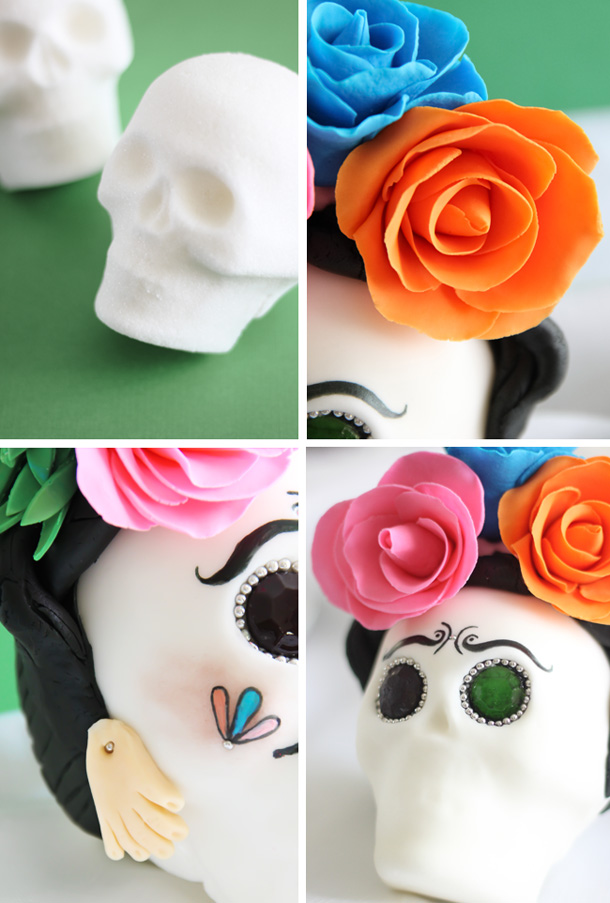
It wasn't too hard to choose a subject for my sugar skull. Mexican painter Frida Kahlo is one of my favorite artists of all time. Her work is beautiful, tragic, ugly, and honest. It's full of pain but also the love of life. Much of her life was spent in physical pain due to a bus accident that shattered her spinal column, and she also suffered emotional pain because of the man she chose to love (the marriage of a dove to an elephant, some called it - you can guess which is which). But from all this pain and loss and love grew beautiful works of art from her hands, most of them self-portraiture.
Speaking of hands - I bet you saw the above picture and wondered why my sugar skull is wearing a hand as an earring. You can see Frida wearing these in "Self Portrait Dedicated to Dr Eloesser". The earrings (called milagros) are wax pieces shaped in the form of the body part that a person wants to be healed. The earrings were a gift from Pablo Picasso, during the time she was recovering from a hand injury.

But enough backstory for now - on to the creative deets! To get started, you'll need a sugar skull mold. I love the look of the larger 3D skulls (more room to decorate!) and I found a nice mold here. According to this site, good meringue powder is also a must! I followed their advice and used CK products meringue powder, and the blanks turned out beautifully. You can see the results of my very first attempts in the video embedded below.
You'll need to whip up a batch of royal icing to assemble the skulls, which shouldn't be a problem since you'll already have the meringue powder on hand. Before putting the two halves together, the middles of the skulls need to be scooped out to about 1/2 inch thickness. This lightens the weight of the skull so they can stand upright. Only scoop out the skull portion - leave the chin portion as-is.
Continued, click to read more...
October 21, 2014
Dusty Bones Sugar Cookies


Boy, October seems to be flying by too fast! There are all kinds of things I'm still trying to squeeze in before Halloween - pumpkin carving, pie baking, costume-making - and I'm determined to not let it all go by without celebrating to the fullest.
I've been enjoying the recent box of goodies that Wilton sent me to review, especially this bone cookie pan. I squealed a little when I saw it because I knew I'd not only use it for Halloween treats, but also for dog biscuits for the pug-a-lugs. But first, I wanted to whip up some spooky people treats, and glazed sugar cookies seemed a good fit.
Continued, click to read more...
October 14, 2014
Candy Corn Tuxedo Cake


It's been brought to my attention that I'm a candy girl in the truest sense. Meaning, I like all candy. Meaning, I like candy that most people don't like. Just last weekend I was getting major side-eye from the Mr. for eating candy corn and black licorice at a party. Turns out, that candy was meant to be table decoration, but hey - decorate with candy and expect to come up a few pieces short. Am I right or am I right?

This cake is for both candy corn fanatics and detractors. The only prerequisite is - you have to like cake. I used a tried -and-true white cake recipe and manipulated the flavor with extracts. It's pretty hard to nail down the flavor of candy corn (it's mostly just one note - sweet), so I decided to make the cake layers little more interesting. From top to bottom, the white layer is vanilla, the yellow layer is butter rum (I used LorAnn flavoring), the orange layer is flavored with orange extract, and the bottom layer is chocolate, made with dark chocolate cocoa powder. I really love how all the layers taste together - it's kind of like a citrus-y butter candy with a chocolate wallop at the end.
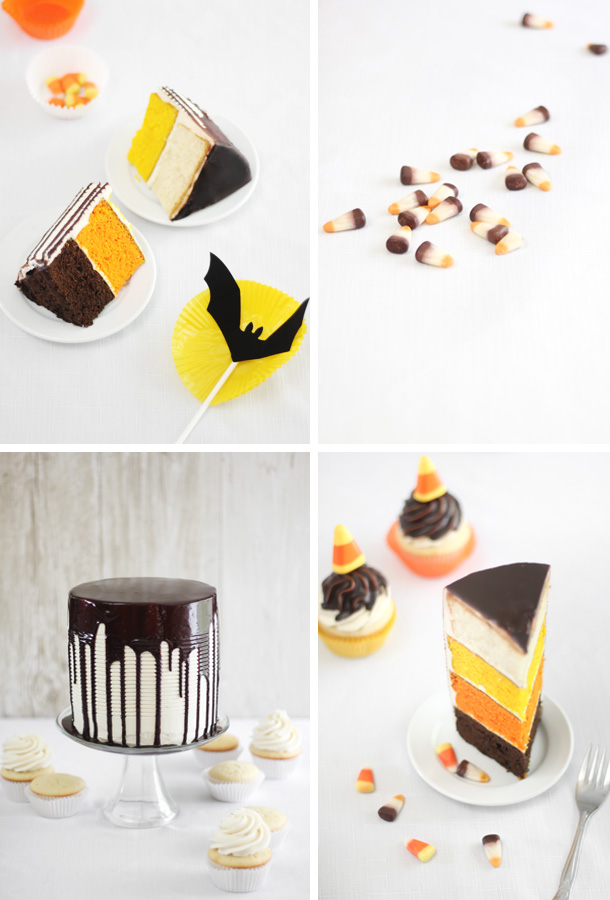
The chocolate elements of this cake were inspired by the new flavors of candy corn available. I mean, have seen S'mores Candy Corn
 yet? I'd reckon even the most candy corn-eschewing person would have trouble turning that down.
As for the drippy ganache, it's quite spooky looking, don't you think? I didn't realize how spooky until I saw Kristan's Scary Cherry Cake. Like Kristan, I tend to lean toward cakes that look cute-spooky instead of scary-spooky, and the ganache is right on point for cute.
Continued, click to read more...
Pretzel Broomstick Appetizers for the Etsy Blog!
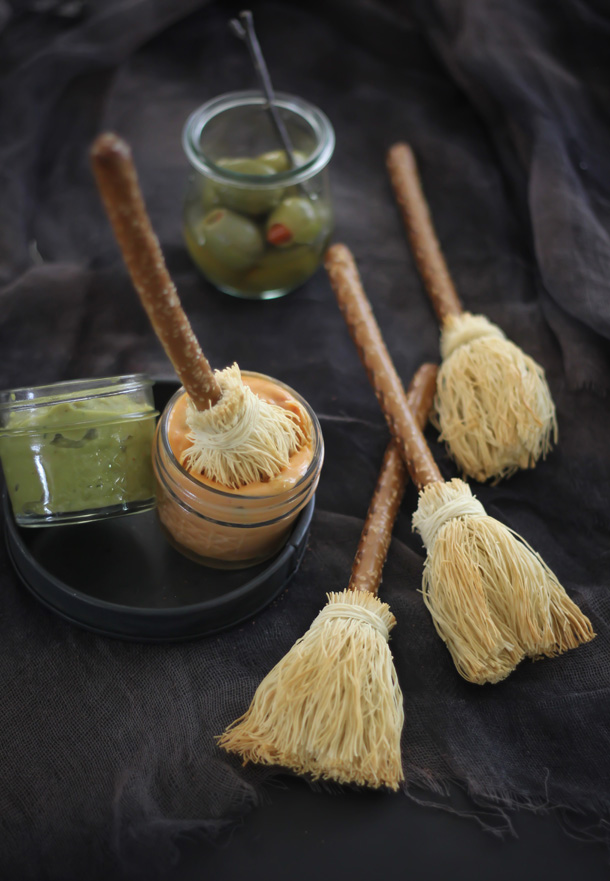
Hi friends! Halloween is fast approaching, so today I'm sharing a SUPER simple recipe for witchy pretzel broomstick appetizers on the Etsy blog. They'll elevate your Halloween party table to a whole new level of cute, and they only require two ingredients!
Hop on over for all the details and step-by-step photos.

Happiest October to you!
xo
H
October 9, 2014
Pumpkin Bavarian Crepe Cake


I just love a good Bavarian cream. Remember this cake I made two years ago? Yeah. That's still one of my favorite recipes of all time. I usually make a molded white chocolate Bavarian each year at Christmastime, but I'd never considered making one during autumn months. I mean, with all the warm cinnamon rolls, pumpkin breads and apple pies, it didn't even occur to me until... until! My oven suddenly stopped working - mid-brownie baking, no less. 'Twas a sad day.
During the two weeks without an oven I revisited an idea for a crepe cake. I've been wanting to make another one for ages (see my first one here), but other recipes took precedence. So, when I found myself with no means of baking, the crepe cake idea seemed like a shiny new penny. Most of the work is done on the stove top, and that part of my kitchen was still alive and well.

First, I should tell you that this cake was one big experiment from the get-go. With no instruction, I wasn't sure if crepes and Bavarian cream even belonged together. Or if it would mold as beautifully as I'd imagined. Thankfully it did! It's just as dreamy as I'd hoped it would be, and the many-layered texture is divine!
Here's how I put it all together.

First, you'll need chocolate crepes. The recipe I provided makes a big stack of sturdy, eggy crepes. Some grocery stores sell ready-made crepes, and if you wanted to short-cut this recipe, then you could buy them instead. You'll need 12.


The Bavarian cream is simple and delicious. I added a dose of Creme de Cacao to the pumpkin spice mixture to complement the chocolate crepes. It really made a big difference in flavor!

First, you'll layer 1/2 cup of the pumpkin Bavarian in the bottom of a spring-form pan.

Spread it as evenly as possible with an off-set spatula.

Add a crepe!

Top with another 1/2 cup of pumpkin Bavarian, and spread as before. Continue this process until all the crepes are used.

Cover the last crepe with the remaining pumpkin Bavarian. This will be slightly more than 1/2 cup. Refrigerate for 4 to 6 hours, or until completely set.

Run a small knife between the top of the pan and the Bavarian cream, then gently remove the spring-form collar. You could serve the cake on the spring-from base, but I turned it onto a cake stand, then used the small knife to gently remove the bottom of the spring-form pan. It unmolded beautifully!

I sure didn't love life without an oven, but if it had never stopped working I may have never attempted this cake. And we LOVE this cake! My honey suggested I bring it to Thanksgiving dinner this year. It tastes much like pumpkin pie, but creamier, and with a little punchy bite of chocolate. I decorated the top center with chocolate wafer rolls, but you could use chocolate shavings or curls, if you prefer.
Pumpkin Bavarian Crepe Cake
[click for printable version]
Yields one 9-inch cake
Prep: 1 hour 30 minutes
The crepe recipe makes 15 to 18 crepes, but you’ll only need 12. This gives you a little room to master your crepe-cooking technique, or, if you get perfect crepes every time, then save the extra ones for breakfast (I suggest a Nutella/whipped cream filling!). You’ll need a 9-inch spring form pan to make this recipe. This cake needs to chill for 4 to 6 hours, so plan ahead.
Crêpes6 large eggs1 cup/280 ml whole milk1/2 cup/120 ml heavy cream1/2 tsp vanilla3/4 cup/95 g all purpose flour1/4 cup/30 g unsweetened dark cocoa powder1/8 tsp salt1/4 cup/30 g confectioners sugar
Place all ingredients in the bowl of a food processor or a blender and process until well combined. The mixture will be the consistency of heavy cream.Brush an 8 or 9 inch skillet with melted butter and place over medium heat until butter just starts to smoke. Pour scant 1/4 cup of batter into the skillet. Swirl the batter with the pan lifted over the stove eye until the bottom is coated with a thin layer of batter. Place pan on the stove eye and cook until the surface of the crepe loses most of its glossiness and the top is set. At this point, most recipes will tell you to flip the crepes; mine were cooked through without flipping, so I just slid them out of the skillet and onto a plate. Repeat process until all crepe batter is used. If the crepes start to cook before you can get the entire bottom of the pan coated with batter, then reduce the heat to medium-low. Allow the crepes to cool completely.
Pumpkin Spice Bavarian24 ounces (about 2 3/4 cups) canned pumpkin puree2 teaspoon pumpkin pie spice3/4 cup/150 g sugar1/3 cup/ 80 ml crème de cacao2 envelopes/ 1/2 ounce unflavored gelatin powder 2 cups/475 ml heavy cream
Combine the pumpkin, pumpkin pie spice and sugar in a saucepan. Cook over medium-low heat until the sugar is dissolved into the mixture (check by rubbing a bit of mixture between your thumb and forefinger – if grainy, keep cooking). Cook, stirring the mixture constantly, for 5 more minutes. Cool to room temperature (do not refrigerate).Combine liqueur and gelatin in a heatproof cup and let stand 5 minutes. Heat in microwave for 10 seconds or until gelatin turns to liquid. You can also melt it in a saucepan on the stove top if you don’t have a microwave.Whisk the gelatin mixture into the cooled pumpkin mixture.Beat heavy cream in bowl until stiff peaks form, using electric mixer at high speed. Fold pumpkin mixture into the whipped cream.
Assembly2 cups whipped creamChocolate wafer rollsCinnamon for dusting
Cover the bottom of an ungreased 9 inch spring form pan with 1/2 cup pumpkin Bavarian cream. Spread evenly with an off-set spatula. Center a chocolate crepe on top of the Bavarian cream in the pan. Cover the crepe with 1/2 cup of pumpkin Bavarian, spreading it to the edges of the pan. Repeat the process until all the crepes are used; spread the remaining Bavarian cream over the surface of the last crepe evenly.Drop the pan on the counter once or twice to settle the cream and remove air pockets. Cover and refrigerate until mixture sets, 4 to 6 hours.Run a small knife between the Bavarian cream and the pan. Remove spring form collar. Spread 1 cup whipped cream on the sides of the cake. Pipe a decorative border of whipped cream around the edge of the cake with the remaining whipped cream, using a large star decorator tip (if desired). Dust the entire cake with cinnamon and garnish with chocolate wafer rolls.
Refrigerate leftovers.


