Heather Baird's Blog, page 79
July 18, 2014
Rainbow Meringue Truffle Cones


I've had my serious hat on for a couple of weeks now, mostly due to deadlines and commitments. I believe that's partly how these rainbow meringue cones came about. I just couldn't take one more day with a furrowed brow. And do you know that rainbow treats are the opposite of a furrowed brow? They are.
Another reason why these rainbow puffs made it onto my baking sheet is because ThinkGeek sent me a Sprinkles the Unicorn Sprinkle Shaker. It's just the cutest thing. I've been waiting for the right inspiration to use it in a blog post, and I felt something rainbow-themed was in order. This morning while drinking coffee and cloud gazing (I do that sometimes when the clouds are extra puffy), I saw a vaguely horse-shaped cloud illuminated by light, and felt it was a sign to use my unicorn shaker today.

Do you see it too? Practically a unicorn without a horn, right? Or maybe a dog. A goat with an abnormally fluffy tail? (smile)

Because the folks at ThinkGeek are so awesome, they sent along another Sprinkles the Unicorn shaker for a giveaway, and I'm opening the contest worldwide. You can enter with the Rafflecopter widget below. Email subscribers, please visit the blog post to enter.
a Rafflecopter giveaway


I'd never made rainbow meringues before, but it's really easy. Just fit a piping bag with a decorator tip, and then paint long stripes of gel food color on the inside of the piping bag using an artist's brush. Space the painted stripes out if you'd like some white meringue showing, or if you want a solid rainbow, place the stripes very close together.

Here's my sprinkle shaker in action! I tried all kinds of sprinkles in the shaker, and found that rainbow nonpareils work best. Sprinkle the piped meringues just before you put them in the oven. The sprinkles won't melt away because the meringues are baked at a very low temperature.
I decided to make the meringues into cones because the colorful swirls reminded me so much of these little treats I ate as a kid. They were always stale, but I loved them anyway. I filled the cones with chocolate ganache, which makes the finished dessert taste like exactly four bites of rich chocolate tart. The sugar cone makes a great "crust".

Even though these ice cream cones are the non-melting sort, I think they'd be a cute addition to an ice cream social. It's good to have something a little different and unexpected. Hope everyone is having a GREAT summer!
Rainbow Meringue Truffle Cones
[click for printable version]
Source: Sprinkle Bakes original
Yield: 20 cones
Prep: 30 minutes, 4 hours with baking and chilling
Ganache cones
20 sugar cones or mini ice cream cones
9 ounces semisweet chocolate, chopped finely
1 cup heavy whipping cream
Rainbow meringues
2 egg whites
Pinch cream of tartar
1/2 cup superfine sugar
Gel food color in red, orange, yellow, green, blue, violet (I used Wilton brand)
Assembly
1/2 cup melted semisweet chocolate
Rainbow nonpareils.
 If using standard size sugar cones, trim about two inches from the top by scoring the cone with a serrated knife. Break the top at the scored mark and save the excess for later use (on a bowl of ice cream!).
The cones will need to stand upright to be filled. If you don't have a specialty ice cream cone holder (who does?!) then cut several X's into the top of the sugar cone boxes with a serrated knife. Place the cones upright into the X perforations in the box. (See pictures in the blog post for clarification.)
In a large microwave-safe bowl, combine the chocolate pieces and heavy cream. If any chocolate pieces are poking above the surface of the cream, then pat them down with the back of a spoon. Heat at 30 second intervals or until the mixture can be whisked smooth. Allow the ganache to cool at room temperature until slightly warm but still pourable, about 30 minutes. Pour the ganache into the upright standing cones. Transfer the cones to the freezer until set. Meanwhile, prepare the meringues.
Fit a piping bag with a large closed star decorator tip (Ateco 843). Set aside.
Whip the meringues in a standing mixer until frothy and add the cream of tartar. Beat on high until soft peaks form and gradually add the sugar. Beat on high speed until the meringue is thick and glossy, and will hold a standing peak with the beater is lifted from the bowl. Cover two baking sheets with parchment paper and preheat the oven to 170F.
Using an artist's brush, paint thick 1/2-inch stripes of each gel food color inside the piping bag, cleaning the brush between colors. If you want a true rainbow effect paint the colors in this order once around the inside of the piping bag: red, orange, yellow, green, blue, violet. Place the meringue inside the piping bag. Don't worry if the colors smudge - it'll all be okay in the end. Pipe the first one or two meringues back into the bowl - these will have no rainbow stripe, and the rainbow colors will intensify as you pipe the meringue. Pipe each meringue in two swirls, one on top of the other, to give it the appearance of soft serve ice cream. Bake the meringues for 40 minutes, then turn the pan halfway and bake for another 40 minutes. Turn off the oven and let the pans cool. You can leave them overnight if desired.
Dip the set cones into the melted chocolate and then dip the edges in the multicolor nonpareils. Up to one hour before serving, dip the bottoms of the meringues in a little chocolate and set them on top of the chocolate-dipped cones. Allow them to stand until the meringue is stable. Serve immediately.

A few tidbits before I end this post!
I'd love for my puppy-loving pals to check out my Ice Pops for Pups post on the Etsy blog. Biscuit was on
Etsy's front page - what hoot!

Check out a recipe round up for summer cookout fare on TripAdvisor's FlipKey blog (you'll see a familiar watermelon cake there!).
Check out my latest article for Betty Crocker, it's a sprinkle-coated Confetti Cake Roll!


July 3, 2014
Crème Brûlée Filled Strawberries


Happy July, friends! This will be a month of celebrations and birthdays (including my own!) so I've been trying to think up new ideas for party food. One of my favorite desserts of all time is creme brulee, and with all the juicy ripe strawberries at the market right now I felt the two should get together.
The hollowed-out berries each hold one spoonful of creme brulee. The tops of the strawberries are heaped with granulated sugar and then torched until caramelized. It's all so nice together - the freshness of the berry, the creamy custard and the crack of the caramelized sugar - it's a perfect bite!

To make the berries stand upright, cut the pointed end off flat with a serrated knife. Hollow the centers and take extra care to avoid piercing through the sides. At this point the berries can be filled with creme brulee and stored in the refrigerator until you're ready to serve them.

Just before serving, place a spoonful of sugar on top of each berry and use a chef's torch to caramelize the sugar. You can also caramelize the sugar under the oven broiler, just be sure to get it good and hot before you put the strawberries in. The strawberries will break down under heat, so they should only be allowed to stay in the oven for 2-4 minutes, just long enough for the tops to caramelize. Keep a sharp eye on them, it won't take long!


These turned out better than I'd hoped! I served them with mini forks but honestly there's no need for utensils. If you serve them to guests, I suggest putting the berries in paper liners for easy pick up, or have napkins close by to keep fingers tidy.
Crème Brûlée Filled Strawberries
[click for printable recipe]
1 cup/232 g heavy cream
1/3 cup/80 g half and half
Seeds from 1/4 vanilla bean or 1/4 teaspoon vanilla extract
4 egg yolks
1/4 cup/50 g granulated sugar
30 to 40 medium strawberries, capped, hollowed and pointed ends trimmed flat
Additional granulated sugar for sprinkling
Preheat the oven to 300F.
Heat the cream, half and half, and vanilla bean (or vanilla extract) in a medium saucepan over medium heat just to a boil. Immediately turn off the heat. Set aside to infuse for 10 minutes.
Whisk the egg yolks with the sugar in a large bowl until just combined. Whisking constantly, gradually pour in the hot cream mixture. Pour the mixture into a 10x10-inch baking and remove the vanilla bean.
Place the 10x10-inch pan in a large roasting pan and pour in hot water until it reaches halfway up the custard pan. Bake in the center of the oven until the custard is set but still has a slight wobble (it will cook more as it cools), about 55-65 minutes. Remove it from the water bath and let it cool. Cover with plastic wrap and place in the refrigerator until chilled, about 2 hours.
Fill each berry with a spoonful of creme brulee. Store the filled berries in the refrigerator until you're ready to serve them.
Just before serving, place a spoonful of sugar on top of each berry and use a chef's torch to caramelize the sugar. You can also caramelize the sugar under the oven broiler, just be sure to get it good and hot before you put the strawberries in. The strawberries will break down under heat, so they should only be allowed to stay in the oven for 2-4 minutes, just long enough for the tops to caramelize. Keep a sharp eye on them, it won't take long! Let the berries stand for 5 minutes to let the caramelized sugar harden.
Note: The longer the berries stand at room temperature, the more likely they are to weep a little berry juice around the bottoms. I suggest serving these in paper liners or cute candy cups. They'll keep things tidy and disguise drips of berry juice.

June 27, 2014
Magic Flan Cake

Life feels a little crazy right now because in two short months the manuscript for my second cookbook is due. As you can imagine, I've been spending all my time baking, testing, and washing loads of dishes. Most mornings I can be found in a quiet place, trying to connect my head and heart so I can articulate how much these recipes mean to me. I'm eager to share all the details with you, but for now I can only tell you that all of the recipes are brand new, except for three favorites from the blog - and the only reason those are being included is because they were the inspiration for the book. Are you curious? (smile)
Between all these working days that fly by too fast, life happens. My husband had a birthday yesterday, and even though there are cookbook sweets all over the house (on every flat surface and some balanced precariously on chair arms) I was determined to make him something special.


This was my first time making Magic Flan Cake, and let me tell you this: it is special. It may not win any beauty contests, but it's the kind of cake that makes you close your eyes after you taste it. And the magic part? That takes place in the oven. The cake batter get poured into the pan first, and then the flan mixture is poured on top of the batter. During baking the two switch places- pretty neat! My favorite part is how the flan infuses the cake batter with creamy goodness, so the whole thing is a glorious custard/pudding/cake masterpiece.

There are two important things you need to know about this cake. (1. start one day ahead, the cake needs to chill in the refrigerator 8 hours or overnight, and (2. it requires a water bath. That might sound like a lot of work, but it's worth it. I repeat - It's SO worth it!
Magic Flan Cake
[click for printable version]
Yields 14 to 16 servingsSource: adapted from Cook’s CountryPrep: 2 hours 30 minutes
Cake1/2 cup/155g prepared caramel sauce1/2 cup plus 2 tablespoons/60 g all-purpose flour1/3 cup/46 g cocoa powder2 teaspoons cinnamon1/2 teaspoon baking soda1/4 teaspoon salt4 ounces bittersweet chocolate, chopped6 tablespoons/85 g unsalted butter1/2 cup/121 g buttermilk1/2 cup/105 g sugar2 large eggs1 teaspoon vanilla extractFlan28 ounces (2 cans) sweetened condensed milk (not evaporated milk!)2 1/2 cups/598 g whole milk, room temperature6 ounces cream cheese, room temperature6 large eggs, room temperature4 large egg yolks, room temperature1 teaspoon vanilla extract
Preheat the oven to 350°F.Spray a 12-cup bundt pan with flour-based baking spray (such as Baker’s Joy). Pour the caramel sauce evenly into the bottom of the pan.In a medium bowl, combine the flour, cocoa, cinnamon, baking soda, and salt; set aside. In a microwave-safe bowl, combine the chocolate and butter; heat at 30 second increments in the microwave, stirring between heating until smooth. Add the buttermilk, sugar, eggs, and vanilla to the melted chocolate mixture and whisk until incorporated. Add the flour mixture and stir until combined. Pour the chocolate batter evenly over the caramel in the pan.Add all the flan ingredients to a blender pitcher and process on liquefy (high) until smooth. Slowly pour the flan mixture over the cake batter. Place the cake pan in a large roasting pan and then place it in the oven. Carefully pour hot water into the roasting pan (I used hot water straight from the tap) until it reaches halfway up the sides of the bundt pan. Bake the cake for 80 to 90 minutes, or until a toothpick tester comes out with a few moist crumbs clinging (mine took about 1 hour 40 minutes). Gently remove the Bundt pan from the roasting pan and place it on a cooling rack. Allow it to cool completely in the pan. Refrigerate the cake in the pan for 8 hours, or overnight.
To unmold the cake, fill a large bowl (or your sink) with hot water. Place the bottom of the cake pan in the water to warm the caramel/flan portion of the cake. This will help the cake release. Turn the cake out onto a large serving platter or a cake stand that has a lip. The caramel will drizzle down over the cake as you remove the pan. Store the cake covered in plastic wrap in the refrigerator.
June 25, 2014
Black and White Wedding Cake


I'm not in the business of making wedding cakes, nor do I want to be, but I make exceptions for family and close friends. Clearly, there's a lot of pressure involved, and my hat goes off to anyone who chooses this as an occupation. Any cake that is served to a large group of people should always be the perfect trifecta of beauty, flavor and texture, and I still feel like I'm learning to master all of those elements. That's why I'm amazed that anyone would trust me with their most memorable cake, but alas, earlier this year I was asked, and I said yes because I love my family. I reasoned that even if it was an epic failure, everything would be okay because my family is still obligated to love me.

When I learned of this new project, I turned to my friends at Wilton. They gave me some great products to work with, and I'm not sure how this cake would have turned out without them. The cake's design is very simple, but that means the few embellishments on the cake needed to be well executed.
The black ribbon around the bottom of the cake is cut from Wilton Sugar Sheets. I tried using fondant for this at first, but I could never make it look as uniform as it needed to be. The Sugar Sheets turned out to be a life saver! They are as easy to cut as regular paper (with kitchen-dedicated scissors, of course) and gave the cake a crisp black edge. Plus, it had none of the metallic taste that is associated with black food color. I am a fan!

Another tool Wilton sent was the Lace Fondant and Gum Paste Mold. The bride picked out a specific floral design that I hand painted on the cake, but when I finished painting the first flower, I felt it needed a little something extra. I made the flower centers with black fondant and the gum paste mold. I know it looks subtle, but it really made the finished cake look polished.

The black crossed lines on the bottom tier are made with black fondant, and boy, were those ever difficult to get right! Maybe someday I'll dedicate an entire post and video tutorial on how to create the effect. It sure is pretty but I spent several hours measuring, moving, straightening, fixing - repeat, repeat, repeat!
Speaking of tutorials. I decided to make a video on how to achieve smooth buttercream frosting on a cake, specifically for cakes that will be covered in fondant. Once upon a time I applied a measly thin coat of buttercream, but have since seen the err of my ways. A thick coat hides imperfections better, and in my opinion it makes the cake taste better too.
You'll need a couple of special tools, a $5 bench scraper (that is worth many times that, if you ask me) and a cake turntable (or a homemade turntable, as suggested in the video). Email subscribers, click here to watch the video.

Did I mention the top tier was made of cheesecake? Friends. There's a very good reason why wedding cakes are not made of cheesecake. I'd only suggest doing this if you are able to remove the cake from the refrigerator, snap a couple of formal pictures, and then commence the cutting all within 15 minutes. We did not have this luxury, so the cheesecake was very soft. Luckily, the bride got her requested piece, and the remaining cake was whisked off to the refrigerator.

After agreeing to do cupcake favors and also the groom's cake, I realized I'd need some help. My sister-in-law Megan was a real life saver. I think she's recently taken to wearing flip-flops to avoid tying one more bow. But oh, the favors were pretty!

Major props to Megan again for figuring out how to enlarge the Jeep logo. I've never seen it look so elegant (and trust me, I know because we have two!). I used the same smoothing technique on the groom's cake as I did on the buttercream base for the wedding cake. You can see a few spots where I stopped and started with the bench scraper, but overall the effect is nice. Plus, cake should look like cake - right?!

I mention in the video to use a frosting with high butter content. You can find two very suitable frostings here with my cupcake frosting tutorial.

I ended up being the cake-cutter again, but thankfully I had help. The support dowels were removed before the first slice was served (a valuable lesson I learned from making this cake). In the end everyone was served and love was celebrated. I even got a few cake recipe requests, which I'll most likely fill by adding them to this blog.
Biggest love and hugs to the bride and groom. Thank you for allowing me to be part of your big day!

June 24, 2014
Breakfast in Bed with Homemade English Muffins (and Doughnut Muffins, too!)

Breakfast in bed is rarely served at my house, but that's something I'm trying to rectify. I know it's considered best if someone makes it for you, but I'm kind of a control freak when it comes to breakfast pastries and breads, so really, I don't mind doing the work.
I decided to document my last effort, which was assorted nibbles shared with the hubby. It was delicious and made us feel cheery all day long. Here's what was on our tray.
Coffee is a must for us both and since it's been 85 degrees at 10 a.m., I bought our favorite bottled coffees and made sure they were served ice cold.Doughnut muffins. These are a favorite that I've made countless times. They're easy, and if you've never made them then you should probably drop everything and go make them right now. Seriously, they are my favorite mini breakfast muffin. Homemade life-changing English muffins (with the option of butter and jam). I'm still pinching myself. I made English muffins that look and taste like English muffins! It can be done! More details on this later.Juicy red cherries. It's good to offer a fresh bite with breakfast. It makes everything seem more vibrant and special.O.J. - good ol' sunshine in a glass. It's thirst-quenching in a way that coffee is not. There are a few other small things that make breakfast in bed really great, like the morning paper or your favorite book, real table linens, and a single fresh bloom on the tray.

I made the doughnut muffins the night before. They keep really well (although they never last more than two days), so they tasted just as fresh as the first day. I know many of you have made these before, but for those who haven't, you should know that these muffins get dipped in butter (major!) and then rolled in cinnamon-sugar. They are tops in my book!

Now let's talk about these homemade English muffins, because I can't believe how well they turned out. There were two recipes I considered making before settling on this one. The first is made with a pourable batter that requires the purchase of English muffin rings, but since not everyone has those, I opted for the roll-and-cut version. I still used my pastry rings to fry them in, but I soon discovered that they are not needed. My first muffins were a little too thick, and didn't have that wonderful bubbly, craggy interior, so I patted the dough thinner, cut new rounds and fried a second batch - they were perfect! They have just the right amount of chewiness, and a perfectly pocked interior. I made these the night before too, and they kept well in an air-tight container.


Breakfast in bed is totally indulgent, and I almost dismissed it entirely with a "who has time for that?", but sweet memories are rarely made with that attitude. I'm so glad I made time for it, and I'd encourage you to try it just once!
Edit 6/24/14: Friends, please note that there is an egg in the English muffins and "ground sugar" in the muffin recipe is supposed to be "ground cinnamon". These errors have been corrected in both recipes. My apologies for the omissions! -xo
Homemade English Muffins
(Roll and Cut Method)
[click for printable version]
Source: The Bread Bible

Yields 12 to 14 three inch muffins
Prep: 45 minutes, total time about 2 hours
1/4 cup/ 60 ml warm water (105° to 115°)
1 tablespoon active dry yeast
1/8 teaspoon sugar
2 teaspoon salt
1 egg
4 to 4 1/2 cups/ 512 to 576 g all-purpose flour
1 1/4 cups/300 ml warm milk (around 95° to 100°)
2 tablespoons butter, melted
Plain yellow corn meal for dusting
Combine the active dry yeast, water, yeast and sugar in a small bowl and allow it to stand until foamy, about 7 to 10 minutes.
Combine 2 cups of flour and salt in the bowl of a standing mixer. Pour in the egg, milk, butter and yeast mixture. Stir with a spoon to combine. Fit the mixer with the dough hook and add the remaining flour 1/2 cup at a time, kneading on medium-low speed as you make the additions. Knead for 3 to 5 minutes after the last flour addition.
Place the dough inside a large greased bowl and turn the dough over so that the entire surface is coated. Allow the dough to rise for 1 hour, or until doubled in size.
Sprinkle a work surface with cornmeal. Pour the dough out of the bowl onto the surface. Sprinkle the top of the dough with cornmeal and roll into a rectangle, slightly less than 1/2-inch thick. Cut muffins with a large round cutter, or with the mouth of a drinking glass.
Lightly oil a skillet and place it over medium heat. Place the muffins in the pan and cook until the bottoms are golden brown, 5-7 minutes per side.
Serve warm or split and toasted with jam and butter, or cool before placing them in an air-tight container. They will keep for 3 days air-tight or up to 1 month in the freezer.
You may use pastry rings or English muffin molds to help the muffins keep their round shape, but I tried the recipe both ways and found they did fine without.
Cinnamon Sugar Donut Muffins
[click for printable version]
Yields 24 mini muffins
Prep: 15 minutes, total time 40 minutes
Cakes
1/2 cup/100 g white sugar
1/4 cup/ 57 g unsalted butter, melted
Pinch of ground nutmeg
1/2 cup/120 ml milk
1 teaspoon baking powder
1 cup/ 128 g all-purpose flour
Coating
1/4 cup/57 g unsalted butter, melted
1/2 cup/100 g sugar
1 teaspoon ground cinnamon
Pinch of fine grain salt
Preheat the oven to 375°F. Grease the cavities of a 24 quantity muffin tin. (I like using flour-based baking spray that greases and flours the pan in one step).
Mix the 1/2 cup sugar, 1/4 cup butter and nutmeg in a large bowl. Stir in the milk, baking powder and flour until just combined. Fill the muffin cups 1/2 full and bake until lightly golden, about 15-20 minutes. Allow the muffins to cool slightly before turning them out onto a wire rack.
Place the melted butter in a small bowl and dip the muffins into the butter. (I normally use a fork to skewer the bottoms of the muffins and then tilt the butter bowl so it pools to one side, then I swirl the entire muffin into the butter.) As you dip the muffins, place them back onto the wire cooling rack. Pour the cinnamon-sugar in to a large zip-top bag (or a paper lunch sack) and place few muffins in at at time - shake, shake, shake - and return the sugar coated muffins to the wire rack. Repeat until all the muffins are coated. Store in a container that seals air-tight.

June 11, 2014
Gentlemen's Chocolate Whiskey Cake


According to The Chocolate Bible, a Gentlemen's Torte is a many-layered Sachertorte that is soaked with booze. Other books on the subject say that almost any cake could be called a Gentlemen's Torte if it is doused with enough whiskey. In fairness, I think this type of cake could also be called a Whiskey Women's cake (a book I'm loving, by the way) but with Father's Day fast approaching I was inspired by the masculine title. There's nothing wrong with honoring our fine fellows with cake - as long as they share!
This sheet cake is generously brushed with whiskey and a covering of ganache helps retain a lovely damp crumb. When I spotted the "Décor Smoking" cake decoration tutorial in my new Patisserie
 book there was no question it had to happen. It's as simple as cutting a triangle of fondant and folding in two edges - anyone can do it! I made a little video to show you exactly how easy it is, but I also wanted to show you how to transfer a cake like this from a drip rack to a cake board. Earlier this year someone had asked me how to transfer cakes easily, and here is my advice: chill the cakes before you try to move them and always use a cake lifter. The latter is a marvelous help, but due to it's oversized spatula head it's a pain to store. Believe me, I have two of them and even with the uncomfortable size, I now consider having at least one a necessity.
Video note! You'll notice that when I knead the red fondant for the "shirt" portion, I use vegetable shortening to grease the work surface. I also work just a little into the fondant. This may seem strange, but it makes the fondant soft and pliable without making it dry. It's not greasy at all, and I highly prefer it over messy powdered sugar and cornstarch. If you're not a fan of fondant, marzipan is a suitable substitute.


The chocolate cigarettes on the corner of the cake were an afterthought because - oops! I accidentally grazed it with my wedding ring. I was really sad when that happened because the cake's surface was so perfectly mirrored and shiny. I like them on the cake though, and I think they make sense on a cake dressed as a smoking jacket. Chocolate cigarettes are perhaps the least alarming cigarettes of them all, am I right? I found them at World Market in the baking ingredients section if you're looking to buy them.


I'm not ashamed to admit that I ate three pieces of this cake yesterday. It reminds me of a chocolate cake from my favorite Italian restaurant - but better! The whiskey gives it a sophisticated flavor, but it's not overly boozy on the tongue. The fact that it's a sheet cake makes it so simple to whip up, but if you're looking for layers, the batter can be baked in two 9-inch round cake pans. You can find baking times for both versions in the recipe below.
Gentlemen's Chocolate Whiskey cake
[click for printable version]
Source: Food.com and Patisserie by Christophe Felder
Prep: 1 hour 30 minutes, total time about 2 hours
Chocolate cake
2 cups/190g all purpose flour
1 teaspoon salt
1 teaspoon baking powder
2 teaspoons baking soda
3/4 cup/85g unsweetened cocoa powder
2 cups/398g granulated sugar
1 cup/200g vegetable oil
1 cup/8oz hot coffee
1 cup/242g whole milk
2 large eggs
1 teaspoon vanilla
2-3 oz. whiskey
Chocolate glaze
1 1/2 cups/300ml heavy cream
1 tablespoon sugar
9 oz./250g bittersweet chocolate (60-70% cocoa)
3 tablespoons/ 50g unsalted butter
Bow tie and shirt decor
4 oz. ready made rolled fondant, red
1 oz. ready made rolled fondant, white
3 black pearl dragees
2 chocolate cigarettes, optional
Preheat the oven to 325F. in a large mixing bowl, sift together the dry ingredients. Add oil, coffee and milk; mix at medium speed for 2 minutes. Add eggs and vanilla and beat 2 more minutes. Expect the batter to be thin. Pour the batter into a 13x9-inch greased and floured pan or two 9-inch round pans and bake the 13x9-inch pan for 40 minutes. If using the two 9-inch round pans, check them at 30 minutes. Let the cake cool in the pan for 10 minutes and then turn it out onto a wire cooling rack. Place the cooling rack on a large baking sheet. Using a pastry brush, coat the cake with the whiskey. Allow the cake to stand 20 minutes to absorb the liquor.For the glaze, bring the cream and sugar to a boil in a small saucepan over medium heat. Finely chop the chocolate and place it in a bowl. Pour half of the hot cream into the chocolate. Let the mixture stand for 2 minutes, then stir the mixture slowly with a wire whisk. Add the remaining cream and whisk slowly until smooth. Add the butter and stir until the chocolate in smooth and shiny. Let the mixture cool slightly.Pour the glaze over the cake and cover it completely. Use an offset spatula to smooth the surface and wipe off any excess glaze. Lightly rap the rack on the baking sheet to even out the glaze. Refrigerate for 15 minutes, or until the chocolate is set. Scrape the excess chocolate from the baking pan into a bowl and heat it again in the microwave or on the stovetop until pourable but not hot. Place the cake on the rack on top of the baking sheet and cover the cake a second time with the ganache. Smooth with a spatula and rap the rack again to even the ganache coating. Refrigerate again until set.Run a sharp knife under the edge of the cake to loosen it from the drip rack. Use two cake lifters or two large spatulas to transfer the cake to a cake board or serving platter. For the decor, lightly grease a work surface with white vegetable shortening. Knead the red fondant until smooth and pliable. If it is too dry, then knead in a small amount of shortening. Roll out the red fondant to 1/8-inch (2-3mm) thick. Cut a triangle almost as long as the cake. Fold over the two upper corners to create shirt lapels. Lift the piece with a long spatula and place it on the center of the cake. Roll out the white fondant and trim it into a small rectangle, just long enough to make a bowtie. Gather it in the center to shape it. Cut a very small strip from the excess white fondant to make the center of the bowtie; wrap it around the gathered center of the bowtie. Pinch away the excess fondant strip on the backside of the bowtie. Place the bowtie in the center of the red fondant lapels. Press three black pearl dragees evenly spaced down the center of the cake to create shirt buttons. Cross the chocolate cigarettes and place them on one lower corner of the cake, if using.
June 2, 2014
Blondie Confetti Ice Cream Sandwiches and a Giveaway!
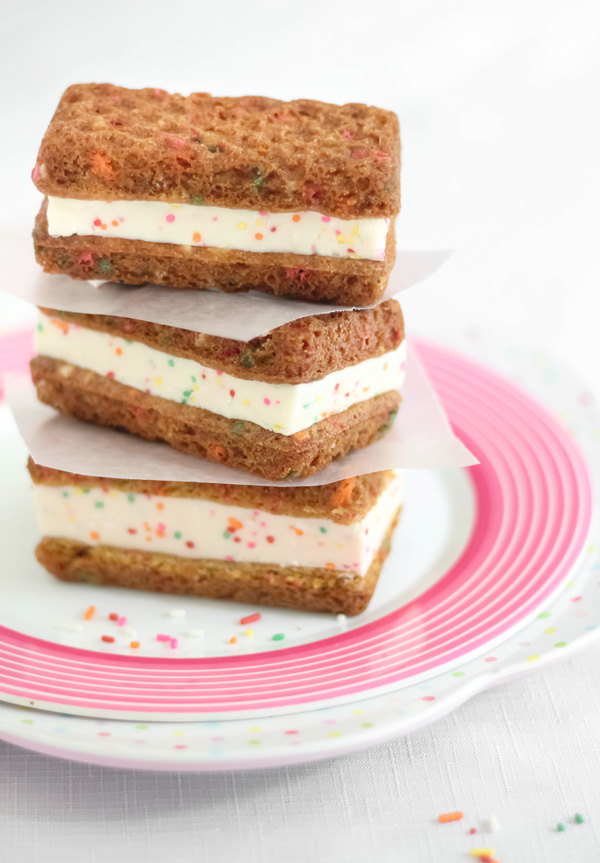
Hello June! The first day of summer is still three weeks away, but from where I'm standing -which is squarely in 80 degree weather- it feels like we're already there! I say we give this month a fitting kick-off with a chilly treat. I always associate ice cream sandwiches with summer. And if you ask me, they're made to be enjoyed while sitting outside on the front porch steps, watching the first fireflies.
To me, blondies taste like birthday cake but with a different texture. Chewier. So, these little ice cream sandwiches are like having your birthday cake and ice cream all rolled into one sweet. I can't tell you how many times I've made blondies over the years, but this is the first time I've made them for a blog post - can you believe it? I know! I deserve a proper scolding.

I love how these sandwiches are so uniform, and that's thanks to this super cute pan from Wilton. With it, you can basically turn any cake, brownie, or cookie recipe into shells for sandwiching ice cream. Because I love it so much, we're giving one away, along with a pretty ice cream scoop and a big bottle of multicolor sprinkles!

a Rafflecopter giveaway
This contest is open to US residents. Please read the terms and conditions on the widget for more information.

This pan is destined to get a workout in my kitchen this summer. I can't wait to try brownie ice cream sandwiches, or even a no-bake chocolate chip cookie dough version. There are so many possibilities! I'm rather fond of this blondie version, but Wilton has also included two recipes inside the pan's packaging to get you started!
Blondie Confetti Ice Cream Sandwiches
[click for printable version]
Source: Blondie recipe adapted from Williams-Sonoma
Yields: approximately 18-20 sandwiches
These sandwiches were made using the Wilton Ice Cream Sandwich pan. If you don't have this pan, instructions for using cookie cutters are included.
1/2 gallon vanilla ice cream, softened
1 cup/180g multicolor jimmies/sprinkles
2 1/2 cups/340g all-purpose flour
1/3 cup/60g multicolor jimmies/sprinkles
1 teaspoon baking soda
3/4 teaspoon salt
1 cup/216g unsalted butter, softened
1 cup/257g firmly packed light brown sugar
1/2 cup/114g granulated sugar
2 eggs
2 teaspoons vanilla extract
1/2 gallon ice cream of your choice
Place the ice cream in a large bowl and fold in the multicolor jimmies. Line a 9x13 baking dish with parchment paper so that two sides of the paper overhang the edges. Pour the ice cream into the dish and freeze until solid, 3-4 hours or overnight.Preheat oven to 325F. Spray the Wilton ice cream sandwich pan with baking spray with flour (such as Wilton brand Bake Easy!), or spray a 13x9-inch jelly roll pan with cooking spray and line it with parchment paper, allowing the parchment to overhang two sides.Sift together the flour, baking soda and salt. Set aside.In the bowl of an electric mixer fitted with the paddle attachment, beat the butter on medium-low speed until smooth. Add the brown and granulated sugars, increase the speed to medium and beat until fluffy, about 2 minute, stopping to scrape down the sides occasionally.Add the eggs one at a time, beating well after each addition, then beat in the vanilla, stopping the mixer occasionally to scrape down the bowl.Reduce speed to low, gradually add the flour mixture and beat until just combined. Cover the bowl and refrigerate for two hours or until the dough is stiff.Press 1 1/2 tablespoons batter into each cavity of the ice cream sandwich pan using buttered fingers or a piece of parchment paper sprayed with cooking spray. If not using the ice cream sandwich pan, evenly press the dough so that it just fits into the jelly roll pan. Bake for 13-15 minutes (check the Wilton ice cream sandwich pan at 13 minutes). Transfer the pan to a wire rack to cool. Place a sheet of parchment over a work surface and turn the individual ice cream shells out onto the paper. Allow them to cool completely. If using the 13x9 pan, lift the blondie out of the pan with the two overhanging pieces of parchment. Let cool completely. Cut shapes out of the large blondie sheet using cookie cutters.Remove the ice cream from the pan by lifting it with the two overhanging parchment edges. Working quickly, cut shapes from the ice cream using the same cutters used for the blondies. Sandwich like shapes together. If using the Wilton pan, use a blondie sandwich piece as a template to cut rectangles from the ice cream slab. Use a sharp knife and work quickly! Sandwich the ice cream rectangles between blondie shells.Store sandwiches individually wrapped in wax paper in the freezer.
May 30, 2014
Rhubarb-Wrapped Pineapple Mousse Cake

Last summer I received a beautiful dessert magazine in the mail. It was titled Sweet Dreams, and the cover had a big glossy image of a cake on it. It was so striking, I couldn't wait to read every single page. I quickly found out it was written in German, so reading would have to wait for translation. Still, I sat leafing through the pictures and -surprise- a picture of me! There I was, in the same magazine with esteemed pastry chefs and their gorgeous desserts -which was a real hoot, if you ask me! On the opposite page (and more eye-catching than I could ever be) was a picture of fresh rhubarb, with stalks shaved paper-thin and curled into ribbons. I may have gasped, it was so beautiful.
Further into my reading (if you can call it that) I fell in love with a cake. At first glance I had no idea what was on the inside, nor did I care because the outside was so stunning. It was all wrapped up in strips of pink-red rhubarb. I wanted to make it immediately, but found myself questioning my own aptitude. Then I remembered something a smart baker once said: you shouldn't be afraid of cake, if anything, cake should be afraid of you because you're going to eat it.
I decided to go forward on that thought.

Since the recipe was in German, I set to translating it, and gratefully I have a friend who is a German professor who helped me when I stumbled (dankeschön, Darlene!).
After the recipe was translated in full, I decided to use my own method for making pineapple mousse, mostly because the recipe called for gelatin sheets, and those aren't sold in grocery stores here. Other problems persisted - the local produce wasn't great, I could only find short stalks of rhubarb and I couldn't find any good tarragon (only bad tarragon), so a few things were changed and simplified along the way.
Despite all the tweaking, this cake is delicious. Dreamy. And, of course, the one thing I refused to compromise was the beautiful paper thin covering of rhubarb strips across the cake.

This recipe makes a standard 8-inch cake. Since my rhubarb stalks were so very short, and they wouldn't have wrapped very far around a cake that size, I ended up making one 5-inch cake and three 2-inch cakes. I must admit, it was kind of nice having my own little single serving cake.


The most complicated part of building this cake is the process of boiling the rhubarb strips in sugar syrup.You can't leave them in the boiling water for too long or they'll become rhubarb noodles. I found that a cooking time between 20 and 30 seconds was about right. It's a good idea to have extra rhubarb strips in case the first batch ends up being practice.
Decorating the mousse cake was so much fun, and it was easy! Just lay the strips across the top of a frozen mousse cake and trim the excess with a pair of kitchen scissors. The rhubarb pieces I used were varied in color, so I decided to create an ombre effect. After you're done with the top, start layering the strips around the edges. Layer the first pieces so that the rhubarb strips are flush with the top of the cake and hides any ragged edges you may have created while trimming the top.


This mousse cake is like a gift all wrapped in beautiful packaging with delicious things inside. The center is so sweet and mild with light pineapple flavor, it really strikes a balance with the slightly tart rhubarb covering. I'll definitely be making it again before fresh rhubarb disappears from the market shelves!
Rhubarb-Wrapped Pineapple Mousse Cake
[click for printable version]
Yields one 8 or 9 inch cake
Source: Mousse and crust recipe from the Sprinkle Bakes book,
Rhubarb wrap technique by pastry chef Bernd Siefert
Prep: 1 hour, total time with chilling about 4 hours
Crust
1 1/4 cups fine graham cracker crumbs
4 tablespoons unsalted butter
1/2 tablespoon sugar
Pinch of salt
Combine the ingredients in a large bowl. Mix well, making sure that all the crumbs are well coated with butter. Press evenly into the bottom of an unlined 8 or 9 inch springform pan. If making individual cakes, place 6 pastry rings on individual sheets of plastic wrap. Divide the crust mixture evenly among them and press tight with a flat-bottomed tumbler.
Pineapple mousse
2 tablespoons unflavored powdered gelatin
1/4 cup pineapple juice with pulp
2 cups pineapple puree
3/4 cup sugar
1 1/4 cups heavy whipping cream
In a small bowl, sprinkle the powdered gelatin over the pineapple juice. Let stand until the gelatin absorbs the water. Microwave for 10 seconds at full power or until the gelatin has melted into a clear liquid. Gelatin can also e melted in a saucepan on the stovetop over medium heat.
Combine the fruit puree and sugar; mix well. Pour in the liquid gelatin mixture. Let stand at room temperature until the mixture begins to thicken, about 20 minutes.
Whip the heavy cream until stiff peaks form. Stir the fruit puree mixture gently to loosen it. With a large rubber spatula, fold 2-3 tablespoons of whipped cream into the fruit puree to relax it. Fold in the remaining cream until blended and there are no longer steaks of fruit visible.
Pour the mixture over the crust in the spring form pan (or divide between pastry rings) and freeze until solid, about 2 hours.
Rhubarb strips
1 cup water
1/2 cup sugar
6-7 long stalks of rhubarb
Place the water and sugar in a small saucepan. Bring to a boil over medium-high heat and stir until the sugar is dissolved. Lower the heat to medium and let stand until the mixture is at a slow simmer. Lay out sheets of double thick paper towels on a large work surface or your kitchen counter.
With a vegetable peeler (Y-shaped or asparagus peeler-type) shave the rhubarb stalks into paper thin strips. Place two to three strips in the simmering water at a time, only allowing them to cook for 20-30 seconds. Lay the cooked rhubarb strips flat on the paper towels to drain. Repeat with remaining rhubarb strips. After you're done, the sugar syrup will be bright pink-red. Reserve the syrup for later use.
To decorate the cake, lay the strips on the top of the cake until the surface is completely covered. Trim away the excess with kitchen scissors. The strips should stick naturally, but if they do not, brush them with a little of the reserved sugar syrup. Wrap more stalks around the sides of the cake, beginning with the top so that the strips will cover any ragged edges created during trimming the top. Brush the entire cake with the reserved syrup. Place in the refrigerator to thaw. Cut with a very sharp knife - rhubarb can be very fibrous, so this is a very important step. You may also cut the cake into pieces while frozen and let the slices come to room temperature. Store the cake, covered, in the refrigerator or freezer.
May 27, 2014
Coffee Caramel Ice Cream Bombe for Better Homes and Gardens

Happy almost June, friends! It's hard to believe how fast this month has gone by, and it's been a sweet one for sure! Many, many thanks to BHG for having me on as their Month of Cakes contributor.
My final post combines so many of my favorite things - coffee ice cream, hot fudge, salty almonds, chocolate shavings - I don't think there is a craving it won't satisfy!
You can find all the instructions for this summertime-ready ice cream cake here - enjoy!

May 23, 2014
Fresh Watermelon Cake


I'm not really sure who came up with the idea for this cake, but I love everything about it. I've seen a few versions floating around the web and with Memorial Day weekend coming up, I decided it was time to try it for myself.
The best part about it is that you only need three ingredients to make it (okay, four if I'm being picky). It's delicious, and even more so now because juicy watermelons are ripe and readily available at the grocery store. It is so easy to make and highly summer cookout appropriate. And if you're like me, you occasionally enjoy faking people out, especially at family gatherings. Leave the melon balls of the top of the cake and no one will be the wiser!

The frosting is heavy whipping cream beaten with granulated sugar. I added vanilla bean to the party because I knew it would be delicious. And it is. I've seen versions of this using tubs of frozen whipped topping, so you could use that too and make even shorter work of building the cake. I recommend the homemade whipped topping, though. Everything tastes so fresh and lovely.

Cutting the watermelon to shape was easier than I thought. Just cut the top and bottom of the melon off flat, and then carve the rind away. The shape doesn't have to be anywhere near perfect, just do the best you can. The whipped cream will camouflage an uneven surface.

You can make this cake as large or small as your party dictates (or that the available produce will allow), but you'll need to adjust your whipped cream topping accordingly. This watermelon was about 7 pounds before carving, and 2 1/2 cups of heavy whipping cream covered it well. It's actually better to have too much whipped cream than too little, since it is instrumental in smoothing an uneven carving job.
Hope you all have a happy Memorial Day weekend! ♡
Fresh Watermelon Cake
[click for printable version]
Yields 12 servings
Prep: 30 minutes, total time about 45 minutes
7- 10 pound whole seedless watermelon
2 1/2 cups/580g heavy whipping cream
1/4 cup/50g sugar
Seeds from one vanilla bean
Mint sprigs for garnish (optional)
Using a large sharp knife, cut the top and bottom off of the watermelon flat and save the ends for later use. Turn the watermelon upright and carve away the rind in downward strips until all of the green and white pith is removed and you're left with a red, ripe center. Carve away small pieces from the sides and top until the center is roughly cake-shaped.In a large mixing bowl, beat the heavy cream on high speed with an electric hand mixer until it begins to thicken. Add the sugar one tablespoon at a time, and then the vanilla bean seeds. Beat until the mixture is thick and spreadable, about 5 minutes.Transfer the watermelon to a cake stand or serving plate and pat the outside with paper towels to remove excess water. Spread the whipping cream over the entire surface of the watermelon. Use a melon baller to cut round pieces of melon from the two reserved ends. Place them on the top center of the cake and garnish with mint sprigs, if using.Store the cake in the refrigerator.
PS. The adorable little red bicycle is a cake topper and can be found at Hey Yo Yo!