Heather Baird's Blog, page 83
December 3, 2013
Sugar Plum Fruitcake with Cream Cheese Frosting
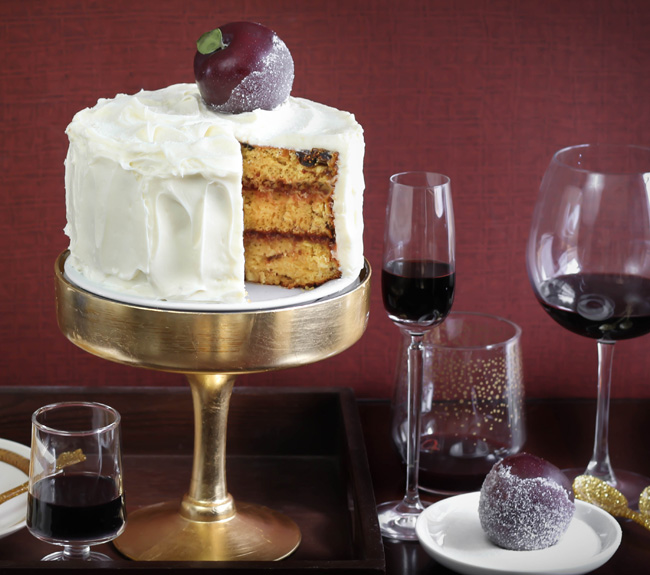

Many of you know that I've spent 2013 baking for Betty. It's been a lively year of fun minion cakes, candy bar creations and snickerdoodle skillets. I'd anticipated some special holiday projects, and I was thrilled to learn I'd be recreating one of their Red Hot Holiday Trends! You see, each year the sweet minds behind Betty Crocker gauge what's new and exciting in the baking world - turns out, fruitcake is so in!
But not just any old fruitcake (so leave those bright green and red candied cherries on the shelf!). We're talking bourbon-plumped figs, juicy dates, plum jam filling and homemade cream cheese frosting. Frosting on fruitcake? Heck yes. Cheese paired with fruit is almost always a heavenly match.


This recipe uses Betty Crocker's SuperMoist® yellow cake mix as a base, and considering how lengthy most fruitcake recipes are, it's a nice little shortcut to scratch-made flavor. I baked the batter in my three favorite 7-inch spring-form pans, but it'll bake up perfectly as a 9-inch double layer cake, too.

Red plum jam is used as the filling, and it plays well against the fruit and fragrant orange zest used in the cake batter. There's a definite sweet-tart boozy goodness to this confection, and the creamy frosting helps to strike just the right balance.


Since some folks have a knee-jerk reaction to the word "fruitcake", I'll understand if you want to drop that moniker and just call this "Sugar Plum Cake. It's really nothing like the traditional (read: brick) fruitcake you'll see on Great Aunt Earnestine's buffet. It's moist and flavorful, and to me, it tastes just like Christmas.
Be sure to check out Betty's take on the new fruitcake, and a slideshow of all the yummy trends by other Betty bloggers!
Sugar Plum Fruitcake
[click for printable version]
Yield: 12 servings
Source: Sprinkle Bakes original recipe
Prep: 30 minutes, total time with fruit-soaking up to 24 hours
Cake
1 box Betty Crocker SuperMoist® yellow cake mix
1/2 cup dried dates, chopped
1/2 cup dried figs, chopped
1/4 cup Kentucky bourbon
Zest of 1 orange
4 eggs
1/3 cup vegetable oil
1 cup water
1/2 cup slivered almonds, crushed
1/2 cup ground almonds
Filling
3/4 cup prepared red plum jam or jelly
Frosting
8 oz. cream cheese, softened
1/2 cup unsalted butter, softened
2 cups powdered sugar
1 fresh, whole red plum
Corn syrup
2 tablespoons granulated sugar
Combine the dates and figs in a small bowl. Pour over the bourbon and cover tightly. Allow fruit to soak for at least 2 hours or overnight (preferred).Heat oven to 350F. Grease and flour three 7-inch cake pans (or two 9-inch); set aside.Combine the following in a large bowl: cake mix, orange zest, eggs, vegetable oil and water. Mix well with an electric hand mixer. Fold in bourbon-soaked fruit and crushed almonds. Pour cake batter into prepared pans and bake for 30-35 minutes, or until the cakes spring back when pressed in the center. Turn cakes out onto a wire rack to cool completely.When cakes are cool, fill the layers with red plum jam. For the frosting, combine the cream cheese and butter in a large bowl. Beat well with a hand mixer until combined and creamy. Add powdered sugar a little at a time; beat on high speed until smooth and fluffy. Cover the cake in a thick coating of cream cheese frosting. For a wintry decoration, brush the fresh plum with a little corn syrup and roll in the granulated sugar. Place slightly off-center on top of the cake. Serve immediately. Store cake loosely covered in the refrigerator. Bring cake to room temperature before serving.
This post is sponsored by Betty Crocker, and is part of the Red Hot Holiday Trends of 2013.


December 2, 2013
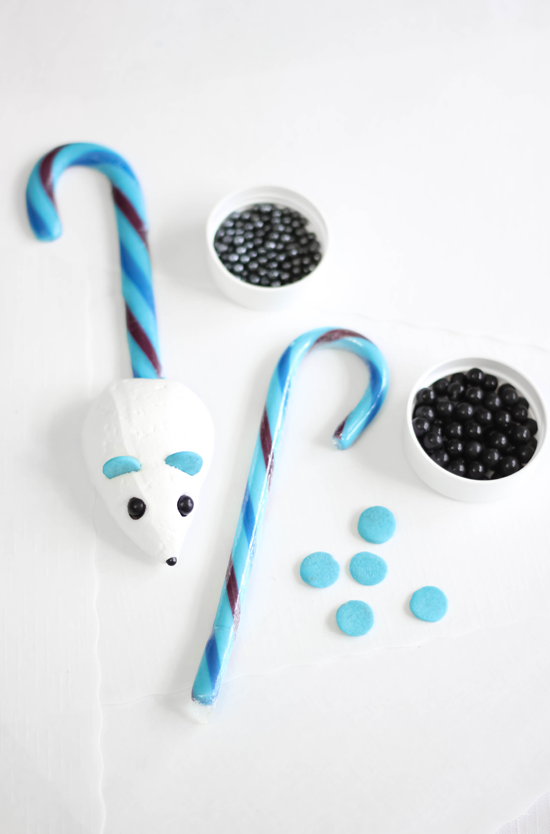
Candy Cane Mice

How funny are these little guys? I couldn't help but giggle as I made them because each seemed to take on a different personality. They're simply made from meringue and candy canes. I used jumbo confetti sequins (like these) for their ears, but slivered almonds would work well, too. I love how they're like a lollipop with an edible stick.
Even though these are pretty easy to make, Biscuit and I decided to make a short video tutorial!
(email subscribers click here or here to view)
You can make these using stiff peak royal icing also, (which eliminates baking) but the baked meringue version is my favorite, and that's what I chose to demonstrate in the video.

I learned a few things after making several batches of these. There are some small details that need attention for a perfect end result.
Make sure to buy candy canes that are made of hard candy. They'll be shiny and heavy, unlike porous lightweight candy canes that are softer and made for chewing. You want the ones with the hardness of a lollipop. One brand I used was Jelly Belly for blueberry, bubblegum and green apple flavors - fun! If making the baked meringue version, bring the eggs to room temperature before whipping. They'll gain maximum volume and stand up to the oven's heat better.Add the sugar to the egg whites gradually. I'm talking 1/2 tablespoon at a time. Incorporating the sugar slowly will help avoid a grainy meringue.Beat the meringue until stiff peaks form. This can take up to 7 minutes. Don't skimp on this part, otherwise the mice will weep and flatten in the oven. The extra moisture will cause some of the candy cane to melt and run.Make sure your oven temp is true. These are baked at a mere 160 degrees F. and if your oven is too hot the candy canes will melt and make fat squirrel tails instead of thin little mousy tails. But then, squirrel tails are pretty cute too... hmm.

These also make way cute Christmas tree decorations - just be sure to make the royal icing version instead of the meringue version for the tree. Meringue will soften with humidity in the air, and royal icing is much more durable (as most gingerbread-builders know).
Candy Cane Mice
[click for printable version]
Yield: 16 mice
Source: SprinkleBakes original recipe
Prep: 1 hour, total time with drying up to 24 hours
2 egg whites, at room temperature1/4 teaspoon (1g) cream of tartar1/2 cup (100g) granulated sugar16 full size candy canes (hard candy type, see tips)
Jumbo confetti sprinkles or almond slivers
Black Sixlets pearls or jumbo nonpareils
Black nonpareils
Prepare two large baking sheets by lining them with parchment paper. Preheat the oven to 160 degrees F. Unwrap candy canes and line them up (6-8 canes per sheet) on one side of the baking sheet, spaced 2-inches apart. The candy canes’ curved end should be pointed toward the edge of the baking sheet leaving plenty of space to pipe meringue onto the pointed end.Place room temperature egg whites in the bowl of an electric mixer fitted with a whisk attachment. It is important that the bowl and whisk both be very clean, so that the egg whites whip properly. Begin beating the egg whites on medium speed. Once they are very frothy, stop the mixer and add the cream of tartar. Start the mixer again and continue to beat the egg whites. Once they form soft peaks, increase the speed to high and gradually add the sugar, 1/2 tablespoon at a time. Beat the whites until they are very shiny and hold stiff peaks, but are not dry or crumbly.Spoon the meringue into a large pastry bag fitted with a 1/2-inch round tip (You may also use a zip-top bag with the corner snipped). Pipe meringue onto the end of a candy cane in a large teardrop shape; decrease pressure as you pipe and pull the bag away to create a point that will be the mouse’s nose. If meringue point falls downward, wipe the fallen part away with a finger. Press a black nonpareil onto the end of the point. Place two black Sixlets pearls on either side for the eyes. Press a jumbo confetti sequin onto each side of the head for the ears.Bake the meringues at 160 degrees F. for about 90 minutes, turning them halfway through the cooking time to ensure an even bake. Let mice cool on the baking sheet. The candy canes will be soft and break if moved too soon. When cool, the meringues should be hard and dry to the touch, and you should be able to easily lift them easily from the parchment. If making the royal icing version, click here for my Royal Icing with Meringue Powder recipe. Proceed as directed for baked meringue mice, but do not bake. Allow royal icing to set 24 hours before lifting from the parchment. Since this version is not baked, you may use chocolate chips for eyes instead of Sixlets pearls or jumbo nonpareils.
TIPS!
Make sure to buy candy canes that are made of hard candy. They'll be shiny and heavy, unlike porous lightweight candy canes that are softer to chew. You want the ones with the hardness of a lollipop. One brand I used was Jelly Belly for blueberry, bubblegum and green apple flavors - fun! If making the baked meringue version, bring the eggs to room temperature before whipping. They'll gain maximum volume and stand up to the oven's heat better.Add the sugar to the egg whites gradually. I'm talking 1/2 tablespoon at a time. Incorporating the sugar slowly will help avoid a grainy meringue.Beat the meringue until stiff peaks form. This can take up to 7 minutes. Don't skimp on this part, otherwise the mice will weep and flatten in the oven. The extra moisture will cause some of the candy cane to melt and run.Make sure your oven temp is true. These are baked at a mere 160 degrees F. and if your oven is too hot the candy canes will melt and make fat squirrel tails instead of thin little mousy tails. But then, squirrel tails are pretty cute too... hmm.
November 30, 2013
Five Minute Bourbon Balls

This year my Christmas candy wishlist is bigger than ever! It's making a real mess of things in my kitchen, but in the end those dirty dishes are usually worth it. Of course, if I had my preference every candy recipe would be just like this one - easy, delicious, and my kitchen didn't suffer any turmoil. And it's a seasonal favorite to boot!

I mixed these up in five minutes flat, and in about five more I had them all rolled out and stored in a tin. You can eat them immediately, but they improve upon standing. In about three days' time the boozy edge will mellow and the bourbon flavor will be more developed. I plan to make several batches ahead of time to give as Christmas gifts.


Since these only have five ingredients, I'd urge you to use best of each. I used quality chocolate, local honey and a fine Kentucky bourbon. Keep these guys tightly closed in a tin for longevity and they'll keep for up to four weeks!
Five Minute Bourbon Balls
[click for printable version]
Yield: 1 1/2 dozen
Source: adapted from a vintage Betty Crocker microwave cookbook
Prep: 5 minutes, total time about 10 minutes
1/2 cup/ 4 oz. semisweet chocolate chips
2 tablespoons/ 43 g honey
1 1/2 cups finely ground vanilla wafers (such as Nilla Wafers)
1 1/2 cups/ 155g ground walnuts
3 tablespoons/ 45 ml bourbon whiskey (I used Wild Turkey Kentucky Bourbon)
Pour 1/2 cup of the ground walnuts in a small bowl and set aside for later use.
Mix chocolate chips and honey in a 1 1/2 quart microwaveable bowl. Heat in the microwave at full power 1-2 minutes, until the mixture can be stirred smooth with no lumps remaining.
Stir in ground vanilla wafers, walnuts and whiskey. Stir; mixture should be quite thick. Scoop out mixture by the level tablespoons and roll into balls. Roll in reserved 1/2 cup of ground walnuts. Store tightly in a covered container. Flavor will fully develop over four days. Stored properly, these will keep up to 4 weeks.
Note: If you don't have a microwave, you can melt the chocolate and honey over medium-low heat in a saucepan. This may take a little longer (you'll have to abandon the 5 minute moniker) but it'll be worth the time and effort!
November 26, 2013
24 Karat: Saffron Poached Pears with Chocolate


'Tis the season for poaching pears, my friends. It's cold here, and I've been spending my time stirring pots of simmering spices and sitting on the kitchen floor (book in hand) in front of my oven. It's my particular way of keeping warm, both physically and in spirit.
Something else that warms my soul - unexpected goodies sent from a friend traveling abroad. I squealed a little when I unwrapped the little matchbox of red-orange threads: saffron. It's one of the more magical items you can use in cooking, if you ask me. I mean, how can just a pinch yield such magnificent golden color? Magic.
Saffron is complex on the tongue, and it's possible that each taster will have a different flavor experience. These pears are simmered with a vanilla bean, and to me, they seem to take on sweet honey-like qualities. Although the pears are indulgent on their own, the chocolate sauce makes the dish decadent. Pour over as little or as much as you like!

These are so easy to make, but you'll need to plan ahead. I poached the pears and then let them stand in the poaching liquid overnight to absorb as much color and flavor as possible. This isn't absolutely necessary, but I found the vanilla flavor was more pronounced. The color was just a tad brighter, too.
Saffron Poached Pears with Chocolate
[click for printable version]
Yield: 4 servings
Source: adapted from Chef Jun Tanaka's recipe
Prep: 20 minutes; total time 40 minutes to overnight (subject to your variation)
This is my riff on poires au chocolat. A word about choosing pears for this recipe - try to find pears with an almost apple-like firmness, especially if you plan to steep the pears overnight. I use and recommend Bosc.
Saffron pears
3 3/4 cups /875 ml cold water
1/2 lemon
1 cup/200 g granulated sugar
4 firm pears, peeled with core and stems in tact
1 pinch saffron threads
1 vanilla bean pod
Chocolate sauce
1/2 cup/82g chopped semisweet chocolate
3 tablespoons heavy cream
1 tablespoon unsalted butter
Edible gold leaf *optional
For the saffron pears, fill a medium saucepan with the cold water. Squeeze the lemon over the water and then add the rind to the pot. Add the sugar and stir briefly. Carefully place the peeled pears in the water. Place over medium-high heat and stir until the sugar is melted. Split the vanilla pod and scrape out the seeds. Add the seeds and pod to the saucepan. Add the pinch of saffron. Bring ingredients to full boil and then reduce to a simmer. Simmer for 20 minutes or until just fork-tender. Remove from heat and let the pan cool to just warm. You may drain and serve the pears immediately, or cover the saucepan and place in the refrigerator overnight for intensified color and flavor. If you choose the overnight method, gently re-heat pears in the poaching liquid before serving.For the chocolate sauce, place all ingredients in a small saucepan and cook over medium-low heat. Stir until all components are melted and blended smooth. Place pears on a serving plate and top each pear with chocolate. Adorn with gold leaf if desired.Baker's note: Whenever I feature poached pears on the blog, someone inevitably asks how they're supposed to eat them. Although I'm a bit puzzled by this, I'll formally state here that serving them with a knife and a fork is a good idea. (smile)
November 15, 2013
Sweet Potato Pecan Praline Cheesecake Bars


Cheesecake is a dessert that everyone in my family loves. I turn to it for our annual gatherings more than any other sweet, and it never disappoints. This sweet potato version is a new favorite of mine. It's light and mild with a creamy texture rather than being tangy and dense (I'm looking at you New York cheesecake!).
I whipped up an easy pecan praline sauce to give it added texture and sweetness. In my opinion, the sauce really makes this dessert. The buttery brown sugar flavor contrasts perfectly with the mild sweetness of sweet potato.

Believe it or not, this recipe's humble genesis was from an old weight loss magazine. I was drawn in by the beautiful pictures, but I cringed reading the ingredients - low-fat/no-fat and Sucralose-laden... yeesh! I threw out the recipe but kept the picture for inspiration. In the end, a delicious dessert was realized: gingersnap crust (the original recipe didn't even have a crust - seriously?), a sugar-sweetened yammy cream cheese filling, and a brown sugar-pecan topping that underscores all the above.
I have a feeling this recipe will be in heavy rotation for the next couple of weeks. These bars are SO easy to make and quintessentially fall!
Sweet Potato Pecan Praline Cheesecake Bars
[click for printable version]
Yield: 15-20 bars; one 10x10 or 13x9 pan
Source: Sprinkle Bakes original
Prep 25 minutes, 6 hours 25 minutes with chilling
Crust
2 cups/272g gingersnap cookie crumbs
1/2 cup/ 57g unsalted butter, melted
Filling
3 packages/24 oz. cream cheese, softened
3/4/150g cup granulated sugar
15 oz. sweet potato puree (canned, packed sweet potato is fine)
2 tablespoons/16g all-purpose flour
1 tablespoon ground cinnamon
1 teaspoon vanilla extract
2 large eggs
Topping
1/2 cup/64g unsalted butter
1/2 cup/110g brown sugar
2 tablespoons milk or cream
1/4 cup chopped pecans
Pinch of sea salt
Preheat oven to 325F.Combine the cookie crumbs and melted butter in a small bowl. Stir until crumbs are evenly moist and covered in butter. Press into the bottom of a lightly buttered 10x10 or 13x9-inch baking dish. Refrigerate while you prepare the filling.For the filling, combine the cream cheese and sugar in a medium bowl. Beat well on medium speed with an electric hand mixer. Add the pumpkin, flour and cinnamon; mix well. Add vanilla and eggs and beat on low speed until just combined. Pour filling over chilled crust.Bake for 40-45 minutes. When done, the center of the cheesecake will be almost set but still have a slight wobble. Let cheesecake cool in the pan, then cover and transfer to the refrigerator. Chill for 6 hours or overnight (preferred). Cut cheesecake into bars, approximately 15-20 pieces.For the topping, melt the butter over medium heat in a small saucepan. Add the brown sugar and stir to combine. When sugar is almost completely melted whisk in the milk; stir until smooth. Stir in pecans and sea salt. Let cool slightly before pouring over bars. Serve. Store leftovers loosely covered in the refrigerator.
November 6, 2013
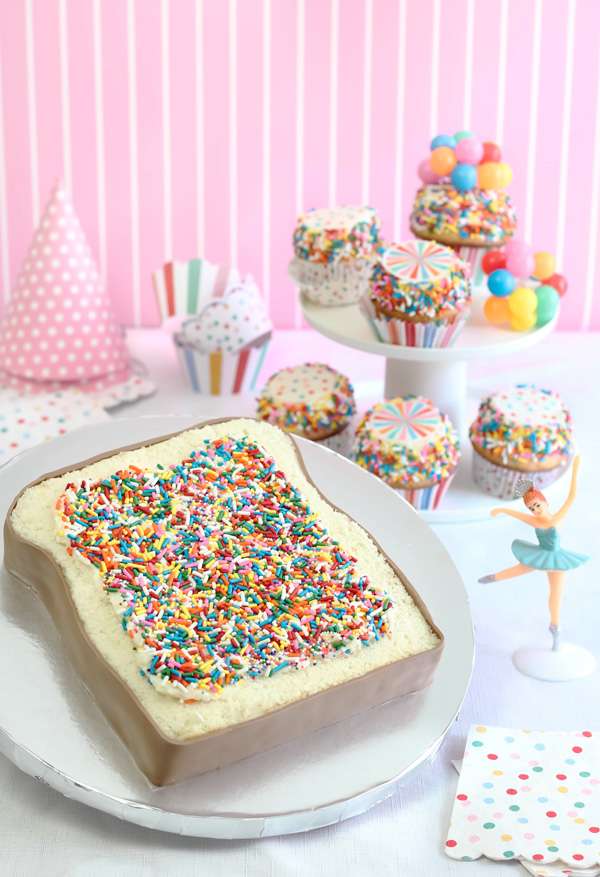
Fairy Bread Party Cake and a Hey YoYo Giveaway
Today I'm bringing you a special Hey YoYo giveaway! We're in the midst of holiday baking season, so it's a good time to stock up on baking essentials, partyware and pretty packaging. Wouldn't a $40 Hey YoYo gift certificate be nice to help out with that? Yes!
In addition, all Sprinkle Bakes readers shopping at Hey YoYo will receive a 20% discount by entering promo code sprinklebakes at checkout - something for everyone! I like it.

Before I get to the fairy bread party cake (which may be my favorite sprinkle cake, ever!) I have to tell you about these neat edible icing transfers. They meld right onto buttercream icing and make cupcakes look adorable. It's seriously the easiest cupcake decorating I've ever done! And I love how they match the rest of the Toot Sweet party line.


With all the confetti-themed party supplies floating around the house, I couldn't resist making a fun celebration cake. This one stems from my love of fairy bread. It's easily made with an 8x8 square cake pan and a serrated knife. I used some brown fondant strips around the edges to give it an authentic-looking bread "crust", but honestly, the cake was pretty cute without the fondant!

Dotty party candles are a must-have!

Dancing ballerinas and sprinkled cupcakes are party-perfect!
Hey YoYo ships everywhere, so this contest is open worldwide!
a Rafflecopter giveaway

This is a nice little all-purpose single-layer white cake. The recipe description is "white velvet" but the southern girl in me hesitates to call it such. In my experience, a true velvet cake should be made with buttermilk and have vinegar and baking soda leaven. I'm often surprised at what people will call a velvet cake, but I'm never one to turn down a piece - however it's been remixed!
Fairy Bread Celebration Cake
[click for printable recipe]
Yield: 8-10 servings
Source: adapted from Roses' Heavenly Cakes; Sprinkle Bakes frosting and design
Prep: 20 minutes; total time about 1 hour
Cake
2 cups/ 200g cake flour
1 cup/ 200g granulated sugar
2 1/2 plus 1/8 teaspoons baking powder
1/2 teaspoon salt
8 tablespoons/ 113g unsalted butter, softened
2/3 cup/5.6 oz/ 160g whole milk
3 large egg whites
1 1/2 teaspoons vanilla extract
Frosting/ toppings
1 cup/226g unsalted butter, softened
2 cups/230g confectioners' sugar
1-2 tablespoons milk
2/3 cup rainbow sprinkles (jimmies)
2 tablespoons rainbow nonpareils
5 oz. milk chocolate fondant
Preheat the oven to 350F/175C.
Grease and flour an 8x8 baking pan, or spray it with a flour based baking spray (recommended).
Mix flour, sugar, baking powder and salt in a large bowl. Add butter and milk; mix on low speed with an electric hand mixer. Add vanilla and raise speed to medium, beat for 2 minutes.
Reduce speed to medium low and gradually add the egg whites in two additions. Beat at medium speed for 2 minutes. Scrape batter into the prepared pan and smooth the surface with a rubber spatula.
Bake the cake for 35-45 minutes, or until the top is golden brown and a toothpick tester comes out clean. Let cake cool in the pan before turning it out onto a wire rack to cool completely. When cake is cool, place on a cake board or serving platter. Designate the top of the cake and round those two corners using a serrated knife. Carve away cake pieces a little at a time until a bread slice shape is achieved (see pictures).
For the frosting, combine the butter and confectioners' sugar in a large bowl. Beat on medium speed until combined. If frosting is stiff, add milk 1 tablespoon at a time until a spreadable consistency is achieved. Beat at high speed for 2 minutes until fluffy. Spread frosting onto the surface of the cooled cake; leave a 1-inch unfrosted border around the top edge of the cake. Pour sprinkles and nonpareils onto the frosting. Use a pastry brush to sweep away any stray sprinkles or crumbs from around the cake.
Knead the fondant until pliable. Roughly shape it into a rope between your palms, then roll it out flat with a rolling pin. Cut one 16-inch long x 1 1/2-inch wide strip. Re-roll scraps and cut another strip of the same size. Frost the sides of the cake with some of the remaining frosting (you will have leftover frosting) Apply fondant strips to the sides of the cake. Trim away excess with a small plain-edge knife. Store cake loosely covered in plastic wrap.
October 30, 2013
Butter Toffee Candy Bar Shots in Edible Chocolate Shot Glasses

I can hardly believe we're sailing into November this week! As we cruise into these major holiday months, my attention is turned toward entertaining. I love to offer gussied up individual desserts at a meal's end. That's what these entirely edible shots are all about!
To make these you'll need a silicone shot glass mold. I found mine online (here)
 . The mold is small and relatively inexpensive (they range from $3 to $15) so I didn't mind allotting it a little of my rationed cabinet space. I'm already planning to use it again for Christmas. Wouldn't a tray of these in gingerbread and peppermint flavors be
so
party-perfect? Yes!
. The mold is small and relatively inexpensive (they range from $3 to $15) so I didn't mind allotting it a little of my rationed cabinet space. I'm already planning to use it again for Christmas. Wouldn't a tray of these in gingerbread and peppermint flavors be
so
party-perfect? Yes!
Eating one of these is like eating a toffee candy bar, except with a flowing toffee center. I decided to use store-bought tea biscuits as "coasters" and in the end I really appreciated having that cookie as a foil for all that sweet toffee. The rims of these are dipped in English toffee bits, which gives them a little extra crunch and yumminess.

I used about 3/4 lb. of milk chocolate for six shots. I didn't temper the chocolate, I just melted it slowly over a bain marie until it was smooth and then poured it into the cavities using a spoon. I suggest using block chocolate, but if using chocolate chips, check the label to make sure there's at least some amount cocoa butter in the ingredients. The good stuff (with cocoa butter) will mold better and you won't have as many gaps or air bubbles in your glasses. They'll taste better, too!

The added sword cocktail picks look pretty cute and contribute to the idea of these being "shots" - though there's not a drop of booze in there! But if you must, a jigger of rum in the toffee would make a delicious butter rum version. Now, that's an idea!
Butter Toffee Candy Bar Shots
[click for printable version]
Source: Sprinkle Bakes original recipe
Yield: 6 servings
Prep: 30 minutes, total time about 1 hour
You'll need a 6 cavity silicone shot glass mold for this recipe. They can be found online or at specialty cooking shops. The Rich Tea Biscuits I used as "coasters" are a product of the UK. US readers can find them in the international aisle at the grocery store. I've also purchased them at CostPlus World Market.
3/4 lb. milk chocolate
2/3 cup/ 138g dark brown sugar
1/2 cup/ 113g unsalted butter, cubed
7 oz. (1/2 of a 14 oz. can) sweetened condensed milk (not evaporated milk)
1 teaspoon vanilla
pinch of salt
4 oz. English toffee bits
Whipped cream
Chocolate shavings, if desired
6 Rich Tea Biscuits or any 3-inch round butter cookie
Fill a saucepan 1/3 full of water and bring to a simmer. Chop chocolate into small even pieces and place in a metal heat-proof bowl. The bowl should be big enough to sit on top of the saucepan without it touching the water. Place the bowl over the simmering water and stir constantly with a rubber spatula until chocolate is completely melted. Place a 6 cavity silicone shot glass mold on a small baking tray. Fill the cavities halfway with the melted chocolate, then tap the baking sheet on the work surface to remove air bubbles. Fill the cavities the rest of the way and tap again until no air bubbles appear at the surface. Place in the freezer until completely solid, about 1 hour.
Meanwhile, combine brown sugar, butter and sweetened condensed milk in a medium saucepan. Place over medium-low heat and stir until butter is melted and sugar has dissolved. The mixture should not thicken much and should fall in a ribbon from your spoon. Stir in vanilla and the pinch of salt. Transfer toffee to a clean bowl to cool. Toffee is ready to use when barely warm and still pourable.
Unmold shot glasses by pressing them up from the bottom turning the mold inside-out. Twist the chocolate shot glass slightly and pull to release. Pour toffee bits into a shallow dish. Dip the rims of the shot glasses into the toffee filling and then into the toffee bits. Spoon toffee filling into the shot glasses (you should have a little filling left to drizzle on top later). Top the shots with whipped cream and a drizzle over some of the leftover toffee filling. Garnish with chocolate shavings, if desired. Refrigerate leftovers.
October 23, 2013
Chocolate Turtle Pumpkin Torte

Sometimes I'll fall in love with a song and listen to it on repeat for hours. It satisfies some longing in the soul. That's kind of how I feel right now except it's not for music, it's for pumpkin and chocolate. I keep using this combination in my fall baking with no signs of stopping!

This torte combines yummy pumpkin cake layers and the flavors of chocolate turtle candies. It's so good and so easy (yes, easy!) I might bring it home for Thanksgiving dinner this year.
I use prepared dulce de leche for the filling in this cake and it's also in the topping. It provides all of the milk-caramel flavor you'd want without any sugar-boiling or candy thermometers. This is a great shortcut, but I must speak a few cautionary words - we all know that quality ingredients make quality food; it's a universal truth that bears repeating. Use the best prepared dulce de leche you can find.


Since salted caramel turtles are my favorite chocolate thing in all the land, I couldn't hold back a sprinkling of fleur de sel on top. That little sprinkle works its magic well on pecans, caramel and chocolate. I highly suggest you give it a try!
Chocolate Turtle Pumpkin Torte
[click for printable recipe]
Yield: One 8-inch double layer cake
Source: Sprinkle Bakes and Hershey's chocolate frosting recipe
Prep: 1 hour, total time about 2.5 hours
Pumpkin cake layers
2 cups/250g all purpose flour
1 teaspoon baking powder
1 teaspoon baking soda
2 teaspoons pumpkin pie spice
1/2 teaspoon salt
1 cup/200g granulated sugar
1/2 cup/ 115g dark brown sugar, packed
1/4 cup/ 50g vegetable oil
4 large eggs
15 oz. pumpkin puree
1 teaspoon vanilla
Frosting/topping
1/2 cup/113g unsalted butter
2/3 cup/53g unsweetened cocoa powder
3 cups/330g confectioners' sugar
1/3 cup/80g whole milk
1 teaspoon vanilla extract
28 oz. prepared dulce de leche
2-4 tablespoons heavy cream
1/2 lb. pecan halves
Chocolate shavings
Fleur de sel, if desired
Preheat oven to 350F.
Grease and flour two 8-inch round cake pans, or spray with flour based baking spray.
Combine flour, baking powder, baking soda, pie spice and salt in a large bowl. Whisk together; set aside.
Combine sugar, brown sugar and vegetable oil in a separate large bowl. Mix well with an electric hand mixer until well combined. Add eggs one at a time, mix well after each addition. Add pumpkin puree and vanilla, mix until smooth. Gradually add flour mixture to pumpkin mixture while mixing on low speed. Divide batter equally between the two prepared pans. Bake for 30 minutes or until cakes spring back when pressed in the center. Let cake cool 5 minutes in the pan and then turn out on to cooling racks. Allow cakes to cool completely.
For the frosting, melt the butter in a microwave at 30 second intervals or on the stove-top in a small saucepan over low heat. Combine the butter and cocoa in a large bowl. Mix with a spoon until smooth and well combined. Add powdered sugar and milk alternately while beating with an electric mixer on medium-high speed. Beat in vanilla extract.
Torte each cake layer so that there are four even layers. Use about 18 oz. of the dulce de leche to cover three cake layers. Stack the layers so that the unfrosted layer is on top. Frost the entire cake with the chocolate frosting. Place a line of pecan halves all the way around the bottom edge of the cake (be sure to do this before the frosting sets or they won't stick!).
Place the remaining dulce de leche in a microwave safe bowl. Add 2 tablespoons heavy cream. Heat for 30 seconds in the microwave; stir well. Mixture should be loosened enough so that it falls from your spoon in a ribbon. If mixture is not to consistency, add another tablespoon of heavy cream and heat for another 30 seconds; stir. Add additional cream and heat as needed until the mixture comes to consistency.
Pour mixture over top of the cake and spread gently with the back of a spoon so that the caramel drips down the sides of the cake. Top with remaining pecans chocolate shavings. Sprinkle fleur de sel over the top of the cake, if desired.
October 20, 2013
Biscuit's Pumpkin Biscuits
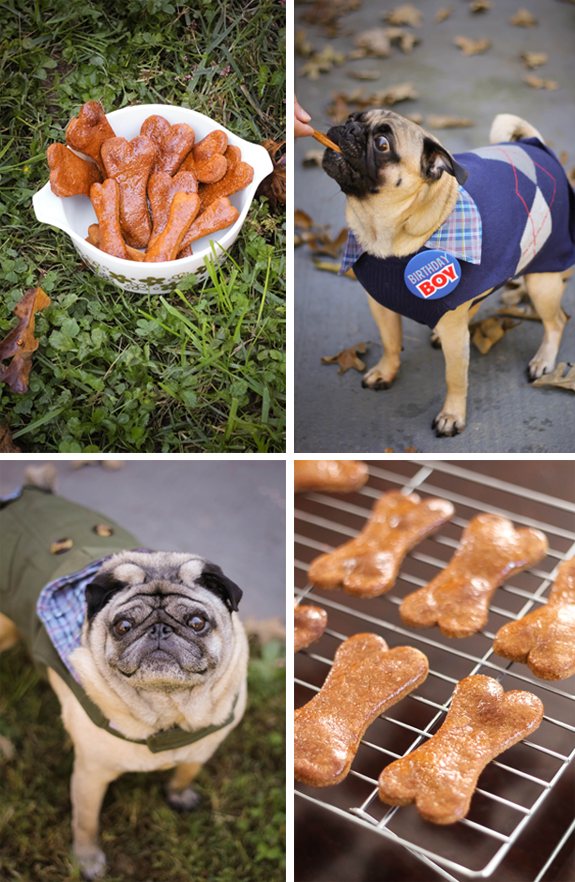
Hi friends! I'm updating with a quick little post to wish my best buddy Biscuit a Happy Birthday! He's the most funny, spirited, mischievous little dog I've ever had. Everything he does borders on ridiculous! He definitely helps me to not take life too seriously, and I appreciate that.

I like to keep wholesome treats on hand for the pups, and these pumpkin biscuits are just that - plus they're easy-peasy to make. The honey glaze I brush on them during baking makes them extra tasty, and the boys always scarf them down!

Nerds.
I use chamomile tea in this recipe, but you could substitute hot water if you don't have any tea on hand. You'll only use a few tablespoons, but I like to brew a 12 oz. cup anyway. That means I get to enjoy the remaining tea while making the treats.
Well, we're off to have a little more backyard playtime in the cool fall air. Happy 5th birthday to my little sweater-wearing clown!
Biscuit's Pumpkin Biscuits
[click for printable version]
Yield: 2 dozen 2-inch dog treats
Source: SprinkleBakes original recipe
Prep: 10 minutes, total time 55 minutes
1/2 cup pumpkin puree
3 eggs
Pinch of salt
2 1/2 cups whole wheat flour
3-4 tablespoons brewed chamomile tea, divided
1 tablespoon honey
Preheat oven to 350F.
Place pumpkin puree, 2 eggs and pinch of salt in a large bowl. Mix with an electric hand mixer on low speed until combined. Add the flour and mix again on low speed. Mixture will be very dry and crumbly. Add brewed chamomile tea 1 tablespoon at a time and beat on low speed until a non-sticky workable dough is formed. Knead until all the flour has been absorbed. Roll into a ball and place on a sheet of parchment paper; flatten dough slightly with hands. Cover dough with another sheet of parchment and roll to 1/2-inch thickness. Remove top sheet of parchment and cut out biscuits with a cookie cutter. Transfer cut-outs to a parchment lined baking sheet.
Beat remaining egg, 1 tablespoon chamomile tea and 1 tablespoon honey together in a small bowl. Brush mixture onto the cut-outs using a pastry brush. Bake treats for 20 minutes. Brush again with honey glaze and bake for an additional 20 minutes. Transfer to a wire rack. Allow biscuits to cool completely before treating your buddy.
Note: Not into cookie cutters? A knife or pizza cutter may be used to cut the dough into squares before baking.

October 17, 2013
Pumpkin Butterscotch Chip Cupcakes
Every time I opened the refrigerator this week I had leftover pumpkin puree staring me in the face. It wasn't enough to make a pie, and it was too much for another round of these. When you take the time to roast your own pumpkin for puree you hate to see it wasted. Something had to happen, and soon.
Happily, I discovered these pumpkin cupcakes. They take exactly 3/4 cup of pumpkin puree to make, which was exactly the amount I had left over -yes! I decided to add butterscotch chips to the batter because, well, I am so (inexplicably) into butterscotch these days. I looked around for a good butterscotch frosting recipe but they all used brown sugar and a long list of various and sundry. I cheated a little and made the frosting with melted butterscotch chips. It worked! And it's mighty tasty, too.


I'm totally smitten with this flavor combination. There's something so cozy about pumpkin spice cake with butterscotch chips floating around inside. And the butterscotch frosting - it's too easy. It's cheating in the best way possible!
Pumpkin Butterscotch Chip Cupcakes
[click for printable version]
Source: Joy of Baking cake recipe, Sprinkle Bakes original frosting
Yield: 12 cupcakes
Prep: 20 minutes, total time 45 minutes
Cake
1/2 cup/ 113g unsalted butter
1 cup/ 200g granulated sugar
2 large eggs
1 teaspoon/ 5g vanilla extract
1 1/2 cups/ 195g all-purpose flour
1 teaspoon baking powder
1/4 teaspoon/ 1.5g baking soda
1/2/ 2g teaspoon salt
2 teaspoons/ 8g pumpkin pie spice
3/4 cup (180ml) pumpkin puree (canned is fine)
1/2 cup/ 100g butterscotch baking chips roughly chopped
Frosting
1 cup/200g butterscotch chips
1/2 cup plus 2 tablespoons/ 140g unsalted butter, softened
1 1/2 cups/ 175g confectioners sugar
Pinch salt
Preheat oven to 350F.
In a large bowl, beat together the butter and sugar with a hand mixer. Add the eggs one at a time. Beat in the vanilla extract. In a separate bowl, whisk together the flour, baking powder, baking soda, salt and pumpkin pie spice. With the mixer on low speed add the flour mixture and pumpkin puree to the butter mixture, alternating in three additions, beginning and ending with the flour mixture. Mix in chopped butterscotch chips on low speed. Scrape down bowl and mix again. Fill muffin cups about 3/4 full and bake for 18-20 minutes or until the cakes bounce back when pressed in the center.
For the frosting, melt butterscotch chips with 2 tablespoons (27g) butter at 30 second intervals in the microwave. Stir well between heating. Butterscotch chips will be thicker than semisweet chips when melted (even with the addition of butter), so don't overheat or chips will scorch; just stir and mash chips together with the butter until no lumps remain.
Combine melted butterscotch mixture and 1 stick (113g) unsalted butter in a large bowl. Mix on high speed with an electric hand mixer. Add confectioners sugar in two additions. Add pinch of salt. Beat on high speed until light and fluffy. If mixture is too thick, add milk 1 tablespoon at a time until it's piping consistency. Transfer frosting to a piping bag fitted with a large star tip. Pipe frosting onto cooled cupcakes.