Heather Baird's Blog, page 81
April 2, 2014
Strawberry Confetti Cake and Vanilla From Tahiti Giveaway!


I have two sweet things for you today! The first is this thoroughly sprinkled strawberry cake. You probably know by now that my heart beats for confetti cakes, and if you're not convinced, I urge you to look here, here, here and here. This strawberry version may be my favorite yet!
The second and possibly sweetest of the two is a generous giveaway from Vanilla from Tahiti ! I mean, what would our baked goods be if not for the loving touch of vanilla? It's a necessity! And it's the star ingredient in the Swiss meringue buttercream on this cake. Tahitian vanilla is known to be of the highest quality, and it's used by the finest pastry chefs and chocolatiers in the world. I love using it in my baking, and you will too.
One grand prize winner!The perfect collection of Tahitian vanilla goodies to surprise and delight any epicurean.
Vanille de Tahiti book2 oz. Vanilla ExtractGround Vanilla Bean2 Tahitian Vanilla BeansVanilla Mustard
Two sampler winners!This sampler is a convenient way to experience pure Tahitian vanilla, in it's most popular forms. Perfect for the home chef.
2 oz. Vanilla ExtractGround Vanilla Bean2 Tahitian Vanilla Beans
Something for everyone!
Vanilla from Tahiti is giving my readers a 10% discount on all orders! To access the discount, click here.

a Rafflecopter giveaway

I have to say, the Tahitian vanilla beans they sent me to sample are some of the fattest, oiliest, most fragrant beans I've ever tried. They really made the frosting on this cake something special. Just having the split vanilla beans on the counter top made the entire kitchen smell dreamy. Another product that I loved was the vanilla bean powder. I used just a smidgen in my morning coffee, and now I'm hooked! I can't wait to use it in pie crusts and cookies.
I've been doing lots of strawberry cake-testing recently because I'll be making a strawberry groom's cake in May. The first time I made this cake I knew it would be perfect for a sprinkled interior. The batter was just the right consistency to suspend confetti quins evenly throughout the batter, and thick enough to prevent the sprinkles from melting away. The baked cake has a firm, moist texture and every bite or two you'll get the tiny crunch of a strawberry seed to remind you that there's real strawberry puree in the batter.

I chose Swiss buttercream for this cake because it's so silky-smooth and the surface doesn't dry or "crust". This means the frosting remains sticky and I can take my time applying the sprinkles to the sides of the cake. One of the most frequently asked questions I get is "how do you get sprinkles on the sides of a cake?". There are a few different effective methods, but for most cakes I just toss them on with one brisk hand movement. Be sure to place your cake in a pan to catch the excess. You'll still have a few wayward sprinkles, but it makes clean-up much easier.

The strawberry cake is so fragrant - certainly during baking, but also after it's cooled. Add to that the ultra-aromatic and flecked Tahitian vanilla bean frosting, and you just can't miss. It's such a wonderful combination. I hope you'll give it a try! Strawberry Confetti Cake with Tahitian Vanilla Bean Swiss Buttercream [click for printable version]Yield: one 9-inch double layer cake or one 7-inch triple layer cake (12 servings)Source: Cake recipe adapted from allrecipes.com, frosting recipe from the SprinkleBakes bookPrep: 50 minutes, total time about 2 hoursA few quick tips!The first time I made this cake I followed the ingredients to the letter and when I tasted it, the lack of salt in the batter was evident. Even a very small amount can make a big difference in baked goods, so please, don't forget the salt! It really rounds out the flavor of this cake. If you're measuring the ingredients in cups, be sure to sift the cake flour before measuring. You'll be rewarded with a fluffier cake. I added a little red food color to the batter to ensure the cake retains a beautiful pink interior; this is optional. Lining the pans with parchment paper is key. Some of the confetti sprinkles will float to the bottom of the pan and melt against pan's surface as it bakes. This can cause sticking, and parchment lining ensures flawless removal.Inevitably, someone will ask if the amount of butter is correct in the Swiss meringue buttercream. The answer is yes indeed! 1 pound of butter is correct. They don't call it buttercream for nothin'!2 cups/390g granulated sugar3 oz. package strawberry flavored gelatin1 cup/226g unsalted butter, softened4 large eggs2 3/4/225g sifted cake flour2 1/2 teaspoons baking powder1/8 teaspoon salt1 cup/240ml whole milk, room temperature1 tablespoon pure vanilla extract1/2 cup/4 oz. fresh strawberry puree1/4 teaspoon red gel food color1 cup/134g confetti sprinkles
Preheat the oven to 350F/175C.Grease two 9-inch cake pans or three 7-inch cake pans with vegetable shortening. Line the bottoms and sides of the pans with parchment paper. Set aside.In a large bowl, cream together the butter, sugar and dry strawberry gelatin until light and fluffy. Beat in eggs one at a time, mixing well after each addition. Combine the flour, baking powder and salt; stir into the batter alternately with the milk. Blend in vanilla extract and strawberry puree. Add the food color, if using, and mix again until consistently pink. Fold the confetti sprinkles into the batter and immediately divide the batter between the prepared pans.Bake for 25-30 minutes, or until a toothpick inserted into the center of the cake comes out clean. Allow the cakes to cool in the pans for 10 minutes before turning them out to cool completely.
Tahitian vanilla beanSwiss meringue buttercream5 egg whites1 cup (198g) sugarPinch of salt1 pound (4 US sticks) unsalted butter, cubed, at room temperatureSeeds of 1 Tahitian vanilla beanConfetti sprinkles for decoratingWhite chocolate-covered strawberries for garnish
Whisk together the egg whites, sugar, and salt in a large heatproof bowl. Set over the simmering water and whisk until the mixture is hot to the touch and the sugar has dissolved.Transfer the mixture to the bowl of a stand mixer fitted with the whisk attachment.Beat on low speed for 2 minutes. Increase to medium-high until stiff peaks are formed.Continue beating at medium-high speed until the mixture is fluffy and has cooled (the mixing bowl should feel cool to the touch).Turn the mixer off and switch from the whisk attachment to the paddle. Turn the mixer on medium-low and add the butter, a few cubes at a time, beating until well incorporated before the next addition. The egg whites will deflate and thin with the first few additions – don’t let this discourage you – keep going. It may also look curdled, but don’t fret. Beat on high speed when all the butter has been added. The mixture will thicken and become smooth after several minutes of beating. Beat in the vanilla bean seeds. Transfer about 3/4 cup frosting to a piping bag fitted with a large open star tip. Fill and frost the cake layers. I used about 2/3 cup to fill each 7-inch cake layer, or use 1 1/3 cups to fill a 9-inch layer. To decorate the bottom of the cake with confetti sprinkles, place the cake (on the cake stand/serving plate) inside a large baking pan. Toss a handful of sprinkles onto the cake allowing the excess to fall back into the baking pan. Repeat process around the entire lower circumference of the cake. Brush excess sprinkles off the bottom of the cake plate with a pastry brush. Pipe stars around the top edge of the cake with the reserved frosting in the piping bag. Pipe one large frosting swirl in the center of the cake and garnish with a white chocolate-covered strawberry half.Store the cake in the refrigerator loosely covered in plastic wrap. Bring to room temperature before serving.


March 25, 2014
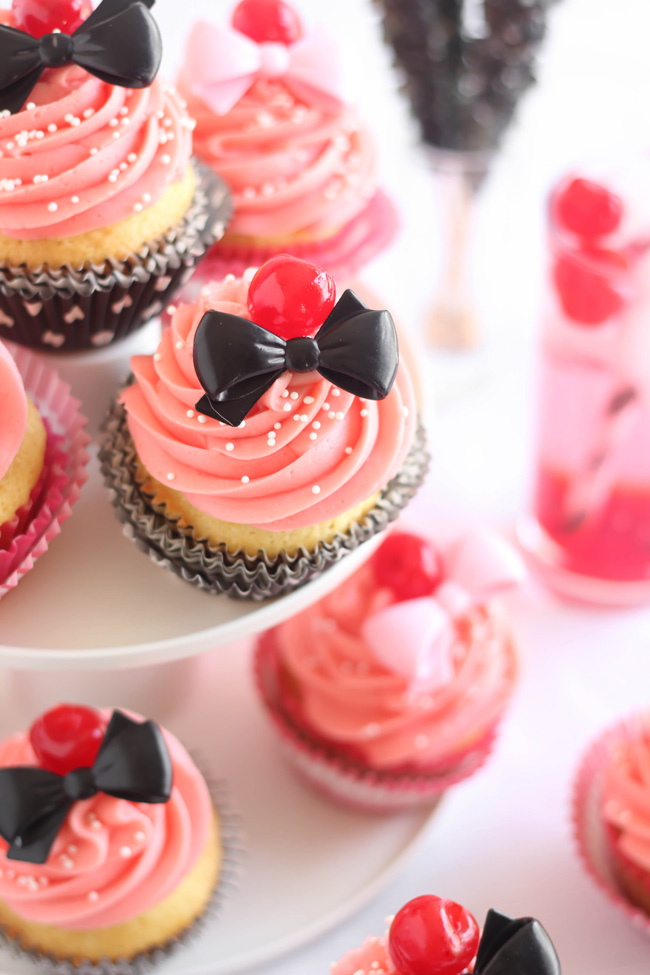
Shirley Temple Cocktail-Inspired Cupcakes

The non-alcoholic Shirley Temple cocktail has a reputation for being super sweet, so it's no surprise that it translates well into cupcake form. I also really like the grown-up Shirley Temple Black cocktail, which has all the ingredients of the original version, but with a shot of Kahlua (or Campari. Or dark rum, some would argue). So, I decided to make these cupcakes both ways.
The cute little bows on top of the cupcakes are plastic ring birthday party favors. I think they make adorable toppers for Shirley Temple cupcakes. To differentiate the two cupcake flavors, I gave the non-alcoholic cupcakes a pink bow and the Kahlua-flavored cupcakes a black bow.
 Original Shirley Temple
 Shirley Temple BlackHonestly, I'm not sure which version I like better. Both are distinctly different and delicious. Grenadine plays a huge role in the flavor of the beautiful pink icing that goes on both types of cupcakes. Most grenadine is flavored with pomegranate or black currant juice, so you can expect a fruity-slash-berry sweet-tart flavor. I used Sprite soda in the cupcake batter, which gives the baked cakes a really subtle flavor that's hard to put a finger on, but it all works together so very well flavor-wise. If you prefer using ginger-ale in your Shirley Temples, then you can certainly substitute it for the Sprite in the cake batter.
Okay, so this part of the process felt a little deviant, somehow. You literally give the cupcakes a shot of grenadine with a syringe! These flavor-injectors are normally used for injecting marinades into Thanksgiving turkeys, but I love using them to give cupcakes a sweet-hit of flavor in their centers. The syringes are inexpensive, and you can find them online here.
 Most of the syringes have metal needle-tips, but if you can find one with a plastic needle, those work fine for cupcake injecting and are less dangerous to come across when rifling in your utility drawer.
The Shirley Temple Black cupcakes were treated in the same manner. Instead of grenadine, they each got a shot of Kahlua in the center. These were so good! They might be my favorite of the two. Maybe. It's hard to say for sure, so more taste-testing is in order (wink).

One thing is for sure, nothing beats biting into one of these and finding that there's more to offer than just cake inside. The injected syrups keep the cake so moist and flavorful.
An important thing to note: Don't overfill the cakes with grenadine or Kahlua. I used just one teaspoon in each of my cakes. If you use too much the liquids will completely soak through the bottom of the cupcake liners and then you've got a mess on your hands. Or on your pretty white tablecloth.
These are really easy to make, and if you don't have a flavor-injecting syringe, you can cut a little divot in the tops of each cupcake and drizzle syrup in with a spoon.
When party-time rolls around, I'll definitely serve these cupcakes alongside their cocktail counterparts. I've included the drink recipes in this post if you'd like to do the same.
xo
-h
Shirley Temple Cocktail Cupcakes
[click for printable version]
Yield: 15 cupcakes
Prep: 40 minutes, total time about 1 hour 30 minutes
Source: Sprinkle Bakes original recipe
This recipe is written assuming that you want to make both Shirley Temple and Shirley Temple Black cupcakes. If you want to make an entire batch of original cocktail Shirley Temple cupcakes, just replace the Kahlua with grenadine, and for an entire batch of Shirley Temple Black cupcakes, vice-versa. I like to give my cupcakes a stately crown of frosting but not everybody is into that much on one cupcake. Feel free to half the Grenadine Buttercream recipe.
Cake
1/2 cup/113g butter softened
1 cup/200g granulated sugar
2 eggs
1 3/4 cups/ 223g all-purpose flour
1/2 tsp baking soda
1/4 tsp baking powder
1/4 tsp salt
1/2 cup/122g sour cream
1/2 cup/ 4 oz. Sprite soft drink or ginger-ale
1/4 cup grenadine
1/4 cup Kahlua liqueur
Preheat oven to 350 degrees.
Line one cupcake pan with 12 paper liners and another cupcake pan with three liners. I used 8 pink liners for the regular Shirley Temple cupcakes and 7 black liners for the Shirley Temple Black cupcakes. Set aside.In the bowl of a stand mixer fitted with the paddle attachment, cream together butter and sugar until light and fluffy. Add eggs one at a time beating well after each addition. Whisk together flour, baking soda, baking powder and salt, set aside. In a medium bowl, whisk together 1/2 cup Sprite soda and 1/2 cup sour cream (mixture will fizz and bubble a little). Add flour and Sprite mixture alternately, beginning and ending with flour. Fill cupcake papers with 1/4 cup level measures of batter. Bake for 17-22 minutes. Let the cupcakes cool completely. When cupcakes are cool, fill a flavor injecting syringe with roughly 1 teaspoon of grenadine. Place the needle in the center of a cupcake and push the plunger as you gently pull the needle up and out of the cupcake. Repeat with 7 more cupcakes. Wash the syringe and repeat process with Kahlua and remaining cupcakes. Set cupcakes aside while you make the frosting.
 Ateco #856Grenadine buttercream
1 lb/452g of unsalted butter, softened
2 lbs (one 32 oz. bags/ 453g) confectioners’ sugar
3-4 tablespoons grenadine, or more to taste
Milk or heavy cream, if needed
15 maraschino cherries
White nonpareils for sprinkling
Mix together the butter and confectioners’ sugar in a stand mixer fitted with the whisk attachment. Begin mixing on low speed until crumbly and then increase to high and beat for 5 minutes. Reduce mixer speed to low and add the grenadine 1 tablespoon at a time; add more grenadine to taste if desired. Beat frosting again for another 5 minutes until light and fluffy. Scrape down the bowl and mix again on the highest setting for 3 minutes. If you find the buttercream is too stiff, you may add milk or heavy cream 1 tablespoon at a time until the mixture is piping consistency. Transfer the frosting to a piping bag fitted with a large closed star tip, such as Ateco #856.
 Pipe frosting onto each cupcake in two large swirles and top each with a maraschino cherry. Sprinkle over the white nonpareils. Store cupcakes loosely covered in plastic wrap or in a plastic cupcake-keeper.
 Shirley Temple cocktail recipe with variationYield: 1 serving
6 oz. lemon-lime soda, such as Sprite (can use ginger-ale)1 1/2 tablespoons grenadineMaraschino cherry for garnishPour the lemon-lime soda into a Collins glass filled with ice.Add grenadine. Garnish with a cherry and a fancy straw. Stir drink just before sipping.
Shirley Temple Black variation: Add 1 to 2 oz. Kahlua and an additional cherry.
March 21, 2014
Sriracha-Orange Marmalade Marshmallows

I hope by now you are all well acquainted with the condiment known as Sriracha, but for those who aren't familiar, it's a delicious chili sauce that is sweet, hot and boasts a showy bright red-orange color. If you don't have a bottle in your fridge, you should probably go out and buy some right now. It's that good!
I've used it on everything from sushi to burgers, but never considered using it in sweets until I saw lollipops flavored with Sriracha. I decided to make my own. They were good; sweet at first and then -surprise! a little heat from the peppers made my tongue tingle.

Sriracha has a bit of garlic in the ingredients, which doesn't exactly play nice in dessert. At first, the garlic flavor was almost non-existent in the lollipops but over the course of a few days it became more developed. For this recipe, I wanted to find a way to temper this element so it didn't show up unexpectedly. Turns out, a good dose of acidity will do the trick. Lemon juice along with sweet Seville orange marmalade neutralizes the garlic but still retains that recognizable sweet-hot flavor that is Sriracha. I really like the fruity orange flavor the marmalade brings to the party, too.


Is it just me, or do you also want to lay your head on that soft, pillow-like slab o' mallow above?
Like all homemade marshmallows, these are so soft and dreamy. I'd almost call them angelic, except they've got a gradual heat that you'll feel within a few minutes of chewing. You might get a bite of candied orange peel, too, which is a nice occasional surprise.
 The only kind of math I like to do.I couldn't help myself from dipping some of the marshmallows in chocolate. Boy, is this ever delicious! I can't wait to float one of these in a jumbo cup of hot chocolate. I cut my mallows a little larger than usual, and I think that just two of these packaged in cellophane and tied with a green ribbon would make a great little gift. Small batch artisan candy is one of my favorite things to give - and receive!
I really love how these turned out, and I can't wait for you to try them. The first bite will be sweet and tangy with spicy orange flavor, then comes the heat - a mild heat that lingers on the tongue. I sprinkled each marshmallow with a half-pinch of cayenne, but it's really not necessary. They're just fine as-is.
Sriracha-Orange Marmalade Marshmallows
[click for printable recipe]
Source: Sprinkle Bakes original recipe
Yield: 2 dozen 1 1/2-inch marshmallows
Prep: 40 minutes
Total: 1 hour 40 minutes
Gelatin mixture
1/2 cup/117g prepared orange marmalade
1 tablespoon Sriracha chili sauce
2 tablespoons lemon juice
2 tablespoons cold water
4 .25 oz. packages/30g unflavored powdered gelatin
Sugar syrup
3/4 cup/150g sugar
1/2 cup/154g light corn syrup (divided)
2 teaspoons Sriracha chili sauce
1/4 cup/60ml water
Pinch of salt
Powder coating
3/4 cup/96g confectioners sugar
1/2 cup/32g cornstarch
Lightly coat an 8x8-inch baking pan with cooking spray. Heat the orange marmalade in the microwave (or in a saucepan over low heat) until slightly melted and stirable, about 30 seconds. Stir in the Sriracha, lemon juice and cold water. Whisk in the gelatin and let the mixture stand while you prepare the sugar syrup.For the syrup, stir together the sugar, 1/4 cup of the corn syrup, Sriracha, water and salt. Bring to a boil over high heat until the mixture reaches 242F on a candy thermometer. While you wait for the candy mixture to come to temperature, pour the remaining 1/4 cup corn syrup into the bowl of an electric mixer fitted with the whisk attachment. Microwave gelatin on high for 30 seconds or until it is liquefied. Pour it into the corn syrup and set the mixer to low speed and keep it running.When the syrup comes to temperature, slowly pour it into the mixer bowl in a steady stream. Increase the speed to medium and, with a timer set, beat for 5 minutes. Beat on the highest mixer setting for 5 more minutes. Spray a rubber spatula with cooking spray. When the marshmallow mixture has tripled in volume, stop the mixer and immediately pour it into the prepared pan, smooth the surface with the greased spatula. For the powder coating, mix together the confectioners sugar and cornstarch. Lightly sift the coating over top of the marshmallow in the pan. Let stand until set, about 1 hour. Note: If humidity is high in your area, setting time may take longer. Use a knife to loosen the edges of the marshmallow from the pan. Invert the pan onto a powder coating-covered work surface. Dust the entire slab of marshmallow with more powder coating. Dip a large plain-edge knife into the powder coating and cut the marshmallow into pieces. Store marshmallows in an air-tight container on the counter top. Don't be tempted to store them in the refrigerator! Your mallows may gather humidity - keeping them cool (not cold!) and dry is key.
March 13, 2014
Chocolate Celebration Cake for 100

How often do you get to make a 90th birthday cake? Not often enough, I'm sure. When I found out this milestone was on the horizon for our own sweet grand-lady, I didn't wait around for anyone to ask me - I offered my cake bakery services immediately! March 9th was the special day we honored Ms. Ruby - our friend, teacher, aunt, mother, and grandmother. I could never make a cake as special as she is, but it was my great honor to try.
My sissy-lou, Megan, themed the party Country Chic and decorated with Mason jars filled with happy daisies and quilt-square pennants.We both put our hands and hearts together for this cake. She came over to my house one day and we made fondant daisies together, nonstop!

The timing of this cake was right in sync with a new partnership I've entered into with Wilton. I've used Wilton cake decorating products for as long as I can remember, so being a brand ambassador for them is a natural fit. It's my strict rule to only promote products that I personally use (and love!), and that will add value to the baking endeavors of my readers. The products they sent me recently were enormously helpful with the creation of this cake, so I'm going to tell you all about them. And I'm going to take you through all the steps for this chocolate cake for 100. A cake this size is a good notch to have on the ol' baking belt, and it's totally doable for thrifty DIY'ers. I mean, with just a couple of tweaks (a cute couple's cake topper?) this could be a DIY wedding cake.

First thing, you'll need some special supplies.
Cake pans. Choose those with straight sides, like this.
 Some cake pans nest for easy storage, so the top edge flairs outward slightly - you do not want this type of pan. It makes the sides of the stacked cake uneven, and that makes a real mess of things when you start frosting. I used two of each size aluminum pans: 10x2-inch and 8x2-inch.Choose a cake stand. The bottom tier of this cake is 10-inches round and over 12-inches tall, so choose something about 12-inches in diameter and
sturdy
. The finished cake is very heavy. A stand that's low to the table surface like this
Some cake pans nest for easy storage, so the top edge flairs outward slightly - you do not want this type of pan. It makes the sides of the stacked cake uneven, and that makes a real mess of things when you start frosting. I used two of each size aluminum pans: 10x2-inch and 8x2-inch.Choose a cake stand. The bottom tier of this cake is 10-inches round and over 12-inches tall, so choose something about 12-inches in diameter and
sturdy
. The finished cake is very heavy. A stand that's low to the table surface like this is ideal. Inner support for the cake. You'll need a 10-inch cake drum, and one 8-inch and one 10-inch plastic cake separator plate - you can find those here. Pick up two sets of wooden dowels, too - and don't worry - you won't need any special equipment to cut them to size. I'll show you how later in this post. Prep the pans. I used Bake Easy flour-based spray. This is by far the easiest way to grease and flour a pan in one easy step. Just spray it on the sides and bottom before you pour in the batter. It also decreases the amount of crumbs you have on the cake when it's turned out of the pan (win/win!). I almost never bake a cake without Bake Even strips. You soak them in water and place them around the sides of the cake, and during baking, it prevents the cake from crowning (or, forming that bump on top that has to be leveled off). I already had an old set that is almost completely worn out, so I was happy that Wilton sent me a shiny new set. They've updated the design too! The old set had stick pins (which I lost immediately) to hold the strips onto the pans, but this new set has a belt-loop style cuff so you can tighten the strip against the pan - no pins needed! The cool down. Wire racks are needed so the cakes can cool completely without becoming soggy on the bottom. I suggest using at least one grid-style cooling rack, but three will make your life easier when making this recipe.
Now, you don't absolutely have to have a revolving cake stand, but it helps tremendously with frosting a cake evenly. If you're not excited about dropping 50 bucks on a professional style model, you can use an ordinary cake stand placed on a lazy susan. My OXO turntable
 was about $11, and I still use it when I don't want to pull out Old Ironsides. You can see how I use it here.
The cake recipe I used is the chocolate big sister to this cake. Yes, it starts with a cake mix (which, you know I'm usually a scratch girl, but cake mixes happen in real life - please don't be a box-mix snob) and it is vastly improved upon with additions of flour, sugar, sour cream and extra cocoa powder. I use it because it is sturdy and yet retains an incredibly moist texture. In my experience, the average non-cake/cake baking obsessed person (i.e. not me) is accustomed to the moistness and texture a box mix cake offers. Dede Wilson calls this "The Duncan Hines Conundrum" in her book Wedding Cakes You Can Make
 (recommend, by the way). I agree with her sentiment infinity times one million. I find this particular recipe satisfies my desire for scratch-made taste, yet still offers most of the desirable texture the general public is accustomed to. I believe part of being considered a good baker is trying to anticipate what your audience will like, and this cake received tons of praise at Ruby's 90th celebration.
Before we get to the cake recipe, I'll share a few snaps from the party. The cake topper was really beautiful and came from


Continue past the recipe for assembly instructions and fondant daisy tutorial.
Double Chocolate Sour Cream Cake with Cream Cheese Filling for 100
[click for printable version]
Source: Adapted from Wilton discussion forums, Sprinkle Bakes original frosting recipes
102 servings
It's a good idea to read the recipe through once from beginning to end before starting. Please note that the cake ingredients will be divided. You'll make two successive batches of cake batter. A standing mixer is recommended, or use a jumbo mixing bowl and a 7 speed (or higher) electric hand mixer. The directions are written assuming you have a single oven and two of each size cake pans, but if you have a double oven and more than two pans each, by all means - use them!
Chocolate cake
4 boxes (16.25 oz. each) Betty Crocker SuperMoist Devil's Food cake mix
4 cups/500g all-purpose flour
4 cups/796g granulated white sugar
1 1/2 cups cocoa powder
3 tsp. salt
5 1/3 cups water
2 cups canola oil
2 tablespoons pure vanilla extract
2 cups/32 oz. full fat sour cream
12 large eggs
First batter batch:
Place 2 boxes of cake mix, 2 cups of flour, 2 cups of sugar, 3/4 cup of cocoa and 1 1/2 teaspoons of salt in a extra-large mixing bowl. Whisk together to combine. Add 2 2/3 cups of water, 1 cup of canola oil, 1 tablespoon vanilla extract, 2 cups of sour cream and 6 large eggs. Beat on low speed until all ingredients are combined. Scrape down the bowl to make sure all of the wet and dry ingredients are incorporated. Beat for 1 minute longer.
Preheat oven to 325F.
Spray two 10x2-inch round cake pans with Bake Easy flour based spray. Divide batter between cake pans, filling them about three-quarters full. You may have some leftover batter - place it in a bowl, cover with plastic wrap and refrigerate it. Soak the Bake Even cake strips (see supplies) in warm water and attach to the sides of the cake pans. Set oven timer for 30 minutes and place the cakes inside the oven. The cakes will not be done when the timer goes off, but it's good to peek through the oven window to see how things are progressing at this point. Set the timer for 10 more minutes and check progress again. Thereafter, check at 5 minute intervals (if needed) until the cake tests done with a toothpick tester. Let cakes cool in the pans for 5 minutes before turning them out on wire racks to cool completely. Remove Bake Easy strips from pans. Wash and dry one of the 10-inch pans.
Second batter batch:
Place 2 boxes of cake mix, 2 cups of flour, 2 cups of sugar, 3/4 cup of cocoa and 1 1/2 teaspoons of salt in a extra-large mixing bowl. Whisk together to combine. Add 2 2/3 cups of water, 1 cup of canola oil, 1 tablespoon vanilla extract, 2 cups of sour cream and 6 large eggs. Beat on low speed until all ingredients are combined. Scrape down the bowl to make sure all of the wet and dry ingredients are incorporated. Beat for 1 minute longer.
Preheat oven to 325F.
Spray one 10x2-inch round cake and two 8x2-inch round cake pans with Bake Easy flour based spray. Divide batter between cake pans filling them about three-quarters full. If you lack a little cake batter filling the pans, use the reserved cake batter in the refrigerator (if not, use the reserved batter to make yourself a few cupcakes later - you deserve it!). Soak and attach Bake Even strips to the 8-inch cake pans and place them in the oven. Cover the 10-inch cake with plastic wrap and place in the refrigerator. Bake the 8-inch cakes for 25-30 minutes, adding additional baking time until a toothpick tester comes out clean. Let them cool in the pans 5 minutes before turning them out onto a wire rack. Bake the final 10-inch layer as before, attaching soaked Bake Easy strips and checking the cake periodically after an initial 30 minute baking time. Cake is done when a toothpick tester inserted in the center comes out clean. Allow to cool completely, as with the previous cakes.
When cakes are completely cool, torte each layer evenly (meaning, cut them in half horizontally). Each cake layer should now be two layers. Cover the layers generously in plastic wrap and refrigerate until ready for assembly.
Fillings and frostings:
A few notes about these components. You'll need to have both filling and frosting made up for assembling the cakes. Also, please do not to freak out about the amount of butter in these frostings. Keep in mind that this cake serves a little over 100 guests, and that each guest will be enjoying a 2-inch piece of cake. Yes, pounds of butter go into these elements, but nobody will be eating pounds of butter at once. Also, you'll have extra frosting after covering the cake. You always need extra frosting in case accidents happen during delivery.
As for the cream cheese, I occasionally buy off brand, but never EVER when I'm serving to a crowd this size. I have good working knowledge making this filling, and Philadelphia brand cream cheese has the best flavor and texture. No one's paying me to say that, I truly recommend using it.
Cream cheese filling
1 lb/ 452g unsalted butter, softened
8 cups/880g confectioners sugar
16 oz. cream cheese, cut into 8 pieces
2 tablesepoons vanilla extract
Pinch of sea salt
In a stand mixer fitted with the whisk attachment, beat butter and sugar on low speed until just incorporated. Switch to medium-high speed and beat until light and fluffy, about 2 minutes. Add cream cheese 1 piece at a time and beat well after each addition. Add the vanilla and salt; mix again. Cover the finished frosting with a damp tea towel so that is doesn't crust or dry out.
Vanilla buttercream
2 lbs/ 904g of unsalted butter, softened4 lbs (two 32 oz. bags/ 907g each) confectioners’ sugar 2 tablespoons vanilla extractMilk or heavy cream, if needed
For the frosting, mix together the butter and confectioners’ sugar in a stand mixer fitted with the whisk attachment. Begin mixing on low speed until crumbly, and then increase to high and beat for 5 minutes.Add vanilla extract and beat again for another 5 minutes until the frosting color has lightened in color and is fluffy. Scrape down the bowl and mix again on the highest setting for 3-5 minutes. If you find the buttercream is too stiff, you may add milk or heavy cream 1 tablespoon at a time until the mixture is spreading consistency. Cover the finished frosting with a damp tea towel so that is doesn't crust or dry out.
Assembly, finally!
Get in your most focused, zen-like state for this part of the process. It's not rocket science, but you do need full presence of mind for a successful outcome. Also, make room - and I mean a LOT of room, in your refrigerator to store this cake. I have a second cake-dedicated refrigerator and it took up the entire lower half.
Again, here are the supplies you'll need.
Your choice of sturdy cake stand
1 ten-inch cake drum
1 ten-inch plastic cake separator plate
1 eight-inch plastic cake separator plate
2 packages bamboo dowel rods
Large off-set spatula
Cake turntable (optional, but very helpful to use)
Okay, Let's get started!

Tier 1: This first photograph is from a different cake recipe, but it illustrates how I filled this cake. The cream cheese filling is a little softer then the vanilla buttercream, so the buttercream does a good job of keeping the cream cheese filling wrangled in. First thing, put a dot of icing on your 10-inch cake drum and add one torted cake layer. Fill a piping bag fitted with a plain 1/2-inch tip (or no tip at all) with some of the vanilla buttercream. Pipe a line of butter cream around the top edge of the cake (like in picture #1), making an enclosed circle. Place 1 1/2 cups of the cream cheese filling inside the circle and spread evenly. Top with another torted layer. Pipe a line of vanilla cream on top of the second layer and fill with 1 1/2 cups cream cheese filling as before. Place a third torted layer on top of the second layer - take care to line the cake edges up as evenly as possible (no matter how hard you try, it won't be perfect - just do the best you can). Cover the top of the cake with vanilla buttercream.

Cover the entire cake with a slightly thicker-than-usual crumb coat. We're making this layer thick because this is chocolate cake, and we don't want ANY brown crust showing through. Place this first tier in the refrigerator to set, about 1 1/2 hours.
Tier 2: Place a dot of icing on the the 10-inch plastic cake separator ( this is what it looks like, in case you've forgotten), stack and fill and frost the remaining 10-inch cakes as before. Place in the refrigerator to set.

After the cakes chill and the frosting is dry to the touch, measure a wooden dowel against the bottom cake tier (the tier on the cake drum). Score the dowel with a pair of scissors just below the top of the cake tier. Break the dowel at the scored mark. Repeat the process with the remaining dowels. Press 5-6 dowels into the cake vertically, and in a circle within 2-inches of the outside of the cake. Place one in the center of the cake also.The dowels should not stick up from the top of the cake, and if they do then you'll need to trim them shorter. Reserve the remaining cut dowels for later use.

Stack the second cake tier on top of the doweled first tier. Press tier 2 down into the first tier until the legs on the plastic separator are embedded into the cake. Try to line up the edges as much as possible. Cover the entire cake with a thick layer of vanilla buttercream. I usually spend a ton of time on this part, trying to get the outside perfect, but I don't mind a few frosting swirls showing. It makes the cake look more delicious, if you ask me.

One way to achieve smoother icing is to warm your spatuala in hot water, wipe it dry, and then smooth on the frosting. You'll immediately see a difference in how the frosting glides across the surface. The heat melts the butter in the buttercream as it smooths on.
Examine the cake and determine the front. This is purely for decorating purposes for this cake, as some of the fondant daises slightly cascade to the front right. That said, all cakes have one side that looks slightly better than the other. Place the best side to the front. If your cake is going to be displayed in the center of a room where people can examine it up close on all sides, then budget for lots of extra frosting/perfecting time. Whenever I have the front of my cake chosen, I mark it in some small way. You can see that I've used a small daisy in picture #10 to remind myself where the front is.
When the cake is frosted to perfection (or near perfection) place it in the refrigerator to set. 1 to 2 hours time should do it.

After the cake is chilled, remove it from the refrigerator. Grab the 8-inch plastic separator plate and center it on tier 2. Press it down so the legs insert into the cake, and then remove it. Dowel the cake with the reserved cut dowels between the leg marks. Place one dowel in the center of the cake also. Place the cake back in the refrigerator while you work on the top tier.

Tier 3: Place a dot of icing on the 8-inch plastic separator cake plate. Center a torted 8-inch cake layer on the cake plate, pressing down slightly so the icing dot with adhere to it. Pipe a line of vanilla buttercream in a circle on the first layer (as before with the 10-inch tiers) and fill with 3/4 cup cream cheese filling. Repeat process with remaining layers. Again, frost the entire tier with a thicker-than-usual crumb coat and refrigerate for 1 1/2 hours.

When the top layer (tier 3) is set (icing is firm and dry to the touch), line up the 8-inch tier's plastic separator legs to the leg indentations made previously on top of the cake. Press the top tier down into the cake. Frost the top tier with vanilla buttercream. Take this time to further perfect the icing on the cake, and fill in any gaps that separate the bottom large tiers from the smaller top tier. Place the finished frosted cake in the refrigerator until time to decorate.

The daisies were a lot of fun to make, and if you've ever played with Play-Doh, then I'm confident that you can make these decorations, too. Wilton sent me some fondant cutters and a neat flower impression mat - the latter I just loved for making the daisy centers.
Daisy supplies:
1/2 lb. Ready-made white rolled fondant - Wilton brand is easiest to work with for fondant newbies
1/8 lb. Ready-made orange or yellow (or both) rolled fondant
White vegetable shortening
2 tablespoons clear corn syrup
Wilton fondant sculpting tool #5 (comes in this set)
Daisy Cut-Outs fondant cutters
Fondant rolling pin
Flower impression mat
Flower forming tray or a clean empty foam egg carton
First knead a little of the white fondant until it is pliable. Lightly grease a work surface with the white vegetable shortening and roll out the fondant with a rolling pin. Cut out several daisy shapes with the Daisy Cut-Outs fondant cutters. Use the fondant tool with the #5 tip to give dimension to the daisy petals. To make a double daisy, place a dot of corn syrup on a large daisy and top with a smaller daisy in the center. To make the daisy centers, roll a small amount of the orange/yellow fondant into an oval and press it into one of the flower center cavities in the flower impression mat.

While holding the fondant in the cavity, slide a small knife underneath the excess fondant and cut it so that the center fondant is flush with the top of the cavity. Remove the flower center with the tip of your knife (or a toothpick) and adhere it to the center of the daisy with a little dot of corn syrup. Place the finished flower in a flower forming tray, flower forming cups or in the cavities of a clean, empty foam egg carton. This will give the flowers dimension, so they'll look more authentic.
Make as many daisies as you care to for this cake, but let them dry for a few hours before you start placing them on the cake. They'll adhere well with a dot of buttercream, and you should have plenty leftover for this purpose.

I also made some leaves with this fancy leaf press and green fondant. I used the leaves sparingly on the cake because I didn't want anything to take away from the sweet little daisies.

If you need to refrigerate the cake after you decorate it with the fondant flowers, then don't cover it in plastic wrap - don't do it! The fondant will get soft and become greasy-looking and look generally unappetizing. Just leave everything uncovered in the refrigerator, then allow the cake to come to room temperature over the course of a few hours.
Transporting the cake: Holy smokes. This was the most nerve-wracking/wrecking part of the whole project. This cake had to make an hour + journey through the hills and valleys of East Tennessee, and yes, it did get bumped and dinged a little along the way. I suggest carrying a frosting emergency kit, even if you don't have very far to travel with it.

I transported the cake on a very large, sturdy wooden tray in the back seat of our Jeep Liberty. I really needed some grippy shelf lining to line the tray so the cake didn't slide around, but I didn't have the foresight of needing it. And yes, the cake did slide around a little inside the tray and it did get a ding or two (even though I was sitting in the back seat holding it), but otherwise it rode fairy well. I used some sugar pearls to decorate the lower tiers, but I'm not sure I'd repeat that step again. I ended up getting a piece of cake with a pearl on it, and it seemed totally foreign to the texture of the cake - almost unpleasantly so. But they are pretty -decide for yourself.
Cutting the cake: Again, holy smokes! This was trial by fire for me. I'm accustomed to leaving the cake cutting to the caterers, but we didn't have a caterer at this party. So this was my first time cutting and serving a cake of this magnitude and I really wasn't prepared. I knew how to portion the cake, but not how to do it without making an enormous mess. And I'm pretty sure I served someone a wooden dowel in their slice (cringe), live and learn, right? All the guests were really nice and no one pointed out their dowel.
 My guide for cutting this cake.
 What I did to the cake!If you end up being the cake-cutter, you'll have to disassemble the cake before slicing it. The first tier will lift of rather cleanly with an off-set spatula wedged underneath- the buttercream won't stick to the plastic cake plate as long as you refrigerated the tiers until dry and set as indicated earlier. The next tier is a little trickier- you'll have to use a finger to locate the plastic cake plate through the icing in the large tier. But it lifted off just as easily as the first tier did. As for slicing, the magic trick (that I obviously didn't know) is to warm your knife between slices in a glass of hot water, and dry it quickly with a tea towel before cutting the cake into pieces. Otherwise you're just putting the crumbs from the previous slice of cake right on top of the next slice. I also really like this post by a nice lady named Debi, she does not use a warmed knife, but her descriptive words pictures are very helpful should you find yourself in my predicament.
Well, I have certainly used a lot of words in this post, but there's only one more important thing I have to say - Happy Birthday Dearest Ruby! I'm already planning a cake for your 91st!
xo,
h
March 7, 2014
Special Delivery! Mendl's Shortdough Cookies


Today is the opening of Wes Anderson's new film The Grand Budapest Hotel, and I am SO excited to go see it! I've always loved his work - the strong visuals and nostalgia - it's like seeing fairytale illustrations come to life on the big screen. This new movie holds an extra ounce of delight for me because one of the main characters is a baker, and she's employed at a beautiful patisserie called Mendl's.
This past Valentine's Day I received a gorgeous box of macarons from the fictional Mendl's bakery (courtesy of Fox Searchlight - I think . No note or explanation was enclosed.) This is a genius way to promote a movie, if you ask me. But seriously. How did I get on that mailing list? And do they know I have Moonrise Kingdom artwork all over my living room walls? Whatever the case, I appreciated the gift and it made me feel like I was part of the story in some small way. The macarons were yummy, too!

Inside Mendl's Patisserie Now, apparently Mendl's sells some of the fanciest, tastiest pastries in all the land. One particular of note is a choux tower stacked three puffs high - you can see them balanced on the candelabra-esque display in the picture above. They remind me of a confection (mostly stacked two high) known as Religieuse. I was thisclose to trying my hand at the choux towers, but without having seen the movie yet, I didn't want to assume anything regarding flavor. Instead, I went with a cut-out cookie all decorated up to look like the Mendl's delivery truck. The adorable wood paneling on the sides of the truck completely sold me on the idea of cookie-ifying it, and as you may know, I'll take any opportunity I can to create Bavarian detail in chocolate fondant.

Since the scene is set in the Republic of Zubrowka (fictional, also), which is an Eastern European nation, I made my favorite European cookie: Murbteig. It's a buttery cookie that I almost always infuse with lemon zest and vanilla bean, but the variations are endless, really. You can pat it into the bottom of a pie pan and use it for pie crust, use it for cut-out cookies and jammy thumbprints. You can see its many uses here, in a past Christmas cookie post.

The above shows a little of my process making the fleet of Mendl's trucks. I hand-cut 4x3-inch square cookies. Ready-made Satin Ice fondant was used for the pink truck facade, and chocolate fondant for the wheels and wood detail. Decorator piping tips made excellent wheel cutters! I free-handed the lettering for the Mendl's sign (which, you can probably tell, it isn't perfect) with red and white gel food colors mixed with a drop of two of vodka.

To those of you who get to see the movie tonight - I'm so jealous! It's not even showing in my town yet! My consolation is that I'm working on a very special 90th birthday cake this weekend for my husband's Grandmother - 90, my friends! I'm so honored to be making such a special cake. I get tears in my eyes just talking/typing about it. You can be sure that I'll be sharing pictures and posts of the occasion. But until then, go see this amazing movie! You can get a peek of it here.
Murbteig Butter Cookies
Yield: About 4 dozen cookies [click for printable recipe]
Source: Adapted from my favorite cookbook The New Pastry Cook by Helen S. Fletcher.
This all-in-one cookie dough is sometimes referred to as German Shortcrust or Viennese Shortdough. All you need to know is that it's buttery and delicious - and it's easily made with a food processor. The unfilled baked cookies will keep well for 10-14 days in an airtight tin. In fact, they improve with age. Doubling this recipe is not recommended, even in a large machine. Successive batches may be made without cleaning the bowl and blade. Over-processing the dough will make it too crumbly and the cookies will fall apart, so do be careful to not overwork the dough.
Zest of 1 lemon
1 vanilla bean
1/2 cup/100g sugar
2 1/2 cups/303g all purpose flour, sifted
1/4 tsp. salt
1/2 lb. (2 US sticks) unsalted butter
3 egg yolks
Place lemon zest, seeds of the vanilla bean and sugar in the bowl of a food processor fitted with a steel blade and process for 1-2 minutes. Sugar should be pale yellow and fragrant with lemon. Add the flour and salt, process for 5 seconds to mix. Cut butter into pieces and place in a circle on top of the flour mixture in the food processor. Process for about 20 seconds, or until the butter is cut into the flour very finely. Mixture should be light and powdery. Add yolks in a circle on top of the mixture and process for 20-30 seconds until a ball forms. Process again 10 seconds longer. Roll dough between sheets of wax paper or parchment paper to 1/4-inch thickness.Preheat oven to 350F. Reduce temperature to 325F just before putting the cookies in the oven.Remove top sheet of wax paper and cut out shapes with cookie cutters or a knife. Dough is very buttery, so I did not have to flour my cookie cutters. If dough wants to stick, dip cookie cutters in flour. Transfer cut outs to a parchment-lined cookie sheet using a spatula. Chill in the refrigerator for 30 minutes, or place cut-outs in the freezer for 15-20 minutes (preferred). Bake for 15-20 minutes, depending on size. Let cool completely and dust with confectioners' sugar or frost as desired. Scraps can be re-rolled between wax paper and cut again.

March 2, 2014
Chocolate Donut Coffee Truffles and a Dunkin' Donuts Giveaway!


Today I'm so excited to share a whole new line of coffees from Dunkin' Donuts called the Bakery Series. Each coffee flavor is inspired by a bakery confection: Jelly Donut, Old Fashioned Donut, Chocolate Glazed Donut, Caramel Coffee Cake and Blueberry Muffin. I think coffee always tastes better over conversation, so I invited my friend Christen to help sample the goodies. As soon as I tasted the Chocolate Glazed Donut coffee, I knew it was destined for a batch of truffles.
What's better than truffles? Dunkin' Donuts is generously giving one Sprinkle Bakes reader a "Bakery Flavor Dunked In" kit, worth $350, which includes:
The complete Bakery Series coffees (1 each): Chocolate Glazed Donut, Jelly Donut, Old Fashioned Donut, Blueberry Muffin and Caramel Coffee Cake flavors.Dunkin' Donuts coffee mug (the one Christen is holding in the above picture!)Turtle Donut blended coffee recipe$250 Visa Gift CardMr. Coffee Pot Coffee Maker

Enter here for a chance to win! This contest is open to US residents.
a Rafflecopter giveaway

These truffles are going straight on my holiday bake list because they're so easy and SO delicious. Not only do these have a generous dose of Chocolate Glazed Donut coffee in the ganache, there's two crumbled up chocolate cake donuts in the mix - holy smokes! Does that ever make them tasty. With each bite you'll get a hit of rich chocolate ganache and a cakey piece of chocolate donut. New favorite truffle right here, I tell ya!
Chocolate Donut Coffee Truffles
[click for printable recipe]
 Yield: 2 1/2 dozen truffles
Source: Sprinkle Bakes original recipe
Prep: 10 minutes
Total time: 2 hours 30 minutes
These truffles have two crumbled chocolate cake donuts in the batter. Be sure to use cake donuts! Yeast donuts are much too airy and will become rubbery in the ganache. I used Dunkin' Donuts chocolate glazed donuts fresh from the bakery case.
8 oz semisweet chocolate, chopped finely and evenly
1/4 cup/37ml brewed Dunkin' Donuts Chocolate Glazed Donut Coffee
1/4 cup/43ml heavy whipping cream
1/2 cup/113g unsalted butter, cubed
2 large/101g chocolate cake donuts, roughly crumbled (see pic)
1/3 cup/43g unsweetened natural cocoa powder
Cover a large baking sheet with parchment paper. Set aside.Place the chocolate, coffee and whipping cream in a medium saucepan and heat over medium-low until the mixture can be stirred smooth with a whisk. Remove from heat and add the unsalted butter; stir until well combined. Stir in the chocolate cake donut pieces. Press them down into the ganache so that none of the pieces are sticking out above the surface of the ganache. Refrigerate for 2 hours, or until the ganache is firm.Scoop out ganache by the heaping 1/2 tablespoons full. Roll ganache into a ball between your palms and place on the baking sheet. Roll each ball in the unsweetened cocoa. Place finished truffles in an airtight container; store in the refrigerator.

February 27, 2014
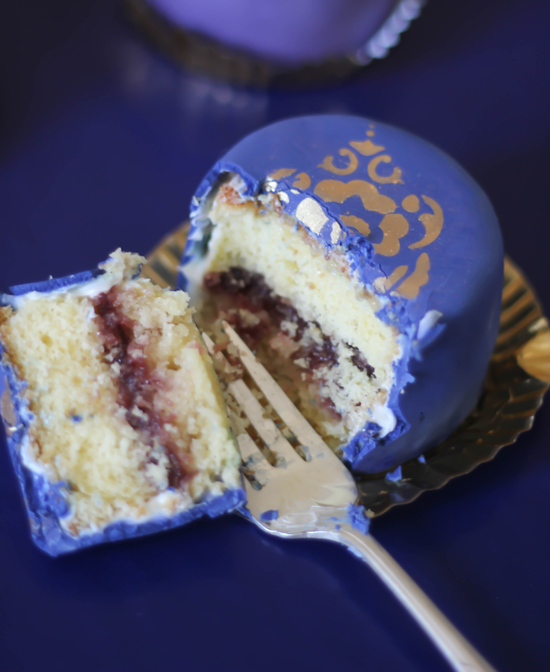
Fancy Little Jam Cakes
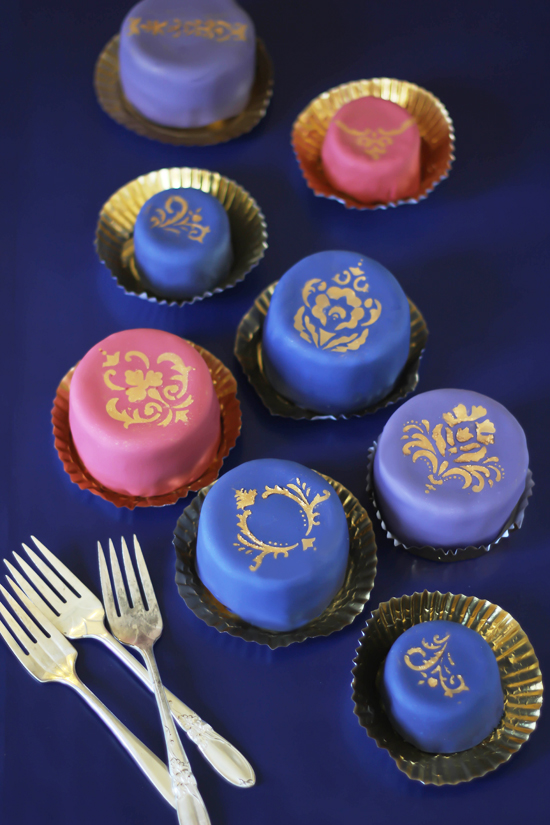
I'll be honest. I made these cakes for myself. I wasn't even super concerned if they made it onto the blog. I just had a bad craving for little yellow cakes filled with blueberry, raspberry and blackberry jams. It was only after I scarfed down one of each flavor (still warm) that I decided to cover them in fondant. Color-coding was in order so we'd know what jam flavor was inside each cake - blue fondant for blueberry-filled and etcetera. The fondant really helped seal in the moisture of the yellow sponge, and I think the cakes were even better the next day!
I recently purchased six 4-inch springform pans
 , and I can't stop using them. I may need a baby cakes intervention. It's like making the fancier cousin of cupcakes; these are slightly larger and with straight edges. They have the prettiest petite cake shape.
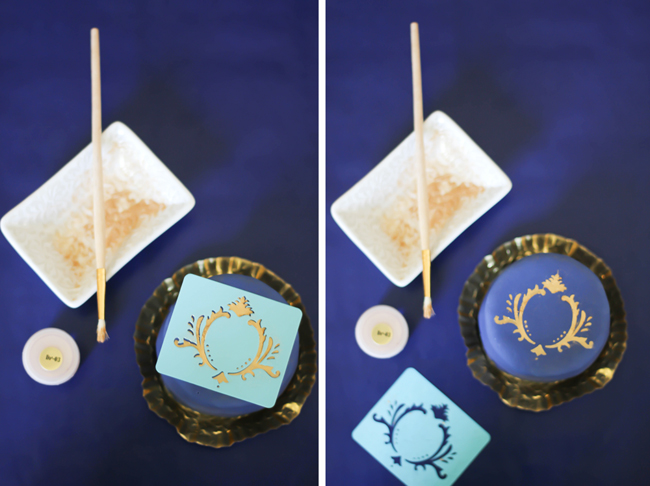
This isn't the first time I've stenciled cakes. Remember these? This technique is one of my favorite embellishments for fondant. Edible gold dust shows up beautifully on these jewel-toned cakes. I used these
 stencils, which are just sticky enough to lightly adhere to dry fondant, but not so sticky that it will damage the fondant when removed. If you try my stenciling technique, be sure that the fondant is dry to the touch before you begin. If the fondant is still fresh and moist, the stencil may stick a little too well and the surface could be damaged when you try to peel it away.
My tutorial for covering petit fours with fondant is essentially the same technique you'll use with these. You can find that here with my homemade fondant recipe. Homemade fondant tastes the best, but a close second is ready-made Satin Ice fondant. I use the latter often, and I used it on these delicious cakes.
Fancy Little Jam Cakes
[click for printable version]
Source: cake recipe adapted from King Arthur Flour
Prep: 30 minutes
Total: 1 hour 20 minutes
Yield: 9" round layer, about 8 servings
1 cup granulated sugar
1/2 cup unsalted butter
2 large eggs
1 tablespoon vanilla extract
1/8 teaspoon almond extract
3/4 teaspoon salt
2 teaspoons baking powder
3/4 teaspoon baking soda
1 2/3 cups all-purpose flour
1/2 cup full fat vanilla yogurt
1/2 cup full fat sour cream
Jam(s) of your choice (I made blueberry, blackberry and red raspberry)Preheat oven to 350F. Grease and flour six 3-inch round spring-form cake pans, or use a flour-based baking spray such as Bake Easy.Beat together sugar and butter until lightened. Add the eggs one at a time, then increase mixer speed to high for two minutes or until batter is light and fluffy. Add the vanilla, almond extract, salt, baking powder and soda; beat for another minute and scrape down the sides of the bowl.Stir together yogurt and sour cream in a small bowl. Beginning and ending with flour, alternately add the flour and yogurt mixture. Beat well after each addition. Scrape down the sides of the bowl and beat again briefly.Spoon batter into the pans. Bake for 15-20 minutes, or until the cake springs back when pressed in the center. Let cakes cool in the pan for 10 minutes, then turn them out onto a wire rack to cool completely.Level each cake with a serrated knife, and then cut each cake in half. Fill a cake half with 1-2 tablespoons jam and replace with remaining cake piece. Let cakes stand uncovered while you make the buttercream.Buttercream:1 cup of unsalted butter, softened2 cups confectioners’ sugar - the finest you can find (usually 10x)1 tsp. vanilla extract* Milk or heavy cream, optionalIn a stand mixer fitted with the whisk attachment, mix together the butter and confectioners’ sugar. Begin mixing on low speed until crumbly, and then increase to high and beat for 3 minutes. Add the vanilla extract and beat until light and fluffy.Frost the top and sides of each cake with the buttercream.*Note: If you find the buttercream is too stiff, you may add milk or heavy cream 1 tablespoon at a time until the mixture is piping consistency.
Assembly and decoration:2 cups (about 1/2 lb.) ready-made white fondantBlue, black, rose, and lavender gel food colorPlastic food service glovesGold luster dustSmall cup of waterCulinary stencil or other plastic non-toxic craft stencilSmall soft-hair artist’s brushLightly grease a work surface with white vegetable shortening. Knead in 1/2 teaspoon blue gel food color and 1 small dot of black gel food color to a 2/3 cup piece of white fondant. Knead in additional food color if needed to achieve a deep blue saturation. Roll half of the piece out on the greased surface. Lift piece with a rolling pin (or your hands – it’s small enough) and drape over a cake. Smooth fondant down and around the cake and trim the excess with a sharp knife. Repeat process a second cake . Repeat the process tinting 2/3 portion of the fondant with lavender food color, and then the last 2/3 portion with rose.Place a stencil on top of each cake. Tap out a little gold dust onto a clean plate. Dip the paintbrush into water and then into the luster dust; work it into a paint-like paste on the plate with the brush. Repeat dipping/working until your brush is loaded with luster dust “paint”. Gently apply in even strokes over the stencil. Carefully lift stencil to reveal the design.Tips:
Roll out a piece of fondant on which to practice your stenciling.The stencils I used had a lightly adhesive backing. I coated the sticky side with vegetable shortening and then wiped most of it off with a paper towel. This took enough of the stickiness away so that it would not damage the fondant’s surface. If you use the same brand of stenciling that I did (below), be sure to use this method and test the stickiness on a test piece of fondant before applying to the cakes.
Supplies:
Adhesive Stencil, Scrolls
 Adhesive Stencil, Fair Isle Dots
 Old Gold Luster Dust 2 grams Cake Decorating Dust Great for Gum Paste Deco
February 20, 2014
Buttons Birthday Cake (Easy White Cake with Vanilla Bean Frosting)


My mom's birthday was at the beginning of this month, but with all the icy weather we've been having lately we didn't get to celebrate on time. Now that our world is finally thawing, the whole family's coming over this weekend and we're doing it up Southern style with barbeque, cornbread muffins and gallons of sweet tea. And cake of course!
I asked my mom what she'd like for her birthday this year and her only request was a birthday cake. She added "and not that meringue stuff, I like the frosting with confectioners' sugar. And I like that white sour cream cake, the kind that starts with the box mix. That's my favorite." What can I say? The woman knows what she wants (and she should have it!).

I decided to do a sewing-themed birthday cake because mom is fine seamstress. She even made some Sprinkle Bakes-themed oven mitts and potholders for my Christmas pop-up shop (and by the way, thanks to everyone who made that a success - I truly felt like a Christmas elf! Over 80 sprinkle mugs alone were shipped out and I'm pretty sure my mailman hated me for a while after that...I digress.)

The button decors are made of fondant, and they couldn't be easier to make. I used the large opening-end (opening-end? That sounds wrong, but I don't know how else to say it) of decorator's piping tips to cut the buttons, and used the pointed end of a Wilton No.2 round tip to create the button holes. The large fondant daisies were made with a daisy fondant cutter and Sixlets pearls were pressed in the flower centers. The teeny-tiny fondant daisies were made with a plunger cutter and jumbo yellow nonpareils were pressed in the centers. (See the list at the end of this post for links to the supplies.)


I wish I could show you the interior of this cake, but the queen must first blow out her candles. Just trust me when I say it's beautifully pale, moist and very wedding cake-like.
I found some waaaay cute sewing needle appetizer picks, and they're so perfect for this cake. I think I'll have to make a few cupcakes to serve alongside because those picks would make the cutest cupcake toppers!
One more thing before I'm off to hang up birthday banners - The Kitchn is holding the 2014 Homies awards, and I've been nominated (thanks guys!). The best sweets and baking category is explained, "...for all those blogs who focus on Pinterest-worthy desserts, amazing cakes, and gorgeous baking." If you think this sounds like SB, send a nomination my way here . You can log in with facebook, so there's no password rememberizing (which I appreciate because I am awfully forgetful). You can nominate as many blogs as you like, and it's an awesome place to discover new baking-centric blogs. And that means everybody wins a little something!
White Almond Sour Cream Cake with
Vanilla Bean American Buttercream
[click for printable recipe]
Yield: One 9-inch double layer cake or one 7-inch triple layer cake, serves 12
Source: WASC recipe by Rebecca Sutterby, Sprinkle Bakes buttercream
Prep: 45 minutes, total time about 3 hours
This cake starts with a box of white cake mix but is improved upon with additions of sugar, flour, sour cream and flavorings. It's often made for weddings because if its moistness and pure white interior. The frosting recipe will make a little more than you''ll need for this cake, but I always like to have extra just in case accidents happen pre-party. My mom used to say that spackle makes all carpenters equal. I tend to believe the same is true with frosting and bakers.
White almond sour cream cake layers
1 box/ 16.25 oz. white cake mix
1 cup/128g all-purpose flour
1 cup/200g granulated sugar
Generous pinch of salt
1 cup/242g sour cream
1 cup/ 8 oz. cold water
3 large eggs
1 teaspoon vanilla extract
1/2 teaspoon almond extract
Whisk together the first 4 ingredients in a large mixing bowl. In a four cup measure, stir together the sour cream, water, eggs and extracts. With a hand mixer running on low speed, gradually pour the liquid ingredients into the dry ingredients. Scrape the bowl down and mix again. Divide the cake evenly between the pans, about 3 cups per 9-inch pan or 2 cups per 7-inch.
Vanilla bean buttercream
2 cups/452g of unsalted butter, softened
5 to 6 cups/640g to 768g confectioners’ sugar
Seeds of 1 vanilla bean
Milk or heavy cream, optional
In a stand mixer fitted with the whisk attachment, mix together the butter and confectioners sugar. Begin on low speed until crumbly, and then increase to high and beat for 3 minutes.
Add vanilla bean and beat again for another minute. If you find the buttercream is too stiff, you may add milk or heavy cream 1 tablespoon at a time until the mixture is spreading consistency. Beat until light and fluffy.
Fill each 7-inch cake layer with 1/2 cup frosting, or if making 9-inch layers, use 1 1/4 cups. Stack cake layers and frost entire cake with a generous covering of buttercream. Store loosely covered at room temperature.
Buttons and Daisies Fondant Decors How-To
[click for printable version]
Equipment needed:
Daisy Fondant Plunger Cutter Set

Wilton Fondant Daisy Shape Cutter

Wilton Fondant 9 Inch Rolling Pin

Candy Beads, Yellow
 (I used Sixlets Pearls)
Jumbo Rainbow Nonpareils
 (you'll only use the yellow ones in the jar)
Satin Ice Ready-Made Rolled Fondant
 (in colors white, pink orange and blue-green)
Decorator Piping Tips
 (in graduated sizes)
First, roll out about 1/4 lb. of fondant per the package's directions. If you're a beginner with fondant, be sure to read the pamphlet on the inside of the box. Work with one color at a time and be sure to close the unused fondant in an airtight container while you work.
For the large buttons, I used Ateco #822 tip just like a cookie cutter to cut out the rounds, but you could use any 1-inch round cutter. The Wilton #2 round decorator tip was used for the smaller buttons, and it measures approximately 3/4-inch. On the larger 1-inch cut outs, center the smaller piping tip in the middle of the button to impress a small circle, then with the piping end of the Wilton #2 tip, create 4 button holes. For the smaller buttons, I used a 1/2-inch magic marker cap to make a button-like impression in the fondant. Use the #2 piping tip to punch two button holes. Allow the buttons to dry until firm, about 3 hours.
For the large daisies, use the fondant daisy cutter to cut shapes from rolled white fondant. Stack two cut-outs on top of each other and press a yellow candy bead in the center. Be sure to press the candy into freshly cut fondant -it won't stick if it's been sitting too long and dries. Tip! I propped some of my daisies up on the curve of a bowl to give them extra dimension.) Allow daisies to dry until firm.
For the tiny daisies, cut white rolled fondant with a small daisy plunger cutter. Press a yellow jumbo non-pareil into each cut flower. As before, be sure to press the centers in while the fondant is fresh and moist.
Arrange buttons and daisies in garland-fashion around the top and bottom edge of the cake. Use additional buttercream as glue if the pieces don't naturally stick.
February 11, 2014
DIY Love Elixirs: Infused Simple Syrups

Do love potions exist? I say yes. Okay, kind of. The words potion and elixir both imply conjury - perhaps a bubbling test tube or a little amber bottle of murky liquid - but I'm referring to something much less hexed. It has more to do with the allurement that draws us outdoors to the first camphoric buds of spring and makes us pinch them right from the stalk. I'm talking aromatherapy meets sugar and cookery. Kitchen alchemy with herbs and flowers.
Our sense of smell is estimated to be ten thousand times more sensitive than our sense of taste. So, getting together flowery herbs and dessert is an exciting thing! Of course, this is not a new idea. Infused simple syrups have long been a staple of confectioners and the effects of aromatherapy on the body and spirit have been studied for ages. The novelty here is using herbs and flowers with specific characteristics. Intoxicating floral notes (lavender, rose) and stimulating scents (mint,citrus) are best suited for syrups we're giving the conceit of "love elixir".


Just like any simple syrup, these can be be poured over ice cream, added to cocktails, or drizzled over buttermilk-vanilla bean cupcakes with the recipe provided at the end of this post. Most infused syrups are colorless, and if you make a lot of different infusions at the same time as I have, adding a drop of complementary food color to each syrup is a good idea (i.e. green to mint-infused). This will help you identify them quickly and easily.
It was fun to learn about each herb's characteristics as I stirred them into syrup, and I've given some information with each elixir I created below, but it's also fine to disregard the back story and just enjoy them for what they are - yummy on dessert.

l to r:Lavender-Juniper Berry - floral and heady with evergreen flavor. Maybe we should call this elixir "keep calm and forget-me-not" because lavender is known for relaxation and juniper berry reportedly helps improve memory! This one is a nice addition to cocktails.
Rose-Vanilla - rose is sweet and intoxicating and vanilla bean evokes feelings of safety and home. Cuddle up with your favorite person and a little of this over vanilla ice cream (one bowl, two spoons of course).
Lemon-Thyme - the scent of lemon is bright and energizing. Thyme has traditionally been associated with courage and reduces fatigue. Let's toss out our energy drinks and have a little of this over poppyseed pound cake instead, shall we?
Mint-Rosemary - cool with a kiss of pine. Mint is refreshing and invigorating. Rosemary is mood-lifting. Both pair extremely well with dark chocolate -and don't forget, chocolate supposedly simulates the feeling of falling in love. Mint/Rosemary/Chocolate? Win/win/win.
I hope you're inspired to create your own elixirs. Here's a little cheat sheet of lovey-dovey aromatics and their characteristics. This is by no means a complete list, but it should get you started.
Intoxicating: Rose, lilac, jasmine, honeysuckle, marigold, hibiscusRefreshing: citrus, bergamot, mint, lavender, rosemary, thymeStimulating: peppermint, orange oil, lemon oil, black peppercorn
Stuff you should know!
Use organic flowers and herbs, or forage from a trusted landscape. Use only flowers and herbs you can positively identify.
It's not a bad idea to make friends with your local florist, too - they may be a little more costly to buy from, but they'll have a good source for safe organic roses. The best roses for infusing are the wild-growing variety that are bursting with fragrance in summertime. If you can't find a good source for fresh petals, use a bit of rosewater in the syrup instead.If you are pregnant, be extremely well-read on herbs and oils before you use them. Some should not be taken during pregnancy. The best safe-guard is to consult your physician.

Now, honestly. I don't know of any magic elixir that will cause instant and abiding affection. I think that has much more to do with temperament of the heart. However, I do believe that certain aromatic infusions are mood-lifting, anxiety-reducing and promote a feeling of happiness and well-being. And those are some of the same things I love about love.
Several sources were very helpful with the writing of this post: ABC news, Discovery Health, National Cancer Institute, Wild and Weedy Apothecary and Mrs. Leslie's Complete Cookery.
Infused Simple Syrup [click for printable recipe]Yield: about 1 2/3 cup/ 400 ml
1 cup/ 200g granulated sugar1 cup/ 8 oz. water
In a medium saucepan, combine sugar and water. Bring to a bubble over medium heat, stirring occasionally until sugar has dissolved. Steep with herbs as desired (further information below). Place syrup in lidded jars and store in the refrigerator.
Syrup inclusions (per 400 ml batch)Lavender syrup: 2 tablespoons/5g organic culinary lavender buds, steep for 5 minutes in hot liquid then sieve to remove lavender buds.Vanilla syrup: 1 vanilla bean, split and scrape vanilla bean, add seeds and steep in hot liquid with pod for 10 minutes, discard pod before using syrup.Mint syrup: 1/2 cup (5-7 sprigs) packed fresh mint leaves, steep for 10 minutes in hot liquid then sieve to remove leaves.Thyme or rosemary syrup: 3-5 stalks of thyme, steep whole stalks with leaves for 5 minutes then sieve to remove stalks and stray leaves.Rose syrup: 2 cups (about 60 large) fragrant, organic rose petals , stir petals into hot liquid, let steep until syrup is cool; sieve to remove petals. If fresh rose petals are out of season, stir in 1/8-1/4 teaspoon of purchased rosewater.
Buttermilk Vanilla Bean Cupcakes
[click for printable recipe]
Source: Adapted from marthastewart.com
Yield: about 18 cupcakes
Prep: 15 minutes, total time about 1 hour
1 cup/200g sugar
1/4 cup/57g unsalted butter, softened
1 large egg plus 1 egg yolk
1 1/2 cups/192g all-purpose flour
1/2 teaspoon baking powder
3/4 teaspoon baking soda
3/4 teaspoon salt
1 cup/8.5 oz. reduced fat (1.5% milkfat )buttermilk
Seeds of 1 vanilla bean pod
Preheat oven to 350F. Line two muffin tins with paper liners, set aside.Combine the butter and sugar in a large mixing bowl. Beat on medium speed with an electric hand mixer. Add the egg and yolk and beat until combined. In a separate bowl, whisk together the flour, baking powder, baking soda and salt. Add the flour mixture and buttermilk alternately to the batter, mixing well between each addition. Begin and end with flour. Add the seeds of the vanilla bean and mix on low speed. Fill each muffin cup about 2/3 full. Bake for approximately 15-20 minutes, or until the cakes spring back when pressed in the center. Allow the cupcakes to cool in the pans for 10 minutes, then remove them from the pans and allow them to cool completely on wire racks, about 15 minutes.Frost with vanilla Swiss meringue buttercream, if desired (recipe here ).
January 31, 2014
Cherry Chip Sponge Cake with Almond Whip


It's hard to believe we're saying goodbye to January already! It's completely passed me by. I've spent this cold month scribbling in recipe journals with red velvet cake batter on my elbows. And in my hair. And on my dog. (Sorry Biscuit.)
Much of this month went toward styling, shooting and re-shooting book recipes, drinking coffee and Emergen-C, and doing the most dishes ever, ever, ever. It's a month that made me wear all my socks at once (brrrr!).


But at month's end January made my world a snow globe, which made the cold a little more bearable. And gave me enough time to create a tutorial for homemade rolled fondant, which is a total game changer when it comes to wrapping beauty and brains and good taste all in one porcelain white sugary blanket. (I urge you to try it!)

As for this cake, I've been dreaming of it since early December. The cherry chip sponge is sturdy enough to stack high, and the bright-tasting almond whipped filling is a lovely compliment. Since I had leftover homemade rolled fondant, I made sugar cookies and flavored the fondant with almond extract. I think they make an eye-pleasing accompaniment to this cake - yummy too!
I had planned on using maraschino cherries as a cake garnish, but I accidentally ate the ones I'd set aside (funny how that happens). So, I rolled some of the red fondant into little cherries and used mint stems for faux cherry stems. I think they might be even cuter than the real thing!
Cherry Chip Sponge Cake with Almond Whip
[click for printable version]
Yield: 4 servings
Source: Sprinkle Bakes original recipe
Prep: 30 minutes, total time about 1 hour
Cherry chip sponge
4 eggs, room temperature
3/4 cup/150g granulated sugar
1 tablespoon canola oil
2 tablespoons buttermilk
1 tsp almond extract
1 cup/125g all-purpose flour
1 teaspoon baking powder
1/2 teaspoon saltRose or pink gel food color1 tablespoon all-purpose flour1/2 cup/ 100g maraschino cherries, chopped
Almond filling
2 cups/16.8 oz heavy whipping cream1/4 cup/48g granulated sugar1/4 teaspoon almond extract4 maraschino cherries with stemsPreheat oven to 350 degrees. Grease a 15x10 jelly-roll pan with white vegetable shortening and line with parchment.In a large bowl, beat eggs with a hand mixer for 5 minutes (I always set a timer for this, so I’m absolutely sure the eggs are whipped to maximum volume). Properly whipped eggs will lighten in color considerably and have the appearance of yellow cake batter.With the mixer still running, slowly add sugar and oil to the whipped eggs. Next, add buttermilk and almond extract. Sift together flour, baking powder and salt. Slowly add to the liquid ingredients. Mix until well combined. Mix in the pink gel food color a little at a time until the desired shade is achieved, usually about 1/8 to 1/4 teaspoon.Sprinkle the 1 tablespoon flour over the chopped maraschino cherries and stir briefly. Fold the flour-coated cherries into the sponge batter. Pour batter into the prepared pan. Bake for 12-15 minutes; check for doneness at 12 minutes. Cake is done when it springs back when pressed in the center.Allow the cake to cool in the pan for 5 minutes before turning it out onto a large wire rack to cool completely.Sparingly trim the edges of the cake with a serrated knife so that the dimensions are 14x9. Cut the cake into four rectangles approximately 7 x 4.5-inches. Stack the cake slices and cut into four even slices or “fingers”. For the almond filling, place the heavy cream in a large mixing bowl and whip until slightly thickened, about 2 minutes. Gradually add in the sugar one tablespoon at a time. Add the almond extract and whip until stiff peaks form. Transfer 1 1/2 cups whipped cream to a piping bag fitted with a large star tip. Using an off-set spatula, frost three sponge fingers with a little of the whipped cream and stack them; place an unfrosted sponge finger on top. Pipe an undulating line of whipped cream on top and garnish with a maraschino cherry. Repeat with remaining sponge fingers. Store loosely covered in the refrigerator.
Find my sugar cookie recipe here , and my Beginner's Guide to Fondant tutorial here !