Heather Baird's Blog, page 80
May 20, 2014
Chocolate Mojito Cupcakes

My third post for Better Homes and Gardens' Month of Cakes is a refreshing take on grasshopper cupcakes. Fluffy whipped cream is flavored with mint, lime zest and rum to give rich chocolate cupcakes a Mojito-inspired topping. I love this frosting so much I've even piled it on top of an ice cream sundae!
Ready to try them at home? Find all the details here!


May 13, 2014
Raspberry Rosé Cake for Better Homes and Gardens

Hi all! Today you can find me on the Better Homes and Gardens blog again, and this time I'm showing you how to make an easy celebration cake. Rosé champagne is used to flavor fluffy white cake layers, and then they're filled and frosted with pretty pale blue vanilla bean frosting. Add some fresh raspberries on top and you've got yourself a stunner for the dessert table!
It's easy to put your own spin on this cake with your favorite bubbly and berries. Get all the details here !
May 6, 2014
Lavender Earl Grey Cupcakes for Better Homes and Gardens

Hi friends! This month I'll be sharing a few of my cake creations on the Better Homes and Gardens blog - starting with these tea-time inspired cupcakes! They're so easy to make, and perfect for a Mother's Day dessert.
Lavender and Earl Grey flavors have a natural affinity for each other, but you can use any tea you fancy. To get all the details (including how I made tea bag tags into cupcake toppers) click here !

April 30, 2014
Giant Skillet Cinnamon Roll and a Fair Trade Giveaway!

You guys. I'm so excited about today's post because there are so many good things to talk about!
First of all, Mother's Day is just around the corner, and I've teamed up with my friends at Fair Trade USA (along with some other fabulous bloggers) for a virtual Mother's Day brunch. I developed this recipe especially for the occasion, and I have to tell you, I may never bake individual cinnamon rolls ever again. My favorite part of a cinnamon roll is the soft, flaky interior, and - guess what. You get more of that when you make one giant cinnamon roll! And you can slice it like cake! I really love how all those beautiful layers separate ever-so-slightly on the plate. It's irresistible when smothered with orange-zested cream cheese glaze (I swoon!).


Second, there's a giveaway involving some of the best stuff around - products that are really worth using! I buy Fair Trade whenever possible, not only because the products add quality to my baking, but also because it positively impacts the lives of Fair Trade workers. There are a great number of women who work for Fair Trade companies, including moms who are working to provide better lives for their families. This virtual brunch is our way of honoring them. And all moms, really!
Fair Trade certified, means the products come from workers that are justly compensated. Below are some of the best teas, coffees and snacky foods I've ever tasted, and we're giving the whole stash away to one lucky winner! You'll get the same delicious Fair Trade cinnamon and muscovado sugar that I used in this skillet cinnamon roll. And just take a look at this Prana embroidered scarf. It's even prettier in person.
Giveaway is open to US residents.
a Rafflecopter giveaway
There's a friendly little competition going between the participating bloggers, too. So you can help me out by re-pinning my image here!
Now to even more good stuff - step-by-step instructions for the skillet cinnamon roll. You'll see my process below, and I hope it will serve as a helpful guide while you make your own!


The entire process is a little messy, but well worth the end result. The muscovado sugar really punches up the brown sugar flavor, so it's worth seeking out next time you're at the grocery store.

Just look at that landscape of swirly goodness up there. I can't wait to try out different versions of this skillet pastry. Maybe I'll hide some Guittard Fair Trade chocolate between the layers next time.
Giant Skillet Cinnamon Roll
with Orange-Cream Cheese Glaze
[click for printable version]
Yield: One 12-inch skillet cinnamon roll
Source: My Mom's cinnamon roll recipe plus my original glaze recipe
Prep 2 hours; Total 2 hours 30 minutes
Dough
1 cup whole milk
1/2 cup sugar
1 1/2 teaspoons salt
4 1/2 teaspoons active dry yeast
1 teaspoon sugar
1 cup warm water (90-110°F)
2 eggs, room temperature
6 cups all purpose flour, sifted
4 tablespoons unsalted butter, melted
Filling
1/2 cup butter melted
1 cup sugar, 1/2 cup moscovado sugar (or dark brown sugar) and
3 teaspoons ground cinnamon mixed together
Glaze
4 oz. cream cheese, slightly melted4 tablespoons butter, melted
2 cups confectioners' sugar
2-4 tablespoons hot milk
2 teaspoons orange extract
Zest of one-half organic orange
For the dough, heat milk, 1/2 cup sugar and salt in a saucepan over medium-high heat. Stir until sugar melts and a few small bubbles appear at the edges of the pan. Remove from heat and let cool while you prepare the other elements.Dissolve yeast and 1 teaspoon sugar in very warm water (90°F to 110°F) in the bowl of a standing mixer (or a large bowl if you don't have a stand mixer). Stir with the paddle attachment (or wooden spoon) until well blended. Let stand 10 minutes.Beat eggs into yeast mixture. Stir in cooled milk mixture (it should be lukewarm), switch to the dough hook then add in flour a little at a time until dough is elastic. Add melted butter and mix, then add in more flour until dough is elastic and pulls away from the sides of the mixer. Note: you may not have to use all the flour. Do not add so much flour that the dough does not stick to your hands. Set a timer and knead with the dough hook (or knead with hands on a floured surface) for 5 minutes. Place dough in a buttered bowl and turn it over to coat the entire surface. Cover with plastic wrap and let rise in a warm place 1 hour or until doubled (mine took a little longer than an hour to double).Punch down dough and turnout onto a lightly floured surface. Knead a few times and cut into two pieces. Roll out each piece to 12x9-inch rectangles. For the filling, brush the rolled dough pieces with the melted butter. Sprinkle each with half the cinnamon sugar mixture. Cut the each dough piece into 5 even strip lengthwise. Roll one strip up as if you were making a regular cinnamon roll. When you get to the end, use another strip and continue rolling. When the dough spiral reaches about 6-inches in diameter, (3-4 strips-worth of spiraling) place it in the center of a lightly greased 12-inch cast-iron skillet. Continue spiraling dough strips around the middle. This is a messy job, but just embrace the mess. It'll be well worth the end result.When all the dough has been used, cover and let rise about 45 minutes or until doubled.Preheat oven to 400°. Bake for 18-25 minutes, or until golden. Keep a close eye on it so it doesn't over-bake! Whisk together glaze ingredients, adding additional milk as needed. Glaze pastry in the pan while it is still hot. Add additional orange zest if desired. Slice into pieces and serve while still warm.

Fair Trade prize package courtesy of :Allegro Coffee, Guittard, Nutiva, BarkThins, prAna, sweetriot, Numi Organic Tea, Frontier Natural Products, Choice Organic Teas, India Tree, Honest Tea.
April 28, 2014
Marshmallow-Candy Swirl Cake

I've been finding a lot of inspiration at the candy store lately. There's something so wonderful about all those bins of colorful candies - jawbreakers, gummybears and jelly beans (and etcetera) - just looking at them makes me feel happy and energetic. (Or maybe I'm just having a sugar rush. It's hard to say, really.)
My last trip yielded a giant tub of candy necklaces and an extra large package of strawberry-stripe marshmallows called Puffy Poles . The two looked so pretty when I held them together, I felt certain that they would live harmoniously on a candy-inspired cake.
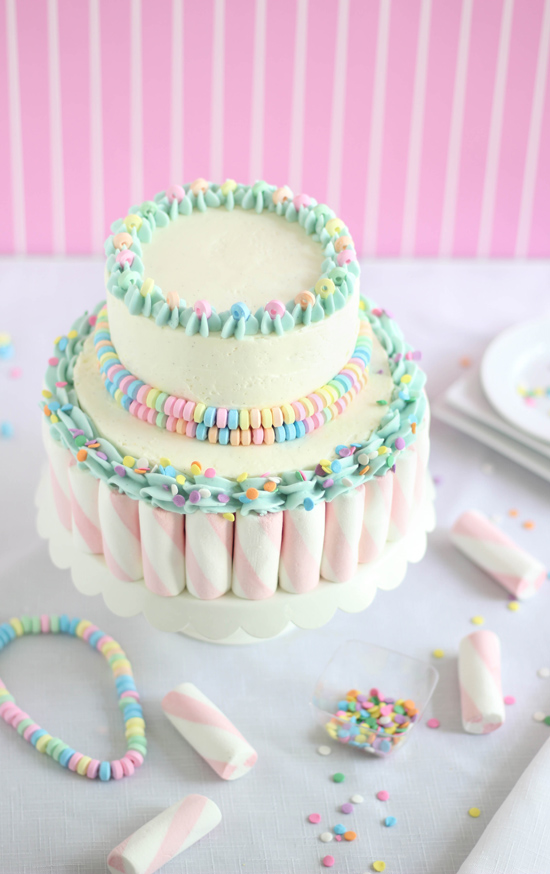
I already had a clear image of what I wanted the cake to look like, so it was just a matter of choosing a cake flavor and putting it all together. The Puffy Poles are really soft and delicious with a pronounced strawberry flavor, and I didn't want to take away from that. I ended up making a simple white cake swirled with pastel color. The frosting is Swiss meringue buttercream - it had to be. It doesn't crust like American buttercream frosting, so you can take your time applying the candies and marshmallows to the sides of the cake.


My method for accessorizing the cake with the candy necklaces is demonstrated in the picture above. I snipped the elastic string with scissors and then gently draped the necklace around the cake's top tier. It's good to have another person help you pat the candies gently into the icing while you hold the two ends in place. The elastic is so small and stretchy, it is very easy to let go of the two ends before it's completely anchored down. I'll say it again for emphasis - it is VERY easy to let go of the two ends, so it's a good idea to have a helper,otherwise you may end up with candy beads in spilled down one side of the cake.
Once the beads are in place, you can pull out the elastic string! Viola!

I used two 6-inch springform pans for the bottom tier and one 4-inch pan for the top tier. It made for a dainty little cake, but with the added marshmallows, you'll still need a standard 8-9-inch cake stand.

I really love the scratch-made white cake recipe I've included below, but there's no reason you couldn't give any cake the Marshmallow-Candy Swirl treatment. You can find Puffy Poles marshmallow in every color here, and bulk candy necklaces here.
Enjoy!
Marshmallow-Candy Swirl Cake
[click for printable version]
Yield: 14 servings: One double layer 6-inch tier and one single layer 4-inch tier
Prep: 1 hour, total time about 2 hours 30 minutes
Cake
3 1/2 cups/287g cake flour (such as Swan's down, do not substitute homemade cake flour)
1 Tbsp plus 1 tsp baking powder
1/2 tsp salt
6 large egg whites, room temp
1 teaspoon vanilla extract
1 1/2 cups/12.75 oz whole milk, room temp
1 cup/113g unsalted butter, softened
1 1/2 cups/298g sugar
Pink, yellow and green food color
Preheat oven to 350 degrees. Grease two 6-inch pans and one 4-inch pan; line with parchment.
Sift together flour, baking powder, and salt; set aside. Whisk together egg whites and milk in a separate bowl; set aside.Beat butter using the paddle attachment until soft and creamy. Add sugar gradually and beat until light and fluffy. Scrape down the bowl as needed. Beat in vanilla.Add flour mixture alternately with the egg white/milk mixture. Begin and end with flour mixture and beat until smooth on medium-low speed after each addition.Divide batter between three bowls evenly; color each bowl of batter with a food color. Divide batter between pans, pouring in different colors into each pan and swirling them gently with a knife or skewer. Bake 6-inch cakes at 350 for about 25-30 minutes. Bake 4-inch layer for 20-22 minutes. Let cool slightly in pan, then turn out and cool completely.
Buttercream and decors6 egg whites1 cup/198g sugarPinch of salt1 pound unsalted butter, cubed, at room temperatureSeeds of 1 Tahitian vanilla bean
Blue food colorConfetti sprinkles for decorating
5 candy necklaces, multicolor
25 Puffy Poles strawberry marshmallows
Whisk together the egg whites, sugar, and salt in a large heatproof bowl. Set over the simmering water and whisk until the mixture is hot to the touch and the sugar has dissolved.Transfer the mixture to the bowl of a stand mixer fitted with the whisk attachment.Beat on low speed for 2 minutes. Increase to medium-high until stiff peaks are formed.Continue beating at medium-high speed until the mixture is fluffy and has cooled (the mixing bowl should feel cool to the touch).Turn the mixer off and switch from the whisk attachment to the paddle. Turn the mixer on medium-low and add the butter, a few cubes at a time, beating until well incorporated before the next addition. The egg whites will deflate and thin with the first few additions – don’t let this discourage you – keep going. It may also look curdled, but don’t fret. Beat on high speed when all the butter has been added. The mixture will thicken and become smooth after several minutes of beating. Beat in the vanilla bean seeds. Transfer about 2/3 cup to a bowl and fold in one or two drops of blue food color. Transfer frosting to a piping bag fitted with a large closed star tip; set aside.
Fill and frost the cake layers with the remaining frosting. Stack the smaller tier, centered, on top of the larger tier. Place the marshmallows vertically around the entire bottom circumference of the large tier. Using the blue frosting in the piping bag, pipe decorative swirls along the tops of the marshmallows. Sprinkle the blue frosting with confetti sprinkles.
Snip the elastic on the candy necklaces and, while holding the two ends, drape it across the bottom of the smaller cake tier. Don't stretch the necklace! You want all of the beads to be perfectly lined up, and stretching will make them separate. Gently pat the necklaces into the frosting so they stick (I had to have a helper for this, it's not as easy as it sounds!). When all the beads are embedded into the frosting, gently pull the elastic string free and discard. If you need more beads to finish the line around the cake, snip another necklace and place the beads onto the cake with your fingers. Repeat the process with the remaining necklaces. You will have candies left over - but don't eat them! Safe them for the next step.
Pipe blue frosting stars around the top edge of the top cake tier. Place a candy bead on top of each piped star.
Serve cake to delighted guests.
April 23, 2014
Easy Piping Techniques for Cupcakes

Hi friends! Today I'm doing something a little different. I'm going to show you a few of my favorite piping techniques for cupcakes. I even made a fun video tutorial, and if you're an email subscriber then you'll need to click here to view it. If you're visiting the blog, then you can just scroll down to the embedded video.
These techniques are perfect for beginners because they are so forgiving. How forgiving? Well, in the video my frosting begins to soften considerably under the studio lighting, but even then things turn out beautifully! If you're a seasoned decorator you'll probably already know these techniques, so be aware this video is geared more toward novice decorators.

Beginners will need a few supplies to get started. First, good thick buttercream frosting. You'll find my two favorite frosting recipes at the end of this post. You'll also need the decorator piping tips featured in the video so I've linked them below. Piping bags are a must! Reusable or disposable - your choice, because either will work.
In the video you may notice that I don't use couplers, and instead I just drop the piping tips into the bags, score the end of the bag and get straight to piping. I honestly feel the couplers are not necessary when using larger tips, but I do use them for smaller tips and when I need to quickly switch out a plain tip for a star tip.
My favorite decorator piping tips!
Ateco Pastry Tube Star Size 8
 - This is the first tip demonstrated in the video. It may be my very favorite piping tip of all because you can make the perfect soft serve ice cream swirl on top of a cupcake. If you've never ventured into piping, then this is a good one to consider buying first. I also demonstrate a single swirl with this tip, and you may remember it from these lucky vanilla cupcakes.
Wilton Petal Decorating Tip 125
 - This is the second tip demonstrated in the video. It's a petal tip, which certainly makes pretty individual petals, but I love using it for piping a simple rose in one continuous icing spiral. This technique takes a little dexterity, so it's a good idea to set aside one or two practice cupcakes.
Wilton Decorating Petal Icing Tip #104
 - or, ruffle tip. This is the third tip demonstrated in the video, and you can see that it's just a little smaller than the previous petal tip. In my opinion, it's the best size petal tip for ruffling cupcakes. When I first tried this technique I felt like I was making a real mess of things - starting and stopping rows, accidentally smearing a few ruffles with the piping tip - but when I finished, the cupcake looked picture-perfect. So remember, if you get halfway through ruffling and things are feeling a bit chaotic, keep at it and judge the end result. This petal tip can also make daisies, like the ones on these cupcakes I made for the Etsy blog last year.
Ateco Pastry Tube Plain 808
 - Icing mounds are the easiest of the easy-to-make. Honestly, you don't really even have to use a piping tip to achieve the effect. You could just use a zip-top bag with the corner snipped. That said, I really like this size piping tip to make a nice fat, even heap of frosting on top of cupcakes. It's the tip I use for these champagne cupcakes, too.
Ateco Closed Star Pastry Tube 847
 and 843
 - I love to use these two piping tips together, as you can see demonstrated on the last cupcake in the video. The smaller one is used to make little stars around the edge of the cupcake and the larger tip makes a nice big swirl in the middle. It looks best when contrasting colors are used, like these bonbon cupcakes I made for Valentine's day.
This is just the tip of the iceberg when it comes to piping tips and techniques, but these are my favorite and I use them most often. And they are some of the easiest to master, too! If you decide to try them for yourself, share your results on my facebook wall! I'd love to see your work!
Swiss Meringue Buttercream Frosting
[click for printable version]
Source: adapted from the SprinkleBakes book
Small batch (will generously frost 12-15 cupcakes)
6 egg whites
1 cup/200g sugar
Pinch of salt
1 pound unsalted butter, cubed, softened (room temperature works too, but takes longer to come together)
3 teaspoons clear vanilla extract
Large batch (will generously frost 24-30 cupcakes)
12 egg whites
2 1/2 cups/500g sugar
1/4 tsp salt
2 1/2 lbs. unsalted butter, softened
1 tbsp clear vanilla extract
Set a saucepan filled one-third full of water over medium-high heat and bring to a simmer.Whisk together the egg whites, sugar, and salt in a large heatproof bowl ( I suggest a stainless bowl). Set over the simmering water and whisk until the mixture is hot to the touch and the sugar has dissolved (120-140 degrees on a candy thermometer, to be sure).Transfer the mixture to the bowl of a stand mixer fitted with the whisk attachment.Beat on low speed for 2 minutes. Increase to medium-high until stiff peaks are formed.Continue beating at medium-high speed until the mixture is fluffy and has cooled (the mixing bowl should feel cool to the touch).Turn the mixer off and switch from the whisk attachment to the paddle. Turn the mixer on medium-low and add the butter, a few cubes at a time, beating until well incorporated before the next addition.Add the vanilla extract. Divide batter and tint with food coloring, if desired. Beat until the frosting is thick and completely smooth.Store in an airtight container until ready for use.
American Buttercream Frosting [click for printable version] Source: SprinkleBakes bookYield: about 3 cups, enough to generously frost 12-15 cupcakes
1 cup/226g unsalted butter, softened2 ½-3 cups/320 to 384g confectioners’ sugar1 tsp vanilla extractMilk or heavy cream, optionalIn a stand mixer fitted with the whisk attachment, mix together the butter and confectioners sugar. Begin on low speed until crumbly, and then increase to high and beat for 3 minutes.Add vanilla extract and beat again for another minute. If you find the buttercream is too stiff, you may add milk or heavy cream 1 tablespoon at a time until the mixture is spreading consistency.

April 18, 2014
Bubble Gum Frosting Cupcakes with Gelatin Bubbles

Let's not take things too seriously today.
Instead, let's make cupcakes with bubble gum frosting and use way too many sprinkles. Let's be crafty and make gelatin bubble toppers, too. It's easy and I'll show you how!

I first saw the gelatin bubble technique weeks ago on Cake Central, and I've been dying to try it ever since. I wasn't sure exactly what kind of treat I would make to put bubbles on - something soap themed seemed a little unappetizing, but I found my inspiration in a little dram bottle of LorAnn bubble gum flavor. In my experience, bubble gum flavored treats are a bit polarizing. I'll admit that I was wary of adding the flavor to frosting, but it's surprisingly good!

Ready to see how I made the bubbles?

Refer to these pictures as you read the tutorial. The first thing you'll need to get is a pack of small balloons. Mine were 6-inch, and I inflated them to various small sizes, roughly 2-4-inches in diameter. Standard balloons are usually egg-shaped when inflated, but you can make them round by pinching the two ends of the balloons and tying the ends together.
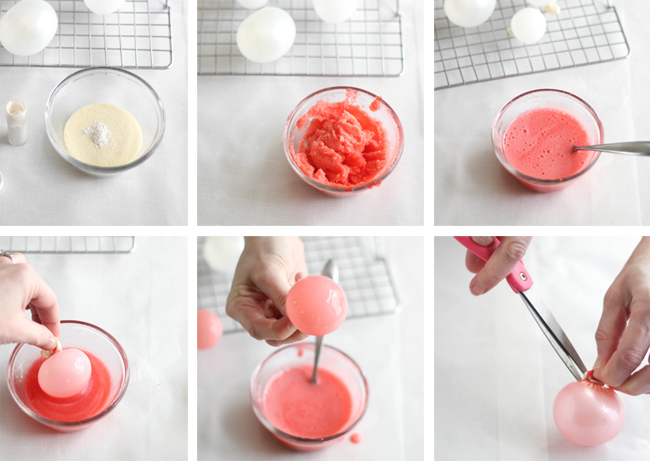
The gelatin portion is fun -a tad messy, so have a wet dish towel handy for drips.
Now, let me be clear on something here, the toppers are purely decorative. Because they are simply made of gelatin and water, they don't taste yummy. But they are so worth making for the effect! I couldn't believe how well they turned out!

The gelatin will set on the balloon and feel rubbery at first, but over the course of 24 hours, it will become dry and very crisp. You can re-dip the bubbles after they are just set to make them darker and more sturdy. In the picture above, the balloon in the foreground was coated twice in gelatin. The balloon in the background was coated only once.
I think this makes a great little weekend project. And if you have kiddos, I can't imagine them not wanting to get involved. It's so fun and kind of fascinating, too!
 Gelatin Bubble Tutorial
[click for printable version]
Source: Cake Central
Prep: 24 hours
Supplies:
Small balloons
2 packages (.25 oz each, about 2 tablespoons)
1 or 2 drops liquid food color (I used 1 drop of red)
4 tablespoons cold water
1/8 teaspoon white or silver pearl luster dust
Clear vegetable shortening
Small artists' brush
Grid cooling rack
Fill a balloon 1/3 to 1/4 full of air. Pinch the balloon at both ends (the blown up/bulbous end and the open end) and tie the two together. This will help the balloon achieve a more round, bubble-like shape. Repeat process with remaining balloons. Balloons tend to attract fibers and particles (hello static electricity!) so place them on a dust-free surface.Brush the balloons with a little vegetable shortening, then use your fingers to completely coat the balloon. Use a paper towel to wipe off most of the vegetable shortening you just applied. There will still be a very thin residue of shortening left behind. If too much of the shortening is left on the balloon, the gelatin will not stick!In a small microwave-safe bowl, quickly whisk together the gelatin, food color, luster dust and cold water. It will become thick almost immediately. Let gelatin stand 5 minutes.Heat the gelatin in the microwave for 10 seconds, or until it is completely melted. Let the mixture stand until lukewarm. Hold a balloon by the knot and dip it into the gelatin, rotating it to coat the sides and avoiding the knot. Hold the balloon upright (knot to the bottom) and allow the excess to drip back into the bowl. Transfer the balloon to the grid cooling rack knot-side down. (I placed the balloon knot into an open grid.) Allow the balloon to dry for 5-10 minutes. Repeat with remaining balloons. Re-dip balloons in the gelatin. You may need to re-heat the gelatin mixture in the microwave for 3-4 seconds. The balloons will feel rubbery at first, but will dry to a firm, crisp shell over a 24 hour period. Once the balloons are completely dry, you can remove the balloon. Start by snipping a hole with scissors right beside the tied knot. As the air escapes, the balloon should pull away from the sides of the gelatin. Using the scissors again, cut a larger hole in the bottom of the balloon and pull the balloon out with your fingers. If the gelatin layer is too thin, it may collapse. This happened to me a couple of times, but I was able to pop them back into place from the inside.Place the bubbles cut-side-down when decorating. They can be used on buttercream and attached to fondant with piping gel or corn syrup.The bubbles will keep for a long time. Store them in an air-tight container or zip-top bag until ready to use.

Call these cupcakes an ode to your inner teeny-bopper. I have one that loves Lip Smacker lip gloss and slumber parties. (Okay, maybe just the idea of slumber parties, because sleep = everything.)
The grown-up me can't wait to try these on another bubbly treat - champagne cupcakes! Perhaps they'll be a new topper for these that I love so dearly.
Happy weekend, friends! ♡
Bubble Gum Frosted Cupcakes
[click for printable recipe]
Yield: 15 cupcakes
Prep: 40-50 minutes
Moist Yellow Cupcakes
Source: adapted from King Arthur Flour
Prep: 30 minutes
Total: 1 hour 20 minutes
Yield: 9" round layer, about 8 servings
1 cup granulated sugar
1/2 cup/113g unsalted butter
2 large eggs
1 tablespoon vanilla extract
3/4 teaspoon salt
2 teaspoons baking powder
3/4 teaspoon baking soda
1 2/3 cups all-purpose flour
1/2 cup heavy cream
1/2 cup full fat sour cream
Preheat oven to 350F. Line one cupcake pan with 12 paper liners, and a second cupcake pan with 3 liners.Beat together sugar and butter until lightened. Add the eggs one at a time, then increase mixer speed to high for two minutes or until batter is light and fluffy. Add the vanilla, salt, baking powder and soda; beat for another minute and scrape down the sides of the bowl.Stir together heavy cream and sour cream in a small bowl. Beginning and ending with flour, alternately add the flour and yogurt mixture. Beat well after each addition. Scrape down the sides of the bowl and beat again briefly.Spoon batter into the liners. Bake for 22-25 minutes, or until the cake springs back when pressed in the center. Let the cupcakes cool in the pan for 10 minutes, then turn out onto a wire rack to cool completely. Bubblegum Frosting1/2 cup/113g of unsalted butter, softened1 cup/128g confectioners’ sugar 2-4 drops LorAnn concentrated bubblegum candy flavor (to taste)Pastel star confetti sprinkles15+ gelatin bubbles (see tutorial)* Milk or heavy cream, optionalIn a stand mixer fitted with the whisk attachment, mix together the butter and confectioners’ sugar. Begin mixing on low speed until crumbly, and then increase to high and beat for 3 minutes. Add the bubblegum flavor to taste and beat until light and fluffy. Transfer mixture to a piping bag fitted with a 1/2-inch round tip, or use a zip-top bag with the corner snipped. Pipe frosting onto cupcakes in a large mound and sprinkle on the star confetti. Top each cupcake with one (or more!) gelatin bubble.*Note: If you find the buttercream is too stiff for piping, you may add milk or heavy cream 1 tablespoon at a time until the mixture is piping consistency.
April 16, 2014
Italian Easter Bread
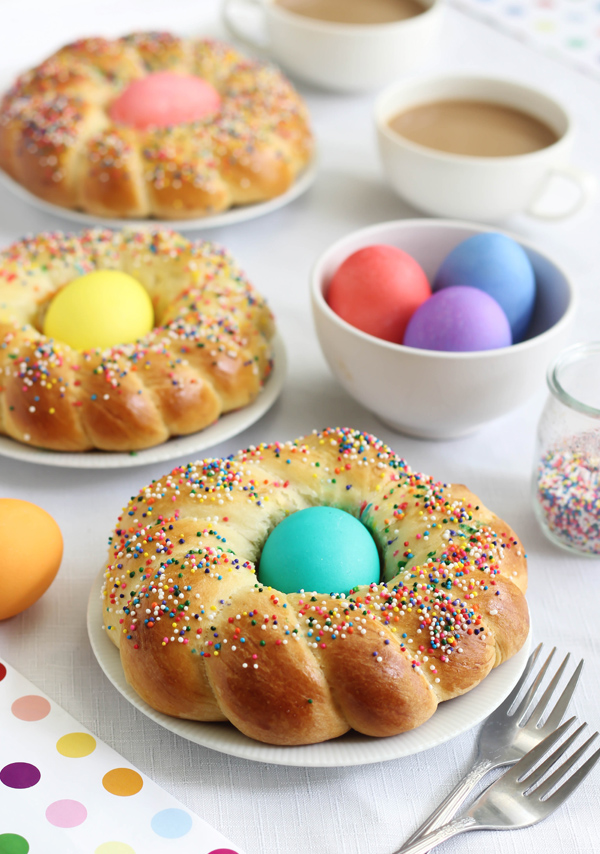

This may be the happiest-looking bread I've ever made. Sprinkles on bread? Yes times one million!
I've had Italian Easter Bread on my bake list for ages, but each year the holiday seems to pass by too quickly, or I just plain forgot about it. So, late this past Monday night, I decided to drop everything and just make it already!
Because of my late start I was babysitting rising bread until 11 pm, and then rolling it into loaves at 11:30, but it was all worth it because at midnight we were pulling apart hot, feathery bread with our fingers. I've always thought that dessert tastes better after midnight. It feels like you're doing something secretive or getting away with something. The same goes for freshly baked bread. I mean, Italian Easter Bread makes a nice brunch, but after midnight it tastes AMAZING.
Trust me, I would never lie about something so important.

My favorite thing about this bread, besides the sprinkles of course, is the colorful egg in the center. You don't have to worry about hard boiling the eggs before adding them to the bread. They cook perfectly as the bread bakes in the oven!
I used a common drugstore brand of egg coloring to dye uncooked eggs and allowed them to dry completely on paper towels before placing them inside the dough rounds. Most loaves turned out perfect, but the eggs in two loaves speckled a little during baking, so we ate those imperfect ones first. Just a heads up that you might experience the same result.

See how the egg cooks up perfectly? Love!
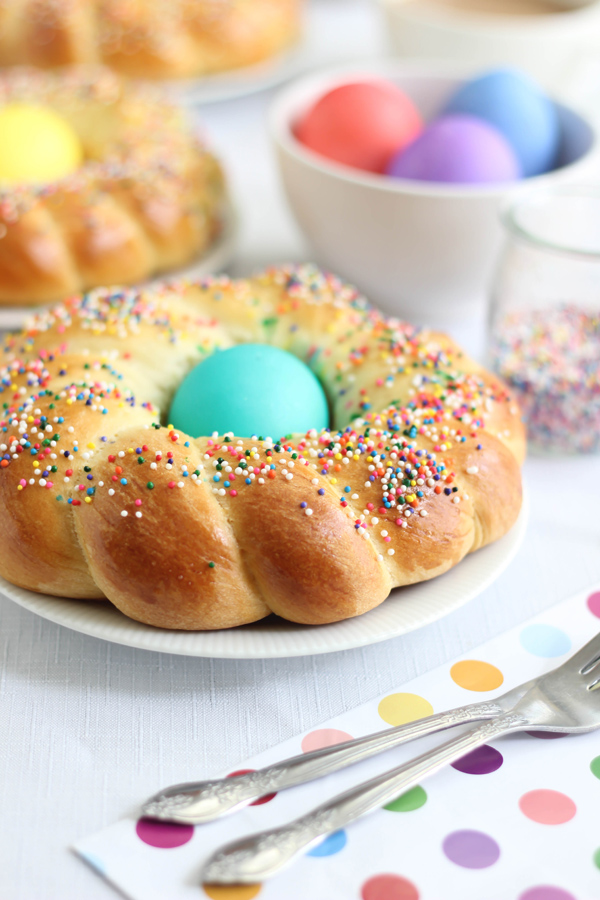
This bread is slightly sweet - the perfect sweetness for me - but my husband said he'd appreciate a glazed version next time. To increase the sweetness factor, you can make a simple glaze from 1 cup confectioners' sugar mixed with 2 tablespoons milk. See the recipe notes for other variations on this bread. And If you need a little help understanding the bread-twisting and whatnot, refer to the process shots below the recipe.
Happy Spring, friends!
Italian Easter Bread
[click for printable recipe]
Yield: 6 bread loaves
Source: Recipe adapted from The Italian Dish Blog, advise on inclusions and glazing from Taste of Home
Prep: 25 minutes, with raising and baking about 3 hours
This is a very basic version of Italian Easter Bread. The dough can be endlessly varied with your choice of dried fruit and citrus zests. Some common toppings are pearl sugar, nonpareils and sweet milk glaze (see note). I sprinkled one loaf with fleur de sel and was quite content to call it lunch.
It's a good idea to plan ahead - have the eggs dyed, thoroughly dried and ready to go in the loaves!
1 1/4 cups/301 ml. milk or half and half
1/3 cup/76g unsalted butter
2 1/4 teaspoons instant yeast
Pinch of salt (about 1/16 teaspoon)
2 eggs, lightly beaten
1/2 cup/100g sugar
3 to 4 cups/ 408 to 544g bread flour (approximate)
1 egg
1 teaspoon water
Rainbow nonpareils
6 raw eggs, room temperature, dyed in rainbow colors
Combine the milk and butter in a small saucepan and place over medium-low heat. Warm just until the butter is completely melted and remove from the heat. Let cool until just warm.
Combine the yeast, salt, eggs and sugar in the bowl of a standing mixer. Add the warm milk and half of the flour. Knead with the dough hook until combined. Add more flour gradually until the dough starts to pull away from the sides of the mixer. You may not have to use all of the flour (but I did!). Knead the dough about 3-5 minutes longer, or until completely smooth and elastic.
Place the dough in a greased bowl and turn it over once to coat the top. Cover with plastic wrap and allow the dough to rise in a warm place, about 1 hour (my dough took longer, about 1 hour 30 minutes to raise).
Gently deflate the dough with a fist. Turn it out onto a floured work surface and pat it down slightly so that the dough has an even thickness. Cut the dough into 12 even pieces. Roll each piece to form a 1-inch thick rope about 14 inches in length. Take two lengths and twist them together; loop the twist into a circle and pinch the ends together. Place the circle onto parchment lined baking sheets. Cover the loaves with plastic wrap and let rise again for 1 hour, or until doubled.
Preheat the oven to 350F.
Combine the egg and 1 teaspoon water in a small condiment cup. Using a pastry brush, lightly coat the loaves with the mixture. Sprinkle on the nonpareils and gently place a dyed egg in the middle of each loaf. Bake for 20 minutes, or until the bread is golden and fragrant. Let cool until warm, if patience allows. The burned fingers were worth it to me!
Notes:
For a simple milk glaze, mix 1 cup of confectioners' sugar with 1-2 tablespoons of milk. Whisk together until smooth. A little vanilla extract couldn't hurt, either. After the dough is raised and turned out onto a work surface, 1/2 cup mixed candied fruit and 1/4 cup blanched almonds can be mixed in. 2 tablespoons of citrus zest may be added to the dough also.

Need more spring inspiration? Check out two more of my egg-themed treats! My Chocolate Surprise Egg tutorial is on the Etsy blog, and my Speckled Egg Malted Milk cake is featured at BettyCrocker.com.

April 14, 2014
Christian Dior's Apricot Mousse
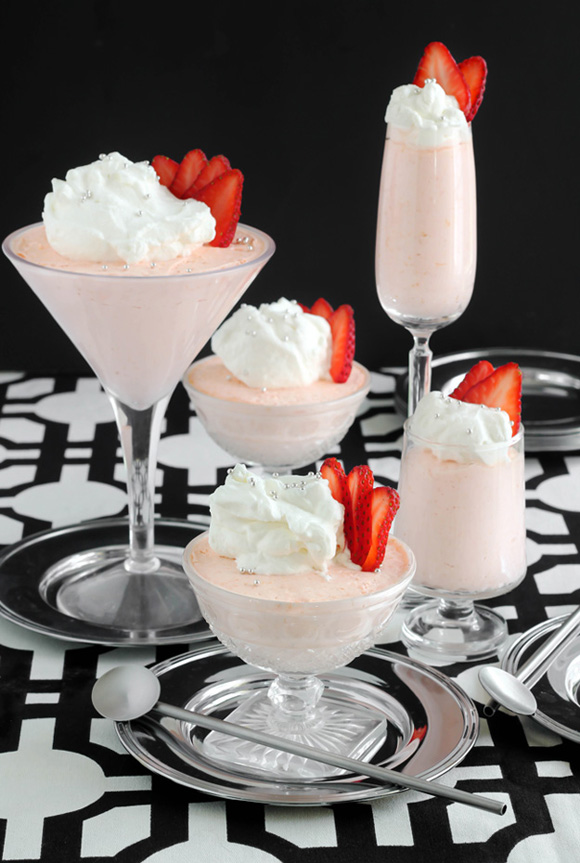
As much as I love shiny new cookbooks (and oh, I do!) my shelf of mid-century cookbooks is my sentimental favorite. I especially love those purchased second-hand with notes and recipe clippings tucked in the pages. I’ll admit, reading through the oddball "Tuna Surprise" and congealed salad recipes is a weird form of entertainment for me, but there are other recipes in those pages that are still relevant today.
In 1956 General Mills published the second edition of the Betty Crocker Picture Cook Book. In this revised and enlarged version, special menus and recipes were included from celebrities of the time - Jimmy Durante, Ed Sullivan and Eleanor Roosevelt to name a few. Among those esteemed contributors was French fashion designer Christian Dior. His suggested menu for "Dinner in Paris" included apricot mousse for dessert. I have a copy of this book, and when I read the recipe's simple ingredients and preparation, it struck me that it would be at home in the pages of any newly published cookbook today. One might say it is as timeless as his design.

The original recipe calls for the mousse to be frozen, but I like it just fine chilled in the refrigerator. It's light and refreshing - not at all heavy - and "the Dior treatment" as it is referred to in the text, is the addition of Kirsch cherry liqueur. In that case, the Sprinkle Bakes treatment (heh) would be the addition of whipped cream and fresh berries. Apricots aren't quite in season here, so I reluctantly used frozen. The mousse turned out delicious and fruity nonetheless, but you can bet that I'll be making this again in summer when apricots are at their peak.

In 1957, just one year after this recipe was published, Mr. Dior passed away at the age of 52. Lucky for us, House of Dior lives on, as does this last course of "Dinner in Paris". I hope you'll give it a try because it's so simple to make and absolutely delicious. Best of all, you don't have to be a fashionista to appreciate it.
Christian Dior's Apricot Mousse [click for printable recipe] Yield: 6 servingsSource: Betty Crocker's Picture Cook Book second edition circa 1957Prep: 25 minutes, total time with chilling about 3 hours
I've re-written this recipe with greater detail in case you're not sure how to make the cooked apricots called for in the original text. "The Dior treatment" is mentioned as the addition of Kirsch liqueur to the mousse, but it gives no instruction as to when or where to add it. I've added this information along with my own addition of whipped cream and fresh berries.
Mousse1 cup/250g cooked apricot puree *1 teaspoon powdered gelatin1 tablespoon water2 tablespoons Kirsch liqueur 2 cups/464g heavy whipping cream1/2 cup/64g confectioners' sugar1/4 teaspoon salt1 drop of each: red and yellow food color (optional)
Whipped cream and garnish1 cup/232g heavy whipping cream3 tablespoon6 fresh strawberries stemmed and cut into vertical slicesdragees, if desired
*Cooked apricot puree can be made by placing 6 peeled and sliced apricots (36 grams each) in a medium saucepan with 3 tablespoons sugar and 1/2 cup of water. Cook over medium-high heat until the fruit starts to come apart, about 20-30 minutes (less time for frozen apricots). Sieve the mixture and puree it in a food processor or blender. Measure 1 cup/250g apricot puree and let cool to room temperature for the mousse recipe. Sprinkle the gelatin evenly over 1 tablespoon water in a small microwave-safe condiment cup. Let stand for 5 minutes. When the gelatin is firm heat it in the microwave for 10 seconds or until liquefied. Add the gelatin to the apricot puree. Stir in the kirsch liqueur.
In a separate large bowl, beat the 2 cups heavy whipping cream to soft peaks, then gradually add in the confectioners' sugar and salt. Whip to stiff peaks. Fold the apricot mixture into the whipped cream using a rubber spatula. Add the food color, if using. Use gentle strokes as to not deflate the mixture. When the apricot mixture is fully dispersed into the cream, pour the mousse into footed dessert glasses or ramekins. Refrigerate for 2 hours or until set. For a frozen treat, freeze the mousse for 3-4 hours before serving.
For the topping, whip the heavy cream in a large bowl and gradually add in the sugar. Whip to stiff peaks. Top each mousse cup with the whipped cream and add fresh berries to garnish. Add dragees, if using. If fresh apricots are in season, garnish each cup with a fresh apricot slice.
April 7, 2014
Espresso Religieuse (Caffeinated Nuns)

I'd almost forgotten how much I loved baking choux - the way they magically puff in the oven and create the perfect hiding place for rich filling. My recent obsession with them started when I made these fancy stacked Courtesan au Chocolat. I've been making successive batches ever since, and filling them with whatever yummy ingredient is close to hand.
After tasting these espresso-chocolate Religieuse, I knew it was a recipe to share. It's become one of my favorite choux incarnations. Did you know that by stacking a smaller cream puff on top of a larger cream puff you create a new dessert with a fancy new name? Truly. It's a French pastry called Religieuse, and you can read more about it here. The name means "nun", given because they are said to resemble nuns in their habits (if I squint my eyes I think I can see it). The puffs are held together with dollops of buttercream - all the better when it's coffee buttercream, I say.

The choux recipe I use and recommend is from the SprinkleBakes book (that's it in the upper left corner picture). It never fails me. I learned how to make choux paste by hand (without a mixer) from my days as a Daring Baker, and it's still my preferred method. Yes, you can make it on a stand mixer, and it is less work, but I like the experience of working without modern gadgets when it comes to this pastry. I like that it's just me, a wooden spoon and a mixing bowl.

Now, there are endless ways to make this stacked pastry look fancy. I've seen them macaron-topped, with frilled frostings, ruffles and dragees - but something about this coffee version begged for simplicity. I didn't do much more than add a buttercream star and a roasted coffee bean on top.

Making the glaze is so simple. It's a mixture of powdered sugar, cocoa powder, espresso powder and coffee. I really can't wait to use this glaze on a batch of homemade doughnuts. (I swoon.)

The interior is smooth, chocolaty and with an obvious coffee flavor. I use espresso powder in my baked goods when a strong coffee flavor is desired. Freeze-dried instant coffee is an acceptable substitution, just be sure to grind it to a fine powder in a food processor or with a mortar and pestle before adding it to confectionery.

My new favorite ingredient to use in frosting is this Tahitian vanilla bean powder. It's made from pristine whole vanilla beans that have been ground fine. If you don't have vanilla bean powder, then vanilla seeds or even vanilla extract will work. I just really love how it speckles the frosting and adds a sparkling note of vanilla flavor - and I'm giving some away! If you're interested in winning a bottle, check out the details here.
Espresso Religieuse (Caffeinated Nuns) [click for printable version] Yield: 12-14 pastriesSource: Daring Bakers/SprinkleBakes originalPrep: 2 hours, total time with chilling about 4 hours
I like to make this dessert over the course of two days. The first day I'll leisurely make the pastry cream, and then I save the choux and frostings for the next day. Choux puffs are so easy to make, but you must give them ample time to puff in the oven. Pay attention to the temperature decrease during baking and don't open the oven door until they are fragrantly eggy and golden.
Pate a Choux 3/4 cup/175 ml water6 Tbsp/85 g unsalted butter1/4 tsp salt1 Tbsp sugar1 cup/125 g all-purpose flour4 large eggsFor Egg Wash: 1 egg and pinch of saltPreheat an oven to 425◦F/220◦C degrees. Line two baking sheets with parchment paper.Combine water, butter, salt and sugar in a saucepan over medium heat. Bring to a boil and stir occasionally. At boil, remove from heat and sift in the flour, stirring to combine completely.Return to heat and cook, stirring constantly until the batter dries slightly and begins to pull away from the sides of the pan.Transfer to a bowl and stir with a wooden spoon 1 minute to cool slightly.Add 1 egg. The batter will appear loose and shiny.As you stir, the batter will become dry-looking like lightly buttered mashed potatoes. It is at this point that you will add in the next egg. Repeat until you have incorporated all the eggs.Transfer batter to a pastry bag fitted with a large open tip (I piped directly from the bag opening without a tip). Pipe 12-14 choux about 1 inch-part in a baking sheet. Choux should be about 1 1/2 inches high about 1 1/2 inches wide. Pipe 12-14 smaller choux on the second sheet.Using a clean finger dipped in hot water, gently press down on any tips that have formed on the top of choux when piping. You want them to retain their ball shape, but be smoothly curved on top.Brush tops with egg wash (1 egg lightly beaten with pinch of salt)Bake the choux at 425◦F/220◦C degrees until well-puffed and turning lightly golden in color, about 10 minutes. Lower the temperature to 350◦F/180◦C degrees and continue baking until well-colored and dry, about 20 minutes more. Remove to a rack and cool. Can be stored in an airtight container overnight. Chocolate pastry cream2 Tbsp cornstarch1 cup/225 ml whole milk6 oz. fine quality semisweet chocolate, chopped evenly2 tablespoons cocoa powder6 Tbsp/ 79g sugar1 large egg2 large egg yolks2 Tbsp/30 g unsalted butter1/2 tablespoon espresso powder or 1 tsp vanilla extractDissolve cornstarch in 1/4 cup of milk. Combine the remaining milk with the sugar chocolate and cocoa in a saucepan over low heat. When chocolate is melted and thoroughly combined with the milk, bring the mixture to a boil; remove from heat.Beat the whole egg, then the yolks into the cornstarch mixture. Pour 1/3 of boiling milk into the egg mixture, whisking constantly so that the eggs do not begin to cook. Return the remaining milk to boil. Pour in the hot egg mixture in a stream, continuing whisking. Continue whisking (this is important – you do not want the eggs to solidify/cook) until the cream thickens and comes to a boil. Remove from heat and beat in the butter, espresso powder and vanilla. Pour cream into a stainless steel/ceramic bowl. Press plastic wrap firmly against the surface. Chill immediately until completely cool. To fill pastry puffs, make a small slit in the sides or bottoms of the choux and pipe in pastry cream. Chocolate-espresso glaze2-4 tablespoons hot freshly brewed coffee1/2 teaspoon espresso powder1 tablespoon natural unsweet cocoa powder1 cup/128g confectioners’ sugar1 drop chocolate gel food color (optional)Stir together 1 tablespoon of the hot coffee and espresso powder in a small cup. In a separate bowl, whisk together the unsweet cocoa and confectioners’ sugar. Add the coffee/espresso mixture and whisk until thick. Add more coffee as needed until a thick, runny glaze is achieved. Add the gel food color if desired. Dip the tops of each filled choux puff into the glaze to the midline. Lift the choux from the glaze and allow the excess to fall back into the bowl. Place the dipped puffs on wax paper and allow them to dry until the glaze hardens, about 1 1/2 hours. Espresso buttercream/topping1/2 cup/113g of unsalted butter, softened1 cup/128g confectioners’ sugar - the finest you can find (usually 10x)1 teaspoon espresso powder dissolved in 2 teaspoons hot water1/2 teaspoon vanilla bean powder or 1 teaspoon vanilla extract12-14 roasted whole coffee beans* Milk or heavy cream, optionalIn a stand mixer fitted with the whisk attachment, mix together the butter and confectioners’ sugar. Begin mixing on low speed until crumbly, and then increase to high and beat for 3 minutes. Add the espresso mixture and vanilla and beat until light and fluffy. Transfer mixture to a piping bag fitted with a small star tip.Place one large choux puff on a serving tray and pipe a buttercream star on top. Add a second smaller puff on top of the larger one and gently press down onto the buttercream star to secure. Pipe a buttercream star on top of the smaller puff and garnish the center with a whole coffee bean.Store puffs in an airtight container in the refrigerator. Bring to room temperature before serving.*Note: If you find the buttercream is too stiff for piping, you may add coffee, milk or heavy cream 1 tablespoon at a time until the mixture is piping consistency.