Heather Baird's Blog, page 76
December 7, 2014
Rosemary Shortbread

This shortbread is the best kind of aromatherapy. Rosemary has a piney fragrance that reminds me of a freshly cut fir tree, and when combined with buttery shortbread dough you've got a cookie that tastes like Christmas!
I usually cut shortbread into long fingers (they're great for dipping in coffee) but this aromatic dough absolutely begged to be cut into evergreen shapes.


I love how the chopped rosemary speckles the cookies throughout. It's just so naturally beautiful.
Just about any cookie-lover will appreciate these, but I'm especially excited to give these to the avid herb gardener on my Christmas list.
Rosemary Shortbread
[click for printable version]
2 1/2 cups/320 g all-purpose flour
2 tablespoons chopped rosemary
3/4 teaspoon salt
1 cup/226 g unsalted butter, softened
2/3 cup/85 g confectioners' sugar
Line two baking sheets with parchment paper.
In a bowl, whisk together flour, rosemary and salt. In a stand mixer, beat the butter and sugar on medium speed until well blended. Reduce speed to low and slowly add in the flour mixture. Blend until the mixture resembles coarse crumbs.
Gather dough into two balls. Roll each dough ball flat (to about 1/4-inch) between two pieces of parchment paper; refrigerate for 10 minutes.
Preheat oven to 350F.
Cut the dough with a tree-shaped cookie cutter, or other desired cookie cutter shape.Transfer cut-outs to the prepared sheets; re-roll scraps and cut as many shapes as possible.
Bake for 10-12 minutes. (Do not allow cookies to brown.) Transfer cookies to a cooling rack.
Note: Sometimes a rosemary leaf will not cut with the cookie dough, so you'll have a piece sticking out of the side of your cut-out. Just take a pair of kitchen-dedicated scissors and snip the piece away from the edge before baking.


December 6, 2014
Sprinkle Christmas Tree Cookies
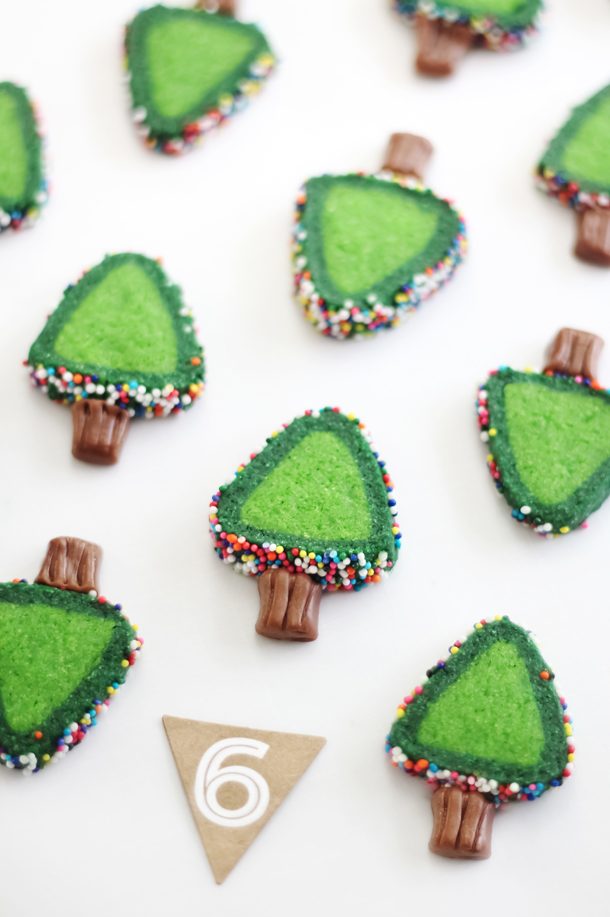
I'm not exactly sure how it happened, but one day after some experimentation with sugar cookie dough, I ended up with green slice-and-bake triangles. They looked so much like Christmas trees, that I felt they should have some kind of decoration - cue the sprinkles!
 I love these so much, I decided to make them into a Christmas card!
The technique for making these is pretty simple. Just divide the sugar cookie dough in two and tint one piece dark green and the other light green. I decided to make mini trees, so I divided the dough into four pieces (2 dark green pieces and 2 light green pieces). Roll the light green piece of dough into a fat log and then shape it into a triangle (I did this by gently pinching the dough with my fingers as I pressed the dough flat against a work surface). Roll the dark green piece of dough flat between two pieces of parchment paper, and then wrap it in a single layer around the light green triangle dough.
Time for sprinkles!

It's best to coat the cookie dough in the sprinkles while it's at room temperature. It's okay if the sprinkles don't completely coat the outside - it doesn't have to be perfect. It helps to gently press the sprinkles into the dough with your fingers. I did this and they stuck fairly well.
I found these cookies slice best after they've chilled about 20 minutes in the freezer. The sprinkles stay on better and the shape doesn't squish when you cut it.

The tree trunks are made from Tootsie Rolls. I just pressed little pieces into the bottoms of the cookies and they held together on their own. If you have some trouble getting them to stick, a dot of melted candy (candy melts
 ) can be used as adhesive.
Because my trees were so tiny, I cut the Tootsie Roll candies into smaller pieces to make the tree trunks. It's best if the tootsie rolls are fresh and soft so they'll stick to the cookies well. If you've had your Tootsie Rolls since Halloween, then you might want to purchase a fresh bag.

I'll close with a great big HOORAY(!) for slice-and-bake cookies. You can store the shaped dough in the freezer until you're ready to bake them.
Sprinkle Christmas Tree Cookies
[click for printable version]
Yields about 4 dozen 2-inch cookies, more or less depending on what size you shape them
1 cup/226g unsalted butter, softened
1 1/2 cups/300 g granulated sugar
1 egg
1 1/2 teaspoons vanilla extract
1/2 teaspoon almond extract
2 3/4 cups/350 g all-purpose flour
1 teaspoon salt
Leaf green gel food color
Dark green food color
1 cup rainbow nonpareils
Tootsie Rolls
Candy melts (meltable candy disks) optional
In a large bowl, beat butter and sugar with an electric mixer at medium speed until well blended. Beat in egg and extracts; mix well. Combine flour and salt; add to butter mixture. Beat until well blended. Divide dough into two equal pieces. Tint one piece light green and the other piece dark green (I kneaded it into the dough with my hands, but you could use the mixer on low speed). The dough should not be sticky, but if it is, then add extra flour to the batter until it is no longer sticky.
Divide the tinted dough into four equal pieces (or six, for mini trees). Shape the light green portions into triangles by rolling the dough into a log and then pinching in into a triangular shape with your fingers. Roll the dark green pieces of dough flat between two pieces of parchment paper and wrap it over the light green triangle in a single layer. Cut away the excess dough with a knife.
Place the sprinkles in a shallow dish and place the dough on top of them, turn the dough to coat the outside, pressing the sprinkles on with your fingers as you go. This part doesn’t have to be perfect. It’s okay if some of the sprinkles don’t stick to the dough.
Cover the sprinkle-coated dough in plastic wrap and chill in the freezer for 20 minutes.
Preheat oven to 350°F. Line two (or more) baking sheets with parchment paper.
Cut the dough into 1/4-inch slices, and place them on the parchment –lined sheets. Bake small cookies for 7-9 minutes, and 10-12 minutes for larger cookies. Bake times will vary according to size, so keep an eye on them. They are done when slightly puffed and fragrant.
Cut Tootsie Rolls candies in half, and then into small rectangles to make the “tree trunks”. Use the back of a knife to press tree bark striations in the candy. Press the Tootsie Rolls onto the bottoms of the trees. If the Tootsie Rolls are fresh and soft, they should stick to the sprinkles naturally. If you’re gifting these or taking them to a party, I suggest adhering the trunks to the trees with a dot of melted candy melts (insurance is best!)
Allow the cookies to stand for several minutes or until the melted candy is set and the Tootsie Roll tree trunks are stable.
Cheerful cookies like this are meant to be seen, so gift them in clear cellophane bags tied with pretty ribbon.
December 5, 2014
Golden Gingerbread with Hard Sauce

I am deeply smitten with giving little bundt cakes at Christmastime - and getting them (hint hint)!
This classic gingerbread recipe has been around for ages. My personal touch to the confection is sorghum molasses (I recommend Muddy Pond pure sorghum
 from my home state, it's the best!). Sorghum is lighter in flavor and color than regular molasses. It gives this cake a golden appearance and mild flavor, but if you prefer a darker, more typical gingerbread, then blackstrap molasses can be used in place of the sorghum.
This is a good cake to gift to long distance friends, because it's sturdy enough to ship. The liberal soak of rum preserves the cake and prevents it from drying out. A slice is great alone but even more delicious with strong coffee.

One of my favorite ways to package mini cakes for gifting is to wrap them with disposable forks standing upright in their centers (I like biodegradable Birchware
 brand). With the fork provided, the giftee can enjoy the cake right away. Which is good should a cake emergency arise. (Cake emergency = real thing.)
Golden Gingerbread with Hard Sauce
[click for printable version]
Yields 1 bundt cake or approximately 6 to 8 mini bundt cakes
Source: Southern Living, The Desserts Cookbook circa 1976
Cake
1/2 cup/113 g unsalted butter
1 cup/ 200 g sugar
1 cup/240 ml sorghum molasses (or blackstrap molasses if preferred)
2 eggs, separated
3 cups/350 g cake flour, sifted
1 teaspoon baking soda
1 teaspoon sea salt
2 teaspoons ginger
2 teaspoons cinnamon
1 cup/240 ml buttermilk
1 cup/ 240 ml dark rum
3 tablespoons brown sugar
Hard sauce
2 cups/260 g confectioners' sugar
1 tablespoon dark rum
Milk or cream
Preheat the oven to 350 F.
Cream the butter in a bowl with an electric mixer. Add sugar and beat until light and smooth. Add the molasses and egg yolks; mix thoroughly. Sift the flour with the baking soda, salt and spices and add to the creamed mixture alternately with the buttermilk.
In a separate bowl, beat the egg whites until stiff. Fold the egg whites into the creamed mixture using a large rubber spatula. Pour the batter into a well-greased and floured mold (a bundt pan, or 6 to 8 mini bundt pans). Bake for 30 to 40 minutes (check mini cakes at 25 minutes), or until the cake springs back when pressed.
Let the cake rest in the pan for 5 minutes then turn it out onto a wire rack and let it cool completely.
Combine 1 cup of dark rum with the brown sugar in a small saucepan. Place over medium heat until the sugar is dissolved. Remove the pan from the heat source and let cool slightly. Brush the cake liberally with the syrup using a pastry brush. Allow the cake to stand, loosely covered, for several hours to ensure the rum is thoroughly absorbed.
For the hard sauce, combine the confectioners' sugar and rum in a medium bowl. Add milk a few drops at a time while whisking. When the mixture is thick and drop from the whisk in a thick ribbon back into the bowl, then the correct consistency has been achieved. If the glaze is thinned too much, add additional powdered sugar until consistency is achieved. Pour the glaze over top of the cake, allowing it to run down the sides.
Let the cake stand uncovered until the sauce hardens. Package as desired.
December 4, 2014
Easy Almond Buttermints

December 4th's treat is one of my favorite sweets of all time. Go to any bridal shower in the south and you're likely to find buttermints on the reception tables. It's tradition, but I don't limit them to showers. I make them for all kinds of occasions! They're cute and petite with a mighty sweet punch. At Christmastime I flavor them with vanilla and almond extracts, which gives them a sugar cookie flavor.
The candy dough takes about 5 minutes to put together (it's no-cook/no-bake!), and it can be tinted any merry and bright color you choose. The dough can be molded into bonbon shapes using a candy mold, or make them into patties by rolling marble-sized pieces and flattening them with the tines of a fork.

I used this
 silicone mold to form them into various shapes. After filling the mold with candy, just pop it into the freezer, and when the candies are firm, pop them out from the bottom-up. So easy and über cute!
I don't know which ones I like best. Maybe the red ones because they remind me of Rudolph's nose.
These look nice placed individually in frilly candy papers. I like to package them in boxes decorated with washi tape, but they look pretty in cellophane bags tied with ribbon, too. If you make them with real butter then they'll need to be refrigerated. You can make them with margarine instead and they'll keep at room temperature for up to a week.
Easy Almond Buttermints
[click for printable version]
Makes about fifty 1-inch pieces

1/3 cup/76 g unsalted butter or margerine
1/3 cup/75 ml light corn syrup
1/2 teaspoon salt
1/2 teaspoon vanilla extract
1/2 teaspoon almond extract
4 1/2 cups/570 g confectioners' sugar
Your choice of gel food color
Using an electric mixer, blend together the butter or margarine, corn syrup, salt and flavorings in a large mixing bowl. Add the sugar and mix until smooth. The dough should not be sticky; add additional powdered sugar if the dough sticks to your hands.
Divide the dough and tint with gel food color as desired. The dough can be molded into bonbon shapes using a candy mold, or make them into patties by rolling marble-sized pieces and flattening them with the tines of a fork.
If using a silicone mold, press the dough into the cavities and level the tops with a knife. Transfer the mold to the freezer and chill for 1 hour. Pop the shapes out from the bottom while still firm. Place the shaped mints in candy papers and let them come to room temperature.
Note: If you make the mints with real butter then they'll need to be kept refrigerated. You can make them with margarine instead and they'll keep at room temperature for up to a week.

December 3, 2014
Ugly Christmas Sweater Cake

If the sweater above was real and not made of cake and buttercream, would you wear it? (I hope you said no!) Would you wear it to an ugly Christmas sweater party ? (I hope you said yes!)
A few weeks ago Wilton sent me a sample of their Decorator's Choice cake mix, and I've been ruminating on what to make with it ever since. Then recently, their Christmas product box arrived at my front doorstep with a Sweater Cake Pan inside. It was a done deal, folks. I giggled all the way to the kitchen.

The pan holds exactly 1 box of cake mix (convenient!), and what's better, the baked cake releases from the non-stick pan beautifully! The cake mix is designed to have a sturdy texture and yields less crumbs on the outside - and that's exactly what I experienced. I don't think I've ever had a cake that turned out of the pan with such a flawless surface! It's tasty, too, and not at all dense or tough.

As for the decorating, I covered the cake in buttercream tinted with Wilton's No-Taste Red gel food color. The rest of the decorations were made with ready-made fondant and sprinkles. I had no template or plan for the ugly sweater - I just listened to my inner ugly sweater-designer (smile).
Decorating the cake with the fondant pieces was so easy. I just placed the shapes on top of the buttercream and they adhered well without the addition of water or corn syrup. I tooled around each fondant cut-out with a gum paste quilting wand, and that really transformed the cake and made it look "sewn". You can find a link to this tool at the end of the post - I loved the effect!

Below you'll find links to all the items you'll need to make the sweater cake. In hindsight, I wish I'd had some mini ornament or snowflake cookie cutters.That would have made life a little simpler, but still, I think the cake turned out pretty cute.
And pretty ugly!
Ugly Sweater Cake Materials:
Sweater Cake Pan
Wilton's Decorator Preferred Cake Mix, baked as directed in the Sweater Cake Pan
Wilton's Decorator Preferred Fondant in green, yellow and white
Wilton No-Taste Red Gel Food Color
Fondant quilting tool
Jumbo Christmas Nonpareils
Jumbo quins
Silver sprinkles
You can find my buttercream recipe here, and my button-making technique at the very bottom of this post.
December 2, 2014
Almond Florentine Cigar Cookies

As far as cookies go, Florentines are high on my list of favorites. They're just so darn pretty and crunchable. It's hard to eat just one!
For those not familiar, Florentine cookies are lacy, delicate cookies that are pliable when taken from the oven, so they can be rolled into tubes or kept flat. My usual practice for making these is to sandwich two flat Forentines with melted chocolate, but this time I rolled them around a chopstick to make cigars. This method takes a little patience and dexterity, not to mention careful handling of the hot cookies, but the added crunch is so worth the effort!

I dipped one end of the cookies in melted chocolate and chocolate vermicelli
 , and then added a sprinkle of black pepper over the unset chocolate. This brings a little heat to the "lit" end of the cigar. You don't need much! Just enough to be playful.
After the chocolate firms, place them on pastry liners (sometimes called eclair liners
 ) and seal them up tight in a holiday tin. This makes a nice gift and keeps them delectably fresh and crisp.
Almond Florentine Cigars
[click for printable recipe]
Yields about 16 cookies
1/2 cup/113g unsalted butter
3/4 cup almond flour
1/2 cup/100 g granulated sugar
1 tablespoon all purpose flour
1 tablespoon milk or heavy cream
Pinch of salt
4 ounces semisweet chocolate, evenly chopped
1/3 cup chocolate sprinkles
Ground black pepper for sprinkling (optional)
Melt the butter in a small saucepan over low heat. Add the almond flour, sugar, flour, cream and salt. Increase the heat to medium and cook until hot, about 5 minutes. Let the mixture cool for 10 minutes, or until the it thickens slightly.
Preheat the oven to 350 F.
Line two baking sheets with parchment paper. Drop the batter onto the parchment paper by the heaping teaspoonfuls spaced well apart, baking about 4 cookies to a cookie sheet.
Bake for 7 to 9 minutes, or until cookies are well spread and bubbling.
Slowly peel up the edge of a cookie after it has sat on the cookie sheet for about 2 minutes.
Using a chopstick or wooden spoon handle, quickly wrap the cookie around the form. Hold for 30 seconds and then slide the cookie off the form. Repeat with remaining cookies. If cookies become too rigid from cooling, place them back in the oven for 2 minutes and try rolling again.
Repeat with remaining cookie batter. Allow the cigars to cool completely before dipping them in chocolate.
Cover a work surface with waxed paper or parchment paper. Melt the 4 ounces of chocolate in the microwave at 30 second intervals until smooth (or melt over low heat on the stove top). Place the sprinkles in a small bowl. Dip one end of each cigar into the chocolate and then into the sprinkles.
Sprinkle a pinch of black pepper over the chocolate-dipped end. Place the cookies on the prepared work surface and allow the chocolate to set, about 2 hours.
Store the cookies in an air-tight container to keep them crisp.
Note: Be extra careful when peeling the cookies from the hot cookie sheet and and rolling the hot cookies onto the chopstick or spoon handle.
Salty-Sweet Peanut Butter Cup Bars

This recipe is so easy, it feels like cheating. It's one of those treats you can turn to in the most harried days of the Christmas hustle and bustle. In about 5 minutes you can have a weighty pan of candy made, and after a short chill in the fridge, they're ready to be sliced up and packaged for gift giving.

You're probably aware by now that I'm a HUGE fan of salty and sweet together, especially when peanut butter and chocolate are involved. I love Maldon flake sea salt
 on these bars, but Fleur de Sel or any other sea salt would be wonderful too. Or, if you'd rather keep things sweet, the salt can be omitted - but I urge you to think about it first. Or perhaps taste-test one lightly salted piece before adding it to the entire pan.
You can package the bars in cellophane bags tied with pretty ribbon, or place them in cupcake liners and gift them in a pretty holiday tin. They're potent, so I usually cut them no larger than 1x3-inches.
Peanut Butter Cup Bars
[click for printable version]
Yields 12x8 or 13x9 dish
Prep: 5 minutes, total time about 45 minutes
The peanut butter portion of these bars is almost cookie-like, thanks to the addition of graham cracker crumbs to the batter. If you're short on time, buy graham cracker crumbs and chopped peanuts already prepared from the grocery store.
1 cup/226 g unsalted butter
1 cup/250 g creamy peanut butter
2 cups/90 g graham cracker crumbs
1/2 cup/ 4 oz. finely chopped peanuts
2 1/2 cups/320 g confectioners' sugar
1 cup/6 oz. chocolate chips
2 tablespoons vegetable shortening
Maldon flake salt, optional
Line a 12x8 or 13x9-inch dish with parchment paper with two sides overhanging, or butter the pan generously.
In a 2 quart microwave-safe mixing bowl, combine the butter and peanut butter. Microwave at full power for 2 to 2 1/2 minutes, or until melted. Blend together. Mix in crumbs, peanuts and sugar until the mixture is stiff. Press firmly into the prepared pan.
In a small bowl, combine chips, and shortening. Microwave at full power at 30 second intervals, until the chips and shortening are melted and can be stirred smooth. Pour over the peanut layer and smooth the chocolate evenly with an off-set spatula. Refrigerate until set, about 40 minutes.
Lift the candy from the pan by the two overhanging parchment edges. Sprinkle the chocolate with two or three pinches of Maldon flake salt, if using. Cut the bars into pieces and store in a container that seals air-tight.
Stove-top directions: If you don't have a microwave, then this candy may be prepared on the stove-top instead. Melt the butter and peanut butter in a small saucepan over medium heat until smooth. Melt the chocolate chips and shortening in a small saucepan over medium-low until smooth.
November 30, 2014
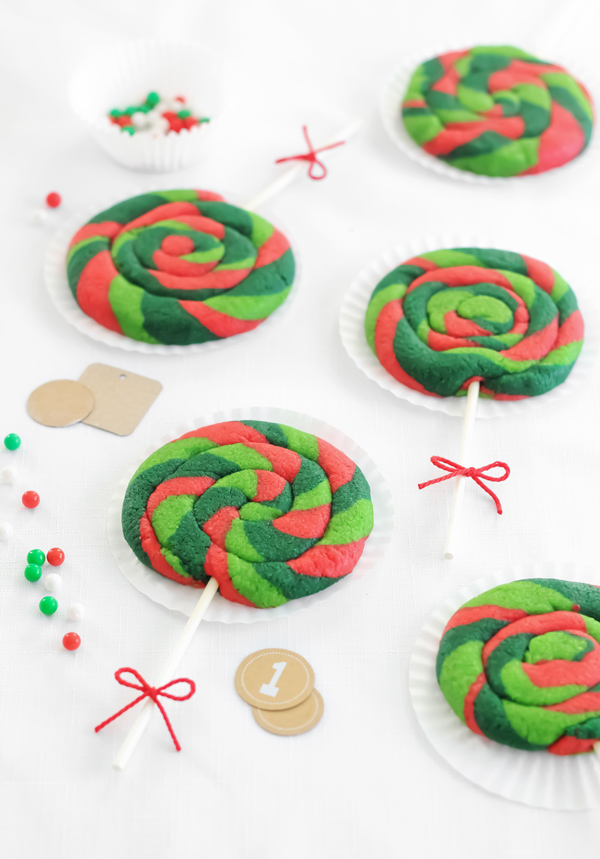
Lollipop Sugar Cookies
Happy first day of December, friends!
Let's kick things off right with a treat that's fun and festive. I just love these swirly lollipop sugar cookies. They make a cute edible gift and they'll be right at home on any holiday cookie tray. I plan on making a big batch of these for my cookie swap this year. They're easier than you'd think!
Most any sugar cookie recipe will work with this technique, but if you don't have one then you'll find a really great recipe to use at the end of this post. Just divide the cookie dough into three even pieces, and tint each piece a contrasting color. Then you'll pinch off about a 2-inch piece of each color of dough, roll each into a rope, and then roll the three colors together into one big rope! As you roll you'll notice the colors will start to twist and make a candy stripe. It's pretty intuitive once you get started!
After you have approximately 10-inches of cookie rope, coil it up and place the cookie on a parchment-lined baking sheet. Insert a lollipop stick straight through the middle of the cookie, making sure to pass through all the coils without poking the lollipop stick through the top of the cookie. After that, repeat, repeat, repeat until all the dough is used.

After the cookies bake and cool, you can pick them up by the stick - just like a lollipop! I like to package these individually in cellophane wrappers an tie them with ribbon or baker's twine. They are so pretty displayed standing upright in a Styrofoam base, or even tied onto a gift-wrapped package (which is like getting a present on top of a present!).
Lollipop Sugar Cookies [click for printable version]
Yields 18 to 20 cookiesSource: The lollipop technique was first spotted at Occasional Cookies, and then on Sweet Sugarbelle's blog. The cookie recipe is my own.
1 cup/226g unsalted butter, softened1 1/2 cups/300 g granulated sugar1 egg1 1/2 teaspoons vanilla extract1/2 teaspoon almond extract2 3/4 cups/350 g all-purpose flour1 teaspoon saltRed gel food colorLeaf green gel food colorDark green food colorLollipop sticks
Preheat oven to 350°F. Line two (or more) baking sheets with parchment paper.In a large bowl, beat butter and sugar with an electric mixer at medium speed until well blended. Beat in egg and extracts; mix well. Combine flour and salt; add to butter mixture. Beat until well blended. Divide dough into three equal pieces. Tint each piece a different color with the gel food color (I kneaded it into the dough with my hands, but you could use the mixer on low speed). The dough should not be sticky, but if it is,then refrigerate it for 15 minutes.
Pinch away a 2-inch piece of each color dough and roll each piece between your palms to make small, fat logs. Stack the logs on top of each other, then roll them into one long 10 to 12-inch rope. The dough will twist and stripe as you roll it. Coil the rope into a 3-inch round and transfer to a parchment lined baking sheet. Insert a lollipop stick straight through the middle of the cookie, making sure to pass through all the coils without poking the lollipop stick through the top of the cookie.
Repeat with remaining dough. Space cookies at least 2-inches apart on the cookie sheet.
Bake 10 to 12 minutes or until fragrant and puffed. Cool on the pan for 10 minutes; transfer the cookies to a cooling rack and let them cool completely.
Package in cellophane wrappers tied with pretty ribbon.
November 25, 2014
Orange Chiffon Cake with Sparkling Cranberries


When I sit down to Thanksgiving dinner this Thursday, I know there's going to be a little more butter and cream in the mashed potatoes. The cornbread stuffing will have an extra dose of love (read: bacon fat) and I'll help myself to second servings (maybe thirds) of my mom's famous garlic cheese grits.
Admittedly, that's a lot of heavy food. That's why I'm bringing this chiffon cake for dessert. It's light and fluffy, and so fragrant with citrus that it perfumes its surroundings.

How do you feel about fresh cranberries? I've been a little wary of their tartness, so I've mostly avoided using them as a garnish. But these! They are delicious because they get a bath in hot sugar syrup and then a toss in sparkling sanding sugar. They are a perfect bite of tart, crunch and sweetness and they crack between your teeth which makes them addictively poppable. I love how they look like sparkling gems on top of this cake. It was fun making them because they are so simple and beautiful.


This cake is a nice, light addition to a Thanksgiving feast, but it will also beautiful on a Christmas dessert buffet (those cranberries!). If you've never made a chiffon cake, then you should know that there's quite a bit of egg-whipping involved. A standing mixer is helpful and preferred for this recipe.
I added marshmallow cream to the glaze on this cake, which is a good counter to all the feather-lightness. If marshmallow cream is not available to you, then it may be omitted from the recipe. This cake is still lovely with a basic confectioners' glaze.
Orange Chiffon Cake with Sparkling Cranberries
[click for printable recipe]
Yields one 10-inch cake
This recipe requires the use of a tube pan.
Cake
2 cups/240 g all-purpose flour
1 1/2 cups/300g granulated sugar
3 teaspoons baking powder
1/4 teaspoon salt
7 eggs, separated
1/2 cup/125 ml orange juice (2 to 3 oranges, freshly squeezed)
1/2 cup/125 ml vegetable oil
1/4 cup/50 ml water
1 teaspoon vanilla extract
2 teaspoons orange extract
2 tablespoons orange peel
1/2 teaspoon cream of tartar
Glaze
1 cup/130 g confectioners’ sugar
2 tablespoons milk (plus more for thinning, if needed)
3.5 ounces marshmallow cream (about half of a 7 ounce jar)
1/2 teaspoon orange extract
Cranberry garnish
1/2 cup/125 ml water
1/2 cup/100 g granulated sugar
8 ounces fresh cranberries
6 ounces sanding sugar
Grated orange peel, if desired
Sift the flour, granulated sugar, baking powder and salt into a large bowl; make a well in the center. In the bowl of a stand mixer, beat the egg yolks until thickened and light yellow in color, about 7 minutes.
Beat in the orange juice, oil, water, vanilla, orange extract and orange peel. Pour the wet ingredients into the well of dry ingredients; combine with a large spoon or spatula until well incorporated.
In a separate bowl, beat the egg whites on medium speed until foamy. Add the cream of tartar; beat until stiff peaks form. Gradually fold into batter with a large rubber spatula.
Transfer the batter to an ungreased 10-inch tube pan. Bake at 325°F for 55 to 60 minutes, or until the cake springs back when lightly touched. Immediately invert cake; cool completely. Loosen the cake from the sides of the pan with a butter knife; remove the cake and place on a serving platter. Let cool completely.
For the glaze, combine the confectioners’ sugar and whisk in the milk 1 tablespoon at a time. The mixture will be thick. Stir in the marshmallow cream and extract. Thin the mixture with additional milk, if needed. The mixture should be thick enough to fall in a thick ribbon from a spoon. Pour glaze evenly over the top of the cooled cake.
For the cranberry garnish, heat the water and granulated sugar in a small saucepan until the sugar is dissolved. Place the fresh cranberries in a shallow dish and pour the sugar syrup over them. Stir them gently, then transfer them to a wire rack placed over a length of parchment. Allow them to dry slightly before rolling them in the sanding sugar. Garnish the top of the cake with the cranberries. Add grated orange peel, if desired.
Store cake loosely covered on the counter top or under a glass cloche.
November 24, 2014
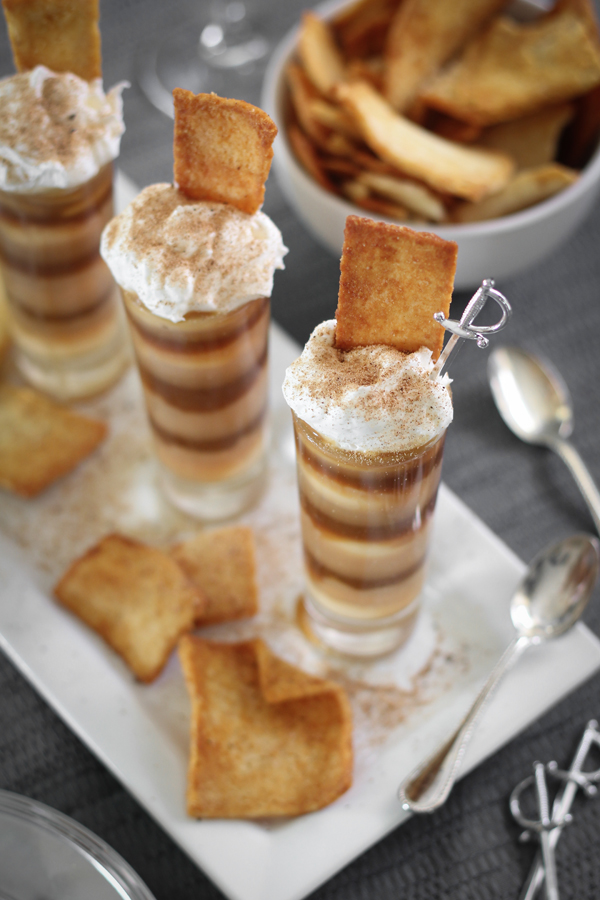
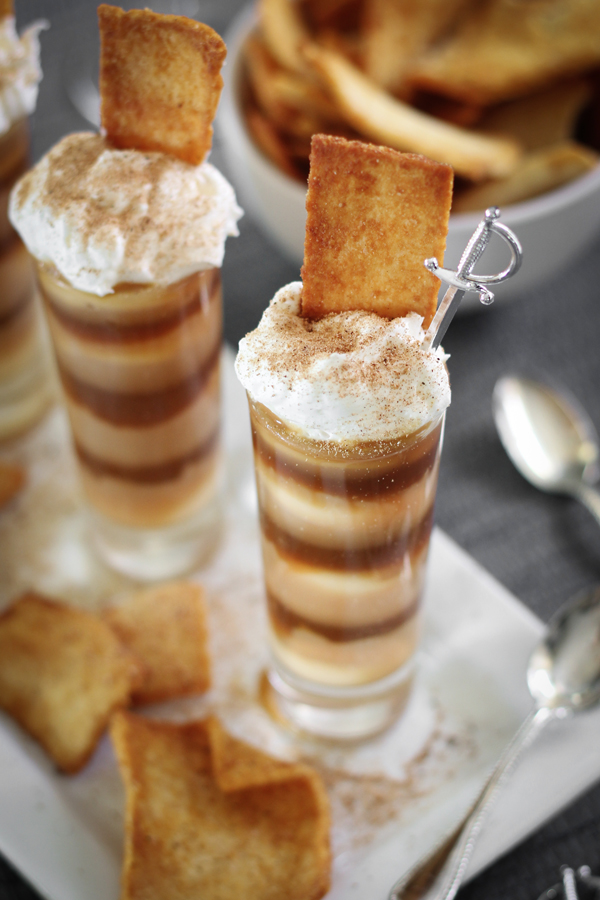
Salted Caramel Eggnog Shooters
It's hard to believe we're getting ready to bid November farewell. I can almost hear those sleigh bells jingling, can you?
When it comes to party fare, I'm always searching for the perfect bite that will satisfy guests and make them feel special. But since it's also the busiest time of year - especially for home bakers - simplicity is key. That's why I love this recipe so much.
Creamy eggnog pudding takes all of five minutes to whip up, and after a quick chill, it's layered with prepared caramel in shot glasses. The shots are topped with whipped cream and Stacy's Salted Caramel Pita Chips - the latter provides a crunchy contrast to the creaminess of the pudding. If you're like me, you'll forgo the spoon entirely and use the chips instead - so keep a bowlful close by!

The chips have a rich, buttery, authentic caramel flavor (which is rare joy in a world of artificially flavored snack foods), and they have just the right amount of salt and sweet. They are certainly delicious enough to serve on their own, but their sturdiness makes them great for dipping.
These little desserts are about six-ish bites of salted caramel goodness, which is just enough to indulge your sweet tooth without overdoing it. They look elegant all lined up on a fancy serving tray and no one will guess that they took just minutes to put together!
Find out more about Stacy's Chips on their website or on their Facebook page. Stacy's Salted Caramel flavor is available for a limited time only - from November 2014 to December 2014, so be sure to look for them in the Deli section at your local grocery store.
Salted Caramel Eggnog Shooters
[click for printable version]
Yields six 2 ounce servings
1 cup commercially prepared eggnog
2 tablespoons granulated sugar
1 1/2 tablespoons cornstarch
7 ounces caramel ice cream topping (the thick jarred variety)
3/4 cup whipped topping or homemade whipped cream
Freshly grated nutmeg
Stacy's Salted Caramel Pita Chips, for serving
Have ready six 2 ounce empty shot glasses.
Combine the eggnog, sugar and cornstarch in a medium saucepan. Place over medium-high heat and bring to a bubble while whisking constantly. When the mixture thickens, remove it from the heat and transfer to a bowl.
Cover the surface of the pudding with plastic wrap and let chill for 15 minutes. Stir the pudding and transfer to a piping bag or a zip-top bag with the corner snipped.
Transfer the caramel to a piping bag or zip-top bag with the corner snipped.
Pipe a little of the pudding into each shot glass, followed by the caramel. Alternate until all of the eggnog pudding and caramel is used.
Top each shot with the whipped topping and garnish with freshly grated nutmeg. Just before serving, place a Stacy's Salted Caramel Pita Chip upright in each shooter.
Serve the shooters next to a bowlful of the pita chips for easy dipping and eating. Spoons are optional.
Disclosure: This post is sponsored by Stacy's Pita Chips. Regardless, I only recommend products or services I use personally and believe will add value to my readers. Thank you for supporting our sponsors!