Heather Baird's Blog, page 74
March 16, 2015
Guinness Cupcakes with Toasted Beer Marshmallow Meringue

Hello, hello! It's Monday so I think we should have a cupcake (maybe two) - or at least plan to enjoy one of these tomorrow on St. Patrick's Day. I love a chocolaty bite after Irish stew, and these are rich indeed! They are heavily infused with malty flavor thanks to a dose of Guinness Draught.

I will find any excuse possible to use my chef's torch. It's one of my favorite kitchen gadgets. It's ideal for toasting the beer-flavored marshmallow meringue on these cupcakes, but if you don't have a chef's torch they'll toast up mighty fine under the oven broiler.

The cupcakes can be poured into paper liners if you prefer (and if you're looking for one less pan to clean). If you plan to use a kitchen torch to toast the frosting, remove the liners first because they'll easily catch fire.

My favorite part of this confection is the toasted beer marshmallow meringue topping. The appearance against the dark chocolate cupcake reminds me of the beer foam on a freshly poured pint. Its flavor is nuanced with a Guinness Draught reduction, giving the sweet marshmallow notes of malt, coffee and caramel.
May the road rise up to meet you, friends!
Guinness Cupcakes
with Toasted Beer Marshmallow Meringue
[click for printable version]
Yields about 20 cupcakes
Cupcakes
1 cup all-purpose flour
3/4 cup dark cocoa powder
1/4 teaspoon salt
12 ounces semisweet chocolate, chopped
6 tablespoons butter, softened
1 cup granulated sugar
4 eggs
11.2 ounce bottle (about 1 1/3 cups) Guinness Draught
Preheat oven to 350°F. Spray the cavities of one or two nonstick cupcake pans with cooking spray.
Whisk together flour, cocoa powder and salt.
Melt the chopped chocolate and butter in the microwave at 30 second intervals until the two can be stirred together and the mixture is smooth (this took about 2 minutes in my microwave). Alternatively, heat the two together in a small saucepan over low heat until melted; stir to combine.
Beat the sugar and eggs together on medium-high speed in the bowl of an electric mixer until the mixture lightens, about 4 minutes.
Decrease mixer speed to low and slowly add the chocolate mixture to the egg mixture. Gradually add the flour mixture and beat until combined. Pour the Guinness Draught in a thin stream down the side of the mixing bowl with the electric mixer at medium speed. Batter will be thin (see video). Scrape down the batter bowl and mix again to be sure all the ingredients are well distributed.
Pour the batter into the prepared baking pan(s) about 2/3 full. Bake for 15 to 20 minutes, or until a toothpick tester comes out clean (my batch was well baked at 15 minutes). Let the cupcakes cool completely before topping them with the meringue.
Toasted beer marshmallow meringue
1 cup Guinness Draught
3 egg whites at room temperature
Pinch of cream of tartar
1/2 cup granulated sugar
10.5 ounce bag mini marshmallows
20 pretzel sticks
Place the Guinness Draught in a small saucepan and bring to a simmer. Let the beer cook until reduced to 1 tablespoon, about 20 minutes. Let cool.
Using an electric mixer beat the egg whites until foamy. Add the pinch of tartar and mix again until the mixture thickens slightly and becomes opaque. Gradually add the granulated sugar and beat until the mixture holds stiff peaks. Fold in the marshmallows using a large rubber spatula. Fold in the beer reduction.
Pile meringue high atop each cupcake and brown with a kitchen torch. Alternatively, place the meringue-topped cupcakes on a large baking sheet and place them under the oven broiler for a few minutes (watch them constantly to prevent burning!) until the meringue is well browned and slightly puffed.
Insert a pretzel stick in each cupcake. Let them cool for 1 to 2 minutes before enjoying.


March 9, 2015
Mast Brothers Chocolate Chip Cookies


The ubiquitous chocolate chip cookie may seem less than poetic to write about, but after eating one of these, I'm ready to pen a stanza or two. The "chips" in these cookies are hand-chopped from dark chocolate bars. When added to the batter, all of those assorted shards, chips and chunks create swirling ribbons and pockets of chocolate throughout the baked cookie. This is one of the best chocolate chip cookies I've ever tasted.

The recipe comes from the Mast Brothers
 cookbook. For those unfamiliar, they are makers and purveyors of fine chocolate. I'm almost embarrassed to admit this, but I was sold on their chocolate before I sampled it. First of all, the chocolate bars are wrapped in gorgeous heavyweight Italian papers with print motifs worthy of covering the walls of 111 Archer Avenue. I've taken to using them as bookmarks for the cookbook. Secondly, the bristly faces and serious gazes of the brothers Mast remind me of my husband. How easily I am gentled by sentimentality.
Luckily my sentiments were not at the expense of good taste. Never have I enjoyed chocolate so profoundly dark and sharp. A chocolate fruity and floral; untamed and yet refined. If you have the opportunity to try this chocolate, take it. I think you'll find my description to be accurate.

Since this recipe requires a whopping 15 ounces of chopped dark chocolate, I used 10 ounces of block dark chocolate that I already had on hand. I mixed this chocolate into the cookie dough. The remaining 5 ounces came from two bars of Mast Brothers chocolate: Stumptown Coffee and Sea Salt. I chopped these bars and sprinkled them over the cookies mid-bake. The unsung hero of this confection is the cookie batter. It is the yin to the snappy dark chocolate's yang. It puffs slightly in the oven and then sinks down to create a slight pillow.
That's pretty much chocolate chip cookie perfection, if you ask me.
Mast Brothers Chocolate Chip Cookies
[click for printable version]
Yields about 35 cookies
1 cup unsalted butter, softened
3/4 cup brown sugar, packed
2/3 cup granulated sugar
2 eggs
2 1/4 cups all purpose flour
1 teaspoon baking soda
1 teaspoon sea salt
15 ounces dark chocolate, chopped
Coarse grey sea salt, optional
Preheat oven to 350 Fahrenheit.
In a large mixing bowl, cream softened butter with both sugars until fluffy.
Blend in the eggs one at a time.
Add flour, baking soda, salt and 10 ounces of the chocolate; combine.
Spoon cookie dough 2 inches apart on to a parchment-lined baking sheet using heaping tablespoons.
Bake for 10 minutes. Top the partially baked cookies with a few pieces of the reserved chocolate. Bake for an additional 5 minutes, or until the cookies are brown around the edges and soft in the centers. Do not overbake.
Allow the cookies to cool slightly on the pan until they can be removed with out tearing.
Repeat process with remaining cookie dough. Sprinkle cookies with sea salt while still warm, if desired.
March 4, 2015
Rainbow Spiral Cookies


Hello March! No other month mixes me up like this one does. The roller-coaster temperature fluctuations guarantee I'll be inappropriately dressed wherever I go, and my circadian rhythm gets totally out of sync (thanks Daylight Savings Time). But there are reasons to revel in this time of year. The first day of Spring is fast approaching, and St. Paddy's Day will arrive on the 17th with much merry-making and rainbow-inspired treats.

Remember these cookies I made a long time ago? They seem to be everywhere now! It's been a delight to see them ripple throughout the food blogosphere and beyond. I decided it was time to give them a rainbow makeover, just in time for Saint Patrick's Day.

These cookies are absolutely eye-popping (and a little psychedelic-looking, too!). They have the benefit of slice-and-bake convenience, so I'm making a few batches to store in my freezer. I plan to gift them to friends and family in goodie bags along with a few gold-wrapped chocolate coins.

I hope you enjoy these cheerful cookies as much as I have! They are buttery beyond words, so use the best quality butter you can find. I'd even look to those Irish specialty butters for superior flavor and extra St. Paddy's Day flair.
Rainbow Spiral Cookies
[click for printable version]
Yields about 3 dozen cookies
Author: Heather Baird
Ingredients
2 3/4 cups all-purpose flour, divided
½ teaspoon baking powder
¼ teaspoon salt
⅔ cup confectioners’ sugar
¼ cup granulated sugar
½ pound plus 4 tablespoons (2½ sticks) butter, cut into pieces and kept very cold
1 teaspoon vanilla extract
½ teaspoon each color gel food coloring: red, orange, yellow, green, violet (I like Wilton brand)
Combine 2 cups of the flour with the baking powder, salt and sugars in a food processor, and pulse
briefly to mix.
Add the cold butter in pieces; process with short bursts until the mixture has a crumbly consistency.
Add the vanilla extract and process in 3second pulses until a dough ball forms.
Divide the dough into 6 equal portions. Add one portion of dough to the bowl of a stand mixer (with paddle attachment) and tint with the red food color. Add 2 tablespoons of flour and mix to combine. The dough should not be sticky and resemble the consistency of soft play-doh. Add more flour if needed. Repeat process with remaining dough pieces, food color and flour.

Roll out each portion of dough between sheets of waxed paper or parchment paper to form a rectangle, to about 1/8 inch thickness.
Peel off the top sheet of wax paper from the red piece of dough.
Using the wax paper, lift the orange dough and flip it over onto the red dough so they are stacked. Gently press the two dough pieces together and remove the top layer of waxed paper.
Continue to stack the dough pieces on top of each other. The order should be red, orange, yellow, green, blue and lastly, the violet dough. When the dough is stacked, flip it over on a large piece of waxed paper, so that the red dough is facing upward, and roll it thinner, to about 1/4-inch thickness.

Remove the top sheet of wax paper and trim the edges of the dough square.
Roll the dough along the longest side like a jelly roll.
Gently curl the edge with your fingertips so you don’t get any air pockets as you roll the dough into a
log. While rolling the dough, the violet portion (which will be on the outside of the roll) may want to
tear; pinch tears together as they happen and keep rolling. It’s okay if a few tears remain; it doesn’t have to be perfect.
After forming the dough into a log, dispose of the wax paper.

Wrap the log in plastic wrap and refrigerate until firm enough to slice, about 3 hours.
Note: Cookie dough can be frozen for up to 2 months. Defrost in the refrigerator until soft enough to
slice.
Preheat the oven to 325°F. Line 2 baking sheets with parchment paper.
Slice the dough into ¼ inchthick cookies, cutting carefully and avoiding the nonpareils, and bake on
parchmentlined baking sheets for 12 to 15 minutes.
When done, cookies should be slightly puffed and no longer be shiny on top.
Heather's tip: I often skip refrigeration and opt for a chill in the freezer. The cookies slice more cleanly when slightly frozen.
March 2, 2015
Waffled Cheesecake

They say necessity is the mother of invention, but in this case it was impatience and laziness. I wanted cheesecake but didn't want to wait an hour for it to bake in a water bath. And I certainly didn't want to wait another 2 hours for it to chill. There were a few no-bake options that I'd considered for a quick result, but even that wasn't fast enough. There were simply too many barriers between me and delicious cheesecake.

I'm not sure how I arrived at this decision, but I found myself pouring cheesecake batter onto the hot irons of my Belgian waffle maker. It didn't work at first. The recipe was all wrong. The cheesecake stuck to the irons and in the end it was heaped into a delicious mess onto a plate (we ate it of course, because warm cheesecake is irresistible). The formula needed some adjustments to "waffle" correctly. I searched online for help - because surely someone else had tried this - but no! By now the idea for waffled cheesecake had turned into an all-out obsession.
With just a few tweaks - success! I've eaten a lot of waffles in my day, but nothing beats warm waffled cheesecake hot off the press. Nothing. I even made you a little video to show you how easy it is.
(Email subscribers click here for the video.)
The recipe I developed makes exactly four Belgian waffles (in the video I'm only making a half-batch). This will generously serve four people. When the waffle is warm, the cheesecake is puffy and light, but after it is chilled it becomes more dense - just like regular cheesecake!

Stack a few waffle quarters together and you've basically got yourself a slice of cheesecake. All cheesecake accoutrement are welcome to this waffle party: salted caramel sauce and powdered sugar (pictured), strawberries, whipped cream, lemon curd, chocolate syrup - you name it!
My waffle maker is not fancy. This recipe was tested in a standard household Belgian-style waffle maker (this cheapo version,
 to be precise). I haven't tried this recipe in a regular waffle iron, but I feel sure it would work. Belgian waffle makers require more batter per waffle, so using a regular waffle maker would require less batter and yield a greater number of waffles.
Two important notes before you commence the waffling:
First, the small addition of flour to the batter was soft winter wheat all-purpose flour (I like White Lily). This addition held the cheesecake together well enough without compromising the cheesecake texture. If you can't find soft winter wheat flour, then use cake flour in its place.Second, some waffle irons are prone to over heat the longer they're in use. My last waffle over-browned a bit, so if yours is prone to do this check it a minute or two before the indicator light goes off (or the buzzer times, or whatever your particular model does to indicate your waffle is done).
Waffled Cheesecake
[click for printable version]
Serves 4
Source: Recipe by Heather Baird
This recipe is written for use with a Belgian waffle maker. If you use a regular waffle maker, use the amount of batter recommended in the manufacturer's instructions. Adjust to more or less batter as needed.
16 ounces cream cheese at room temperature
4 eggs at room temperature
1 tablespoon lemon juice
1 teaspoon vanilla extract
2/3 cup granulated sugar
1/2 cup cake flour (or soft winter wheat flour such as White Lily)
Pinch of salt
Cooking spray
Powdered sugar
Place the cream cheese and eggs in a large bowl. Beat together with an electric mixer at medium speed until well combined. Add the lemon juice and vanilla extract; mix again briefly to combine.
Add the sugar, flour and salt. Beat again until combined, about 2 minutes. Let the cheesecake batter rest while your Belgian waffle iron preheats.
Coat the hot waffle irons with cooking spray (I used olive oil spray because it's what I had on hand, but a neutral-tasting oil like canola is an even better choice). Pour 1 cup of batter onto the irons and close the waffle maker lid. Let cook until the mixture stops steaming and the indicator light (or timer) indicates the waffle is done. Open the lid and remove the waffle with a fork. The cheesecake will be tender, so you may have to remove the waffle a quarter at a time.
Top warm waffled cheesecake with powdered sugar and your choice of toppings. I suggest any of these: salted caramel sauce, lemon curd, chocolate syrup, whipped cream, fresh strawberries.
Enjoy!
February 23, 2015
Salted Greek Honey Nut Pie


Last week an ice storm hit our little corner of the world with great force. We lost our electricity and much of our heat source, and without a safe way to leave the house, well - we were cold. I spent most of last week being mad at myself because the cold made me feel tired and cranky and kind of like a weakling. I tried to work despite the frigid environment (I had baked a cake the day before, and my camera batteries were charged), but would eventually find my way back to huddling with two pups in a wool blanket.
As soon as power was restored I turned on the oven. I needed comfort food and to use some of the things in my freezer that were quickly thawing. One of those was a box of Filo dough.


I have strong feelings for pie, and I have even stronger affections for Baklava (see here and here). Put the two together, and I'm a goner. Completely. This pie is absolutely bursting with nutty goodness. It's a hearty stick-to-your-ribs kind of dessert, yet it retains lightness thanks to gossamer layers of Filo. It's a short-cut to Baklava, but with a warm cinnamon note. I wasn't sure I could finish a whole piece by myself, but I did (!) and it certainly revived my wilting energies.

One ingredient you mustn't underestimate or leave out in this recipe is salt (fine grain sea salt, if possible). I know. I can get preachy about salt in desserts at times, but here it accentuates the pecans, pistachios and black walnuts like nothing else can. It's transformative!

Before I close, I'd like to share some news that had me jumping up and down on my tippy-toes! Out of thousands of entries, Better Homes and Gardens has chosen this site as one of their Top 10 Baking Blogs. (Side note: I'm pretty sure when my Mom reads this she's going to die of happiness. She's a BHG reader from way back!). There's another round of voting for "Reader Favorite", and you can vote for your favorites by clicking the icon below. I was thrilled to find myself in the company of so many baking bloggers that I love and admire. Warm and fuzzies all around (take that ice storm!).


Okay, back to the delicious business of this pie. If you love Baklava, then you will love this dessert. It's one of the best pies I've ever made, and I'm planning to bring it to Easter dinner this year. It is truly worth sharing with the people you love. I hope you'll find it to be a glowing addition to your recipe box.
Salted Greek Honey Nut Pie [click for printable version]
Yields one 9-inch pie, 8 servings
This recipe comes from a magazine clipping tucked in one of my second hand cookbooks. I've altered it somewhat with my favorite variety of nuts and seasoned it to taste. I recommend using black walnuts if you can find them. They add depth to the overall flavor of this pie. If you can't find them, regular walnuts are always welcome to this pie party.
Pie2 cups chopped black walnuts1 cup chopped pecans1 cup chopped pistachios1/4 cup brown sugar, tightly packed2 teaspoons ground cinnamon1/4 teaspoon fine grain sea salt1 cup unsalted butter, melted1 package (16 oz.) frozen Filo dough, thawed
Honey syrup3/4 cup granulated sugar1/2 cup water1/2 cup wildflower honey2 pinches fine grain sea salt, plus extra for sprinkling slices2 tablespoons vanilla extract
Preheat oven to 350F.
Combine the black walnuts, pecans, pistachios, brown sugar, cinnamon and salt in a large bowl. Toss the ingredients together so that all the nuts are coated with the sugar, cinnamon and salt. Brush a 9-inch pie plate with some of the melted butter. (I used a tart pan with a non-removable bottom).
Unroll the Filo dough. Drape a piece of plastic wrap over it and cover it with a damp towel to prevent it from drying out. Layer 8 sheets of Filo in the prepared pie pan, brushing each layer with butter and rotating sheets to cover the pie plate. Allow the edges to overhang the sides. Sprinkle a third of the nut mixture over the layered Filo.
Layer four sheets of Filo over the nut mixture in the same manner; sprinkle with a third of the nut mixture. Repeat these last two steps. Top with an additional eight sheets of Filo, again, brushing, buttering and rotating the sheets. Fold the end of the overhanging Filo up over the top of the pie. Brush with butter.
Using a sharp knife, cut the pie into eight wedges. Cut 1-2 additional sheets of Filo into thin strips; arrange decoratively on top of the pie. (Save remaining Filo for another use). Bake pie for 40 to 45 minutes or until golden brown.
Meanwhile in a saucepan, combine the sugar, water honey and salt. Bring to a boil; reduce heat. Simmer uncovered for 10 minutes. Remove from heat and add vanilla extract. Pour the syrup over the warm pie. Let the pie cool in the pan.
Sprinkle each slice of pie with a pinch of sea salt before serving.
February 9, 2015
Raspberry Rose Water Layer Cake


I'm having a raspberry moment. A little over a week ago I posted the most chocolaty-raspberried cake, ever. We ate every last smidgen, but that still didn't cure my craving. I decided to make a second and completely different kind of raspberry cake.
These fluffy yellow cake layers are marbled with rose water batter. There's just a whisper of rose fragrance added- it's nearly undetectable, but it enhances the raspberry elements of the cake like nothing else can. If you've ever stewed raspberries on the stove top, then maybe you've noticed their pretty floral aroma. The rose water just makes the berries taste more... raspberry!

The bright red filling is absolutely bursting with sweetness and berry flavor. It may be my new favorite cake filling (sorry lemon curd!). I used two tablespoons of the filling in the buttercream and it presented the most beautiful pink color. It also adds a berry note that ties the entire cake together.


The meringues! I'd planned for these gentle giants to have a blog post of their own, but they just begged to be arranged on top of this cake. They are so delicious. The inside is soft and marshmallowy and the outside is crisp and cookie-like. I decided to add a little sparkle with some gold leaf I've been saving for something special. And altogether, I think this cake deserves that description.
Raspberry Rose Water Layer Cake
[click for printable version]
Rose Marbled Cake Layers
1 cup unsalted butter, softened
1/4 cup shortening
2 cups granulated sugar
5 large eggs
3 cups all-purpose flour (I like White Lily)
1 teaspoon baking powder
1/2 teaspoon baking soda
1/2 teaspoon salt
1 cup whole milk
2 teaspoons vanilla extract
1/4 teaspoon rose water
2 drops liquid pink food color
Grease and flour three 9-inch round cake pans. Preheat the oven to 350°F.
In a bowl, cream the butter, shortening and sugar until fluffy. Add the eggs one at a time, mix well with each addition. Combine the flour, baking powder, baking soda and salt. Add the flour mixture to the creamed mixture alternately with milk, beginning and ending with flour. Beat well after each addition.
Place two cups of batter into each pan. Add the 1/4 teaspoon rose water to the remaining batter in the mixing bowl; add the two drops of liquid pink food color and mix well. Drop spoonsful the pink batter on top of the white batter in each pan. Spread the batter evenly into the pans then run a knife or skewer through the batter to marble it (try to avoid scraping the bottom of the pan with the knife, this will remove the pan’s floured coating).
Bake for 25 to 30 minutes or until a toothpick tester comes out clean. Cool for 10 minutes before removing the cakes from the pans. Transfer to wire racks to cool completely. Level the cakes with a serrated knife or cake leveler.
Note: The floured surface of the coated baking pan usually contributes to an orangey-brown cake crust. I usually trim this away from the bottom and sides of the cake, and I did this to this cake. It’s an extra step but the cake will be softer and more delicate.
Raspberry Filling
12 ounces fresh or frozen raspberries (thawed)
3/4 cup water
1/2 cup sugar
2 tablespoons cornstarch
Pinch of salt
In a small saucepan, bring the raspberries and water to a boil. Reduce heat. Simmer for 5 minutes. Remove from heat. Press raspberries through a sieve; discard seeds and allow the mixture to cool.
In the same pan, combine the sugar and cornstarch; stir in the cooled raspberry puree and whisk until smooth. Bring the mixture to a boil and cook for 2 minutes or until thickened. Transfer the mixture to a separate bowl and let cool completely.
Raspberry Frosting
1 cup unsalted butter, softened
4 cups confectioners’ sugar
2 teaspoons vanilla extract
2 tablespoons raspberry filling (recipe above)
2 to 4 tablespoons heavy cream or milk
Combine the butter and sugar in a large mixing bowl and beat until just combined. Add the vanilla extract and raspberry filling. Beat again until incorporated. Add milk or cream a little at a time until the mixture is spreading consistency.
Assembly
Assorted meringues (recipe follows)
Fresh raspberries
Transfer 2/3 cup of the frosting to a piping bag with a plain tip (or with the end snipped to about 1/2 inch diameter). Place a cake layer on a cake stand or serving plate. Pipe a circle of frosting around the top edge of the cake layer; fill with raspberry filling (this should be about 1/2 cup plus 2 tablespoons filling per cake layer). Stack a second cake layer on top and pipe and fill as before. Finish with the third cake layer on top.
Use an off-set spatula to spread the frosting on the top and sides of the cake. Top the cake with assorted meringues and fresh raspberries.
Giant Meringues
1 cup granulated sugar
1 cup confectioners’ sugar
6 egg whites at room temperature
1/4 teaspoon cream of tartar
Gold leaf (optional)
Preheat the oven to 170F.
In a medium bowl, combine the two sugars. Line two cookie sheets with parchment paper.
Place the egg whites in a clean mixing bowl and whip them with an electric mixer on high speed until frothy. Add the cream of tartar. Beat again on high speed until the egg whites start to thicken. Gradually add the sugar mixture a little at a time.
Beat until the mixture is shiny and holds stiff peaks, about 5 to 7 minutes. To make sure the sugar is dissolved, rub a little between your thumb and forefinger to see if granules remain. If grainy, beat the meringue until the sugar is dissolved.
Spoon the meringue in 10 large heaps on the cookie sheets, or transfer the meringue to a piping bag fitted with a star tip and pipe swirls onto the cookie sheets. (I did both).
Place the cookie sheets, staggered, on the top and bottom oven rack. Bake for 2 hours, rotating the pans halfway through baking. Turn off the oven and let the meringues cool down with the oven, about 1 hour. When the oven is cool, remove the meringues. They should lift easily from the parchment paper.
Press gold leaf onto the meringues, if using. Serve immediately, or store them in an airtight container for up to three days.
January 29, 2015
Raspberry-Covered Devil's Food Cake


I'd like to introduce you to my favorite Devil's Food Cake recipe - or perhaps you've already met. You may recognize it from my cookbook (in a different kind of heart shape) or from this recent post on Food52. It's soft yet substantial and deeply chocolate with a velvety texture. The recipe yields exactly one 9-inch round cake, but I also bake it in an 8x8-inch square brownie pan. I used the latter to make this cake.

This cake revealed itself to me while I was sketching on my tablet. I've been recording some of my cake sketches, and I thought it might be fun for you to see one. More often than not, this is where my confections begin - on a drawing board. You can find a short video below (or here, for email subscribers).
Believe it or not, after years of curating a specialty cake pan collection (an accidental one), I've never splurged on a heart-shaped cake pan. It's just so darn easy to cut your own heart-shaped cake from a template! Just trace the bottom of the cake pan onto a piece of parchment paper, cut out the shape, fold the paper in half and then cut into a heart.

Trimming the cake into a heart is easy-peasy, just lay the template on top of the cake and cut around it with a serrated knife. The rest comes together rather quickly - just spread on a layer of frosting and go crazy with the berries.
It's important to make sure you have enough berries to cover the entire cake, so don't leave the grocery store with less than 3 pints of fresh raspberries.

Check out the inside of this cake. It's seriously dark and rich and so delicious with tart raspberries.

To be completly and utterly cheesy, I added a little chocolate love note badge top of the cake. I made it with a chocolate transfer sheet (similar here) and a handful of chocolate chips. If you'd like to see how the transfer sheets work, then you can find my tutorial here. Otherwise, a little square of Ghiradelli or Scharffen Barger would look nice, too.
I hope you'll give the cake a try, because it is literally tops in my (cook)book!
Raspberry-Covered Devil's Food Cake [click for printable version]
Yields one 8 or 9-inch cake layer
I use LorAnn
 raspberry flavoring oil in the frosting to boost the berry flavor. I recommend using it if you can find it, but the cake is just as lovely with vanilla flavored frosting. If you prefer vanilla frosting, omit the flavoring oil and add 1 teaspoon pure vanilla extract.
 Devil’s Food cake1/2 pound unsalted butter, softened1 1/2 cup light brown sugar, packed2 eggs6 tablespoons unsweetened cocoa powder1 1/2 teaspoon baking soda1 teaspoon vanilla extract1/4 teaspoon salt1 1/2 cup all-purpose flour2/3 cups sour cream1/2 cup hot coffee
Buttercream and berries1 cup unsalted butter, softened4 cups confectioners’ sugar1/2 dram bottle (about 1/3 teaspoon) raspberry flavoring oilLiquid red food color3 pints raspberries, rinsed and driedConfectioners’ sugar for dustingDecorative square of chocolate or chocolate transfer*
Preheat the oven to 350° F. Grease and flour an 8 x 8inch square cake pan.Using an electric mixer beat the butter in a large bowl until smooth. Add the sugar and eggs; beat until lightened in color. Add the cocoa, baking soda, vanilla extract, and salt; mix well. Beat in the flour in 3 additions, alternating with the sour cream (begin and end with the flour). Add the hot coffee and mix until a smooth batter forms.Pour the batter into the prepared pan. Bake until a toothpick tester comes out clean, approximately40 to 50 minutes. Cool the cake in the pan for 10 minutes before inverting and cooling completely on a wire rack. Level the top with a serrated knife, if needed. This cake usually doesn’t crown much (that means it doesn’t get the bump on top when it bakes) and I rarely have to level it.Trace the bottom of the 8x8-inch square cake pan on a piece of parchment paper. Cut out the shape and fold in half diagonally. Conservatively trim away two corners with scissors to create a heart shape. Lay the paper heart on the cake and, holding a serrated knife vertically, cut the cake around the paper using gentle sawing motions. Save the extra cake pieces as ice cream crumbles, or have a few bites for a pick-me-up while you frost the cake.
For the frosting, combine the butter and confectioners’ sugar in a mixing bowl. Beat with an electric mixer until smooth and fluffy. Add the raspberry flavoring oil and a few drops of the liquid red food color. Beat until combined. Add red food color a little at a time until a red-raspberry color is achieved. Spread the frosting onto the cake with an off-set spatula. Make sure you get at least 1/4-inch thickness of icing on the sides of the cake, otherwise the berries will not stick!Starting at the pointed end of the heart, line the raspberries around the bottom edge of the cake. Pack them together closely so as little of the frosting shows through as possible. Travel upward with your berry rows until the entire cake is covered in raspberries. If you see any icing lines showing through, dab a little frosting on a berry and place it over the exposed icing. Use a little frosting to adhere the chocolate square in the upper left hand corner of the cake. Store the cake in the refrigerator. Remove it about 1 hour before serving so that the cake loses its chill. Dust with powdered sugar and cut into slices. Store the leftovers in the refrigerator.
*For chocolate transfer instructions, see this post.
January 22, 2015
Applewood Bacon Shortbread Cookies


Many months ago I purchased a sampler set of flavored salts on an impulse. The names and colors drew me in: Murray River Pink, Bolivia Sunset, and Red Alaea. Since then I've sampled all twelve salts in the set, and my favorite - the supply that is quickly dwindling - is the flavorful brown-black grains of Applewood Smoked Sea Salt. It lends a smoky, almost bacon-like richness to anything it touches. If you love the flavor of Applewood bacon, then you may want to pick up a pinch tin. It's good on just about anything!
I've had the idea to use this salt on shortbread ever since I first tasted it. I just knew it would be fantastic on top of a slightly sweet, butter-rich cookie. And oh, it is!


How fun are these streaky bacon slices? I learned how to make bacon cookies from Jennifer when she made bacon sugar cookies. I was happy to find the technique also works with shortbread dough. If you're into making your cookies look like bacon too, then be sure to take a look at her dough stacking technique. I followed it loosely, and was pleased to find my cross section of shortbread looking so... bacony!
Once the slab of "meat" was assembled, I sprinkled on the Applewood salt and some freshly ground black pepper. The sliced dough yields a well-balanced cookie, with the salt and pepper crust just at one edge. I love the playfulness of this treat, but it's really delicious too. The recipe is based on the Scottish shortbread recipe in the Sprinkle Bakes book.

If you chill the shortbread slices in the freezer for about 10 minutes, they'll hold their shape well during baking. The cookies are done when the edges turn slightly golden, which I think gives them an even more realistic appearance. If you can't find Applewood Smoked Sea Salt locally, then you can order it here, or the entire sampler set I purchased can be found here.

These cookies made us giggle and hoot and brought out our inner practical jokers. Make them if you're in need of a delicious treat or just a smile.
Applewood Bacon Shortbread Cookies
[click for printable version]
Yields about 2 1/2 dozen cookies
The key to making great shortbread is using the best quality butter you can find. Applewood smoked salt can be found in kitchen specialty stores and online.
1 pound (4 sticks) unsalted butter, softened
1 cup granulated sugar
1 teaspoon vanilla extract
4 cups all-purpose flour, plus more for dusting
1/4 teaspoon salt
Wilton Burgundy gel food color
Wilton Brown gel food color
Liquid red food color
Applewood Smoked Sea Salt, in fine grain
Ground black pepper
In a stand mixer fitted with the paddle attachment, beat the butter and granulated sugar until light and fluffy. Add the sugar and mix again until well incorporated.
Add the vanilla extract and mix again.
Add 2 cups of the flour, and the salt, and mix on low speed until a dough forms. Add the remianing 2 cups of flour and mix again on low speed until a very stiff dough forms.
Divide the dough into 4 even portions. Place one portion back in the mixing bowl and add some of the burgundy and brown gel food color. Mix well. Add food color as needed to create a dark brownish-red color; add more flour 1 tablespoon at a time if the dough gets too sticky to handle; set aside.
Tint a second portion of dough in the same way, but use less of each food color so that it is slightly lighter than the previous batch.
Tint a third portion of dough with a small amount of brown food color and a few drops of liquid red food color to create a light pinkish-brown color.
Leave the fourth portion of dough untinted.
Flatten 3/4 of the untinted dough into a rough rectangular shape, about 1/2 inch thick. Flatten and stack the two lighter colors of dough alternately on top. Add the remaining untinted portion in random pieces on top (this creates another "fat streak" in the dough"). Finally, add the darkest portion of dough.
Flip the dough over so that the untinted portion is on top. Sprinkle with Applewood Smoked Salt and black pepper. Chill the dough in the refrigerator until firm, about 2 hours.
Preheat the oven to 350F. Line two large baking sheets with parchment paper.
Slice the shortbread dough into long even rashers, about 1/4-inch thick. Carefully transfer them to the cookie sheets. Bake for 12 to 15 minutes, or until the edges of the cookies turn golden brown. Let the cookies cool on the baking sheets until they are firm enough to move to a wire cooling rack. When the cookies are completely cooled, transfer them to an airtight container.
Note: I have made this with rendered bacon fat added to the dough. If you'd like to try it, add 1/4 cup chilled bacon fat to the butter mixture and 1/4 cup of flour.

January 19, 2015
Harlequin Truffle Roulade


If you've been reading this blog for very long, then you know I love a cake roll. I found this recipe in a secondhand baking textbook, and was instantly smitten. The alternating chocolate ganache and vanilla buttercream interior was so striking on the page, I had to try my hand at the technique.
Compared to the eye-catching interior, the outside of the cake seemed a little plain. That was easily remedied with a swirl of dark chocolate ganache buttercream on top and an assortment of truffles. You may also recall how much I love bonbons on cake.


This last process shot is my favorite. I had anticipated having a real mess on my hands after rolling up the cake, but it was a relatively tidy affair. It's important that the buttercream isn't too lax in texture. It should have a little heft to it so it rolls up nice and clean.

One prerequisite for this recipe - you must like buttercream (no issues here!). This cake is rich, so a small slice goes a long way. The textbook suggests using slices of this cake to create a beautiful dessert tray. I can imagine slices fanned out on a fancy platter would be quite pretty.
Harlequin Truffle Cake Roll [click for printable version]Source: Professional Baking textbook with my adaptations and notesYields 12 servings
Buttercream filling1/3 cup/3.5 ounces heavy cream5 ounces dark chocolate, chopped1 1/2 cups/340 g unsalted butter, softened4 cups/510 g confectioners’ sugar1 teaspoon vanilla extractPinch of salt2 tablespoons unsweet dark cocoa powderIn a saucepan, bring the cream to a simmer. Remove from the heat and pour in the chopped chocolate. Whisk to combine. Transfer the mixture to a shallow dish and transfer to the refrigerator. Stir the mixture intermittently to speed cooling. In a large bowl beat the butter until creamy. Add the confectioners’ sugar and beat until light and fluffy, about 4 minutes. Beat in the vanilla extract and pinch of salt. Remove half of the frosting and place it in a piping bag fitted with a 1/2-inch decorator tip (or no tip, and a 1/2-inch hole cut in the end). Beat the cooled chocolate mixture and 2 tablespoons dark cocoa into the remaining frosting. Transfer the chocolate frosting to a piping bag fitted with 1/2-inch decorator tip (or no tip, and a 1/2-inch hole cut as previously mentioned). Set aside. Keep the bags at room temperature.
Sponge roll1/2 cup egg yolks (about 7 yolks from large eggs)3 tablespoons/ 1 1/2 ounces granulated sugar1 tablespoon vegetable oil1/3 cup/2 ounces cake flour, sifted1/4 cup egg whites (about 2 egg whites from large eggs)Confectioners’ sugar for dustingBeat the egg yolks and sugar together in a standing mixer on high speed until light in color, about 5-8 minutes. Gradually add in the oil. You can tell the mixture is properly whipped when it has the appearance of lemon pudding.Gently fold in the cake flour using a large rubber spatula. Set aside.Beat the egg whites in a separate bowl until soft peaks form. Gently fold the beaten egg whites into the yolk mixture. Preheat the oven to 350°F. Grease a 10x 15-inch baking sheet with vegetables shortening and line it with parchment paper (the greased surface helps the paper to stick to the pan). Carefully spread the mixture in an even layer over the parchment with an offset spatula.Bake for 8 to 10 minutes, or until the cake just starts to brown around the edges. The cake may look glossy and underdone in the middle, but looks can be deceiving. Check the cake’s center by pressing your finger on the cake. If it springs back, it’s done. Be careful not to over-bake this cake, or it break into pieces as you try to roll it.Let the cake cool slightly. Run a knife around the edge of the pan and turn the cake onto a work surface dusted with powdered sugar (put a piece of waxed paper down first and clean-up will be a snap). Peel off the parchment paper. Trim the brown edges away from the cake. Let the cake cool completely.Pipe spaced lines of chocolate frosting across the length of the cake. Leave just enough space to allow for same-sized lines of white icing between the chocolate icing. Pipe the white frosting between the chocolate rows, filling the gaps completely. You should have leftover chocolate frosting, reserve it for later use. Gently begin to roll the cake, starting at a long side, pushing it forward with your fingers. Roll the cake up completely and wipe away any excess frosting that gets squished out during rolling. Place the cake roll on a large sheet of waxed paper (or parchment) and roll the cake up into the paper. Chill the cake in the freezer until firm.
Chocolate glaze and topping4 oz. chocolate, finely chopped1/2 cup/120 g heavy creamAssorted chocolate bonbonsPlace heavy cream in a large microwaveable bowl. Heat in the microwave at 40 second intervals until very hot but not boiling (you can do this on the stove top if you don’t have a microwave). Stir in chopped chocolate. Let stand for 3 minutes then begin gently stirring mixture. You can use a whisk, but do not whisk vigorously as it will create air bubbles in the finished glaze. Remove cake from freezer and place it on a grid baking rack; place the rack on top of a large baking pan. Pour glaze over entire surface, allowing the excess to drip into the pan. Let stand for 2 minutes, and then transfer the cake to the freezer.
Transfer the remaining chocolate frosting to a piping bag fitted with a large open star tip. Pipe an undulating line of frosting on top of the cake. Garnish with chocolate bonbons. Cut the cake into pieces with a warmed knife, cleaning between slices, while it is still cold. Let the slices come to room temperature before serving.
January 12, 2015
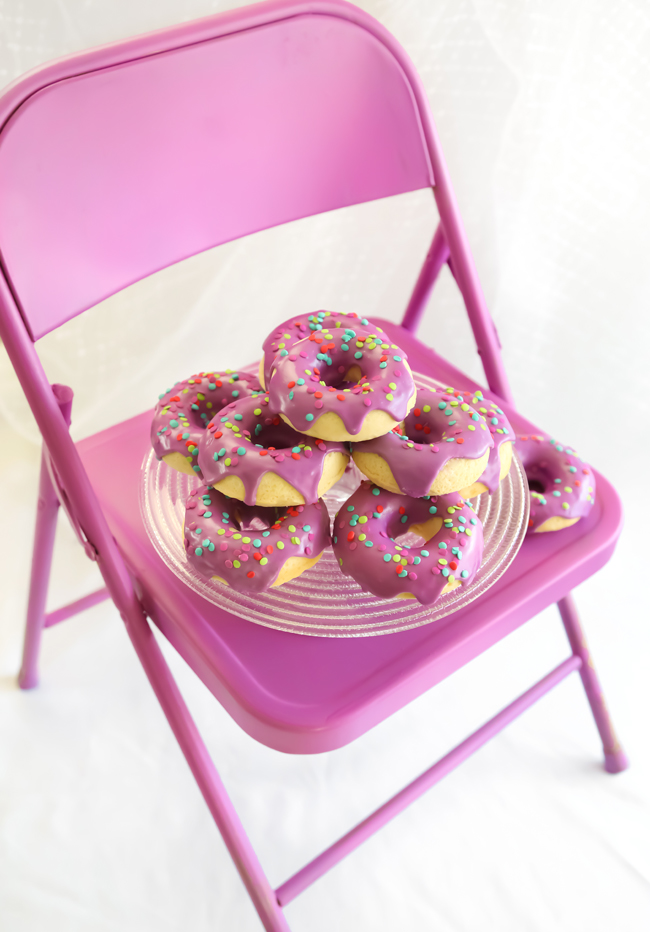
Baked Buttermilk Doughnuts


January is a funny time, because just as you're getting a fresh start and looking at things anew, the world outside looks grey and dismal. Something about that doesn't exactly match up. Although there are days when I prefer a sky that looks like wet cement (accompanied by snowflakes, hot tea and fuzzy socks), there are other days when I long for a colorful landscape. On those days I am prone to create my own scenery - like a mountain of purplish-pink doughnuts with the prettiest confetti sprinkles.
Remember way back when I made these baby doughnuts? Since then I've used the heck out of that mini doughnut pan.
 Recently I decided that I needed the regular-sized version.
 I put it on my Christmas list and was happy to find it in my stocking.
These buttermilk doughnuts could almost be called pound cake doughnuts. They're hearty and cakey and so good with cup of java. The tang of the buttermilk really makes all the difference, so I suggest seeking out the real thing. If you can't find real buttermilk, then a good approximation can be made with 1 cup of whole milk mixed with 4 1/2 teaspoons white vinegar or fresh lemon juice.

How pretty are these confetti sprinkles? I just love the color palette. I've had my eye on them for a long time, but my supplier has been sold out of them for months! I felt pretty lucky to snag a bulk supply of them recently, and they're available here in the shop.
Baked Buttermilk Doughnuts
[click for printable version]
Source: Wilton
Yields 13 doughnuts
This recipe requires the use of a doughnut pan.
Doughnuts
2 cups/240 g cake flour, sifted
3/4 cup/150 g granulated sugar
2 teaspoons baking powder
1 teaspoon salt
Pinch of nutmeg
3/4 cup/180 g buttermilk
2 eggs, lightly beaten
2 tablespoons butter, melted
1 teaspoon vanilla extract
Glaze
2 cups/260 g confectioners' sugar, sifted
1 teaspoon clear vanilla extract
Whole milk
1 drop violet gel food color (I used Americolor
 brand)
2-3 drops neon pink liquid food color, (I used McCormick
 brand)
Preheat oven to 425F. Spray the doughnut pan with nonstick cooking spray.
In a large mixing bowl, sift together the cake flour, sugar, baking powder, salt and nutmeg. Add the buttermilk, eggs, butter and vanilla. Beat until just combined. The batter will be thick. Transfer the batter to a piping bag with a 1/2-inch opening. Pipe the batter into the doughnut cavities until approximately 2/3 full.
Bake the doughnuts for 7 to 9 minutes, or until the top of the doughnuts spring back when touched. Let cool in the pan for 4 minutes. Turn the doughnuts out onto a wire rack to cool completely.
To make the glaze, put the confectioners' sugar in a large bowl. Make a well in the center and add the vanilla extract and 1 tablespoon of milk. Stir together with a whisk; add the food color. Add more milk a little at a time as needed, until a thick glaze is formed. The glaze should fall from a spoon in a thick ribbon back into the bowl, leaving a trail that disappears completely by the count of 10.
Spoon the glaze onto the doughnuts. Garnish with confetti sprinkles. Let the doughnuts stand until the glaze is set, about 30 minutes.
Doughnuts are best served fresh. They can be stored in an air-tight container overnight, and they will still taste fresh, but the glaze will have a wrinkly appearance.