
Heather Baird's Blog, page 75
January 6, 2015
Chocolate Champagne Genoise

January clockwork. This time of year always seems to bring out the optimist in me. I am hopeful. No other word can describe it better. Hopeful.
2014 was a year filled to the brim. It was a year of baking and recipe testing and a whole lot of avoiding dirty dishes. It was the year I wrote a new book for you. I know it seems like forever ago when I first told you about it, and I'd considered keeping it a secret until closer to the release date, but ultimately I decided to spill the beans. I want you to know what I'm up to, especially when blog posts seem sparse. I would love to be the kind of blogger who can simultaneously write a book of recipes and also post blog recipes regularly, but I am not that person. It's slow and steady for me, and I'm learning to accept my inner tortoise. Now the finish line is in sight with a fall publish date for the book and I could not be more excited. It was certainly a year of hard work, and for that, I'm grateful beyond words.

I had trouble deciding what to make for the first blog post of the New Year, and I'd considered nearly a dozen recipes before settling on this one. My motto is, when in doubt - chocolate. Plus, genoise cake is something every baker and baking enthusiast should know how to make. If you're looking to expand your baking abilities in 2015, then this classic cake is a great place to start.
Genoise is a sponge cake that has no chemical leaven, and instead relies on the air whipped into eggs to give it rise as it bakes. The cake's dry spongy texture is made for soaking up delicious flavored syrups and it's sturdy enough for layering, so it's no surprise that this recipe is a common building block in patisserie.

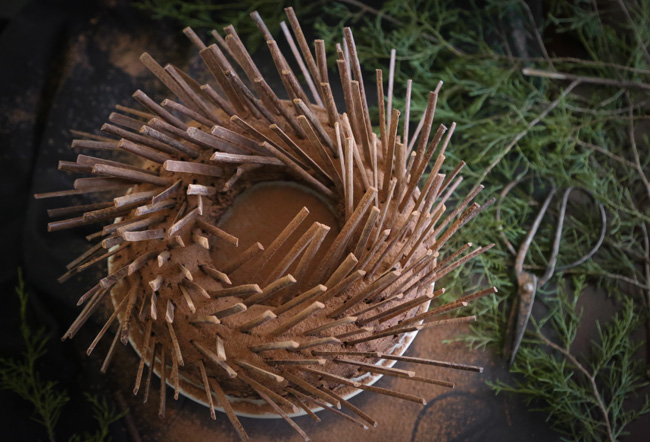
This cake is often baked in a thin sheet or in a standard 9-inch round, but I decided to use a Savarin Mold.
 I love how this pan makes cakes look like one big doughnut (note to self: make One Big Doughnut Cake).
What do you think of this cake with quills? I'd seen a similar cake in a bakery, and decided to make my own version at home. It reminds me a little of the winter treescapes right now - a whole lot of bare limbs jutting towards the sky. Chocolate sticks can be purchased online, but because this cake requires quite a lot of them, I made my own. It's not difficult, and if you have the tools, it's totally beginner friendly. Another great thing to learn in 2015 (if you haven't already) is how to temper chocolate. You can find my tutorial here with last year's Etsy post for Red Velvet Bonbons. But if you're not inclined to temper, then an excellent substitute is Ghirardelli Chocolate Melting Wafers.
 These wafers taste deeply chocolaty and no tempering required.
You can find the tools I use for making the chocolate sticks here. It's relatively inexpensive and the comb can be used to texture the edges of frosted cakes, too.

In the picture above, I've spread the chocolate to about 1/4-inch thickness, then run the pastry comb straight through it. You can tidy the edges by running the scraper across each end.

After the chocolate stands for a few minutes and the surface becomes matte, you can cut it into even lengths with the scraper. This particular scraper has a very flexible knife, which is important for removing the sticks from the paper. It glides underneath the sticks easily without breaking the thin pieces of chocolate.
-10.jpg)
This cake was given a generous soak of champagne syrup and then left to absorb overnight. This is an important step if you're using the chocolate sticks as decoration. If the genoise cake isn't properly saturated, then the chocolate sticks will not insert easily and because they are so thin, they'll break.
I really loved the flavor of sweet champagne syrup with chocolate cake. It tastes like a celebration. And with that, I'll bid you a very Happy New Year !
Chocolate Champagne Genoise Cake
[click for printable version]
Yields one 9-inch cake
Plan ahead, this cake needs to stand for at least 3 hours or preferably overnight.
Chocolate genoise3 large eggs plus 3 large egg yolks, at room temperature3/4 cup/150 g granulated sugar1/8 tsp. salt1/3 cup/40 g cake flour1/3 cup/40 g cornstarch1/4 cup/35 g unsweetened alkalized cocoa powder
Champagne syrup1 cup/240 ml champagne or prosecco1/2 cup/100 g granulated sugar
Decoration10 ounces chocolate sticks (about 120 pieces)Unsweetened cocoa powder, for dusting
Preheat oven to 350°F. Grease and flour a 9-inch round baking pan or a 9 3/4-inch Savarin mold. In a heat-proof bowl (preferably stainless) beat together whole eggs, egg yolks, sugar and salt, using an electric hand mixer at high speed. Place bowl over pan of simmering water and continue beating with the electric mixer until the mixture is warm. Remove bowl from water. Continue to beat until mixture is cooled and increased in volume; this will take 5-7 minutes, and the batter should be thick and leave a trail when the beaters are lifted from the bowl.
Sift together cake flour, cornstarch and cocoa. Sift dry ingredients over the beaten egg mixture, gently folding with a rubber spatula. Pour batter in prepared pan.Bake for 30 minutes or until cake springs back when touched with finger. Cool in pan on wire rack for 10 minutes. Loosen edge with knife and invert cake onto a rack. Cool completely.
For the syrup, combine the champagne or prosecco and sugar in a small saucepan. Simmer over medium-high heat, stirring constantly, until the sugar is melted. Remove from heat and let cool until just warm, about 20 minutes.
Place the cake upside down on a large sheet of plastic wrap. Poke holes in the bottom of the cake using a fork. Using a pastry brush, liberally brush half the syrup all over the bottom of the cake. Turn the cake upright and brush with the remaining syrup. Be sure to use all the syrup so the cake is thoroughly saturated. Loosely wrap the cake in the plastic wrap, and then in a layer of aluminum foil and allow the cake to stand at least three hours or preferably overnight.
To decorate the cake, press the chocolate sticks into the cake at a 45 degree angle, beginning at the center. Do this gently, as chocolate sticks are fragile. Avoid holding the sticks in your hands as you decorate because they will become soft. Keep them on the counter top. Continue pressing more sticks into the cake, moving outward, until the entire cake is covered. Dust the cake with unsweet cocoa, if desired. Store the cake in the refrigerator, covered with plastic wrap, for up to 3 days.
Note: This cake is excellent brushed with Kirsch (cherry) syrup. Just replace the champagne with Kirsch liqueur and serve with whipped cream. Add a few Morello cherries and you've got Black Forest Cake.
Edit 1/6: Someone asked how this cake is sliced. If you cut between the chocolate pieces at an angle, you'll get a clean slice.


December 19, 2014
Double Vanilla Pink Stocking Sugar Cookies


Since joining Wilton's Sweet Treat Team last February, I've had the opportunity to try out all kinds of new products and explore new ideas in confectionery. It's been a sugar-filled fun year to say the least!
To end the year on a sweet note, the members of the Treat Team decided to have a cookie exchange. I was paired to swap cookies with Marilyn of Pink Martinis and Pearls. She makes some of the most beautiful sugar cookies I've ever seen, so I knew I had to up my cookie game. Plus, something pink with pearls had to happen!
 If you've never had the experience of shipping decorated cookies before, I can tell you from experience that it's a real nail-biter! These little pink stockings are making the journey from Tennessee all the way to California. Hopefully the little prayer I said over them, along with all the extra bubble wrap will help them to arrive unscathed.
Below you'll find my favorite sugar cookie recipe for decorating, except this time they're infused with double vanilla goodness! You can use this recipe for any shape cookie you like, but if you're interested in making your own pink pearled stocking cookies, scroll down a little furthe rfor the quilting technique instructions.
Double Vanilla Sugar Cookies
[click for printable version]
Yields 2 dozen
Source: SprinkleBakes book
Vanilla Sugar Cookies
1/2 lb. (two US sticks) unsalted butter
1 cup plus 2 tablespoons/225 g granulated sugar
1 egg
1 tsp. vanilla extract
Seeds of 1 vanilla bean
3 cups/380g all-purpose flour
Pinch of salt
In a stand mixer fitted with the paddle attachment, mix the butter and sugar together until just incorporated. Do not over-mix at this stage, or the cookies may spread while baking.
Add the egg and vanilla and vanilla seeds. Mix again on low speed, stopping to scrape down the sides of the bowl intermittently as needed.
In a medium bowl, whisk together the flour and salt. Add to the butter and egg mixture. Mix on low speed until a dough is formed and there are no longer any streaks of butter in the mixing bowl. The dough will often clump around the paddle attachment while being mixed. This is normal and a good sign that your dough is the right consistency. If your mixture does not come together and is crumbly, add ice cold water 1 tbsp. at a time until the dough clumps.
Line a baking sheet with parchment paper.
Turn the dough out onto a sheet of wax paper and top with a second sheet. Roll dough into an oblong disc between the paper with a rolling pin. Transfer dough - wax paper and all - to a large cookie sheet. Wrap the dough tightly onto the cookie sheet with plastic wrap and refrigerate for 1 hour.
Remove top sheet of wax paper and roll dough a little thinner. It should not be sticky. You may dust the surface lightly with flour if it is sticky, but not too much! You don’t want streaks of white flour baked onto your pretty sugar cookies.
Roll dough to a ¼-inch to ½ -inch thickness.
Cut out desired shapes from the dough and transfer to the prepared baking sheet. (Use a 3-inch stocking-shaped cookie cutter for the cookies featured.) Be careful not to stretch the cutout shapes or they will be distorted after baking.
Refrigerate the cutouts for 30 minutes. This will help the cookies maintain a crisp shape during baking.
Preheat the oven to 350°F.
Bake the cookies for 15 to 20 minutes, more or less depending on size.
Let cool on the baking sheet for 5 minutes. Transfer to a wire rack. Decorate the cookies when completely cooled.

Pink Quilted Stockings
Supplies:
Stocking cookie cutter
Wilton Quilt Pattern Roller 1907-1354
1/2 lb pink ready made fondant
1/8 lb white, red and green ready made fondant
Corn syrup
Pearl nonpareils
Small artists' brush
Sanding sugar
No.3 decorator piping tip
9 inch fondant rolling pin
Knead all fondant well before using.
Roll the pink fondant out to 1/4 inch thickness; use the quilt pattern roller to emboss the fondant.
Use the stocking cookie cutter to make stocking-shaped pieces of fondant. Dot the backs of the pieces with corn syrup and lay them on top of a sugar cookie. Place a pearl nonpareil at each intersecting line and press it into the fondant.
To make the fuzzy white tops of the stockings, roll a piece of white fondant out and cut a straight edge. Use the top of the stocking cutter to cut 1/2-inch pieces of the white fondant. Lightly brush the pieces with water and sprinkle with sanding sugar. Use corn syrup to adhere the stocking tops to pink fondant.
For the buttons, roll the red and green fondant flat. Cut circles using the #3 round decorator tip (it measures approximately 3/4-inch). I used a 1/2-inch magic marker cap to make a button-like impression in the fondant, but you could use any pen cap or even a chapstick lid. Use the #3 piping tip to punch four button holes. Allow the buttons to dry until firm, about 3 hours. Attach them to the stockings with a dot of corn syrup.
Allow the cookie to stand until the fondant pieces are set and well-adhered, about 2 hours. Package the cookies in airtight containers or zip-top bags.
December 16, 2014
Salt Dough Ornaments for The Etsy Blog!
Today I've cooked up something a little different - treats for your tree! These salt dough ornaments look and smell just like real gingerbread, and they make a sweet homemade gift. Best of all, they keep indefinitely, so you can use them each year to decorate your tree.
You'll find the complete instructions along with step-by-step photos
December 13, 2014
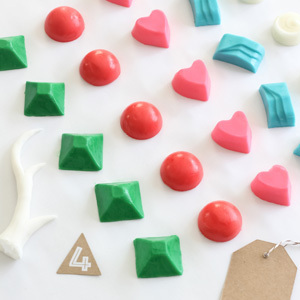
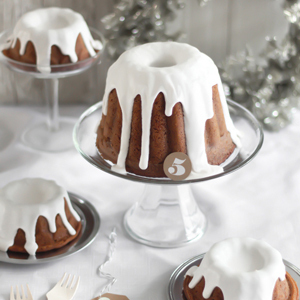
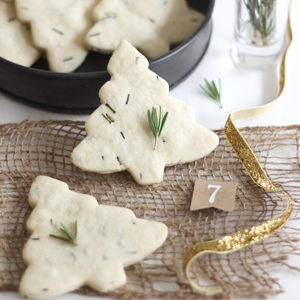
12 Treats of Christmas

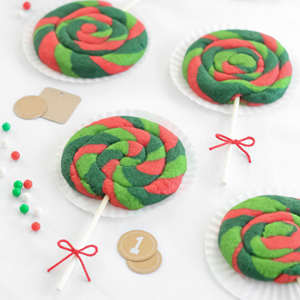
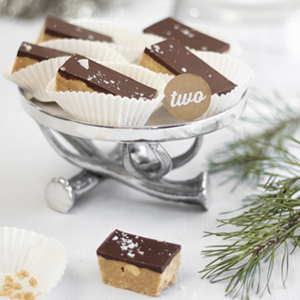
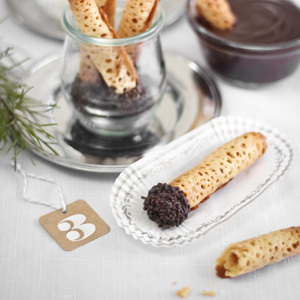
1. Sugar Cookie Lollipops; 2. Peanut Butter Cup Bars; 3. Almond Florentine Cigars, 4. Almond Buttermints; 5. Golden Gingerbread with Hard Sauce; 6. Sprinkle Christmas Tree Cookies; 7. Rosemary Shortbread; 8. Sugar Cookie Bark; 9. Gingerbread Cupcakes; 10. Microwave Sea Salt Caramels; 11. Muddy Reindeer Cookies; 12. Peppermint Mousse Cups
It's hard to believe that we're a mere 9 days away from Christmas Eve! Time sure does fly, so I resolved to make the most of Christmas baking this year. I started planning and recipe testing the 12 Treats of Christmas in early November. It's been a lot of fun posting every day for the past two weeks, and I hope you've enjoyed the treats as much as I have. Many of them are easy and make great homespun gifts.
I'll be back to regular posting soon. Right now I'm catching up on a mountain of Christmas gift wrapping!
Happy Winter!


Mocha Party Punch

Silly me. I thought all party punch was supposed to be bright red and fruity, but this punch changes everything. It's like sipping on a combination of chocolate milkshake, Yoo-hoo and café frappé. The ice cream on top mixes with the chocolaty punch and creates the most divine frothy topping. If you're looking for something unexpected to serve at your next party - this may be it!


I decided to display some of my most-loved vintage party napkins beside this punch. I collect mid-century cocktail napkins, and I'm seriously stingy about using them. I only bring them out for special occasions, and apparently, when chocolate punch is being served (smile).

One dip or two?

The chocolate curls on top makes the punch look like a million bucks - and when has extra chocolate ever been a bad idea?
I doubled this recipe because my punch bowl holds 12 quarts.
Mocha Party Punch
[click for printable version]
Yields: about 5 quarts, or 20 punch cup servings
The coffee flavor in this punch is mild but obvious and it intensifies the chocolate flavor. I certainly recommend using it, but if you're serving this to children or you do not like the flavor of coffee, you may omit the instant coffee granules. If you have instant chocolate milk mix or powdered hot cocoa mix, then you may use it in place of the freeze dried coffee.
1 1/2 quarts water
3/4 cup/255 g prepared chocolate syrup
1/2 cup/65 g powdered vanilla coffee creamer
1/2 cup/100 g granulated sugar
2 tablespoons light brown sugar
4 tablespoons instant coffee granules
1/2 gallon vanilla ice cream
1/2 gallon chocolate ice cream
Whipped topping or whipped cream (I used 2 cups, but use as much as you like!)
Chocolate curls or shavings for garnish
In a large saucepan, bring the water to a boil. Remove from the heat. Add the chocolate syrup, creamer, sugars and instant coffee granules. Stir until well dissolved. Cover and refrigerate until cold, about 3 hours, or overnight (preferred).
20 minutes before serving, pour the chilled chocolate punch into a punch bowl. With a large ice cream scoop, place dollops of ice cream on top of the punch; stir briefly and let stand until the ice cream spreads and covers the surface of the punch. Heap the whipped topping in the center of the punch and garnish with chocolate curls or shavings.
December 12, 2014
Peppermint Mousse Cups

This is one of the easiest and prettiest treats to make this holiday season, and best of all? It's totally edible, right down to the candy cups and peppermint spoons.
These cups are yet another sweet inspired by Wilton's Christmas products. The candy cups are easy to make with white vanilla candy melts (although, peppermint candy melts could be used for a triple peppermint whammy!). Just paint the melted candy on the inside of a paper cupcake liner. When the candy is set, just peel away the liner!
 Instant candy cup!
I went crazy over the peppermint spoons. They are so perfect for these mousse cups, but there are so many other ways they can be enjoyed - dipped in chocolate or stirred into a steaming mug of hot cocoa. You can find them here or at most craft stores in the baking aisle.
Peppermint Mousse Cups
[click for printable version]
Yields 6 standard cupcake size mousse cups
8 ounces white vanilla candy melts (or almond bark)
1/2 cup white chocolate baking chips
1 cup plus 3 tablespoons heavy whipping cream
1/2 teaspoon peppermint extract
2 drops red or pink liquid food color
Crushed peppermint candy
Peppermint spoons
Have ready 6 paper cupcake liners.
Melt the vanilla candy melts in the microwave at 30 second intervals until smooth. Using a pastry brush, coat the inside of each paper cupcake liner. Refrigerate until set.
Meanwhile, in a small bowl, heat the vanilla baking chips, uncovered in the microwave for 1 minute at full power. Stir in 3 tablespoons heavy whipping cream. Heat for an additional 30 seconds, oruntil chips are melted and can be stirred smooth with the heavy cream. Stir in the peppermint extract and food color. Let the mixture cool to room temperature.
In a medium bowl, beat 1 cup of heavy cream with an electric mixer on high speed until stiff peaks form. Fold the melted peppermint mixture into the whipped cream. Spoon or pipe the mousse into the candy cups. Refrigerate until serving. Just before serving, sprinkle with crushed peppermint candy.
December 11, 2014
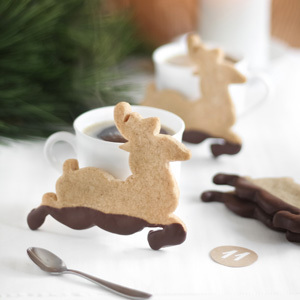
Muddy Reindeer Cookies (Chocolate-Dipped Gingerbread)

Santa's reindeer have quite a job to do on Christmas Eve. They have just one night to travel 75 million miles and carry a sleigh of toys that weighs over 300 tons (some years more or less depending on the naughty to nice children ratio). Wow!
That's a lot of landing on sooty rooftops and traveling through inclement weather. No doubt the reindeer would become a little sullied from the journey. These cookies are my way of regarding Santa's antlered helpers.

Remember when I said I was SO into gingerbread this year? Yeah. I wasn't kidding (see here and here). This vintage gingerbread recipe was new to me and I'm so glad I decided to try it. It's made differently than some of the contemporary gingerbread cookie recipes. Instead of creaming butter and sugar together (like most any cookie recipe) the butter is cut into the flour with a pastry blender (or a food processor) as you would to make pie crust. This makes for a truly delectable texture.
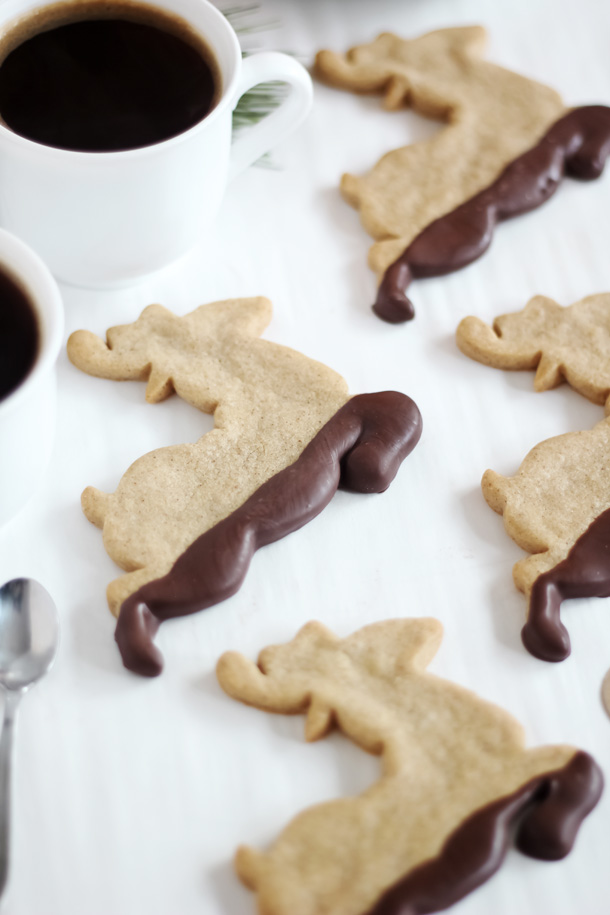
These guys were "muddied" with melted semisweet chocolate. It gives the cookies just a little extra sweetness, and that makes them delicious with hot tea or strong coffee. You could also dip the cookies in white chocolate - I'm sure the reindeer encounter many snowy rooftops on their travels as well!

You can find the reindeer cutter I used here
 but there are many other reindeer silhouettes (like this one
 ) that would be cute, too.
If you're like me, and crazy about gingerbread, then you can find links to some of my other ginger-spiced creations below.
Gingerbread Bundt Cake with Coffee Glaze
Gingerbread Pie
Bavarian Gingerbread house (Gingerbread House Dough Recipe)
Gingerbread Hobbit Hole
Designer-Worthy Gingerbread Houses for HGTV
Muddy Reindeer (Chocolate Dipped Gingerbread)
[click for printable version]
Yields 2 dozen cookies
1 1/4 cups/160 g all-purpose flour
1/4 teaspoon baking soda
Pinch of salt
1 teaspoon ground ginger
1 teaspoon ground cinnamon
5 tablespoons unsalted butter, cold, and cut into pieces
1/2 cup/100 g granulated sugar
2 tablespoons pure maple syrup
1 egg yolk, beaten
6 ounces chocolate, finely and evenly chopped
Sift together the flour, baking soda, salt and spices. In a large bowl, cut the butter into the flour mixture with a pastry blender (or you may use two forks or process in a food processor). When the mixture resembles fine bread crumbs, add the sugar, syrup and egg yolk, and mix or process to a firm dough. Knead lightly.
Line two baking sheets with parchment paper.
Roll the dough to 1/4-inch thickness between two sheets of parchment paper. Cut the rolled dough with a reindeer cookie cutter (or other preferred cutter). Transfer the shapes to the parchment lined baking sheets using a spatula, and then chill the shapes in the refrigerator for 10 minutes or until firm.
Preheat the oven to 350F.
Bake the cookies for 10-12 minutes, or until golden around the edges. The cookies should be fragrant and slightly puffed.
Let the cookies cool on the sheets for 10 minutes, then transfer to a wire rack to cool completely.
Line a work surface with a sheet of waxed paper or parchment paper.
Melt the chocolate in a small saucepan over low heat on the stove top, or heat at 30 second increments in the microwave until melted and smooth. Dip the reindeer's feet/lower half of body into the chocolate and place on the paper. Let stand until the chocolate is set.
When the chocolate is well set, place the cookies in an air-tight container, or package them in cellophane bags tied with holiday ribbon for gift giving.
December 10, 2014
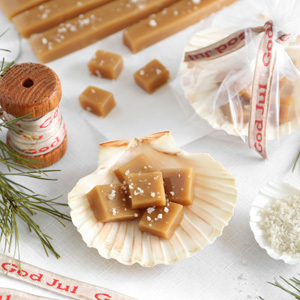
Microwave Grey Sea Salt Caramels

This is one of my favorite caramel recipes because you don't have to use a candy thermometer. Total cooking time is about 7 minutes in the microwave (as opposed to 20 + on the stovetop) and after a short chill in the refrigerator, they're ready to be cut and wrapped. This is a great recipe for busy holiday cooks.


Sea salt is the ultimate complement to this caramel. I use coarse Celtic grey sea salt
 to finish this candy because it's beautiful and makes the candy taste like it's been kissed by a mermaid.
Wrap these up in waxed paper because they are rather soft at room temperature. A few pieces wrapped up in a culinary scallop shell
 makes a beautiful little gift, especially if you opt to use the coarse sea salt.
Microwave Grey Sea Salt Caramels [click for printable version]
4 tbsp unsalted butter, cut into cubes1 cup light brown sugar, tightly packed1/2 cup corn syrup2/3 cup sweetened condensed milk (not low fat)1/2 tsp pure vanilla extractGrey sea salt
Lightly grease an 8x8 dish with vegetable shortening or butter and line the pan with parchment paper. Cut the paper long enough to overhang the two edges of the pan.In a large microwaveable bowl or 8 cup glass measure, combine the butter, brown sugar and corn syrup. Microwave at 100% power for 2 minutes.Stir mixture well. It will be a little grainy. Microwave for another 2 minutes, stir well.Add 2/3 cup sweetened condensed milk. Microwave for 3 minutes. Watch carefully, it is prone to bubble up at this stage. If it starts to bubble over, open the microwave door intermittently so that the mixture will sink down and not bubble over.Remove from microwave and stir in vanilla extract. Be very careful at this stage, the caramel is extremely hot and sticky!Pour hot caramel into the parchment lined pan.Lightly sprinkle with grey sea salt.Let stand until set, or speed setting with refrigeration. Lift caramel block from pan and cut into individual squares. Wrap the caramel pieces in waxed paper squares.
Note: this recipe should be made in a standard household microwave. High powered commercial microwaves are not suitable for this recipe.
December 9, 2014
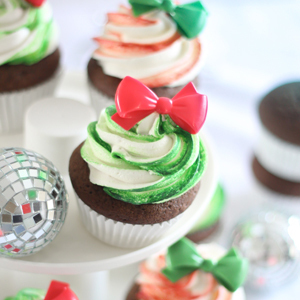
Gingerbread Cupcakes with Candy Stripe Frosting

I'm into gingerbread in a big way this season, and that's not always been the case in previous years. I'm not sure why. Perhaps because I was too busy stuffing Oreos inside Red Velvet Crinkles, or building the biggest Black Forest Cake ever, ever, ever. But this year is different and I just can't get enough ginger-spiced goodness!


There's just a touch of cream cheese added to the frosting - not enough to call it cream cheese frosting, but just enough to give it a tang. It's a nice complement to the spiced cake.
I gave the frosting a candy stripe with red and green gel food color painted on the inside of the piping bag. I think next time I make these, I'll add a little peppermint extract so the flavor matches the appearance.
 Paint 3 or 4 lines of gel food color on the inside of the piping tip and piping bag
 for the candy stripe effect. Piping tip is Ateco 847.

You may remember seeing some similar bow-topped cupcakes earlier this year. I just love how they make cupcakes look like a present (for me?!) so I hunted down the supplier and now they're available in the shop! You can purchase them here (the shop is best viewed via desktop, mobile is still a work in progress, le sigh). Orders are shipping the same day so there's still time to get them well before Christmas!
♡
Gingerbread Cupcakes with Candy Stripe Frosting
[click for printable version]
Cupcakes
1/2 cup/100 g granulated sugar
1/2 cup/113 g butter or margarine, softened
1/2 cup/ 170 g molasses
2 eggs
2 cups/260 g all-purpose flour
1 teaspoon baking soda
1/2 teaspoon salt
1 1/2 teaspoons ground ginger
1/2 teaspoon ground cinnamon
1/2 teaspoon ground allspice
3/4 cup/180 ml water
In large bowl, beat granulated sugar, 1/2 cup butter, the molasses and eggs with electric mixer on medium speed, or mix with spoon. Stir in flour, baking soda, salt, ginger, 1/2 teaspoon cinnamon, the allspice and water. Spoon about 1/4 cup batter into each muffin cup.
Bake 15 to 18 minutes or until toothpick inserted in center comes out clean. Cool 5 minutes; remove from pans to cooling racks. Cool completely, about 20 minutes.
Frosting
1 cup/226g unsalted butter, softened
2 ½-3 cups/320 to 384g confectioners’ sugar
3 ounces cream cheese, softened
1 tsp vanilla extract
Milk or heavy cream, optional
Red and green gel food color for icing stripes (optional)
In a stand mixer fitted with the whisk attachment, mix together the butter and confectioners sugar. Begin on low speed until crumbly, and then increase to high and beat for 3 minutes. Add the cream cheese a little at a time.
Add vanilla extract and beat again until light and fluffy. If you find the buttercream is too stiff, you may add milk or heavy cream 1 tablespoon at a time until the mixture is piping consistency.
Fit a piping bag with a large closed star decorator tip (Ateco 847). Dip a small artists’ brush in the red or green food color and paint 4 well-spaced stripes onto the inside of the piping tip and all the way up the piping bag. Carefully spoon the frosting into the piping bag and pipe swirling mounds of icing (about 3 passes) on top of the cooled cupcakes.
Garnish with a bow cupcake topper, if desired.
December 8, 2014
Sugar Cookie Bark


Who doesn't love candy bark? There must be a million different ways to vary the confection and I want to try them ALL. I created this version when Wilton sent me a bag of sugar cookie-flavored candy melts. Boy, are those things good! I ate one or two (or five) right out of the bag.
They also sent the cutest candy bark mold imprinted with Christmas greetings. I think I'd rather get candy bark than a Christmas card, wouldn't you?

I love making cookie crumbles for cake and muffin toppings, so I knew it would be a delicious addition to this candy bark. It only takes minutes to whip up a batch, and it really adds a delicious homemade element to this candy bark. Sugar cookies of all kinds need sprinkles, if you ask me, so I added Christmasy red and green nonpareils to the mix.
For those of you without a moment to spare, you can short-cut this recipe by crumbling bakery-purchased sugar cookies in a bowl and mixing them with red, white and green sprinkles.


This was a really easy (seriously easy!) and fun project - delicious too! The bark has just the right amount of creamy cookie-flavored candy to the crunchy cookie crumbles. I'm hooked!
If you're a gifter of edibles around the holidays, then I'd recommend using the silicone candy mold - it makes an adorable presentation. If you'd rather skip the mold, then the candy melts can be spread on a baking sheet and then sprinkled with the cookie crumble.
Sugar Cookie Bark
[click for printable version]
Sugar Cookie Crumble
1/2 cup/100 g granulated sugar
2 tablespoons light brown sugar, packed
3/4 cup/90 g all-purpose flour
1/2 teaspoon baking powder
1/2 teaspoon salt
2 tablespoons red, white and green nonpareils
1/4 cup vegetable oil (or other neutral tasting oil such as canola)
1 tablespoon pure vanilla extract
1 package Wilton Sugar Cookie Candy Melts (10 oz.)
Preheat the oven to 300 F.
Combine the sugars, flour, baking powder, salt and sprinkles int eh bowl of a standing mixer fitted with the paddle attachment and mix on low speed until well combined.
Add the oil and vanilla and mix again until the mixture forms small clusters of crumbs.
Spread the mixture onto a baking sheet and bake for 15 minutes. When the crumbs are golden, remove from the oven and let cool completely.
If using the sugar cookie mold, fill the cavities with the candy disks and microwave at 30 second intervals until melted - you won't even have to stir the candy melts as you heat them. Just tap the mold on a work surface to even the surface. Sprinkle the melted candy generously with the cookie crumble. Let cool completely before unmolding.
If you're not using the mold, line a baking sheet with parchment paper. Melt the bag of candy melts in the microwave at 30 second intervals, stirring in between heatings until smooth. Spread the candy onto the parchment and sprinkle generously with the cookie crumble. Let cool and then break the candy into pieces.
Place candy in a cellophane bag tied with pretty ribbon for gifting.


