Heather Baird's Blog, page 82
January 17, 2014
Lemony Rainbow Checkerboard Cake

It's been a busy two and one-half weeks since I last posted, and I've missed you terribly! Those of you that keep up with me on Instagram or Facebook know that during this time I made a great big red velvet groom's cake with a cute little crabby topper. What a job! But it was so much fun, and I'd like to extend a thank you to those of you who rooted me on. Those typed words look extra small to me today, but just know that your encouragement really carried me through. Big virtual hugs!
I'm getting back in the swing of things with, what else - more cake! I've got a serious crush on rainbow cakes of all kinds, but I wanted to make something a little less expected. I considered making another Battenberg Cake (only in rainbow colors and much bigger) but I decided against it when I saw this gorgeous cake.
News flash! You don't need a special pan to make a checkerboard cake. You just need a couple of circle templates - you could even use a cereal bowl and a bottle cap as make-shift guides.


The first order of business is to make your cake layers. After they're baked and cooled they all need to be leveled to the same height. I used a cake leveler
 so they'd all be perfectly even. Place them in the refrigerator to chill so they'll be much easier to cut into circles.
I used 6-inch cake layers, so my circle template guides were a condiment cup with a 4-inch rim and a 2-inch cookie cutter. Just place the cup straight down onto the center of the cake and cut around the rim. Avoid cutting at an angle - place the knife straight into the cake vertically and cut around the rim using up-and-down cutting motions.

I really loved how the cakes looked disassembled, but they were really something when they were all put back together! They reminded me of a Kandinsky painting. There's really no rhyme or reason to my color pairings - I just sketched something out quickly on my tablet and went with it. Each smaller circle will need a dab of icing on the outer edge before they're nested into the other circles- but not too much! Just enough to hold them all together when the cake is cut.

When the layers are all stacked and sliced - wow! Talk about some crazy vibrant color! It appealed most to the part of me that wants to be the next Willy Wonka (can we please make that happen, universe?). The cake layers are all zingy and lemony, and cream cheese frosting makes it taste like you're having a little cheesecake with your cake. I am a fan of this.

As you may know, I have a small tabletop cotton candy maker, and I just love it. I used it to make a fluffy beehive hairdo for this cake, just because I thought it would be cute and funny. This
 is the model I own, it's relatively inexpensive and it's held up rather well over the past couple of years, so if you're looking to buy one, this model is pretty decent. Using cotton candy for a cake topper is a gamble (it's not recommended humid weather), but it will hold up for several hours in the wintertime when the weather is cold and dry.
This cake was a delight to make, especially when the view outside my window is so dreary (I need color in my life to function normally, okay?). It takes some time to put together, but probably not as long as you'd think. Or maybe it didn't seem so awfully long since I was having so much fun making it. I joked with my hubby that you might have to be a little cuckoo to dream up a cotton-candy-beehive-sprinkle-topped-rainbow-checkerboard-cake. He never passes up an opportunity to call me a fruit-loop, so of course he agreed. But it's good to be a little crazy sometimes.
Lemony Rainbow Checkerboard Cake
[click for printable recipe]
Yield: One six-inch layer cake, about 8-10 servings
Source: Sprinkle Bakes original recipe
Prep: 3 hours, total time about 5 hours
Using 6-inch cake pans (as I have) will require making the batter recipe twice. Use 2-inch and 4-inch circle templates for the 6-inch layers. This cake can be made into a standard 9-inch cake by making the batter recipe three times and dividing each batter between two pans. Use a 3-inch circle template and a 6-inch circle template for the 9-inch layers.
A quick note about the cream cheese frosting. Use Philadelphia brand cream cheese if you can find it. I'm not much of a loyalist when it comes to brands and I rarely endorse products, but it is simply the best product on the market flavor-wise for this frosting.
First three 6-inch cake layers
2 1/2 cups/ 320g all-purpose flour
1 1/2 teaspoons baking soda
Pinch of sea salt
1 cup/ 8.2 oz. whole milk
1 tablespoon white vinegar
2 large eggs
2 teaspoons lemon extract
12 tablespoons/330g unsalted butter
1 1/2 cups/ 300g granulated sugar
1/2 teaspoon red gel food color
1/2 teaspoon yellow gel food color
1/2 teaspoon orange gel food color
Preheat oven to 350F. Grease and flour 3 six-inch round cake pans; set aside.Whisk together flour, baking soda and salt in a medium bowl. In a 4-cup measure, stir together milk, vinegar, eggs and lemon extract; set aside. In the bowl of a standing mixer fitted with the paddle attachment, cream together the butter and sugar until light and fluffy. Add 1/3 of the flour to the butter mixture and mix on low speed. Add 1/2 the liquid mixture, mix well on low speed. Alternate the remaining flour and liquid, ending with the flour mixture. Divide the batter evenly into thirds and place in separate bowls (a generous 1 1/2 cups batter per bowl). Color each batter with the red, yellow and orange food color. Pour into pans and bake for 25-30 minutes. Allow cakes to cool 10 minutes in the pans, then turn them out onto wire racks to cool completely. Level cakes with a cake leveler or serrated knife. Wrap them in plastic wrap and place in the refrigerator to firm, about 1 hour.Next three 6-inch cake layers
1 cake batter recipe (above), without added food color
1/2 teaspoon blue gel food color
1/2 teaspoon green gel food color
1/2 teaspoon violet gel food color
Divide the batter evenly into thirds as before and tint each batter with the blue, green and violet gel food color. Bake as previously directed. Cool, level and refrigerate as previously directed. Cream cheese frosting
1 cup/ 226g unsalted butter, softened
4 cups/440g confectioners sugar
16 oz. cream cheese, cut into 8 pieces
2 teaspoons vanilla extract
Pinch of sea salt
In a stand mixer fitted with the whisk attachment, beat butter and sugar on low speed until just incorporated. Switch to medium-high speed and beat until light and fluffy, about 2 minutes. Add cream cheese 1 piece at a time and beat well after each addition. Add the vanilla and salt; mix again.
Assembly
Mixed rainbow nonpareils
Cotton candy, if desired
Use a 4-inch circle template to make the first cut (you could use a small bowl or cup with a 4-inch rim). Place the template onto the center of the cake and cut around it with a knife held vertically; avoid cutting the circles at an angle or your checkerboard will be uneven. Use up-and-down cutting motions so the cake doesn't tear as you cut it. Remove the center of the cake and use the 2-inch template to cut a small round from the center of the smaller cake. Repeat process with all cakes. Lay all the cake pieces out on a large piece of parchment paper. Lightly frost the outer edge of a medium circle and place it inside a different color large circle. Frost a small circle that is a different color than the first two circles and place inside the medium circle. Repeat process with all cakes, so that there are six tricolor cake layers. Frost the tops of two cake layers and stack them. Place the third unfrosted layer on top. Frost entire cake with the cream cheese frosting, creating swirls with an off-set spatula. Top with rainbow sprinkles and cotton candy. Due to the cream cheese frosting, cake will need to be stored in the refrigerator.


December 31, 2013
Macaron-Pom Gelée Spritzers

Standing on the precipice of each new year, I always find myself wondering what the coming year will look like. I usually get that roller coaster stomach-flip feeling of anticipation. (Maybe you get it too?) It's exciting to me, especially considering the amazing things that happened in 2013. There were ups and downs of course, but creatively speaking, I've never been more fulfilled. For me, that's a huge deal! It's a big part of my happiness in life. So, believe me when I say that it's been my pleasure to bake for you -and with you- this past year.

I whipped up these pomegranate gelée spritzers in a hurry because I've spent the better part of today thinking it was December 30th. (How did that happen?) Luckily, I'd done some prep work yesterday and already had the macarons baked and filled. I used a combination of pomegranate juice and sparkling white wine for the spritzer gelée, and it really turned out delicious. If you don't have time (or are totally confused about what day it is- ahem.) you can short-cut these parfaits by purchasing macarons from a local bakery.

Well friends, there's not much left to say except - Happy New Year!
Here's to a super sweet 2014!
Macaron-Pom Gelée Spritzers
[click for printable recipe]
Yield: 6 servings
Inspired by this trifle from Donna Hay
Prep: 20 minutes if you use purchased macarons
Total time: 3 hours with chilling
A quick word about this recipe. The acidic nature of the pomegranate juice and wine requires almost a double amount of powdered gelatin to set properly. I don't recommend decreasing the amount of gelatin or using a vegetarian gelatin substitute in this recipe.
3 packages (.25 oz. each) powdered gelatin
1 1/2 cups/375 ml pomegranate juice
1 1/2 cups/355 ml sparkling white wine (or sparkling grape juice)
1/3 cup/ 67g granulated sugar
2 dozen vanilla macarons
2 cups/500ml heavy cream, whipped to soft peaks
Pomegranate arils for garnish
For the pomegranate jelly, place the powdered gelatin and 1/2 cup pomegranate juice in a small bowl; mix well. Let stand until the gelatin is completely absorbed. Place the remaining cranberry juice and wine in a saucepan over medium-high heat. Add the granulated sugar and stir until dissolved. Bring the mixture to a boil and cook for 1 minute. Remove the pan from the heat source and add the gelatin mixture. Stir well until dissolved. Pour liquid jelly into stemware glasses until halfway full. Place glasses on a tray and transfer to the refrigerator for 2 hours or until liquid is well jelled.When jelly is set, arrange the macarons on top of the jelly in the glasses; 1-3 cookies per glass depending on its capacity. Fill each glass with the soft-peak whipped cream. Garnish with pomegranate arils and additional macarons.Note: If you're keen on making your own macarons, see my tutorial here.
December 24, 2013
Cabin Waffles (DIY Waffle Mix)
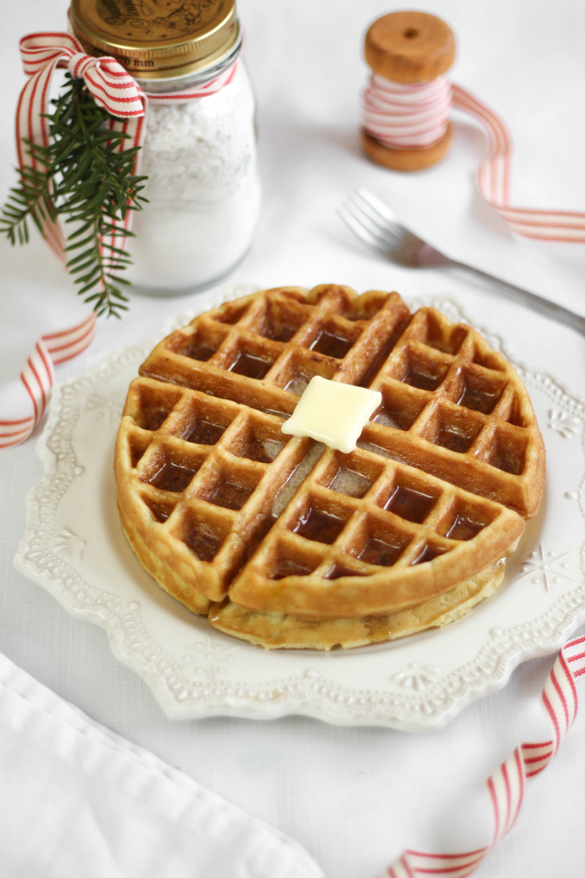


Last week we packed up the pugs and some warm clothes and headed to a little cabin in the mountains for a pre-Christmas-Christmas. Gifts were exchanged, naps were taken, and most importantly, waffles were made. It's become our tradition to always have waffles for breakfast during our cabin stay.
The waffle mix I use couldn't be easier to make. I whisk up a batch just before we leave and it totes away easily in an air-tight container. There are a few extra things we have to bring along too, like our waffle maker and a bottle of maple syrup, but we shop for the perishables at a local mini mart after unpacking (eggs, butter, buttermilk).
Waffle mix makes a good last minute gift, too - just put it in a pint jar tied with pretty ribbon and write the additional ingredients needed on a tag.


These waffles make a good Christmas morning breakfast, too. If you don't have buttermilk available in your area, try using sour cream in its place (see recipe notes).
Merry, happy and lots of love to you! ♡
Cabin Waffles (DIY Waffle Mix)
[click for printable version]
Source: adapted from Country Living Magazine
Yield: 4 cups dry waffle mix
Prep: 10 minutes
Dry mix
3 1/2 cups/312g all purpose flour
1/4 cup/50g granulated sugar
4 teaspoons baking powder
1 teaspoon baking soda
1 teaspoon salt
Whisk all ingredients together in a large bowl. Store in an airtight container until ready to use. To gift, you'll need two pint jars with a screw-top lid. Place two cups of waffle mixture in each jar.
For waffles
Yield: 4 Belgian waffles, or 6-8 standard waffles
2 cups/256g waffle mix (above)
2 eggs, lightly beaten
2 tablespoons butter, melted
1 1/2 cups/ 360g buttermilk
Place waffle mix in a large bowl. Stir in wet ingredients and mix until well incorporated. Pour batter into a heated and buttered waffle iron (capacities will vary). Cook for 5 minutes or until waffles are golden.
Notes: When I take this mix to-go, I include a vanilla bean in each jar of mix. Although it's not necessary, I enjoy the extra layer of flavor. The bean can be split and scraped then added in with the wet ingredients.
Buttermilk substitute - 1 cup sour cream mixed with 1/2 cup whole milk.
December 20, 2013
Mint Chocolate Cheesecake Bûche de Noël


My favorite part of making a yule log cake has always been the adornments - bark made from chocolate pieces, powdered sugar snow, almond pine cones and above all - meringue mushrooms. Since I've been using meringue mushrooms this year in other less traditional ways (see here and here), I decided that this cake didn't need them. But that was only after my discovery of mint chocolate twigs. I knew they'd be just the thing for a more modern take on Bûche de Noël.

The top layer of this "cake" is a mint-flavored no-bake cheesecake. It's so creamy and mild, which is exactly how I like my minty sweets (aggressive peppermint is such a turn-off!). The chocolate mousse layer is slightly more airy texture-wise but it's right at home with the other cold, creamy no-bake elements.

Mint chocolate twigs are probably not readily available to everyone. I only just discovered them this holiday season at a local specialty market (they seem to be a seasonal thing here in the Southern US) but any chocolate baton, cigarette, or stick will work- as long as they're relatively soft and easy to slice through. These mint-filled batons from Sweet Works (pictured above) are a good choice, too!

I used scraps of a wood grain patterned chocolate transfer sheet to make decorative white chocolate embellishments. You may remember that I used it here also, on another favorite minty-mousse creation.
If you don't have a specialty buche mold like mine, then you can use a standard 9x5-inch loaf pan instead. All the recipe steps will be the same, except you'll need to line the loaf pan with parchment before pouring in the batters for easy removal later.
I can't wait to bring this to our family gathering on Christmas, - and gosh! We're almost there, friends! Just a few more short days. Hope you're having a wonderful holiday season!
Mint Chocolate Cheesecake Bûche de Noël
[click for printable version]
Yield: 10 servings
Source: Sprinkle Bakes original recipe
Prep: 1 hour, total time 8+ hours with chilling
I used a special buche mold to make this cake (see picture for product link), but you could use a standard-size 9x5-inch loaf pan. If you use a loaf pan, line it with parchment paper that overhangs two edges. The cake will need to thaw slightly before it will cleanly release from the pan.
 Tortaflex Buche Mold from Pastry Chef CentralMint cheesecake layer1 cups white chocolate chips1/2 pound cream cheese at room temperature1/2 can/7 oz. sweetened condensed milk1/3 cup water1/2 oz. packet unflavored powdered gelatin1 cup heavy cream2 teaspoons peppermint extract4-5 drops liquid green food color
Chocolate mousse layer1 tsp powdered gelatin 1 tbsp. cold water2 egg yolks1/4 cup sugar1/4 cup milk, hot - (put in the microwave for 30+ seconds)8 oz. quality chocolate, chopped 3/4 cup whipping cream
Glaze/topping9 oz. chocolate, finely chopped1 cup heavy whipping cream1 tbsp. corn syrupChocolate mint twigs (such as Grand Belgian brand or Revillon)Pieces of white chocolate with wood grain motif *optionalFor the mint cheesecake: In a large heatproof bowl, melt the white chocolate at 30-second intervals in the microwave at full power, stirring well after each heating. When chocolate is smooth, add the cream cheese and mix well with an electric mixer. Add the sweetened condensed milk and beat until smooth. In a small microwave-safe condiment cup combine the water and gelatin. Let mixture stand for 1 minute. Heat gelatin in the microwave for 5-10 seconds or until liquefied. Stir gelatin into the cream cheese mixture. Pour in the (un-whipped) heavy cream and 2 teaspoons peppermint extract. Mix with a handheld mixer on the lowest speed until just incorporated. Pour the batter into a silicone buche pan or a 9x5-inch loaf pan. Place in the freezer while you make the chocolate mousse layer.For the chocolate mousse layer: Pour water into a small saucepan and sprinkle over powdered gelatin. Let stand for 1 minute. Whisk in eggs and sugar. Stir in hot milk. Cook over medium heat, stirring constantly. Mixture will thicken after 5 minutes or so. When done, it should be thick enough to coat the back of a spoon. Stir in chopped chocolate and blend gently with a whisk until chocolate is melted and even in color (no streaks). Let this mixture cool until barely warm, about 25 minutes; stir mixture occasionally. Whip cream until stiff peaks form. Gently fold whipped cream into the chocolate mixture until well blended. Pour mixture over the mint cheesecake layer in the buche pan and smooth the top. Cover and freeze for at least 3 hours, or until frozen firm.To unmold, place buche pan over a wire rack. Soak a dish towel in hot water and lightly wring; place hot towel over the bottom of the buche mold. Gently pry sides of mold away from the mousse. Press the top of the mold gently with your hands until the mousse releases. Place the rack over a large jelly roll pan; place cake in the freezer while you prepare the glaze.For the glaze: place heavy cream in a large microwaveable bowl. Heat in the microwave at 40 second intervals until very hot but not boiling (you can do this on the stove top if you don’t have a microwave). Stir in chopped chocolate. Let stand for 3 minutes then begin gently stirring mixture. You can use a whisk, but do not whisk vigorously as it will create air bubbles in the finished glaze. When chocolate and cream are thoroughly mixed and smooth, add corn syrup. Stir until combined. Transfer to a 4-cup measure with a pour spout. *Note: Corn syrup can be omitted if desired. It is used in this recipe to give the glaze shine.Remove cake from freezer and pour glaze over entire surface. Allow the dessert to stand until the glaze dripping subsides, then pour excess chocolate in the jelly roll pan back into the 4-cup measure. Rewarm glaze for 20-30 seconds in the microwave if it has thickened. Stir, then pour a second coat over the entire surface of the dessert. When dripping subsides repeat warming and pouring process a third time (the more times you cover with chocolate, the smoother the surface becomes). Transfer cake to a serving platter with a large spatula on one side of the dessert and a hand supporting underneath on the other side. Press mint twigs on top of the cake in crisscross fashion. Place white chocolate pieces on top of cake, if using. Store the cake in the refrigerator or freezer. Cake slices best when partially frozen. Allow mousse to stand at room temperature until soft but still chilled; serve.

December 17, 2013
Stamped Peppermint Candy for the Etsy Blog!

This is a fun and easy project for holiday gift giving, and one that you can - quite literally - put your own unique stamp on! Peppermint pastilles are made with confectioners' sugar, powdered gelatin and mint extract. When the candies harden, you can turn them into little works of art using rubber stamps and food color.

To get all the instructions with step-by-step pictures, head on over to the Etsy Blog !
December 16, 2013
Tres Leches Cake Cones


Our family tradition is to make Snow Cream on powdery winter days. There's something about its sweet, creamy flavor that reminds me of Tres Leches Cake (no doubt it's all that sweetened condensed milk and vanilla in the three milks mixture). I had the idea to marry the two as a cake-cone, and since the paper cones are made to hold ice and syrup, I figured they would hold up to the saturation of tres leches.

What I wasn't sure about - the baking part. I've never baked cake in a paper cone before, so I didn't know what to expect. I was afraid the centers would be under-cooked due to the shape, but I'm happy to say that these baked up just perfectly!

If you decide to try baking in paper cones, I'd suggest getting some sturdy cones like these. Even though they held up beautifully through baking and all that luscious milk saturation, I decided to double up on the cones just in case. Hand-held, they felt a little sturdier, so you'll probably want to have a few extra just in case you feel the need to double-up, too!

I had no special equipment to make these, just my standard size cupcake pan. I lined the cavities with bunched-up aluminum foil and nestled each cone's pointed end into the foil so that they stood upright. I'm sure it would be more convenient to have something like this
 in which to display them, but I did just fine without. They look just as pretty arranged together standing upright in a clear glass bowl or separately in glasses. A fork or spoon makes it easier to eat these, so stick one in each cake before serving.
Tres Leches Cake Cones
[click for printable recipe]
Yield: 16 cones
Source: Adapted from Nestle kitchens cupcake recipe
Prep: 30 minutes, total time 4 hours
Paper snow cones are needed for this recipe, or, if you'd prefer, they can be baked as cupcakes (yield 2 dozen). Be sure to use sweetened condensed milk in the sauce, not to be confused with evaporated milk.
 Sponge cakes
2 cups all-purpose flour
2 teaspoons baking powder
1 teaspoon sea salt
6 egg yolks
6 egg whites
1 1/3 cups granulated sugar
1/2 cup whole milk
2 teaspoons vanilla extract
Tres leches sauce
14 oz. can sweetened condensed milk
2/3 cup lite coconut milk
1 cup heavy cream
2 teaspoons vanilla extract
Topping
1 cup heavy cream
1/4 cup granulated sugar
1 teaspoon vanilla
16 red maraschino or glace cherries
Confetti sprinkles
Preheat oven to 350F. Line each cavity of one (or two if you have them) muffin tin with crumpled aluminum foil. Press paper cones down into the foil so they are securely standing upright. Set aside.Whisk flour, baking powder and salt in a medium bowl. Beat the egg whites in a separate large mixing bowl until soft peaks form. With the mixer running add egg yolks one at a time; beat well after each addition. Alternately beat in flour mixture with milk, beginning and ending with the flour mixture. Beat in the vanilla extract. Fill the cones with batter only halfway - if you overfill, later on in the recipe the tres leches sauce will overflow and make a big 'ol mess! Bake for 15 minutes, or until the cakes spring back when pressed in the center. Remove cakes from oven and let them cool in the pan. Gently poke holes in the cakes with a wooden skewer - be careful to to avoid poking holes through the paper cones. For the sauce, whisk together all the milks in a 4 cup measure. Pour 2-3 tablespoons of sauce into each cone; let stand until liquid is soaked into the cakes. Pour another 2-3 tablespoons of liquid into each cone. Cover and refrigerate for 4 hours, or overnight.For the topping, beat the heavy cream until soft peaks form; gradually add the granulated sugar and whip until stiff peaks form. Beat in vanilla. Transfer whipped cream to a piping bag fitted with a large star tip. Pipe swirls of topping on each cake. Garnish with a cherry and confetti sprinkles.
December 13, 2013
St. Lucia Buns (Swedish Saffron Christmas Bread)


Today is St. Lucia day! The day that our Scandinavian friends celebrate Saint Lucy, a symbol of hope and light in dark times. If you're not familiar with her story, you should definitely read up about it here and watch the adorable video here. In short, The festival of St. Lucia begins the Christmas season in Swedish custom, and she comes as a young girl crowned with fresh greens and lit candles carrying a tray of baked goods. These sweet, spiral buns are traditionally served on this day.
I decided to create a traditional candle crown to surround my bowl of Lucia buns, so I spent some time yesterday in the woods collecting pine branches. I'm not at all qualified to play Lucia, but I couldn't resist trying on the crown. It's hard for me to imagine anyone walking around with lit candles on their heads! These days a safer battery operated candle alternative is offered (which I think is a good idea, considering the use of flammable hair product and whatnot).


It's difficult to be in a bad mood with the delicious aroma of yeast buns and evergreen floating around the house. Even the little sleeping dogs got feisty once I brought in those branches. You'll notice Churro-pug in some of the pictures here -I couldn't keep his sniffer out of my wreath pile!

This is one of the easiest yeast breads I've ever made. It's almost no-knead, and the dough can be refrigerated overnight, which is a nice convenience if you're considering these for breakfast. I really love the flavor and golden color the saffron lends to these airy, puffed buns. If you can't find the non-melting Swedish pearl sugar in your grocery store, it can be ordered online.

St. Lucia Buns: Swedish Saffron Christmas Bread
[click for printable version]
Source: Adapted from The Great Scandinavian Baking Book
Yield: 24 buns
2 packages active dry yeast
1/2 cup warm water, 110F to 115F
1/2 cup sugar
1/2 cup unsalted butter, melted
1/2 cup heavy cream
1/2 cup whole milk
1/4 teaspoon crushed saffron threads
1/2 teaspoon salt
2 eggs, room temperature
4 to 4 1/2 cups all-purpose flour
Glaze
1 egg
2 tablespoons milk
Swedish pearl sugar
In the bowl of a stand mixer, combine the yeast in the warm water; stir gently and briefly with a fork. Add 1 tablespoon of the sugar; stir again. Let mixture stand until the yeast foams, about 5 minutes. Add the remaining sugar, butter, cream, milk, saffron, salt and eggs. Fit mixer with the paddle attachment and beat well on medium-low speed until combined. Remove paddle attachment from mixer and fit with the dough hook. Add flour 1 cup at a time mixing well with each addition to keep the dough smooth and satiny. You may not need to use all of the flour.Cover and refrigerate for a minimum of 2 hours, or up to 24 hours.Preheat oven to 375F. Line two baking sheets with parchment paper.Turn dough out onto a lightly floured surface and cut into 24 even pieces (about 2-inches square). Roll each square into a long rope, about 12-inches long. Curl each end of a rope in opposite directions, creating an "S" shape (or a backward "S" shape). Lift the bun onto the parchment; repeat curling with remaining dough ropes until there are 12 per baking sheet.For the glaze, beat the egg in a condiment cup and stir in the milk. Brush each bun with the glaze then sprinkle over pearl sugar. Place sheets in a warm place to rise until doubled, about 45 minutesBake for 15 minutes, or until golden brown and puffy.Heather's notes:
I use a stand mixer with a dough hook to make this bread, but it requires no intensive kneading. You can stir the ingredients by hand until a satiny, soft (but non-sticky) dough is formed.
You may not have to use all the flour. I used a little less than 4 cups. I stopped adding flour when the dough started pulling away from the sides of the mixing bowl (while beaten with the dough hook).
I place the sheets of buns on the range-top of my preheated oven. The heat from the oven encourages the dough to raise.

December 9, 2013
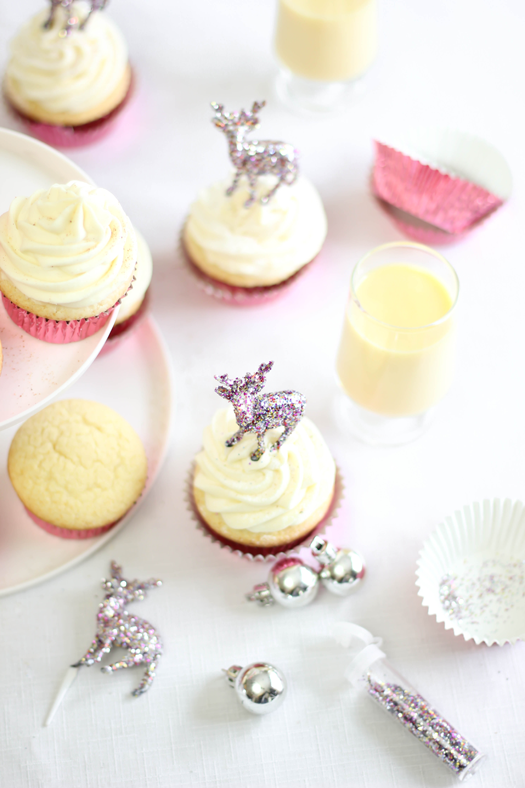
Sparkling Spiked Eggnog Ganache Cupcakes

I was so happy when my husband offered to put up our Christmas tree this year. With all the baking and book-writing going on, I simply didn't have the time or inspiration to spare. He's a pretty creative guy (in a software developer kind of way), so I was excited to see what kind of tree-decorating magic he could work.
When he called me over to see his design, I was amazed at how beautifully woodsy and natural the tree looked. As I studied the tree in greater detail, I noticed some things were missing. Then I noticed a box set aside, and therein was every sparkly ornament I'd ever bought.
"What about these?" I picked two sequined birds from the box.
"Nope." he said.
"They're woodsy!" I argued, which garnered an eye roll.
I held up a glittered pear. He shook his head.

The good news is, I didn't even feel like sulking about the lack of sparkle because the tree was undeniably beautiful - and I didn't have to lift a finger! Anyway, I've more than made up for the lack of holiday glitz with these sparkly,spiked eggnog cupcakes.


The cakes have a shot of rum in the batter, and if you have concerns about serving them to children, feel free to omit it. But like most boozy cakes, the alcohol bakes out only leaving behind nuances of flavor. The buttercream frosting is made from an eggnog ganache (white chocolate + eggnog = eggnog ganache!) and it gets whipped with butter and confectioners' sugar for a creamy, decadent cupcake covering. Grate a little fresh nutmeg over each mound of frosting and you've got Christmas in a cupcake!
If you're wondering about the sparkling deer, I gave these guys a makeover with silver acrylic paint. While the paint was still wet I dipped them in regular ol' glitter from the craft drawer. The pink metallic cupcake liners are available here.
Spiked Eggnog Ganache Cupcakes
[click for printable version]
Yield: 12 cupcakes
Source: cake recipe adapted from Intoxicated Cupcakes
 with Sprinkle Bakes original frosting
Prep: 55 minutes; total time about 3 hours
Cupcakes
4 tablespoons unsalted butter, softened
3/4 cup granulated sugar
1 large egg
2 tablespoons dark rum
3/4 cup commercially prepared eggnog
1 1/2 cups cake flour
1 1/4 teaspoons baking powder
1/4 teaspoon salt
Frosting
8 oz. quality white chocolate, chopped
1/2 cup commercially prepared eggnog
1/2 cup/ 113g unsalted butter, softened
2 cups confectioners' sugar
Freshly grated nutmeg
Preheat oven to 350F. Line a cupcake pan with 12 cupcake liners. Set aside.Combine the butter and sugar in a large bowl. Mix with an electric mixer on medium-high speed and beat until creamy. Add the egg, and once beaten smooth, add the rum and eggnog.Turn off the mixer and add the flour, baking powder and salt. Mix together on low speed until well combined. Place batter in the paper liners by the level 1/4 cup. Bake for 18-22 minutes, or until a toothpick tester comes out clean. Cool cupcakes in the pan for 5 minutes, or until cool enough to handle. Transfer to a wire rack to cool completely.For the frosting, combine the chocolate and eggnog in a small saucepan. Place over medium-low heat until mixture can be stirred smooth. Transfer ganache to a bowl and let cool completely in the refrigerator, about 1-2 hours. When ganache is cool (it won't set completely like normal ganache, rather, it will be a bit soft and runny) place it in the bowl of a stand mixer and beat until slightly thickened, about 5 minutes. Add softened butter and beat briefly at high speed. Add confectioners sugar 1 cup at a time. Beat on high speed again until fluffy and mixture is lightened in color.Transfer frosting to a piping bag fitted with a large star tip. Pipe frosting onto cooled cupcakes. Grate fresh nutmeg over each cupcake; serve. Store in an air-tight cupcake caddy or covered in plastic wrap. Tips:
My cake batter was very thick. I think this was due to the brand of prepared eggnog I used. I added 2 tablespoons of milk to loosen the batter and it baked up perfectly. If the frosting is too loose to pipe and hold its shape, place it in the refrigerator for a little while to firm; re-whip with a hand mixer and then transfer to a piping bag.
December 6, 2013
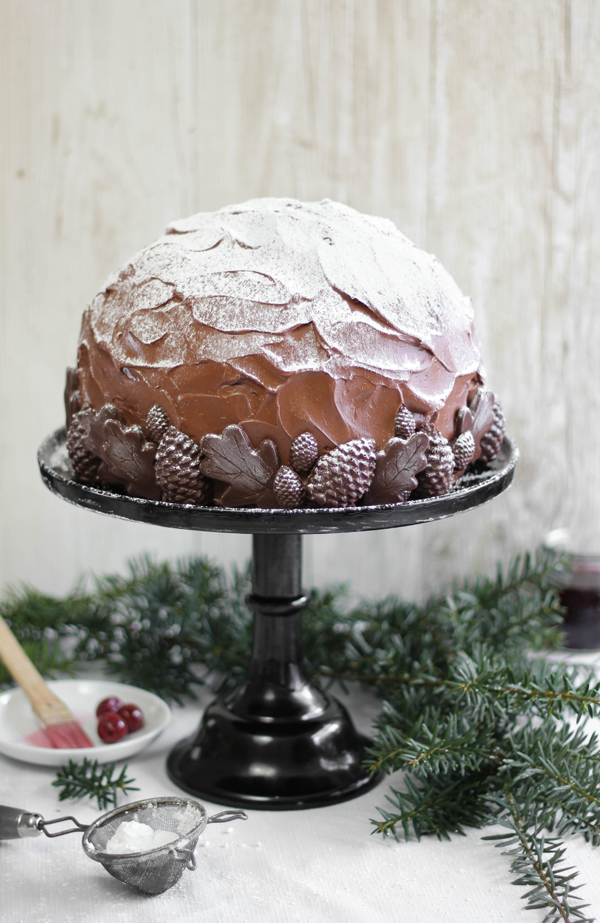
Black Forest Dome Cake

Black forest cake has been on my baking bucket list for ages. I've attempted it several times - and made it as far as the deep chocolaty cake layers - only to find that my jar of cherries had gone missing (i.e., eaten by a forgetful me). This time I bought two extra jars and resolved to just make it already!
My previous attempts always gravitated toward the standard 9-inch round double layer cake covered in whip and chocolate shavings et al. But not this time. I'll claim the muse led elsewhere, but it could just be my inability to ever make something exactly as it is intended to be made. Either way, what resulted is a rather stately black forest-zuccotoesque (that's not really a word)-dome cake. It's mighty good, too!

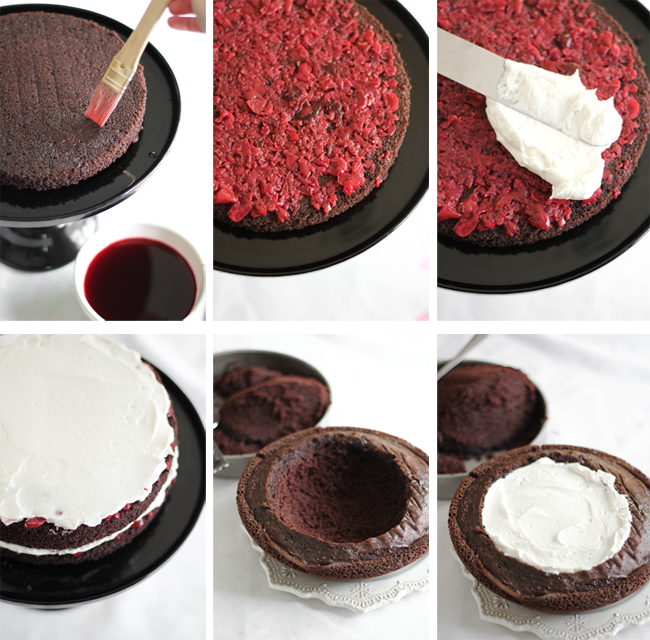
For the cake layers and dome, you'll make the same chocolate cake recipe twice. An entire batch of batter gets baked in a bowl (2 quart or larger) and the second batch gets baked into two 9-inch rounds. The rounds get a heaping helping of chopped morello cherries. In most black forest cakes the cherries are left whole, but I chopped them because I wanted this cake to slice beautifully, and I'm happy to report, it does!
The filling is also a bit of departure from tradition. Whipped cream is the usual filling and cake covering, but I used boiled frosting that, to me, resembles a gourmet version of Hostess Twinkie Filling (no kidding!). It is absolutely cloud-like and it holds up better if left standing on a buffet for several hours (as cakes tend to do during our family Christmas gatherings).

I forgot to mention the Kirsch syrup! All the cake layers get a good drenching of Kirschwasser syrup that's mixed with morello cherry juice. As you can imagine, this makes every bite moist and SO flavorful.

My inspiration for the little chocolate decors comes from the hand-carving on black forest cuckoo clocks. Oak leaves and pine cones are a common motif, and I decided they should be included somewhere on this cake. Ghiradelli recently sent me a few packages of their dark chocolate melting wafers, so I used them in the molds instead of taking pains to temper chocolate. They turned out pretty cute, and they taste good, too!

This cake takes a bit of time to make, and even though I made it in one day, I can't recommend doing that. It'd be much easier and less stressful to make the cake layers one day, and the fillings/frostings the next. This cake is certainly time consuming, but it's very much worth the time and effort. It may just be my favorite cake to date!
Black Forest Dome Cake
[click for printable recipe]
Yield: 24 servings
Source: Sprinkle Bakes original with cake adapted from Ina Garten.
Prep: 4 hours; total time about 8 hours or up to 24
Stock up on semisweet chocolate before making this recipe. The chocolate frosting uses 1 1/2 lbs., which is more than I've ever used in a single frosting recipe, but the end result is a true chocoholic's dream! I suggest making this cake over the course of two or three days. Chilling the dome cake before filling it is essential, otherwise it will be too soft and break apart under the weight of the whipped filling- so don't skip that step! Please read the notes at the bottom of this recipe for additional tips.
Cake
1 cup/ 242g buttermilk
1/2 cup/ 100g vegetable oil
2 large eggs, room temperature
1 teaspoon vanilla extract
1 3/4 cups/221g all-purpose flour
2 cups/400g granulated sugar
3/4 cups/ 68g cocoa powder
2 teaspoons baking soda
1 teaspoon baking powder
1 teaspoon salt
1 cup/230g freshly brewed hot coffee
For the two 9-inch rounds:
Preheat oven to 350 degrees F. Grease two 9-inch round cake pans and line them with parchment (or use flour a flour-based baking spray to grease and flour in one step-no parchment needed).In a four cup measure, combine buttermilk, oil, eggs, and vanilla set aside. Combine the flour, sugar, cocoa, baking soda, baking powder and salt in a large bowl. Whisk together until flour and cocoa are free of lumps. With the mixer on low speed, slowly add the wet ingredients to the dry. Gradually add the hot coffee and mix briefly; scrape down bowl and beat again on low speed. Pour batter into the prepared pans and bake for 35-45 minutes. Turn them out on a wire rack to let cool completely. Level cakes with a large serrated knife if needed. Wrap layers in plastic wrap and refrigerate to firm, about 2 hours.For the dome cake
Grease and flour a 2 quart (or larger) heat-proof bowl (preferably stainless steel). Repeat cake batter recipe and mix batter as directed. Pour batter in prepared bowl and bake for 50-60 minutes or until cake springs back when pressed in the center. Turn cake out onto a wire rack and let cool completely. Wrap in plastic wrap and place in the freezer to firm, about 2-3 hours.
Boiled whipped vanilla filling
1/4 cup/32g flour
1 teaspoon salt
2 cups/460g whole milk
2 cups/1 lb unsalted butter, softened
2 cups/400g granulated sugar
1 tablespoon vanilla bean paste or vanilla extract
In a medium saucepan, whisk together flour and 1/2 cup of milk until smooth. Set over medium heat and let cook for 3 minutes, or until slightly hot. Whisk in remaining milk and salt. Whisk constantly until the mixture is thick and paste-like (almost like pudding). Remove from heat and pour into a separate bowl. Place in the refrigerator until cool. When cool, mixture will be thick like set custard.In a large bowl (or bowl of a stand mixer, if you have one) beat the butter and sugar together until fluffy. Add vanilla and mix well. Beat in cooled flour mixture one tablespoon at a time on medium-high speed. When all the flour mixture is added, beat on high speed until light and fluffy, about 6 minutes. Rub a little frosting between your fingers, if sugar granules remain, beat for 4 more minutes, or until granules cannot be detected with fingers. Set aside (do not refrigerate) and prepare cherries and syrup.Cherry filling and syrup
24 oz. jar morello cherries in light syrup
3 tablespoons kirschwasser liqueur
1/4 cup/50g granulated sugar
6 oz. black cherry jam or jelly
Drain cherries and reserve 3/4 cup of cherry juice. Chop cherries (I used a food processor) and press through a sieve to remove additional juice created during chopping. Stir cherries together with black cherry jam or jelly. Set aside.Combine 3/4 cup cherry juice and 1/4 cup sugar in a small saucepan. Set over low heat and stir until sugar is dissolved. Remove and stir in kirsch liqueur.Dark chocolate frosting
1/2 cup/46g unsweet cocoa powder
1/2 cup/115g freshly brewed hot coffee
1/4 cup/50g granulated sugar
2 cups/1 lb. unsalted butter, softened
3 1/2 cups/ 1 1/2 lbs. semisweet chocolate, melted and cooled
Combine cocoa and hot coffee in a small bowl; whisk until smooth and set aside to cool. Beat sugar and butter together in a large bowl using an electric mixer (or stand mixer with whip attachment, preferred). Gradually beat in cooled chocolate; scrape down bowl and beat again. With the mixer on medium-low speed, gradually add cocoa/coffee mixture. Beat until smooth. If frosting is too lax to frost cake, place in the refrigerator for 10 minutes, or until just firm enough to spread.Cake assembly
Chocolate oak leaves and pine cones (as explained in blog post)
Powdered sugar for dusting
Remove cake layers from refrigerator and place a 9-inch round on serveware. Brush liberally with kirsch syrup. Cover with half the chopped cherries. Spread about 3/4 cup of boiled vanilla filling over the cherries. Top with second 9-inch cake layer; brush liberally with kirsch syrup, cover with remaining cherries and spread about 3/4 boiled filling over the cherries. Remove bowl cake from the freezer and place it flat-side-up on a plate (or place it back in the bowl it was baked in). Remove the center of the cake using a serrated knife and reserve -note: try to remove it in one piece with flat portion in tact. Place 3/4 of the remaining frosting into the center. Use a serrated knife to cut off the flat end of the reserved cake piece, this creates a cover for the filled center. Place it onto the frosting-filled center and refrigerate for 30 minutes. Turn chilled dome cake over onto the stacked and filled 9-inch rounds. Brush dome layer liberally with kirsch syrup. Use additional boiled frosting to fill in any gaps around the stacked cakes. Generously frost the entire cake with the dark chocolate frosting (there's a lot of frosting, but keep piling it on - it helps give the cake its round shape!). Place chocolate pieces around the bottom edge of the cake. Dust entire cake with powdered sugar. Refrigerate 30 minutes, or until chocolate frosting is set. Bring cake to room temperature before serving. Store cake loosely covered in refrigerator.Notes about this cake
Some people have experienced trouble with the boiled filling in a previous recipe I developed. It's usually because the flour and milk mixture wasn't cooked long enough on the stove-top. Make sure to cook it until it is thick like pudding, and cool it completely until it has the consistency of set custard.The boiled frosting may be replaced with 3 cups heavy whipping cream beaten with 3/4 cup of granulated sugar. It won't hold up as well if left sitting out on a buffet for hours, so you'll have to store the cake in the refrigerator at all times, This is a rather large cake - the equivalent of two double layer cakes! I serves up to 24 people, so don't guffaw at the amount of butter, sugar and chocolate - remember, one person is not eating the whole cake, just one (maybe two?) slices. Calorie counters - look away.It's okay to use semisweet chips in the dark chocolate frosting - I did. Just make sure it's a brand that contains some amount of cocoa butter in the ingredients. Of course, high quality chocolate is preferred.Morello cherries in light syrup can be found at Trader Joe's. If you don't have one in your town, grocery stores usually stock "dark pitted cherries in syrup" - buy two 12 oz. cans of those - they'll work fine.
Supplies
Chocolate leaf mold

Large chocolate pine cone mold

Small chocolate pine cone mold

Ghirardelli dark chocolate melting wafers

5-Quart stainless steel mixing bowl


December 5, 2013
Three Designer-Worthy Gingerbread Houses for HGTV!

Gingerbread houses are a favorite of mine to make during the Christmas season. You might already know this if you're a regular reader (if not, see here , here and even here !). This past summer HGTV cooked up an idea for three different takes on gingerbread structures, and they asked if I'd be willing to whip them up for a holiday feature. I was more than happy to oblige!
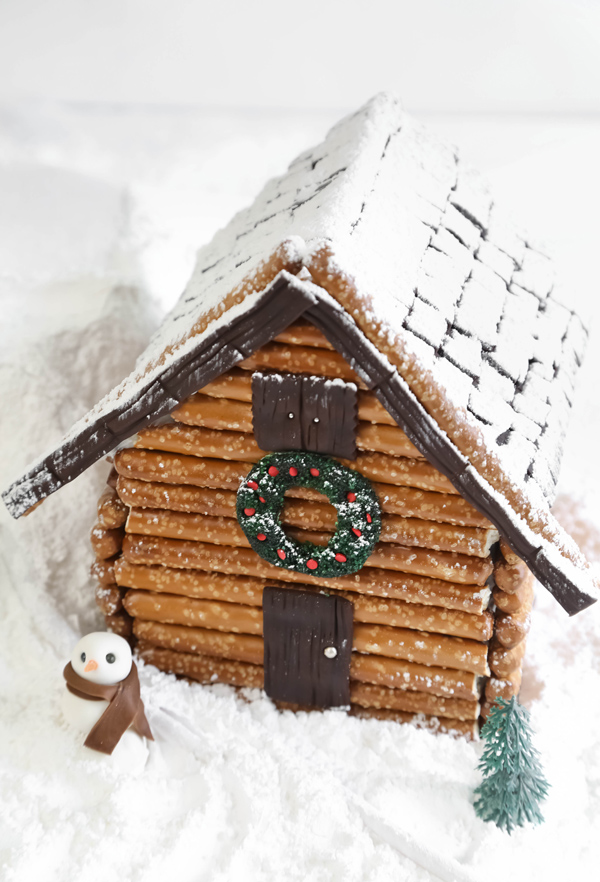
The first on my list to design was a log cabin. The walls are made of gingerbread, but then they're covered with pretzel rods cut to size. It's hard to pick a favorite of the three houses, but this one may be it (it's the coziest, if you ask me!). If you'd like to try your hand at making it, click here for the template , here for the recipe and here for a step-by-step image gallery .

Next is the Cape Cod home. It uses the same template as the Log Cabin, but the structure is turned differently (using the long side as the front). My husband and I live in a Cape Cod house, so this one had special significance for me. Despite lacking dormers (for simplicity's sake), I think it represents the style fairly well.
Want to give it a try? You can find the recipe here and the step-by-step image gallery here .

Last but not least is the Victorian. The original idea was to use one template for all three houses, but I felt the Victorian needed more character. So, this house uses a different set of plans ( you can find them here ). It seemed daunting to design turrets and bay windows, so I kept things fairly simple.
If you'd like to try your hand at recreating it, you can find the recipe here and the step-by-step images here . The pine tree cupcake picks I used to decorate around all of the houses can be found here .
I hope you've enjoyed seeing my cookie architecture, and I hope it inspires you to make your own!
Happy building!
xo
-h