
Bakerella's Blog, page 12
August 15, 2017
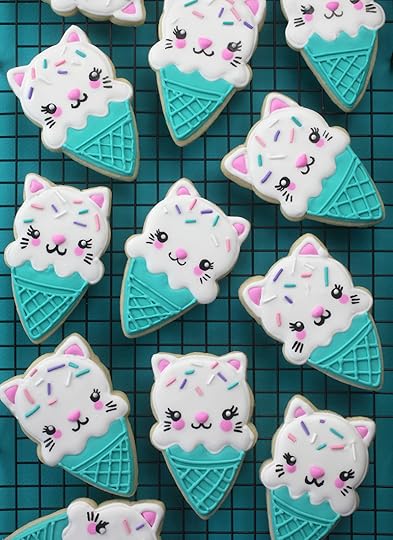
Ice Cream Cone Kitty Cookies
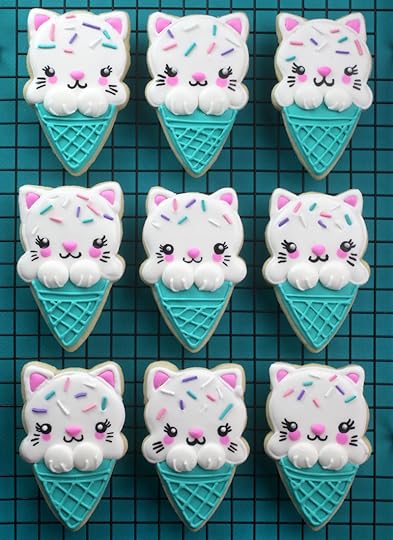
I’m super in love with these ice cream turned kitty cat cone sugar cookies. They are all kinds of adorable and pretty easy to decorate.
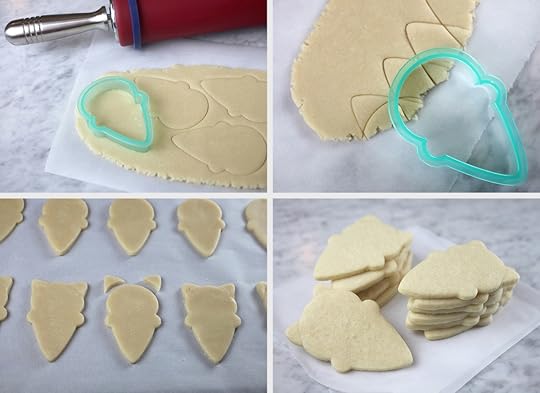
I used this ice cream cone cookie cutter from Sweet Sugarbelle’s line of awesome cookie decorating products. I love that the lines of the cone are more rounded than straight. When I was deciding what kind of ice cream to make, it was the end of the cone that inspired me to turn them into kitty cats. The tip of the cone can be used to make the perfect little ear shape. Use it to cut out rounded triangles and then use the rounded ice cream end to cut out a curved bottom like in the pics above. Then gently press the ears to the cut out ice cream cones and bake away.
P.S. Here’s the sugar cookie and icing recipes I used to make them.


Check out some of Sweet Sugarbelle’s other products. Cookie cutter duos, decorator bags and tips, cute packaging in different sizes. So much good stuff. And make sure to visit Sweet Sugarbelle’s blog for endless cookie decorating ideas, too.
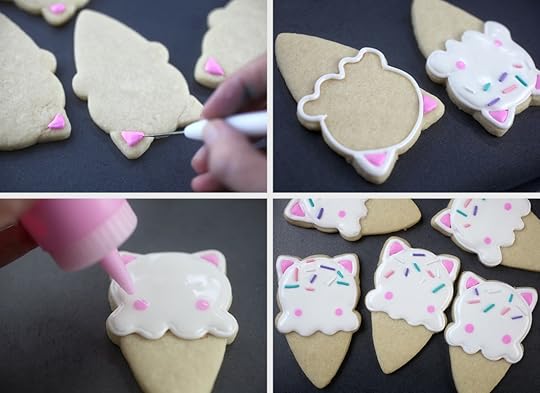
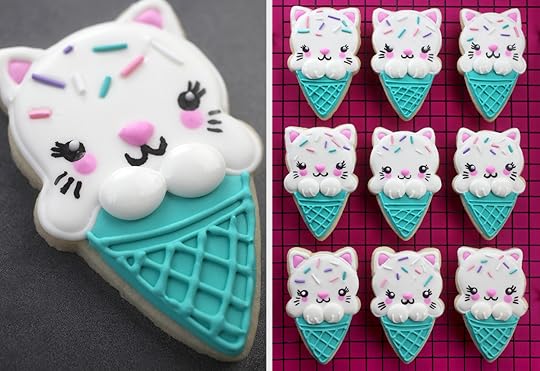
When you’re ready to decorate, pipe pink royal icing on the ears and use a scribe (more on this in a minute) to help shape them.
Working with one cookie at a time, pipe the outline of the ice cream and ears with white royal icing.
Fill the center of the cone with flow consistency icing and immediately dot two pink cheeks in position. Then carefully place sprinkles toward the top portion of the ice cream.
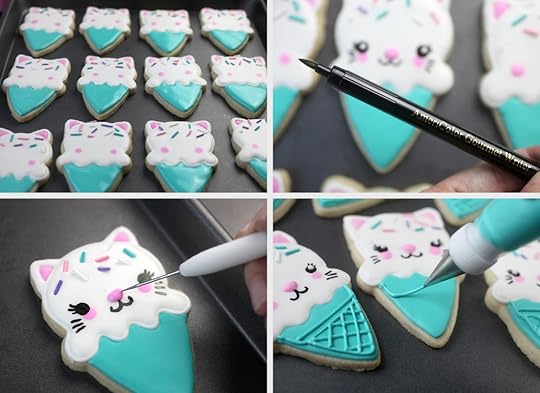
Next, pipe and fill the bottom of the cones. Let dry for a couple of hours so it’s safer to add facial details without messing up the icing.
When dry, use a black edible ink pen to draw on faces. I like this one from Americolor. Gently draw eyes, mouths, lashes and whiskers. Don’t press down too hard just in case the icing isn’t completely dry when drawing.
Then dot on pink royal icing in position for the nose and use the scribe to help shape it into a rounded triangle. Dot the eyes with white royal icing for a little more personality. Ummm… I mean purr-sonality.
Finish decorating by piping waffle cone lines and let dry completely.

Rewind. The scribe/food pick tool! Okay don’t laugh but this may be my favorite tool in a long time. Probably because I have never had one to use before. I’ve just always grabbed a toothpick to help coerce royal icing if needed. Well, now I don’t want to live without one. The super thin and pointed tip is much more precise. Throw in the long handle and it’s way better than a toothpick. I guess if I were a cookie decorator I would know about these things. Sometimes it takes a while. ; ) Anyway get one if you enjoy making decorated sugar cookies.
Ahhhh. I love these!!!
But, I think the ice cream drips are begging to be turned into kitty paws.
Yes, definitely.
Pipe two dots over the two center drips with thicker consistency royal icing. Let dry and pipe short lines on top.

Pawsome!!!
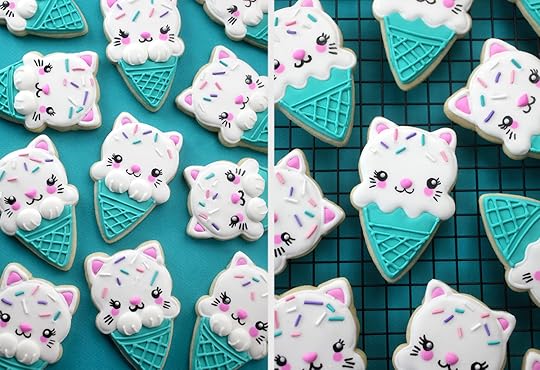
Paws or no paws? What do you think?

I think I know.
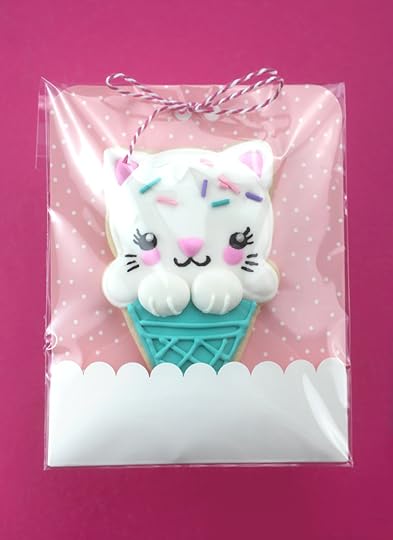
Package your pretties in the cutest treat bags, also from Sweet Sugarbelle. Purrfect to gift to someone special.
Hope you enjoy!


August 6, 2017
Chocolate Chip Cookie Cakelets
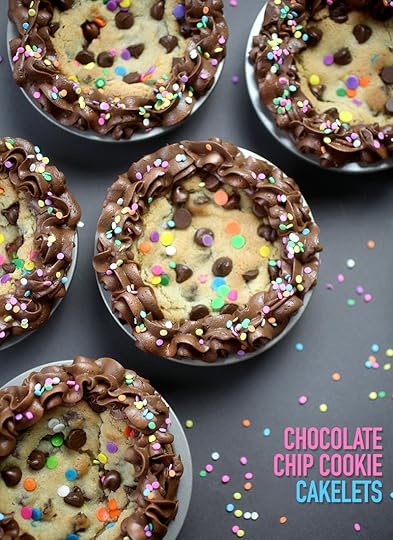
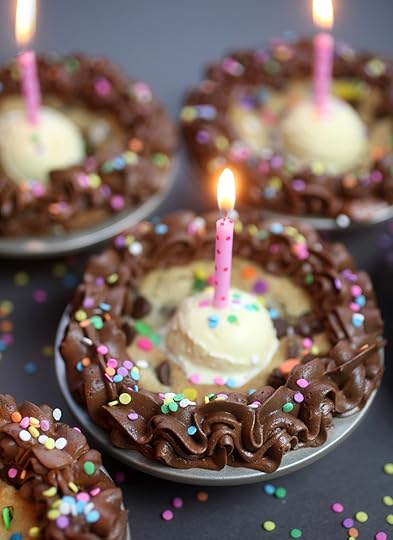
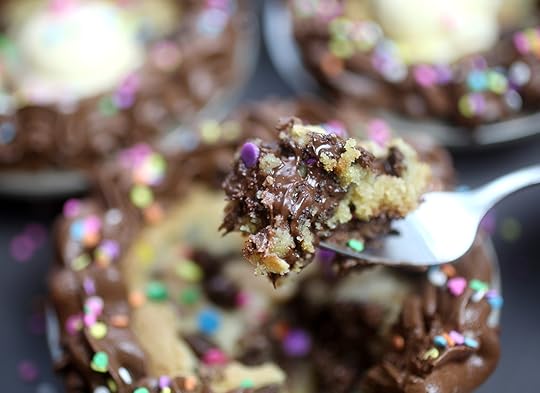
These cute cookie cakelets make adorable individual treats to celebrate with others. They’re party perfect, baked in tiny 5-inch pie pans.
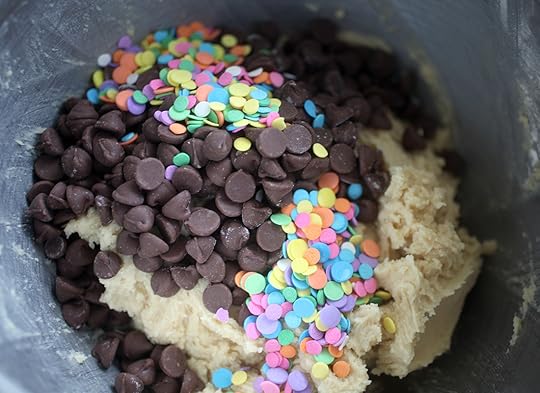
Mix up some yummy chocolate chip cookie dough and add pastel confetti sprinkles along with milk chocolate or semi sweet chocolate morsels.
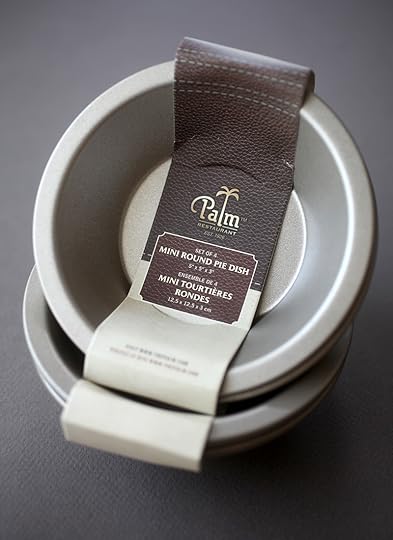
I used these 5-inch metal pie pans that I found at Home Goods and snatched up as soon as I saw them because they were so cute. They’re probably long gone by now, but here are some I found online that are similar. You can also find aluminum pans in this size online.
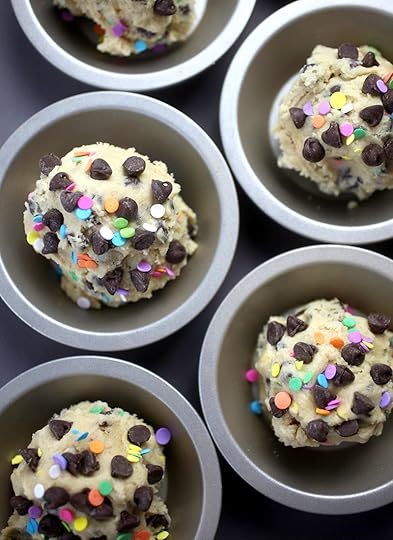
When baking, just scoop even mounds of cookie dough in each pan, but don’t press it into the bottom. Let the dough bake to fill the pan shape.
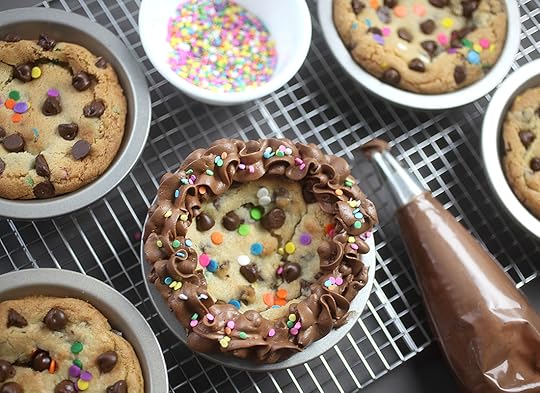
When cool, pipe a thick border of chocolate frosting around each cookie and add a few more confetti sprinkles.
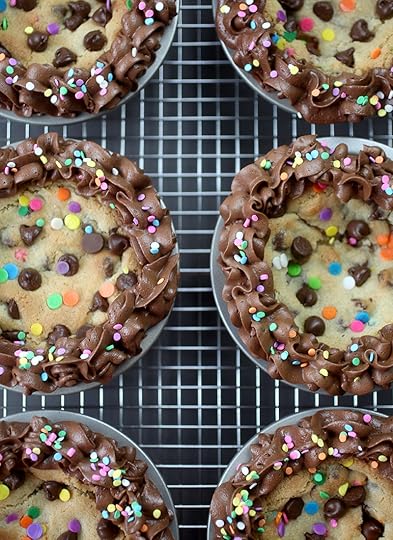
You’ll end up with six super cute cookie cakelets.
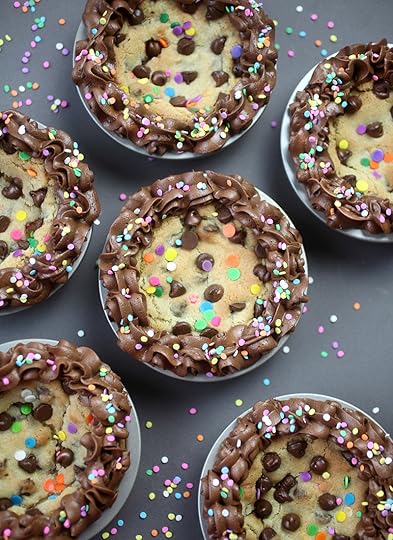
Serve them just like this …
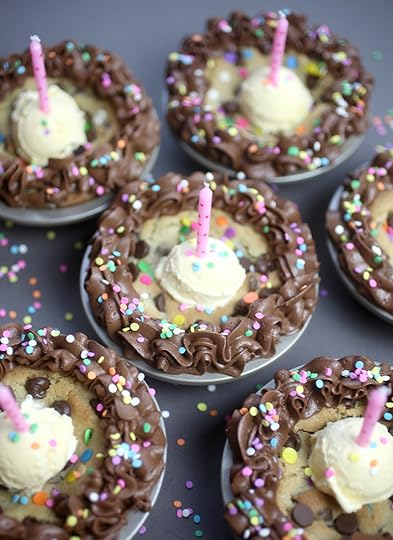
… or add a tiny scoop of vanilla ice cream using a 1-1/2 inch cookie scoop.

Print Recipe
Yield: 6 cakelets
Chocolate Chip Cookie Cakelets
Ingredients:
COOKIES
2 1/2 cups all purpose flour
1 1/4 teaspoon baking soda
1/2 teaspoon salt
1 cup butter, softened
1 cup sugar
1/2 cup light brown sugar
2 teaspoons vanilla
2 eggs
12 oz. pkg chocolate morsels
1/3 cup confetti sprinkles
FROSTING
1/2 cup butter, softened
1 teaspoon vanilla
3 cups confectioners’ sugar
1/2 cup natural unsweetened cocoa
3-5 tablespoons milk
Directions:
FOR COOKIES: Preheat oven to 350 degrees and very lightly grease 6 5-inch pie pans.
Sift flour, soda and salt together in a medium bowl and set aside.
Cream butter and both sugars using a mixer until light and fluffy. Add both eggs and vanilla and continue mixing until completely incorporated.
Slowly add flour mixture until just combined. Stir in about 3/4 of the morsels and about half of the confetti sprinkles, reserving the rest for later.
Using a 2 1/2-inch ice cream scoop, place six large mounded scoops of cookie dough in each pan. Press the extra morsels and some of the sprinkles on the surface of the dough, but keep the dough mounded when placing pans in the oven. Bake for 18-20 minutes.
FOR FROSTING: Cream butter and vanilla in a stand mixer.
Sift sugar and cocoa together in a medium bowl and then slowly add to mixer in intervals, mixing thoroughly with each addition.
Add milk a few tablespoons at a time until creamy and smooth.
Fit a pastry bag with a decorating tip and pipe frosting around edge of cooled cookie. Sprinkle with remaining confetti sprinkles.
Place a tiny 1-1/2 inch scoop of ice cream in the center of each cakelet to top it off.
Enjoy!

July 24, 2017
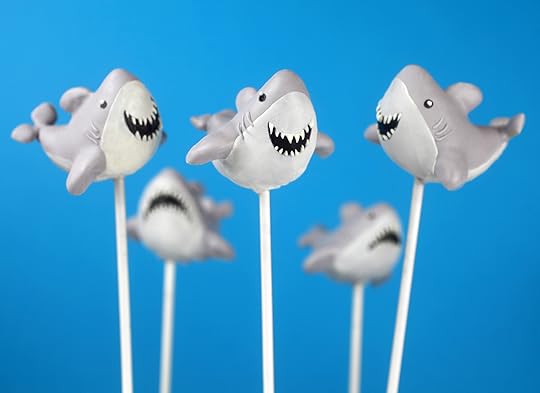
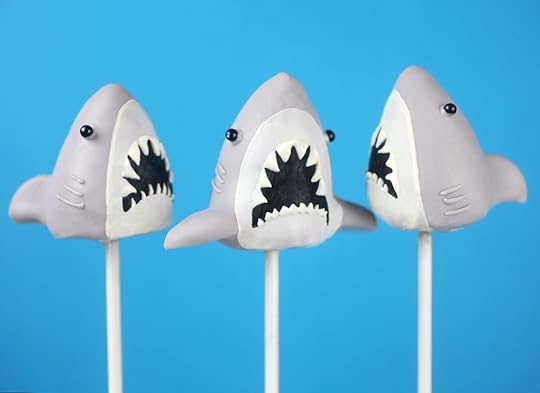
Super Sweet Sharks

Look at these cute little sharkies. Did you know it’s Shark Week on the Discovery Channel and Shark Fest on National Geographic … and I finally made some cake pops to go along with it. I’ve been wanting to make these for more than a couple of years now, but I always think about it when Shark Week is over. Not this year though. I’m only a couple of days in to all the tv programming, so there’s still plenty of shark shows to go and I’ll be chomping on these over the next few days. : )
Want to make some, too?
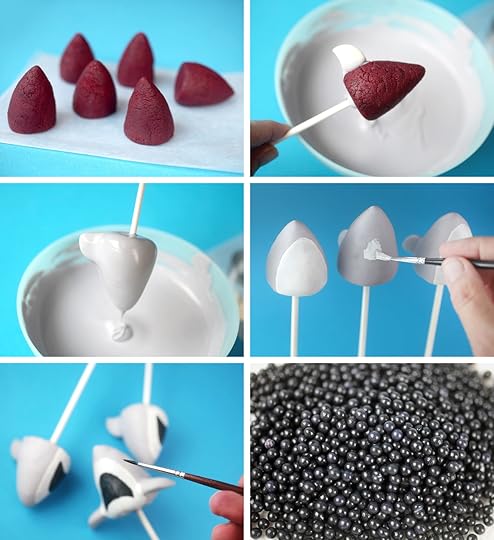
Start out by making basic cake pops (instructions here) rolling the balls slightly larger than usual. Then use the directions below to decorate them.
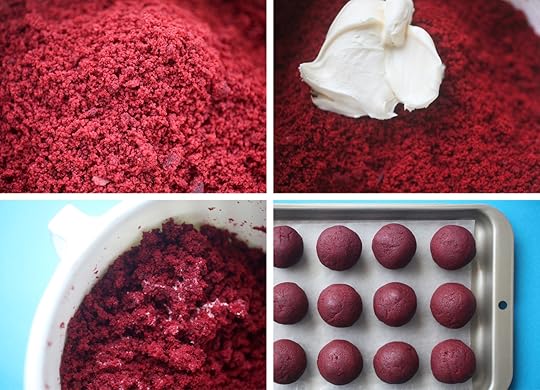
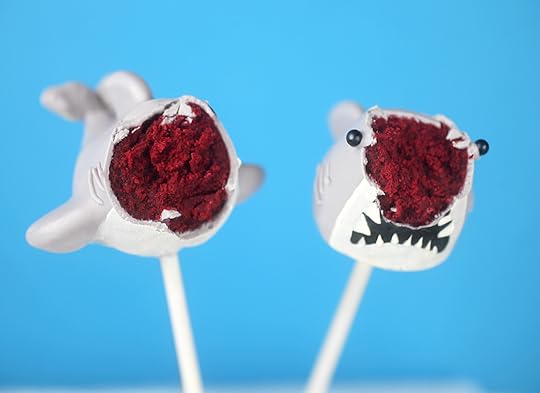
Obviously, red velvet cake is the only way to go here.
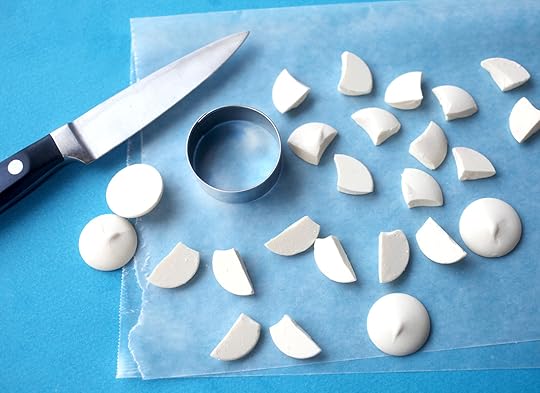
I didn’t really have anything perfect on hand for the fins, so I improvised by cutting curved shapes out of candy wafers.
There are two different shapes here. The top left is made by cutting a curved section out of the wafer and then cutting it again kind of parallel to the first cut so you end up with a small dorsel fin (top) shape.
The bottom shapes are made by cutting a small curved piece away from a candy wafer and then cutting the wafer in half. These are for the pectoral fins (side) shapes. These pieces will be attached to the cake shape before dipping so that when the cake pop is removed from the melted coating, the attached pieces will help create the final shark.
Like so.
Okay let’s decorate this guy…
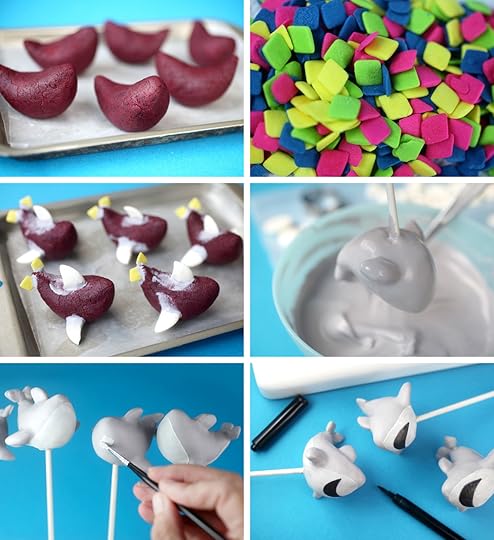
Take the round cake balls and shape into… well, I don’t know what I would call this… but, it’s curved and then rounded and plump on one end (the front) and pointed and thinner toward the back (tail).
I used these flat diamond shapes for the caudal fin in the back (yes, I totally looked that up.) But you can use whatever works. I just had these handy. Jumbo heart sprinkles could work too.
Attach all the fin shapes to the shaped cake ball using melted candy coating to glue. It’s okay if they look messy right here. Just make sure the candy coating is smoothed flat to the cake. If not, any bulk will change the shape of your sharks when you dip.
When chilled, not frozen, dip the end of a lollipop stick in coating and then into the bottom of the shark. Tilt the shark’s head up so when you insert the stick, you have more area for it to go into. These are on the heavy side and if you stick it straight into the middle, they will fall off. Having the heads tilt up also adds to the character of these I think.
When dipping, make sure the coating is melted and fluid. If it’s too thick, they will also fall off. For the gray coating, I added black candy coloring to white coating. But you can also make these a blue color and they’ll be super sassy.
Let the sharks dry. Note: a couple of times, my caudal fins fell off in the coating. If that happens. just quickly remove them and then you can attach them separately after the shark is dry.
I used edible food paint to make the area underneath the shark white.
Let dry and then draw on big mouths using a black edible ink pen.

For the finishing touches, draw on eyes with the black edible ink pen and then dot them with white candy coating using a toothpick.
Use a clean toothpick to draw on teeth. Dot and pull to a point to make them look sharp.
Draw on gills using a toothpick and gray candy coating.
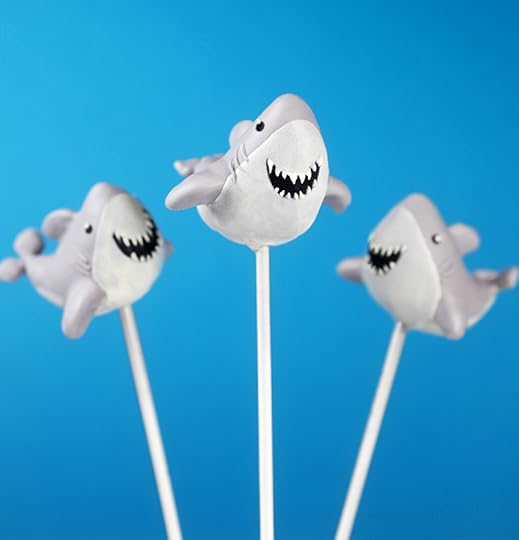
Look how happy these sweet little sharkies are.
But maybe we should make one a little more menacing.
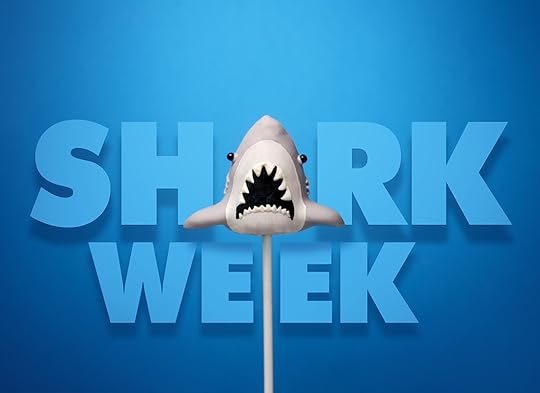
Duunnn. Duunnnnnn. Yes. That’s more like it. And more iconic. BTW these are much easier to shape and dip if you’re thinking about making some.
Roll the balls on wax paper and begin to shape into a cone. Slide the bottom on the wax paper to make it flat. Continue shaping until the top is pointed. These are also angled to one side slightly.
Attach a dorsel fin to the back with melted candy coating and dip. Add pectoral fins if you like. They look cute both ways.
Dip and let any excess fall off. Let dry completely.
I also used edible food paint for the white undersides, but you can also dip these at an angle (almost flat) in melted white candy coating. Use a toothpick to coerce into a smooth line and let dry. The extra white coating will add some bulk to the look of your shark but that’s ok. You can also skip the white all together.
For the mouths, I used black edible food paint, but you can also use a black edible ink writing pen.
To finish the look for these, dot on gray candy coating and place a black sugar pearl in position for the eyes and draw on gils. Let dry.
Use a clean toothpick to draw on teeth the same as for the other shark design. These are just a bit bigger. Dot and pull to a point to make them look sharp.
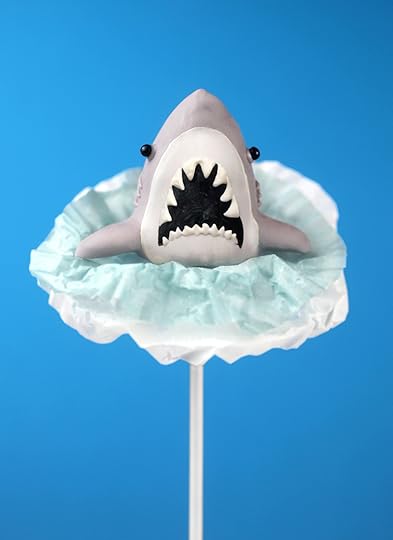
Okay, tell me what you think here. I wanted to make them coming out of water, but didn’t want to add more colors of candy coating around the base of the shark. So I crumpled up light blue and white cupcake liners, poked a hole in the middle and slid up the lollipop stick. I think it kinda works. These would make a big splash at a kid’s party, too.
Umm… definitely my kind of shark bite!
Hope you enjoy.

July 10, 2017
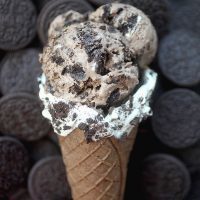
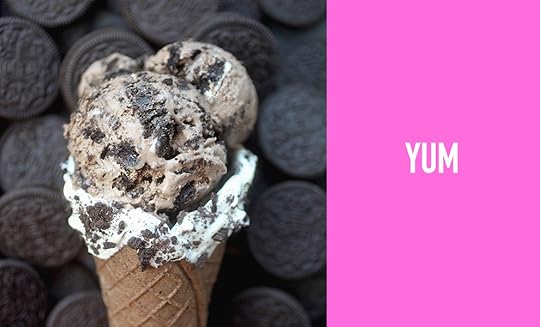
Cookies and Cream Chocolate Ice Cream
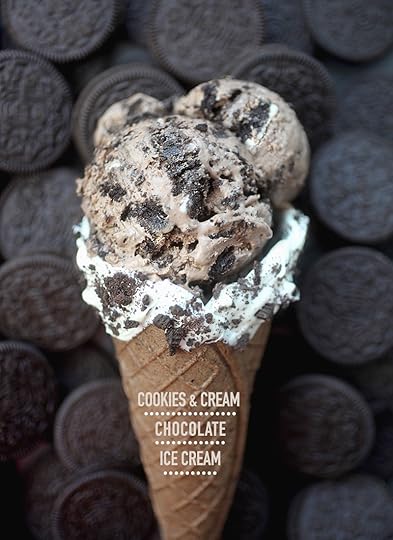
Calling all cookies and cream fans. This chocolate ice cream cone is loaded with broken cookies in the ice cream and sprinkled with cookie crumbs in the cone. It’s an Oreo explosion in every bite.
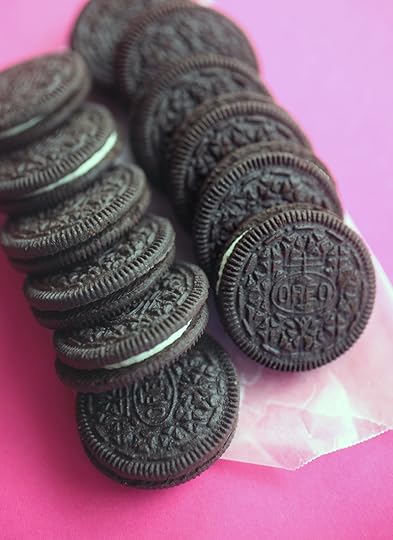
Okay, so you know you’ll need some Oreo cookies. You’ll also need sweetened condensed milk, heavy whipping cream, cocoa and vanilla. But that’s it.

The best part about this recipe is that you don’t need to own an ice cream maker. You can whip everything together in just a few minutes and put in the freezer to firm up.
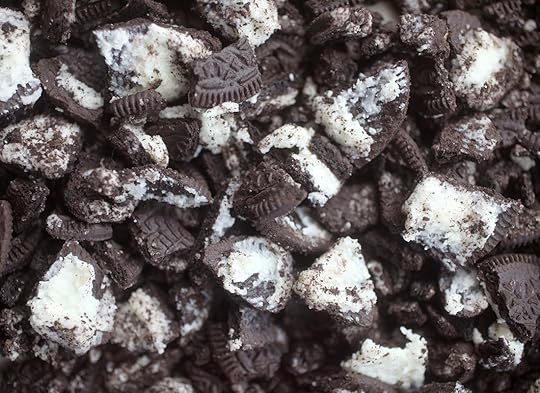
The ice cream base is plain chocolate with crumbled cookies mixed in. But, feel free to switch up your add-ins for different combinations using your fave cookies or candies. Snickers ice cream anyone?
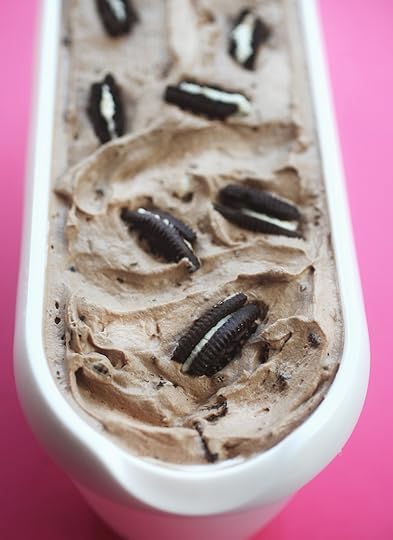
Once everything is mixed up, pour the mixture in a 9 X 5 loaf pan and freeze. Or use a long and narrow container like the one above. I love it. It’s great for scooping and I usually keep it stored in the freezer when I’m not using it.
Freeze the ice cream for a few hours and it’s ready to enjoy.
If you’re up for it, make your own waffle cones while the ice cream is chilling out in the freezer.
You’ll need a machine for these though.
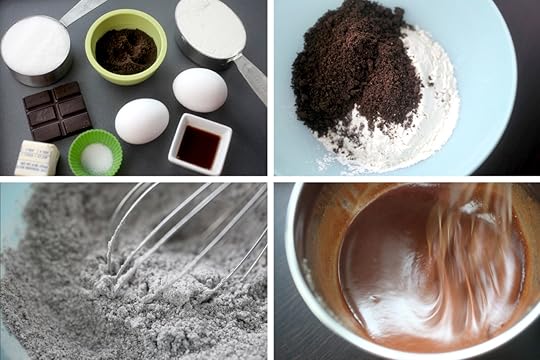
For the waffle cone batter, I mixed in some melted chocolate and some finely crushed cookie crumbs.
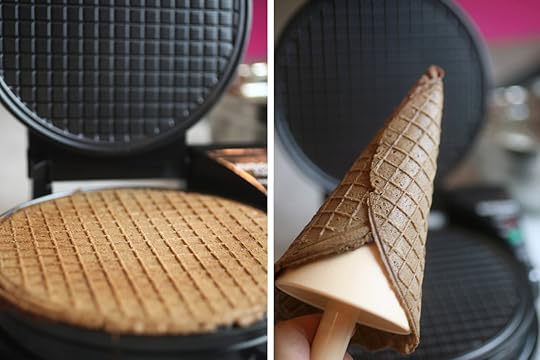
It’s just like making a waffle. A super shallow waffle! (Here’s the machine I used) But then you get to roll and shape them. The fun part!!! And very satisfying.
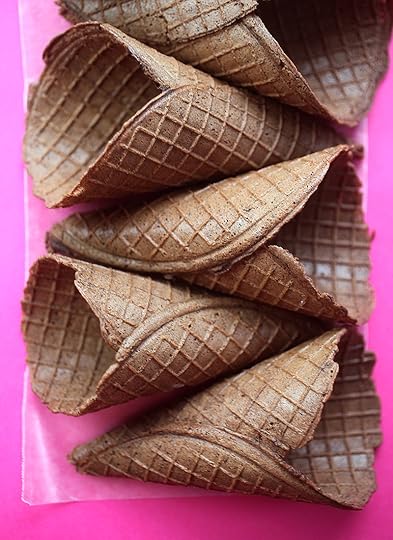
So cool! Simple things make me happy.
Print Recipe
Cookies & Cream Ice Cream Cones
Ingredients:
Cookies & Cream Ice Cream
14 oz can sweetened condensed milk
1 teaspoon vanilla
1/2 cup unsweetened cocoa powder
2 cups heavy whipping cream
15 Oreo cookies, broken into small pieces
Chocolate Cones
1 oz unsweetened chocolate
2 tablespoons butter
2 eggs
1/4 teaspoon salt
1/2 cup sugar
1/2 cup all-purpose flour
1 teaspoon vanilla
3 tablespoons finely crushed Oreo Cookies
vanilla candy coating, optional
Directions:
For ice cream: Place metal mixing bowl and whisk attachment in freezer for about 30 minutes to get really cold.
Meanwhile, in another bowl, whisk together sweetened condensed milk, vanilla and cocoa until combined and smooth.
Remove bowl from freezer and whip heavy cream on medium-high for about 2-3 minutes or until stiff peaks form.
Fold whipped cream gently into chocolate mixture until incorporated. Fold in cookie pieces reserving some of the pieces to place on top. Pour ice cream mixture in loaf pan or container. Freeze for 5-6 hours.
For cones: Melt chocolate and butter in a small bowl in microwave for about 20 seconds. Stir to combine and set aside to cool.
In a separate bowl, stir eggs and salt together until combined. Add sugar and whisk for about a minute. Whisk in the chocolate mixture and add vanilla. Then slowly stir in the flour and fine cookie crumbs until combined and any lumps are gone.
Bake about 3 tablespoons or 1/4 cup of batter in waffle cone maker at a time following your machine's instructions.
Note: you can dip cooled cones in melted vanilla candy coating and sprinkle with more cookie crumbs if desired. Place on wax paper until set.
Makes 6 cones.
Enjoy!!!

July 4, 2017
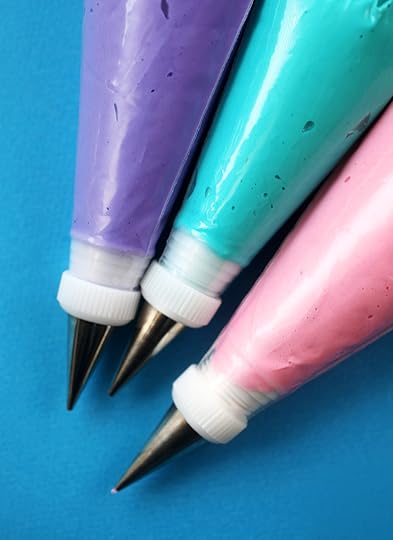
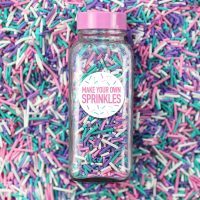
Make your own sprinkles!
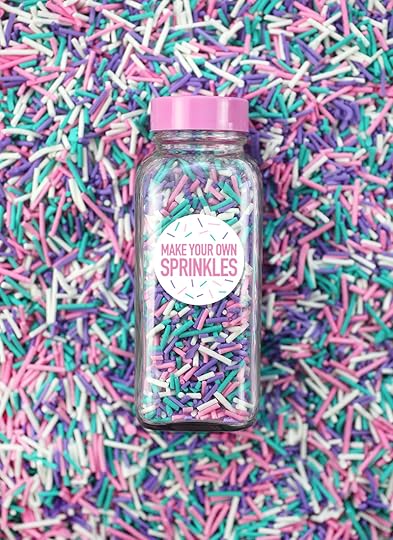
Make your own sprinkles and make a little happiness.Then bottle it up into little jars of joy up to share with someone sweet.
I’ve wanted to try making my own sprinkles for like ever. Well, I finally got around to it – inspired by my baking buddy Rosie of Sweetapolita and her amazing sprinkle shop. If you’re looking for whimsical color combos and magical medleys, then check out her site asap.
But if you’re curious about creating your own like me, then give them a go one day. It’ll make you feel good.
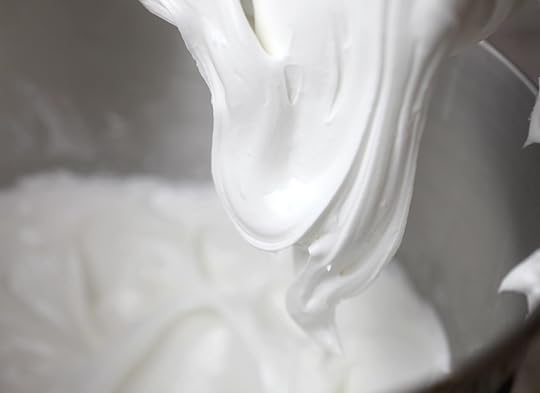
You’ll need a batch of royal icing to get started. I used Rosie’s recipe from her Sweetapolita Bakebook which was perfecto!
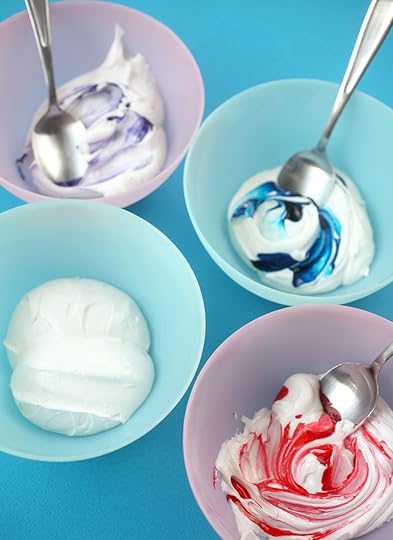
I divided the icing into four equal parts…
… and then tinted three of the parts with icing color.
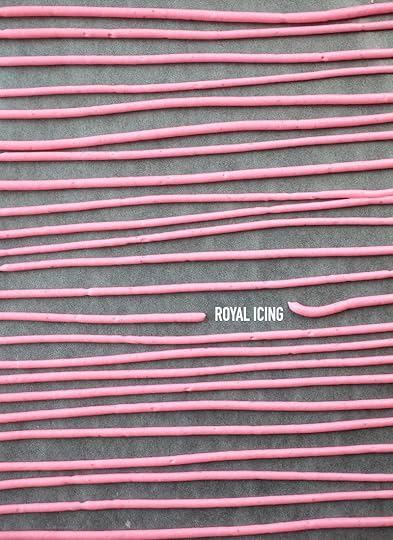
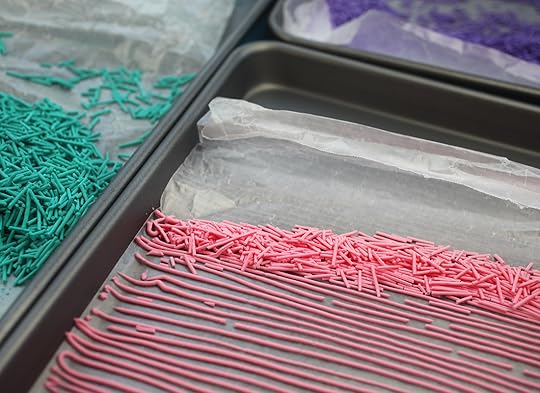
Use a No. 2 decorating tip to pipe lines of royal icing close together onto wax paper.
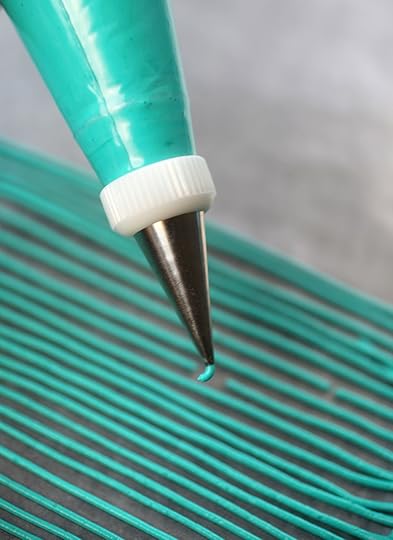
Repeat with each color.

That’s a whole lot of lines.
Let the piped royal icing dry for several hours or overnight.
Sidenote: Right about here, with my hand cramping from piping so long, I was like I am never doing this again.
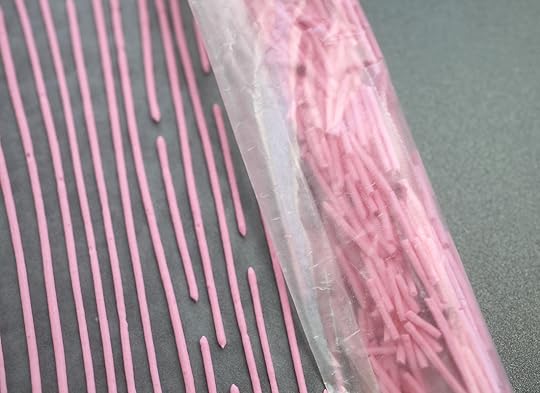
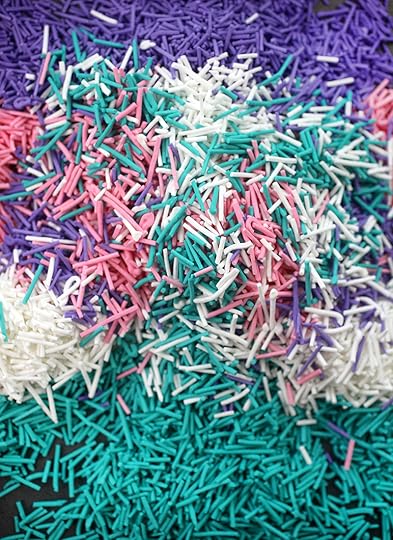
But, by the next day I was over that because breaking the lines of royal icing up into little pieces is pretty satisfying when you see them turn into sprinkles. Or as some call them … jimmies … when they’re shaped like this.
I have to say I had a big smile on my face.
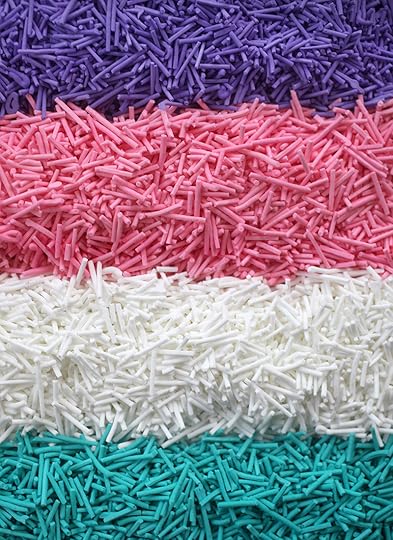
I mean look at those colors!
That’s the best part. You can customize them into any color you need.
So super satisfying!!!!
At least once, anyway. Ha! So glad I gave these a try, though!

Print Recipe
Yield: About 3 cups
Make Your Own Sprinkles
Ingredients:
1 - 1 lb box confectioners’ sugar
1/4 cup meringue powder
1/3 cup water
1 teaspoon fresh lemon juice
1/2 teaspoon vanilla or almond extract
gel paste food color
Directions:
Combine sugar, meringue powder, water, lemon juice and extract in bowl of a stand mixer fitted with the paddle attachment.
Beat on low speed until incorporated. If too dry, add a teaspoon more of water. Continue beating until very thick, about 15 minutes.
Add 1 tablespoon of water and mix again until it reaches a glossy, medium-peak consistency.
Divide icing into separate bowls and tint with gel icing color. Fit pastry bags with #2 round tips and fill with icing, no more than half full. You can use a rubber band to tie off the ends of the bags and a toothpick inserted into the decorating tip to keep the other icings from drying out while you work with first color.
Pipe long lines of royal icing on wax paper and let dry for at least three hours or overnight.
Gently roll the wax paper up and breaking the piped lines into small sprinkles. Store in jars or sealed in zip-top bags until ready to use.
Adapted from The Sweetapolita Bakebook by Rosie Alyea, 2015

YAY for sprinkles! And check out Rosies’ Sweetapolita book and shop for more fun.
Enjoy!

June 9, 2017
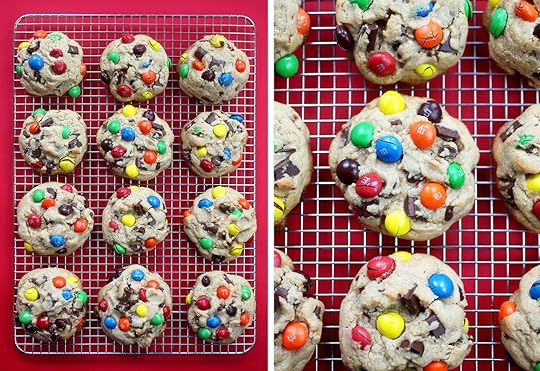
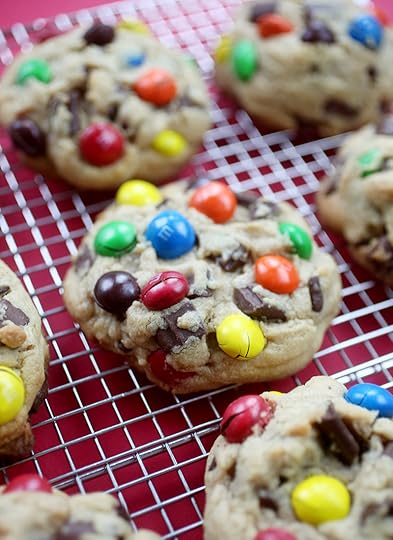
Peanut Butter Chunkers
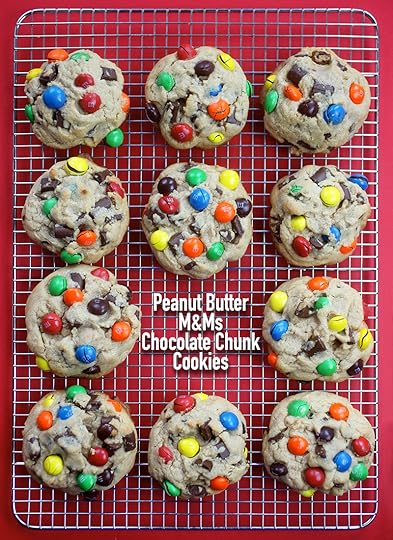
These cookies are major. Chocolate chunks, peanut butter M&M’s, and creamy peanut butter all wrapped up in a mega, palm-sized cookie. A happy and colorful cookie celebration.

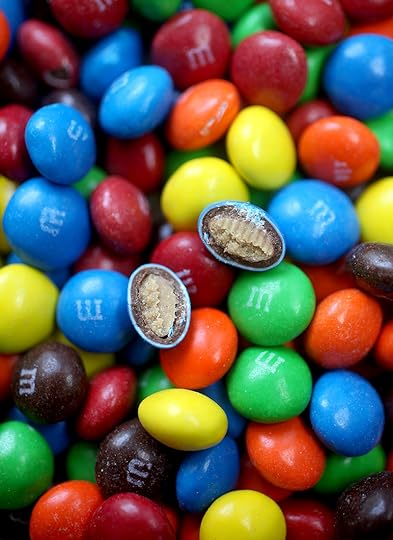
I’ve been obsessed with these peanut butter M&M’s since March when I first found them on shelves in the shape of eggs for Easter. I’m not a big peanut M&M’s fan, but these… I can eat these for days. I almost wish they would stop making them so I would quit buying them. But in case they ever do, find some now and make these cookies.
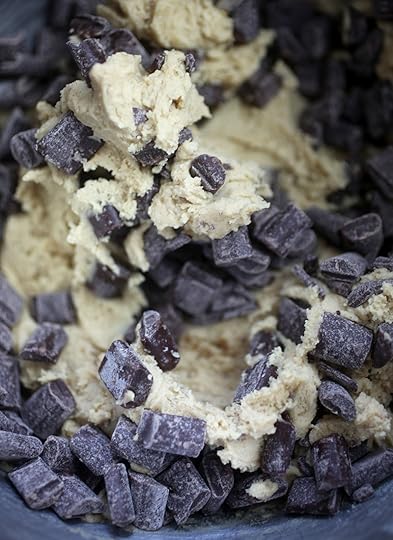
And go for the chocolate chunks to mix in with them since these cookies are so big. You know, so you get a balanced bite.
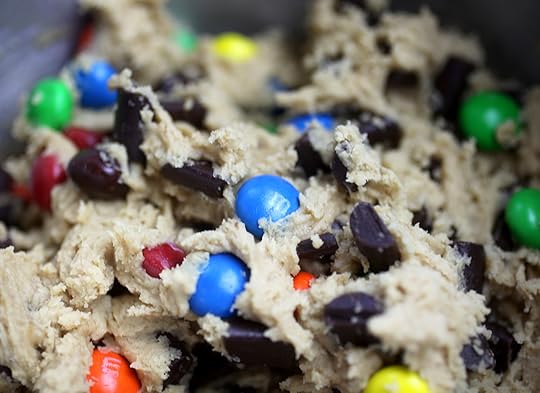
Mix some of the candies in the batter, but be sure to save some to press into the tops so they’ll be super colorful when baked.
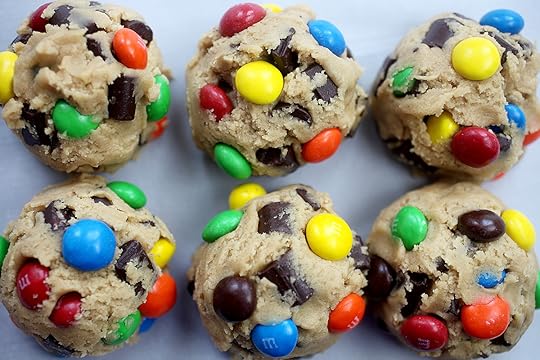
I used a big 2 1/2 inch ice cream scoop for these, but you can always make more/smaller cookies.
The recipe below makes 12 jumbo cookies.
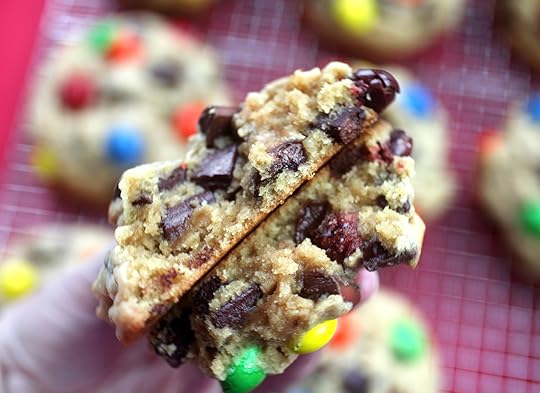
They’re big and thick and beautiful.

Print Recipe
Yield: 12 jumbo cookies
Peanut Butter M&M's Chocolate Chunk Cookies
Ingredients:
2-1/4 cups all purpose flour
1 teaspoon baking powder
1 teaspoon salt
1-1/2 sticks unsalted butter, room temperature
2/3 cup peanut butter
3/4 cup light brown sugar
3/4 cup granulated sugar
2 eggs
2 teaspoons vanilla
11.5 oz bag semi-sweet chocolate chunk morsels
9.6 oz bag peanut butter M&M’s
Directions:
Preheat oven to 375 degrees Fahrenheit and line baking sheet with parchment paper.
Whisk flour, baking powder and salt together in a bowl and set aside.
Cream butter, both sugars and peanut butter in a mixer until combined. Add eggs and vanilla and mix until combined.
Add flour mixture and mix until combined.
Stir in chocolate chunk morsels and about 1/4 of the peanut butter M&M’s.
Chill dough for about 20 minutes and then scoop onto prepared baking sheet using a 2 1/2 scoop, placing about 2 inches apart. Use remaining M&M’s to press into the tops and sides of cookie dough before baking.
Bake for 15 minutes.
Enjoy a great big bite!

May 29, 2017
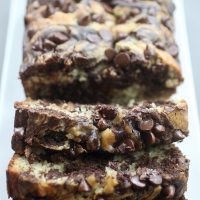
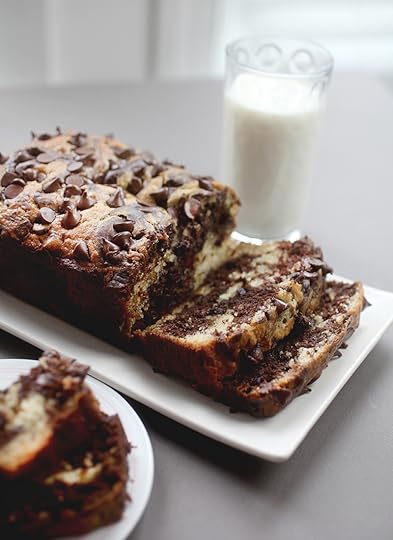
Chocolate Marbled Banana Bread
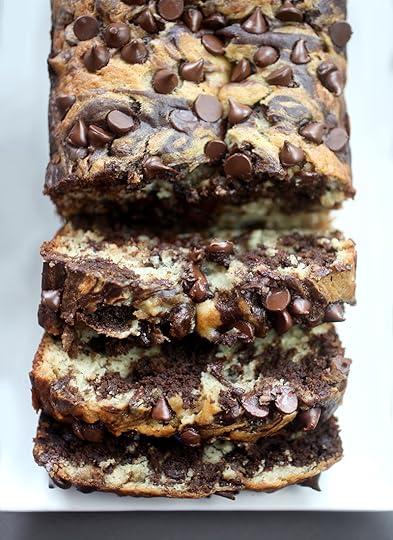
This jam-packed loaf of chocolate chip marbled banana bread is calling your name. I hope you have some ripe bananas ready because you might just want to make it right away. P.S. I’m totally eating a slice right now while I write this post and OMG… it’s so good.
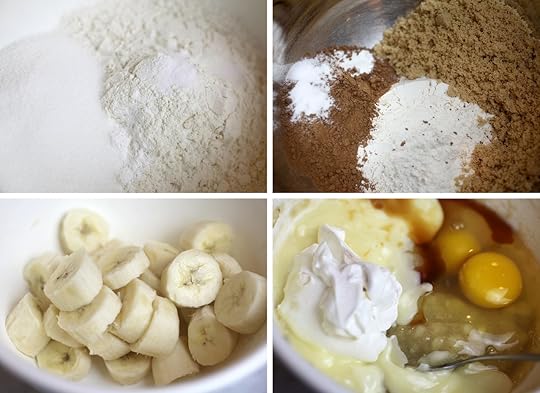
You just need to whip up two separate batters using flour, cocoa, sugar, baking powder, baking soda, salt, bananas, butter, eggs, sour cream and vanilla.
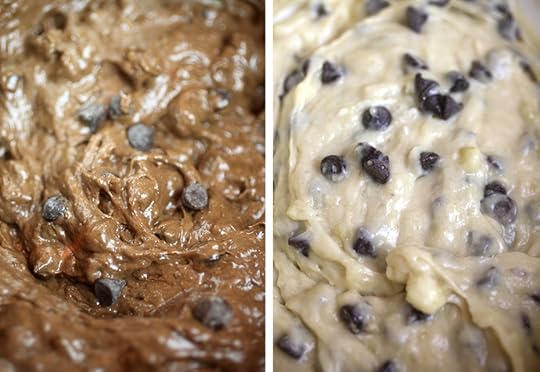
And then just mix a bunch of chocolate chip morsels into each batter.
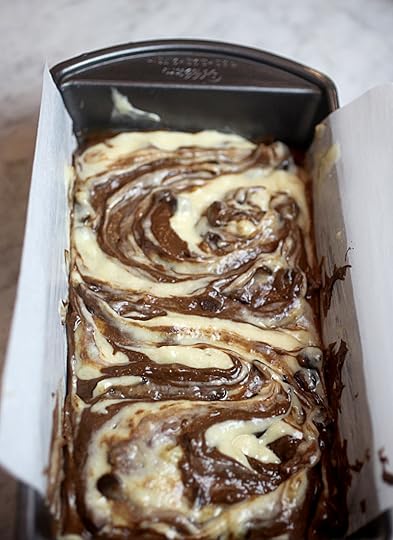
Layer small spoonfuls of both batters in a 9 X 5 inch loaf pan and then gently make a couple of swirls in the batter with a knife. Don’t over mix it though.
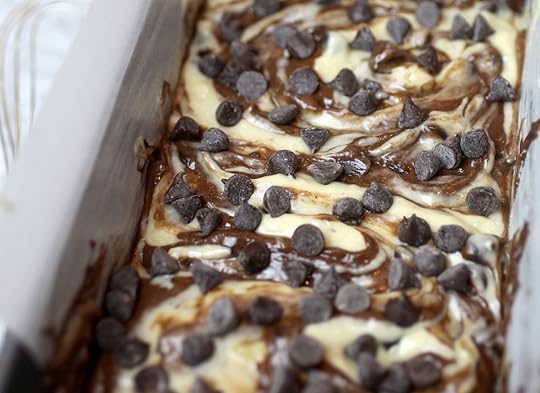
Before it bakes, sprinkle more morsels on top.

Oh my!
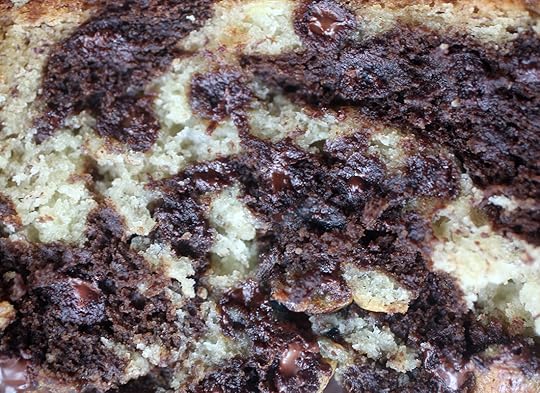
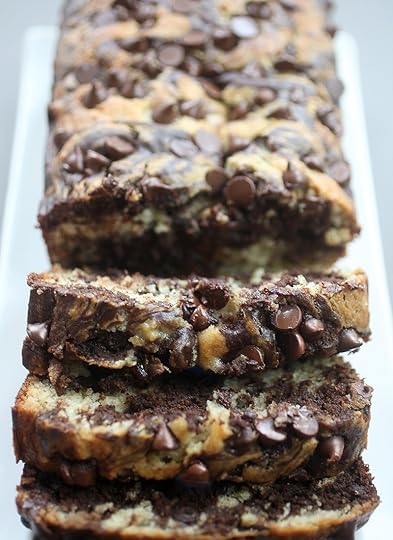
Let cool some and then serve thick slices while still warm with a big glass of milk. You won’t regret it.
Print Recipe
Yield: 1 - 9 X 5 inch loaf
Chocolate Marbled Banana Bread
Ingredients:
1-3/4 cups all purpose flour
1/4 cup natural unsweetened cocoa
1/2 cup granulated sugar
1/2 cup light brown sugar
1 teaspoon baking powder
1/2 teaspoon baking soda
1/2 teaspoon salt
1-1/2 cups ripe bananas, mashed (about 3-4 bananas)
1/2 cup butter, mostly melted and cooled
2 eggs
1/3 cup sour cream
1 teaspoon vanilla
1-1/2 cups semisweet chocolate morsels
Directions:
Preheat oven to 350 degrees Fahrenheit. Grease and line a 9 X 5 inch loaf pan with parchment paper overhanging sides of pan.
For the regular banana bread: whisk together 1 cup of the flour, 1/2 cup granulated sugar, 1/2 teaspoon baking powder, 1/4 teaspoon of baking soda, and 1/4 teaspoon of salt together in a medium bowl. Set aside.
For the chocolate banana bread: whisk together (in a second medium bowl) the remaining 3/4 cup of the flour, 1/4 cup cocoa, 1/2 cup of brown sugar, 1/2 teaspoon baking powder, 1/4 teaspoon baking soda, and 1/4 teaspoon of salt. Set aside.
In a third bowl, combine mashed bananas, melted butter, sour cream, eggs and vanilla until combined. Divide mixture and add half to each flour mixture, stirring each until combined. Add 1/2 cup of chocolate morsels to each batter and stir until combined.
Place small spoonfuls of both batters into prepared loaf pan layering and alternating between each. Then gently make a couple of swirls in the batter with a knife without over mixing.
Sprinkle remaining 1/2 cup of morsels on top and bake for 50-55 minutes.
Enjoy!!!

May 14, 2017
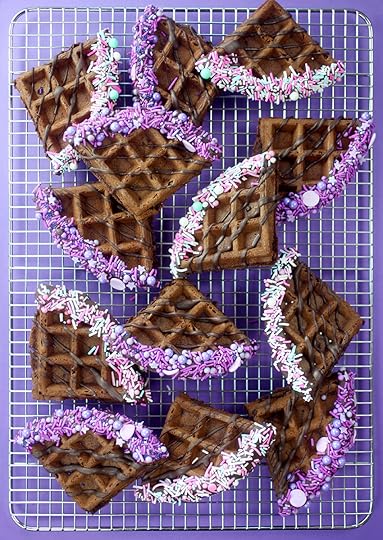
Waffle Wedge Sundaes
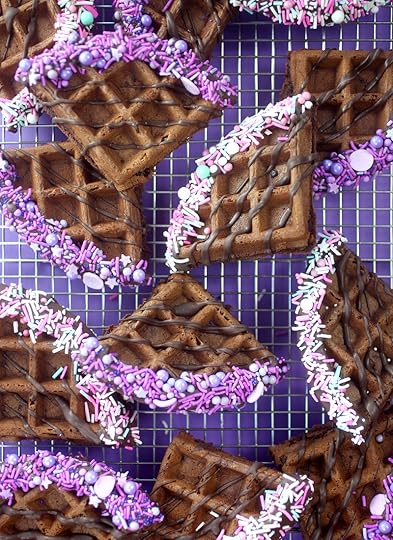
These pretty waffle wedges would certainly make breakfast better, but I like the idea of adding them to ice cream. Chocolate waffles dipped and drizzled in melted chocolate and covered in pastel sprinkles. Perfect.
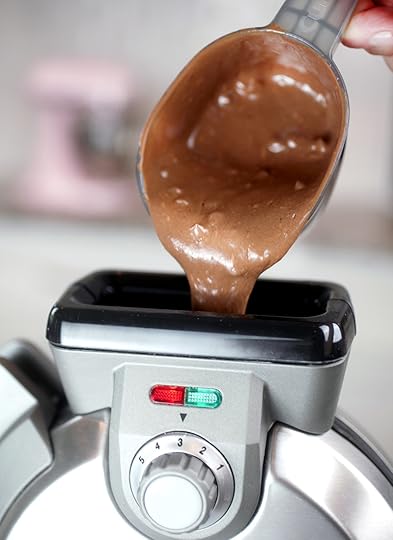
I broke out the top loading vertical waffle maker that I received for Christmas last year. Still love it …
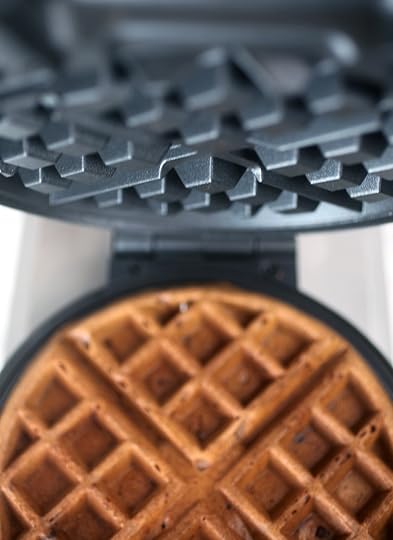
… and how it perfectly fills up the waffle shape with batter.

You can get 6 waffles or 24 wedges from the recipe below. That’s a lot of ice cream sundaes, so feel free to freeze some or just enjoy them as straight up warm chocolate waffles.
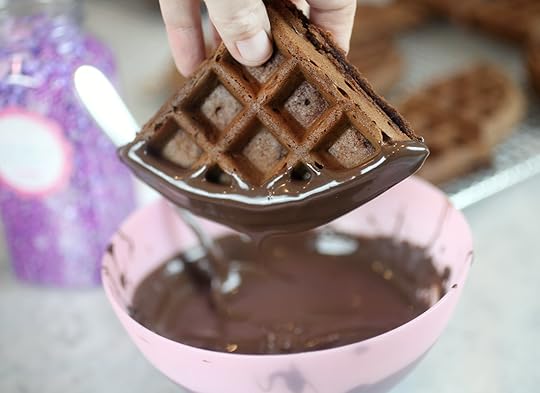
To decorate wedges, melt chocolate candy coating in a small bowl and dip the round waffle edges in.
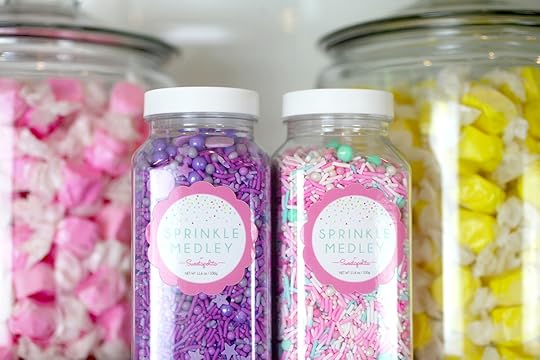
I used these gloriously beautiful sprinkles from my friend Sweetapolita to dress them up. If you haven’t stumbled on her sprinkle shop yet, hop on over to see all the amazing color combinations she has. It’s a very happy place.
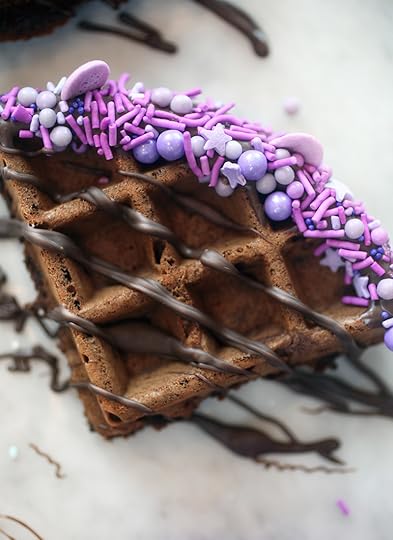
Before the chocolate melts, cover the edges with sprinkles. Sprinkle them over a large bowl so you can reuse any leftover. Lay waffle wedge on a wax paper covered surface and drizzle with more chocolate. Let dry and they’re ready for their close up.

Pretty in pink and purple.
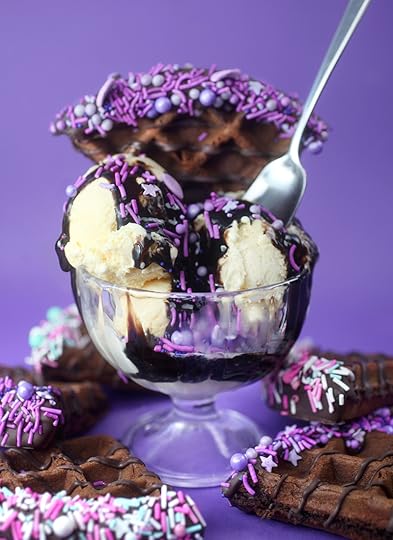
And prettier as a backdrop for an ice cream sundae. All the yeses!!!

Print Recipe
Yield: 6 waffles or 24 wedges
Ingredients:
2 cups all purpose flour
1/2 cup granulated sugar
2/3 cup unsweetened cocoa powder
2 teaspoons baking powder
1/2 teaspoon baking soda
1/2 teaspoon salt
1/2 teaspoon cinnamon
2 1/2 cups buttermilk
2 large eggs
1 teaspoon pure vanilla
1/3 cup vegetable oil
1/2 cup mini semi sweet chocolate morsels
Directions:
Whisk dry ingredients together in a large bowl.
In another large bowl, whisk the liquid ingredients together until combined. Add to the dry ingredients and whisk until smooth.
Fold in mini morsels.
Preheat waffle maker to desired setting and when ready, pour a scant cup of batter into the spout (if using a model like mine) or on the waffle maker grid and bake until tone sounds and the waffle is done.
Remove waffle and repeat with remaining batter.
Do decorate: Cut each waffle into four wedges. Dip the round edge into melted candy coating and top with your favorite sprinkles. Place on a wax paper covered surface and drizzle with more melted chocolate candy coating. Let sit until dry. Serve as is or use them to accessorize ice cream sundaes.
Recipe from Cuisinart Vertical Waffle Maker Booklet.
Enjoy!

May 4, 2017
Fri-YAY!
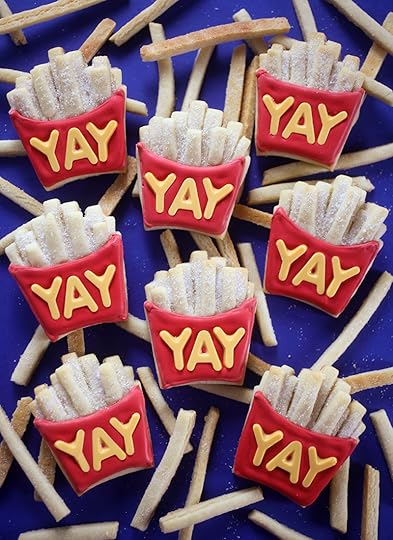
Yay… It’s Friday and I’m super excited to share these french fry sugar cookie cartons with you guys.
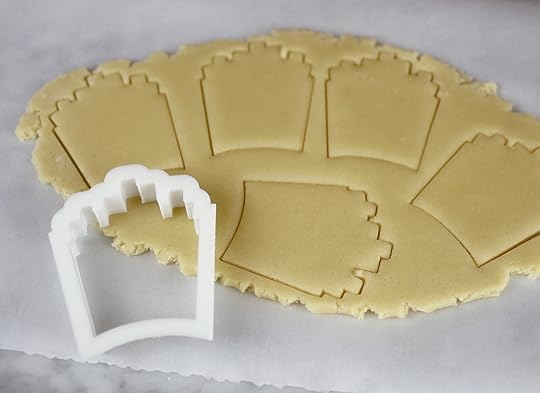
I bought a bunch of random 3D printed cookie cutters and have been eager to try out this one (the 3 inch tall size) for a while now. A fave by the way. Also, can I just say, custom cutters are one of the neatest practical uses I’ve seen people do with those printers. I mean literally, endless inexpensive customizable options.
Okay, so for these cookies, I used this sugar cookie and royal icing recipe.
To shape these little fry guys to look like they are sticking out of a carton I made a couple of adjustments to the straight-up carton shape.
Cut out the french fry carton shapes first.
Use a straight edge to delineate the fries and where they would likely meet the carton. Don’t cut through the dough though, just make a defined impression.
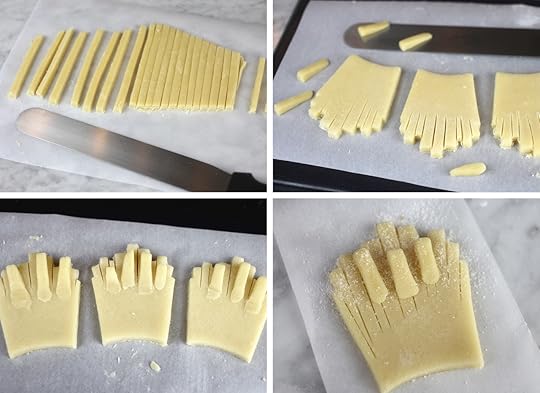
With some of the sugar cookie dough, cut thin strips for extra fries.
Cut short pieces from some of the strips and then place a few on top of each cut out carton. The trick is to shape the strips of dough so that they taper down flat (or as close as you can get) against the cookie underneath. This is so that when you pipe the carton shape with icing, it doesn’t look too bumpy going over thick square french fries.
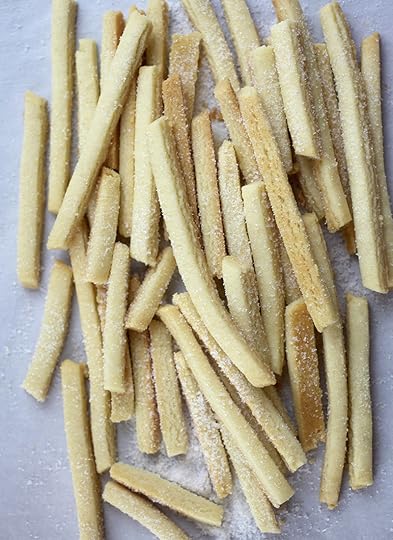
And then, with the rest of the cut strips of dough, you can bake them just as is. I love how real they look!
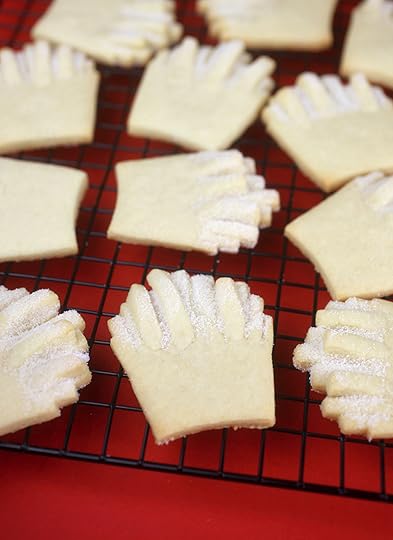
When you remove the carton cookies from the oven after baking, immediately sprinkle the top french fry section with granulated sugar while they are still warm so it will stick a bit and give them a salty look. And go over your indented lines with a toothpick to ensure they look separated.
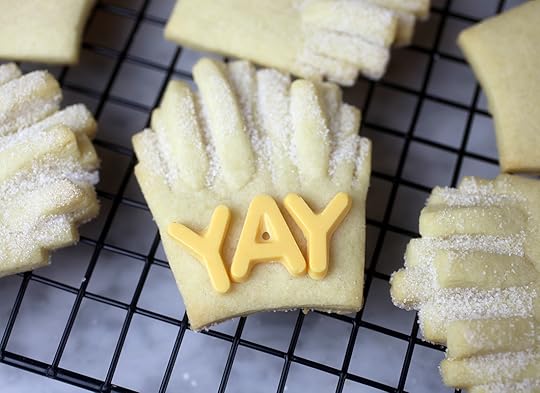
Now, because I love Fridays, and maybe french fries even more… let’s celebrate and say YAY.
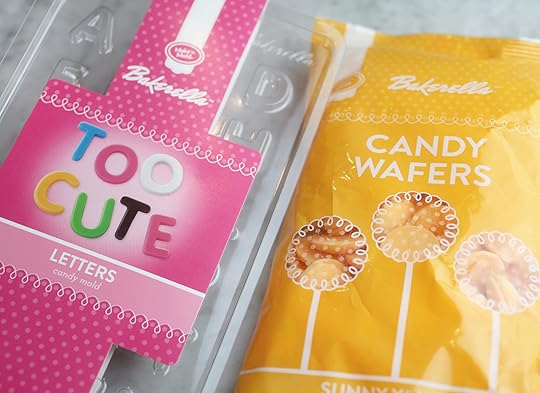
To make the letters, I used my little letters candy mold and melted yellow candy wafers from my line with Make’n Mold. They fit just right for the cutter I used. But, you can also just pipe the letters on with royal icing. Easy peasy like.
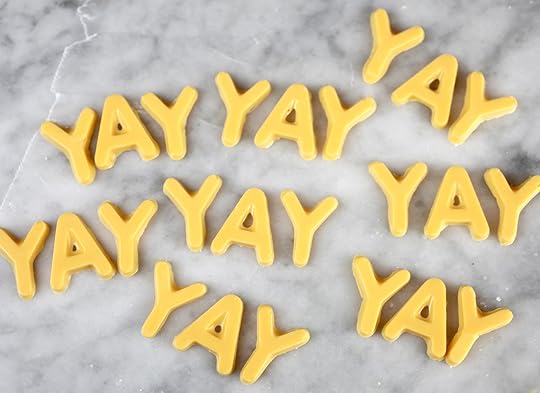
Yeah, Yay!
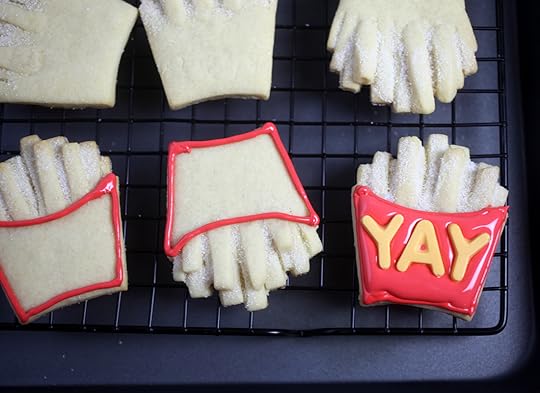
To decorate, pipe and outline carton shapes with tinted royal icing and then fill the interior of the shapes with flow consistency icing.
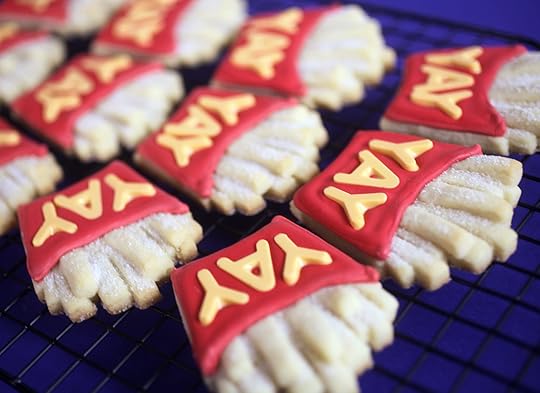
I mean, these guys lay flat, but still look real enough that you can reach right in and grab a fry. I like.
I think I know someone else who will, too. My mom. She loves fries more than anyone I know (Mickey Ds to be specific) and sugar cookies are probably in her top ten so I think she’ll appreciate these.
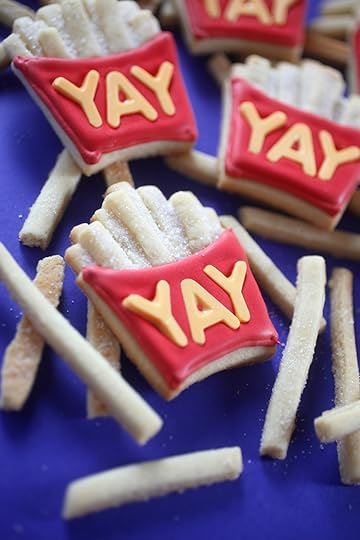
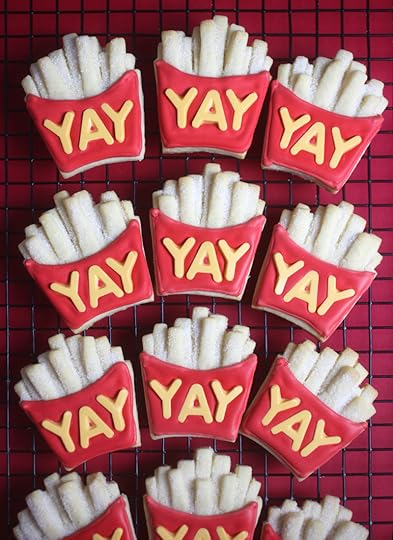
Hope you enjoy them, too … and Happy Friday!

April 25, 2017
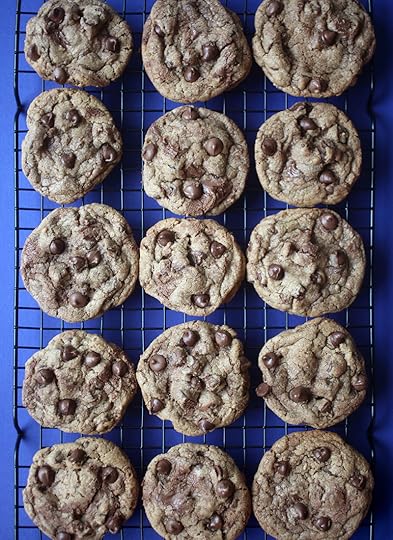
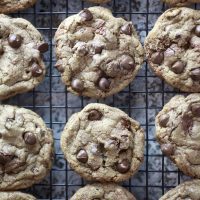
Nutella Chocolate Chip Cookies
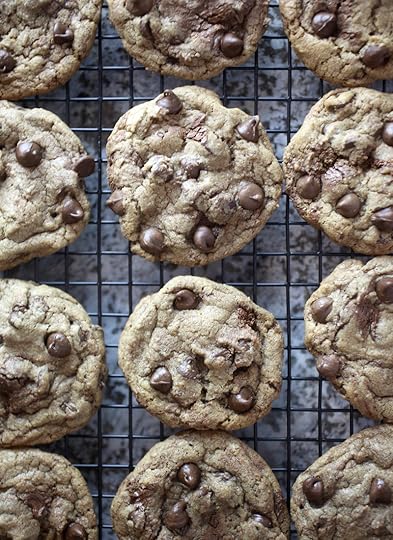
I have a new favorite cookie to crave. At least for this week anyway. These cookies are hugged with nutella and make a pretty sweet switch up to my go-to chocolate chip cookie.
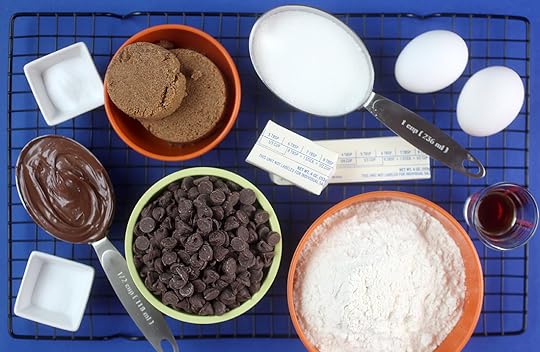
In addition to the nutella mixed in these guys, I also used a combination of granulated and dark brown sugar and oh my gosh. They are so good. Velvety even. I can’t stop eating them.
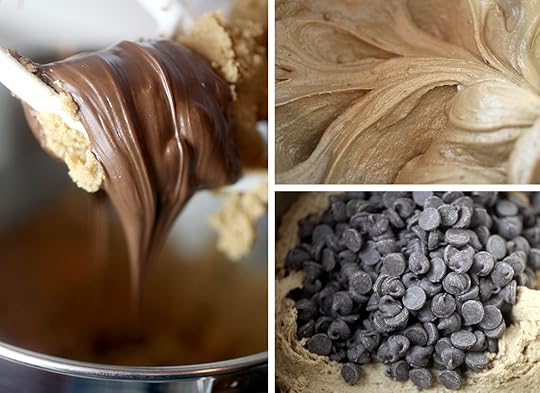
Mix 1/4 cup of nutella in the batter and stir in 2 heaping cups of chocolate chips.
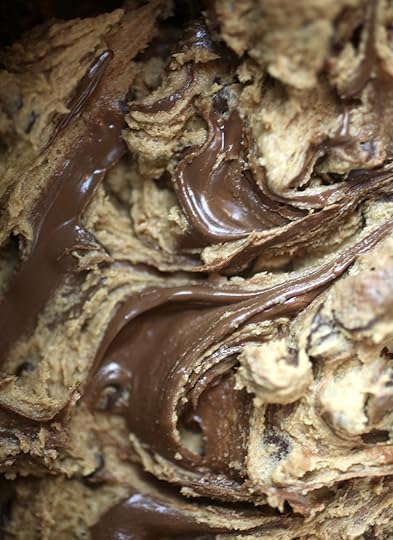
Then streak the batter with the remaining nutella. Scoop onto baking sheets and bake away.
Print Recipe
Yield: 2 dozen cookies
Nutella Chocolate Chip Cookies
Ingredients:
2 1/3 cups all purpose flour
1 teaspoon baking soda
1/2 teaspoon salt
3/4 cup butter, room temperature
3/4 cup dark brown sugar
3/4 cup granulated sugar
1/2 cup nutella
2 eggs
2 teaspoons vanilla
2 cups semisweet chocolate morsels
Directions:
Preheat oven to 350 degrees Fahrenheit and line baking sheet with parchment paper.
In a medium bowl, whisk together flour, soda and salt. Set aside.
Using a mixer, cream butter and both sugars. Add 1/4 a cup of the nutella (reserving the rest) and continue mixing until completely incorporated.
Add the eggs and vanilla and mix until combined. Gradually add the flour mixture until just combined. Stir in chocolate morsels and then loosely swirl in the remaining nutella (plus a little more if you like) leaving streaks in the batter.
Scoop dough onto baking sheet and bake for 9-12 minutes.

Enjoy! You’ll love them just as they are or try them sandwiching your favorite ice cream on a warm, sunny day. Yum!!!

Bakerella's Blog

- Bakerella's profile
- 9 followers

