
Bakerella's Blog, page 32
October 11, 2012
Spooktacular
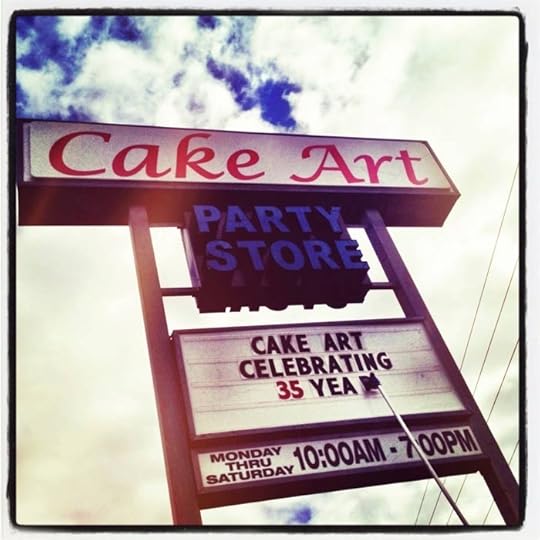
So I needed a couple of things from Cake Art the other day.
Like candy coatings for some Halloween cake pops I wanted to make a few days ago.
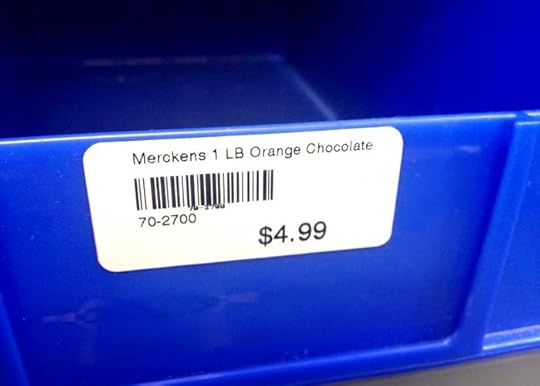
I needed orange.
Boo. All gone.
I guess I wasn’t the only one with that thought.
But don’t worry. I didn’t leave the store empty handed. Actually, I don’t think that ever happens.

How could it with all kinds of spooktacular goodies staring me in the face.
My heart definitely started beating faster when I saw all this.
And umm… yes, this is just the Halloween section (not even all of it) and yes, I now have a small amount of it in my kitchen too.
I had to.
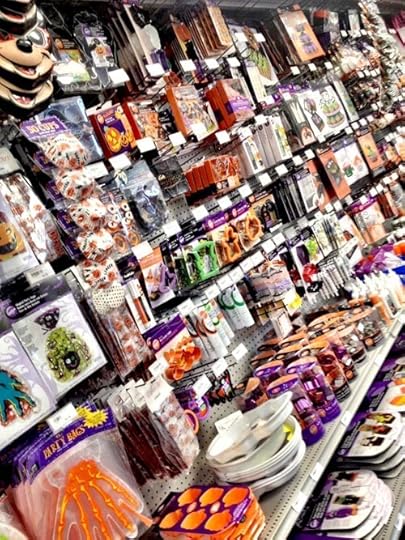
But I also had to pick up a few things for you, too. Every time I picked something up that I wanted, I thought somebody else might really like this. So by the time my arms were overflowing and I had sprinkles and spiders falling in the floor, I thought it would be fun to share and do a quick giveaway before Halloween hits.
So let me show you what’s up for grabs. Just a few random things I bought and thought you might like.
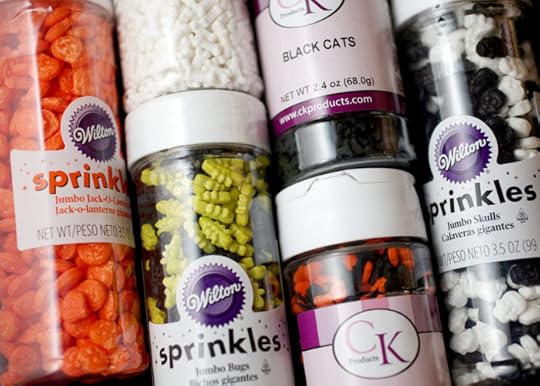
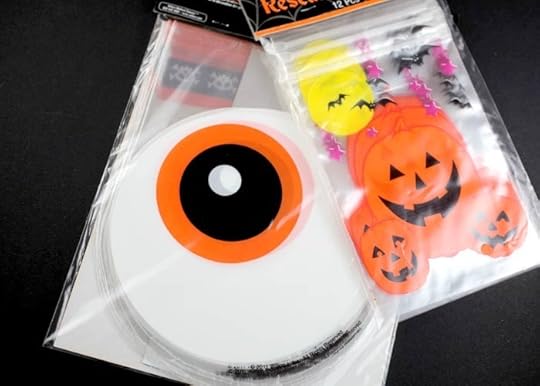
Starting with special sprinkles.
Pumpkins, bugs, bones, skulls and more.
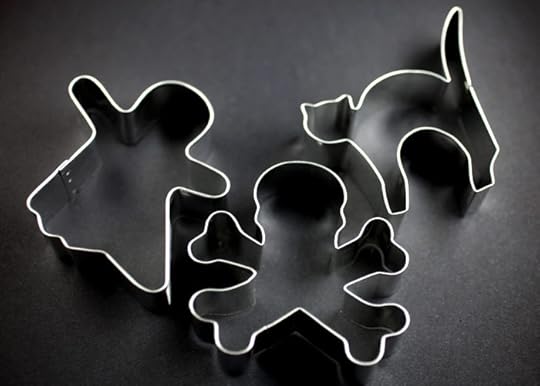
I also loved these cutters.
Floating ghost, scaredy cat, and this great skull and crossbones. I picked this one up mainly because I don’t think I’ve ever run across one before.
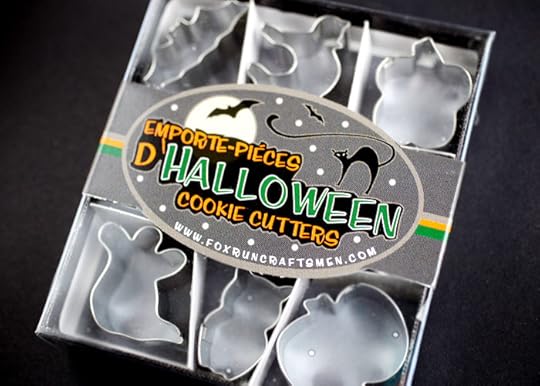
Then there’s these itty-bitty cookie cutters. So cute.
Want to make cookies with your own jack o’ lantern faces.
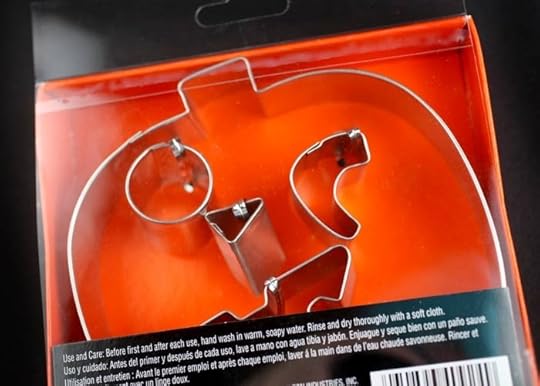
I love how this is packaged so you can make your own expressions.
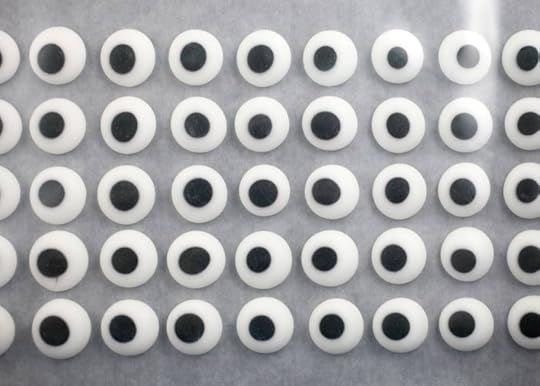
Speaking of faces, how about some candy eyes?
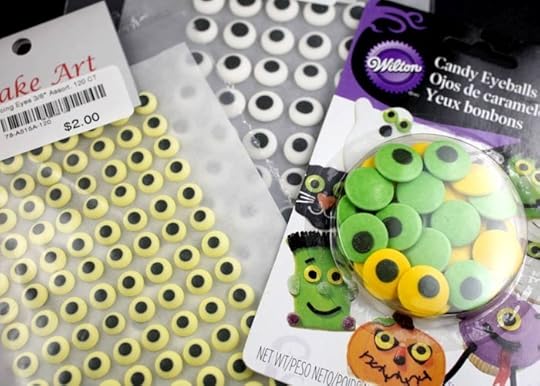
In three different sizes.
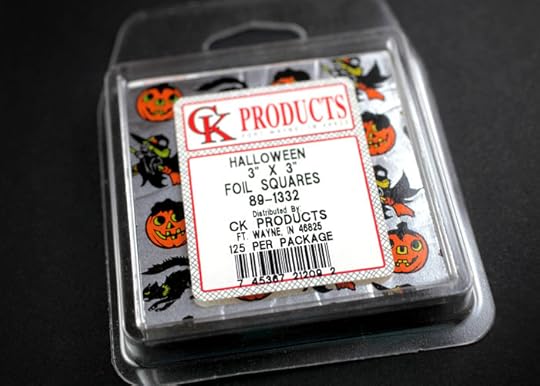
And look at these cute foil wrappers. Great for wrapping chocolates, truffles and cake balls if you like, too.
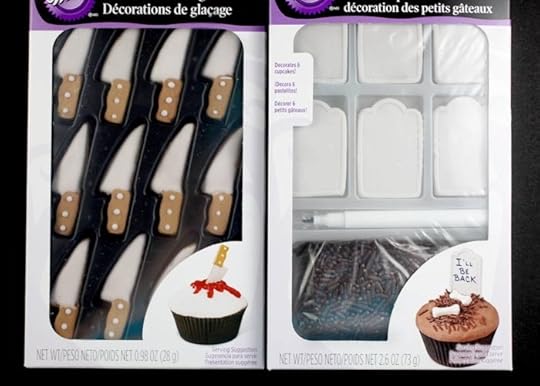
Cupcake toppers anyone?
These little daggers are darling. And the graveyards … dying from cuteness over here.

Oh and look at this vampire cutter. Perfect for making cookies to really sink your teeth into.
Eyeball treat bags.
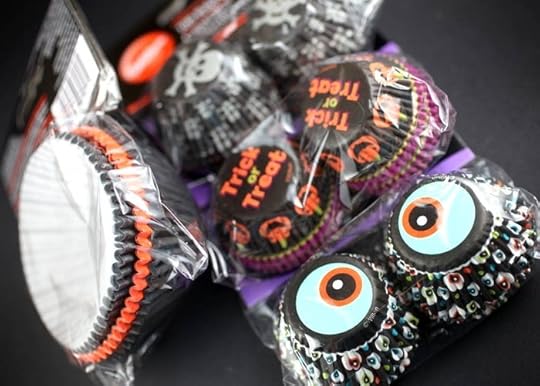
Festive baking cups.
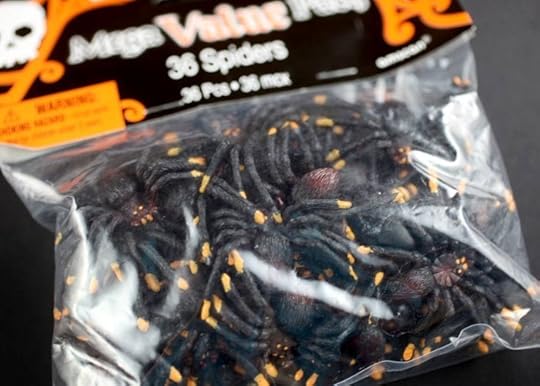
And who doesn’t love a good spider trick. Well there’s enough here to keep you content for a while.
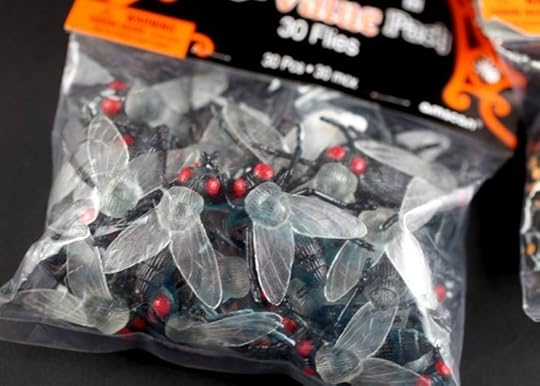
But spiders are so last year. How about some freaky little flies.
Oh, I love these skull cupcake wrappers. Really well done.
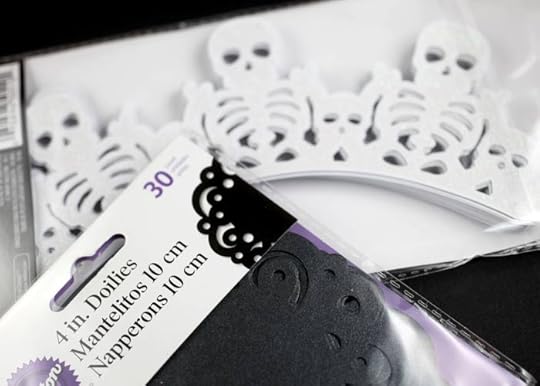
And the black doilies. Had to get some of those, too.
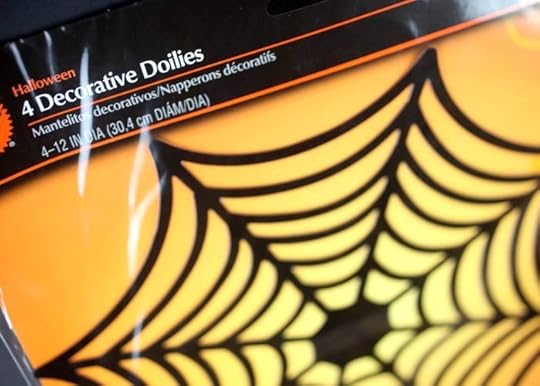
And these spider web doilies. Love!
Okay, almost done.
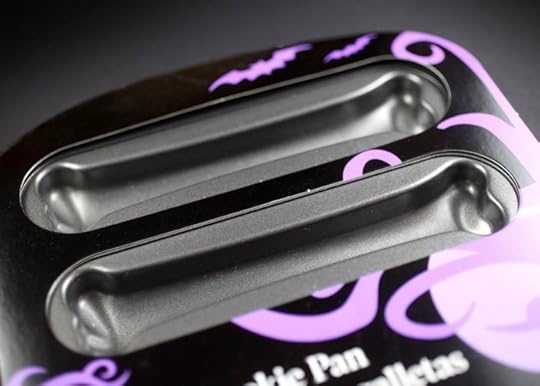
But first I think you need a pan to make some bone-shaped cookies…
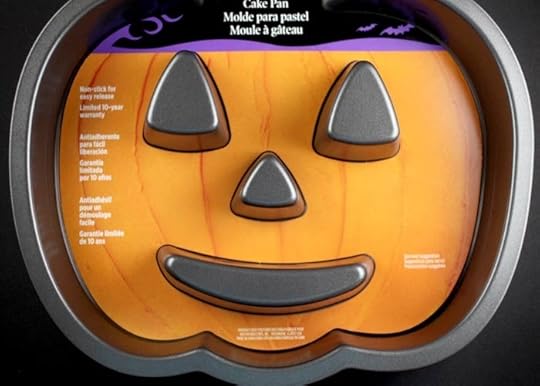
… And a happy little Halloween cake, too.
Enter for a chance to win all this Spooktacular Stuff.
To enter the giveaway, just leave a comment on the blog and let me know you’re interested or which items you like the most or if you’re planning on any Halloween baking or even just Hi! I’m easy!
Deadline to enter is Monday, October 15th at 7 pm ET.
One winner will be chosen at random and announced sometime Monday evening on this post. Just in time to mail the winner these goodies for some fun Halloween baking.
Giveaway sponsored by me.
Good luck guys!


October 10, 2012
Baking Sweet Memories Mixer and Gift Card Winner
It’s time to announce the winner of this giveaway for one sweet KitchenAid Mixer and a $250 Williams-Sonoma Gift Card. And I think someone’s day is about to get a whole lot brighter.
Thank goodness the winner is picked by random, because the responses to your favorite baking memory were so much fun to read and go through. I would never be able to pick just one. So many of you had such heart-warming memories of baking with loved ones and traditions that made my heart fill with happiness.
And then so many of you had baking mistakes and mishaps that had me laughing out loud. With you. Not at you. I Promise. I’ve totally done those things too. Maybe not accidentally pouring microwaved beef gravy on cheesecake instead of chocolate fudge like Becky did at her holiday get together, but I have some good ones right up there with you. Those memories you can laugh about are some of the best ones don’t you think. Anyway, thank you so much for sharing.
And I hope this makes a great new baking memory for someone.
Drumroll please.
The winner is…
Yay SherryC! Looks like the mixer and gift card are going to get a good workout.
To make it official, please contact me and I will provide you with your next steps to claim the prize! If I don’t hear from you, I will need to select an another winner.
This post is sponsored by Nestlé® Toll House® Morsels, the perfect special ingredient for all of your family’s favorite treats!

October 7, 2012
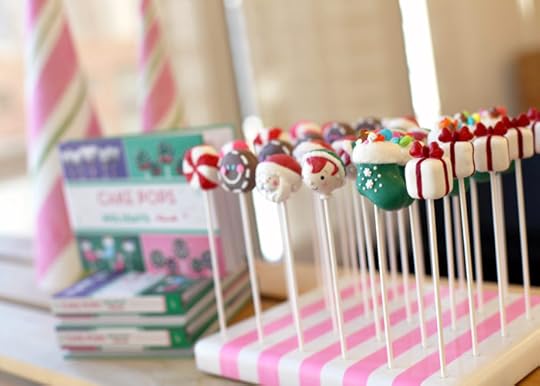
Cake Pops Holidays Book Signing Dates
My new book is coming out this month. I can hardly believe it’s finally here! If you missed the announcement post a few months ago… It’s a follow up to the first book with more than twenty winter holiday cake pop projects. It comes in a cute little size with a great little price … perfect for gift giving and stocking stuffing. ; )
[image error]
And yay… The new promo book video that White on Rice shot is now up on Amazon (Click here to view and just scroll down after the jump.) When a larger format version goes up on YouTube, I’ll embed it here for better viewing.
Now the fun news. I’m going to be visiting several cities in November and December for the release of the book! I am super excited! I tried to fit as many stops in as I could before the holidays are over and wish I could do even more. I think I could do them all year long because meeting you guys when the first book came out was such an incredibly special time. Seeing all of your smiling faces meant so much to me. Like so much.
Okay, here are all the details (below). I hope you come say hi … and bring your cake pop questions, photos, stories and smiles. I’ll bring hugs.
The fun starts November 1 and I would love to see you.
CAKE POPS HOLIDAYS BOOK SIGNINGS
GARDEN CITY, NEW YORK
Thursday, November 1, 2012
6:00 pm
Williams-Sonoma
Roosevelt Field
Garden City, NY
PARAMUS, NEW JERSEY
Friday, November 2, 2012
6:00 pm
Chef Central
240 Route 17 North
Paramus, NJ
KING OF PRUSSIA, PENNSYLVANIA
Sunday, November 4, 2012
1:00 pm
Williams-Sonoma
King of Prussia Mall
King of Prussia, PA
CORAL GABLES, FLORIDA
Friday, November 9, 2012
8:00 pm
Books & Books
265 Aragon Avenue
Coral Gables. FL
STILLWATER, MINNESOTA
Thursday, November 29, 2012
6:00 pm
Cooks of Crocus Hill
324 S. Main St
Stillwater, MN
LONE TREE/DENVER, COLORADO
Saturday, December 1, 2012
2:00 pm
Barnes & Noble
Shoppes at the Meadows
8374 S. Willow Street
Lone Tree, CO
HOUSTON, TEXAS
Friday, December 7, 2012
7:00 pm
Barnes & Noble
12850 Memorial Drive
Houston, TX
DALLAS, TEXAS
Sunday, December 9, 2012
2:00 pm
Barnes & Noble
7700 West Northwest Hwy
Dallas TX
BURLINGTON/BOSTON, MASSACHUSETTS
Friday, December 14, 2012
7:00 pm
Barnes & Noble
98 Middlesex Turnpike
Burlington, MA

October 5, 2012
The Scharffen Berger Chocolate Adventure Contest
[image error]
Oh my gosh. I am so excited about this. The Scharffen Berger Chocolate Adventure Contest launched this week. And the theme is sandwich cookies. Think s’mores, whoopie pies, ice cream sandwiches, macarons and more.
Are you up for the adventure? I hope so because Scharffen Berger Chocolate Maker and TuttiFoodie.com invite you to enter the fabulous, 6th annual Chocolate Adventure Contest. So go ahead … invent, create, and explore the boundaries of your own culinary imagination. This year the contest accepts entries in one category — Sandwich Cookies — for the chance to win a $25,000 grand prize.
Yes. Twenty. Five. Thousand. Dollars! Oh my.
Plus… Ten honoree winners will receive an engraved iPad.
Pretty sweet prizes!
To be eligible, combine any Scharffen Berger chocolate or cocoa with one or more of the following 12 select “adventure ingredients” in an original recipe.
Banana
Sweet Potato
Cacao Nibs
Yerba Mate
Coconut Cream or milk
Tapioca or tapioca flour
Tequila
Sumatra Coffee
Corn Meal
Pine Nuts
Chili Pepper
Fresh Ginger
Sounds fun. And adventurous!
The contest period is October 1 – January 2, 2013 which is great because that’s plenty of time to come up with some amazing and hopefully prize-worthy recipes. Yes, recipes plural.
Each contestant can enter up to 10 recipes. That means more chances to win.
So start baking. I can’t way to see your creative twists on the sandwich cookie.
And I can’t wait to taste them, too…because I am one of the judges again this year along with John Scharffen Berger, Top Chef Elizabeth Falkner, Matt Armendariz (Matt Bites) and renowned and author Alice Medrich. Here’s a look at the last time I judged – so much fun.
It’s going to be a tough and tasty job.
You can submit your recipes and view the complete contest details at www.chocolateadventurecontest.com.
If you have questions after visiting the site and reading the rules, feel free to reach out to lisa@tuttifoodie.com.
_____________________________________________________________
Up for the adventure? Think you have a $25,000 sandwich cookie recipe?
What adventure ingredient sounds the most fun to work with?
I’m so excited for you guys and I hope someone that reads this site wins.
Good luck and happy, adventurous baking!
_____________________________________________________________
Credits: Matt Armendariz photographer, Elizabeth Colling food stylist, Scharffen Berger Chocolate Maker chocolate

October 1, 2012
Boo!

I set out to make a few fun Halloween cake pops Sunday.
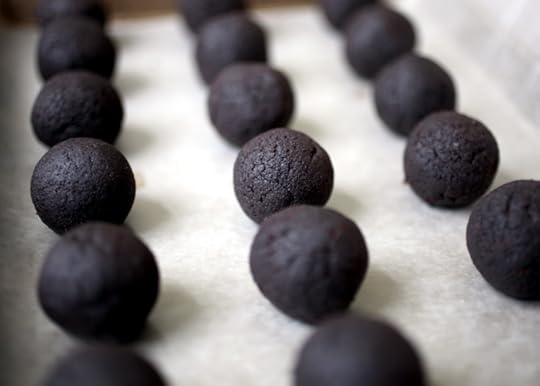
I baked cake, crumbled it, mixed it with frosting, rolled into balls and then molded them into different shapes to play with. I had big plans. (Basic Cake Pop Instructions here.)
Then I realized I didn’t have any of the right candy coating colors on hand for my plans… I was out. Boo…Hoo! … Okay, time to switch gears.
I did have white. I always try to keep white and chocolate in the house.
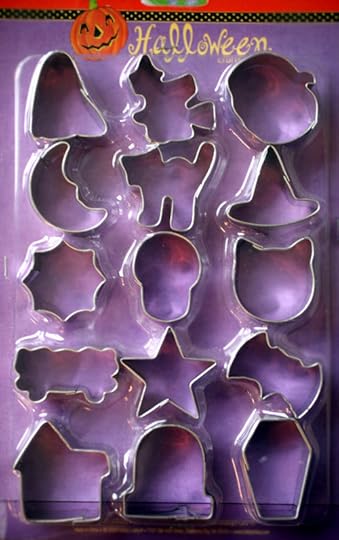
And I still had these cutters sitting on the counter from the other day because I wanted to use them again soon. And soon turned out to be Sunday.
One of the cutters inspired a cute quick variation to the ghosts I’ve made before.
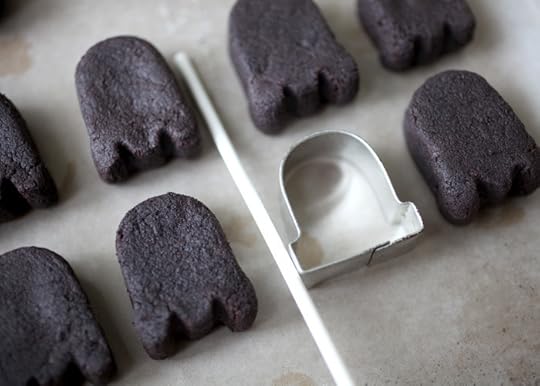
I thought the grave mini cutter would work great to make ghost shapes. And it did.
Just press the ball inside and use the height of the cutter to help mold the shape.
Remove and press the ends down so the sides are flat.
And don’t worry… you can totally hand shape these even if you don’t have a similar cutter.
Flatten the rolled balls and then shape them with the aid of wax paper. It helps a lot. Promise.
Just press, slide and rotate the shape against a wax paper covered baking sheet and it will help form flat and smooth sides.
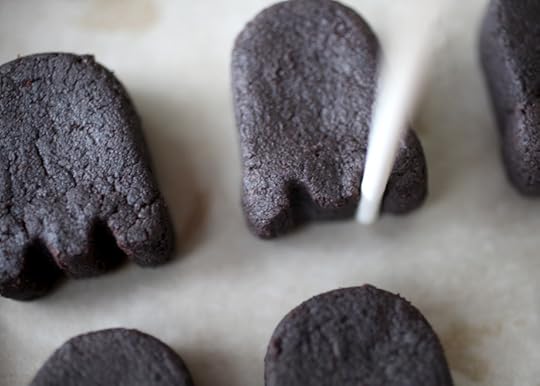
Then just use a lollipop stick to press into the bottom of your ghost.
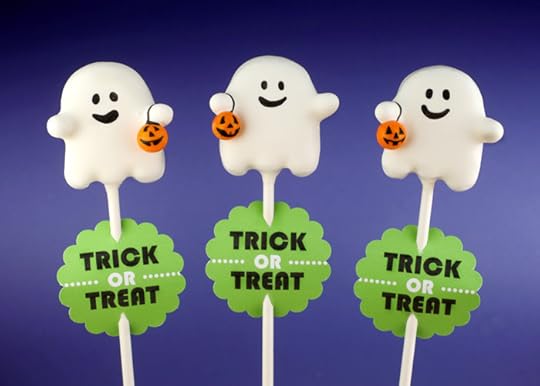
And now I have a sudden urge to make Pac Man Cake Pops.
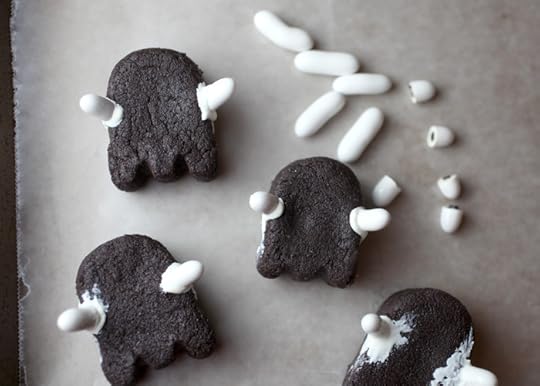
For arms, you can use white licorice pastilles. Good and Plenty candies would work, too – they are just a little bit thicker.
Cut about a 1/3 of the candy off using kitchen scissors. And then attach the cut end of the candy to the shaped cake with melted white candy coating. If there is excess (see bottom right) use your finger to spread it in a thin layer on the surface of the cake. This is mainly so you don’t have a big lump show through the coating after you dip.

While the coating is wet, attach an orange sixlet candy under one of the arms. Or any other similar candies … M&M’s would work – they’d just be flatter. Hold candy in place until set.
Let the cake pops dry and draw faces and a handle for the bucket using a black edible ink pen. I like Americolor Gourmet Writing Pens by the way.
Boo-tiful!
I’m pretty happy with how these turned out as an impromptu pop.
If you would like to use these tags for Halloween, you can download the tags here.

Enjoy!
And I’ll try to get around to some more pops before Halloween. When I stock up again on candy coating! : )

September 27, 2012
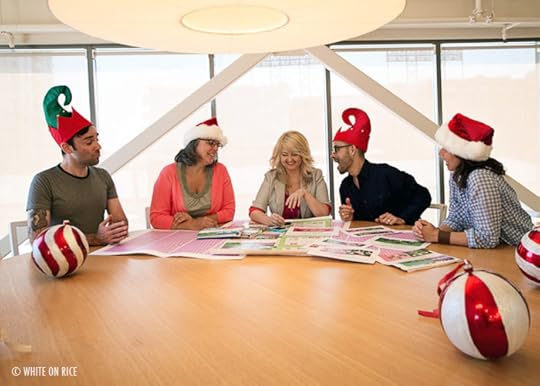
Behind the Scenes: Cake Pops Holidays Book Trailer
My new book Cake Pops Holidays is coming out soon. Yay!
And last month, we shot a book trailer for it in San Francisco.
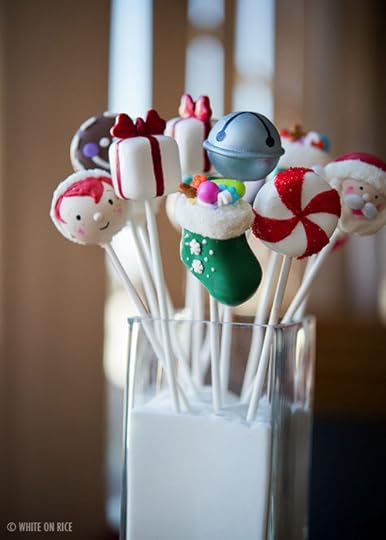
It involved cake pops of course.
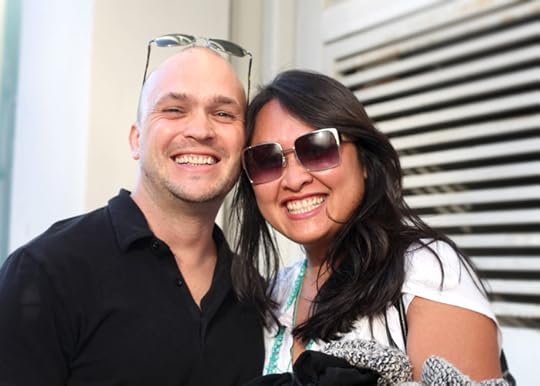
And my friends Todd and Diane from White on Rice shot it. I was so happy to finally work them. If you’re familiar with their blog, or photography or other videos, you know why. And if you’re not, you should check them out.
(P.S. – Todd and Diane have their own book in the works right now. I know they are pouring their hearts into every word and every photo and I’m so happy for them.)

When Chronicle (my publisher) told me they wanted to make another video, I thought I’d do something different from the first few, so I suggested we shoot it at Chronicle Books and give it a bit of a Santa’s workshop feel. Or as much of a feel that we could do in a few hours filming… in August. : )
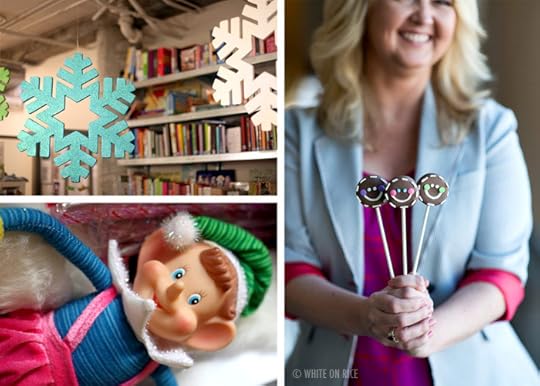
I shipped giant snowflakes, sugary sweet props and brought some adorable gingerhead pops.

We made garland from promotional postcards, wrapped presents and decorated with candy ornaments.

Diane brought giant Peppermint decorations that happened to work perfectly with one of the pop designs in the book. Oh my gosh, I need one of these! Or ten.

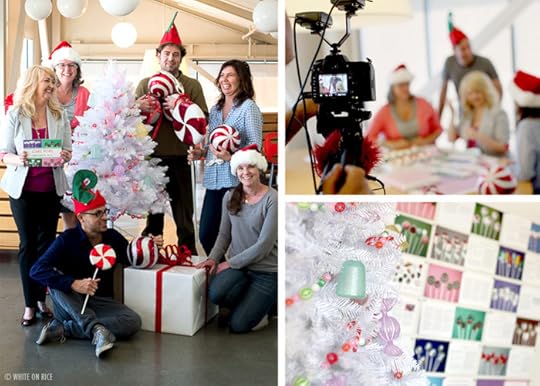
Peter brought the fun! As always.
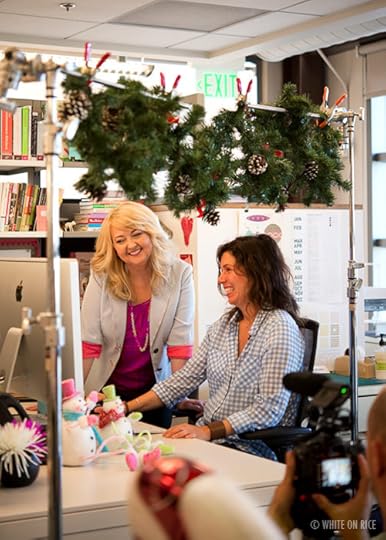
We shot scenes about the book’s design with Vanessa.

And scenes about the format with my editor Amy.
I basically moved in for the afternoon. We made it December for a day and it was a blast.
Thanks Peter, Amy, Vanessa, Ben, Alice, Doug and Claire for playing around with me.
And Chronicle’s Headquarters has such wonderful light throughout the building, it made every shot easy breezy.

Dork wave.
Silliness.

Happiness

Scariness. Todd don’t trip please. That would be bad.

I need to show you one day how I travel with cake pops. I have a pretty awesome and easy way that I found to safely carry them on a plane, across the country. I always panic when I do something like this. I would normally ship them, but when I’m traveling one day and filming them the next, I like to personally carry them to make sure they make it safely. Always stressful for me, but so far so good.

Thanks Todd and Diane for making the shoot so fun and for your amazing talent.
And Chronicle, thanks for letting me invade your offices with sugar and glitter.
Cake Pops Holidays is available for preorder now and ships in October! Ho Ho Hooray!!!
I’ll share the final video with you guys soon.
PS. Cake Pops stand by KC Bakes if you’re curious.

September 23, 2012
Baking Sweet Memories
I love this time of year. When fall rolls around I get even more excited about baking than I do any other time of the year. Summer ends and the real baking begins. The last months of the year are full of special reasons to spend time with family, share smiles, and bake sweet memories.
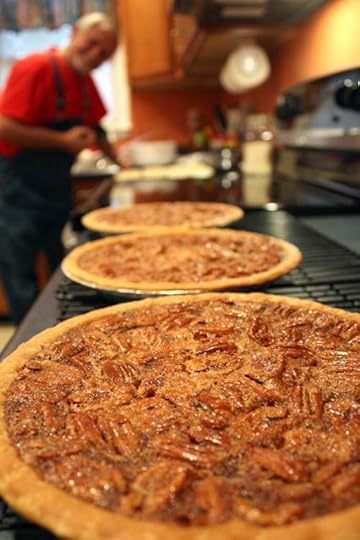
One of my favorite baking memories is making pecan pies with my uncle. We make them every year around Christmas but I thought I’d share the recipe with you again a little early this year. It’s too good to wait until December.
My grandmother used to make these pecan pies. Her recipe made three perfect pies at a time. She made them every year for family and friends. She loved it. And when she became less able to keep up with the same quantity of pies she liked to make, my uncle Ronnie became the official pie maker. He doesn’t bake and he’s not really a dessert guy but he makes a mean pecan pie. He’s been making them now for well over a decade since my grandmother passed away. He’s continued making them every year for friends and family to carry on his Mama’s tradition. And now I bake with him every year I can and if not I make sure to bake them in my own kitchen. It’s our family’s way of keeping her with us during the holidays.
And the pies are delicious too, so that’s awesome.
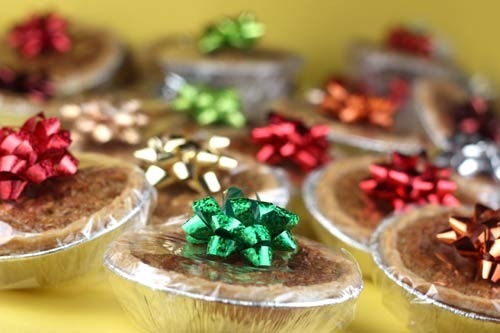
Of course, I had to put my touch on them and make them mini. Major cute. But I still wrap them just like she did. Simple and sweet. I love these refrigerated and I eat them like a giant pecan pie cookie.
Here’s the recipe how my grandmother made it and here’s a link to the original post with step-by-step photos demonstrated by my uncle and a little more about my grandmother.
And keep scrolling for a fun giveaway below…
___________________________________________________________________
Mama’s Pecan Pies
Makes 3 pies or about 32 individual pies
16 oz. pecans
2 sticks margarine
16 oz. package light brown sugar
1 heaping tablespoon (serving tablespoon, not measuring spoon) self-rising flour
16 oz. bottle Karo light corn syrup
1 tablespoon vanilla
6 eggs
3 regular size (not deep dish) frozen pie crusts – or make your own (enough for 3)
Melt margarine in the microwave for about 2 minutes or until melted and set aside.
Prepare your pecans. Remove any unwanted dark brown pieces from the pecan crevices and shake out pecan crumbs in a colander.
Place brown sugar in a large bowl. Work out any lumps with the back of a spoon. If the brown sugar is too hard, you can loosen it up in the microwave. Heat it for a few seconds and it will be fine.
Add a heaping serving tablespoon of self-rising flour and stir until the flour disappears into the brown sugar.
Add the bottle of corn syrup. Then add 1 serving tablespoon of vanilla and stir until thoroughly combined.
Add melted margarine. Fold carefully into the mixture so it doesn’t splatter. Fold until the margarine is thoroughly worked in and disappears.
In a separate bowl, crack open six eggs. Remove the “roosters” and loosely beat the eggs with your spoon.
Fold the eggs into the pie mixture until they disappear.
Add pecans and stir until completely coated.
Remove three pie shells from the freezer at this point and check for cracks. (If you do have a crack, thaw and knead the crack together and refreeze.)
Pour the mixture evenly into the three shells. You’ll probably have a little bit leftover in the bowl. Tap tops with a spoon to check consistency and make sure there is the same amount in each pie. Redistribute pecans if necessary to make equal.
Bake for 45 minutes to an hour at 350. Cook pies until they swell and then fall. At that point they are done.
Remove and cool for about three hours to set. Store on the counter or in the refrigerator depending on how you like your pie. Or eat right away and really warm – the pie just won’t hold it’s shape at this point but it will be amazing.
For mini pies: chop pecans, use mini frozen pie shells, removing them from the freezer as needed and bake in three batches on a baking sheet for about 35 minutes each. I’m guesstimating the time. Watch them and make sure they are done.
Enjoy!
___________________________________________________________________
And now, I’d love for you to share your favorite baking memory.
Holiday or any day.
You could be the lucky baker to win a KitchenAid Stand Mixer and a Williams-Sonoma Gift Card.
Prize includes a KitchenAid Stand Mixer (valued at approximately $650) and a $200 Williams-Sonoma gift card. Approximate Retail Value: $850. Tasty!
Giveaway runs from September 24, 2012 at 12:00 am ET through October 8, 2012 at 11:59 pm ET.
One entry per person. You must live in the U.S. for this one (I’m sorry my international friends) and be 18 or over, too to be eligible to win.
Read the complete rules.
To enter for a chance to win the mixer and gift card, just leave a comment on the website and share your favorite baking memory. And if you don’t have one yet, the giveaway lasts long enough for you to bake one. : )
One winner will be chosen at random and announced during the week of October 8th in a follow up post here on the site.
Note that it may take a few minutes for your comment to display.
Good luck guys and I can’t wait to read your baking memories.
___________________________________________________________________
This post is sponsored by Nestlé® Toll House® Morsels, the perfect special ingredient for all of your family’s favorite treats!

September 17, 2012
Homemade Oreos
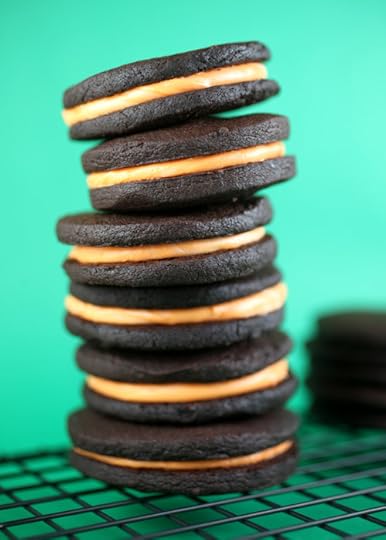
I made some cookies yesterday from one of the cookbooks I’ve been wanting to dig into.
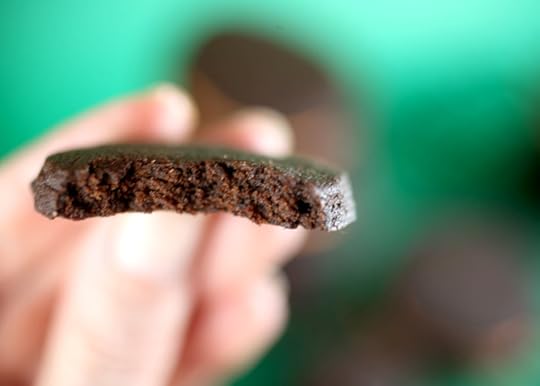
Home. Made. Oreos.
And all Halloween like with orange creme centers, too. So fun!
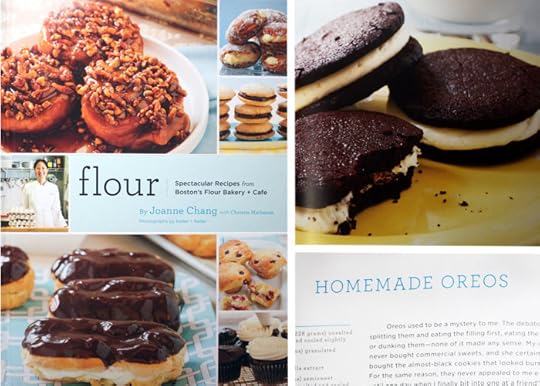
I found the recipe in Flour by Joanne Chang. This book is full of treats I want to try. Especially the Brioche au chocolat and vanilla cream filled doughnuts. Oh my. But I needed much more time for those … oh and yeast.
And since I always try to keep chocolate on hand… well, these cookies were an easy choice.
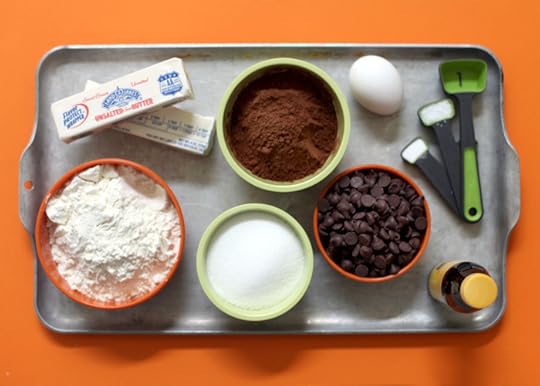
For the cookies, you need butter, flour, sugar, cocoa (dutch process), chocolate, 1 egg, vanilla, baking soda and salt.
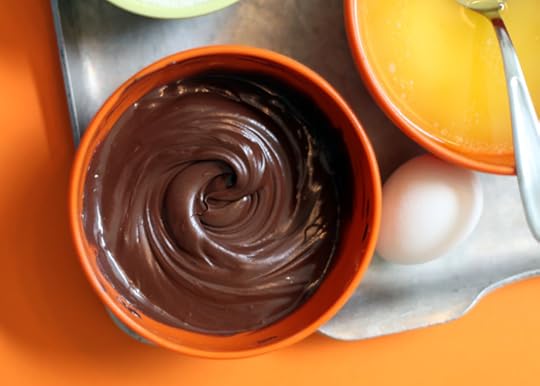
Melted butter and chocolate … yeah, this is heading in the right direction.
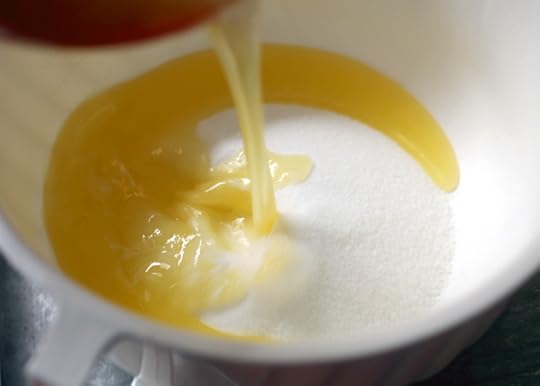
Add the butter to the sugar and whisk away.
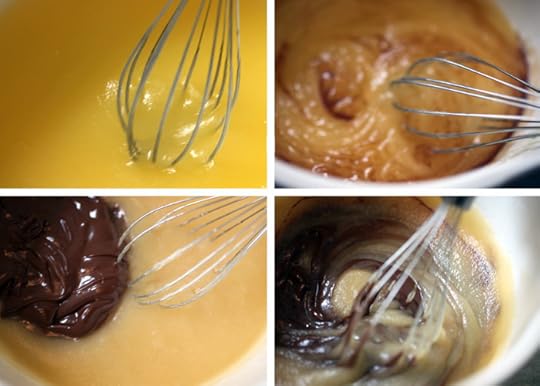
Then keep on going with the vanilla and melted chocolate.
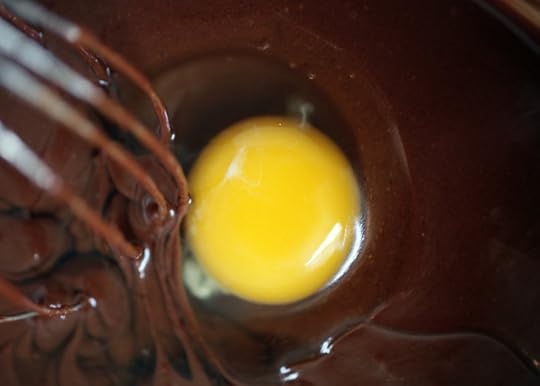
Add zee egg.
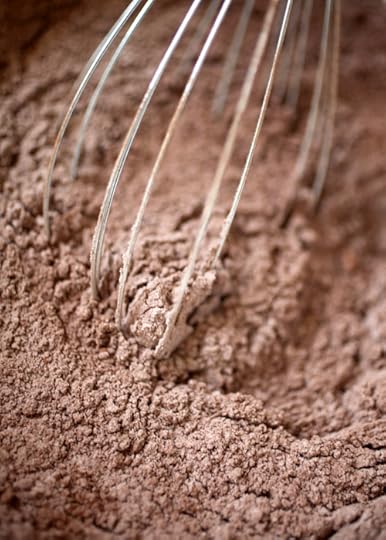
Now whisk the cocoa, flour, soda and salt in another bowl.
I love love love to see cocoa blend with flour and watch the two colors mix together.

It makes me happy.
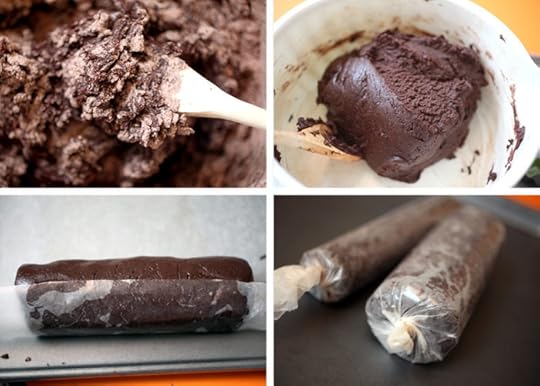
Add the flour and cocoa mixture to the chocolate mixture and stir together until the dough forms.
Shape the dough in to a log and wrap in wax paper. (I made two sizes to play around with)
Chill. And chill out because you need to let it firm up for a couple of hours…
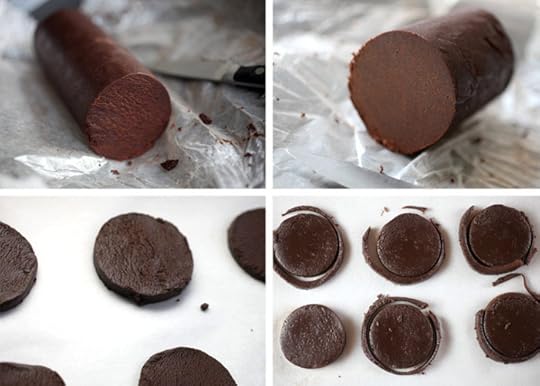
… So you can cut out cookie slices. And if you’re like me, you’ll probably still be compelled to make the edges perfectly round.
Even though you waited all that time for it to chill so you could slice it.
But definitely not a requirement. Just a compulsion.
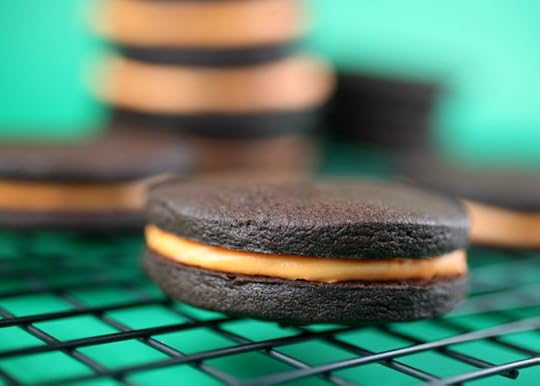
Bake them and sandwich them with vanilla cream filling… tinted orange if you’re in a Halloween kind of mood.
Cute!
Creamless are good, too.
So I didn’t stop there, since I was already breaking out my round cutters, I finally opened up some mini cutters I’ve had for like three years.
A $2.99 Hobby Lobby score I’ve neglected to use the past couple of Halloweens.
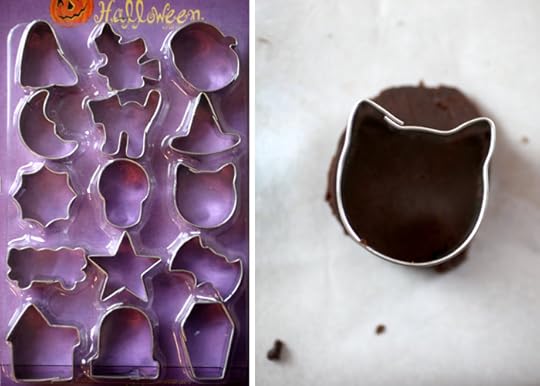
I chose the cats. I was in a kitty kind of mood. I’ll show you why at the end of the post.
Slice the dough and then just use a cutter to make fun shapes.
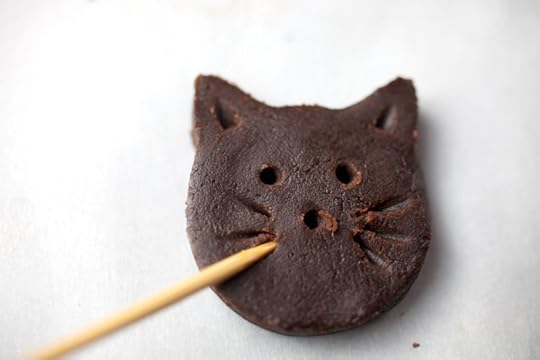
For the cats, I used a skewer to make simple details. The flat end worked great for the defining the ears and eyes. And the pointed end was great for whiskers.
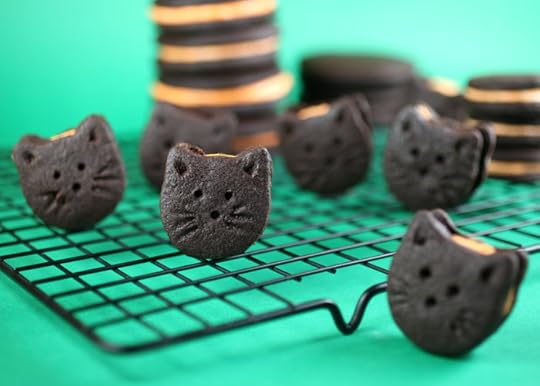
Mini Meow Meows!
Yum! Yum!
____________________________________________________________
Homemade Oreos
Makes about 18 2-1/2 inch sandwich cookies
Recipe from Flour reprinted with permission from Chronicle Books.
Cookies
1 cup (2 sticks/228 grams) unsalted butter, melted and slightly cooled
3/4 cup (150 grams) sugar
1 tsp vanilla extract
1 cup (200 grams) semisweet chocolate chips, melted and slightly cooled
1 egg
1 1/2 cups (210 grams) unbleached all-purpose flour
3/4 cup (90 grams) Dutch-processed cocoa powder
1 tsp kosher salt
1/2 tsp baking soda
Filling
1/2 cup (1 stick/114 grams) unsalted butter, softened
1 2/3 (230 grams) confectioners’ sugar
1 tsp vanilla extract
1 tablespoon milk
Pinch of kosher salt
Food color, optional
In a medium bowl, whisk together the butter and sugar until well combined. Whisk in the vanilla and chocolate. Whisk in the egg until combined.
In another bowl, whisk flour, cocoa, salt and soda until combined. Stir flour mixture into the chocolate mixture. Mix with your hands if it helps to combine the two. Let the dough sit for an hour to firm up.
Transfer the dough to a sheet of wax paper. Shape into a log about 2 1/2 inches in diameter. Place log along the edge of wax paper and roll. Shape as you roll to maintain a smooth cylinder. Twist ends of paper to secure and help keep the shape compact. Refrigerate at least two hours or until firm. If log settles and flattens on one side, rotate every 15 minutes or so to maintain a round shape.
Heat oven to 325 degrees and line baking sheet with parchment paper.
Cut dough in quarter inch thick slices and place on prepared baking sheet. Bake for about 20 minutes or until cookies are firm to the touch. Note: I under baked mine (almost half the time) and they were still great. Just watch them because it’s hard to tell by looks if they are done since they are so dark to begin with. These baked in batches well, so bake a few to test if you have time. And if your cookies are smaller, adjust the baking time.
Cool and prepare the filling. In a mixer, beat the butter until smooth and creamy. Add sugar and vanilla and beat until smooth. Add milk and salt and continue beating until smooth again. Place about a tablespoon of filling on the bottom of one cookie and sandwich with a second. Repeat with remaining cookies and eat em up.
____________________________________________________________
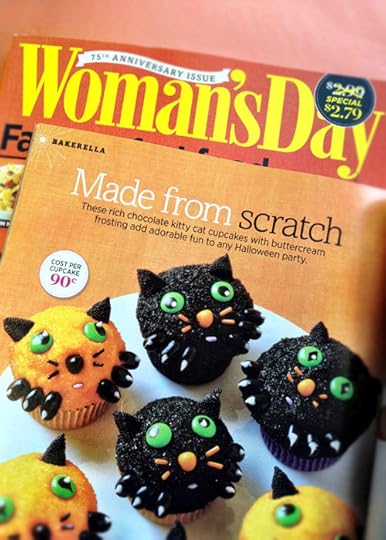
Okay… now I’ll show you why I had kitties on the brain this weekend.
I am so excited to share another project I created for Woman’s Day Magazine. Check out these cute cat scratch cupcakes in the October issue! It’s on stands now if you want to get a copy. Meow. Meow.

September 10, 2012
Want perfect macarons?
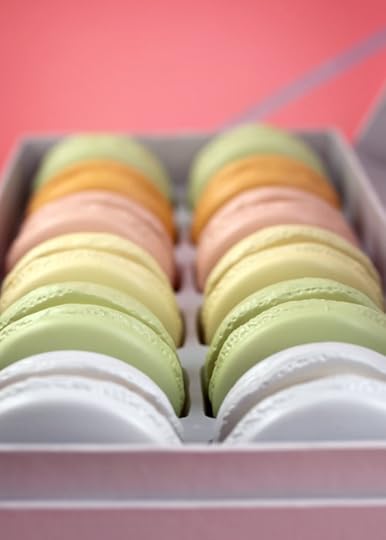
And by perfect, I mean perfectly pretty pastel ones?

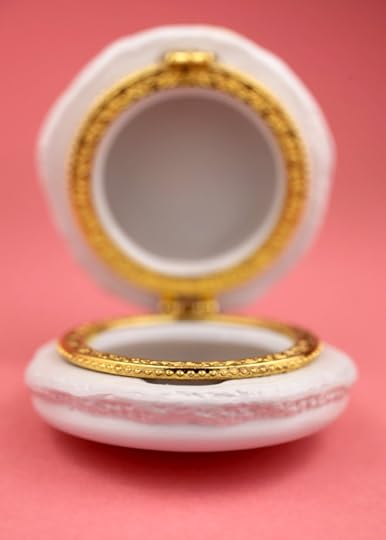
Just don’t bite because you might break a tooth.

That’s right. These aren’t at all edible. But they are completely adorable.
Adorable little macaron trinket boxes.
For trinkets. For sweetness. For smiles.

I’ve been trying to get my hands on some of these for a little while now. They are sold separately and come in six different colors, but they’ve been sold out on a lot of sites. So I was very excited when I came across someone who had them. It was just by chance when I saw that my friend Courtney of Pizzazzerie had posted a picture of this macaron on her instagram and where she got it from. Naturally, I stalked the seller only to find out we had actually met a few weeks before at Amy Atlas’ book signing in Atlanta. Weird. Crazy. Kinda coincidental.
Anyway, you can buy them individually from Waiting on Martha or you can also get a whole set of 12 if you’re as crazy for them as I am.
Why? Well, because with the whole set, you get the super cute store display box, too.
Too. Too. CUTE. CUTE. CUTE.

But, if you want… you can just enter for a chance to win a box set from me right here. Yay!
Yep, I couldn’t resist buying one to give away, too.
………………………………………………………………………………………………..
Enter for a chance to win this set of 12 macaron trinket boxes.
Note: this set has duplicate greens because the rose color was sold out. But when I get my hands on two more rose macarons, the winner will get those also for a complete set.
Just leave a comment on the blog with your answer to the following question.
What’s your favorite show to watch on TV? or What new show are you looking forward to this fall?
Deadline to enter is Wednesday, September 12 at 7:00 pm ET.
One winner will be chosen at random and announced sometime Wednesday evening.
Good luck guys!

September 3, 2012
A Kitchen Assistent
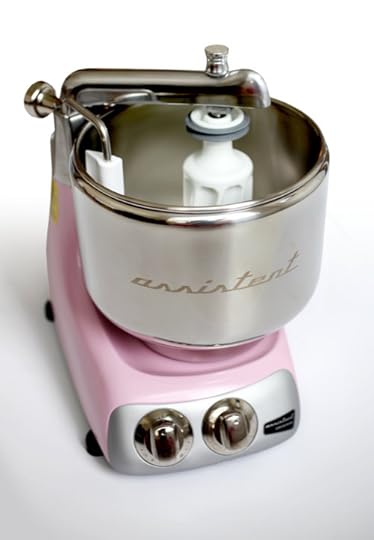
I’ve been playing with something new in the kitchen.
Have you seen one of these before?
It’s unique looking don’t you think. And big. It’s hard to tell by this photo, but it’s quite large. Especially the bowl. Over seven quarts… Could be good for big batch baking.

It’s called an Assistent Original.

And it’s been made in Ankarsrum, Sweden for decades.
But I just saw it for the first time last year, when a sweet reader that works at the company in Ankarsrum emailed me and asked if I’d like to play with one. I was fascinated by the look of it, so I said sure.
I love that it comes in pastel colors. That kinda sold me on wanting one.
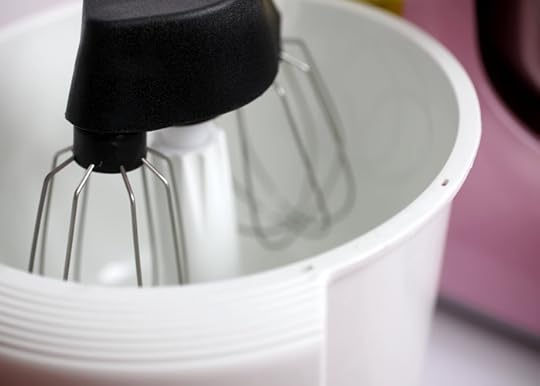
And these double beaters are cool, too.
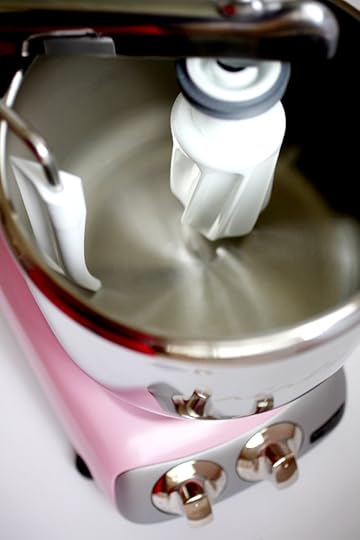
I used the roller and scraper function though to make a cookie dough.
I was trying to decide what to make with it the first time, and it only seemed right to go for a Swedish influenced recipe.
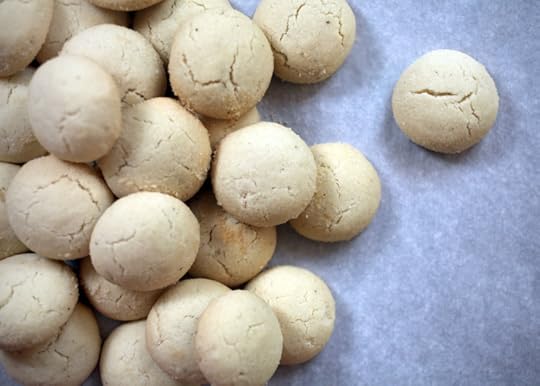
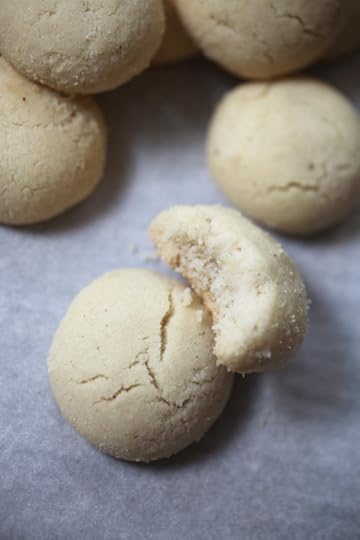
After searching online for Swedish cookies, I found recipes for Pepparkakor, Sandbakelser and Drömkakor … Or these Swedish Dream Cookies.
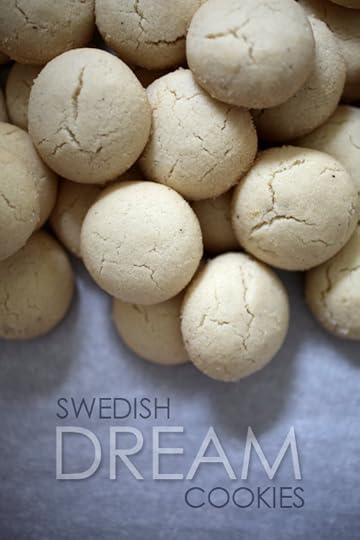
So cute. They’re like light airy sugar cookies, but not really soft. That didn’t stop me from eating them one after the other though. They’re kind of addictive actually and I had an immediate desire to dip them in coffee like I do with Biscoff cookies when I fly Delta. I think they’d soak up beautifully and dissolve in your mouth.
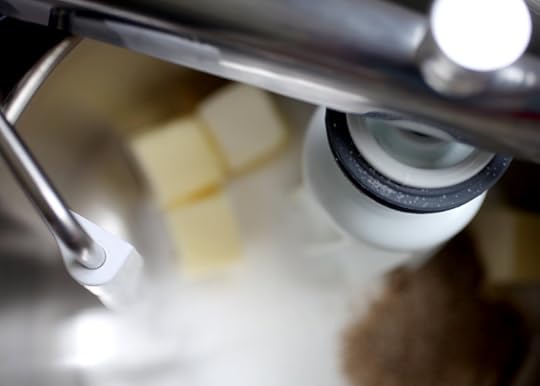
This machine works different than my Kitchenaid. Here the bowl spins at different speeds. And the scraper and roller interact with the ingredients as the bowl rotates. Very interesting.
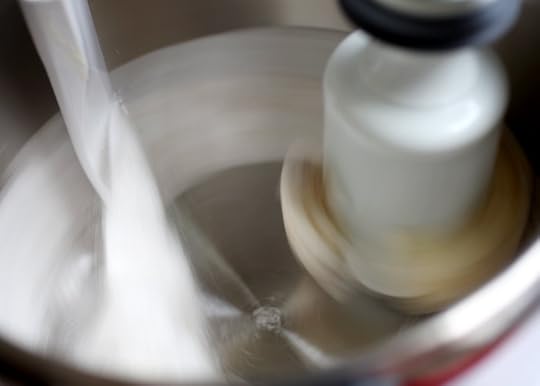
Gotta say, the scraper was mesmerizing.
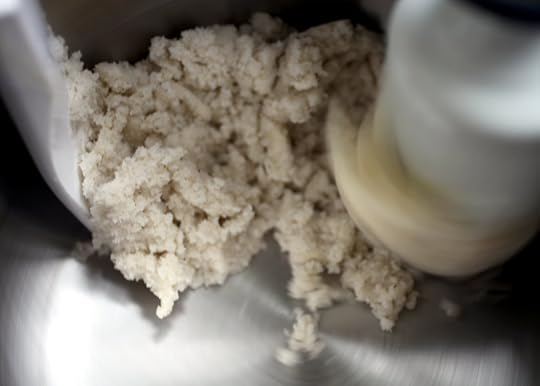
And fun to watch as everything gets combined. You can move the roller closer or farther away from the edge of the bowl as needed.
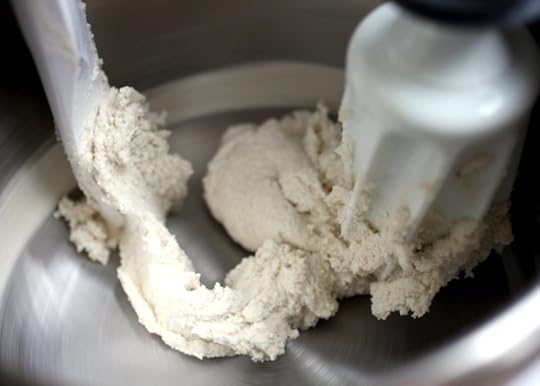
The bowl stayed pretty clean. At least until I added some wet ingredients. Still very interesting.
I’m not sure how often I’ll use it because it will take a little getting used to, but I definitely want to make room for it on my counter because it looks so cool.
Here’s the Assistent website in Sweden and here’s a site where you can find them in the US.
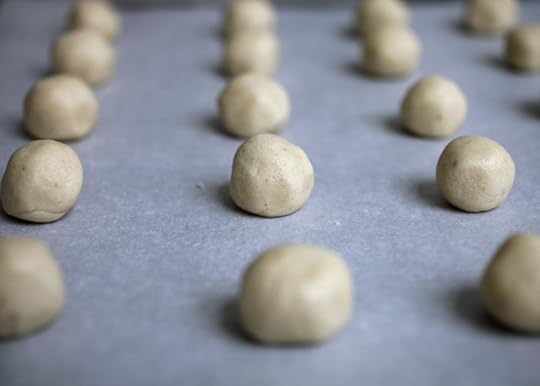
After the cookie dough comes together, roll it into small balls and bake.
Here’s a slightly amended version of the Swedish Dream Cookies recipe on Saveur.com. (I didn’t have corn oil or regular flour on hand.)
Drömkakor
1 2/3 cake flour
1 teaspoon baking soda
1 stick unsalted butter, softened
1 1/4 cups sugar
1 tablespoon vanilla sugar
1/3 cup vegetable oil
Preheat oven to 300 degrees.
In a small bowl, whisk flour and baking soda and set aside.
In a mixer, beat butter and sugars for a couple of minutes until light and fluffy.
Add oil and mix until smooth.
Add dry ingredients and stir until just combined.
Roll dough into 1 inch balls and place on parchment paper lined baking sheets about 2 inches apart.
Bake one sheet of cookies at a time until cookies are just set and crack on the top. About 20 minutes for me.
Cool on a wire rack.
Makes about 3 dozen cookies.
Enjoy! (or Njut in Swedish) At least that’s what Google Translate says. : )
And If anyone has any traditional Swedish Recipes you’d like to share, please do. I’d love to hear your favorites.
I know some of you guys will have good ones.

Bakerella's Blog

- Bakerella's profile
- 9 followers


![[image error]](http://www.bakerella.com/wp-content/uploads/2012/10/kitchenaid.jpg)
![[image error]](http://www.bakerella.com/wp-content/uploads/2012/10/Mixer-Winner.jpg)
![[image error]](http://www.bakerella.com/wp-content/uploads/2012/10/IMG_1171.jpg)
![[image error]](http://www.bakerella.com/wp-content/uploads/2012/10/Holiday-pops.jpg)
![[image error]](http://www.bakerella.com/wp-content/uploads/2012/10/IMG_1133.jpg)
![[image error]](http://www.bakerella.com/wp-content/uploads/2012/10/SCHARFFENBERGER_GROUP_COOKIES.jpg)
![[image error]](http://www.bakerella.com/wp-content/uploads/2012/10/SCHARFFENBERGER_SMORE2.jpg)
![[image error]](http://www.bakerella.com/wp-content/uploads/2012/10/SCHARFFENBERGER_SANDWICH.jpg)
![[image error]](http://www.bakerella.com/wp-content/uploads/2012/09/prize.jpg)