
Bakerella's Blog, page 25
March 2, 2014
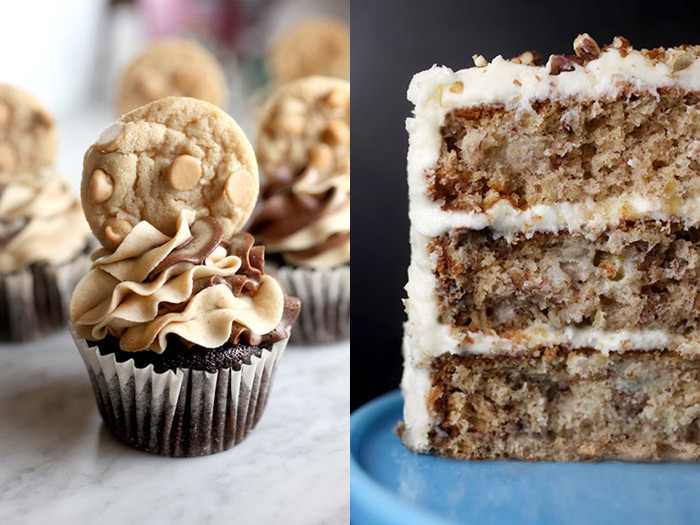
Double Chocolate Fudge Cake

Where does the time go???
When I first started this blog, my sweet little niece was this small.
And now she’s totally THIS tall.
I can hardly believe it. She’ll be a teenager in the morning and I can’t even wrap my head around how much time has gone by and how quickly she’s grown into a such a smart, beautiful young lady.
When I first started baking, she was by my side a bunch.
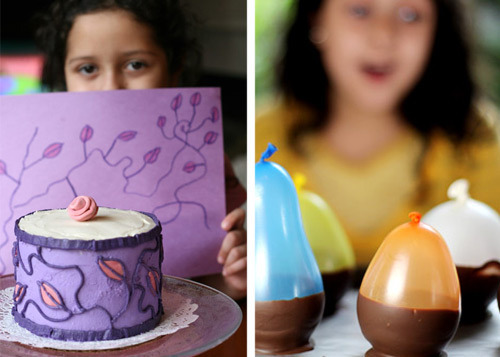
And she was my inspiration more than she knows. I loved making cakes from her drawings or just watching her excitement when she decorated desserts. I loved that she loved just even cracking the eggs. Something so simple and yet so, so sweet. Oh and these chocolate pudding cup bowls we made? Still one of my favorite memories. Oh, my gosh… We’ve had so much fun over the years!
And this weekend we had a little bit more.
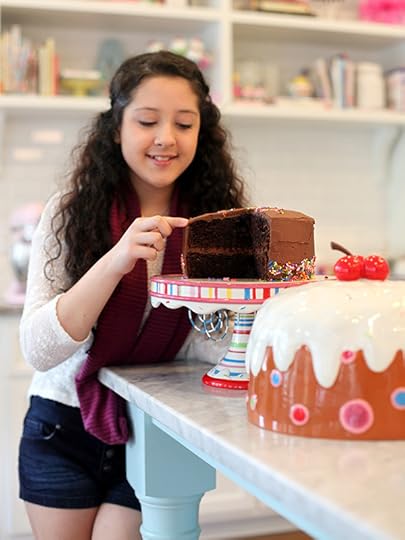
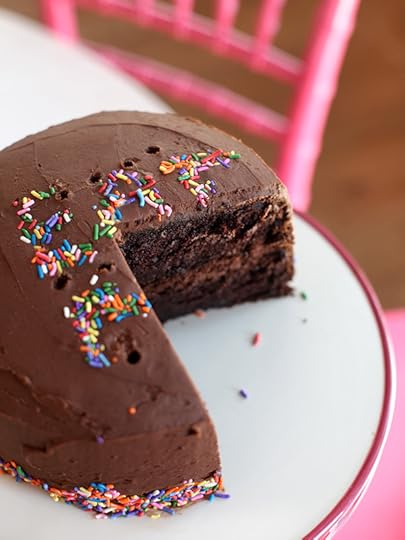
She came over Saturday, which meant we totally needed chocolate cake to celebrate her last couple of days of being 12.
This is a quick and easy cake I used to make when she was little.
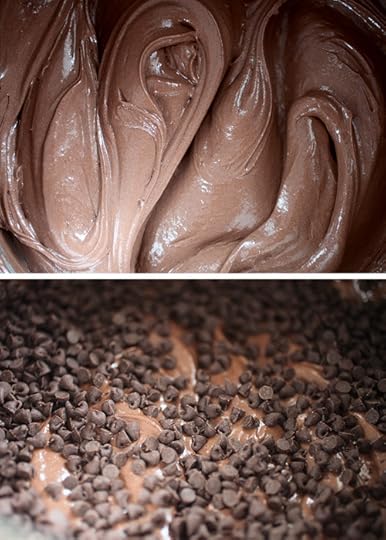
It’s full of mini chocolate chips and major yum!
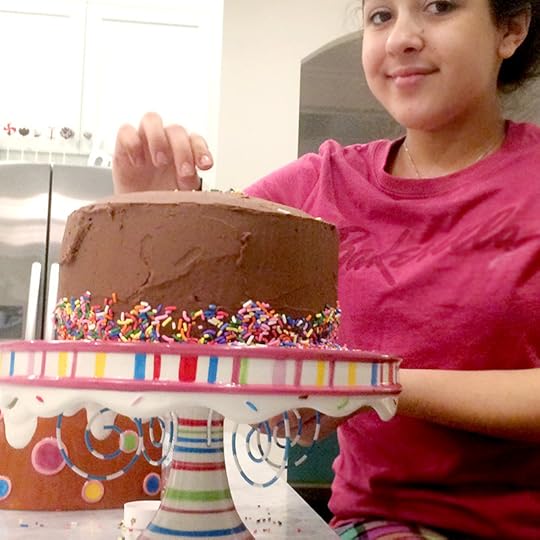
She made the chocolate buttercream frosting, covered the cake and decorated it.
And then we ate it. Like you do. Especially when the cake tells you to.
Seriously, so good!
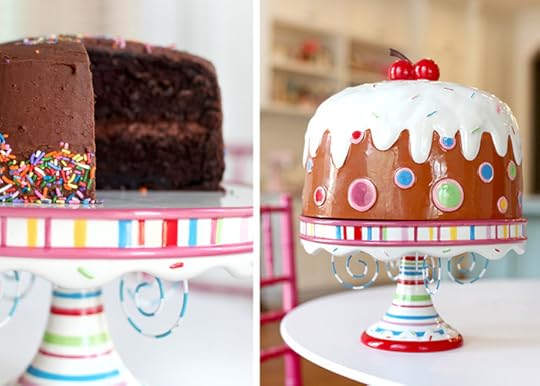
I love how her sprinkles coordinate with this crazy cute cake plate. Just so happy and fun! And, I already can’t wait for the next time we bake together!
Double Chocolate Fudge Cake


February 17, 2014
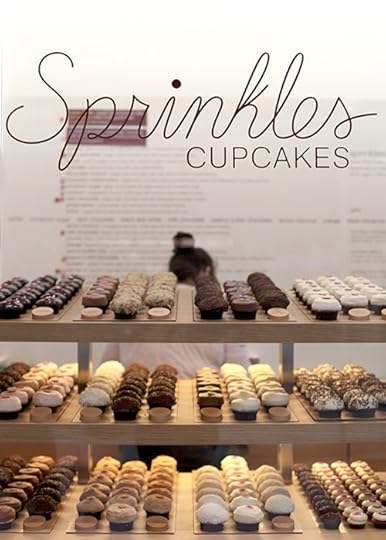
The Black and White
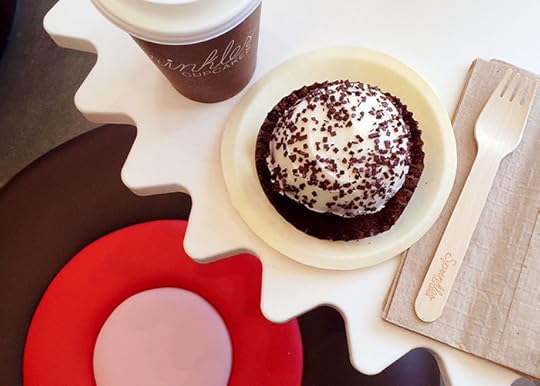
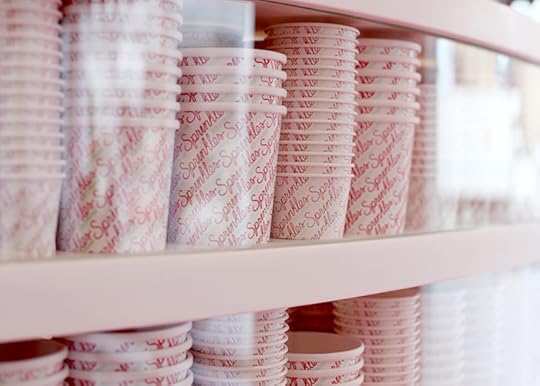
The Black and White. It’s my go to Sprinkles cupcake flavor. Belgian dark chocolate cake loaded with vanilla frosting. Yum! Have you been before? If so, what’s your favorite flavor?
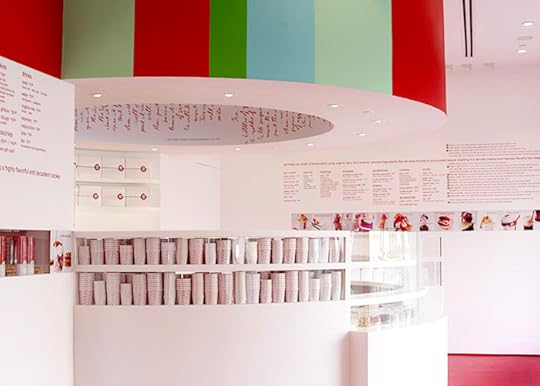
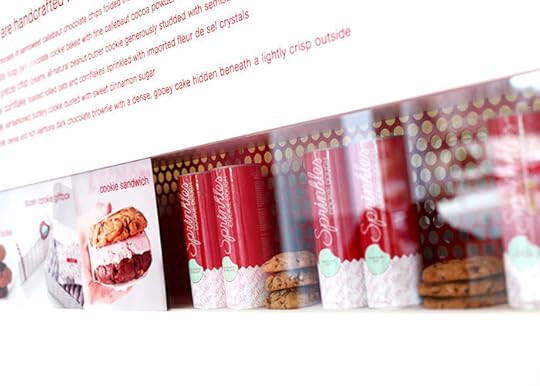
I’ve enjoyed their cupcakes in a few cities. Los Angeles, Chicago, Dallas and Scottsdale. And, I’m excited to say that I can now finally enjoy them in the brand new Sprinkles Atlanta shop when the mood strikes. YAY!!! And YIKES because that might be all too often.
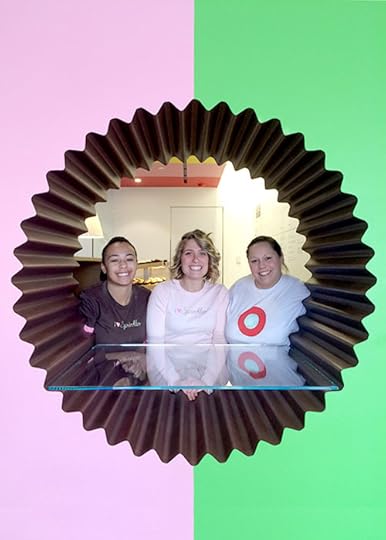
I’ve visited a bunch of cupcake shops that I LOVE over the last several years … you know for research and all ; )… and I really enjoy Sprinkles because I know they’ll always be great whenever I stop in. At least they have been so far.
I just wanted to share a few pics to let you know in case you need a cupcake fix the next time you’re in Atlanta.
They just opened a few weeks ago, so I had to visit right away and I snapped a few photos one morning before things got busy.
I’ll take one of each.
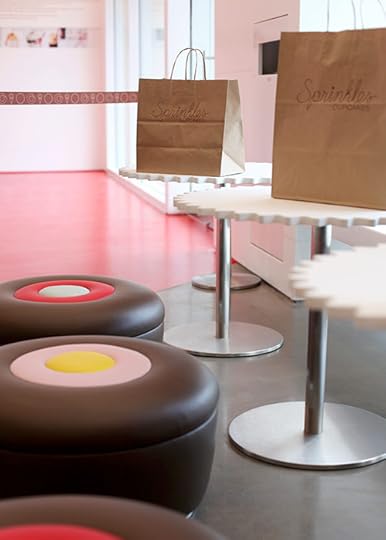
Cute tables and stools!
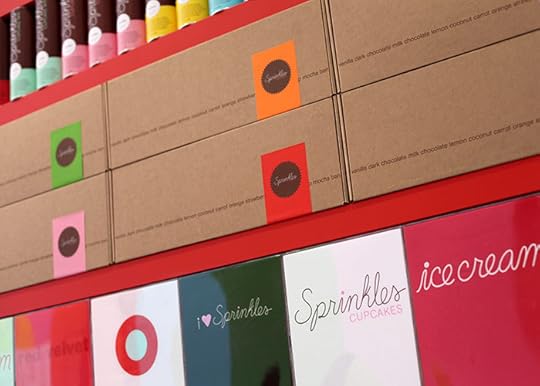
And t-shirts, too.
Hi guys! Love your cupcake wrapper pick-up window.
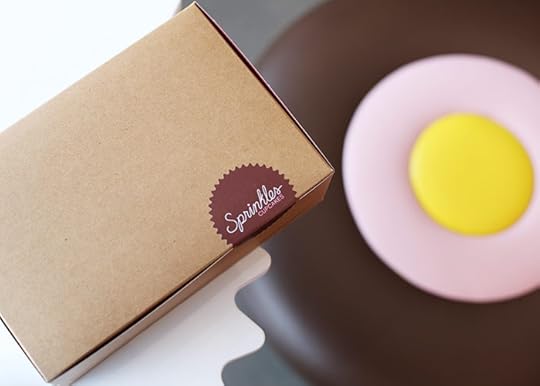
I may have bought a few for the road.
Oh yeah … We have the ice cream shop, too. Awesome!
Who wants a red velvet ice cream cone? I do.
Or maybe a cupcake sundae? Hold me back.
Darn…I was there before the ice cream shop opened.
Another time for ice cream I guess!
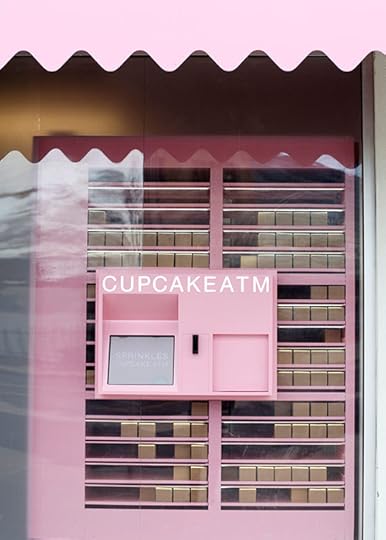
But, it’s cupcakes anytime with their cute outdoor ATM.
Here’s what I brought home. Wow, they look super cute sitting on my table.
Too bad, they didn’t last long enough to look at.

February 9, 2014
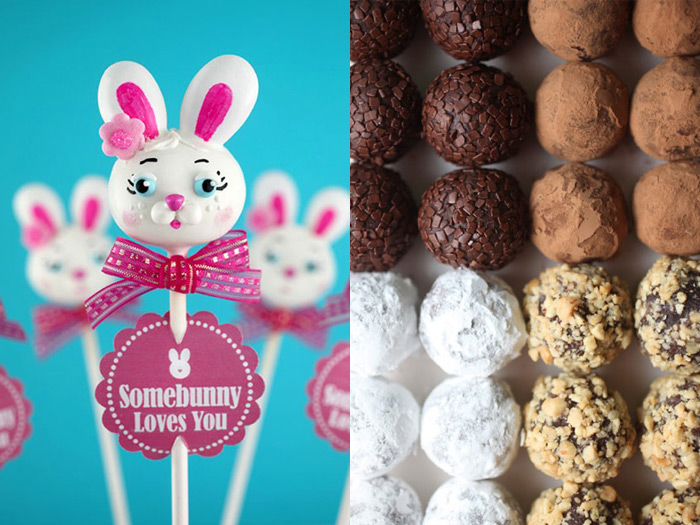
Playing with my heart
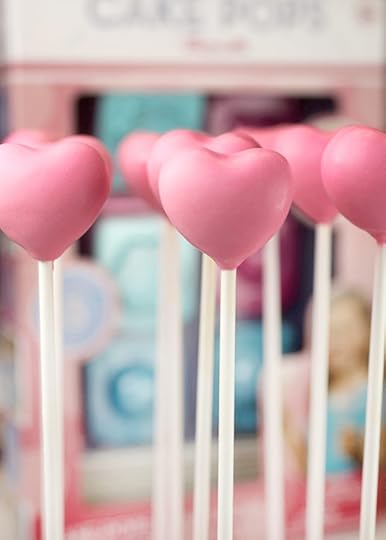
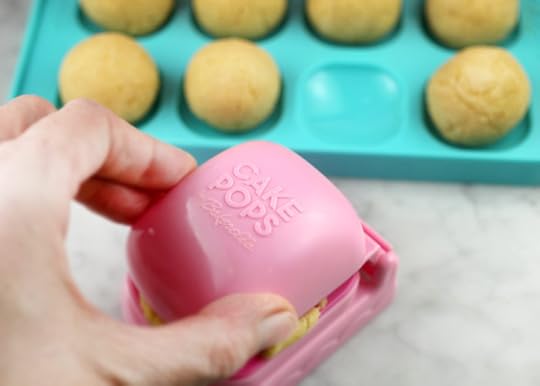
I wanted to make some heart cake pops for Valentine’s Day, so I thought I would play around a little bit in the kitchen.
Like literally.
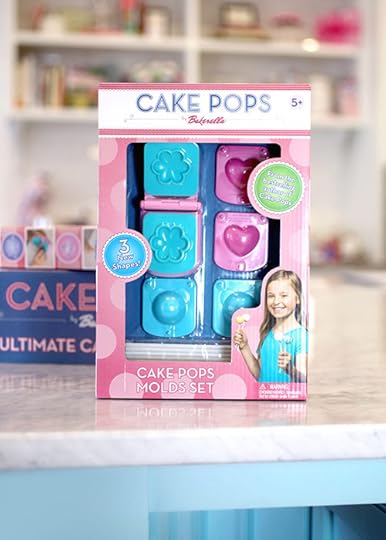
So, I broke out one of my Cake Pop toys that has a heart-shaped mold inside. I usually make shapes by hand, but this was sooooo much easier than hand shaping hearts which can take a little time.
These are rounded hearts, but you can totally use a small heart cookie cutter to shape them also. They’ll just look flatter.
First up… make a cake, crumble it and mix with frosting so you can get started shaping. Here are the Basic Cake Pop Instructions if you need them.
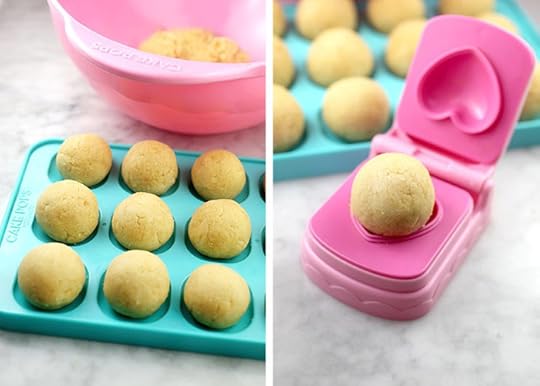
Once you have rolled your cake balls, place one in the mold shape… (or shape by hand)
Then just press.
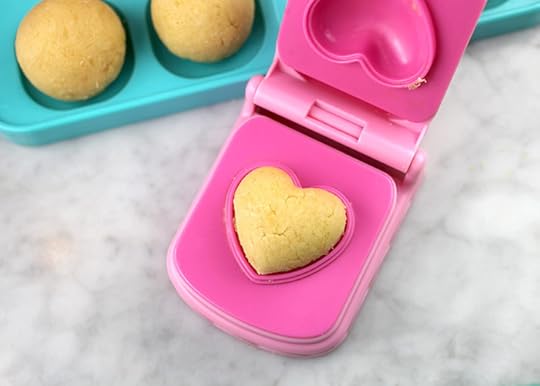
Remove any excess mixture and then pop out your little heart shapes from the mold.
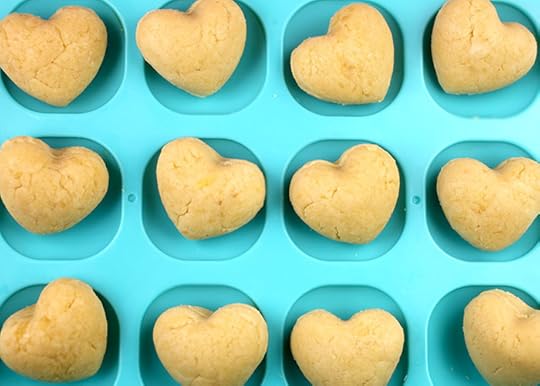
So cute.
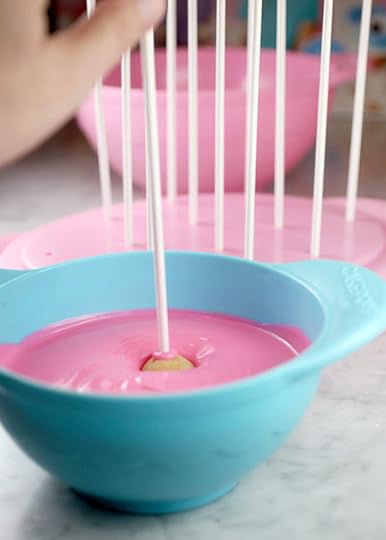
Dipping time.
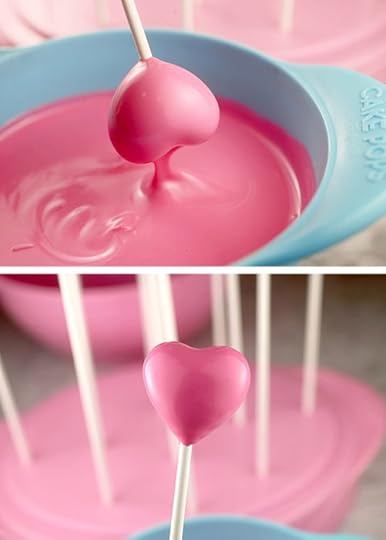
Sweet hearts.
They’d be awesome just like this. Or drizzled with white chocolate or covered in sprinkles.
Simple and adorable.
But I decorated them up a little bit more ………
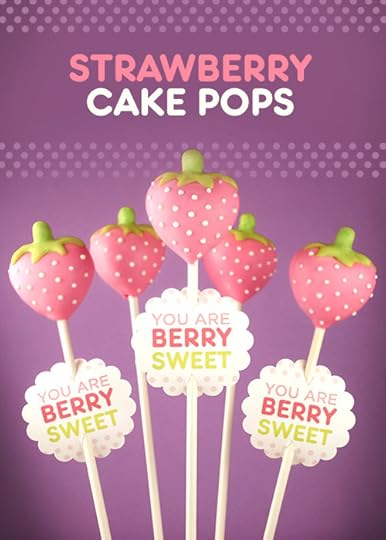
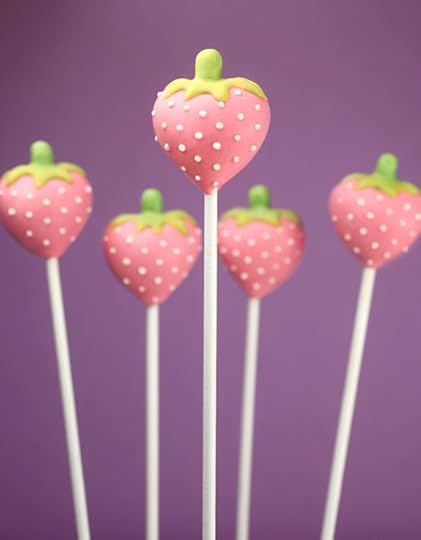
…… And turned the hearts into pretty pink strawberries.
Okay… stop here. If you make these, you totally need to use a strawberry cake for full effect. A big miss on my part, but I hadn’t settled on strawberries when the cake was baked. In hindsight… I’m totally kicking myself.
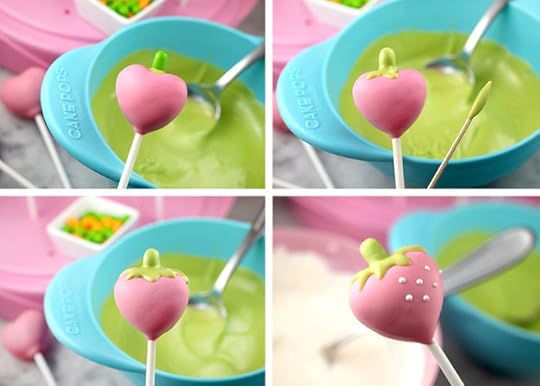
To make strawberries, attach a tic tac or similar shape candy to the top of the coated cake pop. Let dry for few seconds and then use a toothpick to coat the surface of the tic tac with green candy coating and then use the toothpick to draw on the leaves on too. Let dry and then dot on white candy coating to finish them off.
Easy peasy.
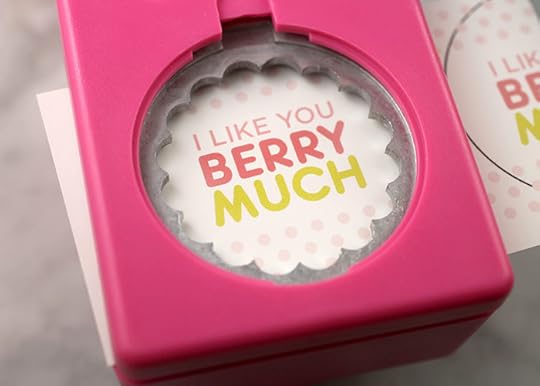
Hope you like these because I like you guys berry berry much.
Here’s the printable for the cake pop tags. Use them for Valentine’s Day or any day.
And remember you if you don’t have the toy, you can hand shape or use a small heart cookie cutter to make them, too.
xoxo
And have a sweet week!

February 2, 2014
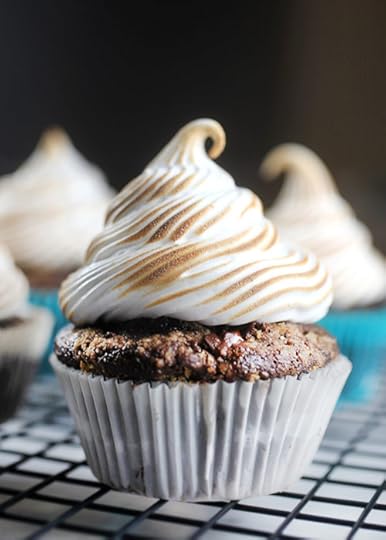
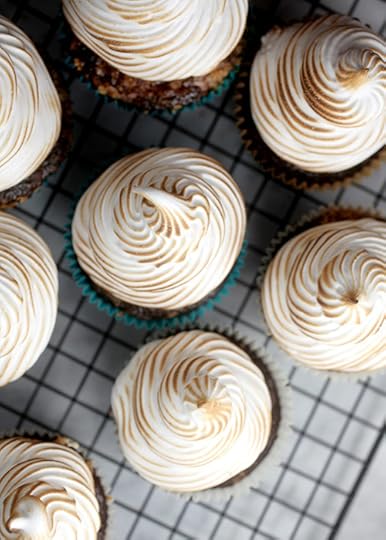
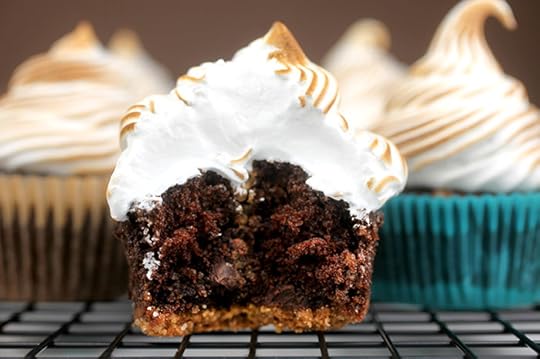
S’mores Cupcakes
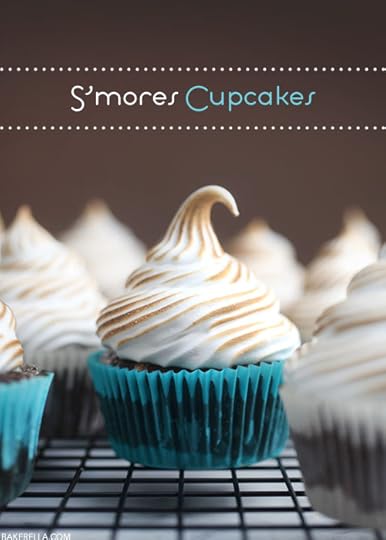
Chocolate Cupcakes with a graham cracker crust and toasted marshmallowy meringue frosting. Oh. my. gosh. These were super duper delicious! I’ve been so excited to make these S’mores Cupcakes for a while now but I didn’t have a kitchen torch to toast the tops. I don’t know why I haven’t bought one before, but I’m super excited that I got one for Christmas. Thanks Mom!
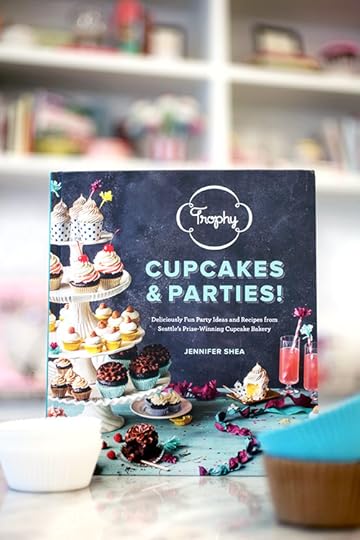
The recipe for these cupcakes is from Jennifer Shea’s new cookbook, Trophy Cupcakes and Parties! (pssst… I’m giving away a couple of signed books below) Trophy Cupcakes has several locations in Seattle. You should visit if you get a chance. Such cute shops and the prettiest cupcakes. I visited the shop in Bellevue a few years ago. Adorable!
But the first time I met Jennifer was back in 2008 when we were both on The Martha Stewart Show. What?!?
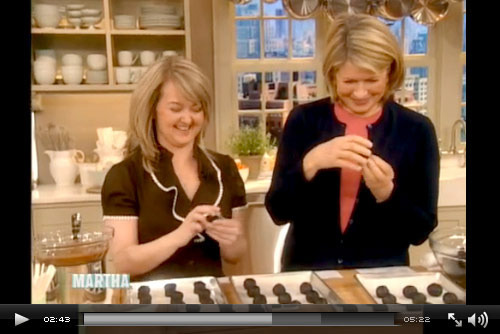
Yes. Still crazy to me. I was on to show Martha how to make my Cupcake Pops about six months after I started the blog (P.S. This past Saturday was National Cake Pops Day. YAY!) and Jennifer was on the show to make these same s’mores cupcakes … which I didn’t get a chance to try when I was on the show.
So, I thought they would be the perfect ones for me to make from her new book.
And boy am I glad I did. They are fantastic!
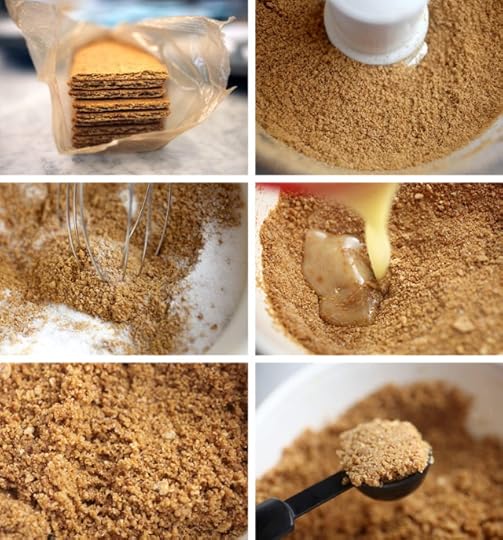
They start with a graham cracker crust for the cupcake. Awesomeness!

Place a teaspoon of the crust mixture in each baking cup.
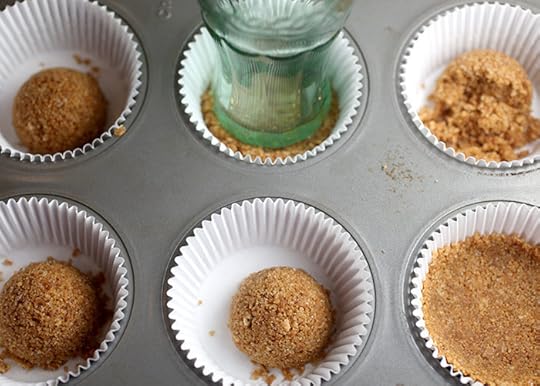
And press with the bottom of a small glass.
Like so.

But that’s not all. They get chocolate, too.
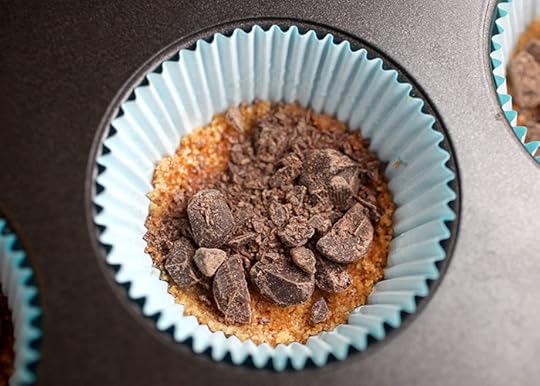
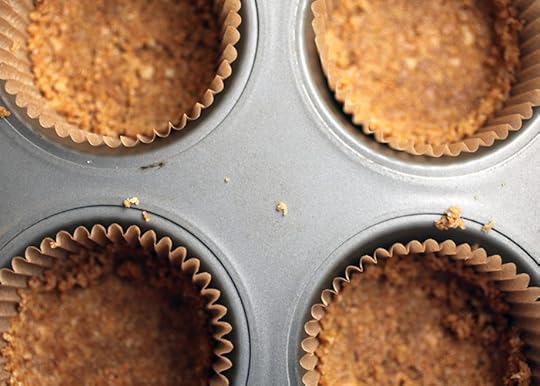
Yep. Just sprinkle chopped chocolate on top of the crusts and bake for a few minutes to set first.
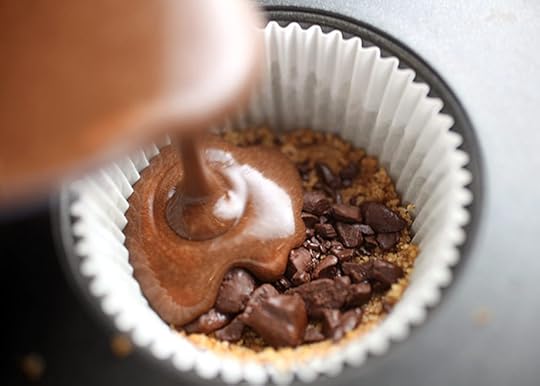
Cool and then… fill with the chocolate cupcake batter. YES!
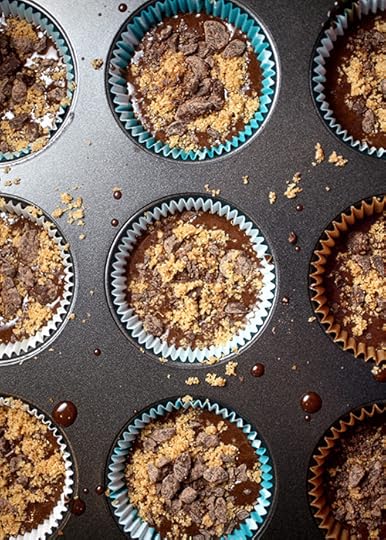
But we can’t stop there. Before baking, sprinkle more graham cracker mixture and chopped chocolate on top. I like where this is going … oh and I’m messy!
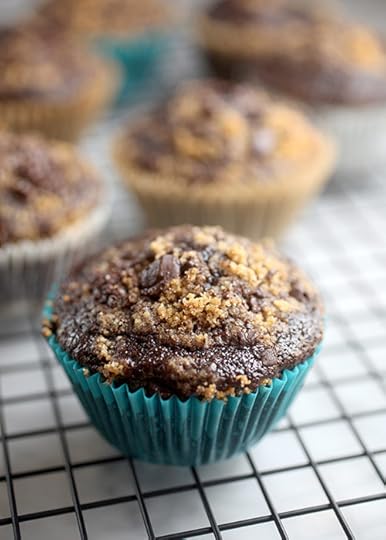
Beautifully cupcakes. I actually think they’re great just like this.
But they wouldn’t be s’mores without the fluffy marshmallow frosting.
Swirl the meringue frosting on top of the cupcake with a star tip and then toast using a kitchen torch.
P.S. I love my kitchen torch. This was the first time I’ve used one, and now I want to toast everything. I wish I hadn’t waited so long to get one. So fun!!!
But not as fun as biting into these babies. Yummmm!
Here’s the recipe … and check out Jennifer’s video on MarthaStewart.com too OR skip down below for the giveaway.
S'mores Cupcakes
January 27, 2014
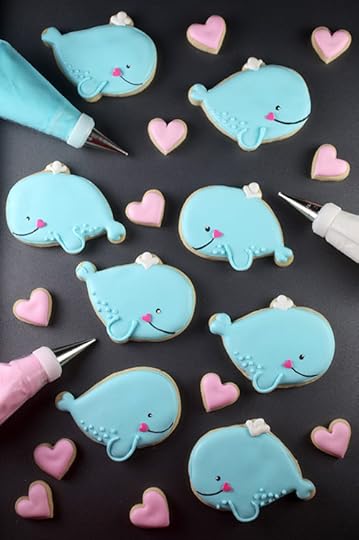
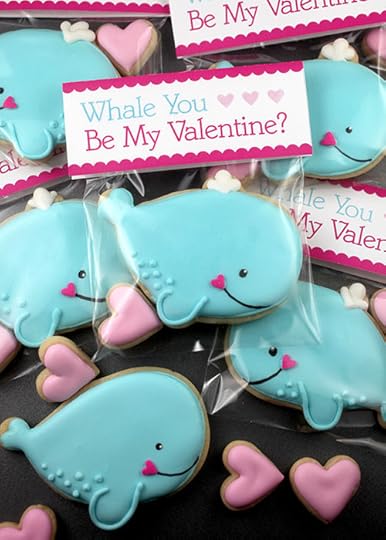
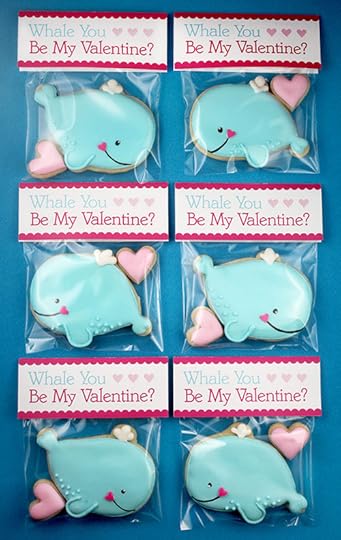
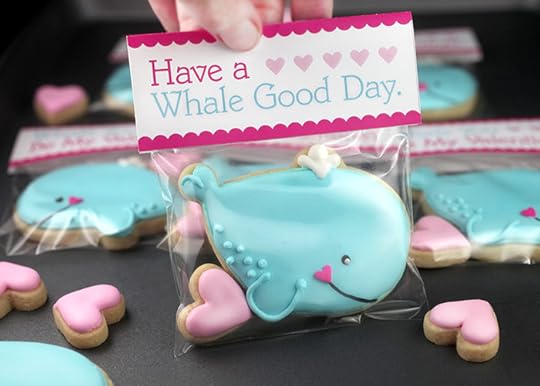
These cookies are whale cute!
Oh my gosh… I love how these cookies turned out. I’ve been wanting to make little whales for about a month now. It started with a cookie cutter that I bought on clearance after Christmas.
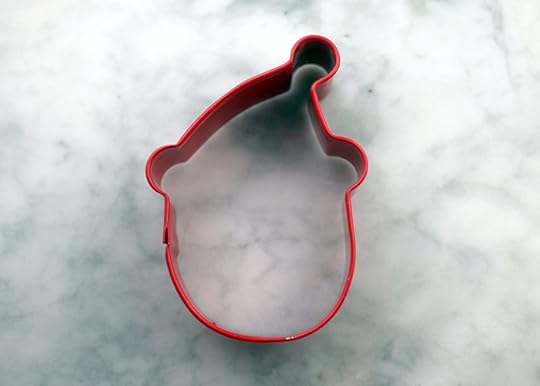
I saw a bunch of these little Santa cutters and decided I absolutely needed one more … you know for next year.
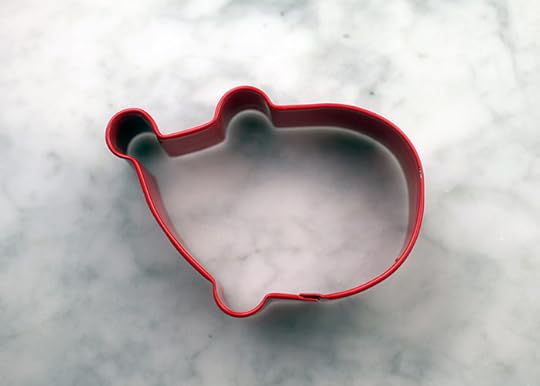
But, when I grabbed it, I must have picked it up sideways because I totally forgot all about Santa. I think I was imprinted or something. This was now my new whale cookie cutter and I haven’t been able to get making them out of my head. So, I decided to turn them into a super sweet packaged treat for Valentine’s Day.
And, also because I like to play.
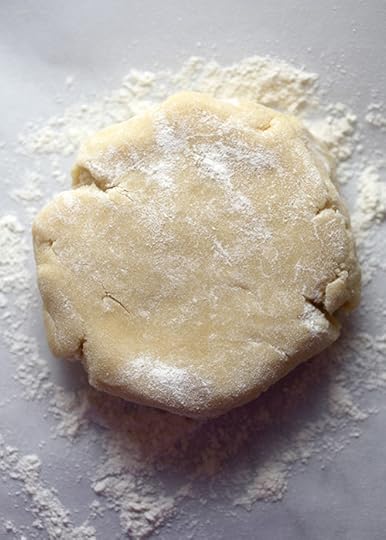
Okay … here we go. It all starts with the cookie dough. And I love using this recipe from my friend Bridget at Bake at 350. It’s always a dream to use. No sticky dough. And if you need cookie decorating help, her book is awesome!
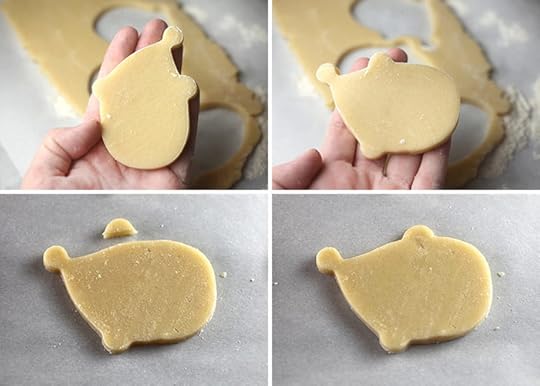
Now my Santa/Whale cookie cutter wasn’t completely perfect. When turned sideways, I needed to cut off part of that little hump from the hat and move it to the right so it would be closer to where the whale’s spout should be for decorating. Not a must, but I thought it made a difference.
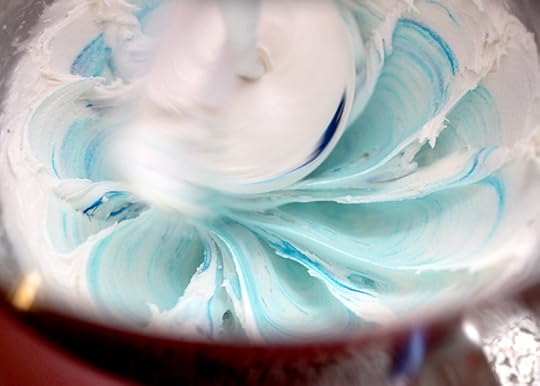
I went light blue for these little guys.
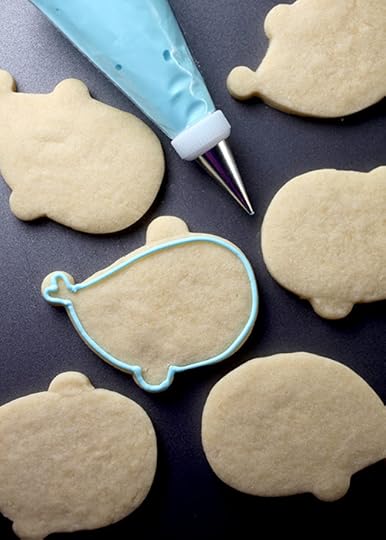
Outline the whale bodies first with royal icing.
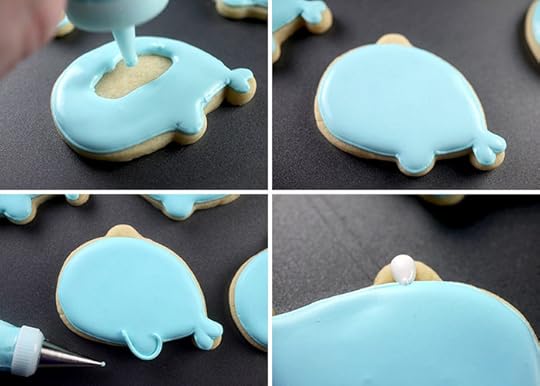
Then fill them in with flood icing consistency and let dry. When all dry, you can define the fins with more of the outline icing.
Then, since my whales were blue, I used white icing for the steam from the whale’s spout.
But that’s not all. These whales have a lot of heart.
… and they needed to be decorated in pink royal icing of course.
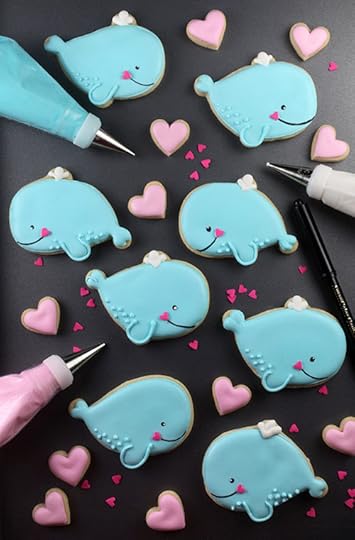
…And topped off with sweet pink heart sprinkles for their mouths, too. Then you just need a black edible ink pen for their eyes and smiles. That makes these cookies pretty easy to decorate. They are basically one color cookies which is right up my alley
P.S. This is the first time I haven’t complained about my piping. I think I’m getting a little better each time I try decorated cookies. But my hearts sunk a bit. I need to work on that.
So that’s the cookie overview. But, that’s not all.
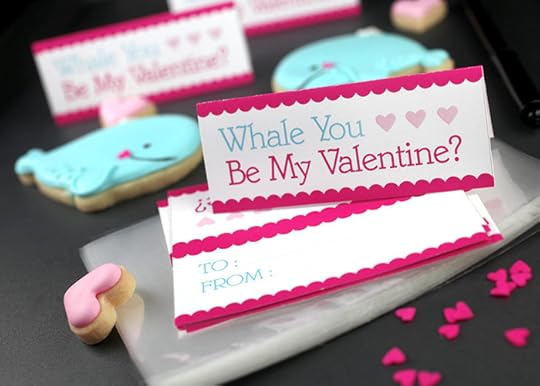
I made custom treat bags to so they’d be extra sweet. The bags I used are 3.75″ X 6″ and I just trimmed off some of the top. The tags are just folded over and attached on top of the bag.
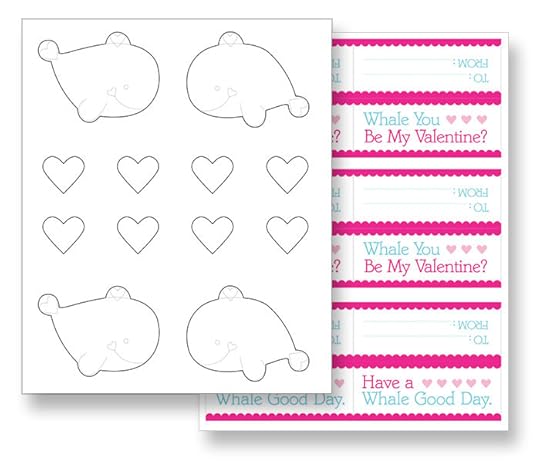
I also made a downloadable pdf for the whale and treat bag tags so you can make them, too.
Oh, and I went ahead and fixed the whale shape if you want to use it as a template to cut out your cookies.
Or … here’s a cutter I found online that looks similar. And the heart cutters were similar to the one in this mini set.
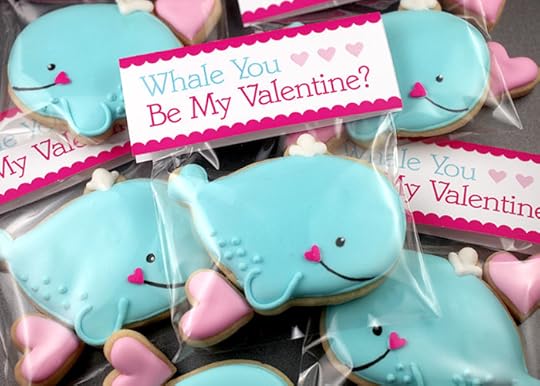
See. Whale cute!
Like whale, whale cute!
Hope they made you smile!
And hope you have a whale good day!
P.S. This version is included in the pdf also, so you can give them away any time of the year.

January 19, 2014
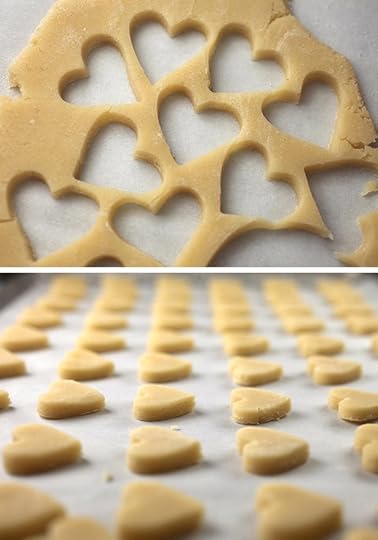
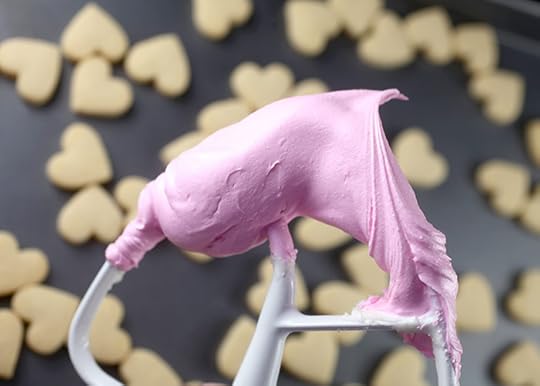
Cranberry Walnut Chocolate Chunk Cookies
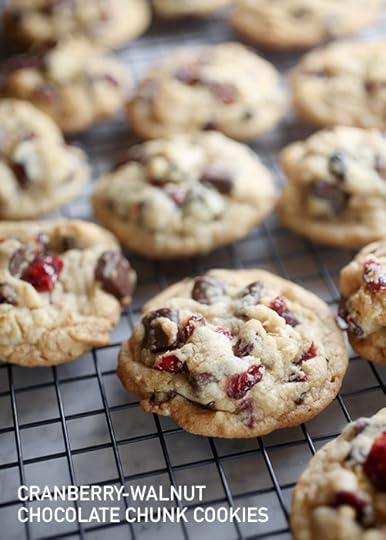
I’ve been craving chocolate chip cookies lately. And when I say lately I mean always. They’re my “I need a chocolate feel-good fix.” But I wanted to mix something else in with them this time so I thought I’d crank them up a bit with cranberries and walnuts. And try to tell myself at the same time I’m eating healthier. It worked for .0001 seconds.
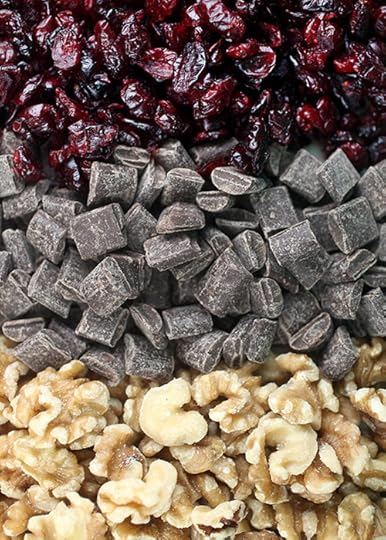
The players.
Dried cranberries. Chocolate chunks. Walnuts. Who’s ready?
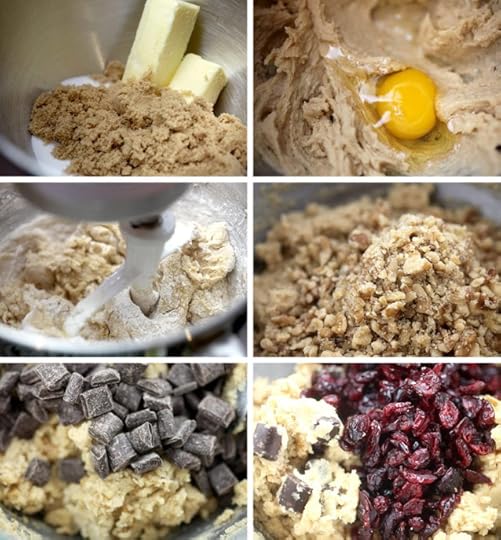
Just cream, combine, mix and stir the ingredients together. Easy. as. that.
The other reason I love chocolate chip cookies. So customizable. It’s fun to just play with different combinations. What’s your favorite cookie mix in? - there’s chocolate … semi-sweet, milk, dark… and in different sizes … mini, regular, chunk or wafer-sized yum. There’s peanut butter, butterscotch, mint and other morsels. Then there’s nuts, fruits, coconut, oats, m&m’s and much more. It’s endless what you can make with a simple cookie base.
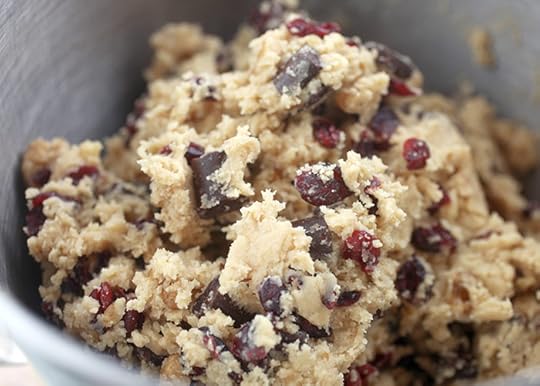
And then you end up with dough to play with. Play dough.
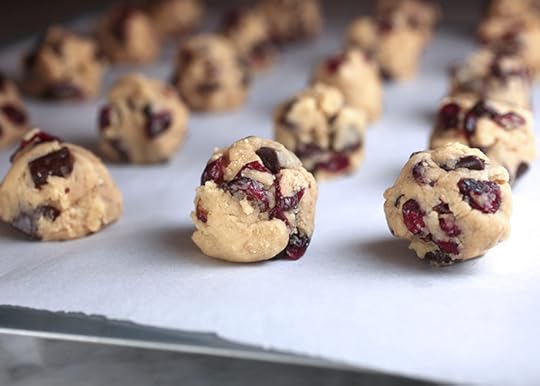
Scoop or roll into 1 1/2 inch balls.
Bake and eat.
That was easy.
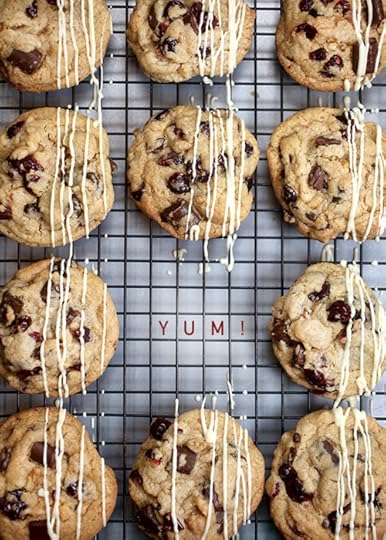
And if you want, drizzle the tops and dress them up with a little melted white chocolate.
Cranberry-Walnut Chocolate Chunk Cookies
January 12, 2014
Say Cheese. Cake!
Today I’m giving away cheesecake! Happy Monday!!!
It’s The Cheesecake Factory Cheesecake from Harry & David. What?? That’s right, the gourmet gift basket company also exclusively ships for the Cheesecake Factory. I didn’t know that until this past fall when I visited Southern Oregon’s Rogue River Valley where Harry & David grows it’s famous Royal Riviera Comice pears. My friend Sandy works with Harry & David and invited a group of us to come out and learn about the company. I love Oregon, so I said sure.
Sidenote: Historically, I’m not a big fruit person…I know, I’m weird. I just stick to a set few that I love. So until that trip I don’t think I’d ever even tried a pear. Oh my gosh I have been missing out. Now I don’t know how other types of pears compare, but the Comice pears they grow are really something special. Definitely delicious. And for me to say that about a fruit is saying a lot.
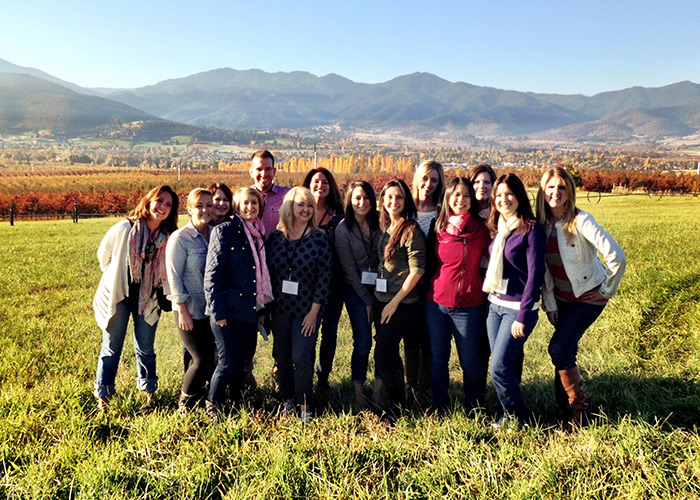
Here’s the fun group of friends I attended with: Helen Jane, Cookies and Cups, The Inspired Room, From Home to Roam, Inspired by Charm, Reluctant Entertainer, Bake Your Day, SkinnyTaste, Gimme Some Oven, The Little Kitchen, Add a Pinch, Love and Olive Oil and Kevin and Amanda.
Check out the slideshow below for a little peek inside the company and Southern Oregon. It was a few days of incredible meals, beautiful surroundings, pears, chocolate decorating, and some of the nicest people I’ve had the pleasure to meet. You can also click here to see the photos on flickr. P. S. If you’re ever in Ashland, Oregon, stay at the Winchester Inn. Some of the best breakfasts I’ve ever had.
Now for some Cheesecake!
The opposite of fruit. : )
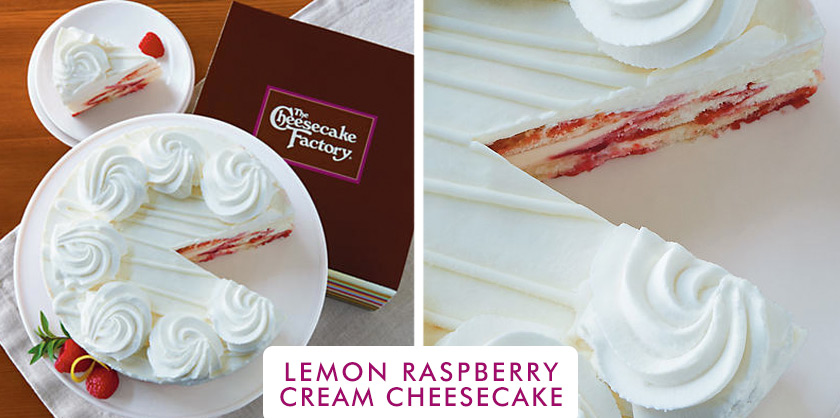
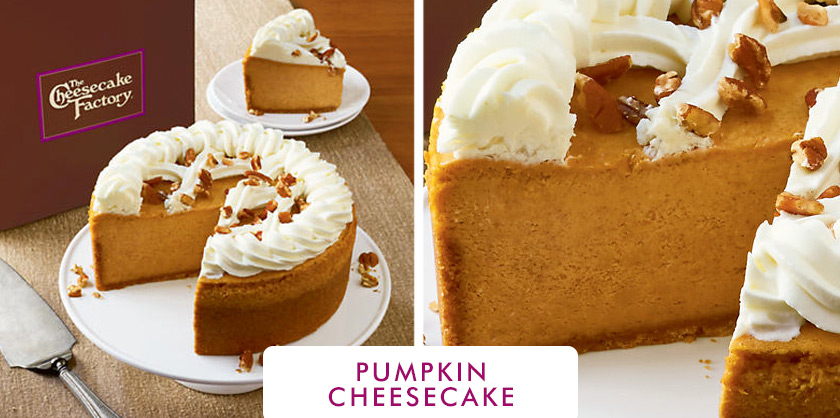
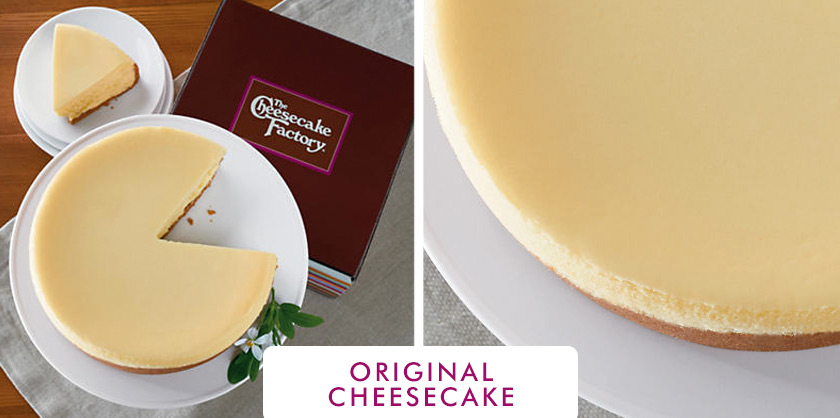
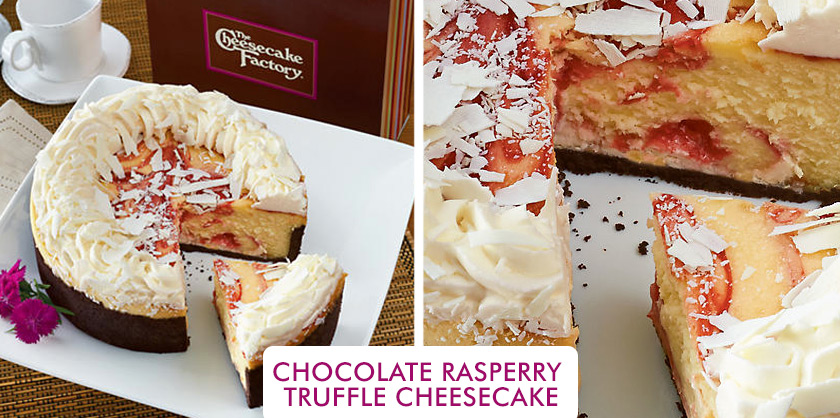
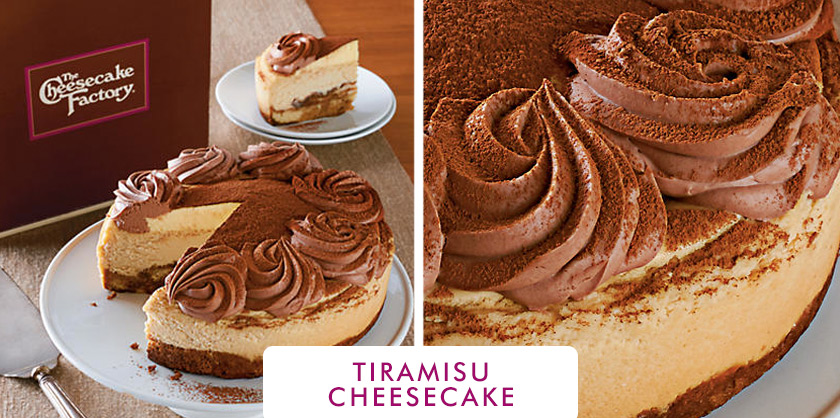
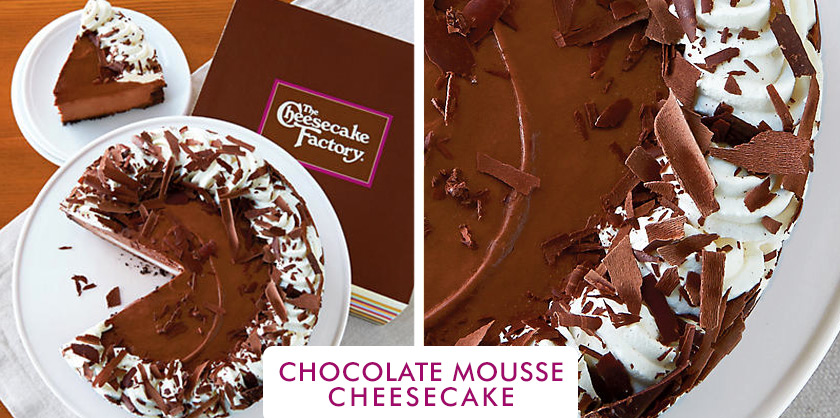
Enter for a chance to win CHEESECAKE! Delivered right to your door.
To be entered for a chance to win, just leave a comment with the name of your favorite flavor above. Easy!
Two (2) winners will be chosen at random to receive your favorite.
And if you really want pears instead, that’s totally fine, too. I’ll be sending gift cards to cover the cheesecake, so you can also pick out whatever you like from the site instead.
Deadline to enter is Wednesday, January 15, 2014 at 7:00 pm ET. Sorry, Time’s Up! Winners announced below.
Winners will be announced sometime Wednesday evening.
Good Luck!
–––––––––––––––––––––––––––––––
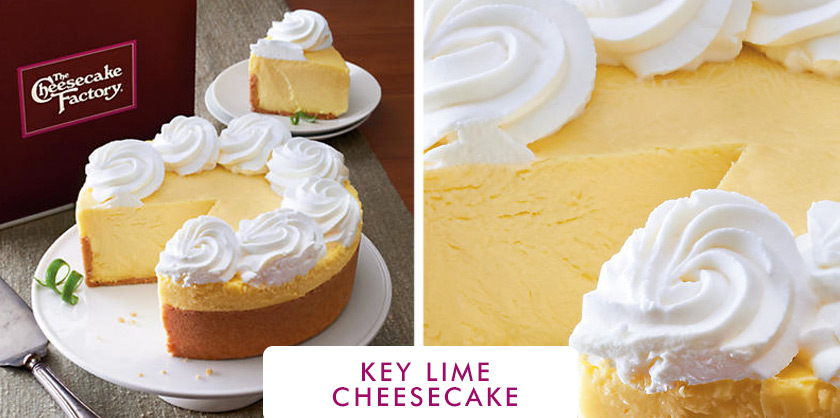
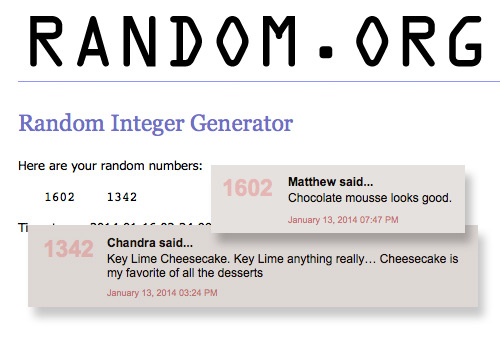
Hey guys! It’s time to announce the cheesecake winners. Their cheesecakes of choice were Chocolate Mousse and Key Lime. So that means you Matthew and you too, Chandra! Congratulations!!! I hope you enjoy.
This giveaway is sponsored by me, but my trip to Oregon was paid for by Harry & David.

January 5, 2014
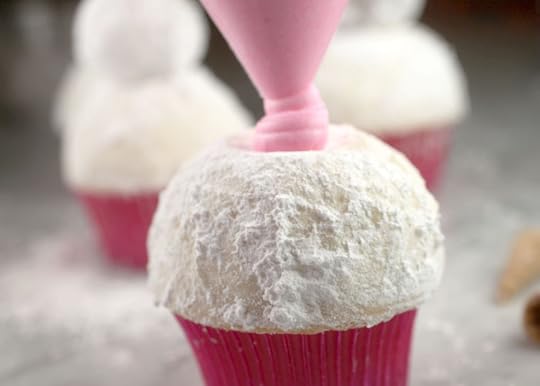
Snow Adorable
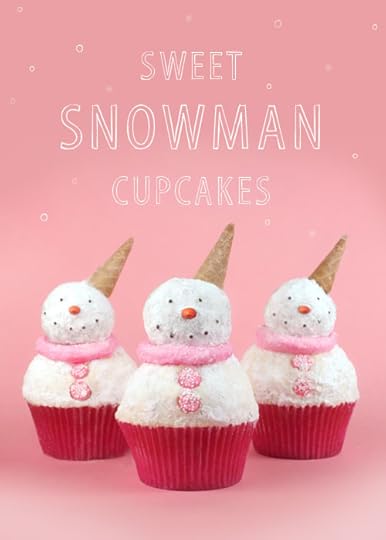
I made some sweet snowman cupcakes this weekend and it kinda looks like it’s been snowing powdered sugar in my kitchen. These snowman heads were inspired by one of my new and now absolute favorite Christmas decorations. I’ll show you in a minute. It’s awesome!
But let me walk you through how I made these first.
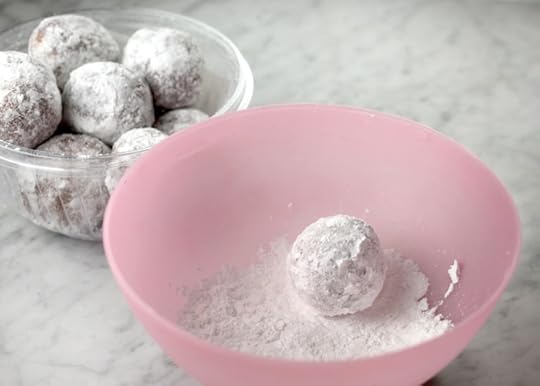
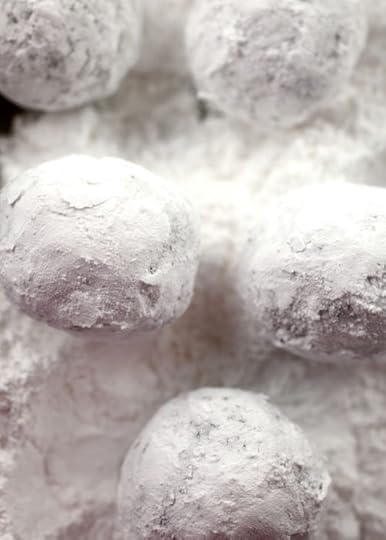
The heads. I just picked up some powdered doughnuts to play with. They needed to be rolled in more sugar though to cover up some of the dark areas.
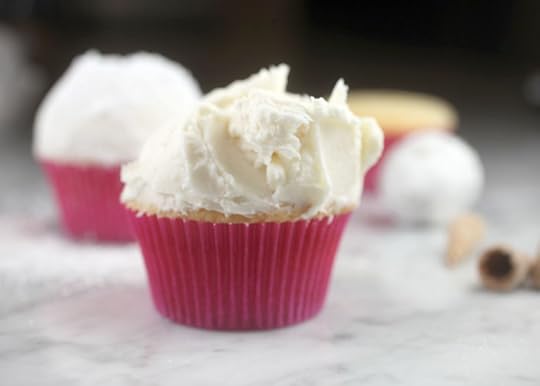
The snowmen bodies were just frosting. I kept it on the thick side, so it would stay sturdy and hold it’s round shape when the heads were placed.
Oh yeah … I used this recipe for the cupcakes.
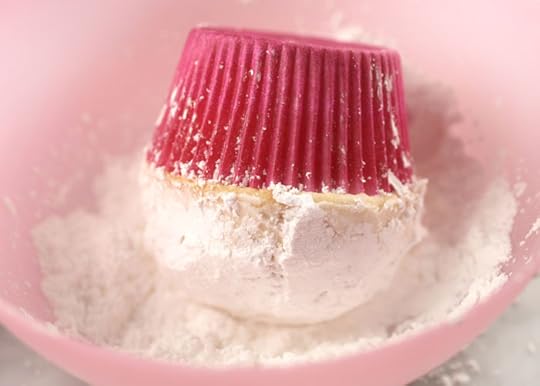
Right after frosting each one, coat with powdered sugar to match the doughnuts and make it look like one snowy body.
The scarves were pink tinted frosting piped on top. When you place the heads and press down, it will look like the scarf wraps all the way around. Then you can sprinkle a little sanding sugar on top for an extra snowy look. You can also put the heads on a lollipop and insert to make it more stable.
One tip – If you want your frosting white, use shortening instead of all butter. It would have made the bodies look brighter. See the frosting and recipe here.

Now for the faces.
I decorated the doughnuts while they layed on a small tray. Just poke a toothpick in position for all the facial features.
Then press chocolate jimmies in for the eyes and mouth and orange sunflowers seeds for the nose.
These Smooth and Melty Mints in pink worked out great as snow dotted buttons on each belly.

And the hats… just gently sawed off waffle cones. You might say that’s a waste of a waffle cone, but I’m not much of an ice cream cone person. I like my ice cream in a cup with a cone on the side. So I just save the unused pieces and use them like nachos.
And speaking of ice cream, let me show you the inspiration for these cupcakes.
Ready?
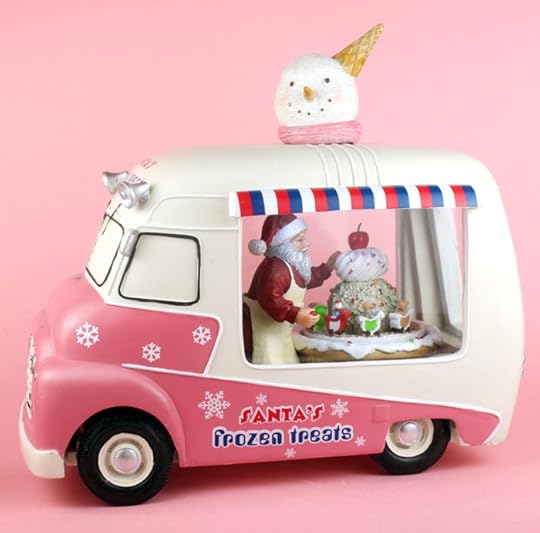
It’s Santa’s Frozen Treats Ice Cream Truck topped with a sweet little snowman head.
I. Love. This. Thing.
P.S. I think the cupcakes are cute, but after the fact I now wish I had made them into cake pops. Just look at that little head. I’m pretty sure I could have made the faces way cuter and definitely less messier. Until next time.
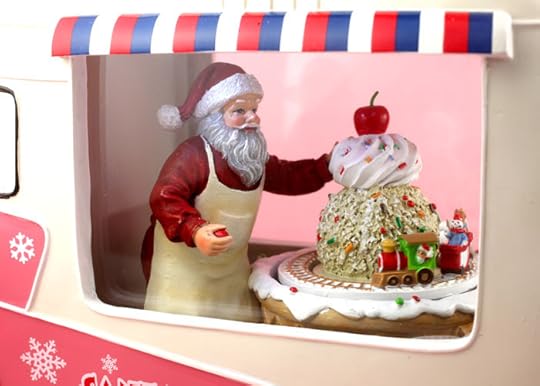
Back to Santa. Inside the truck is an ice cream sundae train track complete with moving train, lighted interior and it even plays 8 holiday tunes. It just makes me happy so I guess I’m going to have to leave it out all year long.
Here’s a short video of it in action on my instagram.

December 29, 2013
It’s been one sweet year!
The holidays are almost over and the year is winding down. I’ve certainly had more than my share of sweets the last several days. Too much even. What about you guys?
But extreme sugar overload hasn’t stopped me from being super excited to start a brand new year of baking. A year of sweets and smiles.
Before more baking begins, here’s a quick look back at a few of my favorite posts from 2013. Check out the links below if you missed any along the way.
Enjoy and here’s to a Happy New Yummy Year!
MINI DOUBLE-DECKER CHOCOLATE DOUGHNUT COOKIES
These were way too much fun to decorate. And double-decking them totally makes them look like real little doughnuts instead of cookies.
CONFETTI CHOCOLATE CHIP COOKIES
These are just simple, fun cookies cuted up with confetti sprinkles and pastel M&M’s. They’ll make you smile with every bite.
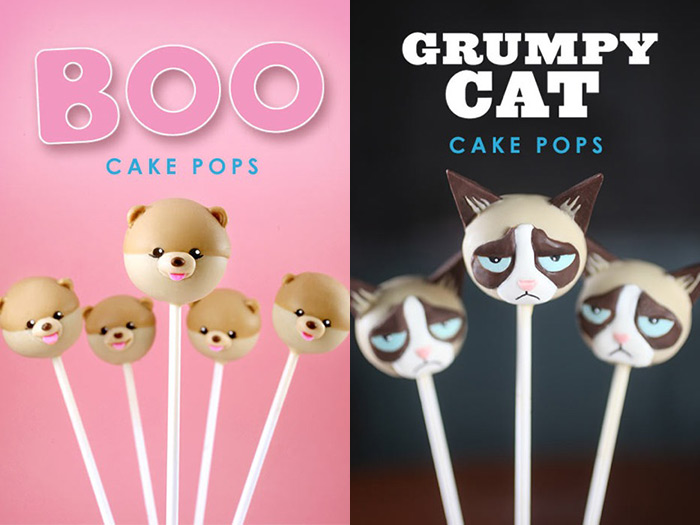
BOO THE DOG AND GRUMPY CAT CAKE POPS
I can’t stand how cute these came out. I love Boo… but then Grumpy Cat’s frown steals my heart. So I had to include them both.
PEANUT BUTTER AND CHOCOLATE CUPCAKES
Umm… Cookies. Cupcakes. Peanut Butter. Chocolate. These are a win all the way around.
HUMMINGBIRD CAKE WITH CREAM CHEESE FROSTING
I’ve been wanting to make one of these cakes forever and it did not disappoint. Sometimes I forget how much I love cake because I make so many other mini treats throughout the year, but this one makes me want to bake more big layer cakes.
These glam bunnies might be my favorite easter-themed pops to date. So girlie and sweet.
CHOCOLATE AND PEANUT BUTTER TRUFFLES
No-bake, bite-size yumminess. Yes and yes. And the coating possibilities make them so pretty.
These were crazy good. I had forgotten all about them until going back through these old posts, but now I think I need to make another batch pronto.
Individual sweet little snack bags with downloadable labels, too. Oh and just a warning – this stuff is super addictive, so if you plan on giving away as treats, make a second batch so there’s enough for you to nibble on, too.
These guys. Oh my gosh. They turned out so cute. You have to check out the other characters I made, too!
Okay… these are the easiest things ever. But can I just say, they might have made me smile the biggest when I was making them. Yes, I was completely giddy… like a little girl. These would be fun for a sleepover with different flavors and sprinkles to play with.
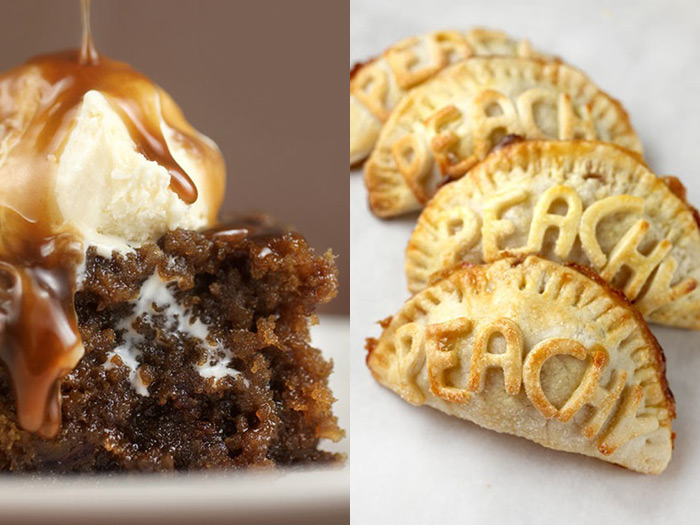
This picture says everything. Make this right now. Oh my gosh.
Little individual pies. I love how you can personalize these for people or label them for flavors by switching up the letters.
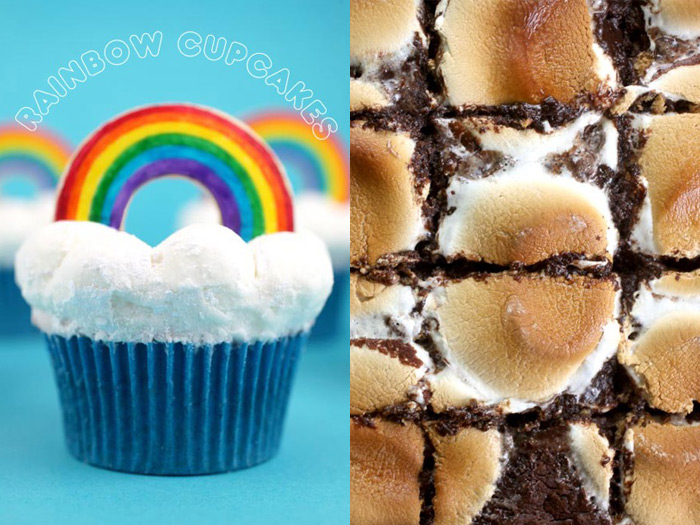
These fluffy frosting cloud cupcakes are smile inducing.
Chocolate, Marshmallows and graham crackers all baked up in a nice little brownie. No campfire required.
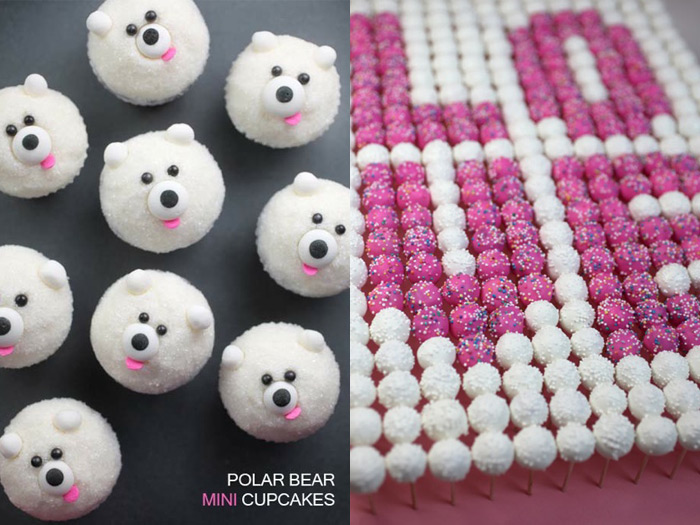
It’s hard to tell here, but these are miniature cupcakes. Decorating them is easy and you don’t even need a piping bag. Just a few different size sprinkles.
Okay, this one took a template and a little time to do, but the effect is awesome. Take a look at the XOXO version, too.
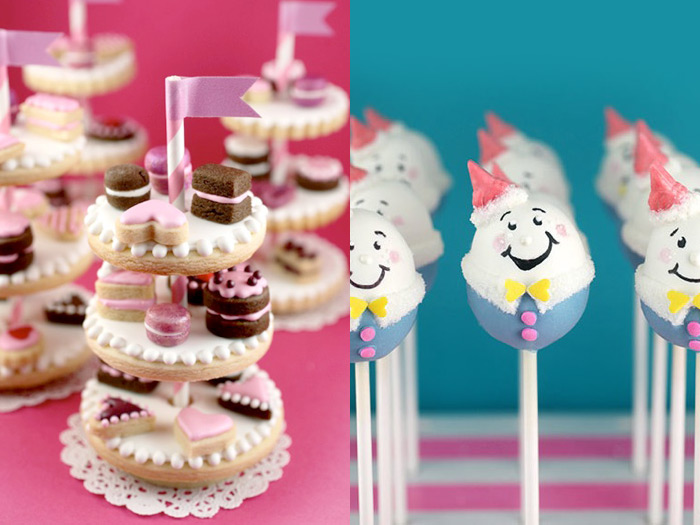
I think this might have been my favorite project from last year. It was so much fun making teeny-tiny play food cookies and then having the tiered stands work out like I had imagined. I’m like a kid sometimes when things all come together and I certainly felt like one making these sugar cookies.
These happy little guys will steal your heart. They are suited up and ready to party. Check out their appearance at this Humpty themed baby shower, too.
Well, that’s it for a little random sweetness from the past 12 months. Hope you enjoyed looking at these again or even for the first time.

December 22, 2013
Say Good Morning with these Chocolate Cinnamon Rolls
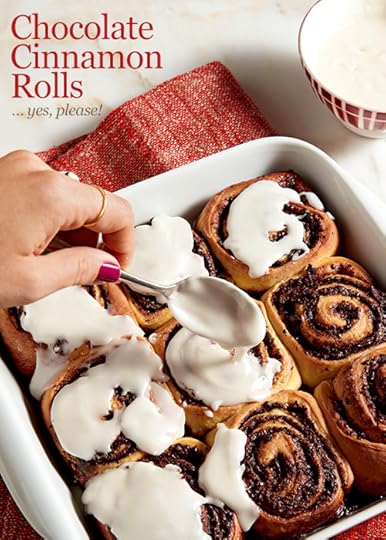
Here’s a sweet recipe if you’re looking for something to make ahead of time that you can pop in the oven on Christmas Morning. Or any morning. Like tomorrow morning. I created these for the December issue of Ladies’ Home Journal and they are amazing swirls of chocolate and cinnamon bathed in a delicious and easy vanilla glaze topping. And I totally want to make them again right now. Every time I make cinnamon rolls I wonder why I don’t make them more often. Oh my gosh. They are so good and simple for such a luscious result.
Sorry, I don’t have step-by-step photos for these since they were photographed by the magazine, but feel free to take a look at my pumpkin cinnamon rolls if you want a visual guide.
Okay… here’s the recipe.
Let the chocolate cinnamon rolling begin.
Chocolate Cinnamon Rolls
Bakerella's Blog

- Bakerella's profile
- 9 followers

