
Bakerella's Blog, page 27
October 13, 2013
Baketober!
October baking is on! Who has already made some super cute treats or perfectly pumpkiny desserts? Do you like fall baking as much as I do? I hope so because I pulled together some fun baking projects in case you want any ideas or inspiration. It’s time to break out the butter.
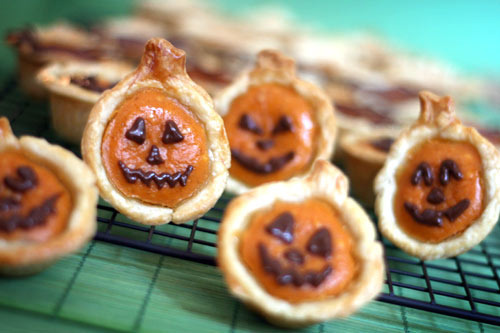
Pumpkin Pie Bites >
Aaaah! These little pie bites are one of my favorite projects. They make me smile every time. I love how easy they are to make, too. They happened when I thought about reusing a pumpkin cutter to make mini pumpkin pie shapes by stuffing the dough in a mini cupcake tray. Too cute.
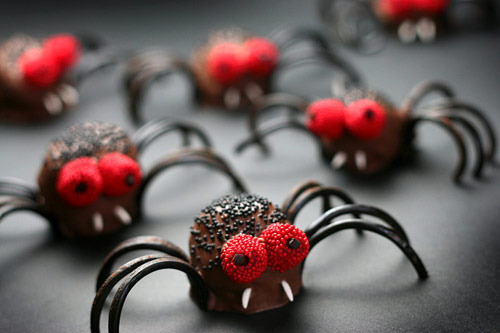
Spider Bites >
These are not so cute. Creepy comes to mind. And fun. Creepy is fun. I can’t help but squirm when I see these little guys with brownies inside.
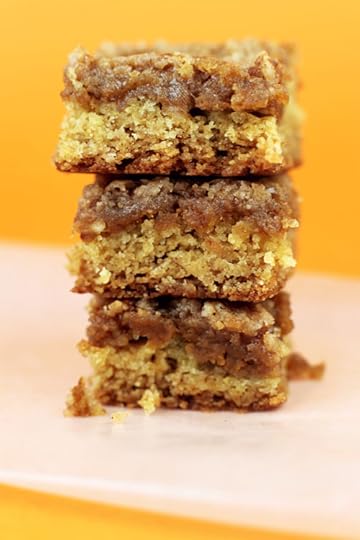
Pecan Pumpkin Butter Squares >
Oh my gosh I forgot about these sweet squares. I had them over and over during October 2010 on my Williams-Sonoma Book tour. I totally need to go out and get some pumpkin butter right now. Or maybe I’ll just head to the mall and hope for some free samples at the store.

Candy Corn Cake Pops >
These are the happiest Candy Corns I ever did see. At least until I bite their cute little cheeks off.
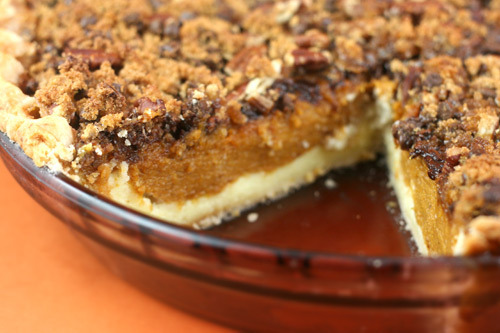
Pumpkin Pie Cheesecake >
I originally made this deliciousness around Thanksgiving time, but it’s calling out to be made in October.
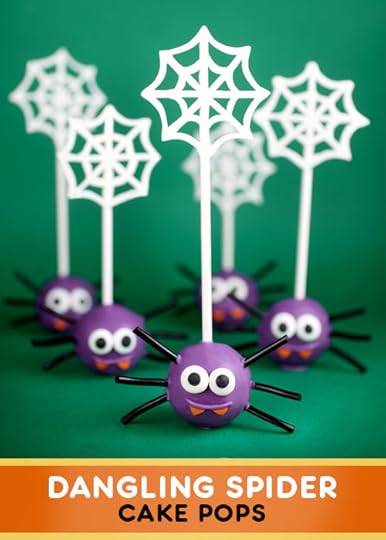
Dangling Spider Cake Pops >
I’m so in love with these happy little spiders. Use a longer lollipop stick to really pull off this adorable dangling look.
Hi Hat Cupcakes >
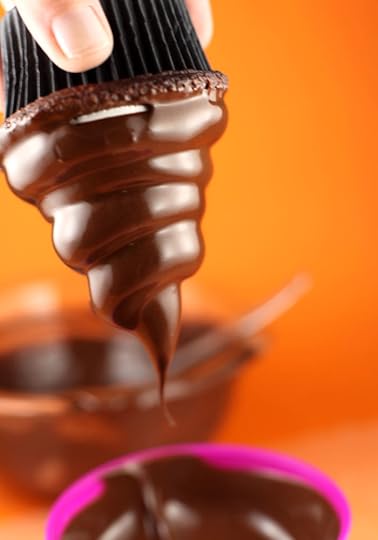
If you’ve never made these cupcakes before, do it right now. There’s something super satisfying about successfully dipping swirly marshmallowy tops in chocolate. Plus they are crazy good. Okay, these don’t really have anything to do with October other than this cupcake looks so good on orange.
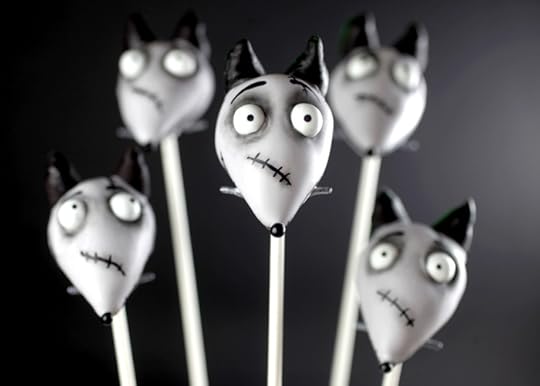
Frankenweenie >
Zombie Doggies. Enough said.
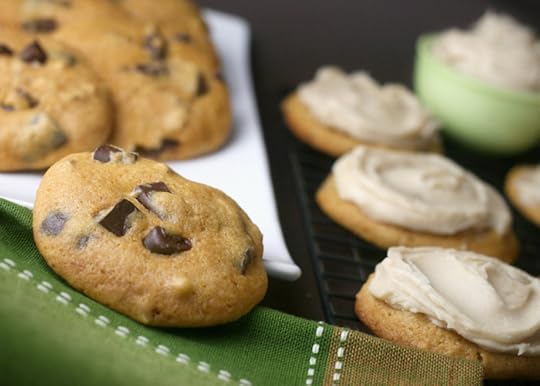
Pumpkin Pecan Chocolate Chunk Cookies with Maple Brown Butter Frosting >
These cookies are all about comfort. Please don’t skip out on the frosting. It’s Aaaahmazing!!
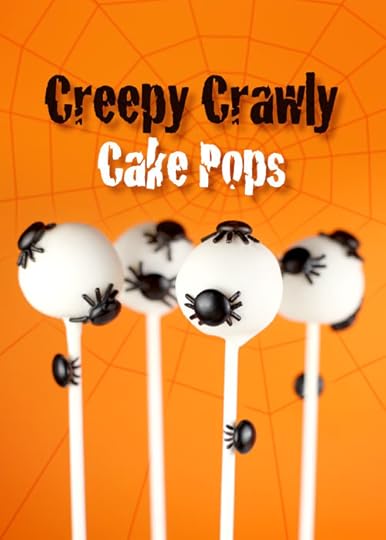
Creepy Crawly Cake Pops >
As much as I dislike spiders, I sure do like decorating with them. These creepy crawlers are cute as can be.
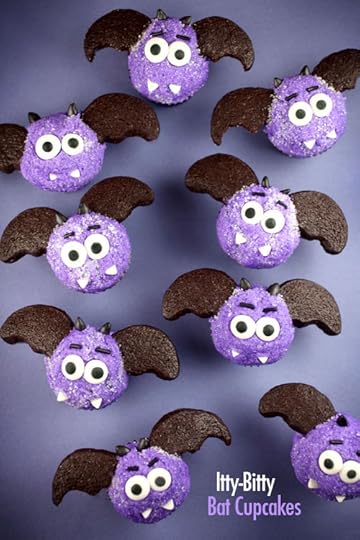
Itty-Bitty Bat Cupcakes >
Sink your teeth into these bite-size bats.
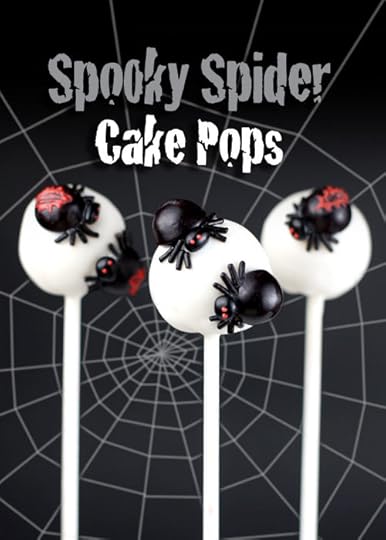
Spooky Spider Cake Pops >
More spiders. You know… those big bodied, pudgy, don’t you dare get near me kind of spooky spiders. Well, these totally taste better.
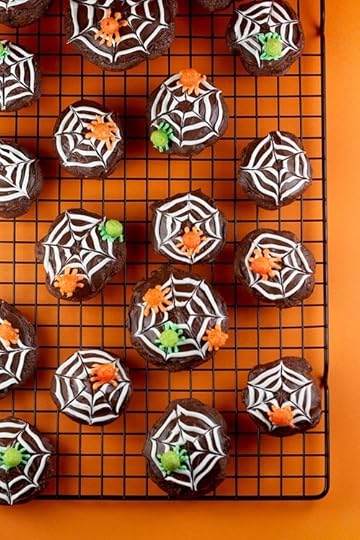
Spider Cookies >
I love how graphic these are with chocolate frosting and piped white spider webs. Super easy doesn’t hurt either.
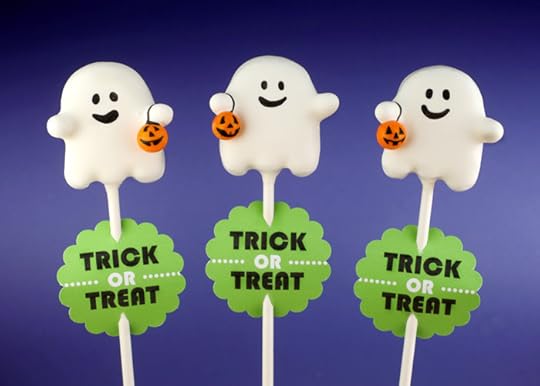
Trick-or-Treating Ghost Cake Pops >
Look at those tiny candy buckets. I can’t stand the cuteness. Oh yeah, there’s also Trick or Treat tags you can download.
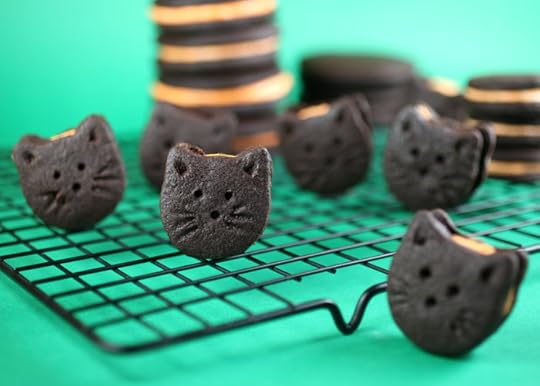
Kitty Cat Oreos >
Meow. Meow. Me…yum…yum! Homemade oreos get in my tum!
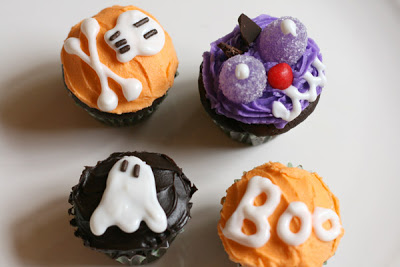
Halloween Cupcakes >
There’s not really a recipe for these, but there are a few more pics if you want to see… or if you want a chuckle. These were the very first sweets I made and posted on this website. I realized right away how much I enjoyed baking and creating and I haven’t been able to stop since.
So… Do you see anything you like?
I hope so and I hope you have fun baking this Halloween.


October 6, 2013
Time to get in the baking spirit
It’s October and one of the most fun months of the year to bake and share sweet treats.
Cute. Spooky. Scary. Ooey. October is all about having fun in the kitchen and treating people to a smile.
Want to get your bake on and get in the baking spirit? Want to trick out your treats?
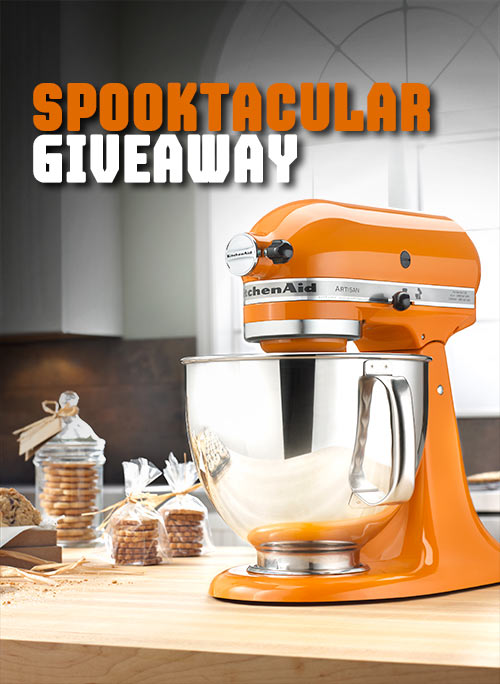
Well, how about a brand new KitchenAid stand mixer to get you started?
Sounds ghoulishly good to me.
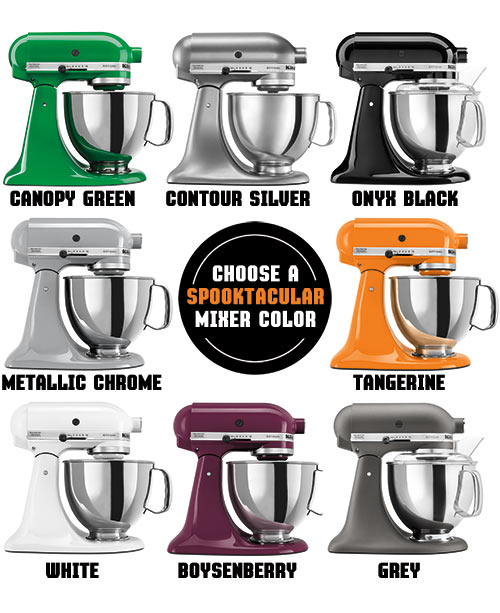
Enter for a chance to win a KitchenAid Artisan Stand Mixer in one of the Spooktacular colors above.
To enter, just leave a comment on this post and tell me which mixer color you’d like to win … oh and if you know what treat you’d like to make this Halloween, I’d love to hear that too.
Deadline to enter is Wednesday, October 9th, 2013 at 7:00 pm ET.
One winner will be chosen at random and announced sometime Wednesday evening.
Good luck guys!
This giveaway is sponsored by me.

October 3, 2013
It’s Chocolate Adventure Time

Who’s up for a baking adventure? One that’s centered around what else, but CHOCOLATE!
Oh my… I’m so excited about this.
Scharffen Berger Chocolate Maker and TuttiFoodie are hosting another amazing Chocolate Adventure Contest and this year the theme is all about BARS.
That’s right. Chocolate and Bars. That’s any kind of bar as long as it uses Scharffen Berger Chocolate and at least one adventure ingredient from this year’s list.
You guys can so do this.
You’ll want to do this.
I hope you do this.
Why, you ask? Well how about a $25,000 winning prize. That’s pretty sweet! … Plus ten Culinary Honorees will also be chosen to win an iPad mini and more. Awesome!
Want to make brownies? Blondies? Ice Cream Bars?
What about layered bars, cookie bars or even chocolate bark?
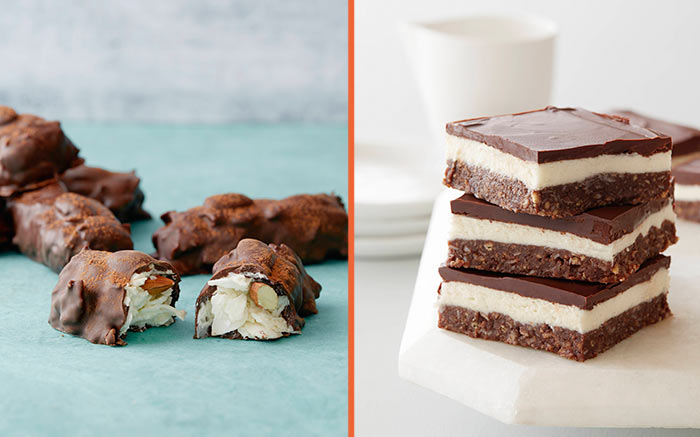
How about candy bars or get in my face bars? We’re talking any kind of bar.
Are you in? Good. I’m glad.
It’s time to set the bar!
Just create an original bar recipe using Scharffen Berger chocolate and one of the following 12 adventure ingredients.
Adventure Ingredients
Bourbon
Turbinado Sugar
Fresh Pomegranate
Hibiscus
Extra Virgin Olive Oil
Peppercorns (Any Type – Black, Red, Green)
Pandan Leaf or Pandan Leaf Extract
Coconut Milk, Cream, Butter or Oil
Oat Flour
Carrot
Sesame Seeds (Black or White)
Fresh Croutons or Crostini
I’m helping judge the contest again this year with John Scharffenberger, Alice Medrich, and Matt Armendariz and we can’t wait to taste your creations. Entries will be judged on creativity, taste, ease of preparation and whether the recipe reflects a spirit of adventure. So get your creative juices flowing.
The contest began October 1, 2013 and goes through January 2, 2014. So you have plenty of time to come up with a recipe. Or ten. Yep. You can enter up to ten recipes. That’s more chances to win.
Check out chocolateadventurecontest.com for official rules and how to enter.
GOOD LUCK!
So… which ingredient sounds adventurous to you?
Photography by Matt Armendariz. Food styling by Adam Pearson.

September 29, 2013
Carefree Caramel Cake
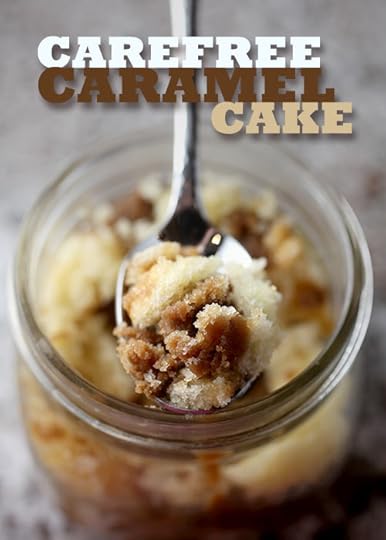
Cake. Caramel. Get Carried away!
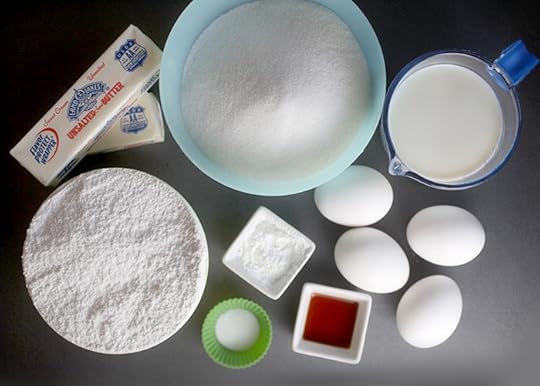
Gather your ingredients. Butter, flour, sugar, milk, eggs, baking powder, salt and vanilla.
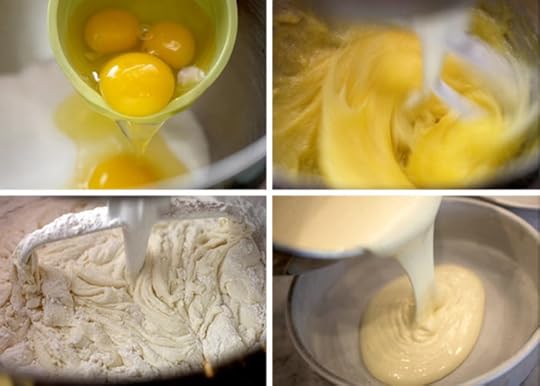
Then start the cake making and get to mixing.
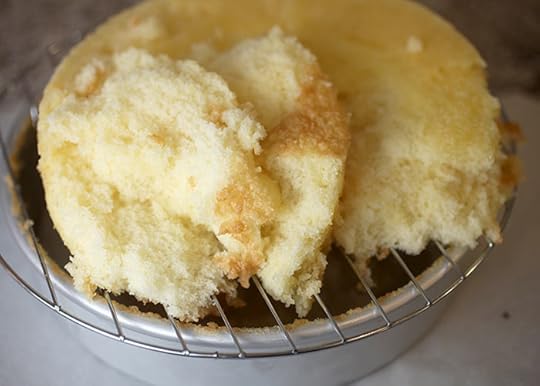
Then get really bummed when you take your cake out of the pans too soon before they’ve cooled… and just before your going to take it to a friend’s house for dinner … in just over an hour. Have you been there, too? Ugh. So disappointing.
So that’s when the caramel layer cake I’d been dying to make became carefree.
And that’s perfectly okay, because this was one of the best tasting yellow cakes. It was so so good. Oh my gosh I could hardly stop eating pieces of it.
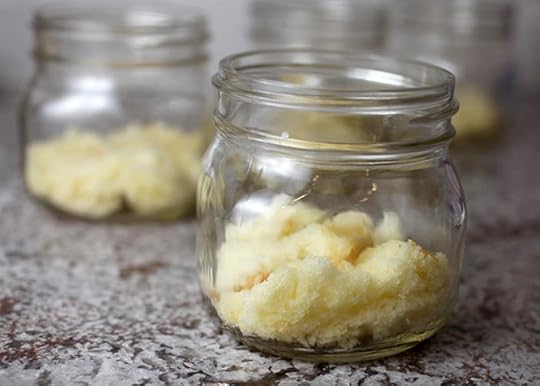
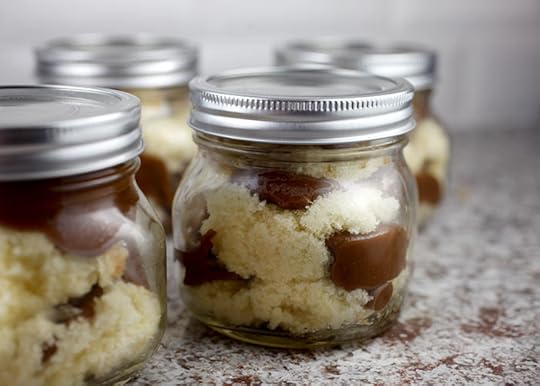
But thankfully I stopped in time to save enough cake and turn them into personal desserts that I could easily carry.
Little jars. Big save. Score.
Now to make the caramel icing so I can layer it on.
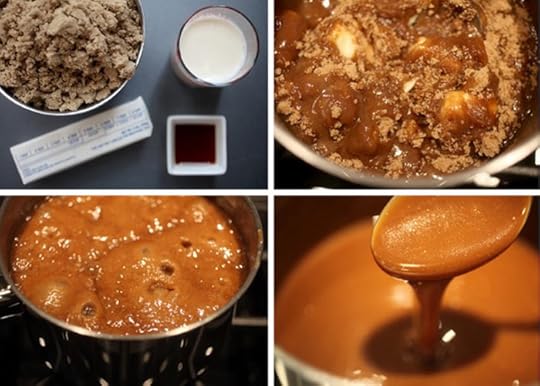
Brown sugar, butter, evaporated milk and vanilla makes one thick glorious icing. You have to spread it quickly while it’s still warm because it will harden when it cools … that is if you’re icing a cake.
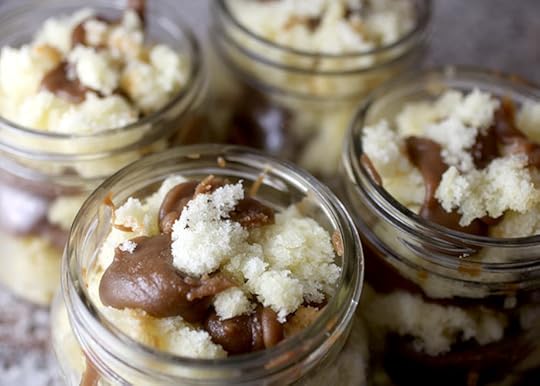
But in jars, and in a hurry… spooning it in worked just fine. My friends certainly didn’t mind.
Spoon. Crumble. Carry. On.
This caramel cake recipe came from a cute little book I have called Southern Cakes by Nancie McDermott.
GiGi's Caramel Cake … in Jars
September 22, 2013
Decorating Doughnuts
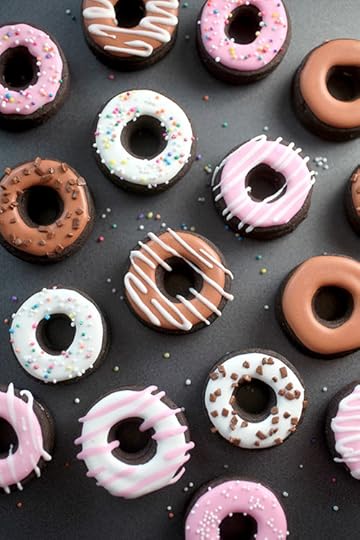
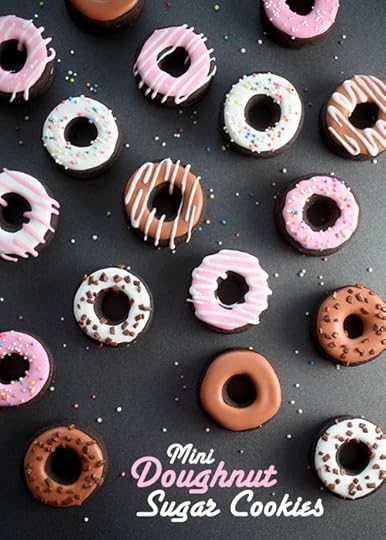
It’s Doughnut Time!

Or rather Double Decker, Dark Chocolate, Mini Doughnut Sugar Cookie time.
That’s a mouthful for these mini treats.
They are just too cute and too easy to make.
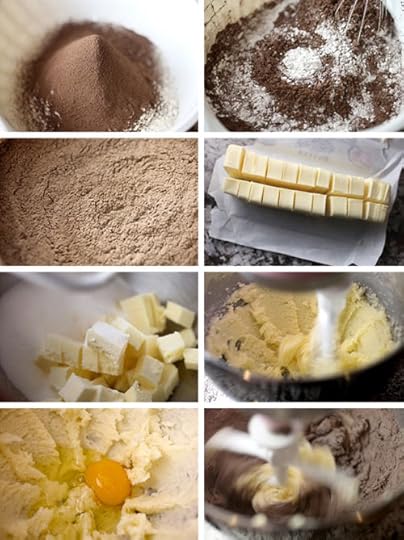
Cocoa. Flour. Mix.
Cold Butter. Sugar. Cream together.
Add the egg and beat. Then add the flour mixture and combine it all together.
I made these yummy dark chocolate doughnut cookies using my sweet sweet friend Bridget of Bake at 350‘s super easy sugar cookie and royal icing recipe that I’ve used before.
This time I just swapped 1/2 cup of flour for 1/2 cup of special dark cocoa from Hershey’s.
Try it. You’ll like it!
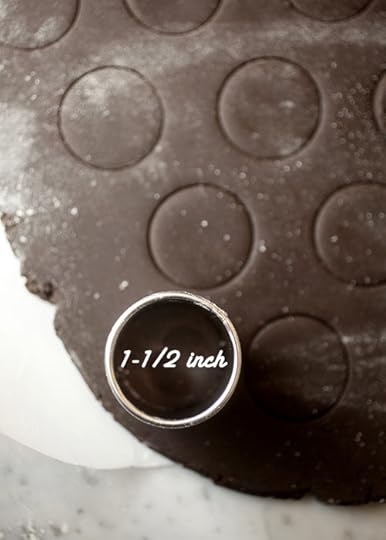
After you make the dough, it’s ready to roll and cut.
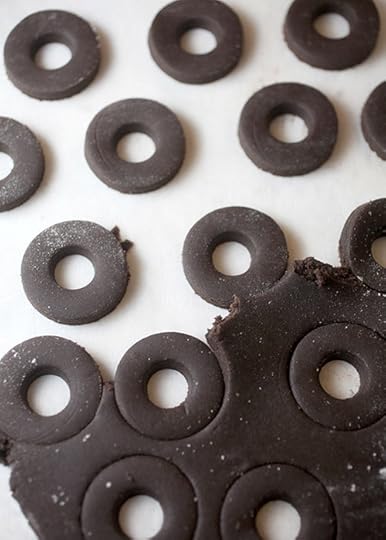
These are mini doughnuts, but you can make them any size you like.
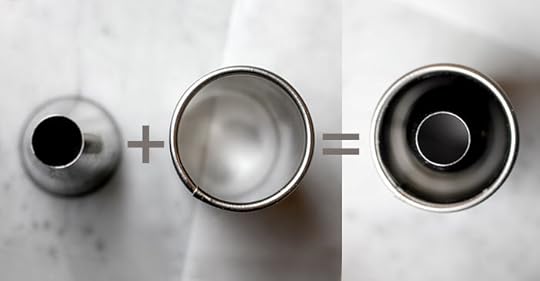
I used a 1 1/2-inch round cutter and a Ateco 807 tip. The two together make a mini doughnut shape.
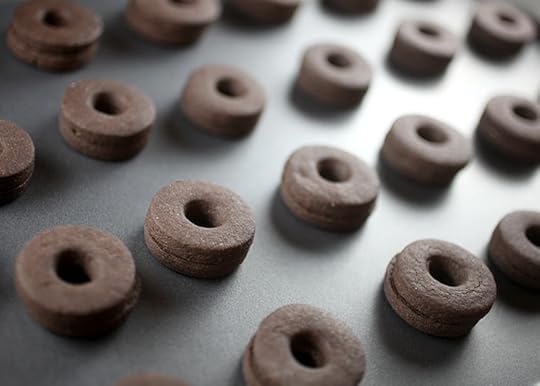
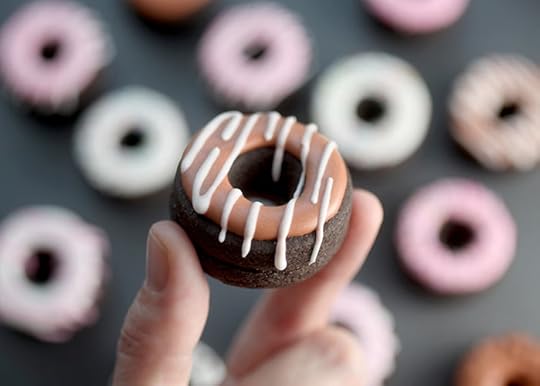
Pair the cookies up and they make the perfect proportions for actual size mini doughnuts.
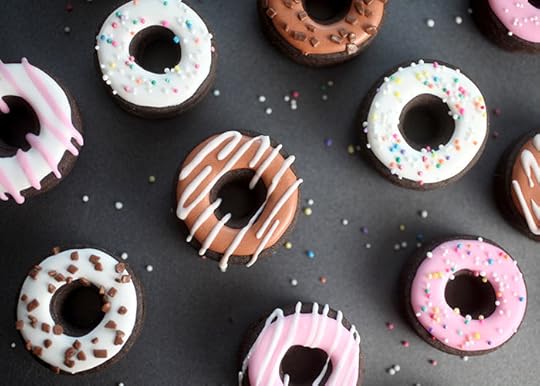
And when you decorate them all super cute… you won’t even think they’re cookies at first glance.
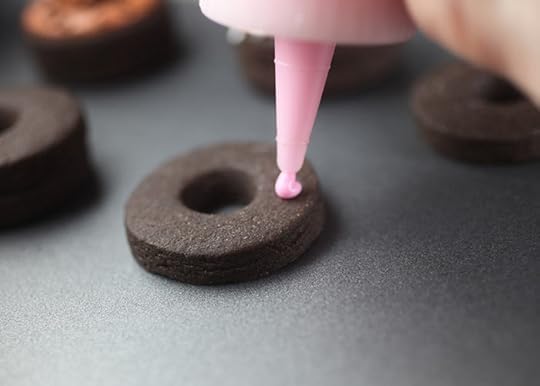
To pipe, I just used a small squeeze bottle filled with royal icing that was thick enough enough to hold its shape without having to pipe an outline border first.
Oh and by the way … I totally make a major mess whenever I decorate cookies.
Well, I really make a major mess whenever I make anything.
That’s okay though.
Mistakes mean they are mine to eat.
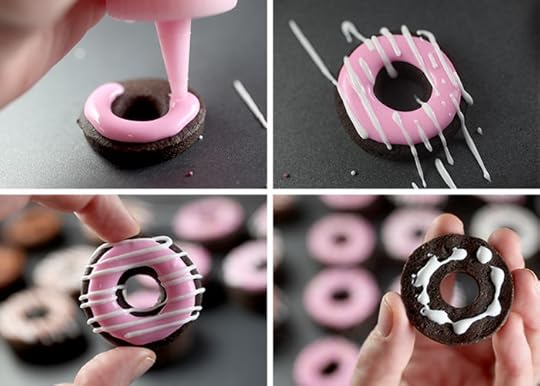
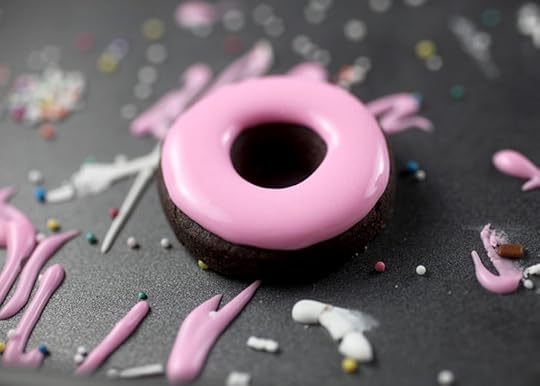
Pipe the cookies with pink royal icing and then you can drizzle the tops with an alternating color for a sweet glaze effect. When dry, Pipe a few dabs of royal icing on the bottom of the decorated cookie and then attach another plain cookie, with flat sides facing each other.
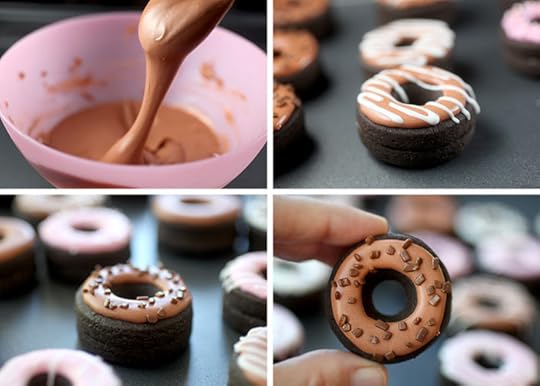
Repeat with chocolate colored royal icing and sprinkles.
Doughnut Sugar Cookies. Done.
You can also just make a bunch of single doughnut cookies if you want more and don’t need a 3-d cookie look.
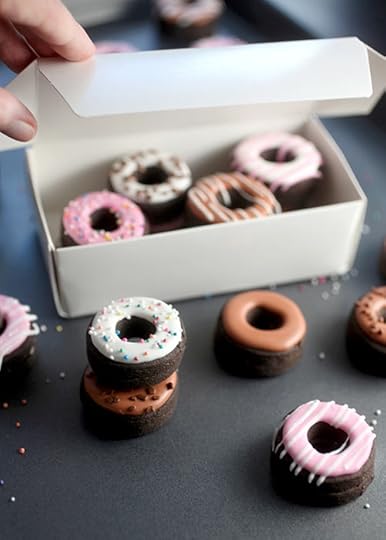
Make them more fun by packaging them in a cute little box to give away and make someone’s day.
Enjoy!

September 15, 2013
Boo. Hiss.
That’s right.
Boo Hiss… in the sweetest way possible.
It’s Boo. The World’s Cutest Dog.
And hiss… it’s one Grumpy Cat.
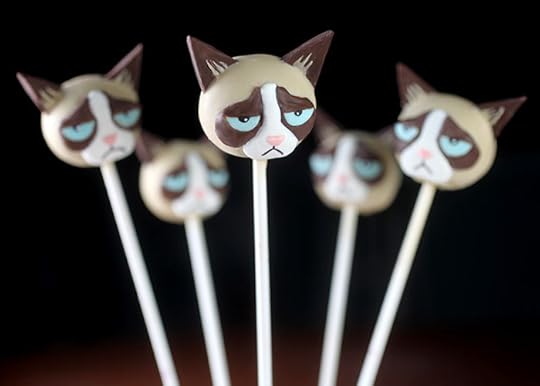
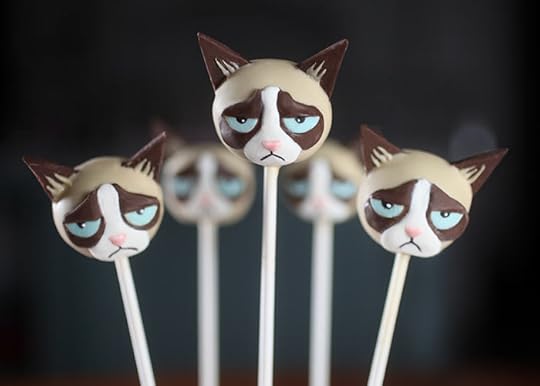
Yeah, so this is what happens when cake pops and cute internet celebrity pets collide.
Adorable edible animals.
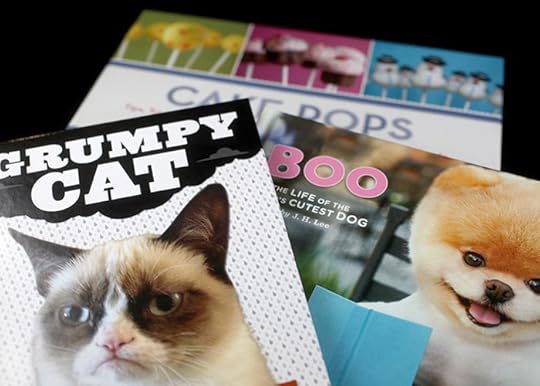
Did you know Boo and Grumpy Cat have their own books? Boo has almost 7.5 million Facebook fans, stuffed animals and calendars and Grumpy Cat even has a movie deal. Crazy.
And the three of us have a little something in common. We share the same publisher, Chronicle Books. I already had Boo’s book and when I found out Chronicle was publishing Grumpy Cat’s book, too – I was unexplainably excited – like I could stop by their offices or something and be able to cuddle that kitty. I thought a while back, it would be fun to surprise my friends at Chronicle and make these two cuties into cake pops and I finally got around to it last weekend. Hope they love them. By the way guys, if you’re reading… I totally want to be there for a Boo and Grumpy Cat playdate.

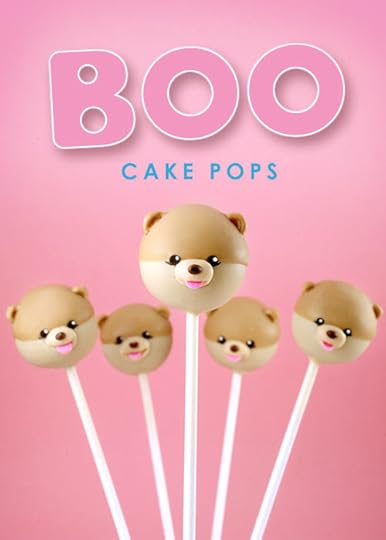
Boo is a little pomeranian with the cutest puppy haircut and bouncing personality.
Grumpy Cat (whose real name is Tardar Sauce) on the other hand is not so perky with a permanent grumpy expression. Let’s just say that if these two hung out together, Boo would totally be Grumpy Cat’s Nermal. And if you get that reference you’ll probably enjoy this and this, too.
Now… if you have no idea who these two are or what I am talking about, just google Boo the Dog and Grumpy Cat for a little pop culture and you’ll get it. Adorable overload.
But even if you don’t know anything about them … they still make the cutest little pet pops. Here’s how I decorated them…
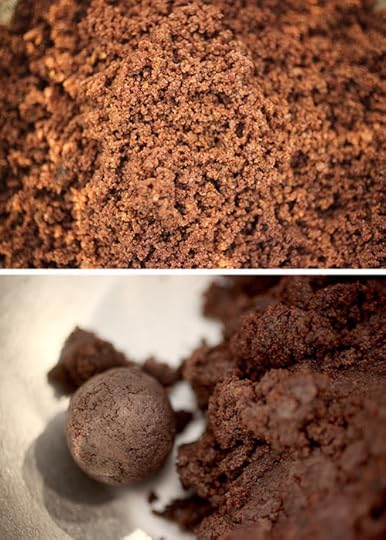
Start with crumbled cake and frosting mixed together and rolled into balls.
You guys know how to do this by now, but if not… here’s a link to the full how-to instructions for basic cake pops.
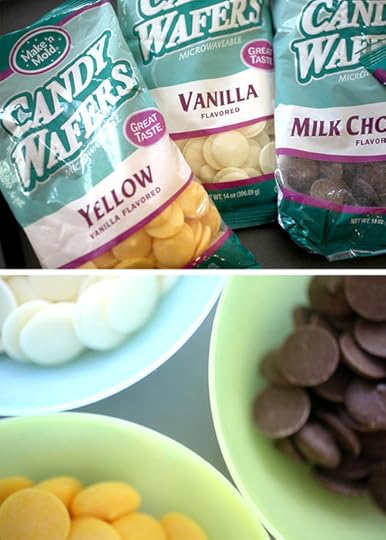
Once the balls are rolled, chilled and ready to dip, you’ll need some candy coating.
I melted chocolate and vanilla and yellow until I achieved a shade I liked that could work as the base for both pops. These candy wafers are by Make ‘n Mold and you can find them at craft stores like Hobby Lobby and A.C. Moore. Start with white as the base and add a few brown wafers in and then some yellow as you melt them. Stop when the color feels right for you. I wish I had kept a ratio of these for you, but I didn’t keep track as I was melting.
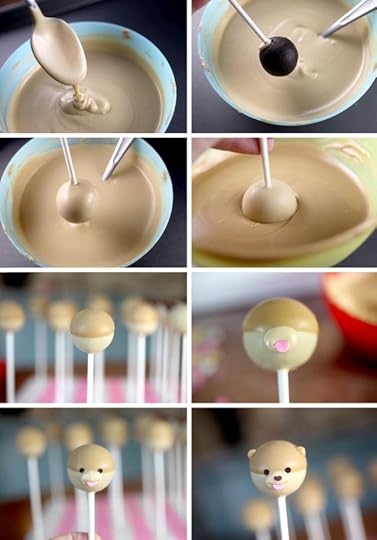
When the coating is fluid, dip the pops in the coating in one motion – no swirling – and tap off any excess.
When dry, Reserve some of the melted light brown candy coating for later use and then add some more chocolate and yellow to the coating to make a darker shade. Dip Boo’s head in about half way and at a slight angle and let dry.
When dry, use a toothpick dipped in the reserved light brown coating and draw on Boo’s snout. Place a miniature pink confetti sprinkle in the coating while it’s still wet and then let dry. Then dot on more light brown coating to overlap the sprinkle. It will look like Boo is smiling with a tiny pink tongue sticking out.
Then use a toothpick dipped in the darker shade and dot/draw on Boo’s ears. Form the shape first and when it dries draw over the shape with more coating to make the ears look curved forward.
Finally, dot on some dark brown coating for a tiny nose. Then draw eyes with a black edible pen and dot then with a speck of white coating to finish the look.
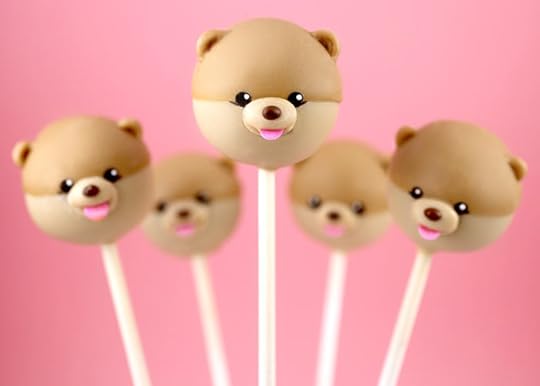
Hey Boo.
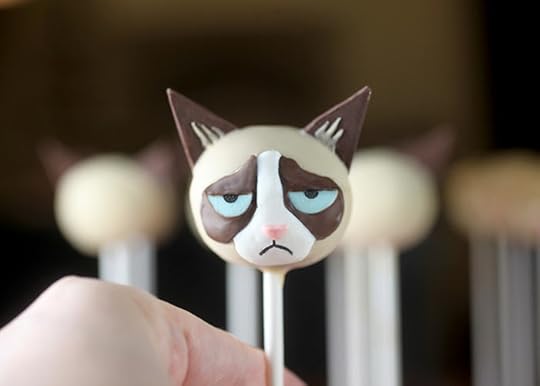
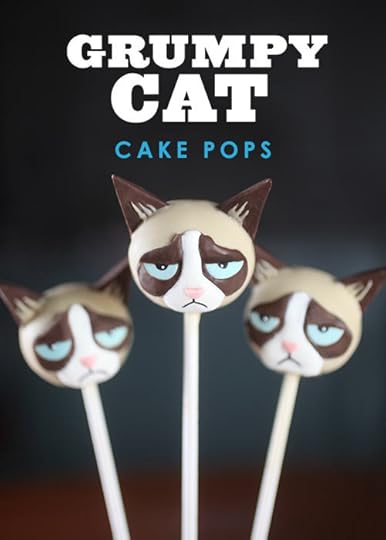
Now for a frowning feline. It’s grumpy time.
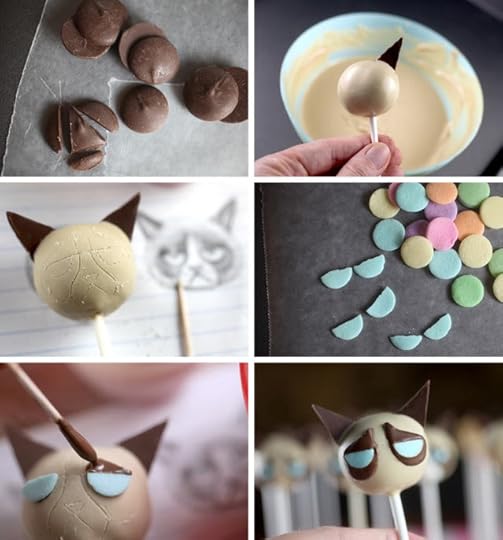
First, use some of the chocolate wafers and cut triangles out of them for ears using a sharp (non-serrated) knife.
When you dip the pops, place ears in position while the coating is still wet.
When dry, use a toothpick and etch out the shape for Grumpy Cat’s face. I drew a cake poppable likeness of Grumpy cat on paper to use as a guide.
Attach eyes (Jumbo confetti sprinkles broken in half) in position with a little melted candy coating and then use a toothpick dipped in more dark coating to draw around eyes in the shape etched on the pop. This way the confetti sprinkle eyes will look recessed a bit with the chocolate overlapping.
Then draw in between with a toothpick dipped in melted white coating. Overlap the brown a tiny bit and let dry.
Dot on pink coating for a little nose and use some of the light brown coating on the ears. Finally draw on eyes and a lovable frown with a black edible ink pen and then dot the eyes with white coating.
A little tip to get sharper edges is when everything is done, use a toothpick to define lines and make sharper edges. You can remove unwanted candy coating pretty easily if you’re careful. You can also use the side of a toothpick to gently rub on the surface if you need to smooth out an area or on the edge of the ears to help make straighter edges. Fingertips can work great too.
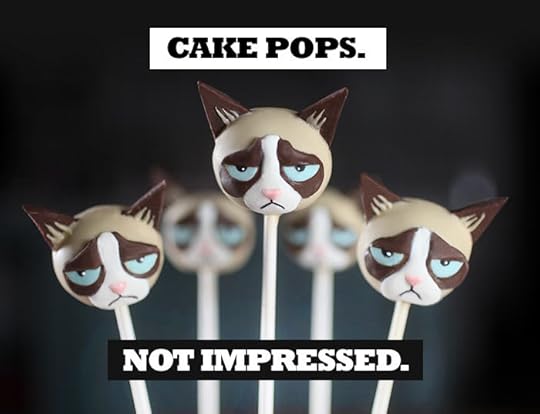
Grumpy Cat may be frowning on the outside.
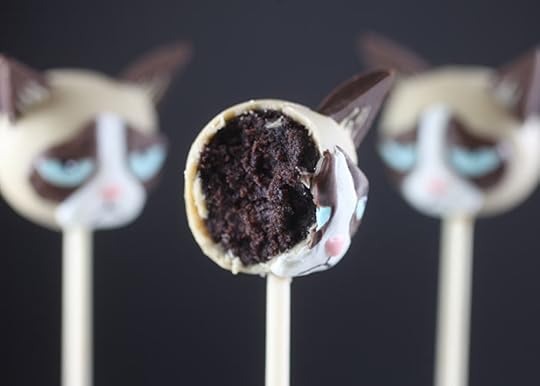
But Grumpy Cat is pretty sweet on the inside.
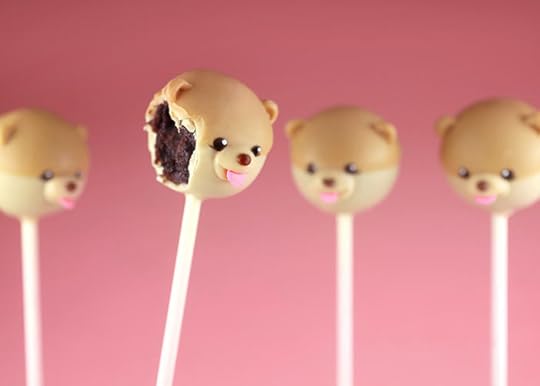
Boo is too of course. I couldn’t resist those cute little chocolate cheeks. Could you?
Here’s Boo’s Book, Grumpy Cat’s book and mine, too if you want to check them out.

August 25, 2013
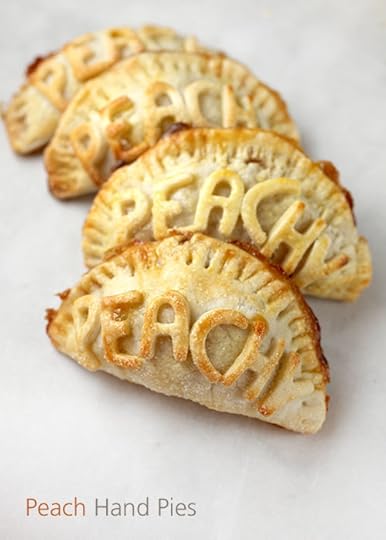
Handy Peach Pies
It’s time for pie.
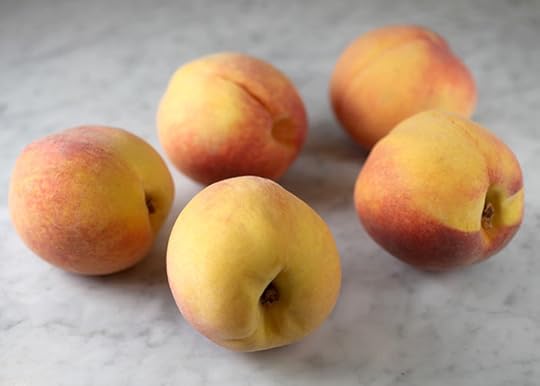
And peaches.
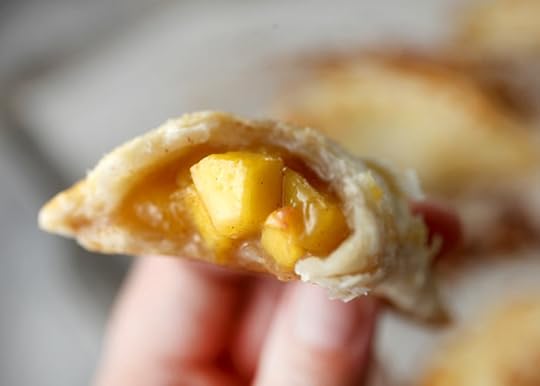
Pretty little peachy hand pies.
Yeah, I’m not sure what’s happening today. Fruit and pie. Instead of chocolate and cake. I never do that. I must be dieting.
Or pieting.
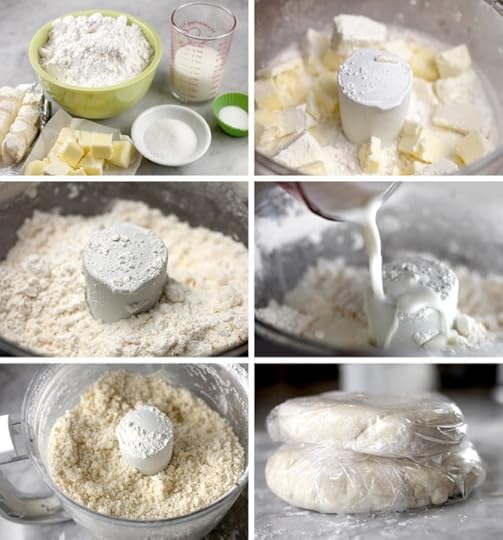
That means pie crusting is happening. This pie dough is made with added cream cheese in the dough. Yummo!
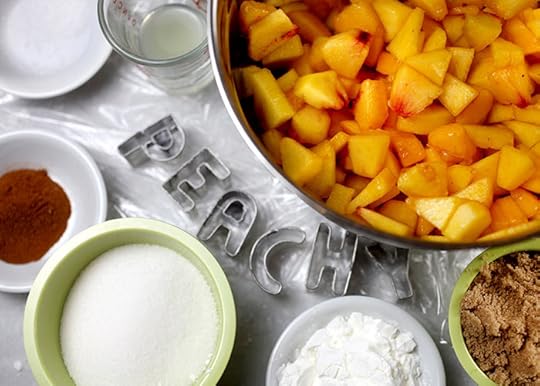
And peachy pie filling… you’ll need diced peaches, sugar, brown sugar, corn starch, cinnamon, lemon juice, and salt.

Toss the filling ingredients together and spoon a small amount in the center of circles cut out from the pie crust dough. Fold the circles together and seal the edges.
You want to keep all those juices tucked inside as much as possible.
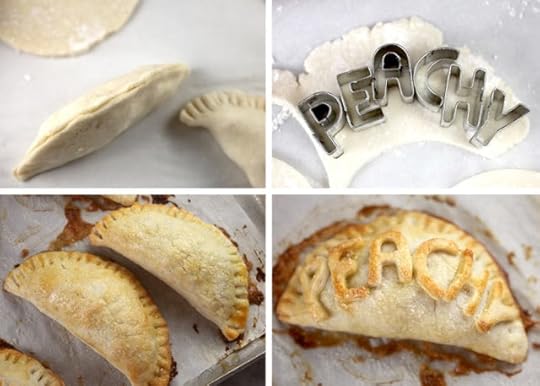
Then crimp the edges with a fork.
I cut out cute little letters for my pies with these mini alphabet cutters. This would be super fun to do if you were making pies in different flavors. Helpful and handy at the same time.
Here’s how to make them:
Just Peachy Handheld Pies
August 19, 2013
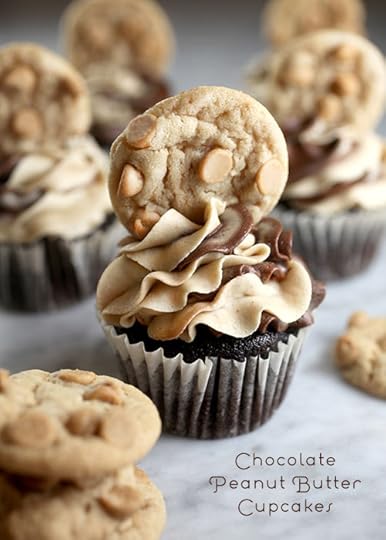
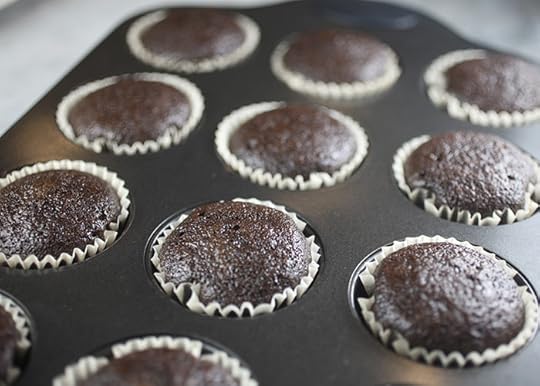
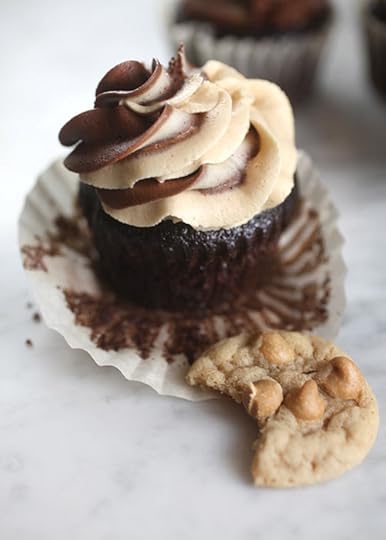
Chocolate Peanut Butter Cupcakes
It’s been weird being in moving limbo the last few weeks. I definitely don’t like having all my pans packed up. And all my stuff boxed away. But I’m almost unpacked. At least the boxes labeled pantry are in the pantry. That’s pretty close. I have a long way to go on getting that all organized.
Since I’ve been blogging, I’ve been storing things anywhere I could find a spot and now I’ll finally have a place where I can see my supplies in a central location. And I’m way excited. It’s been kind of like Christmas unpacking things already and finding five years worth of stuff I didn’t even remember I had. Out of sight is definitely out of mind. But not any more.
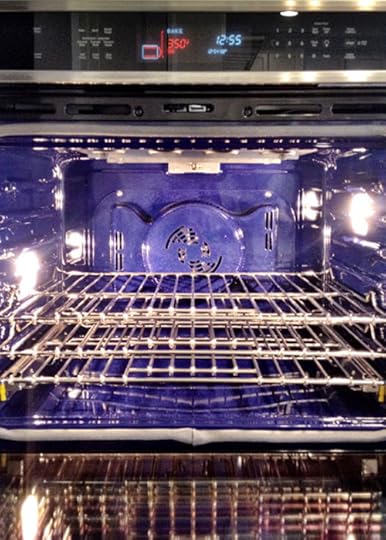
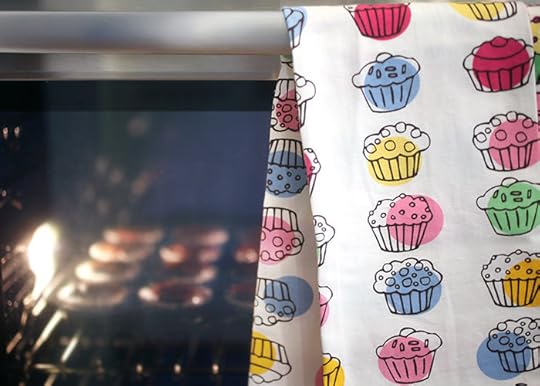
The first thing I unpacked though were my baking pans. A good place to start. Especially since I have a new oven to work. One 18 years newer than my last one. Yikes and Yay! I was actually kind of nervous … like meeting someone new and hoping you’ll be good friends. But you have to hang out together for a while first to find out.
So, I decided to break the ice with a cupcake recipe I make all the time. I thought it would be a good way to see how it compares to my old oven in terms of baking times and such.
So far so good.
Really good!
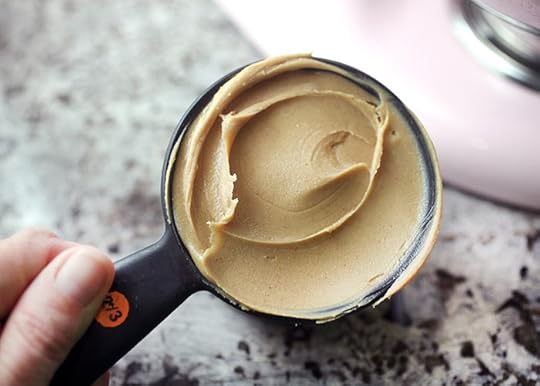
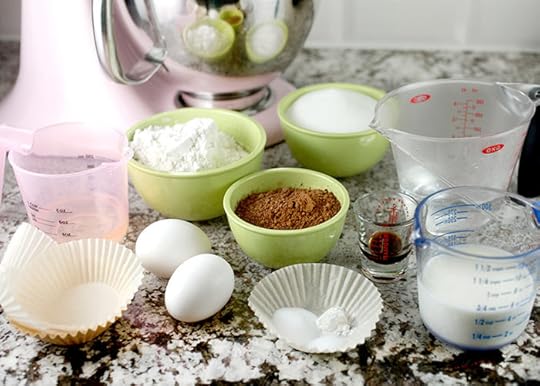
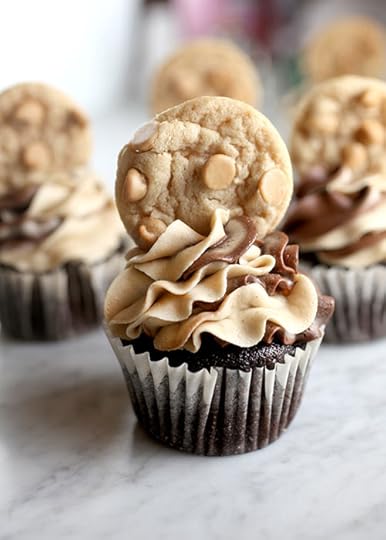
And I made chocolate and peanut butter frostings to go with it.
And whipped up some peanut butter cookies to go on top of it.
But, that was really just an excuse for me to try out some basic cookies in the oven, too.
So I stuck them on top of the cupcakes.
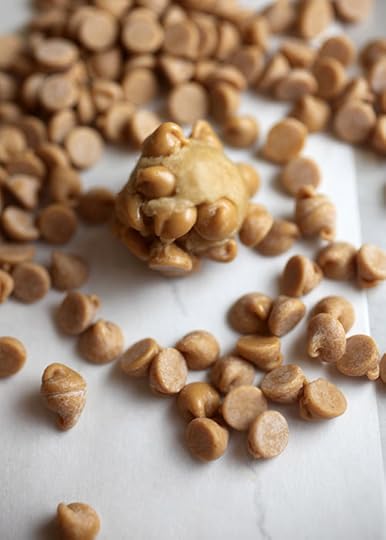
I rolled chilled cookie dough into small balls and then rolled balls with peanut butter chips in my hand, instead of stirring them into the dough to make sure each little cookie was well covered in chips.
Oh… and the frosting. Peanut butter and chocolate. I’m easy.
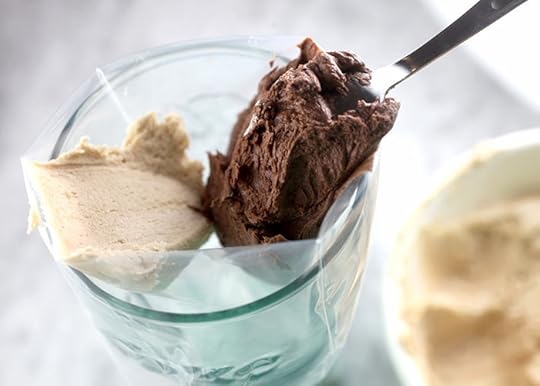
Place a decorator bag fitted with a 1M tip into a large glass and spoon even amounts of chocolate and peanut butter frosting on each side.
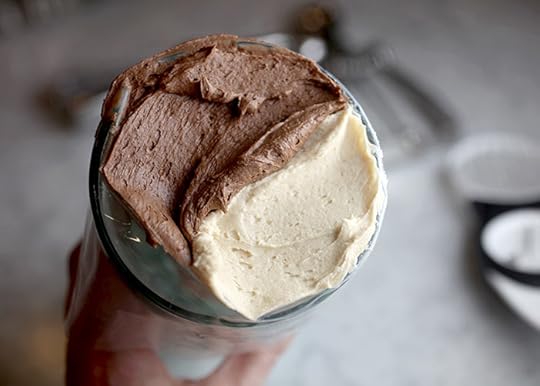
Fill the bag, twist off the end and squeeze evenly until the frostings fill the tip.
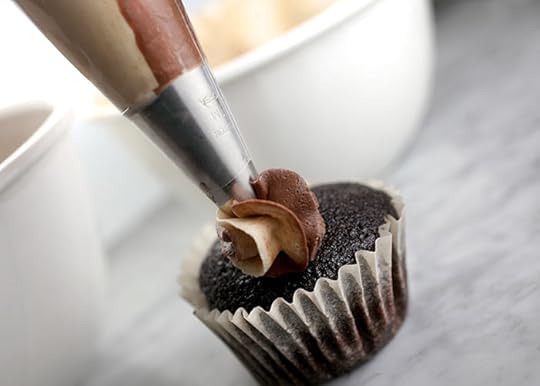
Then pipe pretty swirls.
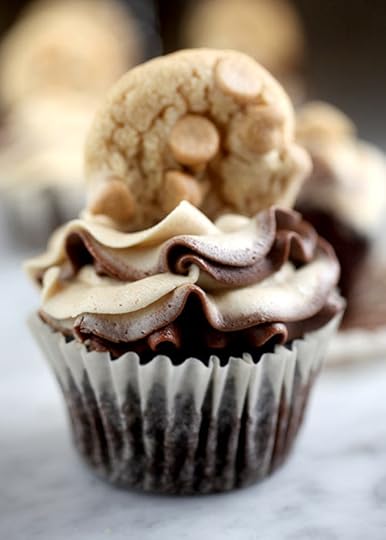
And put a cookie in it.
And then take it out and eat the cookie.
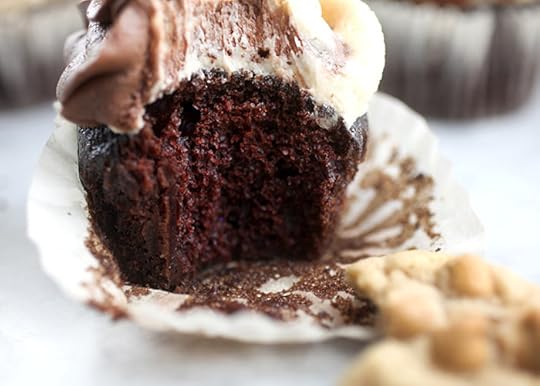
And then eat the cupcake.
And then keep eating. I mean share with friends.
Chocolate Peanut Butter Cupcakes
August 13, 2013
Inked in Sweets
Hey guys and YAY!!!!!! …… I feel like I need to scream that right now. I guess you’ve noticed a little lack of baking lately. I’m sorry about that. I’ve been away from the blog for a few weeks but everything is fine. (Thanks for your sweet emails asking if I was okay.) I’ve just been moving to a new house and my kitchen has been all packed up for a while. And on top of that, I’ve been without internet for almost two weeks, too. Can you say stir crazy? … Because that would be me. But they finally got it up and going last night. YAYAYAY! So now that I’m starting to get all settled in to my new space, I’m way excited to start baking again … and in a new oven.
In the meantime, how about a fun little giveaway now that I can finally blog again. It’s a pretty cute one.
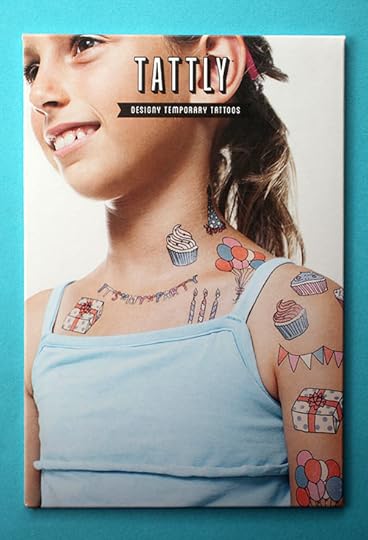
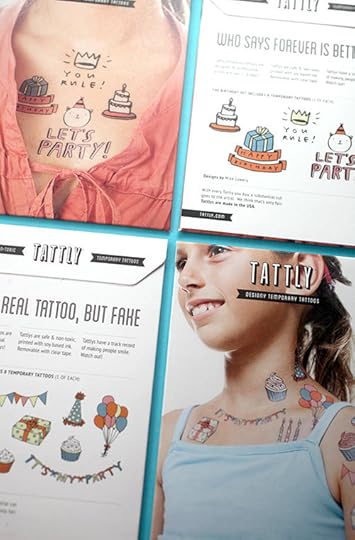
Have you heard of Tattly?
They’re designy temporary tattoos for adults and kids alike … plus they are totally cute.
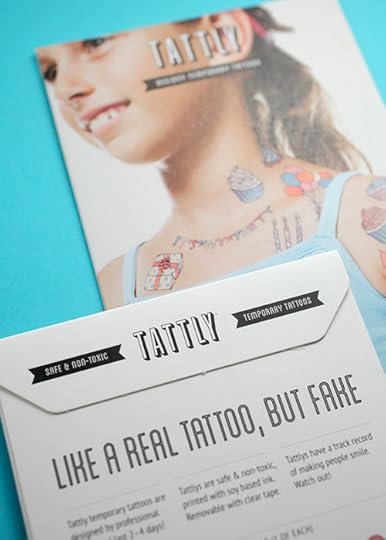
They’re like real, but fake.
And you can buy them in sets or singles.
I chose some that are sweet themed of course but there are tons of other cool and whimsical Tattly designs to choose from.
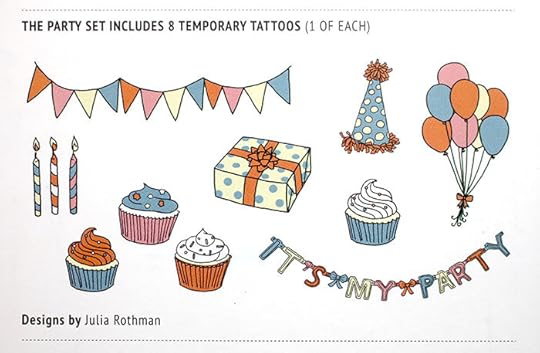
These designs all come in the Party Set illustrated by Julia Rothman.
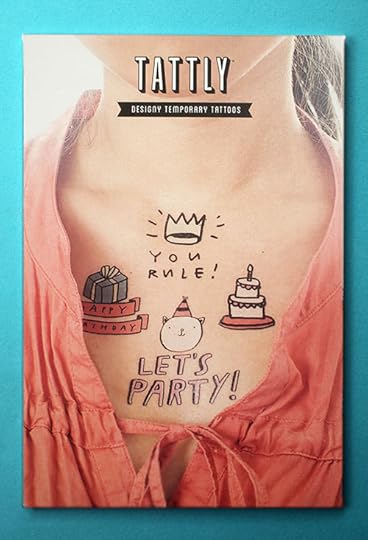

And these designs are in the Birthday Set illustrated by Mike Lowery.
You could totally use either set for a birthday though. Fun times.
Want to see some more sweets in single versions?
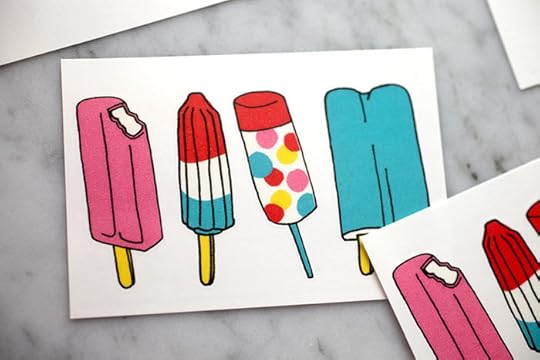
How about popsicles? These are fun because you can use all four as one tattoo or cut them into sections and use one at a time. Love these.
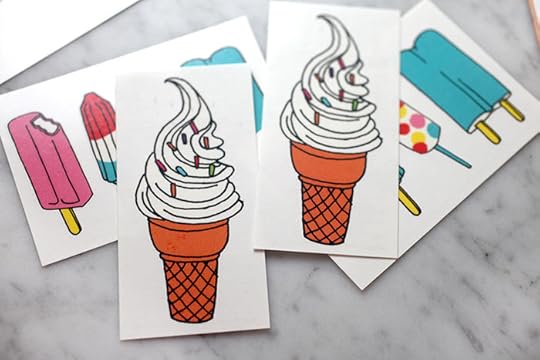
Ice cream cone tattoos with sprinkles? Yes please.
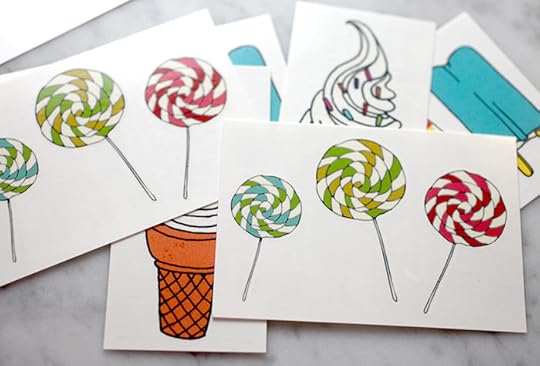
What about lollipops?
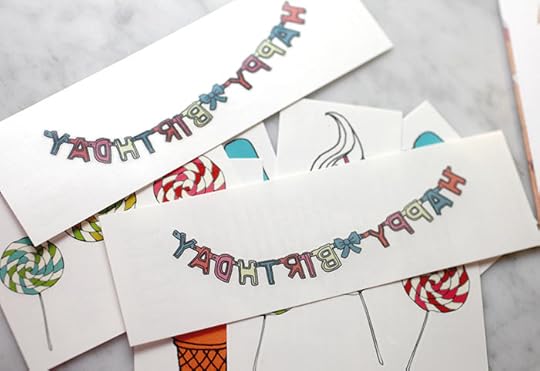
Or Birthday Garland? Way fun.
Want to win some?
Enter for a chance to win one of two Tattly sets including:
The Party Set, The Birthday Set plus the popsicles, ice cream cones, lollipops, and birthday garland.
To enter, just leave your answer to one of the questions below on this post.
Which one of the above temporary tattoos is your favorite (if any)? OR Do you have a real tattoo? and what is it? I’m curious.
Deadline to enter is Friday, August 16 at 8:00 pm ET.
Two winners will be chosen at random and announced sometime Saturday.
Good Luck!
Giveaway sponsored by me.

July 21, 2013
Nice Cream Giveaway

I’m giving away something nice today.
It’s silver and boxy. Short and sweet.

And it will help you make beautiful creamy creations right at home.
It’s the Cuisinart 2-quart ice cream maker.
Very Cool! Freezing, actually.
Want endless ice cream options? Sweet scoopable treats? Fun frozen flavors right at your fingertips?
I think yes. Because I know I totally want one, too. But first I’m giving away one. And to go along with it, a copy of Jeni’s Ice Creams at Home. I love this book and her ice cream, too! It’s soooo so good.

Here’s the scoop for a chance to win a Cuisinart 2-quart ice cream maker and the book, Jeni’s Splendid Ice Creams at Home:
To enter leave a comment on this post and share something fun you’ve done this summer.
Deadline to enter is Wednesday, July 24th, 2013 at 8:00 pm ET.
One winner will be chosen at random and announced sometime Wednesday evening.
Good luck!
Giveaway sponsored by me.

Bakerella's Blog

- Bakerella's profile
- 9 followers

