
Bakerella's Blog, page 29
April 7, 2013
Brown Butter & Biscoff Crispy Treat Bars
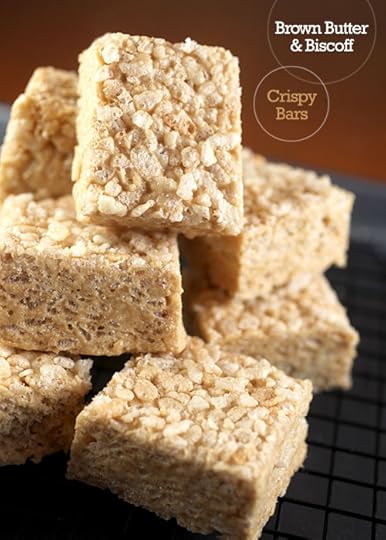
Confession. I don’t think I’ve made Rice Krispie Treats before. What?!?! And if I have, it was so long ago, I can’t remember. Weird, right? I mean, I enjoy them and all their crispy marshmallowy goodness, whenever I do eat one. I just never make them. Maybe it’s because growing up, Rice Krispies didn’t spend that much time in our house. I was a Fruit Loops girl. Die hard. Fruit. Loops. Rice Krispies just got soggy too quick for my taste. It was however, one of the few I’d eat in a lack of Fruit Loops emergency at someone else’s house. I’m just now giving in to Frosted Flakes … I guess I consider that one my grown up cereal. I’m sure I’d enjoy others, but I don’t really eat cereal that often and I just can’t commit to a whole big box of a new cereal. Anyway… that’s a long way of saying I haven’t made Rice Krispy Treats.
But lately I’ve been wanting to …… recently my friend and Wookiee Pies author, Lara was raving about some Brown Butter and Biscoff treats she made inspired by this Smitten Kitchen recipe … but she added a little something to them.
Biscoff spread! Also Speculoos Cookie Butter from Trader Joes. If you’ve tried this stuff before, you know why these have been stuck in my head. It’s ridiculously good. It never makes it spread onto anything though because if I dare open a jar… it doesn’t have a chance against me with a spoon in my hand.
But, I bought some special to make these treats with.
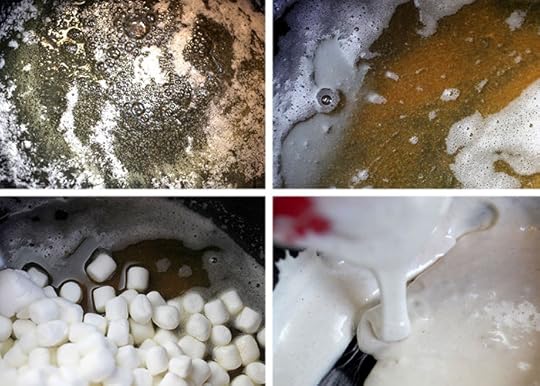
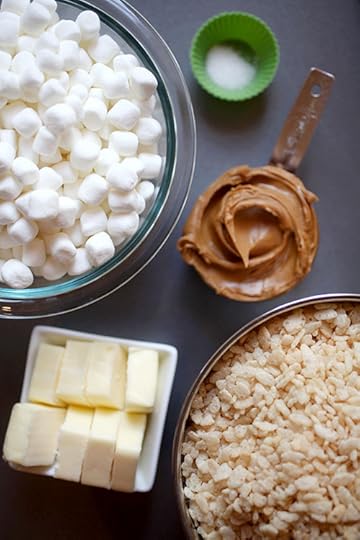
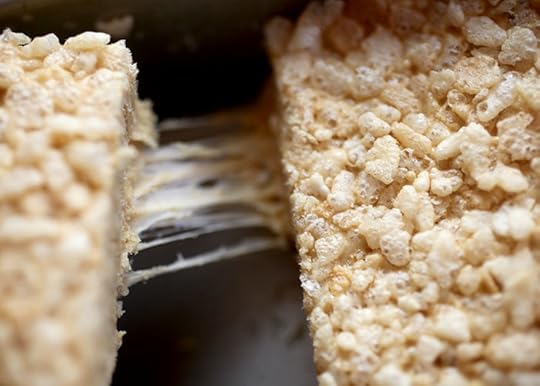
Rice Krispies Treats start with mixing marshmallows into melted butter. But these are made more special by browning the butter first. It enhances the flavor and adds a wonderful nutty aroma. Just use a stainless steel pot when you make it so you can see the butter change color as it’s heated. It was difficult to see the colors change in this dark pot I was using and the butter can burn easily if you aren’t paying attention.
Check out this How-to if you’ve never made brown butter before.
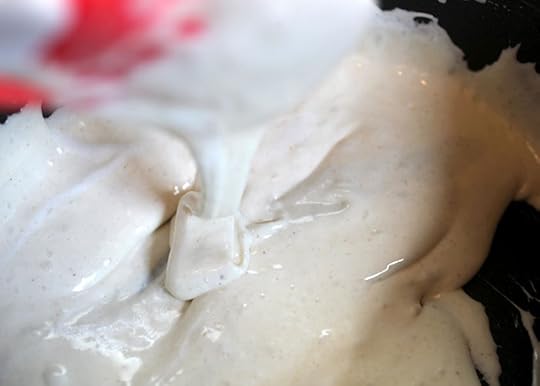
Now you can just use this brown buttery marshmallowy goodness and stir in your cereal if you want.
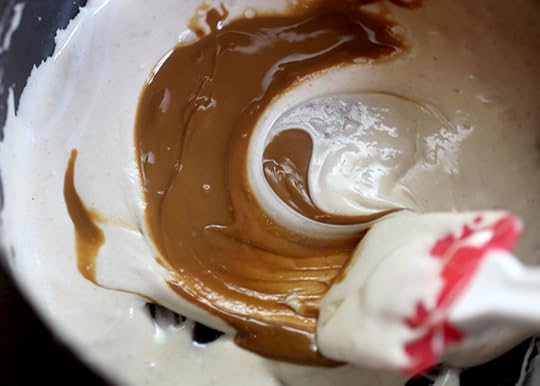
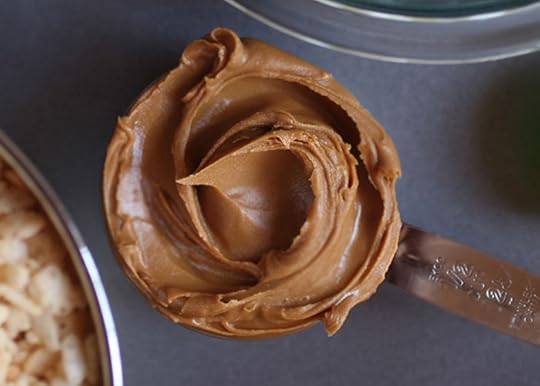
But what fun would that be without a bunch of Biscoff. Heat it a few seconds in the microwave first and it will incorporate easily into the warm marshmallow mixture.
In Lara’s version, she didn’t mix it into the marshmallow. She divided the brown butter marshmallow mixture and spread a thin layer between the two before she pressed it all together. So you can try it that way, too.
But I wanted to marry the two.
Stir the melted marshmallow and Biscoff until combined.

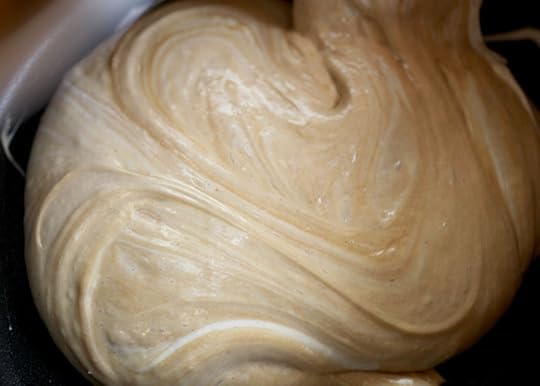
Add a little salt and six cups of cereal.
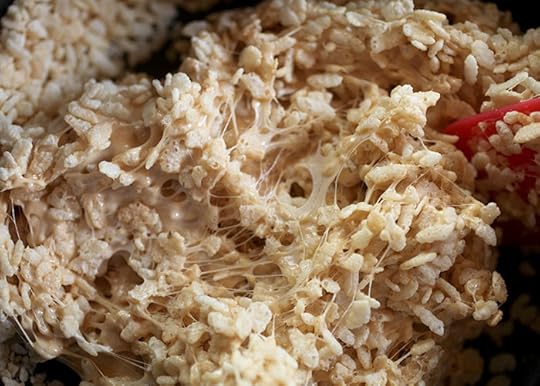
And mix it into a beautiful mess.
Press it into a greased dish and cut into bars.

Like these rectangular ones. Yum.
Drizzle a little melted chocolate on top if you want, too. But they don’t really need it. They just looked lonely all by themselves so I thought they needed a hug of chocolate.
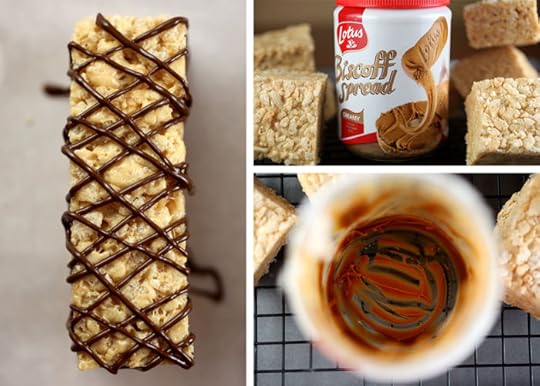
And you know what, the best part about long rectangle bars like this is they make a great dipping stick too for any leftover Biscoff Spread. I mean, not that I would know anything about that first hand.
Brown Butter & Biscoff Crispy Treat Bars


March 31, 2013
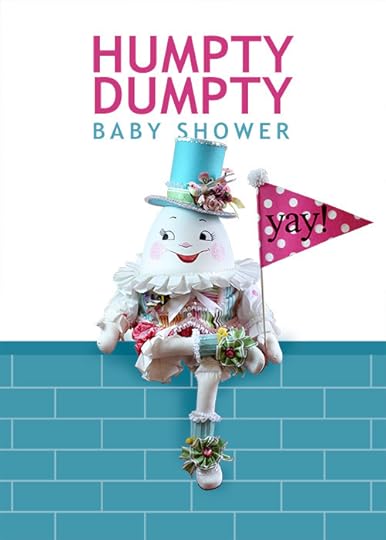
Humpty Dumpty Eggstravaganza
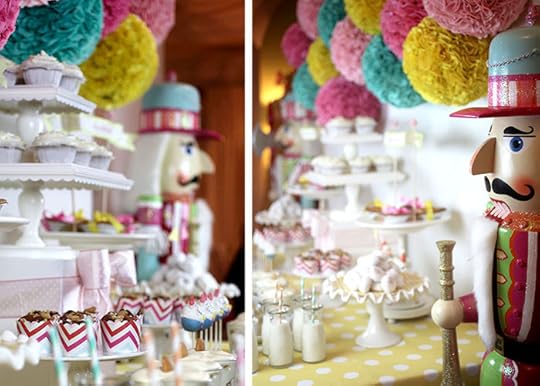
Remember these little guys I showed you how to make last week? Pretty cute, huh? They were for a baby shower my friend Cupcake Julie threw and now I have some of the pictures pulled together to show you all the fun. Julie has been throwing baby showers and creating dessert tables for some time now, but the last few years, she has been building on a Humpty Dumpty theme and creating party props for it. It’s a perfectly cute and cheery theme that works for baby boys and girls. She gets these fantastic ideas in her head and just has to create them and bring them to life. This was the third year she’s made something new for the theme. It’s been a work in progress, but I think she’s definitely perfected the Humpty party props.
Okay, prepare yourself for some amazingness.
It’s kind of mind blowing.
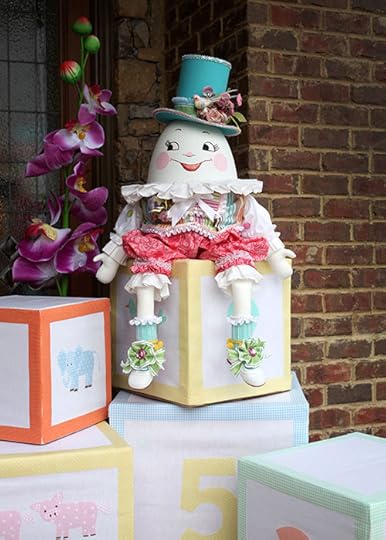
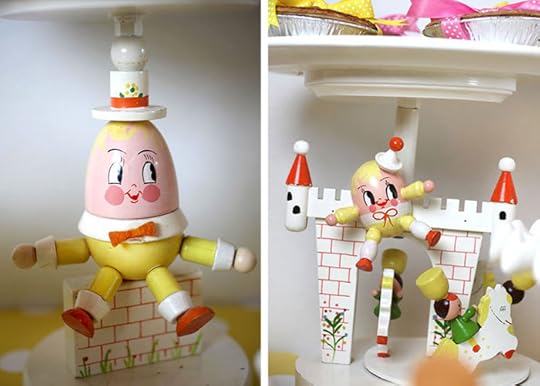
Obviously a Humpty Dumpty Baby Shower has to start with the main attraction.
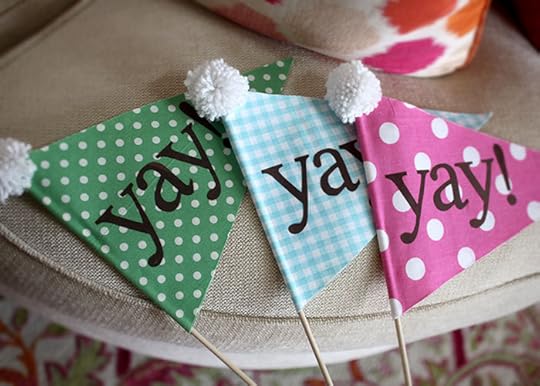
Humpty! Yay!
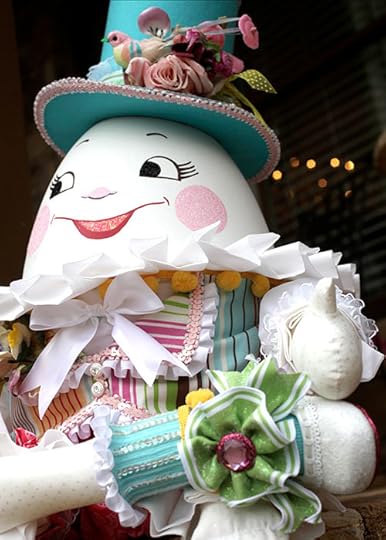
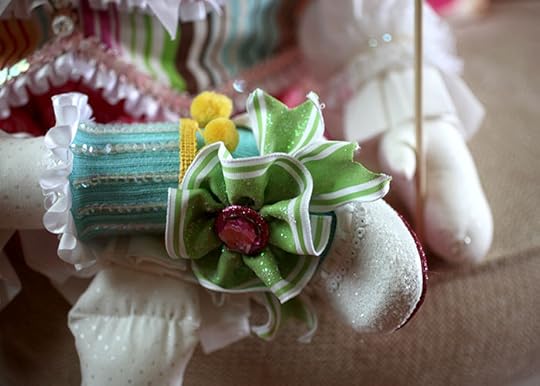
Humpty is huge. And handmade. With custom tailored clothing. Elaborate custom tailored clothing.
Humpty is really just a giant plastic egg. Yep, a giant version of the little ones you might have had an Easter egg hunts with yesterday. Julie found it at Hobby Lobby and just spray painted it white. But first she filled it with rice and hot glued it together so he would be weighted down and could sit in different positions easily. You know… without falling.
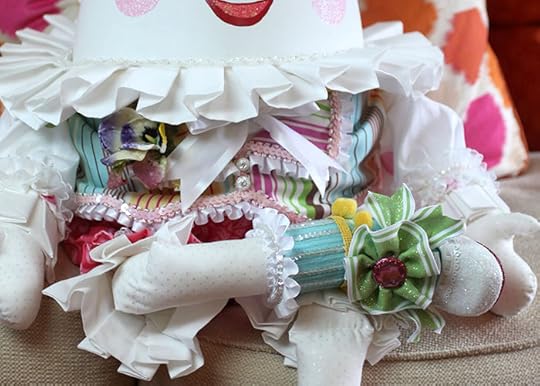
But let’s talk about his outfit. Intense. Elaborate. Detailed. Gorgeous.
So, she can definitely sew. Me, not sew much.
Look at these glittered up shoes with pink painted soles and sweet sequined adorned socks. They’re baby shoes from Target made sparkly. Adorbs.
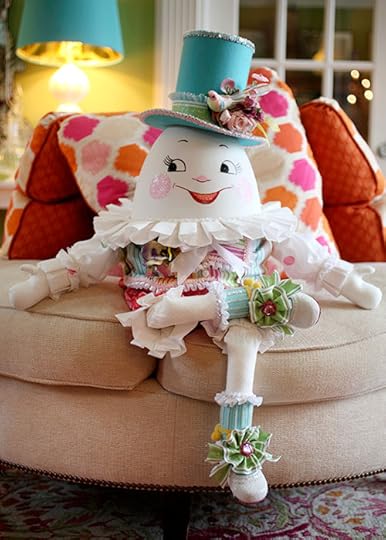
His turquoise top hat is constructed with wool felt. Definitely dapper.
And even though he’s Humpty, he makes a fantastic Easter egg with such a fun, frilly spring outfit, don’t you think.
And he makes me want to scream, YAY!
These are easy pennants she made with fabric fused together and iron-on, hand-cut letters. Topped off with little pom poms, too.
This is much more my speed. She makes me want to learn how to sew, though. Kinda.

Okay, I am in love with these tassels. It’s cotton fabric she cut using a rotary cutter.
The colors are so pretty together.
You can see them hanging in the background here.
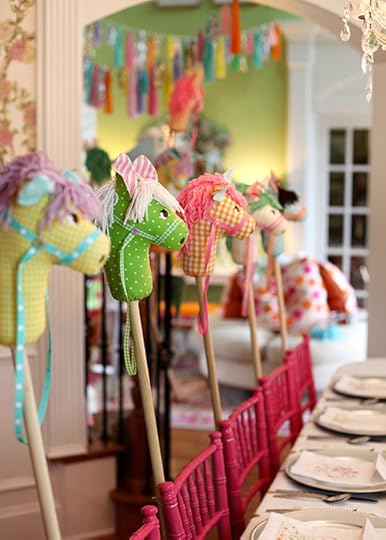
That’s if you can get past the cuteness from these horses.
All the King’s horses are pretty freaking adorable!
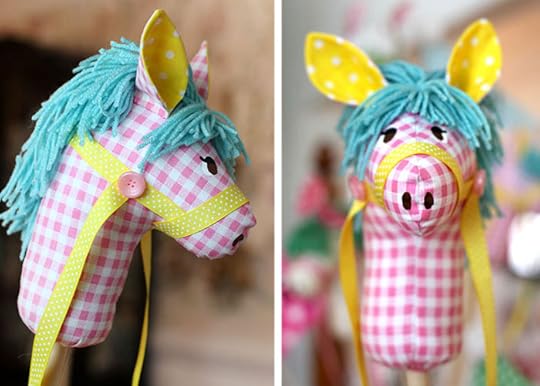
Last year she sewed these stuffed animals using happy colored fabrics and yarn. They’re attached to a wooden rod so you can ride.
Not that I tried. ; )
Giddy up!
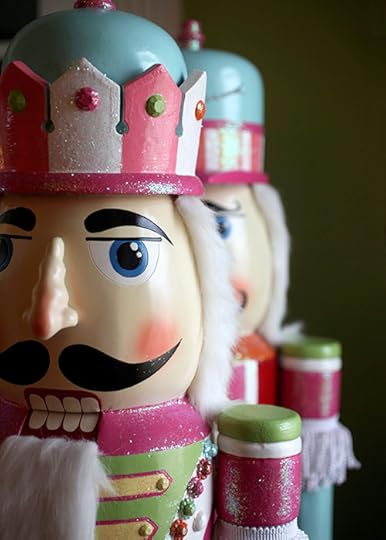
But you can’t have all the King’s horses, without all the King’s men.
Right?
Right!
Julie’s had these sweet soldiers for a while. A Wal-Mart find from several years ago. They were originally red, green and royal blue.
Not so springy. So this year, she finally repainted them, added glitter and covered up the strong Christmas colors to go with the baby shower.
These aren’t quite as tall as her homemade house-sized nutcrackers, but they’re definitely as cute. And I’m sure they’ll get double duty and make an appearance as part of her holiday decorations this year, too.
And if they don’t, I’m bringing them to my house.
Okay, so we have Humpty…
And all the King’s horses…
And all the King’s men…
Now, I guess we need a King…
Bam. King. Check.
Sometimes I think she has a real easy button. But like I said, she gets these ideas and makes them happen.
The King is cool. His body is totally a tomato cage and the arms are just 2X4s with fence post finials for hands.
But the robe and clothes cover all that hard work up. Mr. Cupcake Julie actually constructed the body. He’s a good guy. Especially for getting all this stuff from storage and putting it back each time she throws a Humpty shower.
A Santa wig and beard were both used to create the King’s long beard and eyebrows. She cut bangs from the wig to make the mustache because of the great curls it had.
The crown is made from poster board and adorned with jewels and handmade tissue flowers that she hot glued on.
His face and hair? Can you guess?
It’s totally a Burger King Halloween Mask. Repainted.
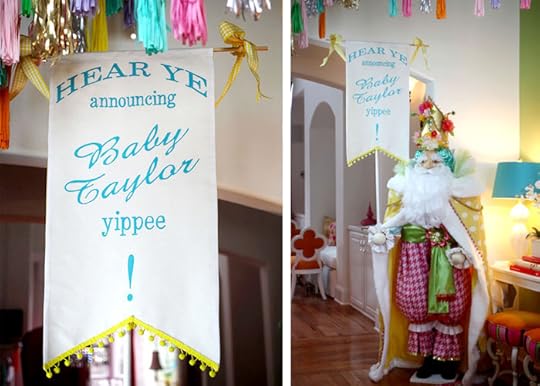
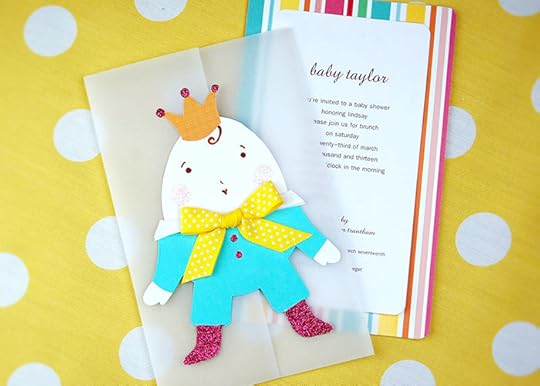
Hear Ye … announcing Baby Taylor … yippee!
A custom welcome sign she sewed and hand painted with the help of an overhead projector.
Okay, so I may have had a little fun moving Humpty around.
But I want to show you these baby blocks. Underneath? Graduated cardboard boxes turned upside down.
They were hidden by pretty linen slip covers that she sewed and decorated with iron on numbers and animals cut out of fabric.
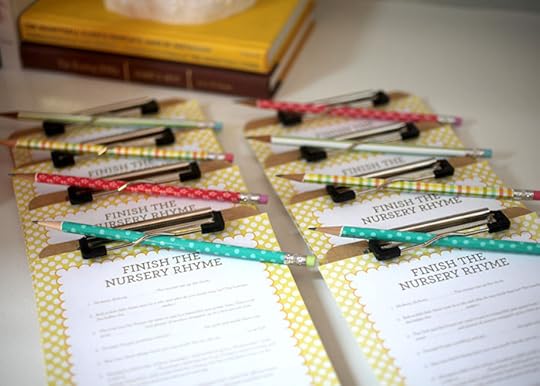
Cute nursery rhyme games she found on clearance from Target. They look extra special with individual mini clipboards and colorful pencils.
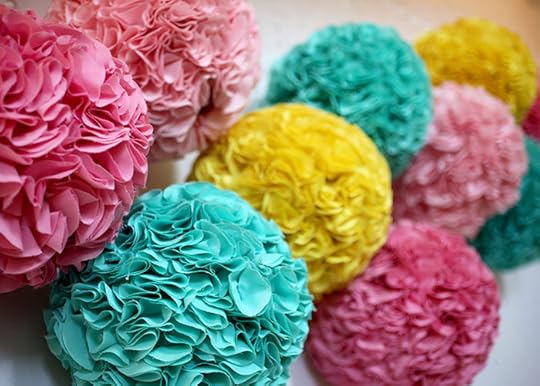
And look at these giant poms. These were made using cut fabric circles ruffled together and hot glued to an outdoor lantern.
I love how the guts of some of these decorations are reused from unexpected items.
Wait, what about the Humpty Dumpty cake pops.
Yeah, those guys.
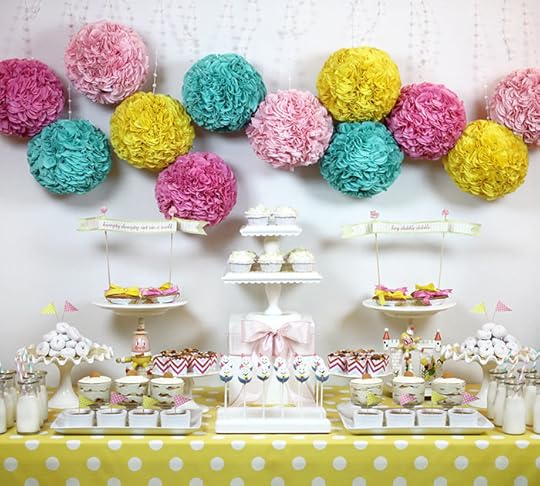
Did I mention there was a dessert table, too?
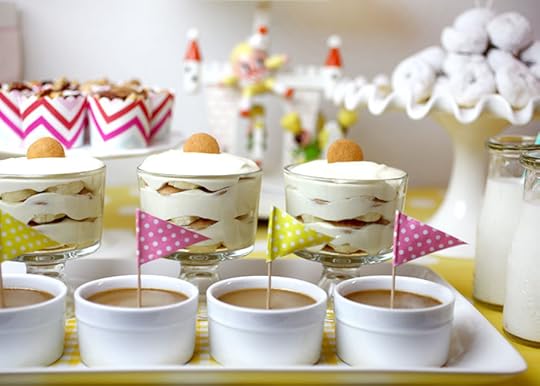
With butterscotch puddings, mini doughnuts, cupcakes, and individual banana pudding trifles. Yum!!!!
Don’t worry, the desserts were guarded.
Oh … and check out these vintage lamps from the 70s she found on etsy. She removed the tops and turned them into cake stands. Creative!
And I think these were the inspiration for this whole Humpty Dumpty theme. I can’t remember though … she’s been doing these so long.
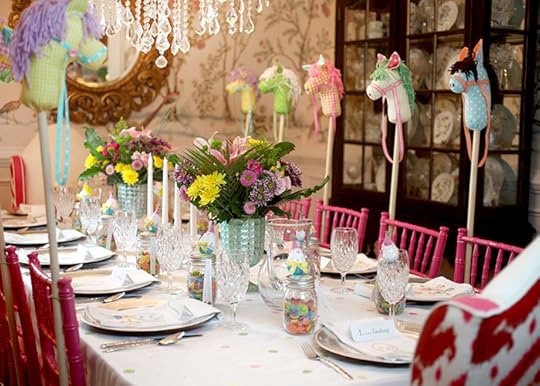
The dining room table was set beautifully for brunch. Yeah, there was food, too.

There were even hand-stitched napkins at each place setting. Julie drew the designs on the napkins with a disappearing ink marker, then stitched on top. When you wash the napkins, the ink disappears. Magic.
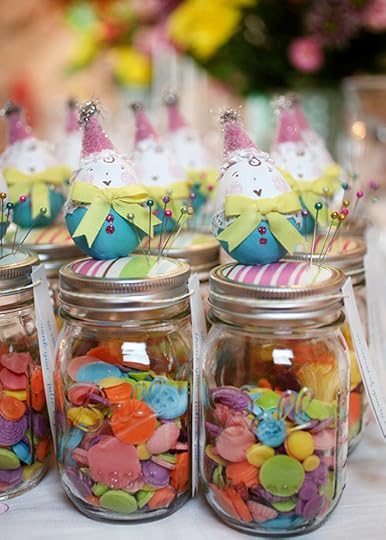
She even made party favors for all the guests. Pin cushion topped mason jars filled with colorful candy buttons.
She used this button mold and this one too and filled them with melted candy coating.
The jars were topped with paper maché eggs that she painted to match the invitations.
Okay, we’re coming to the end. It’s like a crafting marathon.
The invites. The Humpty is an old Meri Meri Accents scrapbook design that she had but isn’t available anymore. So she used it as a guide for the invitations and embellished them with glitter and ribbon for each guest. A happy, fun beginning to the baby shower.

And, that’s all folks.
So, I guess it doesn’t take all the King’s horses and all the King’s men to put a Humpty Dumpty Shower together. It just takes one Cupcake Julie. It does make me feel better that she did all of these elements over a few years and more than one shower, but still… it’s all crazy incredible!!!
I tell her over and over to start a blog and share tutorials for some of this stuff. But right now… she just does it free for friends that she throws parties for and for herself because she loves it. And I love that about her.
I just had to share it with you guys, too.
And now … I think she wants to start working on a new party theme. And I can’t wait to see what’s up her sleeve.

March 24, 2013
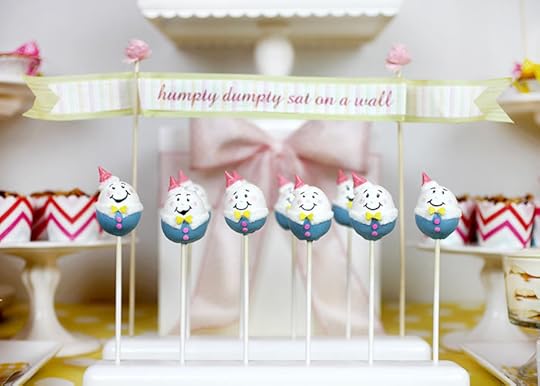
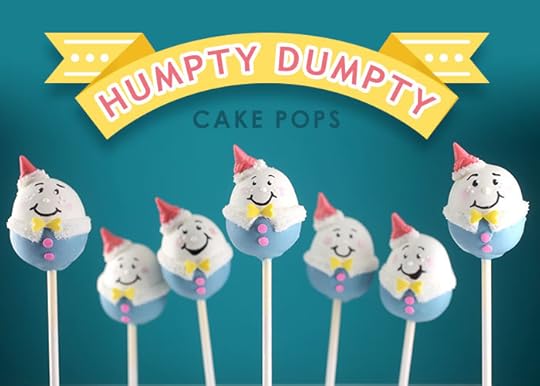
Humpty Dumpty Cake Pops
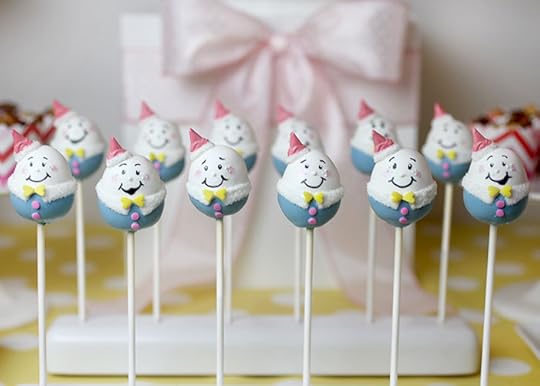
I made some egg cake pops!
They’re really cute … But they’re not for Easter.
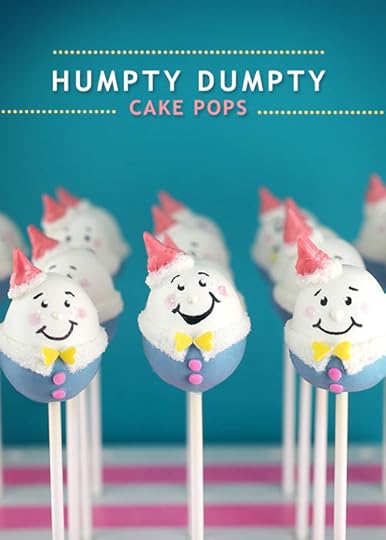
Instead I made happy little Humpty Dumpty Cake Pops for a baby shower that my friend Cupcake Julie threw this weekend. It was an all out Humpty-themed Eggstravaganza. And when I get the pics all together, I’ll show you some of the fun elements she created for it. If you remember this Candyland Christmas post of her party decorations, you can probably guess that she doesn’t hold back on the details.
But first up… here’s a Humpty How-to.
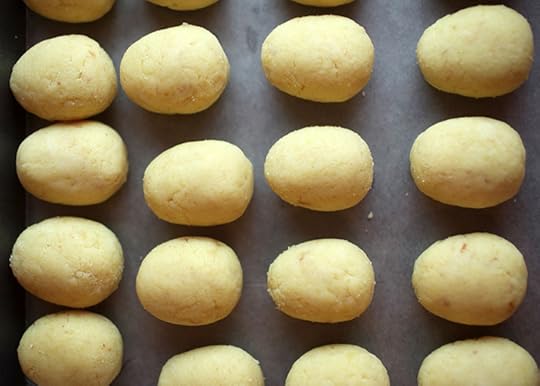
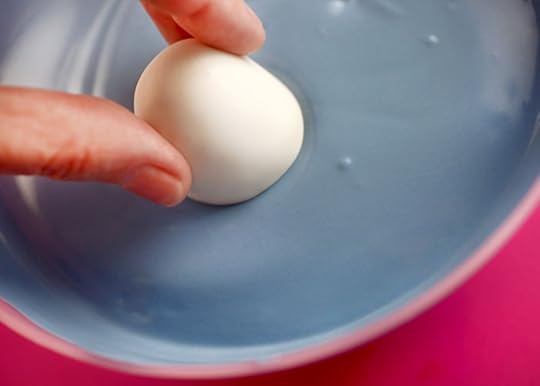
Follow the instructions for making Basic Cake Pops and roll them into egg shapes instead of balls.
Try using a piece of wax paper to help shape the balls into eggs.
Roll the egg-shapes against the wax paper and it will help smooth out the sides.
When they’re all shaped, chill them until firm.
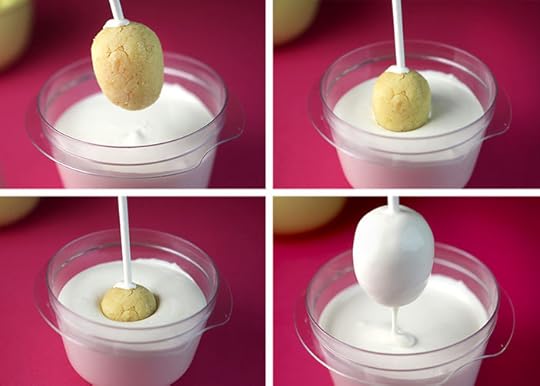
Then it’s dipping time. Dip. Dip. Dip.
Make sure you have enough melted candy coating in the bowl to completely dip and remove the cake pop without having to stir it in the coating to cover.
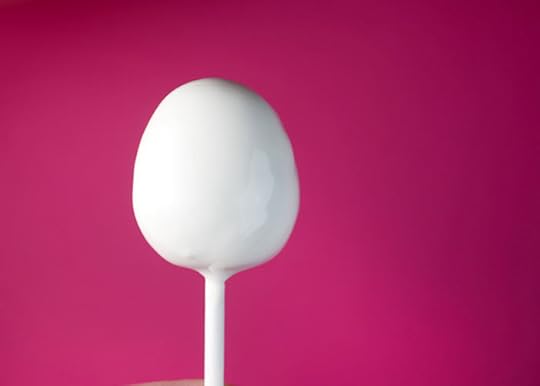
Eggcellent! … and a blank canvas to decorate Humpty.
Or if you want to make pops for Easter, you can totally do that, too. Take a look at this post for some easy Easter Egg Cake Pops.
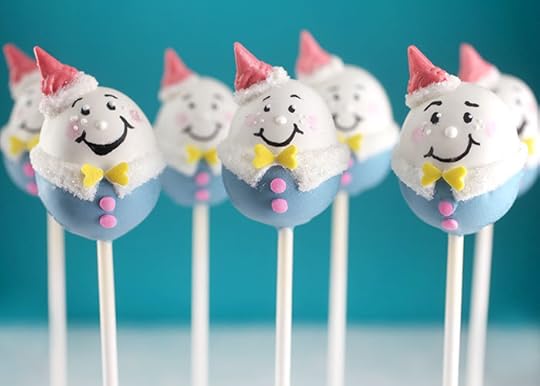
Humpty is actually dipped twice. Once the white coating is dry, gently untwist the lollipop stick from the cake pop and dip the bottom of the egg shape in a second color of melted candy coating.
Just hold the egg shape and submerge the bottom half in coating. Remove, shake off any excess and place the lollipop stick back in the bottom of the egg.
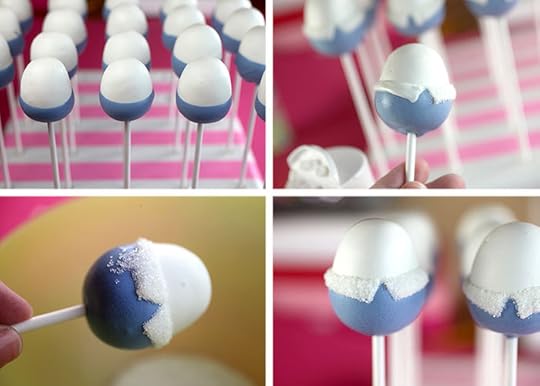
To help Humpty get dressed, fix his collar. Use a toothpick dipped in melted white candy coating and draw a collar shape around the blue coating. Do one side at a time and sprinkle white sanding sugar on top. Then use the side of a clean toothpick to help straighten the edges while the coating is still wet.
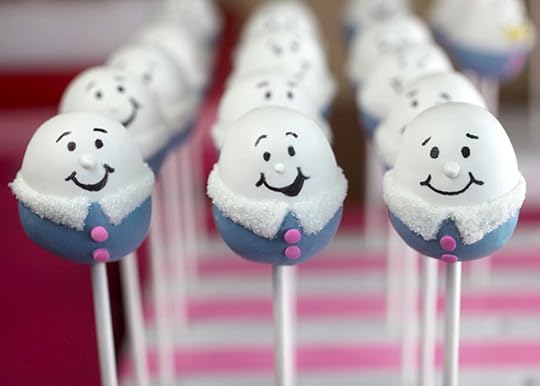
Dot on white candy coating for noses using the end of a toothpick and draw on sweet happy faces with a black edible ink pen.
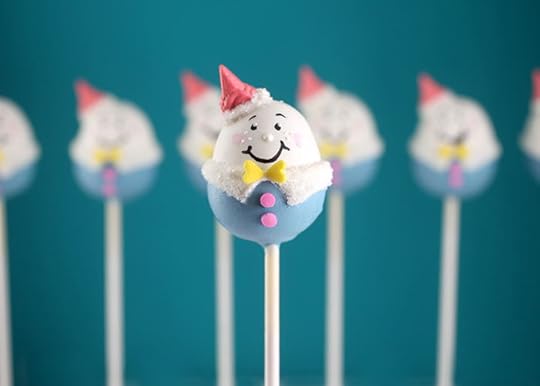
Finish decorating his outfit with a few more sprinkles to dress him up. Humpty needs party clothes you know.
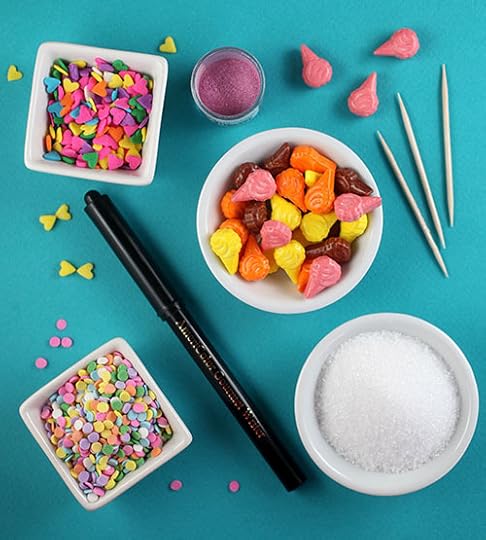
Americolor Gourmet Writing Pen for faces
Luster Dust for rosy cheeks
Sanding Sugar for collars and hat
Pastel Confetti Sprinkles for buttons
Yellow Miniature Heart Sprinkles for bow ties
Ice Cream Cone Candies for hats
I used the same ice cream cone candies I used for the bunny cake pops last week. This time I used some kitchen scissors to cut off part of the round end. That makes it easier for the cone shape to sit on top of the cake pop. Attach it to the pop with melted candy coating and then draw on more coating around the base and sprinkle with sanding sugar to cover up any gaps where the two meet.
The ice cream cone candies aren’t super common. You can find them here, go without hats or find another cone or hat-shaped candy to substitute. Just get creative and have fun.
Enjoy!
Hope their happy faces make you smile.
And I can’t wait till you see the Humpty Dumpty decorations from the the baby shower Julie threw. They are pretty freaking amazing! … Coming soon.
P.S. Anyone have the Humpty Hump Dance song in their head right now. I do and I think it’s stuck there.

March 19, 2013
Bunny Cake Pops
I’m a little behind on posting this week. I started making the sweetest cake pops on Sunday and had to detour from photographing them so I could work on my taxes. Boring! But I had to get ready for an appointment the next day which meant diving into a big stack of paperwork that I’ve been building on… all year. And avoiding. Yuck-o-rama! And definitely not as much fun as cake pops.
But I finally finished taking pictures last night and yay, here they are.

The cake pops I made were inspired by these pretty jordan almonds.
Well, mainly just the white ones.
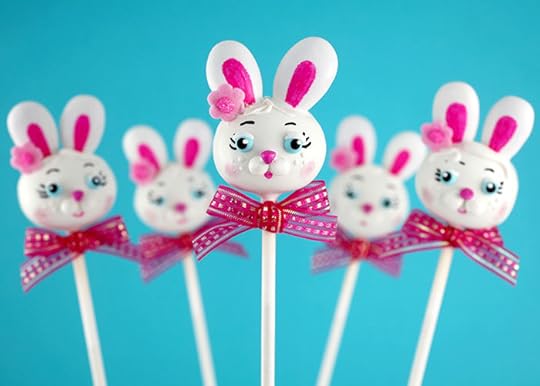
They make the best bunny ears. Like perfect.
I’ve made bunny cake pops before with pastel candy corn and also with pipe cleaners (really, really cute), but oh my – these jordan almonds bunnies are too much. I think these might be my favorite ears, but let me know yours if you look at the other bunny links.
So, I used only the white almonds for these, but you can certainly make them with the other colors as well.
Bunnies are like snowmen to me. I want to make them again and again and again. There’s so many ways to make them look different and still super cute.
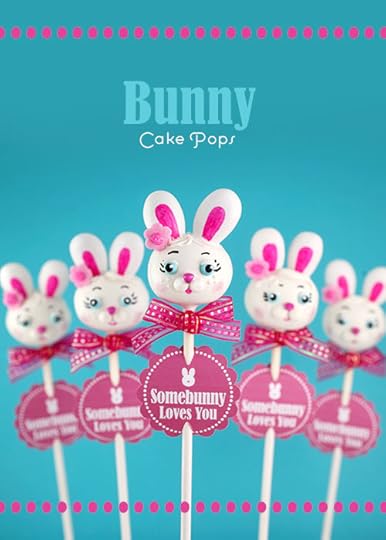
I totally glammed them up too – with blue eyes, big eyelashes, blush, barrettes and bows!
They’re dressed up for Easter you know.
But you can always dress them down, too. The ears alone create a fun canvas to decorate on.
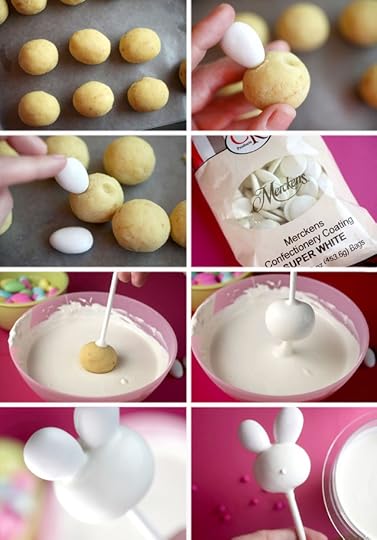
I made the bunny heads with more of an oval shape. And before I chilled the balls, I used an almond to make impressions on the top. That way when you dip, the ears will look like part of the head instead of sitting on top of it.
Here are some basic instructions for generic cake pops.
Follow the directions on the link and then shape the balls into ovals.
Make impressions in the cake balls for the ears using the pointed end of a jordan almond.
Dip the pops and before the coating dries, place the almonds in position for ears.
Hold in position for a couple of seconds so they don’t fall over.
Let dry and then you can add all of the decorations on.
Or just a few … dress your bunnies in any number of ways.
To decorate, dot on a small amount of candy coating and attach sprinkles in position.
Speaking of candy coating. I love the Merckens Super White. Try it some time.
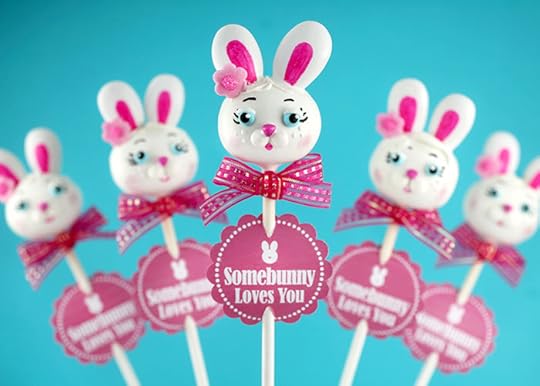
Glam bunnies.
I used a few sprinkles for the faces, but keep in mind you can also just pipe them on with candy coating for a simpler approach.
I just couldn’t stop.
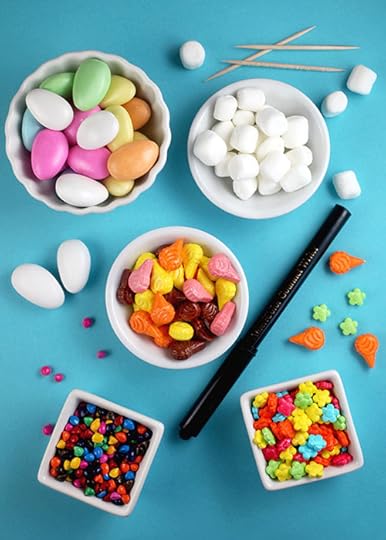
Here’s what I used…
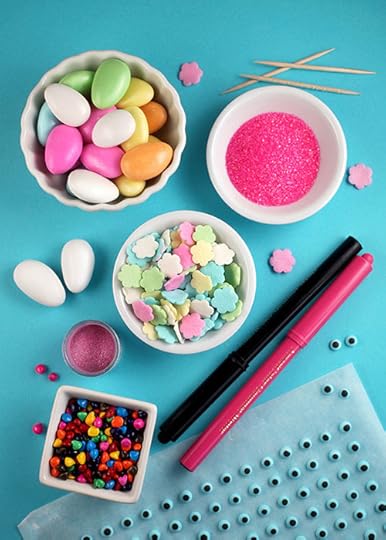
Jordan almonds and a pink Americolor Gourmet Writing Pen for the ears.
Jumbo flower sprinkles for barrettes – dotted with melted candy coating and sprinkled with sanding sugar for the centers.
Blue icing eyes for … well, the eyes.
Pink rainbow chip sprinkles for noses.
Pink luster dust applied with a dry brush for blush.
A black edible ink pen for eyelashes and eyebrows
And more white candy coating, dotted on for freckles and drawn on for hair.
Oh, and toothpicks. I can never have too many.
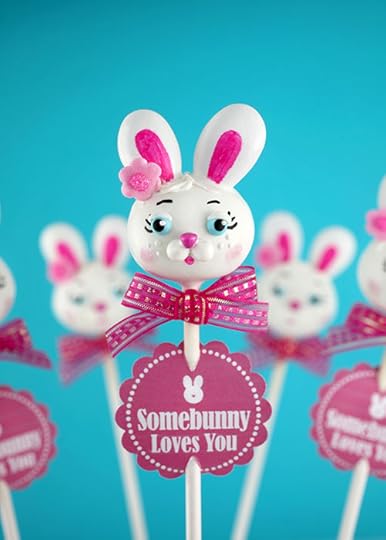
Hey there hunnybunny!
Oh yeah, I made cake pop tags for you too if you’d like to download them for your pops or even for cupcake toppers.
Somebunny Loves You Cake Pop Tags
But that’s not all.
I have another bunny to show you. A little bit simpler. Not as fancy but just as fun.
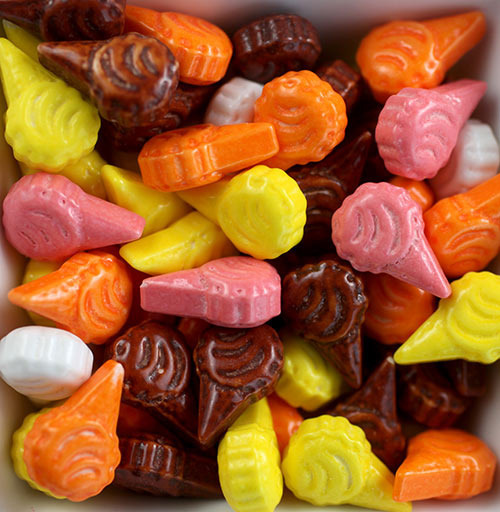
This bunny was inspired by these ice cream cone sweet tarts. These are the kind of unique candy/sprinkles I like to snatch up as soon as I see them. I usually have no idea at the time what I’ll use them for but I know at some point they’ll come in handy for something.
And the orange ones above totally did … literally. Know where I’m going?
I used the almonds again for ears, the pink rainbow chip sprinkles for noses, mini marshmallows for feet and arms, green daisy sprinkles and orange ice cream candy… you guessed it … for carrots.

Same ears, but a totally different lovable, huggable little bunny?
Hugs and hope you like these little guys.

March 10, 2013
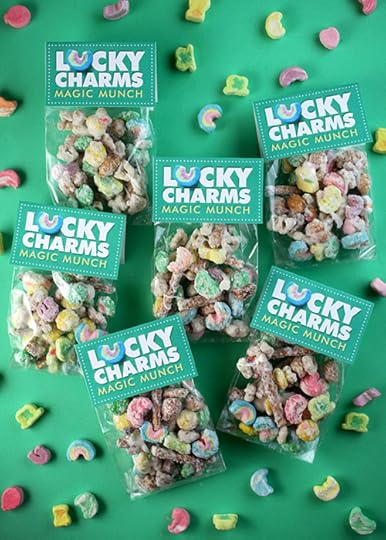
Magic Munch
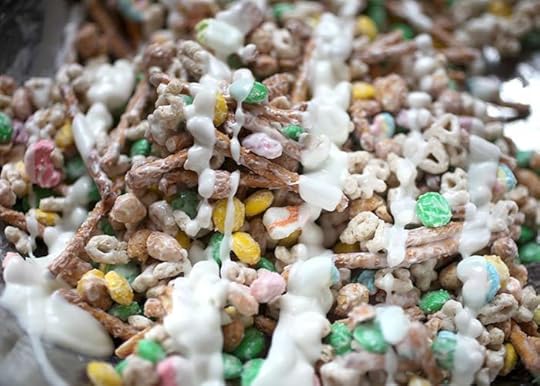
I made some munchies for you. Have you tried Christmas Crunch before? It’s sometimes called Christmas Crack or White Trash. I know, not the nicest names, huh. But, It’s a mighty munchable and very addictive sweet and salty treat coated in white chocolate.
The regular version I’ll usually make uses Corn Chex Cereal in the mix. So, I thought I’d switch it up a little and make it work for St. Patrick’s Day with some Lucky Charms cereal instead.
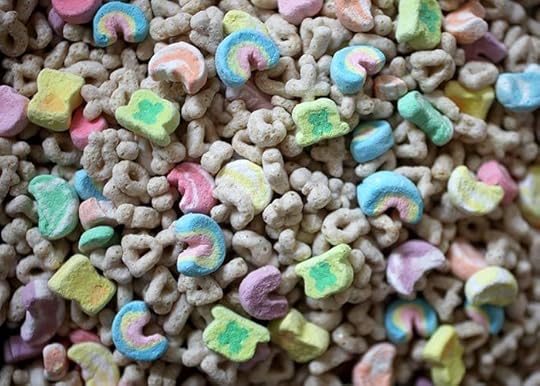
They’re magically delicious, so I’m told.
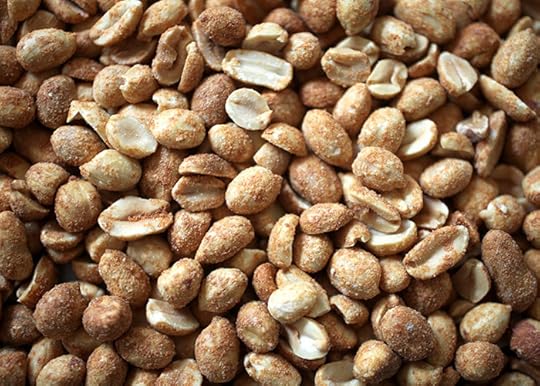
Salted, dry-roasted peanuts get mixed in.
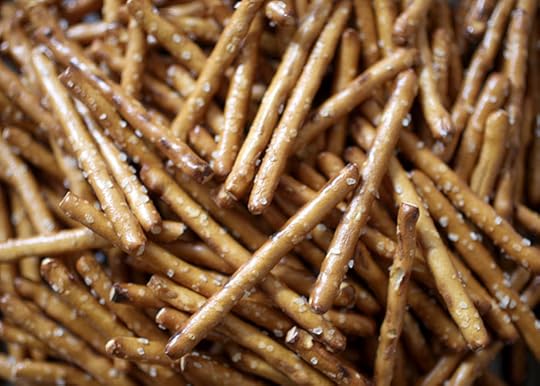
Along with pretzels, too. Twists or sticks.
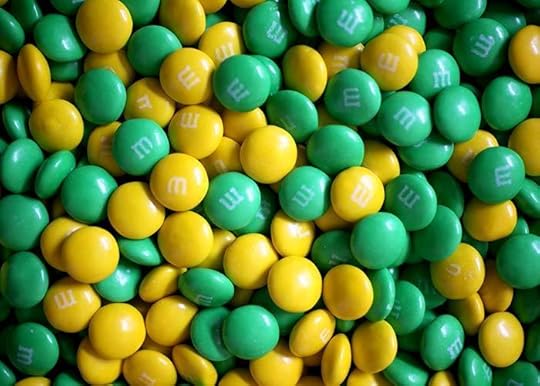
M&M’s. These little bursts of chocolate really make the mix even more munchable.
I bought a party size bag of regular M&M’s and just sorted out the greens and yellows to make them pretty for St. Patrick’s Day!
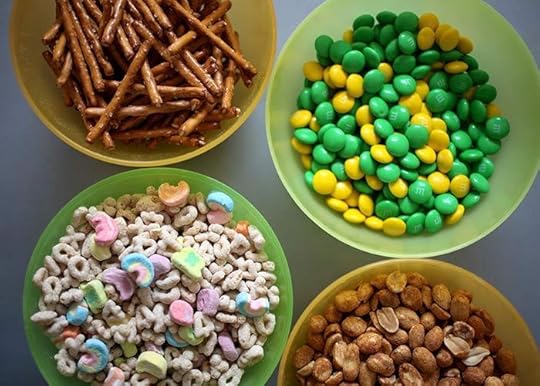
You can mix in as much or as little of each as you like. I used almost equal amounts of each. Two cups or so. And you can switch it up with other favorite add ins, too. Totally customizable. Especially if you aren’t trying to tie in with a theme.

Mix it all up. It’s like cereal soup.
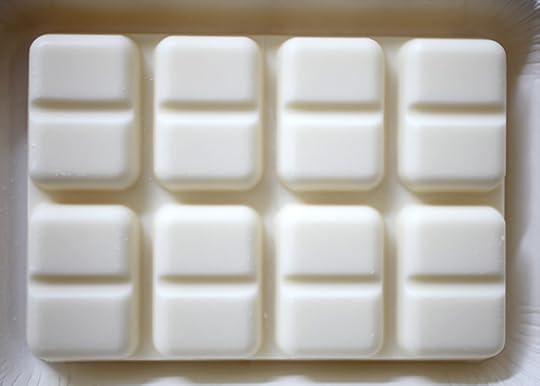
Then melt some white candy coating. This kind is the generic brand from Kroger grocery store. It’s one of the main go to candy coatings that I like to use.
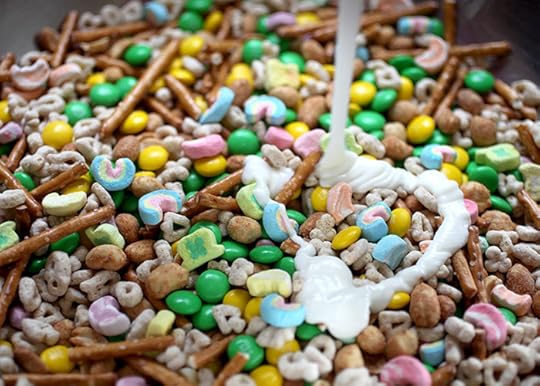
Melt it and stir it all together until lightly coated all over.
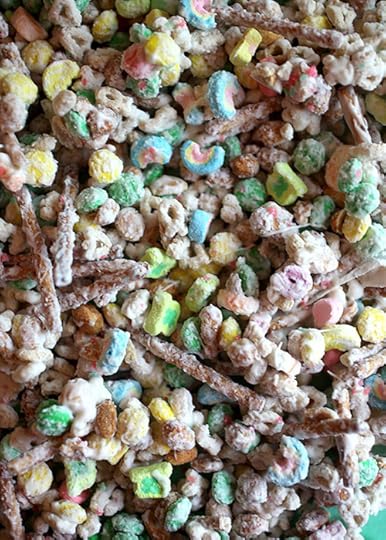
As soon as the coating dries, it’s ready.
Munch. Munch. Munch.
I love quick treats.
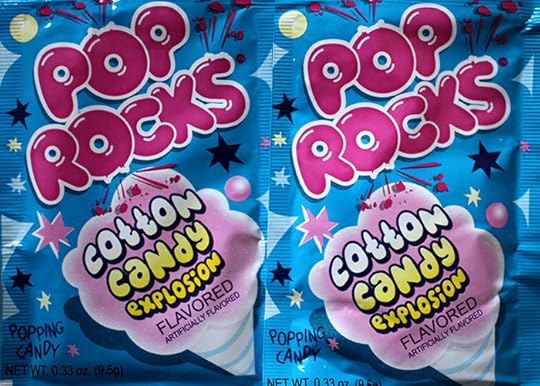
And if you want to add a bit more magic to the mix, try adding in some pop rocks.
Before the melted coating sets…
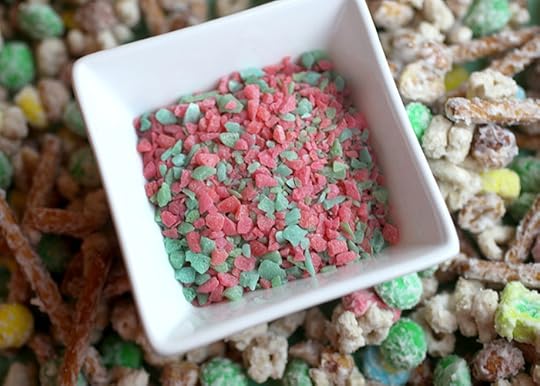
… sprinkle on top.
You’ll need a good amount to make an impression (I only used two little packs) and the pop rocks will start to fizzle out after being opened for a while and mixed in the munch, but if you eat them the same day, you’ll totally get that fun popping sensation in your mouth.
Makes the magically delicious come to life.
Lucky Charms Magic Munch
March 4, 2013
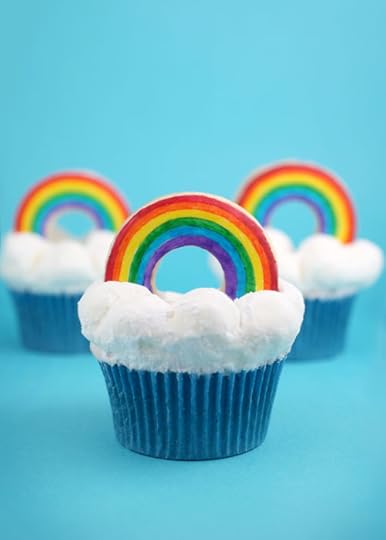
Rainbow Bright Cupcakes
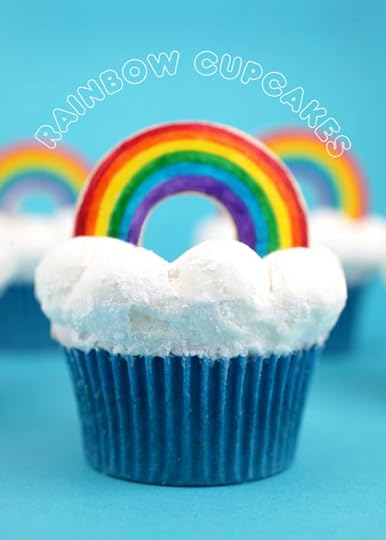
March is here and this weekend I thought I would work on something cute and sweet for St. Patrick’s Day. Shamrocks, leprechauns, pots of gold, maybe? But then I was bored … none of those things really inspired me for some reason. I just wasn’t feeling green treats so much I guess. Instead I was feeling full of color. So I decided on rainbows … and cupcakes … minus the pots of gold at the end.
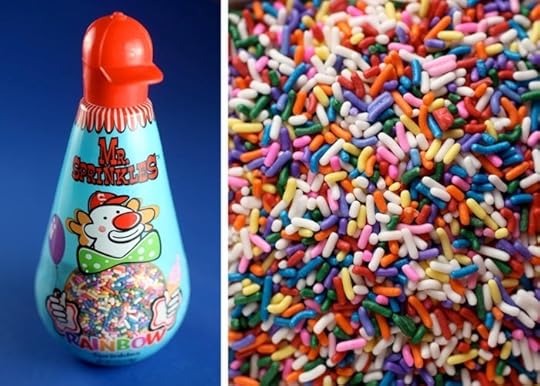
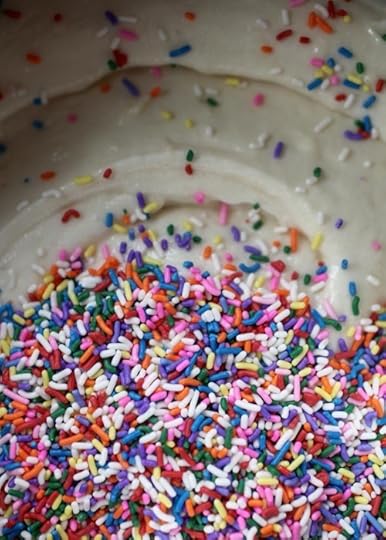
I was also feeling like rainbow colored sprinkles … in my cupcakes.
I love these delicate jimmies by Mr. Sprinkles. (I love these even better, but the pastel colors aren’t available anymore. I’m still very upset about it. I could use them forever. For everything.)
Oh well, the rainbow sprinkles will work great for this bright little cupcake.
You’ll just need a couple. ; )
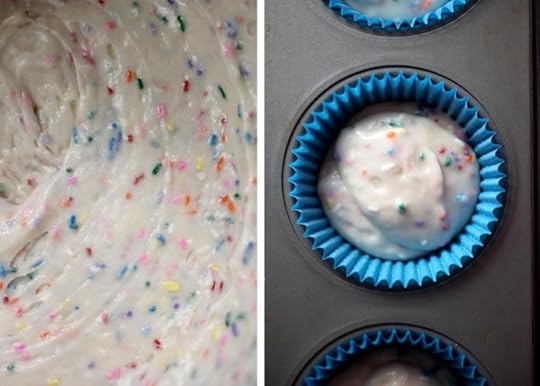
Stir them in the batter and bake away.
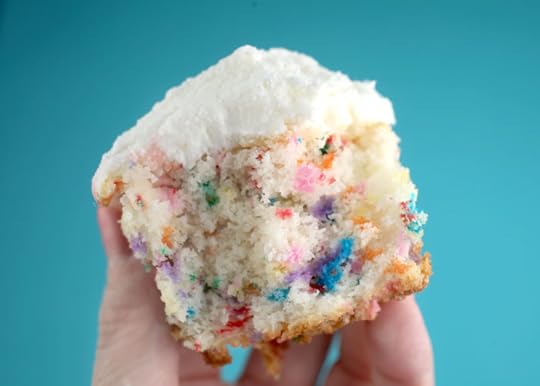
Taste the rainbow.
Cupcakes … Yum!
And so bright and cheery.
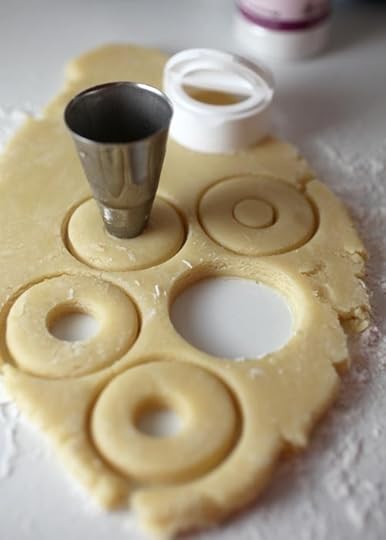
But for this project we need sugar cookies, too… so we can easily cut out rainbows to the right round size and shape.
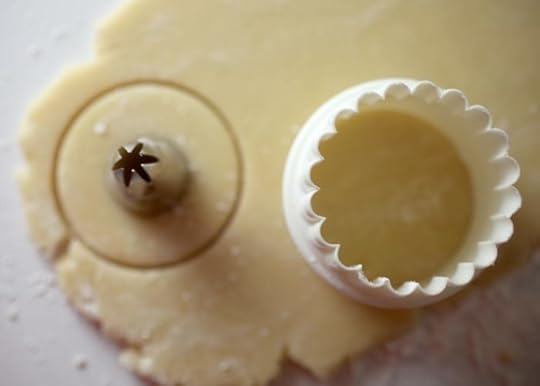
Use two different size circle cutters for the cookies. I used a 2 1/4-inch round cutter and the bottom end of a 1M Wilton decorating tip to cut out the center.
But any round sharp-edged shapes you have on hand can work. Try using the cap to your sprinkles containers for instance. More on that below…
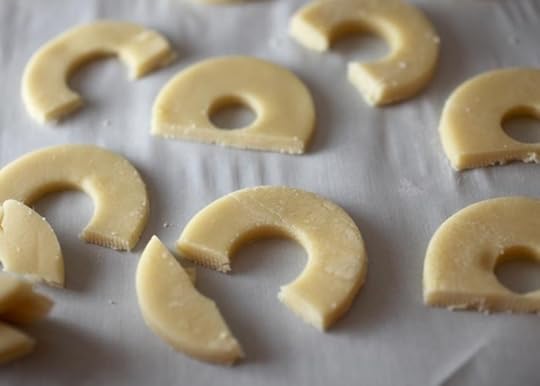
So to make the rainbows, I cut 2 1/4-inch circles, cut out the centers and then just cut off the bottoms so they could stand easily in frosting.
In the pic above, I tried two different center sizes. I liked the larger opening better.
After the cookies are baked and cooled, they can be covered with fondant.

Roll out white fondant and then cut out circles using the same size round cutters used for the cookies. Apply a thin layer of frosting to the top of the cookie and then place the fondant shapes right on top to secure.
Cut off any excess so your fondant shape matches your rainbow cookie shape.
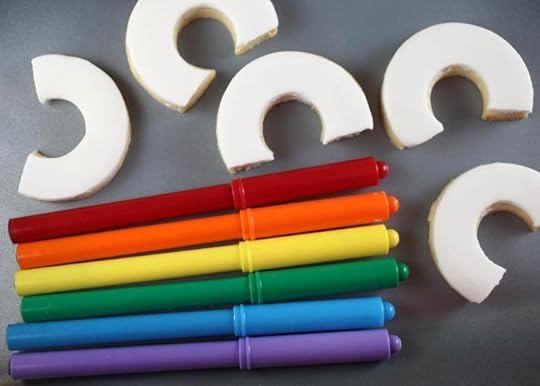
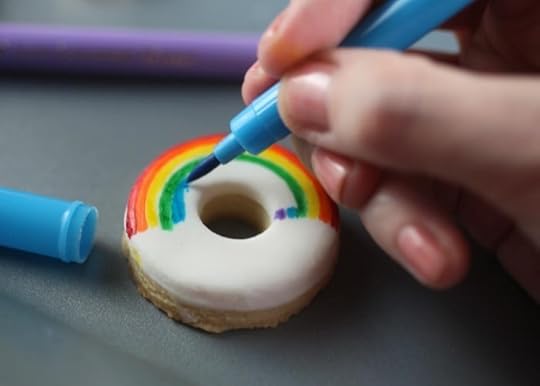
And then it’s time to color. The fun part. For me anyway. I’m much better with a pen than directing icing from a tip in a smooth line, so this is right up my alley. Plus it’s pretty quick and less messy.
I used these Americolor Gourmet Writing Pens that I often use on pops. They work really great on fondant, so I think you’ll have fun with them.
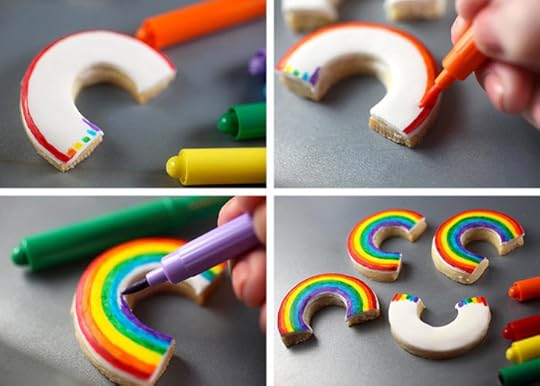
First, make marks for each color so you can get a sense of how thick the lines need to be so each color is equal.
Start with red on the outside and draw even lines with each color until you reach the center.
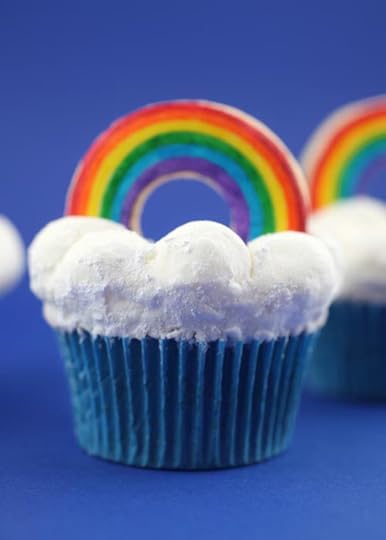
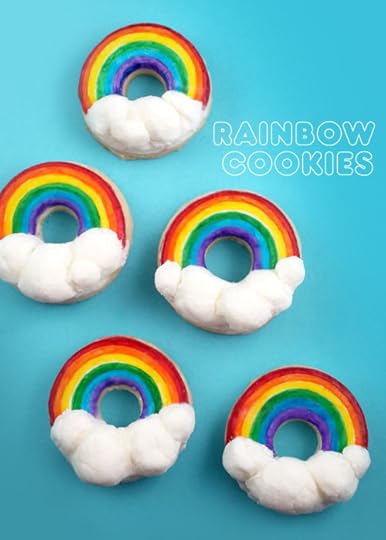
Pretty cute.
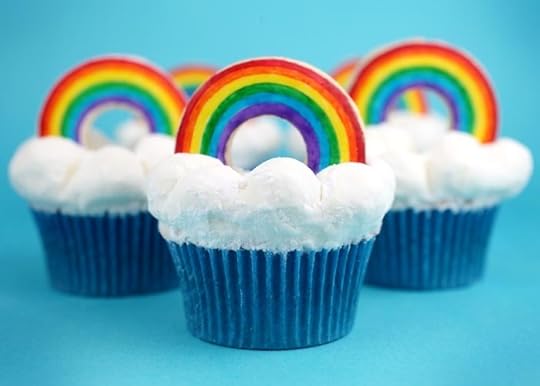
But even cuter in the clouds.
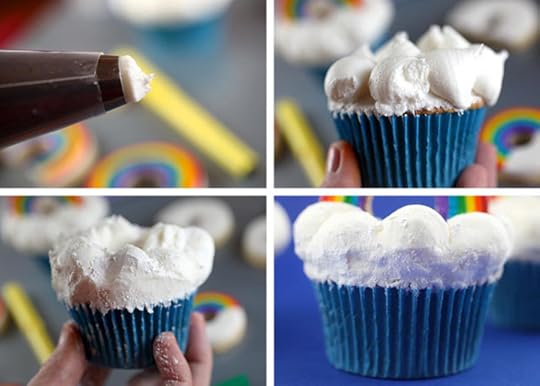
To make the frosting look puffy, use a decorating bag fitted with an Ateco 807 tip and pipe large random dots of frosting around the edge of the cupcake.
Sprinkle a little powdered sugar on top so the frosting looks fluffier … plus it will create a barrier so you can gently shape the clouds. Pat down any peaks with your fingertip and use a toothpick to help define the clouds.
Fluffy and puffy.
So these are some smaller circles I also made sugar cookies with. I used the bottom of a sprinkles cap because I didn’t have the right size cutter and for the center, I used the top of the Ateco 807 decorating tip.
I originally thought these would be the cupcake rainbow toppers, but they were just too small, so I did something else with them.
See… too little. They’d be great on mini cupcakes though.
After seeing how cute the puffy clouds on the cupcakes looked, I wanted to use them on the cookies, too.
So, I colored in about 2/3 of the rainbow.
And added frosting to the rest using the same technique for the cupcakes.
Too cute.
Rainbow Cupcakes
February 27, 2013
San Francisco Treats
I was in San Francisco this past weekend to help judge the Scharffen Berger Chocolate Adventure Contest. A day of eating sandwich cookie entries using Scharffen Berger chocolate and one of ten adventure ingredients. So much fun and so many cookies. Plus the winner is going to get twenty five thousand dollars. Hello. That’s a ton of sweet cookie dough. The winner will be announced in a few weeks. If you didn’t enter this time, I hope you will next year.
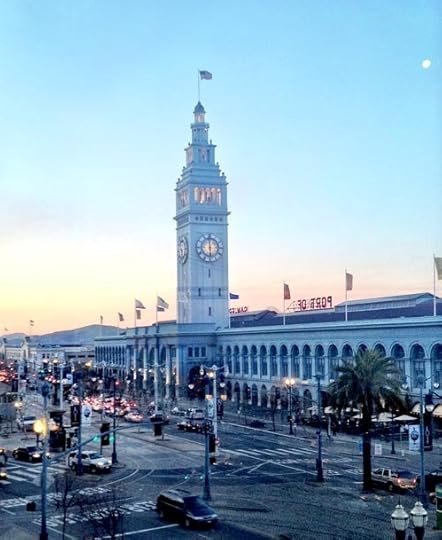
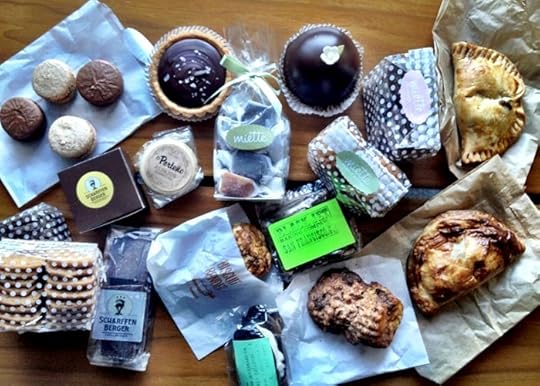
Now, I knew I would be eating a bunch of cookies on Sunday during the judging, but when I travel I like to try treats from sweet shops and such in the places I visit. Do you have this affliction, too? I mean I rarely go to bakeries at home, but when I hit the road … that’s another story. And on Saturday I almost overdosed on sweets. Have you ever been to the Ferry Building in San Francisco? Oh my gosh, such a fun place and so many amazing vendors and shops.
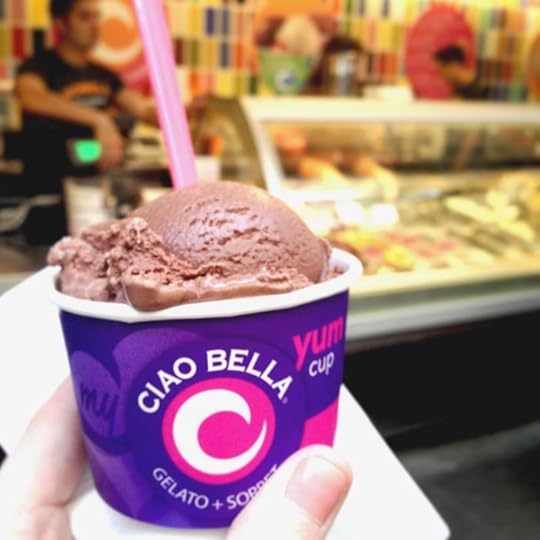
First stop was Ciao Bella Gelato. If I only ate one sweet when traveling it would definitely be ice cream. Ice cream. Ice cream. Ice cream. Or Gelato. Not sorbet though. Creamy yes. Icy no.
But in the case of the Ferry Building, they have so much more than just creamy treats to taste.
And once I started, I couldn’t stop.
This is slightly embarassing, but we’re all friends here.
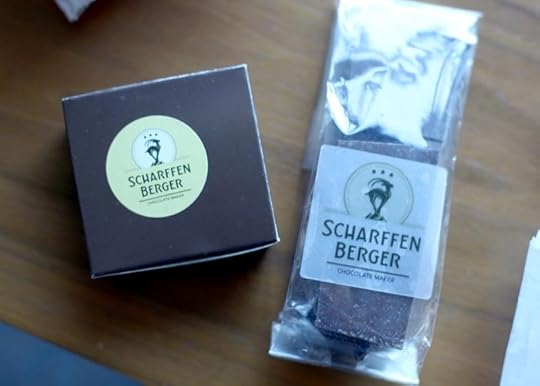
Scharffen Berger had a little spot, so I grabbed a warm up for Sunday’s festivities with this dark chocolate sea salt bark.
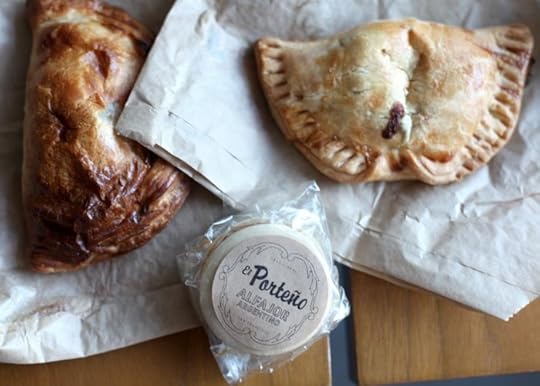
El Porteño – I. Love. Their. Empanandas. Prosciutto and fontina cheese is by far my favorite. I first had them two years ago and oh man I was so happy they were still set up in the Ferry Building. Can’t get enough of these things.
Plus, they had alfajores – Argentine cookies sandwiched with dulce de leche … delish.
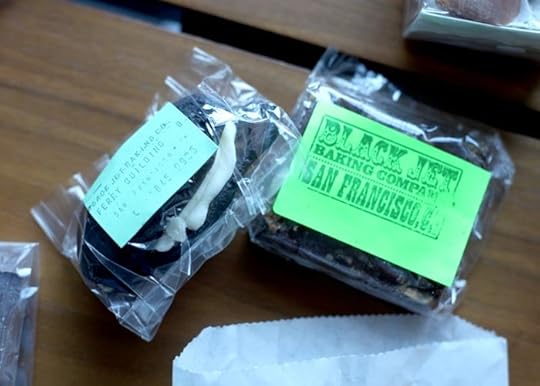
Black Jet Baking Company. I grabbed a super yummy brownie and one of their devil dogs which reminded me of a homemade oreo on steroids. I’ll be back.
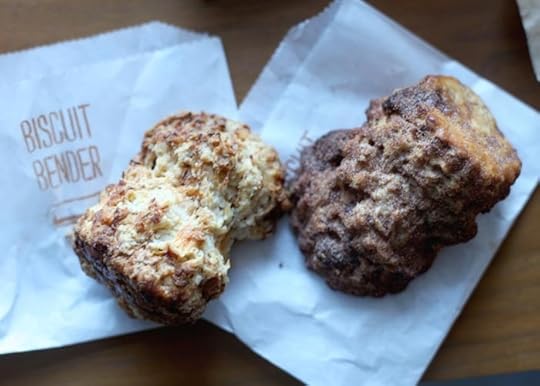
Biscuit Bender. This was a fun place. And they have such a great name. I picked up a Mexican Hot Chocolate Biscuit and Breakfast Sausage for Sunday morning.
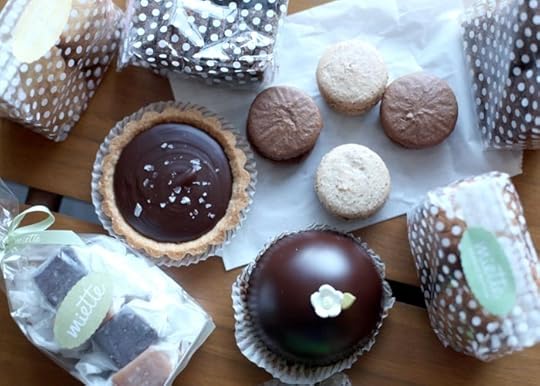
Up next … Miette. Oh, how I love thee. Let me eat the ways.
Your chocolate tart is amazing.
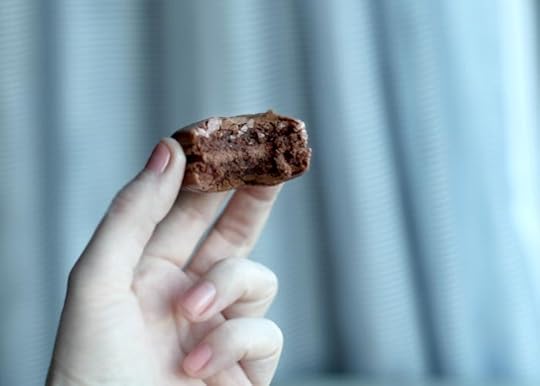
(P.S. All the bagged cookies and caramels were for friends … minus the bag of cookies I am eating right now as I type this. Those chocolate sables are hard to resist.)
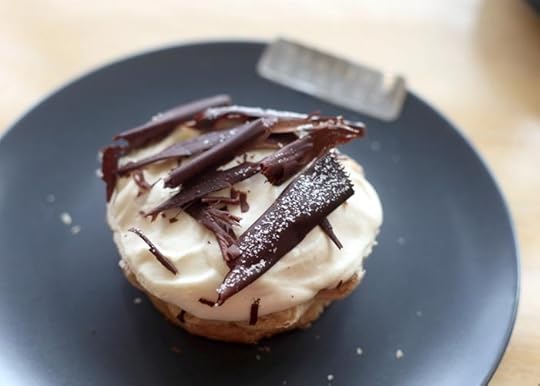
This chocolate macaron was my favorite sweet on Saturday…
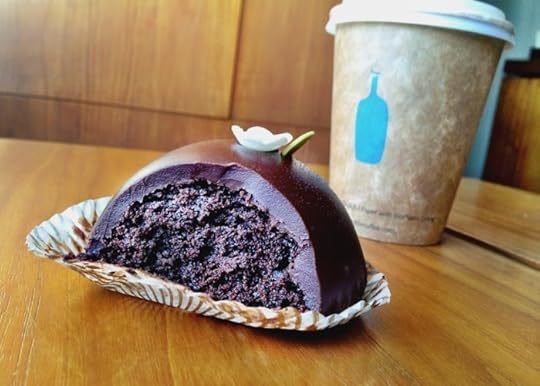
… until I tried this Miette’s Mini Scharffen Berger cake on Monday. Oh My Gosh. So good and still moist after a couple of days. Look at that ganache. Often chocolate cake desserts don’t live up to how good they look, but this petite domed cake was just as incredible as it was beautiful. I’d definitely get this again.
So that’s a little tour of my treats from this weekend at the Ferry Building.
_______________________________________________________________________
And here’s a few stops I haven’t shared with you yet from the last couple of times I’ve visited San Fran.
Humphry Slocombe – an ice cream stop of course.
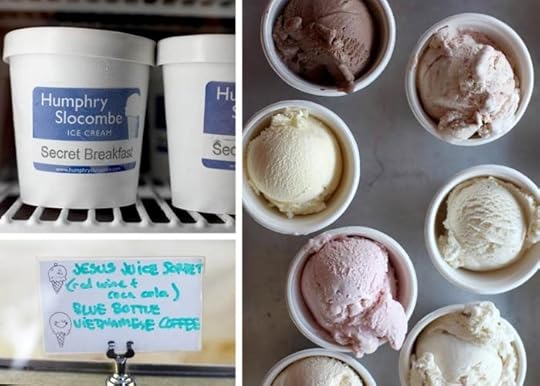
Butter Beer, Cinnamon Brittle, Secret Breakfast, Peanut Butter Curry, Cucumber Ice Milk and Sweet Summer Corn. You’ll be amused as much as you will be satisfied by their creative ice creams.
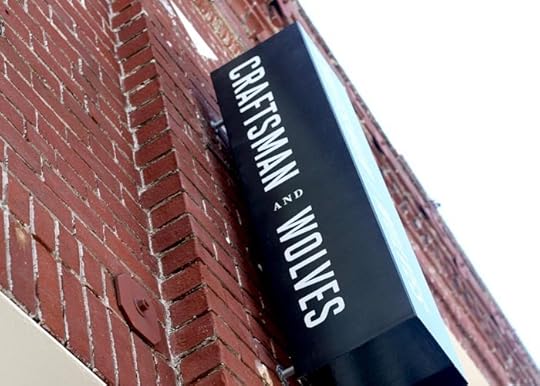
Craftsman & Wolves - This place definitely lived up to its reputation. But by the name, you’d never guess it was an amazing patisserie because it totally sounds like a steak house.
But instead it’s a place you can dine on perfect pastries.
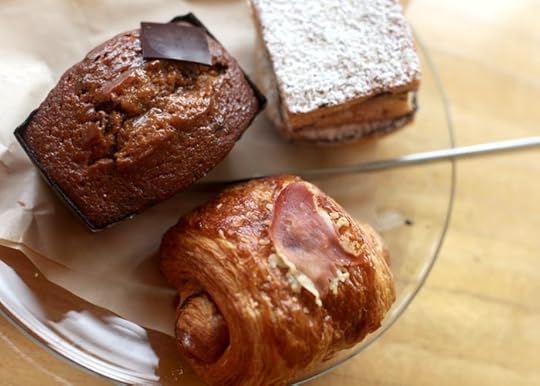
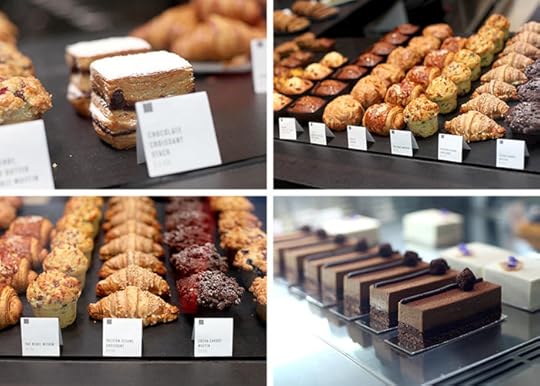
Caramel chocolate pearl travel cake, pain au cochon, and a chocolate croissant stack. Yes. Yes. Yes.
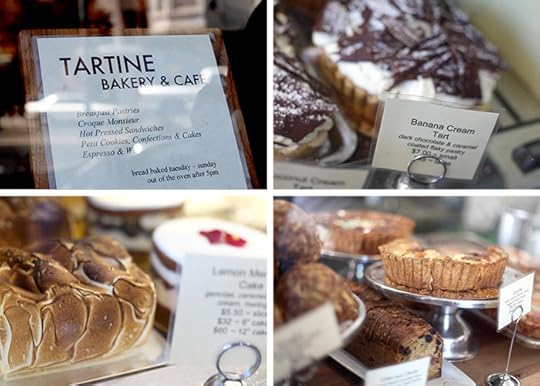
Oh, Tartine. A must visit in San Francisco. So many pastries, breads, cakes and tarts to please.
This mini banana cream tart was superb and was probably the best thing I had that visit.
A flaky pastry coated in dark chocolate with caramel, pastry cream, and lightly sweetened cream. Try it.
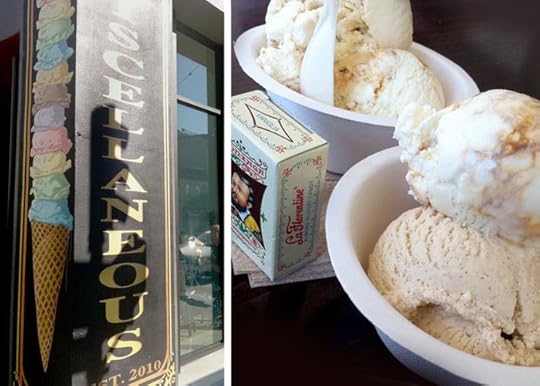
Mr. & Mrs. Miscellaneous. Amazing ice cream and the absolute most adorable ice cream parlor name ever ever.
Try the Bourbon and caramel ice cream. whoah.
Chocolates anyone?
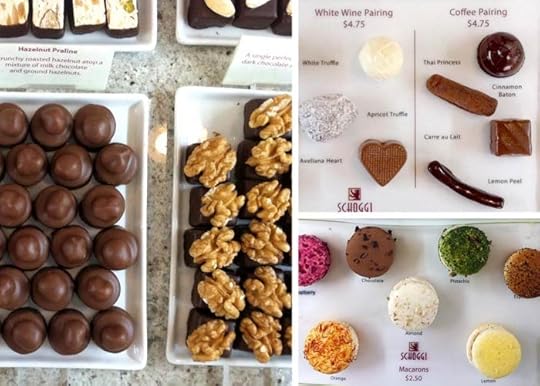
Schoggi is a beautiful shop with a stunning display of swiss chocolates. Plus they offer petite pastries and macarons, too. It was extremely difficult narrowing down my choices. They are all like pieces of art.
_______________________________________________________________________
And since we’ve been singling out San Francisco Treats, here are a few more that I’ve shared on the blog before, but I thought it would be nice to have them all in one place.
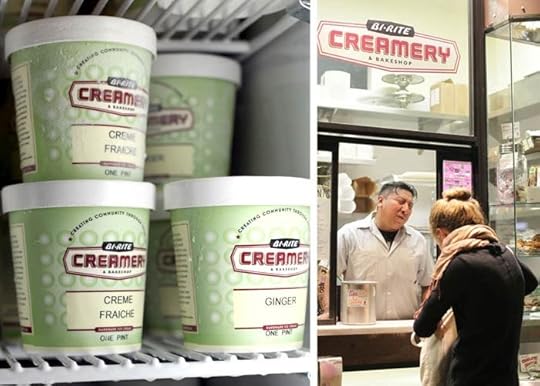
Bi-rite Creamery. Ice cream again. Go figure and go now and get the brown sugar with ginger caramel swirl. Cinnamon Snickerdoodle’s a winner too.
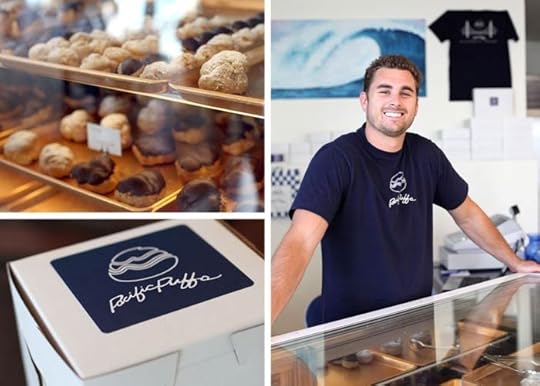
Pacific Puffs. Classic cream puffs. Perfect topped with powdered sugar or covered in a chocolate glaze.
We haven’t even mentioned cupcakes yet.
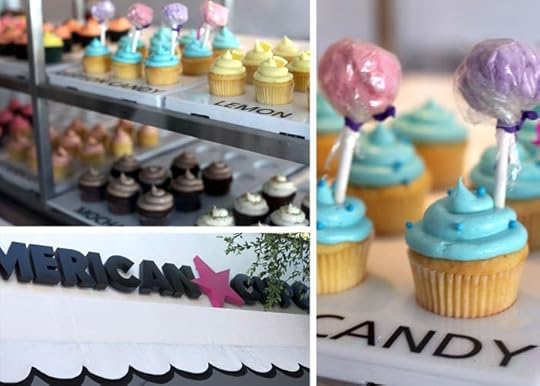
American Cupcake. These cotton candy cakes are just too cute.
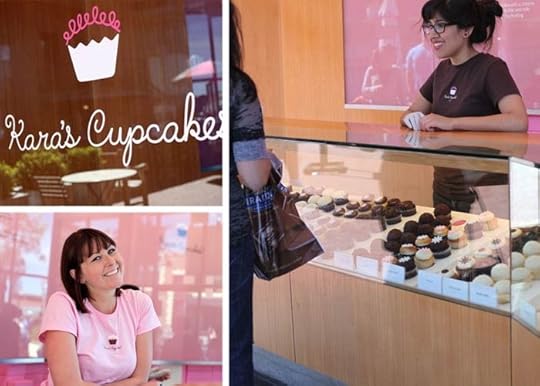
And Kara’s Cupcakes – such yummy cupcakes and with several locations you’re in luck. This one in Ghiradelli Square was gorgeous. Loved the pink menu wall.
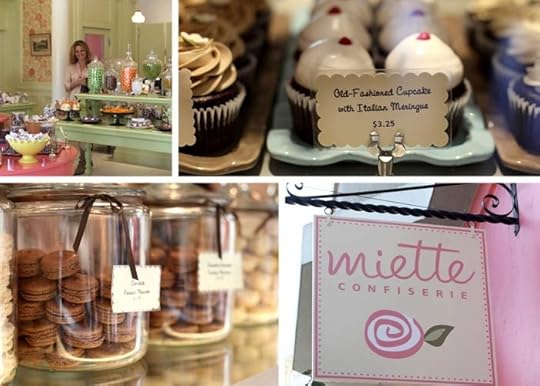
Back to Miette – They have cupcakes too … in addition to all the goodies I showed you at the beginning of this post. If you get a chance, visit the shop on Octavia Street. It is a real treat.
_______________________________________________________________________
Okay, those are all the places I’ve visited in San Francisco over the last few years .… I think.
Now, where to go next time?
If you live in or have visited San Francisco, what am I missing out on?
Doughnuts? Pies? Do tell.
What’s your dish on desserts?

February 22, 2013
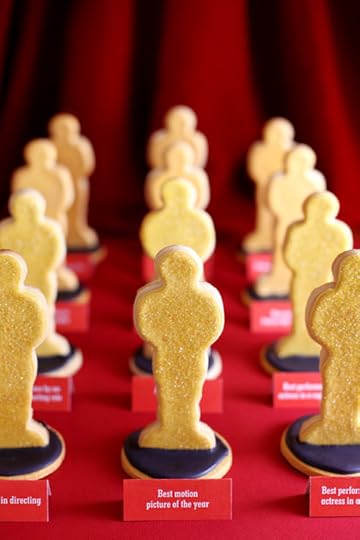
Awards Night Statue Cookies
Happy Saturday and day before the Oscars. Whose gonna be watching Sunday night?
I wanted to re-share these fun sugar cookie statues I made a few years ago because I still get questions about them when the Academy Awards roll around. So I thought I’d do a quick update post to help if you think you’d like to make these one year for the film festivities.
The main question I get is “Where can I get the cutter to make those cookies for my Oscars party? Help!”
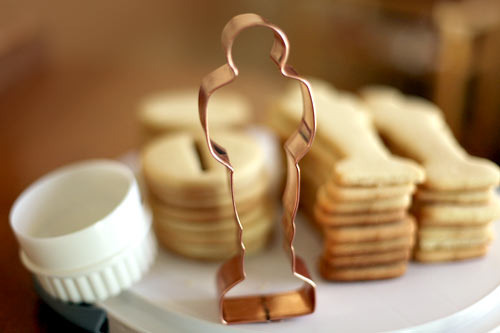
Well, I bought this one from Copper Gifts a while ago … and since then, the cutter is no longer available. Boo.
Good news though, they have another cutter that I think will work just fine.
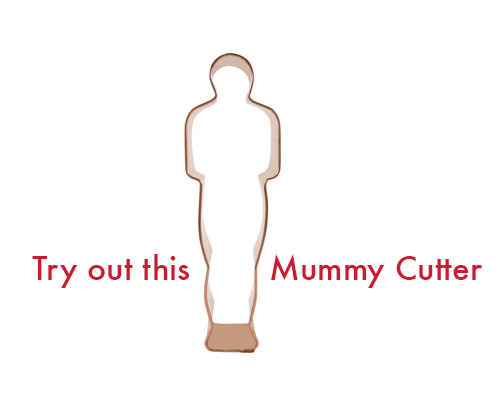
This is the Mummy Cutter from their Halloween section.
Not as statuesque, but I think he’ll definitely do.
Just be careful when connecting the base since it’s not as wide as the one I originally used.
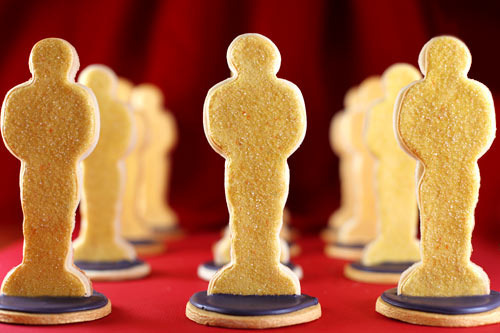
Here is the complete statue cookie how-to if you get a cutter and want to bookmark it for next year or another trophy party.
And if you want to make them totally last minute for tomorrow, get adventurous and use this template I drew for you from the one I have. Cut it out on a heavier paper card stock, lay it on your rolled cookie dough and carefully cut around it. Tedious but the final cookies will be the star of your party.
Or just make these easy chocolate comfort cookies and call it a day.
Either way, hope you have a great weekend. Enjoy!
A Handy Update: Check out the link in comment #7 and you can see how great Nicole’s cookies came out using the mummy cutter.

February 17, 2013
Ooey Gooey Goodness

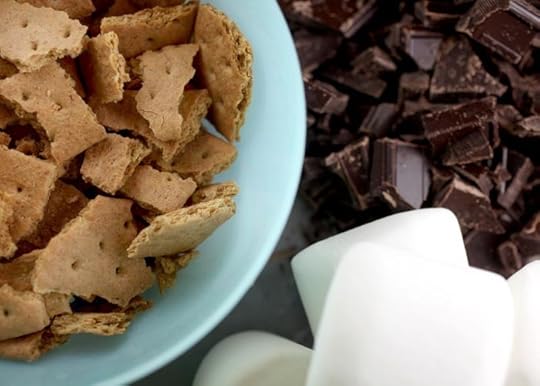
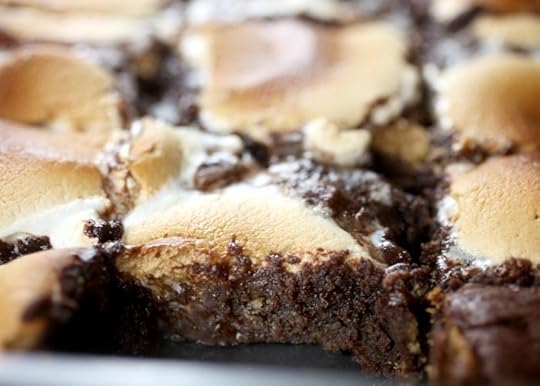
S’mores Brownies.
Chocolate, graham crackers and marshmallows all baked up in a fudgy, gooey brownie. What could be better?
It’s like having a campfire inside my oven.
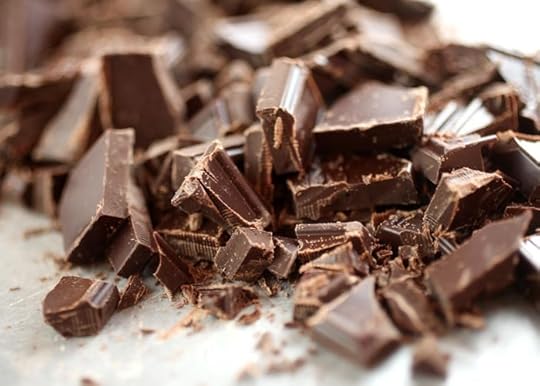
I love a recipe that starts with chopped chocolate.

And ends in something like this.
The recipe for these is from one of my favorite cookbooks, Home Baked Comfort. At least favorite to look at anyway, because I’ve only made one other thing from it so far. But it’s one of the few books I have that I’d want to make almost everything in. Here’s the other recipe I tried out and love: Chewy Chocolate Meringues if you want to check them out. They are way good!
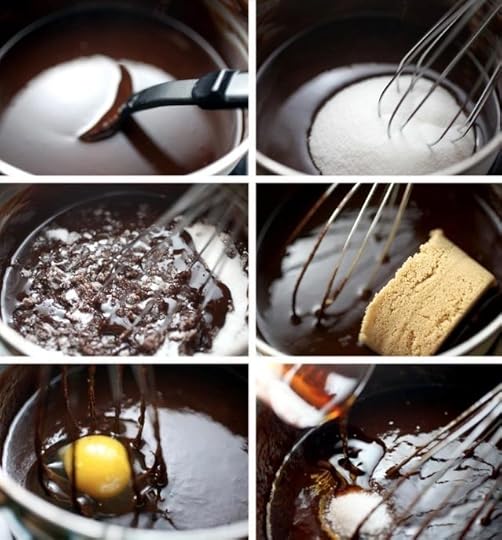
Melted chocolate is so pretty to me. So smooth, shiny, warm, and the beautiful beginning of these brownies.
Heat the chocolate with butter, whisk in sugars, add eggs, vanilla and salt.
And then sift in the flour and cocoa. Hello.
So, after I added the sugars, I realized I was going to need a bigger pot. But too late for that … no turning back.

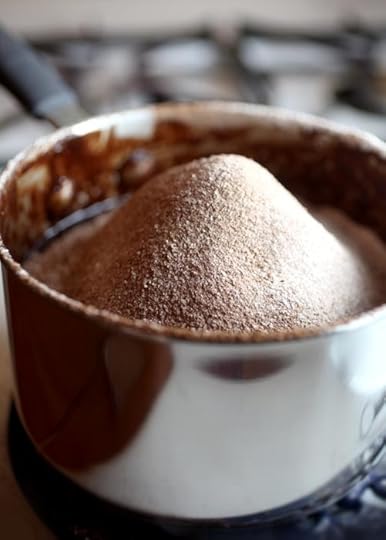
So I carefully stirred it all together and added the crushed graham crackers to the mix before spreading in a pan.
Yummorama!
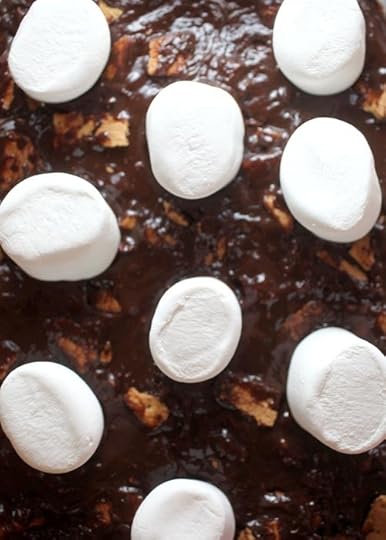
Then just top with marshmallows. I used 9 jumbo ones, but next time I think I’ll try regular size. Read the notes in the recipe below if you decide to make these. The giant amount of gooeyness from these seeped in and made the brownies take longer to bake.
But if you like gooey melt in your mouth brownies, you’ll love these.
Bake away.
S'mores Brownies
February 13, 2013
Mini ways to say Happy Valentine’s Day!
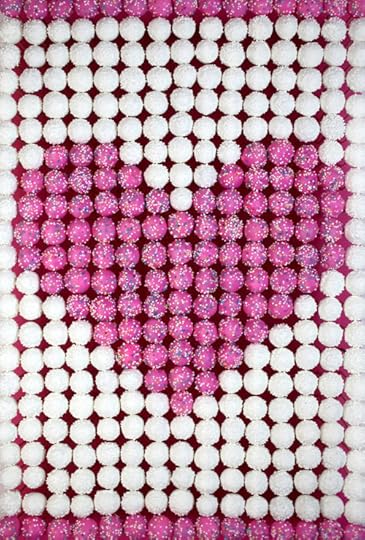
I made mini and many cake pops for you this past weekend. I had this idea I wanted to try just using basic round pops and color to make a sweet little display. So I set out to dip enough cake pops to get the job done. That turned out to be 350 plus. Yikes. Not quite sure what I was thinking … Around number 70, I was really starting to reconsider. I thought … oh my gosh I have to make five times that many. But when I start something I can’t let it go until I get to the end and see how it works out. I know this project doesn’t help you much for this year, but I thought the heart display could totally work for a lot of other things besides Valentine’s Day.
So keep reading below for the how to… or check out my big “mini” giveaway at the end of this post. It’s a mini way for me to say Happy Valentine’s Day!
Okay, here we go.
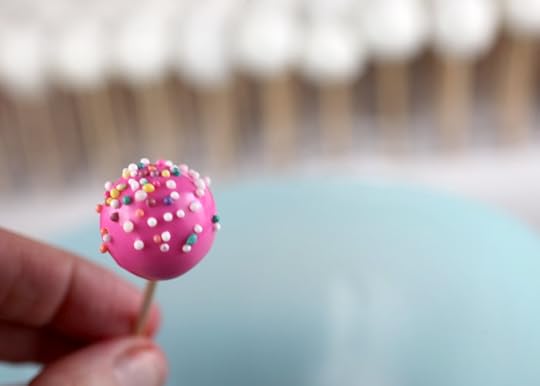
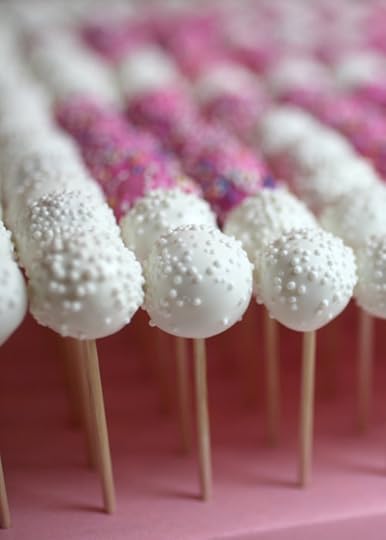
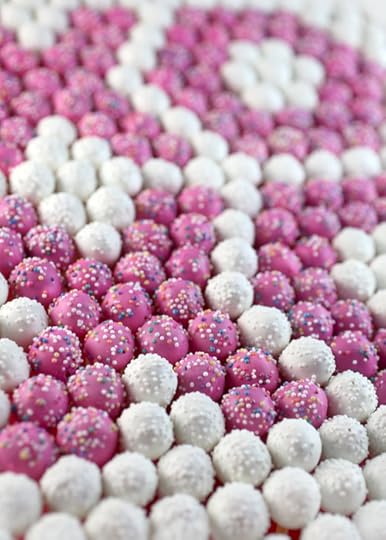
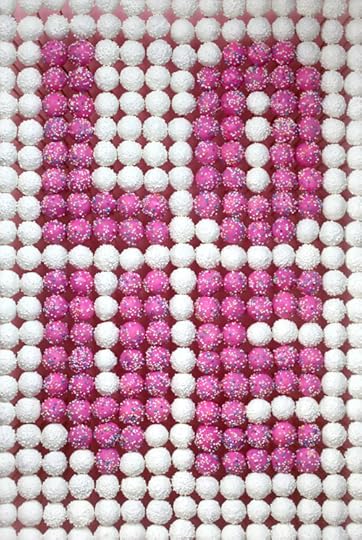
You can’t tell in the picture, but these cake pops are tiny. Like Cake Dots instead of pops. So tiny that you use a toothpick to dip them with instead of a lollipop stick. Yes a toothpick. The cake balls are actually about the size of a penny. But they are small for a reason.
Regular size cake pops would take up a lot of table real estate.
The lollipop sticks would be much taller and people would have a harder time viewing the design from above.
I figured the proportions out so they would work on a pretty standard size piece of styrofoam to make it easier to recreate and transport.
I only had to make one cake. Score.
Mini is major cute.
I based the display design off of a template (see below) I made so that it works with a 12X18 inch or 12X20 inch sheet of styrofoam you can find in craft stores. Then I worked backwards to figure out how many cake pops you’d need to make the the shape look right. Once I had that, I knew how big to make the cake pops. Or how little.
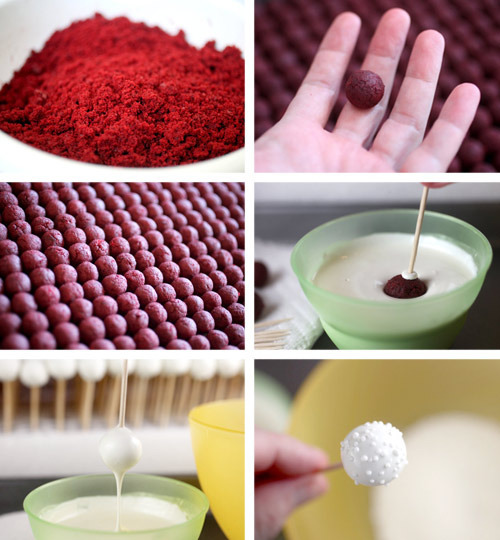
Crumble cake and mix with frosting
Roll into tiny cake balls. (basic cake pop instructions here) You can use the circles on the downloadable template as a guide for the right size. They should be slightly smaller than the circle so that when you add the coating they will still fit together nicely.
Keep rolling and rolling until you have enough
Dip a toothpick into melted coating and then insert into a chilled cake ball.
Dip entire cake pop into the coating and then sprinkle with non-pareils. They are tiny and will be the best size for these tiny treats.
Place in styrofoam to dry.
A couple of things to note.
Use a small plastic bowl to melt the coating. You can work with a smaller amount of coating when dipping. Just melt the coating in batches as you go. Then you can take breaks and watch the Walking Dead marathon on AMC in between.
Buy more than one sheet of styrofoam. You’ll need more room than the display size so they aren’t touching each other as they dry.
Invite a friend over to help you. It will go faster and maybe your neck won’t hurt like mine does right now from looking down and dipping for so long.
I’d try Mercken’s candy coating for this project. It melts nice and fluid – you don’t want thick coating on these. It will add too much volume.
I’ve probably discouraged you already. Kind of like I felt as I was starting making these. But I had a feeling they’d be cute when I finished so I went on… like I’m going to do now. And by the way, these completely make me giddy when I see them finished on the table (looking at them now), so I guess it was worth it. And it will definitely be worth it if one of you decides to try it out some day. Hope you do… with a friend.
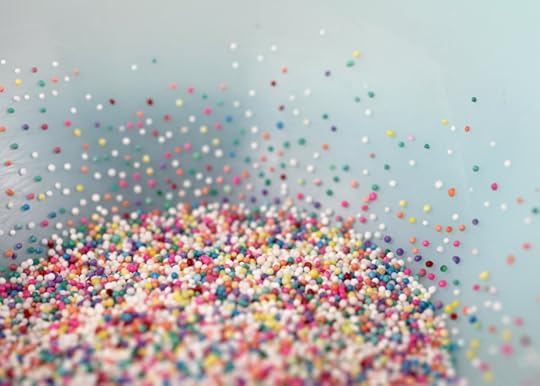
Use multi-color non-pareils for the second candy coating color. Minus the static.
Super cute.
When all the pops are done, prepare your display.
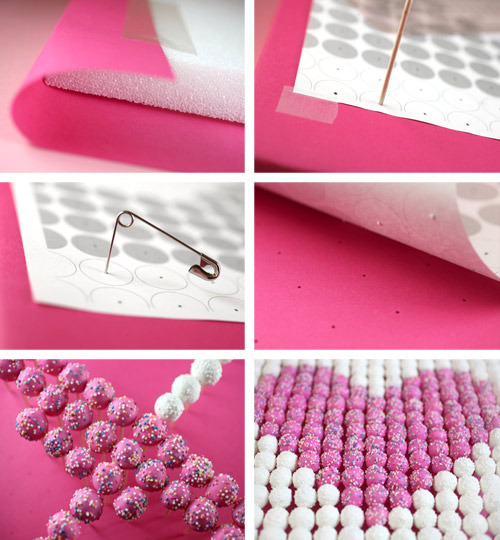
Wrap a 12X18 inch or 12X20 inch sheet of styrofoam with paper. I used the 19X25 inch single sheets you purchase at the craft store. You could also use wrapping paper though.
Packing tape worked best on the styrofoam to tape the paper down.
Print out the template provided centered on an 11X17 sheet of paper at somewhere like Kinko’s. The design is created for a 12X18 surface area but it is set up on 11X17 paper since that is a standard size to print. You’ll notice that some of the circles on the template are getting cropped off when they print, but that’s okay, you’ll have enough information to figure out where the pops on the perimeter should go. I hope that makes sense.
Tape the template down temporarily and use a safety pin to poke holes into the paper.
Remove the template and start arranging the cake pops using the template as a guide. Start in the middle and work your way out from the center. More than likely some of your pops will be bigger than you think and if you start at one end, left to right, they will start to tilt too much to make room as you place them in position. But if you start in the center, they will angle out equally all the way around. Again I hope that makes sense.
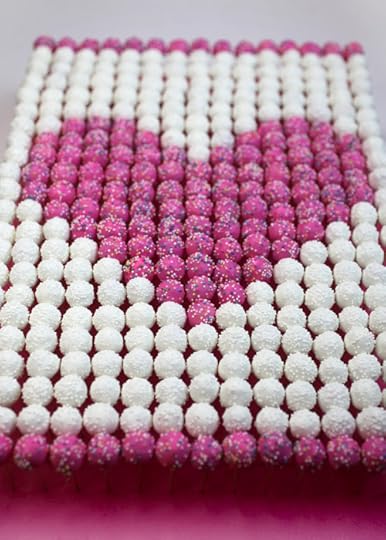
Full of heart.
But you can also rearrange them for a different look …
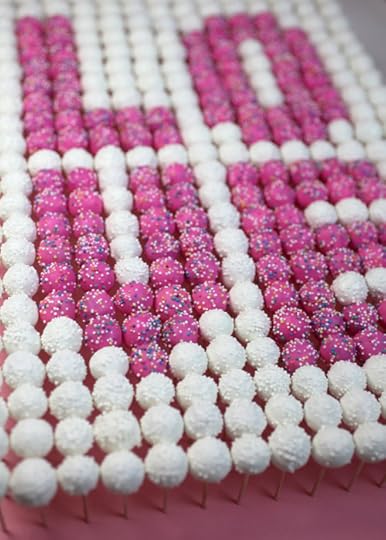
And spread a little love…
… Or some sweet hugs and kisses.
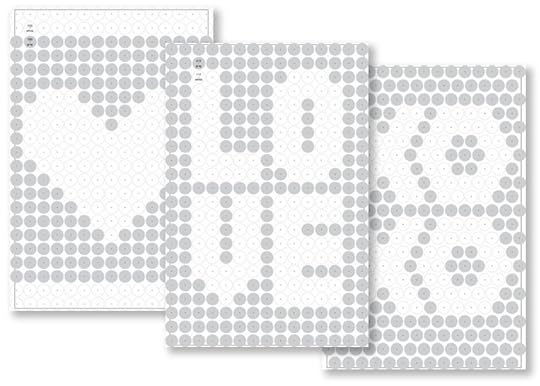
Here are the 11X17 inch templates for each.
And because I love you guys and all things mini, here’s a little giveaway for you.
Happy Valentine’s Day!

To enter, just leave a comment on this post and tell me who your Valentine is, what your plans are (or were) for the fourteenth or just say hi.
Deadline to enter is Sunday, February 17th at 7:00 p.m. ET.
One winner will be chosen at random and announced sometime Sunday evening on this post.
Winner will receive a 16GB Wi-Fi iPad mini.
Good Luck.
Giveaway sponsored by me.

Bakerella's Blog

- Bakerella's profile
- 9 followers

