
Bakerella's Blog, page 30
February 10, 2013
Give Love Cake Pops

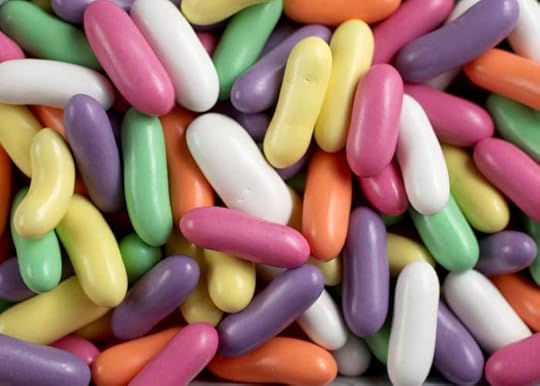
Candy Hearts. These don’t just make cute little ears for puppy dog cupcakes, they can also be used to make perfect little bows.
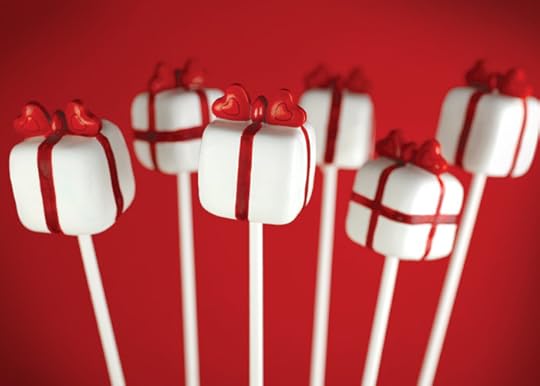
Bows on top of pretty present cake pops for instance.
When I posted those candy hearts last week, it made me think of these sweet little presents.
They are actually a project in my Cake Pops Holidays book. I thought I’d share the how to with you for those that don’t have the book … yet. ; )
The white candy coating and especially the red candy hearts make them totally work for Valentine’s Day. If I had used red and green for the boxes in the book, not so much.
But these can work … especially if you add some cute little tags to the lollipop sticks.
In the book I used tags that look like gift tags for presents. So, I thought I’d give you some tags to coordinate if you wanted to give some sweet love for the fourteenth, too.
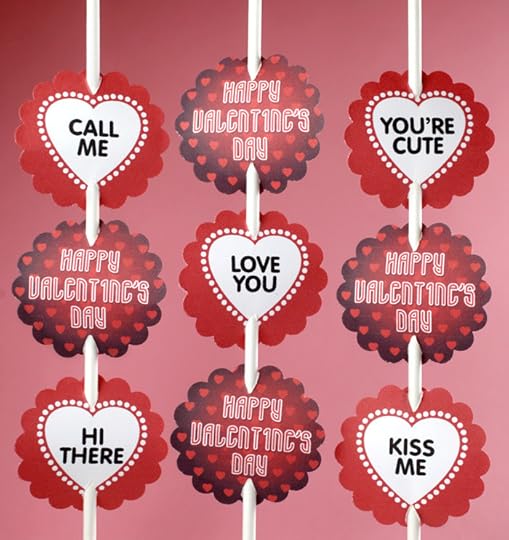
Download the tags and use them with a 1 7/8 inch paper punch for cake pops or make cupcake toppers with them, too.
Happy Valentine’s Day Tags
Conversation Hearts Tags – red
Conversation Hearts Tags – pastel (not shown)
And below is the in depth how-to for these. Have fun!
Give Love Cake Pops


February 4, 2013
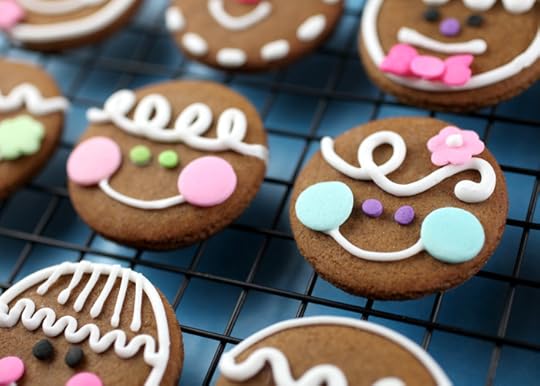
More Minis
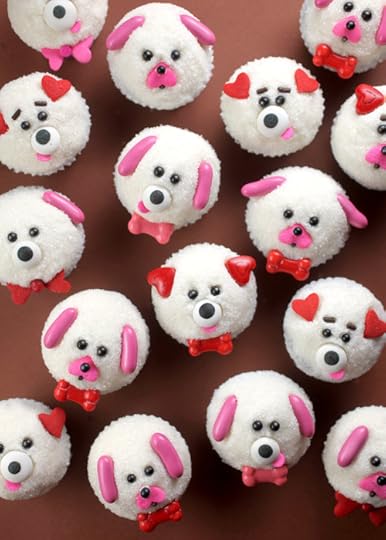
Puppy Love … mini cupcakes decorated with pink and red heart sprinkles for little ears and noses. I love using sprinkles and candies to make faces. Remember these pandas I made? I did something similar using chocolate chips for ears and noses. A candy challenge of sorts. It’s just fun for me to make something with what I have on hand. And make them easy at the same time.
And mini, too. More cupcakes. More cuteness.
I have to say, I’m not completely in love with these puppies. They’re cute, but they were cuter in my head. So keep reading and you can see how a quick candy edit can change them all together.
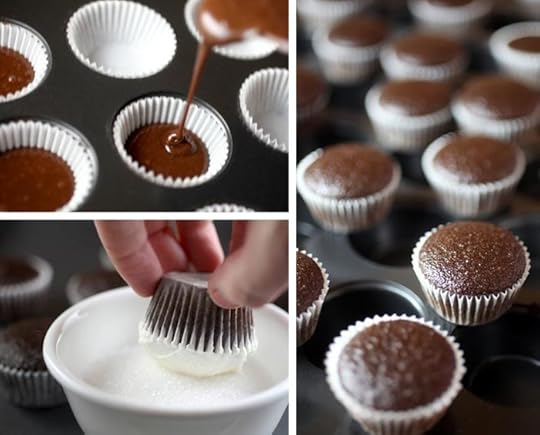
You can use the cupcake recipe from the panda post. It’s quick, easy and bakes yummy cupcakes. And I like that you can measure and mix everything in one bowl. And this basic buttercream recipe works great with it. After you frost the cupcakes, dip the tops in a bowl of sanding sugar to help even out the surface. When you add candies, add a little dab of frosting or even water to the back, so it will attach to the sanding sugar coated cupcake tops.
This little guy. He’s pretty cute with hearts for folded ears.
Ruff.

Red jumbo heart sprinkles.
I always have some of these on hand. They’re handy.
Red Candy Shape Hearts. Whenever I see these, (usually at Hobby Lobby or Cake Art) I grab them. Love the shape and thickness.
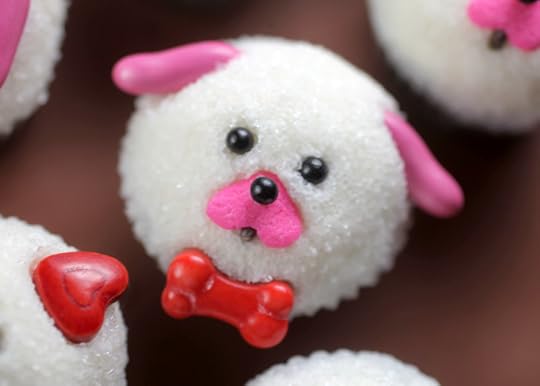
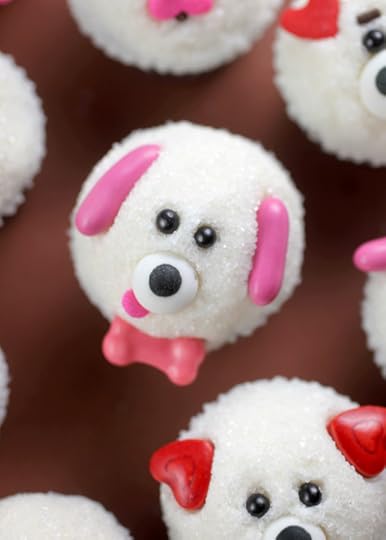
This little guy is pretty cute with an upside down pink jumbo heart nose and a little bone bow tie.

Now I don’t always have these on hand, but I thought it would be fun to finally use them for these Puppy Love Cupcakes.
And this little guy. He’s my favorite even though he doesn’t even have a heart shape to help make his face. So much for my puppy love idea. If I was just going to make one puppy, I think it would be him. He looks sweet.
His ears are made of pink licorice pastilles.
I usually pick these up at the Fresh Market from the buckets of candy you can buy by the scoopful. You could also use Good n Plenty candies, but the pastilles are usually a little thinner which I like.
Chocolate jimmies. You can use these for eyebrows and also for mouths.
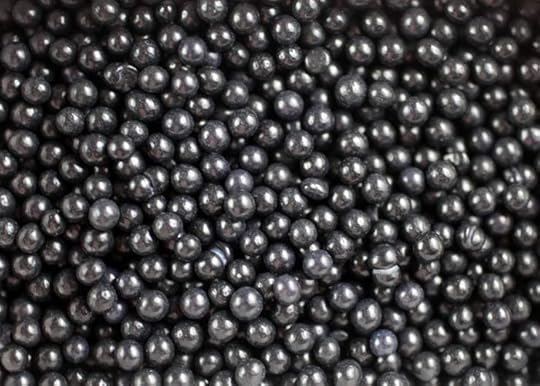
Black sugar pearls for eyes and noses, too.
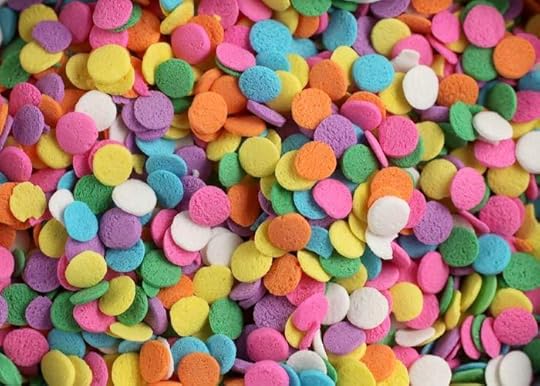
Pastel confetti sprinkles. I’d consider these one of my sprinkle staples. I have them in several sizes and shapes.
I used the pink ones for puppy tongues.
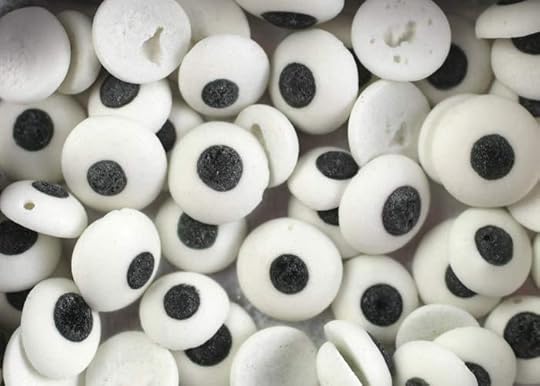
And these candy eyes actually make great noses on small sweets. I find this size at Hobby Lobby. They’re in a jar and sold by Festival. You can also find other brands sold by the sheet like candy buttons.
So those are the add ons I used to make puppies.
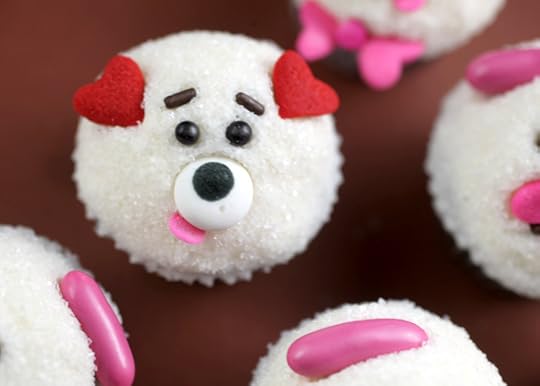
Now, like I mentioned above, I didn’t completely fall in love with the puppies for some reason, but as I was decorating I noticed if you take away the licorice, the hearts, the jimmies, and the bones and add something new for the ears you will end up with an even more adorable cupcake.
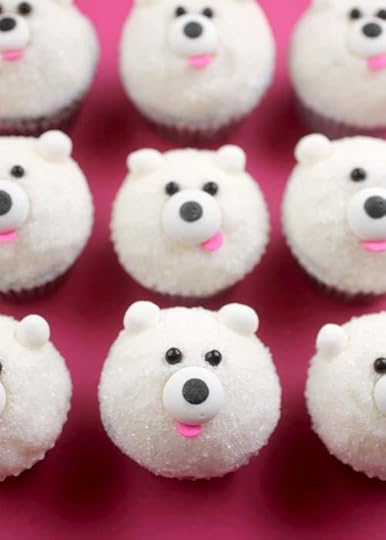
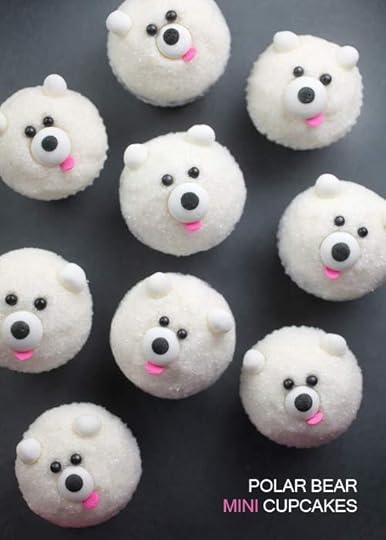
Polar bears.
A cute cupcake with even less candies. I like it…and love when you can create with minimum decoration and still be effective.

The ears are 8mm edible soft pearls. They look like snowballs to me.
There, much better.
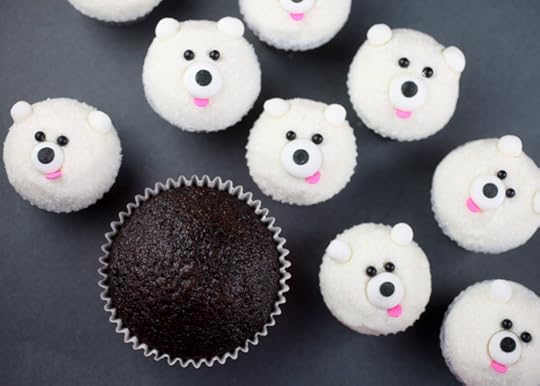
Here they are in comparison to a regular size cupcake. I know it’s hard to tell size sometimes by the photographs but they are itty bitty.
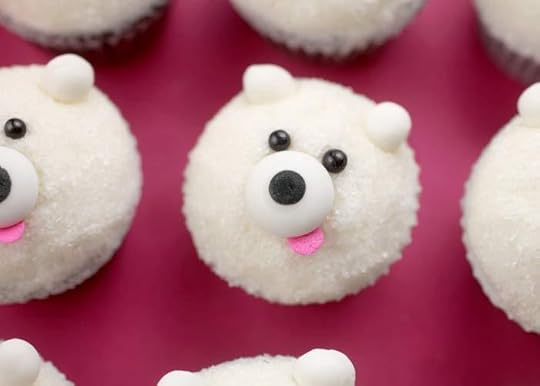
Now, I love these. They’d be super cute served at a winter wonderland party.
Puppies or polar bears. Which do you like prefer?
Either way, it’s fun to get creative with candies. Sprinkles, too.

January 31, 2013
It’s National Cake Pops Day!
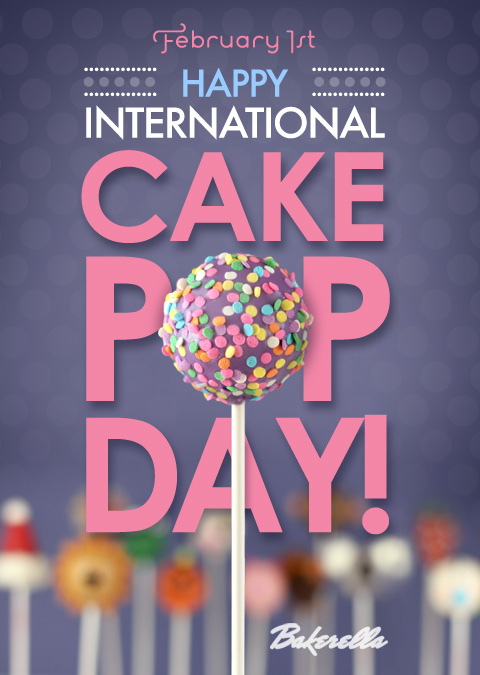
Happy February and Happy National Cake Pops Day, too! Whoohoo!
Or is it Cake Pop Day? It is in the photo above anyway. You know, so I could have POP centered in the card above … The S would have totally thrown off my graphic. : ) And I added International, too. Cake Pops bring smiles everywhere, right.
Can you believe it’s been five years today … five! … since I first posted these cupcakes pops. Reading that post now makes me smile. I had no idea then of how incredibly popular they would become or that people all over the world would be making them. And if someone had told me then that I’d have books based on that little cupcake on a stick … or even better … a toy. Ha! I would have told them they were from crazy town. So I’m glad no one told me that because I might of sabotaged myself if I knew what was coming. But just letting things unfold and having fun making cake pops and sharing them with all of you has brought so much joy and amazingness in many more ways than I could have ever imagined. Plus, I love living in crazy town.
Anyway, last year I thought that February 1st as the anniversary, would be a sweet day to celebrate a treat that takes part in the celebrations of so many. So this year, I’m excited it’s also on Foodimentary’s calendar of national food holidays for February 1st. Yay!
Love Cake Pops?
Raise your hand if you’ve seen them at a party, or made them, or just eaten them.
Give yourself a shout out if you sell them or share them with others.
Say hi if you have. I love hearing how they’ve impacted lives in so many unexpected ways.
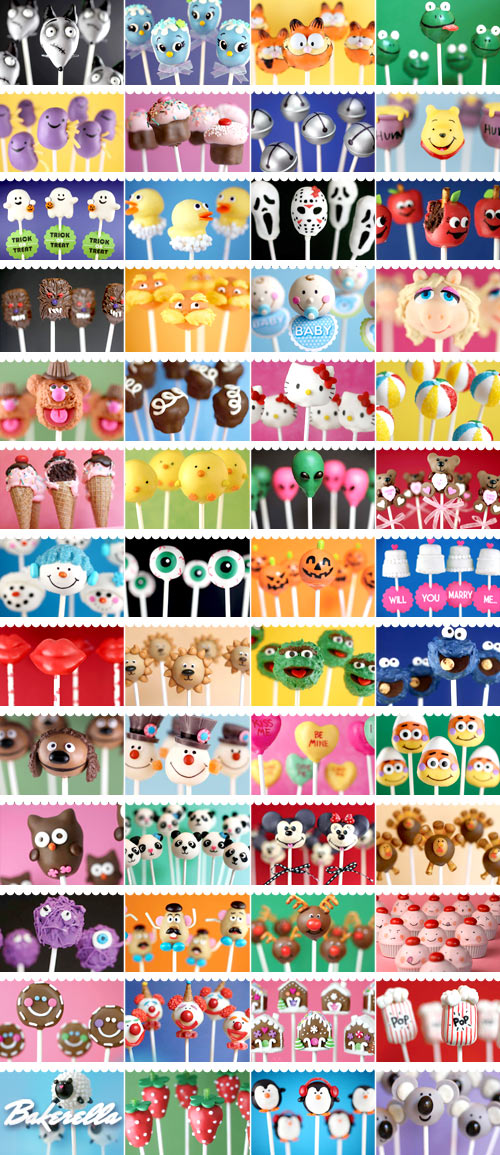
Below are a few of my pops from the last five years. I was trying to pick a favorite, but I don’t think I can anymore. The cupcake pops will always be nearest and dearest to my heart, but man those Garfield pops are too much. I didn’t even remember making them until I started looking back at some of my photos.
Anyway, I hope these brighten your day … and maybe give you a little smile, too.
And please, link up some of your own cake pops below. Who’s making Valentine Pops?
I’d love to see what you’ve been dipping and decorating and especially all of the countries you’ve been doing it from.
Hi… Hugs… and Happy Cake Popping!
xo Bakerella

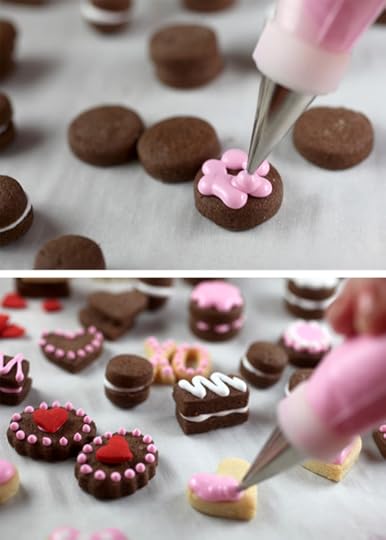
January 27, 2013
Play Food
I made some tiny sugar cookie sugar cookies for you.
Tee-niny!
Yes, I love little and I kinda like to play with my food… But I’m sure you know that about me by now.
And you probably know that I made more than just baby cookies.
They’re cute on their own, but I really needed them to put on display.
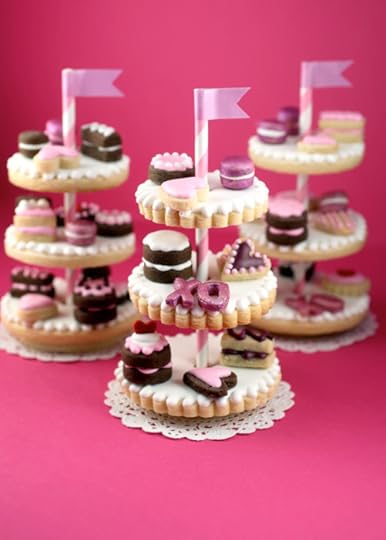
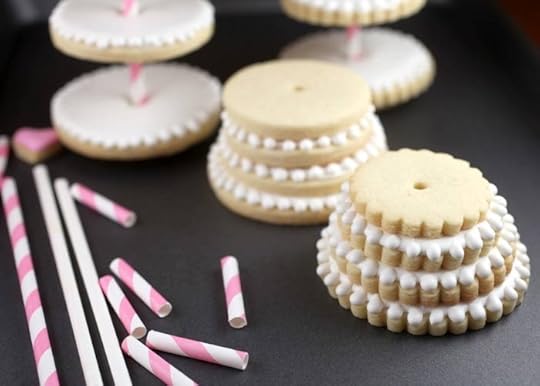
On these 3-tier sugar cookie dessert stands I made.
EEek! Cookies on cookies. Key-ute.
I love sugar cookies since they require a few basic ingredients that I almost always have on hand.
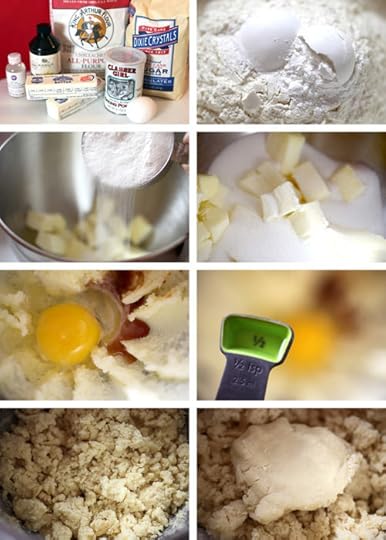
They can be baked in no time – especially with the recipe I’ve been using from my friend Bridget at Bake at 350. It’s been my go-to recipe lately. I love hers because nothing has to be set out to room temperature. And her dough doesn’t need to be chilled before rolling either. Equals Awesome! I hate waiting. So I love this recipe. When the dough comes together it will be crumbly, but don’t worry. Just grab it and knead it a bit and it’s ready to roll and cut. And it lifts beautifully, too.
Here’s Bridget’s recipe for sugar cookies and royal icing on some peppermint cookies I made a few weeks ago. And here is the recipe on her site.
But even better, Bridget has a Cookie Decorating book out. And I’m giving one away at the end of this post. YAY!
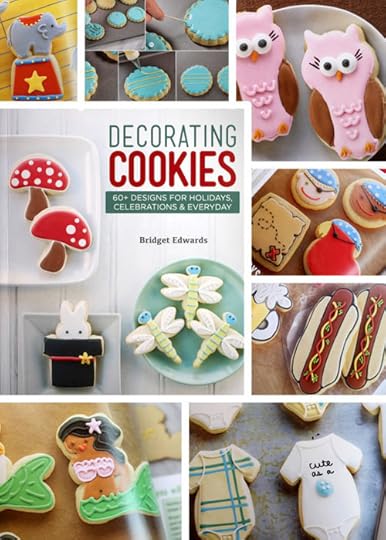
Actually, I’m giving away a signed copy of her book, Decorating Cookies. Easy to understand instructions with tons of adorable cookie decorating ideas. You’ll love it.
Skip on down to the bottom if you want to enter. Wheee!
Or if you want to see how I made my cookies stand, then keep on reading. These aren’t in Bridget’s book… I was just inspired by her cookie creations and love for decorating and wanted to share it with you since I love using her recipe.
Hope you like them Bridget! P.S. I need a piping boot camp. I don’t know how you do it.
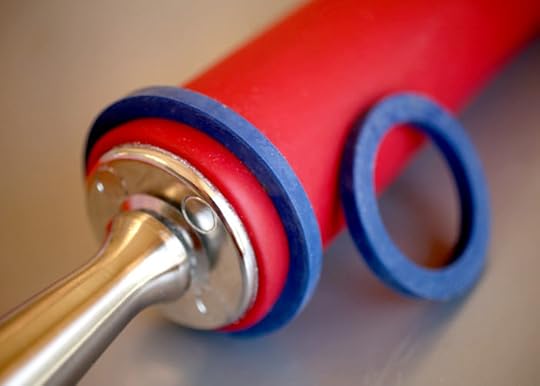
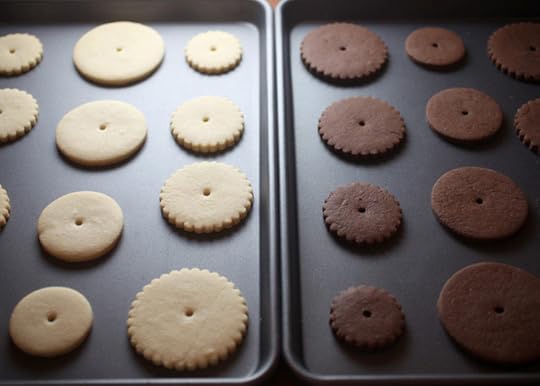
Roll your cookie dough out nice and flat. I used these rubber dough bands to make sure the thickness was even when I rolled.
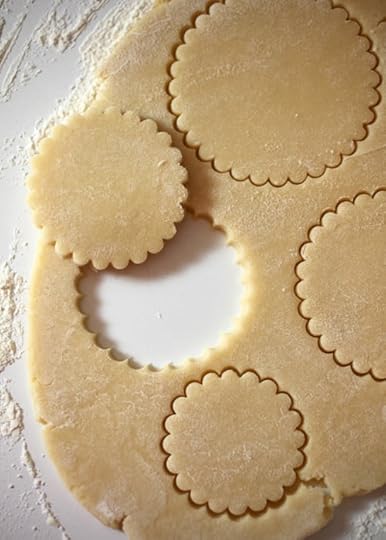
Then cut out circles in graduating sizes. I used 3 7/8, 3, 2 5/8 and 2 1/4 inch sizes.
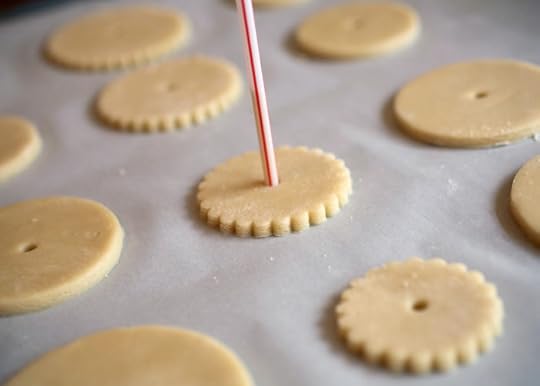
Before you bake, use a plastic drinking straw to remove the centers of each cookie. The straw collects the dough in the center. Convenient.
Freeze the cut shapes for about 10 minutes to help the dough avoid spreading and then bake.
And when they come out of the oven, use the straw again to make sure the holes stay the same size.
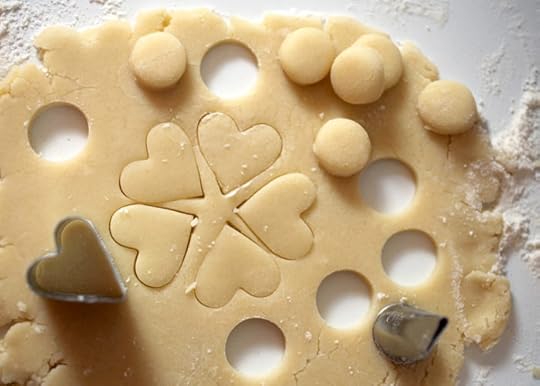
Use the dough scraps and tiny cutters to cut out shapes for your desserts to go on display.
A piping tip like the one on the right will make circles with rounded tops since the tip is cone-shaped.
Makes great mini macarons or whoopie pies. Just tap the tip on the counter to release the dough.
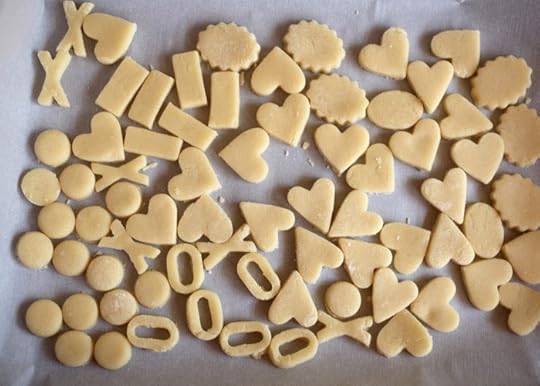
Lots of little shapes.
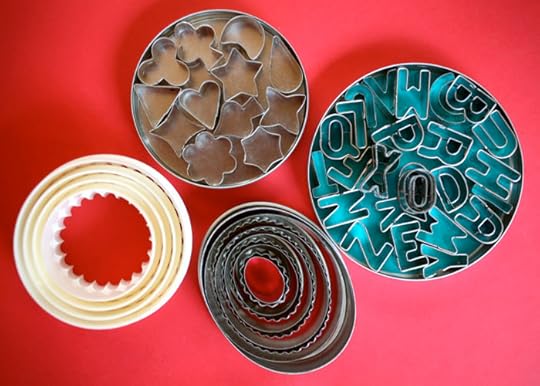
Assorted shapes – around 1 inch wide.
Tiny alphabet cutters. XOXO
Graduated ovals – plain on one side and crinkled on the other.
And my favorite – I can’t live without – graduated circle cutters that I used to make the stands.
You’ll want to use four different sizes to make the 3-tier stands.
Note: For the chocolate cookies, I swapped out 1/2 flour for 1/2 cup cocoa and used all vanilla extract in Bridget’s recipe.
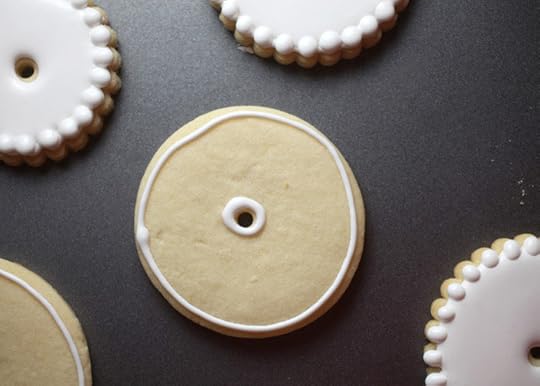
After they are baked and cooled, and then comes the piping. This always goes smoother in my head than when I actually start piping.
Pipe first with outline icing and then fill with flood icing.
However for these I ended up using a royal icing consistency somewhere in between and piped and filled with the same consistency.
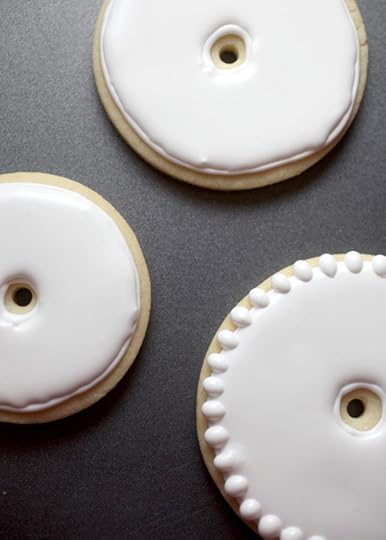
Ugh – wonky lines. Not what I’d hoped.
So after I filled and before the icing set completely, I piped dots all the way around. Camouflage it.
Much better.
Let cookies dry overnight. And after all the cookie decorating save leftover royal icing in an airtight container or in the piping bag with the ends tied off and cap closed for finishing up the project the next day.
Now comes the fun part.
Ice the cakes and decorate!
Easy details for major impact.
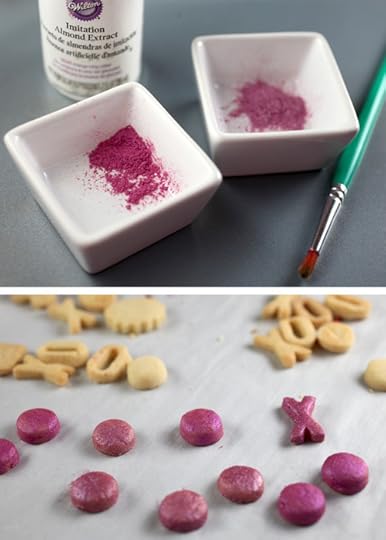
Oh and those macarons, try painting them with a little luster dust.
Just mix some of the powder with a small amount of clear extract and you can paint right on the cookies.
Pretty.
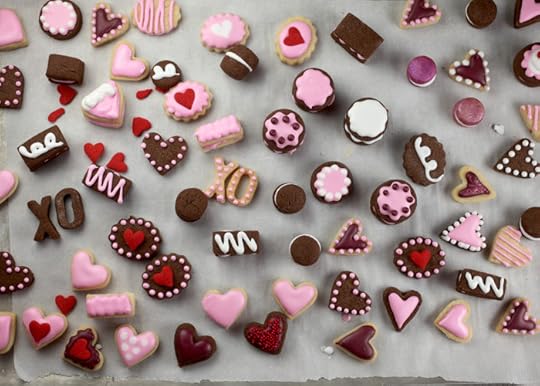
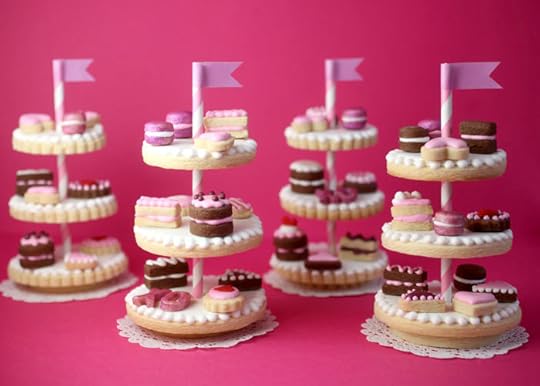
Pretty dang cute!
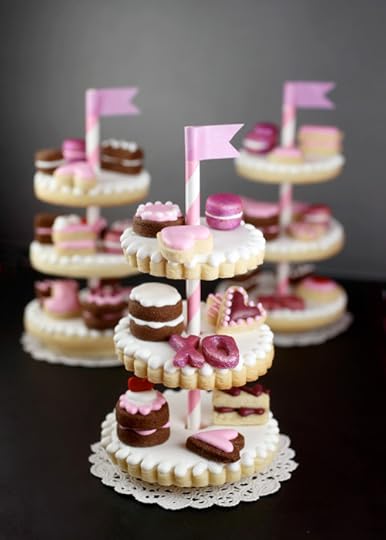
And even cuter on display.
These were surprisingly easy to make stand up.
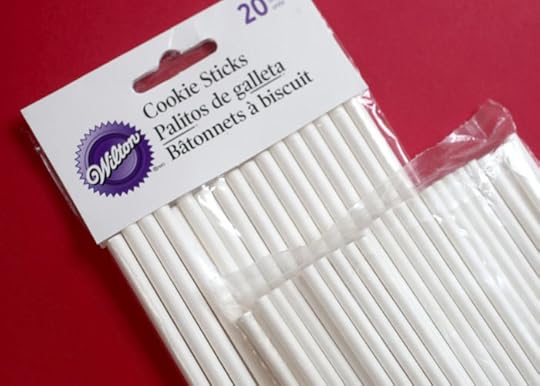
Start with using cookie sticks for the support. These are bigger than the lollipop sticks I usually use for cake pops (lower right).
The sticks should be about 6 inches tall for the stands. Buy the 6 inch sticks or cut down the 8 inch.
Use a cookie stick to gently twist through each cookie opening to make sure it goes through before building.
And make sure your cookie icing is completely dry and set from the day before.
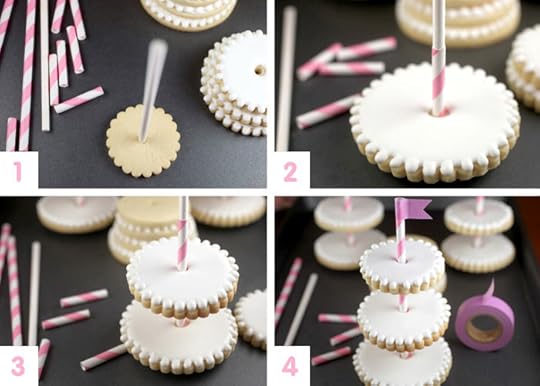
Start with the smallest cookie shape. It should not be iced. Place on a flat surface and then insert the cookie stick. Slide the largest iced cookie on top. Having two cookies on the bottom will give you more support and keep the stick straight.
Cut striped straws into 1 1/2 inch sections. Slide one straw piece over the stick and push to the bottom as a spacer/ledge.
Slide second largest iced cookie on stick until it stops at the straw. Then slide another straw piece on top.
Slide last cookie on top until it stops at the straw. Then slide one more straw piece on the very top. Wrap a piece of washi tape around the straw and cut out a triangle for a cute flag topper.
Note: Not shown. Use the leftover royal icing to pipe in between the two bottom cookies and pipe dots around the centers of each tier to help secure the cookies in place as you build. Attach the desserts to the tiers with royal icing too. Then let dry and don’t move for a few hours. I skipped this step because I wanted to get right to taking pictures.
There you have it four cookies for 3-tier stands. Bridget’s recipe will make four stands with enough cookies to decorate.
And these can be totally scaled back? Two tiers? Just a cookie plate? Just the tiny cookies? Only one cookie shape? Choose how you want to play.
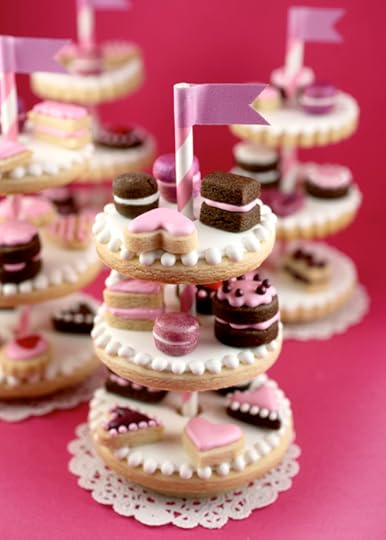
They’d be super fun and totally stand out for Valentine’s Day, for a dessert party or even party favors.
Enjoy!
_______________________
Now for the giveaway!
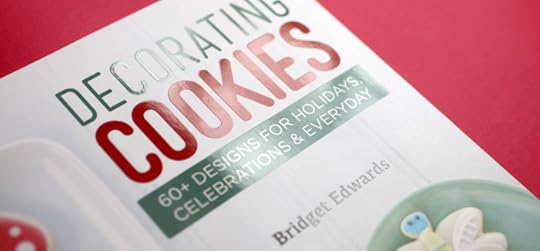
Enter for a chance to win a signed copy of Bridget’s book, Decorating Cookies.
Just answer the following question and leave your response in the comments section on this blog post.
What did you do this weekend? Something fun I hope. I made a bunch of cookies : )
Deadline to enter is Wednesday, January 30, 2013 at 7:00 pm.
One winner will be picked at random and announced sometime Wednesday evening on this post.
Good Luck!

January 23, 2013
Joy with friends and Jeni’s Splendid Ice Cream
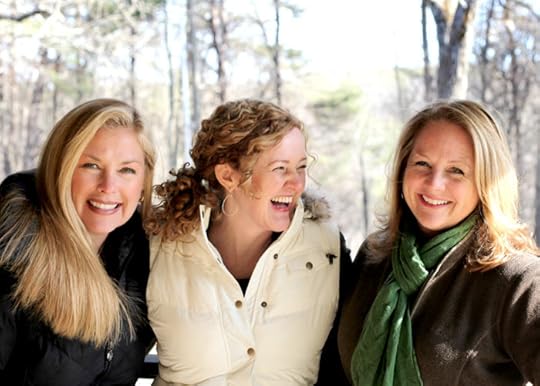
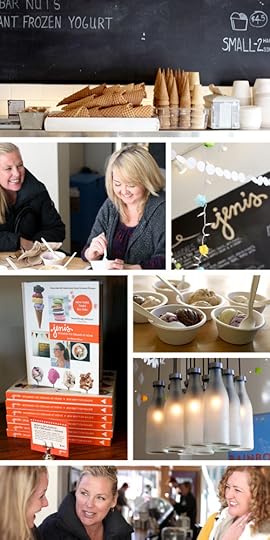
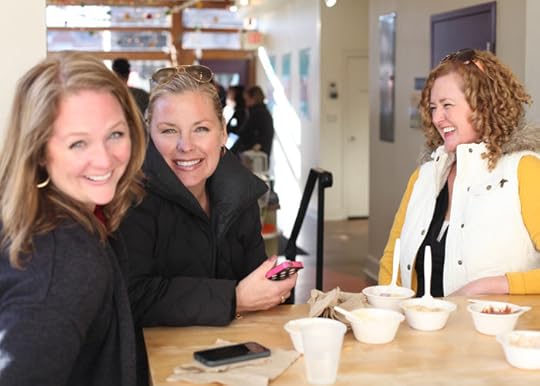
I was in Columbus, Ohio last weekend visiting with some sweet friends that I’ve met through blogging… Wendy of Wenderly, Bridget of Bake at 350, and Amy of She Wears Many Hats. Hi guys! I mean girls.
Wendy lives in Ohio and invited us to spend a few days at her cabin in the woods. Has anyone seen that movie? And yes, I totally spent the weekend suggesting scary movie situations to them. What if this – and what if that. But mostly scaring myself. I definitely watch way too many SyFy Sunday movies. If you watch that channel, you know the ones I mean.
Anyway, we kicked off our fun cabining weekend with a straight from the airport pitstop for lunch and then Jeni’s ice cream. Yay!
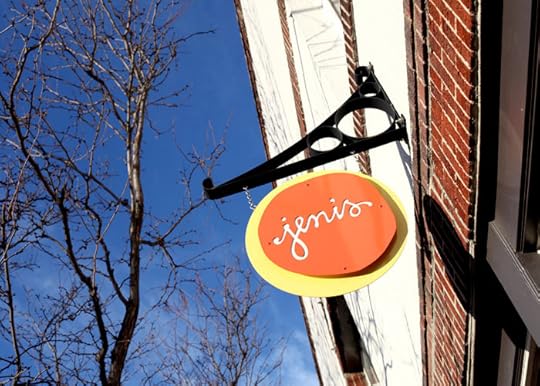
Jeni’s is based in Ohio and I’ve been wanting to visit one of her scoop shops for some time now.
She has some incredible flavors. Or should I say splendid.

And yogurt too.
I love all the chalk writing and window words. So cute.
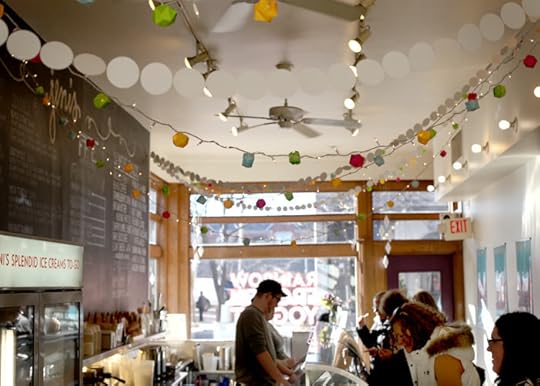
The inside of the store is perfect with the ceiling strung in little lights and paper garland.
You can buy ice cream by the scoop and by the pint. Whoohoo!
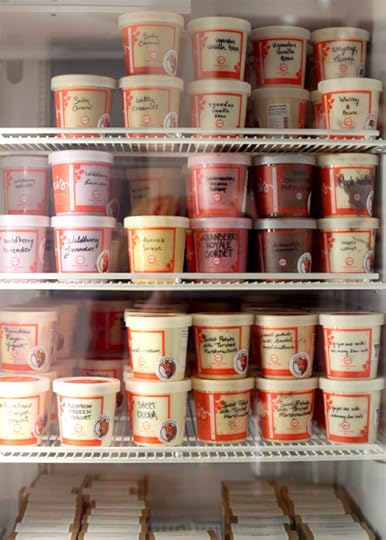
So many flavors. Signature and seasonal ones too.
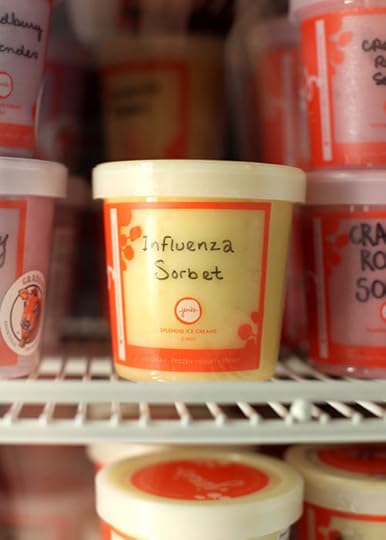
Like this one for flu season. Influenza sorbet.
Soothing for the sickly. Made with cayenne pepper, ginger, bourbon, honey, orange and lemon juices.
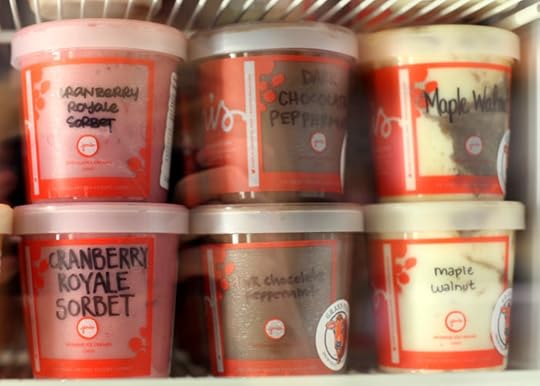
Handwritten! Love it and love how the same flavors are written by different people. What a fun way to add that personal touch.
And now I have a strange desire get a job handwriting ice cream labels. I wonder if I could add hearts and smiley faces.
By the way, if you’re in Ohio, stop what you are doing right now and run and get some of that Maple Walnut ice cream. It’s fantastic. I think that container on the top right is actually mocking me right now with all of its maple amazingness. I even tried to order some more today online, but that flavor is seasonal and isn’t shipping. Wipes tear. So get it in stores while you can.
Sweet friends, ice cream and a great start to our winter weekend away.
You know what, you can also make your own Jeni’s ice cream. Check out her book: Jeni’s Splendid Ice Creams at Home.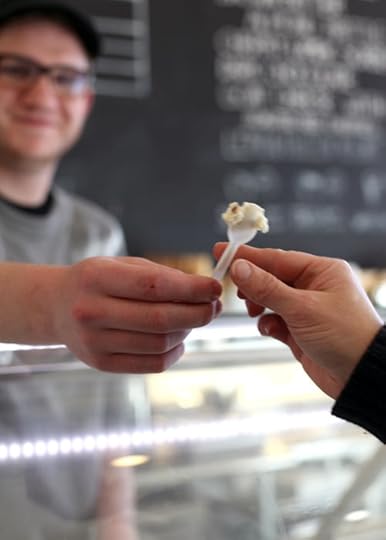
The staff at Jeni’s was great. Super patient. They didn’t even mind the 571 samples we asked for. But I think that’s pretty smart of them, because then we ended up ordering 571 scoops to enjoy. You know … just to be absolutely sure they were good. : )
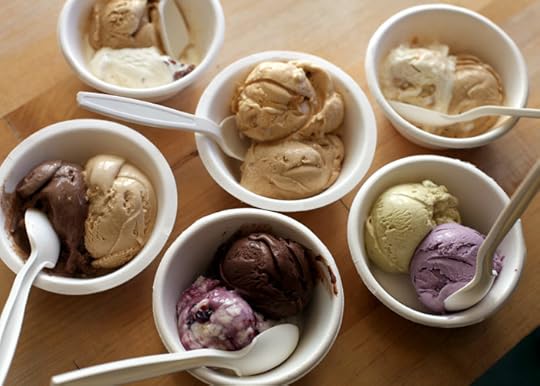
Okay not really 571 scoops, but several. Here’s a few of the flavors we all sampled.
Enjoyed and instagrammed. It’s a mandatory food blogging thing … to share when something is so so good.
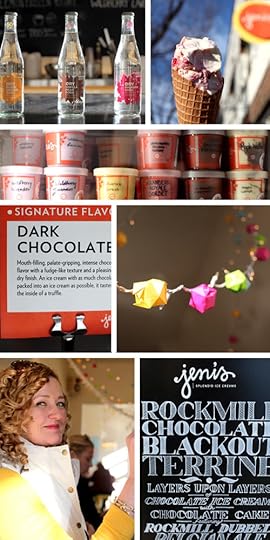
My favorites right now: Dark Chocolate (of course) and that Maple Walnut. Goodness. Very goodness!
While we were laughing and sampling, we had a fun surprise. Jeni stopped in the location we were at. With several stores, we certainly weren’t expecting that. Wendy had met her before so she introduced us.
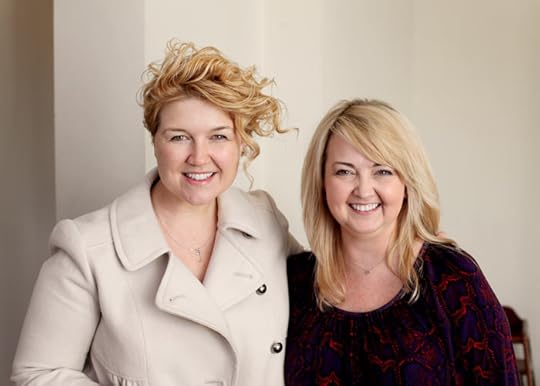
Hi Jeni! Your ice cream makes my tummy happy.

Such a great smile. It’s nice to see when people are doing something they love.
Visit Jeni’s Ice Cream for online ordering, scoop shop locations and where to buy by the pint in other states.
______________________________________________________________
Had enough ice cream yet? Want more?
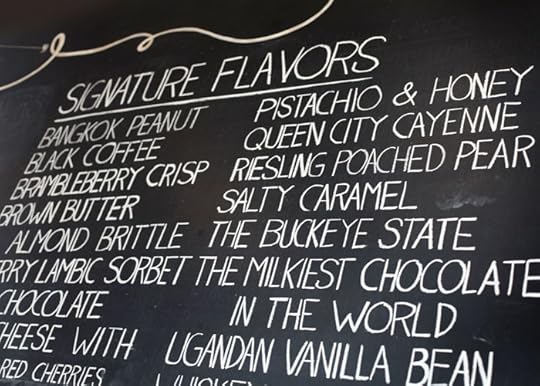
How about 17 of Jeni’s signature flavors?
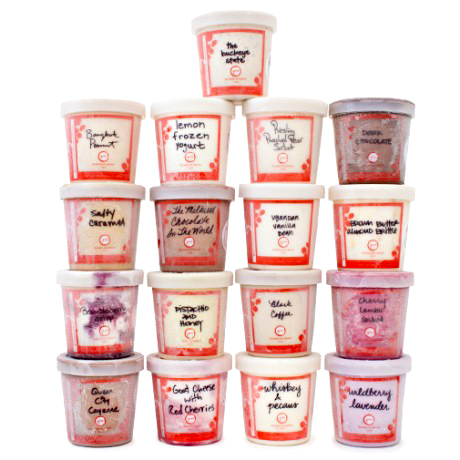
That’s right. I’m giving away a complete set of Jeni’s Signature Collection including:
BANGKOK PEANUT • BLACK COFFEE • BRAMBLEBERRY CRISP • BROWN BUTTER ALMOND BRITTLE • CHERRY LAMBIC SORBET • DARK CHOCOLATE • GOAT CHEESE WITH RED CHERRIES • LEMON FROZEN YOGURT • PISTACHIO & HONEY • QUEEN CITY CAYENNE • RIESLING POACHED PEAR SORBET • SALTY CARAMEL • THE BUCKEYE STATE • THE MILKIEST CHOCOLATE IN THE WORLD • UGANDAN VANILLA BEAN • WHISKEY & PECANS • WILDBERRY LAVENDER
Enter for a chance to win Jeni’s Signature Collection (That’s 17 pints y’all!)
To enter, just leave a comment on this blog post and answer the following question.
Are you all about ice cream, serious for sorbet, or full on frozen yogurt? What’s your favorite frozen treat?
Deadline to enter is Saturday, January 26, 2013 at 9 pm ET. This giveaway is open to US residents only since Jeni’s ships in the United States. I’m sorry international friends.
One winner will be selected at random and announced sometime Sunday on this post.
Note: The winner can choose the collection or a gift card for the equivalent. You know, in case 17 pints of ice cream won’t fit in your freezer. : )
Good luck guys!
Giveaway sponsored by me.

January 13, 2013
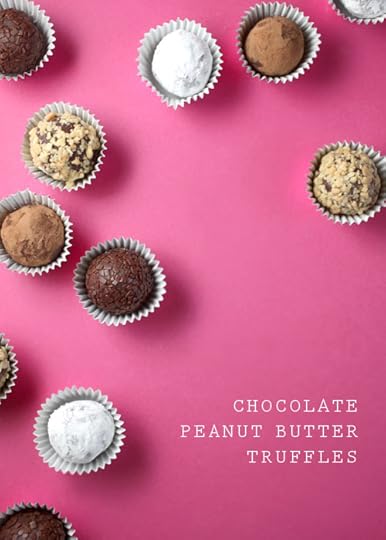
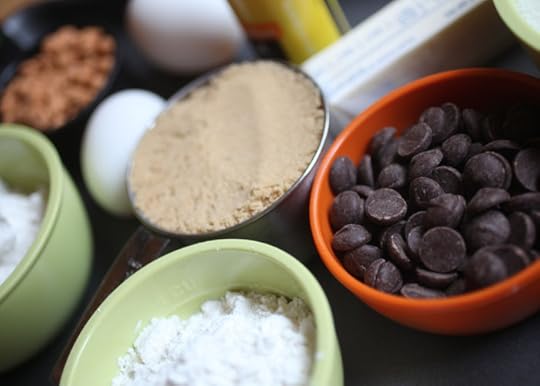
Chocolate Peanut Butter Truffles

So truffles are like really easy. And as it turns out completely beautiful without even one single colorful confetti sprinkle or jumbo red candy heart attached. I had to resist the urge you know.
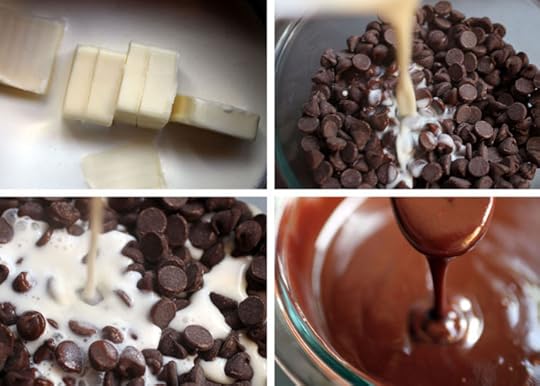
Last week when I made some ganache for those yummy butterscotch brownies, I realized it has been forever since I made chocolate truffles. Like since I was in college forever. And the best I can remember it was only that one time. So I wanted to make some more ganache and truffle it all up. But … ugh … I had no heavy whipping cream on hand and no desire to drive to the store.
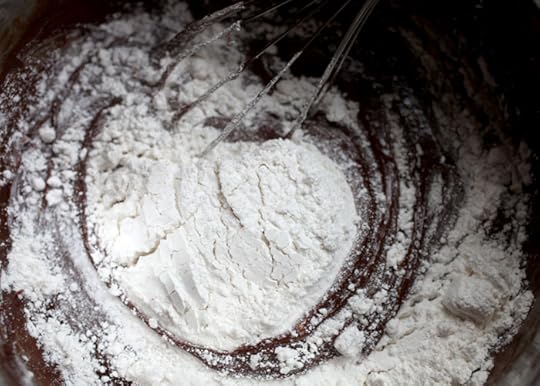
So I made these with cream cheese instead.
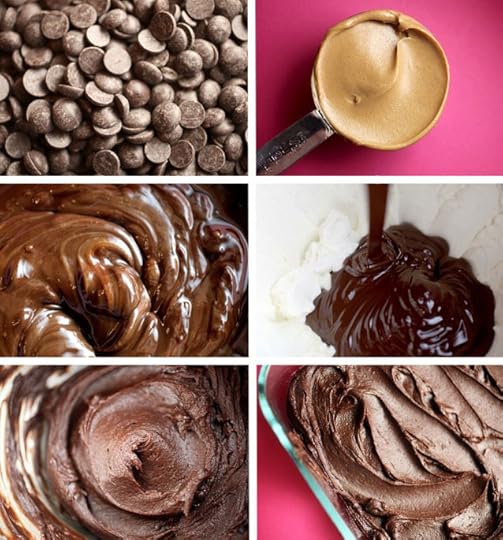
Easy. Easy.
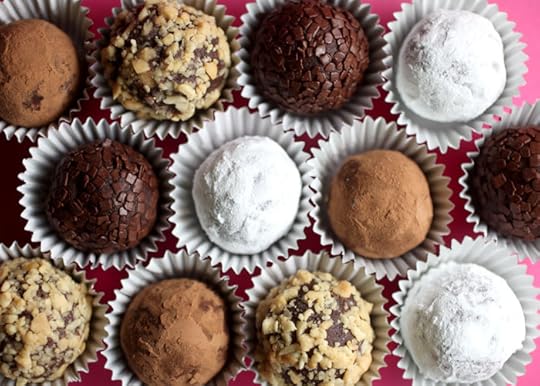
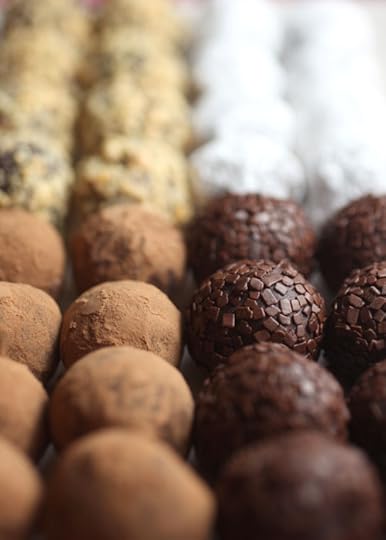
Chocolate. Peanut Butter. Melt. Mix with Cream cheese, Chill. Scoop and roll.
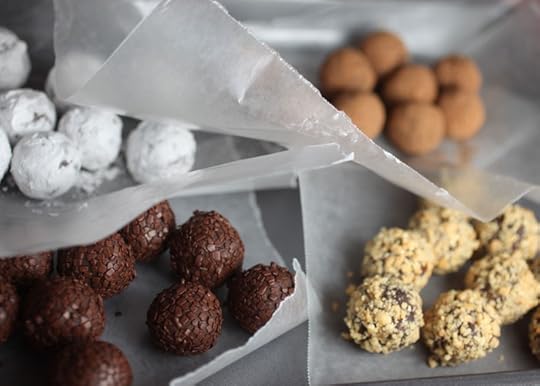
And then the fun part. You can coat the balls with good stuff…
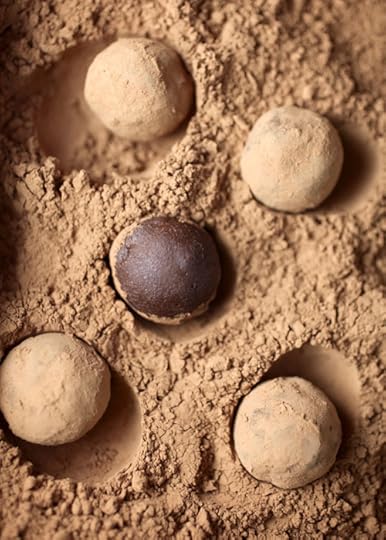
… Like cocoa.
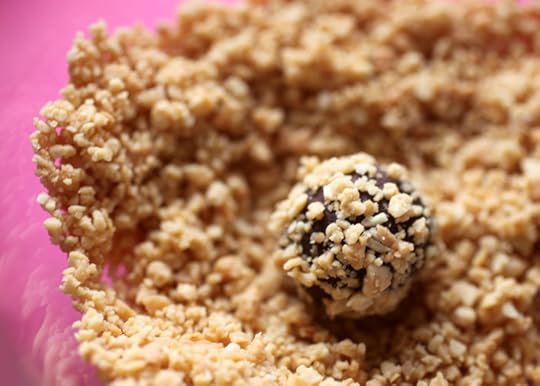
… like chopped peanuts.

…like powdered sugar.
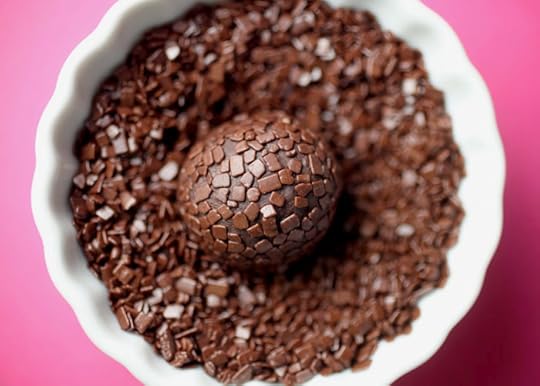
…like chocolate sprinkles.
Like YUM!
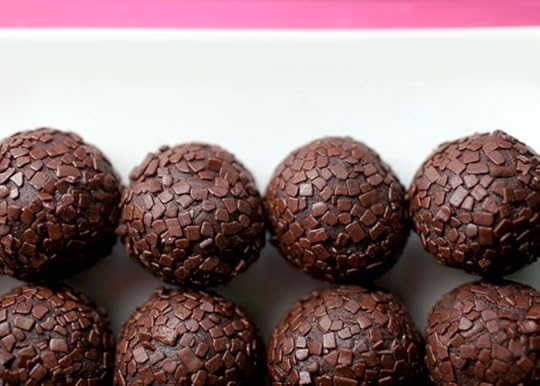
And …… why hello …… cutest little chocolate sprinkles ever. So delicate and delish. I love you.
These are made by India Tree since I know you’ll want to know.
By the way, I had to resist dipping these in candy coating too. You know I’m kind of dipping addicted. But I refrained. : )
When they’re covered, you can do a couple of things with them.
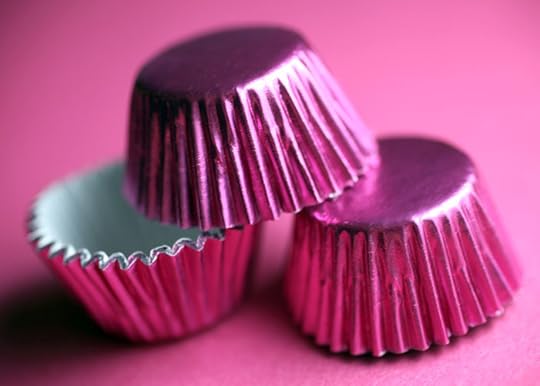
Place them in cute little candy cups like these in pink foil. Love!
Then, you can package them in small candy boxes, too.
The candy cups will keep them clean and cozy. And easy to move without getting cocoa on your fingertips.

You can also wrap them in 4-inch foil candy wrappers like these.
Or be ballsy and leave them on display and uncovered at your party. Just chill again if they get to room temp. But I bet they won’t last long enough for that.
Chocolate Peanut Butter Truffles
January 6, 2013
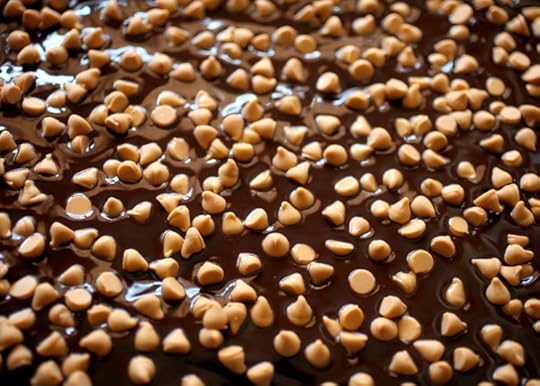
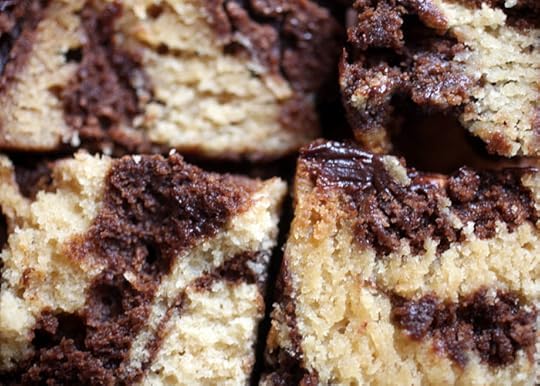
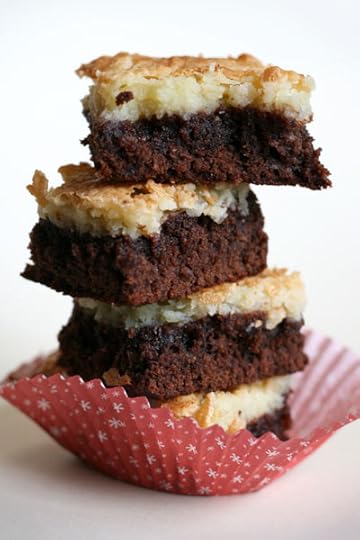
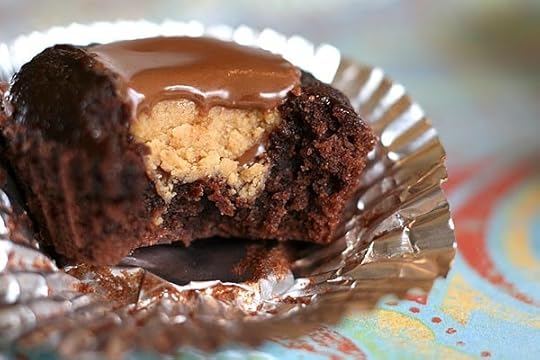
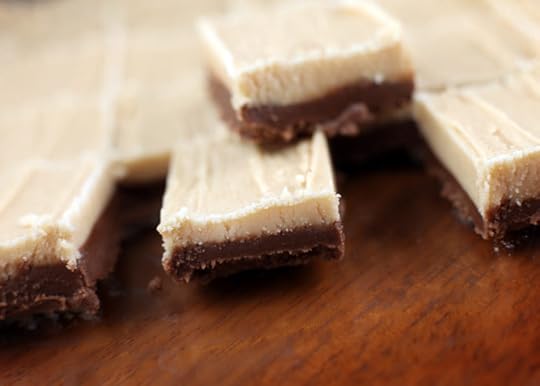
Butterscotch Brownie Bars
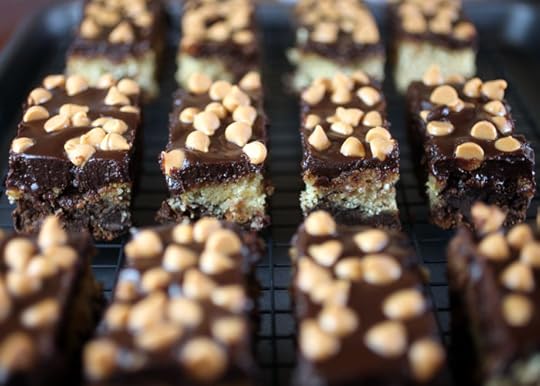
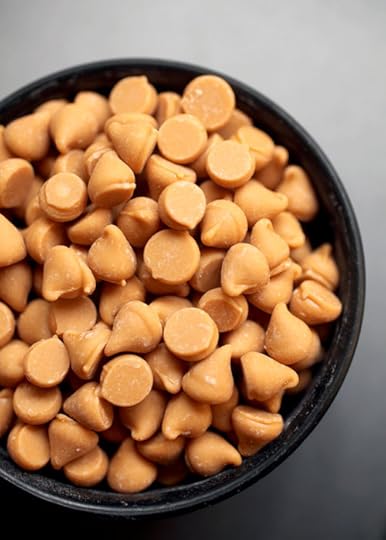
Undecided. I was in the mood for chocolate this weekend. Wait. When am I not in the mood for chocolate? Like never ever. But, besides something chocolatey, I also wanted something butterscotchy – probably influenced by the opened bag of butterscotch chips on my counter – twisting my arm to eat a couple each time I walk by. I couldn’t decide which one I wanted more. So instead of choosing one, I chose both… in one big brownie. Indecisive is good.
Starting off the year right. Chocolate. Brown sugar. Butter. Butterscotch chips. Oh baby.
Brownies are about to happen.

Batter up.
Butterscotch too. Win. Win… for me and you, too.
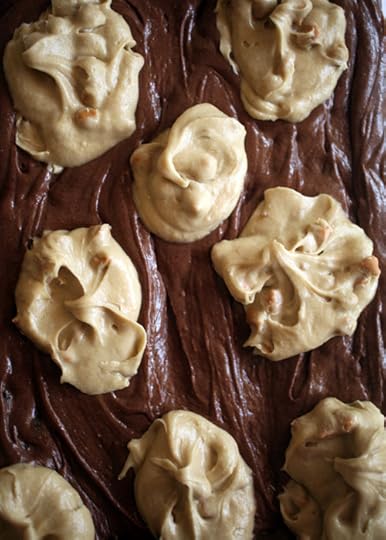
Spread the brownie batter first and then add in the butterscotch batter.
You could also drop big spoonfuls alternating between each.
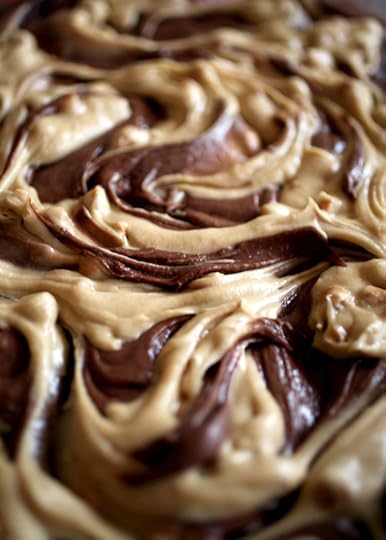
Give it a swirly swirl.
And bake away.
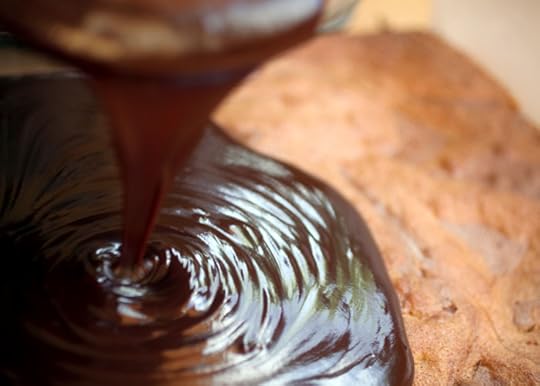
When done, you can cover them in more chocolate… of the ganache variety.
So easy and so good. Butter, heavy cream, chocolate and heat. Hello 2013.
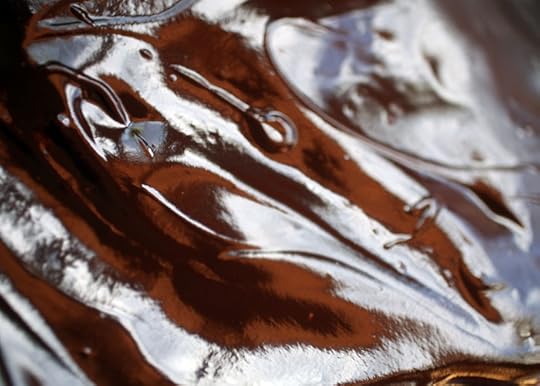
Oh my ganache!!!!! Glorious.
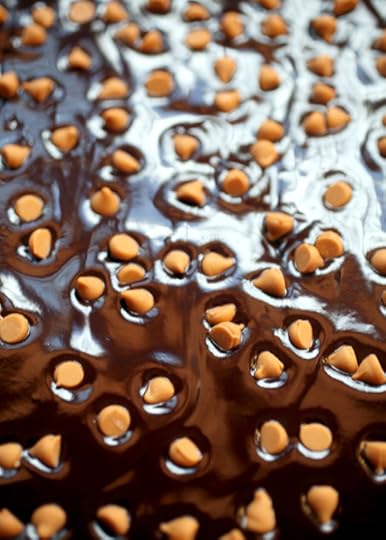
Sprinkle a few extra butterscotch chips on top.
Okay, a couple more.
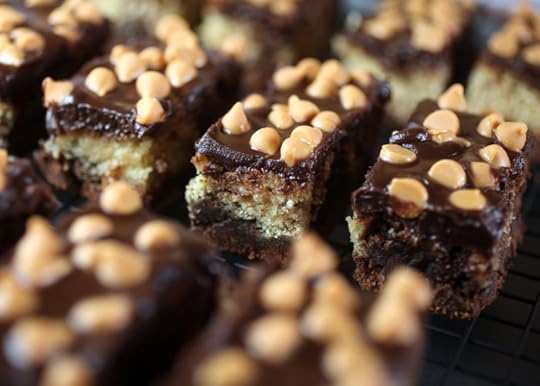
Then cut in cute, little – I mean big beautiful bars.
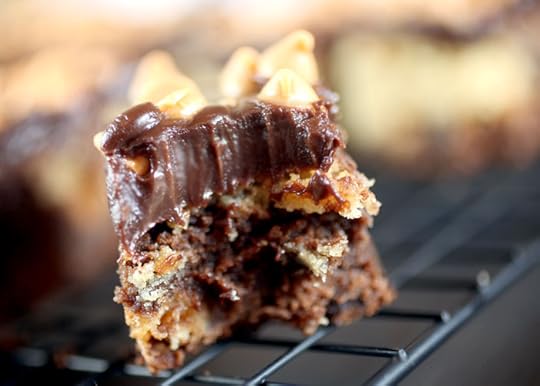
Yum! Yum! Teeth sinking yum.
Now this may sound like crazy talk for me, but I ate a few bites of these without the ganache and I enjoyed them even more.
What’s wrong with me… less chocolate?
Let’s just call that the diet version.
Butterscotch Brownie Bars
December 30, 2012
The Happiest Holidays
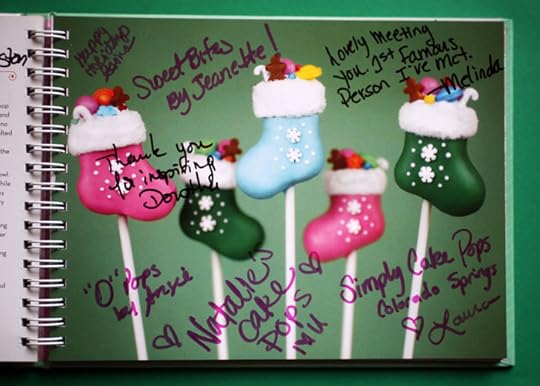
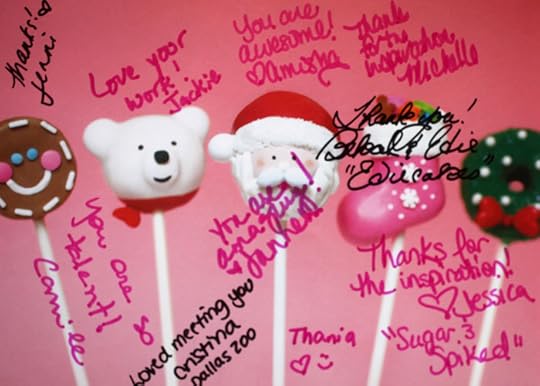
The holidays are winding up and I wanted to take a minute to thank you guys for making them so memorable. The blog has brought so many smiles over the last several years. To me … and I hope to you as well. As this year ends with my heart full, I’m so grateful for you all. You’ve made life so much brighter. Over the last weeks I was fortunate to meet many of you at book signings, see your smiling faces, share hugs, and tears, too. Happy tears. The happiest.

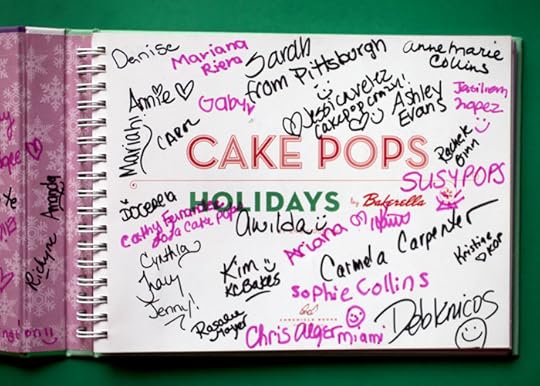
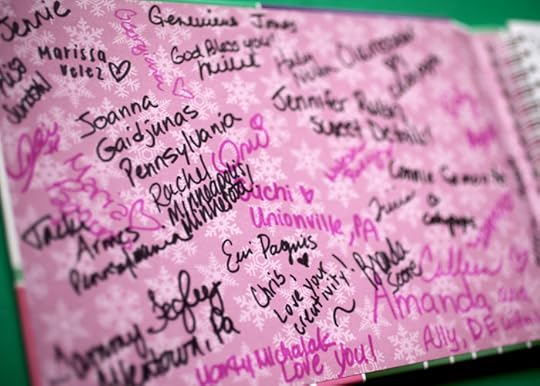
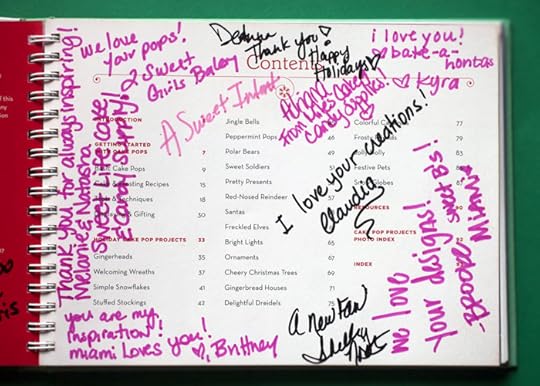
During the signings, I asked if people would write their name in my book too – a little keepsake for me – a reminder that I can hold of what a gift you guys are. Here’s some of your names.
Sarah from Pittsburgh – So happy to finally meet you after emailing over the years. You are the sweetest.
KC Bakes – Thank you for the stands. And tell the family I said hi. Your dad does great work.
Susy Pops – We’ll have to chat longer next time.
Docerela – Happy you were able stay after the signing.
Tammy – Thank you for sharing your story. You are amazing.
Suchi – I loved your cake pop notes.
Melanie & Natasha – Thank you for the candy coating. I can’t wait to try it out.
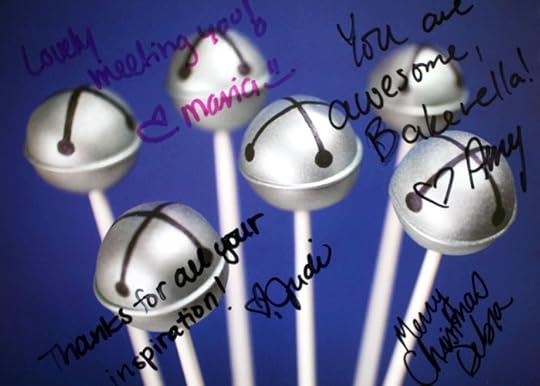
Lovely meeting you too Maria…
And I love that so many of you make cake pops. You’re spreading smiles, touching lives and making people happy… Awesomeness!
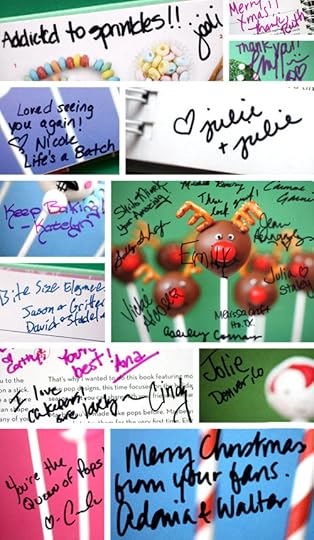
Jodi – me too!
Nicole – I’m so glad you didn’t have to drive as far this time. It was sweet seeing you again. Wish Sweet Sugarbelle could have made it with you.
Jason & David – Impressed with you guys. Thank you guys and Nicole for the stands.
Adonia & Walter – You two are so cute. I love that you make cake pops together and thank you so much for the Cake Pops necklace. I love it.
Sugar & Spiked – Jessica, the letter you shared brought me to tears. Nicole sounds very special. I’m sure she’d be proud of you.
Cristina – Say hi to the chimpanzees. Wish I had time to visit. And thank you for the treats.
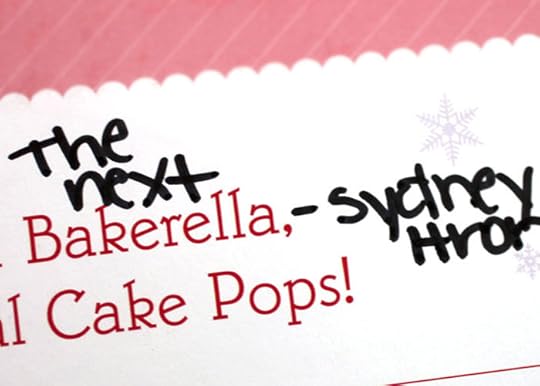
Too funny Sydney. Love how you signed your name!
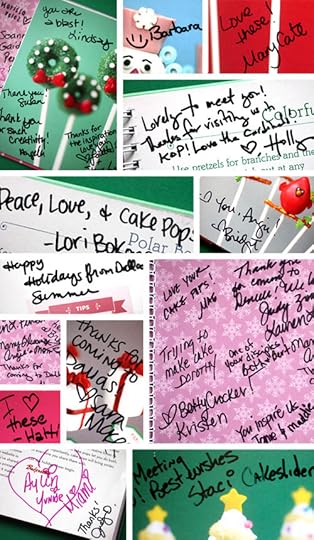
Bridget – Wish we had more time to hang out in Houston. Miss you and love your book! P.S. You have a good looking family!
Hatti – Thank you for being my cake pop helper.
Aylin and Junior – Had such a great time in Miami with you and everyone.
Kristen - So happy you, Heather and the Red Hot Holidays group could make it from Betty Crocker.
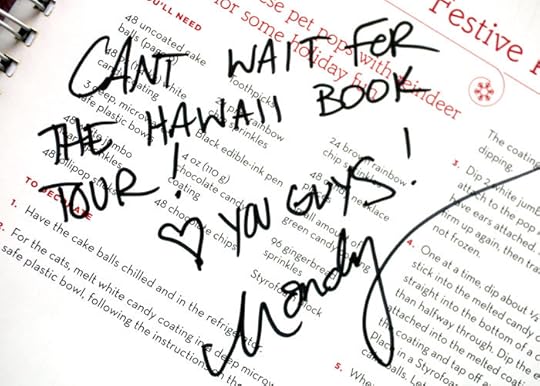
Oh Mandy – me too! I wish!
Mandy works at Williams-Sonoma in Pennsylvania. We hit it off at the first book signing in 2010 in King of Prussia and she came this year on her day off and helped out the store even though she doesn’t work at the same location anymore. She’s the sweetest. Mom says hi Mandy! Me too.
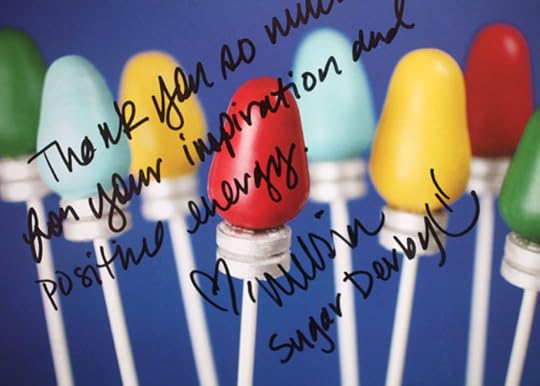
Melissa – I can’t tell you how happy I was to see you again in Dallas. I remembered you right away from the first book signings. You have such a great vibe. Thank you for coming back and sharing your story even though we had tears in our photos. Next time I come back we can cry over pie. At Emporium Pies!
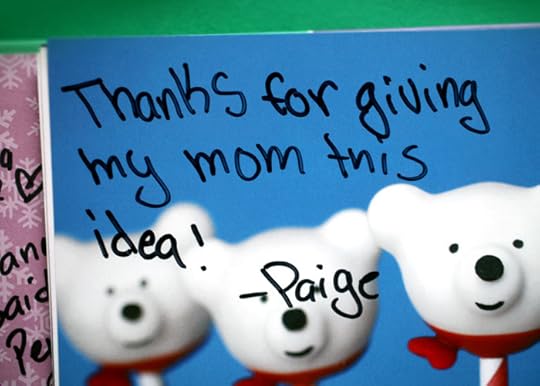
Oh Paige – This just fills my heart. So sweet.
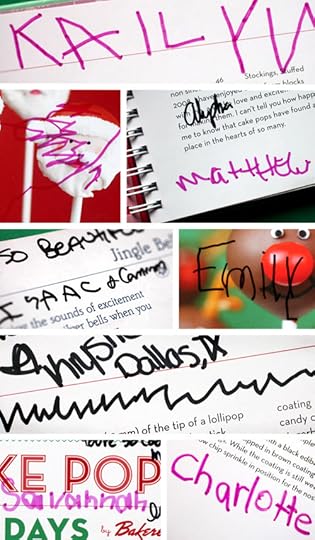
And I just love all the sweet little signatures. So so CUTE!
Charlotte – Thank you for the cake pop drawings and you too Erin!
Ana – I was so honored to finally meet Savannah. She is a little miracle. Please hug her for me and tell her again how much I love my drawing. And next time. No tears. : )
My sweet sweet niece also came to the last two signings. She was with me when I made the first cake pops so it meant so much to have her at the last signings.
And my mom … who came with me to all the signings, took photos, and probably entertained many of you. Thank you for everything. You are the best gift and made the last year and a half possible. This book possible. Me possible. I’m grateful to still be here and celebrating the holidays healthy and happy.
– Love me … and your left kidney.
_________________________________________________________
Here are some of the photos my mom took if you came to one of the signings and would like a copy.
King of Prussia, PA
Miami, FL
Stillwater, MN
Denver, CO
Houston, TX
Dallas, TX
Huntington Station, NY
Burlington, MA
And whether you came to a book signing or enjoy the site from the other side of the computer, I just want to say thank you for being here with me. You make it so much more fun. And now, I’m excited to get back to some regular baking.
Wishing you and your families the happiest New Year.
Here’s to a super sweet 2013!

December 29, 2012
Just a few more days
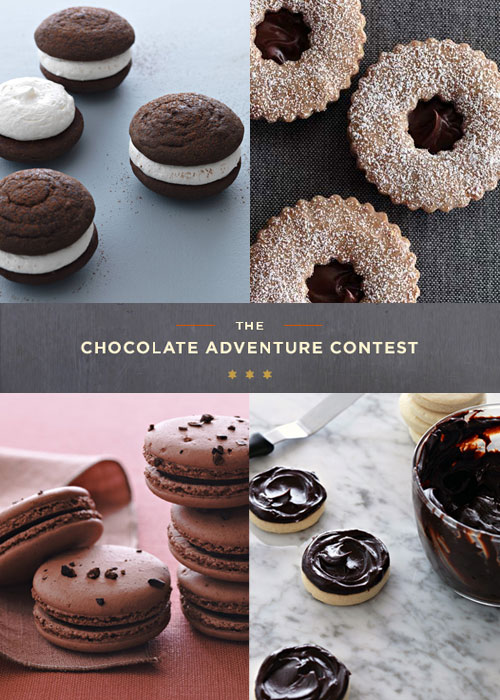
Happy weekend and a sweet reminder… I hope you have your cookie sheets out. There are just a few more days to enter your sandwich cookie recipe in the Chocolate Adventure Contest for a chance to win $25,000 from Scharffen Berger Chocolate Maker and TuttiFoodie.com. Yep… $25K.
That’s a whole lot of cookie dough!
But that’s not all… Nope. Ten honorees will also win an iPad. Tasty!
To be eligible, combine any Scharffen Berger chocolate or cocoa with one or more of the following 12 select “adventure ingredients” in an original recipe by January 2nd.
Banana
Sweet Potato
Cacao Nibs
Yerba Mate
Coconut Cream or milk
Tapioca or tapioca flour
Tequila
Sumatra Coffee
Corn Meal
Pine Nuts
Chili Pepper
Fresh Ginger
I’m one of the judges again this year and I am crazy excited to sink my teeth into all the creative sandwich cookies. I hope you guys make it super hard to judge. Yum!
Check out this post I shared previously for more info or go straight to the website to upload your winning recipe.

Hope you enter and if you do…
Good Luck! Good Luck! Good Luck!
Photo credits: Matt Armendariz photographer, Elizabeth Colling food stylist

December 20, 2012
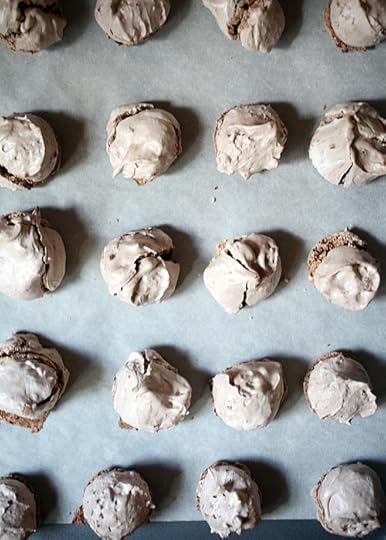
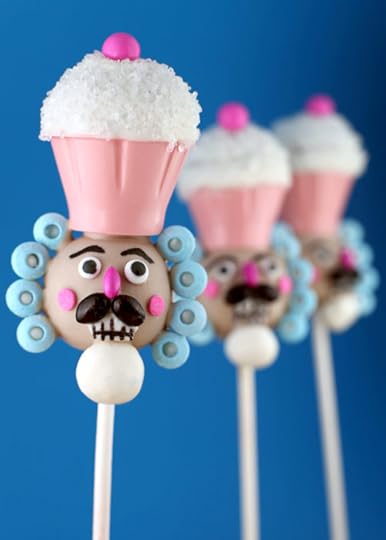
Sweet Holiday Treats
Who’s baking for the holidays right now? Who’s going to be baking over the next few days? And who’s over baking already? Not me. I haven’t even gotten started. I’m like way behind. Last weekend was my final book signing for the year and while I was out of town, I really thought I had two weeks before Christmas. Not so much. More like one week and now it’s just a few days away. Yikes. I need pecan pie and fudge and reindeer chow and cookies and cake balls and MORE time. Help.
While I’m trying to decide what to bake, I thought I would share some past treats. I hope they help make your holidays a little sweeter.
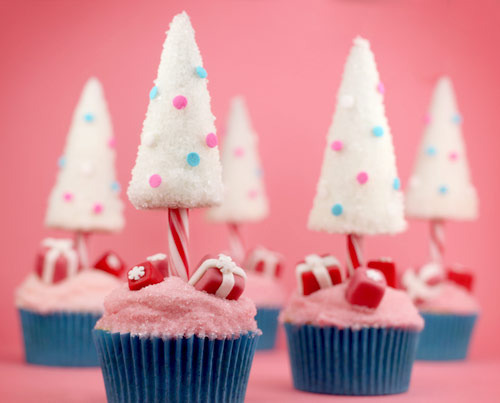
Candy Cane Christmas Tree Cupcakes
These were so much fun to make. Candy cane trunks and ice cream cone trees covered in candy and sprinkles. These are pretty in pink but would be sweet in green, too. Change up the colors for a traditional and festive look.
Yes, please!
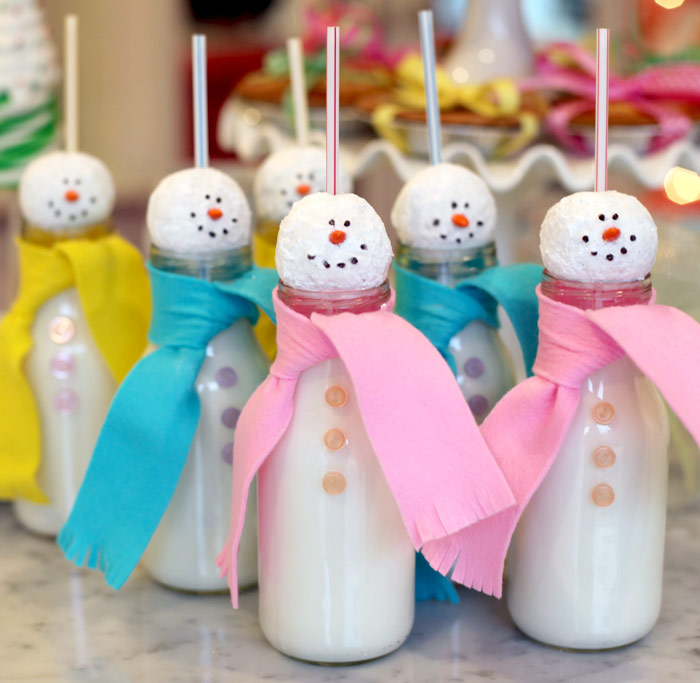
These are just about the sweetest things ever. Snowmen made of donut holes and milk make me melt.
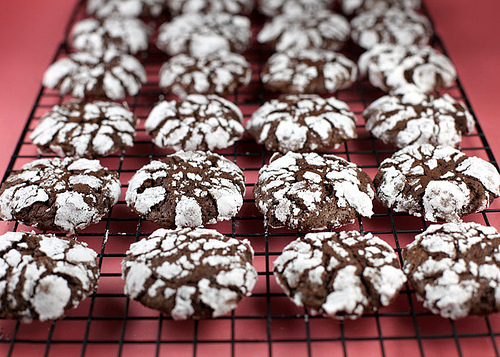
These chocolatey cookies are so pretty for the holidays. I love how the powdered sugar looks like snow.
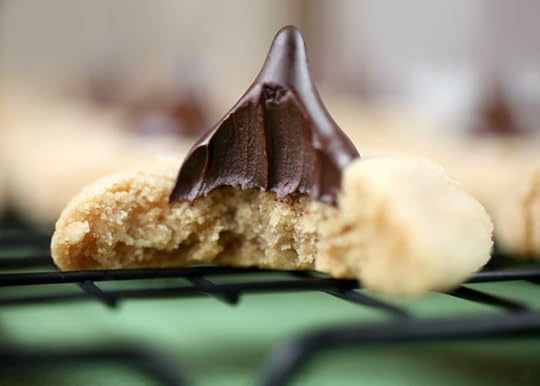
Major yum. They are so rich you’ll only need one… if you can stop yourself.
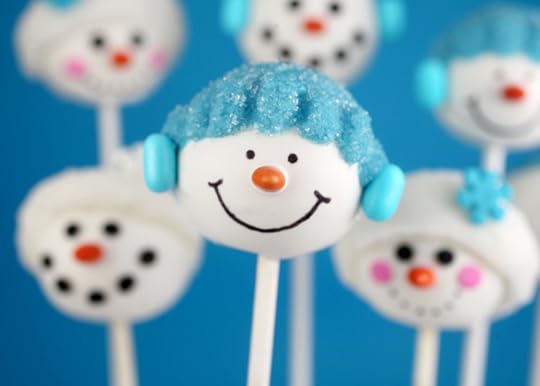
These cookies make me smile every time and they are a blast to decorate. You can make the cutest faces with confetti sprinkles and white royal icing.
These may be the easiest things to make ever. And biting into a brownie with a Reese’s peanut butter cup baked into it is like heaven. These are great to serve at a party too.
This is one of my must makes every year during the holidays. So easy to sink your teeth into. And it keeps for ever. I like to cut them into small squares so I feel like it lasts longer.

These look just like they could pop off the screen and start talking.
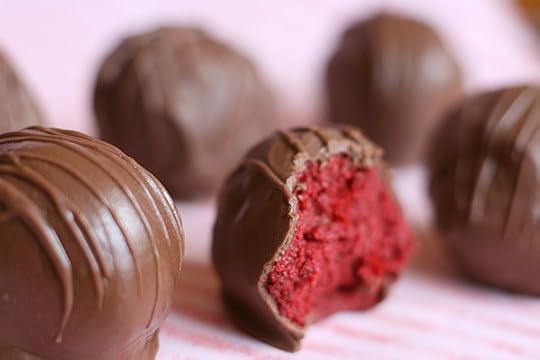
The first time I bit into one of these was at Christmastime. They are the perfect bite-size treat.
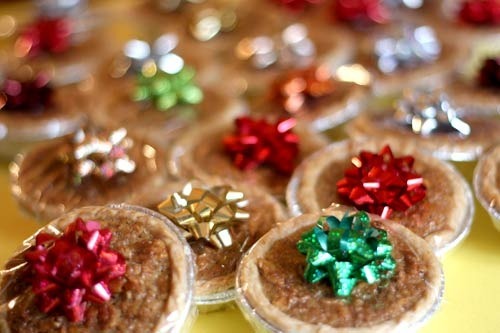
Make 3 regular or 36 mini pies with this recipe and make lots of people happy. Perfect to keep and give away.
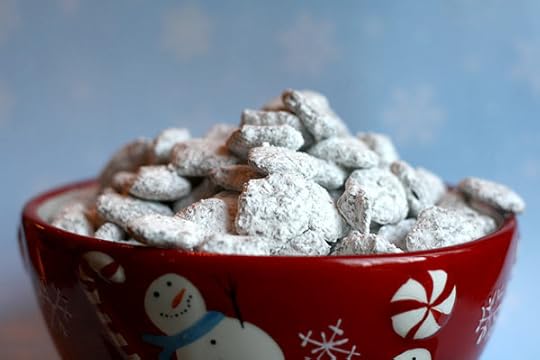
Peanut butter and chocolate lovers – this is for you. You can have a giant bowl ready in just a few minutes … no baking.
These cookies were a sweet surprise. I had not expected to love them so much when I first tried them. But they are one of those recipes I could never get tired of. So good.
Make this the star of your holiday table and you won’t need anything else.
Whatever you do… don’t make this… unless you make a triple batch. It’s super-addictive.
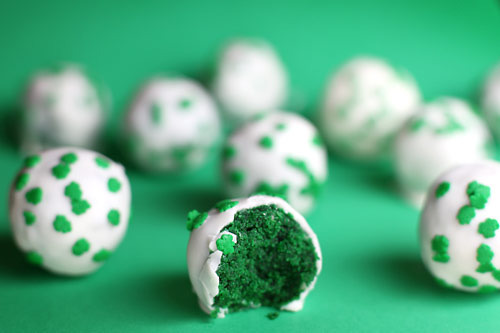
I originally made these for St. Patrick’s Day. Just change up the shamrock sprinkles and they’ll be perfect for Christmas.

These Santas were made using an ice cream cookie cutter. Look through your cookie cutters and get creative with reusing shapes.
These make a great last minute gift. Change the M&M’s to red and green for a festive present.
Double Decker Nutcracker Cake Pops
There isn’t really a how-to for these but, check out the link for my friend, Julie’s Candyland Christmas decorations. It’s worth it. And if you make cake pops often, you can probably figure out how to recreate these sweet soldiers.
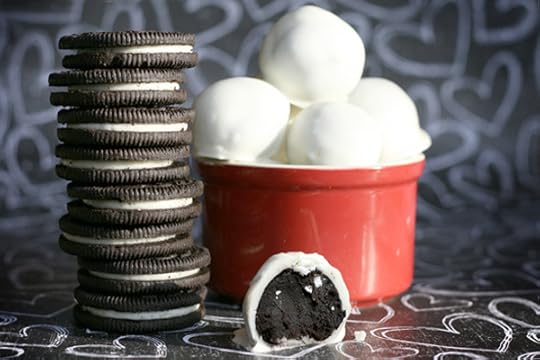
Yes, I like bite size balls. : ) These oreo truffles are like crazy good. CRAZEEEEE. Plus you can whip them up quickly. No baking for these either.
I made these recently for Betty Crocker’s Red Hot Holidays. Try them with red hats for a merry alternative.
Fun to package and even more fun to present to someone and make them feel special.
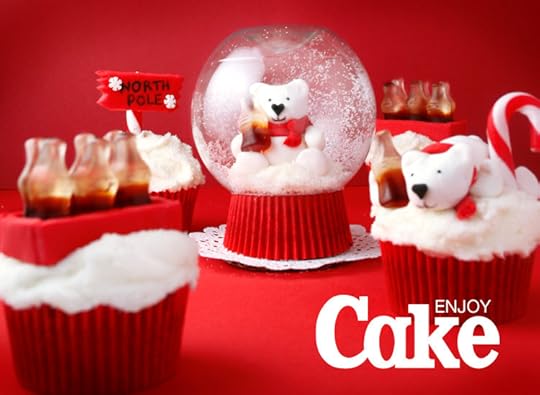
These cupcakes go with an old giveaway post from a few years ago. I haven’t seen the round soft drink bottles this year but the cupcakes are just so cute I had to share again. I hope they bring a smile and you can always make them without the globe. Still super cute.
Enjoy! … And I hope your holiday baking is full of sweet, wonderful memories.
Now, I need to go see how much butter I have handy. What are you guys baking?

Bakerella's Blog

- Bakerella's profile
- 9 followers

