
Bakerella's Blog, page 26
December 16, 2013
Tinsel and Twirl
I have the cutest holiday decorations to share with you guys today. And they’re all sugary sweet. I’m talking cupcake and gingerbread nutcrackers, gumdrop garland, elves with popsicles, ice cream cones, gum ball glass and yes … cake pop ornaments, too.
They are all from my friend, Cupcake Julie’s holiday shop… Tinsel and Twirl. And it’s all crazy cute. If you remember this sugar-coated Candyland Christmas post complete with her handmade house-sized nutcrackers or even this Sweet Soldiers post from previous years at Julie’s holiday house, then you know exactly what I’m talking about. So many of you wanted to know where you could find her amazing dessert-themed decorations. Well, I’m happy to say, she’s curated some of her favorites over at Tinsel & Twirl to help add a little sweetness to your own holiday collection.
Take a peek below at just some of the decorations in her online shop.

Ummmm… that giant snowman punch bowl needs to come to my house. Amazing!!!
Want to see more? Check out all of her festive flexible elves, sweet soldier nutcrackers, and .
And, if you shop Tinsel and Twirl and use the discount code “Bakerella” at checkout, you’ll get 15% off. Sweet!

………………………………………………………………………………………………………
Want more?
Well, you can enter for a chance to win a treat from me, too.
I’m giving away a set of 12 jumbo cake pop ornaments in a cute red and white striped container. You can leave them standing at attention or hang them by their ribbons.
PLUS …
I’m also giving away a $100 Tinsel and Twirl Gift Certificate so you can shop, too.
To enter for a chance to win, just leave a comment on this post and share which dessert decoration satisfies your sweet tooth.
Deadline to enter is Thursday, December 19, 2013 at 6:00 p.m. ET.
One lucky winner will be picked at random and announced sometime Thursday evening on this post.
Good luck guys!
Unfortunately the shop is not set up for international shipping, so this giveaway is open to U.S. residents only.


December 15, 2013
Eye Candy … BARS!
Here’s some eye candy (BARS) that I hope inspire you in the kitchen over the next several days. I just wanted to remind you guys that there’s just about two weeks left to enter the Scharffen Berger Chocolate Adventure Contest. And since I know you’ll be baking up a big sugary storm – why not be a little adventurous and take a shot winning the $25,000 Grand Prize at the same time. I would so love for one of you guys to win!!!
Here’s a quick rundown reminder.
1. Create an original bar recipe. That could be layered bars, candy bars, cookie bars, ice cream bars, brownies. Basically any bar.
2. Your bar recipe just needs to use a Scharffen Berger chocolate product and at least one of this year’s ten adventure ingredients.
Adventure Ingredients:
Bourbon
Turbinado Sugar
Fresh Pomegranate
Hibiscus
Extra Virgin Olive Oil
Peppercorns (Any Type – Black, Red, Green)
Pandan Leaf or Pandan Leaf Extract
Coconut Milk, Cream, Butter or Oil
Oat Flour
Carrot
Sesame Seeds (Black or White)
Fresh Croutons or Crostini
Okay, I know you guys are going to be making some kind of bar recipe over the holidays.
Bourbon? Who’s planning on baking with Bourbon? I thought so.
Coconut Milk? Totally doable.
Pomegranate? Perfect for a festive treat.
Turbinado Sugar? You guys can totally do this.
Break out that family bar recipe and adventure that bad boy up.

Here’s the Chocolate Adventure Contest website with everything you need to know.
Contest ends January 2, 2014.
Hope you guys whip up something magical and make it hard for me to help pick a winner.
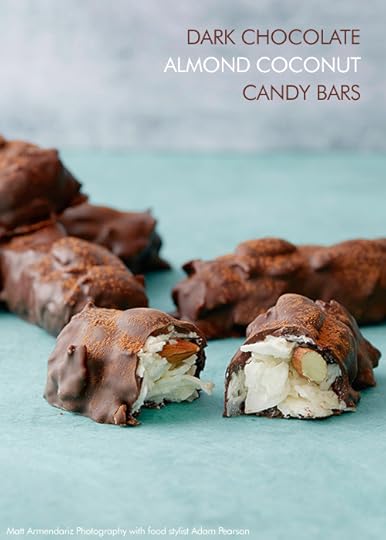
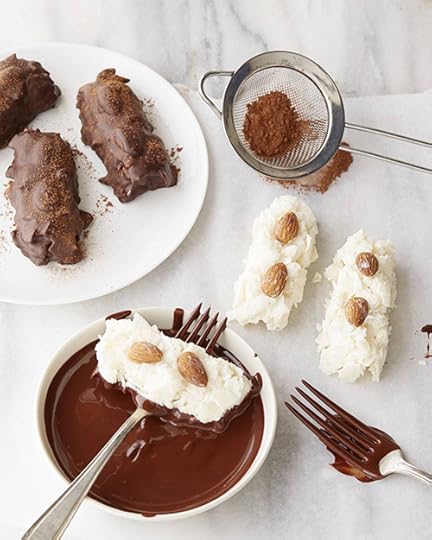
Now, how about those inspiration candy bars above that my friend and fellow judge, Matt Armendariz photographed to illustrate different kinds of bar possibilities… yes, yum… let’s make some. Here are some more of his pics if you need more visual inspiration.
Dark Chocolate Dipped Almond Coconut Bars from Handcrafted Candy Bars
December 8, 2013
Stuffed Stocking Cake Pops (and a giveaway)
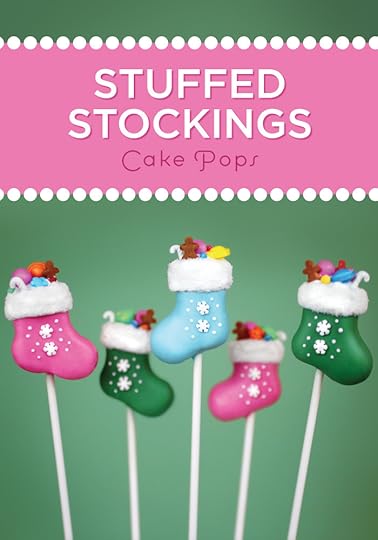
I’m sharing these sweet stuffed stockings from my book, Cake Pops Holidays with you guys today. (Plus, there’s a holiday giveaway at the end, too!)
These stockings are one of my favorite designs in the book and they’re actually easier to decorate than the look.
You start out by shaping the crumbled cake and frosting into thick socks – the stockings – and then you dip them in melted candy coating.
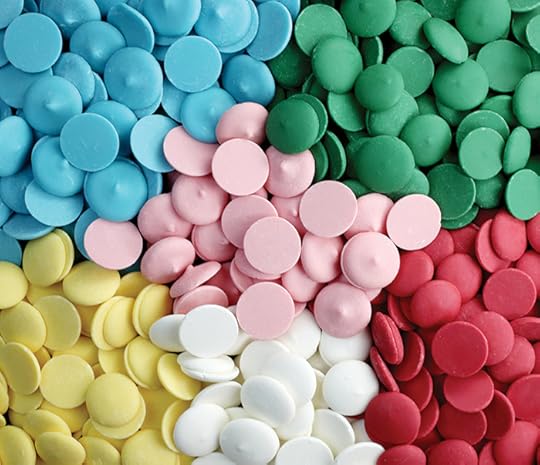
You can coat the stockings with any color candy wafers that you like, but I went with dark pink, green, and light blue. Still fun and festive without being straight up red and green. After they dry, dip them in melted white coating for the cuffs and then you can start bringing them to life with random sprinkles and decorations.
Or you could leave them toyless, but they’ll be way happier stuffed with toys inside.
Plus, that’s the most fun for me. Playing and finding fun candies to decorate with.
These are a few of the shapes I used. Candy canes, gingerbread men, candy snaps … plus, my can’t live without sprinkle – white sugar crystals.
But there are tons of sprinkles that would work. You just need to find simple shapes since the stockings are so small.
Here’s the full how-to from my book.
Stuffed Stockings Cake Pops
December 1, 2013
Chocolate Peppermint Cookies
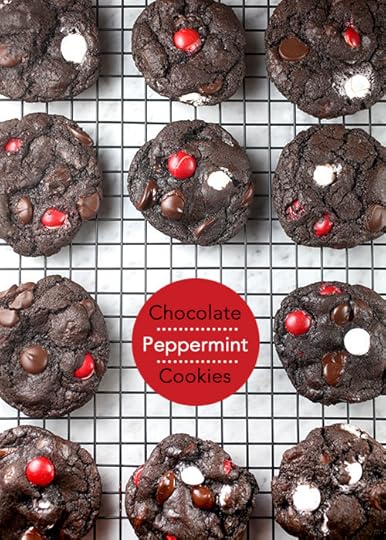
I needed chocolate to offset all the turkey and dressing leftovers I’ve been eating for the last few days so I made some quick cookies on Sunday.
Cookies chocked full of chocolate …
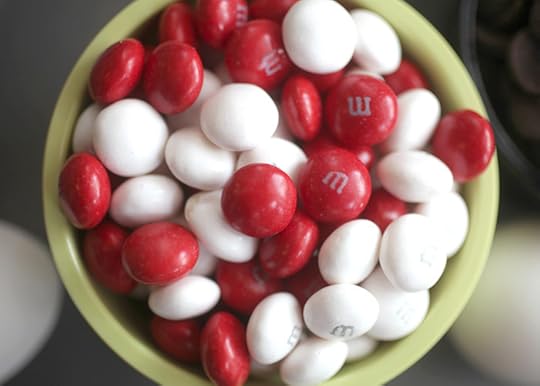
… and peppermint M&M’s.

I blame Target and their huge end cap seasonal Christmas candy displays for these cookies. I was shopping with my mom and walked right past these until she pointed out they were white chocolate inside.
Yes. White chocolate peppermint M&M’s. Yum.
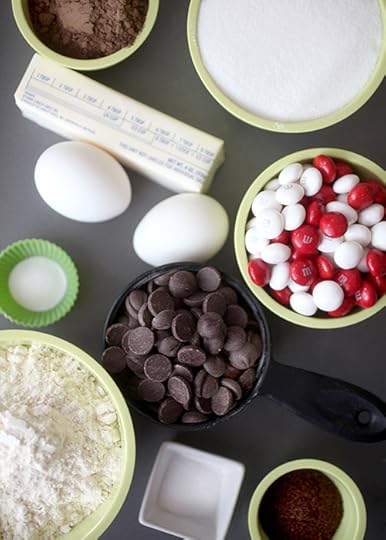
So naturally, I had to buy a couple of bags. Some to snack on and some to bake with. And some to snack on while I’m baking.
Plus, it never hurts to have white M&M’s on hand for random decorating.
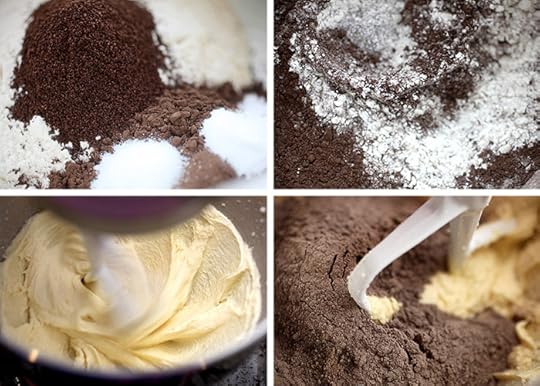
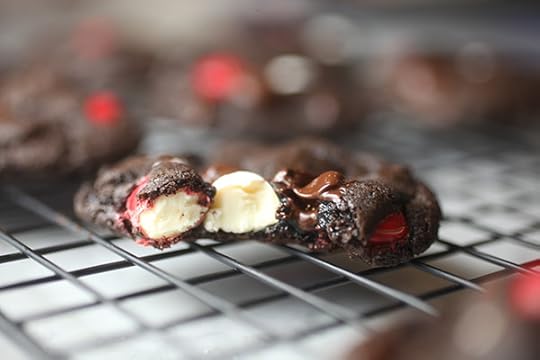
I used dark cocoa for the chocolate in these cookies but you can use regular, too.
Spoon please.
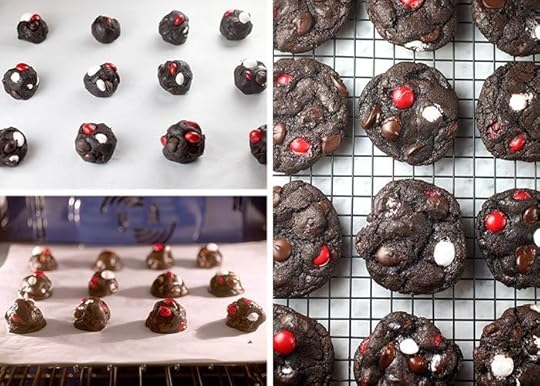
Roll the dough into balls and bake.
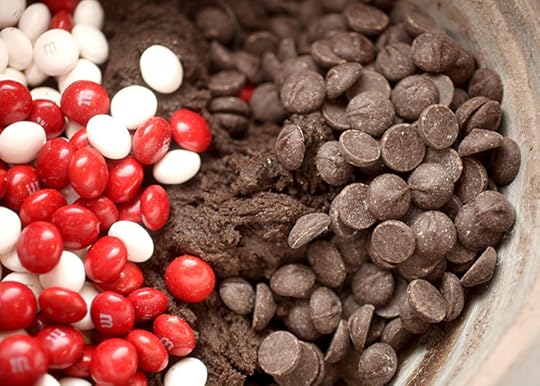
I like to reserve some of the chips and candies to press into the balls after they are rolled so the chips aren’t all hidden inside the cookie.
It helps them look prettier and more pepperminty this way after they are baked.
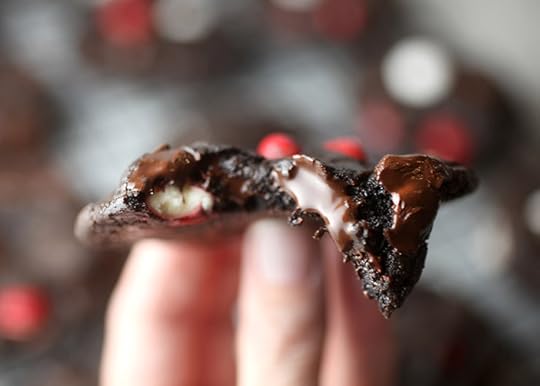
Not that any looks would stop me from warm, soft cookies. Big bites right out of the oven are always a must.
Dark Chocolate Peppermint Cookies
November 18, 2013
Hay There!
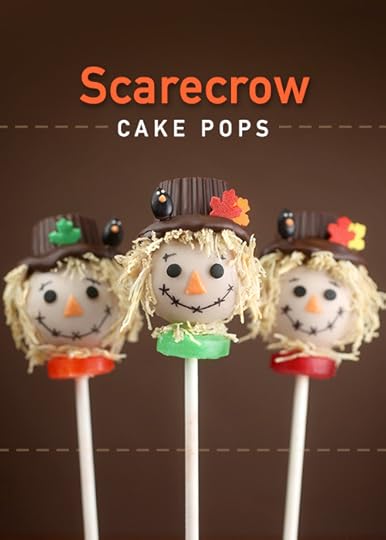
I just had to get these in before Christmas sets in. It’s still Fall after all. And I thought these Scarecrow Cake Pops would be a fun Thanksgiving alternate to my Turkey Pops.
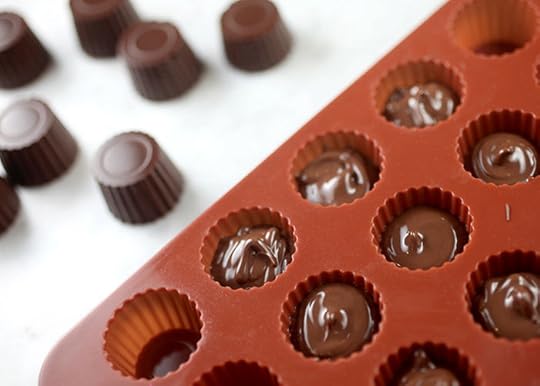
First up. Scarecrows need hats. You know, to hold their hay hair in place. Rolos can work. Reese’s peanut butter cups, too. But I didn’t have any in the house so I made my own with a handy silicone candy mold. Fill the cavities with chocolate and tap the mold on the counter to make solid pieces.
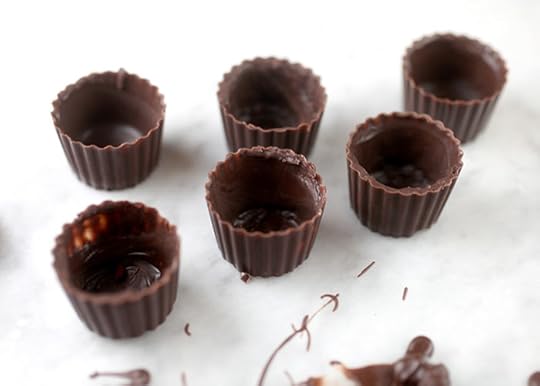
Or, just coat the sides. You can fill the cups and then turn them upside down and tap out the excess or you can brush the chocolate on the sides of the molds. I like this hollow version better because the shape rests on top of the cake pop nicely cupping the curve of the pop so it looks more natural. The solid version sticks up higher.

Dip your cake pops in tan-tinted coating. I used white wafers with a little brown and orange too. But only because I had the orange out to use later.
Note: Here’s the full cake pop how-to here if you haven’t made any yet.
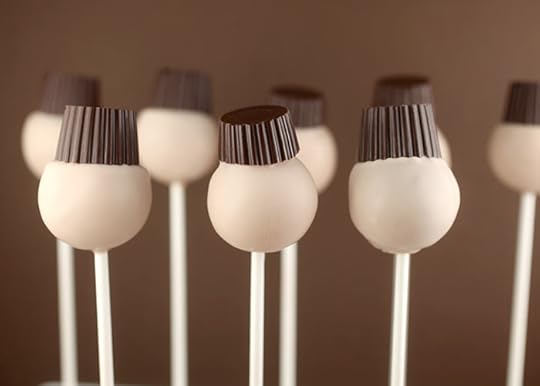
Right after you dip the pop, rest the hat on top. Press gently to secure and then let dry.
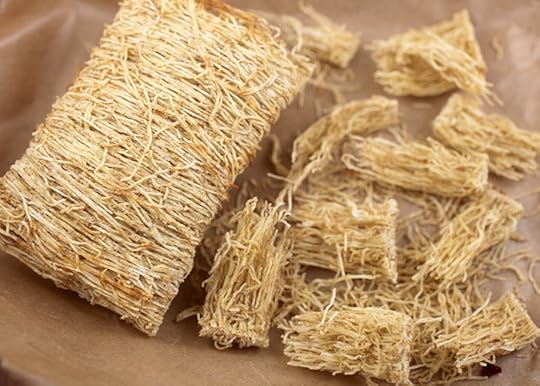
Ahhh. Now for the hair. The hay. The shredded wheat. Yes, we’re talking cereal. Perfect for tiny scarecrows to look their best.

To attach the hay, apply some melted coating to the pop and sprinkle or press into position in a messy, haphazard way. Do the sides first and then the bangs and let dry. Try to get the top of the bangs to attach flat against the pop. They can stick out all they want in front though.
Then use a toothpick dipped in chocolate coating or a squeeze bottle filled with coating and draw a brim over the bangs. You can try to make it straight or make it floppy looking. Floppy is easier since the bangs aren’t super smooth.
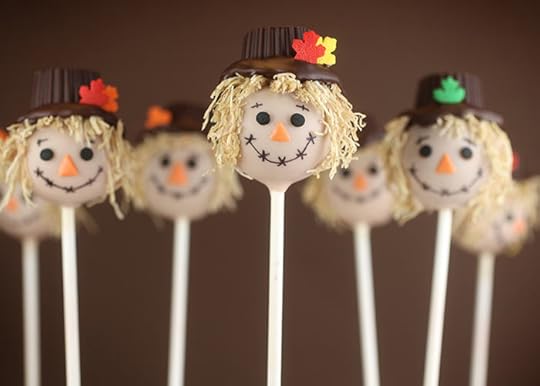
For the faces, draw on the noses with orange melted coating and a toothpick. Attach black confetti sprinkles for eyes and draw on stitched smiles with a black Americolor Gourmet Writing Pen.
Attach a couple of jumbo leaf sprinkles and then your scarecrows are ready to scare … absolutely no one. They’re just too cute.
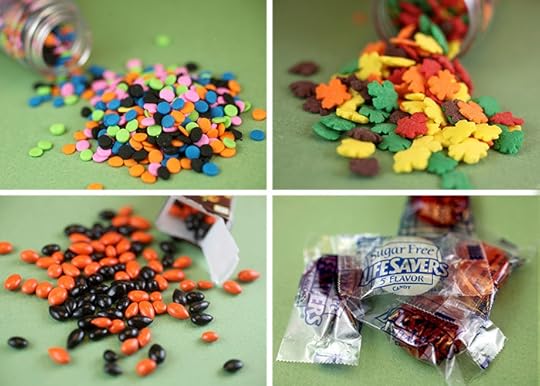
You can also take them up a notch if you want. And I want. Because these scarecrows need to look a little more stuffed. Add a lifesaver collar and attach more “hay” with some melted coating.
And then there’s black coated sunflower seeds.
You know where I’m going with these …
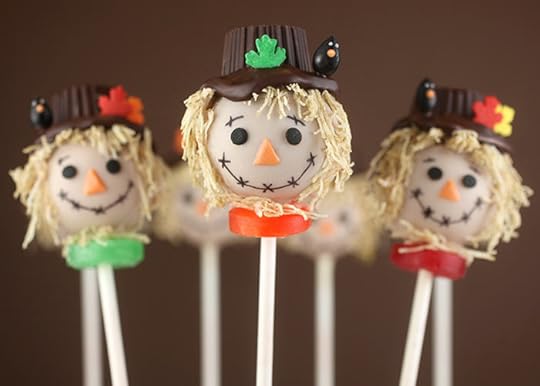
That’s right … little black crows with dotted candy coating beaks and eyes.
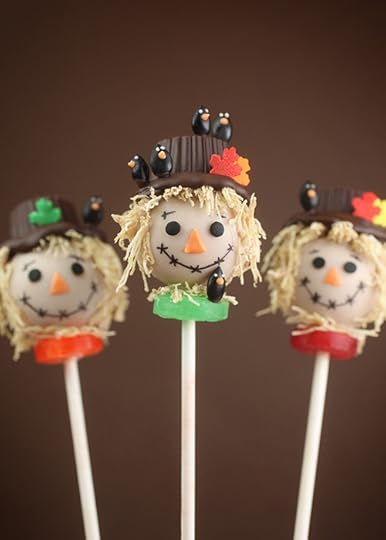
Yep. Definitely not being taken seriously at all here. I guess they’re just too sweet to scare.
Hope you guys enjoy them!
Hugs and happy Fall y’all!

November 10, 2013
Wrapped and Ready

Have you guys started getting ready for the holidays yet? For the last few years, I’ve waited until the last minute, but this year I’m trying to get ahead of the game and wrap some gifts that I already know I’ll be giving.
My Holidays book is a good way to start. And I wanted to wrap them in a cute, quick and totally customizable way. So I’m working with Zazzle.com to create fun, custom cards and packaging. You can upload your own photographs or artwork to their site to make endless types of unique gifts from shirts and phone cases to lunch boxes and lamps. Lots of stuff.
I stayed with paper products though and made something special for the holidays. I used some of my photographs from the book to create illustrated versions of my cake pops, so the whole gift could be one cute coordinating package.
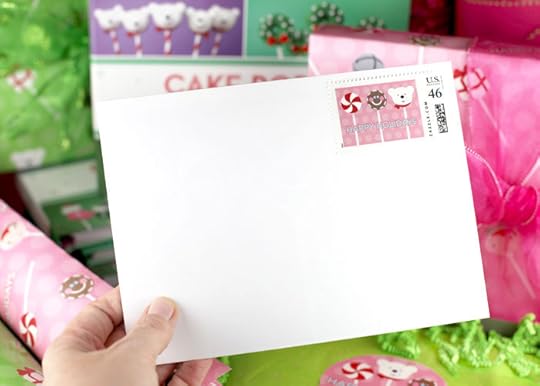
I started with cards, but soon stumbled onto stamps!
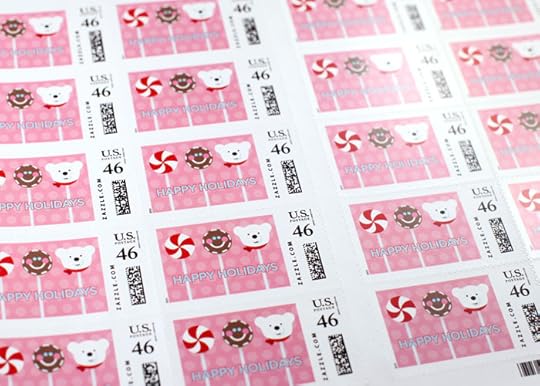
Ack! Have you ever made your own stamps? This is such a cool extra touch that makes mailing something more special.
The only problem is they are so cute I don’t know if I can stand to send them away. I think I’m going to just have to order more to keep for myself.
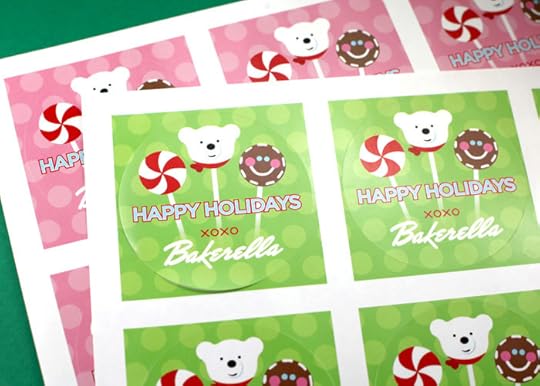
I also made these sweet stickers in pink and green… because, as usual I couldn’t decide on just one color to stick with.
But let me show you my favorite new thing to make.
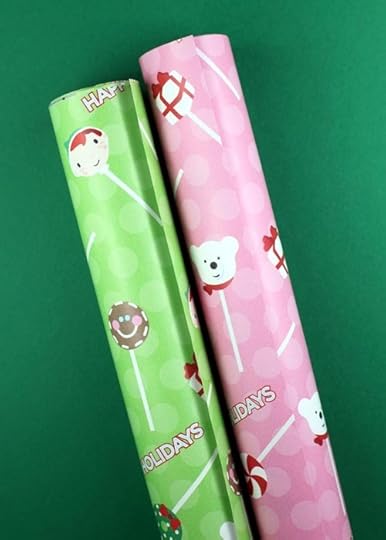
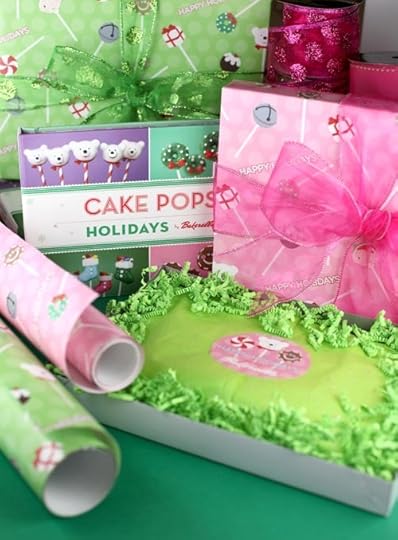
Wrapping Paper!!!!
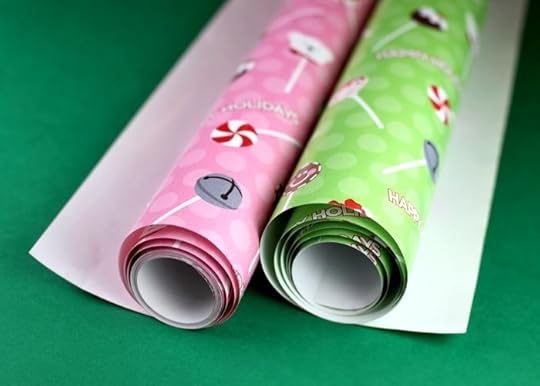
Yes, rolled wrapping paper. You can get so creative with this for special occasions. Birthdays, anniversaries, the holidays, of course. I can’t wait to make more.
Okay, let’s get wrapping!
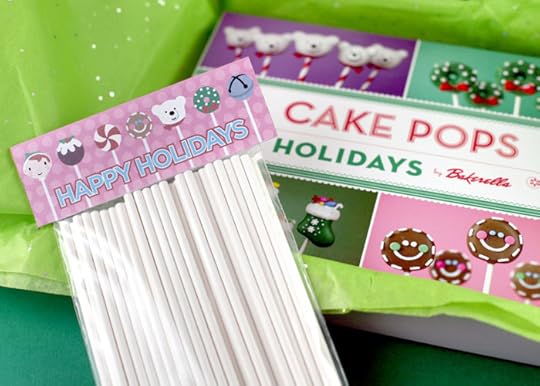
Oh yeah, I’m popping a few sticks inside the box with my book, so I relabeled them to match the packaging.
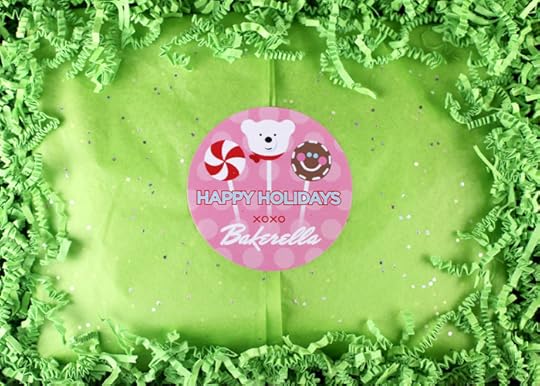
Wrap in tissue, stuff with some coordinating paper filler and then seal with a sticker.
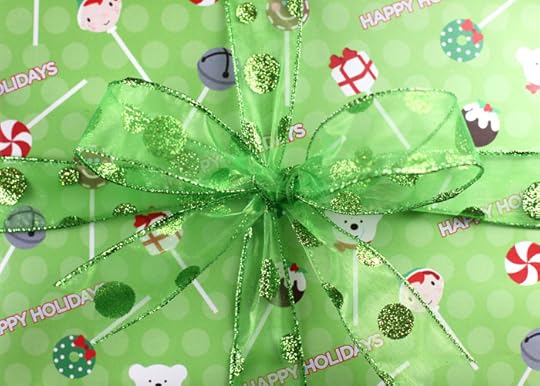
Add a coordinating bow and it’s wrapped and ready!
Yay! One present down.
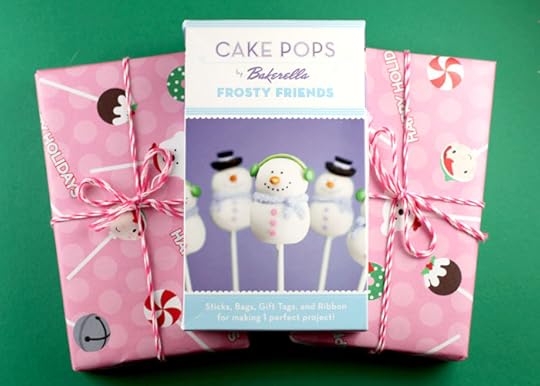
And here’s a few more. Pink wrapping paper for these adorable little Frosty Friends Mini Kits.
I’m thinking stocking stuffers.
Now, who should I send some to?
I thought I’d give away three gift sets if you’d want to get ahead of the game this holiday too and let me wrap a present for you.
Enter for a chance to win one of three (3) Cake Pops Gift Sets that includes a signed Cake Pops Holidays Book with lollipop sticks and a Frosty Friends Mini Kit all wrapped in cute custom paper.
To enter, just leave a comment on the blog and tell me if you’d rather have pink or green wrapped presents. Or if you can’t decide, then just share what kind of wrapping paper you’d like to make one day.
Deadline to enter is Thursday, November 14, 2013 at 6:00 p.m. ET.
Three (3) winners will be chosen at random and announced sometime Thursday evening.
P.S. Two new December Book Signings! - I’m happy to share that I’m making up the Cake Pops Holidays book signing from last year that was cancelled in New Jersey due to Superstorm Sandy. And I have a new one in my home state of Georgia. I hope you can make it if you live nearby.
Good Luck on the Giveaway!
Holidays are made for you at Zazzle. Find gifts they’ll love at Zazzle.

November 5, 2013
Give Books this Holiday!
I’m hosting a fun giveaway today from my publisher, Chronicle Books. Last year they launched a GIVE BOOKS holiday campaign to encourage people to share the love of books during the holiday season, to support local bookstores and to help promote literacy. And I’m excited that they are doing it again this year. But this year they are doing it bigger. Giving bigger. They’ve joined forces with First Book, a non-profit organization that provides access to new books for children in need. And for every #GiveBooks tweet, pin, and online pledge, Chronicle Books will donate a children’s book to First Book.
Here’s how you can help them reach their goal of giving 10,000 books this holiday with a simple tweet, pin or pledge.

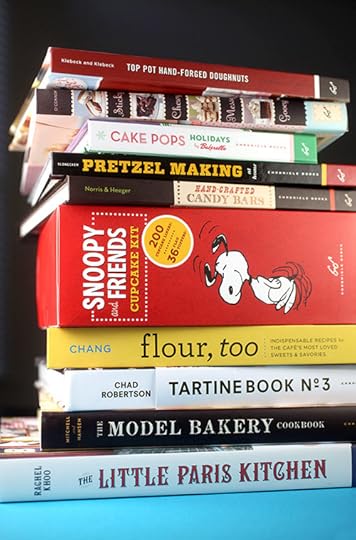
And now let me show you ten books I picked out from Chronicle that I want to give this holiday. They’re cookbooks of course. Sweet ones.
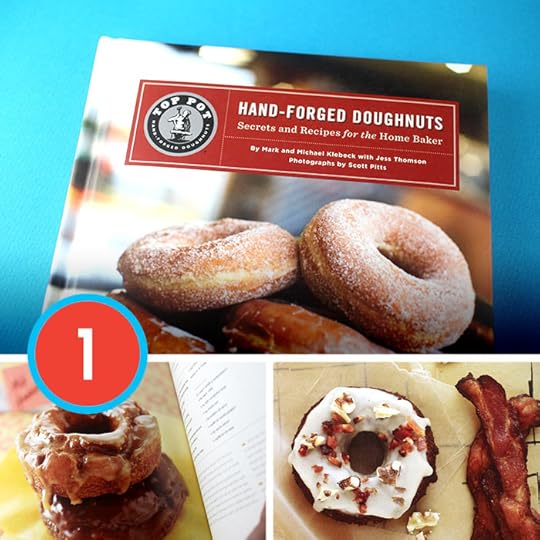
Top Pot Hand-forged Doughnuts
Secrets for the Home Baker
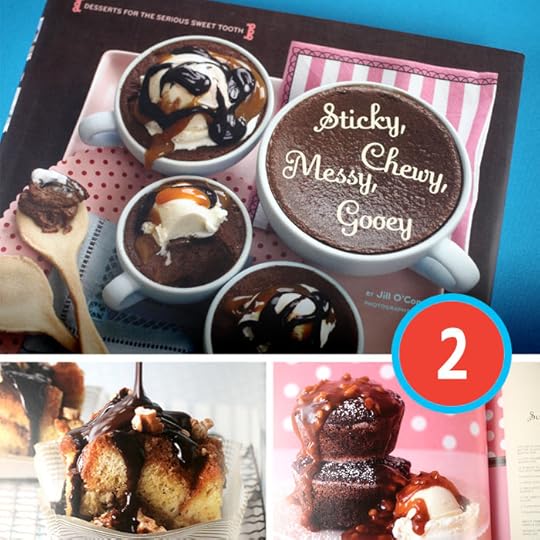
Sticky, Chewy, Messy, Gooey
Desserts for the Serious Sweet Tooth! Every one of the recipes in this book are calling my name.
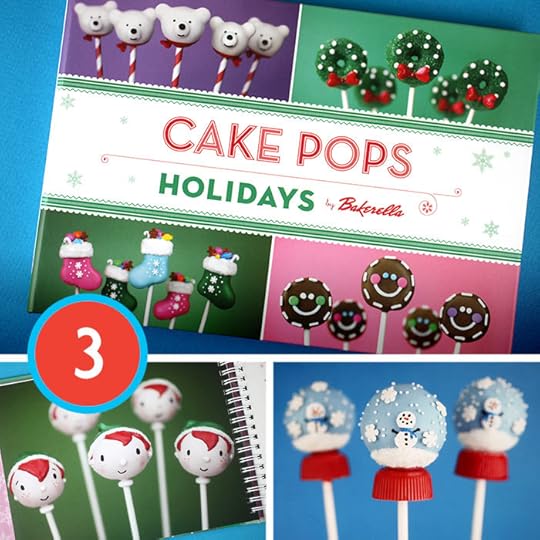
Cake Pops Holidays
Hmmm… this one looks familiar. I couldn’t resist : )
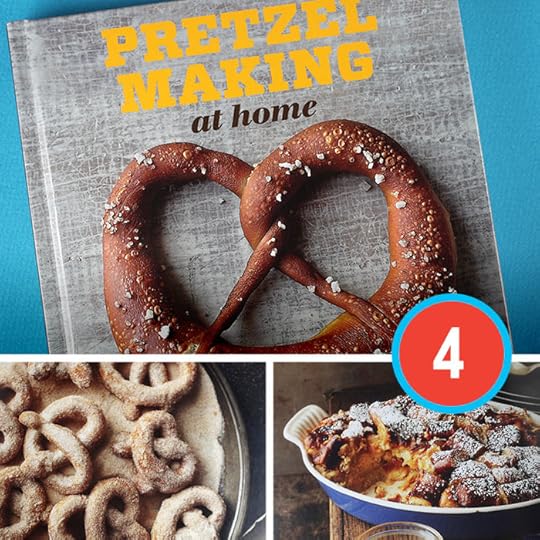
Pretzel Making at Home
Make your own crunchy, chewy, savory or sweet artisan pretzels. Fried Pretzels with Cinnamon Sugar? Why yes.
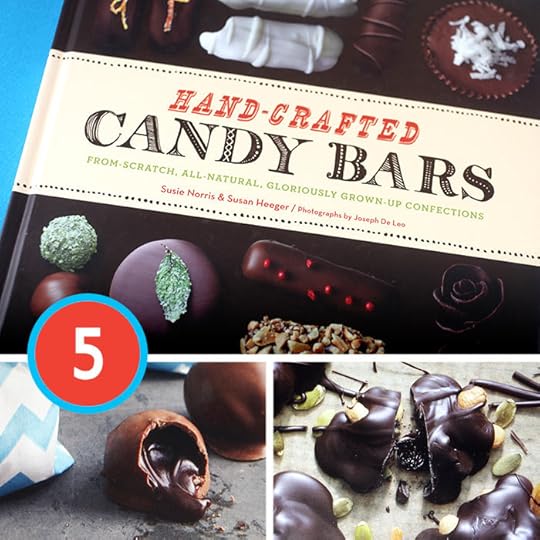
Hand-crafted Candy Bars
From-Scratch, All-Natural, Gloriously Grown-Up Confections
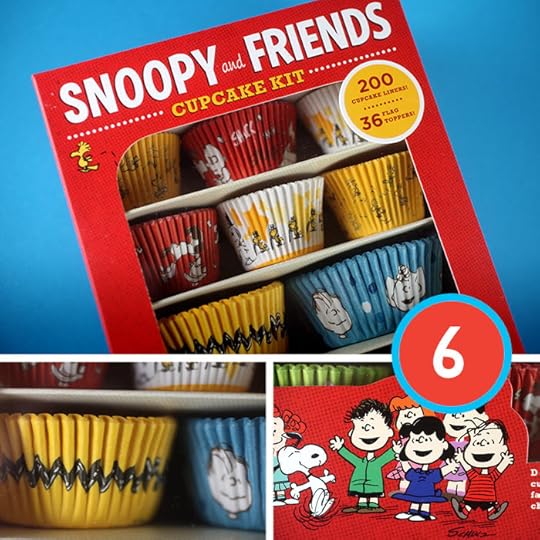
Snoopy and Friends Cupcake Kit
Okay, this isn’t a cookbook but you do get to make cupcakes. That counts, right. Besides … it’s Snoopy with adorable liners and flag toppers. Chronicle has the cutest gift items too.
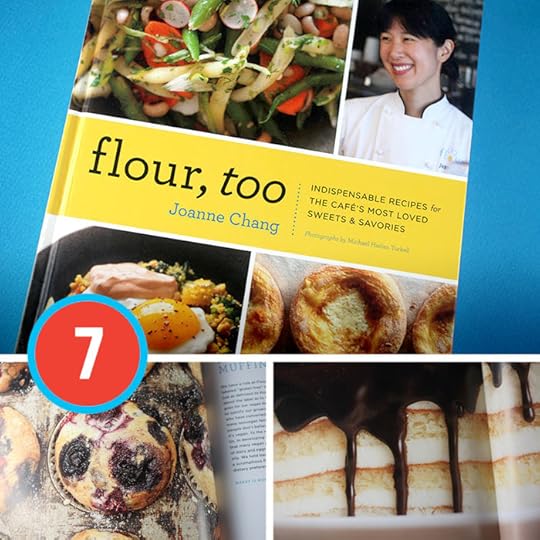
Flour, too
Joanne Chang shares recipes for her Café’s most loved sweets and savories.
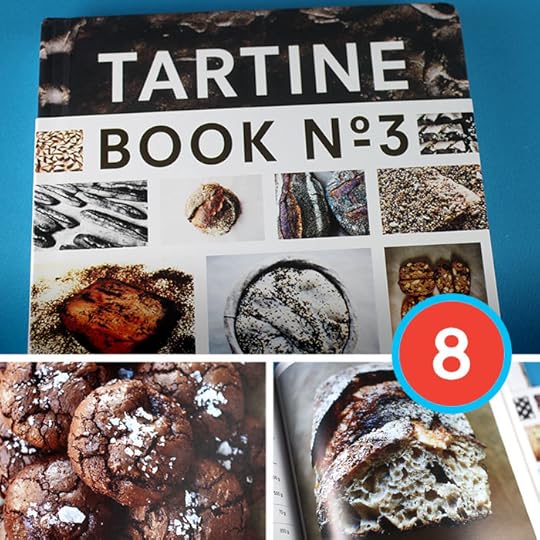
Tartine Book No. 3
This soon-to-be-released cookbook is third in a series of collectible titles from Tartine Bakery & Cafe in San Francisco. We’re talking bread baking and pastry making.
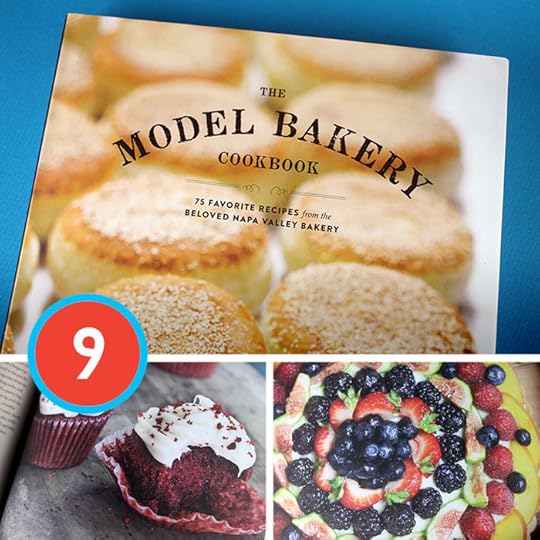
The Model Bakery Cookbook
Sensational artisan baked goods including Peach Streusal Pie, Brandied Pumpkin Pie, Amber Ale Bread and their famous english muffins that I can’t wait to try.

The Little Paris Kitchen
Rachel Khoo shares simple, classic French recipes in her cookbook that’s just as charming as she is. Plus there’s French desserts. Win! Win!

Speaking of win. How would you like to win these 10 awesome books? I’m giving them away to one lucky reader and it might be you.
To enter for a chance to win all ten:
Leave a comment on the blog post and tell me which of these books sounds fun to give or which one you’d like to get the most.
Deadline to enter is 8:00 pm ET on Saturday, November 9th, 2013.
One winner will be chosen at random and announced sometime Sunday… just in time to receive them for the holidays.
Good luck and of course, I hope you can help #GiveBooks to children this holiday.
P.S. – Receive 30% off + free shipping at ChronicleBooks.com (*excluding personalized products). Promo code GIVEBOOKS (valid through 12/31/13).
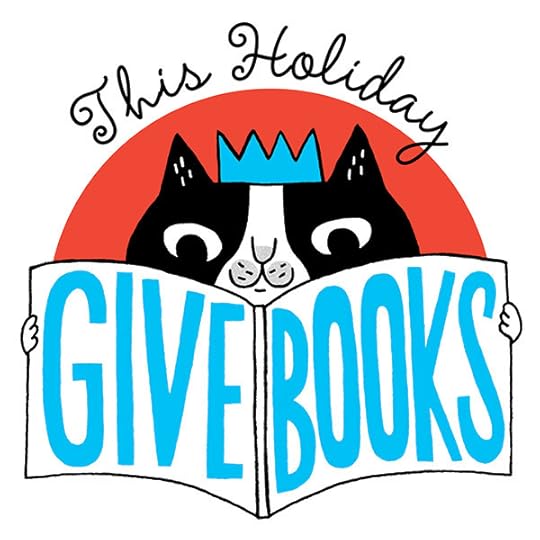
Cute kitty cat illustration by Gemma Correll.

November 3, 2013
Butterscotch Apple Mini Galettes
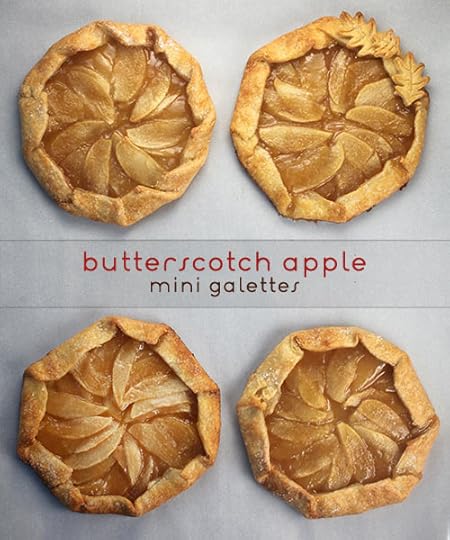
We’re talking personal pies. Flat little freeform pies that are full of charm. They’re casual and fancy at the same time. And you can make them with all kinds of fillings. But today we are all about apples bathed in butterscotch. I’m not complaining.
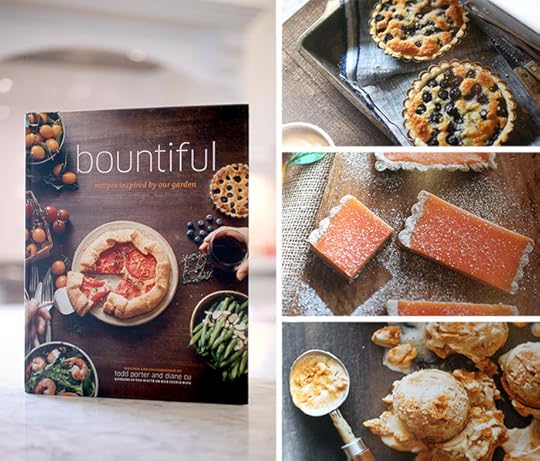
The recipe for these is from my friends, Todd and Diane’s new cookbook, Bountiful. The recipes inside are inspired by the things they grow in their garden. It’s an absolutely beautiful book, but that’s a given with these two. They are amazing photographers and videographers. You may remember that I worked with them last year on a fun little holiday video. But, If you aren’t familiar, check out the White on Rice Couple Blog for more of their beautiful recipes.
Okay … Galettes! Let’s go.

Butterscotch sauce ingredients: sugars, butter, heavy cream, vanilla, scotch and salt. P.S. Yay for heavy cream and brown sugar.
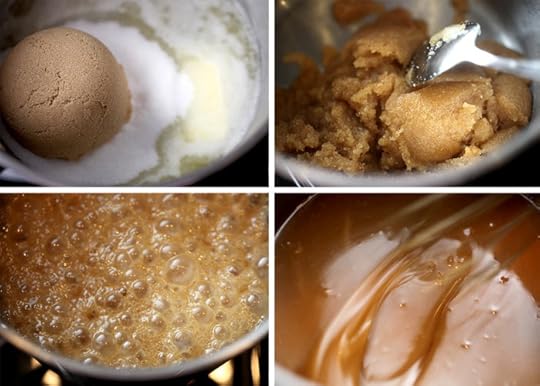
Because it all comes together to make glorious butterscotch sauce.
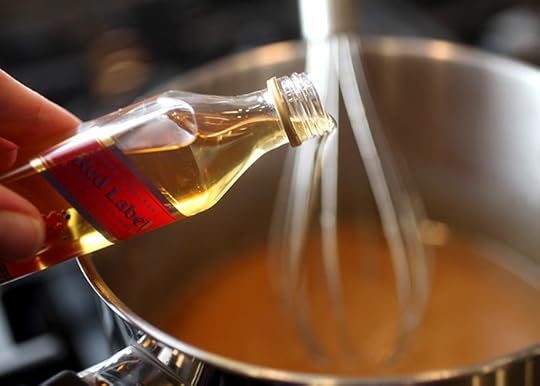
And you can kick it up a notch with a little scotch. Like my airline size bottle? If I bought anything bigger, it would most likely just go to waste.
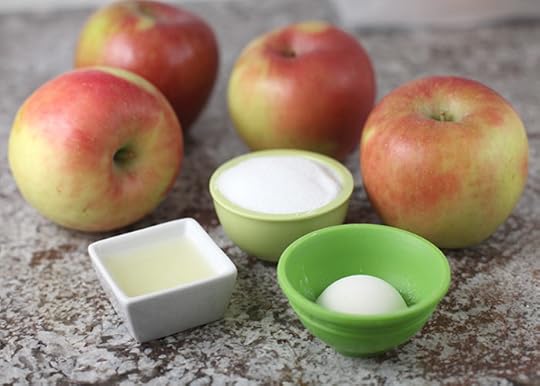
Filling ingredients: Apples, apples, apples and a little sugar, flour and lemon juice.
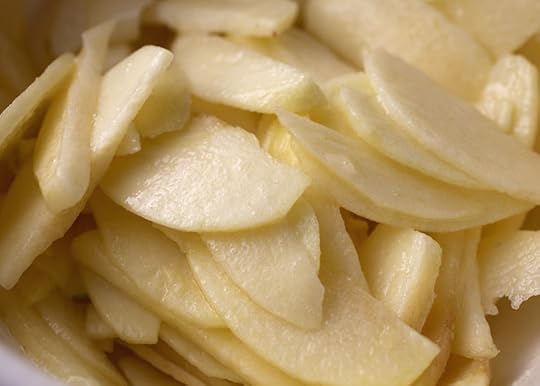
Peel, core and slice those babies so they are nice and thin.

Then we’re on to the pie crust.
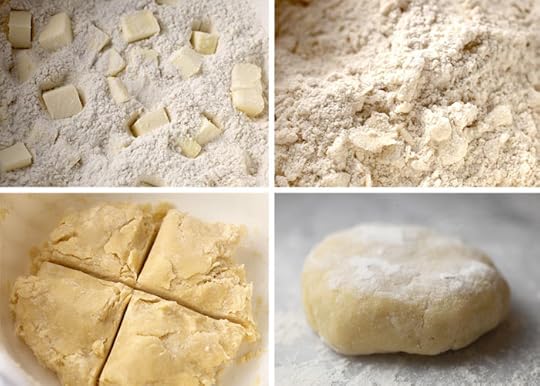
Prepare the dough and divide into four small discs.
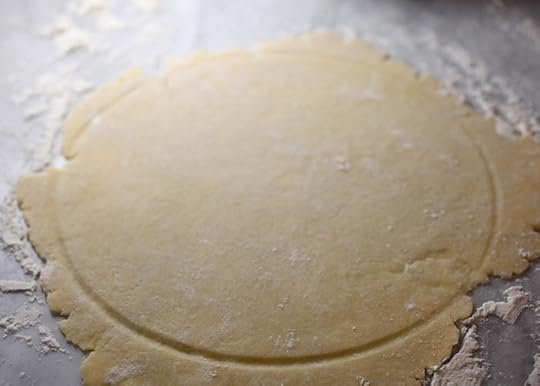
Roll it out into an 8 inch circle. Use a cake pan pressed in the dough as a guide if you want a more perfects. Then just cut off the excess.
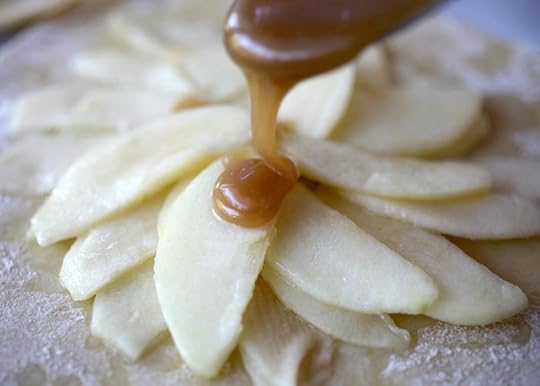
Fill the center with apples and spoon on the sauce.
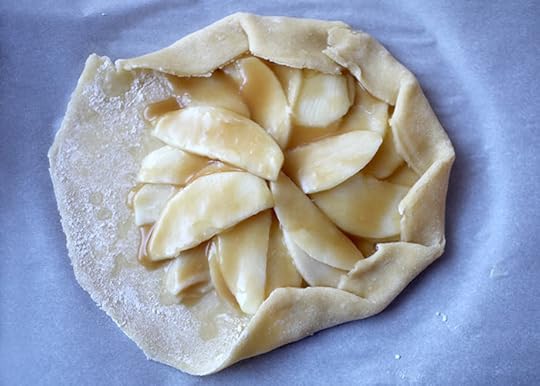
Then just fold the edges, creasing as you go and bake until golden brown.
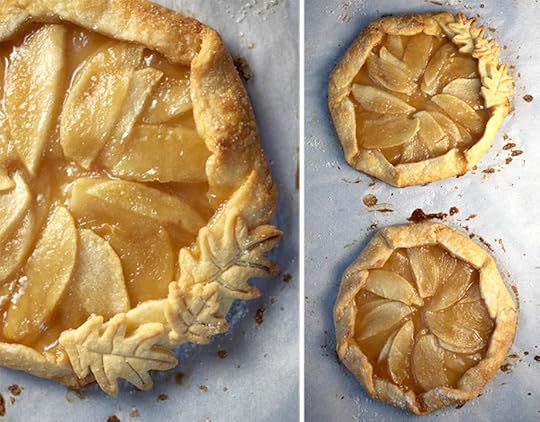
And dress them up a little bit if you want, too. I used these cute little leaf pie crust cutters I found at Williams-Sonoma.
Butterscotch-Apple Mini Galettes
October 27, 2013
Quick and Easy Creepy Cupcakes
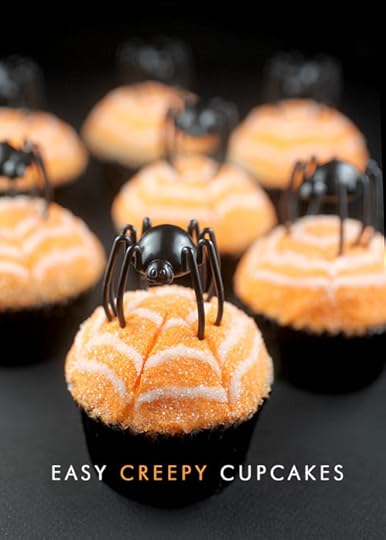
I can’t believe Halloween is just around the corner. It always sneaks up on me before I get to make all the treats I have sketched out in my head. But since we’re just a few days away I thought I’d slip in a quick last minute treat I made Sunday that’s as much creepy as it is cute.
And it’s pretty easy to boot. There’s hardly any decorating, so you can whip them up super last minute.
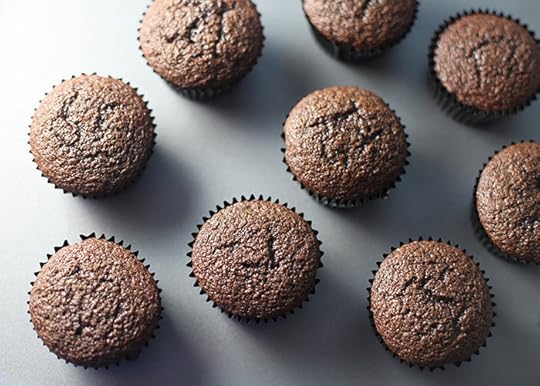
Just bake up your favorite cupcakes. I used this easy chocolate cupcake recipe.

You’ll totally need some frosting, too. Color it orange, purple, black, green or just leave it white.
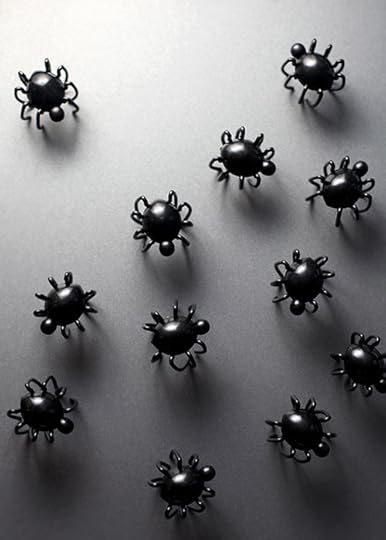
And then you’ll need the creepiest plastic spiders you can find.
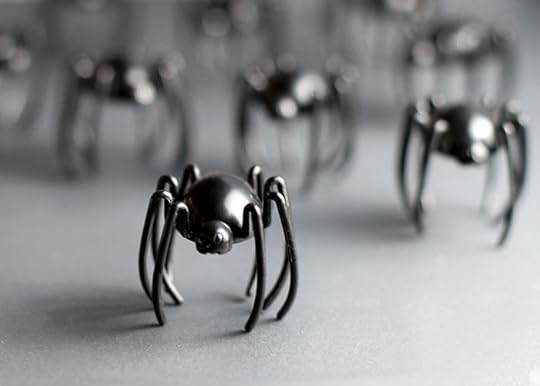
I like these long-legged little guys a lot. Eeek!
I’ve been dying to use them on something since I bought them a while ago. Of course, Halloween cupcakes were perfect.
Unfortunately, I have no memory of where I picked them up, but if you’re looking for some plastic spiders – start with dollar stores or craft stores. Or any of those pop-up Halloween shops. They’d probably have something.
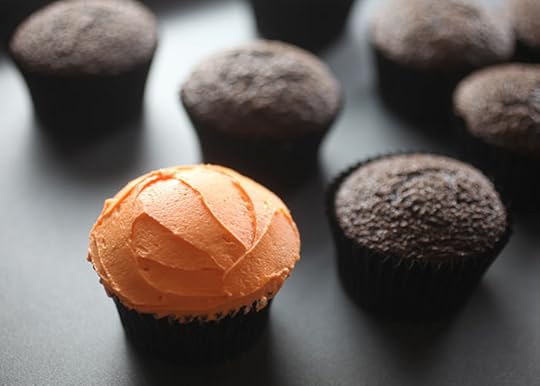
Now you can make your cupcakes super easy by just frosting them with one color.
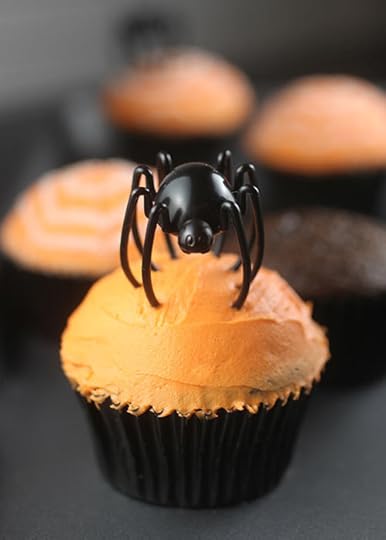
And perching your creepy spider right on top.
I think they’d look pretty sharp in solid white frosting, too.
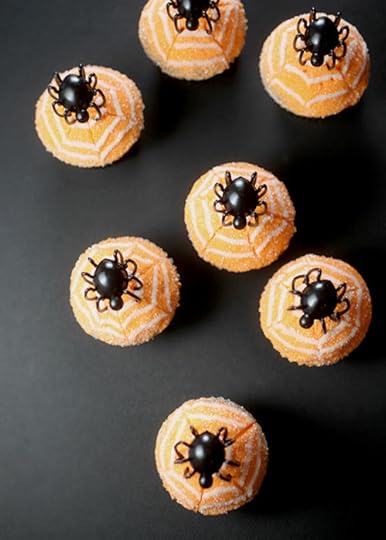
But I wanted them a little snazzier – so I made them with white sugared webs.
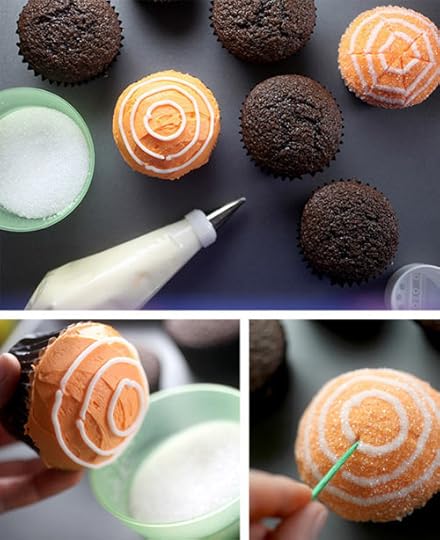
Reserve some of your frosting before tinting it a color and use it to pipe three circles on top of the cupcake.
Just use a ziploc bag with the corner snipped off to pipe if you don’t have a decorator bag or icing tip.
A. Then drag a toothpick through the icing starting from the center and moving towards the edge of the cupcake to create the web.
or
B. Dip the top of the frosted and piped cupcake in a small bowl of white sanding sugar to coat and then drag a toothpick through. I think this makes them a little prettier and it flattens the web into the frosting so it doesn’t look like it’s sitting on top of it. If you need to adjust the web shape, you can do so easily by nudging the sprinkle coated surface a bit.
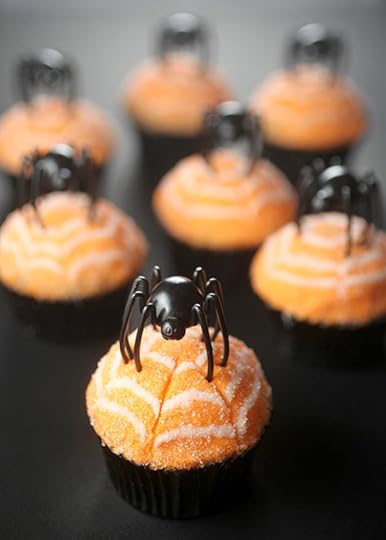
So cute!
I mean, so totally creepy.
I hope you guys have a happy and safe candy-filled Halloween!

October 20, 2013
Pumpkin Pecan Cinnamon Rolls
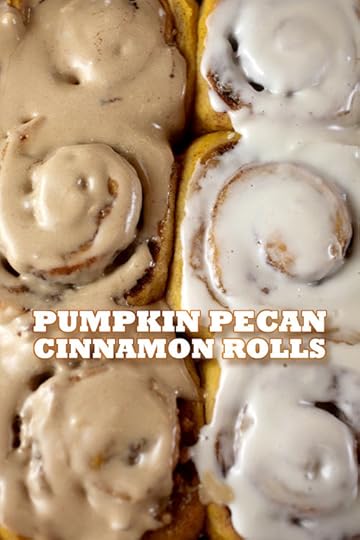
Fall is in the air and that means cinnamon rolls are in my mouth. But not just regular cinnamon rolls, but these pumpkin pecan cinnamon rolls frosted two ways. Half with maple and the other half with good ‘ole cream cheese frosting… because I’m really indecisive.
Or maybe because I’m just really smart.
Who’s ready to whip up some pumpkin yumminess?
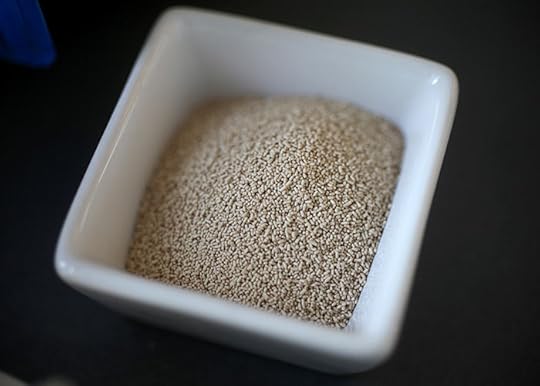
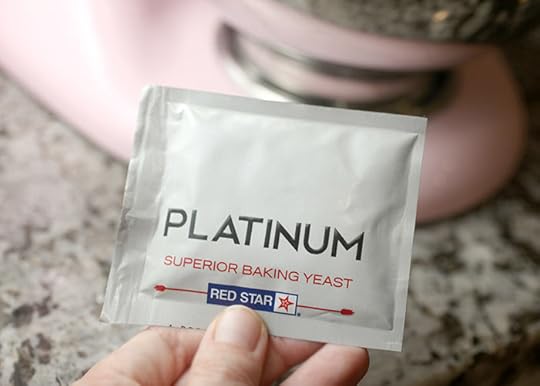
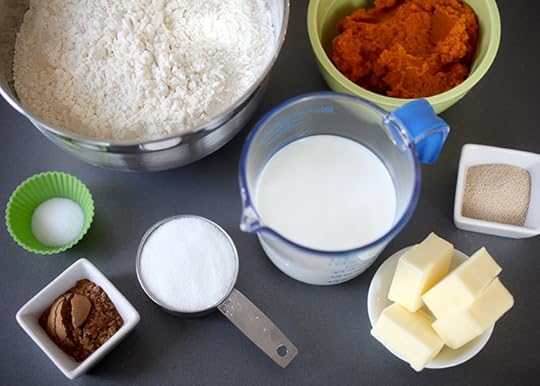
You’re gonna need some yeast … and then you’re gonna want to keep some extra packets on hand so you can make cinnamon rolls to your heart’s desire.
I’ve made 5 batches this fall already. Hmmm. Maybe I shouldn’t keep packets so handy. My hips might thank me.
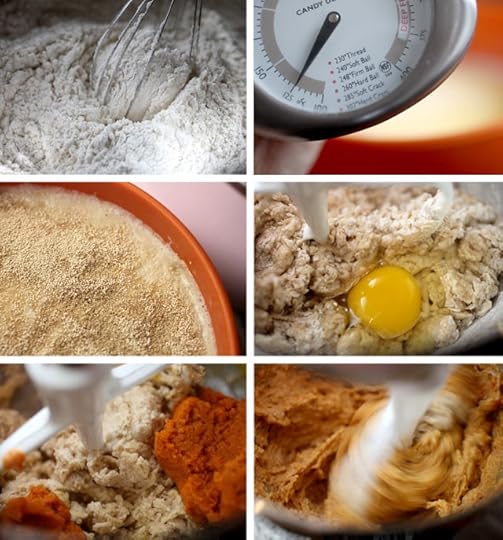
The steps are pretty simple to get this party started. Sift your dry ingredients. Add yeast to melted butter and milk. Add to sifted ingredients. Mix in egg and pumpkin.
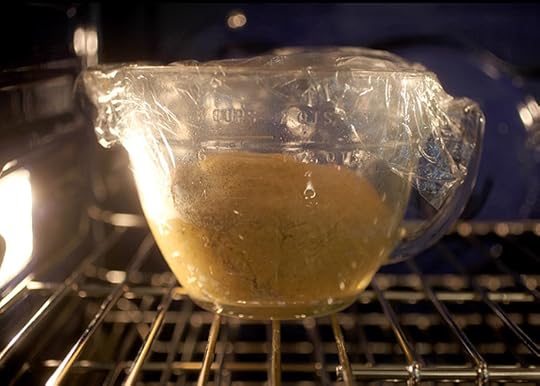
Shape into a dough ball and place in a coated bowl to rise in a warm place until it doubles in size.
I found using my oven with the lights on inside keeps it warm enough. I’ve also turned the temperature to the lowest setting for a few minutes and then turned the heat off so I could place the bowl inside. Leaving the oven door open will keep it from getting too hot.
Dough simple.
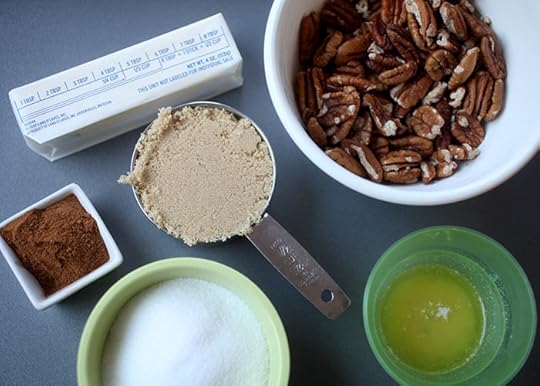
Ahhhh… the good stuff. The filling.
Brown sugar, granulated sugar, butter and cinnamon.
And what about the pecans. Let’s roast them. Yes, lets.
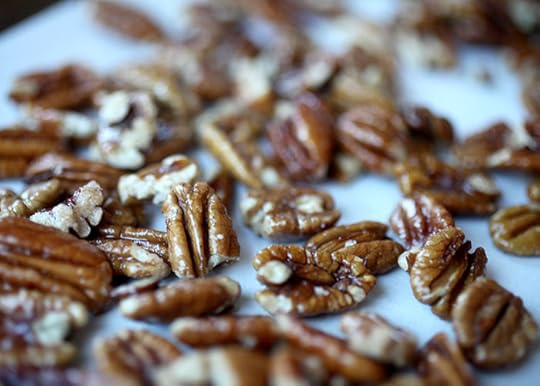
Pecans… coated with a little melted butter and toasted in the oven. They’ll totally make you glad you toasted them.
Chop them finely and the dough will be easier to roll.
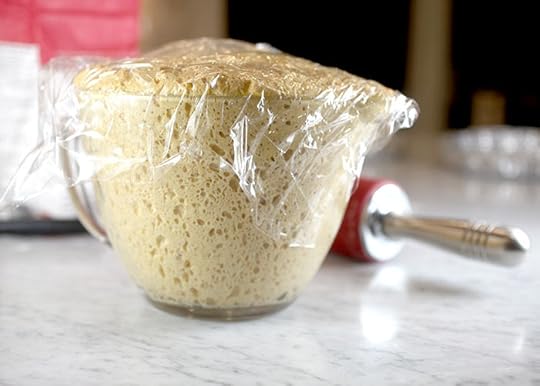
Oh look. Doubled in size dough. It’s like magic… or sweet science.
When it doubles in size, punch it down and turn it out onto a floured work surface so you can roll it out.
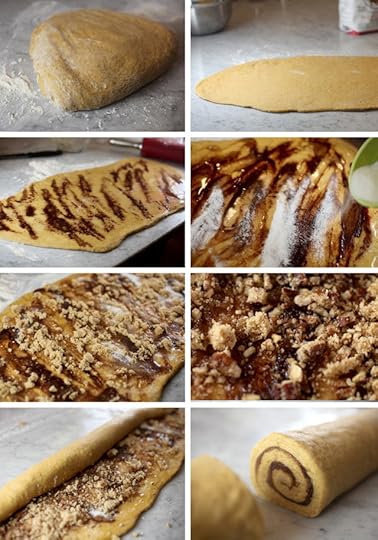
Layer on the goodness. My favorite part.
Butter. Cinnamon. Sugar. Pecans. Perfect.
And then roll it up and cut into equal sections.
Here we go now.
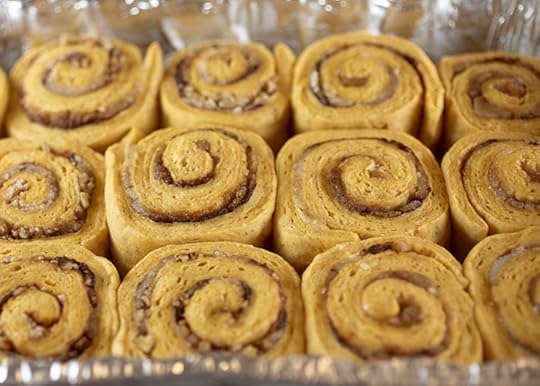
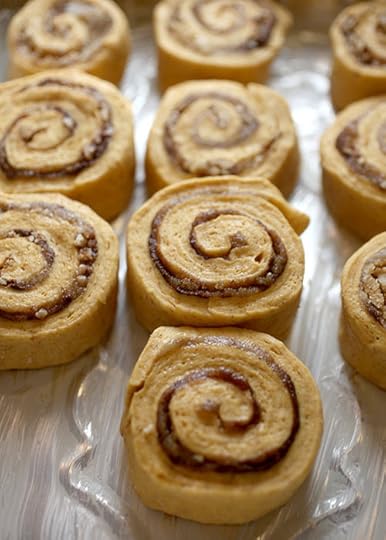
Let the swirls of cut dough rise again before baking.
See how they are touching each other now. Nice.

Then bake away. You may notice I did half with pecans and half without. You know, I couldn’t commit to one way or the other.
Pumpkin Pecan Cinnamon Rolls with Brown Butter Maple Icing
Bakerella's Blog

- Bakerella's profile
- 9 followers

