
Bakerella's Blog
May 31, 2023
Summertime Sweets
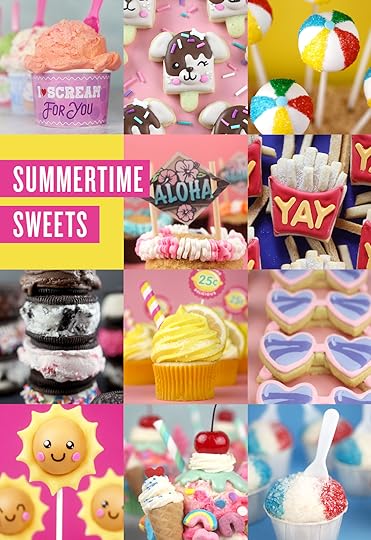
Hey friends! I pulled together a bunch of sweet treats that would be super fun served up this summer. Check these out if you are looking for a cute treat to bake and get you ready for all the warm weather fun on the horizon.
Let’s dive in.
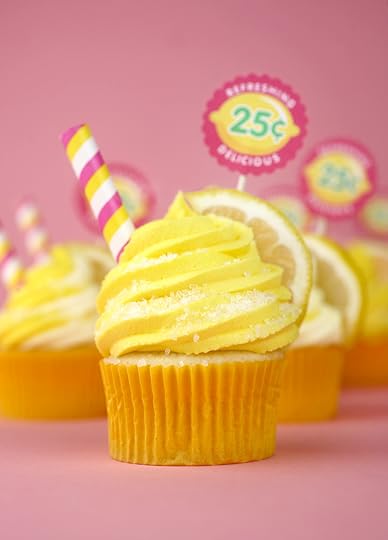
It’s like biting into sunshine! These lemon cupcakes are a fun take on your favorite summertime drink.
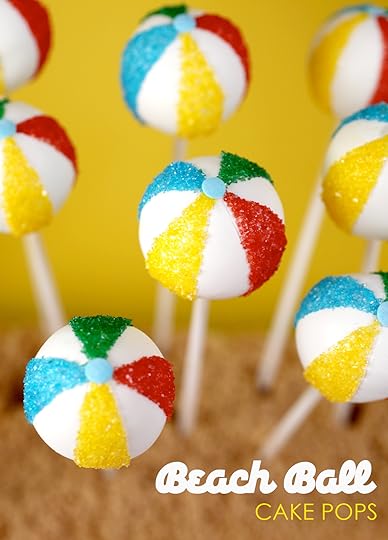
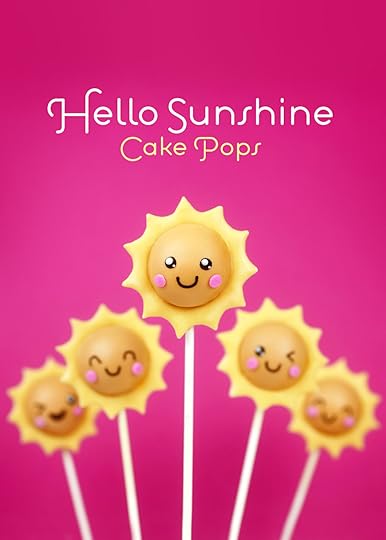
Have a ball (literally) with these happy, colorful cake pops.
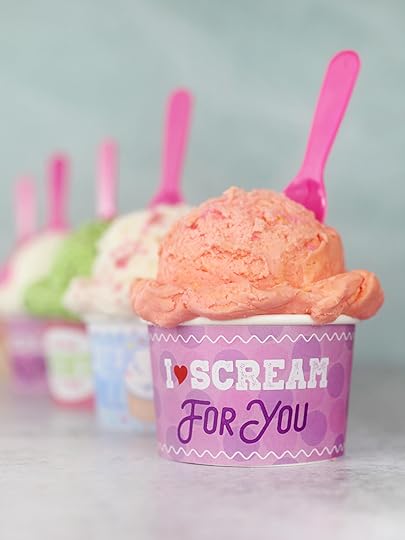
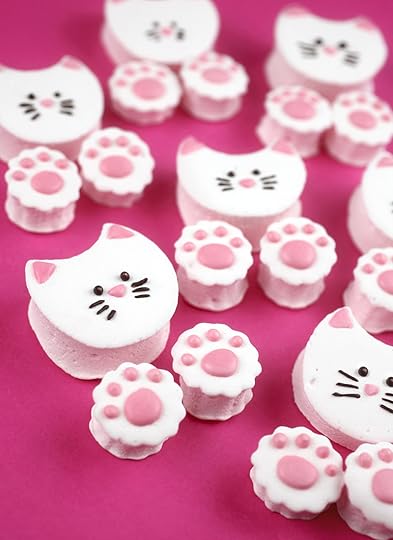
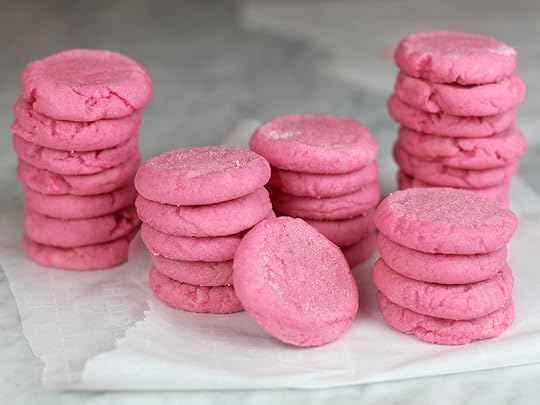
I made these cuties for Valentine’s Day, but they are perfect for summer, too. And they last longer out in the hot sun, to boot.

Say hello to summer with these adorable sugar cookie sunnies.
These are the cheeriest treats and bring big smiles to anyone they meet.
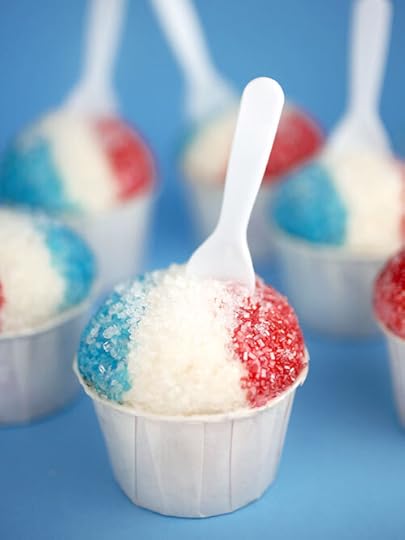
You don’t have to worry about these melting by the pool. That is all buttercream frosting covered in sugar crystals for a faux frozen treat.
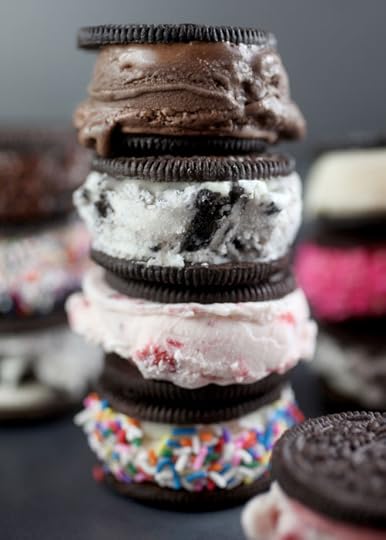
Easy Oreo Ice Cream Sandwiches
These make a big impact with little effort. Oreo Sandwich cookies + an assortment of ice cream flavors = lots of fun!
Serve these up to celebrate the start of summer in a sweet way.

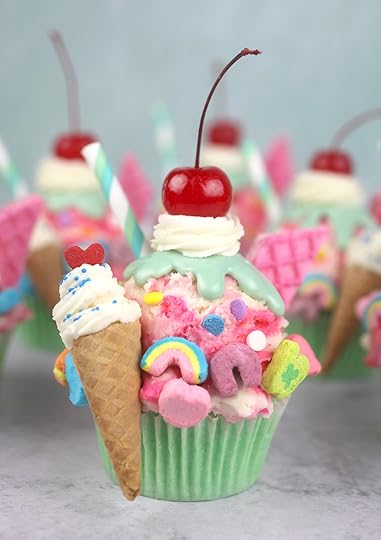
Well hello there, cupcake! These tropical treats would be so much fun for a luau party.
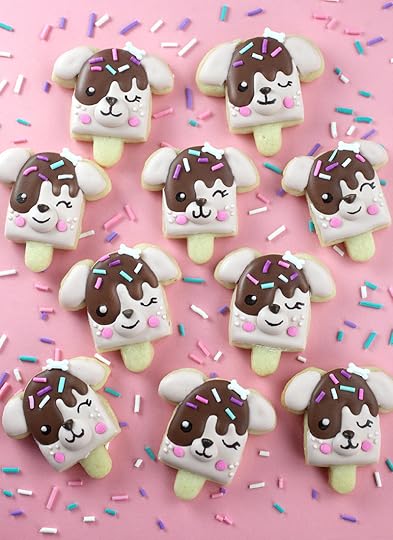
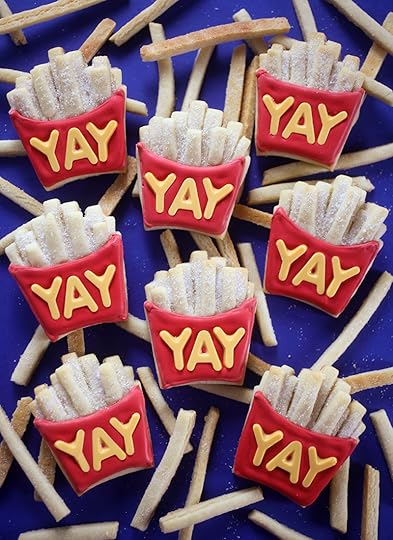
These teeny-tiny treats are doggone cute and a would definitely brighten up the the long, hot dog days of summer.
A buttercream explosion of over-the-top color and fun!


January 31, 2023
Faves for the Fourteenth
Valentine’s Day is around the corner and I’ve rounded up a handful of treats to share with you – from cute to customizable, here’s a bunch of yummy options to make the day sweeter. Hope you enjoy!
Bite into the softest sugar cookies that are just as sweet as a little plush teddy bear.
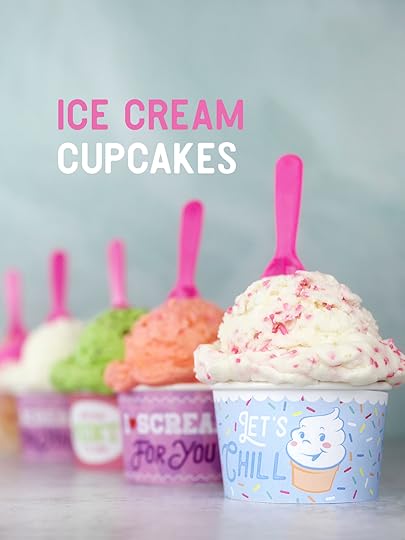
Forget Valentine’s Day cards and go for these customizable ice cream cups filled with cake and frosting.
Packaged to purr-fection and a sweet treat to share with someone over a cup of coffee.
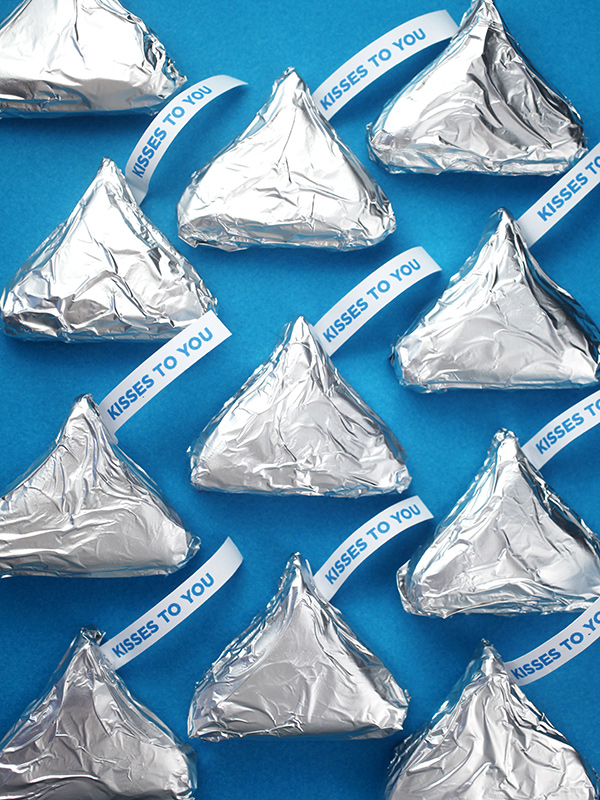
Chocolate sugar cookie kisses that you can customize with special messages.
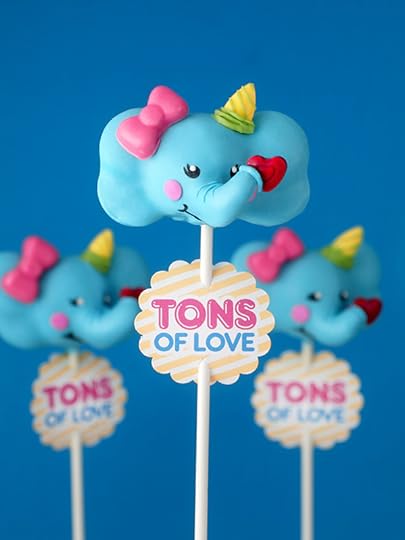
These over-the-top cake pops are a great way to show someone big love.

This one is a fave anytime of the year but especially around Valentine’s Day.
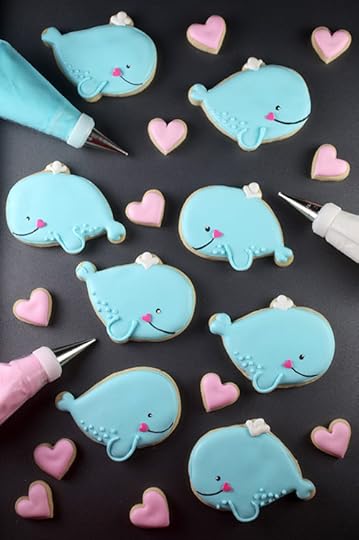
Whale you be mine? Yes, yes I whale!!! These come with tips to package and labels you can print.

Chocolate Peanut Butter Truffles
Customize these chocolate truffles with sprinkles, nuts or roll them in cocoa for an easy-to-enjoy treat.
These are super easy to make, so yummy and just perfect for Valentine’s Day.
Okay, this one takes a little more effort but it is totally worth it when you cut that first slice. WOW!
Hope Valentine’s Day brings you the sweetest treats!
Want more ideas? Check out my Valentine’s Day themed section here!
December 10, 2022
Sweets for the Season
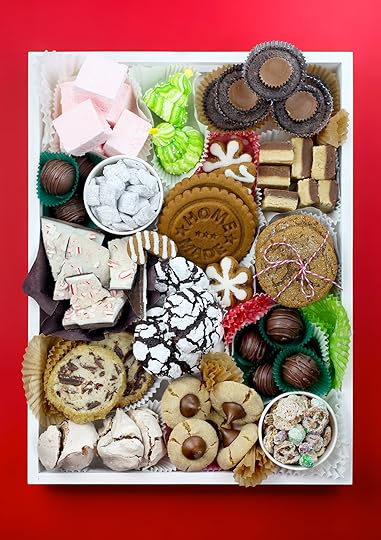
It’s the best season for sweets and treats! And I have a bunch to share with you today including my Merry Christmas Cookie Box filled with so many yummies including: Peanut Butter Blossoms, Chewy Chocolate Meringues, Homemade Marshmallows, Red Velvet Cake Balls, Peppermint Bark, Christmas Crunch, Chocolate Crackles, Merry Good Molasses Cookies, Peanut Butter Fudge, Chocolate Chunk Shortbread Cookies, Reindeer Chow, Gingerbread Cookies, and Brownie Candy Cups.
And that’s not all…
Looking for some cute-as-can-be treats? I can help you there, too.
Let’s take a look… (more…)
October 2, 2022
16 Spooky Cute Halloween Treats

Hey Boos! Let’s kick off October with some of my favorite Halloween-themed sweets. We’re talking frightfully cute cakes, cupcakes, cookies and cake pops – decorated with candies and more. I hope they make you scream with delight and inspire your baking adventures over the next few weeks.
Let’s take a little peek…
July 31, 2022
Vanilla Vanilla Snack Cake
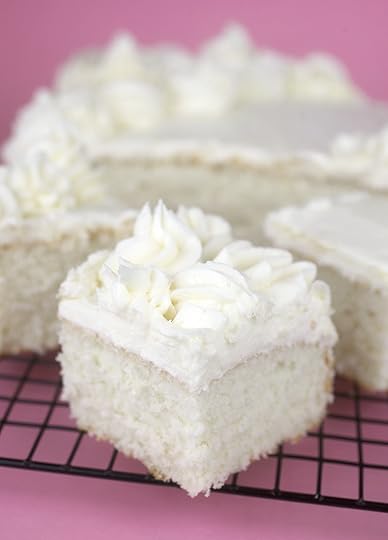
Sunday snack cakes are the best. Knowing there’s a 13 X 9-inch covered dish filled with cake sitting on the kitchen counter makes me happy. And this one in particular made me very happy today.
It’s all vanilla. And no fuss… except maybe for the buttercream swirlies I decided to add at the last minute.

But only because today’s a meaningful day to me. Today marks the 30th year since my first kidney transplant and even though that kidney did not last as long as I had tried and hoped it would, it’s still special and important to me to this day. It helped me live nearly 20 more years of life and when I started getting sick again, it allowed me the time to receive a second transplant from my mom which is still doing good thankfully after 11 years. So today, we’re going to enjoy the heck out of this cake. And I hope you get the chance to try it and enjoy it as well.
That being said, I’m going to keep this post short so I can get back to snacking.
May 31, 2022
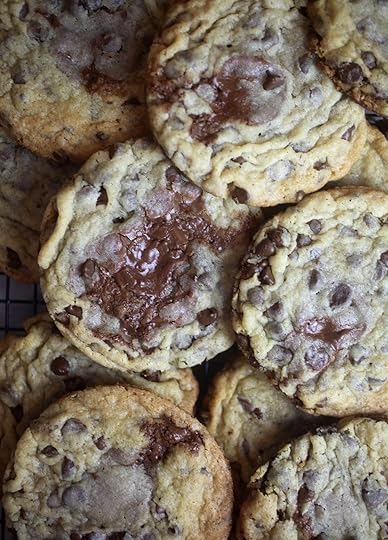
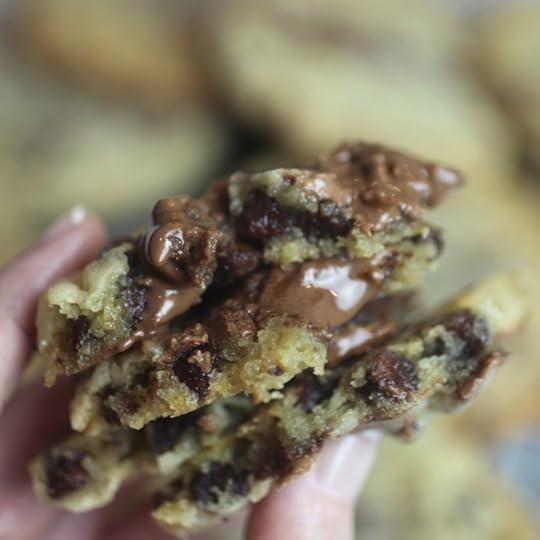
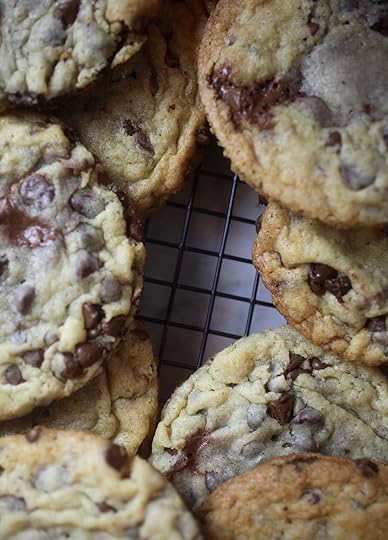
Milk Chocolate Chip Truffle Cookies
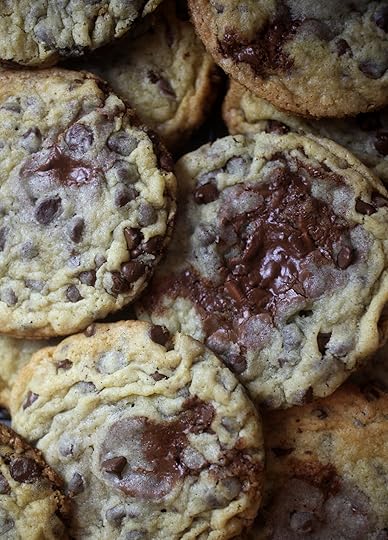
I love a good chocolate chip cookie. You can stuff them with semi sweet, milk or dark chocolate morsels or peanut butter, m&m’s or nutella. I like them just about any way I can get them. For these big chippers, I took chocolate chip cookies and stepped them up a notch, stuffed with a chocolate truffle inside them.
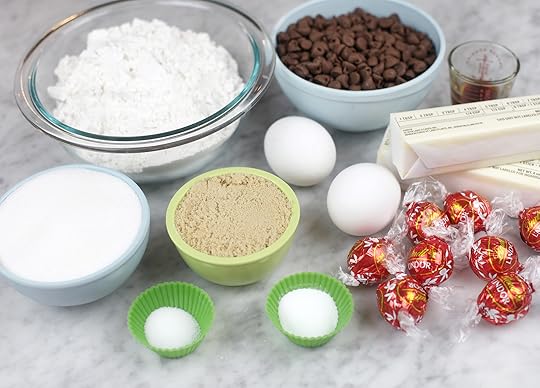
Let’s get to it. Here we have your basic cookie ingredients – plus some Lindt truffles for the win.
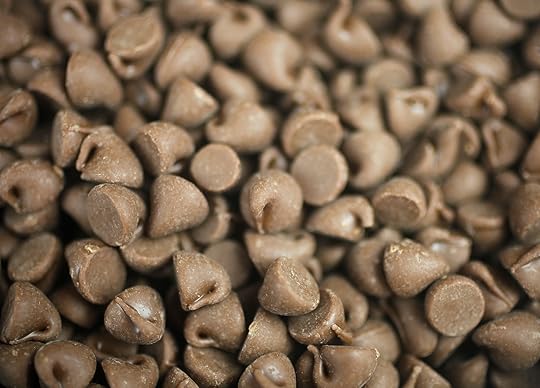
Now, I usually go semisweet or dark chocolate, but these big boys are all milk chocolate to pair with the truffles.
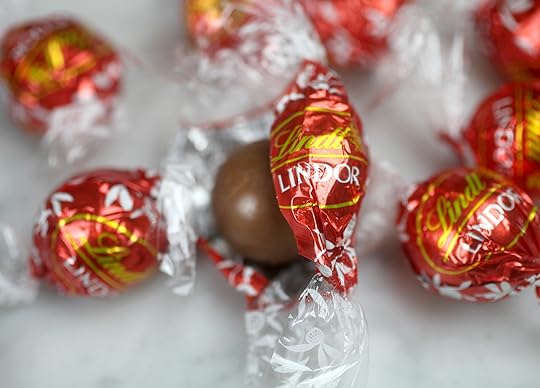
Lindor Milk Chocolate Truffles by Lindt that is. And the stars of this cookie recipe.
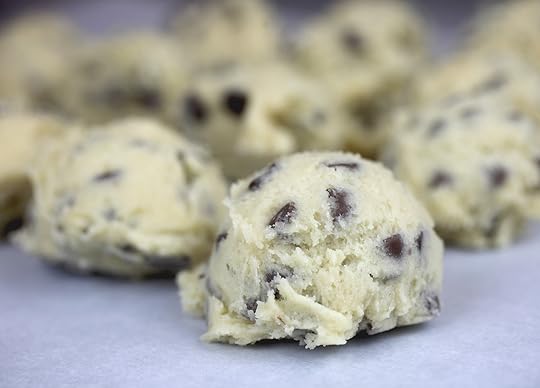
After whipping up the dough, divide into a dozen scoops for jumbo cookies.
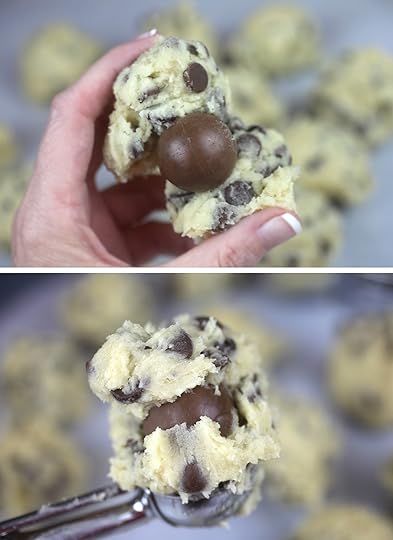
Then stuff those truffles inside. You can either shape the dough around the truffle or you can use a scoop to help shape them and keep some of the cookie dough off your fingers.
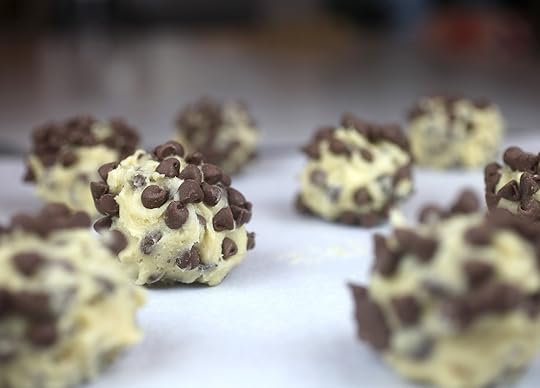
Once the truffles are hidden inside, press more milk chocolate morsels on the top of the cookie dough balls before baking.
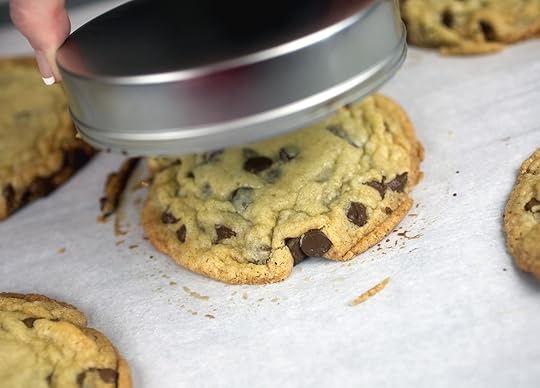
These bake up pretty big and if they spread more than your liking, just use a large cutter/circle (about 4-5 inches) to help shape the cookies right when you take them out of the oven and while they are still hot. Coerce the cutter over the cookie and give it a little swirl. When the cookie cools, it will settle into a nice round shape.
Nice and round. : )
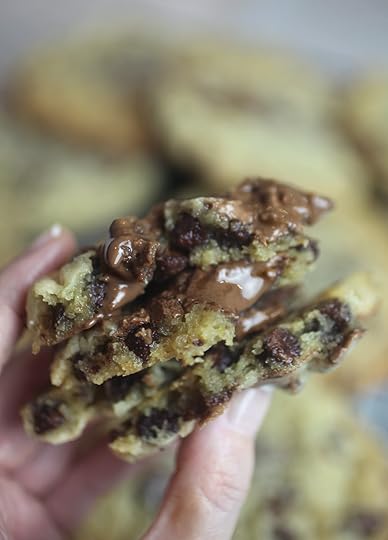
Enjoy these while they are warm for a smooth and creamy, melty, milk chocolate middle.
Yummmmmmmmmm!
 Print Yield: 12-14 jumbo cookies Milk Chocolate Chip Truffle Cookies Prep Time 15 minutes Cook Time 16 minutes Additional Time 30 minutes Total Time 1 hour 1 minute Ingredients 2-1/4 cups all purpose flour 1 teaspoon baking soda 1/2 teaspoon salt 1 cup unsalted butter, room temperature 1 cup granulated sugar 1/2 cup brown sugar, packed 2 eggs 1 teaspoon vanilla 3 cups milk chocolate morsels, divided 12-14 milk chocolate Lindor truffles Instructions Whisk flour, baking soda and salt together in a medium bowl with a wire whisk. Set aside.Cream together butter and both sugars.Add eggs, one at a time until combined. Add vanilla. Slowly add in flour mixture until just combined.Mix in 1-1/2 cups of the milk chocolate morsels until combined, reserving the rest.Chill dough for 15-20 minutes. Scoop into 12-14 large mounds of dough using a 2-1/2 inch cookie scoop. Break dough apart and place a truffle in the middle of each dough ball. Reshape and seal. Place remaining morsels in a small bowl and press top and sides of cookie dough balls into the morsels. Place cookie dough balls in the fridge for another 15-20 minutes to chill.Preheat oven to 350 degrees Fahrenheit and line large 16 X 20 cookie sheet with parchment paper.Bake in batches - only 4-5 cookies on a baking sheet for 15-18 minutes. More cookies than that and they may start to merge together. Cool cookies. Notes
 Let these large cookies cool completely before lifting or they may separate. Bake cookies on a large rimless cookie sheet and you can slide the parchment onto the counter to let the cookies cool.
© Bakerella
Hope you enjoy!
April 10, 2022
16 Sweet Easter Treats
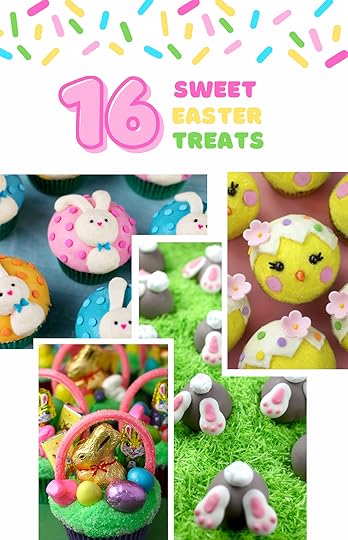
I have some pretty spring treats to share with you today. From cupcakes to cake pops to meringues and more … I hope these adorable sweets inspire you to make something fun for Easter. And if nothing else I hope they make you smile from all the cuteness.
Let’s hop to it.
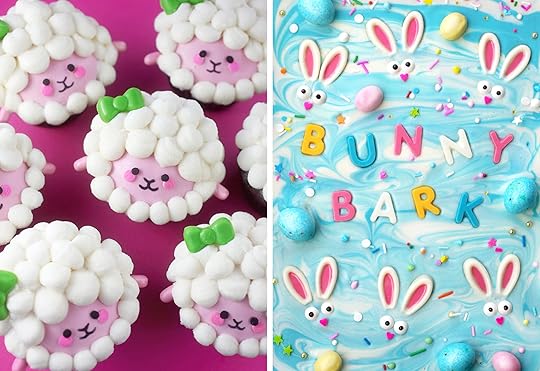
Puffy little balls of buttercream, dusted with confectioners’ sugar make these little lamb cupcakes wooly cute.
2. Bunny BarkThis is such a fun project… and super customizable. Use your favorite Easter candy along with pastel candy coating and sprinkles for a charming treat. Then break the bunny bark apart and enjoy!
March 27, 2022
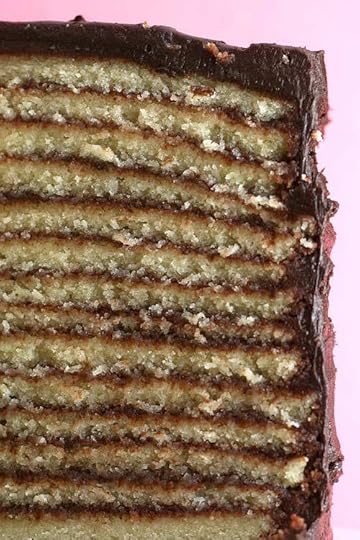
Favorite Chocolate Snack Cake
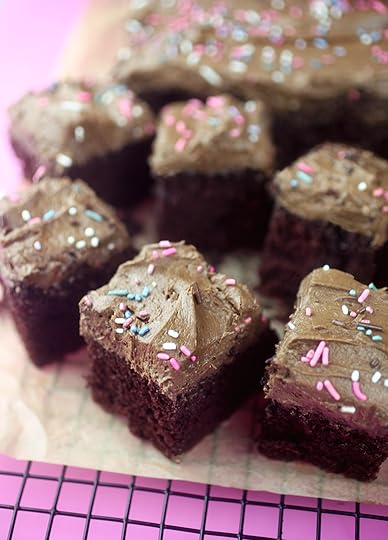
I have a new favorite chocolate cake. Like it is really good and the frosting … Oh my. I took one bite and immediately knew I was in trouble. In a good way, that is. This cake recipe found an instant place on my forever baking list. And I hope you will love it as much as I do.
February 9, 2022
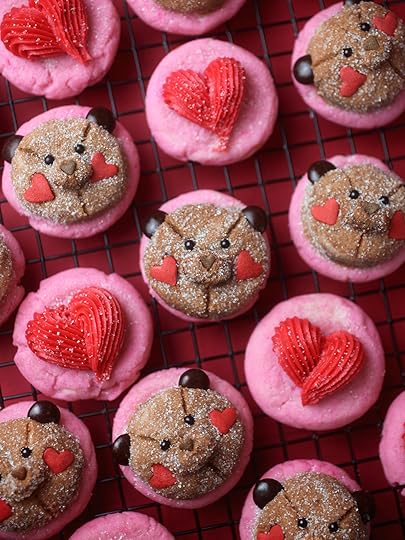
Soft Sugar Cookie Bears
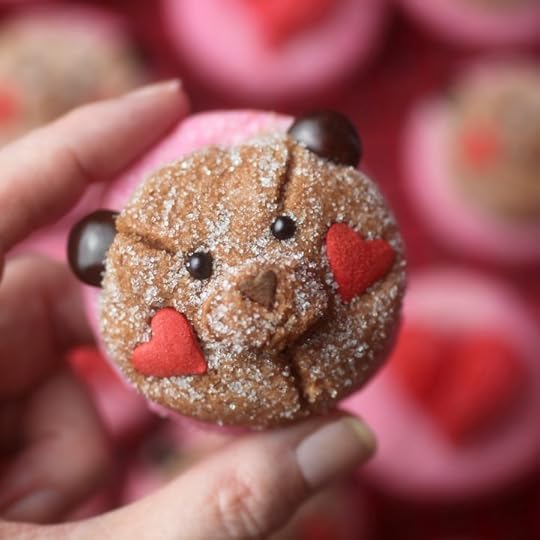
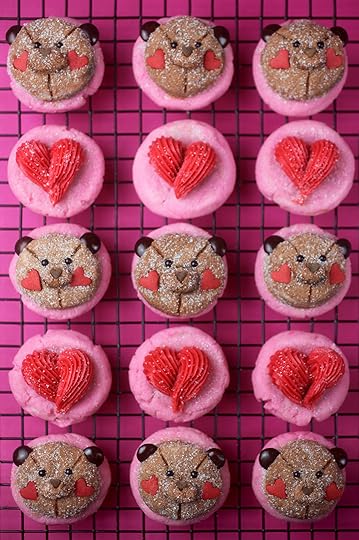
It’s been too long since I last made these sugar cookies. They are so soft and sink your teeth worthy. I’ve made them several times now and love to decorate them for different occasions so obviously I had to dress them up a little for Valentine’s Day since it’s right around the corner. You can decorate them two ways: with quick and easy big buttercream hearts or with candy and sprinkles to make adorable teddy bears.
I started making this recipe from my blogging friend Maria’s Two Peas and Their Pod’s Cookbook and immediately fell in love and added it to my forever baking list. If you want to see some other fun designs based off this recipe, check out these cuties:
Darling Duckling Sugar Cookies
Frosted Frostys Soft Sugar Cookies
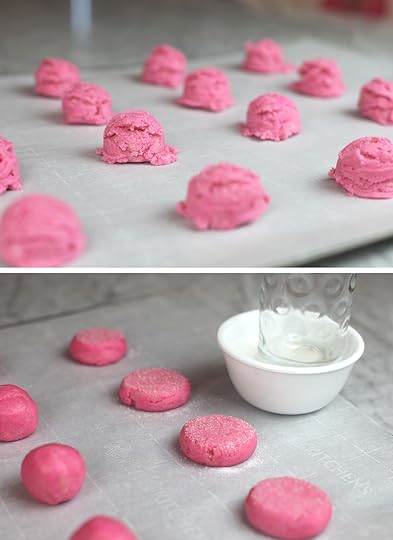
This time I tinted the sugar cookie dough with pink icing color to make them a little more festive. When ready to bake, scoop the dough, roll into balls and then gently each press with a clean, flat surface coated in granulated sugar.
They only need to bake for 8 minutes, so even if you don’t decorate or add buttercream, you can enjoy these cookies in no time. Easy to prepare and too easy to eat.

But let’s get into how to decorate these cute teddy bears. Start out by making buttercream frosting and tinting it brown, or make chocolate buttercream frosting depending on your preferred flavor combination.
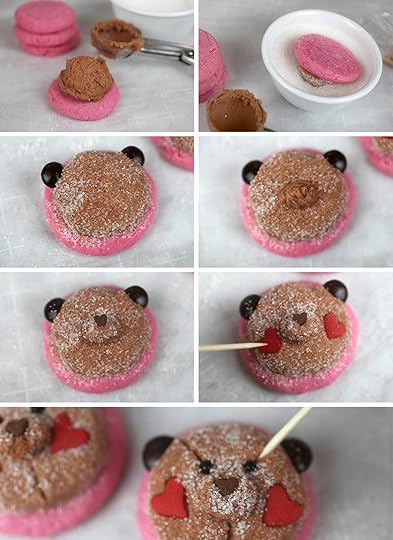
Scoop buttercream using a 1.5 inch scoop and place on top of cookie. Then press into a bowl of decorative white sanding sugar to shape into a smooth mound. Reshape if necessary – the sanding sugar creates a barrier to aid in shaping and helps keep your fingers from getting buttercream all over them.
Place two brown M&M’s in position for ears.
Use a toothpick to remove some of the buttercream where the nose goes and then pipe on a cute little snout. Then sprinkle sanding sugar right on top this time.
If you try to pipe the buttercream directly over the sanding sugar, it won’t really stick. That’s why it’s helpful to remove the buttercream where you want to pipe – so that it attaches.
Now press a tiny heart sprinkle in position for the nose and jumbo heart sprinkles in position for cheeks. You can totally use other shapes, I just had these hearts handy for Valentine’s Day.
Finish off the face with two black sugar pearls in position for eyes and use a toothpick to gently draw lines through the buttercream to emulate stuffed animal seams.
[image error]
Thank you for coming to my teddy talk. : )
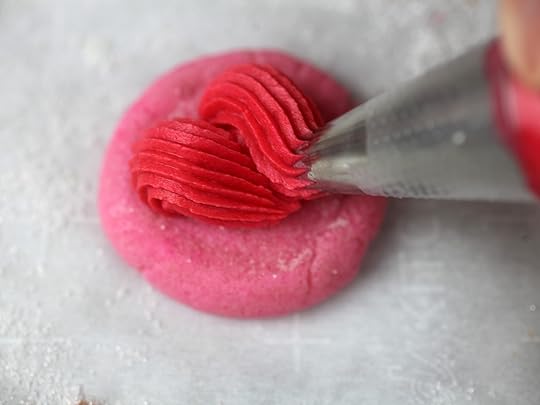
For a much faster decorating approach, just pipe hearts on the cookies using an Ateco 864 decorating tip. Pipe a dollop with pressure, gently releasing the buttercream to a point and then do the same motion creating a v-shape and slightly overlapping the bottom of the first piped section.
That’s it.
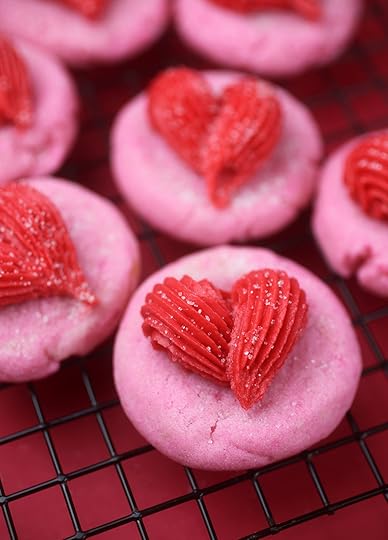
Pretty in pink … and red!
 Print Yield: 24-28 cookies Soft Sugar Cookie Bears Prep Time 15 minutes Cook Time 8 minutes Additional Time 15 minutes Total Time 38 minutes Ingredients SUGAR COOKIES 2-3/4 cups all-purpose flour 1/2 teaspoon baking soda 1/2 teaspoon cream of tartar 1/2 teaspoon kosher salt 1/2 cup (8 tablespoons unsalted butter, room temperature 1/2 cup vegetable oil 1/2 cup granulated sugar, plus another 1/4 cup to use for flattening cookies 1/2 cup confectioners’ sugar 1 large egg 1-1/2 teaspoons pure vanilla extract Pink icing color nonstick cooking spray FROSTING 3/4 cup (12 tablespoons) unsalted butter, room temperature 3 cups confectioners’ sugar, sifted 3 tablespoons heavy cream or milk 1 teaspoon pure vanilla extract Brown icing color White sanding sugar Black sugar pearls Brown M&M's Jumbo red heart sprinkles Instructions Make the Cookies: Preheat oven to 350 degrees fahrenheit. Line a large baking sheet with parchment paper.In a large bowl, whisk together the flour, baking soda, cream of tartar and salt and set aside.In the bowl of a stand mixer fitted with the paddle attachment, cream together the butter, oil, 1/2 cup of the granulated sugar, and the confectioners’ sugar until smooth. Add the egg, and vanilla extract. Mix until combined. Add the dry ingredients and mix on low. Add pink icing color, continuing to mix until just combined.Scoop the dough using a 1-1/2 inch scoop and place on baking sheet about 2 inches apart for evenly sized cookies. Roll the dough into balls. Not all the cookies will fit on the sheet for one batch.Pour the reserved 1/4 cup of granulated sugar into a small bowl or dish. Spray the bottom of a drinking glass with nonstick cooking spray. Press the bottom of the glass into the sugar to evenly coat. Press the sugared glass bottom on top of each cookie dough ball and press down gently. Repeat for each cookie and reapply cooking spray as needed.Bake the cookies for 8 minutes. Don't overbake. Let cool 5 minutes before transferring to a wire rack to cool completely. (Note: I slide the parchment paper and cookies off my flat cookie sheet and onto the counter to cool just a couple of minutes after they come out of the oven.Repeat with remaining dough.Make the Frosting: In the bowl of a stand mixer fitted with the paddle attachment, beat the butter until smooth. Add the confectioners’ sugar and mix until combined. Add the vanilla extract and one teaspoon of milk at a time for desired consistency. To Decorate Bears: Tint buttercream brown. Scoop the buttercream using a 1-1/2 inch scoop and place on top of a cookie. Gently press the cookie and frosting into a small dish filled with white sanding sugar. Very gently rock and rotate to coat the surface. Use the palm of your hand to reshape into a nice mound.
 Place brown M&M's in position for ears. Pipe a buttercream nose and sprinkle with more sanding sugar to coat. (You'll need to remove any sanding sugar where you will be piping to allow the buttercream to stick.) Place a miniature heart sprinkle on top of the nose, two jumbo red heart sprinkles in position for cheeks, and black sugar pearls for eyes. Press firm, but gentle so they are secure. Decorate one cookie at a time to make sure the sprinkles attach. Use a toothpick to draw lines on the face to mimic stuffed animal seams.To decorate hearts: Reserve some of the buttercream to tint red. Use an Ateco #864 tip to pipe a short line on the cookie with more pressure at the beginning and tapering pressure as you pull away to create a pointed end. Then pipe another section to create a V shape that slightly overlaps the first section.
Store in an air tight container at room temperature for up to 3 days.
NotesRecipe adapted from the Two Peas and Their Pod Cookbook by Maria Lichty.
© Bakerella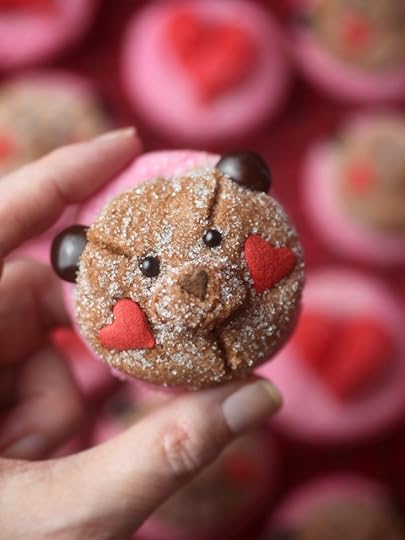
Hugs and hope you have a Happy Valentine’s Day!
January 10, 2022
Snow Cute Snack Cakes
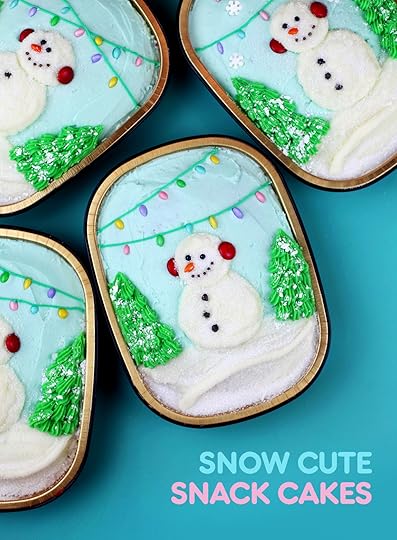
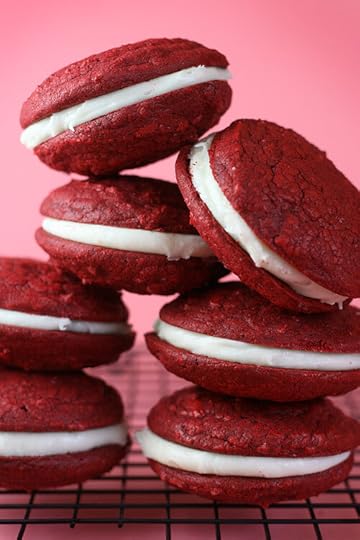
It’s a winter wonderland in a sweet snackable size. These small red velvet cakes are perfect for gifting or sharing. The recipe makes four. That’s enough for you to enjoy and to make a few others smile, too.
Bakerella's Blog

- Bakerella's profile
- 9 followers

