
Bakerella's Blog, page 6
February 11, 2020
Punny Ice Cream Cupcakes
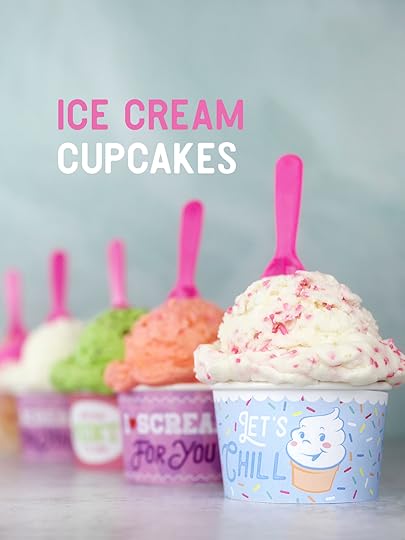
It’s almost Valentine’s Day and I couldn’t resist making some sweet puns. I mean what would the day even be without them.
These are vanilla cupcakes topped with buttercream ice cream and come complete with custom wrappers for the occasion.
I barely squeaked these treats out before the 14th, but I hope you enjoy looking at them even if you won’t have time to make them. Just know you’re ahead of the game on ideas for next year.
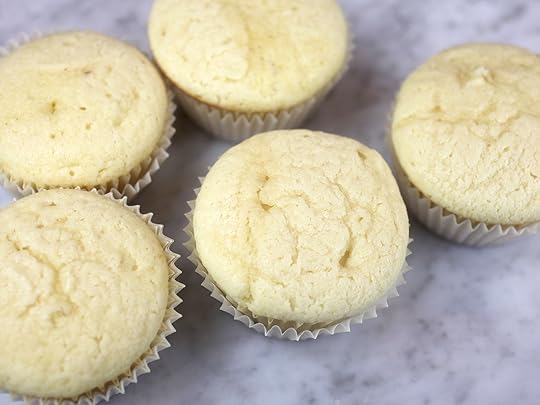
I made vanilla cupcakes, but feel free to make your favorite flavor. This post is really all about the wrappers.
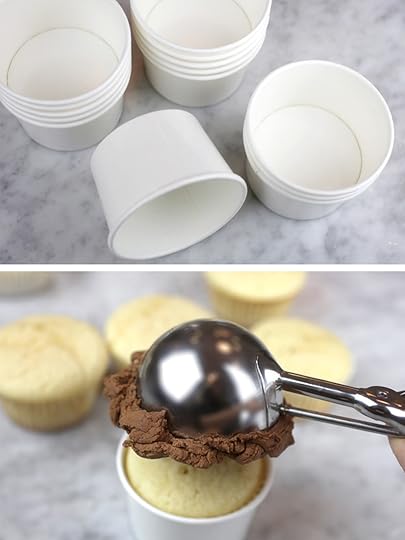
Place baked cupcakes with liners (or go ahead and unwrap them) in a small ice cream cup – 4 oz is the size you should look for. I know because I now have a ton of larger sizes that I ordered by mistake.
Here are the ones I ordered that finally worked.
Note: I tried baking directly in the ice cream cups, but they had a coated surface that started to bubble up slightly in the oven. I didn’t like that or the fact that you could not easily remove the cupcake.
Next, scoop buttercream frosting on top with a large 2-1/2 inch scoop. Make sure there is more than the scoop will hold so it overflows the edge of the scoop when you release it on top of the cupcake.
Look how something so simple as a big scoop of frosting looks totally like ice cream. And these are BIG scoops – Not your everyday ratio of frosting to cupcake, but it’s a special occasion, so I say go for it.
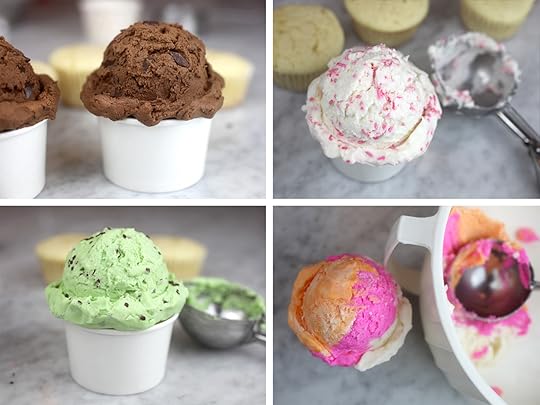
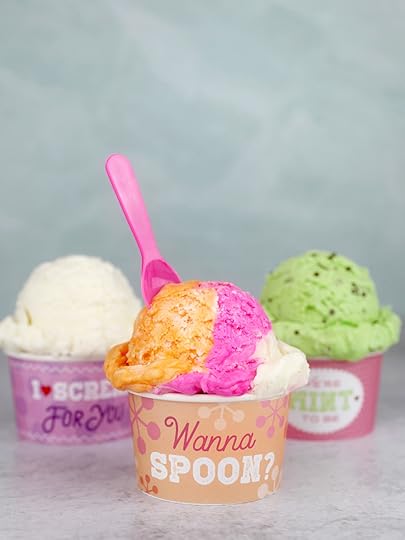
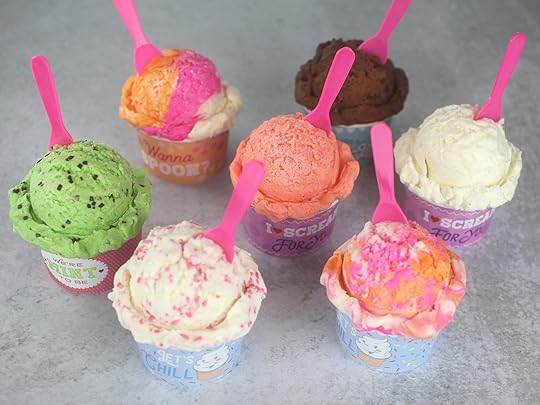
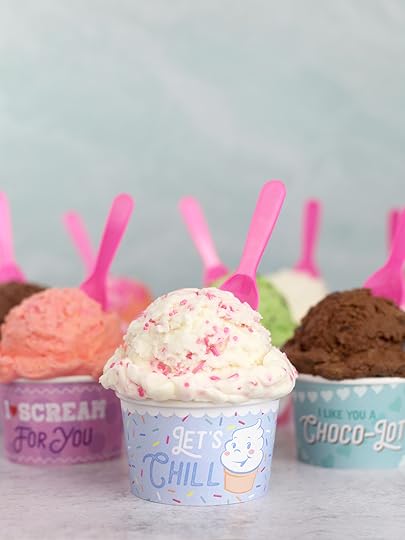
You can mix sprinkles or chopped chocolate into tinted buttercream to give the illusion of different flavors. You can even place several colors together and scoop for a multi-color effect. So many possibilities.

I mean…
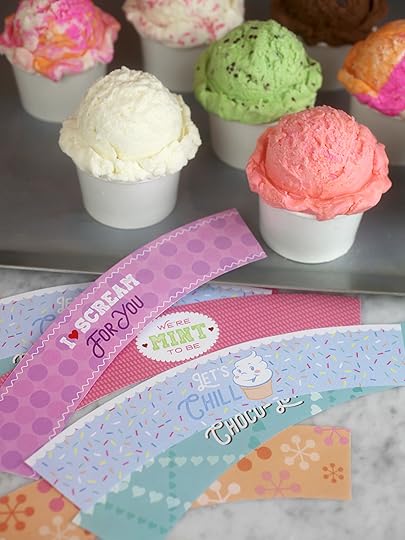
Ice Cream Cup Wrappers! I made a few designs for you to use. Just download one of the pdfs below. It’s an 11X17 file, so if you don’t have access to a larger format tabloid printer, you can download the file and take it to a Kinko’s. I also made two versions for you because I found slight differences in small ice cream cups from different vendors. Basically, the angle of the side of the cup will dictate the arc of the wrapper. So below are two versions that will hopefully help you.
Download Option 1 – for wrappers with a straighter side view
Download Option 2 – for cups with a more angled side view
Just print them out at 100%. Do not reduce the page size to fit your printer. Then, cut out the wrappers and tape them to the cup.
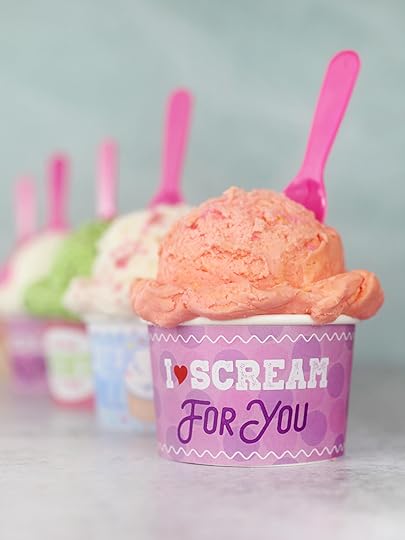
So cute, I could scream.
The tiny spoons I’ve had for a while but you can search mini tasting spoons on amazon for some that are similar.
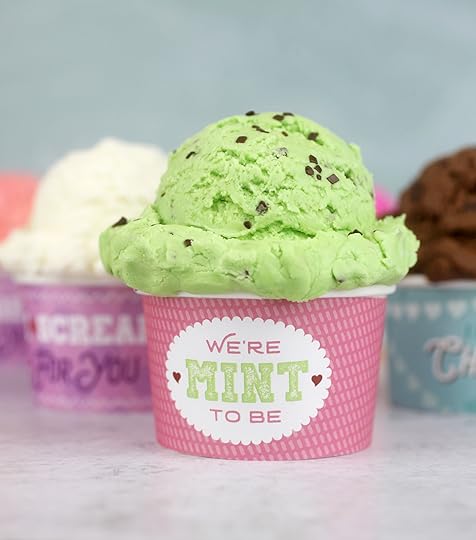
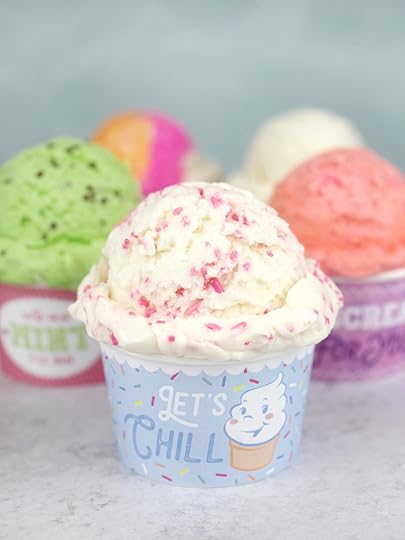
This one might be my favorite. I love all the sprinkles and the little ice cream guy is modeled after a vintage graphic I found online.
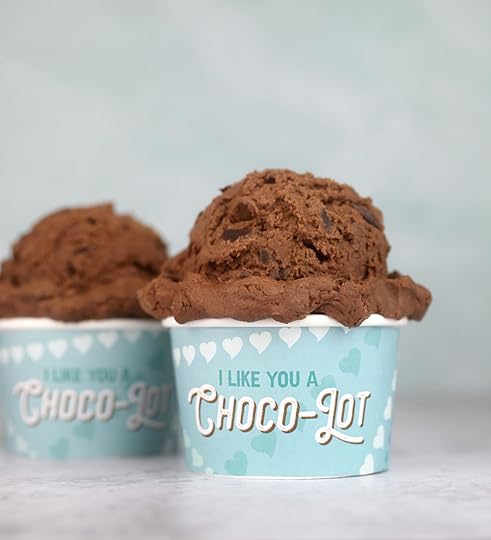
You know I had to make a chocolate one. Always chocolate. : )
What are some other ice cream puns that would be fun?
The best part about these is that they don’t melt. Except your heart. Hehe.

Print Recipe
Yield: 12 cupcakes
Ice Cream Cupcakes
Ingredients:
Vanilla Cupcakes
1-1/2 cups all purpose flour
1-1/2 teaspoons baking powder
1/4 teaspoon salt
3/4 cup granulated sugar
1/3 cup unsalted butter, room temperature
1 egg
1 teaspoon vanilla
1/2 cup milk
Buttercream
You'll need to make two separate batches of the below frosting to have enough for 12 ice cream scoop cupcakes.
1 lb. box confectioners' sugar
1 stick or 1/2 cup butter, room temperature
1 teaspoon vanilla
2-3 teaspoons milk
assorted gel icing colors
sprinkles, chopped chocolate, etc.
Directions:
For cupcakes:
Preheat oven to 350 degrees fahrenheit and line cupcake tray with 12 paper liners.
Whisk flour, baking powder and salt together in a medium bowl and set aside.
In the bowl of a stand mixer, cream butter and sugar until light and fluffy.
Add egg and vanilla and mix until combined.
Add flour in three additions, alternating with milk in between in two additions. Mix until combined with each addition.
Bake for 15-18 minutes or until done. Place cooled cupcakes in ice cream cups.
For Buttercream: One batch of frosting will be enough for six ice cream cupcakes. Make a second batch to have enough for twelve. Mix butter and vanilla in a stand mixer until creamy and smooth. Slowly add confectioners' sugar in several additions, mixing until completely combined. Add milk and mix until combined. If it's too thick you can add another teaspoon of milk until you achieve the desired consistency. (For chocolate buttercream, mix 1/3 cup cocoa with the confectioners' sugar before adding the milk.)
To decorate: Divide the one batch of frosting into six oversized scoops of frosting and place in separate bowls for mixing. You can tint the frosting, add sprinkles, jimmies or chopped chocolate. Get creative. Rescoop the frosting with more of it overflowing the diameter of the scoop. Release on top of the cupcake. Then just tape one of the wrappers to the ice cream cup.
Hope you enjoy. Hugs and Happy Valentine’s Day!


February 2, 2020
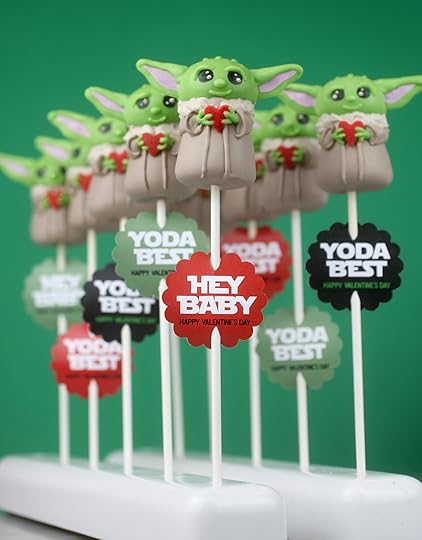
Hey Baby, Yoda Best!
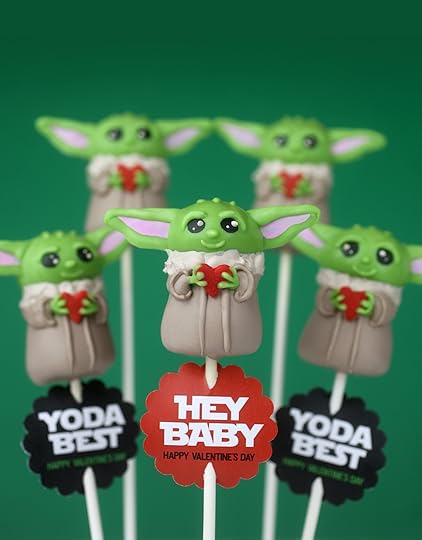
It’s Baby Yoda and my latest crazy cake pop attempt. You guys should know that I wouldn’t be able to resist trying to turn this sweet little baby child into an adorable, edible cake pop. And a Valentine’s Day treat seemed to be the perfect time.
I love recreating characters because they are usually the most challenging. And he might look intimidating, but don’t worry, I will break down all the steps for you into hopefully, easy-to-follow directions. And as always, keep in mind, you don’t have to do every detail I show to make a cute cake pop. I’ll give you some tips along the way to reduce some of the steps if you like.
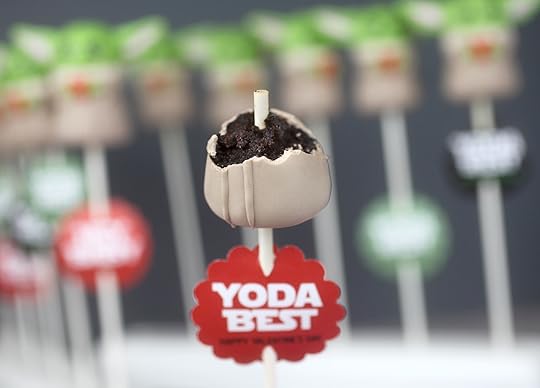
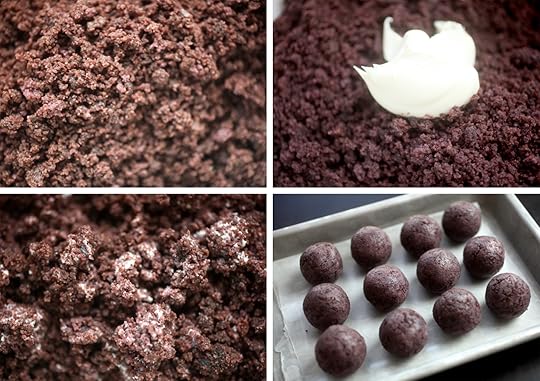
Cake pops start with crumbled cake and frosting. Yes and yum! Use my basic cake pop instructions here to get started. Then follow the directions below to shape, dip and decorate.
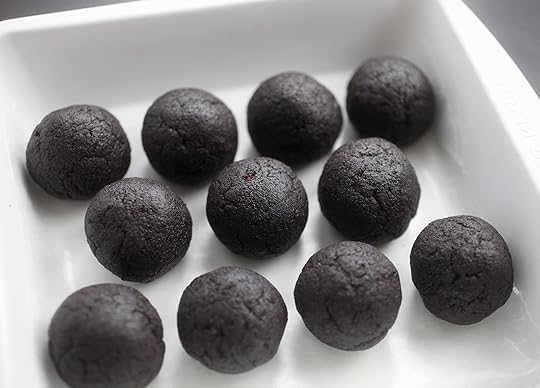
I always roll the cake pop mixture into balls first before shaping to make sure they are pretty evenly sized and also so I know how many I’m going to make. I rolled these into bigger balls to account for the combined body and head. I forgot to measure but they were probably 1.5 -2 inches in diameter.
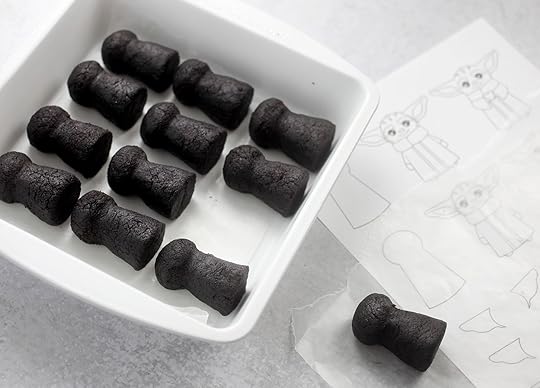
Now, reshape them to resemble a salt shaker.
When making detailed characters, it’s helpful to have reference. So, I made an illustration inspired from the character version on The Mandalorian and created a template you can download and use as a helpful guide.
Use the template under a piece of wax paper and shape the rolled cake ball to match the shape and size on the template. Use your fingers to mold the small head and angled body. Slide the bottom of the body on the wax paper and it will help create a smooth, flat surface. Use the side of a lollipop stick to press against the cake shape to define the neck if needed.
Once shaped, leave on the counter for 30-45 minutes. This can help with the occasional problem of cracking after dipping by allowing the compacted cake pop mixture to rest and expand.
Then, place in the freezer for about 15 minutes to firm up for dipping. Transfer them to the fridge to remain chilled, but not frozen.
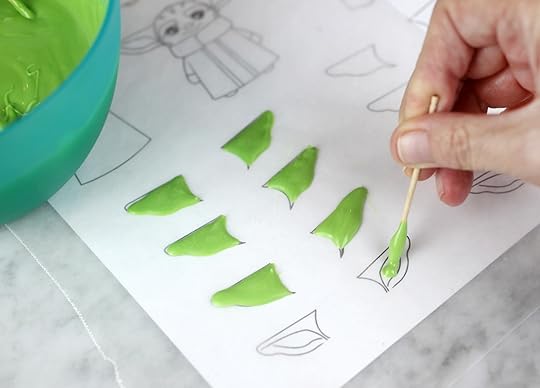
Use the template to make the ears, too. Just dip a toothpick into melted green candy coating and use it to fill in the shape. Make the ears on the thicker side without the coating falling outside the lines. Then just let them dry completely.
For light green coating, mix dark and white vanilla candy wafers together when melting. You can also use vanilla candy wafers mixed with green oil-based candy coloring.
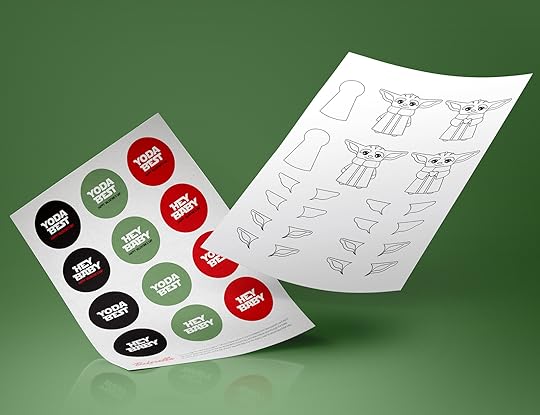
Here are pdfs of the template and coordinating tags that you can download and use. I used a 1-7/8 inch paper punch for the tags, but a 2-inch can also work. Just print out the pdf slightly higher than 100% to accommodate if needed. Also, the tags include a version without Happy Valentine’s Day if you need it.
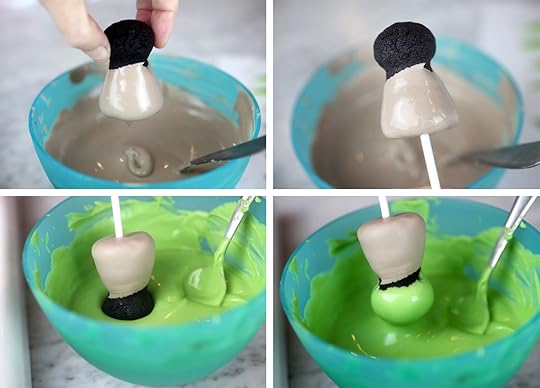
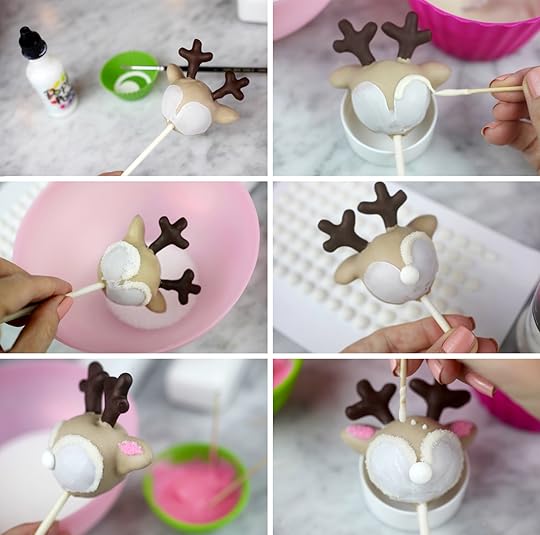
Okay now let’s decorate. Remove a chilled shaped cake ball from the fridge one at a time and holding by the head, dip into light brown melted candy coating.
Gently swirl to let excess coating fall off and immediately insert a lollipop stick into the bottom center of the cake ball. Insert halfway for support – about the same height as the body and let dry.
Once dry, dip the head into the green candy coating and remove allowing any excess coating to fall off. Don’t worry if the cake is exposed around the neck. You’ll be covering it up soon with more coating for the collar.
Once you dip the head, immediately place two ears in position on either side and hold in place until they are set.
Repeat with remaining cake pops to get to this step.
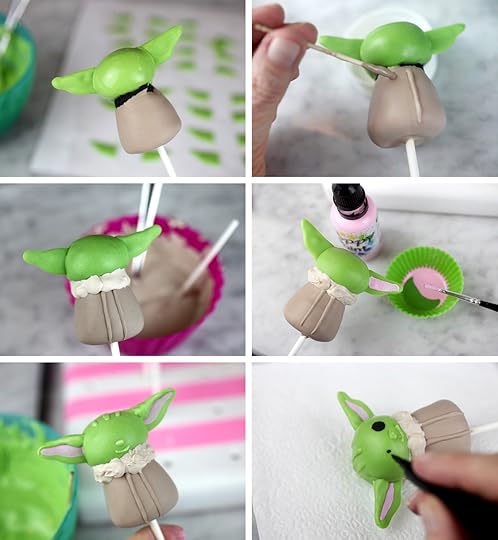
Now add details. Use a toothpick dipped in coating to draw two lines down the front of the coat.
Mix some of the light brown coating with more white vanilla coating to achieve a lighter color for the collar. Use a lollipop stick this time to apply a thicker amount. Apply in sections and let dry in between to create a fluffy look. Otherwise, the coating will spread more smoothly together.
Paint pink on the ears with edible poppy paint or melted pink candy coating.
Use a toothpick dipped in green to draw lines on the forehead, tops of the ears, noses and sweet smiles. Let dry.
Use a black edible-ink writing pen to draw on big black eyes.
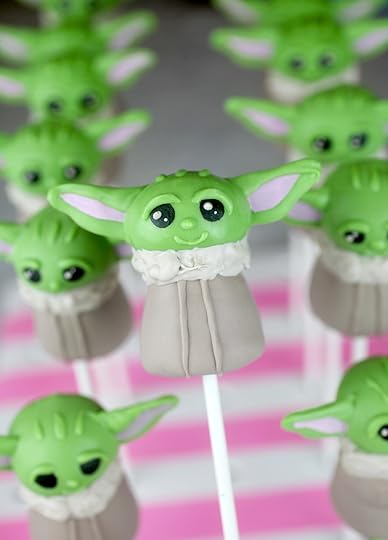
For the finishing facial touches, add more green coating slightly over the eyes to create big brows. Then use white or even the light brown coating to dot and add sparkle to the eyes.
Sidenote: Here’s a good visual where you could stop and still be super cute… Imagine the cake pop without painting on pink or overlapping green coating on the ears. You could also eliminate a step by making his coat all the same color brown. You could skip dotting the eyes, but it really does add something. So, if you’re looking to simplify, consider some of these tips and stop right here.
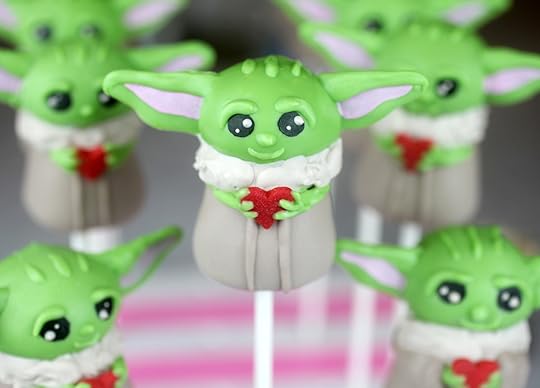
But let’s keep going for some Valentine’s Day fun!
Attach a jumbo red heart sprinkle on Baby Yoda’s coat with a dot of melted coating to act as glue. Once dry, use a toothpick dipped in green to draw little fingers overlapping the heart. Extend the coating around the sides and right under the collar for arms and let dry.
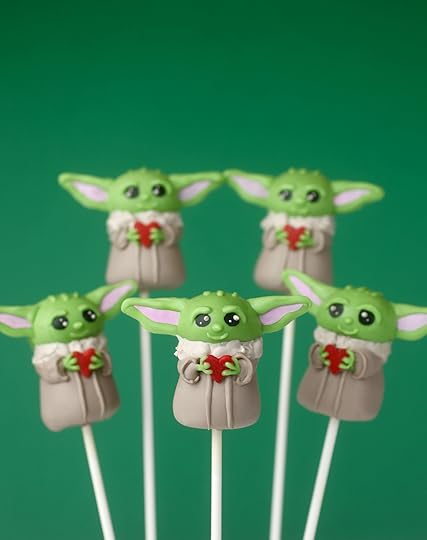
The last step really pulls it all together. Use some of the light brown melted candy coating and apply on the pop overlapping the arms and tapering at an angle towards the collar on the sides. let dry completely and then draw a definition line defining the cuff with more melted candy coating and let dry.

Punch out the paper tags and you’re all set to make someone’s Valentine’s Day.
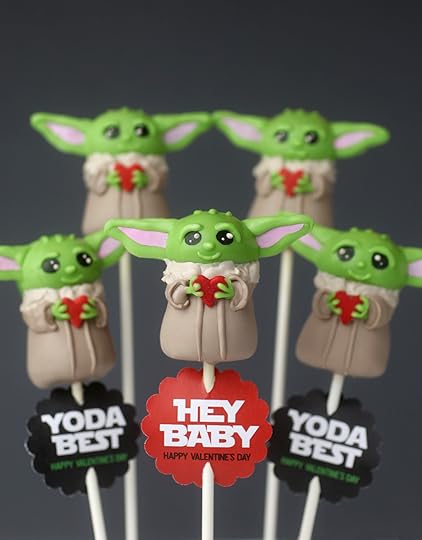
Hey Baby! Yoda Best!

I had to nibble the little guy’s ear.

And his sweet cheeks, too!
Oops! Hope you enjoy these yummy Baby Yodas as much as I did making (and eating) them.
Hugs and Happy Valentine’s Day!

January 22, 2020
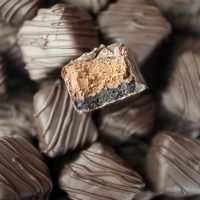
Chocolate Cheesecake Bites
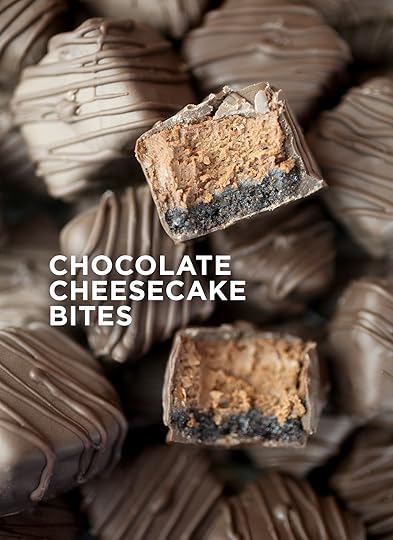
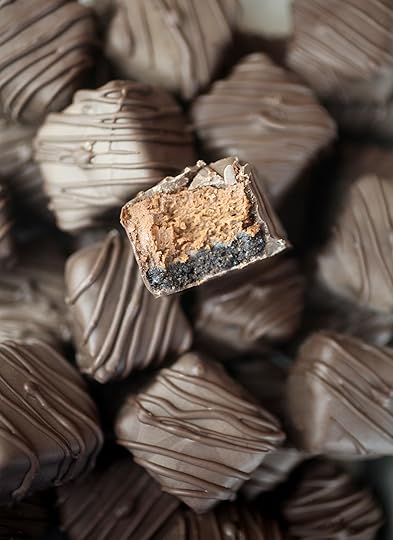
Look at these little bites of thick, rich chocolate bliss. If you’re a big chocolate lover, then I think you’ll really enjoy these miniaturized cheesecakes.
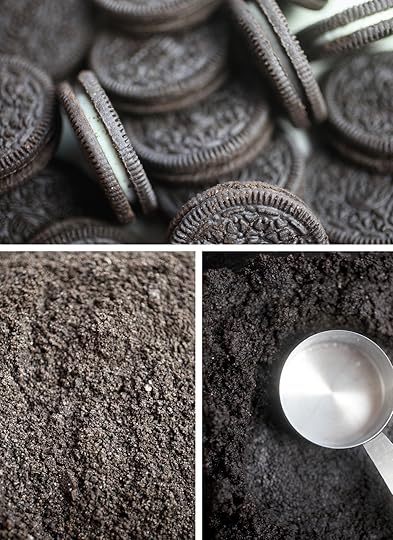
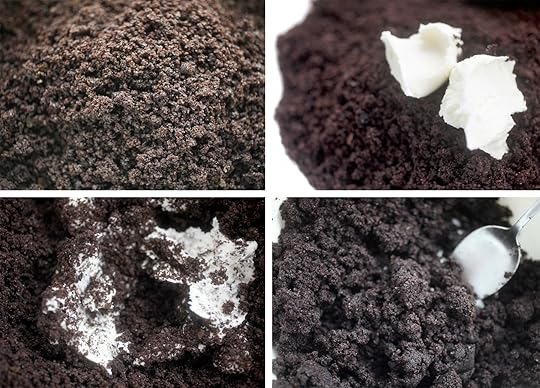
The crust is your basic Oreo variety, crushed into crumbs, mixed with sugar and butter and then pressed firmly into the bottom of a baking dish before baking.
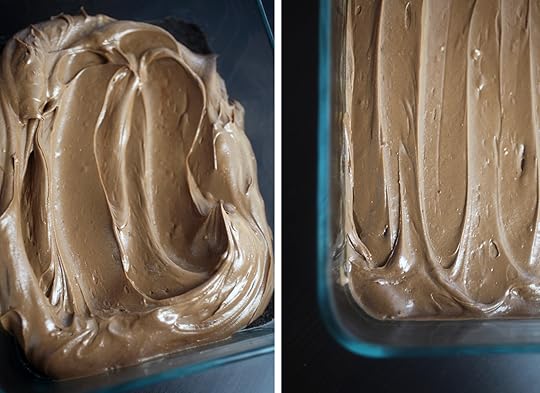
Then there’s the cheesecake filling. OMG … send help and a spoon.
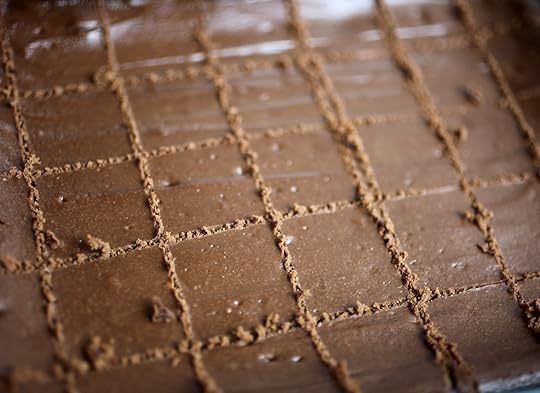
After baking the cheesecake, let it cool completely and then cut into small squares. About 1.25 inches is where I landed when I made these. It’s a good size for dipping!
But, you can also skip the dip and just enjoy these as larger squares.
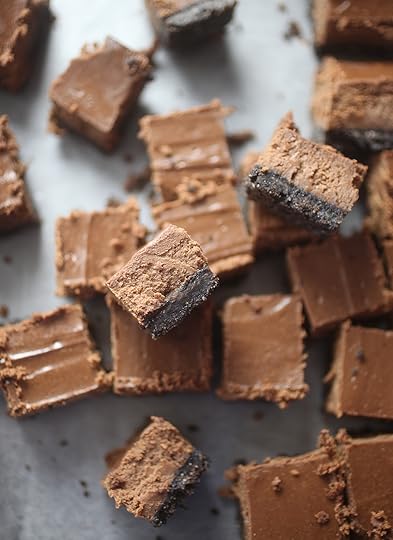
Little or large, you can’t lose.
This cheesecake is dense so, take your time when cutting and try to make clean, straight lines. It also helps to use a sharp, non-serrated knife that you run under hot water before each cut as well.
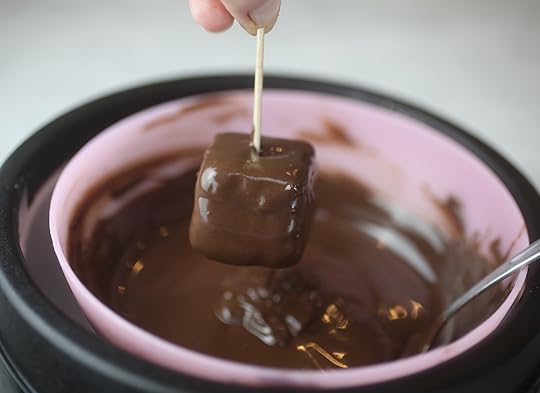
Dipping time.
With the cheesecake, cut into small squares, you can insert a toothpick in the top to use to dip into melted chocolate candy coating. Keep in mind, that larger squares would likely fall off the toothpick due to the heavier weight.
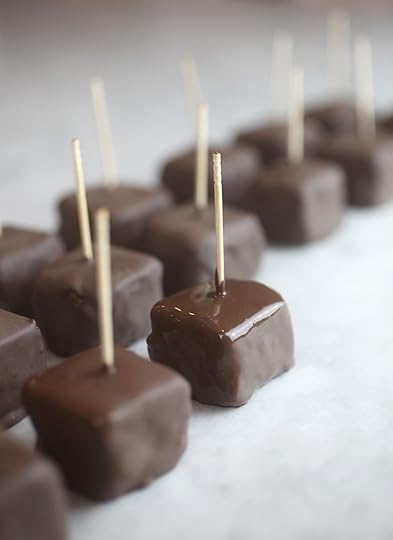
Let any excess chocolate coating fall off and place bites on a wax paper-covered surface to dry completely.
Then, you can leave them just like this to serve on a “stick” if you like.
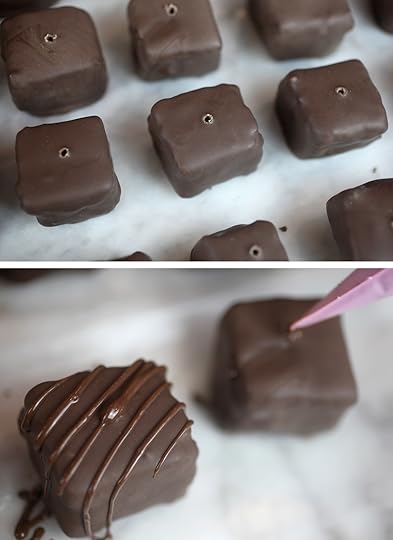
But for bites, just gently twist and remove the toothpicks and pipe decorative lines starting at the center hole and going diagonally across the top.
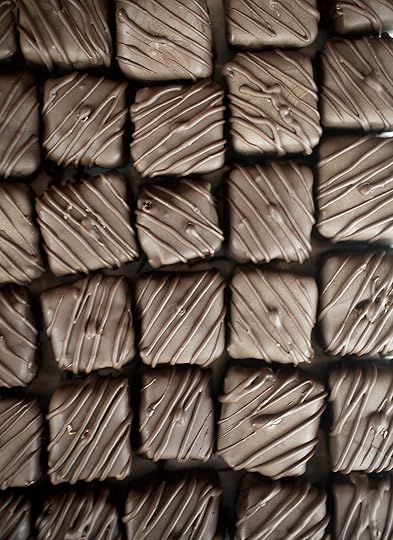
Definitely not perfect lines, but I’m okay with that.
And so is my tummy. Yummy!
Print Recipe
Ingredients:
18 Oreos, crushed into crumbs
3 tablespoons granulated sugar
6 tablespoons butter, melted
12 oz cream cheese, softened
1/2 cup granulated sugar
1 tablespoon all purpose flour
2 tablespoons natural unsweetened cocoa powder
1 egg, plus 1 yolk
1/2 cup sour cream
1 teaspoon vanilla
1 cup bittersweet chocolate morsels (Used Ghiradelli)
24 oz chocolate candy coating
Directions:
Preheat oven to 325 degrees fahrenheit.
Stir crumbs and sugar in a medium bowl. Add the melted butter and stir until combined. Use a flat bottom utensil and firmly press crumb mixture into an 8 X 8 baking dish. I used 6 X 9, but it’s probably not a size you have handy. Bake for 10 minutes and let cool. Once cool, gently pat off any excess moisture resulting from the cookie creme centers if needed using a paper towel.
Heat chocolate morsels in the microwave on low until melted, fluid and smooth. Let cool somewhat while continuing with recipe.
Add cream cheese, sugar, flour and cocoa to the bowl of a stand mixer. Beat until creamy and combined.
Turn mixer to low and add egg and yolk, mixing until combined. Add sour cream and vanilla, mixing until combined.
Slowly pour in cooled, melted chocolate and beat until combined
Bake 40-45 minutes.Remove from oven and let cheesecake cool completely. Chill for several hours or overnight. Cut the cheesecake into 1.25 inch squares. Make straight, deep cuts all the way through the cookie crust. Run a non-serrated knife under hot water in between each cut. (If using an 8X8 pan, you can get 36. In my 6X9 pan, I yielded seven rows of 5, so 35 bites.
Place the cut squares back in the refrigerator to remain chilled while you melt the candy coating. Microwave in a plastic, heat-proof bowl for 30 seconds at a time stirring in between until melted and smooth.
Working with just a couple of chilled squares at a time from the refrigerator, insert a toothpick into the dense cheesecake and dip the square into the melted candy coating. Gently swirl to let any excess fall off and then place on a large sheet of wax paper to dry.
Serve with toothpicks inserted or remove toothpicks by gently twisting them out and then drizzle with more melted coating to cover up the hole from the toothpick.
Place in a tightly covered container and store in the fridge. Enjoy for several days.
Enjoy!

January 5, 2020
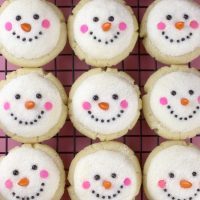
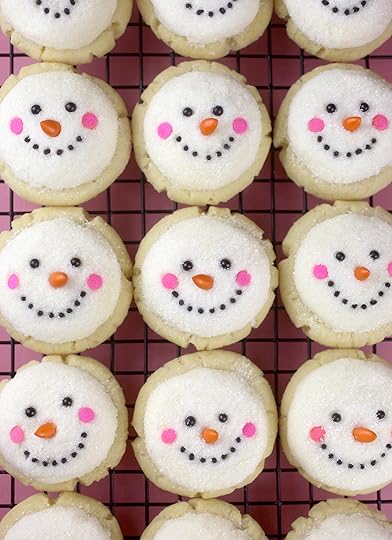
Frosted Frostys – Soft Sugar Cookies
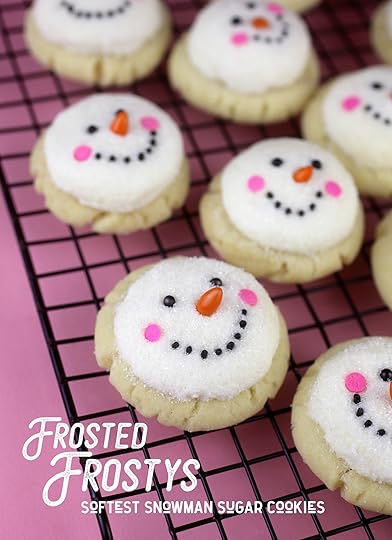
Let’s start the year off with the most delicious frosted soft sugar cookies. The kind you can sink your teeth into and it feels like you are biting into sweet little pillows of sugar and vanilla.
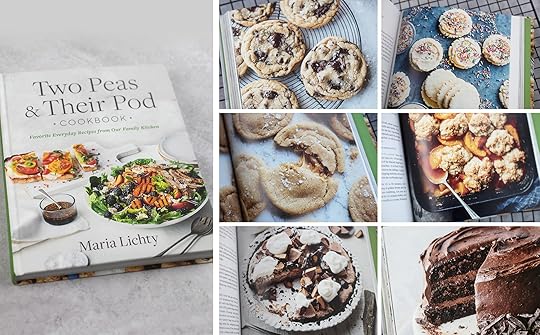
I made some of them for my Christmas Eve Party after I realized all of my treats included peanuts or peanut butter and my niece wouldn’t be able to have any because of her allergies. So I thought I would try a sugar cookie recipe from my friend Maria’s cookbook, Two Peas and Their Pod, that I had been coveting. And oh my gosh… these cookies are now on my must make list forever. I usually make cutout sugar cookies for decorating, but didn’t want to go to all that trouble for a last minute Christmas addition, so I just frosted these and sprinkled them with green sanding sugar for the evening. And over the next few days, every time I would eat another cookie, all I could say is how freaking good they were, so I decided to make them again for you guys here on the blog. I just dressed them up a bit and turned them into frosty little snowmen and now I love them even more.
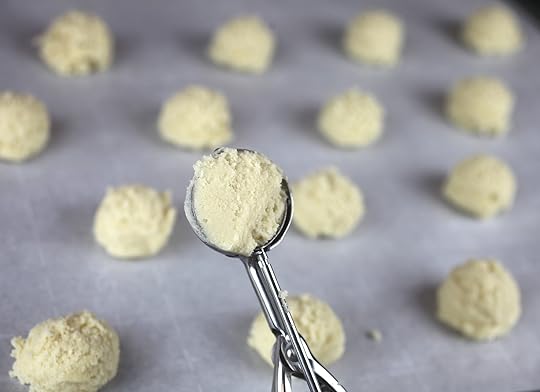
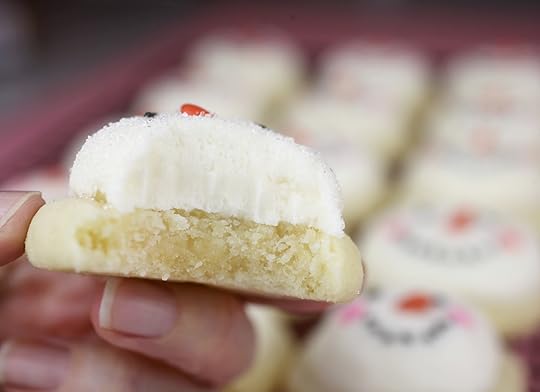
The dough is soft and luxurious. I scooped the dough out and placed on a parchment lined cookie sheet.
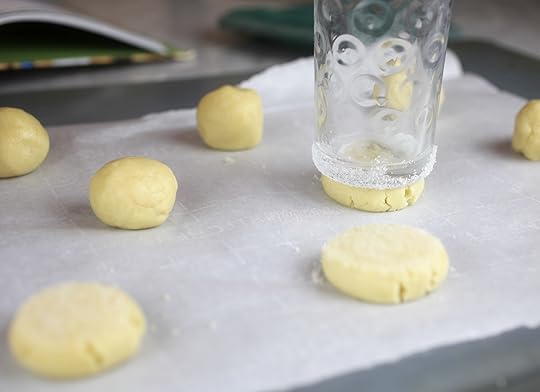
After that roll them into balls and press them flat (but still thick) with the bottom of a glass sprayed with oil and dipped in sugar to keep the glass from sticking to the dough.
Sidenote: Make sure you press them instead of leaving them scooped or rolled. I tried baking a scooped shape and it just did not look very cute.
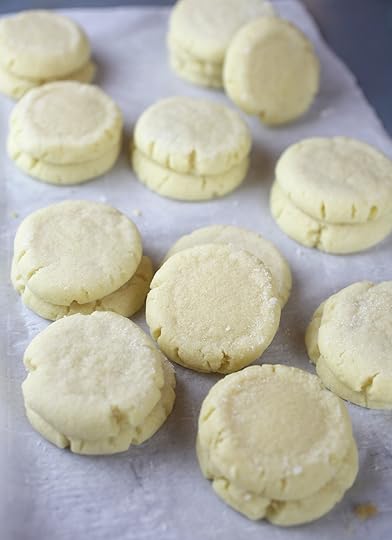
These only bake for 8 minutes. No more. And you’ll end up with the softest texture.
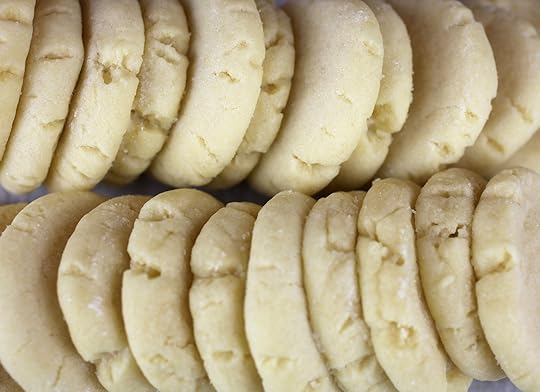
They’re a little round blank canvas for decorating with buttercream or sprinkles or you can even just leave them blank. You won’t be disappointed.
The recipe makes about 24, but you can double it if you like. And I would highly recommend that if you think you’ll give any away to friends or family.
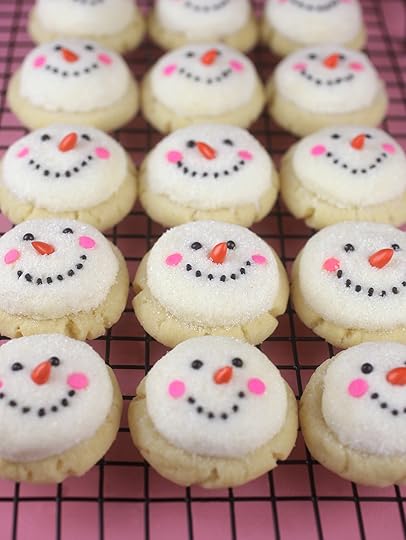
But since I like to break out the cute over here on the site, let’s breakdown how I turned these into frosty little snowman faces.
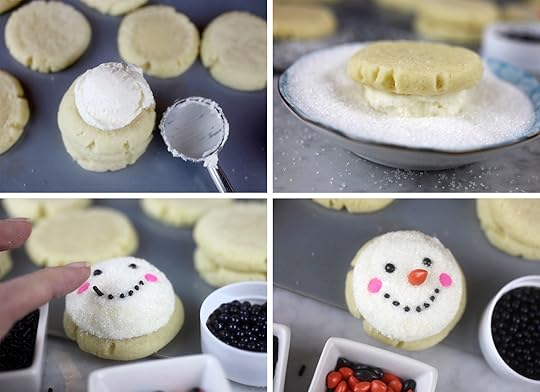
Whip up the buttercream frosting and use a small cookie scoop to place some right on top of a cookie.
Gently turn the cookie over and roll it around in a dish of sanding sugar to coat. Be gentle here and press with your hand flat because they could break easily if you press the wrong way. They are that soft.
Once coated in sanding sugar, you can use your hand to help shape the frosting into a pretty mound.
Then add sprinkles for facial features. Start with pink confetti sprinkles for cheeks, black sugar pearls for eyes, black jimmies for a big smile and then orange coated sunflower seeds for a carrot nose.
Make sure to frost and decorate as you go and insert the sprinkles enough so they stick.
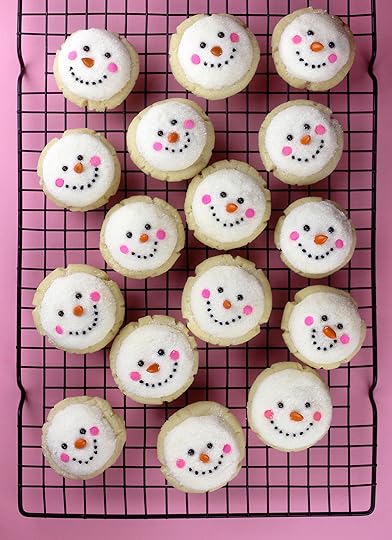
Snow cute!!!!
And even more delicious. I gave these away to several people and more than one came back to say they were amazing or the best sugar cookies they’ve had. I agree.
Print Recipe
Yield: 24 cookies
Easy Frosted Sugar Cookies
Ingredients:
Sugar Cookies
2-3/4 cups all-purpose flour
1/2 teaspoon baking soda
1/2 teaspoon cream of tartar
1/2 teaspoon kosher salt
1/2 cup (8 tablespoons unsalted butter, room temperature
1/2 cup vegetable or canola oil
1/2 cup granulated sugar, plus another 1/4 cup to use for flattening cookies
1/2 cup confectioners’ sugar
1 large egg
1 teaspoon pure vanilla extract
1/2 teaspoon almond extract
nonstick cooking spray
Frosting
3/4 cup (12 tablespoons) unsalted butter, room temperature
3 cups confectioners’ sugar, sifted
3 tablespoons heavy cream or milk
1-1/2 teaspoons pure vanilla extract
3/4 teaspoon almond extract
Snowman Decorations
White sanding sugar
Black sugar pearls
Orange coated sunflower seeds
pink confetti sprinkles
black jimmies
Directions:
Make the Cookies: Preheat oven to 350 degrees fahrenheit. Line a large baking sheet with parchment paper.
In a large bowl, whisk together the flour, baking soda, cream of tartar and salt and set aside.
In the bowl of a stand mixer fitted with the paddle attachment, cream together the butter, oil, 1/2 cup of the granulated sugar, and the confectioners’ sugar until smooth. Add the egg, vanilla and almond extract. Mix until combined. Add the dry ingredients and mix on low until just combined.
Scoop the dough using a 1-1/2 inch scoop and place on baking sheet about 2 inches apart for evenly sized cookies. Roll the dough into balls. Not all the cookies will fit on the sheet for one batch.
Pour the reserved 1/4 cup of granulated sugar into a small bowl or dish. Spray the bottom of a drinking glass with nonstick cooking spray. Press the bottom of the glass into the sugar to evenly coat.
Press the sugared glass bottom on top of each cookie dough ball and press down gently. Repeat for each cookie and reapply cooking spray as needed.
Bake the cookies for 8 minutes. Do not overbake. They will be light in color and soft in the center. Let cool 5 minutes before transferring to a wire rack to cool completely. (Note: I like to slide the the parchment paper and cookies off my flat baking sheet and onto the counter to cool just a couple of minutes after they come out of the oven.
Repeat with remaining dough.
Make the Frosting: In the bowl of a stand mixer fitted with the paddle attachment, beat the butter until smooth. Add the confectioners’ sugar and mix until combined. Add the extracts and and one teaspoon of milk at a time for desired consistency. Beat until smooth.
Spread buttercream frosting on cookies and decorate with sprinkles. Store in an air tight container at room temperature for up to 3 days.
To Decorate as Snowmen: (you’ll need to double the buttercream recipe) Scoop the buttercream using a 1-1/2 inch scoop and place on top of a cookie. Gently press the cookie and frosting into a small dish filled with white sanding sugar. Very gently rock and rotate to coat the surface. Use the palm of your hand to reshape into a nice mound. Place confetti sprinkles in position for cheeks, sugar pearls for eyes, black jimmies for a dotted mouth and orange sunflower seeds for noses. Press firm and gentle so they are secure. Decorate one cookie at a time to make sure the sprinkles attach.
Note: I've made these cookies using White Lily flour and King Arthur Flour. The photos in this post are made with King Arthur flour and yielded a thicker cookie. The White Lily flour is a softer wheat and yield thinner and wider cookies than the ones in this post. Both cookies were still soft and delicious but I would recommend spreading the buttercream on with a knife if your cookies bake thinner and wider instead of scooping as they might not be thick/sturdy enough to support a larger scoop of frosting.
© 2019 Two Peas and Their Pod Cookbook by Maria Lichty
They make me smile … hope they’ll make you smile, too.
Enjoy!
Here’s the link to Maria’s book on Amazon and also a link to a recent post where I made her Biscoff Oatmeal Sandwich Cookies.

December 22, 2019
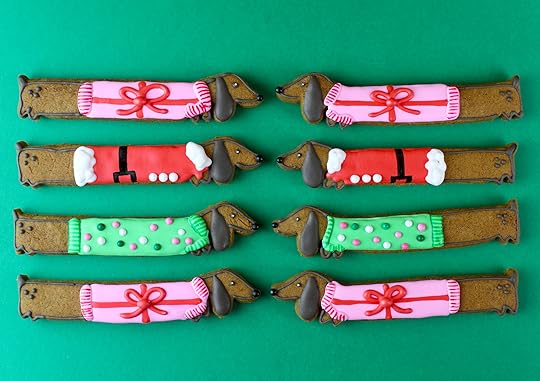
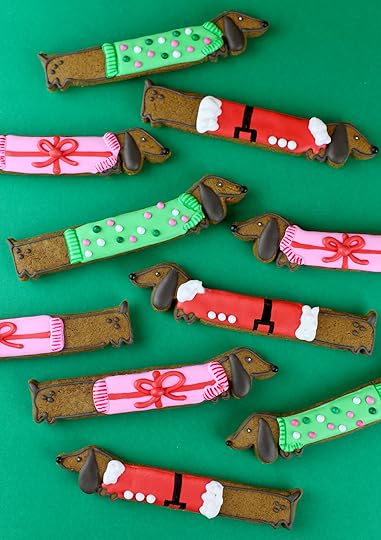
Doggone Cute Christmas Cookies
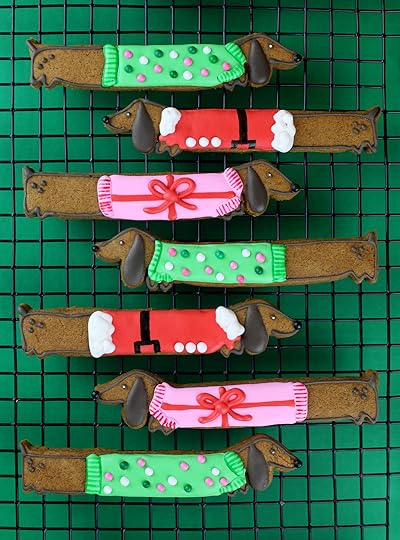
Hot diggity dog! It’s almost Christmas. And, we’re in the home stretch. Are you ready?! I’m ready early for a change and it feels good! So good that I made these sweet sweater wearing dachshund gingerbread cookies for you guys.
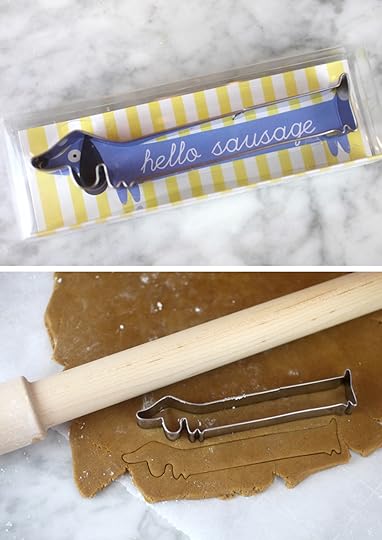
The sausage dog cookie cutter is from Meri Meri. I love how long he is. Like extra long just for fun. I bought him a few weeks ago after I saw some cute Christmas stickers at Target and I knew right away I needed to turn them into cookies.
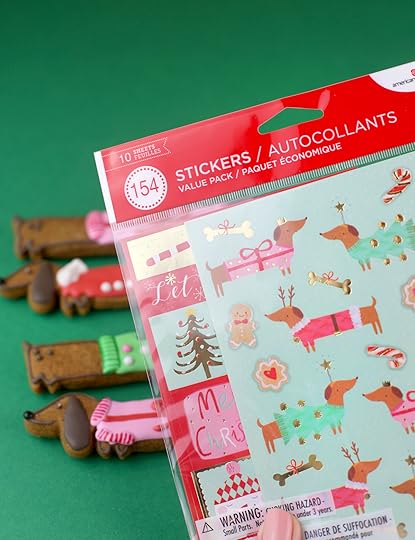
See what I mean?! These were begging to be cookies. Luckily I had already been stalking that Meri Meri cookie cutter.
By the way, if you are looking for inspiration – stickers, greeting cards, baby clothes are great. They usually have simplified designs that you can interpret into cookies, cupcakes, cake pops and more.
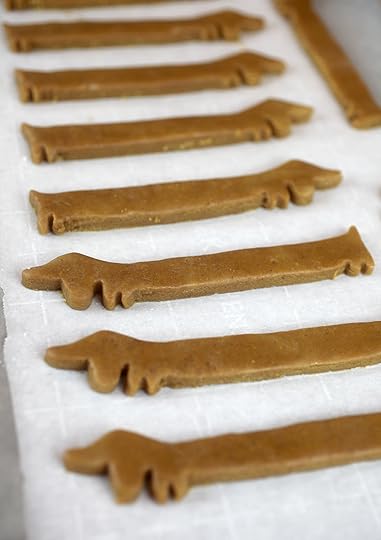
I used this gingerbread recipe for the cookies and royal icing. The flavor is perfect for the holidays and the color makes a great base for doggies.
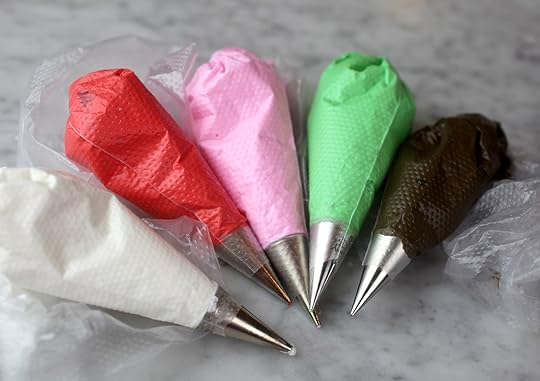
Speaking of color, I tinted royal icing into these five basic colors to use for the three different designs in this post.
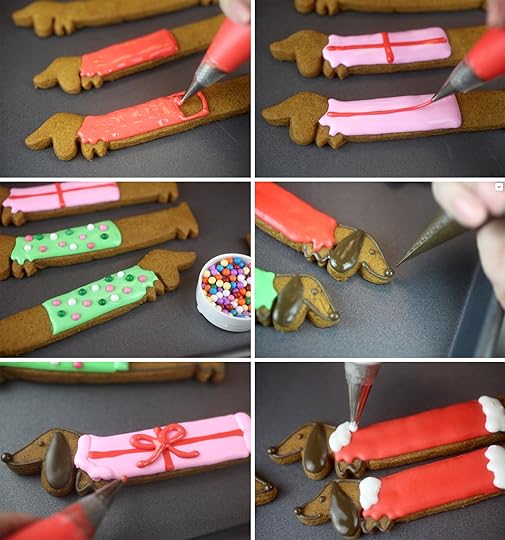
To decorate:
Pipe red sweaters on for the Santa suit base and let dry.
Pipe pink sweaters for the presents. Then immediately pipe two thin lines of red icing on the pink for ribbons and let dry.
Pipe green sweaters and while still wet, carefully place colorful sugar pearls on top for ornaments and let dry.
Now go ahead and outline the dog shape with brown icing. Don’t forget the eyes and tail. Then fill in his floppy ear and pipe a nice round dot on for his nose.
When the sweater bases are dry, you can pipe on collars and cuffs, a nice big red bow on the pink and white fluff and buttons on the red.
Woof! Looking good. The final touches are made with Americolor edible ink writing pens.
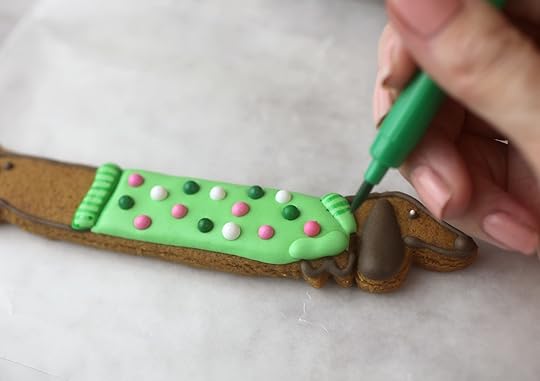
Draw lines on the collars and waistbands.
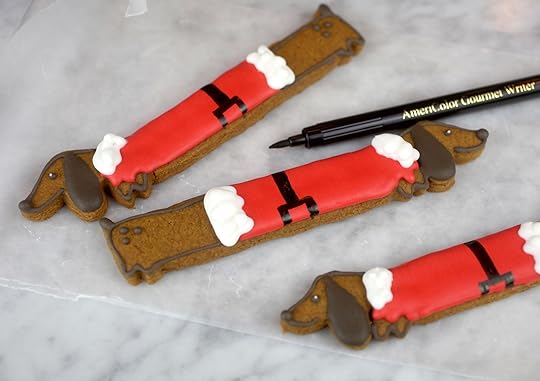
And black belts for Santa “Paws.”
I also went back over all the noses with the black pen so they would stand out a little more.
You can also dot the eyes using a toothpick dipped in royal icing if you like.
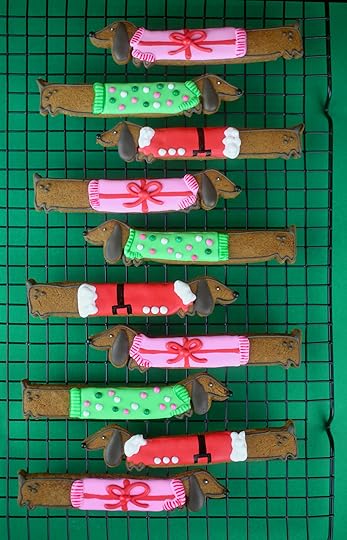
I think they’re pretty doggone cute! Who’s with me?
I hope you have a wonderful Christmas. Hugs and Happy Holidays, friends!

December 11, 2019
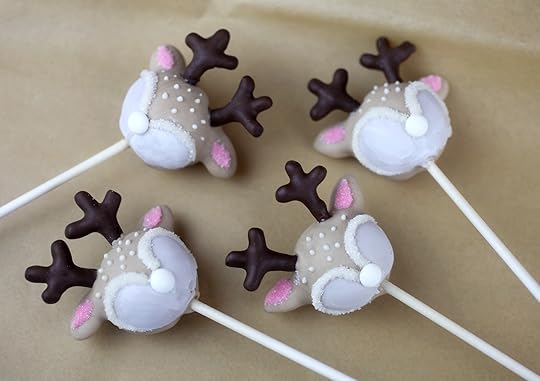
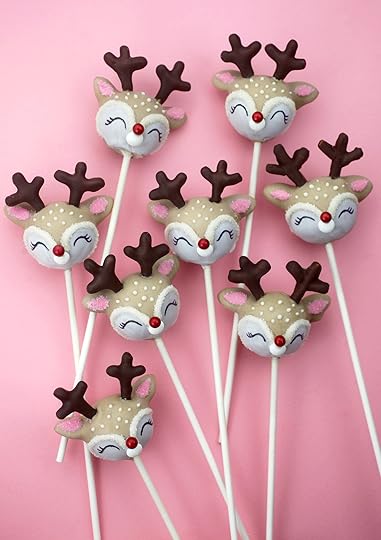
Really Cute Reindeer Cake Pops
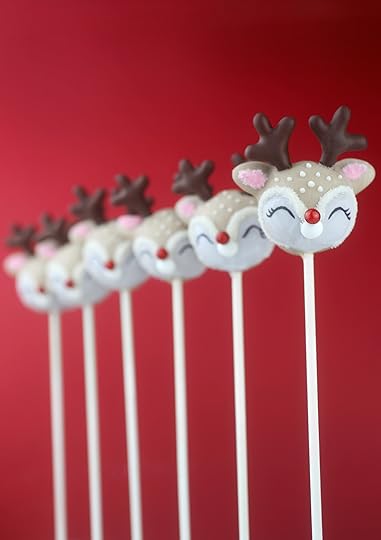
What a difference a decade makes. It’s fun to see where I started and how much better my cake pops look now after making so many of them over the years. These little reindeers are an example of hard work and a lot of learning on the job.
Here are the first reindeers I ever made if you want to see a comparison of what I am talking about.
The ones in this post are definitely a lot more detailed, but they are just an example of what’s possible, you can certainly decorate them down so to speak, but I like to make them a little extra for you guys to see and hopefully inspire even more ideas for you.
For these, I’m going to start by talking all about antlers. You can make them ahead of time and have them ready for when you want to make the pops.
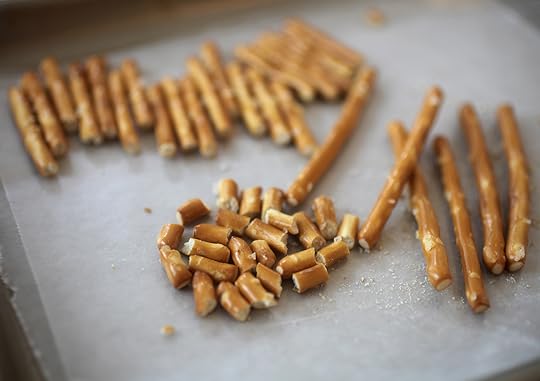
I wanted the antlers for these sweet little deers to look very specific and the only way to really do that was to build them. So, I broke apart pretzel sticks into two smaller sizes … about 1 inch and a 1/4 inch give or take.
(NOTE: You can definitely make these with regular broken pretzel twists for a more casual look and a lot less effort, too.)
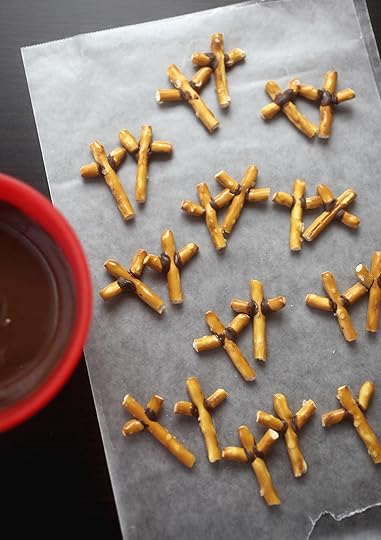
Once the pretzel pieces are broken into two smaller sizes, I used melted candy coating to attach the tiny pieces to the larger ones. This is where it got a little tricky and where you just have to regroup, learn and figure things out as you go.
My plan was to dip them in melted chocolate coating right after this stage, but the melted coating basically melted the chocolate holding the pretzel appendages together and they fell apart immediately. Big, big bummer after building all the little antler parts.
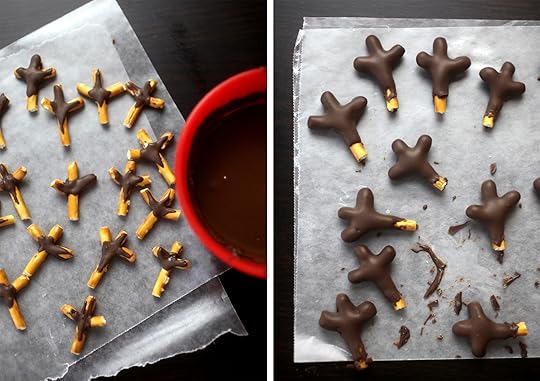
So to try and fix it, I added more melted coating across the three pieces of pretzel (See above left photo). Use your finger or the end of a lollipop stick dipped in the coating to apply. My hope was that the coating would act like a connecter piece and add more support when dipping. And it did! I also … and this is important… froze them for several minutes before dipping.
Voila! Having them frozen and with more chocolate support before dipping was the answer. Submerge them in the melted candy coating with just the bottom bit of the pretzel exposed. You’ll probably get chocolate on your fingers… just wipe it off in between each dip.
Hold them to dry or the coating will pool if you lay them flat. You can speed this up by sticking them in the freezer for a few seconds while holding. I know, I know… annoying, but I was determined to make these little antlers. Once dry, you can store them until ready to use.
Okay, now for the pops. Here are my basic cake pop instructions. Follow them with your favorite cake flavor and then use the rest of the decorating instructions below.
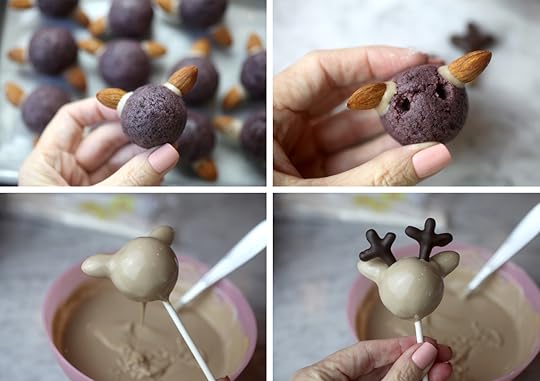
You’ll need rolled cake ball shapes, almonds and melted candy coating tinted a light brown. (Just use vanilla candy coating and add a little chocolate candy coating to mix and lighten the color when melting.)
Place two almonds with the rounded side down in position for ears and use the melted candy coating as glue to attach them. Let dry in position.
Use a lollipop stick to press holes into the cake ball where you want the antlers to go. Do this before chilling and dipping. If you try to attach them without the indention after dipping, it makes it harder to keep the cake ball shape in tact. It will try to separate some.
Once ears are attached and indentions made, go ahead and chill the cake balls in the fridge for about 15 minutes or until firm.
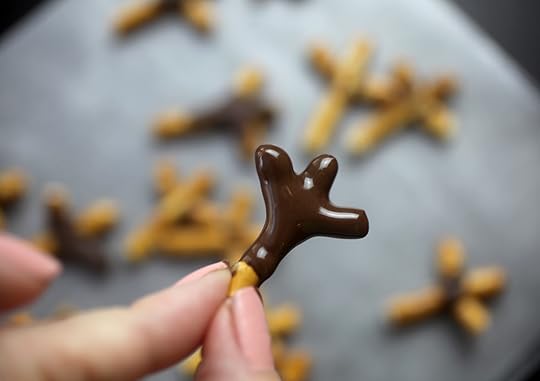
Insert a lollipop stick into the bottom of a chilled and shaped cake pop and dip into melted and fluid candy coating. Remove and let any excess fall off. Immediately insert the prepared antlers in position and place in a cake pop stand to dry.
Now for the faces.
I used white edible poppy paint to create two round shapes on the front of the pop using a brush.
When dry, I emphasized the curves by applying melted candy coating using a toothpick.
Sprinkle white sanding sugar on top and over a bowl for a furry look before the coating sets.
Use melted coating as glue to attach a white candy eye in position for the snout and let dry. The ones I used are blank, but you can easily find them with black eyes in stores.
Apply pink candy coating to emphasize the ears and sprinkle with more sanding sugar before it dries.
Use more of the candy coating to dot on spots around the forehead using a toothpick.
Wow, they are really starting to come together. Just a few more details.
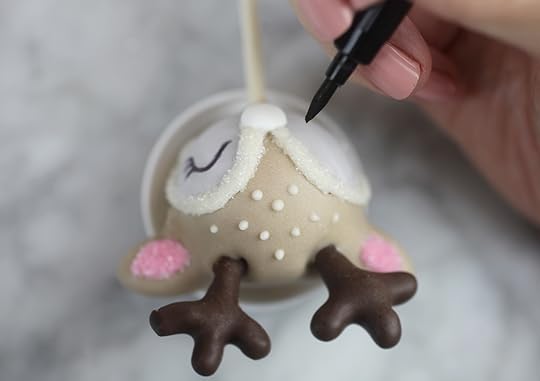
Add sweet lashy lids with a black edible-ink writing pen.
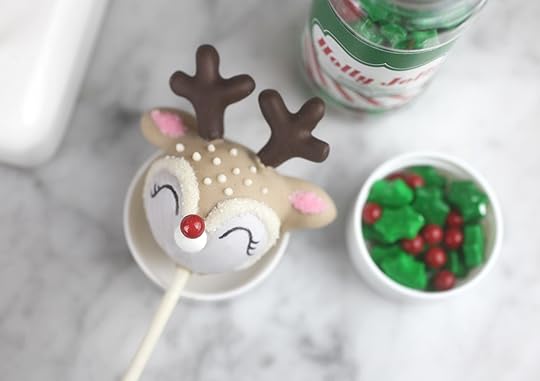
And of course, we need little red noses. I used these seasonal holly and berry sprinkles, but red sugar pearls would probably work, too. Attach them to the snouts with a dot of melted white candy coating as glue.
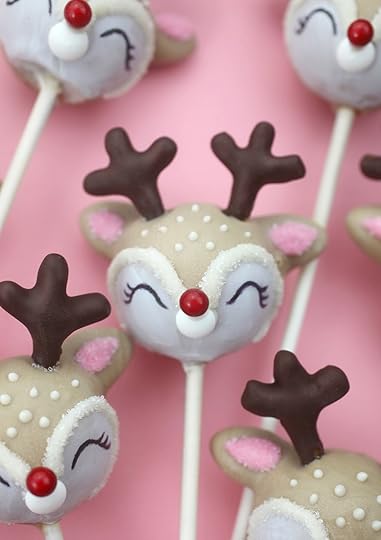
Oh deer, look how cute!

Here was my inspiration for these adorable little guys. A crochet account that I stumbled on through instagram with the cutest cuddly crocheted critters.
Hope these little guys brighten your day! Enjoy.

December 4, 2019
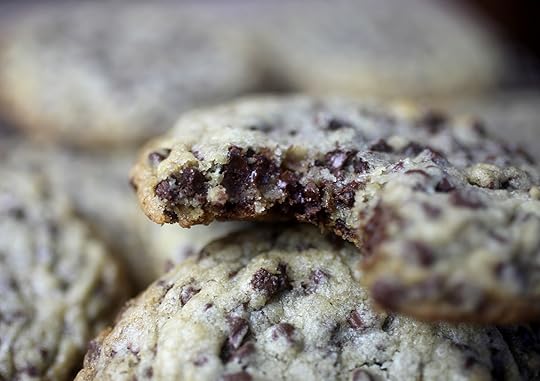
Major Mini Chip Cookies
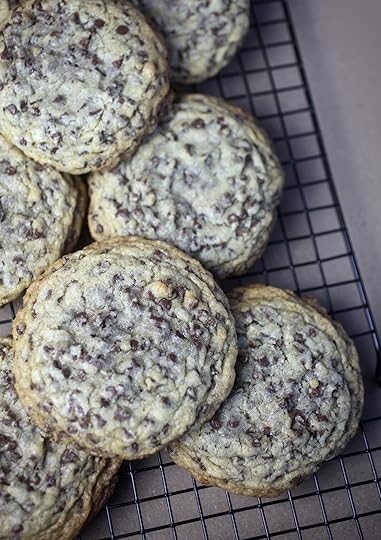
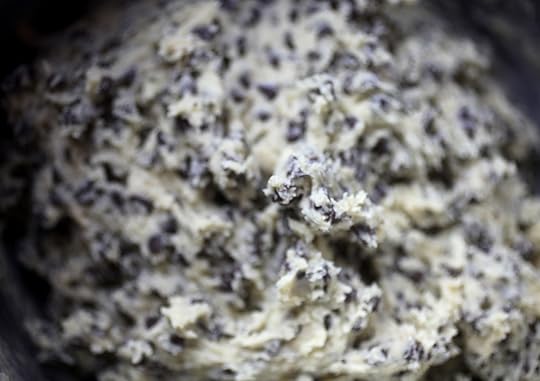
Look at these big boys. Giant chocolate chip cookies are always a good idea. These are palm sized and stuffed with tons and I say tons of mini chips. I’m talking two entire bags of miniature semisweet morsels. Mmmmmm!
Batter up! These cookies are in the major leagues.
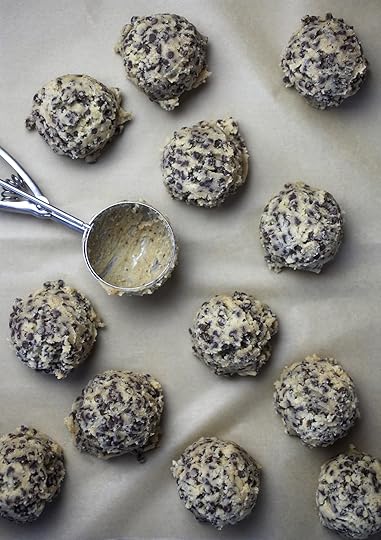
Look at those scoops will you?! Each one dotted diligently with chocolate.
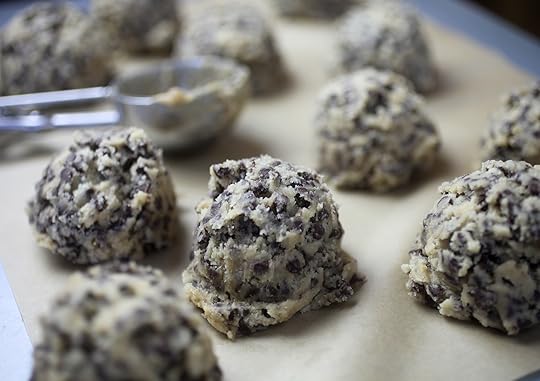
I used a 2.5 inch cookie scoop for these and packed it full.
When they are done baking, they’ll barely fit in the palm of your hands. That’s okay because they won’t last that long there. These are my new favorite chocolate chip cookies. At least until I make another new one anyway! ;) So so good.
Goodness gracious!
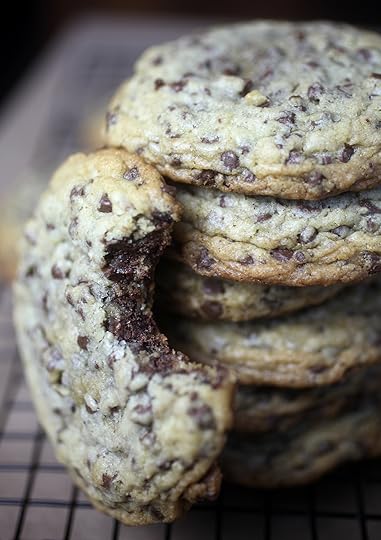
Each bite is guaranteed full of morsels for all my fellow chocoholics out there.

Print Recipe
Yield: 15-16 jumbo cookies
Major Mini Chip Cookies
Ingredients:
1 cup unsalted butter, room temperature
2/3 cup granulated sugar
3/4 cup brown sugar
2 eggs
2 teaspoons vanilla
2 1/4 cup all-purpose flour
1 teaspoon baking soda
1/2 teaspoon salt
2 (yes, two) 10 oz. bags, miniature semisweet chocolate morsels
Directions:
Line a large baking sheet with parchment paper and preheat oven to 350 degrees fahrenheit.
In a medium bowl, sift flour, baking soda and salt together using a wire whisk and set aside.
Using a stand mixer, cream butter and both sugars until light and fluffy.
Add eggs, one at a time and mix until incorporated. Add the vanilla.
Slowly add the flour mixture and mix until just combined, making sure to scrape down the sides of the bowl to incorporate completely.
Add two bags of semisweet morsels to the batter and mix on the lowest setting until evenly distributed.
Chill dough for about 30 minutes. Then, using a 2.5 inch scoop, place mounds of dough on prepared baking sheet - about 5 at a time to make sure they don’t touch each other during baking.
Bake for 13-15 minutes until done and repeat with remaining dough.
Enjoy every bite!

November 17, 2019
Candy Bar Baklava
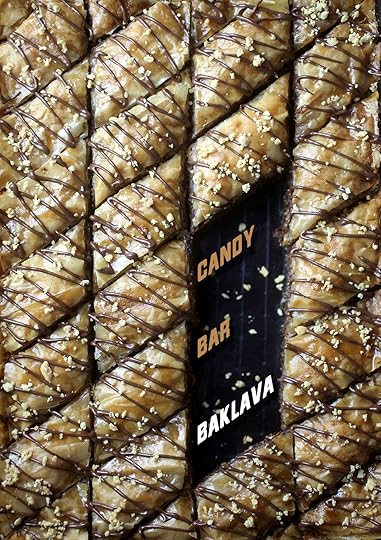
Well, will you look at this deliciousness. I have to tell you that I’ve never made Baklava before and I don’t think I’ve ever eaten Baklava before… or even worked with phyllo dough for that matter. But… I totally feel proud of myself right now. I. Made. Some. Baklava!
Now it’s not the traditional filling, but that’s ok. Candy Bar Baklava is totally my style. And when I saw the recipe in my talented friend Shauna Sever’s amazing new cookbook Midwest Made, I knew I wanted to give it a try. Scroll to the bottom for a peak inside.
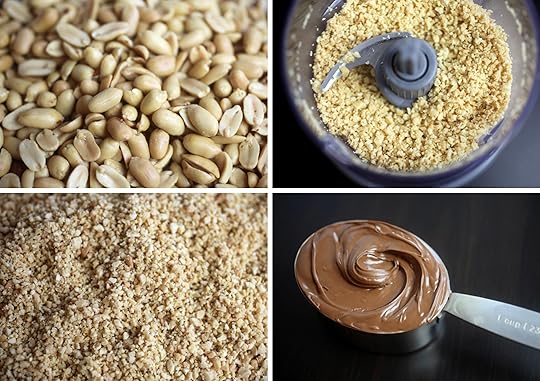
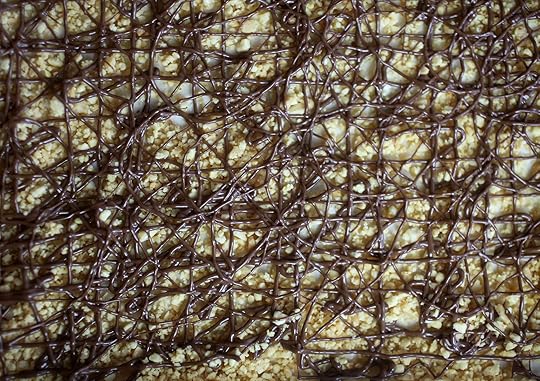
The filling is made of finely chopped salted peanuts and chocolate hazelnut spread … it gets layered between buttered sheets of phyllo dough. Yummo!
So making Baklava isn’t difficult, but it is time consuming. You need to have your head in the game and stay focused. There’s lots of layering and buttering and filling.
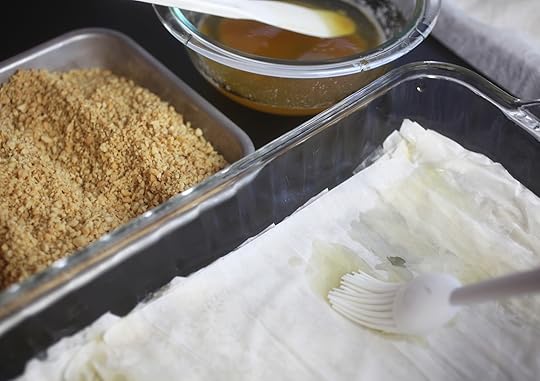
Having an organized workstation with all of your ingredients ready is the way to go.
Browned butter, cooled. Chopped peanuts, check. Hazlenut spread, melted. And phyllo dough, thawed and unrolled from it’s package with a damp towel laying on top to keep it from drying out.
Start out by layering two sheets of phyllo in the bottom of a greased baking dish. Then apply a thin layer of melted butter. Repeat that four more times for a total of ten sheets.

Then spread a third of the peanuts on top of the phyllo.
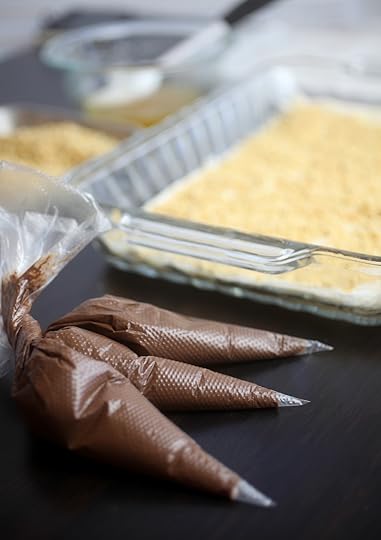
And then add some melted chocolate hazelnut spread. I went ahead and divided mine into thirds to make it easier to work with.
Drizzle a third of the chocolate hazelnut spread on top of the peanuts.
Layer six more sheets of phyllo, buttering every two.
Add another third of the peanuts and hazlenut spread.
Layer six more sheets of phyllo, buttering every two.
Add the final third of the peanuts and hazlenut spread.
Repeat with six more layers of phyllo, buttering every two.
Then for the final four layers of phyllo, butter between each sheet.
That totals 32 sheets of phyllo. Enough for some mess ups if you are using a package that contains two rolls of twenty. Which I did. Mess up, I mean. The phyllo is paper thin and definitely fragile. On the upside, it’s also very forgiving when it’s layered. You can piece it together if needed and no one will be the wiser.
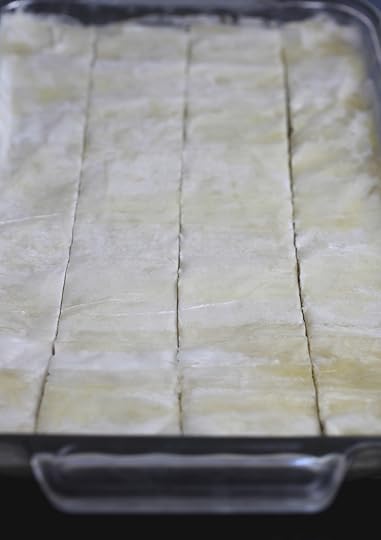
Once layering is complete, make three evenly spaced cuts down the length of the pan.
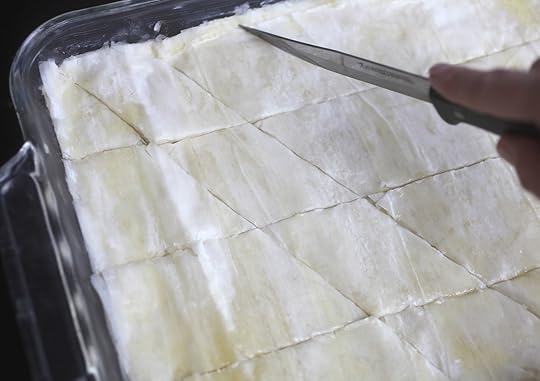
Then make 8-9 diagonal cuts.
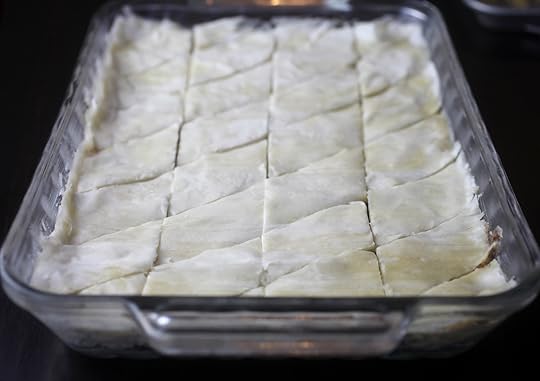
Voila… diamonds in the rough. Now 45 minutes in the oven.
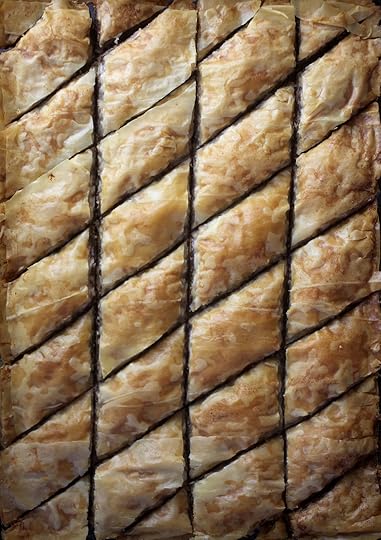
Wow… I feel like an adult.
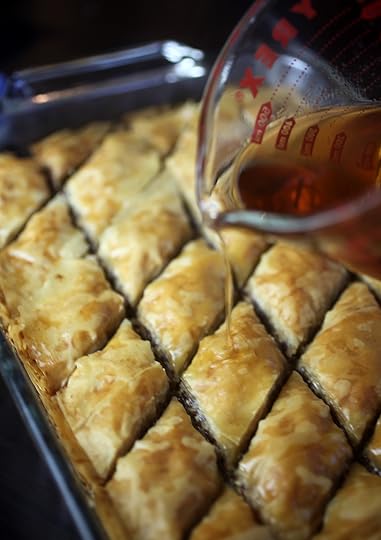
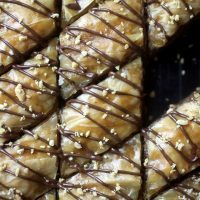
But we’re not done. The Baklava gets a honey syrup poured all over the top before it goes back in the oven for another five minutes.
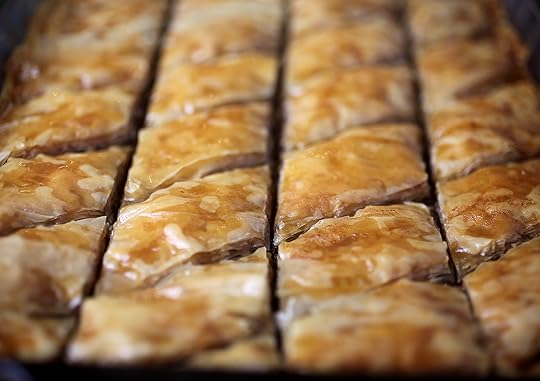
Golden and delicious!
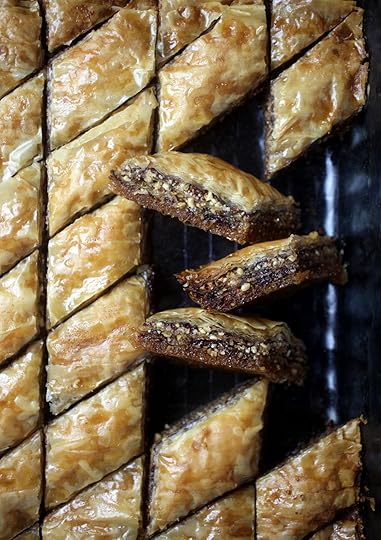
And look at the inside.
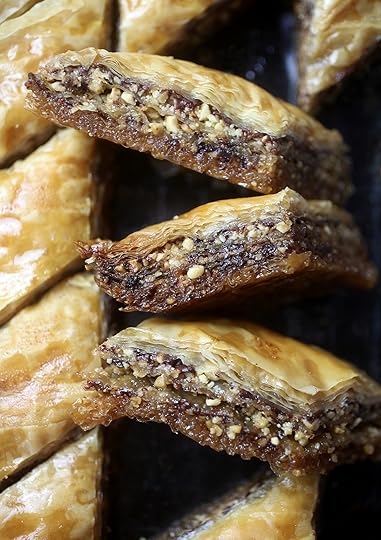
Look closer. Layers galore!
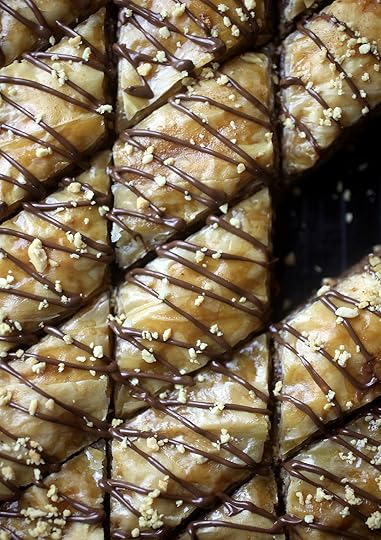
P.S. You can reserve a little bit of the chopped peanuts and hazlenut spread to drizzle on top to really sell the candy bar aspect.
Print Recipe
Yield: About 2 1/2 dozen pieces
Candy Bar Baklava
Ingredients:
Layers:
1 cup unsalted butter
1/4 teaspoon plus 1/8 teaspoon fine sea salt, divided
1 cup chocolate hazelnut spread
1 (16-ounce) box phyllo dough, thawed - you’ll need a total of 40-13X9 sheets
3 1/2 cups salted cocktail peanuts, very finely chopped
Syrup:
1 1/4 cup lukewarm water, divided
1 cup granulated sugar
1 tablespoon honey
1/4 teaspoon fine sea salt
1/2 teaspoon pure vanilla extract
Directions:
Position a rack in the center of the oven and preheat to 350 degrees F. Spray a 9 X 13 inch light colored metal or glass baking pan with nonstick cooking spray.
Prepare the layers: Brown the butter. In a 2 quart saucepan, combine the butter and 1/4 teaspoon salt over medium high heat. Allow the butter to melt, then continue to cook the butter until it turns brown and smells nutty, about 7 minutes. Using your ears, as well as your eyes, when the butter stops sizzling, that means the water has cooked out of the butter, while its butterfat and milk solids remain; the solids will be perfectly browned within seconds after the butter goes silent. Immediately pour the browned butter into a clean bowl, scraping out any brown bits along with it. Set aside to cool.
In a small, microwave-safe bowl, combine the chocolate hazelnut spread and remaining 1/8 teaspoon of salt. Heat in microwave for about 30 seconds until somewhat fluid.
Get your layering station ready: Unroll the phyllo dough into a stack on a work surface. If your dough comes in a box with two rolls, unwrap one roll to work with at a time. If the dimensions are larger than your pan, you can trim them to size with kitchen scissors. Wet a tea towel and wring it out until it’s just damp and place it over the pastry to keep it from drying out while you work.
Have your bowls of chopped peanuts, browned butter, hazelnut spread and a pastry brush ready. (Note: I went ahead and divided my chocolate hazelnut spread into thirds and placed in disposable decorating bags for ease.)
Start layering: Place two sheets of phyllo in the bottom of the prepared pan. Lightly brush with browned butter. Add two more sheets and butter them. Repeat 3 more times until you have 10 sheets in total. Sprinkle with 1/3 of the peanuts and drizzle 1/3 of the chocolate hazelnut spread on top.
Layer with another 6 sheets, buttering every two sheets. Add half of the remaining peanuts and drizzle another 1/3 of the chocolate hazelnut spread on top.
Again, layer with another 6 sheets, buttering every two sheets. Add remaining peanuts and drizzle the final 1/3 of the chocolate hazelnut spread on top. If either the butter or hazelnut spread solidify, you can melt them in the microwave for 10-15 seconds.
Add six more sheets of phyllo, buttering every two. For the last 4 sheets at the top, butter between every single sheet and then the top.
Using a thin sharp knife, cut the baklava into diamond-shaped portions, slicing all the way through to the bottom of the pan. Start with 3 straight cuts evenly spaced down the length of the pan. Then, make 8 or 9 diagonal cuts across the pan, evenly spacing them.
Bake until golden and crisp, about 45 minutes.
During the final 10 minutes of baking, prepare the syrup: Pour 1/4 cup of the lukewarm water into a 1-1/2 quart saucepan. Gently pour the sugar over the water in an even layer. Add the honey and salt. Place the pan over medium heat and stir slowly in a figure-eight motion to help the sugar dissolve while the mixture heats up. Once the syrup is nearly clear, increase the heat to high and stop stirring. Boil, swirling the pan occasionally, until the sugar caramelizes and turns a deep amber with a few wisps of smoke, 7-8 minutes total.
Briefly remove the pan from the heat and carefully pour in the remaining 1 cup of lukewarm water. Carefully swirl the pan to incorporate the water into the caramel. Place the pan back over high heat and boil to a thin syrup, reducing it to about 1-1/4 cups, about 5 minutes.
When the pastry has finished its 45-minute bake, transfer the pan to a wire rack to cool for 10 minutes. Leave the oven on. As soon as the syrup has finished reducing, whisk in the vanilla and slowly drizzle the hot syrup over the still-hot pastry. Return the pastry to the oven to bake for an additional 5 minutes. Remove and let cool completely in the pan set on a wire rack. Rest at room temperature for at least 4 hours before serving.
© 2019 Midwest Made by Shauna Sever
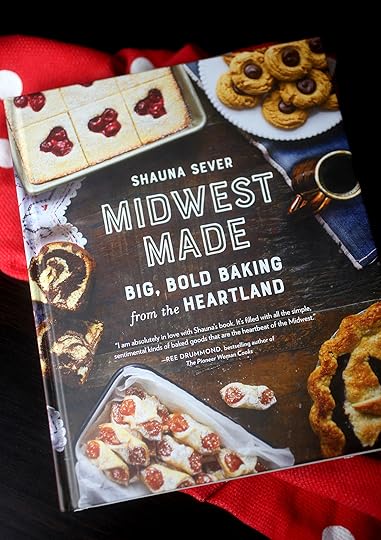
Here’s Shauna’s book. And let me tell you … it is fantastic! There are so many more things I want to bake.
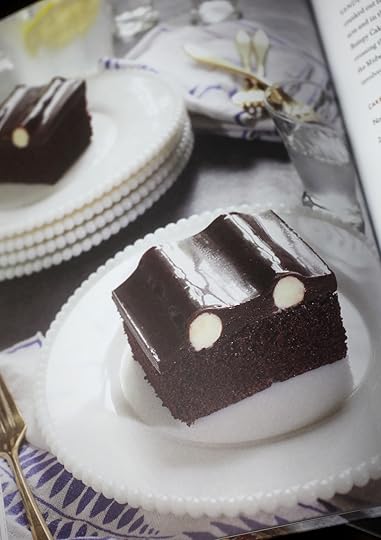
My favorite, section is probably the Counter Cakes (love that name) and this one called Chocolate Bumpy Cake is calling my soul. I had to force myself not to bake it because I always lean heavily toward chocolate overload.
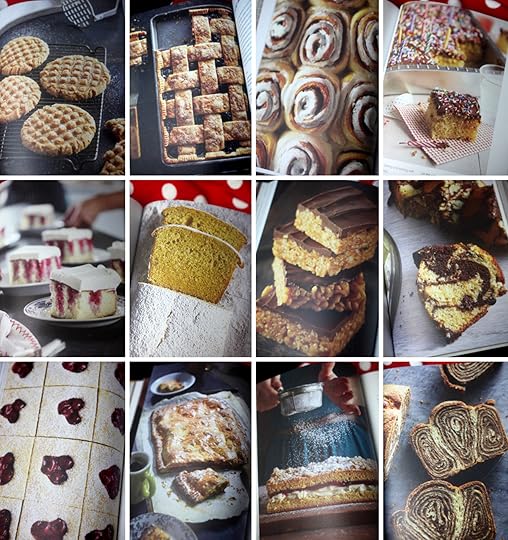
Here’s more good stuff to tempt you. Cakes, Cookies, Pastries and Pies… Oh my! Check it out. I think you’ll love Midwest Made as much as I do.

November 3, 2019
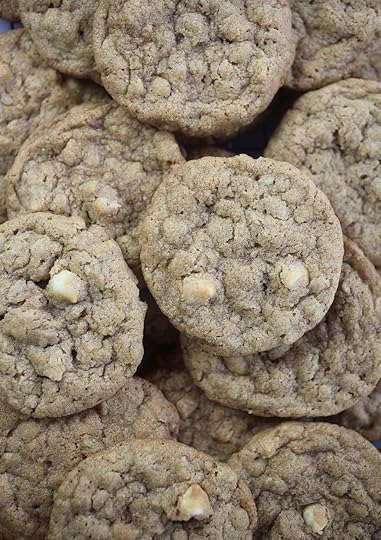
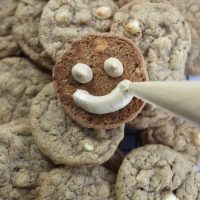
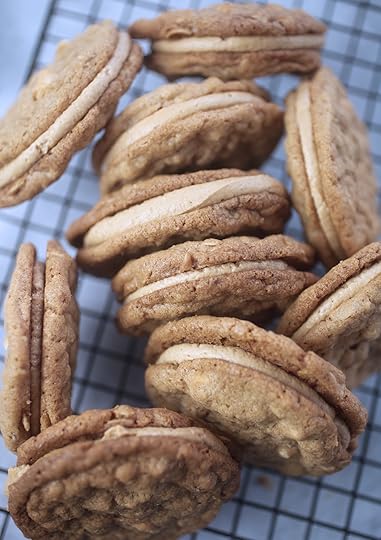
Biscoff Oatmeal Sandwich Cookies
If you can’t guess by the photo… well, these cookies will make you smile. They’re oatmeal sandwich cookies with a double dose of Biscoff spread. In the cookie batter and in the buttercream. If you haven’t tried Biscoff spread before, think of the Biscoff cookies you get on Delta flights, but in a creamy, spoonable spread. So good!
I made this recipe from my blogging friend Maria Lichty’s new Two Peas & Their Pod Cookbook. And let me say, it’s a good one. Full of deliciousness for every occasion and in true Maria fashion, she has a chapter devoted to desserts and a second completely separate chapter devoted to cookies. I’m on board.
So let’s get into this recipe.
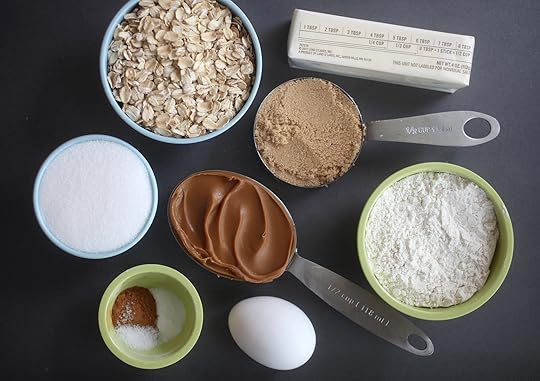
It all begins with oats, butter, sugar, brown sugar, egg, flour, cinnamon, salt, baking soda, vanilla and Biscoff spread.
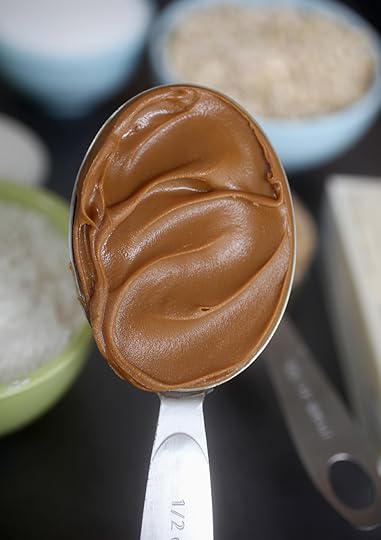
Yes, a half cup of Biscoff, baby! The shining star of these cookies.
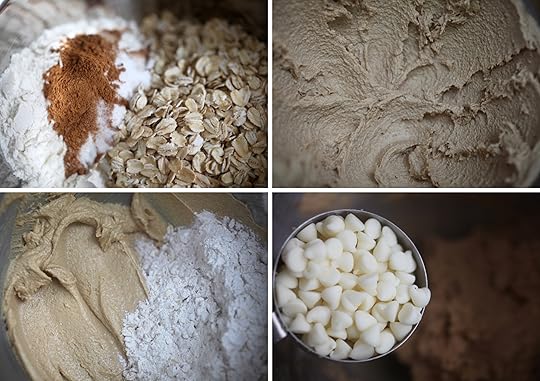
Whisk the dry ingredients together and set aside. Cream the butter, Biscoff and two sugars in a stand mixer. Then add the egg and vanilla. Mix the dry ingredients in until just combined and then if you feel like it stir in some white chocolate chips, too.
These aren’t in Maria’s original recipe, but I had some extra laying around so I decided to throw them in.
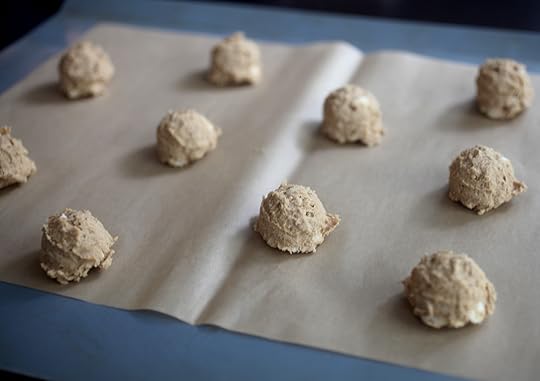
Scoop the dough onto a parchment paper lined baking sheet using a 1 1/2-inch scoop and bake away for about 10 minutes.
Let the cookies cool on a wire rack while you prepare the buttercream.
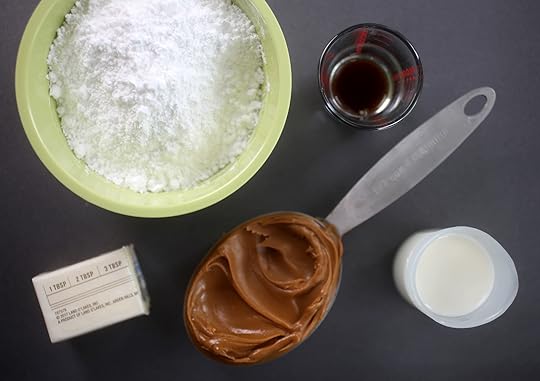
Biscoff again (YAY!), butter, confectioners’ sugar, vanilla and milk are all you need to make this buttercream to sandwich between two cookies.
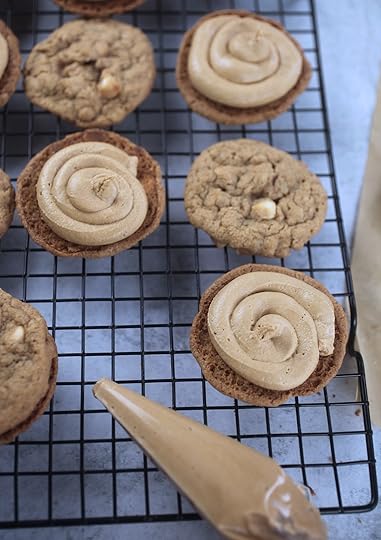
You can spread on with a knife, but for a pretty plump and clean edge, pipe the buttercream on half the cookies and then sandwich them together with the other half. Gently press together and the buttercream will evenly spread to the edges.
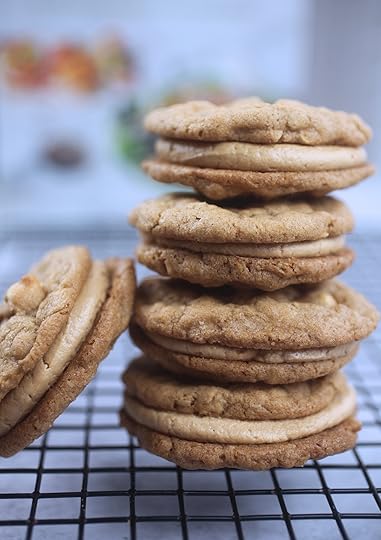
Voila! They’re ready to go and waiting for you to sink your teeth into.
Print Recipe
Yield: 16 sandwich cookies
Biscoff Oatmeal Sandwich Cookies
Ingredients:
Cookies
1 ½ cups old-fashioned rolled oats
¾ cup all-purpose flour
½ teaspoon baking soda
1 teaspoon ground cinnamon
¼ teaspoon kosher salt
½ cup unsalted butter, room temperature
½ cup Biscoff spread
½ cup granulated sugar
½ cup packed light brown sugar
1 large egg
1 teaspoon pure vanilla extract
1 cup white chocolate chips if desired)
Biscoff Buttercream
3 tablespoons unsalted butter, room temperature
½ cup Biscoff spread
1 ¼ cups confectioners’ sugar, sifted
3 tablespoons whole milk
¼ teaspoon pure vanilla extract
Directions:
Make the cookies
Preheat oven to 350 degrees Fahrenheit. Line baking sheet with parchment paper and set aside.
In a medium bowl. Whisk together the oats, flour, baking soda, cinnamon, and salt. Set aside.
In the bowl of a stand mixer, fitted with the paddle attachment, combine the butter, Biscoff spread, granulated sugar, and brown sugar and beat on medium speed until smooth and creamy, about 2 minutes. Add the egg and vanilla and beat until smooth.
Reduce mixer speed to low and add the oat-flour mixture, beating just until blended into a dough. Stir in white chocolate chips until combined. (Note: I decided to add these at the last minute to Maria's recipe, but they are not required.)
Drop the dough by rounded tablespoon onto prepared baking sheet, about 2 inches apart. Alternatively, you can use a 1 1/2 inch cookie scoop to place dough on baking sheet for evenly sized cookies. Not all the cookies will fit on the sheet for one batch. Bake for 10 minutes, until the cookies are golden and just firm around the edges. Let the cookies cool on the baking sheet for 5 minutes before transferring to a cooling rack to cool completely. Once baking sheet has cooled, repeat with remaining dough.
Make the buttercream
In the bowl of a stand mixer, fitted with the paddle attachment, beat together the butter and Biscoff spread until creamy. Add the confectioners’ sugar and beat until smooth. Scrape down the sides of the bowl with a spatula. Add the milk and vanilla and beat again until smooth.
To assemble the cookies, scoop the Biscoff buttercream into a pastry bag, snip off the end and pipe filling on the flat side of half of the cookies. Place the remaining cookies on top, and gently press on each to squeeze the filling to the edges.
Store cookies in an airtight container at room temperature for up to 2 days.
© 2019 Two Peas and Their Pod Cookbook by Maria Lichty
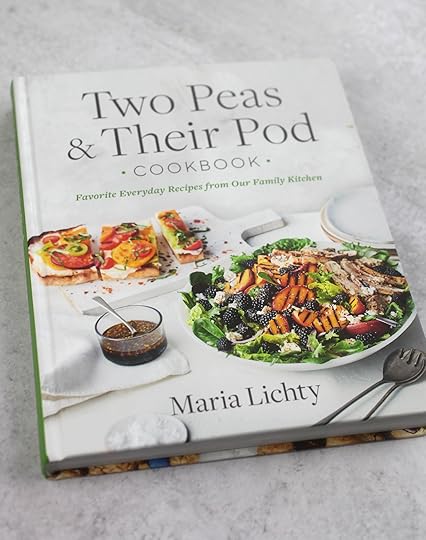
And if you like these cookies, sink your teeth into this big, beautiful cookbook, too.
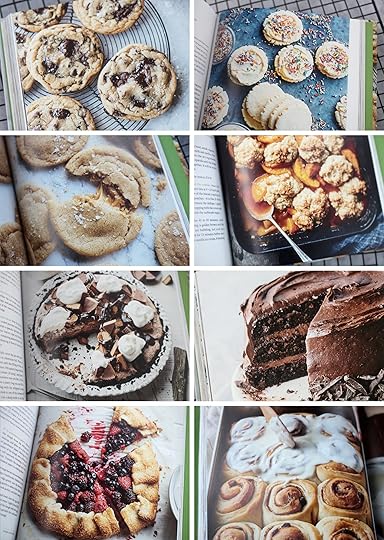
Look at all of these scrumptious desserts. It’s just a tease of all the sweets and eats inside.
Enjoy!

October 17, 2019
Boo-meringue Cake
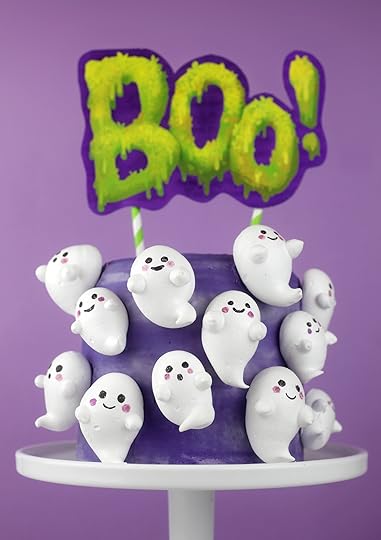
I guess you can tell I really liked the Boo-meringues I posted recently. I mean they do scream cute. And so much so, that I wanted to put them on display in a really sweet way.
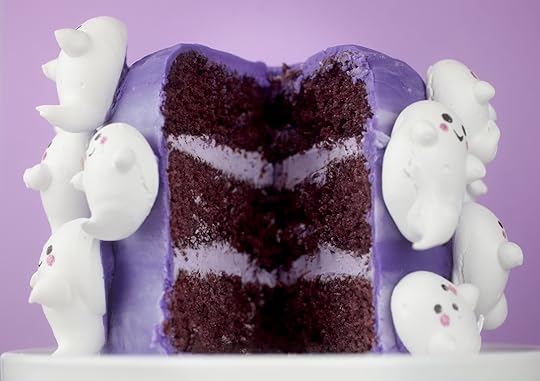
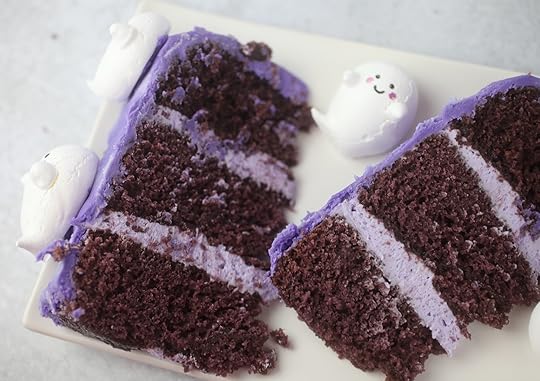
So I made a small 6-inch layer cake for them to float on.
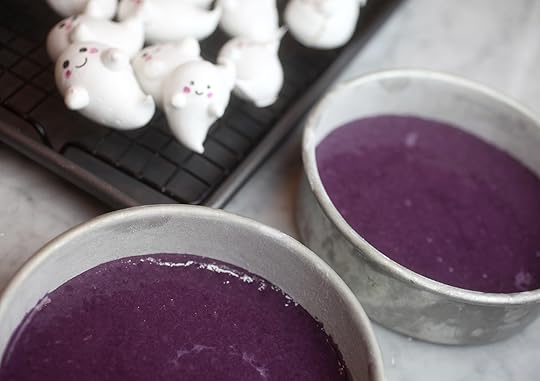
The recipe I used was this one for red velvet cupcakes. I just switched out the color to purple. In hindsight, the dark purple almost looks chocolate when baked. So next time I would use red or green food coloring for a pop of fun color inside.
The recipe will yield enough batter for three 6 inch layers.
And if you want to use a chocolate cake base. This chocolate cake recipe is really good and will also yield three 6 inch layers.
Just watch the baking time and check. I baked these for about 30 minutes at 350 degrees F.
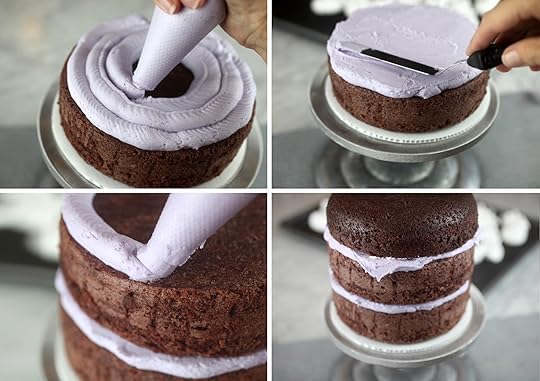
Once baked and cooled, it’s time to frost and layer. I made two batches of buttercream (using this recipe). I tinted one batch a light purple and the other a much deeper shade of purple.
I used the light purple to pipe and fill in between the three layers with enough reserved to pipe on the exterior for some wispy streaks.
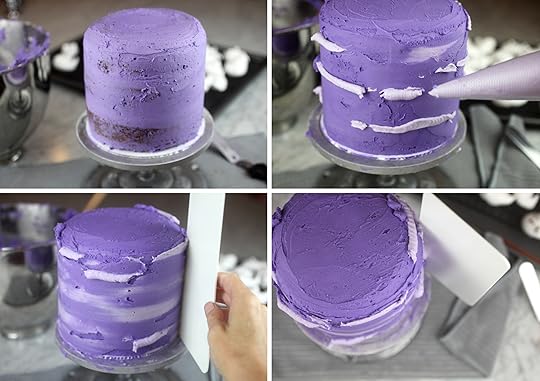
Once assembled, I used the darker purple to apply a crumb coat to the cake. Then I chilled the cake for about 20 minutes before applying the final crumb-free layer of frosting.
If you want to make wispy streaks like these, you can pipe random lines of the lighter purple frosting on the frosted cake and then use a tool like this one to create a smooth edge.
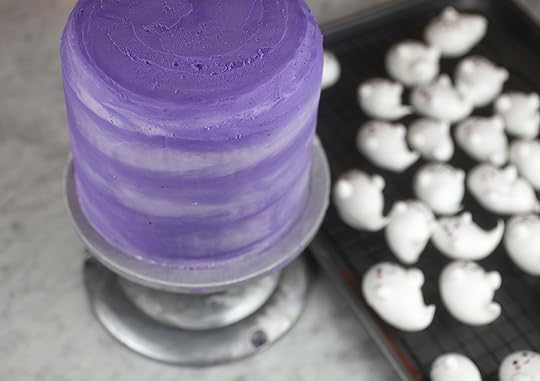
Pretty in purple.
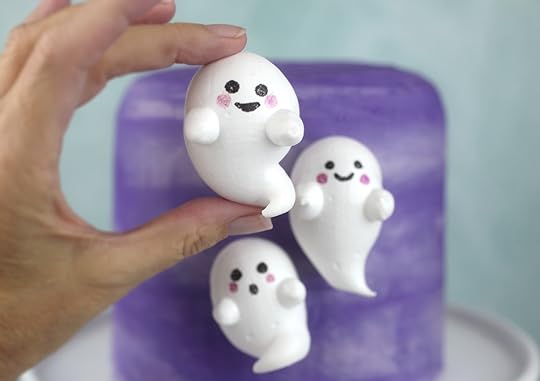
Now for the ghosts.
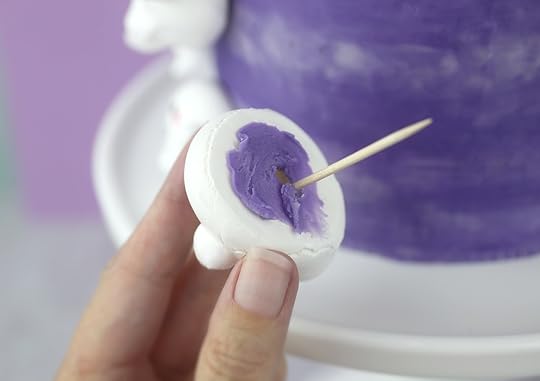
Use some of the frosting on the backside of each meringue to help attach them to the cake. You can also insert a toothpick gently into the back side of the meringue to help them stay in place on the cake.
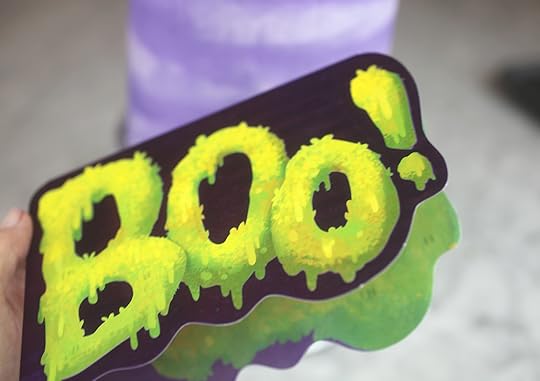
I think the cake is super cute on it’s own, but I had this idea to make a little sign for the top that says BOO! I was going to design one on the computer, print it out, etc. But then I found this card at Target and decided to take a short cut.
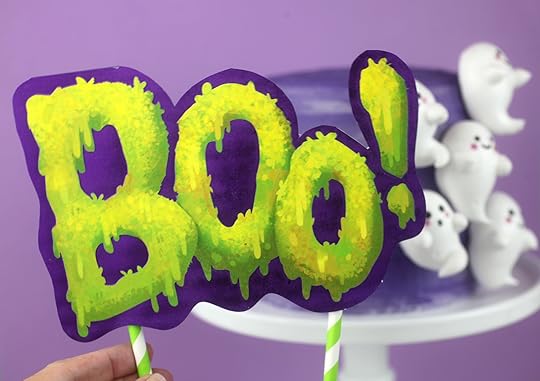
The great thing about using a card like this is that the paper stock is thicker and the print quality is much better than coming off of my always-almost-out-of-ink printer.
This probably would not have been my ideal design for this cake, but the colors and size went together with it pretty perfectly… so homerun!
I just cut out the letters from the card and attached two paper straws to the back to make a Boo-tiful little cake topper sign.
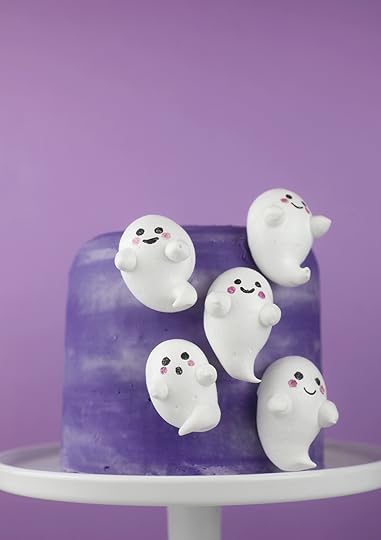
Here’s the cake with just a few floating ghosts.
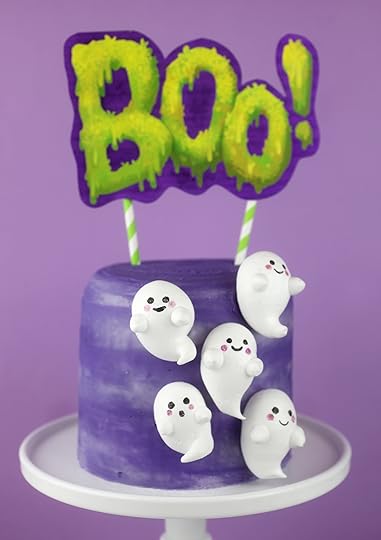
And with the sign…
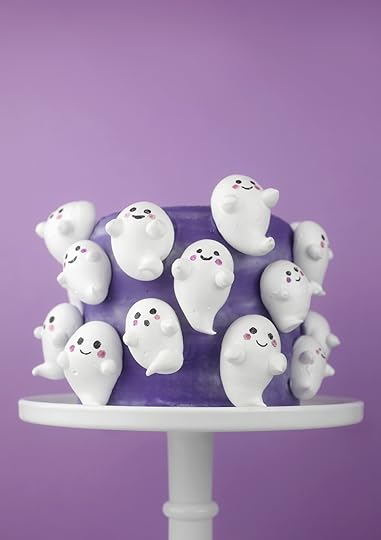
And with a bunch of boos!
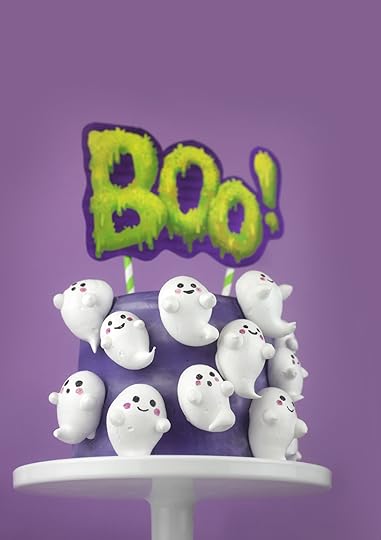
And the sign, too!
What’s your favorite look?
Besides the inside. I mean. Yum!
Hope you enjoy this cute way to display these Boo-meringues.

Bakerella's Blog

- Bakerella's profile
- 9 followers

