
Bakerella's Blog, page 9
October 14, 2018
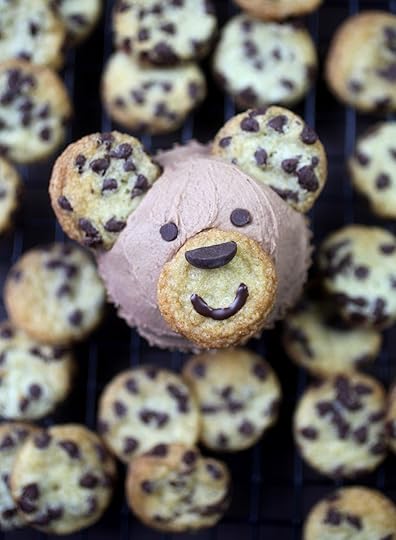
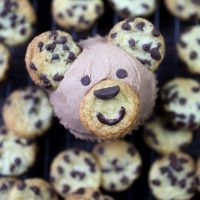
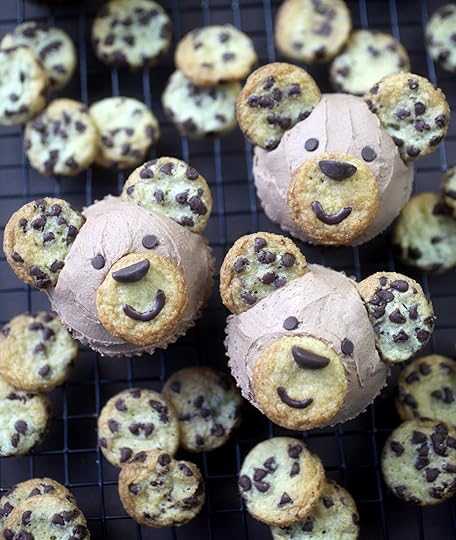
Chocolate Chip Cubcakes
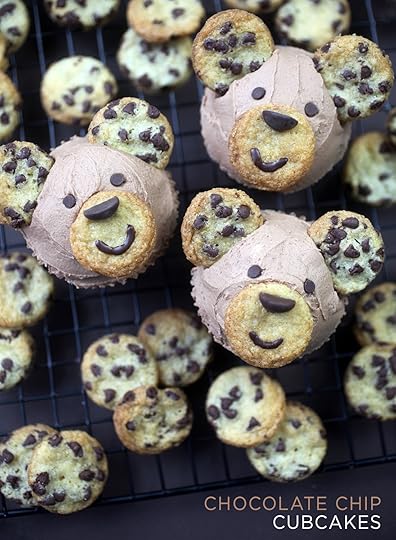
I’m sharing some cute chocolate chip cubcakes today. That’s right … these adorable little bears come complete with chocolate chip cookie ears for you to nibble on.

They are pretty easy to decorate, too. Of course, you’ll need some tiny chocolate chip cookies.
I can help with that.
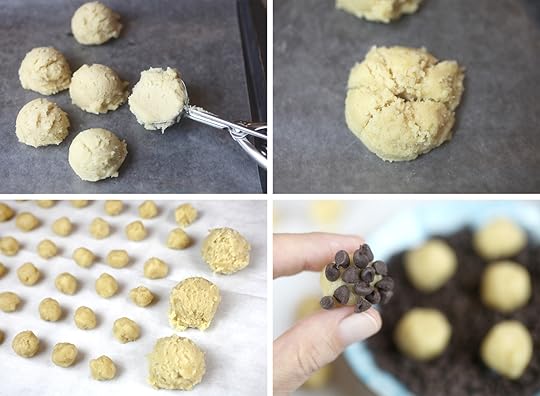
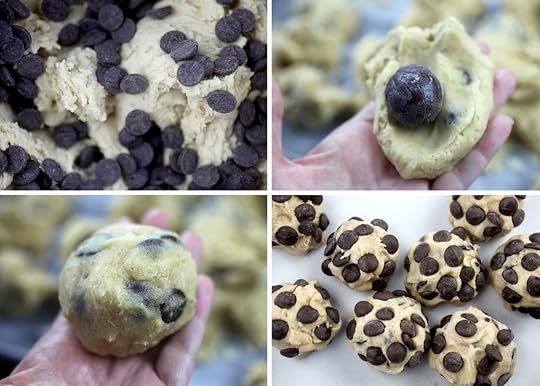
Recipes are below. Mix up the cookie dough, but don’t mix the mini chocolate chips into the dough.
I used a 1-1/2 inch scoop to start with. You know trying to get teeny-tiny cookies. To get them small enough I then divided the dough into roughly six equal sections and then rolled those sections into tiny balls of dough.
For the cub’s mouths, you can just bake the cookies without chips, but for the ears, simply dip the ball into a bowl filled with mini morsels. They’ll stick to the dough and then you can just press them in slightly to stay in place.
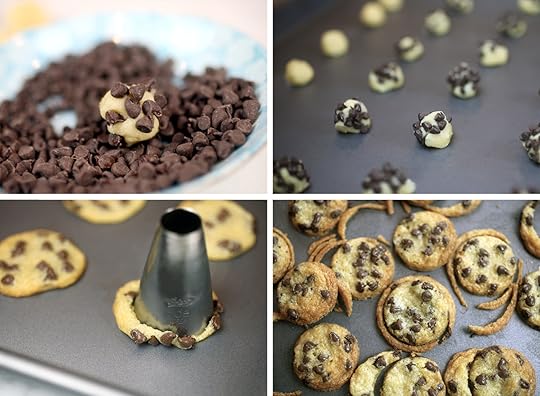
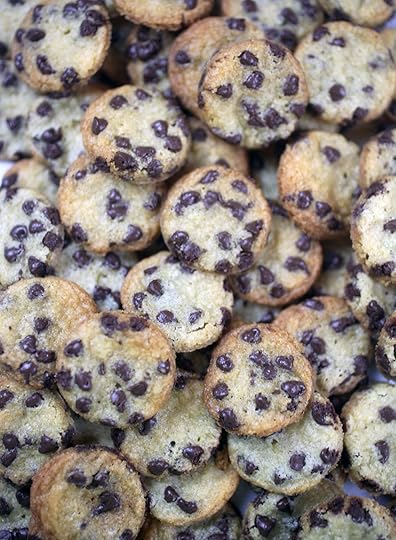
Place the cookie dough balls on a cookie sheet about two inches apart to bake. They only take about 5 minutes at 375 degrees F. Remove them from the oven and they are ready to enjoy as baby cookies.
But if you want them perfectly round for cubcakes, you can use a #808 Ateco decorating tip to cut them out. Easy peasy.
And pretty cute.

Now to assemble.
Frost cupcakes with brown sugar frosting and then cut some regular sized chocolate morsels in half to use for noses. I used Ghiradelli morsels for these because they have a slightly flatter shape than Nestle.
Insert two chocolate chip cookies in position for ears. Press in far enough so they don’t fall down. You can also take a little dollop of frosting to place behind the ears to help prop them up.
For mouths, press one of the chipless cookies on the bottom part of the frosted cubcake.
For the noses, melt a few chocolate morsels in the microwave and use the melted chocolate to attach a cut regular size morsel upside down on top of the cookie for the nose. When the chocolate dries, it will act like glue.
For the eyes, press two miniature chocolate morsels into the frosting with the flat slide facing up.
Then with a toothpick and some more of the melted chocolate, draw on a sweet little smile.
So cute, I can hardly bear it.
Print Recipe
Chocolate Chip Cubcakes
Ingredients:
Mini Chocolate Chip Cookies
1-1/4 cups all-purpose flour
1/4 teaspoon baking powder
1/2 teaspoon baking soda
1/4 teaspoon salt
1/2 cup butter
1/2 cup sugar
1/4 cup brown sugar
1 egg
1 teaspoon vanilla
1 cup semi sweet mini morsels
Ateco #808 decorating tip (if you want perfectly round cookies)
Chocolate Chip Cupcakes
1-1/2 cups all-purpose flour
2/3 cup natural unsweetened cocoa
1 cup sugar
1/3 cup brown sugar
1 teaspoon baking soda
1/2 teaspoon baking powder
1/2 teaspoon salt
2 eggs
1/3 cup oil
2/3 cup whole milk
1 teaspoon vanilla
1/2 cup hot water
1 cup chocolate morsels
Cubcake Frosting
1 cup unsalted butter, room temperature
1/2 cup brown sugar
2 tablespoons cocoa powder
4 cups powdered sugar
1/4 teaspoon salt
2 teaspoons vanilla
1-3 teaspoons milk
Directions:
For the cookies:
Make cookies first and even a couple days before if you want.
Preheat oven to 375 degrees Fahrenheit.
Whisk flour, baking powder, baking soda, and salt together in a medium bowl.
In a stand mixer, cream butter and both sugars until light and fluffy. Add egg and mix until combined. Add vanilla and mix until combined.
Use a 1-1/2 inch scoop to divide the batter. Then divide each scoop into six equal portions and roll into small balls.
Press rolled balls into a small dish containing miniature chocolate morsels. Then place on a baking sheet about 2 inches apart.
Leave some without chips if you are making cubcakes, so you can use them for the cub’s mouths.
Bake at 375 for about 5 minutes or until edges are slightly brown.
Makes about 90 tiny cookies.
For the Cupcakes:
Preheat oven to 350 degrees Fahrenheit.
Fill cupcake tray with 16 cupcake liners.
In the bowl of a stand mixer, mix dry ingredients together until combined. Add eggs, oil, milk and vanilla and mix until combined. Add hot water and mix. It will be very liquid.
Fill cupcake liners about 2/3 full. Pour into liner with a large spouted measuring cup for ease.
Sprinkle some chocolate morsels on top of the batter.
Bake for 15 minutes or until done.
Makes about 16 cupcakes.
For the frosting:
Using a stand mixer, cream butter and brown sugar until light and fluffy.
Whisk cocoa, powdered sugar and salt together in a medium bowl and then add it to creamed butter and sugar in several additions. Mix until completely incorporated.
Add vanilla and mix until combined. Then add milk, 1 teaspoon at a time until the desired creaminess is achieved.
Enjoy!


October 7, 2018
Wild Blueberry Buckle Coffee Cake
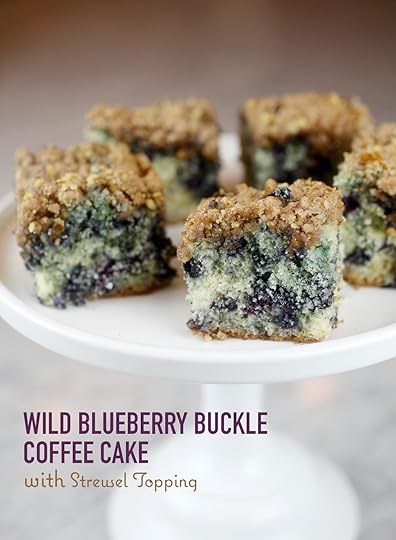
This blueberry coffee cake is great for breakfast or snacking or both. It’s a definite keeper! And that’s coming from my my neighbors, my mom and me.
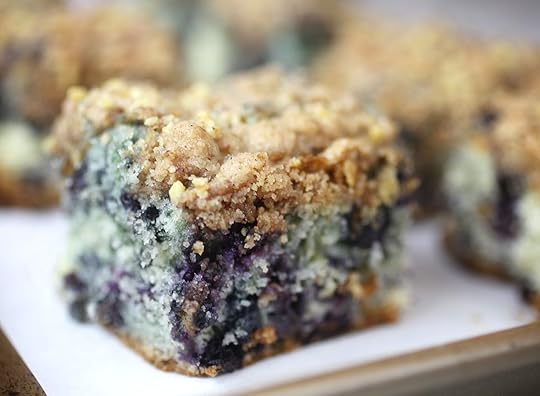
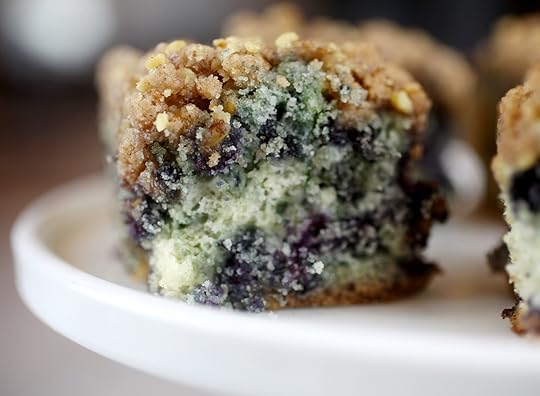
The cake. The crumb. It’s all incredibly good.
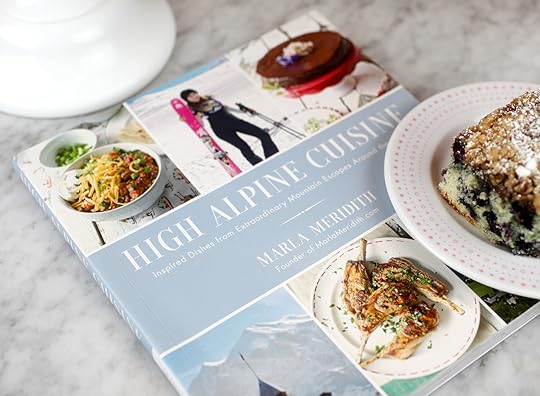
The recipe is from my blogging friend, Marla Meredith’s new book High Alpine Cuisine … all about comfort food inspired by her love of the outdoors and her mountain travels from the Colorado Rockies all the way to the Swiss Alps. There’s something to tempt you for every meal and a section on Alpine Desserts including Funnel Cakes, Apple Strudel, Base Camp Brown Butter Chocolate Chunk Cookies, Skillet S’mores Dip and more. But after flipping through the pages it was this Wild Blueberry Buckle Coffee Cake in the Belly-Filing Breakfast section that caught my eye first.
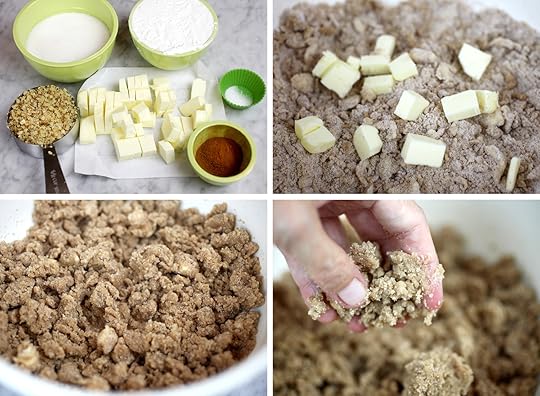
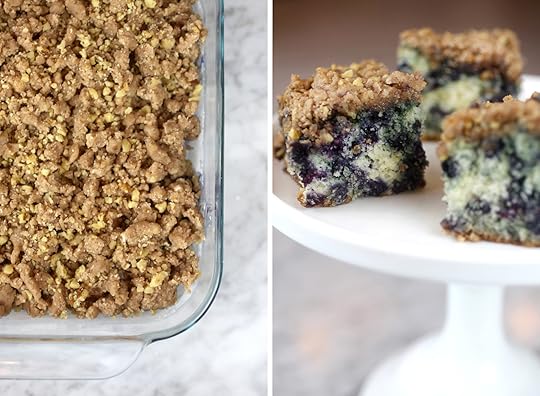
Get started by making the crumb topping. Whisk together sugar, flour, salt and cinnamon in a bowl. Then use your fingers to press the cubed butter into the flour mixture until you form a crumble. It takes a few minutes but stick with it.
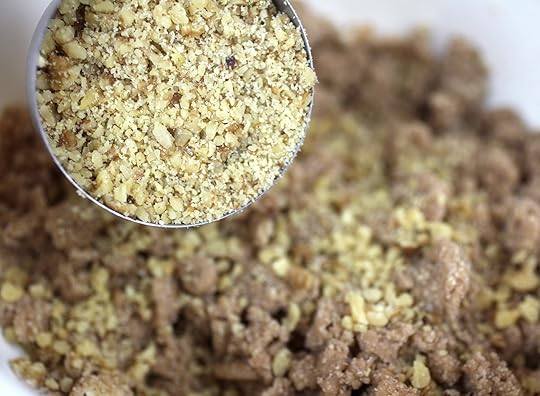
Once you have the crumble ready, add the finely chopped walnuts and mix together.
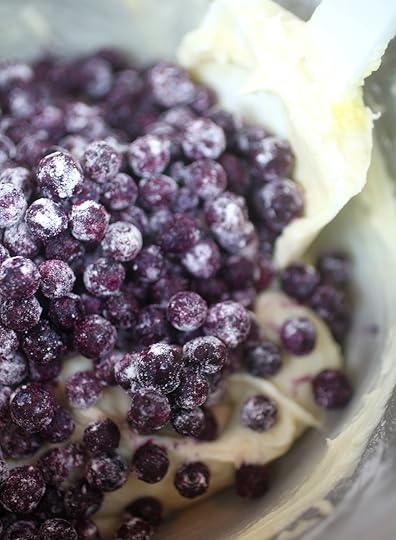
Set that goodness aside and start whipping up the blueberry cake batter.

Spread it in all its gloriousness into a 9 X 9 inch pan. Then cover completely with the crumble and bake away for 40-45 minutes at 375 degrees F.
Print Recipe
High Country Wild Blueberry Buckle Coffee Cake with Streusel Topping
Ingredients:
Streusel Topping
1/3 cup sugar
1/2 cup all-purpose flour
1 teaspoon cinnamon
1/8 teaspoon salt
1/4 cup unsalted butter, cold and cut into 1/4 inch pieces
1/4 cup walnuts, chopped small
Cake
2 cups all-purpose flour
2 teaspoons baking powder
1/2 teaspoon salt
3/4 cup sugar
1/4 cup unsalted butter, softened
1 large egg
1 teaspoon pure vanilla extract
1/2 cup milk
2 cups fresh or frozen wild blueberries
Directions:
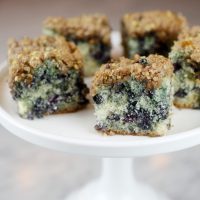
Now you’re ready to dive in. Cut the Coffee Cake into snackable squares. Yum yum!
Preheat the oven to 375 degrees F. Lightly grease and flour a 9 X 9 X 2 square baking dish.
To make the topping, whisk together the sugar, flour, cinnamon and salt in a medium bowl. Mix in the butter. Using your fingers, gently press the butter into the flour mixture until you form a crumble. Add the walnuts and stir until combined.
To make the cake, whisk together the flour, baking powder, salt in a medium bowl.
Then, in the bowl of a stand mixer, beat the butter and sugar until light and fluffy. Add the egg and vanilla and mix until combined. Slowly add in the milk and flour in alternating additions, ending with the flour until just combined. Toss the blueberries in a tablespoon or so of flour to coat and then gently fold them into the cake batter.
Pour the batter into the prepare baking dish and sprinkle the streusel topping over the batter, making sure to cover the entire surface evenly. NOTE: I doubled the streusel recipe above and used almost all of it for a thicker crumb topping.
Bake the cake for 40-45 minutes or until a toothpick inserted comes out crumb-free. Let cool, and then run a knife around the edges of the pan to help release the cake. Then cut squares directly from the pan.
© 2018 High Alpine Cuisine by Marla Meredith
Enjoy every last blueberry bite.

September 23, 2018
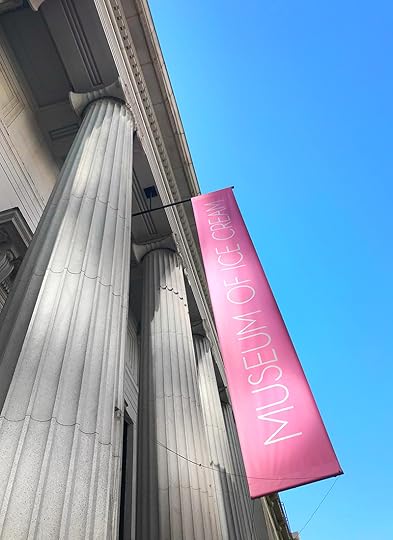
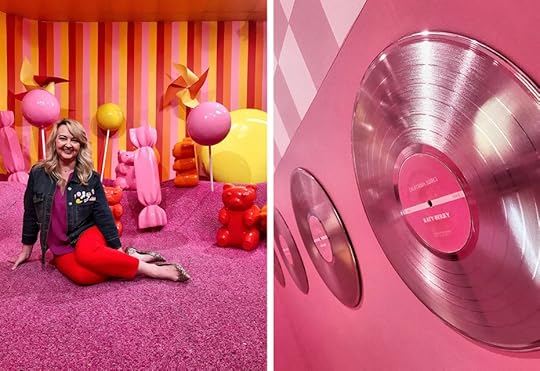
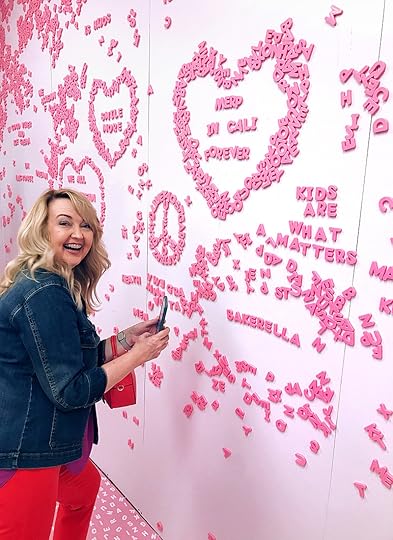
The Museum of Ice Cream
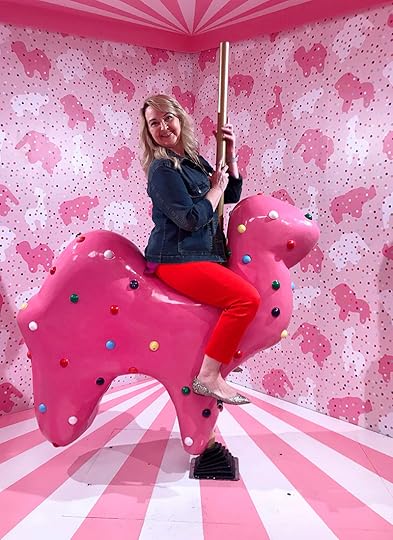
Hey guys! I’m sad to say summer’s over, but it was a pretty great one. I’ve been traveling more than I usually do from Miami to San Francisco to Canada to Las Vegas. You probably noticed there’s been less baking lately. It’s been busy. But, I’m glad to have taken time to do some fun stuff along the way. Like riding jumbo animal crackers and swimming in sprinkles.
Here are a few pics from my visit to the Museum of Ice Cream in San Francisco. Since it started in 2016, it’s been a traveling exhibit of the sweetest kind. You may have seen or heard about one popping up in Los Angeles, Miami or New York over the past two years with all kind of unique ice cream exhibits.
Now, keep in mind, this is more of an experience than it is educational. But that’s perfectly fine with me because it was so much fun!

The Museum of Ice Cream in San Fran is in this cool old bank building and as of last week, it’s now going to be a permanent exhibit in the city. So if you’re into sweets and planning a trip to San Francisco, think about swinging by, but make sure to order tickets in advance because they don’t sell them at the door.
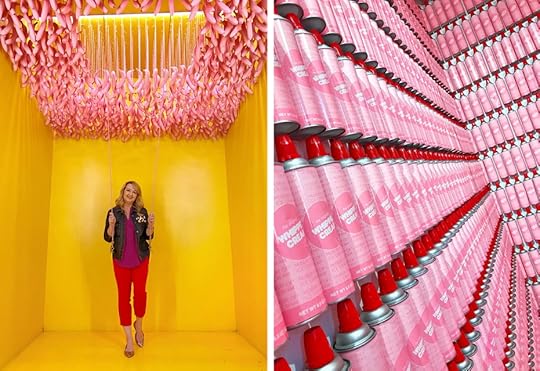
There are a bunch of instagram-worthy installations throughout the museum.
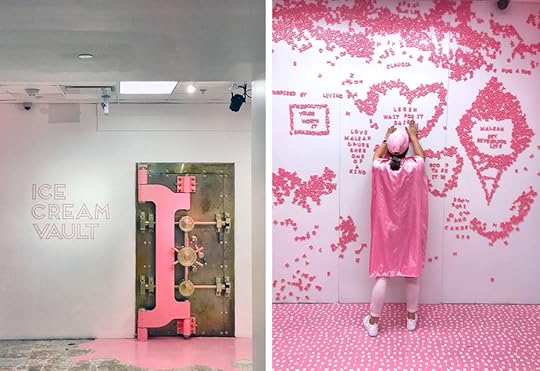
So much eye candy! And as you make your way through all the rooms, you’ll be treated along the way with cotton candy, popsicles and of course you get to taste some ice cream, too.
I really liked the gummy bear room with what I’ll call cake pops sprinkled throughout… Definitely not suckers. ;)
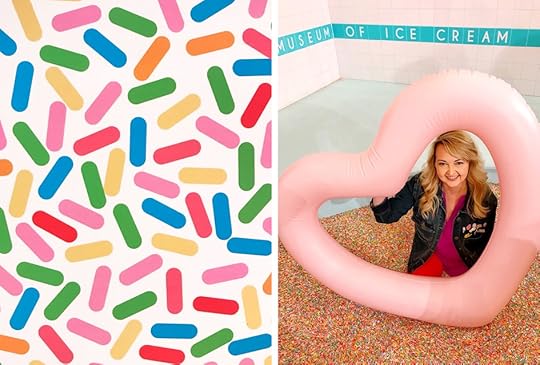
There’s even a sprinkle pool that you can play in.
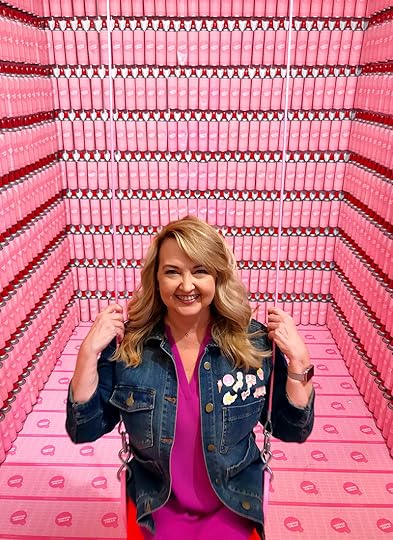
And swings and such. I may have taken a few boomerangs on these. There’s more pics on my instagram stories and feed if you want to see.
Be prepared to feel like a kid again.
P.S. Yep, those are braces on my teeth, but I finally got them off about a week ago. YAYAYAY!

August 11, 2018
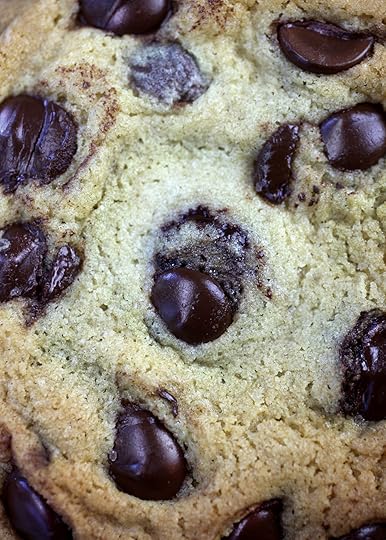
Great Big Dark Chocolate Chip Truffle Cookies
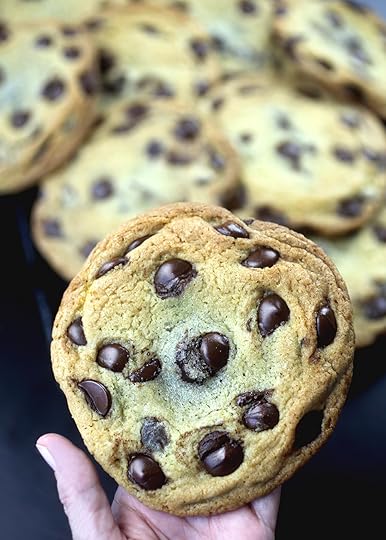
These cookies are colossal and studded with dark chocolate chips and stuffed with a melted dark chocolate truffle inside. So melty. So mega good.
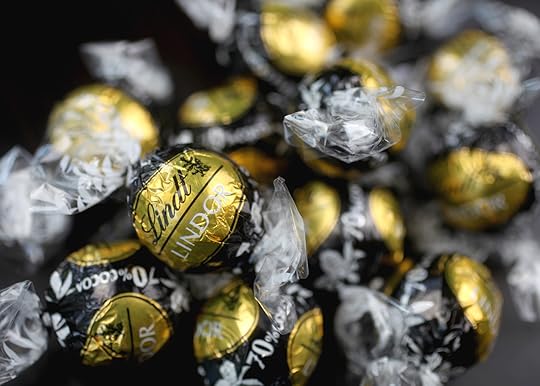
I used Lindt Lindor dark chocolate truffles but you could also make them with milk chocolate morsels and truffles if you prefer.
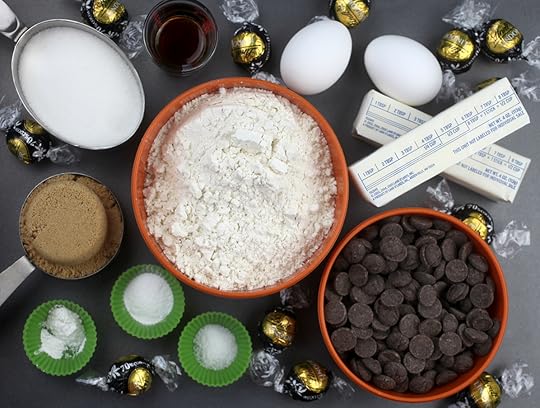
Now gather all the players to get going on the dough. Flour, butter, sugar, brown sugar, eggs, vanilla, baking soda, baking powder, and salt.
Glorious! If only I could eat it all just like this.
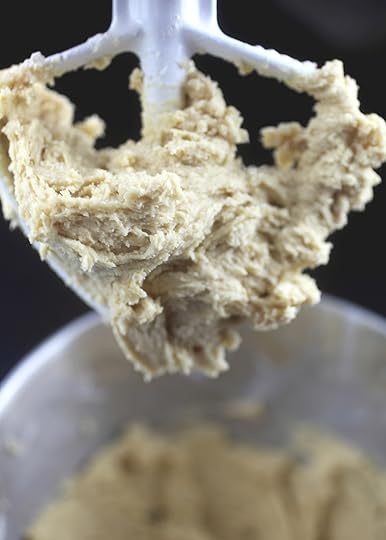
Once the dough comes together, mix in 2/3 of the chocolate morsels. Scoop 12 even mounds of cookie dough onto wax paper. Wrap each truffle with a mound of cookie dough and seal together. Place on a parchment paper lined baking sheet and then use the remaining morsels to stud the tops of the cookie dough balls. Place them four at a time on a baking sheet because these beauties bake up big.
Bake those babies into big beautiful cookies. Like 5 inches big.
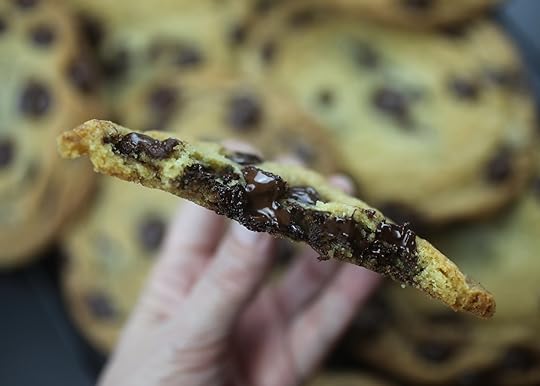
Break into them when they are still warm for a melty mouthful.
Print Recipe
Yield: 12 5-inch cookies
Great Big Dark Chocolate Chip Truffle Cookies
Ingredients:
2 1/2 cups all purpose flour
1 teaspoon baking soda
1/2 teaspoon salt
1/2 teaspoon baking powder
1 cup butter, room temperature
3/4 cup light brown sugar
3/4 cup granulated sugar
2 eggs
2 teaspoons vanilla
2 cups dark chocolate morsels
12 Lindt 70% Extra Dark LINDOR Truffles
Sea salt
Directions:
Line two baking sheets with parchment paper and preheat oven to 350 degrees Fahrenheit.
Whisk together flour, baking soda, baking powder and salt in a medium bowl and set aside.
Cream butter and both sugars in a stand mixer until light and fluffy. Add eggs, mixing one at a time until combined. Add in vanilla and mix until combined. Slowly add flour mixture until just combined.
Stir in 2/3 of the morsels and then divide cookie dough on wax paper into 12 equal mounds. Flatten each mound slighty in your hand, place a truffle inside and wrap dough around sealing the edges together into a ball.
Place cookie dough balls one of the parchment paper covered baking sheets and then use remaining morsels to stud the tops. Sprinkle the cookie dough balls with sea salt and chill for about 20 minutes before baking.
Bake 4-6 cookies at a time on the second prepared baking sheet so they don’t bake into each other. Bake for 12-16 minutes and repeat with remaining cookie dough balls.
Note: These cookies also spread less on dark coated baking sheets.
Enjoy!

July 8, 2018
Puppy Love
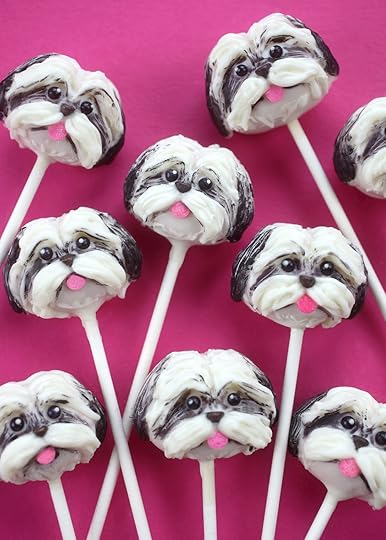
Oh Shih Tzu! How cute are these puppies?! I made these for my mom’s birthday this week. She’s been wanting me to turn her little puppy pie into a cake pop and I finally attempted them this past weekend. Surprisingly, they ended up being way easier than I thought they would be.
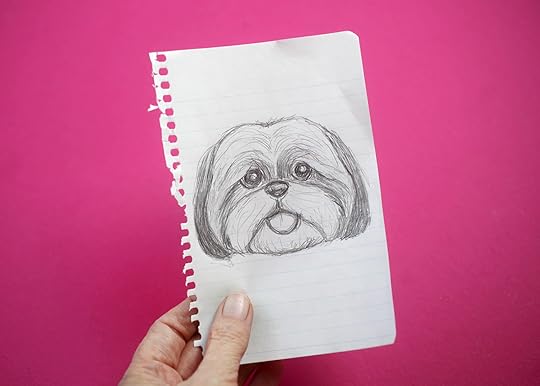
But first I needed reference so I made a quick pencil sketch of the sweet little baby face in question.
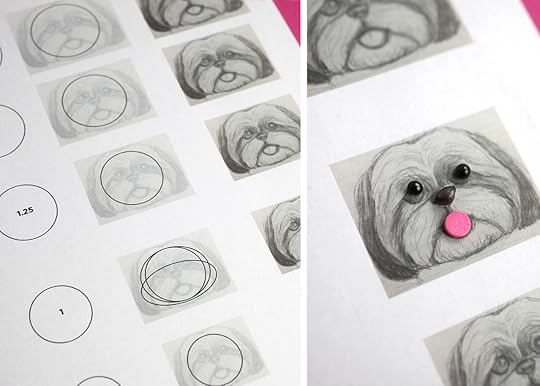
And because I wanted to get as close to her likeness as possible, I worked the sizing out on the computer starting with different size circles. I took a picture of my sketch and emailed to myself to lay over the circles in a graphics program called Indesign. The faces are slightly larger than the circles to allow for the size increase when the round cake balls are dipped in candy coating. Once I had all the sizes, I picked the one that would work best with the sprinkles I had on hand.
In this case, black sugar pearls for eyes, brown rainbow chip sprinkles for noses and pink confetti sprinkles for tongues.
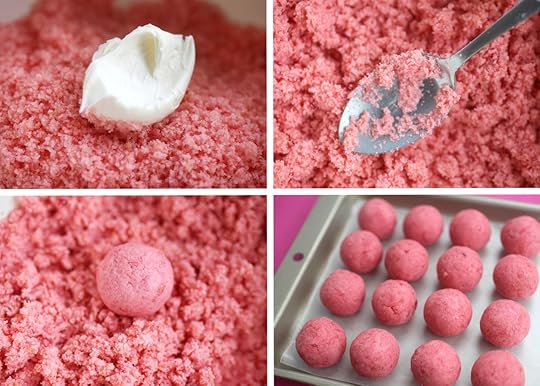
Now to make the cake pops. First mix crumbled cake and frosting together and then roll into balls based on the size you need.
Here are my basic cake pop instructions if you need them.
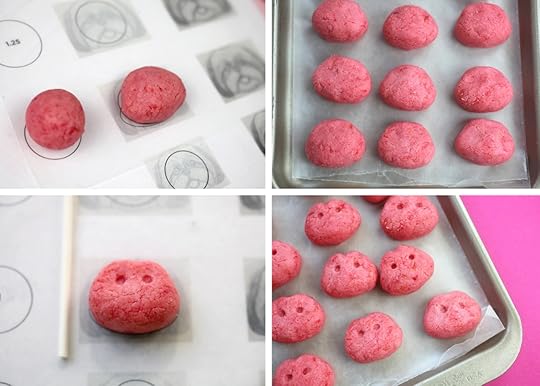
Once I had the starting size, I used the puppy drawing as a guide to hand shape the puppy heads. Just lay a sheet of wax paper over your reference and shape the cake ball to fit. I also used a lollipop stick to press holes into the shaped cake balls where the eyes would be. I did this for reference after they are dipped.
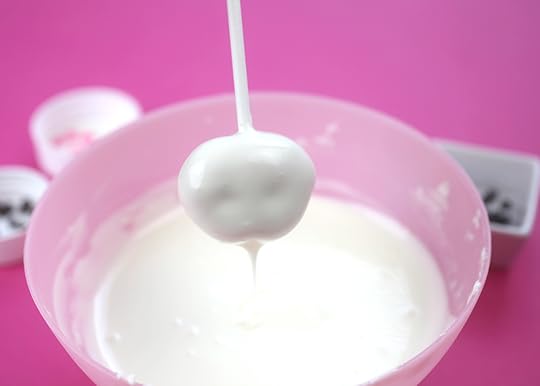
The slight impression helps me know where to quickly place the sugar pearls for eyes because you want to do this while the candy coating is still wet.
Then place the rainbow chip sprinkle in position for the nose and the confetti sprinkle in position for the tongue. (You could do these two steps after the candy coating sets by attaching them with a dot of melted coating, but the eyes look better if they are inset into the coating slightly as opposed to sitting on top of the surface if that makes sense.)
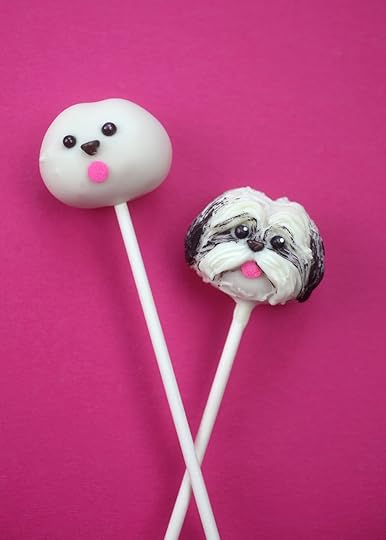
Holy Shih Tzu. The before and after. Now let me show you how easy it is to go from one to the other.
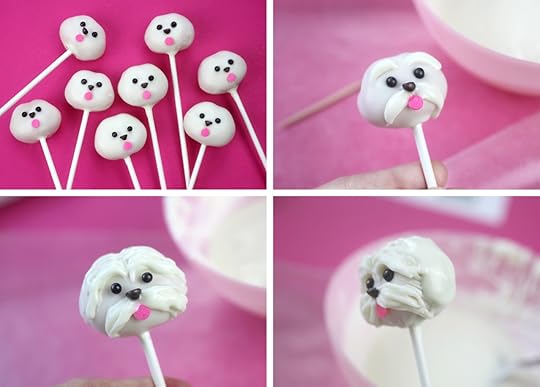
This is all done with toothpicks and a little time. Start with the mustache and eyebrows area and dip your toothpick in coating and draw on the pop to build up dimension. Do all your pops and let them dry before layering on more as needed. Fill in around the nose and overlap the top of the confetti sprinkle. Then just keep drawing on lines of coating with the toothpick. Once you’ve built the face up to look like your pup, then apply more coating with a toothpick on the sides for floppy ears. Let dry.
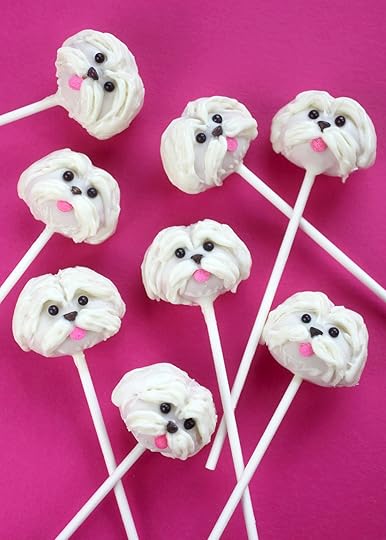
And if you have a little Maltese, you could stop right here. : )
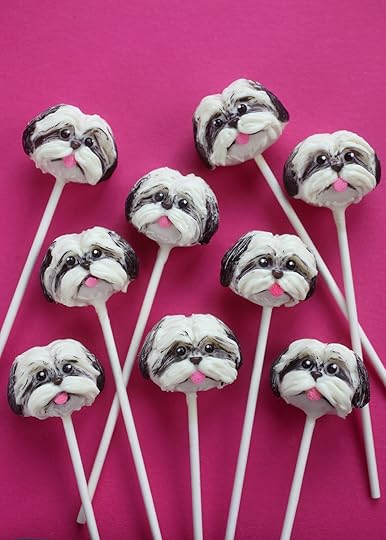
But my mom’s Shih Tzu has black markings like a little mask. This is the fun part.
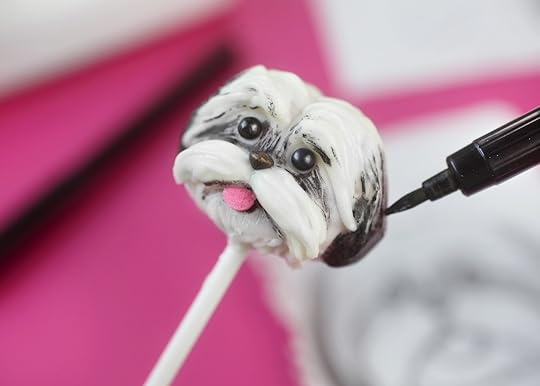
All you need is a black edible ink pen. Maybe two if you are making a bunch. Just use the pen to draw on top of the pop mimicking your dog’s markings as much as possible.
(These are Americolor Gourmet Writers and you can get them in brown if you need them, too.)
Usually when I use these pens I recommend drawing on the surface very lightly like use a paint brush, because when you press down too hard, the candy coating can start to clog the pen.
But for these pups, I like how it looks when the pen is not solid black. It helps give the illusion of different shades of black hair. So I wasn’t as worried about the pen clogging up.
And if draw too much on, you can use a toothpick to gently scrape some of it away.

Look at these little baby boos. To finish the look, just dot the eyes with more of the melted white candy coating.
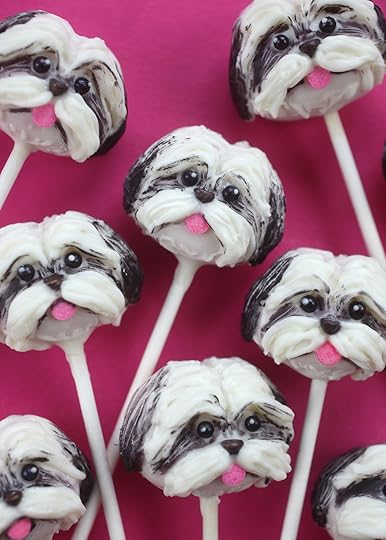
I’m so happy with how cute they turned out.
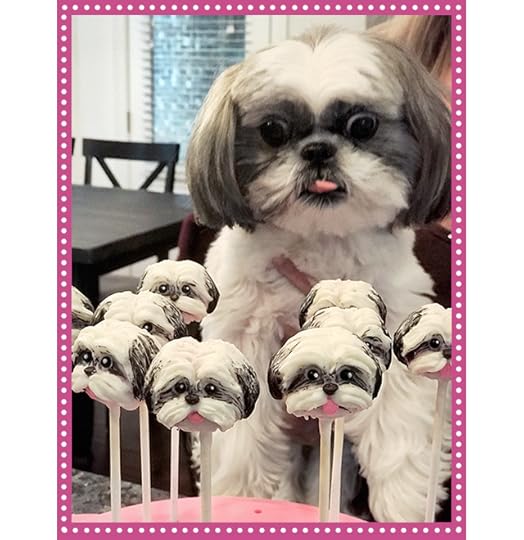
And … they’re puppy approved! Sweet little Sugar Pie loved them. And my mom did, too!
Enjoy!

July 1, 2018
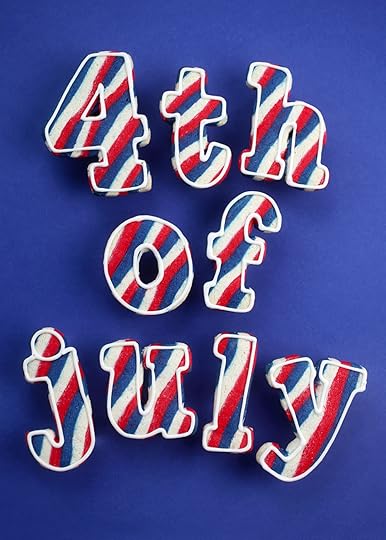
Stars and Stripes Sugar Cookies
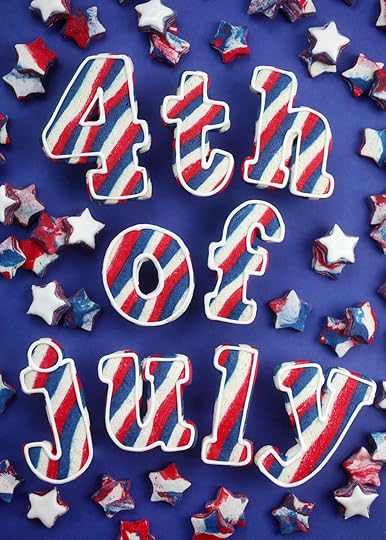 These cookies scream fun and festive for the Fourth of July. I wanted to try making sugar cookies that were striped, but without having to pipe them with royal icing because I think I would have made a mess with that. So I took the concept of pinwheel cookies and instead of rolling up the dough, I layered it flat. Want to see?

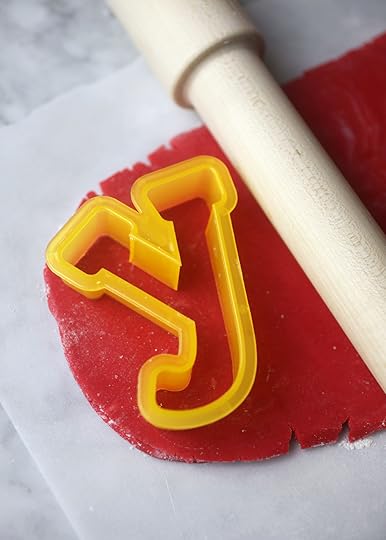
Okay, first I divided some sugar cookie dough into three equal parts. I used this recipe and removed it from the mixing bowl, just before it all came together. Then I placed 1/3 of the dough back in the bowl and added a few drops of white icing color. You could go with the natural color of the cookie dough here, but I used white to make it a little brighter.
Mix the dough just until the color is incorporated and then place dough on a sheet of plastic wrap dusted lightly with flour. Shape dough into a flattened rectangle and wrap up to chill. Repeat with remaining dough, using a few drops of super red icing color next and then royal blue.
When the dough is chilled and firmed up a bit, roll blue dough out on parchment paper so it is 1/4 inch thick and the shape is about 4 X 10 inches. Slide parchment with blue dough to the side and roll the white layer on a new piece of parchment paper roughly the same size. Place on top of the blue layer of dough and remove parchment. Repeat with the red dough.
Also, the 4-inch width in the instructions above, is to accommodate these cookie cutters that I was using. You basically need the dough to be wider than the length your cutters. I’ll show you why in a minute.
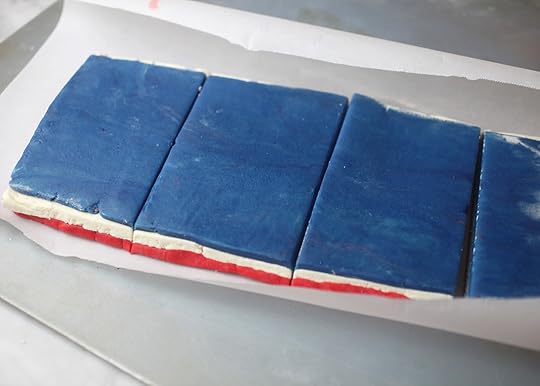
Once the three layers of dough are rolled and layered on top of each other, you can gently and evenly roll it lengthwise to make the dough even longer … about 12 inches long.
Then divide the rectangle equally into four smaller rectangles.
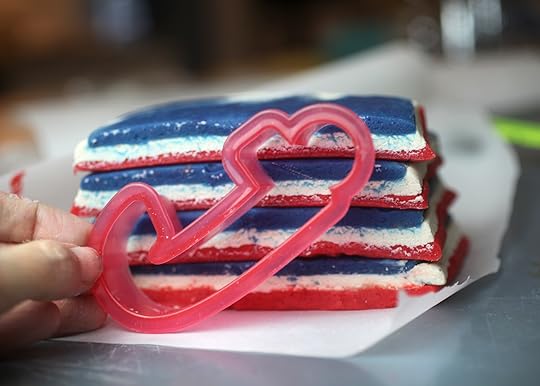
Now stack those sections on top of each other. Here you can see why the height of the layered/stacked cookie dough needs to accommodate the width of the cutters you are using.
(Note: If you want to try these, I would recommend making another batch of the cookie dough recipe. I had just enough to spell “4th of July” with a few extra striped letters. There was however, plenty of leftover dough. I just couldn’t reuse it for the striped cookies because I would have had to reroll the extra dough.)

Once the dough is stacked, place it in the freezer for a few minutes to firm up.
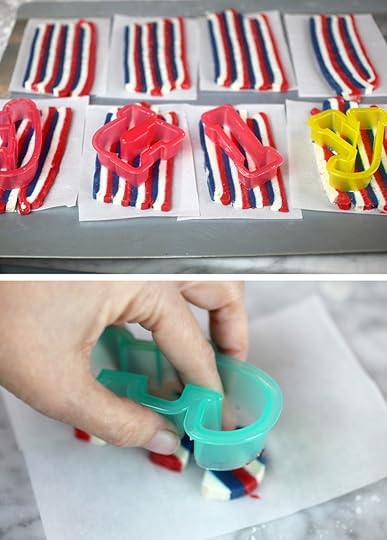
Prepare some cut pieces of parchment paper to individually lay each slice of dough on.
Remove dough from freezer and use a bench scraper to slice through the stack. You may need to slice a couple and then refreeze it so it’s firm each time. Transfer the sliced dough to a piece of cut parchment and roll dough again slightly to press together. Repeat and then place the slices on parchment paper on a cookie sheet and put in the fridge or freezer to firm up before cutting the letters out.
Here you can see how the cutters all can fit within the sliced/layered cookie dough.
When the dough is firm, use a letter cutter to cut out the dough. And use your fingers to press the dough down inside the cutter as you lift it out. Do this slowly and carefully so you don’t accidentally separate the strips of dough as you remove the cutter.
Once all the letters are cut out, place back in the freezer/fridge to firm up again before baking.
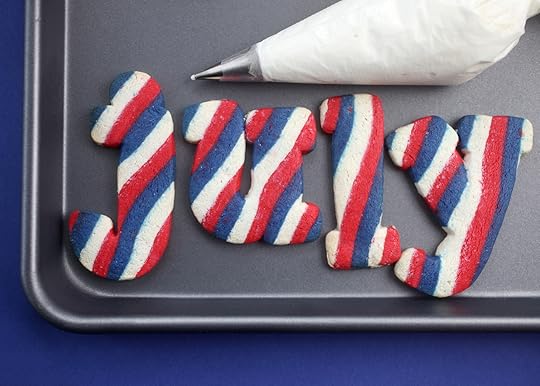
It worked! Yes! and YAY! Because I didn’t have a backup plan if they didn’t.
Once the cookies cool, you can leave them like they are or pipe and outline them with white royal icing to define the edges. I went with icing.
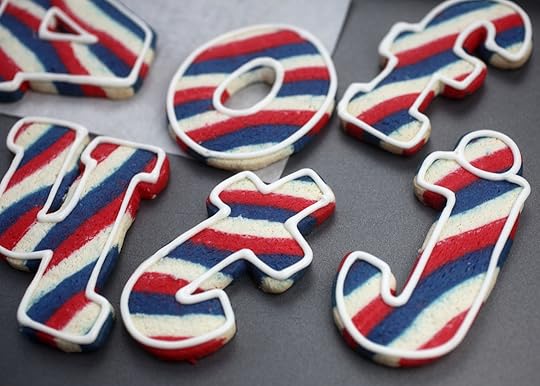
Like so.
YAY! Again, I’m glad this worked out like I pictured it in my head. Things don’t always do.
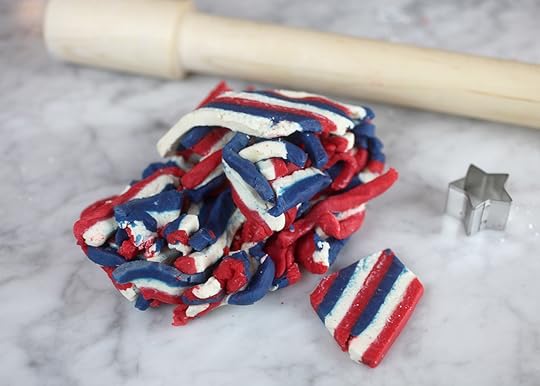
Now, for all those scraps. Since I couldn’t use them for more letters, I just re-rolled the dough together.
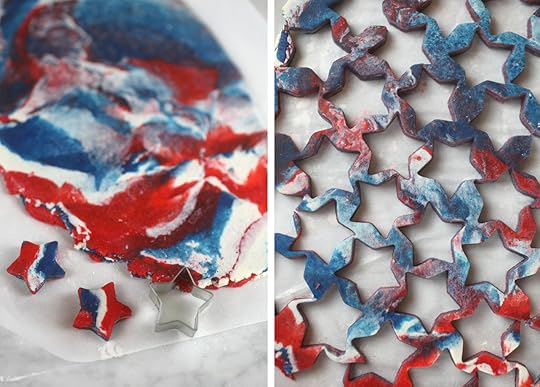
It makes a cool pattern if you don’t over mix the dough and then you can just cut out some cute little stars and pipe those with royal icing if you like also.
Extra Notes:
The cookie cutters I used are from Sweet Sugarbelle. It doesn’t include numbers, so I just hand cut the 4 to match the style of the letters.
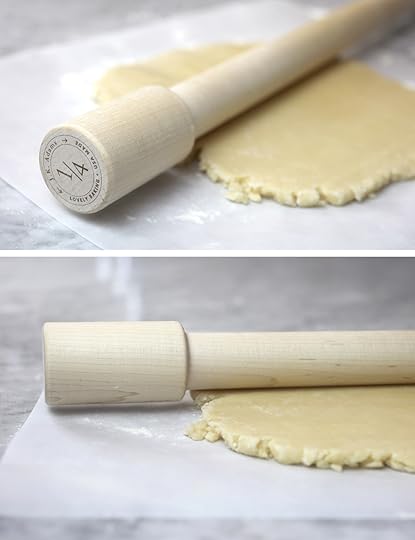
This is the rolling pin I used. I love it because it makes even layers of rolled cookie dough.
I used this cookie and royal icing recipe. Make two cookie batches if you want more than a dozen letters. Also, you only need to make a half batch or really even a quarter batch of the royal icing since you aren’t using much.
If things aren’t working out, just make sure the dough is chilled and firm. It will help immensely.
And if some of the blue dough gets on the white dough when you slice it, you can gently scrape the thin layer of blue off of the white with a knife when the dough is chilled and firm.
Laying the sliced dough on smaller individual parchment sheets is super helpful and gives you more flexibility.
Don’t feel like you need to make letters. You could use the same technique and just make striped stars for instance.
Try these with other colors for a completely different theme.
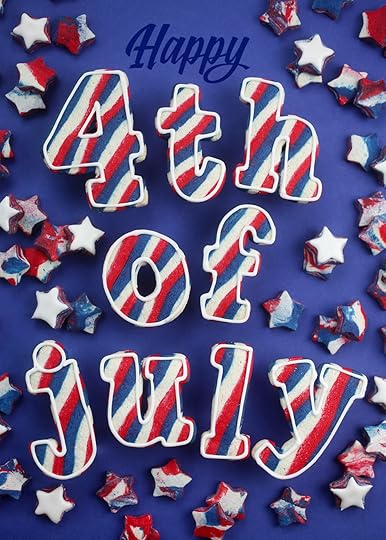
Enjoy the Fourth!

June 26, 2018
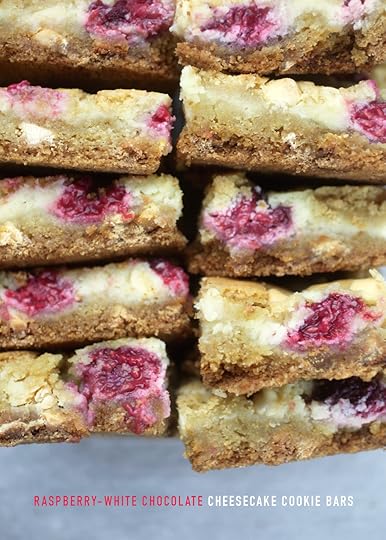
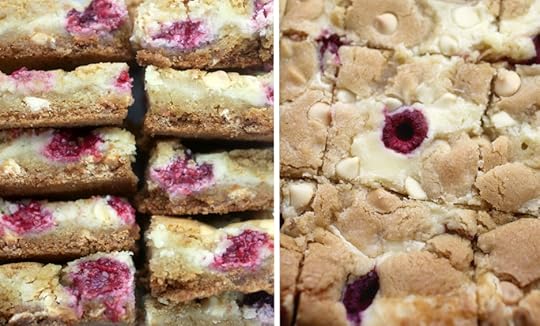
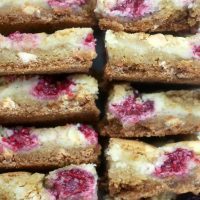
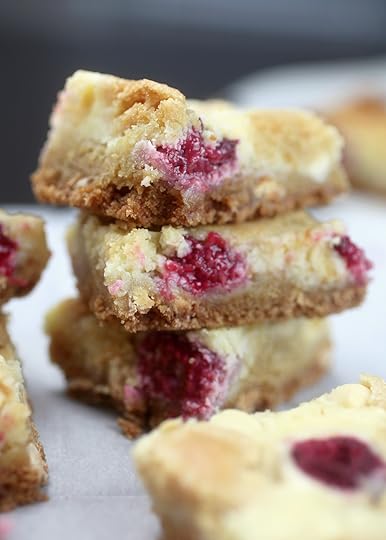
Raspberry White Chocolate Cheesecake Cookie Bars
These Cheesecake Cookie Bars dotted with white chocolate chips and sprinkled with raspberries are a perfect sweet treat to kick off summer. The recipe is from What’s Gaby Cooking’s brand new cookbook. I met Gaby a few years ago and she is just the cutest. And a force when it comes to food. She was in town a couple of weeks ago for her book signing so I stopped in to give her a hug and say hi. And of course, I had to bake something from her beautiful book, which was also photographed by my chocolate loving friend, Matt Armendariz. These besties are a dynamic duo so check them out.
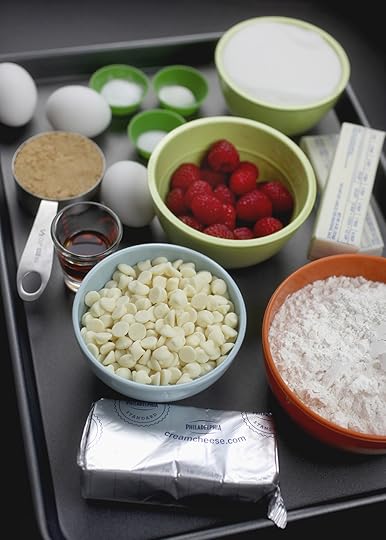
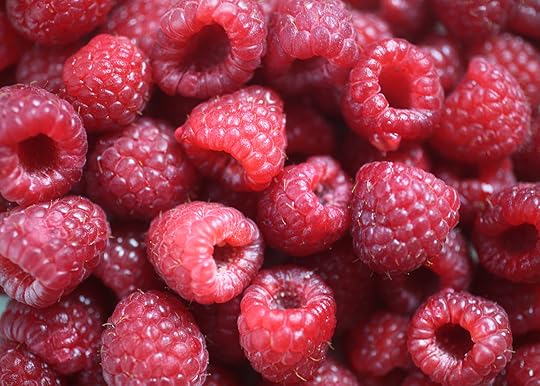
The recipe calls for easy ingredients. Always a win. Eggs, butter, vanilla, sugar, brown sugar, flour, baking soda, baking powder and salt. And let’s not forget the stars. Cream Cheese, white chocolate chips and fresh raspberries.
Pretty!

Once you mix up the cookie dough, stir in most of the white chocolate chips.
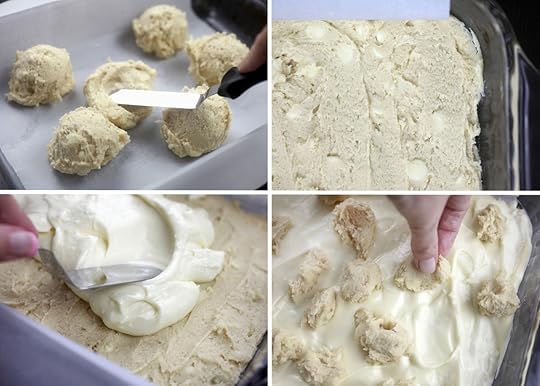
Spread a little more than half of the cookie dough in the bottom of a 9 X 13 inch baking pan. Spread the cheesecake layer on top after that. Then crumble the remaining cookie dough on the very top.
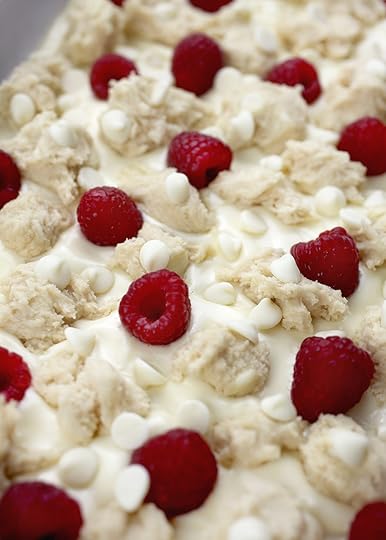
Sprinkle more white chocolate chips and raspberries on the top and bake away!
Remove from the oven to cool and then chill in the fridge before cutting into bars.
OMGoodness! look at those beauties. And so so good, too!
Print Recipe
Raspberry-White Chocolate Cheesecake Cookie Bars
Ingredients:
Cookie Layer:
1 cup unsalted butter, room temperature
1/2 cup brown sugar
1-1/2 cups granulated sugar
2 large eggs
2-1/2 teaspoons vanilla extract
2-1/2 cups all purpose flour
1 teaspoon kosher salt
1 teaspoon baking soda
1 teaspoon baking powder
1-1/4 cups white chocolate chips
1 cup fresh raspberries
Cheesecake Layer:
8 ounces cream cheese, room temperature
1/2 cup granulated sugar
1 large egg
1 teaspoon vanilla extract
Directions:
Preheat oven to 350 degrees F and line a baking pan with parchment paper with a little hanging over the sides.
Make the cookie layer: In a stand mixer, cream together butter, brown sugar and granulated sugar for three minutes, until smooth. Add eggs and vanilla and continue to mix, scraping down the sides of the bowl. Add the flour, salt, baking soda, and baking powder and mix on low speed until ingredients are incorporated. Fold in 1 cup of the white chocolate chips.
Make the cheesecake layer: In a food processor, combine cream cheese, granulated sugar, egg and vanilla and mix for two minutes, scraping down the sides as needed until ingredients are evenly combined and mixture is smooth.
Assemble: Press slightly more than half of the cookie dough mixture into the bottom of the pan to make an even layer. Spread the cheesecake mixture on top of the cookie dough. Crumble the remaining cookie dough on top of the cheesecake mixture. Sprinkle remaining white chocolate chips and raspberries on top.
Bake for 40-45 minutes, until the cookie dough is golden brown. Remove from oven and cool for 30 minutes. Transfer to the refrigerator for at least two hours or overnight. Cut into bars and serve.
© 2018 What's Gaby Cooking: Everyday California Food by Gaby Dalkin
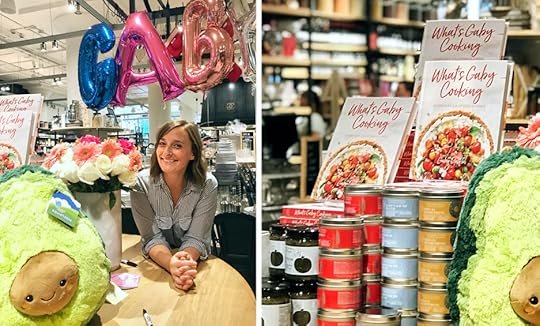
Enjoy and check out Gaby’s book, Everyday California Food … it’s full of deliciously simple and fresh recipes you’ll love. And she also has a line of salsas and seasonings at Williams-Sonoma, too.

June 11, 2018
Hey Pop – you’re da best!
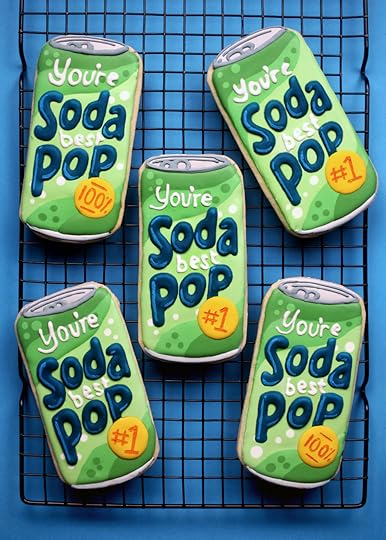
Enjoy these refreshing cookies for Father’s Day! They’re jumbo sugar cookies decorated with royal icing and they’re a fun way to tell Dad he’s the best pop around.
First off make some cookie dough. I used this Sugar Cookie Recipe from Bake at 350. It’s a keeper and I use it whenever I make sugar cookies. The recipe makes 9 of these jumbo cookies. Ten if you rolled them a little thinner.
I used this awesome rolling pin to roll out the cookie dough. A new fave I recently bought from Food52. It rolls perfectly even, quarter-inch-thick cookies. I have always used a rolling pin and added those thick rubber bands on the ends to help keep my cookie thicknesses the same, but this one is much more convenient and I love it so far.
Now, I’ll admit that these cookies are not the quickest to make because of the multiple colors and drying time needed, but I couldn’t resist trying to make them after this soda pop pun popped in my head. If you’re a cookie decorating pro, they’ll probably be a breeze for you, though. I’m not, so I made a template for my idea to make the decorating easier.
I highly recommend downloading this template for yourself if you decide to give them a go.

Cut out the soda can from the paper template with scissors.
Roll out cookie dough and use a straight edge to cut the dough into rectangular shapes based on the size of the template.
Then cut out the corners of the can from the paper template and use a knife to cut the same corners off from the dough.
I always roll my dough on lightly floured parchment paper so I can easily transfer the cookie cut outs to a baking sheet when they are ready to go in the oven.
Bake them at 350 degrees Fahrenheit for about 15 minutes and let cool completely.
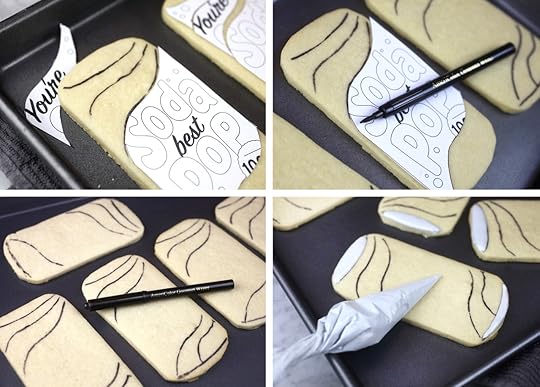
Now for the next step. I used the same template and cut it into sections to use as a piping guide. Just trace each section on the cookie with a black edible ink pen. This was super helpful for me because there is no way I could have gotten them all to look similar without it.
Now, you’ll need some royal icing. You can use the same recipe from here.
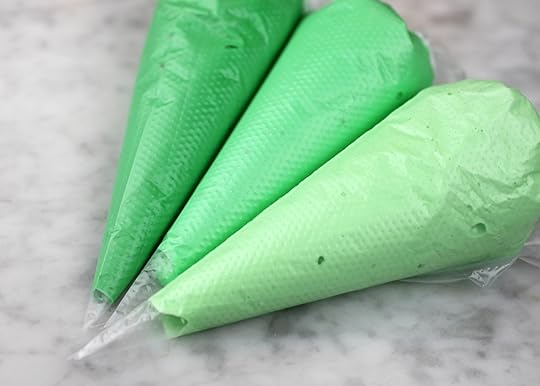
I left some of the icing white, tinted some gray and then tinted three shades of green to get started. If you’re careful and good at cookie icing planning, you can get all the colors you need out of one batch of icing.
These cookies really need to be made over two days, so you can also just make a second batch for the remaining colors when you’re ready …especially if you’re like me and not good at judging how much of each color you’ll need.
Here’s my piping order. (And I basically just played around with icing consistencies to avoid having to pipe the outlines and then come back and fill in with flood icing. To thin icing, you can add a little water and to thicken it, you can add a little powdered sugar.)
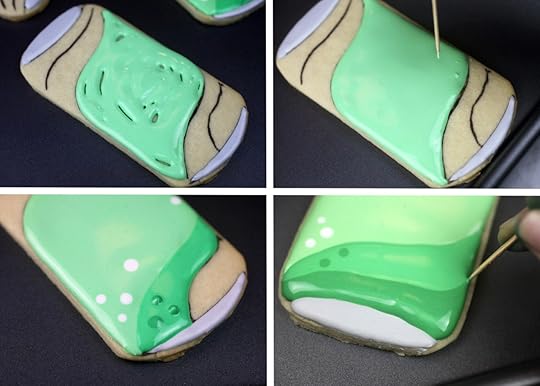
Okay, first I piped the lid and bottom of the can using tinted gray royal icing.
Then, with all my green shades ready to go, I started with the lightest color green in the middle of the can and then filled in the medium green on either side of the light green while the icing was still wet to give it a seamless look. And I repeated the same thing with the darkest shade of green. (Note: As I completed each section, I added a few dots with alternating shades before moving on to the next shade of green.)
Toothpicks are super handy. I used them to even out the icing where there were empty spaces and also to help create pointed ends. Just gently pull it through the icing as shown in the last picture above.

Now let dry. Dry. Dry. Dry. I would recommend drying overnight.

Now, we’re on to day two.
I used white icing and tinted blue, yellow icing and more gray icing to finish the cans.
For the words, I used the same template and cut out the word soda as one piece and the word pop with the circle badge as a second piece.
Then I could easily place each word in position and trace right on top of the cookie with an edible ink-writing pen. I used Sweet Sugarbelle’s pens here because they have a really thin tip.
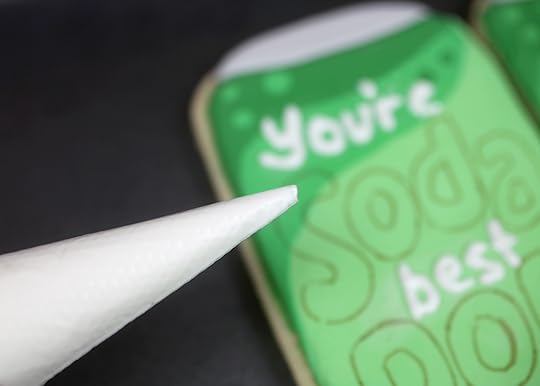
You’re best … I tried to do mine to pipe these words around the other letters.
Oh and I used tipless decorating bags to pipe everything by the way. They’re pretty handy. But me and lettering… not so much. I’m definitely not great at this. But when I would mess up, I would just wipe the icing off and start over until I got something that was readable. Let the words dry some and then you’re on to the the big letters…
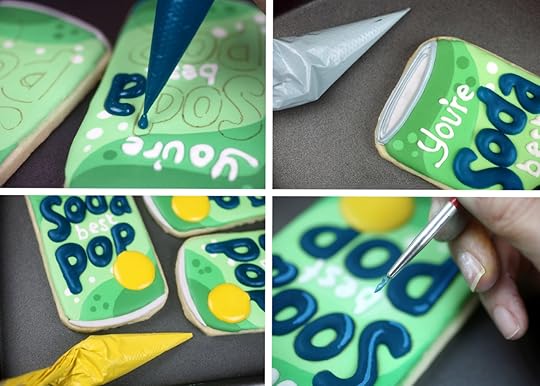
Soda Pop!
I made the blue icing with a thicker consistency so it would not spread, but would also not need to be outlined. Because that would have been a disaster.
Pipe inside the lines and then tint some icing yellow and pipe inside the circle. Outline the lid with more gray royal icing and let everything dry.
When dry, I added a little highlight detail to the big letters by lightening the remaining blue royal icing with white icing color and using a small paintbrush to gently paint highlights on the letters.

For the final touch I used an orange edible ink-writing pen to write inside the circles because after piping the white letters I knew I wouldn’t be able to make them look straight enough. The pens are much easier to control and you could even use them for the other small words if you want. Here’s the color assortment for reference.
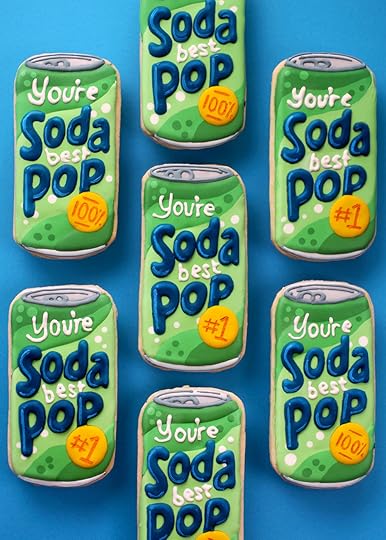
You’re so da best Pop!!! Enjoy and Happy Father’s Day to all the dads out there!

May 28, 2018
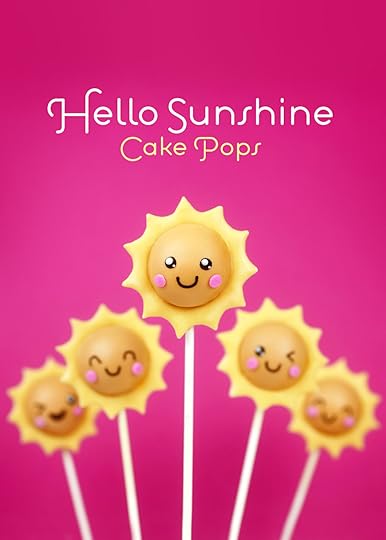
Hello Sunshine Cake Pops
It’s a gonna be a bright, bright sun-shiny day for anyone that receives these super cute cake pops. They are just so cheery!!!
Now, I’m pretty sure these are my first sunny cake pops. You’d think I would have tackled them by now out of all the designs I’ve created over the years…… but really, there’s still a ton of designs I want to make.
And today it’s these sweet-faced little suns. The design was inspired by these cute weather illustrations I saw on Etsy. I think it was their happy little faces that got me.
Okay, let me shine a light on how I made the rays. I knew I needed to make a ring of light to match the illustration. I just needed to figure out how best to make it work.

Here’s what I came up with.
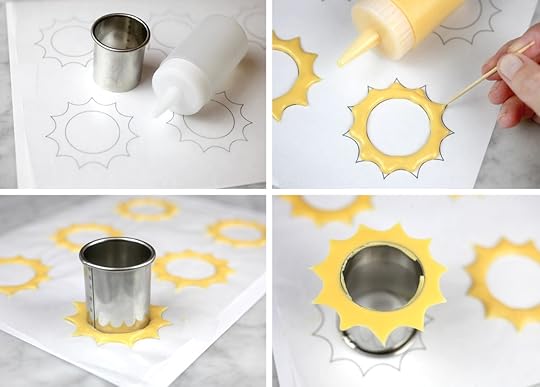
I found a 1.5-inch metal cutter and used this as my starting point.
Then I made a template based on the cutter. (Here it is if you want to give these a go.)
First tape a piece of wax paper to the top of your template.
Then fill a squeeze bottle with melted and smooth yellow candy coating and carefully pipe a ring inside the lines. Use a toothpick to pull and coerce the coating into the pointed tips. You are basically coloring within the lines using melted candy coating.
Let the rings dry and then use the same cutter to very gently remove any excess coating that overflowed into the center. You want a round shape to fit over your round cake pops.
Gently twist the sharp edge of the cutter in position and it will cut through the candy.
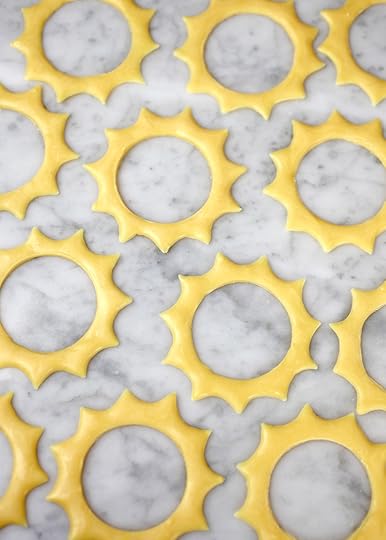
And voila. Rays ready to shine.
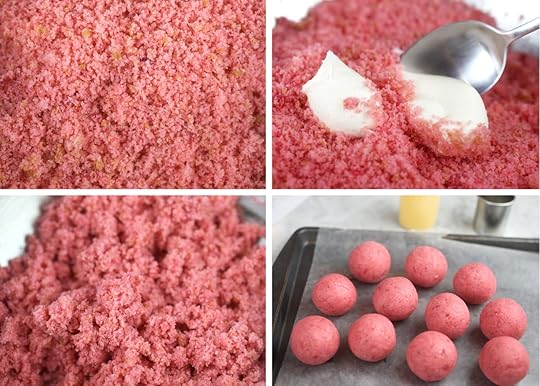
I went with strawberry cake for these… Crumbled, mixed with frosting and rolled into balls.
Here are my full basic cake pop instructions if you need them.
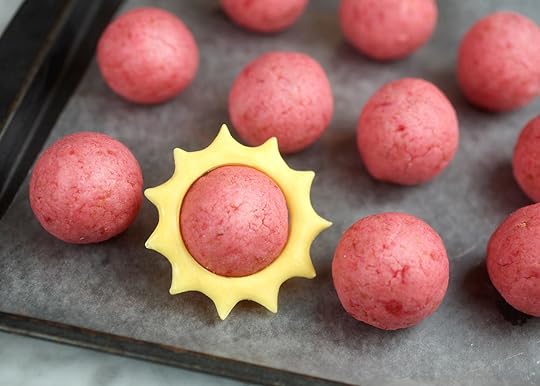
I made the rays first to use as a guide for my cake pop size. You want the balls to be just slightly smaller in diameter than the opening of the rays so that when you dip them in coating and place the rays on top, the coating attaches to the sides and acts like a glue.
I thought about adding the rays to already dipped and dried cake pops, but they would have had to be attached after the fact and the opening could have had gaps or just seemed stuck on instead of one seamless sun.
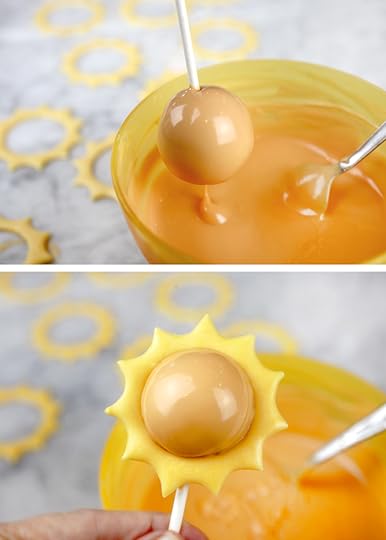
Dip the end of a lollipop stick into melted coating and then into a chilled cake ball. (see my basic instructions for tips)
Dip into melted and fluid candy coating that is a shade darker than your rays. You can use orange or just add a little bit of red candy coating to the yellow you are already using.
Let any excess coating fall off and back into the bowl and while the coating is still wet, quickly place a ring of rays over the pop so that the sides of the cake ball touch the inside opening of the rays.
Let dry completely.
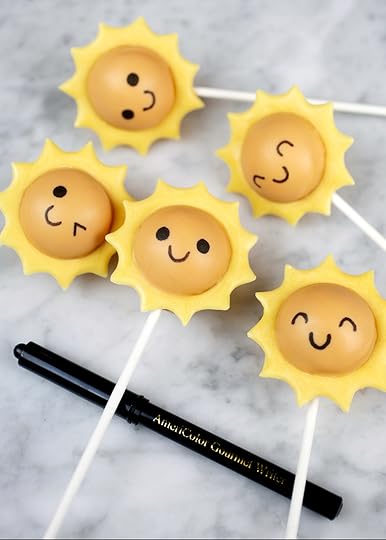
Faces next. Use a black edible ink writing pen to draw little smiles and eyes like above.
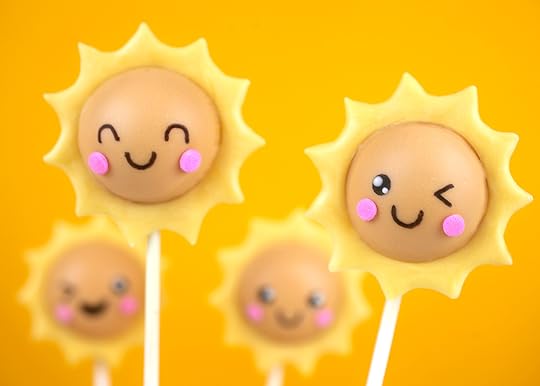
Dot the eyes with melted white candy coating using a toothpick. (It really finishes the look and adds personality) Then attach two pink confetti sprinkles in place using melted candy coating as glue.
And that’s it.

Enjoy and I hope these brighten your day!

May 14, 2018
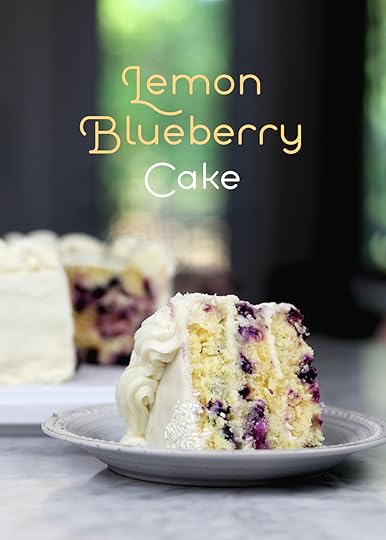
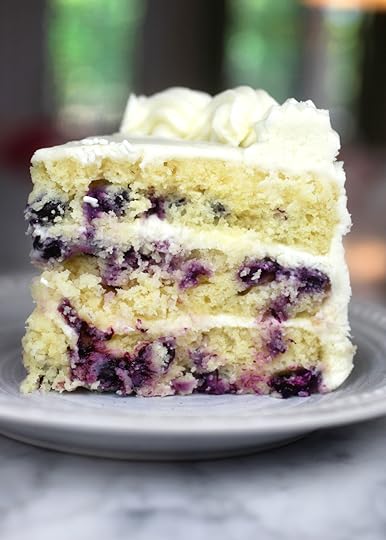
Luscious Lemon Blueberry Cake
Luscious! That’s what this cake is. I made this little gem for my mom this past weekend to surprise her for Mother’s Day. I say surprise because over the last year or more she will periodically send me the link to this cake on Pinterest and ask me to make it for her. Needless to say I haven’t until now.
I mean …
She likes vanilla. I Iike chocolate.
She likes fruit. I like chocolate.
She likes pastries. I like chocolate.
She likes nuts. I like chocolate.
For us to be so much alike, this makes me wonder. But Mother’s Day seemed like the perfect occasion to make something springy and sweet for her.
P.S. When I gave it to her she said, I hope it’s not chocolate.
She was very excited to find out it wasn’t.
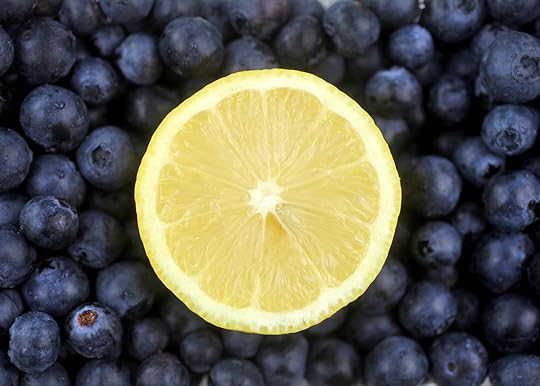
This cake is bursting with loads of lemon and blueberry flavor.
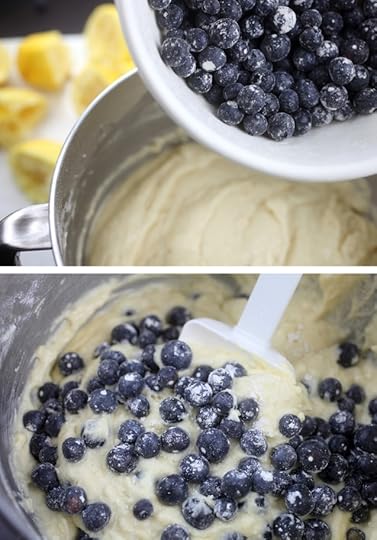
When mixing blueberries in the batter, it helps to coat them first in flour to keep them from sinking to the bottom when baking.
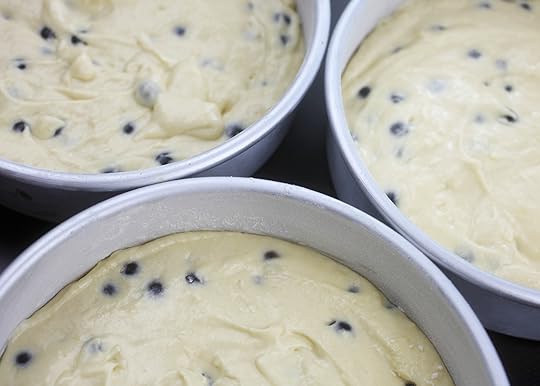
Divide the batter among 3 pans and bake away. I used 8 X 2 inch pans.
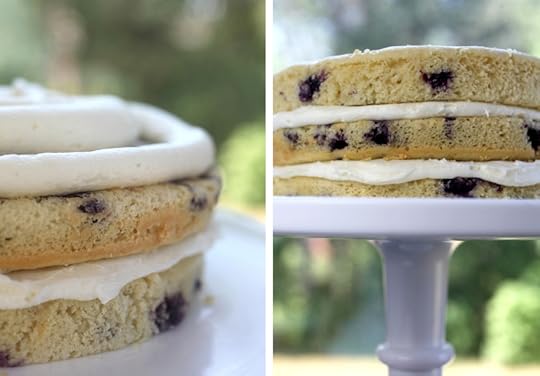
When the cake cools, frost it with cream cheese buttercream. SO so so good.
Decorate the top a bit more and sprinkle it with love.
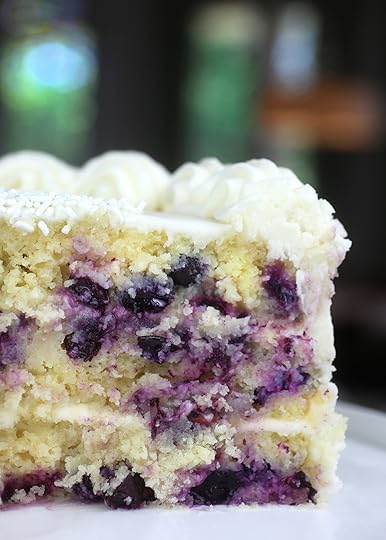
When it’s time to cut into the cake, prepare yourself for this glory that awaits inside.
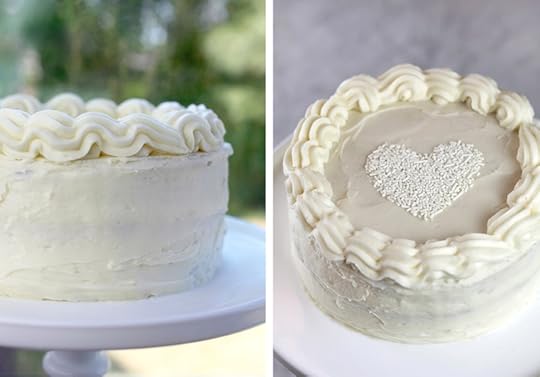
Now, even though I almost always lean towards chocolate, I can appreciate something absolutely delicious and this hits the mark. Mom approves, too!
Keep it in the fridge and when you bite into a berry, you’ll get a thrill from the cold juice that bursts in your mouth.
Here’s the original recipe from Sally’s Baking Addiction. I want to send you straight to the source, because she shared wonderful, detailed instructions that you’ll find super helpful.
P.S. I did double the frosting recipe though.

Enjoy!

Bakerella's Blog

- Bakerella's profile
- 9 followers

