
Bakerella's Blog, page 13
April 9, 2017
Little Lamb Cupcakes
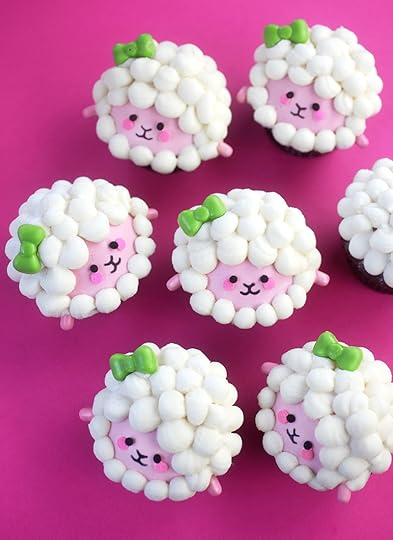
Look how cute these little lambs are. The faces were inspired by kawaii illustrations I liked online. Originally I wanted to make them as sugar cookies decorated with royal icing, but I ran out of time over the weekend, so I tried them out as cupcakes decorated with buttercream frosting.
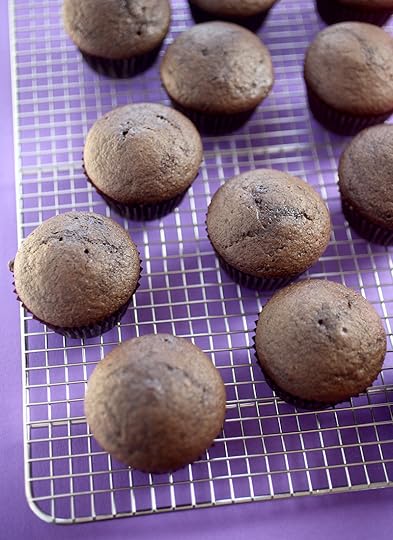
I used this cupcake recipe, BUT instead of baking them as mini cupcakes, I used the same batter and made regular size cupcakes and baked them for about 18 minutes. Also, here’s the basic buttercream recipe I used.

To easily make smooth pink faces, dip the tops of the cupcakes in melted light pink candy coating. You can make a light pink color by tinting white candy coating with pink oil-based candy color or by mixing white candy wafers with pink candy wafers to achieve a lighter shade when melting.
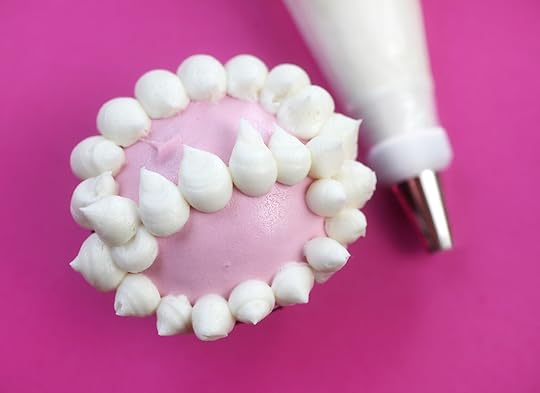
When the tops are dry, pipe dots of white buttercream on top with a #12 tip. Leave a small section free from frosting at the bottom as shown to decorate the face. I couldn’t make perfect small balls of frosting like I had them pictured in my head, but don’t worry, peaked frosting is pretty easy to fix.
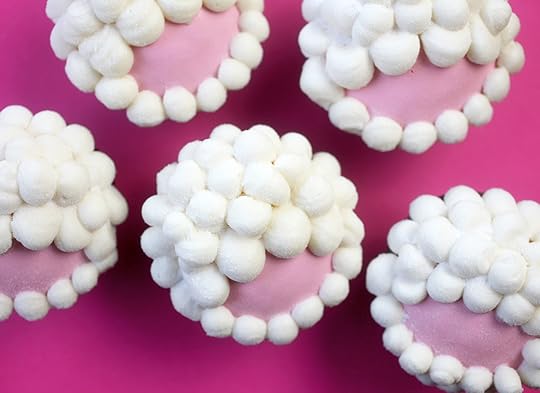
Frost the tops and then just place your cupcakes in the fridge for a few minutes. When the frosting is chilled, you can easily pat down the points. And, to give the frosting an even softer look, you can dust the tops with non-melting sugar. Trying not to get any on the pink area thogh. Chill again for a few minutes to make them easier to handle when putting on their faces.
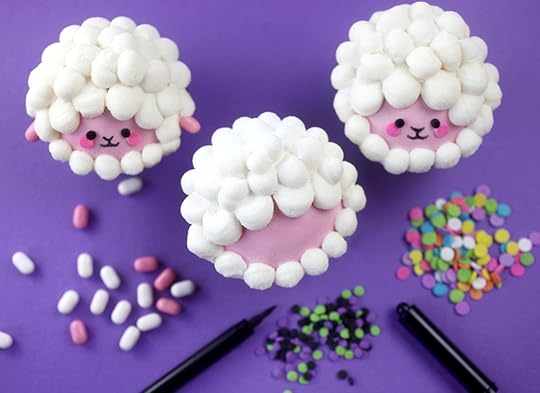
You can use pink confetti sprinkles for cheeks, small black confetti sprinkles for eyes, pink tic tacs for little ears and a black edible ink writing pen to draw on the mouths and noses. Attach the sprinkles using a dot of melted candy coating to act as glue.
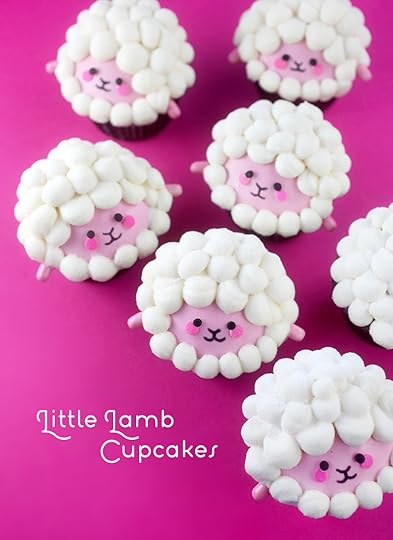
Wooly cute!!!

To dress them up a bit for Easter, add some candy bows. I used my Bakerella for Make’n Mold Playful Shapes candy mold to make them, but you can also use any candy shapes you find to work.
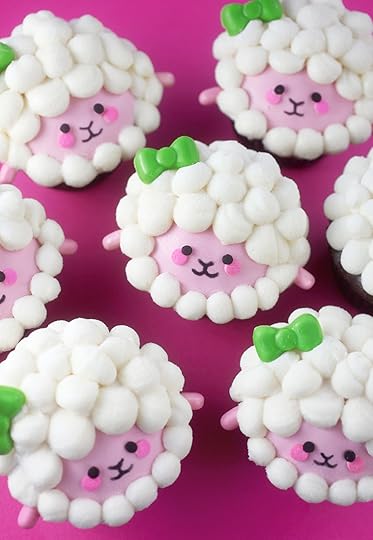
Make them for Easter or any day and make someone smile!


April 3, 2017
Characteristically Sweet
Here’s a fun round up of a bunch of character cake pops I’ve made. These are some of my favorite kind of pops to make because they’re the most challenging. I get excited when I can find just the right tiny candies and sprinkles to portray a character. Sixlets, jelly beans, sunflower seeds, M&M’s, confetti sprinkles and mini marshmallows are some of my go-tos. And of course, I couldn’t live without black edible ink writing pens. So handy for drawing smiles, eyes and especially orange cat stripes. : )
Take a look below and tell me if you see any of your favorites or who I should try to make next. There are just soooo many choices to choose from!!! Wizard of Oz, Star Wars, Nemo, Nursery Rhymes, Superheroes, Simpsons, Scooby, Pokemon, Pusheen, Tweety, Super Mario, Pac Man, Care Bears, Betty Boop, Totoro, Toy Story, Pinocchio, Shopkins, My Little Pony and even emoji. The possibilities go on and on and on.

Hello Kitty – these are the first characters I ever tried to recreate and still a fave.
Garfield
Spot
Grumpy Cat and Boo the Dog
Snoopy
Curious George
Sparky
Paddington Bear
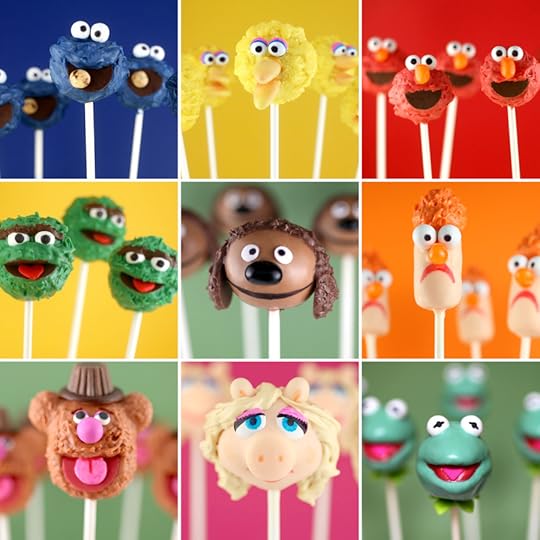
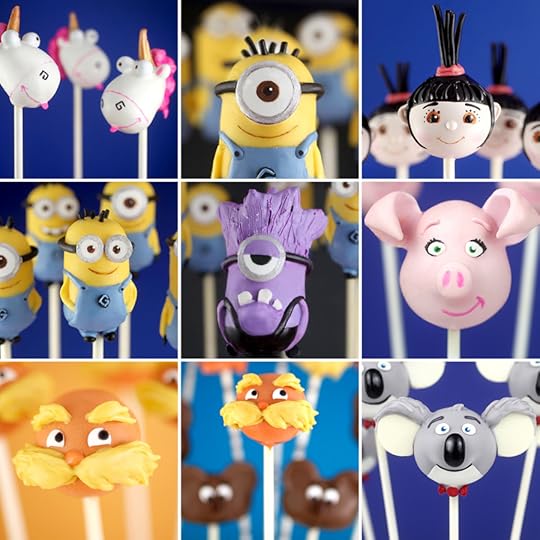
Minions
The Lorax
Sing’s Rosita and Buster
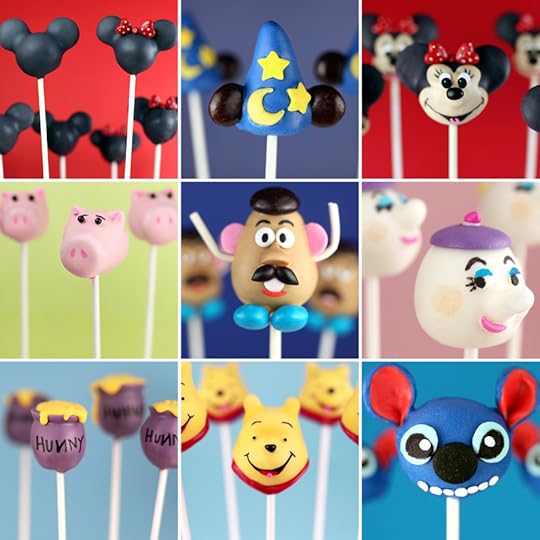
Micky and Minnie
Hamm and Mr. Potato Head
Winnie the Poo
Stitch and Sorceror’s Hat
Mrs. Potts
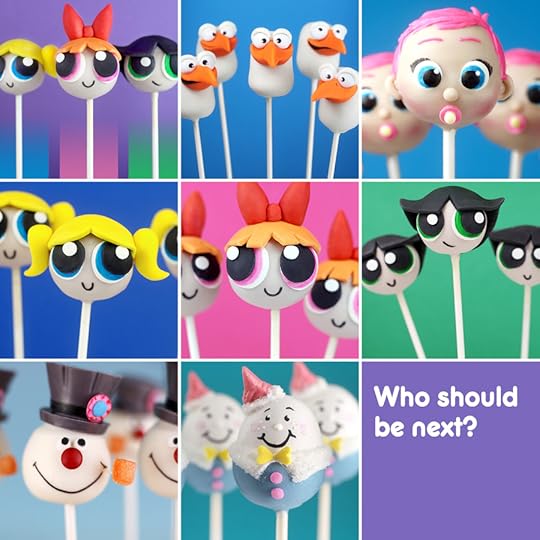
Storks
Powerpuff Girls
Frosty the Snowman
Humpty Dumpty
Hope these made you smile!

March 26, 2017
Italian Cream Cake
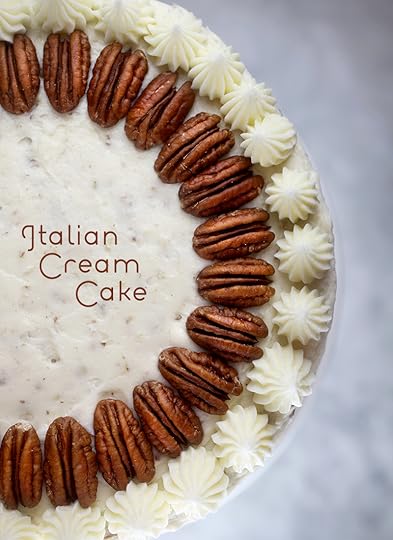
It’s time for cake!
My sweet friend Robyn Stone’s first cookbook releases tomorrow and I’m super excited to bake and share something from it with you. I chose her Italian Cream Cake after I saw it featured on QVC’s In the Kitchen with David when she was on the show. This was also her wedding cake, so I knew it had to be delicious. And, oh my gosh – it’s so good.
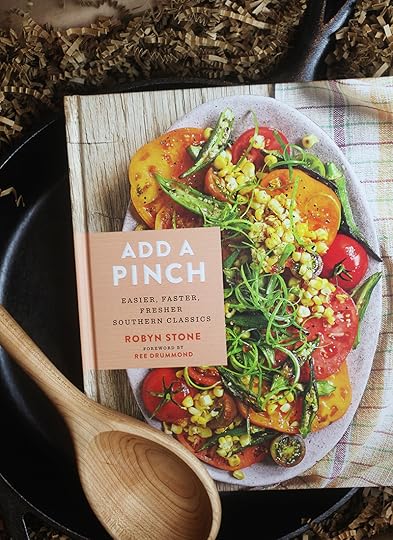
Robyn’s book goes by the same name as her blog, Add a Pinch, so if you’re looking for a mix of sweet, savory and southern dishes, you should totally check her out.
Plus, look at that cover, so pretty and at the same time the most vegetables you’ll likely ever see on my blog. Ha!
The Add A Pinch Cookbook releases March 28th and it’s full of delicious recipes I want to devour including Pimento Cheese Biscuits, Fried Green Tomato Caprese Stacks, Buttermilk Fried Chicken, Citrus Shrimp, and Sausage and Grits Casserole. The recipes are categorized by 10 ingredients or less, 30 minutes or less, freezer friendly and slow cooker favorites. Pretty handy.
Plus, look at these desserts: Strawberry Shortcakes with Sweet Cream Cheese Biscuits, Buttermilk Praline Cheesecake (YES!), Georgia Peach Crisp, Cream Cheese Pound Cake, German Chocolate Cake, and Lemon Meringue Pie. Oh my!
Okay, back to cake. Let’s make one.
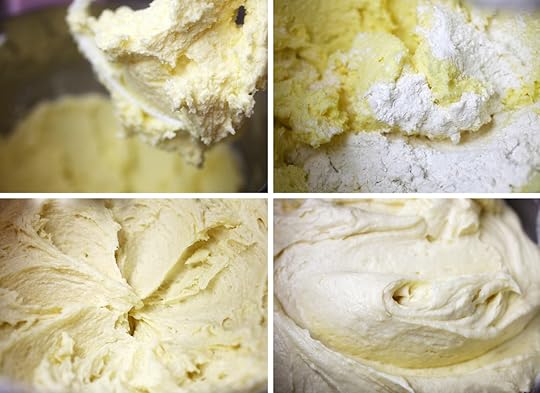
Making this cake batter is super satisfying. I love how thick and luscious it is after creaming the butter and sugar, adding 5 egg yolks and then mixing in the flour and baking soda.
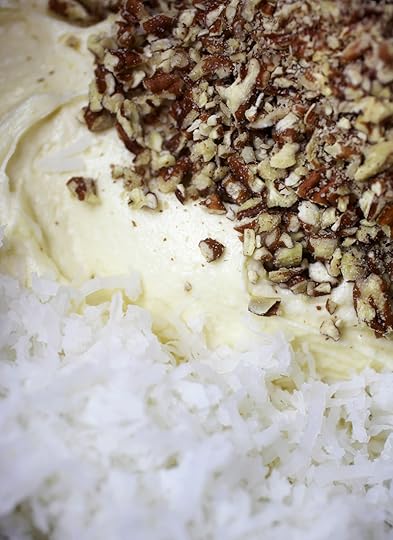
But it’s also chocked full of coconut and chopped pecans.
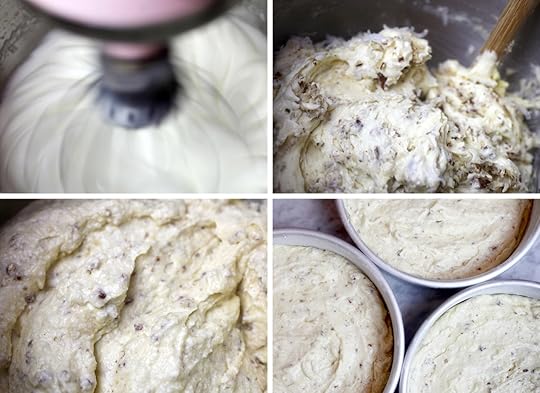
After mixing in the add-ins, fold in five whipped egg whites and spread that magic into three 8-inch cake pans and bake away.

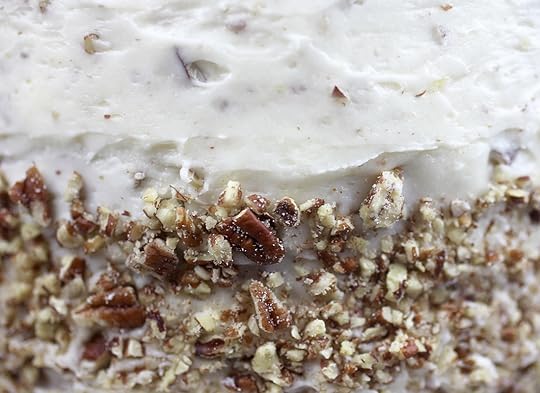
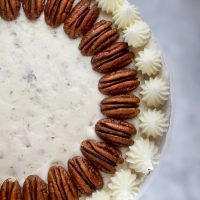
Assemble the cooled cake, spreading the top of each layer with pecan cream cheese frosting as you stack them. Then cover the sides with more frosting and even everything out.
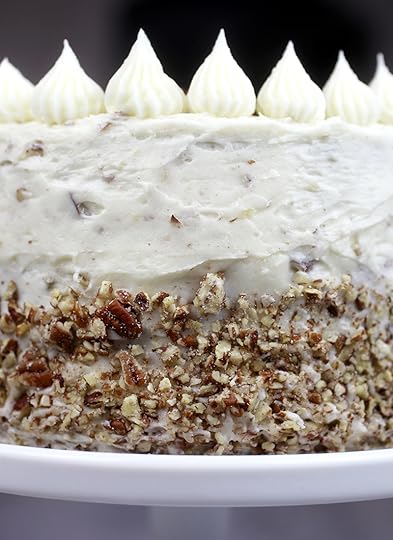
Note: Before mixing chopped pecans in all of my frosting, I set some off to the side to pipe on top of the cake. I also added some extra chopped pecans around the base of the cake…
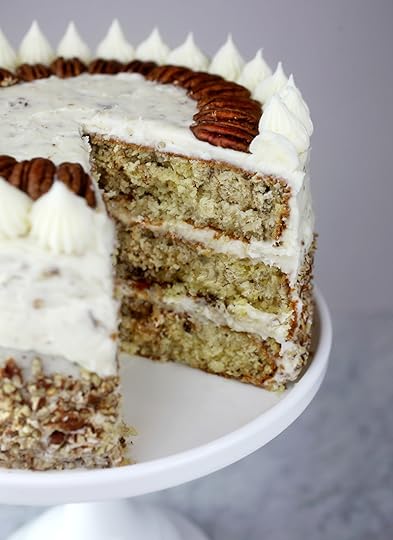
… and a ring of pecans on the top. But you can certainly just frost the entire cake with the pecan cream cheese frosting and forget all about fancying it up.
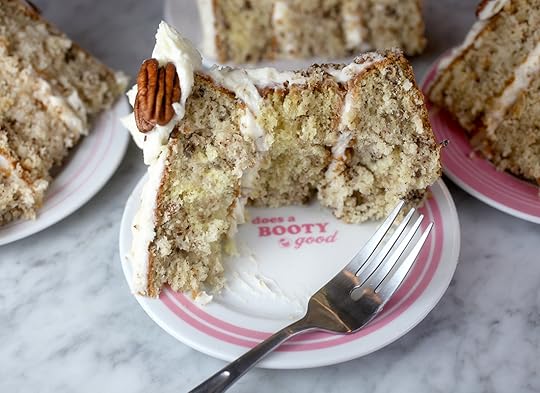
That way you can get right to enjoying a nice big bite. : )
Print Recipe
Yield: One 3-tiered, 8-inch layer cake
Ingredients:
cake
Baking spray
5 large eggs, separated
16 tablespoons (2 sticks) salted butter, at room temperature
2 cups granulated sugar
2 cups all-purpose flour
1 teaspoon baking soda
1 cup buttermilk
1 teaspoon vanilla extract
1 cup sweetened flaked coconut
1 cup chopped pecans
frosting
16 tablespoons (2 sticks) salted butter, at room temperature
2 (8-ounce) packages cream cheese, at room temperature
4 cups confectioners’ sugar, sifted
1 teaspoon vanilla extract
1 cup chopped pecans
Directions:
Preheat the oven to 350°F. Prepare three 8-inch cake pans by spraying with baking spray or buttering and lightly flouring them.
For the cake: In the bowl of a stand mixer fitted with the whisk attachment (or using a hand mixer), beat the egg whites until they hold a stiff peak, about 7 minutes.
In a clean bowl of a stand mixer fitted with the paddle attachment (or using a hand mixer), beat the butter and sugar at medium speed until light and fluffy, about 5 minutes. Add the egg yolks one at a time, beating after each addition until combined.
In a medium bowl, whisk together the flour and baking soda. Alternate adding the flour mixture and the buttermilk to the butter and sugar mixture, beating after each addition until just blended. Stir in the vanilla, coconut, and pecans. Fold in the
whipped egg whites. Divide the batter among the prepared pans.
Bake until the center of the cake springs back to the touch and a wooden toothpick inserted in the center comes out clean, about 30 minutes. Let the cakes cool for 10 minutes. Turn the cakes out of the pans onto wire racks and let cool before frosting.
For the frosting: In the bowl of a stand mixer fitted with the whisk attachment (or using a hand mixer), beat the butter and cream cheese at medium speed until light and fluffy, about 5 minutes. Add the sugar, 1 cup at a time, beating at the highest speed for about 10 seconds after each addition. Stir in the vanilla and nuts.
Spread the frosting over the top of one of the cooled cake layers. Add a second cake layer and spread with frosting. Top with the remaining cake layer and frost the top and sides of the cake. Because of the cream cheese in the frosting, this cake needs to be refrigerated.
Shared with permission from the Add A Pinch Cookbook by Robyn Stone, Copyright © 2017
Enjoy!!!
And hugs and huge congrats to you Robyn, you deserve it!

March 5, 2017
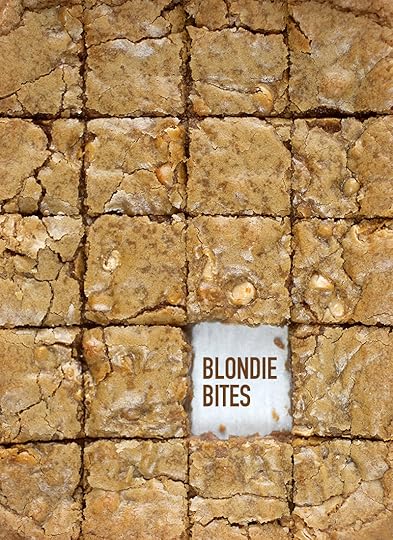
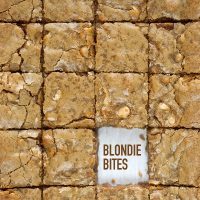
Lazy Day Blondie Bites
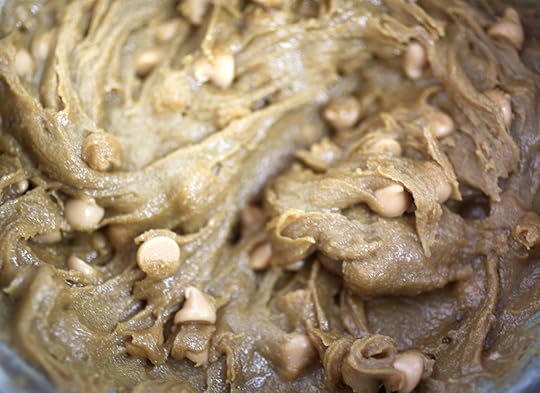
Sometimes I just crave a treat that is sweet and simple. Something that doesn’t need decorating and something I don’t feel compelled to make look super cute. So this afternoon when I wanted to sink my teeth into something sugary while I watched Netflix, I went to the pantry to see what I could whip up in a hurry. I’m low on supplies right now but I did have some an opened bag of butterscotch chips and one single egg left, so I decided to make these decadent little blondies.
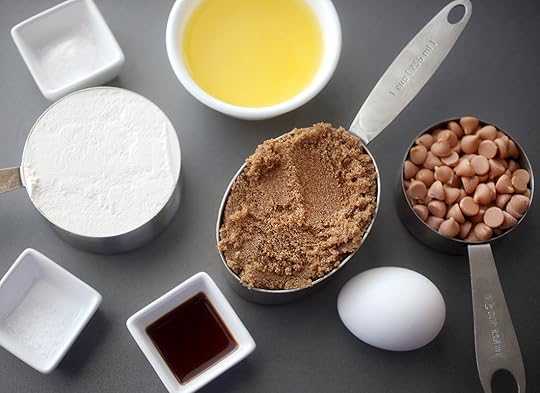
These are great because you only need a handful of everyday ingredients.
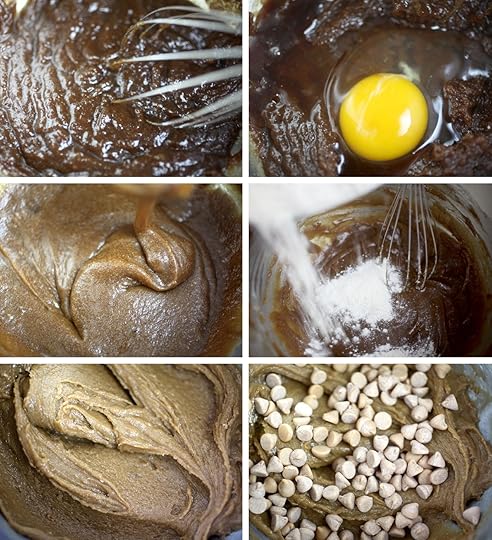
And they are super quick to whisk together.
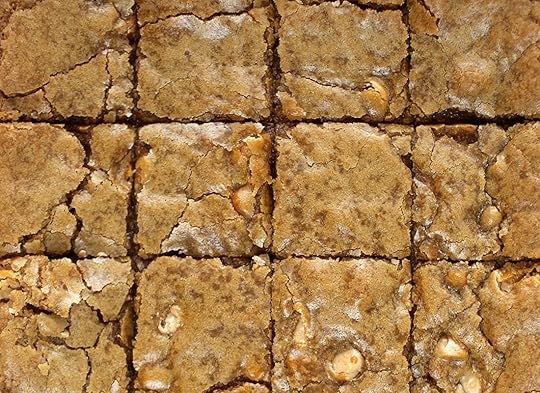
Bake the blondies and when cool, cut into small squares. These are pretty sweet, so you really don’t need a big bar.
Here’s how to make them.
Print Recipe
Yield: 16-20 small squares
Blondie Bites
Ingredients:
1 1/4 cup all purpose flour
3/4 teaspoon baking powder
1/4 teaspoon salt
1/2 cup unsalted butter, melted
1 cup dark brown sugar, packed
1 egg
1 teaspoon vanilla
1/2 cup butterscotch chips
Directions:
Preheat oven to 350 degrees Fahrenheit and lightly coat the bottom of an 8 X 8-inch baking dish with non-stick cooking spray. You can also line with parchment paper to easily lift blondies from dish.
In a small bowl give flour, baking powder and salt a quick whisk and set aside.
In a medium bowl, whisk together melted butter and dark brown sugar until completely combined.
Add egg and vanilla and whisk until incorporated.
Stir in flour mixture until combined and then stir in butterscotch chips.
Bake 25-30 minutes and then let cool before cutting into small squares.
Note: I used a 6 X 9 baking dish to yield 20 squares.
Recipe adapted from this one over at Simply Recipes

Enjoy… and now back to some important binge-watching.

February 13, 2017
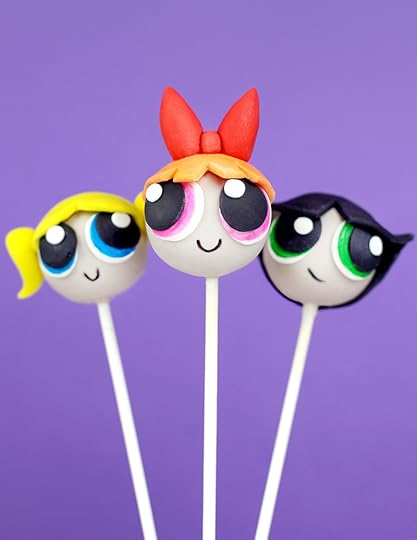
The Powerpuff Girls Cake Pops
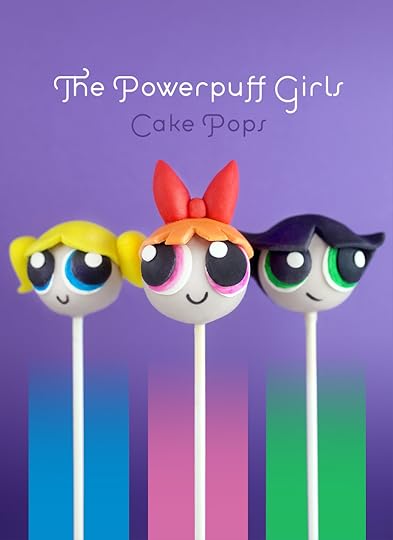
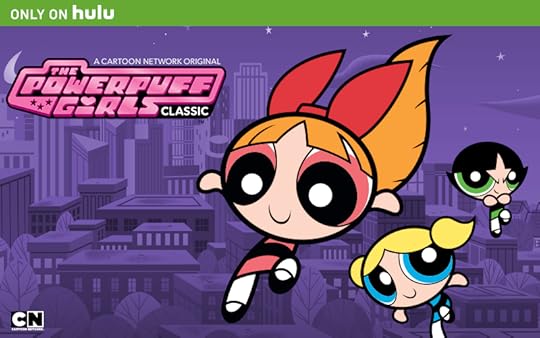
I’ve partnered with my friends over at Hulu to help share the news that The Powerpuff Girls are now streaming only on Hulu. That’s right, forever fans and new ones too can watch the full classic animated series all in one place. Did you know the show first aired in 1998. It’s hard to believe it’s been almost twenty years since these three sugar-coated heroes started fighting crime and saving the world before bedtime, but their message of girl power is just as important now as ever.
Who’s ready to make some cake pops with POW-factor…
Let’s get going.
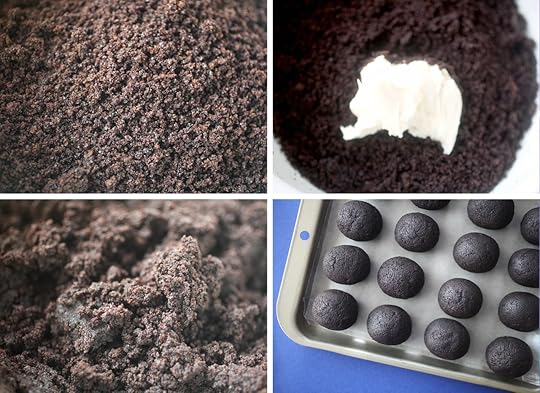
First things first… make some cake pops (crumbled cake mixed with frosting) and shape them into ovals instead of circles. Here are my basic cake pop instructions if you haven’t made them before.
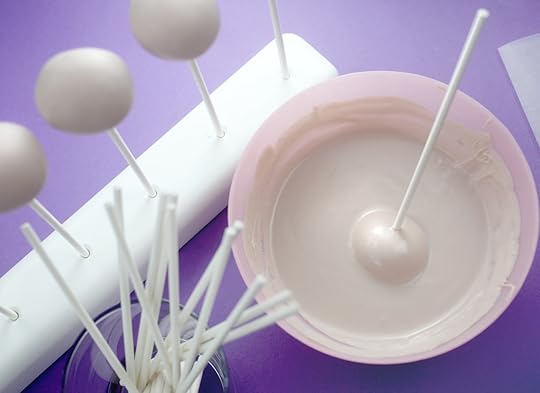
Dip the cake pops into melted candy coating. For a fleshy color, you can melt vanilla coating with a little bit of chocolate and pink candy coating. Add the colors a little at a time until you get the shade you want. Go ahead and dip all the oval-shaped pops and let them dry completely.
Now the fun part… turning them into these cuties.
Sugar, spice and everything nice!
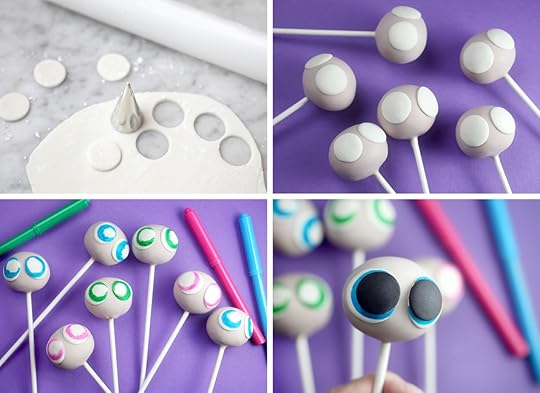
To get started decorating, you’ll need fondant and edible ink writing pens. You can buy white fondant and tint it with icing color to get the colors you need. You can also buy it already colored in small packages of orange, yellow, blue, black, and red at craft stores.
Roll out vanilla (white) fondant on a powdered sugar dusted work surface and cut small circles for eyes. I used the bottom of a decorating tip for the shape and then rolled the circles a little flatter to make the white part of the eyes larger. Roll out a couple at a time and attach to the front of a cake pop with melted candy coating.
When all the pops have eyes, use green, pink and blue edible ink pens to draw circular shapes on top of the fondant. You don’t need to color in the entire circle because the area will get covered.
Now roll out black fondant and use the same decorator tip to cut circles. This time don’t roll them flatter. Just attach on top of the colored fondant with melted candy coating.

Then dot the eyes with white confetti sprinkles.

What’s up Buttercup? To make her raven hair, cut a 2 1/2 to 3 inch circle out of black fondant. Then remove a tiny triangle. Place the circle on top of the pop and pinch points on the sides to shape. Remove and apply melted candy coating on the underside before permanently attaching in position for her hair.
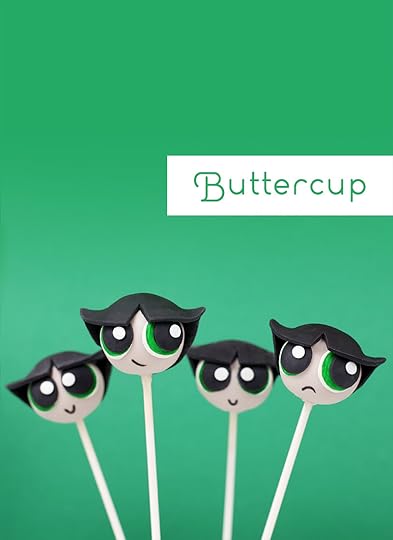
Seriously cute!
[image error]
To make Bubbles bright hair, cut a 1 1/2 to 2 inch circle out of rolled yellow fondant and remove a curved section from one side to resemble a rounded heart. Attach to the pop with melted coating. Then shape two small balls of fondant into pigtails. Attach to the sides of the pop with melted coating or dab a little water on the side of each pig tail and press on the pop to hold in place until set. Let dry.
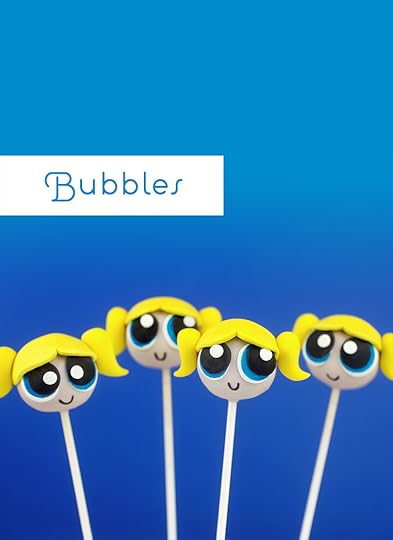
Oh my – as sweet as she can be!
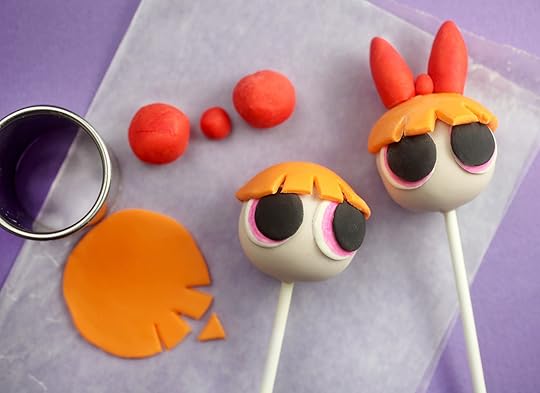
For Blossom’s hair, cut small circles out of rolled orange fondant and then make bangs by cutting three tiny sections out of the fondant. Attach to the pop with melted candy coating.
To make her big bow, roll a tiny ball for the center and two rounded cone shapes out of fondant. I mixed a little red with the orange fondant to create the right shade. Attach bows to pop with a dab of water or melted candy coating. Hold in place until set and let dry completely.
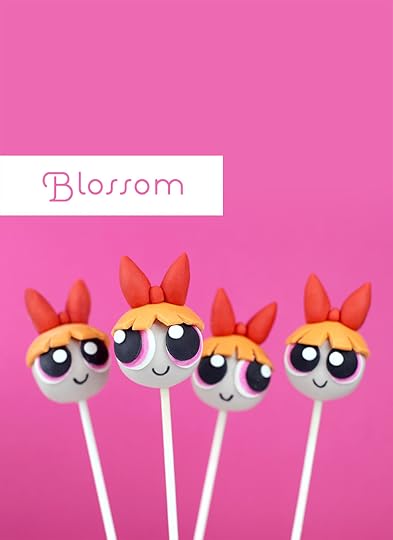
Blossom may be the leader, but I think they’re all equally adorable.
Were you a Powerpuff Girls fan? Who was your favorite?
This post is in partnership with Hulu. Hulu is THE streaming destination for the best of TV, and a great selection of films! Plus, you can stream almost anywhere, on any device, including gaming consoles, set-top boxes, tablets, mobile phones, and more. Visit Hulu.com to start your free trial.

February 5, 2017
Be Mine Gift Guide
With Valentine’s Day just a little over a week away, I’ve gathered some fun finds that would make a sweet surprise for someone special. But really, I kinda just want them to all be mine. Here, let me show you some of the gifts I have my eye on…
Fries Before Guys Chocolate Box
Maggie Louise Chocolates | $38.00
This is the cutest little box of chocolates to give your bestie or favorite french fry fan. The fries are white chocolate with different fillings inside.
Strawberry Cake Slice Candle
Tinsel and Twirl | $18
Brighten someone’s day with this six-inch strawberry cake slice candle.
Mason Cash Hearts Mixing Bowl
The Mercantile | $40
This adorable bowl is full of heart and a great gift for someone who loves to bake.
Whimsies Unicorn Ring
Kate Spade | $68.00
Put a ring on it. This bright pink balloon party ring will bring the smiles all day long.
Love Potion Tumbler
Bando | $14.00
Sip Sip Hooray! Feel the love when you drink from this super cute cup.
Arm Candy Temporary Tattoos
Tattly | $18
Wear your heart on your sleeve. I mean your arm. The set includes 2 each of Be Mine 4ever, Candy Bling, Candy Charms, and Sweetheart Strand tattoos. Or just get the Be Mine 4ever conversation heart bracelet set for $6.00
Pink Syrup Ice Cream Flats
Shoe Bakery | $165.00
These adorable strawberry and vanilla shoes are sprinkled with sass. (Note: These are made to order and can take several weeks)
Champagne and Strawberries Macarons
Dana’s Bakery | $31.50
Enjoy a dozen of these sweet champagne and strawberry shortcake flavored macarons.
Love Cookie Cutter
Meri Meri | $10
Share the love when you make sugar cookies with this cute cutter.
Conversation Heart Mylar Balloon Pack
Studio DIY | $12.99
Love is in the air. Show off these mylar hearts that say: Be Mine, Hey Girl, Girls Rule, Wink Wink, Hot Stuff, Dream On.
Chocolate Sables
Miette | $7.00
Enjoy these perfect bite-size chocolate cookies packaged in a charming polka-dot bag. I love to pick up one of these pretty packages whenever I get the chance to visit Miette in San Francisco.
Ice Cream Tumbler
Oh Happy Day | $15.25
Grab this ice cream tumbler and sip your way to a much sweeter day.
We Go Together: Milk and Cookies and Sweets Cookie Cutter Sets
Sweet Sugarbelle | $6.99
Sweet Sugarbelle’s cookie cutter series keeps getting cuter.
Be My Galentine Sprinkles Variety Pack
Sweetapolita | $40
I love Sweetapolita’s custom sprinkle medleys. Grab her valentines variety pack or buy them individually in your favorite colors.
Jeni’s Ice Cream Valentine’s Day Collection
Jeni’s | $55
Ice cream in the mail? I’m all in. This Valentine’s Collection looks great, but if I’m buying for myself, it has to be the All Chocolates Collection ($48) all the way.
Hope you like these as much as I do and maybe find something to make Valentine’s Day a little sweeter … for yourself of someone else. Enjoy!!!

February 1, 2017
It’s Cake Pops Day
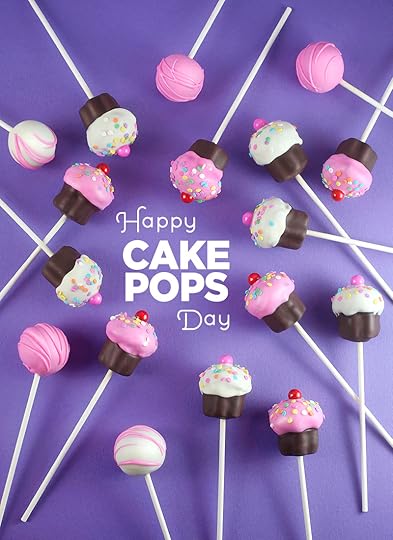
Here’s a sweet little shoutout for National Cake Pops Day! YAY!
It’s been way too long since I made my original cupcake pops so I decided I needed to start dipping. This design is still one of my all-time favorites. Partly because these are the ones that captivated the internet way back when, but also because they are just sweet and simple and perfect for so many occasions. Here’s the first post I made about cupcake pops (don’t laugh) when they debuted back on February 1st, 2008… can you believe it’s been nine years ago now? Raise your hand if you’ve made or enjoyed cake pops sometime between now and then. Crazy, right! I still can’t believe how they’ve brought smiles to so many people around the world.
Anyway, BIG hugs and I hope you have a super sweet day!
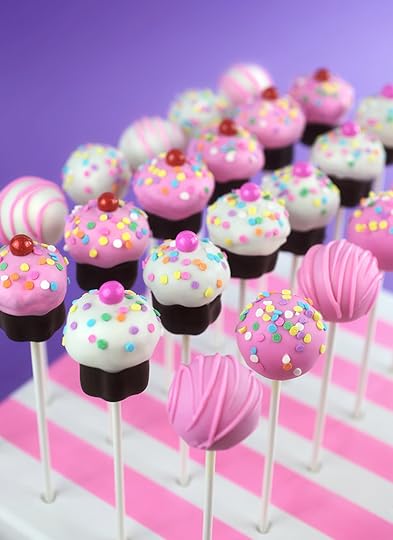
PS… here’s the cupcake pops and cake pops basic how-to instructions if you decide you want to make some, too! And here’s the first time I posted about plain cake pops (again, don’t laugh) – I think you’ll be able to tell by those old posts that I had no idea where these little treats on a stick were headed. : )

January 22, 2017
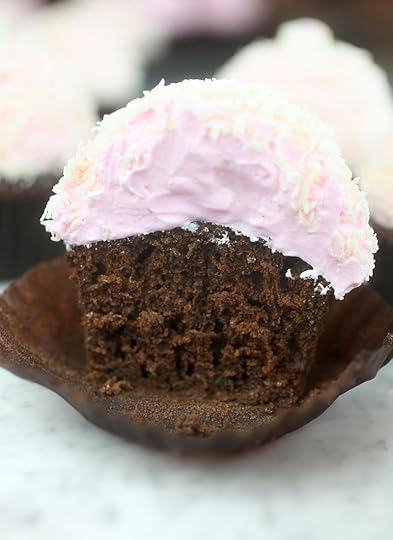
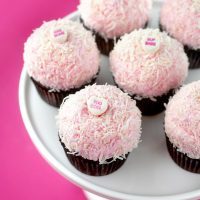
Coconut Cloud Cupcakes
These chocolate cupcakes covered in pink fluff frosting and shredded coconut are dreamy and delicious. I made these bundles of joy from Passion for Baking’s new cookbook. Do you know Manuela? She’s a blogger/baker from Norway and she makes the most beautiful desserts. All of her sweets and photos are impeccable. I first found her on instagram and was immediately wowed. Check her out on instagram and her blog if you want to know more. You won’t be disappointed. In the meantime, let’s love on these cupcakes.
This batter! I think I really just need a spoon.
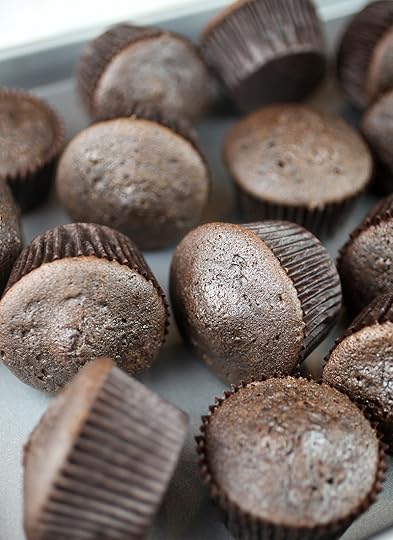
But no, it’s much better that we bake them.
So we can cover them in delicious fluff frosting.
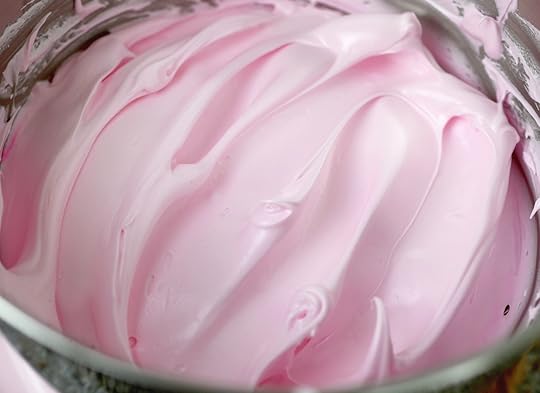
And, look how lovely it looks in light pink.
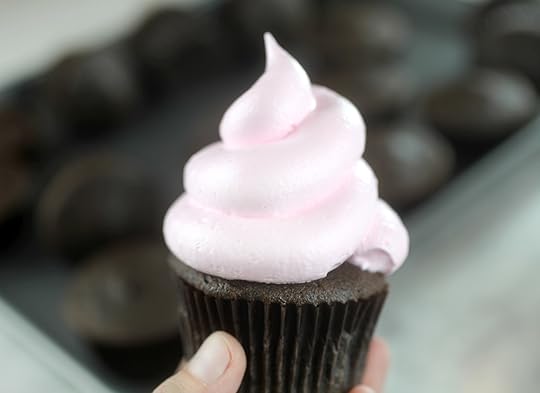
To decorate, you can pipe swirls on top of cupcakes.
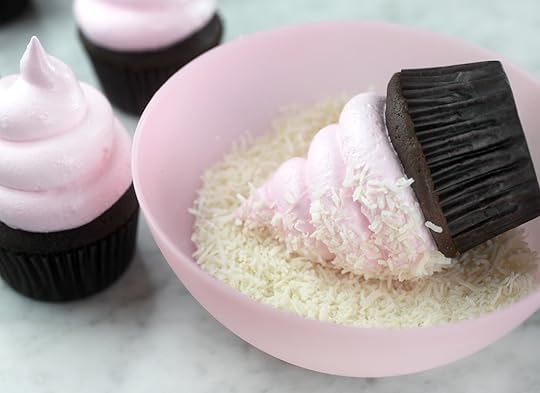
Then gently press sides and tops in unsweetened coconut.
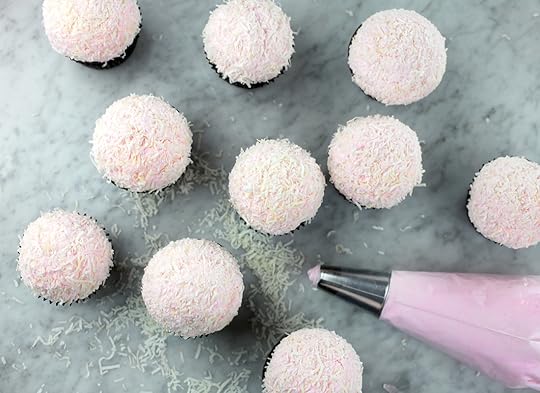
Once coated in coconut, you can use the palm of your hand to gently mold domed tops.
So cute!
And so so good!
Here’s the recipe:
Print Recipe
Yield: 18 cupcakes
Coconut Cloud Cupcakes
Ingredients:
Manuela’s Chocolate Cupcakes
3/4 cup unsalted butter, at room temperature, cut into pieces
1 1/3 cup superfine sugar
4 large eggs, room temperature
2 cups plus 1 tablespoon all purpose flour
3/4 cup unsweetened cocoa powder
3/4 teaspoon baking soda
1/4 teaspoon salt
1 cup hot strong coffee
1 cup heavy whipping cream, room temperature
2 teaspoons vanilla extract
Fluff Frosting
1 cup plus 3 tablespoons superfine sugar
1/2 cup light corn syrup
1/3 cup plus 1 tablespoon water
5/8 cup (150g) egg whites
1 teaspoon vanilla
pink icing color
unsweetened coconut
heart candies (optional)
Directions:
For cupcakes: Preheat oven to 350 degrees Fahrenheit and line cupcake pans with paper liners.
Sift flour, cocoa powder, baking soda and salt in a bowl twice and set aside.
In a bowl of a stand mixer, cream the butter and sugar together until light and fluffy, about six minutes.
Add the eggs, one at a time, mixing slowly after each addition, but not more than 30 seconds. Add vanilla when adding the last egg.
Slowly add half of the flour mixture to the butter mixture, then add the hot coffee, beating slowly until incorporated. Add the remaining flour mixture, followed by the heavy cream. Mix on medium until just combined, about a minute.
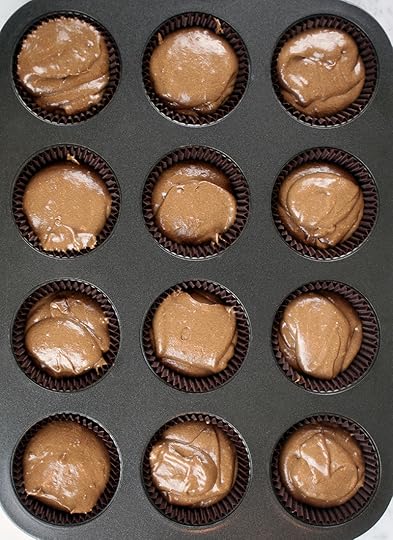
Scoop batter into baking cups so that each cup is about 3/4 full. Bake 16-18 minutes or until a toothpick inserted comes out clean. Remove from pans and let cool.
For fluff frosting: Combine 1 cup sugar, light corn syrup, and water in a small saucepan fitted with a candy thermometer. Stir until completely dissolved and let it heat over medium-low heat until temperature reaches 240 degrees F.
Add egg whites to stand mixer and mix on low speed; as soon as it begins to foam, add the three tablespoons of sugar, one at a time.
When syrup reaches 240 degrees F, slowly pour the sugar syrup into egg whites, aiming for the side of the bowl. When all syrup has been added, turn mixer to medium high speed and whisk until frosting becomes thick and glossy and holds a firm peak. The bowl will be slightly warm. Once frosting is ready, add vanilla and a couple of drops of food coloring. Mix until just combined.
To decorate: Fill decorator bag fitted with a large round tip with fluff frosting. Pipe swirls on top of cupcakes and then gently press sides and top into a bowl filled with unsweetened coconut. Use palm of your hand to help shape round tops if needed. Top with Valentine’s Day candy hearts if desired.
Serve cupcakes the same day.
Adapted from Love, Manela, The Baking Book, 2016
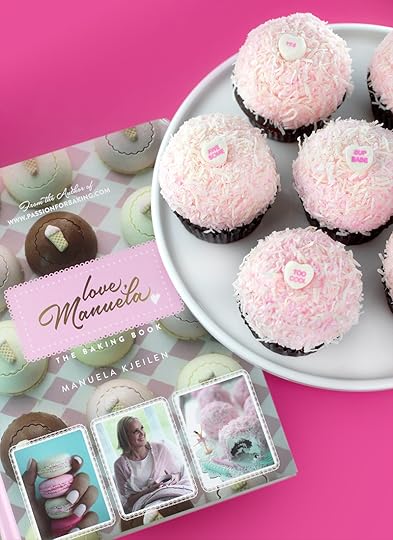
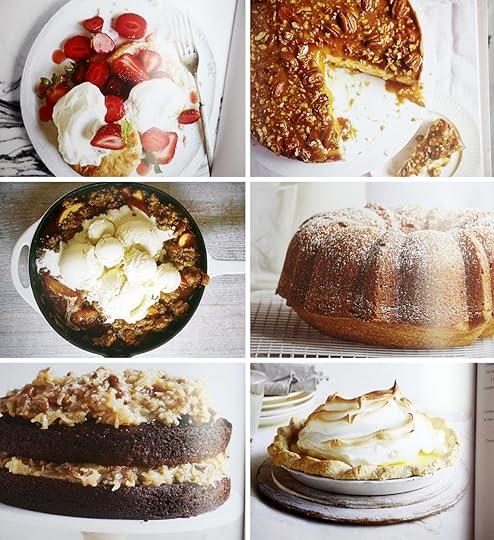
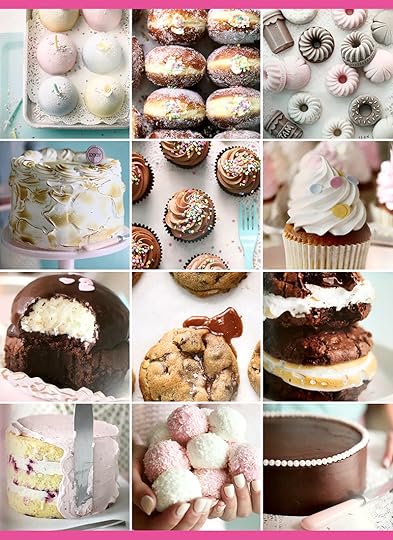
Enjoy!!! Plus, take a peek at some of the pics below to visually sample some of the sweets in Manuela’s beautiful book.
Love, Manuela – The Baking Book

January 9, 2017
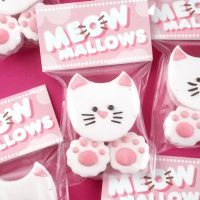
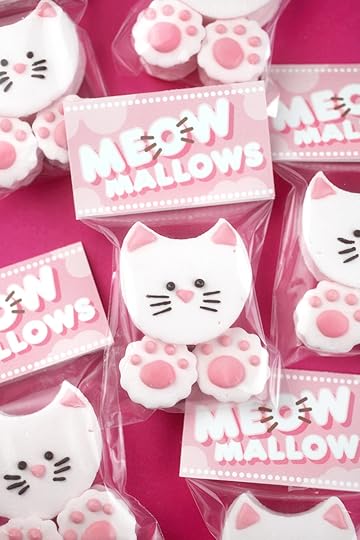
Meowmallows
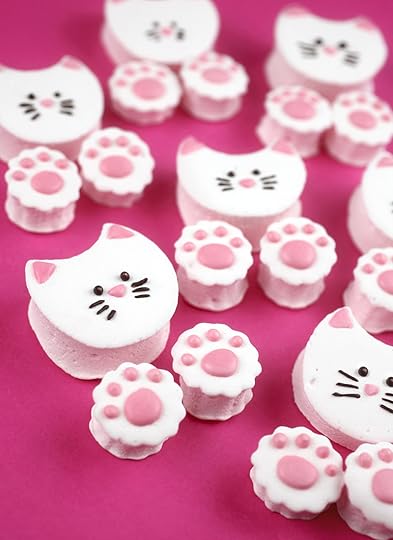
How cute are these cushy kitties! I had the urge to make marshmallows this past weekend and I intended to just dip or drizzle them in something chocoaltey. But, then… right before I cut them into squares, I changed my mind and made these little kitties and paws. Purrfect to cuddle inside your next cup of hot cocoa.

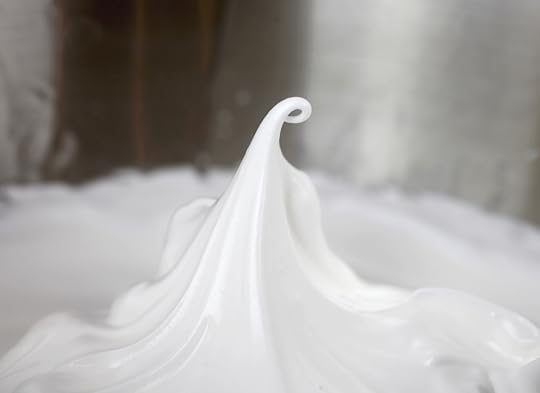
You know, I think marshmallows may be the most satisfying thing I’ve ever made. It’s beautiful to watch it come together from sugar and syrup to a soft and fluffy cloud-like confection.
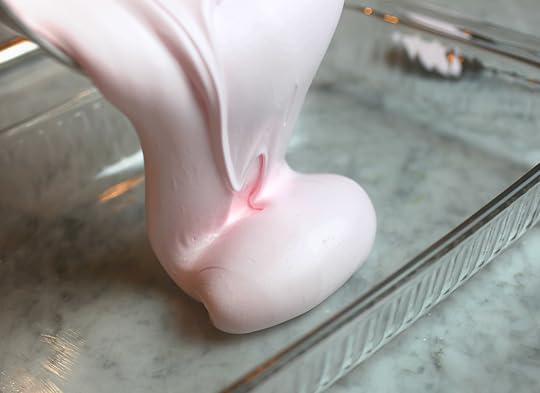
Just look how luscious.
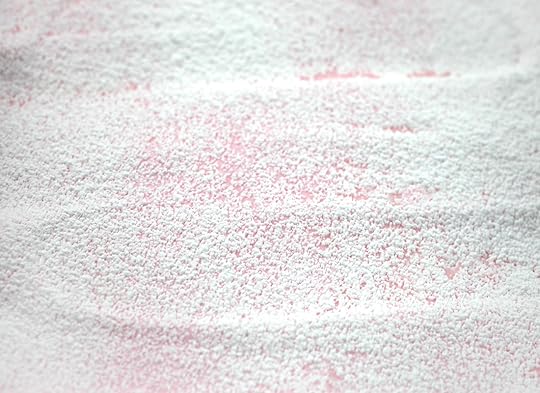
Once it’s poured in a pan, let it set for several hours coated in powdered sugar and corn starch to cure as it transforms from pillowy to puffy.

Ahhhh… satisfaction! Now you can certainly cut your marshmallow into squares, but using a cutter to make shapes is even more fulfilling. I really can’t describe it adequately. I just hope you’ll try it one day if you’ve never given them a go. I could cut out shapes all day.
Okay… To make the kitties, use a circle cutter about 2 inches wide. I didn’t actually have one that size so I used an egg-shaped cookie cutter. Once the shapes are cut, use a smaller circle cutter about 1.5 inches wide to remove a curved piece from the larger circle. The remaining shape is the kitty head with pointed ears. For paws, use a small round cutter about 1.25 inches wide to cut them out. Make sure all the newly cut and exposed sides are also coated in powdered sugar.
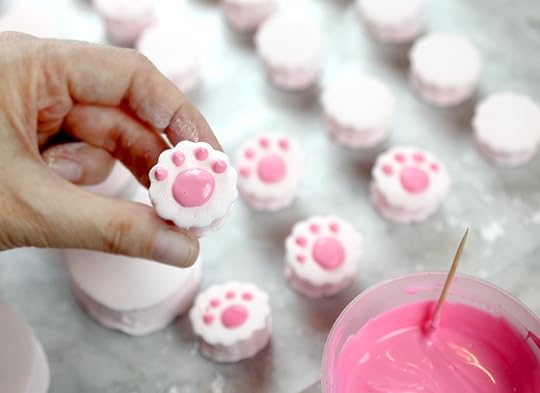
Now you you’re ready to decorate.
Dip a toothpick in melted smooth pink candy coating and draw one big circle and four toes on each small circle.
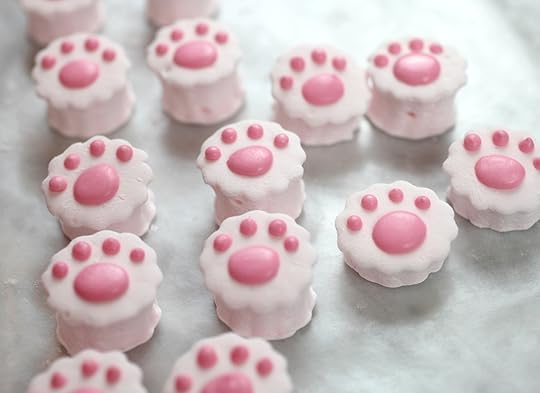
Puffy paws. Tell me you’re not smiling right now. : )
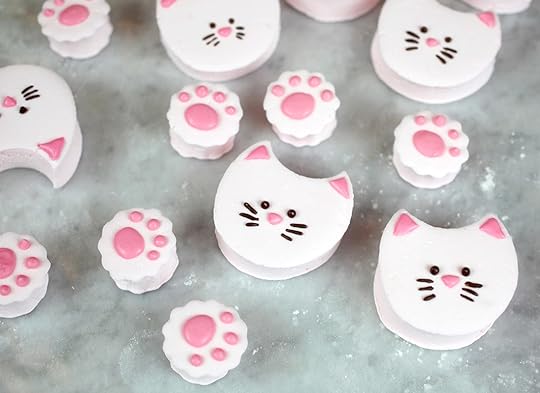
For the faces, draw on more pink melted coating for the ears and nose. And then draw on whiskers and eyes with melted chocolate candy coating.
Done and done.
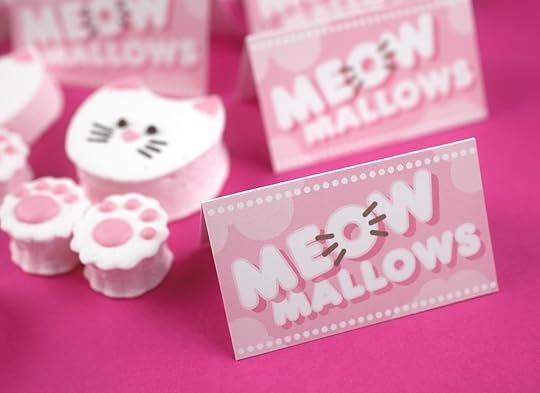
But if you’re not putting these in a cup of cocoa any time soon, then you can package them using these super cute meowmallow tags I made for you.
Download the Meowmallows Tags here.
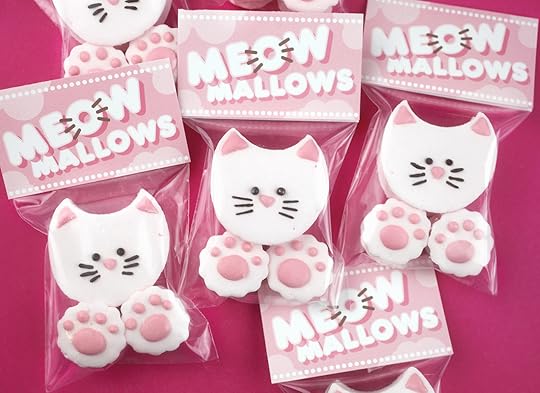
Dying!!! Definitely even cuter all squished in a tiny treat bag. You can staple the tags on 3 X 5 inch bags or use double-sided tape if you don’t want staples to show.
Here’s the recipe:
Print Recipe
Yield: 18-20 Meowmallows
Meowmallows
Ingredients:
3 tablespoons unflavored gelatin
3/4 cup water
…………….
2 cups granulated sugar
3/4 cup light corn syup
1/2 cup water
1/4 teaspoon salt
2 teaspoons vanilla extract
pink gel food coloring (optional)
………………...
1 1/2 cups powdered sugar
3/4 cup corn starch
Directions:
Whisk gelatin and cold water together in a small bowl and set aside to soften for about 10 minutes.
Lightly spray a 9 X 13 inch glass or metal baking pan with nonstick cooking spray. Wipe off any excess with a paper towel, making sure the bottom and sides are completely coated. (Note: For the paws, I used a second smaller glass pan to divide the marshmallow mixture into and yield thinner/more marshmallows. If you use the entire mixture in one 9 X 13 inch pan, they will result in thicker heads and paws.)
In a small saucepan, combine sugar, corn syrup, remaining water and salt over medium high heat. Clip a candy thermometer to the side of the pan and cook, stirring occasionally until the mixture reaches 240 degrees fahrenheit. Before the temperature reaches 240 degrees, place the gelatin mixture in the microwave for about 20 seconds on high and then pour into the metal bowl of a stand mixer with the whisk attachment in place. Turn the mixer on the lowest speed.
Once the sugar syrup reaches 240 degrees F, immediately remove from heat and carefully pour the sugar syrup into the mixing bowl containing the gelatin mixture. Increase mixer speed to medium and beat for about 5 minutes. Increase speed to medium high and beat for another 5 minutes. Add the vanilla and any food coloring and beat on high for one more minute.
Immediately pour the marshmallow mixture (messy) into prepared pan or pans. Spread evenly with a lightly oiled offset spatula.
Sift powdered sugar and cornstarch together and coat the top of the marshmallow. Reserve remaining mixture. Let the coated marshmallow sit uncovered for 5 hours or overnight before cutting.
When ready to cut, gently lift marshmallow out of pan and place coated side down on a baking pan with the bottom of pan also lightly coated with the powdered sugar mixture. Now coat the exposed marshmallow with more of the mixture and you’re ready to cut into squares (or kitten shapes.) Use reserved powdered sugar to also coat the sides exposed after cutting. When all sides are completely coated, brush off any excess.
Decorate paws and faces with a toothpick dipped in melted pink and chocolate candy coating. Package in treat bags with Meowmallow tags.
These cuties would be a super sweet treat for Valentine’s Day in a few weeks, too.
Enjoy!

January 2, 2017
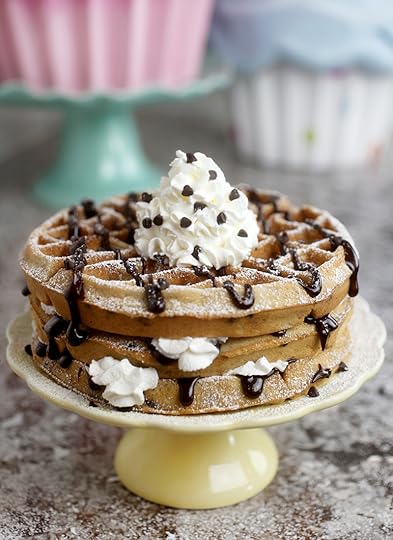
Chocolate Chip Chip Hooray Waffles
Happy Happy New Year friends! I hope the holidays were amazing for you and full of fun, friends and family. I made some chocolate chip waffles for us to help kick off 2017. So let’s get to it. Chip Chip Hooray!
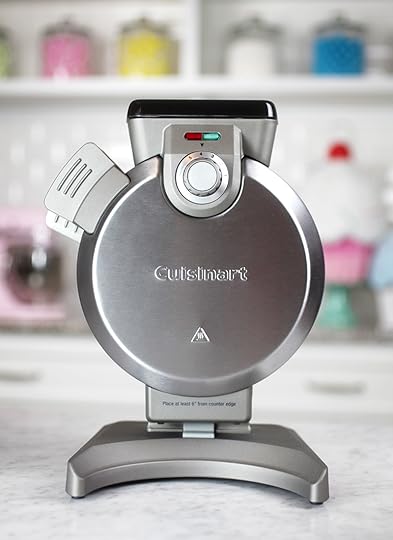
Okay first, check out my awesome new waffle maker. I got this beauty from my mom for Christmas and it’s pretty cool. It stands upright and you pour batter in through the opening on top. When done baking, you just lower the front to get your waffle.

For the recipe, grab some buttermilk, flour, eggs, oil, vanilla, sugar, corn meal, baking soda, salt, cinnamon and mini chocolate chips.
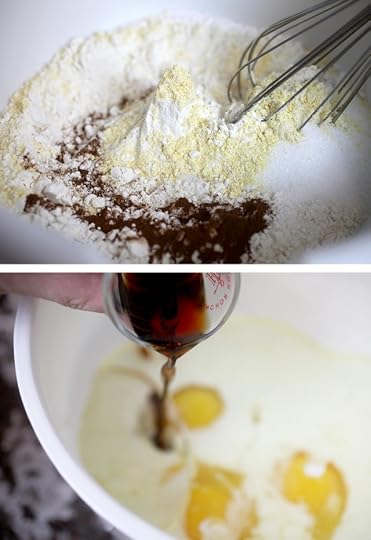
Whisk the dry ingredients together and then the wet ingredients together in two separate large bowls.
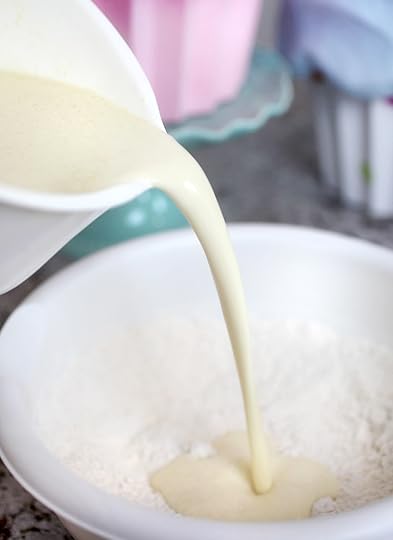
Add the wet ingredients to the dry ingredients and mix it all together
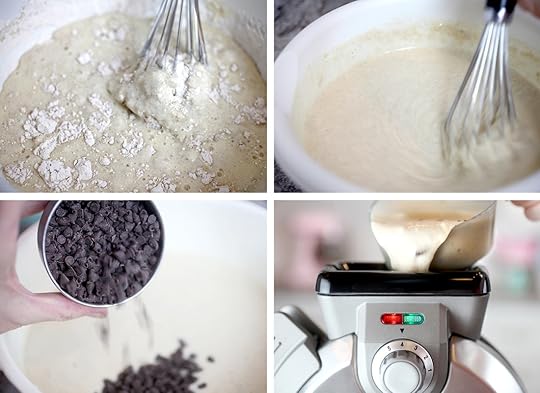
Stir in the mini chips and pour batter into your waffle maker.
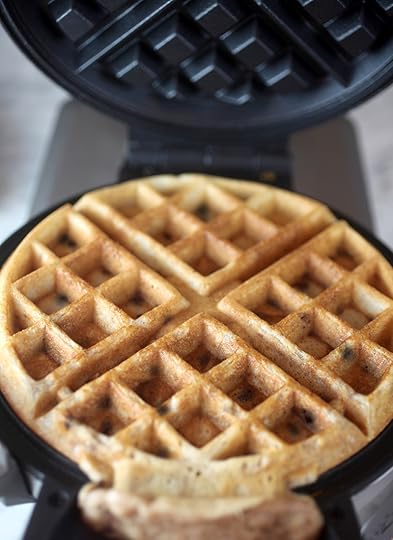
Since you pour batter into the opening on the top of this machine, it’s easy to make sure you get enough to make a complete waffle. Any excess kind of overflows up into the opening so you can just trim the extra off when you remove the waffles.
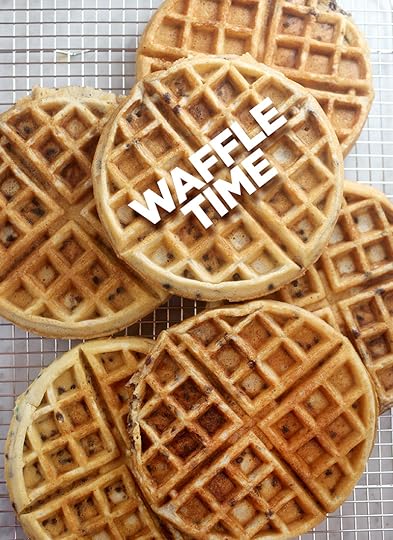
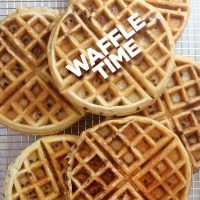
Waffle time! It’s the best time.
Enjoy these big boys with melted butter, syrup, powdered sugar, ice cream or whipped cream.
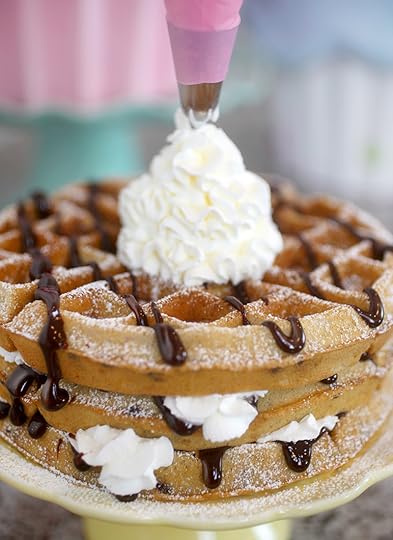
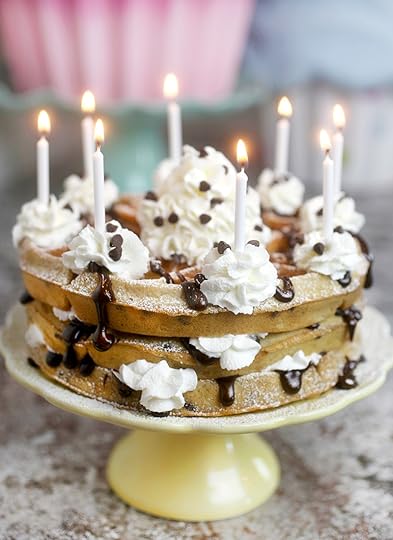
Yeah, let’s celebrate 2017 and go big with whipped cream (and more) … chocolate syrup, powdered sugar and extra mini chocolate chips to make a three layer waffle cake.
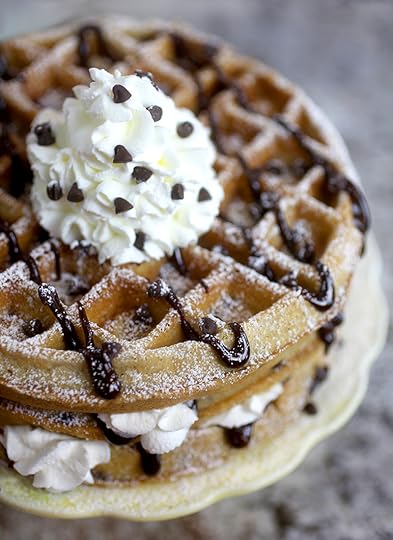
That’s the stuff.
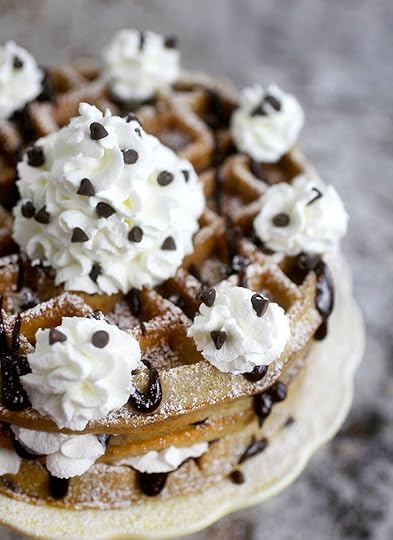
I couldn’t stop.
Print Recipe
Yield: six waffles
Chocolate Chip Waffles
Ingredients:
2 cups all purpose flour
2 tablespoons yellow corn meal or corn meal mix
2 tablespoons sugar
3/4 teaspoon baking soda
3/4 teaspoon salt
3/4 teaspoon cinnamon
2 1/2 cups buttermilk
3 eggs
2 teaspoons vanilla
2/3 cup vegetable oil
3/4 cup mini chocolate chips, plus more for sprinkling
----
1 cup heavy whipping cream
2 tablespoons sugar
chocolate topping
Directions:
Whisk together dry ingredients in a large mixing bowl. In a second large mixing bowl, whisk together the liquid ingredients. Add liquid ingredients to dry ingredients and whisk until completely combined. Stir in mini chocolate chips.
Pour about a cup of batter into preheated waffle maker and bake. Remove gently with tongs.
They’re perfect served right away with melted butter, powdered sugar, and maple syrup. If you want to take them up a notch, then top them with chocolate syrup or fudge topping and add whipped cream and more mini chips for a fun waffle cake.
To make whipped cream, chill metal mixing bowl and beaters in freezer for about 20 minutes. Beat whipping cream and sugar in mixing bowl just until stiff peaks form.
Recipe adapted from accompanying Cuisinart Recipe Booklet.
I hope 2017 is full of amazing adventures for us all. Let’s go get after them.

Bakerella's Blog

- Bakerella's profile
- 9 followers

