
Bakerella's Blog, page 14
December 14, 2016
Playing House

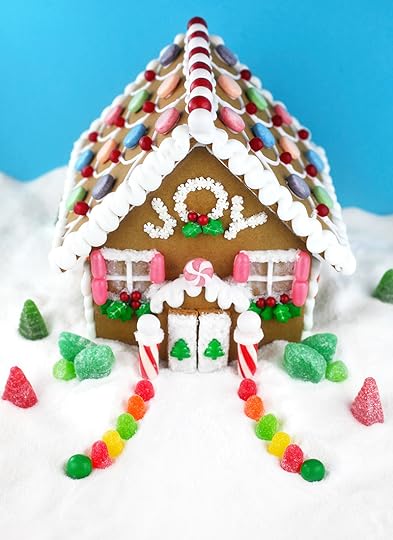
The holiday season is in full swing and oh my gosh, I had so much fun creating this cute little cookie cottage. I made it in partnership with Target’s blog, A Bullseye View, using one of their Build-Your-Own Gingerbread House Kits. I’ve worked with them before to make Spot Cake Pops, Beach Ball Cake Pops and some fun Cotton Candy Cupcakes.
But this project might have brought me the most joy.

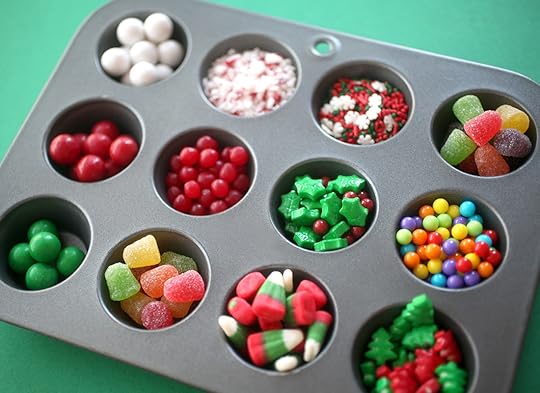
I mean, how can you not love looking at all those candy colors and feeling happy inside.
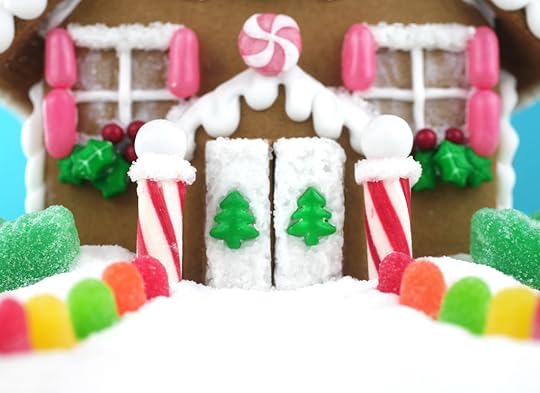
Candy cane poles, Christmas tree door knockers, gumdrop-lined walkways.

Happy, happy, joy, joy!
P.S. this is my first attempt putting a gingerbread house together and decorating it. I know, it’s crazy that it’s taken this long! If you’ve never made one either but have always wanted to, consider a kit for your first time to ease yourself into it. Right now, my little house is sitting on top of a tall cake stand filled with sugar in the middle of my kitchen island and I can’t tell you how much it makes me smile every time I walk by it.
If you want all the fun decorating details, hop on over to Target for the full post and enJOY!
This project in partnership with Target’s A Bullseye View.


December 12, 2016
Sing for the Holidays
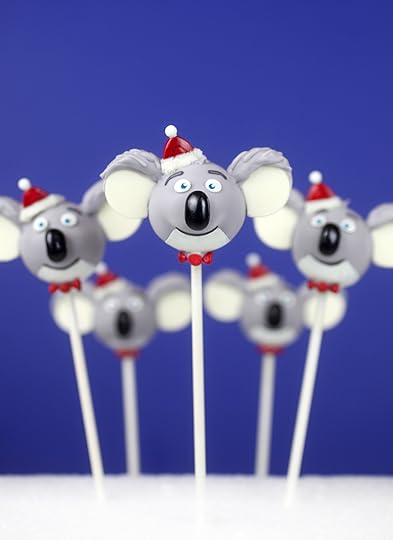
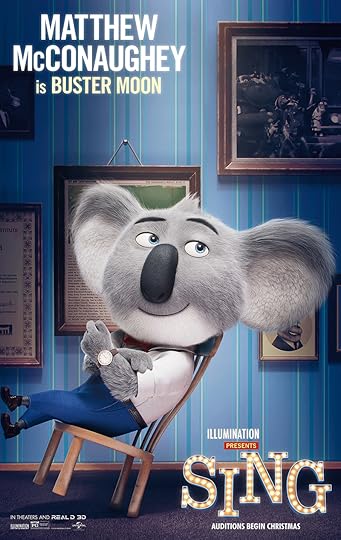
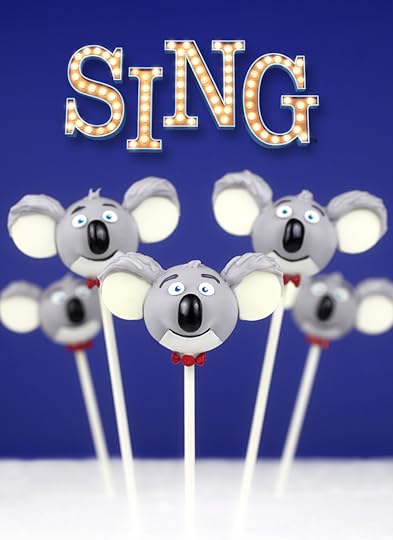
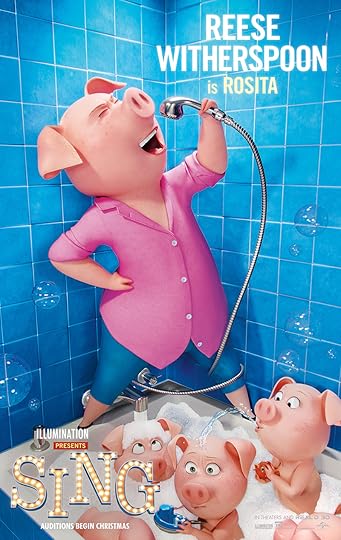
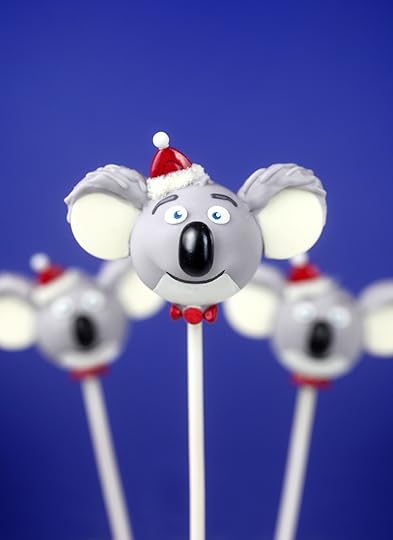
I’m sharing some of the cutest cake pops in partnership with Universal Pictures to celebrate the movie SING in theaters on December 21. The movie stars a cuddly Koala named Buster as he tries to revive his grand theater by producing the world’s greatest singing competition.
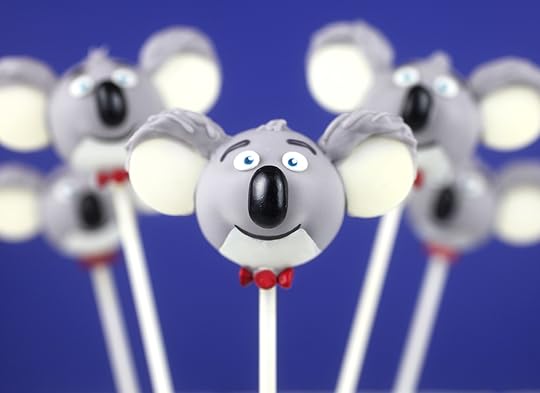
Whenever I make character cake pops I get a little nervous because I never know how close I can get the resemblance until everything is done, but this little guy definitely exceeded my expectations. I just want to squeeze those sweet cheeks. Or, well, bite them.
I love how he turned out.
Plus, this is probably the closest I’ll ever get to Matthew McConaughey.
Ok, let me show you how to make him.
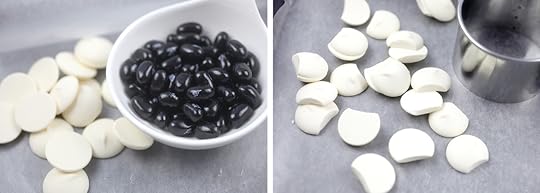
We’ll use black jelly beans to create his nose and white candy wafers to make his ears. Just cut a curved edge from the wafer with a round cookie cutter. The cut edge can then easily attach to the side of the Koala’s head when you are ready.
Here are my basic cake pop instructions to get you started and then keep reading the directions here to decorate.
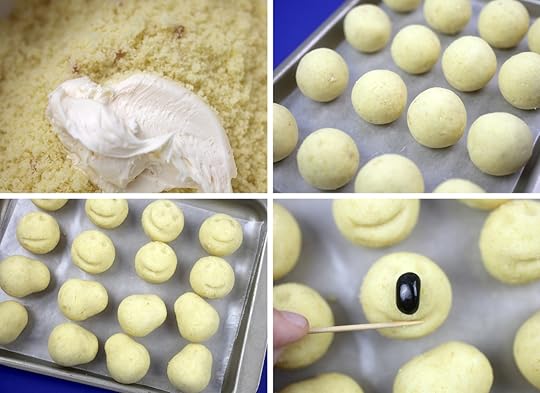
Start with round cake balls to shape Buster’s face. Use a toothpick to press into the ball and make a smile. This will help create his smirk after being dipped in candy coating. When shaping, you can place a jelly bean in position to help make sure your proportions are good.
After shaping, let them chill in the fridge to get firm before dipping.
Oh and those pear-shaped cake balls … well, I’ll show you what they turn into in just a minute. But first let’s make some gray candy coating.
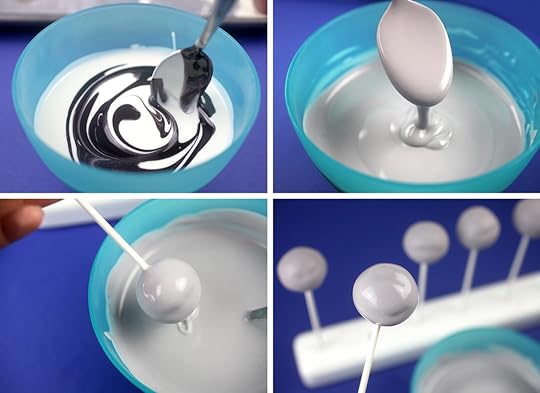
Melt white candy wafers until fluid and smooth. Mix in a small amount of black candy coloring (not food coloring) and stir until you achieve a light gray color.
When ready to dip, remove a couple of cake balls from the fridge at a time to work with and dip in the candy coating. Allow any excess coating to fall off and let dry completely.
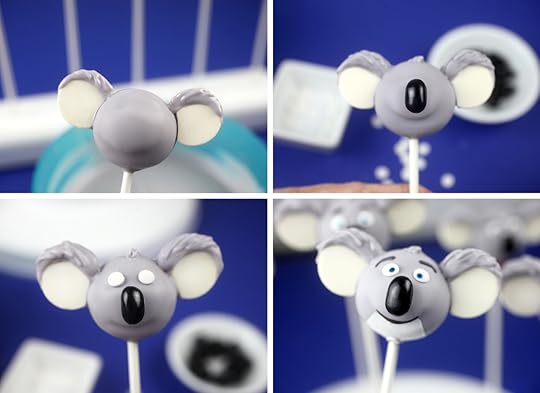
When dry, attach two previously cut candy wafers in position for ears using melted candy coating as glue. Apply tinted gray candy coating over the top of the ears using a toothpick. Let the first layer dry and you can then apply more to make it look fluffy and thick.
Use more coating to attach a jelly bean in position for the nose and two white confetti sprinkles for eyes.
To finish his face, draw on the eyes and mouth with blue and black edible ink writing pens. The eyebrows can be drawn on as well, or tint some of the gray coating darker with more black candy color and draw them on using a toothpick dipped in the coating.
For his chin, apply white candy coating or you can use white edible paint for a flat look like above.
He’s adorable already, but you can dress him up a but and use small red candies or sprinkles to make his little bow tie, Attach them to the bottom of his chin with melted candy coating. Here, I used three red rainbow chip sprinkles and they were a great size to match his character.
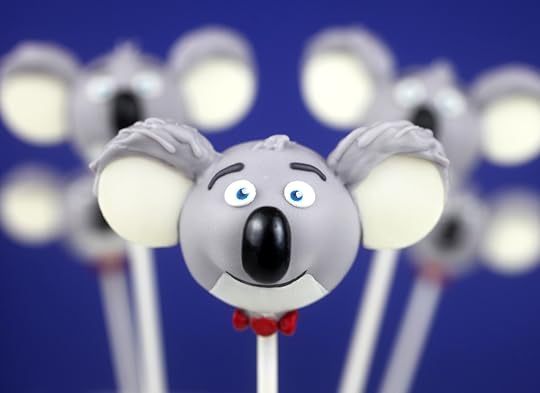
Buster Cake Pops. Too cute.
But what about those pear-shaped cake balls?
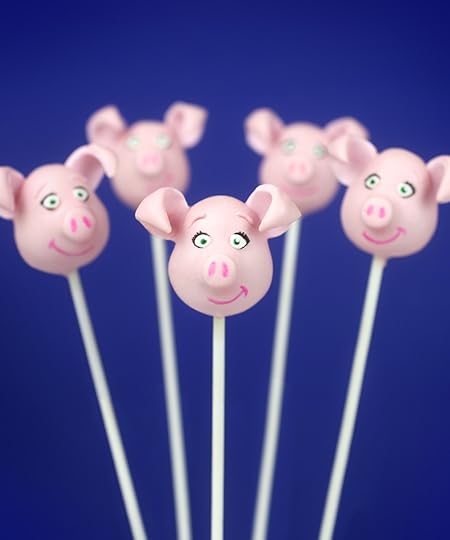
I made Rosita, one of the contestants in the singing competition, from the movie, too.
Rosita, played by Reese Witherspoon, is an overworked mom trying to take care of her 25 piglets. Now, let me show you how to make her into a cake pop.
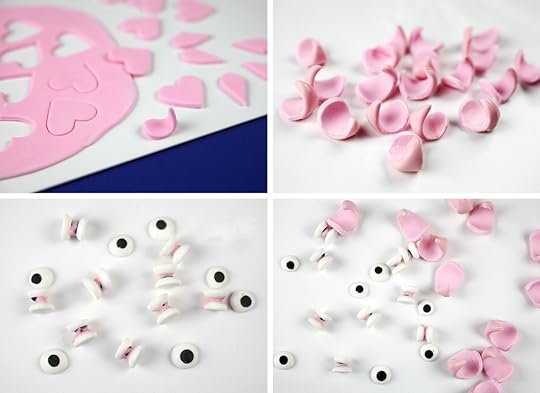
To make Rosita, prepare the ears and snouts first.
The ears were made of light pink-tinted fondant. I cut small hearts out of the fondant and then cut the hearts in half and curled them. When the fondant dries out a bit, dip the tops in melted pink candy coating so they will be the same color as Rosita’s head.
I made the snout using two candy eyes glued together with pink candy coating. Other candies would work, but I had these handy and they made the right size for her snout.
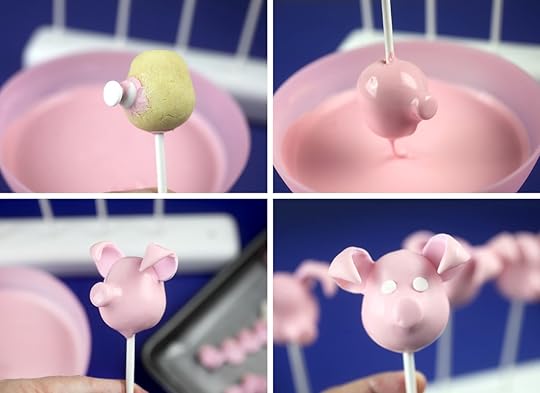
Before dipping attach a prepared snout to the front of a pear-shaped cake ball and dip in melted pink candy coating. Gently tap off any excess and before the coating dries, attach two ears on either side of the head and let dry completely.
Then attach two white confetti sprinkles for eyes.
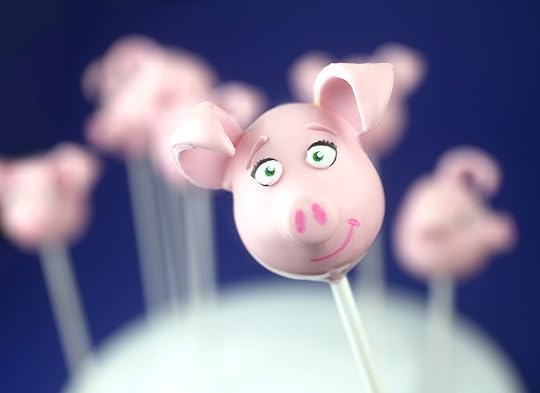
To finish her face, draw on eyes, eyelashes and mouths with green, black and pink edible ink writing pens.
Draw on eyebrows with a toothpick dipped in pink candy coating.
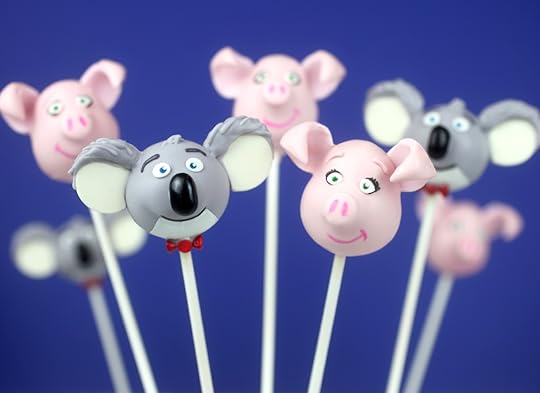
I just wish I had time to make the whole cast of characters because they are all cute. Check them out in the trailer below and I bet you’ll want to see this movie as much as I do. It looks so fun!
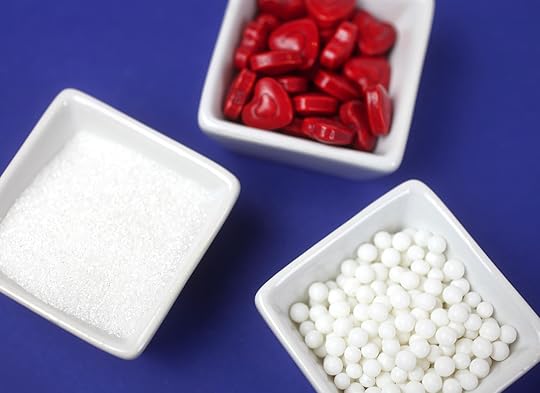
Wait, before you go, let’s make some mini Santa hats. I used red jumbo heart candies, white sugar pearls and white sanding sugar.
Dip the heart in white candy coating and place on top of a character’s head. Sprinkle with sanding sugar before it dries and then attach a sugar pearl on top of the hat with a small dot of white candy coating to glue.
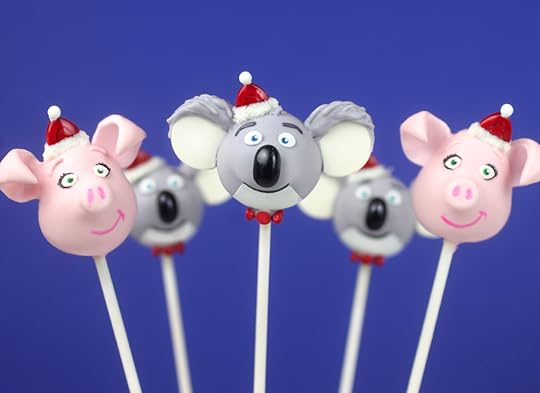
Now, they’re ready for the holidays.

ABOUT THE FILM Sing stars Buster Moon (Matthew McConaughey), a dapper koala who presides over a once-grand theater that has fallen on hard times. He has one final chance to restore his fading jewel to its former glory by producing the world’s greatest singing competition. Five lead contestants emerge: Mike (Seth MacFarlane), a mouse who croons as smoothly as he cons; Meena (Tori Kelly), a timid teenage elephant with an enormous case of stage fright; Rosita (Reese Witherspoon), an overtaxed mother run ragged tending a litter of 25 piglets; Johnny (Taron Egerton), a young gangster gorilla looking to break free of his family’s felonies; and Ash (Scarlett Johansson), a punk-rock porcupine struggling to shed her arrogant boyfriend and go solo. Each arrives under Buster’s marquee believing that this is their shot to change the course of their life. And as Buster coaches each of his contestants closer and closer to the grand finale, he starts to learn that maybe the theater isn’t the only thing that is in need of saving. Sing arrives in theaters on December 21, 2016.
Hope you enjoy these and the movie, too!
This post in partnership with Universal Pictures.

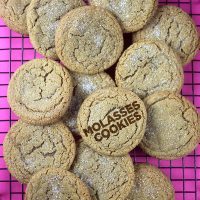
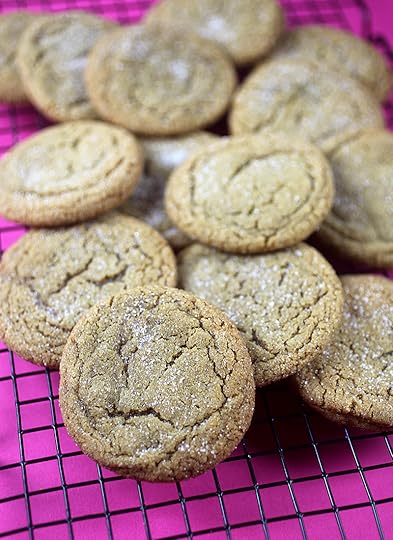
December 4, 2016
Merry Good Molasses Cookies
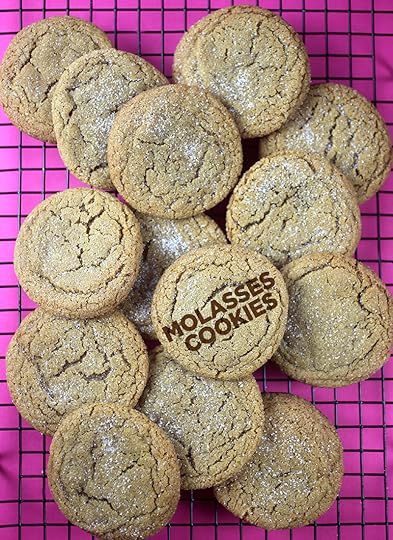
It’s holiday cookie baking season and I’ve had molasses cookies on my mind. Now, usually when it comes to baking cookies, it’s something chocolate and chippy that I can’t wait to take a bite out of. But this weekend, it was molasses all the way. Yay!
These sugar and spice filled cookies are super easy to make.

Chewy and delicious. Enjoy them this holiday or any day.
Okay, let’s get baking.
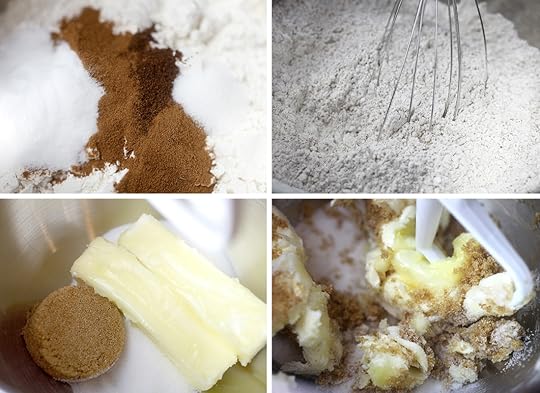
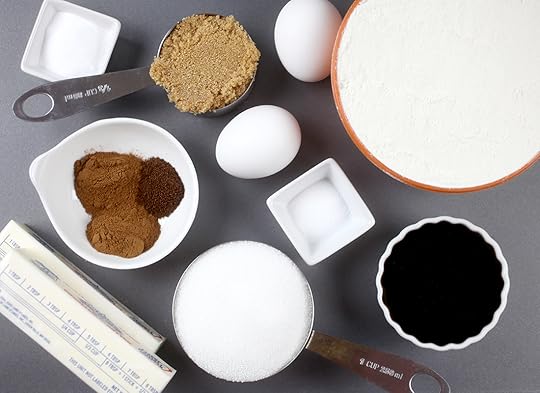
Sift together the flour and spices in one bowl and in another, cream the butter and both sugars.
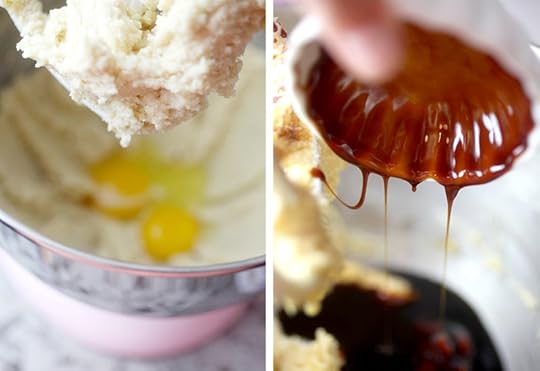
Then add egg and sticky drippy molasses.
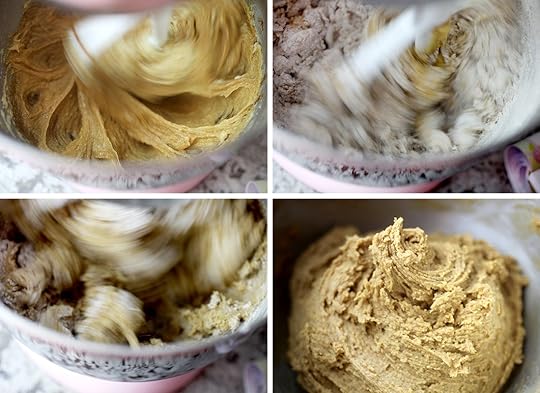
Mix until combined and then slowly add in flour mixture until you have a beautiful brown molasses-kissed cookie dough.
Let it chill out in the fridge for a bit.
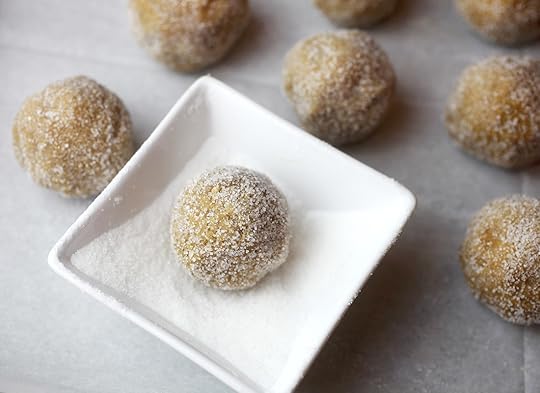
Then scoop and roll dough into balls. Coat the outside with granulated sugar before baking.
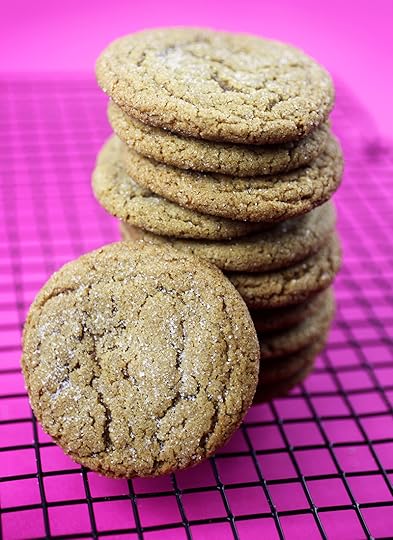
When you remove them from the oven, lightly sprinkle a little more sugar on top of the cookies for a dusted look.
Print Recipe
Yield: 2 dozen cookies
Merry Good Molasses Cookies
Ingredients:
3 cups all purpose flour
2 1/4 teaspoons baking soda
1/2 teaspoon salt
1 1/2 teaspoons ground cinnamon
1 teaspoon ground ginger
1/2 teaspoon ground cloves
1 cup unsalted butter, room temperature
1 cup granulated sugar, plus more for coating balls
1/3 cup brown sugar
1 egg, plus 1 yolk
1/3 cup molasses
Directions:
Preheat oven to 375 degrees fahrenheit and line baking sheets with parchment paper.
Whisk flour, soda, salt, cinnamon, ginger, and cloves in a medium bowl and set aside.
Using a mixer, cream butter and both sugars until light and fluffy. Add the egg and egg yolk and mix until combined. Then add the molasses and mix until combined.
Slowly add in the flour mixture, mixing on low until completely combined.
Chill dough in the refrigerator for 30 minutes.
Scoop dough with a 1 1/2 inch cookie scoop and roll into 1 1/2 inch balls. Then roll balls in sugar and place on baking sheet 2 inches apart. Bake for 9-10 minutes. Remove from oven and lightly sprinkle tops with sugar.
Note: Melt white candy coating and pour into a small squeeze bottle and use to pipe short words on top of the cookies.
Enjoy!

November 20, 2016
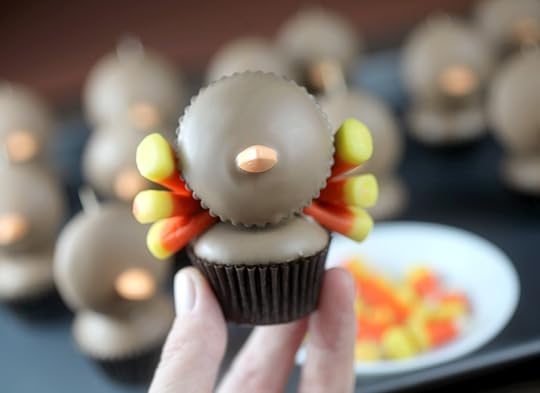
Little Gobblers
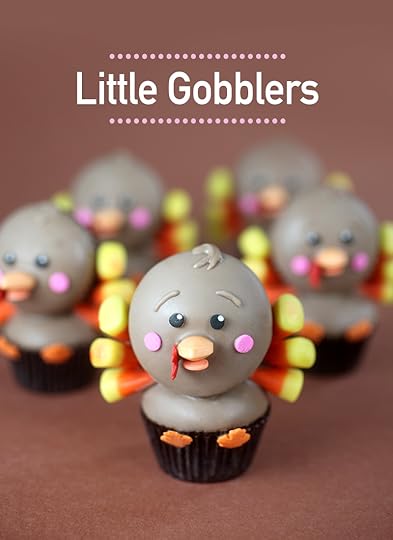
How cute are these tiny turkeys for Thanksgiving? They’re two-bite mini cupcakes dipped in candy coating and a fun treat to decorate for fall.
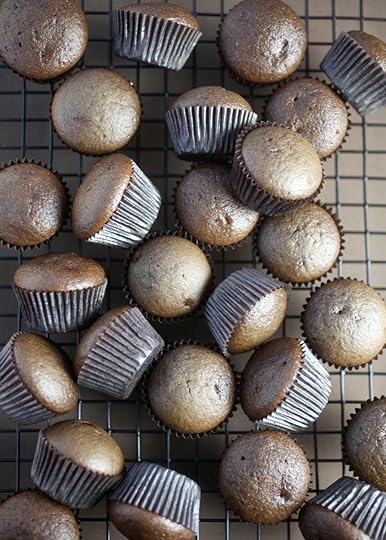
You can use this recipe to make 48 mini chocolate cupcakes. You’ll need two cupcakes for each little turkey.
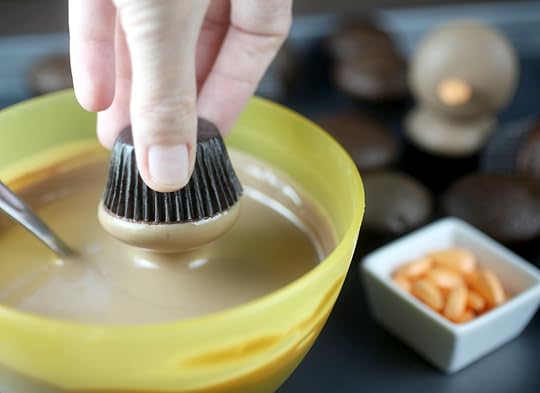
To get started decorating, dip a mini cupcake in melted chocolate candy coating. (Note: I lightened the chocolate by adding some white and yellow candy wafers, but you can just leave them dark brown also.)
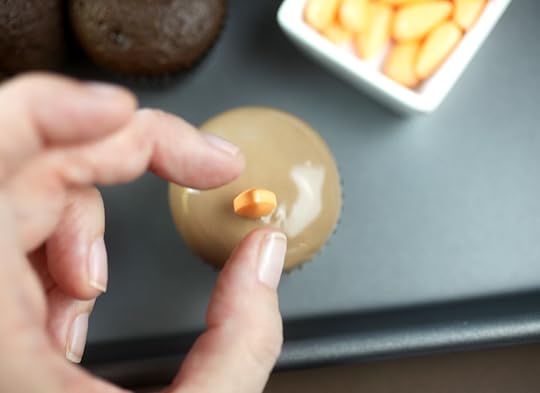
While the coating is still wet, place an orange candy in position for a beak.
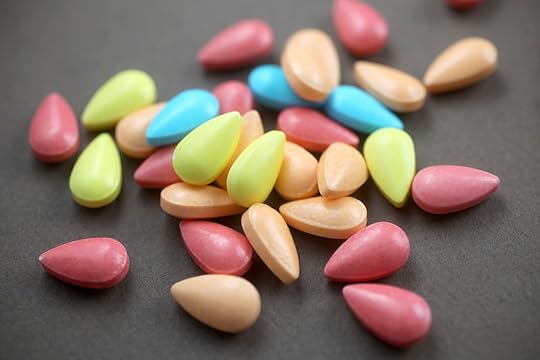
I used these Baby Tear Drop candies and they were a pretty nice size.
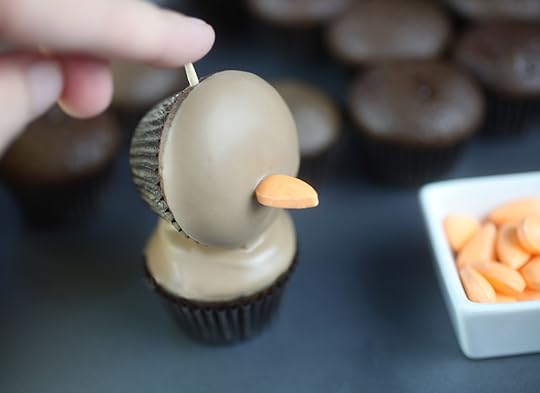
Insert a toothpick through the head when dry. Then place it gently on top of a second cupcake dipped in candy coating while still wet. Push toothpick through to secure and let the two cupcakes dry together.
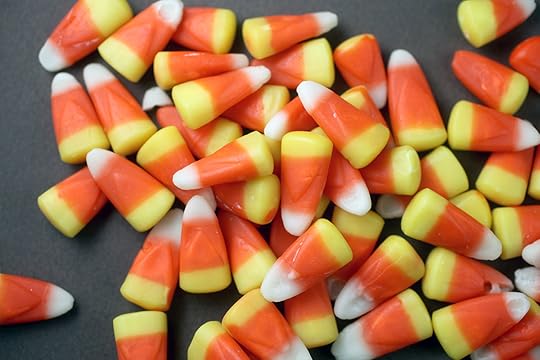
Candy corn… pretty much always a good choice for tail feathers this time of year.
Attach them to the side/back of the cupcakes with melted candy coating. They’re is really only enough room for three on each side unless you attach to the back of the top cupcake. When dry, gently twist and remove the toothpick that was inserted in the head.
Okay, now for the faces.
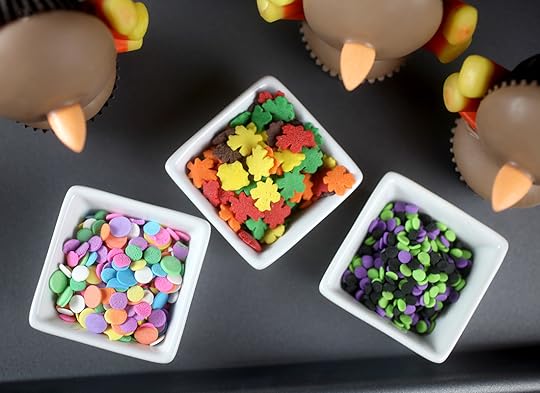
Use pastel confetti sprinkles for pink cheeks and orange sprinkles to add to the bottom of the beak. Use black confetti sprinkles for eyes and red leaf sprinkles or something similarly sized for the wattle. Attach them with melted candy coating.
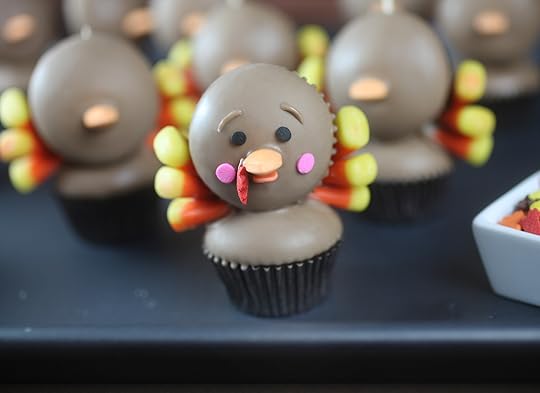
Then draw on eyebrows using a toothpick dipped in melted coating. Too cute. Now you can stop here…
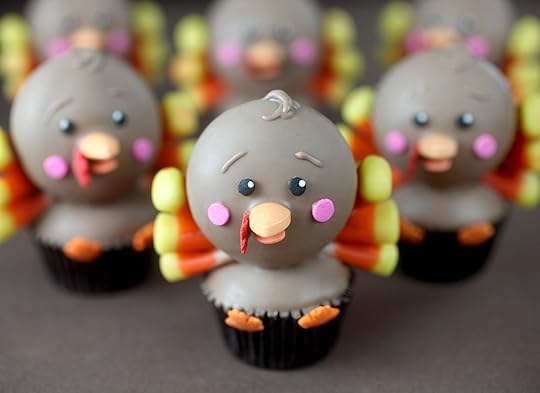
…But faces are always cuter when you can dot the eyes with white candy coating. It just brings their little faces to life.
And since I had already used the leaf sprinkles, I thought I’d use them for little feet, too!
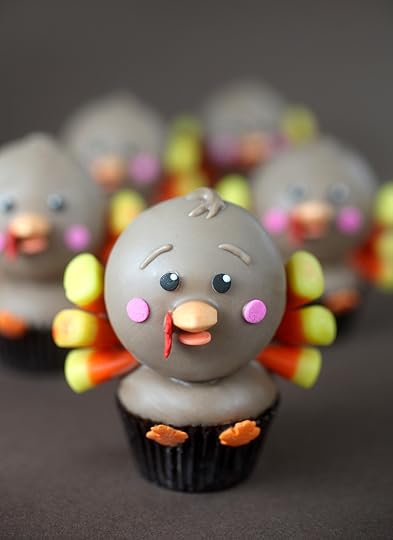
Hope these little gobblers bring you a smile.
Hugs and have a Happy Thanksgiving!!!!

November 15, 2016
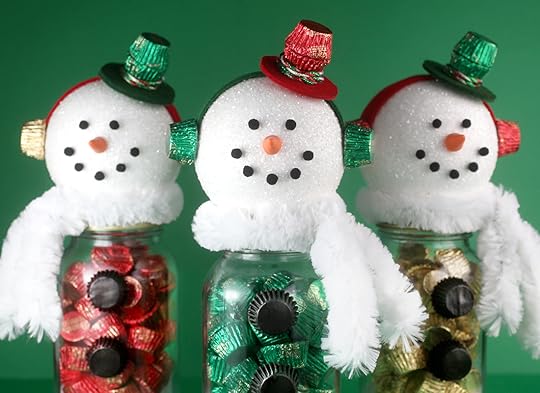
REESE’S Miniatures Snowman Candy Jars
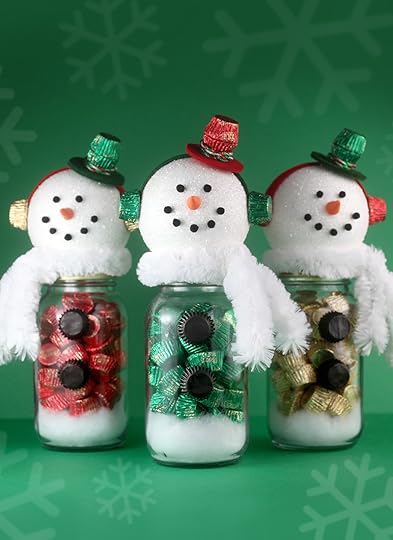
Calling all peanut butter cup lovers! I’m partnering with The Hershey Company this holiday season and getting crafty with candy. I made the sweetest snowmen candy jars and you can make them too! I’ll show you how easy they are with the help of REESE’S Peanut Butter Cups Miniatures.
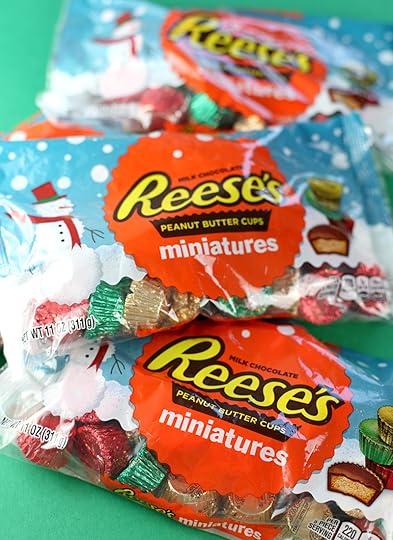
REESE’S Peanut Butter Cups are by far my first and forever-favorite go-to chocolate candy. So, getting to play with them for The Hershey Company makes me super happy. I hope these sweet snowmen make you just as excited to get crafty and celebrate the holiday season! It’s a fun way to make special memories with friends and family during one of the most festive times of the year. Plus, they make pretty adorable handmade gifts.

Okay, let’s get started…
Materials + Tools:
(NOTE: candies used for decoration on outside of jar are not to be eaten)
4-inch smooth styrofoam balls
knife
1 quart smooth mason jars (regular mouth opening, not wide mouth)
glue gun
REESE’S Peanut Butter Cups Miniatures (1-11 oz. bag equals about 34 candies and I used about 50 for each finished jar)
non-toxic craft glue
white crystal craft glitter
paint brush
orange clay or fondant for noses (dried out)
red and green felt (peel and stick and regular)
scissors
toothpicks
ribbon or twine
small black pom poms (7mm)
giant white chenille stems
fluff stuffing for snow
chocolate candy coating
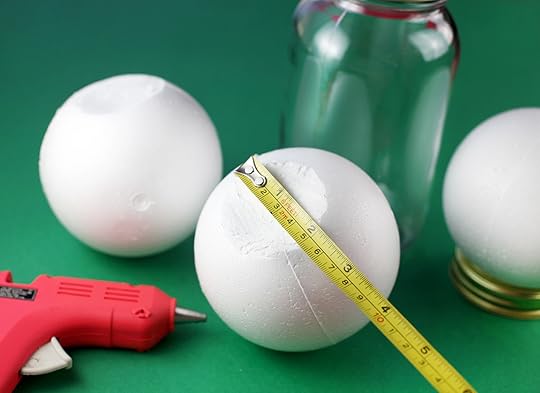
Start out by trimming off the bottom of a four-inch smooth styrofoam ball with a sharp knife so that the diameter is about two inches. Place the ball on top of a towel when cutting so you don’t dent the ball.
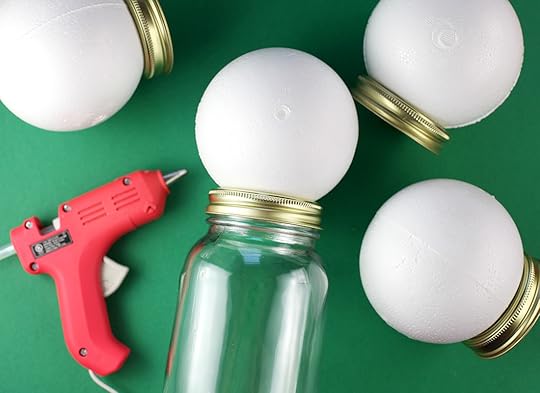
Attach the bottom of the ball to the top of a mason jar lid using a glue gun. Press firmly and hold until secure. The width of the ball will keep the two pieces of the mason jar lid from separating — this way you can still rotate the ball in position where you need it to go after the lid is on.
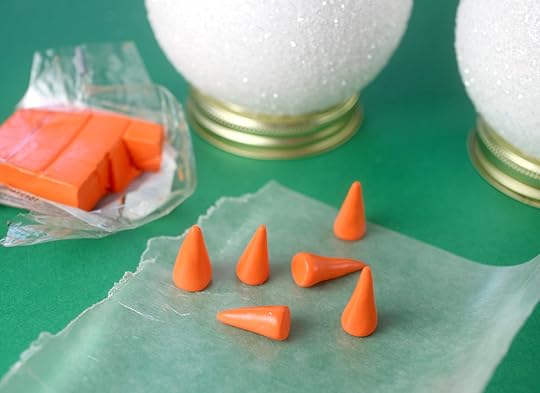
Make cute cone snowman noses. Shape out of orange clay (bake in the oven to dry out using directions on the package). You can also shape out of fondant and let dry. While the noses dry, you can get glittery — The really fun part.
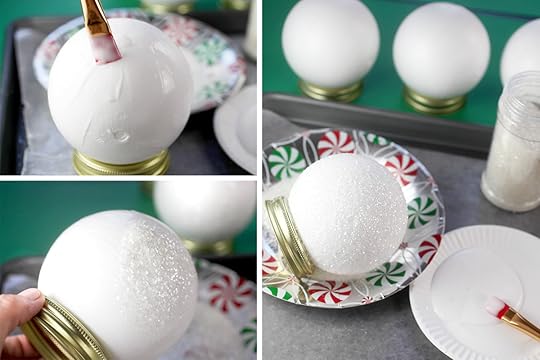
Using a paintbrush and holding by the lid, paint craft glue over the surface of the styrofoam ball and sprinkle with white glitter. Let dry. Make sure to sprinkle over a large paper plate so you can easily fold and return any excess glitter back to the container.
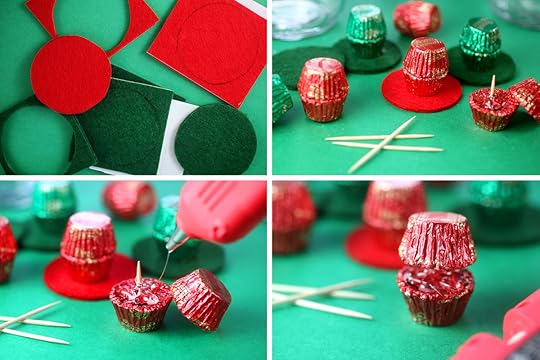
Here’s a little hat trick. Cut out 2-1/4 inch circles out of adhesive felt. Attach three pieces together to increase the felt thickness and make a stiff brim. For each hat, attach two REESE’S Miniatures together with the tops facing each other. To attach, break a toothpick in half and push through the bottom of one candy. Use the glue gun to attach the second candy top-side down. Press gently until secure and let dry.
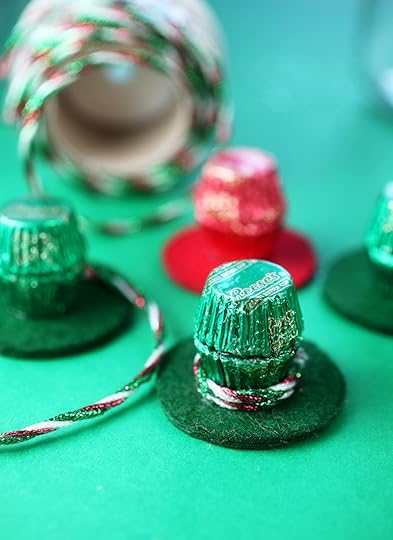
Attach the candies to the felt brim using the glue gun again and then tie ribbon or twine around the base. Use a dot of glue in back to help secure the ribbon in place.

Time to put our faces on. Use tiny black pom poms for eyes and mouths. Attach to the front using craft glue.
Use the glue gun to attach the nose and let dry.
Fill the jars with REESE’S Miniatures. You can do all of one color or mix and match with your favorite foils. I love the solid color look for these.
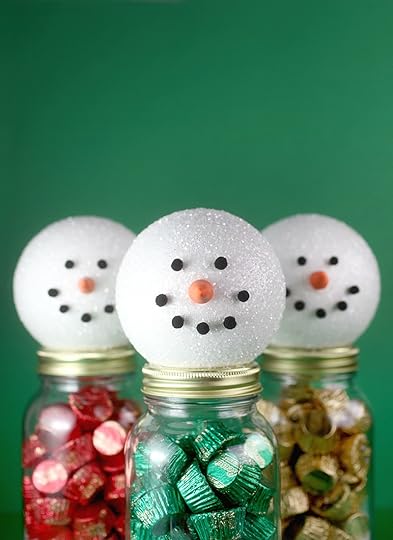
Oh my gosh… snow cute!!!!
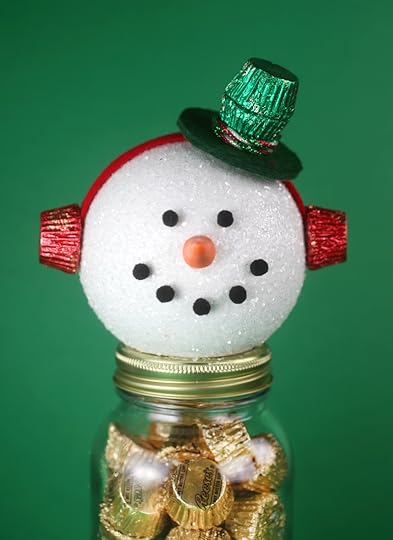
Attach a 1 x 6-inch felt strip to the snowman’s head using a glue gun on either end to secure. Then, glue a REESE’S candy on either side for ear muffs.
Finish the face by attaching the hat on top of the headband, slightly tilted forward with the glue gun. He’s looking pretty dapper just like this, but snowmen get cold and they need to bundle up.
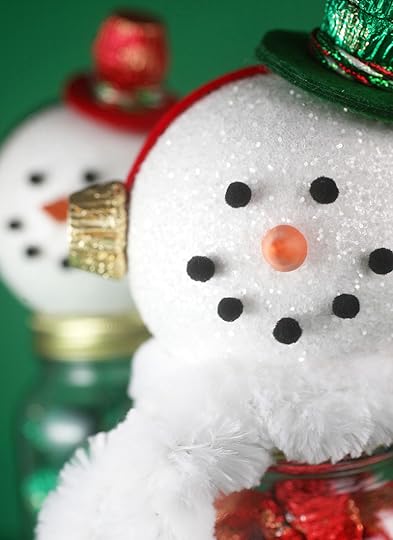
Hey sweet face!
Twist tie a fluffy jumbo chenille stem around their necks to keep warm… but really just to be cute.
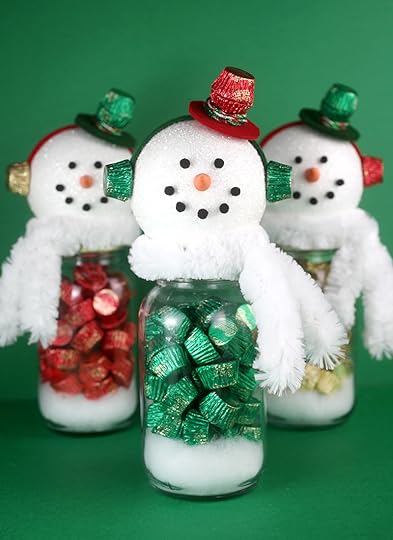
Like super cute. I’m in love.
If you like, before filling the jars with candy, place a small handful of fluff in the bottom for snow.
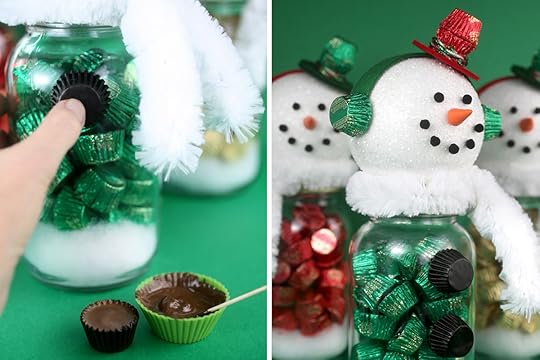
But wait, our snowman needs to button up. That’s right, remove foil wrappers and the candies make perfect buttons. Just melt a little chocolate candy coating and apply to the top of the candy with a toothpick. Press candy gently to the front of the jar and hold in place until set.
Festive, fun and yum!
Enjoy!
This post in partnership with The Hershey Company.

November 7, 2016
DIY Candy Cane Treat Box
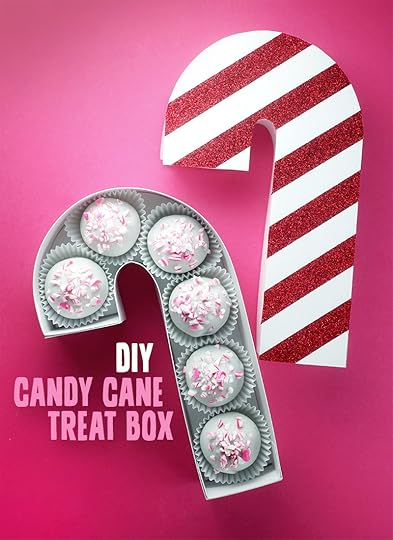
Looking for a handmade holiday gift this season? Well, I just happen to have the sweetest little gift box to share with you. I’m partnering with Scotch™ Brand in celebration of their Most Gifted Wrapper™ Contest that started November 1st. I created this adorable candy cane treat box using some of the company’s products to help them celebrate the contest.

The box design was inspired by Scotch® Expressions Tape. I love the glitter tape for the holidays and in red, I couldn’t help but want to do something fun using the tape as perfectly placed candy cane stripes. It adds an extra touch that’s super easy to use on paper products, especially since you can initially reposition it as needed. I also used Scotch® Heavy Duty Packaging Tape to help construct the box since it sticks securely.

Materials + Tools:
Candy Cane Box Template (pdf)
Scotch® Heavy Duty Shipping Packaging Tape
Scotch® Expressions Glitter Tape (I used red, but it also comes in other fun colors)
Scotch® Double Sided Tape
Scotch® Clear Glue
Scotch™ Titanium Utility Knife
Scotch™ Multi-Purpose Scissors
11-in x 17-in heavyweight paper
Cutting Mat
Ruler
1/8” Foam Core
Peppermint flavored treats…YAY!
Okay, who’s ready to get crafty?!
Print CANDY CANE BOX templates out at 100% on heavyweight 11-in X 17-in paper. (note: I used an 11-in X 17-in pad of bristol board available at craft stores.) Your local office supply store can print out the templates if you don’t have access to a large enough printer.
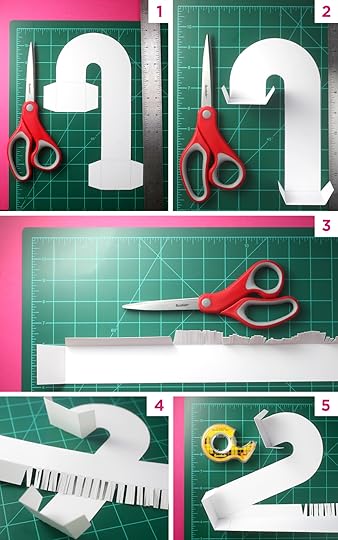
1. Cut out CANDY CANE BOX – BOTTOM structure shape from the template.
2. Very lightly score the square ends and tabs along the dotted lines with Scotch™ Titanium Utility Knife and fold up. You should gently guide your knife along the lines to allow enough give in the paper to fold the edges over without breaking in half.
3. Cut out CANDY CANE BOX – SIDES FOR BOTTOM. The long strip is for the right side of the candy cane and the short strip is for the left side. Very lightly score along the edge where the square end and tabs meet the rectangular shape. Fold the paper so that the printed side is face down under the bottom of box.
4. On the section of template where the small tabs are printed, cut fringe strips, close to but not touching the scored fold. Cut and remove alternating fringe pieces. This will allow the rectangular strip to curve around the candy cane shaped bottom and form the side.
5. Attach the bottom square of the strip to the bottom square of the candy cane shape with Scotch® Double Sided Tape. This is a simple way to hold the paper together and keep the tape hidden from touch and sight. Attach the tab on the candy cane bottom as well.
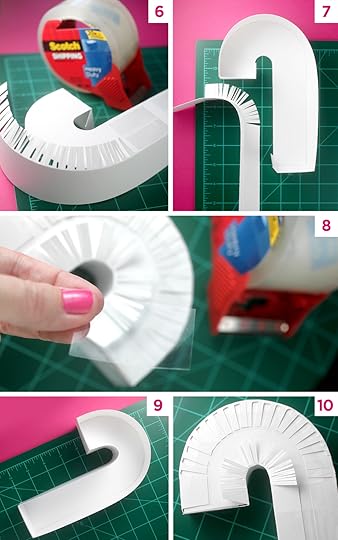
6. Wrap the strip around the candy cane shape and tape the bottom tabs down with large pieces of Scotch® Heavy Duty Packaging Tape. Tape fringe strips down as well.
7. Now follow the same for the left side of the candy cane box. The inside curve of the candy cane is tighter than the outside curve, so cut the fringe strips much closer together, removing pieces in between.
8. Tape down the fringe strips to keep the bottom of the box closed and strong.
9. Now you have a completed candy cane box bottom!
10. Cut out templates for CANDY CANE BOX – LID structure and CANDY CANE BOX – SIDES FOR LID and follow the same method of assembly as above. Instead of folding the tabs underneath the candy cane shape, you will fold them on the side of the box, lid facing up.
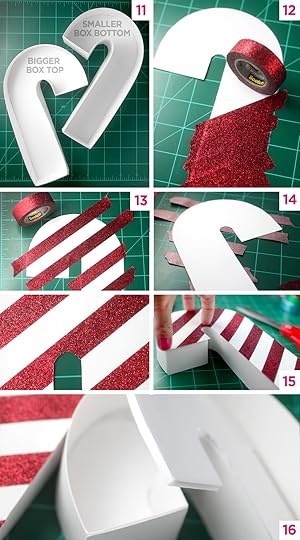
11. Note that the templates for top and bottom are two different sizes! The lid of the box will be slightly larger and not as deep as the base, so you can easily slide and remove.
12. Now that you have the bottom and lid, it’s time for the finishing touch. Cut out the CANDY CANE BOX – TOPPER. This shape is slightly larger than the lid so you can overlap the top. Use Scotch® Expressions Tape to decorate.
13. Place diagonal pieces of tape over the candy cane shape. Use the width of the tape as the spacer for evenly placed stripes.
14. Turn the candy cane over and trim off excess tape.
15. Glue the CANDY CANE BOX TOPPER on the box lid to cover all the taped tabs and keep them hidden. Place gentle pressure until it’s dry — a heavy book works great. Trim out another CANDY CANE BOX – BOTTOM without tabs to glue underneath to hide the taped tabs underneath the box. Be sure to let the bottom and lid dry completely.
16. Now you have a finished box with lid that you can keep small, lightweight objects in. To use as a treat box, trim another CANDY CANE BOX – LID (without tabs) and CANDY CANE BOX – BOTTOM out of 1/8-inch foam core to place inside the lid and inside the bottom for structure and to support the weight of tiny treats. When packaging treats, wrap them securely in individual plastic treat bags or place treats in wax paper candy cups with another layer of wax paper on top.
Complete your candy cane box with chocolate peppermint cake balls inside to show someone special that you care.
You can use my Basic Cake Pop instructions found here. Instead of using lollipop sticks to dip these sweet balls of cake and frosting, simply use a spoon to submerge the rolled and uncoated cake balls into melted candy coating flavored with peppermint oil. Let any excess coating fall off and gently slide cake ball on wax paper. Sprinkle with crushed peppermint candy and let dry.
If too much candy coating starts to pool at the base of the cake ball, use a toothpick to draw a separation line around the base of the ball. Once the candy coating has hardened, you can break it apart and separate the excess.
Place the cake balls in wax paper candy cups with another layer of wax paper on top or in individual treat bags and you’re ready to put a lid on it.

So sweet and super cute!
Enter the Scotch® Most Gifted Wrapper™ Contest for the opportunity to win up to $10,000 in prizes! Enter at: MostGiftedWrapper.com between November 1st and December 1st. LEGAL RESIDENTS OF THE U.S. and D.C. (excluding AZ, CO, NE, MD, NJ, ND, TN and VT), who are 18 (19 in AL and 21 in MS) and older at the time of entry. Ends 12/1/16. To enter and for Official Rules (including prize descriptions), visit mostgiftedwrapper.com. Void where prohibited.
This post is in partnership with Scotch® Brand.

November 2, 2016
A Sweet New Look

Hi guys! Surprise! Surprise! The website has a brand new look and I’m so excited to finally share it. Let’s just say that a redesign is way overdue around here. I started blogging at the end of 2007 and this is just the second time since then that it’s had a makeover. And, oh boy did it need it. Most of my thumbnails weren’t working, the site wasn’t mobile friendly, the pictures were too small and on and on. It was fantastic when the last design debuted (yikes, in 2010 I think) but it really, really needed some freshening up. I worked with my awesome friend Lindsay at Purr Design and she made all the magic happen. I wanted something simple and clean with easier navigation and I love it. She helped me go from clunky to cute.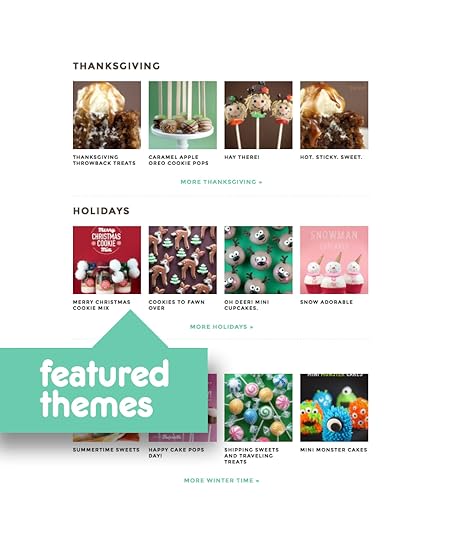
Take a peek around … I think this design makes it more fun and easier to find things. There’s a section on the homepage where I can feature different themes, too. Something I didn’t have before.
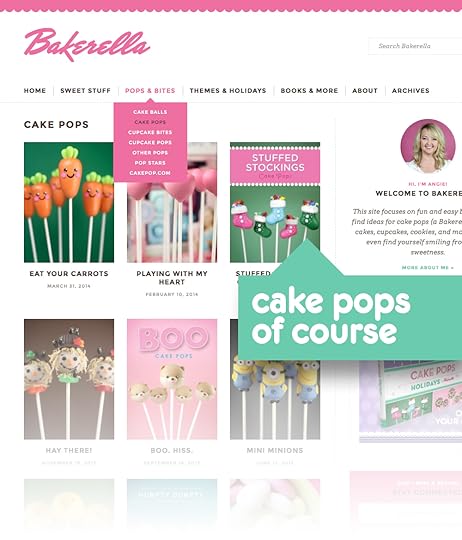
The categories display big thumbnails… (that finally work) Yes!
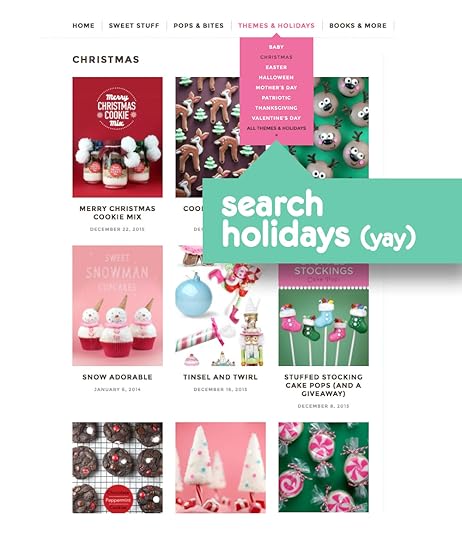
And, in addition to searching by sweets, you can search by holidays too!
I’m still tweaking things, updating categories, making thumbnail sizes consistent, figuring out my feed and so on, but it’s totally ready for you guys to use. Just keep in mind that if things seem a little quirky, I’m on it. And if you have a question about something, please ask away.
P.S. – at the bottom of the page, you can see what’s happening over on instagram! Follow along for more fun stuff there.
Enjoy and hope you find something sweet!
xo

October 26, 2016
11 Spooktacular Halloween Treats

Who’s baking spooky cute sweets for Halloween in a few days? I hope you have something fun planned to treat your friends and family with. Ghostly goodies or creepy cakes maybe? But if not, don’t worry because I rounded up a few of my favorite Halloween cookies, cupcakes and cake pops for you if you need any last minute ideas.
Just click on the photos below to find the recipes and how-tos.
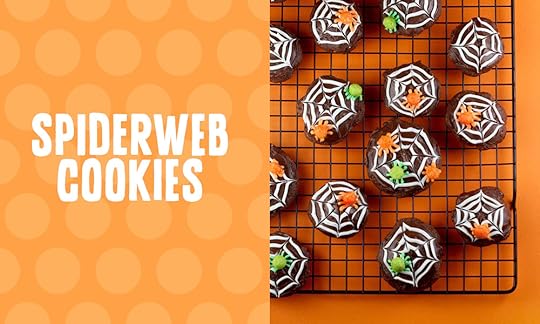
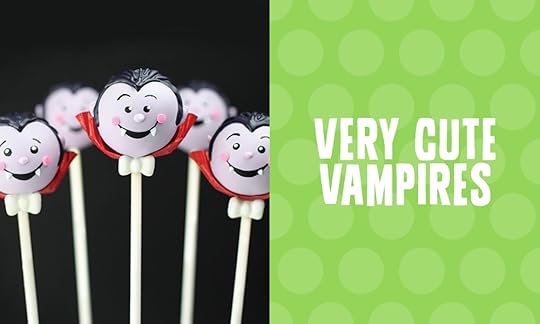
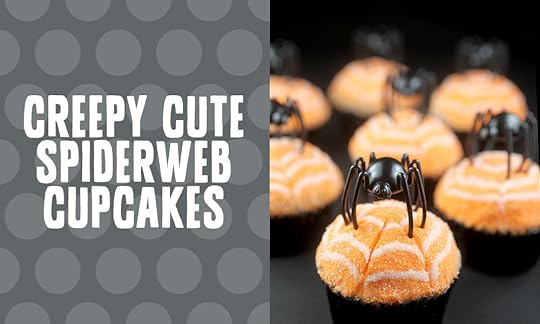
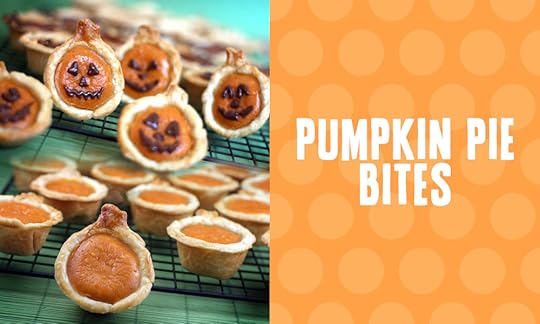
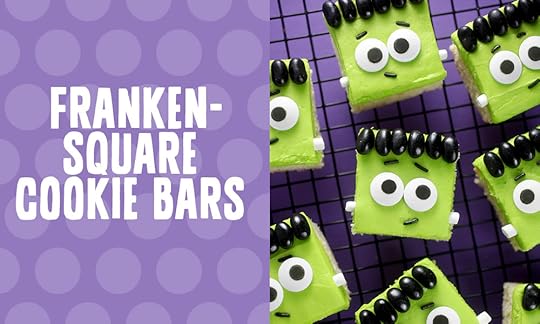

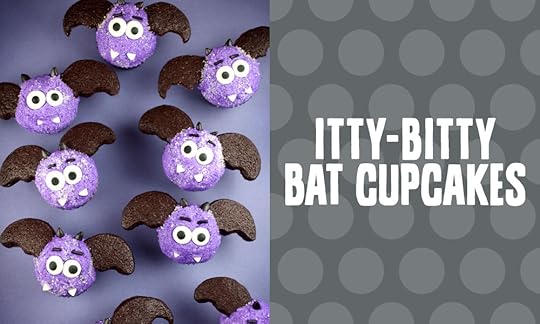
Enjoy! And of course have a Happy Halloween!!!

October 23, 2016
Celebrate Everything!
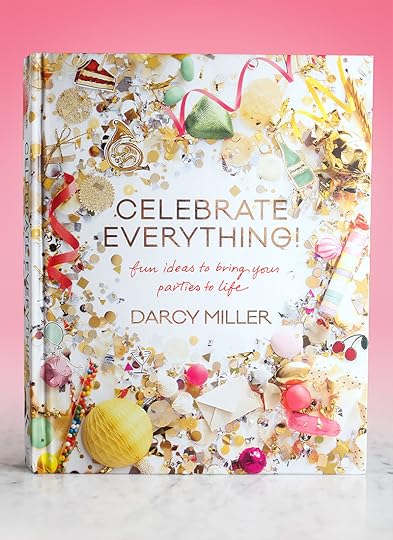
I have a fun new book that I’m excited to tell you about today.
It’s called Celebrate Everything! Fun Ideas to Bring Your Parties to Life by my sweet friend Darcy Miller.
Darcy… if you don’t know her … is the smart, talented, creative force and Editor behind the Martha Stewart Weddings magazine. She loves celebrating life’s special moments in the most fantastic ways and her new book is like being right inside her party-planning mind with ideas, advice, tips, tricks and recipes.
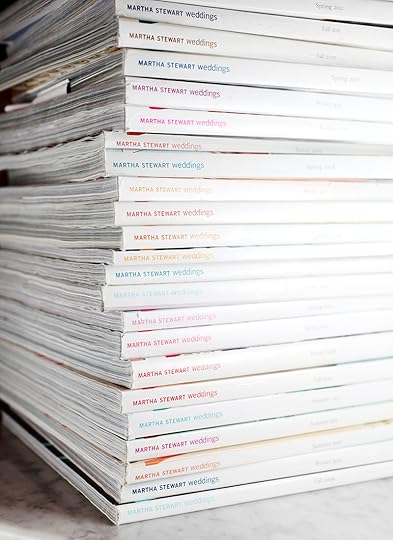
The first time I learned about Darcy was the same year I started this blog. I had taken an introductory cake decorating class and the instructor recommended we take a look at the Martha Stewart Weddings magazine for inspiration. Well, I went right home and subscribed … I have to admit, it felt funny getting a bridal magazine each month when I wasn’t planning a wedding, but it was well worth it and full of inspiration. I skipped over all the pages of pretty dresses and went right to the wedding reception sections each month. The favor details, the cakes and desserts, the seating card ideas and creative ways to add spectacular touches … I loved all of it and quickly became a fan of hers.

Flash forward a few years and Darcy and I crossed paths on social media. I remember thinking OMG, Darcy Miller knows who I am. How can that be?! Then digital life became real when she invited me over to her beautiful home the last time I was in New York City. And she is just as sweet and wonderful in person as I had imagined. I have to say it was a giddy and surreal moment for me.
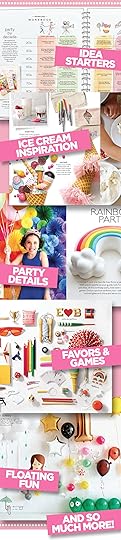
Okay, I’ll stop fan girling now so I can give you a little peek inside her book. Every time I look inside, I feel like I find something new. Here’s just some of what I love about it:
Overflowing with ideas and inspiration
Fun format with lots of lists
Party theme starter ideas
Decorating details
Party-planning basics
Tons of themes
Menu ideas and recipes, too
Plus… Resources! YAY!
That’s just a little, now let’s see a small sneak peek inside this party planning go-to guide.
Images photographed from Celebrate Everything by Darcy Miller. Copyright © 2016 by Darcy Miller. Reprinted by permission of William Morrow Books, an imprint of HarperCollins Publishers.
Check out Celebrate Everything! today! It launches tomorrow October 25th.

October 16, 2016
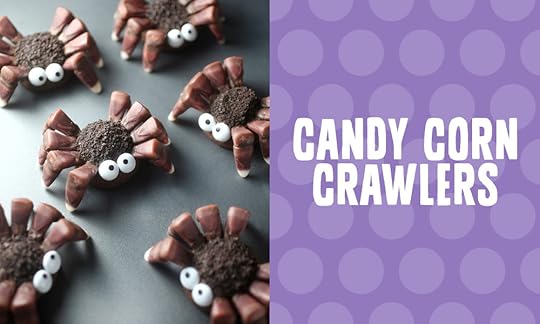
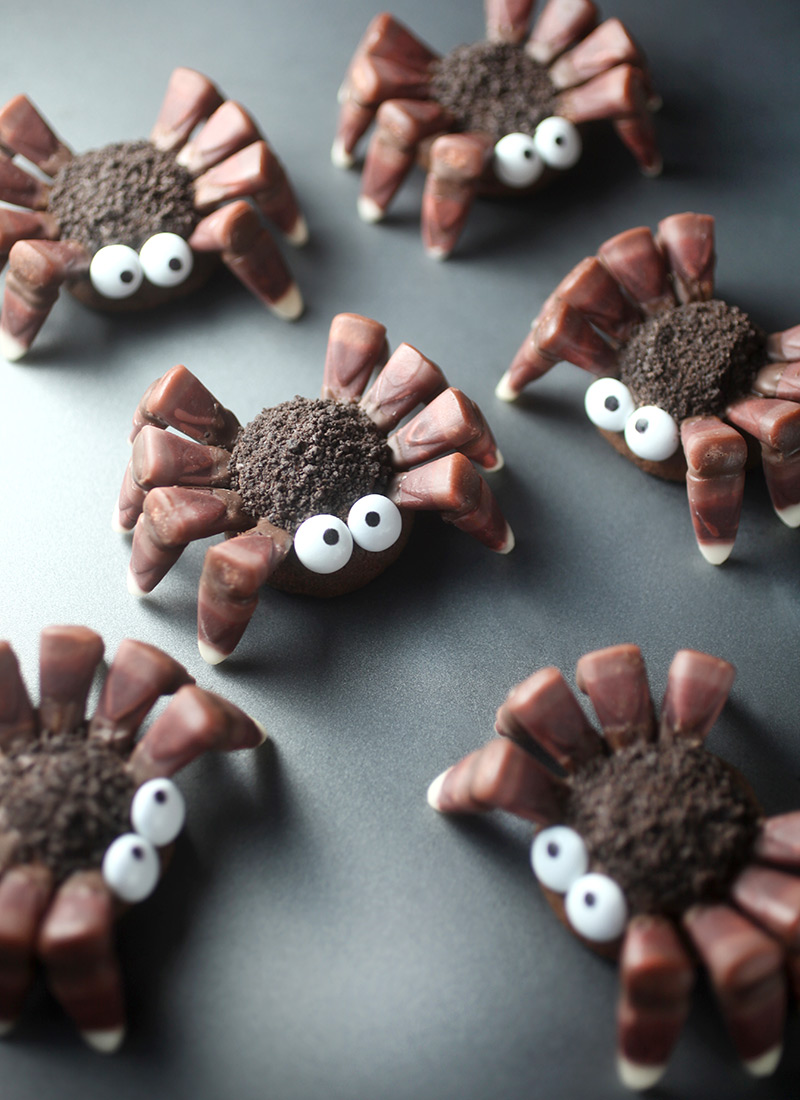
Candy Corn Crawlers
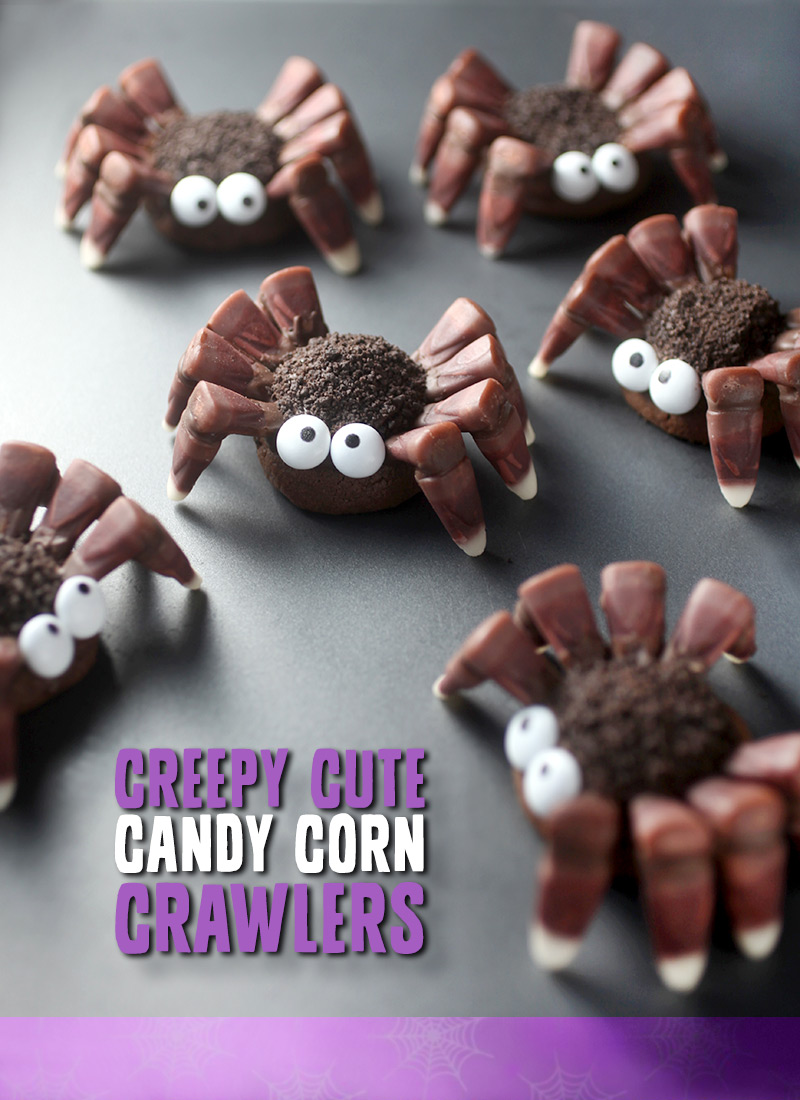
I bought a bag of sea salt chocolate candy corn a couple of weeks ago because I thought the color might be fun for some kind of Halloween treat… but at the time I didn’t know what. Well after staring at the bag long enough I finally decided on spiders this past Sunday and made these creepy crawling chocolate cookies.
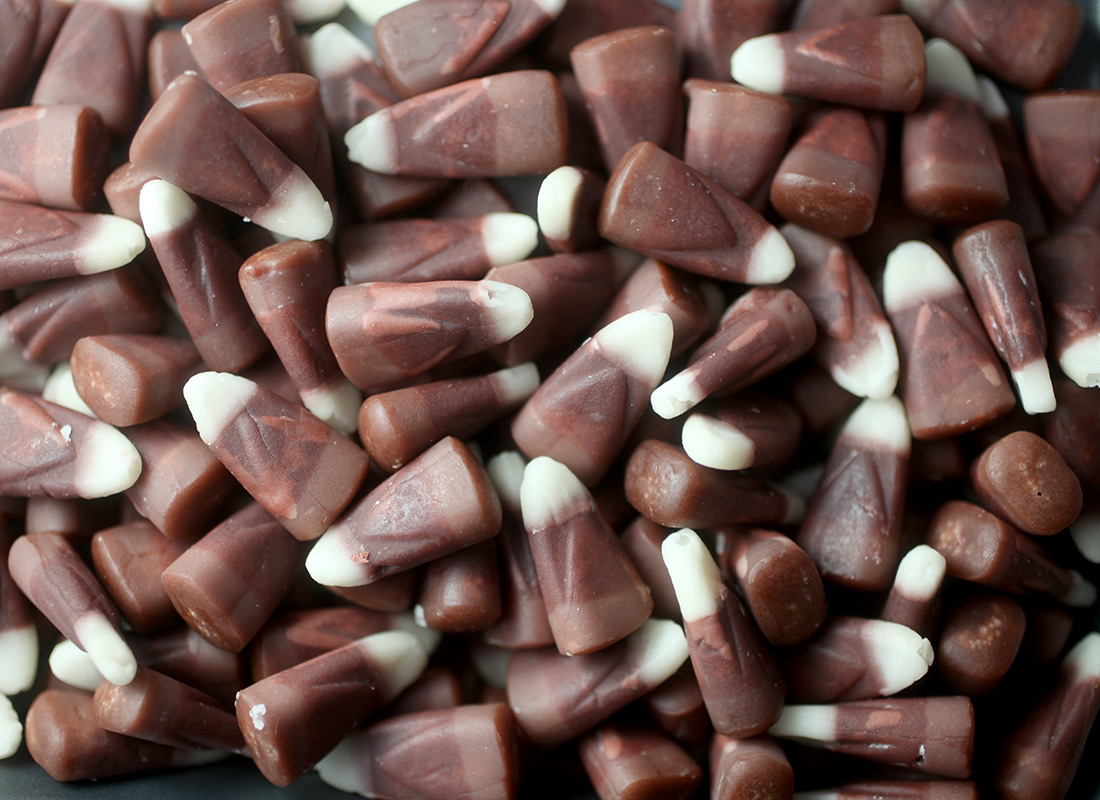
I love the look of this candy corn. The slight color variation in the brown and the white tips make awesome spider leg details.
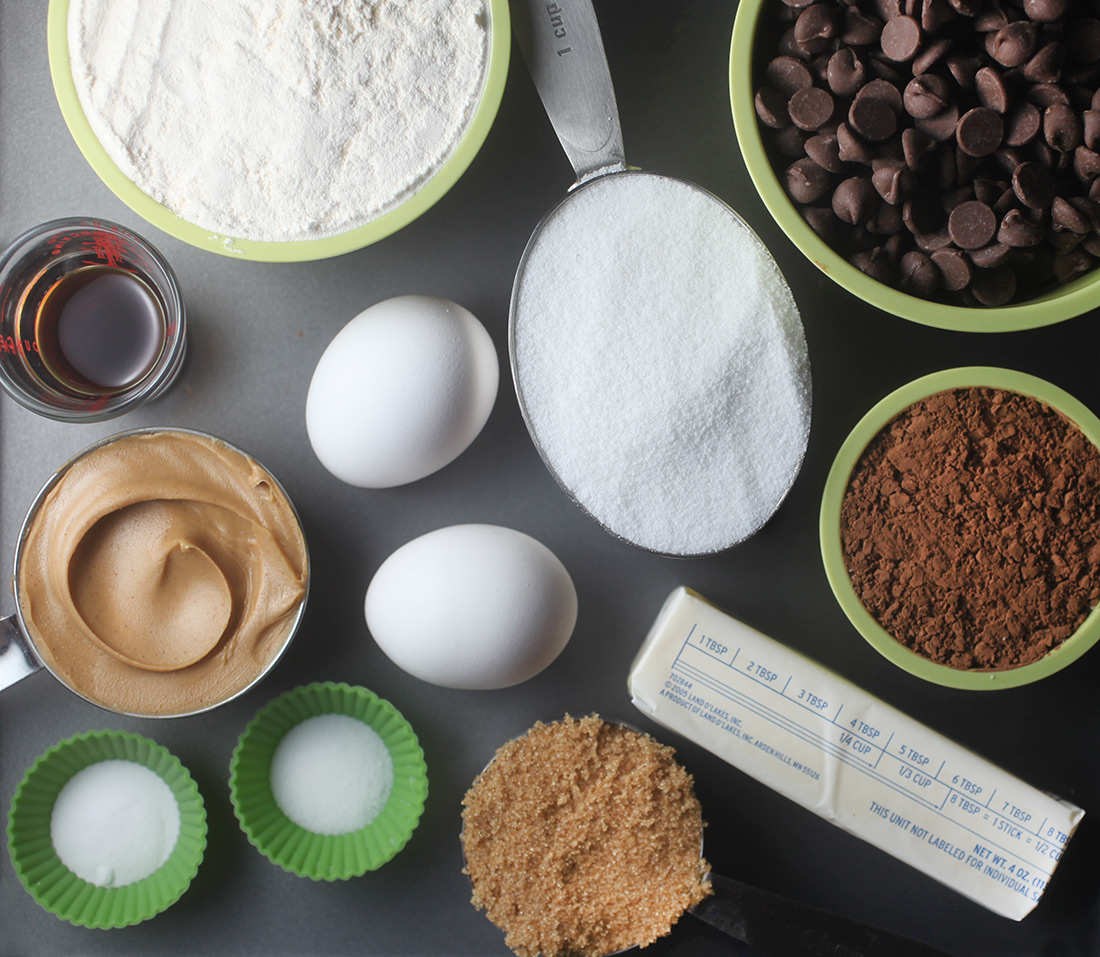
Okay let’s make some cookies. Grab flour, sugar, cocoa, brown sugar, butter, peanut butter, eggs, vanilla, baking soda, salt and milk chocolate morsels.
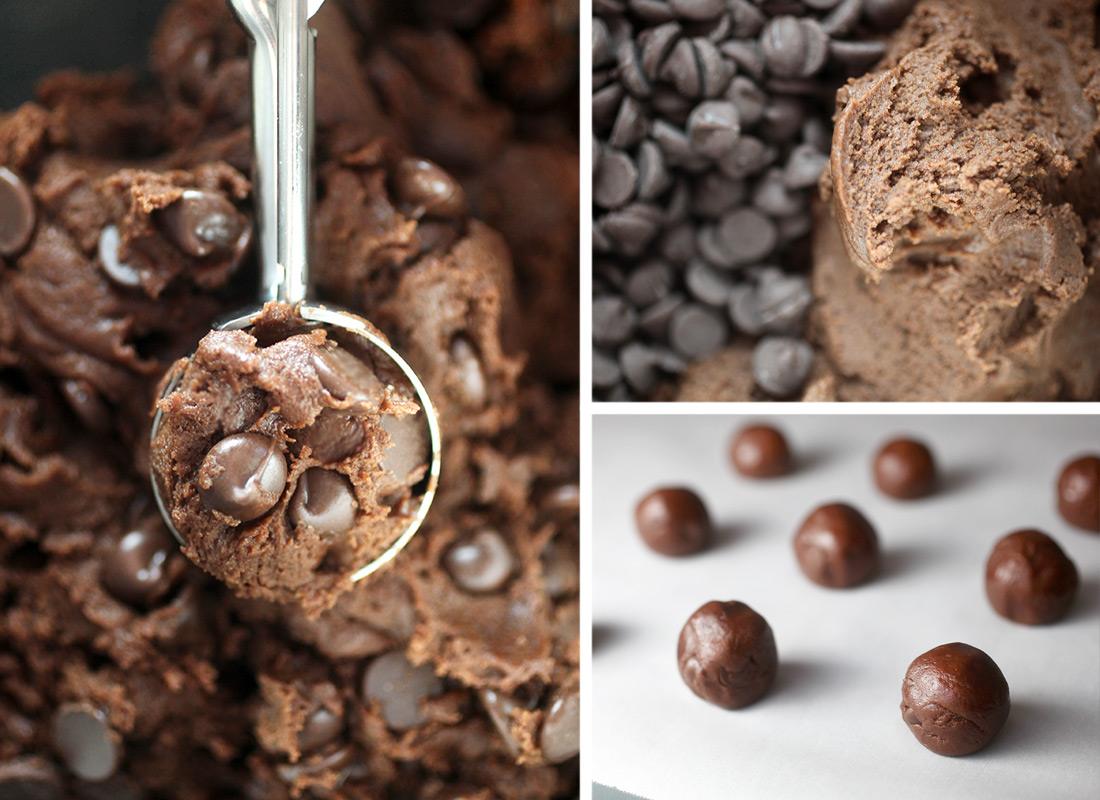
Once you have the cookie dough ready, scoop and roll into 1 1/4 – 1 1/2 inch balls.
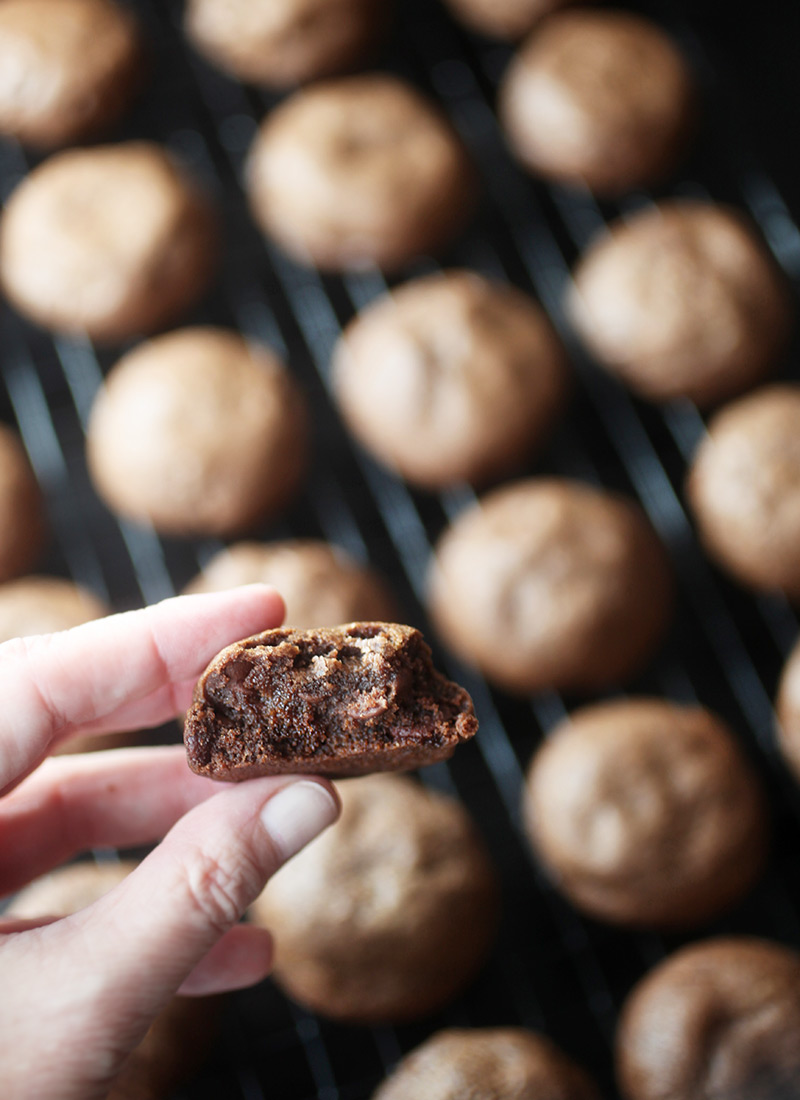
When baked, they are the cutest little 2-inch mounded cookies and soooooooo soooooooo good. I highly recommend eating a few while they are still warm…
And if you want to turn them into spiders, then follow the instructions below.
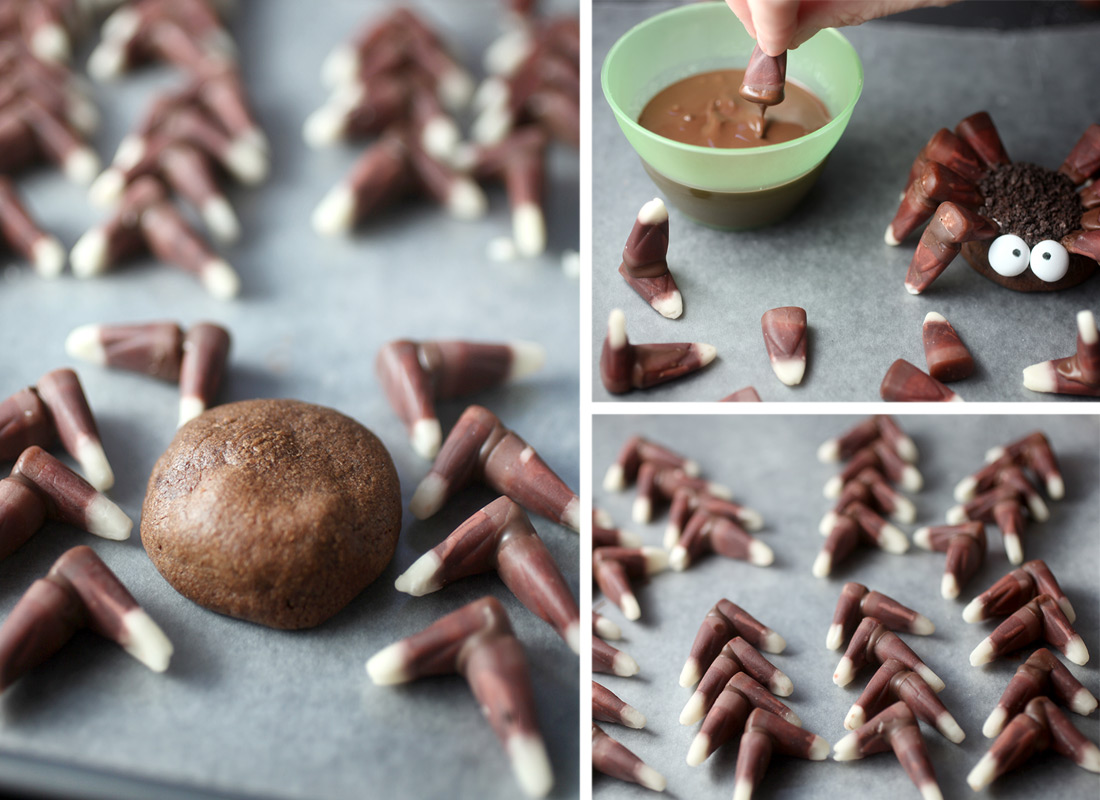
First prepare the legs. Just dip the bottom of a candy corn in melted chocolate candy coating and then attach to the large side of another candy corn. Hold in place a few seconds and set down on wax paper to dry completely. You’ll need 16 pieces to make 8 spider legs for one cookie. But if you want to save a little time and go for 6-legged spiders I won’t tell.
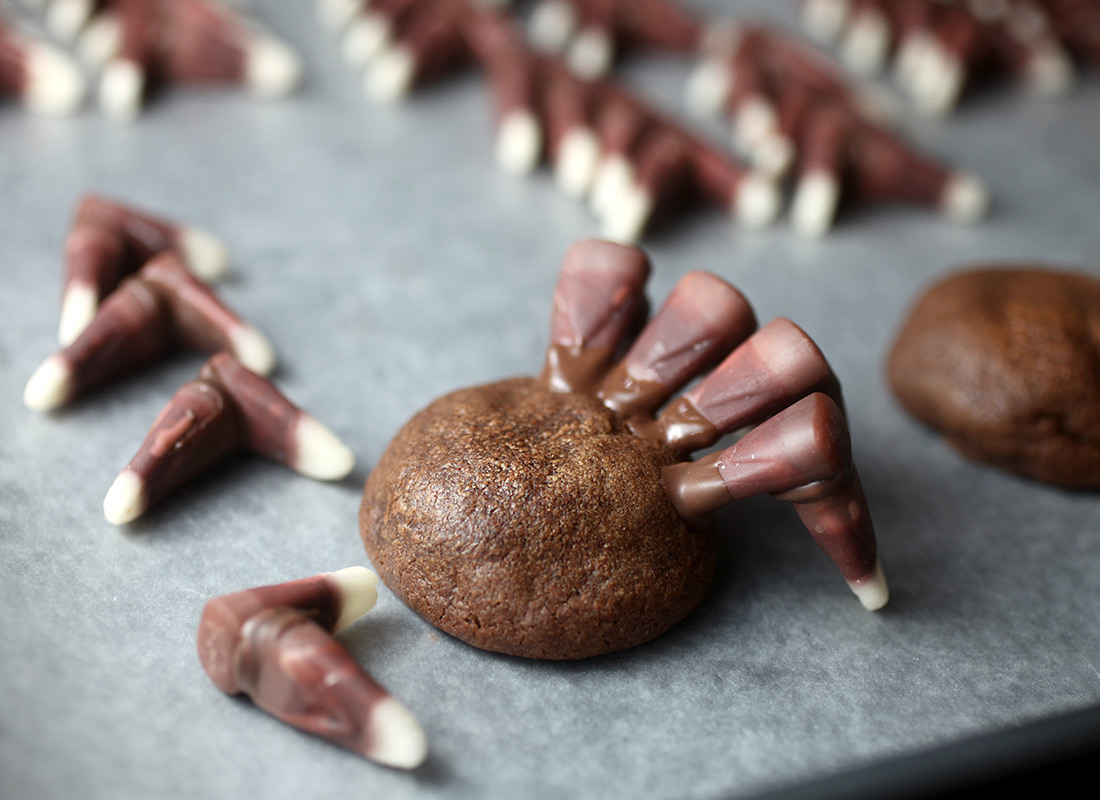
When you have all the legs you need ready to go, then dip the white end of the short part of the spider leg into more melted candy coating and very gently press into a cookie just enough to hold the leg in place while it dries. Don’t press so hard that you break the legs. Repeat for all 8 legs and let dry before moving.
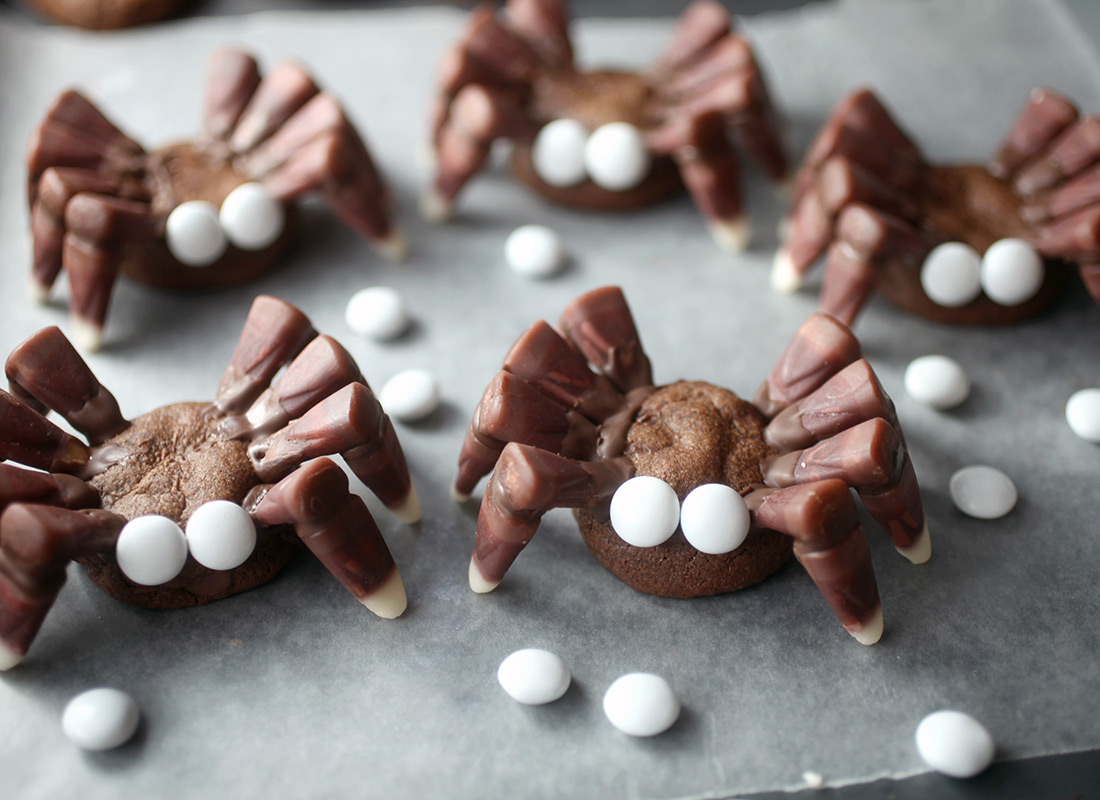
Attach two white M&M’s candies in position for eyes with melted candy coating and let dry.
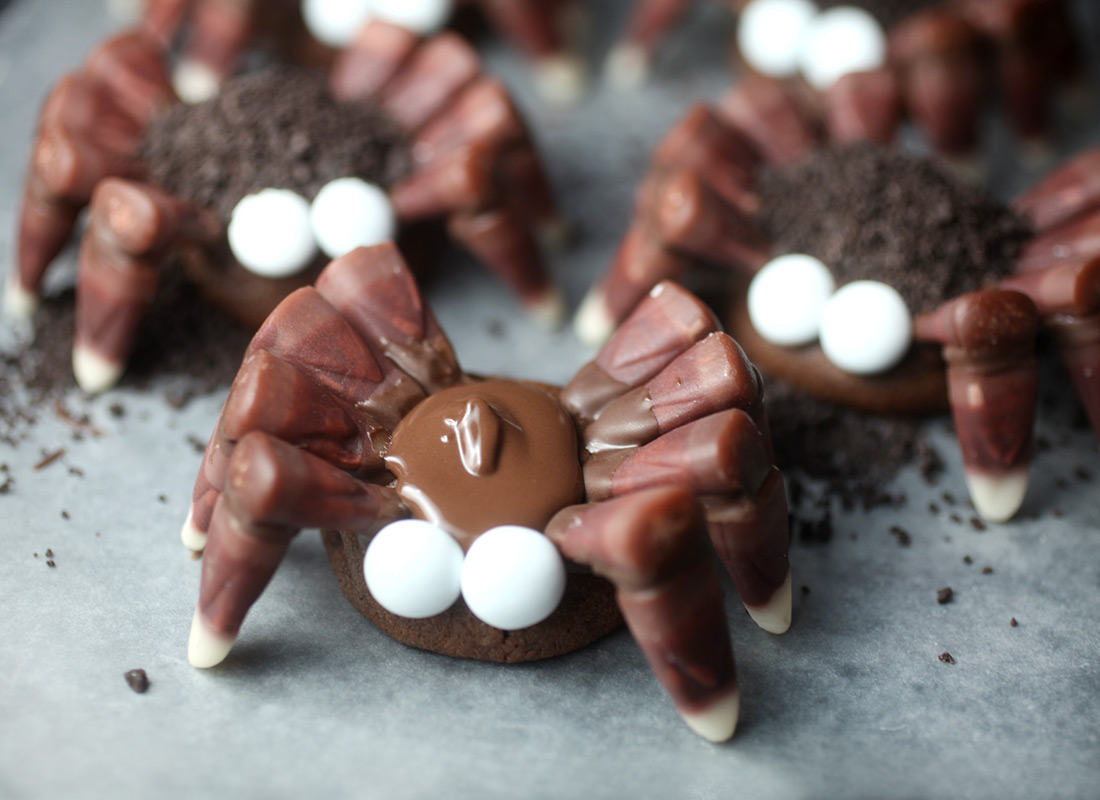
Now spoon a small amount of the candy coating on top of the spider’s back. Use a toothpick if needed to coerce the coating around in a circle and make sure it touches the legs that are already attached. This will give them a little more support.
Before the chocolate dries, cover with Chocolate Crunch Sprinkles.
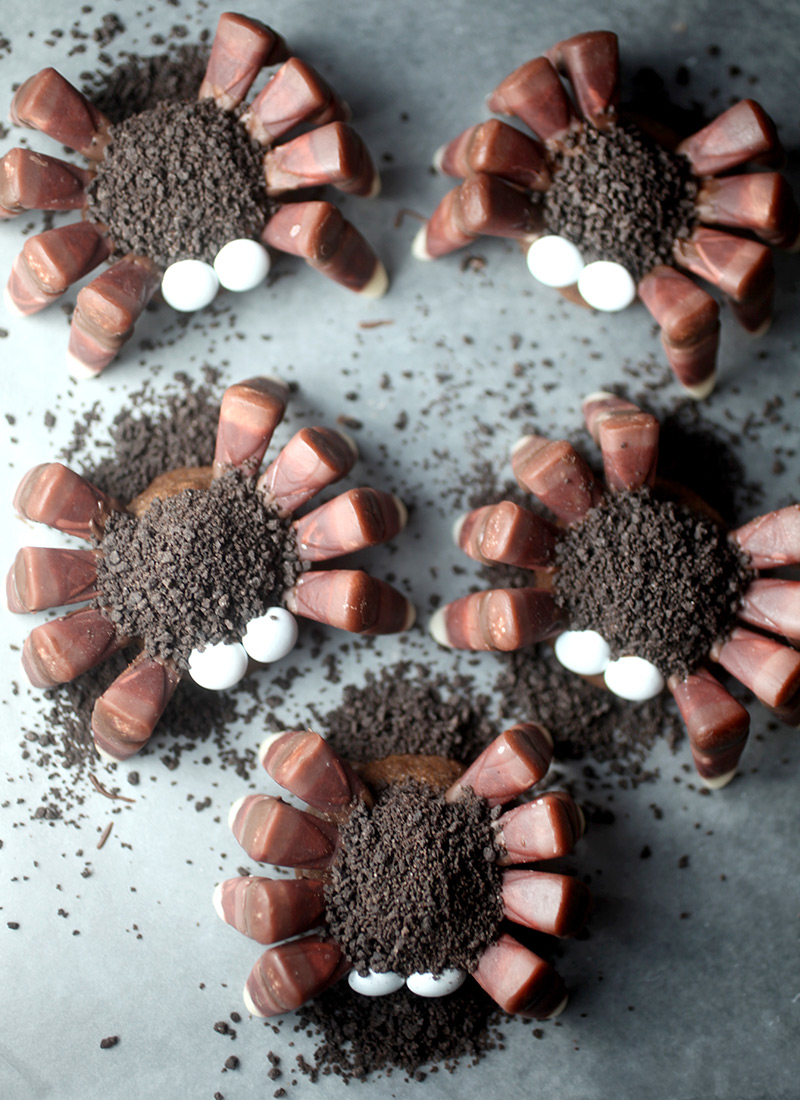
When dry, turn upside down and shake off any of the excess sprinkles.
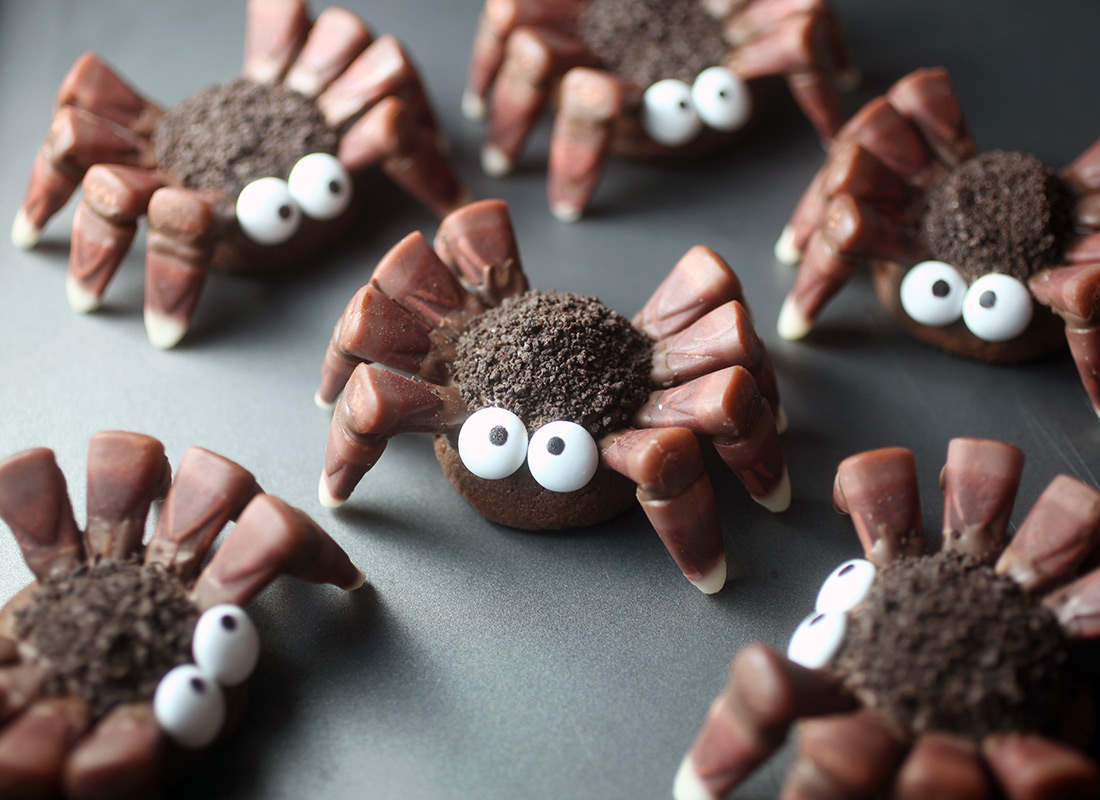
Now all that’s left is dotting the eyes. Use a black edible-ink writing pen to draw on the M&M’s.
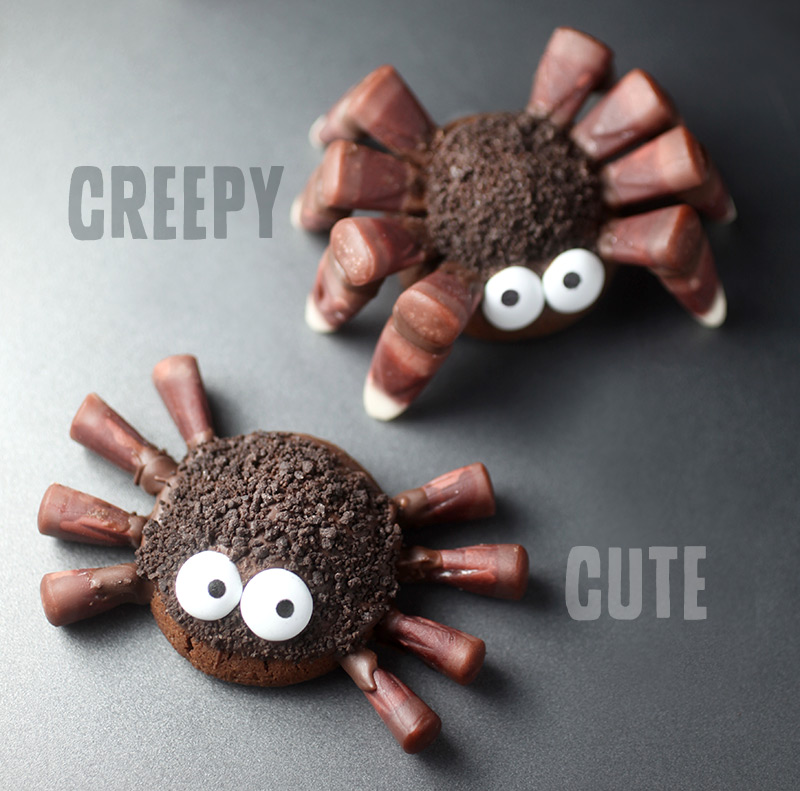
P.S. If you want simpler spiders that are a little sweeter than they are creepy, then just turn the candy corn pieces on their sides and attach to the cookies with melted candy coating. It also helps to break off a little bit of the tips so they aren’t as pointed where the candies meet the cookie.
Creepy Cute Candy Corn Crawlers
1 1/2 cups all-purpose flour
1/2 cup natural unsweetened cocoa powder
3/4 teaspoon baking soda
1/2 teaspoon salt
1/2 cup butter, slightly softened
1 cup granulated sugar
1/3 cup brown sugar
1/2 cup peanut butter
2 eggs
2 teaspoon vanilla
1 1/2 cups milk chocolate morsels
Preheat oven to 350 degrees.
In a small bowl, mix flour, cocoa, soda and salt using a wire whisk and set aside.
In another bowl, cream butter, both sugars and peanut butter until light and fluffy.
Add eggs and vanilla and mix until combined.
Add flour mixture to creamed mixture and mix until just combined.
Stir in morsels.
Roll cookie dough into 1-1/2 inch balls and place on parchment paper covered baking sheet. Bake 9-10 minutes.
Press tops down gently if they are too mounded and let cool.
Makes about 36 2-inch cookies.
For decorating, you’ll need:
Sea Salt Chocolate Candy Corn*
Chocolate Candy Coating
Chocolate Crunch Sprinkles
White M&M’s candies
Black edible-ink writing pen
*I found the Sea Salt Chocolate Candy Corn made by Brach’s at Walgreen’s. The 15 oz bag had enough candies to make a dozen creepy crawling spiders or two dozen cute spiders.
Enjoy!

Bakerella's Blog

- Bakerella's profile
- 9 followers

