
Bakerella's Blog, page 18
October 5, 2015
Chocolate Chunk Banana Snack Cake
It’s snack time! With the start of October, the internet makes me feel like I should be sharing pumpkin recipes. I mean pumpkin this and that is everywhere. But I don’t really feel like pumpkin right now. Actually, I’m not so ready for fall at all. I wish I could get two more months of summer in. Like every year. So that’s where this quick little banana snack cake comes in.
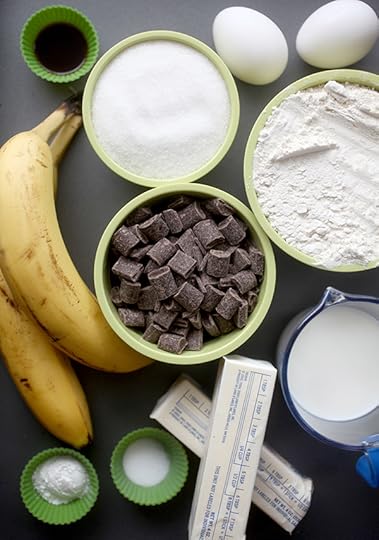
Simple ingredients.
And simply yum.
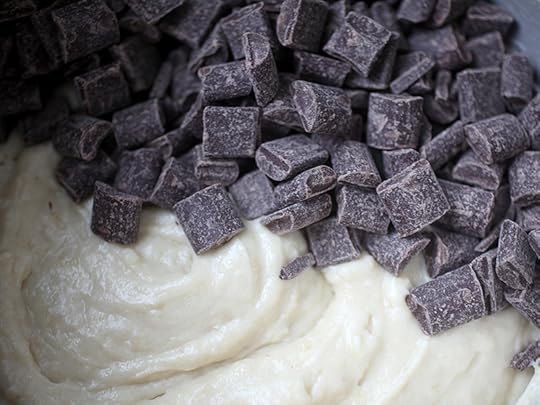
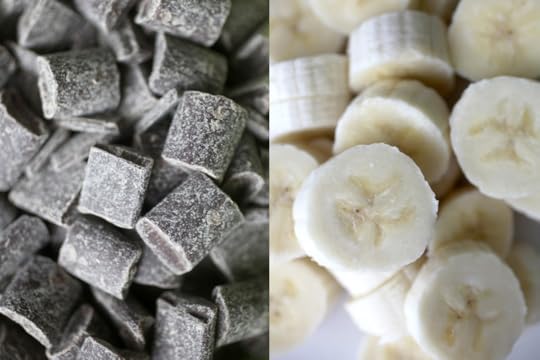
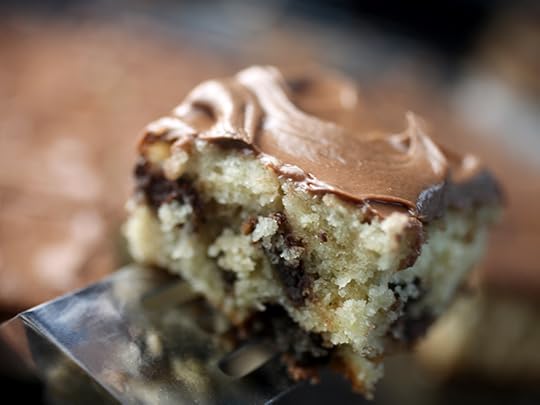
You can use mini chips in your batter, but I like them chunky with chocolate.
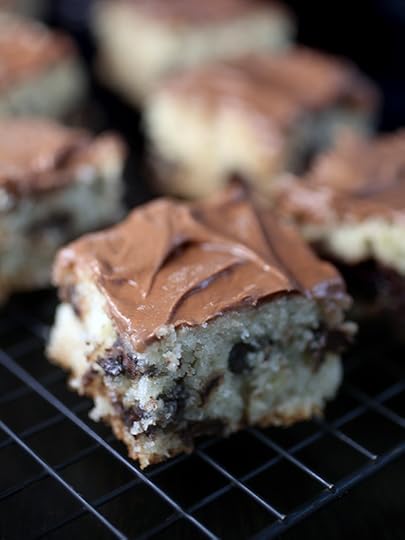
Enjoy the baked banana cake by itself or top it with frosting.

That’s right. Let’s slap on a layer of creamy chocolate frosting.
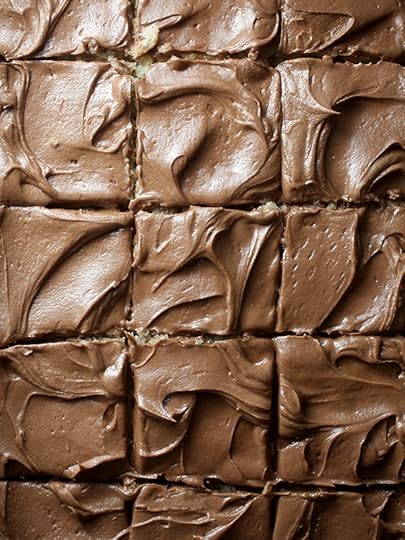
One of the reasons I love snack cakes so much is baking everything in one big, no-fuss, easy layer. Plus, that means lots of little squares to snack on for the next few days.

Chocolate Chunk Banana Snack Cake
Cake
2 cups all purpose flour
1 1/2 tsp baking powder
1/2 tsp salt
3/4 cup unsalted butter, room temperature
1 cup sugar
2 eggs
1 tsp vanilla
1/2 cup milk
1 cup mashed bananas (about 2 large bananas)
1 1/2 cups chocolate chunks
Frosting
1 cup butter, room temperature
3 cups powdered sugar
1/3 cup unsweetened cocoa
1 tsp vanilla
1 Tbsp milk
Preheat oven to 350 degrees fahrenheit. Grease and flour a 9 X 13 inch baking dish.
In a medium bowl, whisk together flour, baking powder and salt until combined. Set aside.
In a mixing bowl, cream butter and sugar. Add eggs and vanilla and mix until combined. Add milk, continuing to mix until combined. With the mixer on low, slowly add flour and mix until just combined. Mix in mashed bananas. (Note: I used a food processor to mash bananas right before adding to the batter.) Stir in chocolate chunks.
Pour batter into prepared dish and bake for 30-35 minutes or until done.
Remove from oven and cool completely.
For frosting: Using a mixer, beat butter and vanilla until smooth. Sift powdered sugar and cocoa together and slowly add to mixer while on low. Increase to medium and beat until completely incorporated. Add milk a teaspoon at a time until desired creaminess.
Enjoy!!!


September 29, 2015
Chocolate Chip Cookie Mix
These major chocolatey chocolate chip cookies actually came from a mix. But not just any mix.

Master Pastry Chef and Mr. Chocolate himself, Jacques Torres now has a convenient way to make his famous chocolate chip cookies.
I was excited to give them a go because I use his scratch recipe all the time and it is one of my absolute favorites. Check out this older post I did on making them and trust me when I say that they are ridiculously good. The original recipe just takes some time (overnight chilling), more than one kind of flour, giant chocolate wafers to bake inside. So, I don’t always have the time to plan to make them or the right ingredients on hand.
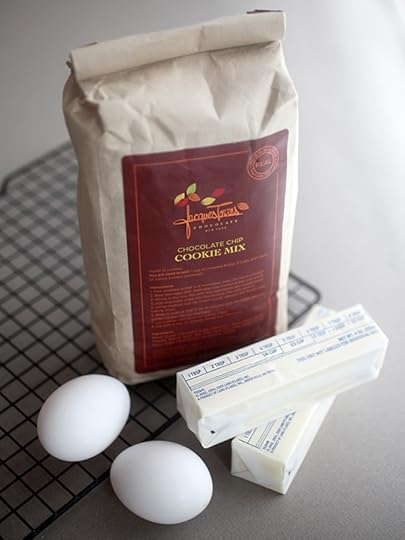
That’s why this little mix came in handy to curb my cookie cravings. You just add butter and eggs. I was a little skeptical about the kind of chocolate that would be included in the bag because when I pressed around, it didn’t feel like it would have the big wafers I am used to with his recipe.

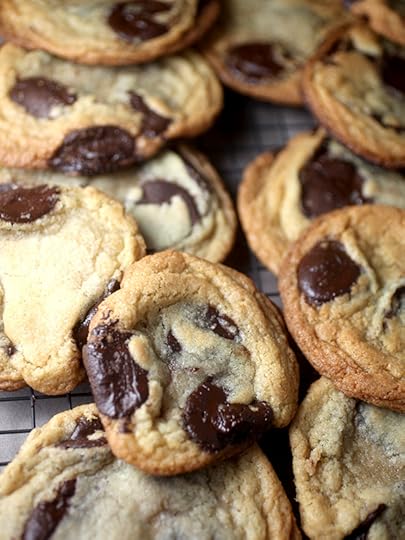
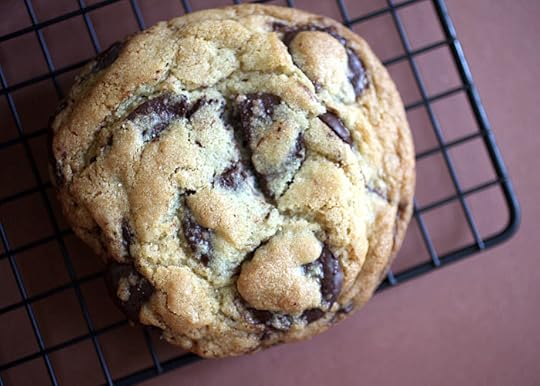
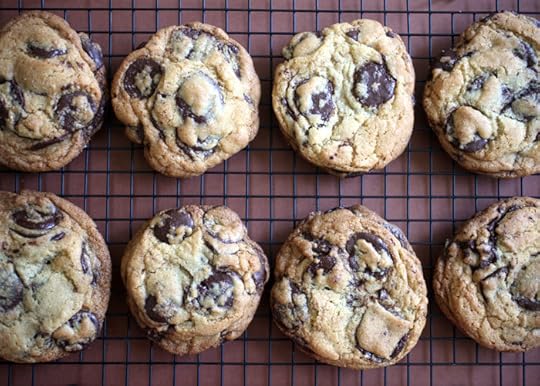
But oh boy … was I wrong. They are ginormous and bigger than the big ones I usually use. Here they are next to regular size chips on the right.

And here they are in my hand. Yes and yum. These are the kind of chocolate chips …I mean chocolate wafers that I can get behind. Or maybe even chocolate saucers, they’re so big.

Spoon, please!

Okay… this is what I’m talking about. Look at all that warm chocolate spilling out when you take a bite. So good.
A couple of things to note about these cookies… The mix is a little pricey. Like $18 for the bag. So I will probably stick to making them from scratch, unless I want to give the mix as a gift. That being said, the chocolate and ingredients I buy to make his original version ends up being around the same price when everything is said and done.
Also… if you do buy the mix and make them, let your dough chill for a while so they don’t spread as much. My cookies went a little flat.
And not quite like his scratch recipe cookies. Photos below are for reference from an older post. Check it out here.

See what I mean. These are insane.
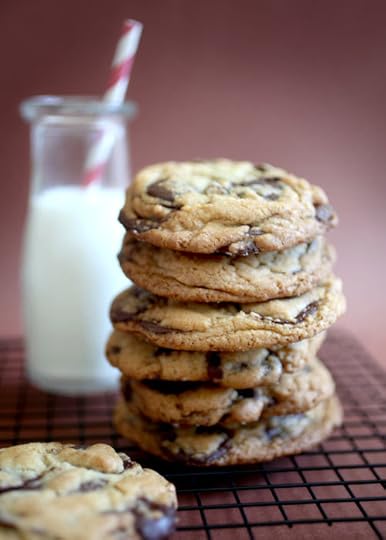
And pretty!
You really have to make them one day! Here’s the recipe for his famous cookies:
Jacques Torres’ Chocolate Chip Cookie Recipe
Enjoy!!!

September 22, 2015
Very Sweet Vegas
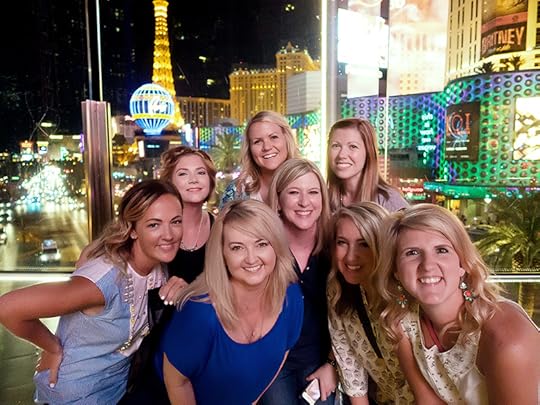
A few weeks ago I went on a super fun girls trip to Las Vegas planned by my sweet blogging friend Jenny of Picky Palate. I loved hanging out with these girls … especially since they love sweets as much as I do. And, we had a blast trying as many treats in three days as we could.
L to R: Shelly of Cookies and Cups, Kristan of Confessions of a Cookbook Queen, me, Shawn of I Wash You Dry, Stephanie of Plain Chicken, Lauren of Lauren’s Latest, Jenny, and Amanda of Kevin and Amanda.
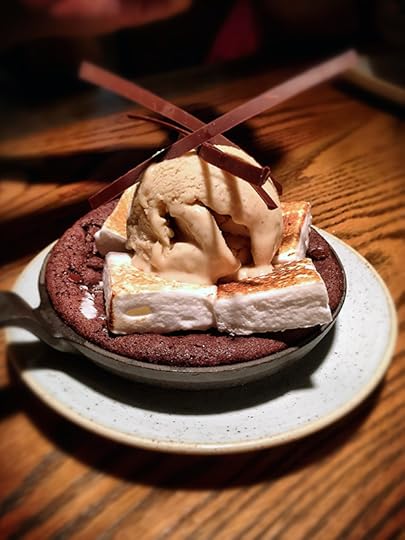
After landing in Vegas, we met up at Yardbird for lunch. We started the weekend strong with Chicken and Waffles followed by a few desserts to share. This s’mores brownie was served up in a cute little skillet.
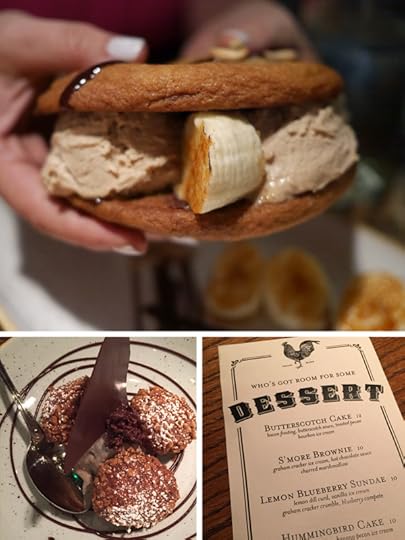
We had fried Oreos, too… but the chocolate chip cookie sandwich with peanut butter ice cream and bananas was by far my favorite. Definitely off to a good start.
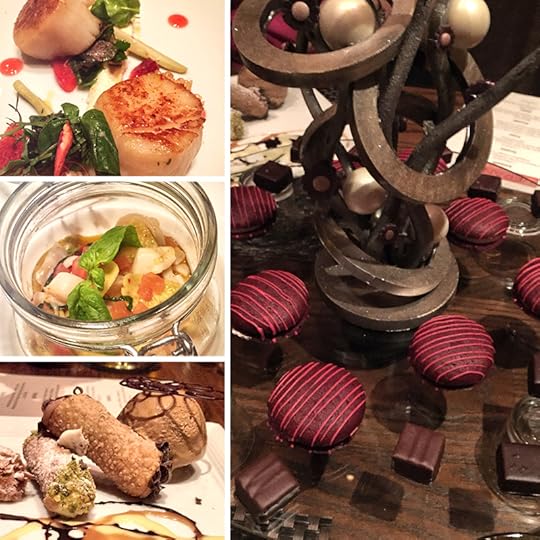
We stayed at the Four Seasons Hotel and enjoyed dinner at their restaurant Verandah. So amazing.
By the way… LOVE the Four Seasons Hotel. I’ll definitely want to go back. It sits on the top floors of the Mandalay Bay, but has its own private entrance free of all the noise and smoke and slot machines. Not that I don’t love slot machines. It was just nice to go back to the hotel and have a break from all the craziness. But then the elevator too conveniently stops on the casino floor to give you access to the Mandalay Bay Casino which I may have taken advantage of more than I should.
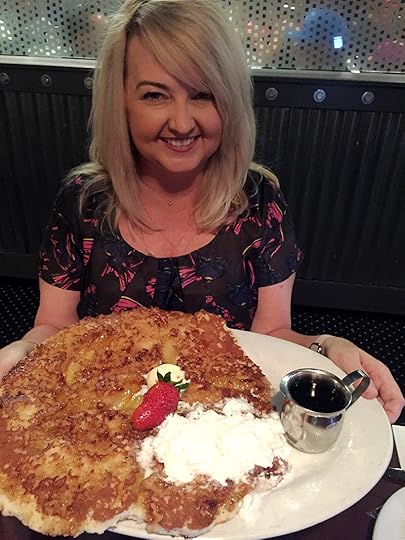
The next morning we headed over to Hash House a Go-Go and you guessed it. Kept eating. this Brown Sugar Banana Pancake was as big as a pizza. But all their dishes are ginormous. You’ll feel guilty when you leave. But your tummy will feel happy.
Okay, in full disclosure. I did not eat all of this.
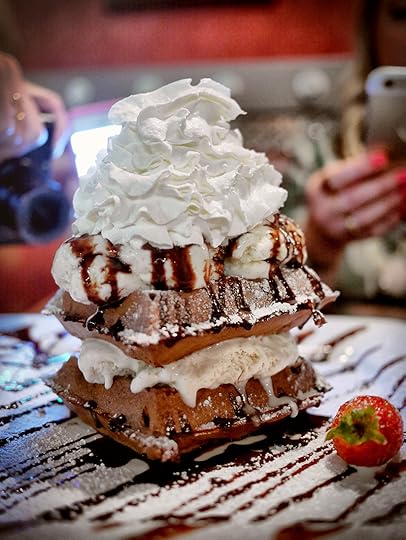
That’s because … I had to try this tower of chocolate waffles, ice cream and chocolate syrup … and it stole my heart.
We all totally shared, though. I don’t think I could finish even one of their dishes.
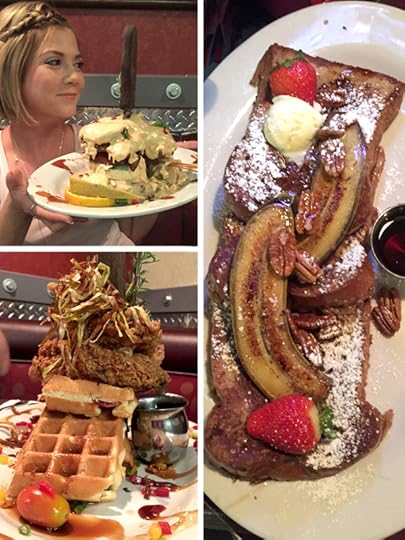
Also devoured by the group were Banana French Toast, Chicken and Waffles … (again), and Kristan ordered the Man vs. Food dish that helped make Hash House so popular.
We don’t hold back.
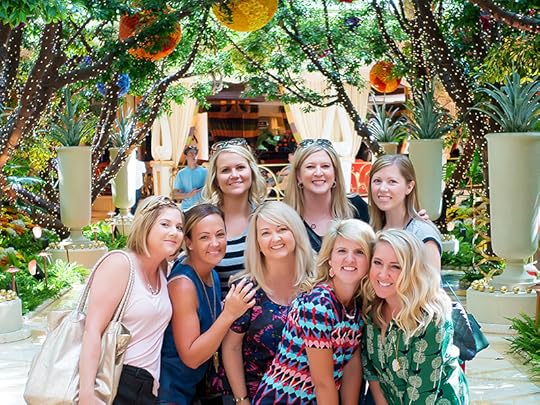
Here we all are at the Wynn Hotel entrance. Such a pretty hotel.
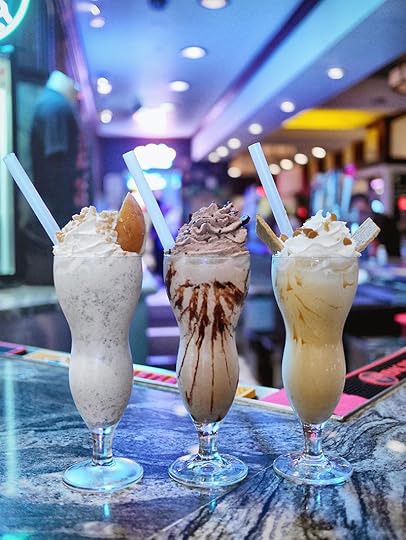
For lunch we slowed down a little bit and just ordered a few French Fry Sampler platters and washed them down with custom milkshakes at Burger Bar. I had the middle one… and it was amazing!
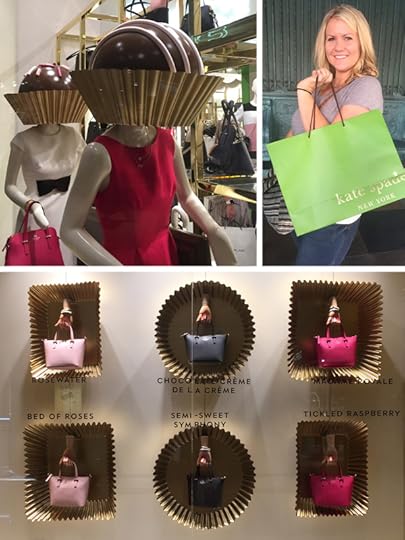
I love this Kate Spade window display. I mean, even our shopping adventures were sweet.
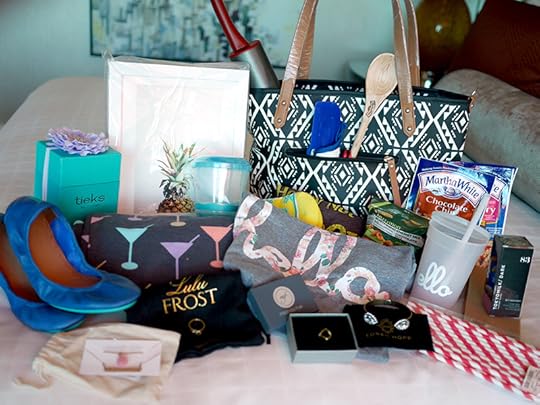
But not as sweet as Jenny was for surprising us with a bunch of amazing goodies to go home with. A big thanks to the brands who helped her make our trip so special:
Four Seasons Las Vegas, Sabra Hummus, Petunia Pickle Bottom, MZ Wallace, Tieks, Lulu Frost, Loren Hope, Miranda Frye Jewelry, Minted.com, Tokyo Milk, Hello Apparel, Bella Cotton Candy Maker, P.J. Salvage, KitchenAid, Retro Bakery, Tillamook, Nestle, Planters, Bon Apetit Pizza and Martha White.
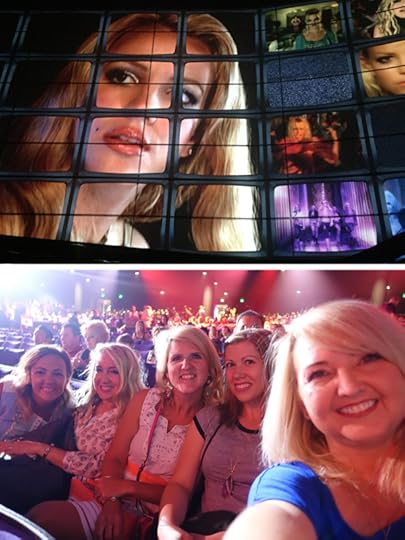
That night we met up with Miss Brit. She totally wanted to hang out with us.
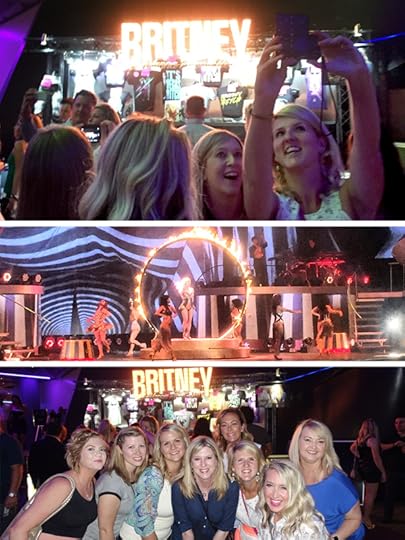
But she was busy dancing her butt off. Such a fun show.
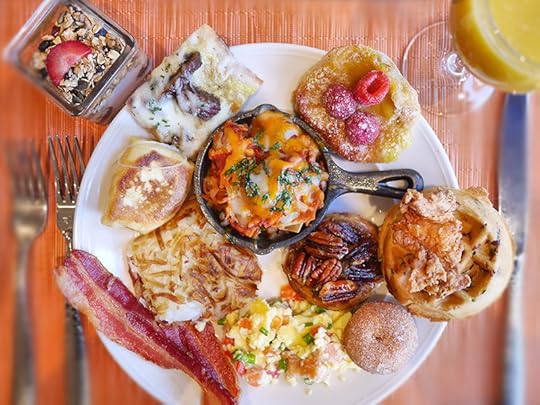
The next morning we had brunch buffet back at Veranda in the Four Seasons Hotel. It’s most definitely worth going to. There is soooooooo much yumminess to choose from. I mean they have everything!
And how can you not love a place with their own adorable doughnut bar.

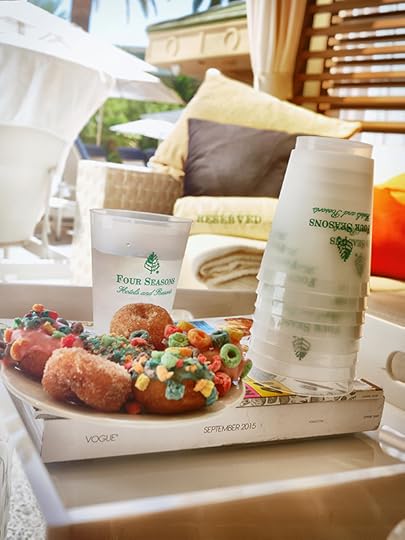
After brunch we hung out at the pool and enjoyed doughnuts in our cabana.
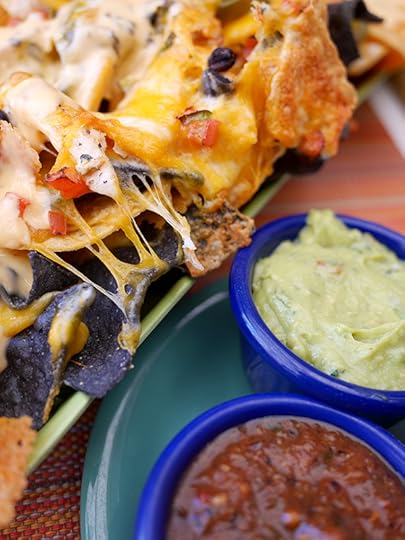
Okay… we also had nachos. But, let’s talk about these nachos. They are one of the best things I had all weekend. And maybe some of the best nachos I’ve had ever. I did not want to stop eating them, but my bathing suit said otherwise.
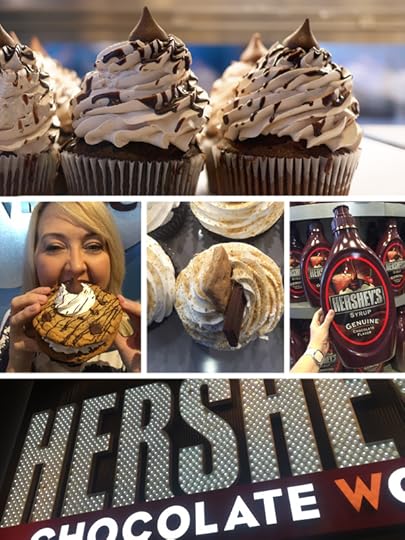
Later that afternoon we stopped by Hershey’s Chocolate World. Such a happy place.
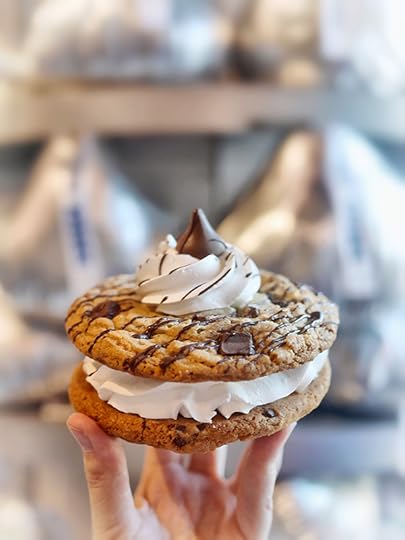
Look at this giant chocolate chunk sandwich cookie. It makes you smile doesn’t it.
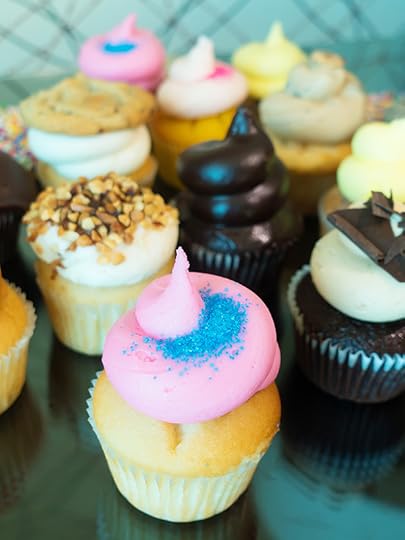
Saturday night we had cupcakes from Retro Bakery. My favorites in Vegas.
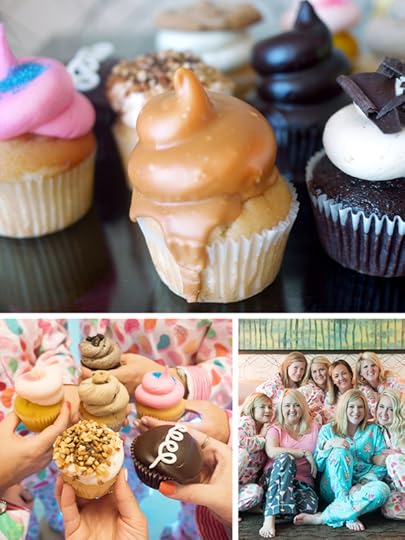
Get the Hopscotch in the above photo and you won’t regret it.
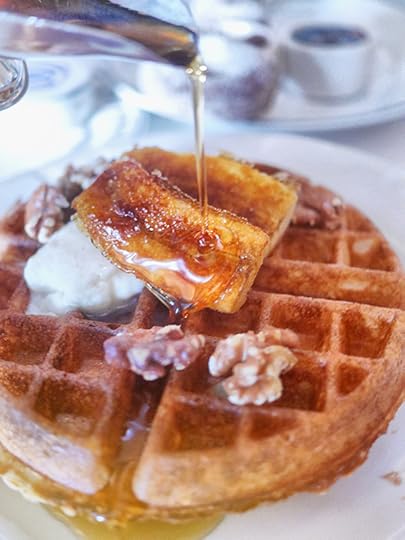
Sunday morning called for Banana Waffles from Bouchon Bistro …delicious. I was sad to leave and drowned my sorrows in a river of maple syrup.
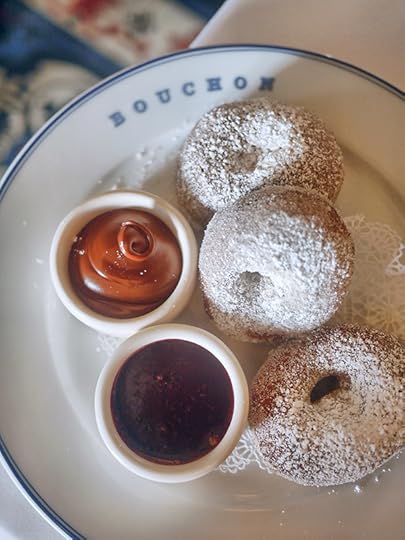
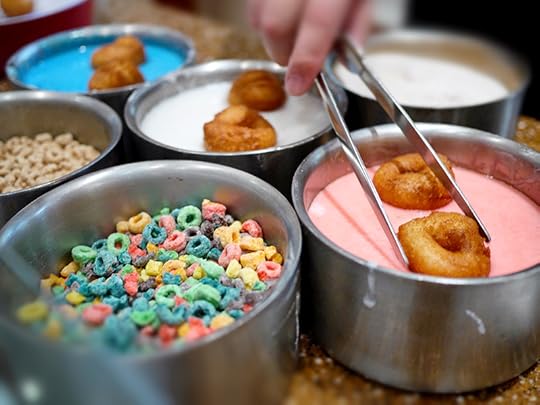
But these warm spiced beignets with Nutella cheered me right up. They were to die for delicious!!!
And now for a delicious end to a very sweet trip with a couple more over the top desserts from Serendipity 3. I didn’t make it here before I left, but Amanda and Shawn did and sent these photos and I cried.
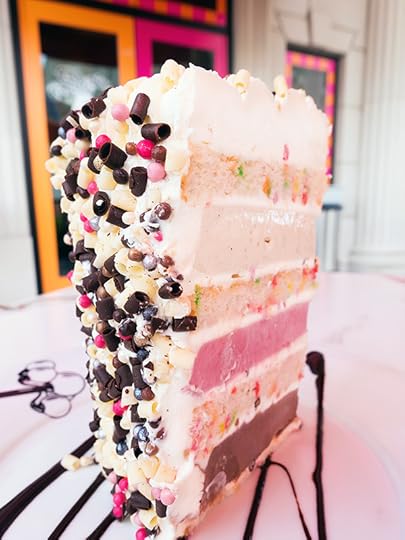
This Party Like it’s Your Birthday Cake!!!

And this Deep Fried Oreos and Ice Cream Sundae!!!!! And now I know my first stop the next time I’m back in Vegas.
Do you have any favorite sweet stops we should try next time?

September 7, 2015
Cake Popalooza!
Today is the 5-year anniversary of my first book. I can’t believe it!
How could five years have gone by so fast?!? It’s just crazy and to celebrate, I’m giving away a bunch of Cake Pops goodies below. YAY! I created cake pops and first shared them on the blog back in 2008 and by September 8, 2010, Cake Pops by Bakerella was released in stores and online. So much has happened since this book made it in to peoples’ homes and hearts all over the world.
Businesses have been launched and products have been created to help make them, shape them, display them, and decorate them. Cake Pops have become regulars at coffees shops, bakeries, birthdays, weddings and more. They’ve helped raise money for charities, inspired creativity, spread joy and probably some frustration, too. Dipping can be tricky to get on the first go. But through the last several years, I know one thing. They have brought endless smiles to so many.
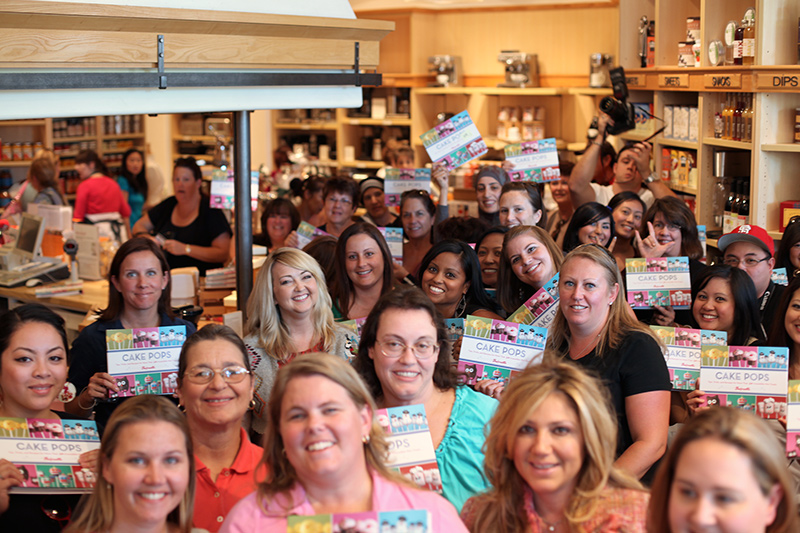
The photo above is from the Walnut Creek Williams Sonoma in San Francisco. P.S. If you attended one of the signings back then you might find your photo here.
When the book debuted, I had the incredible opportunity to travel around the country to meet you guys. It was and still is one of the best experiences of my life. We laughed and cried and hugged and talked dipping and candy and you guys showed me your designs and it was unbelievably exciting to meet everyone who shared the same passion for cute and cake. None of this would have happened if it weren’t for you guys. I can’t tell you how much your support and encouragement means to me.
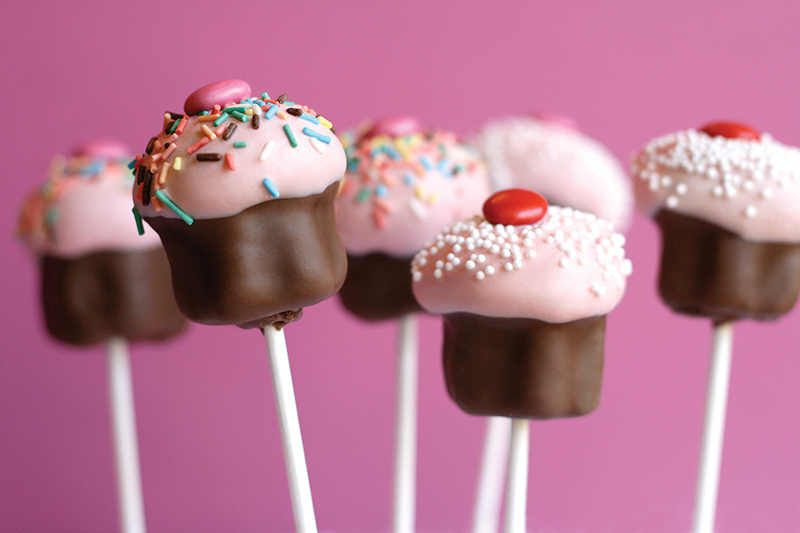
I have to give a little shoutout to these cupcake pops, too. It was these cuties that I first posted on the site in February of 2008 that unknowingly started a cake pop phenomenon. These were my first shaped pops and I could have never guessed how much people would love them and want to learn how to make them back then. It was your enthusiasm for these tiny treats that sent me on a mission to see what else I could to with a little ball of cake on a stick and some candy. I had to know how many ways I could make them and make you smile. And now I know the answer is endless.
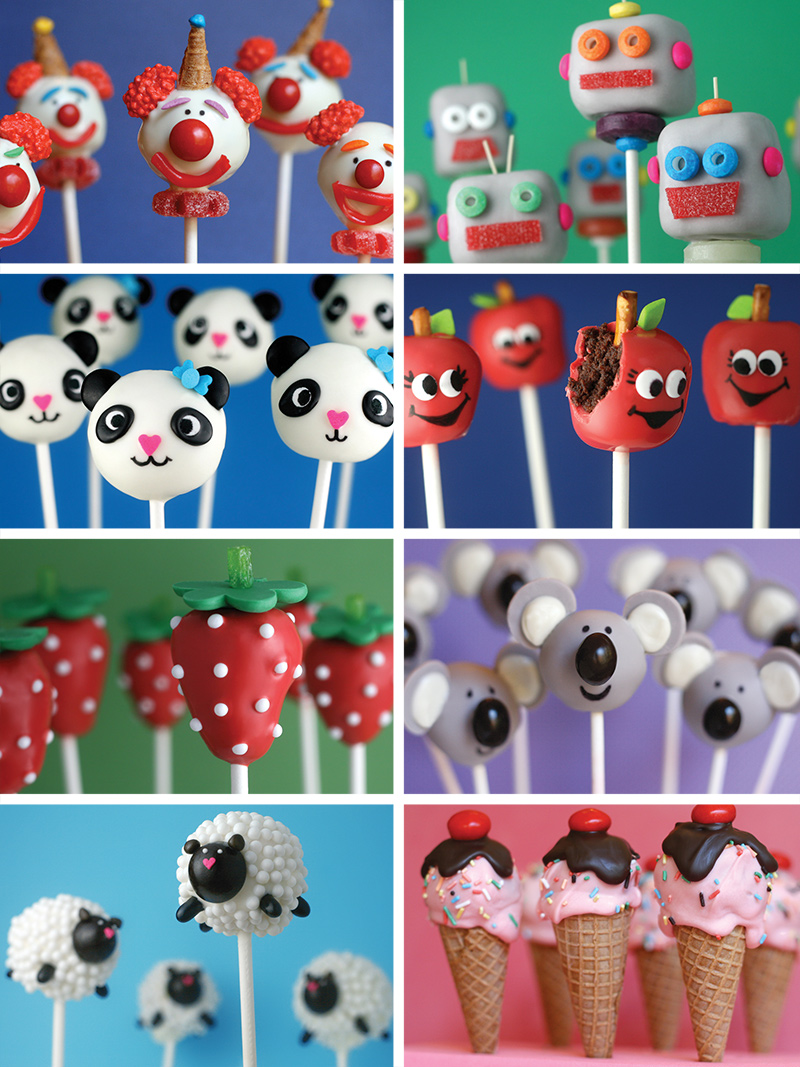
These are some of my favorite pops from the first book and today I want to say YAY and celebrate the anniversary of it’s publication with a knock down all out Cake Popalooza Giveaway of the products that I’ve worked on over the last several years.
Some you may know about … and some maybe not.

This is my second book… Cake Pops Holidays… and it may just be my favorite.
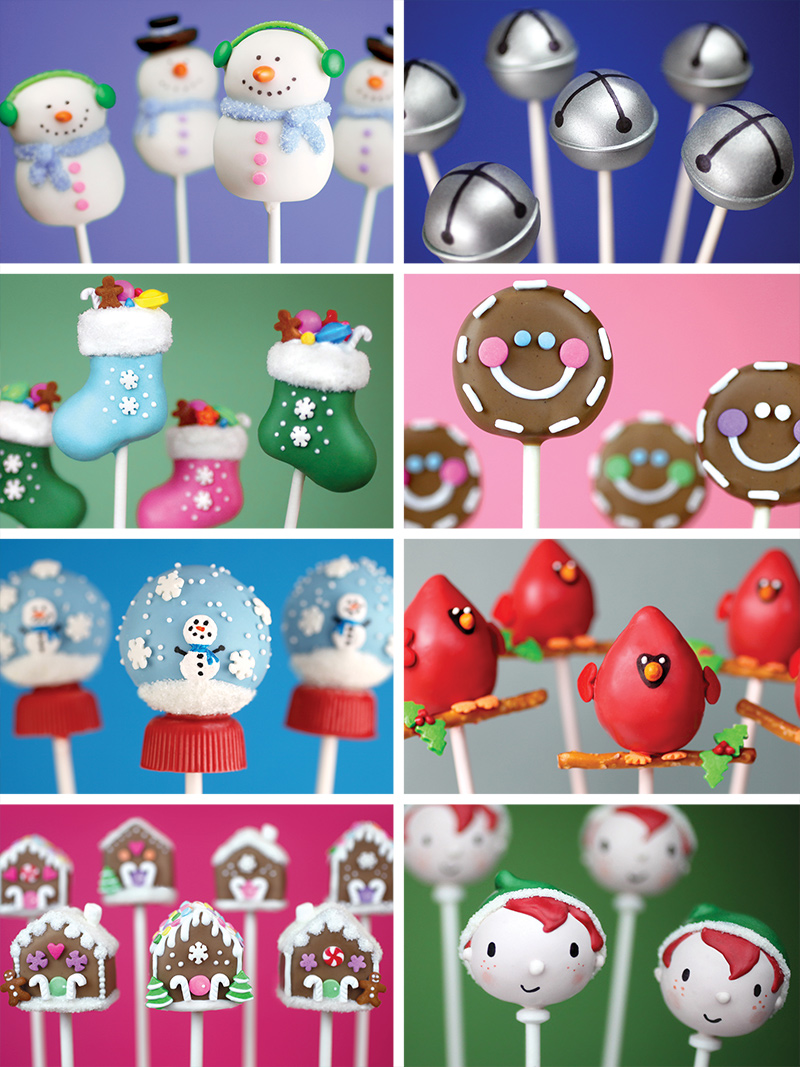
When I was working on it, I started getting a little nervous that it might not be as cute as the first book because there weren’t as many animal designs, but in the end I think it turned out even cuter than the first book. And I fell in love with the smaller size, too.
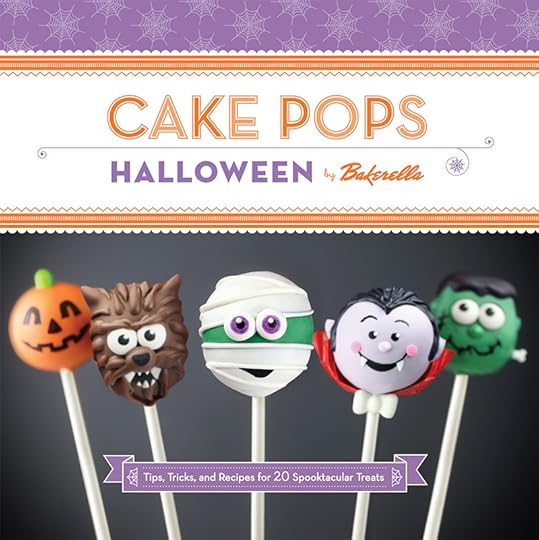
With a Holidays book, how could I not do a Cake Pops Halloween themed book, too… especially with so many frightfully fun character possibilities.
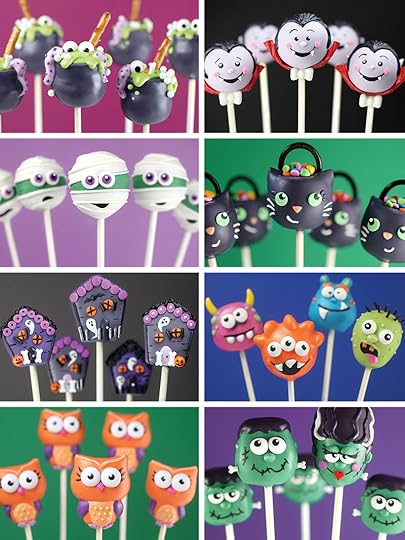
I mean how can you not smile at those spooky sweet faces.
Besides the books, I created a few gift items with my publisher Chronicle Books. They’re the best at making super cute stuff.

Here’s the Cake Pops Kit. It comes with a small book, treat bags, treat tags, ribbon, cake pop sticks and a cute paper cake pop stand.

And these are four different mini kits, each with treat bags, ribbon, tags, and cake pop sticks for specific projects.

These are notecards printed with cake pop photos from my first book. A cute little way to send someone sweet nothings.

Oh…… and the toy! It was available at Toys R Us for a couple of years and I only have a handful of them left. Sad face. It has a cake crumbler, mixing bowl, dipping bowl, cake pops tray, cake pops stand, cake pop sticks and four fun molds to help you shape cake pops.

I also partnered with Make’n Mold for this Bakerella line of products to help you make cake pops and sweet treats. Candy wafers, candy molds, decorettes, pastry bags and more. You can see all of it online here.

Okay… let’s wrap up and celebrate with this Cake Popalooza Giveaway!
Enter for a chance to win the following:
Cake Pops
Cake Pops Holidays
Cake Pops Halloween
Cake Pops Kit
Cake Pops Mini Kits
Cake Pops Notecards
Cake Pops Toy
PLUS a Bakerella for Make’n Mold $100 Gift Card
To enter:
Leave a comment below and tell me your favorite cake pop design or book.
Deadline to enter is Thursday, September 10 at 8:00 pm ET.
One winner will be chosen at random and announced on this post sometime Friday.
Good luck and yay for cake pops!!!

August 23, 2015
Peanut Butter Brownie Ripple Ice Cream
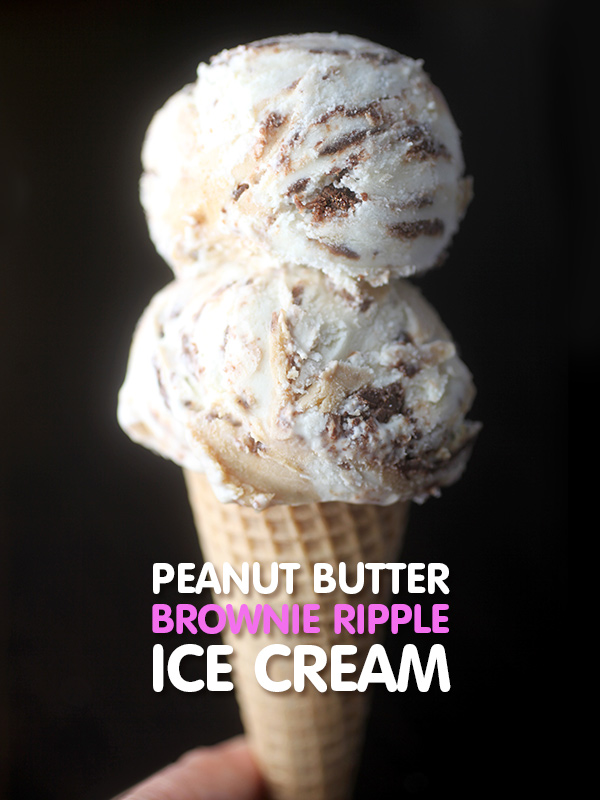
I’ve been playing around more with some more “no-churn” ice cream after making this Butterfinger Crunch batch the other day and I love how easy it is to whip up. This time I decided to mix in two of my favorite things.
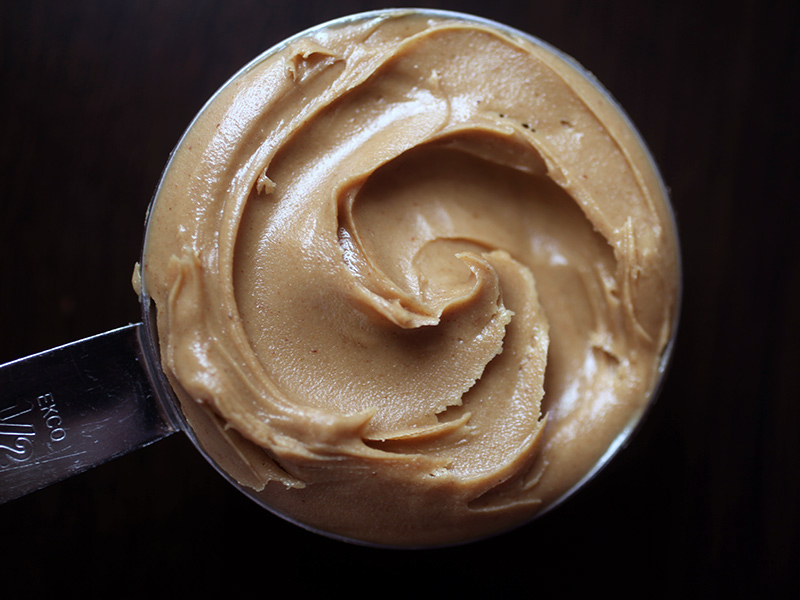
Creamy peanut butter and…
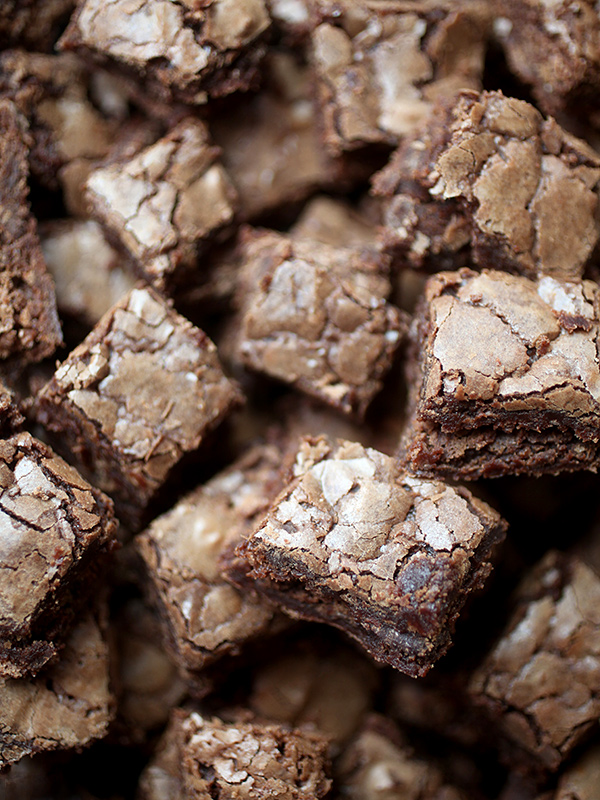
And chocolaty brownies! These are just little bitty brownie chunks that I cut up from some leftover brownie cookies I made recently. But make things even easier with brownie bites from the store if you don’t have any extra brownies hanging around the kitchen. Because let’s be serious. A batch of warm brownies really doesn’t stand a chance of making it into another dessert before I devour them.
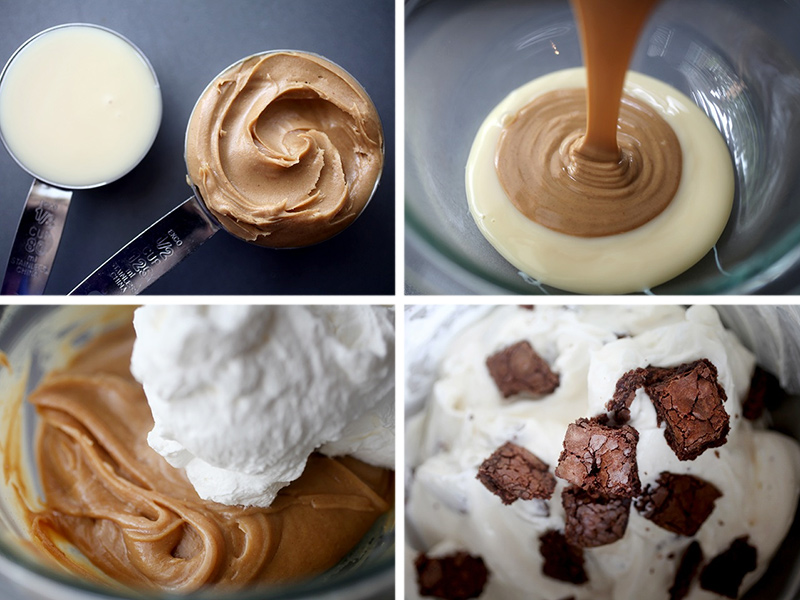
For the vanilla base: I combined sweetened condensed milk with whipped cream and vanilla and then stirred in brownie pieces.
For the peanut butter ripple: I mixed sweetened condensed milk with warmed peanut butter before adding the whipped cream.
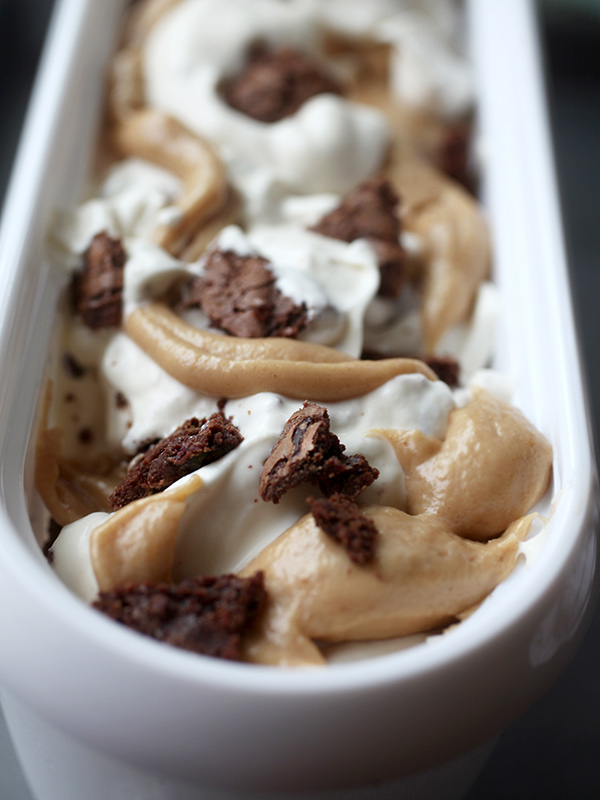
Layer all this yumminess in a 9X5 loaf pan or a container like the one I used above with a lid.
Try putting the peanut butter mixture in a piping bag (I used one of my handy pink ones) so you can easily swirl it in around the vanilla ice cream base.
Once the container is full, just drop it on the counter a few times so all the ingredients get packed in. Then freeze away and wait.
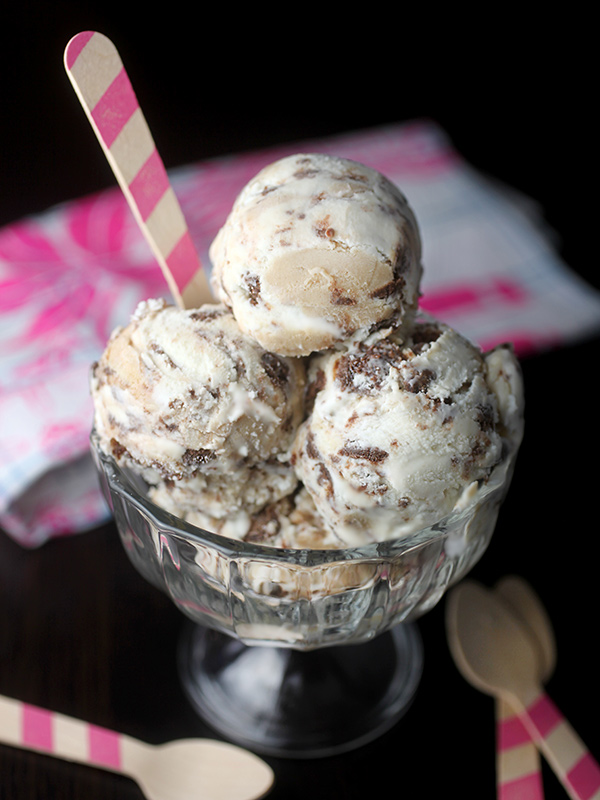
Peanut Butter Brownie Ripple Ice Cream
2 cups heavy cream
14 oz can sweetened condensed milk
1 1/2 teaspoons vanilla
1/2 cup peanut butter
1 1/2 cups small brownie pieces
Chill metal mixing bowl and metal whisk attachment in freezer for about 30 minutes.
Whip heavy cream on high until stiff peaks form, about three minutes.
Warm peanut butter in the microwave and stir with 1/3 cup of the sweetened condensed milk. Fold in about a third of the whipped cream until completely combined.
Fold in the remaining sweetened condensed milk with the remaining whipped cream. Add vanilla and mix until combined. Fold in brownie pieces.
Fill ice cream container or a 9 x 5 inch loaf pan alternating with spoonfuls of the ice cream mixture and piping swirls of the peanut butter mixture. Mix in any remaining brownie pieces.
Freeze for at least six hours.
Scoop and enjoy!

August 9, 2015
Happy Birthday Snoopy!
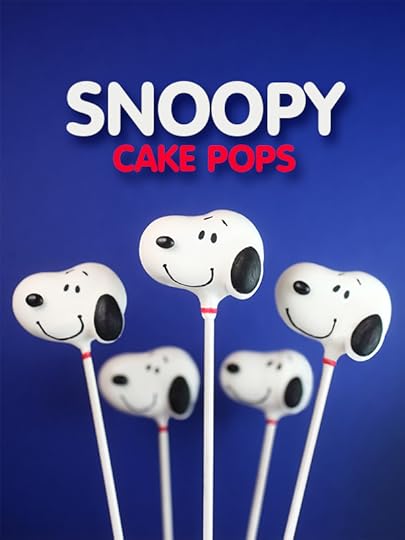
It’s everybody’s favorite beagle’s birthday! And I’m celebrating with the sweetest Snoopy Cake Pops for his special day. It’s a big year for Snoopy and the Peanuts Gang because they make their big-screen debut this November in 3D animation for The Peanuts Movie and I can’t wait.

If you’re excited and want to make Snoopy, too… then check out my complete instructions for making Basic Cake Pops.
Once you have round uncoated cake balls, keep reading to find out how to decorate these lovable pup pops.
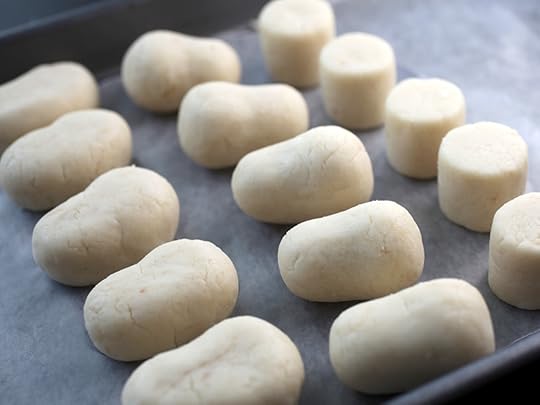
Reshape the round balls to make Snoop’s head. I made two different versions because I wasn’t sure which one I’d like best once they were decorated.
One version is made by shaping the cake pop mixture into a somewhat flattened kidney shape (on left in above pic). This Snoopy is more like the cartoon drawing where his facial features appear on one side. You’ll just need one ear for this one.
The second version is made by shaping the cake pop mixture into more of a rounded light bulb shape (in middle in above pic). This Snoopy needs ears on both sides since it is more three dimensional.
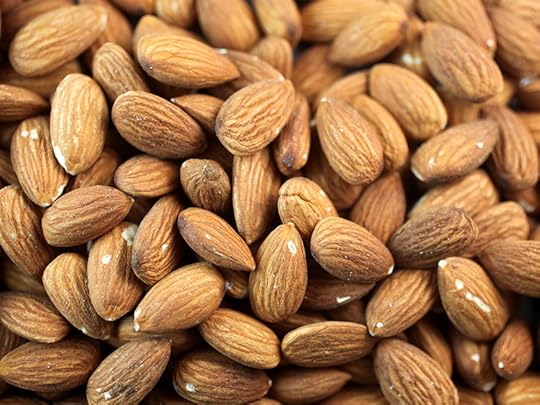
For the ears I used almonds and they turned out to be perfect. YAY! I love it when I find candies or edible add-ons that are just the right size and shape.

Attach almonds to Snoopy’s head with a little bit of melted white candy coating to act as a glue. When dry, dip the shaped cake pop in the melted coating and gently tap off any excess. Let dry completely in a styrofoam block or cake pop stand.

When dry, use an Americolor black edible ink writing pen to color in the ears, draw eyes, eyebrows and a big smile. When using the pens, draw on as gently as possible. If you press down, candy residue will clog the tip.
For cute little noses, use coated black sunflower seeds and attach them in position with a small dot of melted white coating. For the best noses, sort out the ones that are more rounded from the ones with a pointed end.
Draw on collars with a red edible ink pen.

So so cute. But it’s his birthday and I think he needs to celebrate with cake and party hats, too.

See. All smiles!!!
I like this cartoon-inspired version the best because you can have more fun with his expressions.

To make little layer cakes, shape cake pop mixture into a marshmallow shape… OR you can use marshmallows : )
Dip in melted candy coating in your favorite cake color and let dry.
When dry, use a toothpick to draw a line around the middle with white candy coating. Let dry and then dip the tops in more white candy coating. Use a toothpick dipped in coating to make waves in the top layer of frosting.
Top off the cake with tiny candles and multi-color nonpareils.

The candles I used are super skinny. I just cut them into 1/2 inch pieces. Make sure you take them out before eating though.
For the party hats, I didn’t have a candy shape on hand. No worries, I just made tiny cones from the cake pop mixture and used a toothpick to dip the tops in coating.
When dry, attach them to Snoopy’s head with a dot of melted coating and then draw a line around the base of the hat with more coating.
Sprinkle with nonpareils and use the side of a toothpick to straighten the line if needed. The benefit of doing this is that it camouflages the gap where the hat meets Snoopy’s head and makes it look like it seamlessly sits sweetly on top.

Here’s the second version. They’re cute, too. 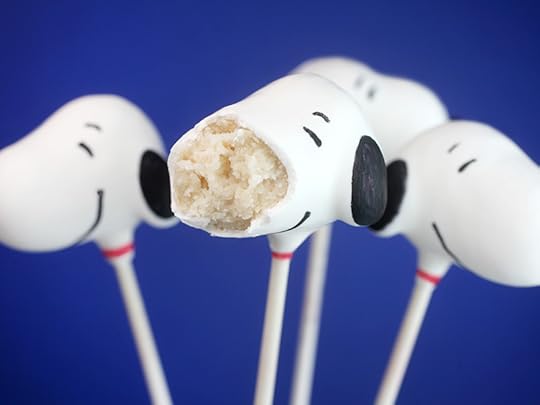
So cute I want to bite their noses off.

This post is sponsored by the #PeanutsMovie coming to theaters this November.

August 2, 2015
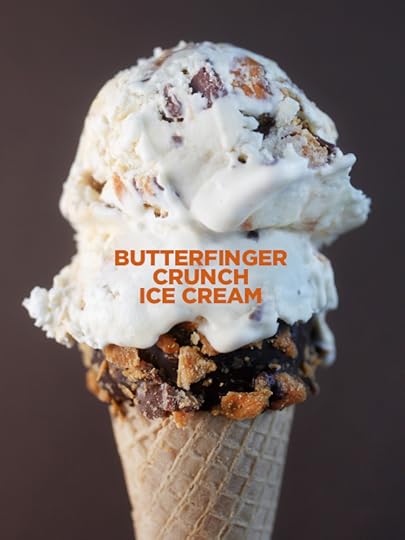
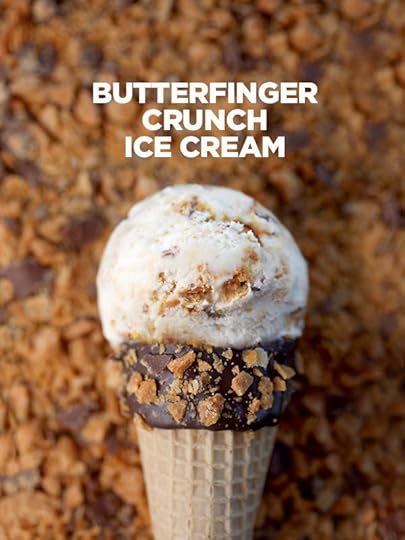
Butterfinger Crunch Ice Cream
I enjoy ice cream way too much. I think I could eat it every day. And I almost did last week when I was on vacation. Ice cream is my traveling must-have treat above all other sweets. And now that I’m back home, I already feel like I’m having withdrawal.
Luckily, this no-churn ice cream is super easy to make. And with just three basic ingredients you can whip up a vanilla ice cream base that’s fun to customize, too.

Basically, you just need to add sweetened condensed milk and vanilla to whipped cream and mix together.
Once you have the base, just mix in your favorite candies, cookies, sprinkles or other fun add ins.

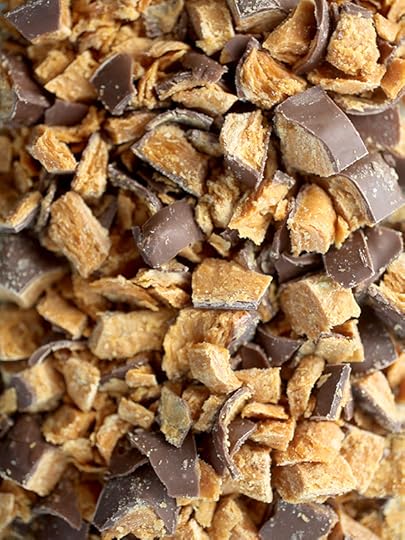
I went with Butterfinger candy bars because YUM, but now I want to try all kinds of other combos.
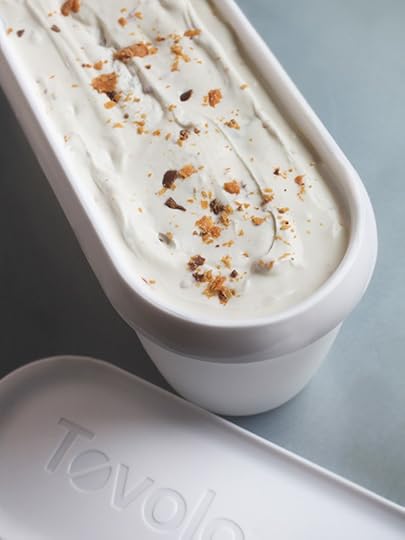
After you mix everything together, freeze the ice cream mixture in a loaf pan or other container that will hold 1.5 quarts.

I bought this Tovolo container a while ago because the long rectangular shape is awesome for scooping and I love it. Stackable and easy to store, too.
No-Churn Butterfinger Crunch Ice Cream
2 cups heavy cream
14 oz can sweetened condensed milk
1 1/2 teaspoons vanilla
12 fun size Butterfinger candy bars, chopped into small pieces
Chill metal mixing bowl and metal whisk attachment in freezer for about 30 minutes.
Whip heavy cream on high until stiff peaks form, about three minutes.
Fold in sweetened condensed milk and vanilla until combined.
Fold in chopped Butterfingers and pour the mixture into a loaf pan or ice cream container.
Freeze for at least six hours.
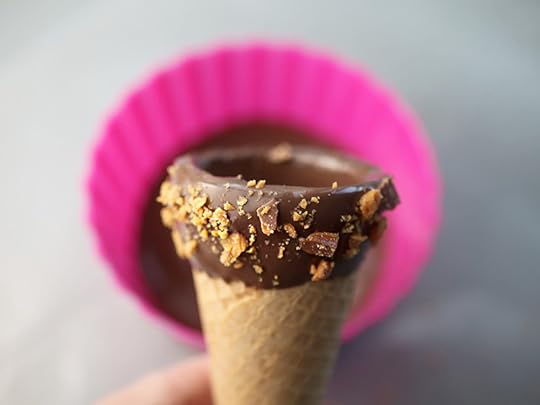
To decorate cones, dip openings into melted chocolate candy coating, sprinkle with more chopped butterfingers candy bars and let dry on wax paper.
Scoop and enjoy!

July 5, 2015
Minions Cake Pops
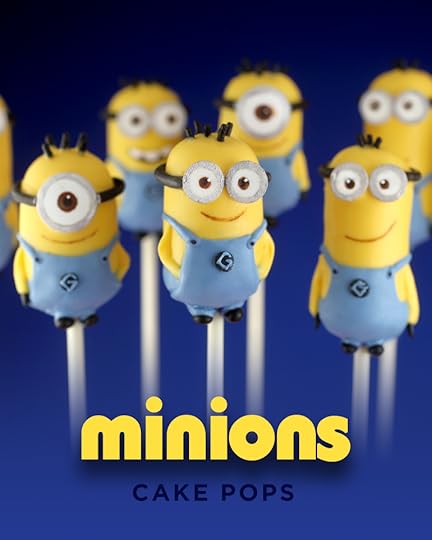
The Minions are coming to back to theaters this Friday headlining their very own movie and I thought it would be fun to showcase these sweet little guys again. I made them back in 2013 for Despicable Me 2 and they are still one of my favorite cake pops. They make me smile every time I see the photos.
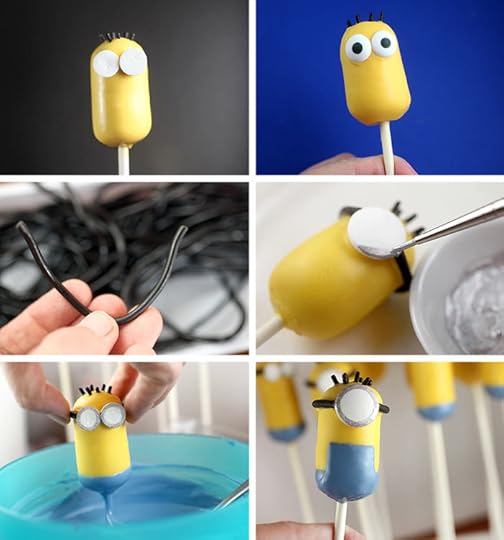
Here’s the Minions Cake Pops how-to from a couple of years ago … plus instructions for adorable Agnes and her unicorn, too!
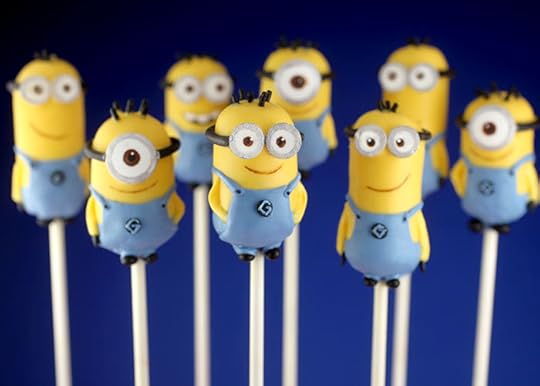
I can still hardly stand how cute these guys are. So much expression in such a small space.
I’d say they are too cute to eat…
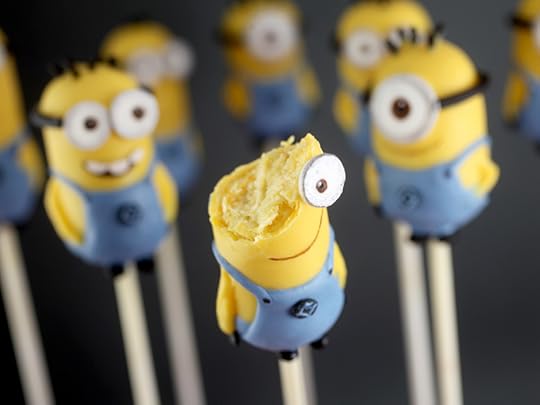
… But that’s just not true. ; )
Want to make some Minions, too?
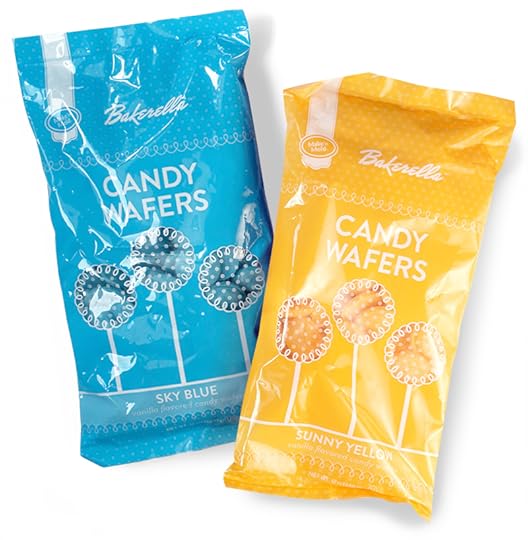

Try my Bakerella for Make’n Mold Candy Wafers and DIY Sugar Eyes (FREE SHIPPING on $50 or more) to get a jump start and check my post for the full Minions Cake Pops instructions.
Here’s to lots of giggles this Friday!

June 28, 2015
Fourth of July Pennant Cookies

Mini pennant bunting sugar cookies!!! So sweet and full of fun for a Fourth of July Celebration. Or any celebration really. Change up the colors and use them for baby showers, birthdays and other holidays.
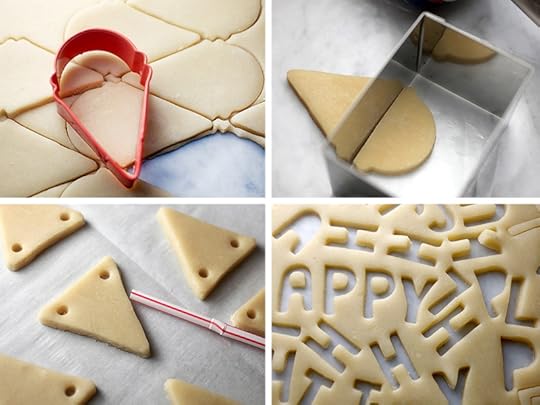
I used an ice cream cone cookie cutter to make the pennants and then just chopped off the ice cream part. Kinda sad.
Looking back now, maybe I should have made ice cream cone bunting cookies. I mean how totally cute would those be!?! Or snow-cone bunting cookies.
But these pennants are super cute, too.
To make holes, just press a plastic straw into the cookie and gently twist it to remove the dough and make openings.
Note: when the cookies bake, the openings may close back up some. If that happens, go back over the holes with another straw right after you remove the cookies from the oven.
Oh and you can use this sugar cookie and royal icing recipe. It’s awesome and easy.
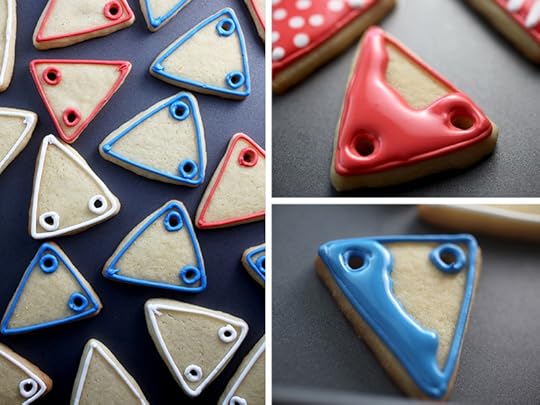
To decorate the pennants, outline the cookies, including the openings with piping consistency royal icing and let dry.
Add a little water to the royal icing to make it more fluid and then flood the cookies with color.
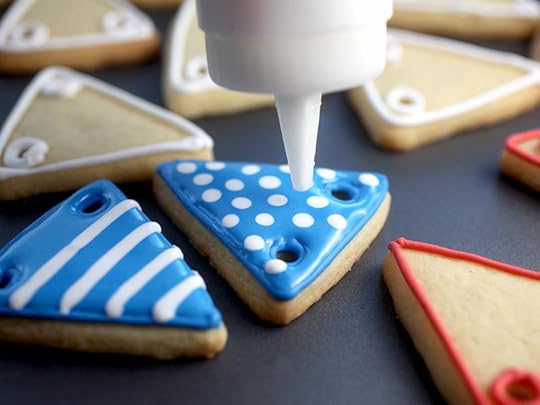
To make a polk-a-dot pattern, just pipe dots with a second color of royal icing while the base color is still wet.
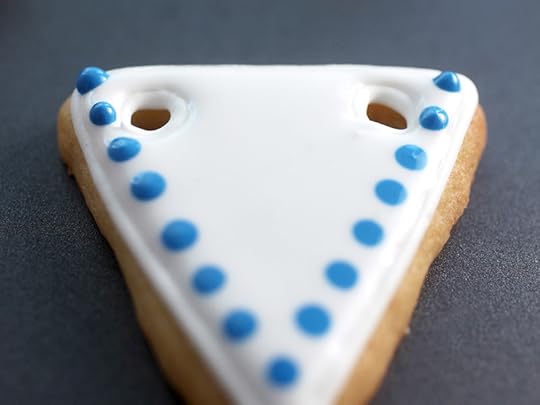
See the ones in the back, those were just piped, but they’ll settle down like the ones in the front. You can also draw lines or make other shapes with the same technique.
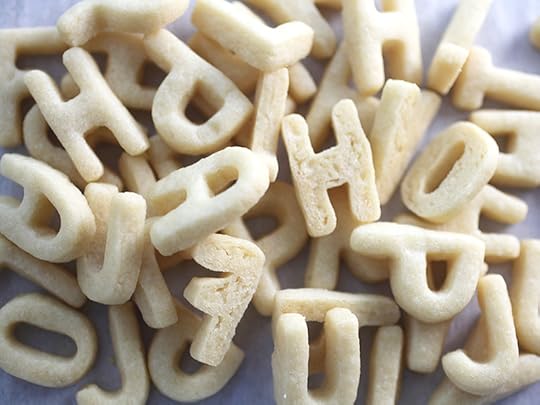
Yay for little letter cookies! These are the cutters I used.
They are a little tricky to get the sugar cookie dough out of, because they are tiny. So I used the end of a lollipop stick to gently push the shapes out of the cookie cutter with.

To decorate the letters, pipe them with royal icing and sprinkle the tops with white sanding sugar while the icing is still wet. Let dry and then attach the letters to the pennants using royal icing as the “glue”.
Ta-da! Too cute!
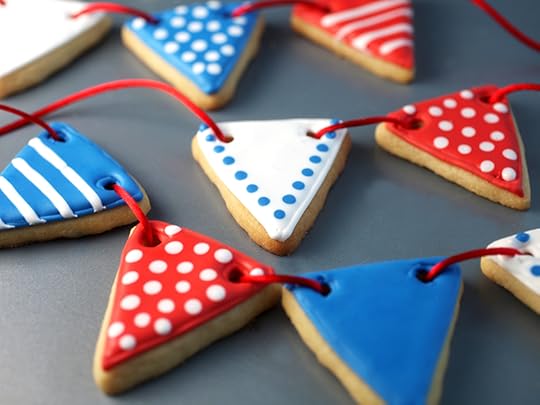
You can also skip the words and simply thread the cookies with thin ribbon or decorative twine.
Have fun and hope your fourth is a happy, happy, happy one!


June 21, 2015
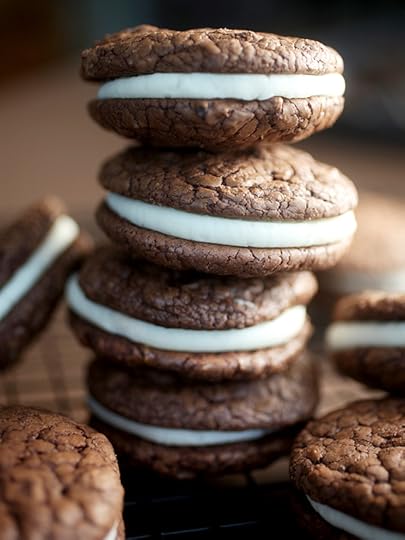
Brownie Caramel Sandwich Cookies
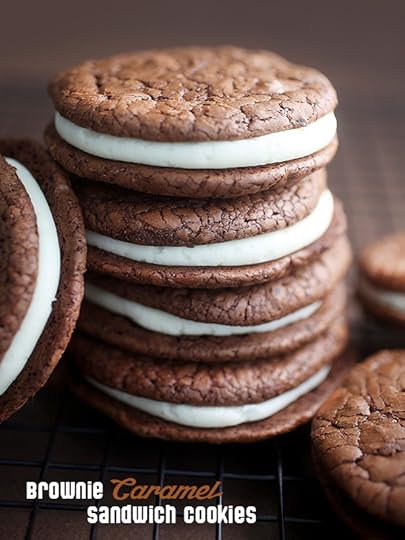
These brownie sandwich cookies are all kinds of yum.
And so tasty that I could have eaten them just like this.
Wait… I did do that.
I had to stop myself so I would have enough cookies left to take pictures of them doubled up for sweet little sandwiches.
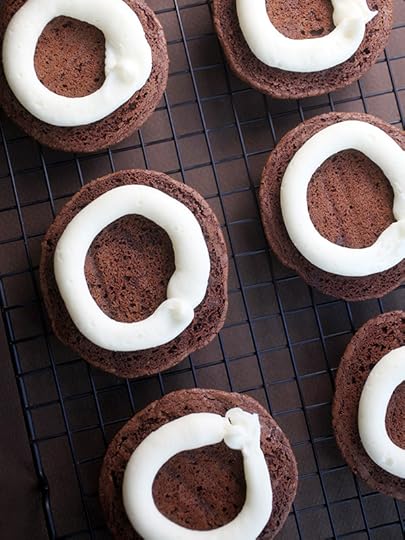
That’s right, I decided to pipe circles of vanilla buttercream on half of them…
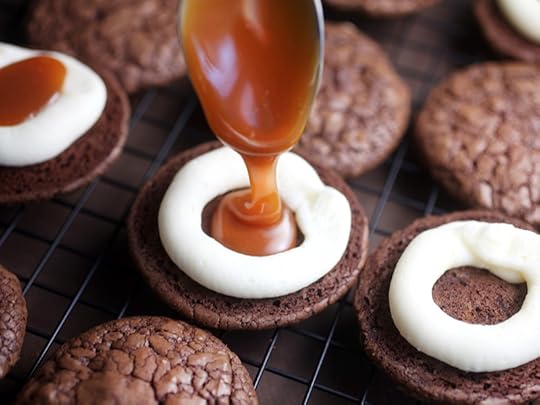
And fill the centers with caramel.

Because caramel is the right thing to do.
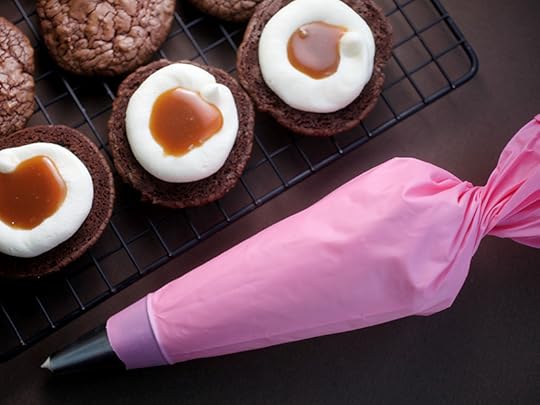
I used my pink decorating bags to pipe the buttercream and love them!
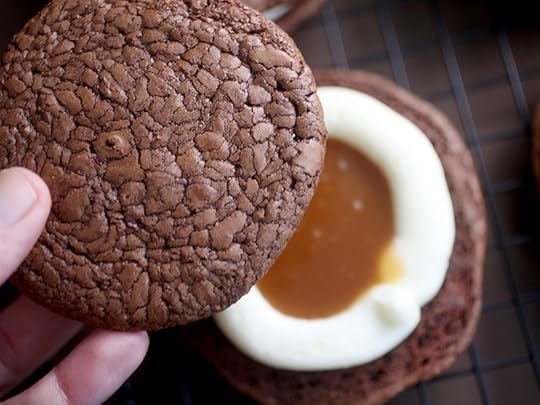
Okay, time to make the sandwiches. Gently press the tops on to secure all that deliciousness in place.

They stack up so sweet.
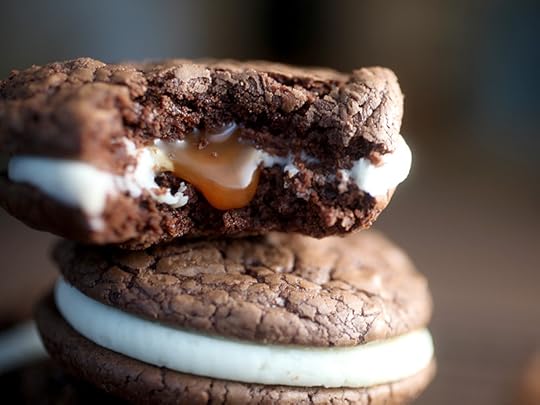
And taste even sweeter with that hidden surprise of caramel inside. Soooo YUM!
Brownie Caramel Sandwich Cookies
Makes 12 sandwich cookies
12 oz dark chocolate (I used Guittard Bittersweet 74% Cacao)
7 tablespoons butter, salted
1/3 cup all purpose flour
1/2 teaspoon baking powder
1 cup sugar
1 1/2 teaspoons vanilla
3 eggs
Preheat oven to 350 degrees farenheit and line baking sheets with parchment paper.
Place butter and 10 ounces of the chocolate in a heatproof bowl. Position the bowl over a pot of simmering water. Stir occasionally until the chocolate is melted and smooth. Set aside to cool.
Chop remaining 2 ounces of chocolate into small pieces and set aside.
In a small bowl, whisk together flour and baking powder and set aside.
Mix sugar, eggs and vanilla in a stand mixer on medium high for about 8 minutes.
Add melted chocolate to the sugar mixture and fold until combined.
Then add flour and remaining chopped chocolate and stir until just combined and the flour has disappeared.
Let rest for about five minutes and then scoop dough onto prepared baking sheet about three inches apart.
Bake for 8 minutes.
Caramel Filling
1 cup sugar
6 tablespoons butter, salted
1/2 cup heavy whipping cream
Heat sugar in a medium pot stirring constantly with a wire whisk. The sugar will turn clumpy and then melt before turning into a thick amber-colored liquid. As soon as this happens (Be careful not to allow the sugar to burn) immediately add butter, whisking until completely melted. Remove from heat and slowly add cream. Whisk until combined and smooth. Pour into a glass jar and set aside to cool and thicken. Note: This makes more than you’ll need for the cookies, but you can store in the refrigerator up to two weeks and then reheat to use over ice cream or other treats.
Frosting
12 tablespoons butter, salted
2 cups confectioner’s sugar
1 teaspoon vanilla
1 teaspoon heavy whipping cream
Using a mixer, beat butter until smooth and creamy. Slowly add confectioners’ sugar and continue beating until combined. Add vanilla and heavy cream and mix until combined.
Pipe buttercream circles on half of the brownie cookies. Fill the centers with thickened caramel and gently press remaining brownie cookies on top to sandwich.
Enjoy!
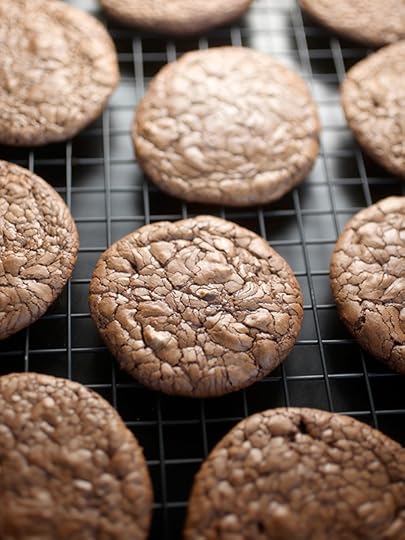
Note: This photo is of a second batch I made where the cookies came out a little more mounded. Just use a 1/2 cup of flour instead of 1/3 and 5 tablespoons of butter instead of 7 in the above recipe. They were good this way too, but the flatter cookies were tastier.

Bakerella's Blog

- Bakerella's profile
- 9 followers

