
Bakerella's Blog, page 21
December 30, 2014
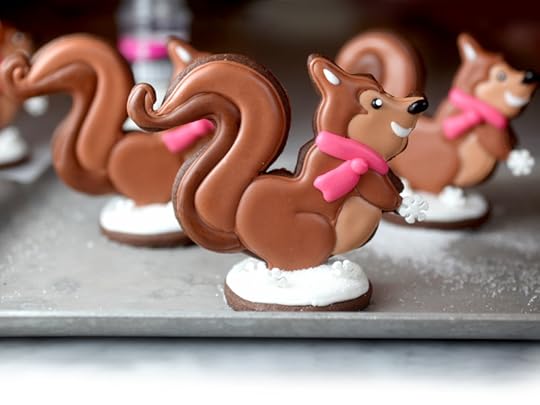
Snow Cute Sugar Cookie Squirrels
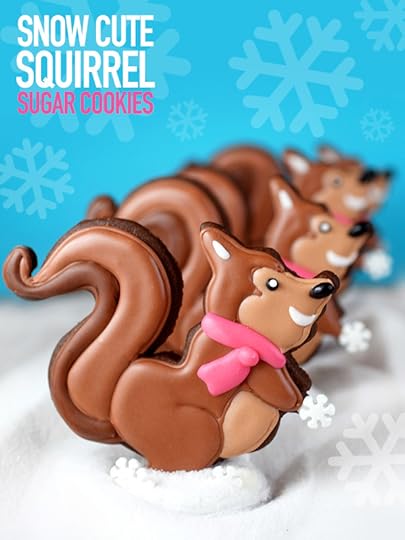
Snowy sweet squirrels. Hmmmm… or chipmunks maybe? No, I’m sticking with squirrels. Brown fluffy, furry squirrels with big beautiful tails.
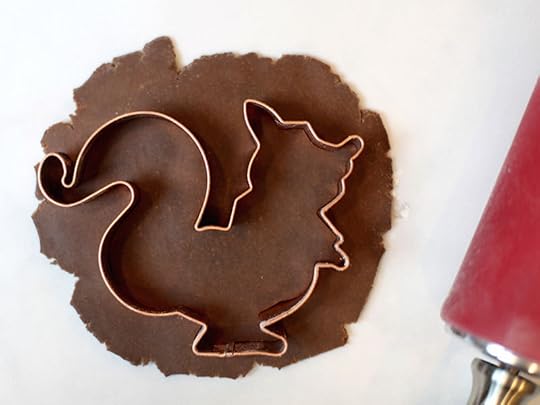
I found this cute cutter last Christmas at Williams-Sonoma and as soon as I saw it, I knew I wanted to make cookies that would stand up to showcase that tall tail. And it only took me a year to get around to trying them out. I’m quick like that. I couldn’t find this exact cutter on their site anymore (boo) but here is a google image search of some other cutter examples if you want to try making some similar.
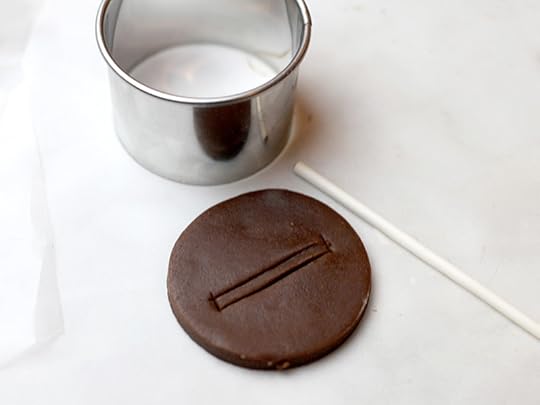
To make the cookie stand, I cut out circles from the dough that were wider than the base of the squirrel’s foot. Then I used a knife to cut a thin rectangular shape in the center. Once the shape is cut, remove the center piece and place the dough circle and squirrel shapes on a cookie sheet to bake.
(I used this sugar cookie and royal icing recipe. Just swap out 1/2 cup of the flour for 1/2 cup of unsweetened cocoa to make chocolate sugar cookies.)
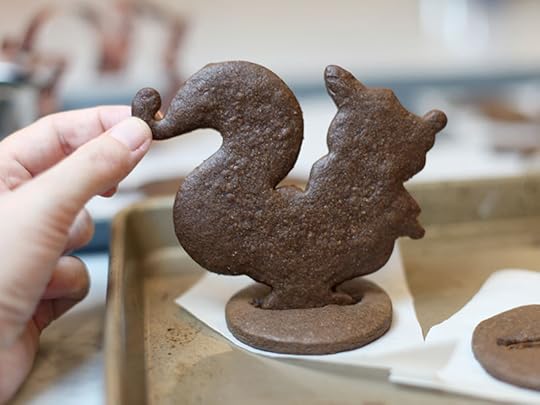
YAY! It works. Ok… this is where I started to go nuts and get really excited picturing a snowy mound for him to stand on.
Note: once the circles come out of the oven, use a knife or narrow spatula to recut the opening as the cookie will spread some during baking. But while it’s warm, you can easily remove any excess to make sure the squirrels feet will fit. And if the opening is a little bit bigger, that’s great too.
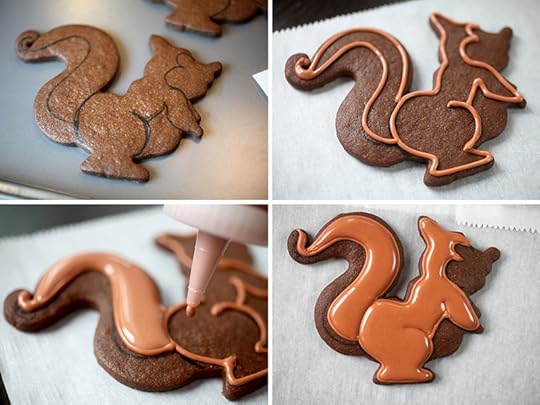
I wanted to add a few details to make him a little more interesting so I drew on the cookie with a black edible ink pen to use as a piping guide.
Now, I usually start getting really anxious right before I start piping because I think I’m going to mess up all of my cookies. Especially when I’m working with shapes like circles or squares or hearts – shapes that are supposed to be more symmetrical. But this shape, even though it looks more involved was actually easier for me because the piped lines could be a bit more forgiving than say a perfectly piped circle. Either that, or I’m finally starting to get a little better at piping.
Outline the bodies first with royal icing and then add a few drops of water to make the icing more fluid so you can easily fill the shape. I usually pipe with a decorator bag fitted with a #2 tip and then I use a small squeeze bottle to fill the inside with flood consistency icing.
It’s helpful to let things dry in between stages. With the second color (brown mixed with white and a little bit of yellow) pipe and fill the face and tummy.
Right after filling the face with royal icing, add a black coated sunflower seed and a black sugar pearl for an easy eye and nose.
Pipe and fill the rest of the tail with a darker shade of brown.
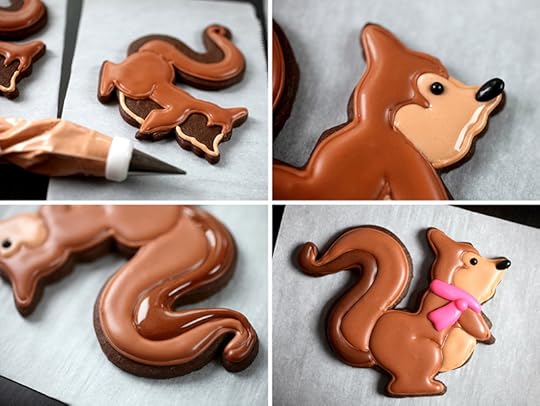
When the bodies are dry, pipe on a colorful scarf to keep your little squirrels warm and cozy.
I don’t have a step photo of this, but before assembling, add the final details by piping white royal icing for the mouth, ears and a dotted eye. You can also attach a jumbo snowflake sprinkle for him to hold by using more of the icing as glue.
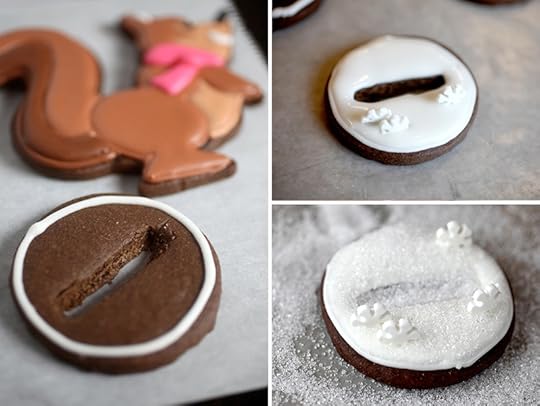
To decorate the bases, pipe and fill the circles with white royal icing and attach a few jumbo snowflake sprinkles so they stand up. Then sprinkle with white sanding sugar while the icing is still wet.
Let the bases and squirrels dry completely before assembling.
To assemble, fill the opening with royal icing and place the squirrel in position to dry and set in place.
Scratch that! I cheated a little and just filled the center with melted white chocolate. It dries much faster. : ) Sprinkle a little more sanding sugar if necessary to cover any white chocolate that might overflow.
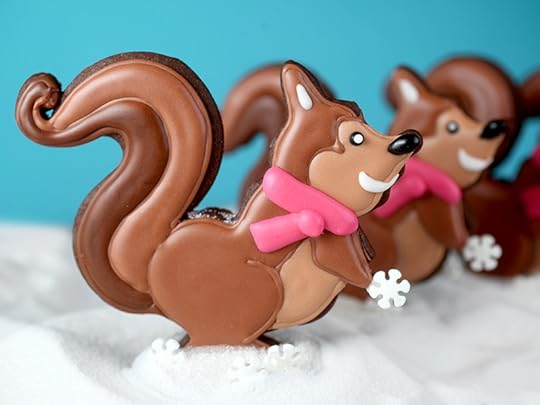
And, now, I’m thinking I should have piped a little fallen snow on the tops of their tails. Next time, maybe.
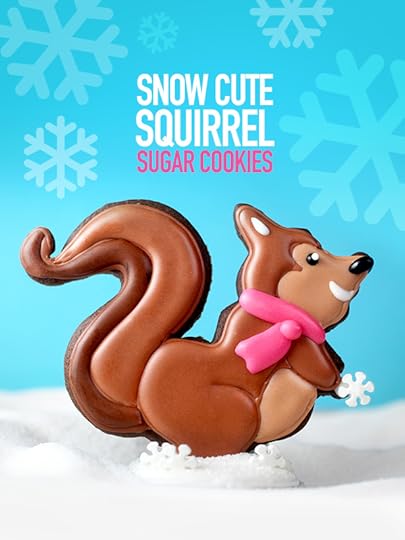
These were super fun and so cute … I mean snow cute to make!
Hope you enjoy them and have a safe, sweet and Happy New Year!


December 15, 2014
Tinsel and Twirl Giveaway
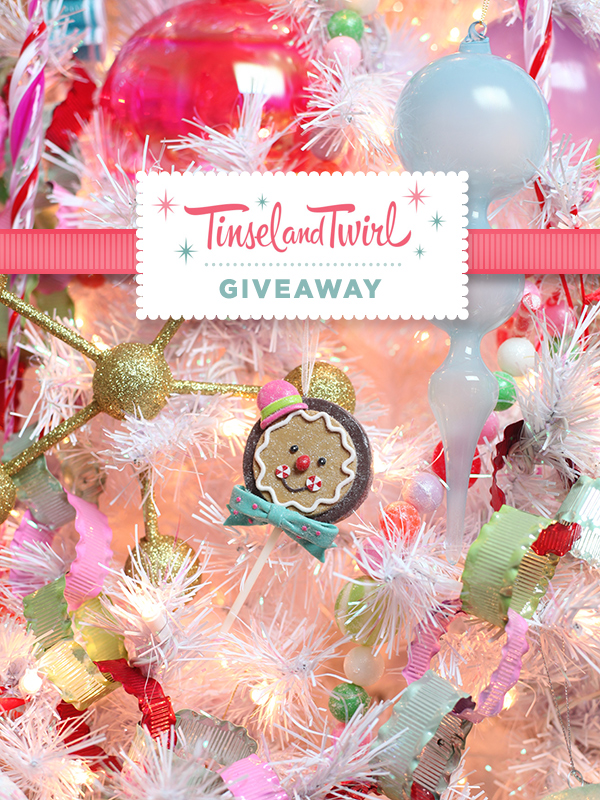
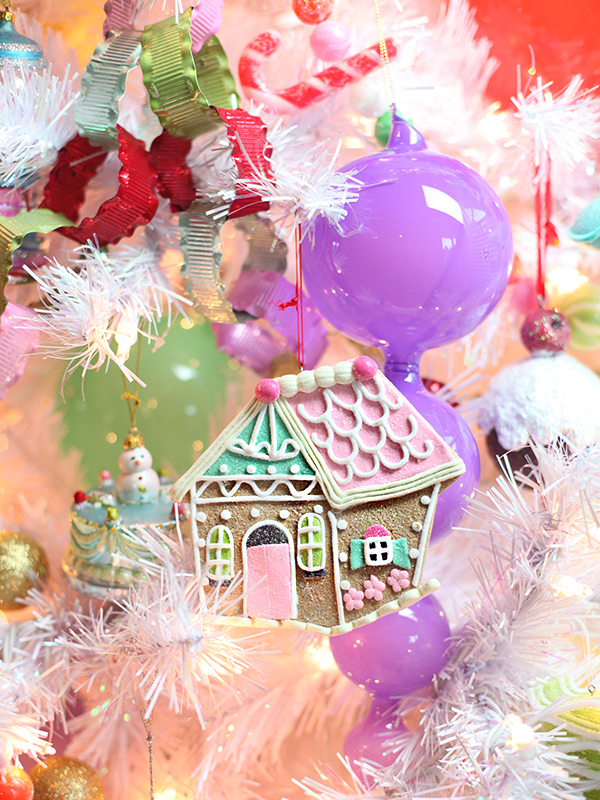
I have a sweet holiday giveaway for you today from my friend Cupcake Julie’s holiday shop… Tinsel and Twirl. Julie’s my friend who has the amazing holiday decorations for Christmas each year including the house-sized nutcrackers that she and her husband hand made (Check out this post and this one too). The first time I saw her decorations I was amazed by how many sweet-themed ornaments she had managed to find or even make! And I knew right away that my next tree would definitely have to be sugar coated.
Below are some of the ornaments on my tree right now that I have from her shop.
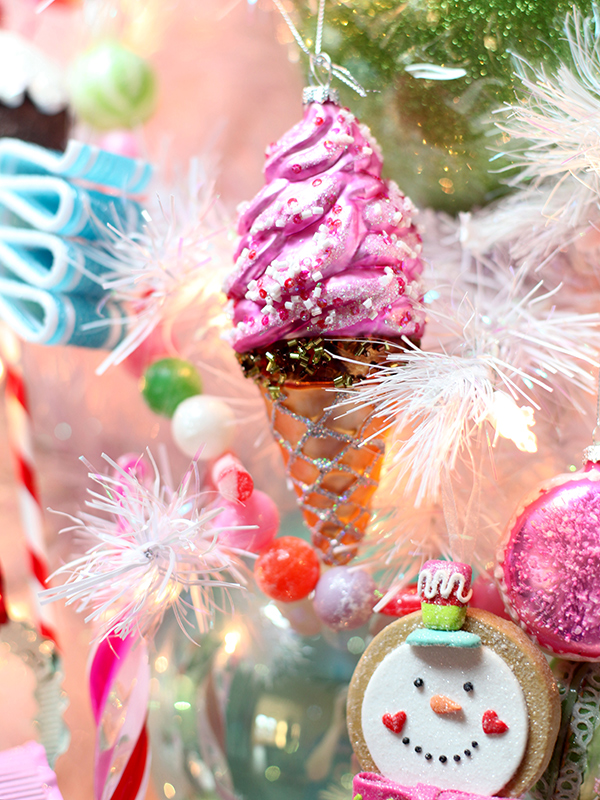
Ice cream cones, candy garland and cookie pops!

Cake Pops and Gingerbread houses!
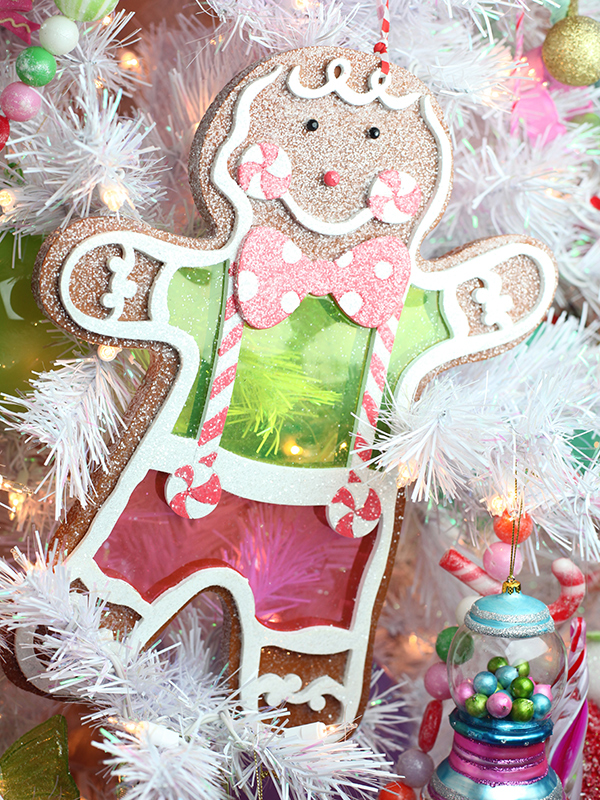
Cute and colorful Gingerbread Boys… and girls!
Gumball glass ornaments.
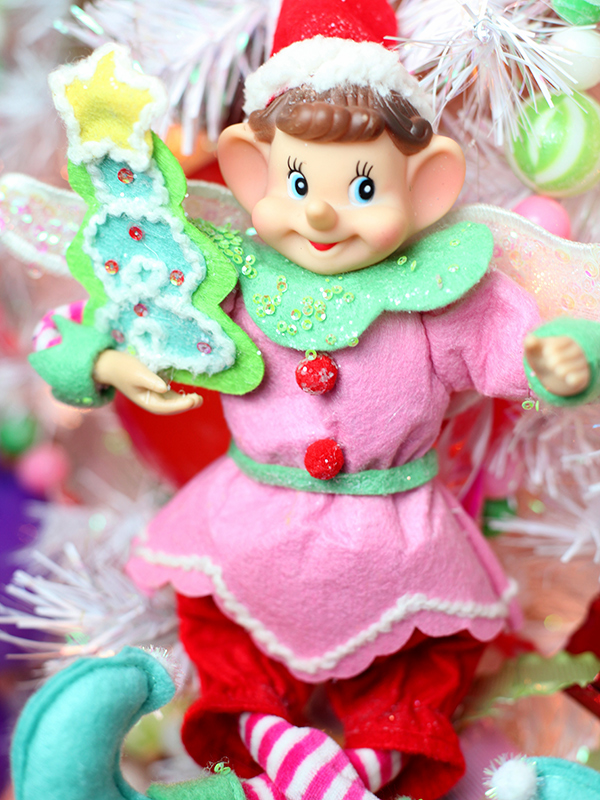
And lots of these little guys. They’re fun and flexible and love to hang out on the tree.
Want to see more?
Here are some of her other decorations that I couldn’t resist.
So cute!
Want to sugar coat your tree, too?
Love sweet soldiers, need the cutest elves or the most ?
Visit Tinsel and Twirl to check it all out. If you see something you like, use discount code: BAKERELLA25 through Saturday, December 20th and get 25% off your entire order.
But wait…
I’m also giving away a $200 Tinsel and Twirl Gift Certificate for one lucky winner to shop for their favorites.
To enter for a chance to win, just leave a comment on this post and tell me the last gift you purchased for someone.
Deadline to enter is Friday, December 19th, 2014 at 12 midnight ET.
One lucky winner will be chosen at random and announced sometime Saturday on this post.
Good Luck!
Giveaway sponsored by me because I love this stuff.
December 7, 2014
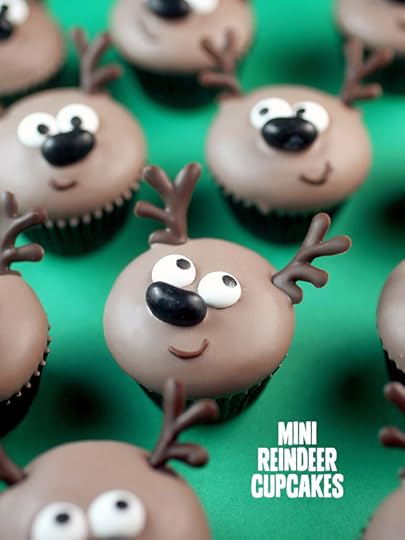
Oh Deer! Mini Cupcakes.
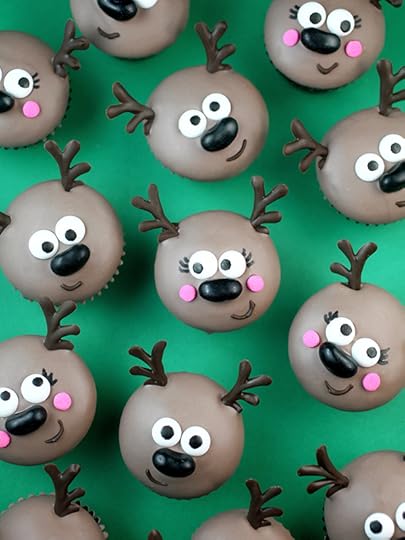
I thought it was time to cute up some cupcakes, so I made merry mini reindeers for you.
Chocolate covered chocolate cupcakes all dressed up for the holidays.
Oh deer! So cute.
To get started, we’re going to need a bunch of miniature cupcakes.
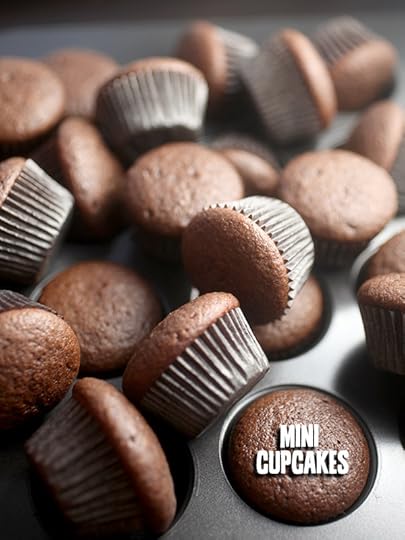
Okay. Done.
Chocolate Cupcakes
2 cups all purpose flour
1/2 cup unsweetened cocoa
1 cup sugar
1 teaspoon baking powder
3/4 teaspoon baking soda
1/2 teaspoon salt
2 eggs
2/3 cup buttermilk
1/3 cup vegetable oil
1 teaspoon vanilla
1/3 cup hot water
Preheat oven to 350 degrees and line mini cupcake pans with 48 mini baking cups.
Sift dry ingredients together in the bowl of a stand mixer.
Add eggs and mix until combined.
Add buttermilk, oil and vanilla and mix until combined.
Slowly add hot water and mix until combined.
Fill cupcake liners with batter about 2/3 full.
Bake for 13-15 minutes. Cool and decorate.
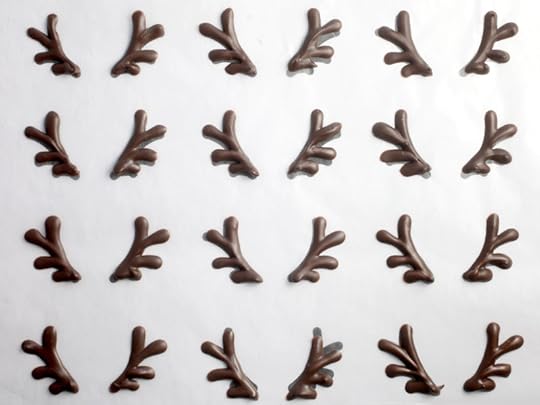
Next, we need a bunch of little antlers.
I used my Chocolate Fudge Wafers, a toothpick and a template to make these.
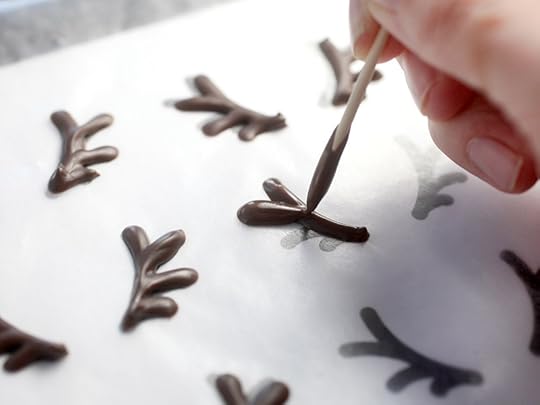
Download and print the antler template I made and place it under wax paper. Then just trace it with a toothpick dipped in the melted chocolate.
Make the lines thick so they will be sturdier. Let them dry and then gently separate the antlers from the wax paper and safely set aside until ready to decorate.
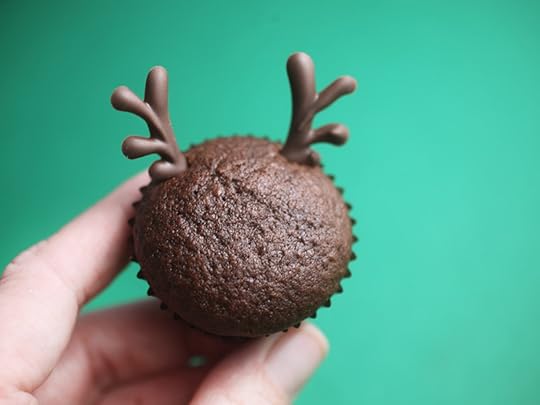
To decorate, we’re going to dip the cupcakes in melted candy wafers.
But first, hold the chocolate antlers near their base and gently press them into the mini cupcake to create a hole. Remove the antlers and dip the cupcake. Then after dipping, immediately insert the antlers back into the holes you made and the coating will dry and hold them in place.
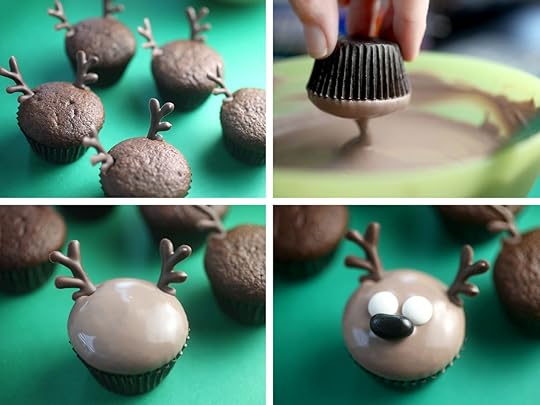
Let’s look at that in steps.
Put antlers in position and then remove.
Dip mini cupcake tops in melted chocolate coating. Note: I added my Marshmallow White Candy Wafers to make a lighter brown color, so the antlers would stand out.
Immediately place the antlers back in position.
Before the coating sets, place two sugar eyes in position and a black jelly bean for a nose and let dry.
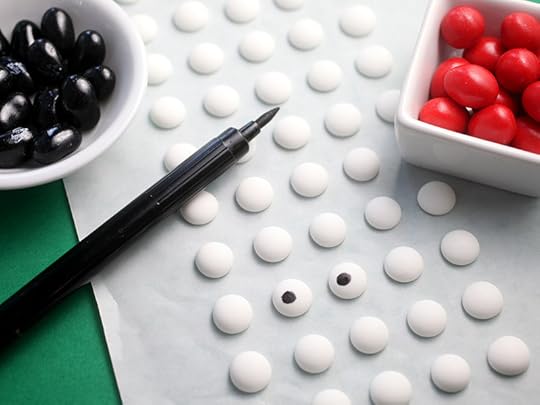
My DIY Sugar Eyes are fun to use for faces because you can have your eyes look in different directions.
I think it gives them character.

See. This one is giving me the side eye.
To finish them, use some a toothpick dipped in some of the leftover melted chocolate and draw on a sweet little smirk.
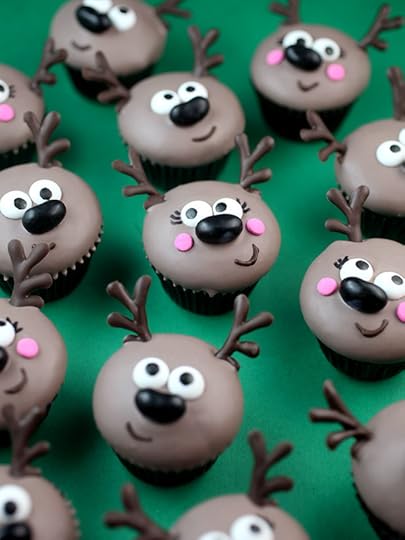
Or use the melted coating to attach pink confetti sprinkle cheeks and draw on eyelashes for girls.
Super cute!

And of course, the group wouldn’t be complete without a red-nosed reindeer in the mix. I used a red sugar coated peanut for the nose, but a red M&M would be cute too.
Hope you like these little guys as much as I do.
…………………………………………………..
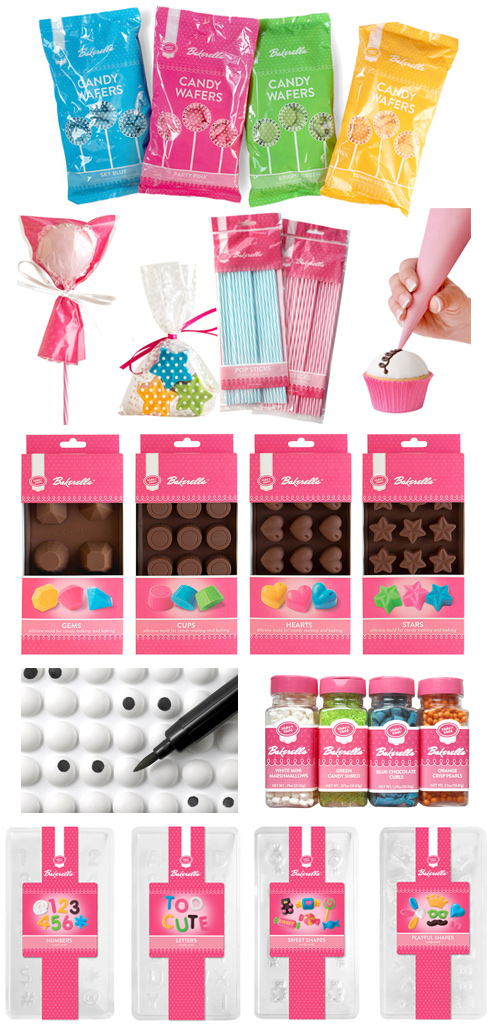
You can find my Bakerella for Make’n Mold Candy Wafers and DIY Sugar Eyes in stores at A.C. Moore Craft Stores or online directly from Make’n Mold.
…………………………………………………..
November 30, 2014
Vanilla Vanilla
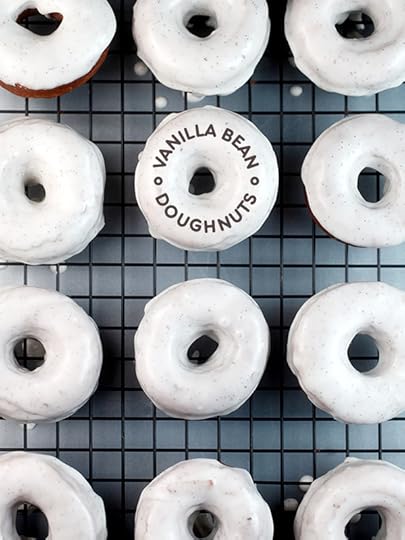
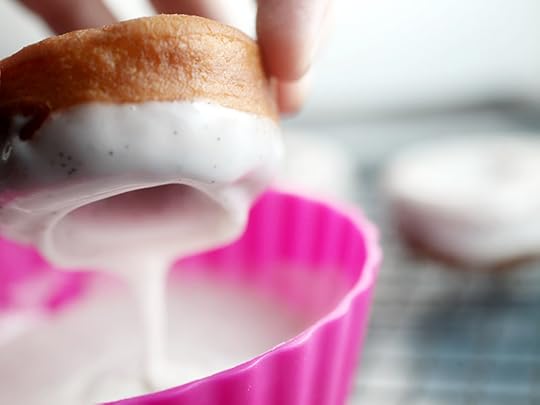
We’re talking vanilla today. I know. I know. Something must be wrong when I don’t have chocolate all over my treats. But, no… I’m fine. I’m just loving on chocolate’s often overlooked sister with these beauties… Vanilla Bean Doughnuts from the book Pure Vanilla and a very vanilla giveaway.
Vanilla, but definitely not plain.
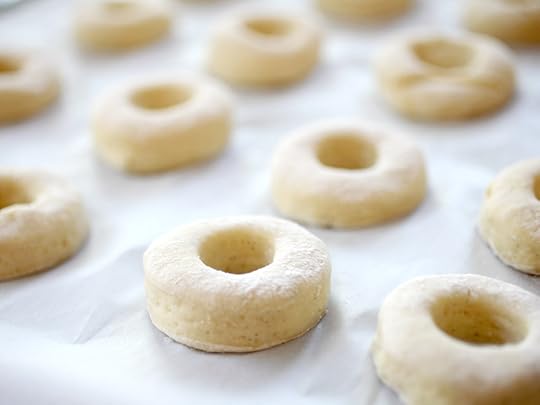
You know, I don’t work with dough and yeast nearly enough. But when I do I remember how much I love to watch it rise. It fascinates me.
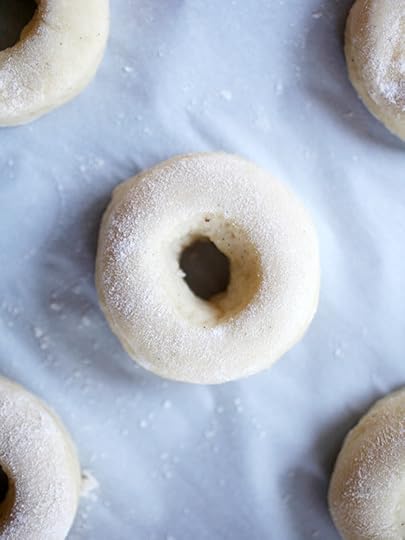
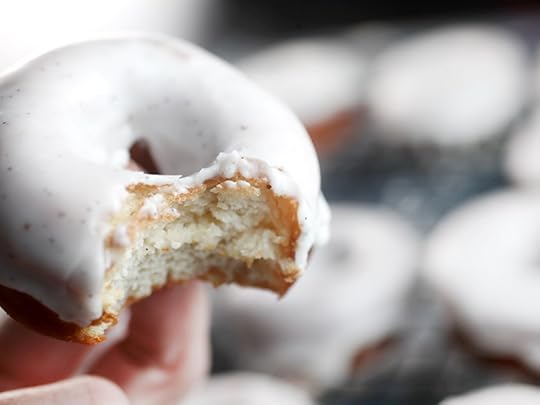
If doughnuts can be adorable – or adoughable (ha) – then this one definitely is.
I mean, look how cute and puffy it is.
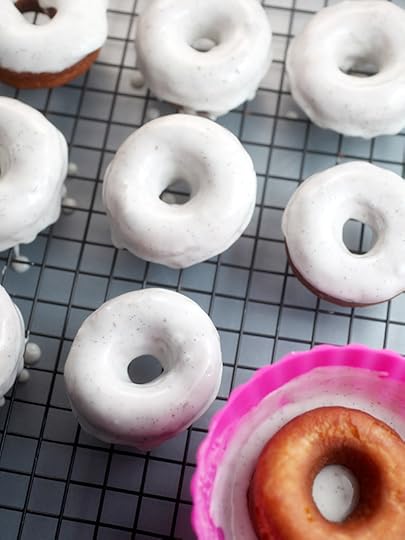
But not as cute as when it’s warm and bathed in vanilla bean icing.
I did have to fight my urge to decorate these with bright, colorful sprinkles though. What a pretty pretty backdrop that white would be.
But I didn’t. I refrained. I mean it would be a shame to cover up all those beautiful tiny vanilla bean specks in the icing don’t you think?
Oh my. Send help.
Never mind. I’ve got this.
Glazed Vanilla Bean Doughnuts
1 tablespoon active dry yeast
1/4 cup warm water (110-115 degrees F)
3 tablespoons sugar, divided
1 cup whole milk, room temperature
1 tablespoon pure vanilla extract
1/2 vanilla bean, seeds scraped
3 large egg yolks, room temperature
1/4 cup unsalted butter, melted and cooled
3 1/2 cups all-purpose flour, sifted – plus more for kneading
1 1/4 teaspoon salt
vegetable oil for frying
glaze
1 1/2 cups confectioners’ sugar
2 tablespoons whole milk
1/2 vanilla bean, seeds scraped
In the bowl of a stand mixer, whisk together yeast, warm water and 1 tablespoon of the sugar. Let stand until the mixture is foamy, about five minutes. Whisk in the remaining two tablespoons sugar, milk, vanilla extract, vanilla bean seeds, egg yolks, and butter. Fit the mixer with the paddle attachment and begin mixing on low speed.
Add flour and salt and mix for three minutes, scraping down the sides of the bowl and the paddle often to keep the dough moving.
Turn out dough onto a lightly floured work surface and knead by hand several times, dusting with flour as needed. Place dough in a large oiled bowl and cover with plastic wrap. Let rest in a warm place until doubled in bulk, about 1 1/2 to 2 hours.
Turn dough out onto a lightly floured work surface and roll to about 1/2 inch thick.
Cut out the doughnuts with a three inch doughnut cutter, place on a parchment-lined baking sheet, and cover with a clean kitchen towel. Let rise for 30-45 minutes or until doughnuts have doubled in size.
Pour 2 1/2 inches of vegetable oil int a 4 or 5 quart pot and heat to 350 degrees fahrenheit. Fry doughnuts in batches of up to four at a time, until the are golden brown, about 2 minutes on each side, turning only once. Transfer to paper towels to drain.
For the glaze, whisk together confectioners’ sugar, milk, salt and vanilla bean seeds until smooth. Spoon glaze over warm doughnuts and serve.
Makes 12
© 2012 Pure Vanilla by Shauna Sever, used with permission
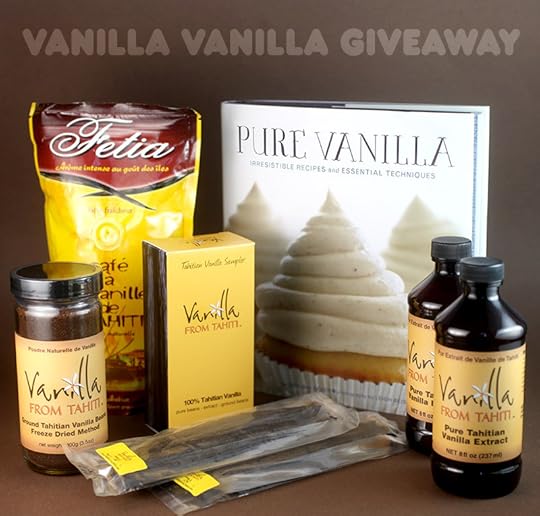
Now, to help get you in the vanilla baking spirit, I have a fun very vanilla giveaway to share with you. We’re talking a TON of vanilla all courtesy of Vanilla from Tahiti.
16 oz Pure Tahitian Vanilla Extract
100 g Ground Vanilla Bean Powder
Vanilla Coffee
20 6-inch Vanilla Beans
Tahitian Vanilla Sampler with ground vanilla, vanilla extract and Tahitian Vanilla Beans
That should keep you set in the kitchen for a while.
But that’s not all. It’s a double vanilla kind of day because the winner will also receive a signed copy of the book Pure Vanilla from my friend Shauna Sever. Yay and yum! And full of fun recipes like the ones below.
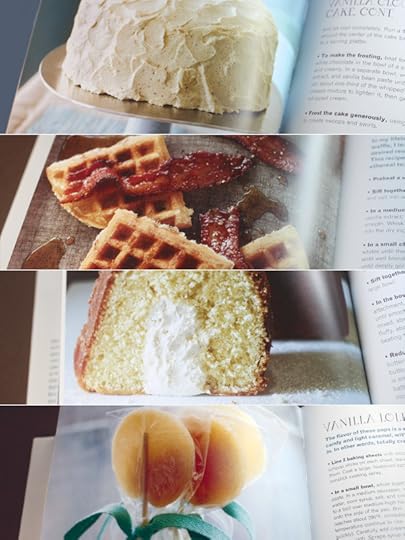
Vanilla Cloud Cake, Vanilla Lollipops, Twinkie Bundt Cake, Vanilla Waffles and much more.
Enter for a chance to win the Tahitian vanilla products and the book Pure Vanilla,
Leave a comment on this post and tell me the last dessert you baked or sweet you made.
Deadline to enter is Wednesday, December 3, 2014 at midnight ET.
One winner will be chosen at random and announced sometime Thursday.
Good luck!
Giveaway items shared courtesy of Vanilla from Tahiti and Shauna Sever.

November 23, 2014
Thankgsgiving Throwback Treats
This week is going to be busy busy. I’m trying to get ready for all the cooking and baking … and eating (YAY) for Thanksgiving. It’s like my favorite day. Things are coming along and most of the menu is planned. I just need to figure out what I’m making for dessert to sit beside the sweet potato pie my mom is bringing. I think I want to make something I haven’t tried before, but I can’t decide what. Buttermilk Pie maybe. While I’m being indecisive, I thought I’d share a handful of Thanksgiving-worthy treats if you need some last minute dessert inspiration. These sweet throwbacks might just fit your menu this Thursday.
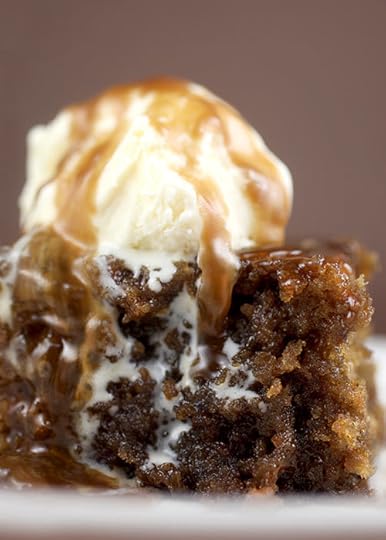
Sticky Toffee Pudding (2013)
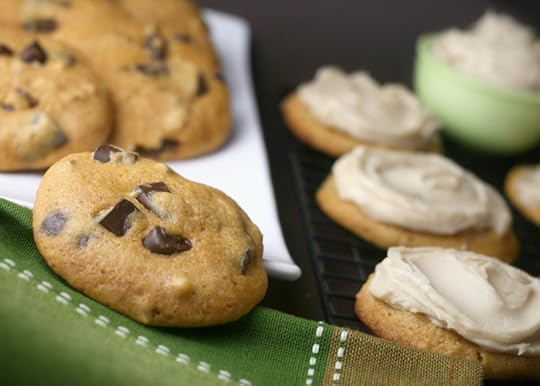
Pumpkin Pecan Chocolate Chunk Cookies With Maple Brown Butter Frosting (2008)
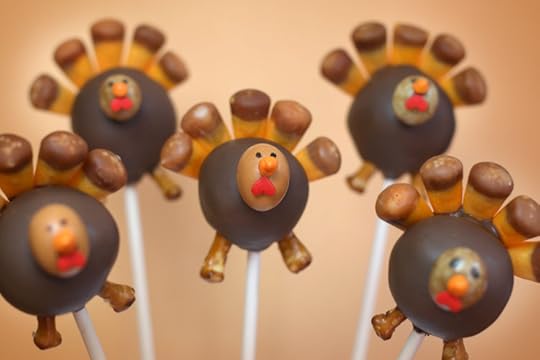
Turkey Cake Pops (2008)
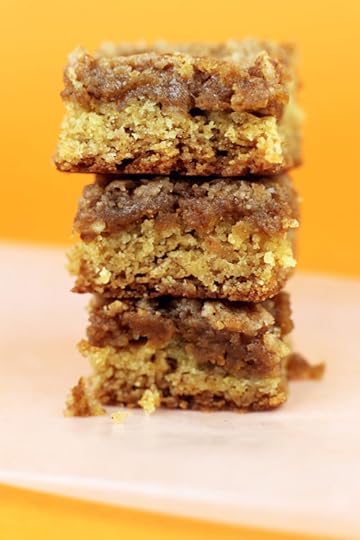
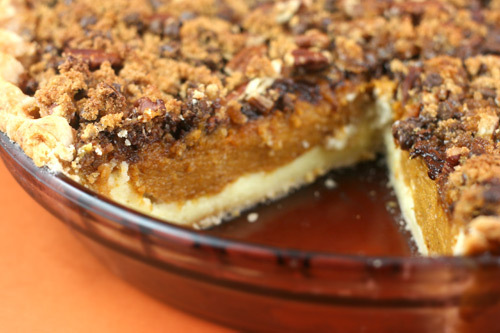
Pecan Pumpkin Butter Dessert Squares (2010)
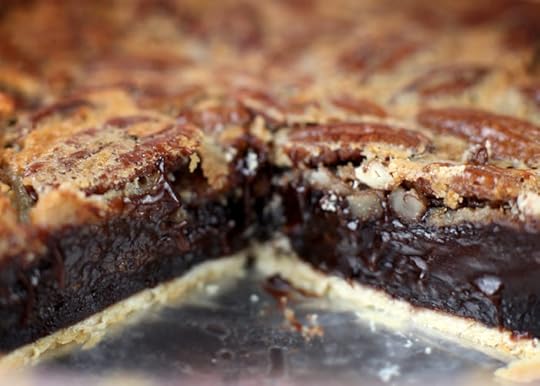
Brownie Pecan Pie (2010)
Pumpkin Pie Bites (2009)
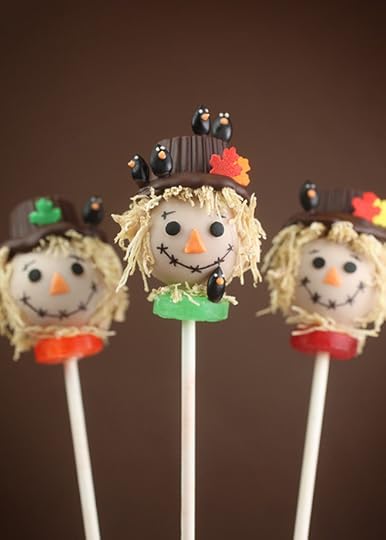
Scarecrow Cake Pops (2013)
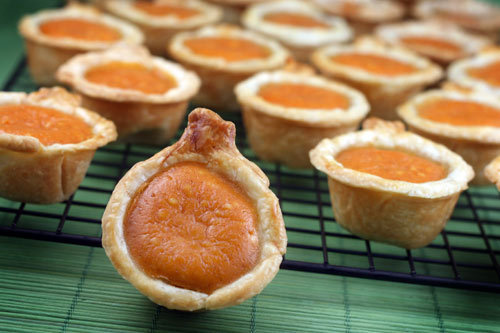
Pumpkin Pecan Cream Cheese Pie (2009)
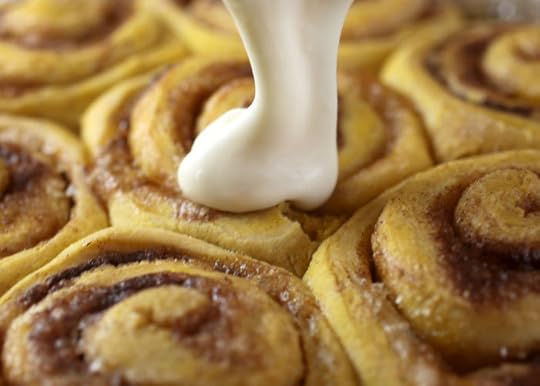
Pumpkin Pecan Cinnamon Rolls (2013)

S’mores Cupcakes (2014)
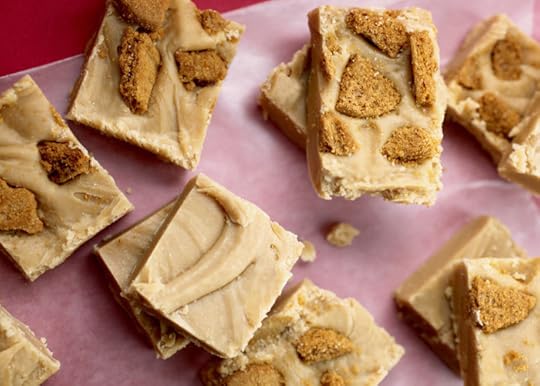
Biscoff Fudge (2011)
Happy Thanksgiving friends!!!!!!!!!

November 17, 2014
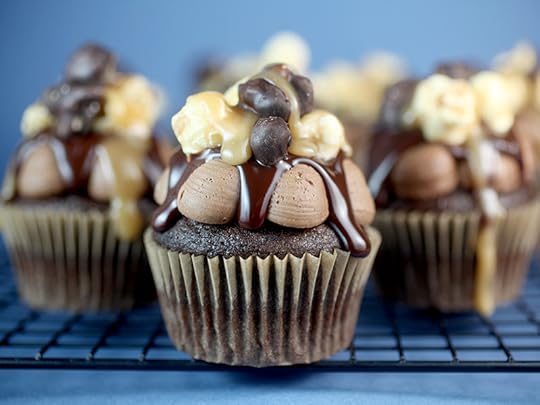
Moose Munch Dark Chocolate Caramel Cupcakes

I have some yummy yummy chocolatey caramel-y crunchy cupcakes to share with you today. I created the recipe for my friends over at Harry & David using their famous flavored popcorn. Visit their blog here for the cupcake recipe, more photos and a peek of their new Moose Munch® Gourmet Popcorn packaging.
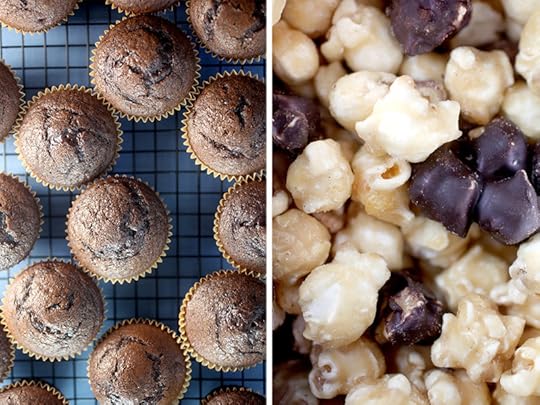
Chocolate cupcakes and caramel coated dark chocolate Moose Munch. Yes! And Yes!
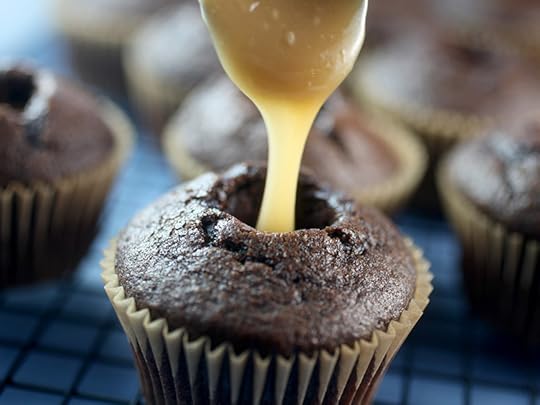
Filled with caramel, too. Oh my.
Get the recipe here:
Moose Munch Dark Chocolate Caramel Cupcakes created for Harry & David.
I really, REALLY enjoyed these and hope you do too!

November 10, 2014
KitchenAid Giveaway and Cake Pop Con Weekend
I had the most wonderful, incredible, emotional and unforgettable few days at the first-ever international cake pop conference in Philadelphia this weekend hosted by KCBakes. I was the keynote speaker and shared my story of creating cake pops back in 2008. It was the most humbling experience talking to so many people whose lives have been touched by cake pops. From simply inspiring creativity in the kitchen to completely changing the way people make a living through home businesses and large scale bakeries, pop products, boxes, books and more – Cake Pops are so much more than just a little ball of cake on a stick.
Here’s a quick little slideshow of some of my pics from the weekend or view them individually on Facebook.
Now … since I was away from the kitchen this past weekend, I didn’t have a chance to bake anything fun for you today. So I thought I’d continue the cake pop love and give away something here on the blog that I also gave away at the conference.
Enter for a chance to win

1. A 5 qt. KitchenAid Stand Mixer in Cranberry … or color of your choice if you don’t like pink as much as I do. : )
AND
2. The NEW line of Bakerella for Make’n Mold products now available in stores exclusively at A.C. Moore Crafts.

To enter for a chance to win:
Leave a comment on this post and tell me what your favorite dish for Thanksgiving is. Easy as Pumpkin pie.
Deadline to enter is November 14, 2014 at midnight ET.
One winner will be chosen at random and announced sometime Saturday!
Good luck!
Giveaway sponsored by me.

November 4, 2014
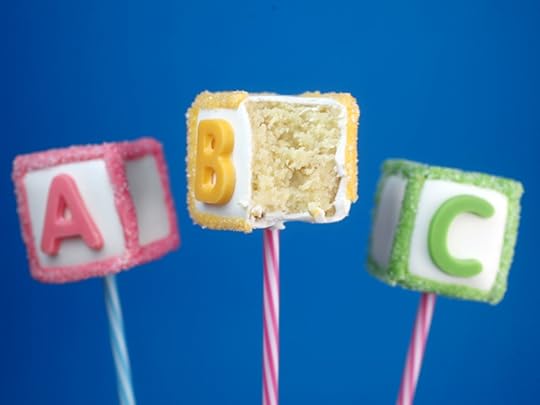
Baby Block Cake Pops

These Baby Block Cake Pops are just too sweet. How Sweet you ask? Sweet enough to help surprise my internet friend Jessica of How Sweet Eats with for her very yummy virtual baby shower. There’s going to be a ton of yum happening today so check out these other friends’ food posts, too and get it on the fun.
To make baby blocks, follow my basic instructions for making cake pops.
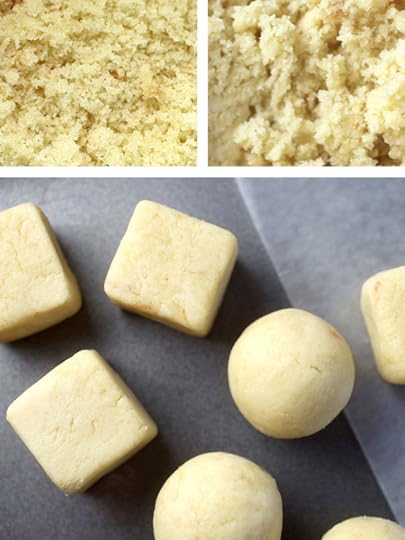
Then shape them into squares before dipping. For shaping, I roll into balls first to help ensure that I get the right amount. If I start shaping as I go, I tend to get all different sizes. But by rolling first, I can count out how many I need and also re-proportion any that are a little too small or too big by pinching off or adding dough and then re-rolling. I made these slightly bigger than my normal round pops to make sure the letter shapes would fit on the flat surface, so the dough will yield fewer pops.
To make the blocks, take a cake ball and start shaping it into a rounded square by rotating and pressing with your fingers using both hands. Then pinch a bit of the dough out on all 8 corners to a form a sharper point. It will look a little wonky at first, but then take your shape and slide it on a piece of wax paper on the counter, pressing down slightly as you do. Rotate and repeat with each side. Continue shaping until all four sides are smooth with defined edges.
Since Jessica loves sparkly and neon, I decided to go bold and bright on the blocks instead of paler pastels. I think she’ll heart them.
But if you want them to be light pink for instance, just melt and mix in white candy wafers to create lighter colors. Easy!
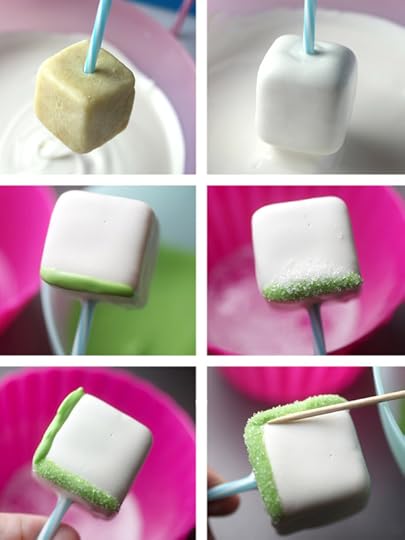
To decorate the blocks, dip in melted white candy wafers first and let dry. When dry, melt a second color to highlight the edges with.
You can decorate these as much or little as you like. You can pipe and outline just the fronts of the blocks or outline each edge. I didn’t pipe the melted wafers on though because I have a harder time controlling the coating that way. I like to just use a toothpick to draw it on instead.
Draw the coating one edge at a time and then sprinkle white sanding sugar on top before it dries. Repeat with each edge until they are outlined and sparkly. The other great thing about using toothpicks and sanding sugar is that the sugar will create a barrier and allow you to gently straighten up any lines with your toothpick and without messing up the melted coating. SO helpful!
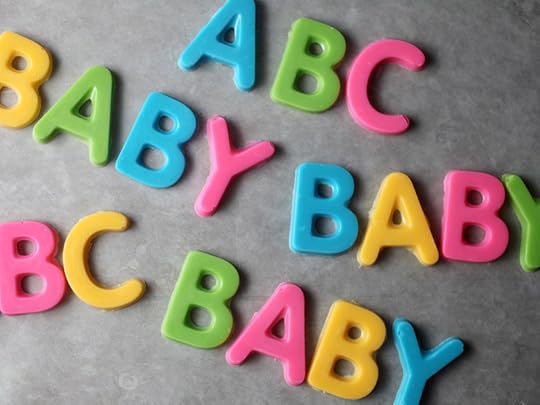
Now for the letters! Oh, baby… too cute!
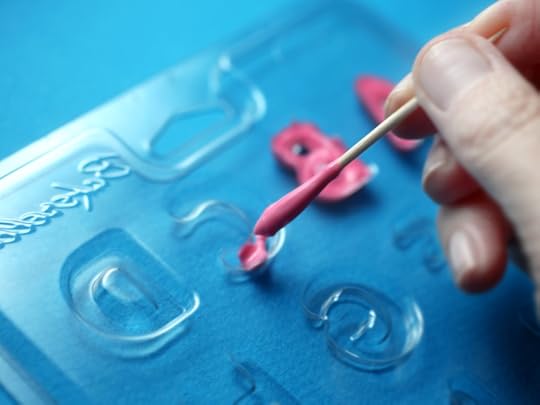
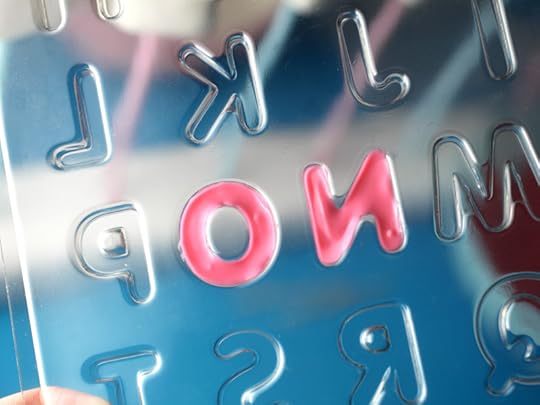
I used the letter candy mold in my new line for these and it worked out great. But if you are good at piping, you can totally just pipe A B C letters on the blocks, too. To use a candy mold, fill cavities with melted candy wafers and tap the mold on the counter gently to settle the melted coating into the cavities. Then place the mold in the refrigerator for a few minutes to help set and dry quickly. To remove pieces, gently twist the mold or press from the back gently to help remove the letters and you’re ready to go.
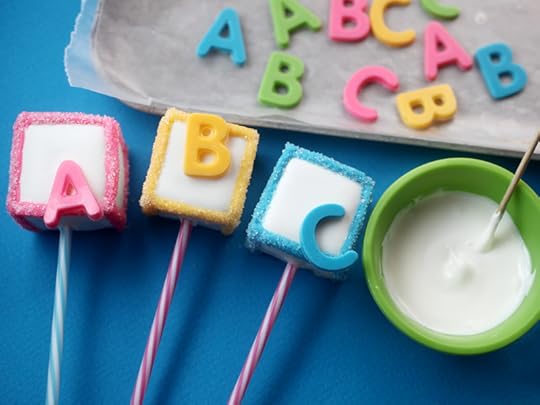
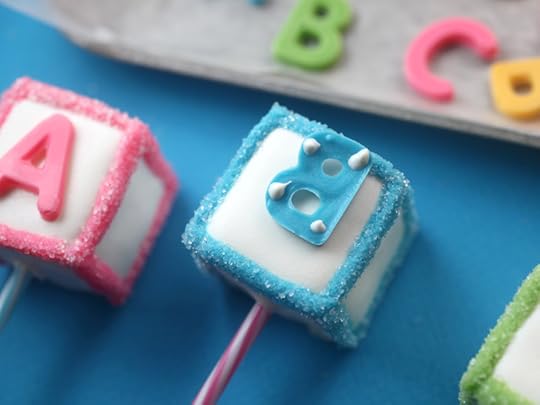
To attach the letters, just add a few dots of melted white candy coating to the backs and “glue” them on. I just did letters on one side.
If you create these for a friend’s shower, have a little fun with the letters and make unexpected words.
For instance, I don’t think we should stop at just A B C for Jessica?
NO… I don’t think so.
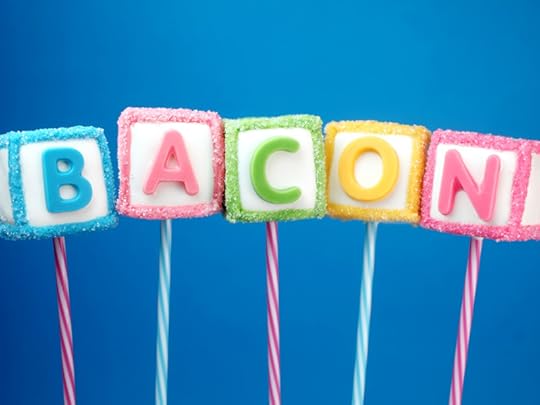
Add an O and N and now we’re getting somewhere… spelling the important things in life. Jessica would agree.
Place them in a stand to serve and display …
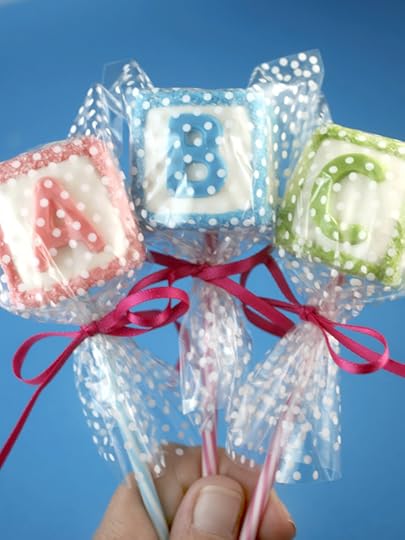
or you can wrap them in treat bags for fun baby shower favors, too.
Now, if you don’t know Jessica yet, then you are totally missing out on some amazing food, photos and fun over on her blog.
Hop on over to visit or you can check out her brand new book for some Seriously Delish food, too.
And don’t forget to check out what else everyone made to help celebrate!
>> Here’s the links to all the other How Sweet Eats Virtual Baby Shower Posts. <<
Enjoy!
Also, below are the Bakerella for Make’n Mold products I used to make these cake pops.
You can find them all in stores at A.C. Moore Crafts right now. And, if there’s not a location in your area, you can also order online from Make’n Mold.
Candy Wafers
Pop Sticks
Letter Candy Mold
Dot Treat Bags

October 29, 2014
Sweet links
Happy Thursday! Here’s a handful of quick links to some sweets I created for People.com. Hope you enjoy!


Boo Bark!
Need a last minute treat for Halloween? You can whip this one up in no time.
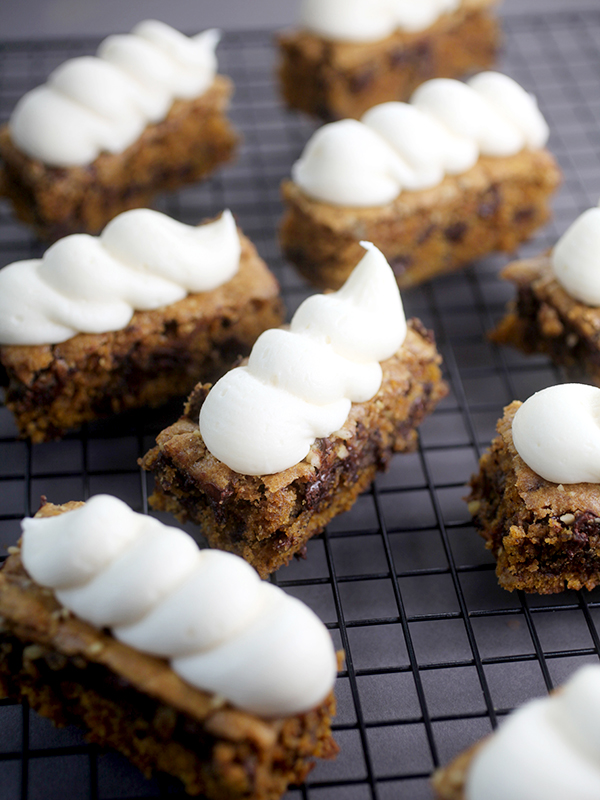
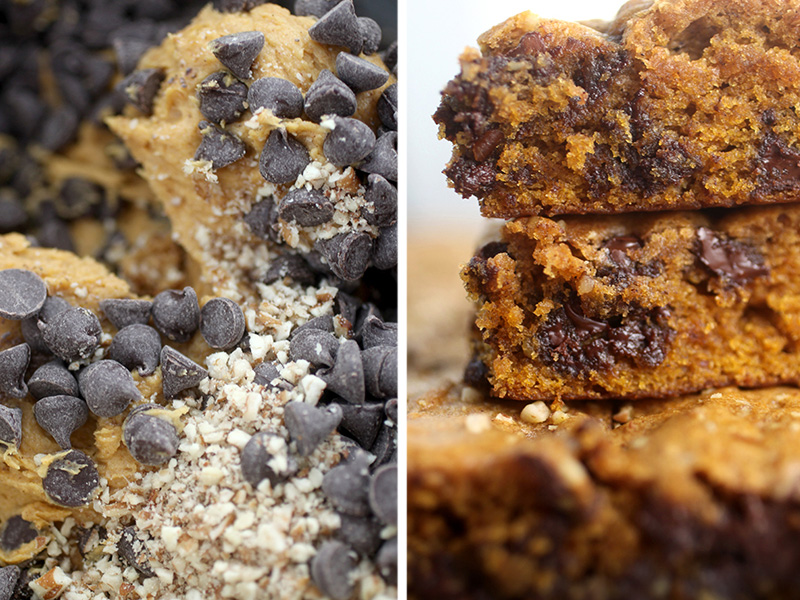
Chocolate Chip Pumpkin Bars
Thick bars of pumpkin yumminess! And the cream cheese frosting doesn’t hurt either.
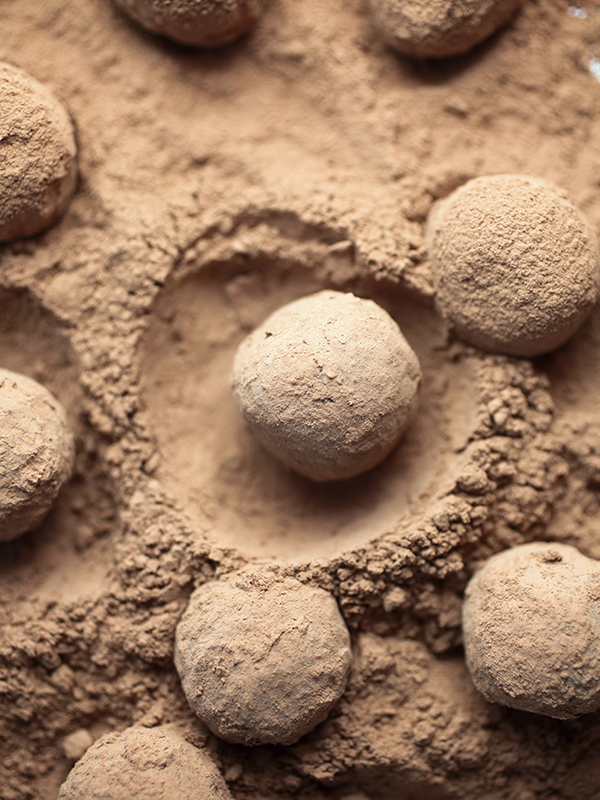

Chocolate Coffee Truffles
Need a little perk me up? Bite size and no-bake. These balls are fun and easy to make.
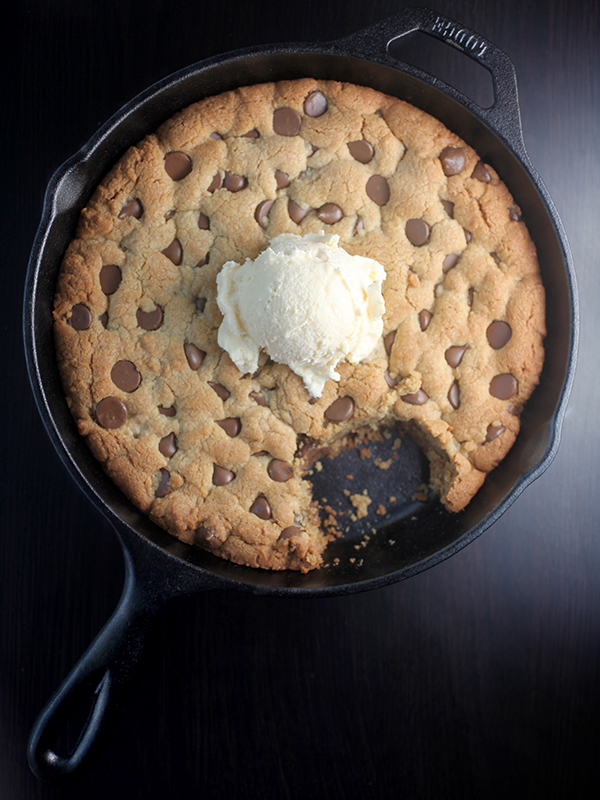
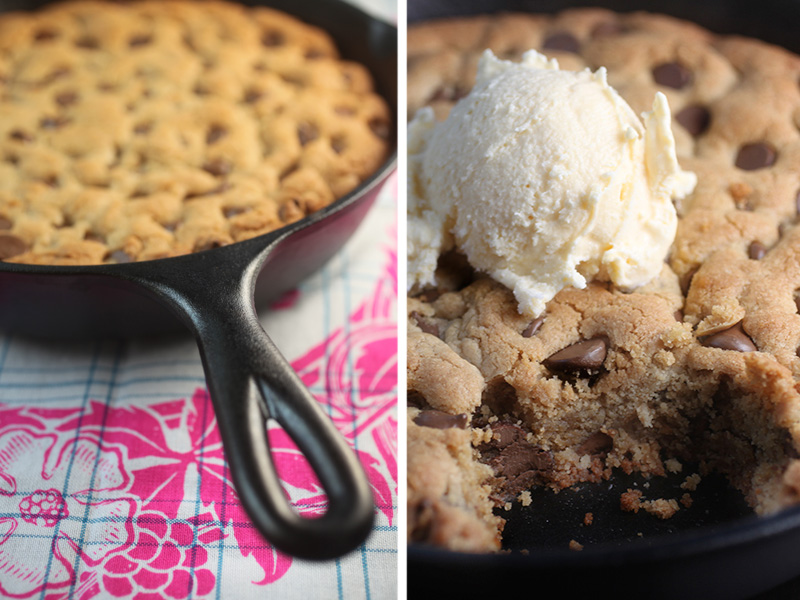
Peanut Butter Chocolate Chip Skillet Cookie
Dig right into this giant peanut butter and chocolate chip cookie. Top it off with ice cream and share with friends… or not. I won’t tell.
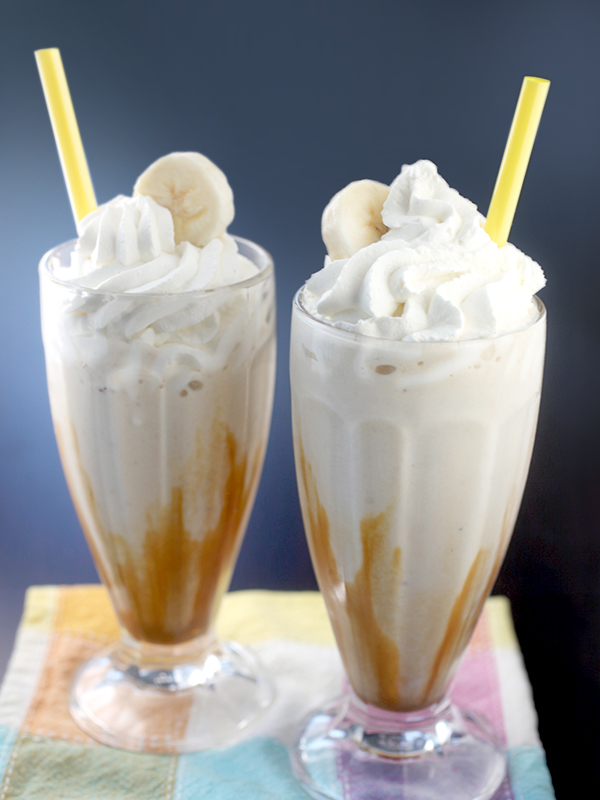
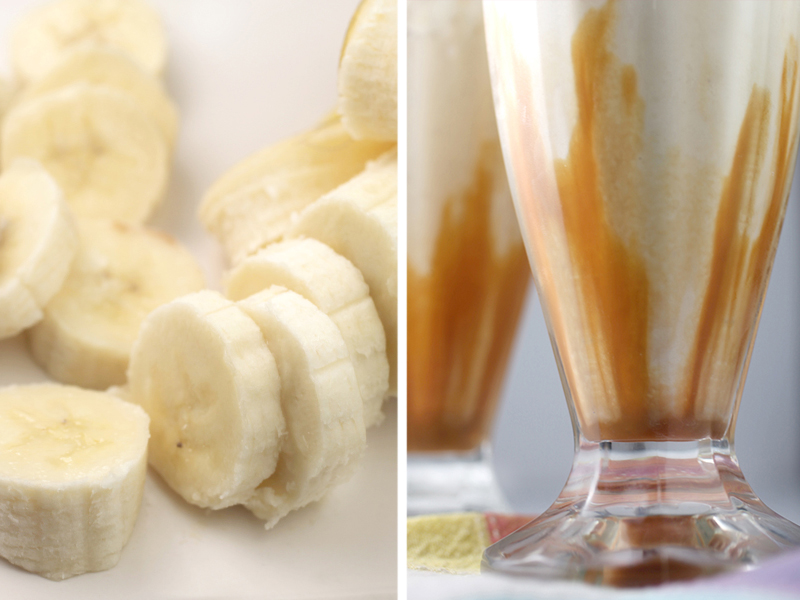
Banana Caramel Bourbon Milkshake
I seriously wish I had this milkshake right now. So good and so easy to make.


Chocolate Cupcakes with Hazelnut Frosting
Swirls of hazelnut frosting top off these chocolaty cupcakes.

October 26, 2014
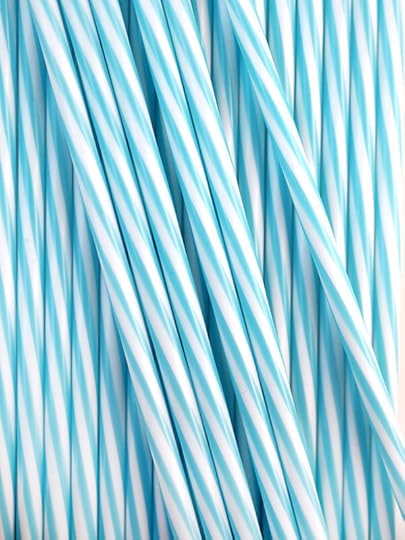
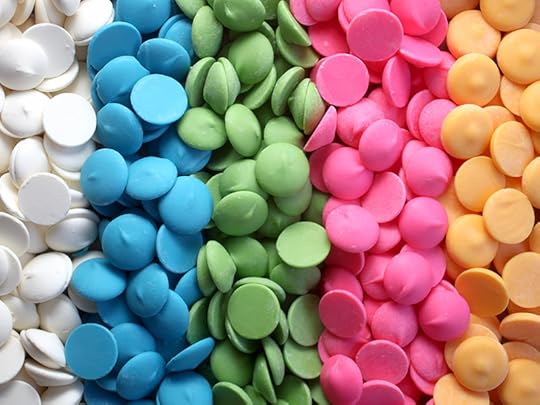
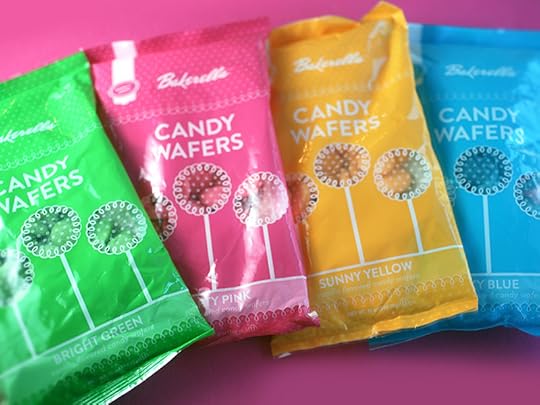
Sugar Skull Cake Pops
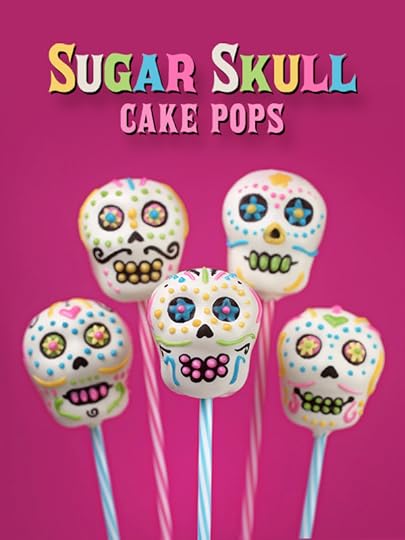
Sweet Sugar Skull cake pops.
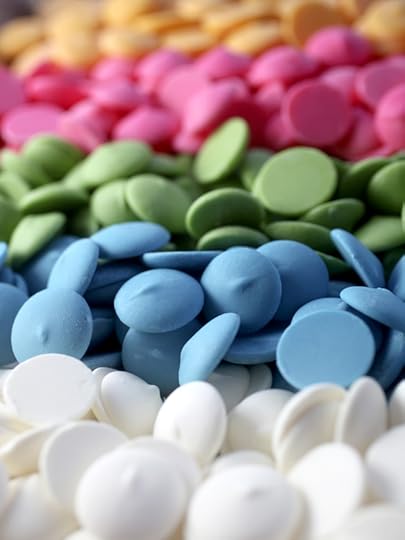
These are a fun little project celebrating Day of the Dead that I wanted to share with you. I made them with the candy wafers in my new line of products with Make’n Mold. I love how much you can customize them using different colors and patterns. Just start with a molded skull cake pop shape and dip it in melted white candy wafers for a blank canvas. You can use a black edible ink pen to draw on the pop and bright colors of melted candy wafers to dot and decorate different designs using a toothpick.
Here are the full instructions over at Make’n Mold if you want to make them, too.

Bakerella's Blog

- Bakerella's profile
- 9 followers

