
Bakerella's Blog, page 16
April 10, 2016
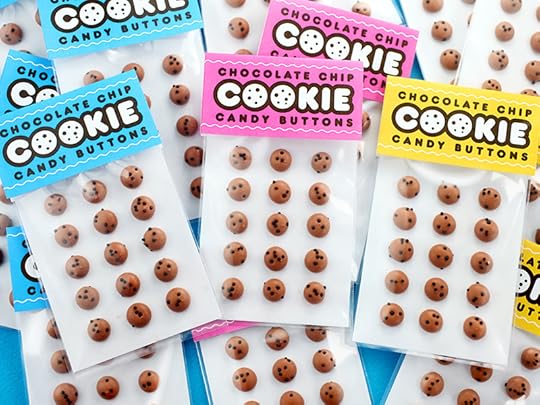
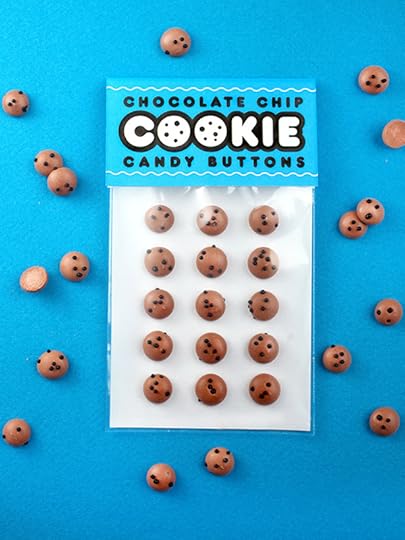
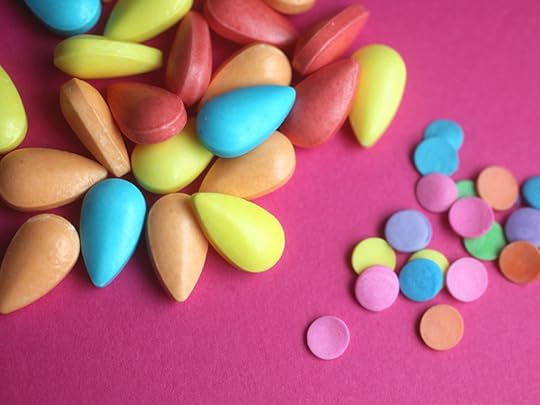
Chocolate Chip Cookie Candy Buttons
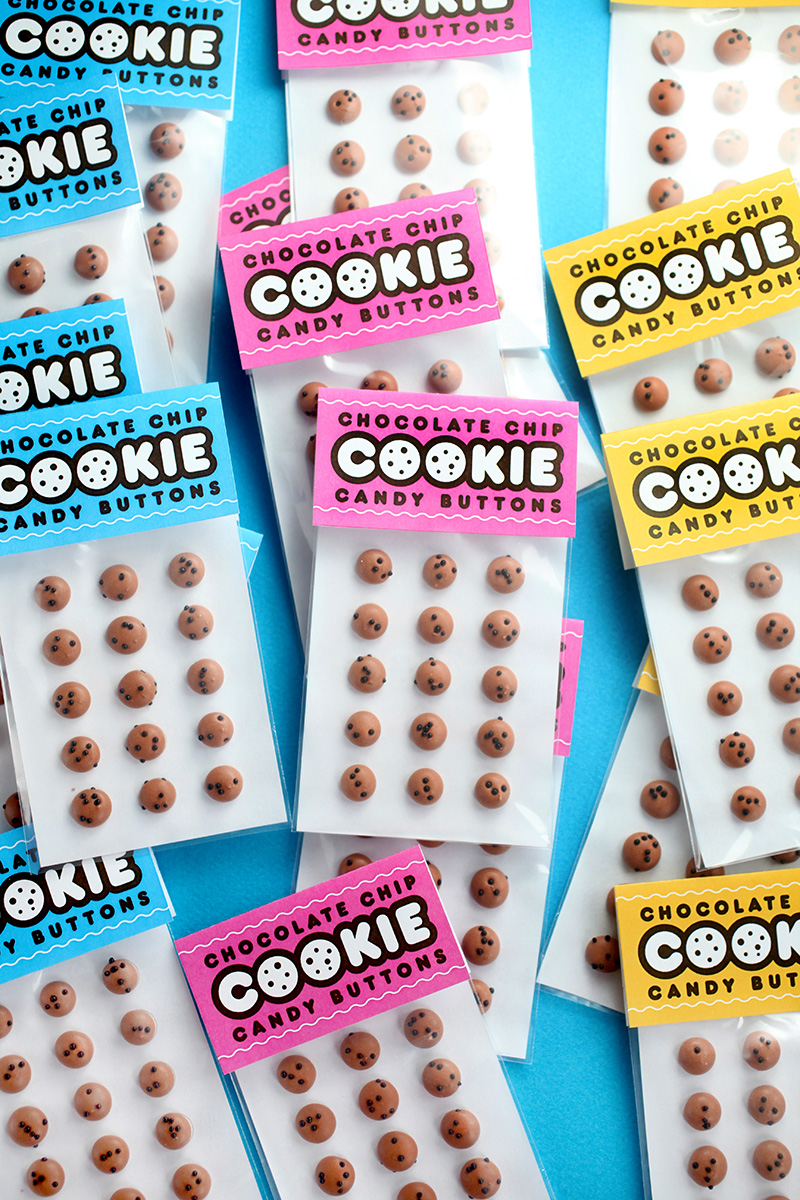
I was playing in the kitchen this weekend and made these super fun candy buttons.
And instead of sugary pink, blue and yellow dots, I made them into these soooo super tiny chocolate chip cookies. Eeek!
Here’s what you’ll need:
Royal Icing (see recipe below)
Chocolate brown icing color
Black non-pareils
Toothpicks
Small squeeze bottle
3 X 4 inch plastic treat bags
Double-sided tape
Template and tags (download here)
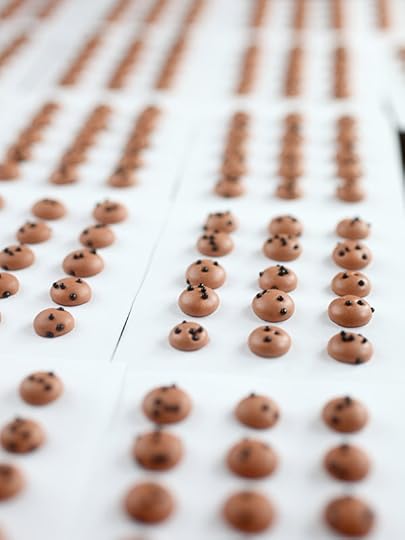

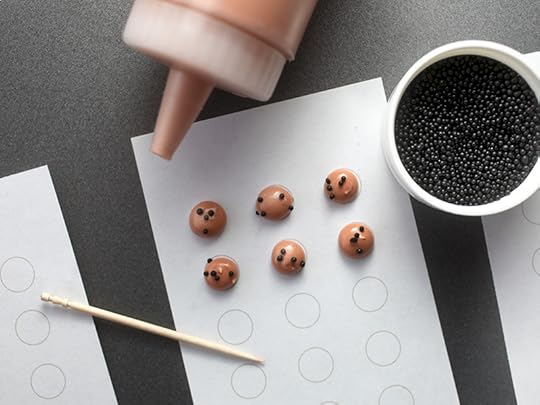
Use the printables provided above to pipe dots of brown royal icing on paper. (Note: I tried using parchment paper to pipe on, but the buttons fell off way too easily). Pipe one sheet at a time using a small squeeze bottle. If the dots have peaks on top from piping then, gently coerce them down with the tip of a toothpick until it blends into the dome of the dot.
Royal Icing
2 cups confectioners’ sugar
2 tablespoons meringue powder
3 tablespoons water
Sift confectioners’ sugar and meringue powder into the bowl of a stand mixer. Add water. Then, using the paddle attachment, increase speed to high and beat for 5-8 minutes until glossy and stiff peaks form.
Tint icing with brown icing color. (I used chocolate brown from AmericaColor.) Check consistency before filling your squeeze bottle. If the royal icing is too thick, add a teaspoon of water at a time. (Note: I only added one extra teaspoon) Alternatively, if the icing is too thin, you can mix in more confectioner’s sugar to thicken it up.
As soon as you finish piping each sheet, go ahead and pinch a few nonpareils at a time and drop them on the tops of each dot of sugar. If you try to sprinkle too many at a time, they will fall in between the dots and attach to the sides making the cookies look kinda weird.
I kept a small amount in the cap of the bottle they came in so they would be handy and to avoid making a mess.
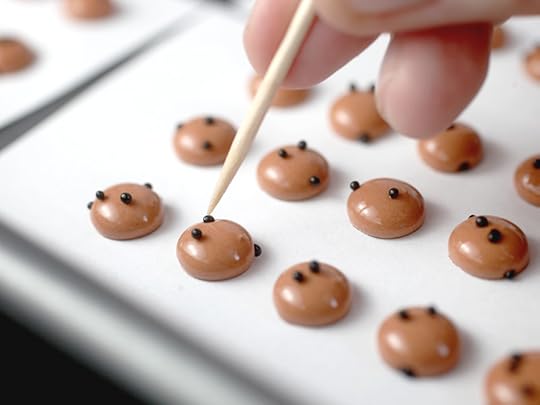
If any of the nonpareils are sitting too high on the sugary “cookie” then just use a clean toothpick to gently press them down a bit.
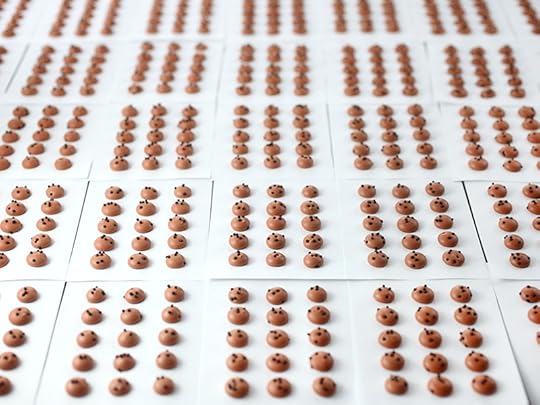
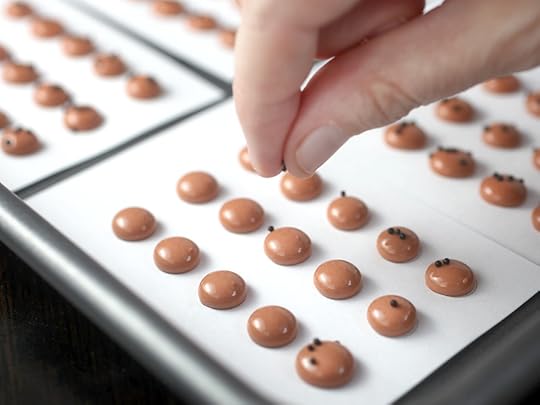
Now just let them dry! Let them sit out for several hours or overnight before packaging them.
Easy peasy!
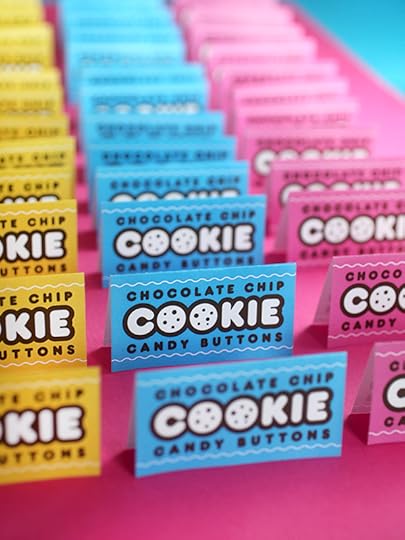
I made the tags for these little treats in the iconic happy colors you usually associate with candy buttons. Just a little subliminal association to help since my treat bags weren’t the normal long and skinny size they usually come in.
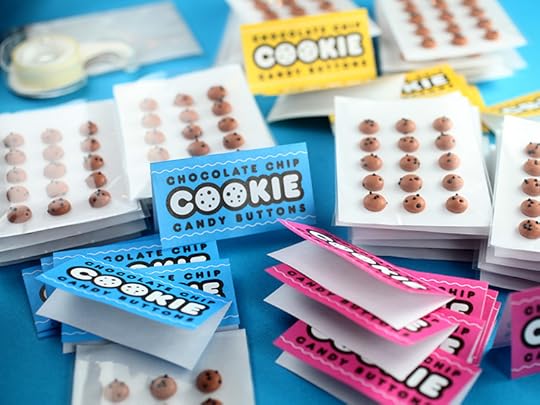
When the cookie candy buttons are completely dry, place each sheet in a treat bag and use double-sided tape to attach the tags to the tops.
Super cute.
I can’t help but thing how fun the blue ones would be as party favors from Cookie Monster at a Sesame Street birthday party.

But really, they’d be fun to give to out anytime.

Enjoy!!!


March 28, 2016
Cookies and Cups

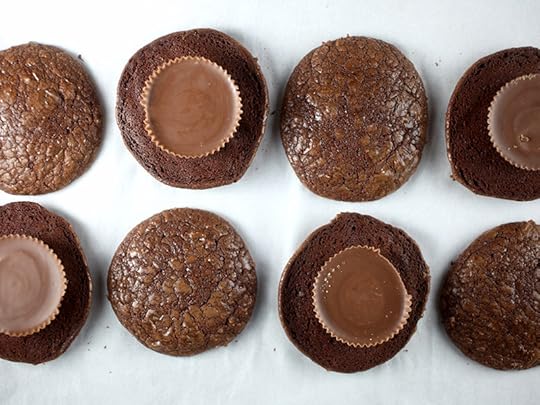
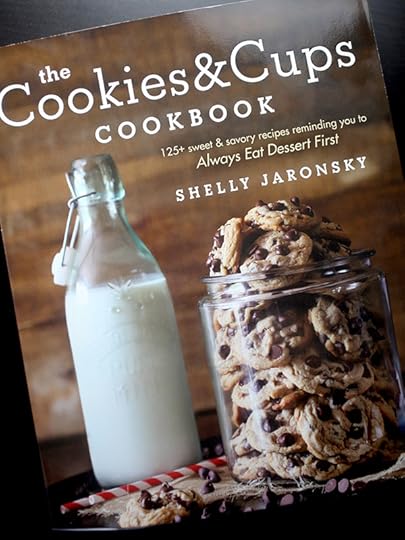
I can’t stop eating these cookies. They’re Peanut Butter Cup-Filled Brownie Cookie Sandwiches from my sweet friend Shelly of Cookies and Cups. Her brand new cookbook (The Cookies and Cups Cookbook) is coming out April 12th and when I saw her recipe for these, I knew I had to try them first. I mean brownie cookies and melty peanut butter cups … I’m so there.
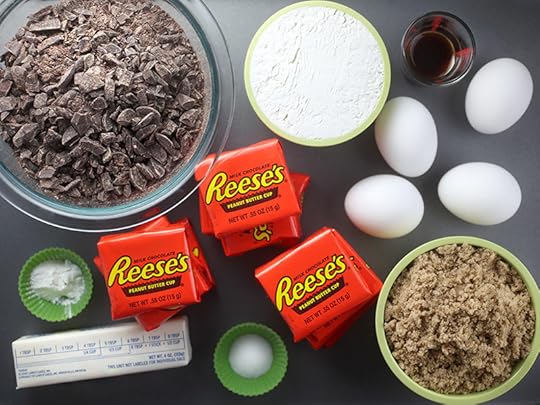
Plus, I like recipes where I have everything on hand. And in this case I just happened to have a bunch of Reese’s on the ready for Easter … they’re a staple in my house for just about any holiday, you know.
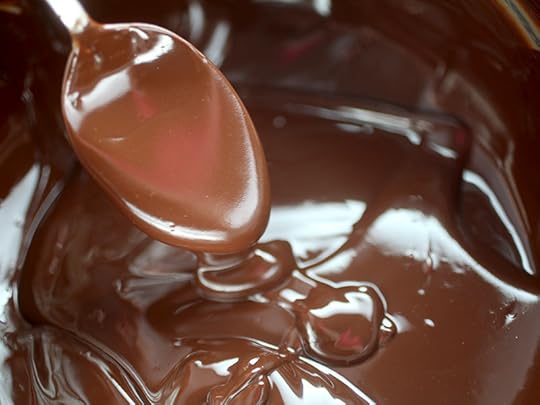
Melted chocolate and butter means we’re off to a delicious start.

I used a small cookie scoop for the brownie batter. As the batter rests, it thickens a bit to make it easier to scoop onto your baking sheet.
Cookies. And. Cups.
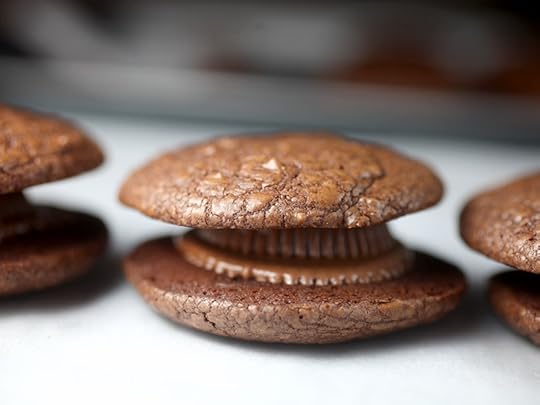
Sandwich them while they’re still warm and watch the middles melt… along with my heart.

Peanut Butter Cup-Filled Brownie Cookie Sandwiches
1/2 cup (1 stick) salted butter
16 oz semisweet chocolate, chopped
1 cup all-purpose flour
1 teaspoon baking powder
1/2 teaspoon salt
4 large eggs
1 1/2 cups packed light brown sugar
2 teaspoons vanilla extract
12 regular-size peanut butter cups
Preheat oven to 350 degrees F. Line baking sheet with parchment paper.
In a medium saucepan, melt the butter and chocolate over low heat, stirring frequently until the ingredients are just melted. Remove from the heat and let the chocolate-butter mixture cool for about 5 minutes.
Meanwhile, in a medium bowl, whisk together the flour, baking powder and salt. Then set aside.
In another larger bowl, whisk together the eggs, brown sugar, and vanilla. Add the chocolate and butter mixture to the egg mixture slowly, stirring as you go. Then stir in the flour mixture until combined.
Scoop brownie mixture and place on baking sheet 2 inches apart. Bake for about 9 minutes until cookies are set in the middle.
Allow cookies to cool on baking sheet for 3 minutes. Flip half the cookies over and carefully place a peanut butter cup on each flipped cookie. Place the remaining cookies on top while they are still warm. The heat from the cookies will melt the peanut butter cups enough to hold the sandwiches together when cooled completely.
Makes 12 – 16 sandwich cookies.

I enjoyed every last bite of these babies! Hope you do, too. Just make sure to have a big glass of milk ready when you do.
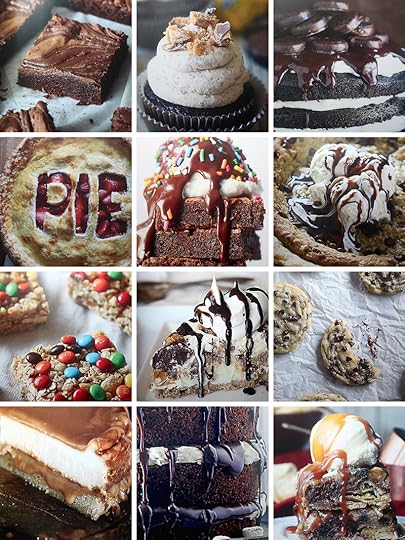
Here’s a little peek at more of the yumminess from The Cookies & Cups Cookbook. Check it out, you can pre-order now! So proud for you Shelly!

March 20, 2016
Bunny Bum Bons
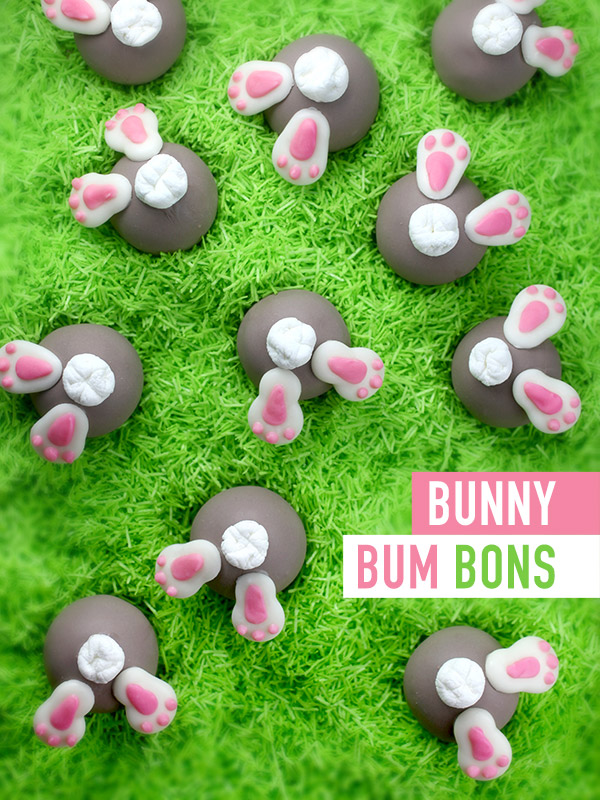
These little cuties are really cake balls but I couldn’t resist calling them Bunny Bum Bons. Actually I think I made them just so I could type those words. Bum Bons. It’s the little things that make me smile.
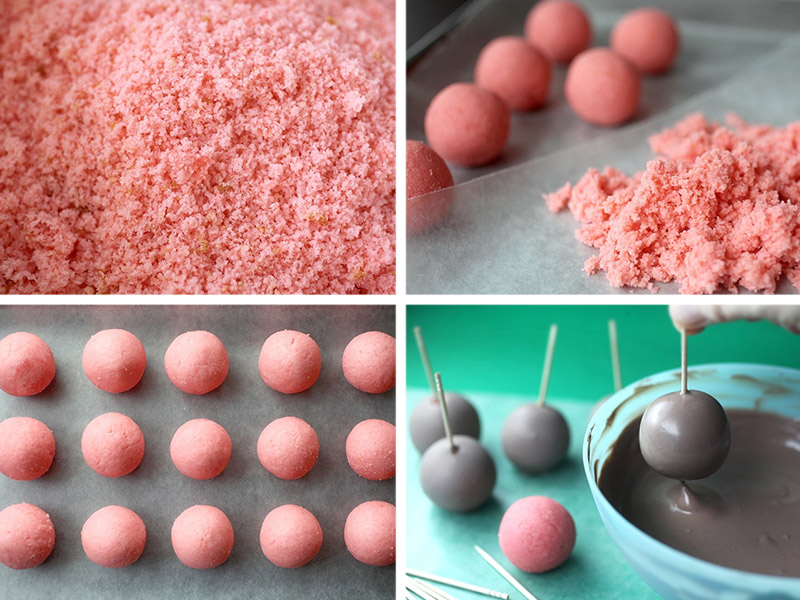
You can use my Basic Cake Pop instructions for the cake ball base.
Now, I usually dip cake balls using a spoon, but I used toothpicks for these to make it easier and also because I knew I could cover up the pinhole with a tiny tail.
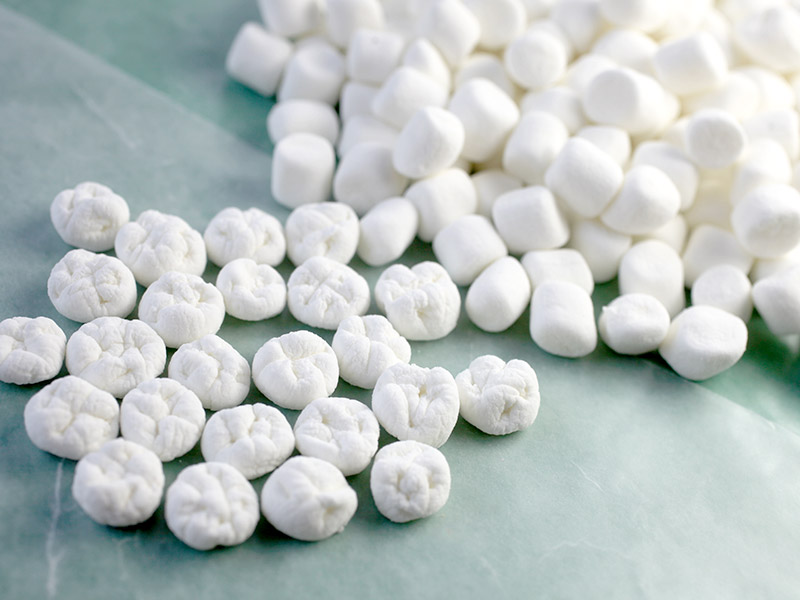
Speaking of tiny tails… Mini marshmallows for the win. To make them look more fluffy, I pressed the marshmallows together a little and then made a few cross hatch marks with kitchen scissors.
When done, you can attach them to the cake balls with a bit of melted candy coating.
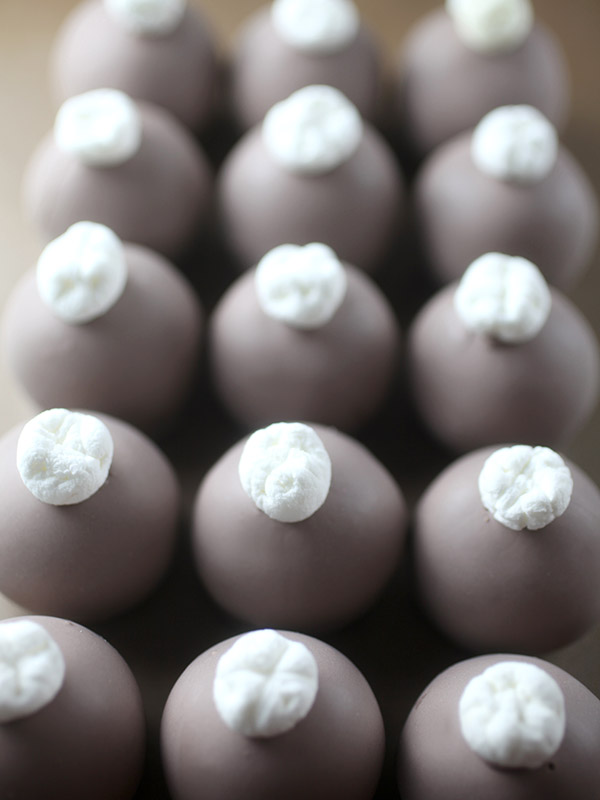
See… Sweet Bunny Bums.
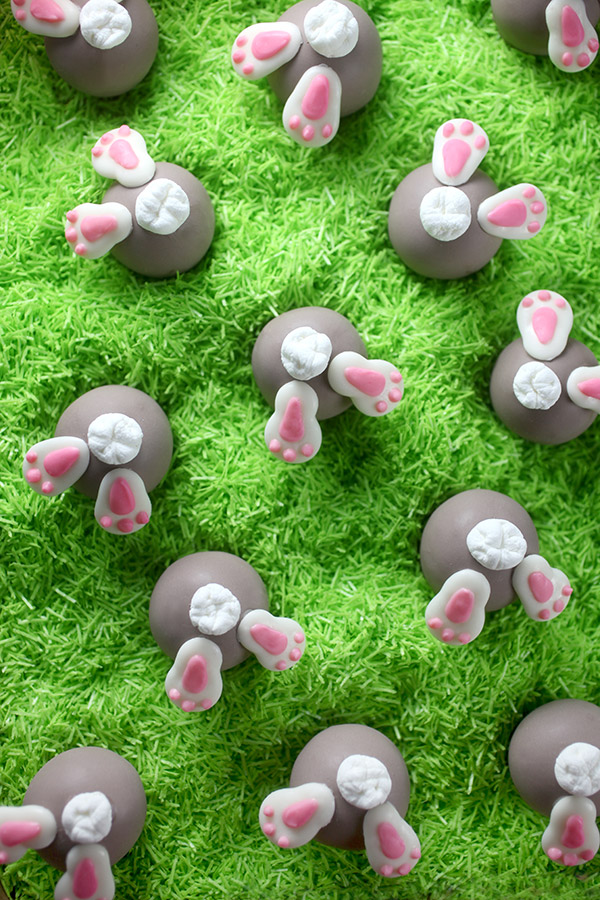
Now for the feet.
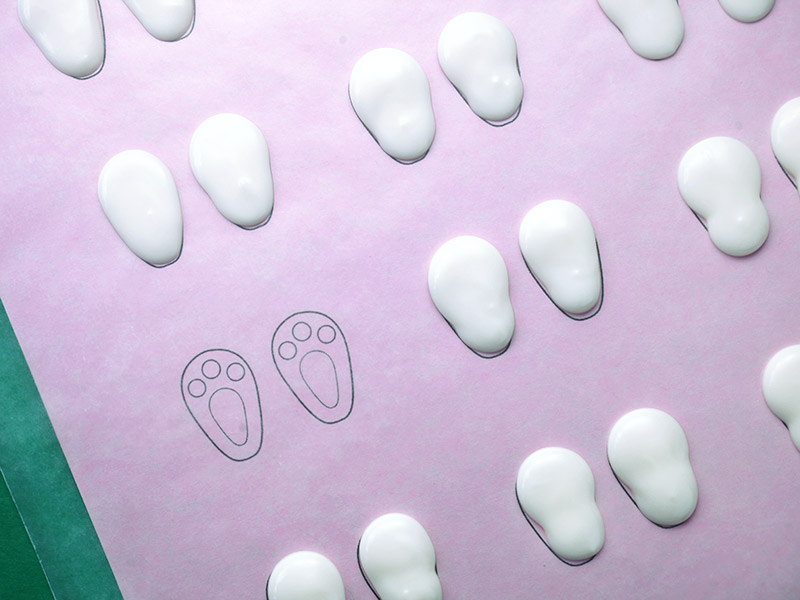
Just pour melted white candy coating in a small squeeze bottle and pipe pairs of paws. Use a toothpick to help smooth and perfect the shape.
Here’s a template for reference if you need it. I think it helps to get pairs of feet the same size more quickly.

When dry, you can dot / draw on the paws with melted pink candy coating.
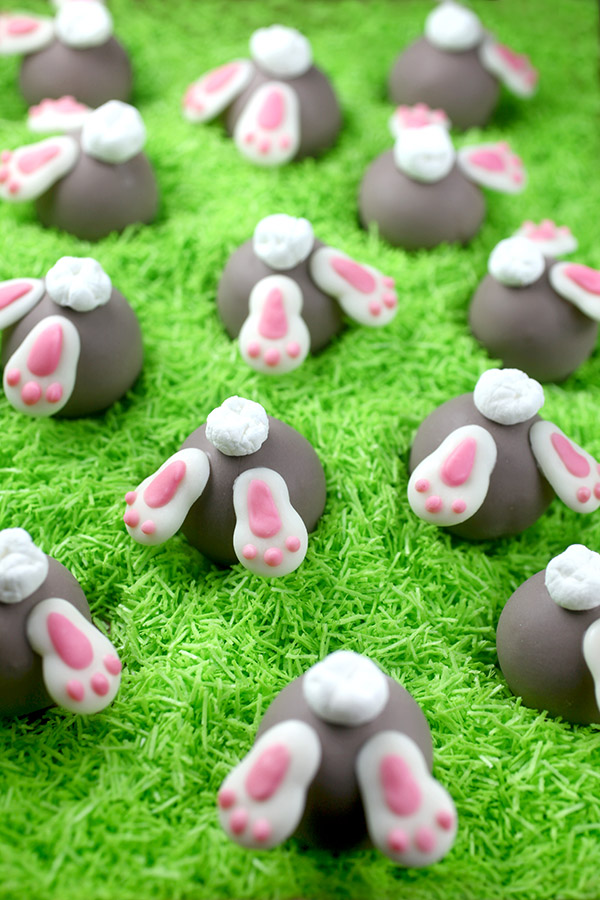
Enjoy and Hoppy Easter!!!
P.S. The green candy shred grass and candy coatings are from my Bakerella for Make’n Mold line if you want to check it out.

February 28, 2016
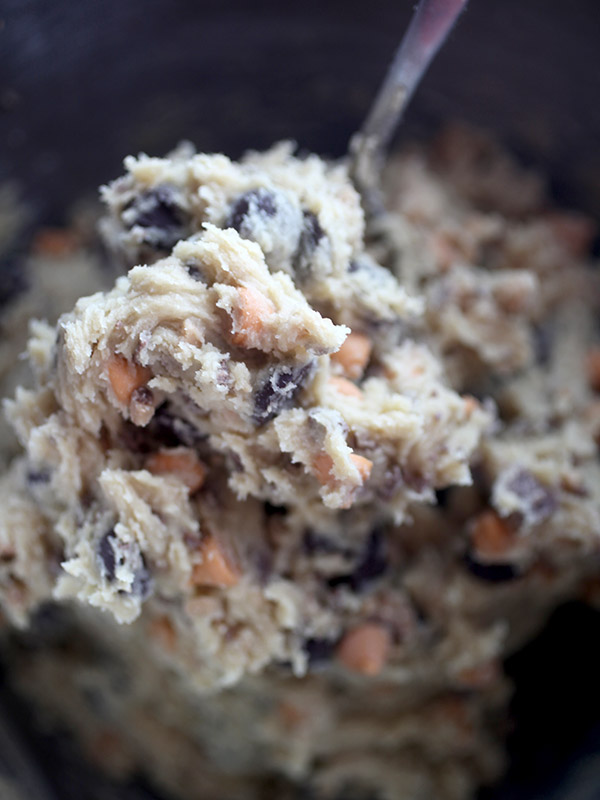
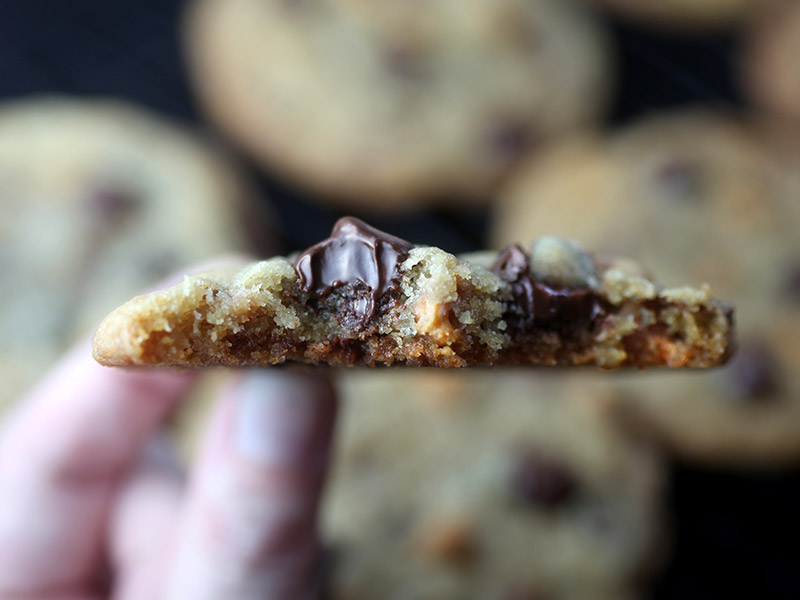
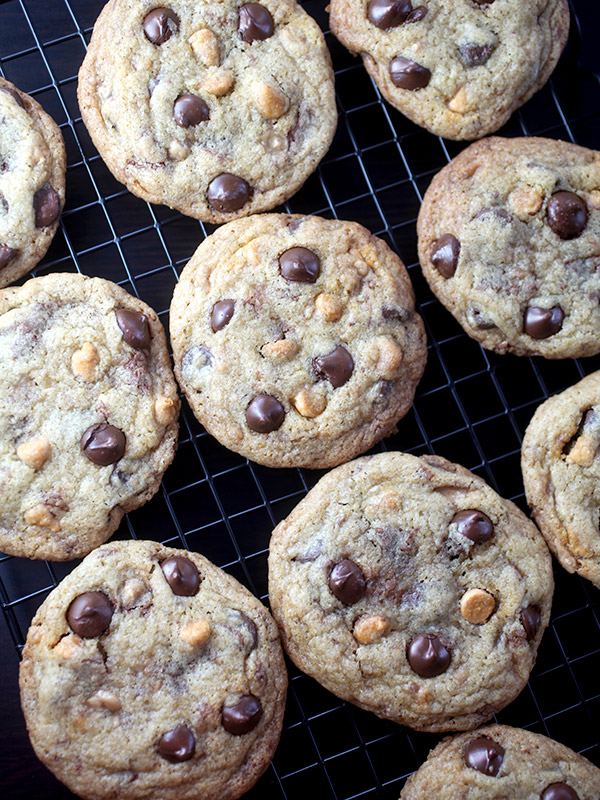
Toffee Bit Butterscotch Chocolate Chip Cookies
These cookies are just as tasty as they look. I made them a couple of weeks ago and I wish I had about a dozen of them right now. I think they’d do just the trick to cure me of this cold/cough/grossness that I’ve had for the last several days. I’m super tired of feeling under the weather, but I’m getting better… at least good enough to get on the computer to finally post these yummies.
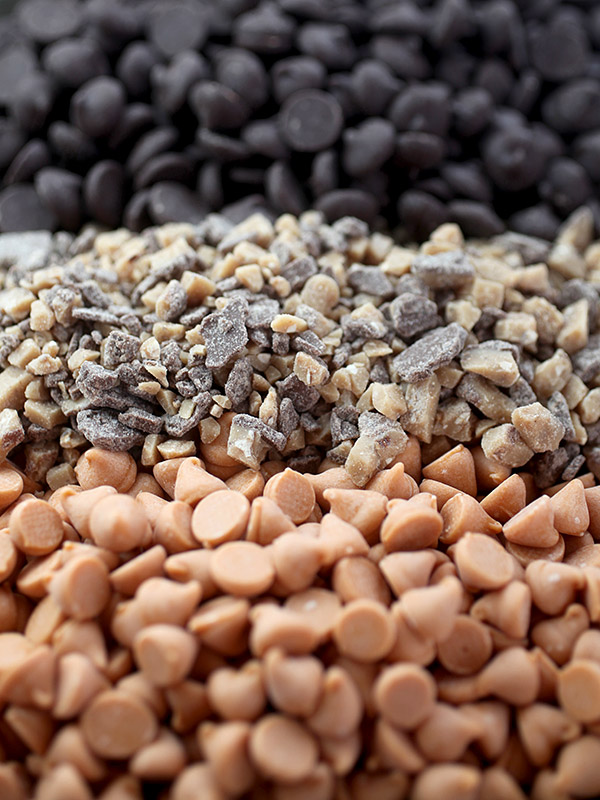
Chips and bits. A tiny ton of chocolate, toffee and butterscotch goodness, baby.
This cookie dough totally makes me want to grab the biggest spoon I can find.
Just don’t get carried away tasting… gotta make sure to save enough spoonfuls to bake, you know.
Toffee Bit Butterscotch Chocolate Chip Cookies
2 1/4 cup all purpose flour
1 teaspoon baking soda
1 teaspoon salt
1 cup unsalted butter
3/4 cup granulated sugar
3/4 cup brown sugar
2 eggs
2 teaspoons vanilla
1 1/2 cups chocolate chips
1 cup toffee bits
1 cup butterscotch chips
Preheat oven to 375 degrees fahrenheit.
Whisk flour, baking soda and salt together in a medium bowl. Set aside.
Beat butter and both sugars in mixer for several minutes until light and fluffy.
Add eggs and vanilla and mix until incorporated.
Add flour mixture and mix on low until combined. Stir in chocolate chips, toffee bits and butterscotch chips.
Place spoonfuls of dough onto baking sheet 2 inches apart.
Bake for 9-12 minutes.
Makes about 36 cookies.
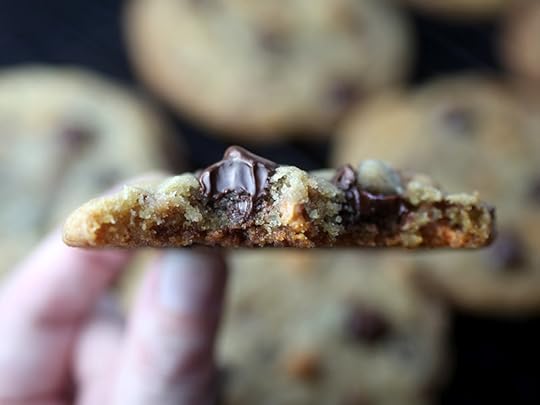
Enjoy all the bits and chips in every warm and melty bite.

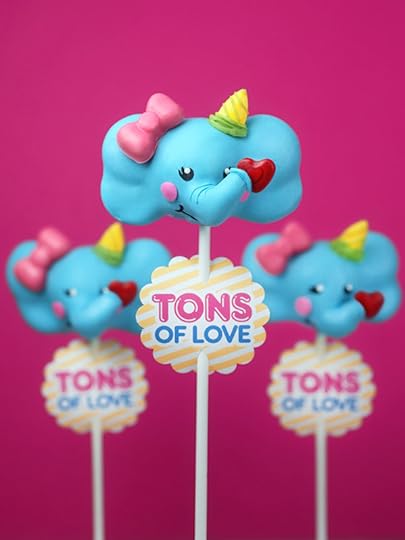
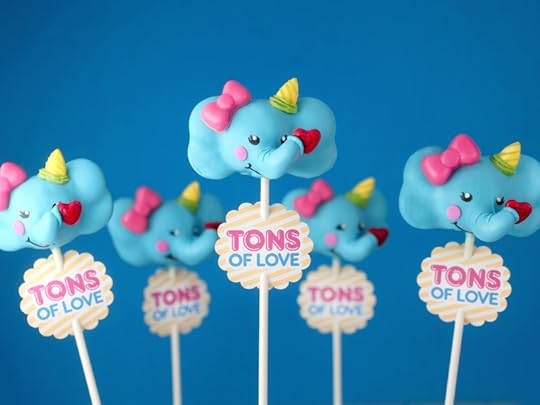
February 7, 2016
Elephant Cake Pop Valentines
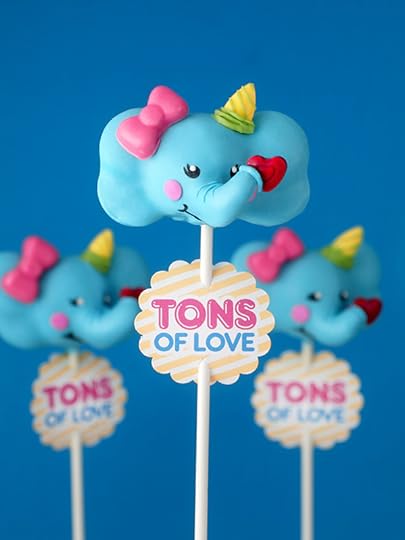
I’m sending you guys tons of love with these sweet little elephant cake pops. Hope you like them. They were inspired by those charming vintage Valentine’s Day Cards where the elephants hold up hearts with their trunks. Anyway, I couldn’t resist trying them out in cake pop form.

To get started you need cake. Well, crumbs to be exact. Hop on over to my instructions for making Basic Cake Pops if you haven’t made them before. Once they are rolled into balls for dipping you can get down to the fun stuff … decorating.
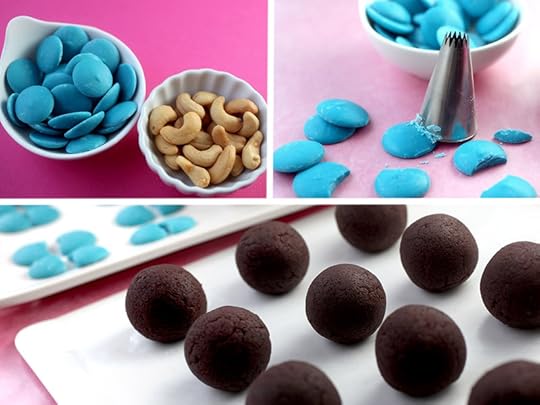
For the trunks, I just used cashews. They worked out pretty awesome!!!
For the ears… and I wanted these to look big and floppy … I originally thought I would use pretzels, but that didn’t go so well for me, so I ended up just using the same candy wafers that I use for dipping.
Instead of melting them, just carve out curves from the side of the wafers using a small round cutter. I used the big end of a piping tip that I had handy. Having the curved side will make it easier to attach by matching the curved shape against the side of the round cake pop. See below.

Okay … dipping prep. Usually I just insert a cake pop stick into melted coating and then into a chilled cake ball right before dipping. And that little pool of coating at the base in the top left photo just blends all together.
But for these elephants, I’m attaching several pieces before they get dipped so that pool of candy needs to be smoothed out or else it will dry and become part of the shape of the head. Just use your finger and quickly smooth it around the base of the pop. This also helps to secure the stick since you’re not dipping right away.
Next, dip the cut and curved edge of a candy wafer into the melted candy coating and attach to the top and side of the ball with the rounded part of the wafer facing front. Take another cut wafer and attach to the bottom right with the flat side facing front. Smooth out any coating where the wafers are attached to the cake pop so when you finally dip, the transition will be smooth. Repeat with the left side.
Now grab a cashew and position at the bottom front of the pop. Press in gently to make an indentation. Then, dip the fat end of the cashew in melted coating and attach to the pop. Again, smooth out any overflowing melted candy. Note that in the bottom right photo, I was making the indentation here. The cashew had not been dipping in coating yet.
Okay, after the pieces are all attached, place the pop back in the fridge to chill again before dipping. If the pop gets to room temperature, it will fall apart when you dip the pops.
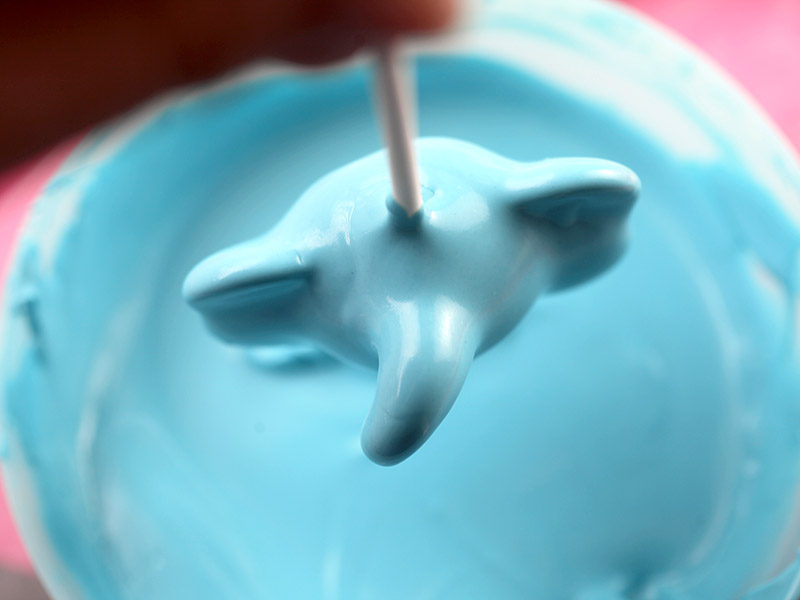
But not if they are chilled. I love to see how things start to take shape when the coating is added. You’d never know all that messiness from building the structure was underneath.
Once all the elephants are dipped, let them dry completely before you really bring them to life.
You can use the melted candy as glue to attach the decorations to the elephant.

Here are the hearts for them to hold. They’re nice and big.
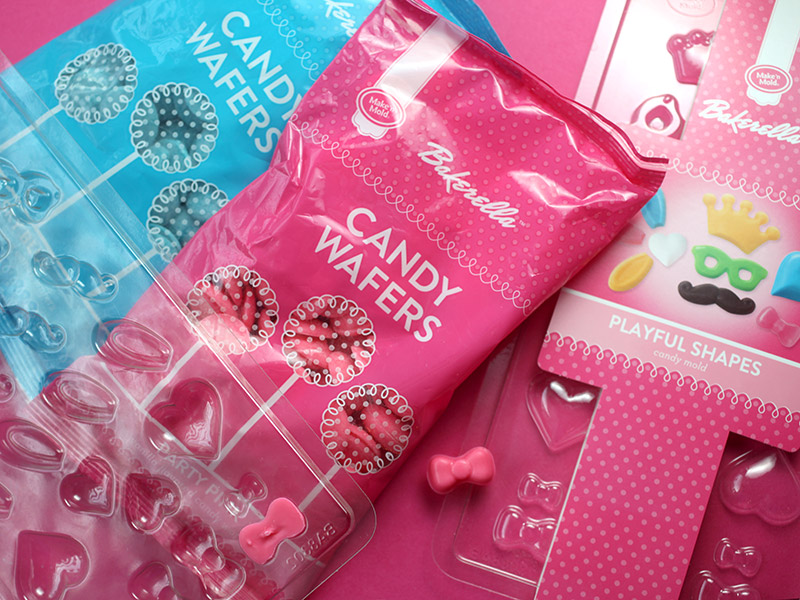
I also wanted them to have sweet little bows on one side so I used my Playful Shapes Candy Mold and Party Pink Candy Wafers. Because they’re totally girl elephants.
They also have sweet cheeks made using pink confetti sprinkles.
And these girls have their party hats on … They’re made with baby tear candy shapes. I just used some kitchen scissors to cut the ends off so they would attach to the shape of the head more efficiently. To cover up the rough edge or gap where the party hat is attached, just use some melted candy to apply around the base.
Want to see…

Totally cute, right.
The candies are all attached using melted candy coating applied with a toothpick.
The eyes and mouth are drawn on using a black edible writing pen.
And the trunk and hat details are just more melted candy drawn on using a toothpick.
Okay, I know these have a lot going on, but I wanted to show you a bunch of eleph-fun options all at once.
Keep in mind…
You can just have them holding hearts…
or only give them bows…
or have them party ready…
And … you can absolutely make them just dipped with eyes and a mouth and they’ll be super cute, too. It’s up to you.

And if you want to make these fun for something other than February 14th, poke a hole in the center of a mini candy wrapper and slide it underneath the pop for a fun collar. A polka-dot wrapper would be totally adorable. And instead of a red heart, try a Sixlet candies – they make the perfect little balls.
But since we’re in the mood for love this week, share a ton of it with these treat tags.

You can download them right here to print out and punch out with a 1 7/8 paper punch.
Don’t forget to have a Happy Valentine’s Day!
Enjoy!

February 2, 2016
36 Valentine’s Day Treat Ideas
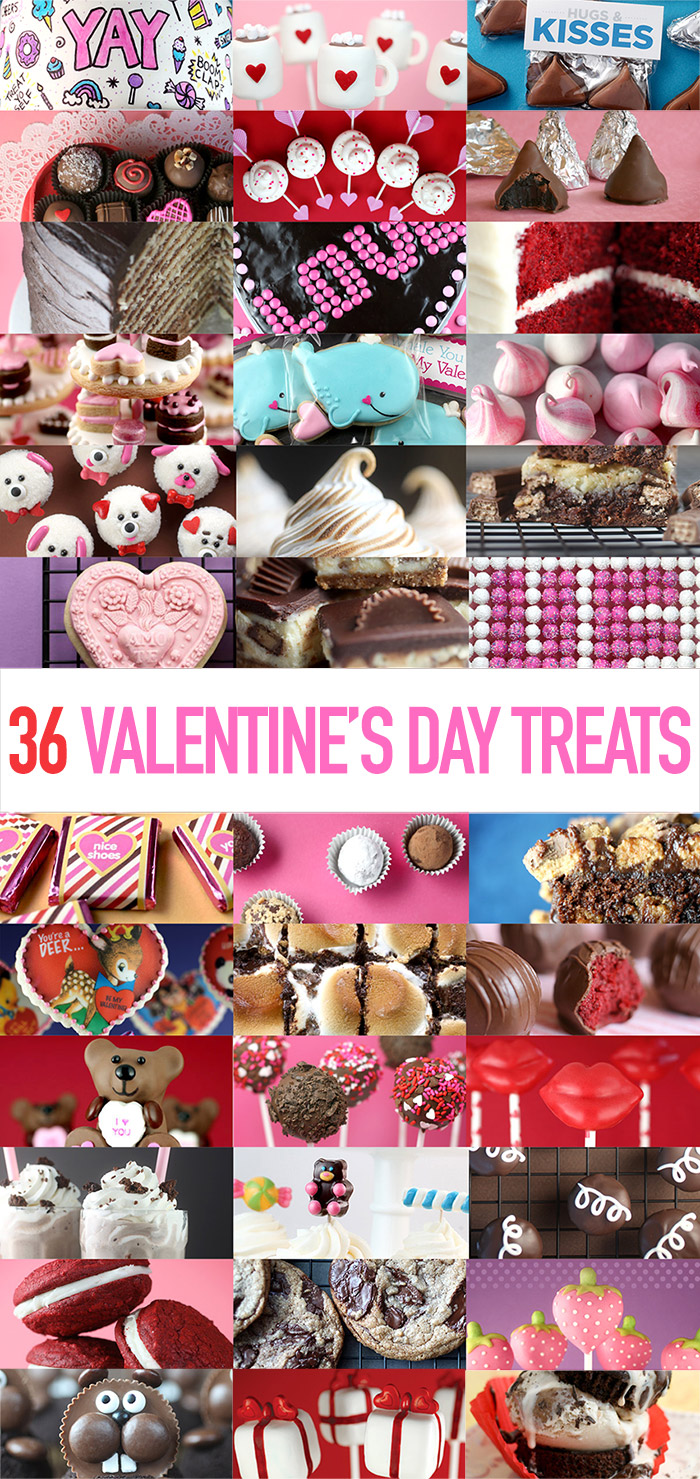
Looking for something sweet to make on the fourteenth? Check out the links below to some of my past posts for fun Valentine’s Day ideas. I think there’s a little something for everyone… from super cute treats to easy chocolate sweets. Hope you enjoy!
Tinier than tiny cake pops to spell out L O V E and X O, too!

This box of chocolates is all cake… okay not the wrappers ; )

3. Chocolate Peanut Butter Truffles
These are a super easy no-bake treat.

One of my all-time favorites!

5. Big Love Butterscotch Cookie
Use pink M&M’s to say it all on this giant chocolate covered cookie heart.

This cake will delight anyone you serve it too.

Make your own mini candy bars with these candy wrapper templates.


10. Red Velvet Cake

11. Sugar Cookie Dessert Stands
The tiniest sugar cookies shaped like desserts will delight.

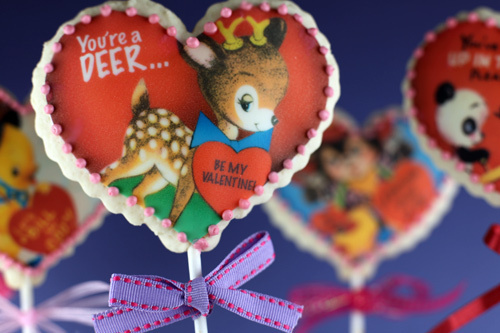
So cute with heart candy noses, bow ties and ears.

Get the template to make these treat bag toppers.
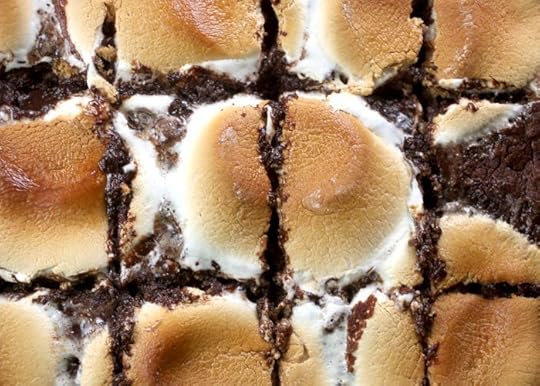
14. S’mores Brownies


17. Sweet Shape Candy Cupcake Toppers
Get my Sweet Shapes candy mold here.
18. Cookie Molds
Make intricate designs look easy with fondant and heart-shaped cookie molds.


20. Kit Kat Cream Cheese Brownies
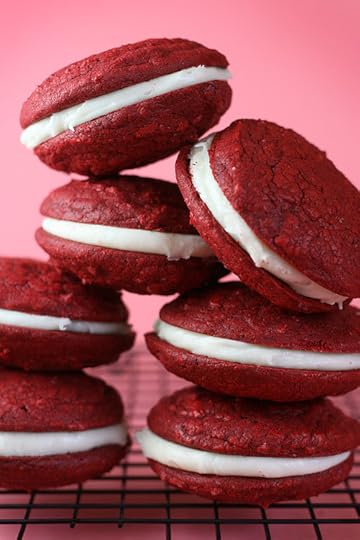
21. Red Velvet Sandwich Cookies

22. Melty Salted Caramel Hazelnut Chocolate Chunk Cookies

23. Cupid’s Arrow Red Velvet Cupcakes
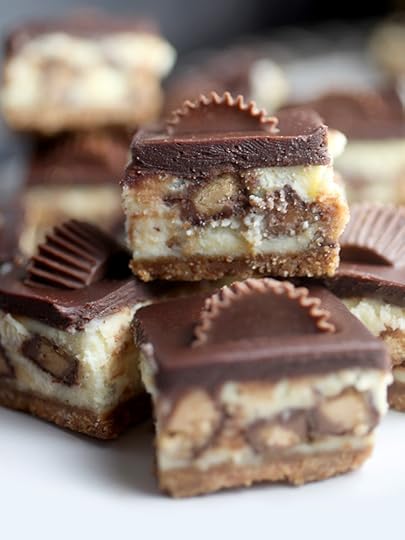
24. Peanut Butter Cup Cheesecake Bars


An all-time favorite of mine. I think you’ll love it, too.
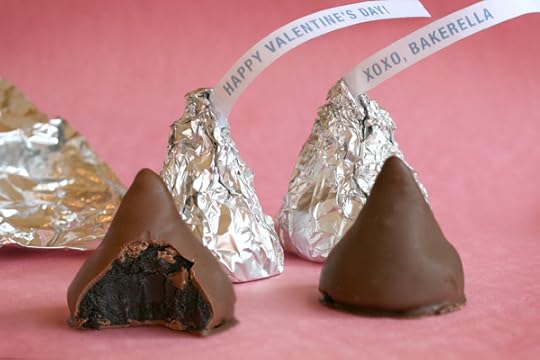
28. Oreo Kisses

29. S’mores Cupcakes

Give someone a big kiss with these cute cake pops.

32. Cocoa Cake Pops
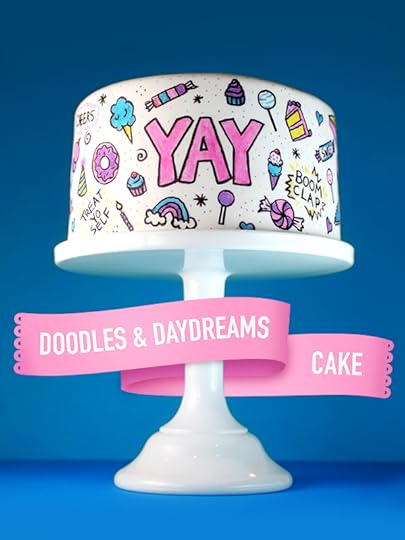
33. Doodles and Daydreams Cake
Use this as inspiration and draw sweet nothings with a black edible ink pen.

35. Cookie Kisses
Tags and templates to make the cutest Kisses cookies.

36. Gopher Cupcakes
So these were really made for Groundhog Day but I can’t stand how cute they turned out and hope someone makes them for Valentine’s Day, too.
Just create little tags and attach to toothpicks for toppers that say… “I Gopher You!”
Hugs and kisses and I h you have a sweet and Happy Valentine’s Day!

February 1, 2016
Happy Cake Pops Day!
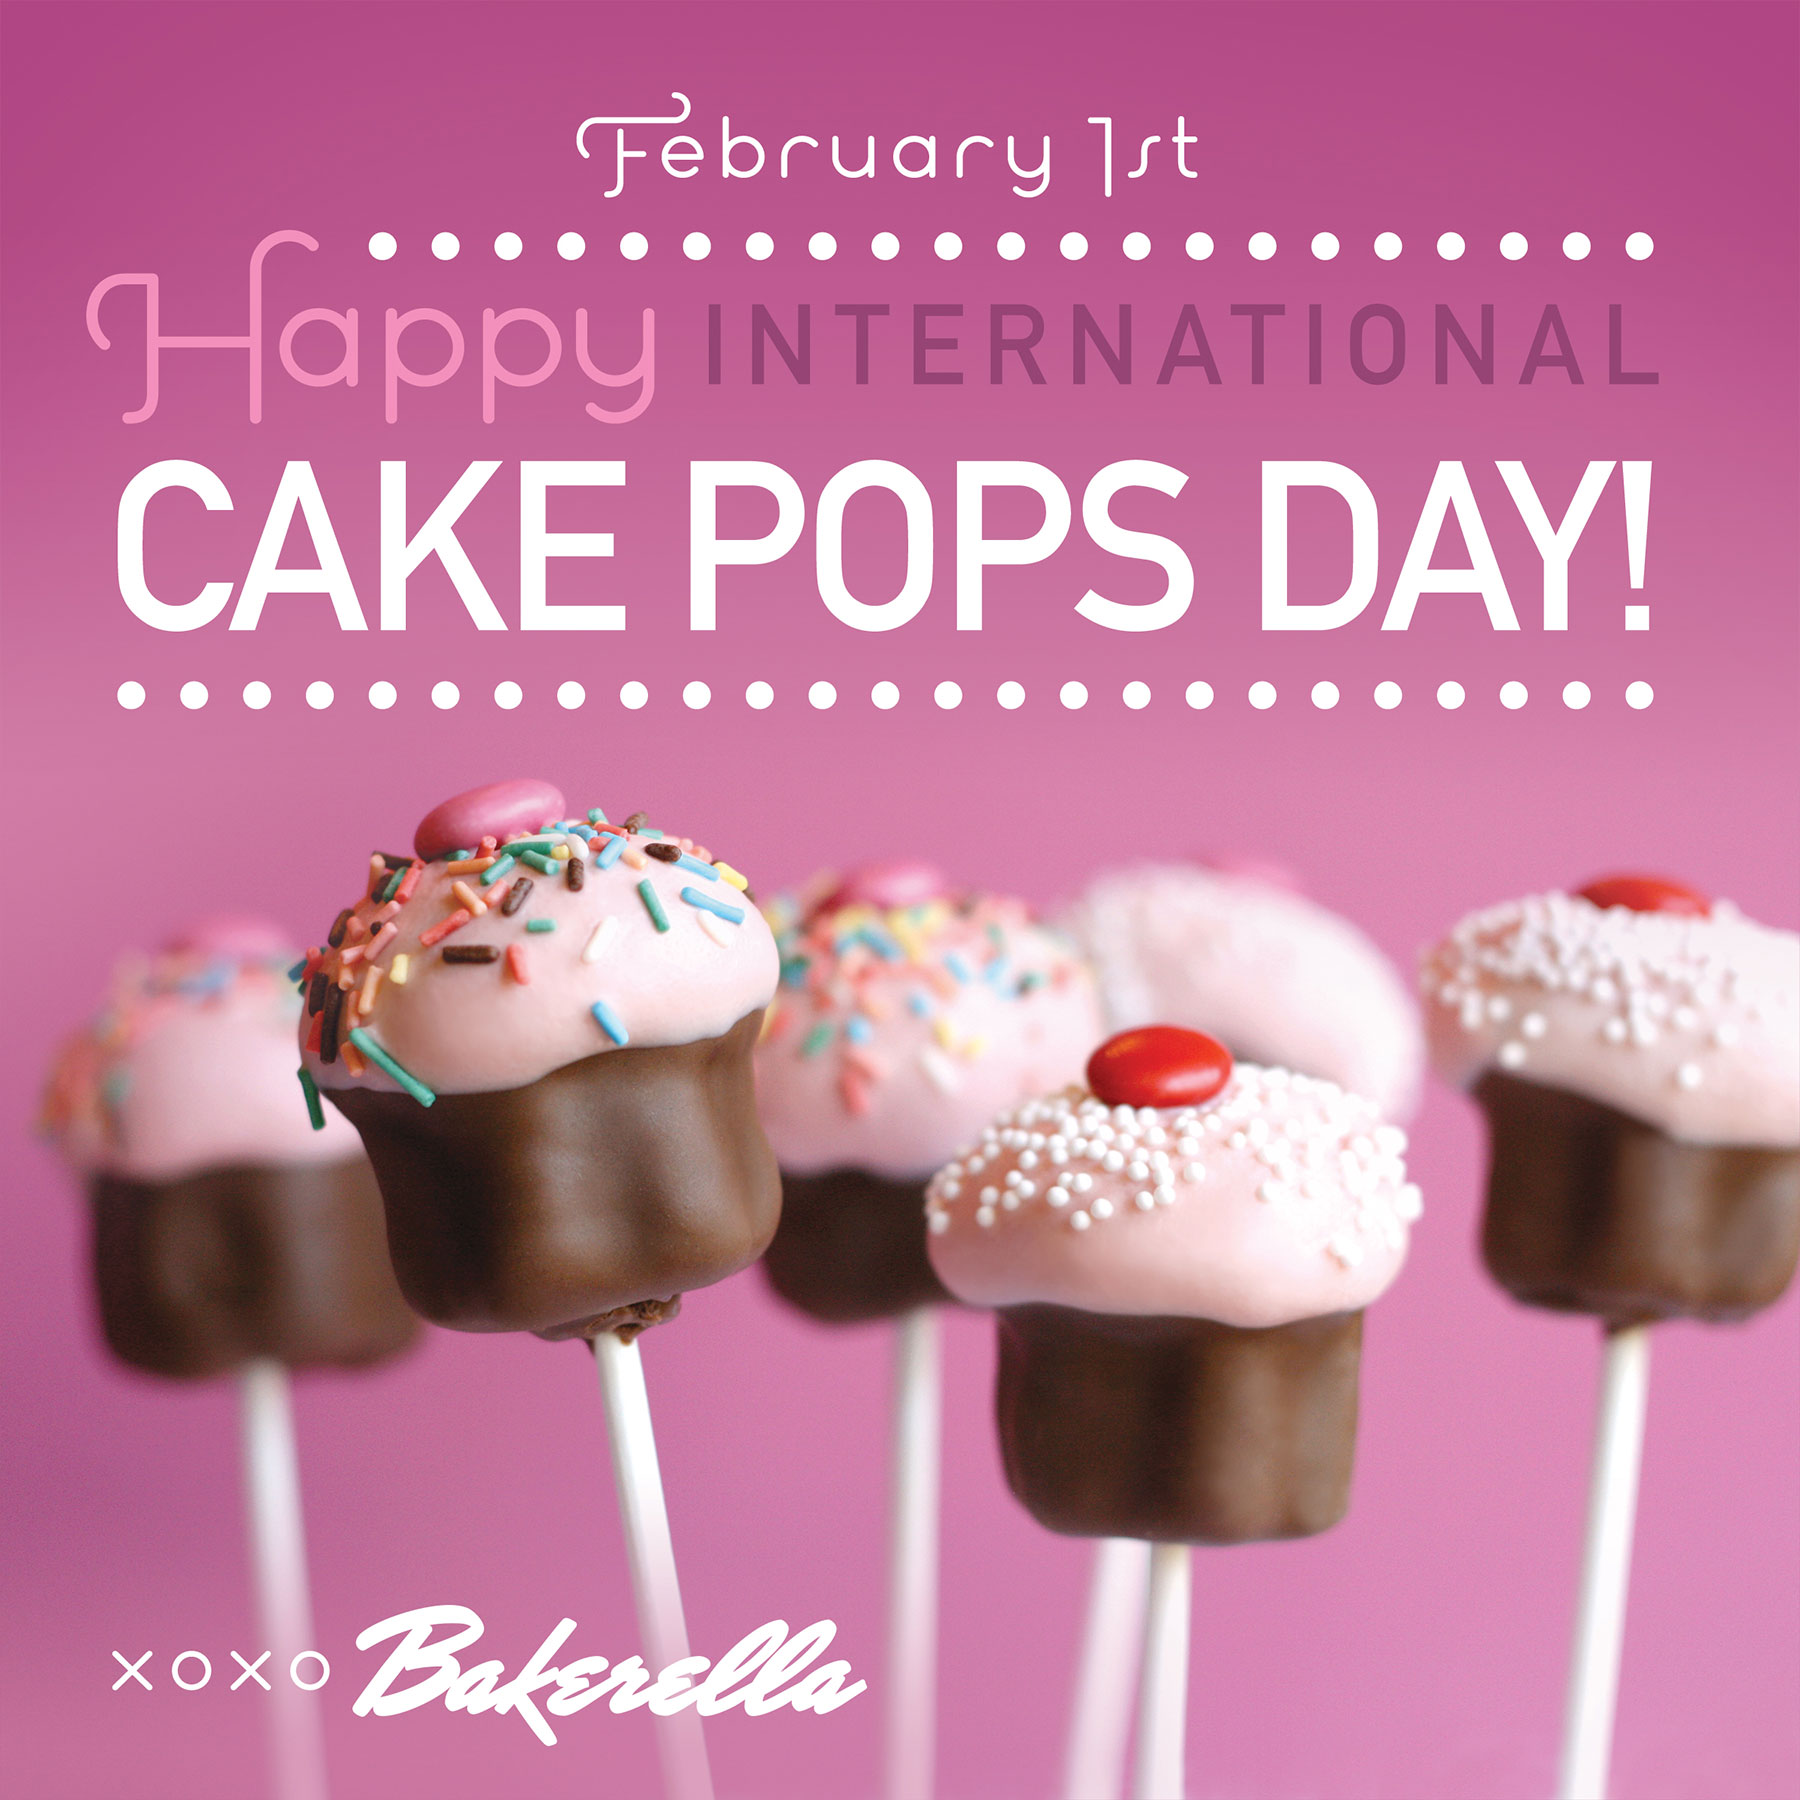
Today is National Cake Pops Day! YAY! But, I’m going with International Cake Pops Day because we can’t limit all the sweetness from these tiny treats to just one nation, right. I’ve seen so many truly spectacular designs from all over the globe and it makes me so happy to see how creative you guys get.
Here’s the first post I made about these cupcake pops back on February 1st, 2008. Wow… how can eight years have gone by so fast. Let’s just say that I had no idea then how much people would fall in love with them. And here’s a post from a few years ago and some of the impact cake pops have made. It’s been a crazy adventure. Thanks for joining me and making your own cake pop adventures, too!
Big hugs!!!

January 25, 2016
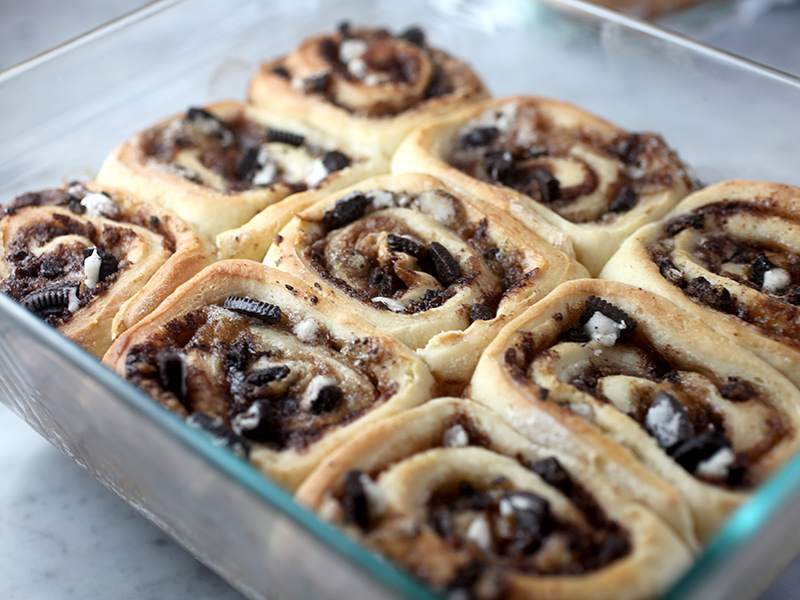
Oreo Cookie Rolls
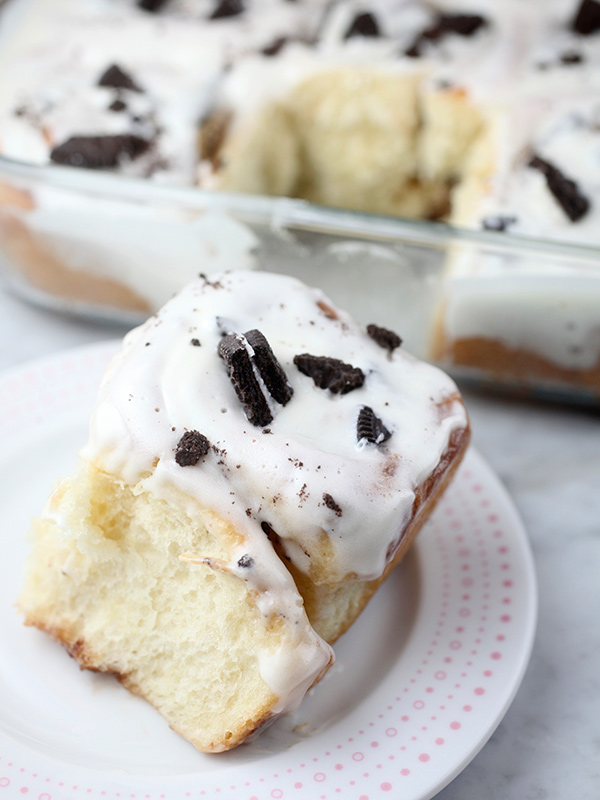
I made some pretty sweet buns to nibble on. They’re made just like cinnamon rolls but without the cinnamon swirled inside.

That’s because these are stuffed with Double Stuf Oreo cookies instead.
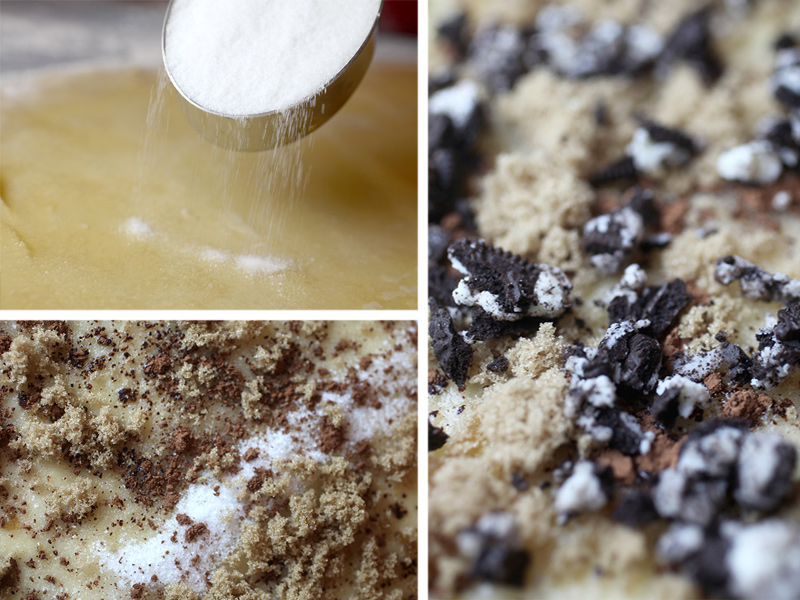
The rolled dough is covered in melted butter, cocoa, granulated sugar, brown sugar and crumbled Oreo cookies.

Spread everything out evenly so you’ll have deliciousness in every section you slice.
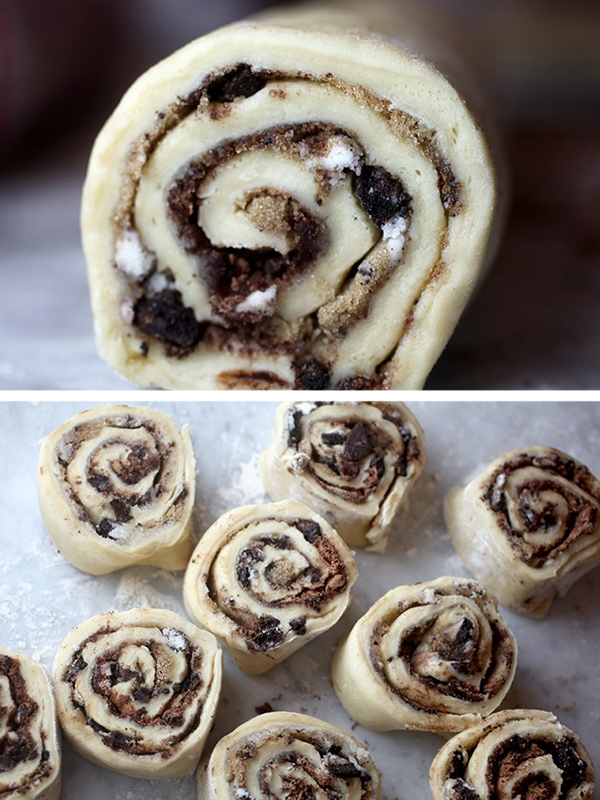
Use a sharp knife to cut even sections. The rolled dough yields enough for 18 rolls. And, if you use disposable square aluminum pans, then you’ll easily have one pan to enjoy and one pan to give away. That is if you’re feeling generous.
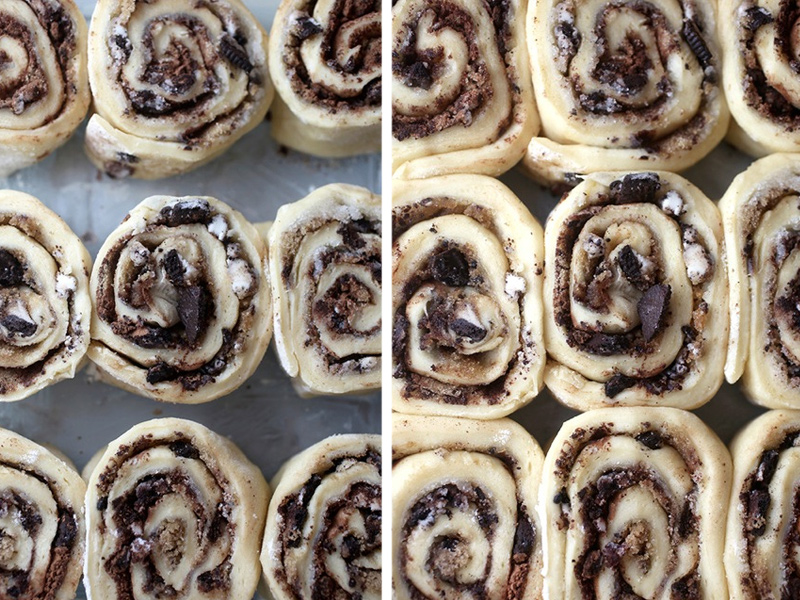
Before baking, allow the dough to rise again and then pop them in the oven for about 15 minutes at 375 degrees fahrenheit.
Ooooh yes and yum!
Yum yummier!
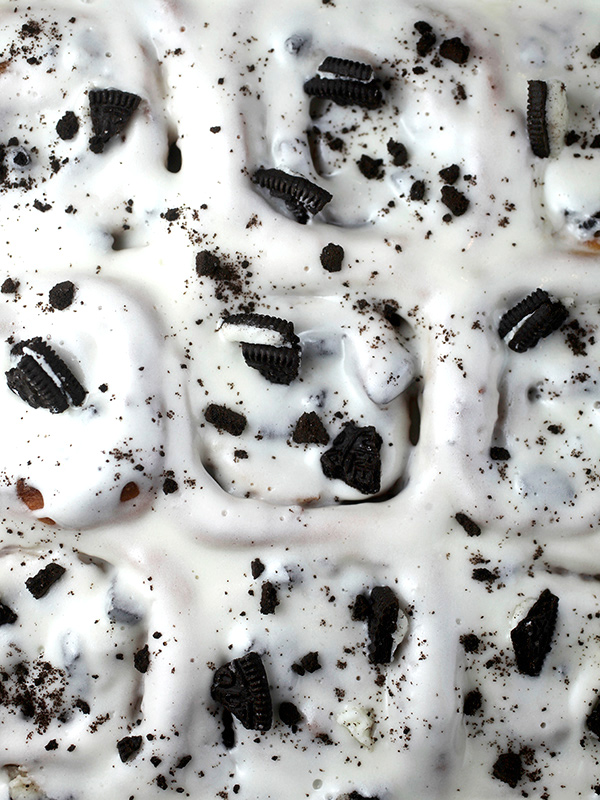
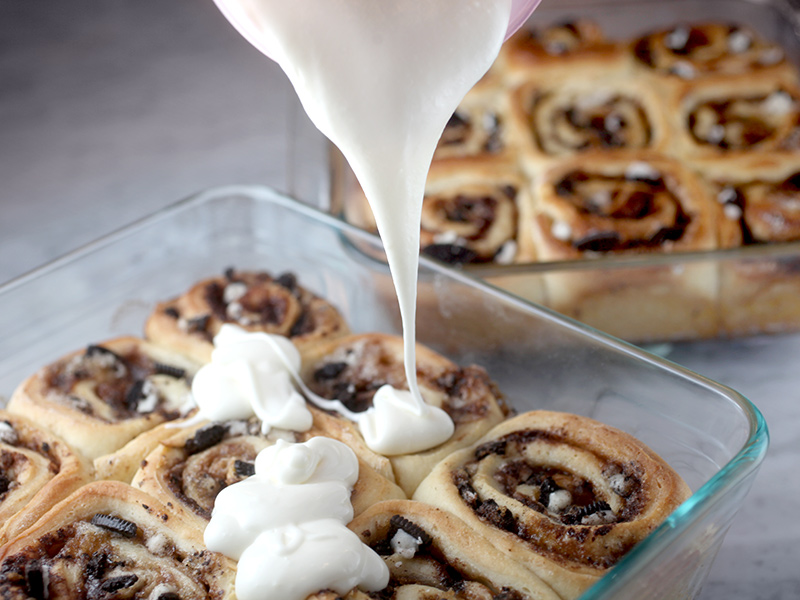
The rolls get covered in a cream cheese icing and then sprinkled with more cookie pieces and cookie crumbs.
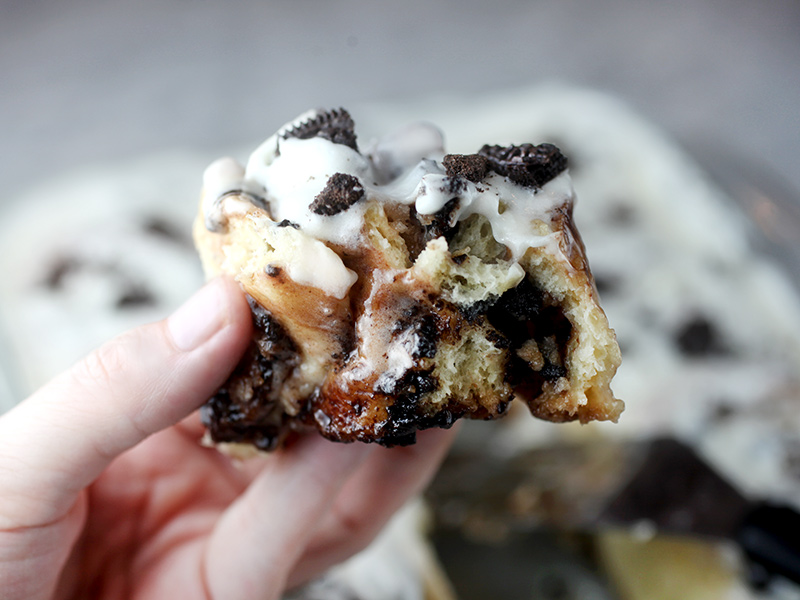
Makes every bite just right!
I made these Oreo Rolls using my Basic Cinnamon Roll Recipe and just switched up a couple of things:
Filling: Instead of cinnamon, sprinkle 2 tablespoons cocoa powder and 10 chopped Oreo cookies on the rolled dough.
Icing: Follow the instructions for the cream cheese icing variation and then sprinkle more cookie pieces and crumbs on top… about 4.
Enjoy!!!

January 18, 2016
Cookie Kisses
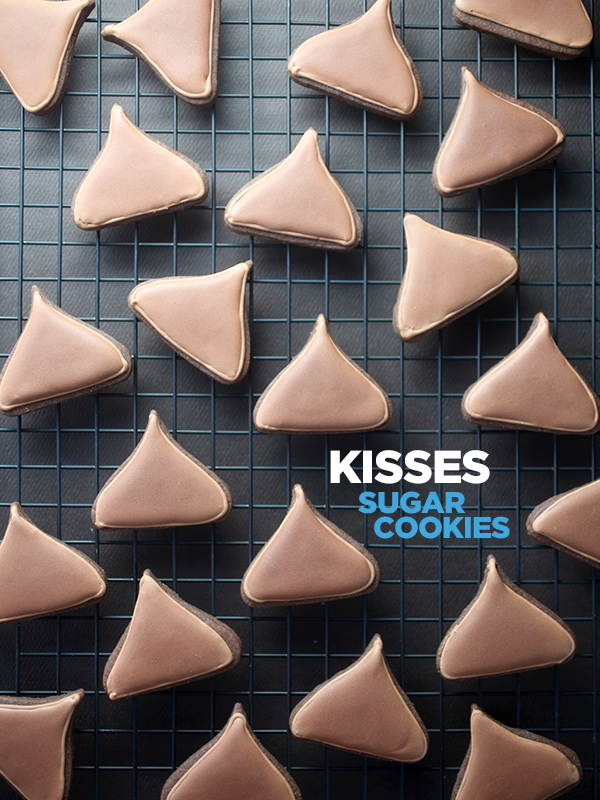
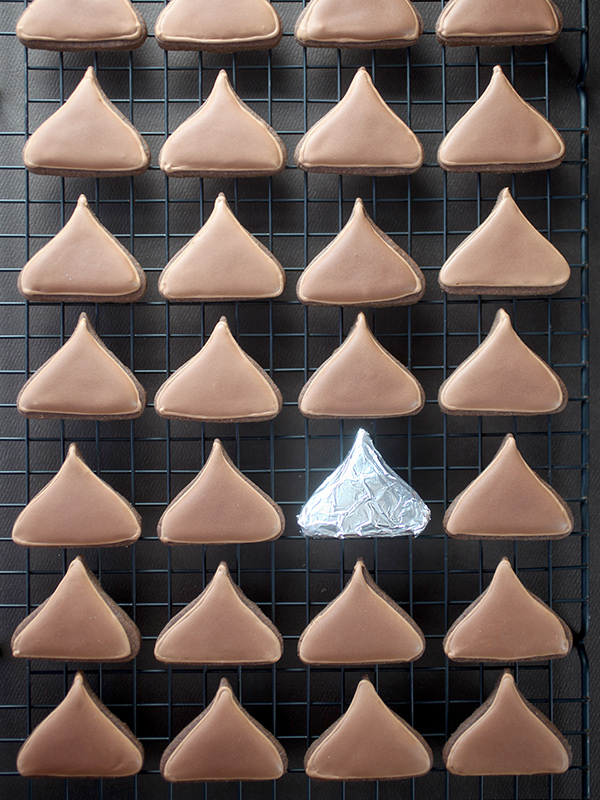
How cute are these chocolate sugar cookies. I mean … totally adorable for a Valentine’s Day treat don’t you think?!
You can use this sugar cookie recipe and directions for the dough. Just swap out 1/2 cup cocoa for 1/2 cup of the flour and then use all vanilla extract and you’re good to go.
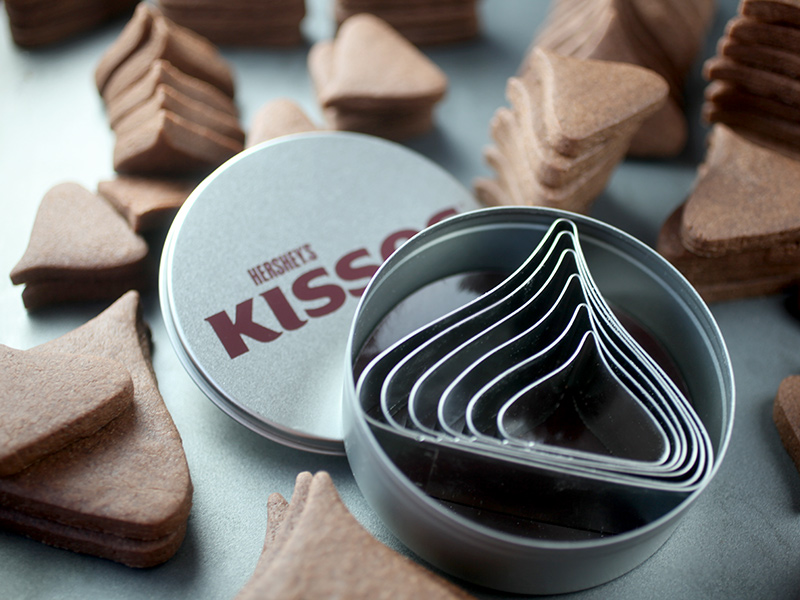
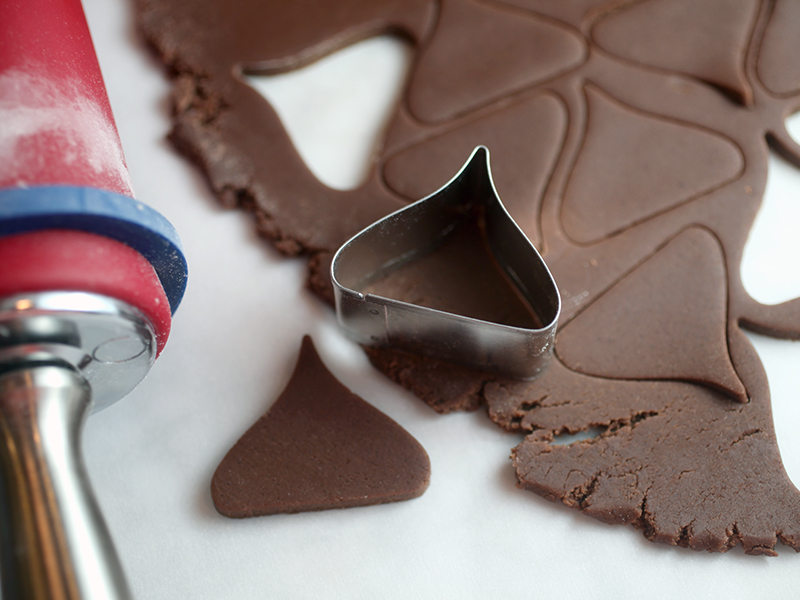
These are the cookie cutters I used. I love how many different sizes the candy shape comes in. And now that I’m done baking and photographing, they are proving hard to find on a google search. Go figure. So here are a couple of options for you if you want to make them, too.
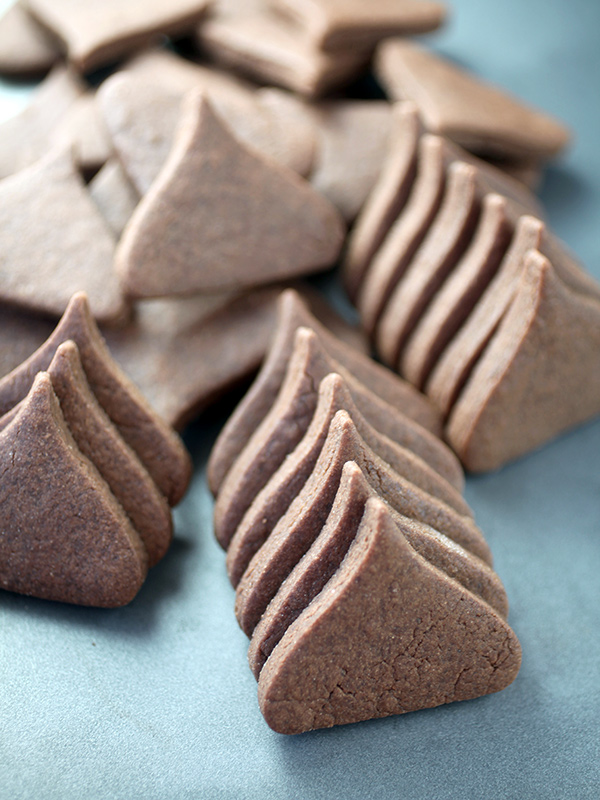
1. Just cut out triangle shapes from your cookie dough and pipe royal icing to create the iconic shape.
or
2. You can use a template to cut out your shapes from the cookie dough. Here’s a pdf that you can use to scale to the size you want.
Once baked, these little morsels are good enough to eat all by themselves or you can decorate them with royal icing.
Here’s the royal icing recipe I used. Just halve the ingredients … using all vanilla extract and chocolate brown icing color to tint.
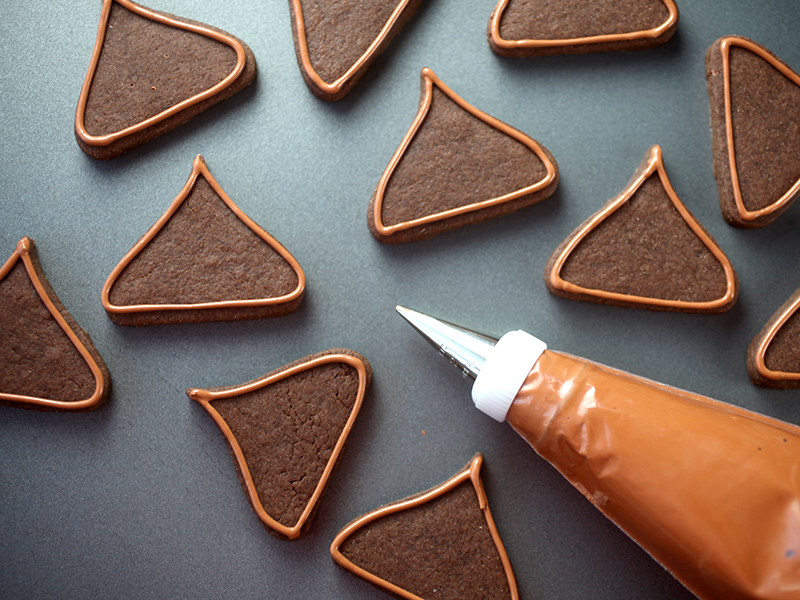
Outline the cookies with a thicker icing consistency using a #2 decorating tip.
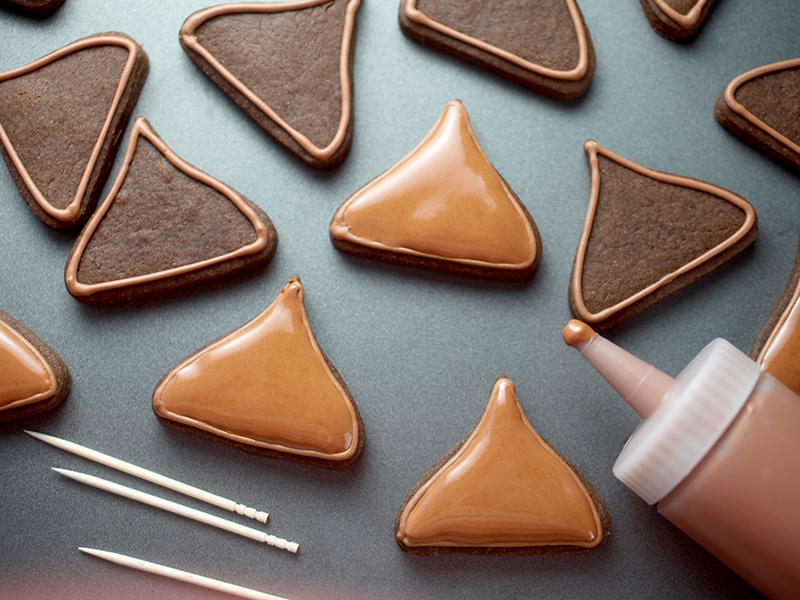
Then add a little water until the royal icing consistency is more fluid and you can easily fill in the shapes using a small squeeze bottle.
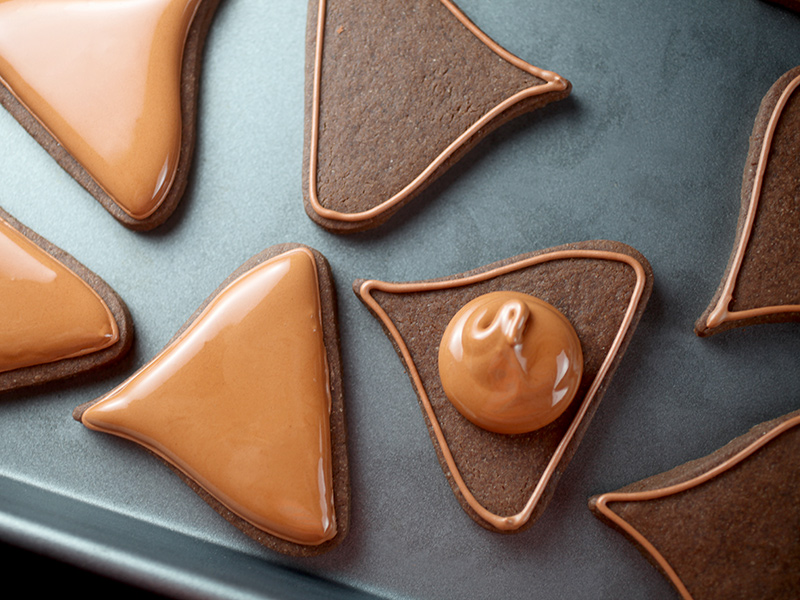
For bigger shaped cookies, I just spooned a small amount in the center and used a toothpick to coerce the icing and cover the cookie. Easy!
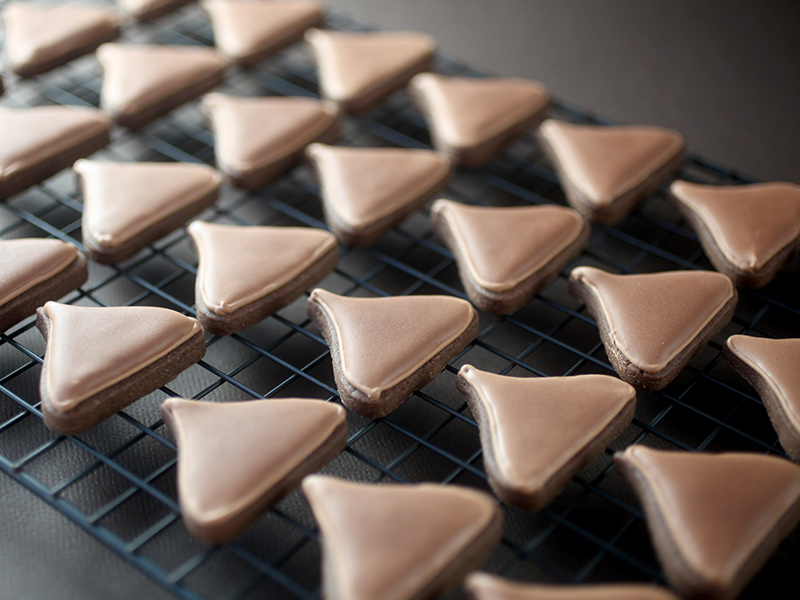
Now, let these little guys dry completely. That means overnight to make sure.
Because now, they’re getting all wrapped up for treating someone special.
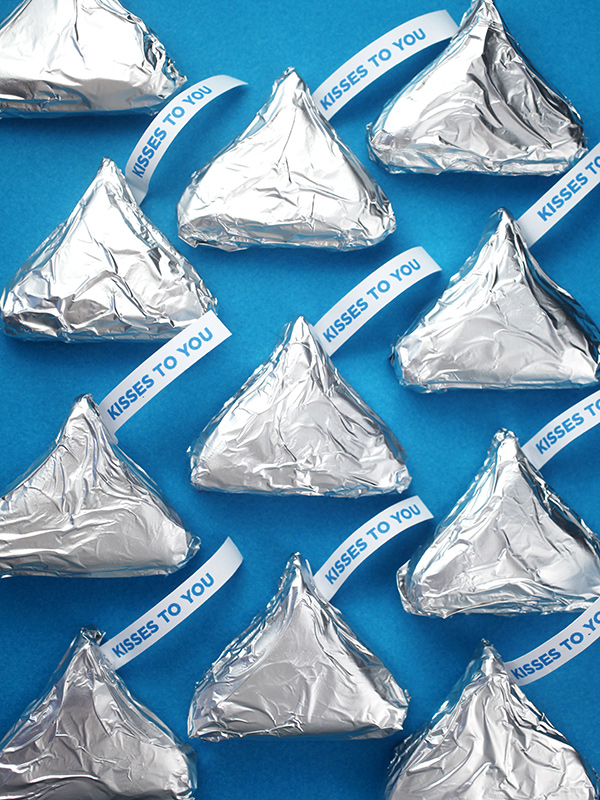
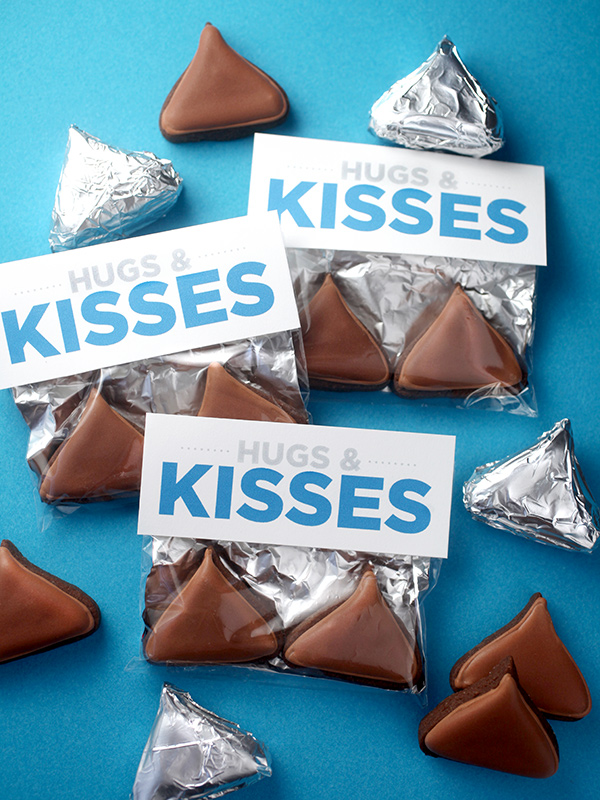
Kisses to You!
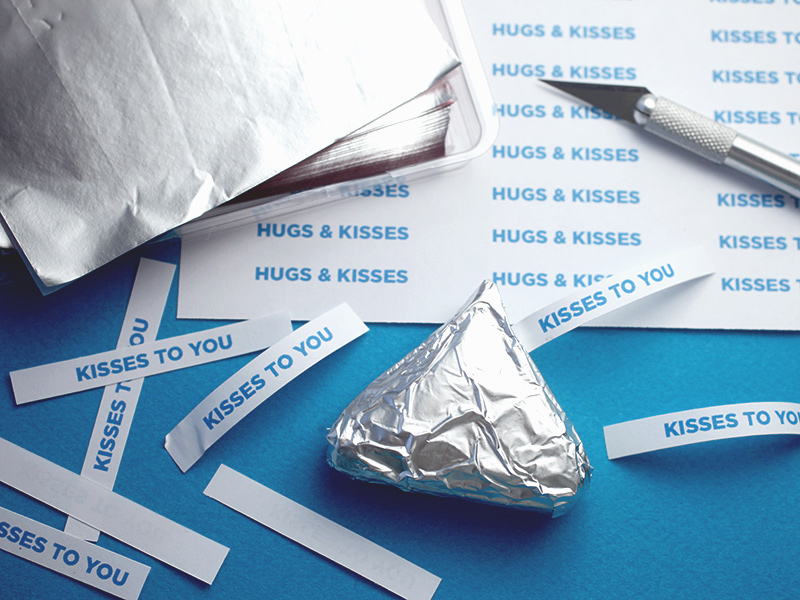
To package these cuties, you can use 4×4 inch square foil candy wrappers to cover the cookies. Foil candy wrappers are a great alternative to regular aluminum foil because the foil wrappers are super thin. Then just tuck a sweet saying inside.
Here’s a pdf for you that contains:
“Kisses to you” and “Hugs & Kisses” sayings that you can cut into strips.
And there’s a bonus label, too … you know … if you want to package them in treat bags instead of wrapping them up.
In the pic below, just tuck two cookies in the bottom of a 6 X 3.75 inch treat bag with a foil candy wrapper placed behind them. Trim the top of bag as needed to reduce the height and then fold the label over attaching to the front and back of the treat bag with double-sided tape.
xoxo … and enjoy!

January 10, 2016
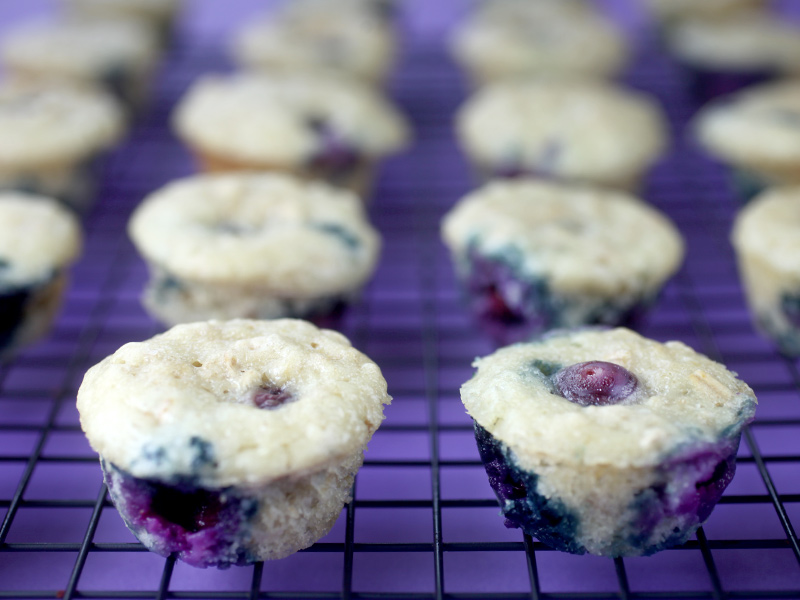
Blueberry Pancake Poppers
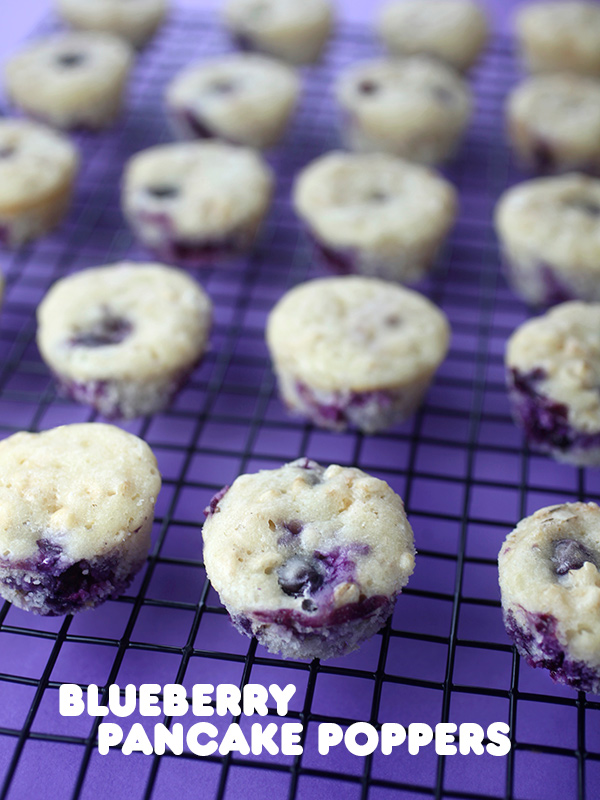
Here’s an easy breakfast bite treat to try. These are blueberry pancakes baked in mini muffin shapes. You know … to make mornings fun and dunkable.
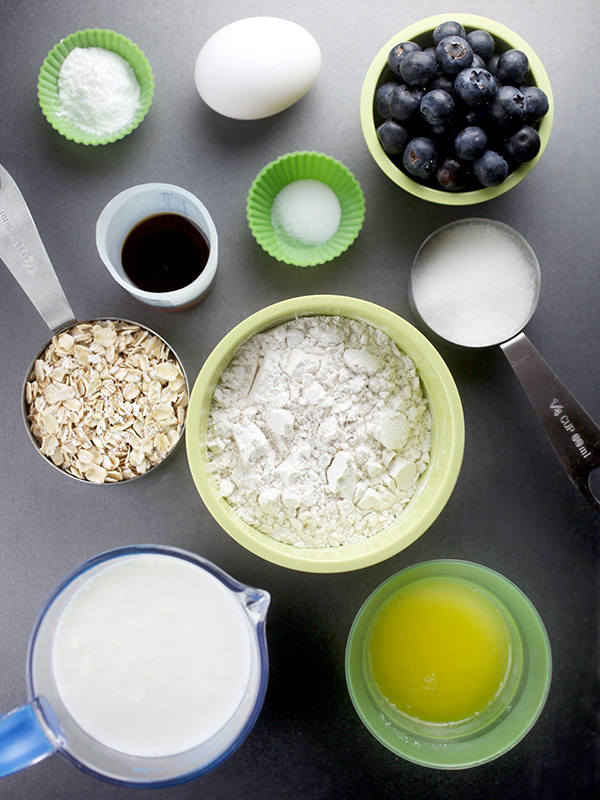
You just need a few baking basics for the pancake batter.
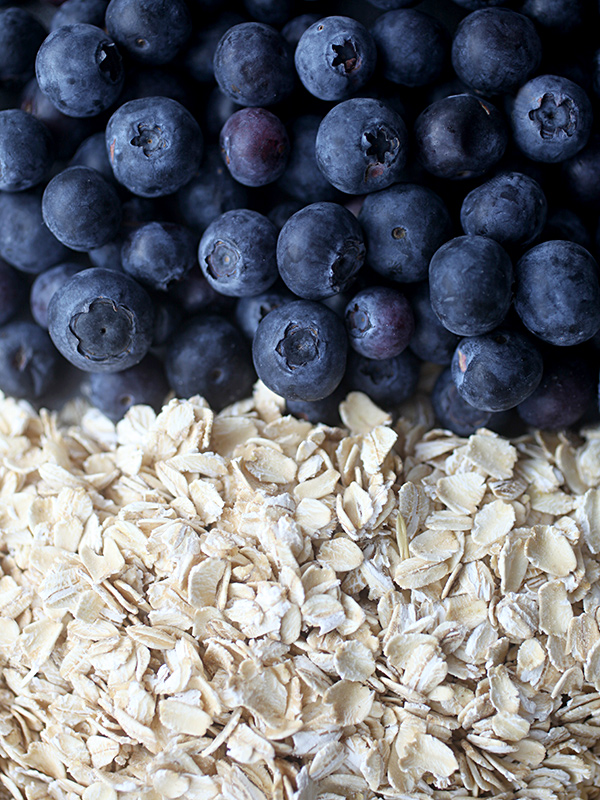
I’ve added mini chocolate chips to these before and loooove them (see here), but this time I’m all about blueberries and oats as the add-in ingredients.
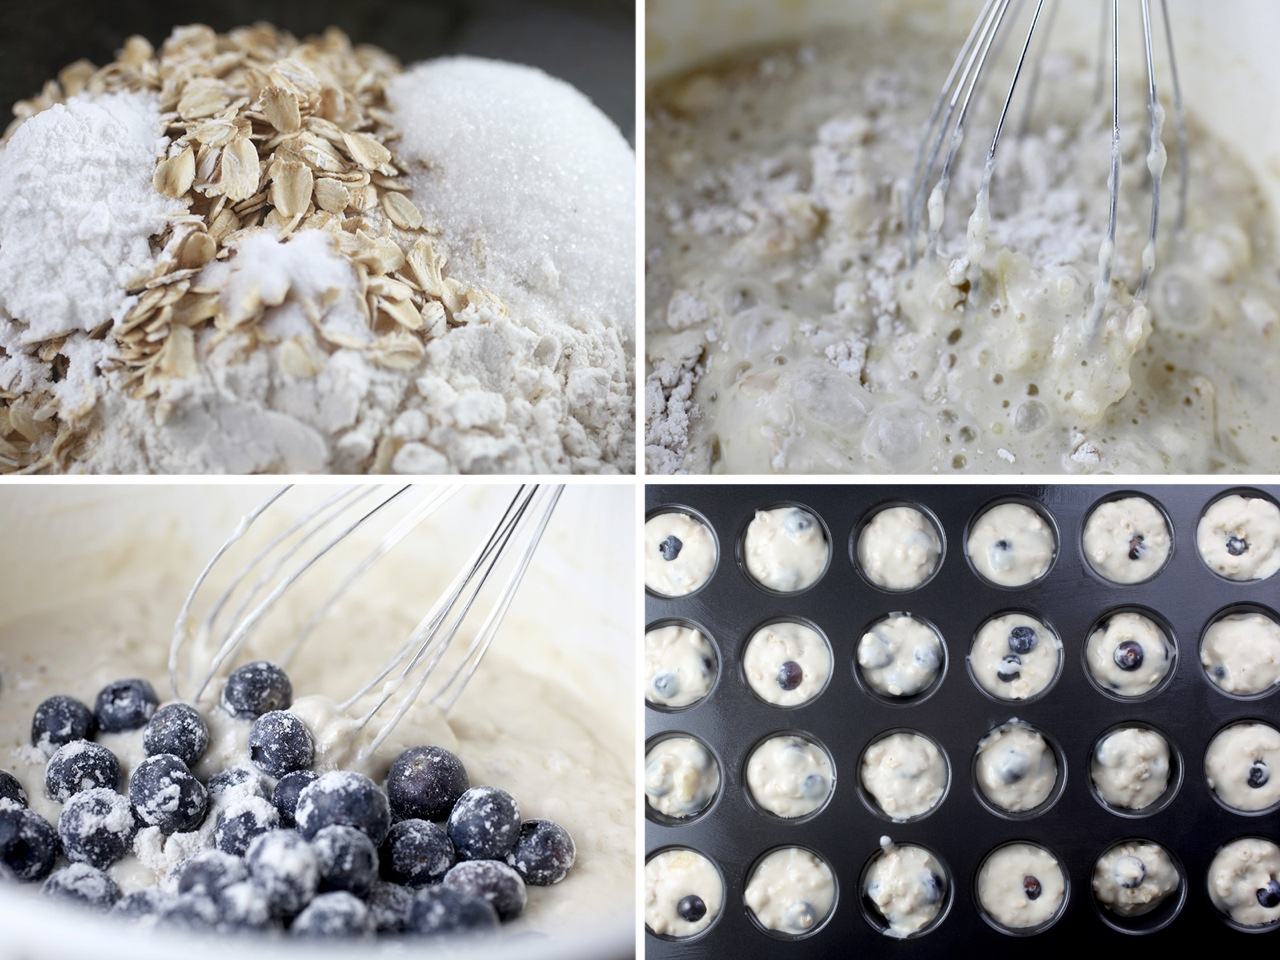
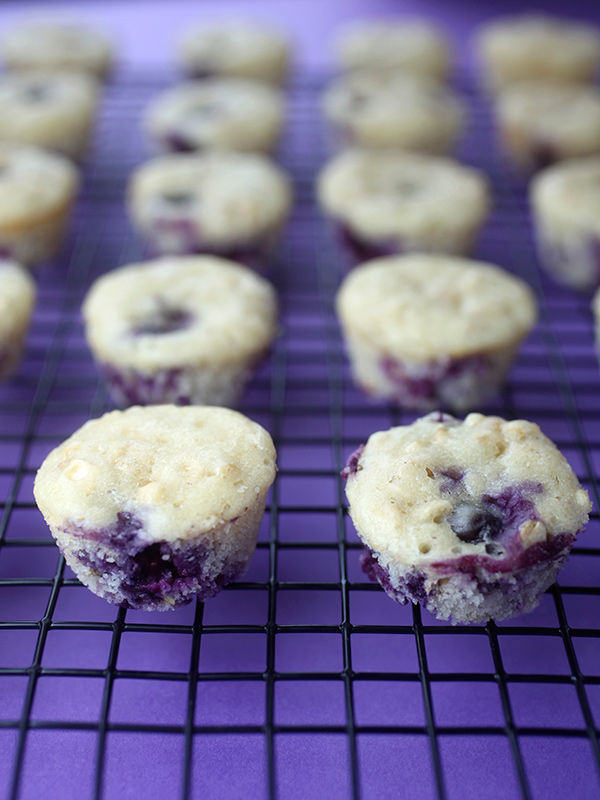
Just mix all the ingredients together and then scoop the batter into the cavities of a greased mini muffin pan.
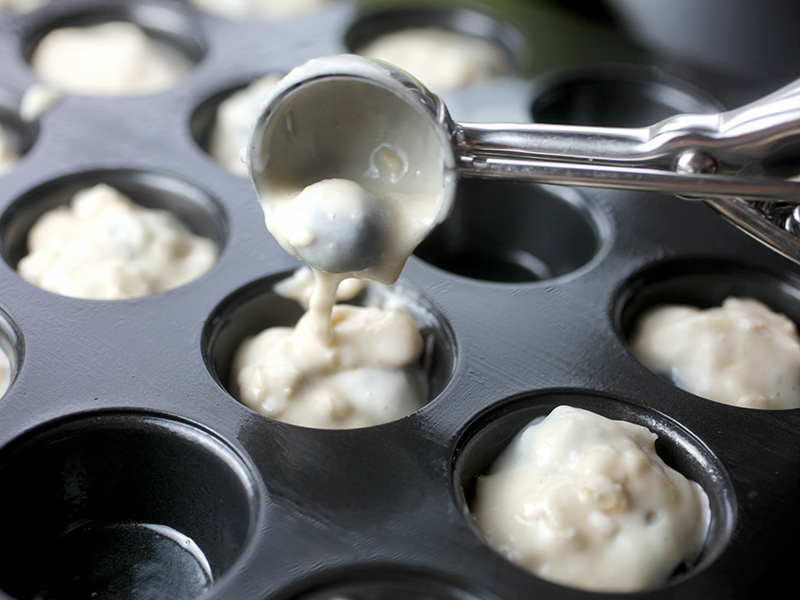
This is way easier than flipping flapjacks a few at a time.
After baking, use a toothpick if necessary to run around the edges of the muffins while still in the pan to make them easier to remove.
Serve them right away with melty butter or maple syrup …
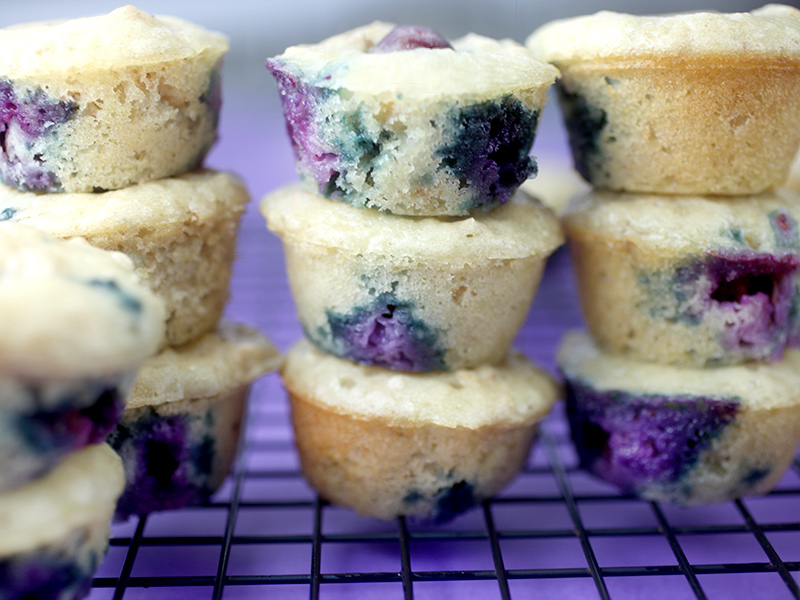
Or stack some up to save for later. Freeze them a few at time for a quick morning meal.
Mini Oatmeal Blueberry Pancake Poppers
1 cup all purpose flour
1/2 cup rolled oats
1 teaspoon baking powder
1/2 teaspoon baking soda
1/4 teaspoon salt
2 tablespoon sugar
1 cup buttermilk
1 egg
2 tablespoon maple syrup
2 tablespoon melted butter
1 cup blueberries
(makes 24 mini pancake poppers)
Preheat oven to 350 degrees and grease mini muffin pan.
Combine flour, oats, baking powder, baking soda, salt and sugar in a medium bowl. Stir together with a wire whisk.
In another bowl, stir buttermilk, egg, maple syrup and melted butter until just combined. Add wet ingredients to dry ingredients and stir with a spoon until combined.
Stir in blueberries. Reserve a few blueberries to press into the tops of the pancake batter. Bake for 10-12 minutes.
Let cool slightly and remove from the pan. You can use a toothpick inserted around the edges to separate the pancake muffins from the pan.
Serve immediately with warmed butter or dip in maple syrup. You can also freeze and remove a few when you need them for a quick on the go breakfast.
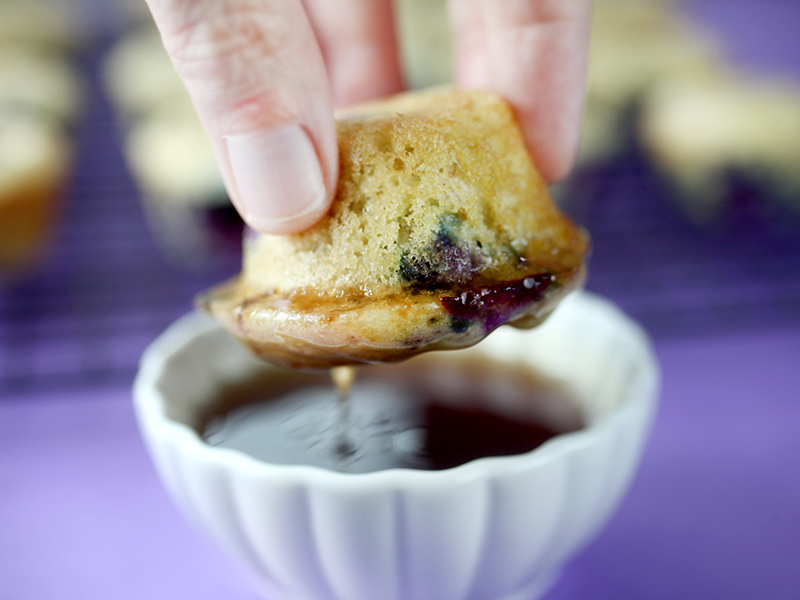
Dunk away and enjoy!!!

Bakerella's Blog

- Bakerella's profile
- 9 followers

