
Bakerella's Blog, page 11
December 12, 2017
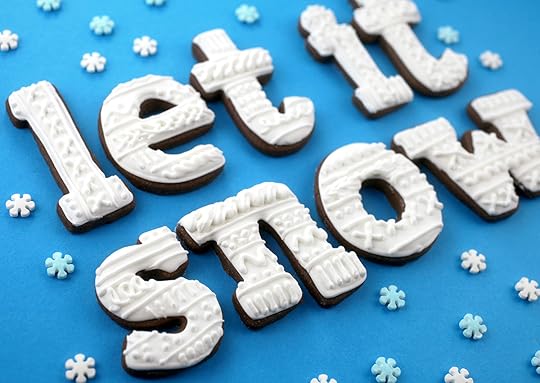
Christmas Letter Cookies – Four Ways
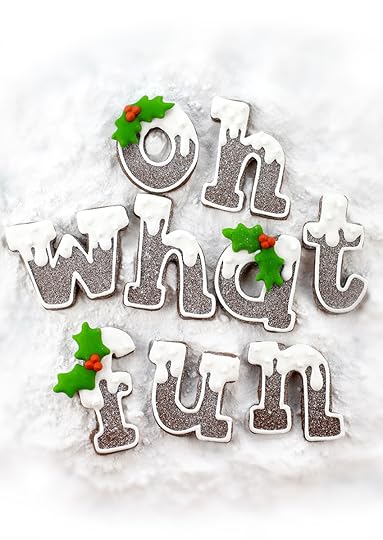
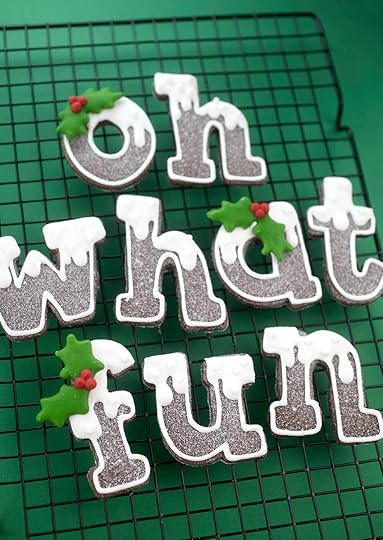
Oh what fun is right! I made sweet sayings for the holidays using the cutest alphabet cookie cutters and just three royal icing colors to decorate chocolate sugar cookies four different ways.

The cutters are from my friend Sweet Sugarbelle’s product line and I love all the lowercase letterforms.
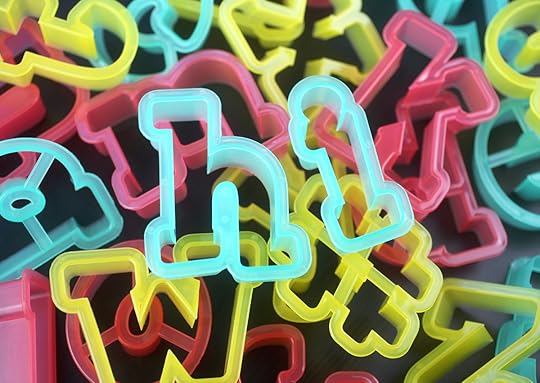
They make an adorable alphabet.
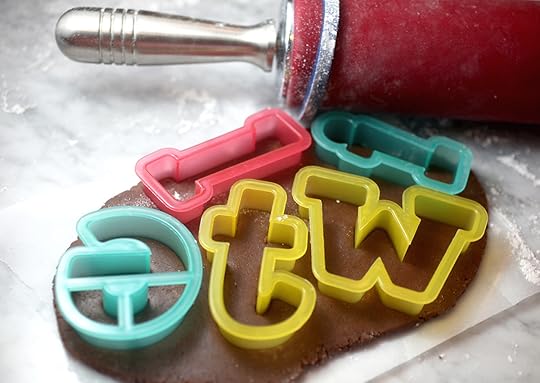
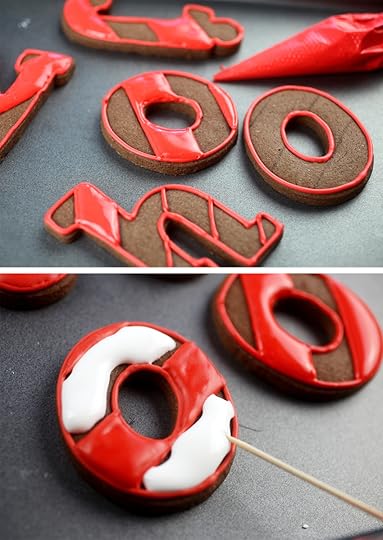
The sugar cookie and royal icing recipe I used is right over here. But, I made the cookies chocolate to accentuate the first design that’s below. Just substitute a 1/c cup of flour for 1/2 cup of unsweetened cocoa in the linked recipe.
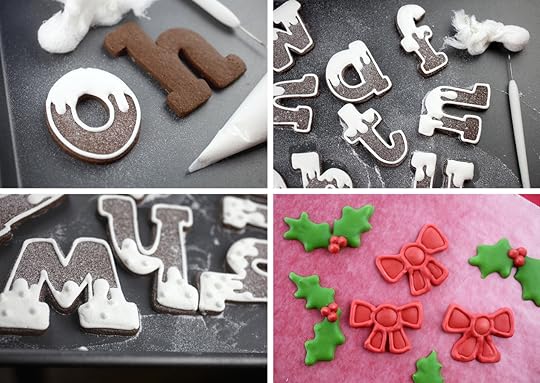
To decorate these cookies, pipe white royal icing to outline the shapes of the letters and then pipe drips on the tops of the letters. Fill in the dripping area using a more fluid/flood consistency of the royal icing.
To make the cookies look like they have a light dusting of snow on them, I used a cheesecloth filled with a small amount of this non-melting sugar and shook it over the cookies. This gave me more control on the amount and evenness of the sugar that covered the cookies. Once the tops were dry I also added a few dots of royal icing on each letter.
Oh yeah, the holly. I made red and green royal icing decorations to attach to the cookies. Pipe green holly leaves on wax paper and when somewhat dry, pipe berries on top. Let these dry overnight before removing them from the wax paper so they don’t break. And if you save a little royal icing in an airtight container, you can use it to glue the holly to the cookies.
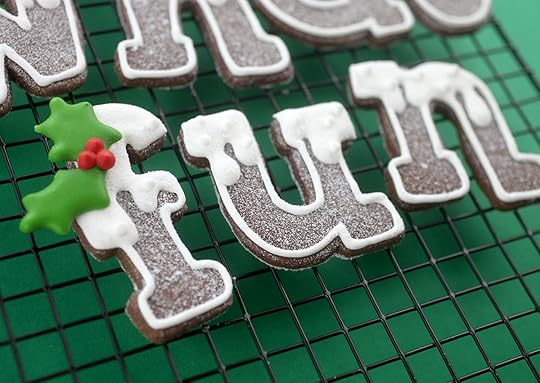
Fun fun!
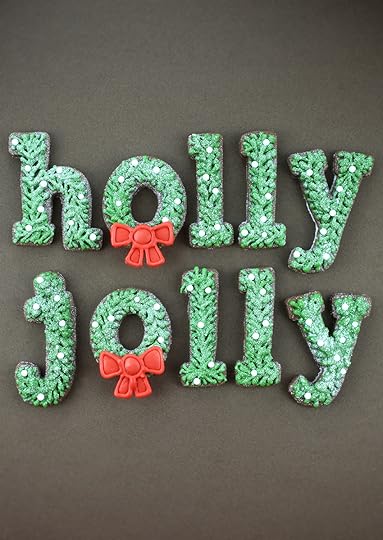
These jolly cookies were inspired by Christmas tree branches. I used a stiffer piping consistency of royal icing for the branches and tinted it green. The bows were piped on wax paper (like the holly decorations above) and attached to the cookies the next day once the bows were completely dry.
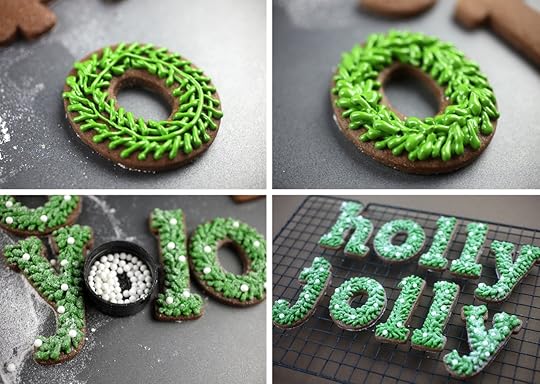
To pipe the branches, layer lines of thicker consistency royal icing all around the cookies. Let layers dry a little before adding the next helps the icing not blend together into a blob.
Dust the tops of the cookies with non-melting sugar wrapped in a cheesecloth like the “oh what fun” cookies above and then attach white sugar pearls to decorate.
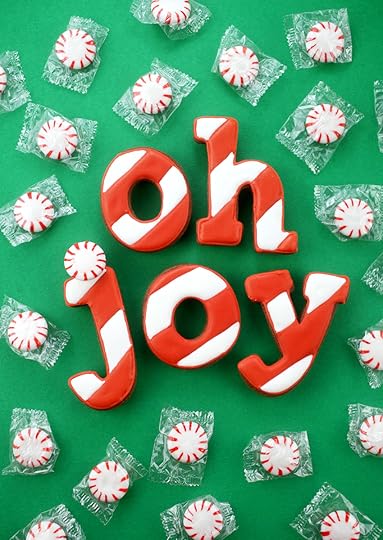
For the this easy design, I just used alternating white and red royal icing to look like candy canes and then dotted the J with a peppermint candy.
Before decorating, you can use a black edible ink pen and an offset spatula as a guide to draw evenly spaced stripes on top of the cookies. Outline the cookies in red royal icing and then pipe the diagonal lines. Fill with red flood consistency icing first and then fill in the alternating areas with white.
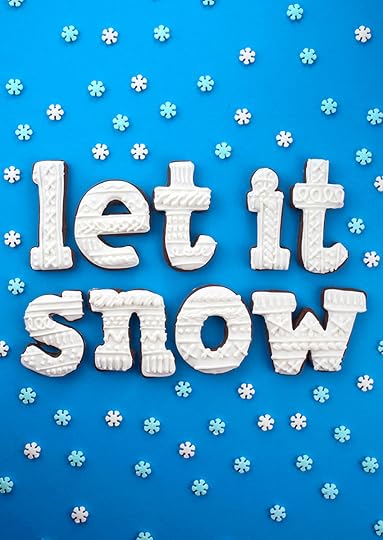
Sweater Letters! These cold weather cookies look cute and cozy.
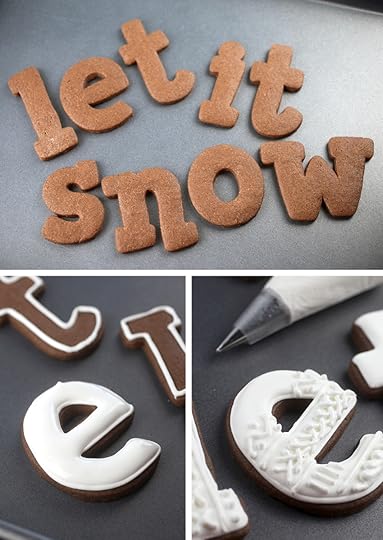
Pipe and fill the cookies with white royal icing and let them dry completely. Once dry, pipe parallel lines, criss crosses, dots and loops on top to imitate the look of a big bulky sweater.
That’s it! Four fun ways to decorate letter cookies with just a few colors.
Hope you enjoy!


November 26, 2017
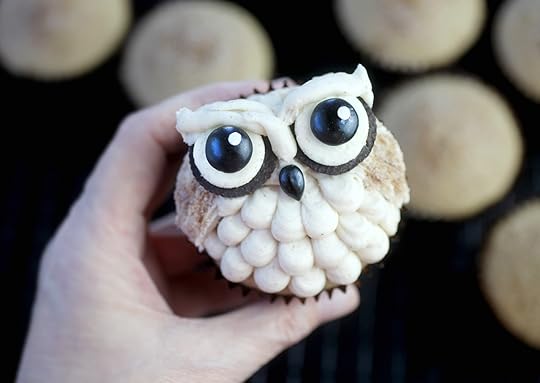
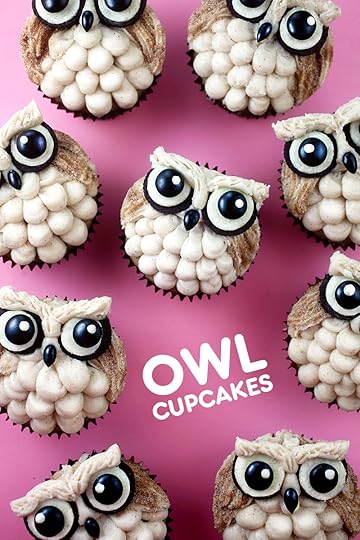
Easy Owl Cupcakes
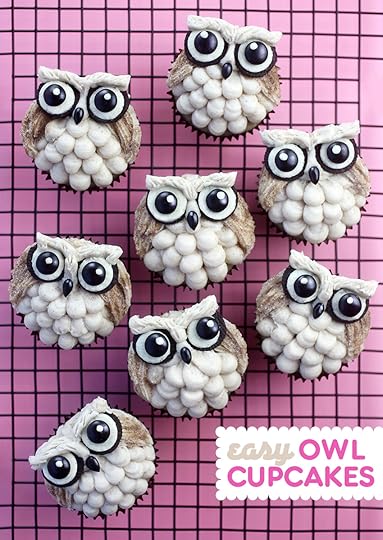
Hoot Sweet! These cupcakes are owl-out adorable with their oreo eyes and plumes of buttercream.
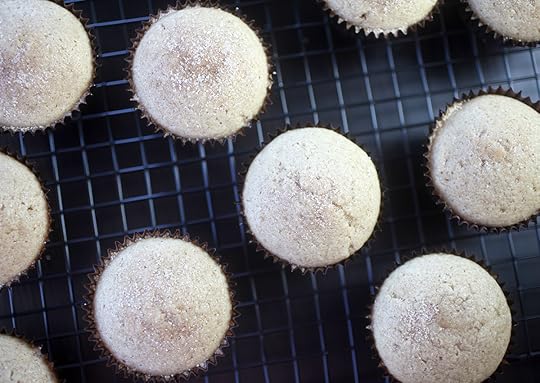
And these cinnamon sugar cupcakes don’t hurt either. They’re the perfect canvas to decorate with just buttercream and a few edible add ons to make little owls. Want to see?
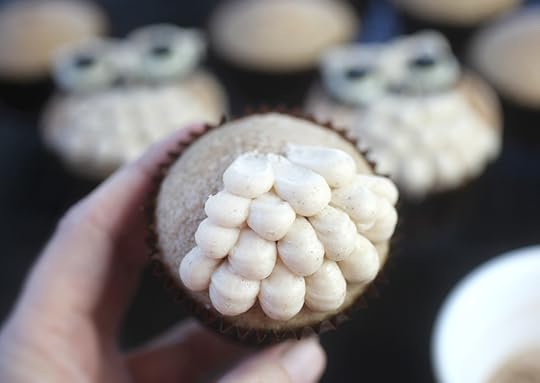
Start by using a small round #10 decorating tip. Pipe about 5-6 big dots of buttercream around the bottom edge of the cupcake top. Pipe and pull the frosting into a thin layer. Then pipe another row on top of the first row. Continue piping rows of dots into somewhat of a triangular shape.
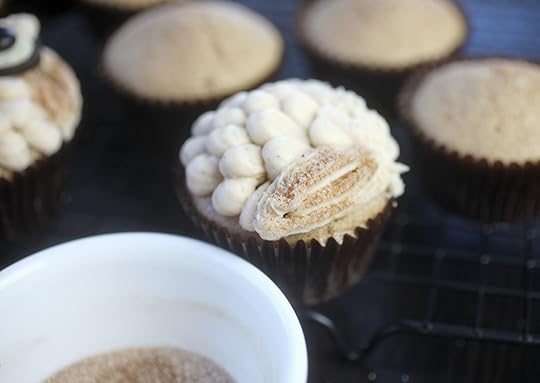
For the wings, use a #18 tip to pipe frosting on either side of the owl’s chest (covering the rest of the cupcake surface) and then sprinkle cinnamon sugar over the wings for texture.
Now it’s time to put the faces on. Yep! We need some big eyes.
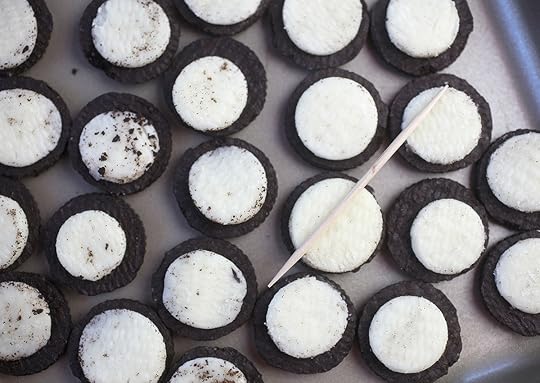
They’re made using Oreo Minis. And if you’ve ever opened a bag of these and separated the cookies, then you know they are dappled with cookie crumbs. To fix that, you can chill the cookies and then use a toothpick to gently brush or scrape off the crumbs.
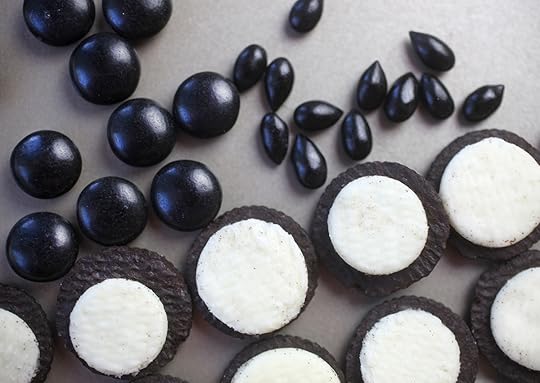
Much better! Use black candy gems or M&M’s for the owl’s pupils. Just press one into the middle of each cookie creme center.
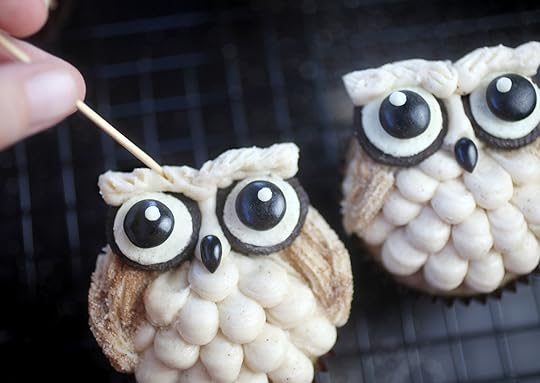
To bring it all together, use the round decorating tip again and pipe a line of frosting down the center of the cupcake, starting from the top row of chest feathers toward the top of the cupcake. Then press the cookie eyes in position on either side of the piped line and add a black sunflower seed for the beak. Finally pipe a buttercream brow over the top of the two cookie eyes and use a toothpick to add texture.
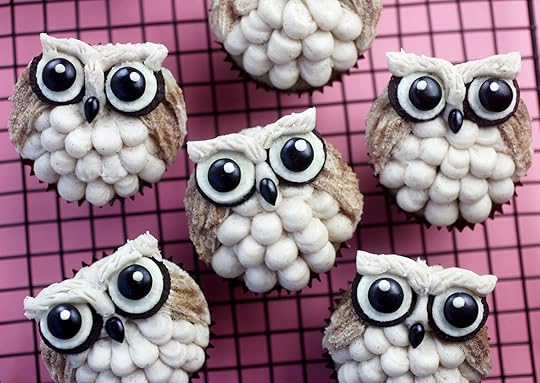
See… so cute!!!
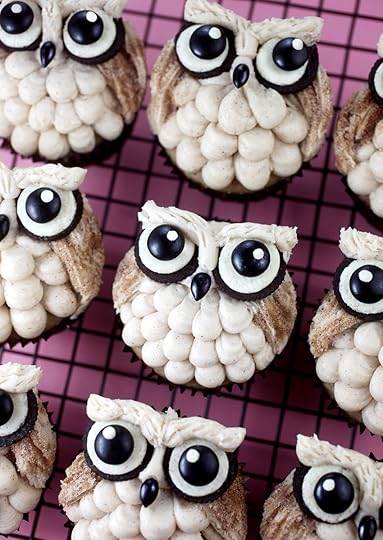
The eyes have it!

Print Recipe
Yield: 12 cupcakes
Cinnamon Sugar Cupcakes
Ingredients:
Cupcakes:
1-1/2 cups all purpose flour
1 teaspoon baking powder
1-1/2 teaspoons cinnamon
1/4 teaspoon salt
1/2 cup butter, room temperature
1 cup sugar
2 eggs
2 teaspoons vanilla extract
2/3 cup milk
Frosting:
1 cup butter, room temperature
16 oz confectioners sugar
1 teaspoon cinnamon
1 teaspoon vanilla
1-2 teaspoons milk
Directions:
Preheat oven to 350 degrees Fahrenheit and line cupcake tray with paper liners.
Sift flour, baking powder, cinnamon and sugar together in a medium bowl and set aside.
Using a mixer, cream butter and sugar until light and fluffy.
Add eggs, mixing each until just combined. Add vanilla extract and mix.
Slowly add flour mixture in three additions, alternating with milk in two additions.
Divide batter into prepared paper liners and bake for 18-20 minutes. (Sprinkle a little cinnamon sugar mixture on top of the warm cupcakes if desired.)
For cinnamon sugar frosting: Beat butter and cinnamon on medium speed until combined. Add confectioners sugar in several additions starting on low and then increasing speed to medium. Scrape down sides in between each addition. Add vanilla and mix until combined. Add 1-2 teaspoons of milk until desired consistency.
Enjoy!

November 13, 2017
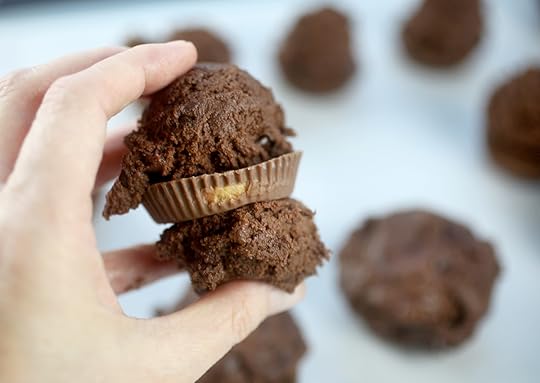
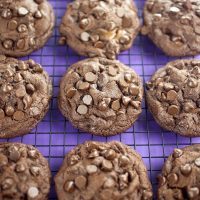
Peanut Butter Cup Stuffed Chocolate Cookies
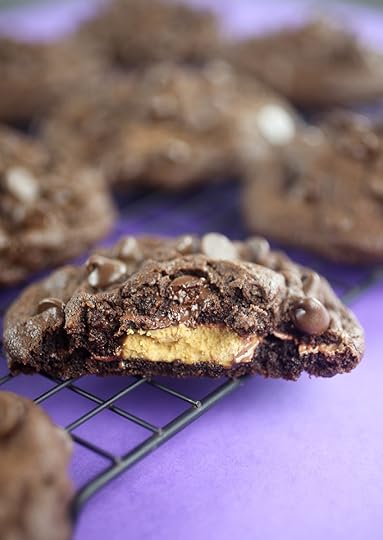
This is what happens when I buy too many bags of Reese’s peanut butter cups to hand out for Halloween. So instead of stuffing my face with those leftover little cups of peanut butter comfort, I’m stuffing them into these jumbo chocolatey chocolate chip cookies to share with friends.
Oh my! oh my! Look at these beauties.
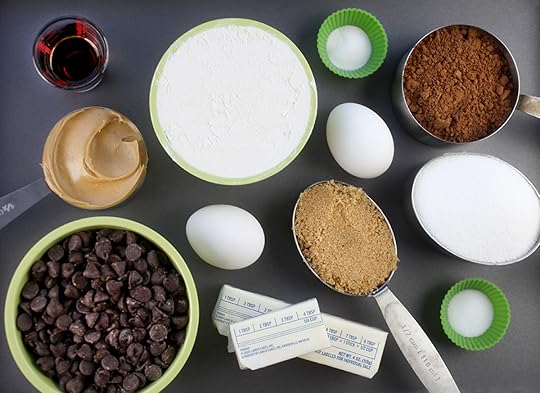
Cookie dough ingredients! The dough also has a 1/2 cup of peanut butter mixed inside for extra yum.
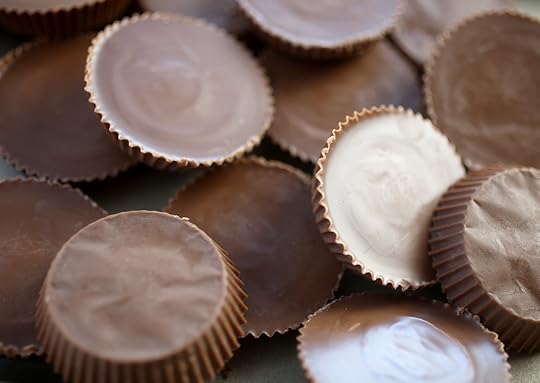
And let’s not forget the main attraction. You’ll need a dozen regular size Reese’s peanut butter cups.
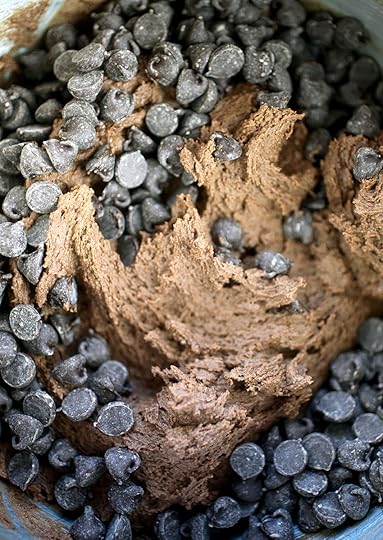
Mix the cookie dough and stir in half of the semisweet morsels. Save the other half to press into the cookies before baking.
Get the scoop. A 1 1/2-inch cookie scoop that is. Place one scoop of dough on top of the candy cup and one on the bottom. Then press together and press the seams together around the edge. Oh yeah, chill the dough for about 30 minutes first to make it easier to work with.

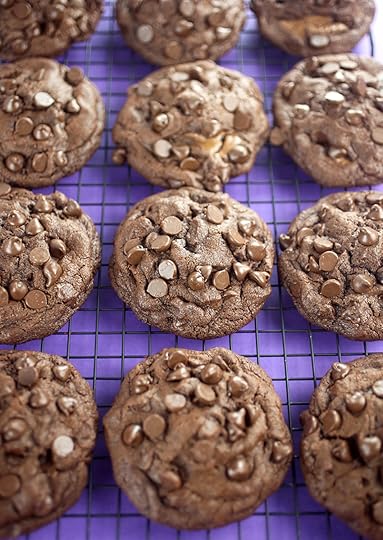
Then take each cookie dough covered candy cup and press into a cup filled with the rest of the morsels. If you have any remaining morsels, press a few onto the sides and bottoms as well.
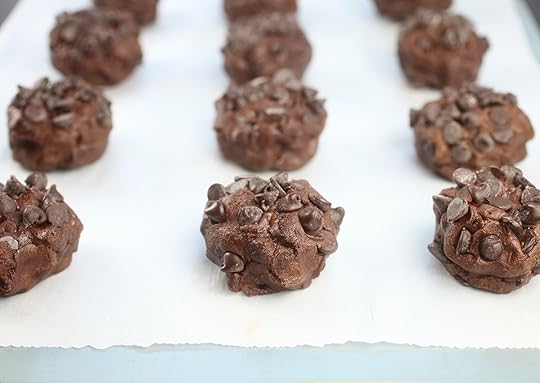
Sitting pretty and ready to bake.

Bake for about 15 minutes and you’ll end up with these jumbo stuffed surprise-inside chocolate cookies.
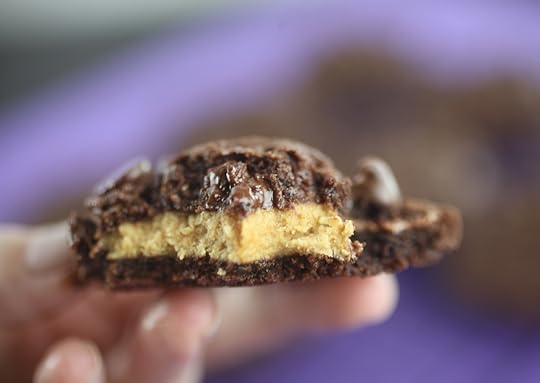
Yum! Yum! Yes!
Print Recipe
Yield: 12 jumbo cookies
Peanut Butter Cup Stuffed Chocolate Cookies
Ingredients:
1 1/2 cups all purpose flour
3/4 cup natural unsweetened cocoa
3/4 teaspoon baking soda
1 1/2 sticks butter (I used salted), at room temperature
1/2 cup creamy peanut butter
1 cup granulated sugar
1/2 cup packed light brown sugar
2 eggs
2 teaspoons vanilla
2 cups (12 oz pkg) semisweet chocolate morsels
12 Reeses peanut butter candy cups (regular size)
Directions:
Sift flour, cocoa, and baking soda together in a medium bowl and set aside.
In a stand mixer, cream butter, peanut butter and both sugars until light and fluffy.
Add eggs and vanilla to butter mixture and mix until incorporated.
Slowly add flour mixture in three additions, mixing each until combined. Scrape down sides of bowl and mix again to incorporate.
Stir in 1 cup of the chocolate morsels, reserving the rest.
Chill dough and peanut butter candy cups for 30 minutes.
Preheat oven to 350 degrees Fahrenheit and line baking sheet with parchment paper.
When dough is chilled, scoop mounds of dough on to the top and bottom of each chilled candy cup.
Press dough together and make sure the edges are sealed. Then press the tops of the cookies in a small bowl containing the remaining morsels. When done, adding morsels to the tops, press any remaining morsels on the sides and bottoms of cookie dough balls.
Place 3 inches apart on prepared baking sheet. Bake for 13-15 minutes. Cool for about 10 minutes (if you can wait that long) before stuffing your face. Note: I baked the cookies in two groups to make sure I had enough room on the baking sheet for them.
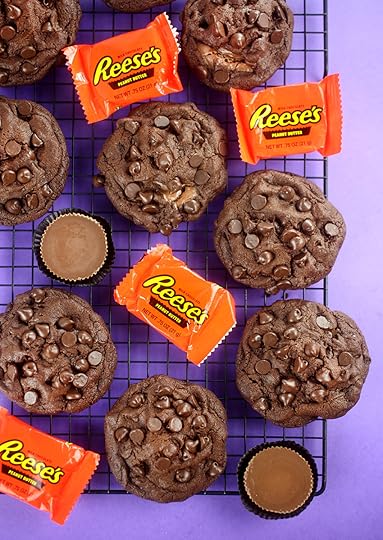
Oh and here’s a pic for a little cookie-to-candy cup reference. The peanut butter cups melt and flatten just a bit, helping make these some big beautiful chocolate cookies.
Enjoy!

October 31, 2017
Ten Years!!!
Hip Hip Hooray! I’m celebrating ten years of tiny treats today. That’s right TEN YEARS of baking and blogging and Bakerella. I can hardly believe it. I mean when I started this blog a decade ago, I had no real intentions of doing anything other than keeping track of some baking attempts. The excitement I felt for decorating desserts kind of took over my entire being though. It was all I could think about and all I spent my spare time doing. I say spare time, because I’ve been doing everything over the past ten years while also working a full-time job. My excitement for creating and desire to make others smile has kept me inspired and ultimately led to some pretty unexpected adventures and experiences along the way that I will cherish forever. Want to take a stroll down memory lane with me? Okay, let’s go!
My first baking project
Just to give you an idea where things started, on the left are the first cupcakes I posted from Halloween back in 2007. Black cats – and beside them are some I posted just last week. Things have definitely come a long way since then.
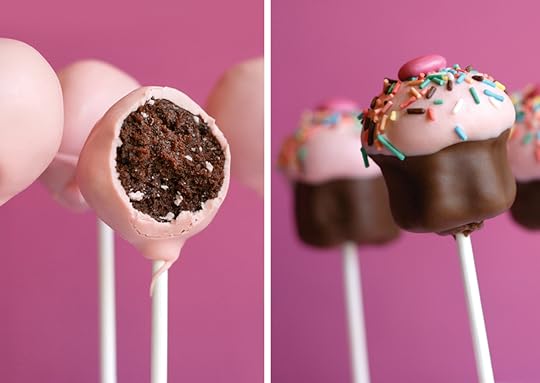
The First Cake and Cupcake Pops
That following January, I posted my cake pops for the first time. And then my cupcake pops. I didn’t know it then, but these two posts would completely change the course of my life in ways I could never imagine.
Baking with Martha
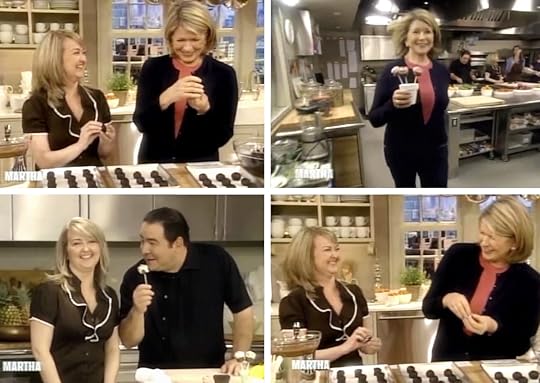
… Like appearing on the Martha Stewart Show less than six months after my first blog post. This was completely crazy! Oh my gosh I have never been more nervous about anything in my life. The funny part back then was that at the time I had not told anyone I had started a blog or was even baking treats. So for friends and family it came as quite a surprise when I told them that I was going to go to New York to be on the show.
Visiting the Pioneer Woman
In 2009, the Pioneer Woman invited me to her ranch for a few days to bake and have a cake pop party. It still feels like yesterday and remains one of my favorite experiences. I can remember people who weren’t familiar with Ree or blogging that much at the time being confused that I was going to go to Oklahoma to stay with a woman from the internet that I had never met – in some house on her land. But it’s the Pioneer Woman I would tell them. You need to go read her blog! Here’s all the fun we had.
A Surprise Wedding Proposal
Say hi to Melissa and Rich. Okay, this just makes me all happy inside. Years ago, Rich, someone I had never met, emailed me and asked me to help him propose to his girlfriend. We planned and plotted and popped the question through one of my blog posts. Being a part of someone’s biggest moments in life is incredibly humbling. Here’s the proposal, her answer and a year after. Hugging you guys!
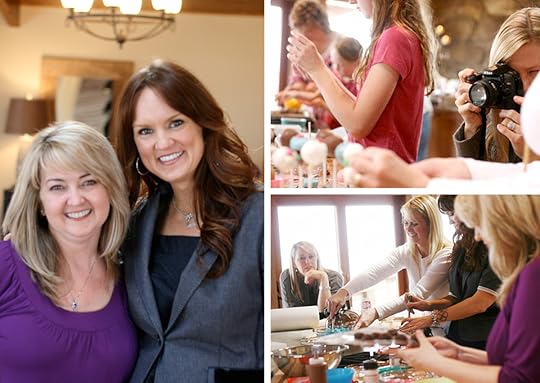
Friends, food and fun
Over the years, blogging has given me more than a bunch of baked goods. It’s given me the opportunity to travel, meet talented people and make some of the sweetest friends.
Emmy’s Fun
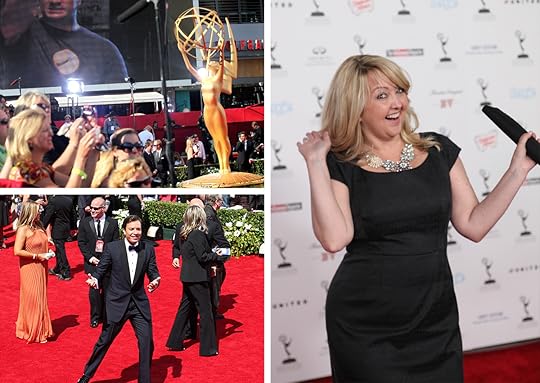
One of the trips I went on was this Emmy’s Red Carpet experience. OMG, this was soooo fun. The night before the red carpet was a party with some of that year’s nominees. Watching the red carpet festivities the following day with all the celebrities as they walked by was pretty exciting, too. This was so not my average day. (Neither was this trip to Betty Crocker Headquarters to be featured on one of their magazine covers.)
Cake Pops by Bakerella – The book!
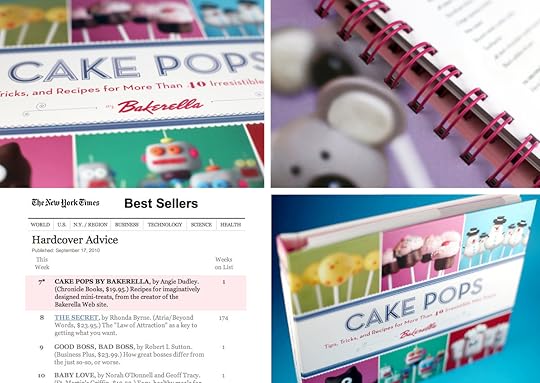
In September of 2010, Cake Pops by Bakerella was published by Chronicle Books. It’s funny now, because before blogging, I had never, ever thought about writing any kind of book, being an author, or anything like that. But, as I kept posting my cake pop creations on the site, I had tons and TONS of questions, inquiries and interest from all over the world. It was overwhelming. My nights were spent answering emails and trying to help people make their own pops, too. It was a natural progression to put a book together. A ton of work, but so worth it. The book even made the New York Times Bestsellers list. Again, not real life.
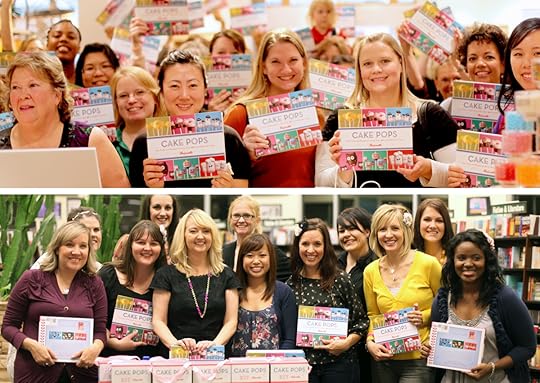
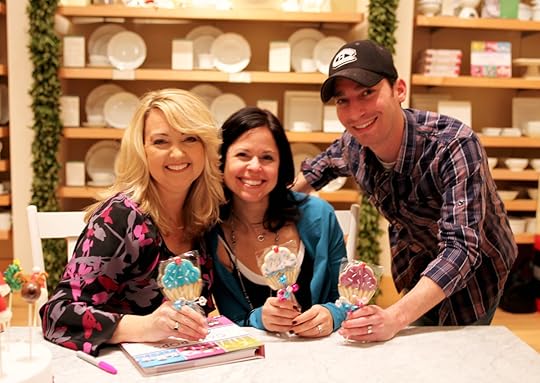
Book Signings – THE BEST!!!!!!!!
When the book launched, I started out on a book tour at Williams-Sonoma stores. The book signings are by far some of my absolute favorite memories. I laughed and cried, hugged and spent time with so many sweet and happy people. I wish I could bottle up the feelings and happiness I felt during those weeks and share it with each of you. Euphoric. During the signings, I tried to take pics with everyone that attended because I wanted to remember every bit of it. Here’s a link to all the signings if you attended one and want to check out your photo.
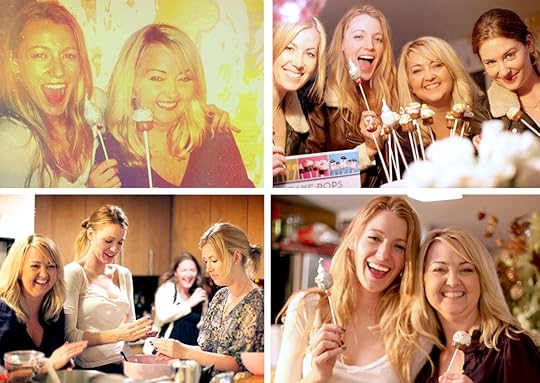
Baking with the VERY sweet Blake Lively
In the middle of my book signings, I had an unexpected adventure pop up. Blake Lively invited me to spend time with her in NYC while I was there on my book tour. We had dinner one evening and the next, my mom and I went over to her place and we spent the evening making cake pops. So surreal! Blake is completely charming and makes you feel like the most important person in the room. Whenever I’m around my mom and she happens to come on the TV, we just look at each other, smile and shake our head – like did that really happen.
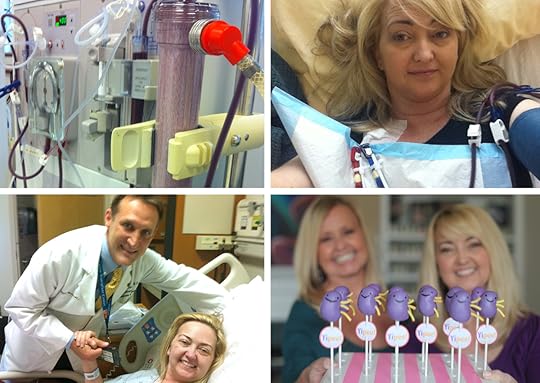
Getting Sick
Okay, this is a big one. I would have to say that 2011 was my most important year. You see, I had started to get sick. Again. I have kidney disease and received a transplant in 1992. During 2010, my kidney functioning had started to deteriorate again and it was looking like I would need a new kidney. In March of 2011, I got really sick and went into the hospital. I came out eighteen days later on dialysis and hoping that my mom would be a donor match. Thank God she was and in June we both underwent successful surgeries. (I love you Mom!) 2011 was a really hard year, but I’m so grateful for my mom and thankful for all of you guys, too. I still think about all of your wonderful comments on this post. Your thoughts, prayers and concern made me feel so much better. Below is a recap of that time.
Twelve Days
Hello Again
Great news an random other stuff
Here We Go
Yipee
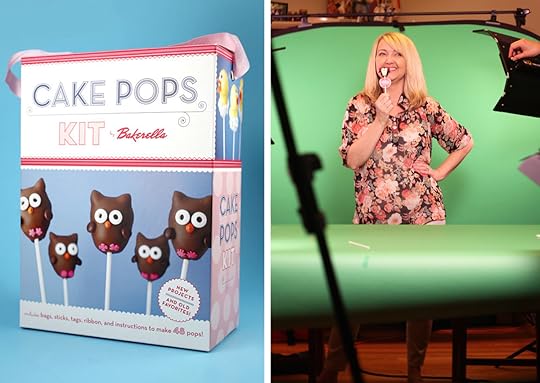
Kits and Cards
After recovery and finally feeling better, I worked on a Cake Pops Kit and Notecards set along with these videos. Then a couple of years later I also had a few mini kits come out.
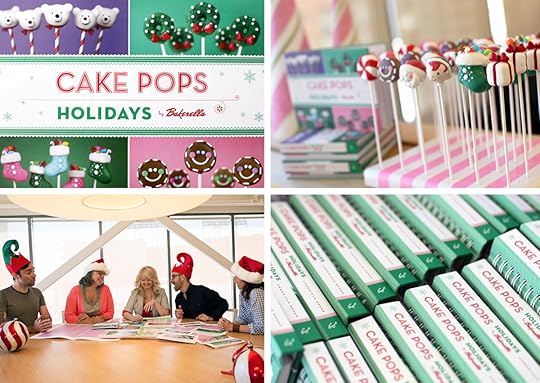
Cake Pops Holidays
The next year I worked on my second book, Cake Pops Holidays. This one was so fun to do. I instantly fell in love. But probably because I had gotten a lot better at making cake pops over the years. Here’s a cute video promo for the book, too. I filmed it in San Francisco at my publisher’s offices and we all had a blast.
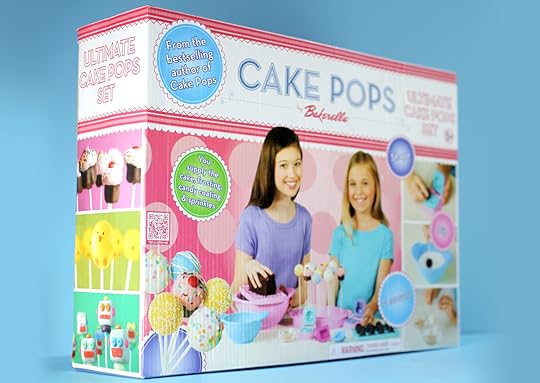
Cake Pops – The Toy!
Did you guys know I once had a Cake Pops toy… I know, I wouldn’t believe it either if I didn’t see it at Toys R Us. This project was a huge learning experience and so different from anything I had ever worked on before. The set included lollipop sticks, a cake crumbler, dipping bowl, mixing bowl, cake pop stand, cake pop tray and presses to make four different cake pop shapes.
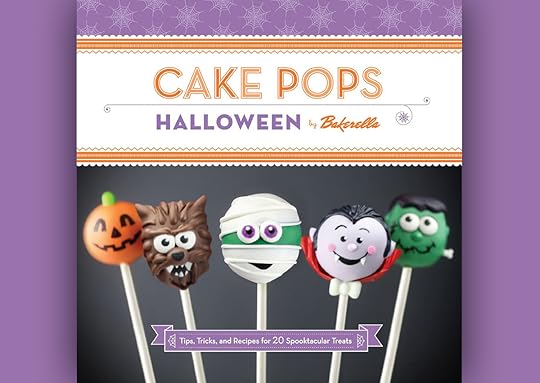
Cake Pops Halloween
The last cake pops book I wrote was for Halloween in 2014. The pops in this book are spooky cute and some of my faves. It’s funny, I look back at my first book now and there are so many I wish I could redo because I know I could do them better. My first book will always have my heart though, even if the ones in Holidays and Halloween are cuter.
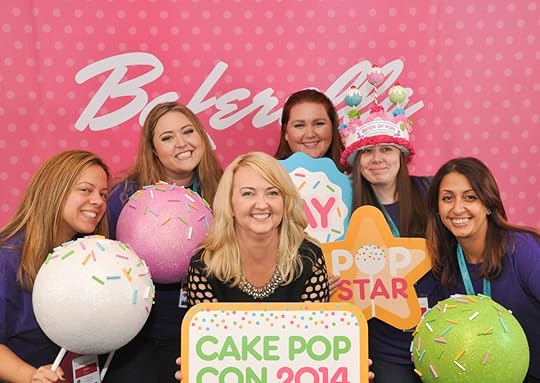
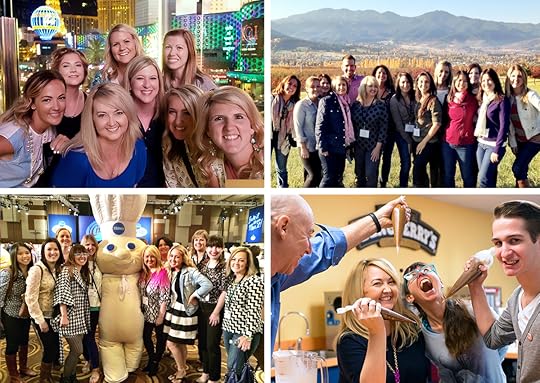
Cake Pop Con
In November of 2014, I spoke at the very first Cake Pop Conference in Philadelphia. (Here’s an instagram slideshow from the event.) This was such an amazing event devoted to these tiny treats. Being around so many people with the same love for creating, learning and and making others happy is an incredible experience. A big shout out to KC Bakes for putting it all together.
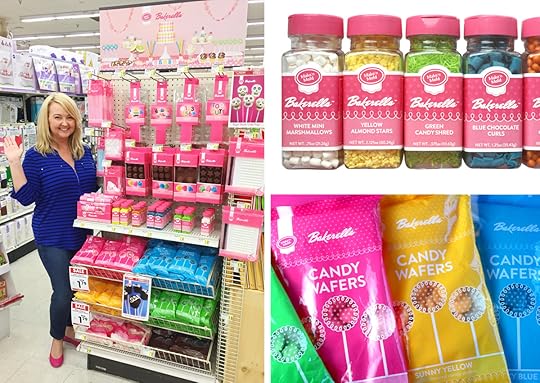
Bakerella for Make’n Mold
This is cool. I worked with a brand called Make’n Mold to develop a Bakerella product line. Make’n Mold is the candy wafer company that I used when I first started making cake pops. We had colorful candy wafers, cute molds, decorates, candy eyes, cute lollipop sticks and more. You can still find some items on their website here.
A post shared by Angie | BAKERELLA (@bakerella) on Jan 8, 2015 at 4:43pm PST
Being on Jeopardy! Sorta. What?!?!
Oh yeah… this little nugget is pretty fun. Did you know I was an answer on Jeopardy!?!?!? Crazy town!
Those are just some of the highlights that stick out in my mind over the years – outside of all the cute baked goods on the blog. If you’re a new reader or long-time follower, thank you so much for being a part of the fun with me. I wouldn’t have been able to keep things going over the years without you guys and your same love for little treats. Big. Giant. Hugs!!!

October 22, 2017
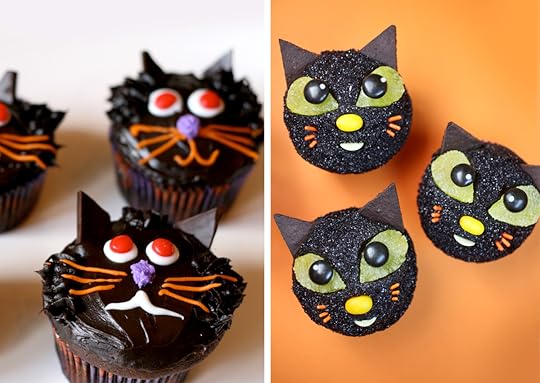
Black Cat Cupcakes
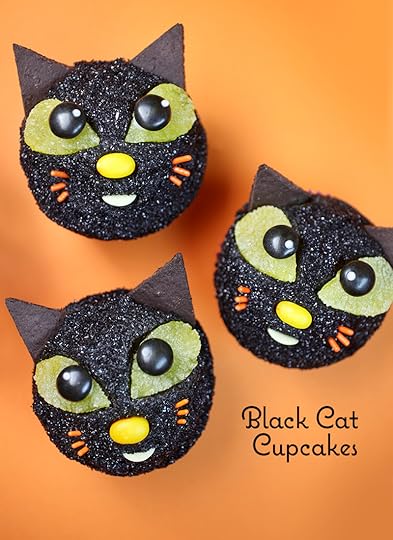
Treat someone with these kitty cat cupcakes for Halloween. They’re decorated with cookies and candy, making them a purrfectly adorable spooky sweet!
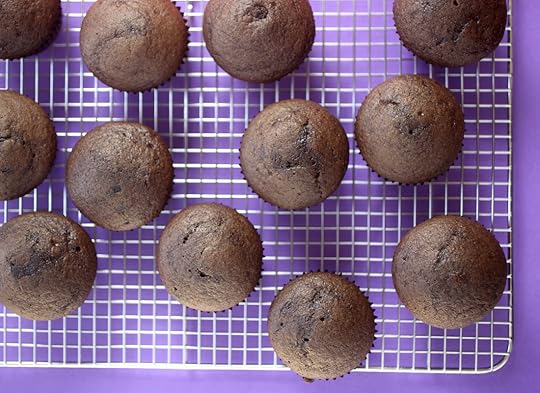
Chocolate cupcakes are the way to go for these. You can use this recipe.
Frost the cupcakes with chocolate frosting and then dip the tops in a small bowl filled with black sanding sugar to give them a shimmering coat.
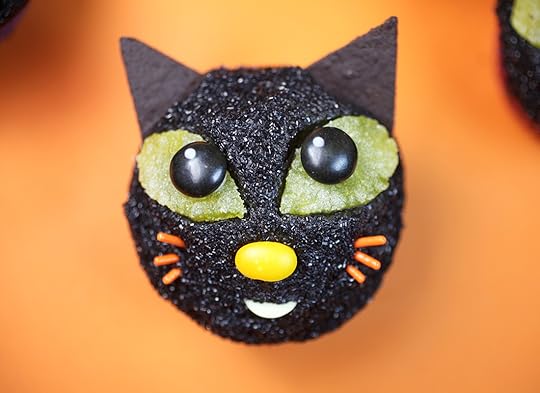
Such a sweet face with those big eyes and that bright yellow button nose.
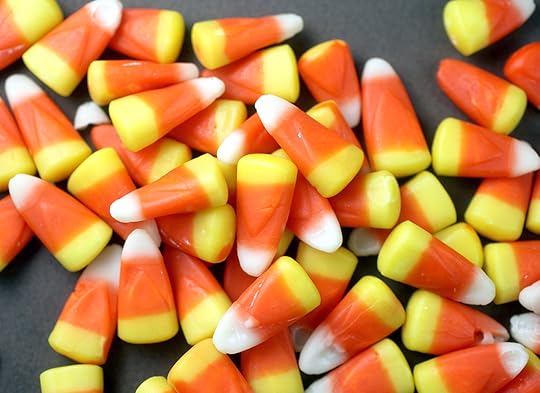
Oh those. The noses are simply candy corn inserted into the cupcake so only the yellow shows.
And the rest of the feline features are easy, too.
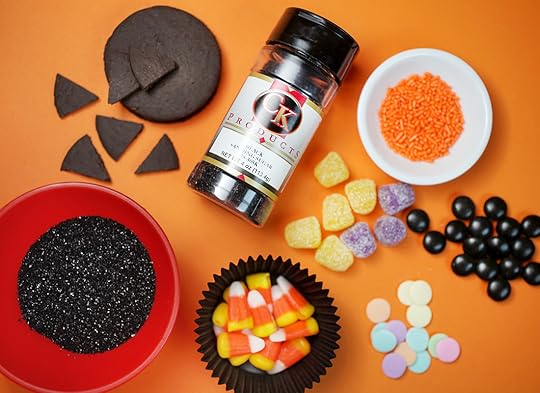
Kitty cat recap:
Fur coat: black sanding sugar
Button noses: candy corn
Ears: chocolate wafer cookies, cut into triangles
Mouths: Jumbo confetti sprinkles, pink would make them look like tongues
Whiskers: Orange jimmies
Eyes: Gumdrops, rolled flat on wax paper and cut with a teardrop cookie cutter
Pupils: Black M&M’s attached to the gumdrops with melted white candy coating as glue and then dotted on top, too.
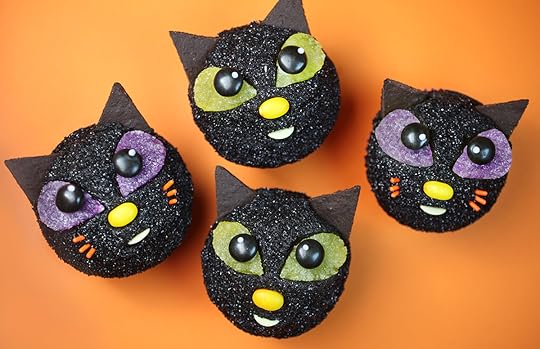
Super sweet. Super Cute!
Hope you enjoy and have a Happy Happy Halloween!

October 15, 2017
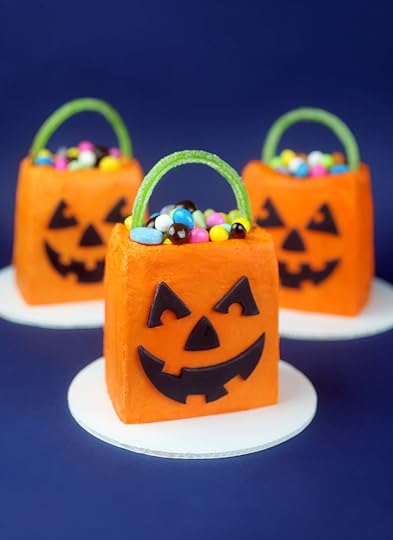
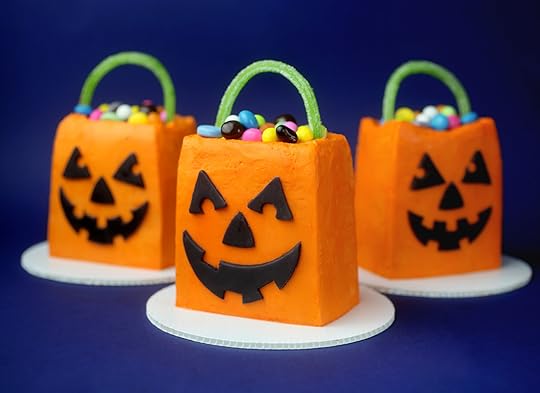
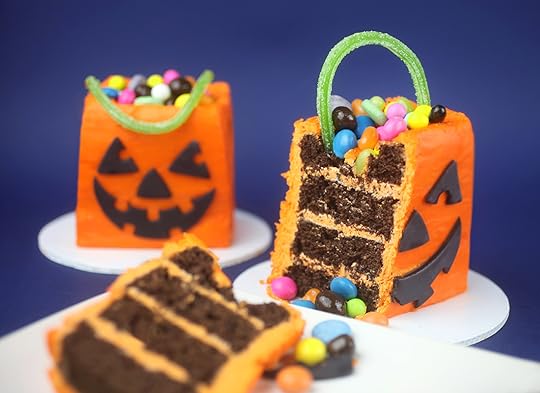
Trick or Treat Mini Cakes
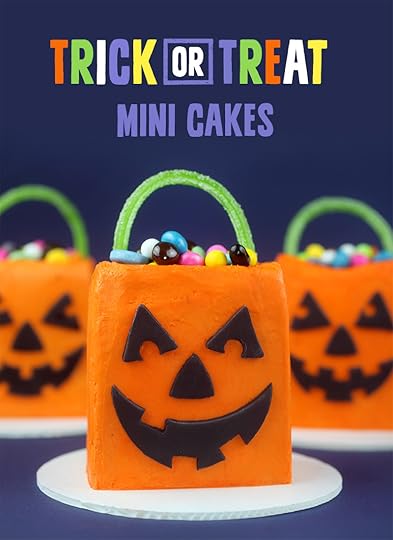
These cakes scream happy and not just from their big familiar smiles. Cute individual cakes decorated with bright colors and topped off with tiny candies to resemble trick or treat bags. What’s not to love?
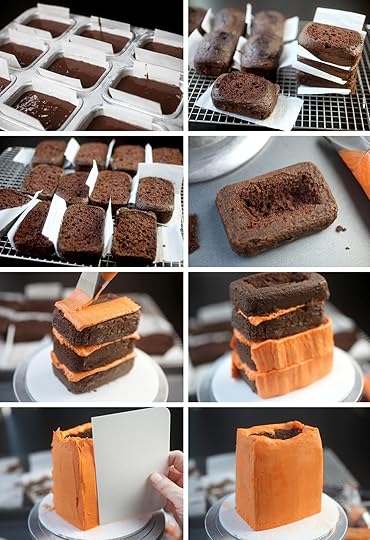
These tiny and tall cakes were inspired by this rectangular mini loaf pan. The cavities are about 2 X 3.75 inches and I thought baking in them would make perfectly-sized small layers of cake to try and stack.
Grease and line baking cavities with parchment paper to help easily remove the baked cakes. Trim off the mounded tops with a serrated knife. These scraps are all yours to snack on.
Make and tint orange frosting. I used this frosting recipe and made two batches to be sure I had enough. (For the cake, I just used a chocolate cake mix.)
To prepare, place a small amount of frosting on top of a plastic cake board and add the first cake layer. The frosting will help keep it in place. Stack and apply a layer of frosting on the first three cake layers. On the fourth, carefully carve out the center to leave a depression for the candy before placing on top. This will help keep the candy from just looking like it’s sitting on top of a box.
Next, carefully frost the sides of the cake with a crumb coat. Freeze or refrigerate cakes until chilled to make it easier to frost the top layer. Smooth out the sides with a cake scraper and the top edges with an offset spatula.
Side note: so this step was way easier when I pictured it in my head. Frosting little cakes is harder than it seems like it would be and I def need more practice. But taking it slow is the way to go … you don’t want them to tip over. You can also just decorate three-layer cakes to make them more manageable.
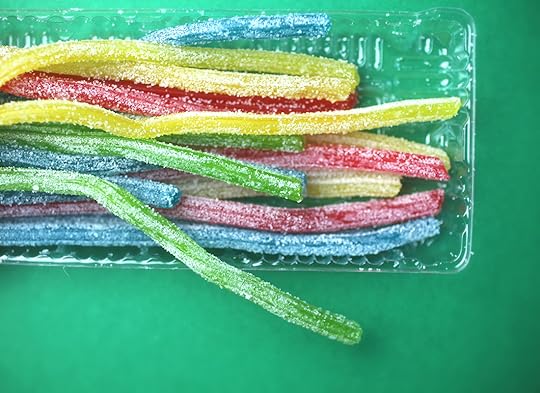
For the handles, I used green Sour Punch Straws.
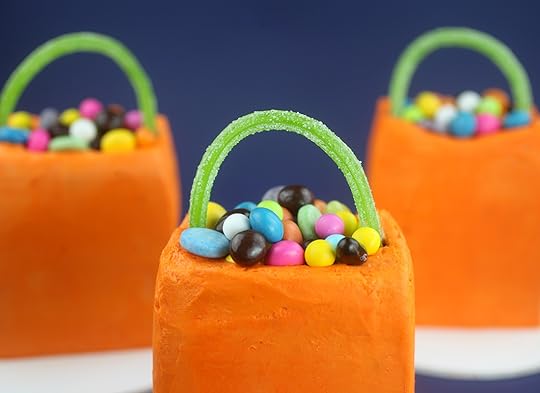
Chill the frosted cakes and use a straw to insert in the top to make an opening. Then gently insert the Sour Punch Straw until snug. Fill the cake tops with small, colorful candy pieces. If serving cakes the same day, straws will stay tall. If you serve the following day, they may fall or snap. So if that’s the case, wait until closer to serving before inserting
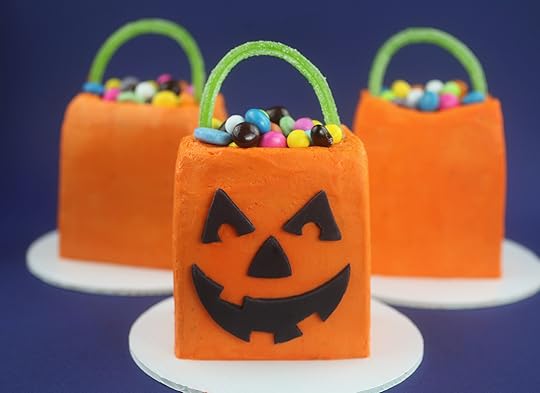
Face it. These are pretty cute.
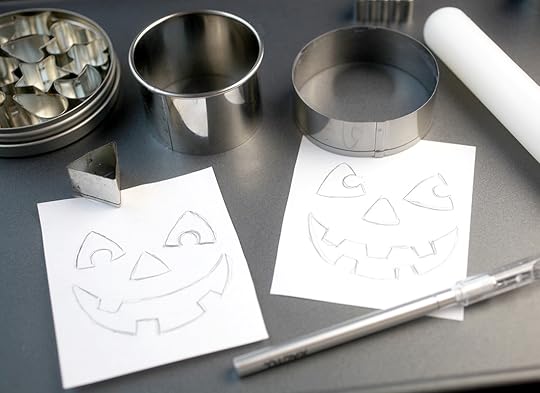
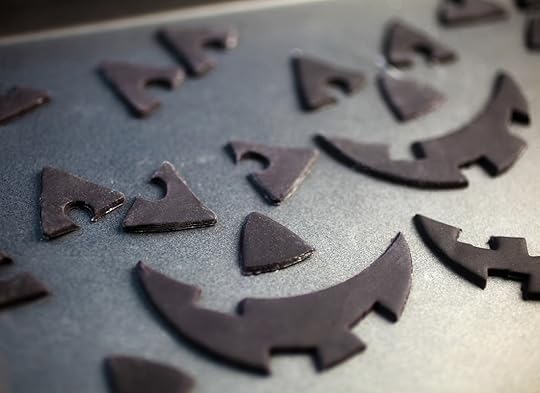
To make these cakes smile, I rolled and cut out tinted black fondant shapes. But, first I cut pieces of paper about the same size as the front of the cakes to use as templates. You can then use a variety os small cookie cutters to help create the faces or simply cut thin out with a sharp straight edge.
Happy! Happy!
Now, time to enjoy!
Hope these make you smile today!

October 8, 2017
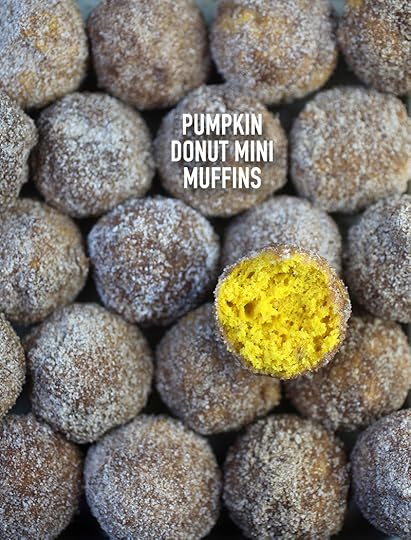
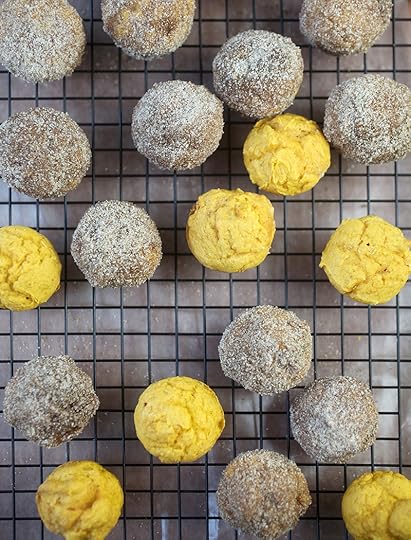
Pumpkin Donut Mini Muffins
It’s starting to get cooler outside (yay!). If you’re ready to begin the baking season, then I think you’ll fall for these divine mini muffins. I did!
Mini muffins packed with pumpkin, that is.
I don’t bake with pumpkin very often, but I think I should more often.
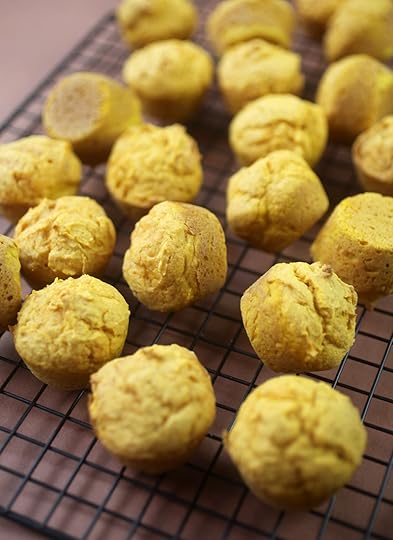
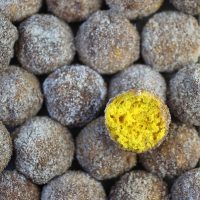
These little guys don’t look all that cute like this, but dunk them in butter and cover them in cinnamon sugar… they’ll look like donut holes. And taste dangerously delicious.
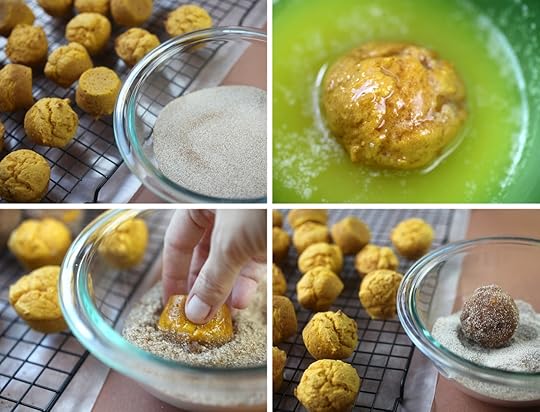
The process get’s a little messy so you’ll want to wash your hands several times along the way and reheat your butter if it starts to thicken, but oh my. Worth every minute.
And look what a difference!
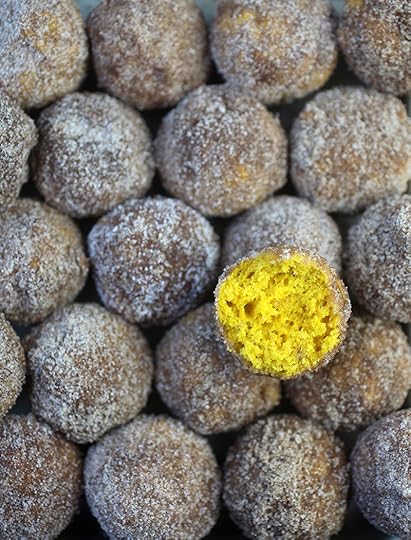
I love what a surprise you get when taking that first bite.
I made a few non-pumpkin enthusiasts try these muffins and each one of them wanted more.
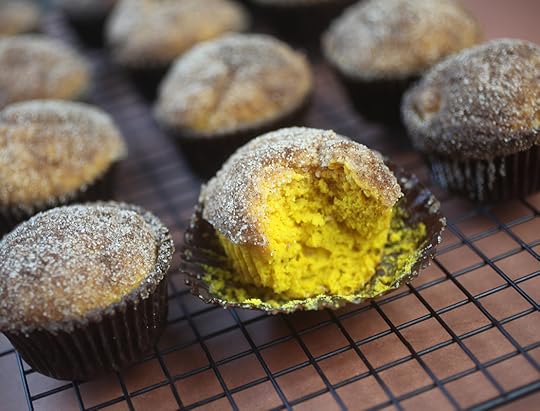
I also made regular-size muffins, but the sweet lover in me fell harder for the completely covered cinnamon-sugar version. The recipe is from a book called The Pumpkin Cookbook that was sent to me. And it has tons of pumpkin-perfect recipes to try.
Print Recipe
Yield: 48 mini muffins
Pumpkin Donut Mini Muffins
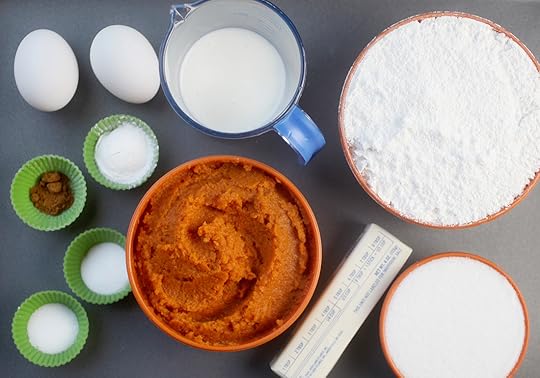
Ingredients:
Mini Muffins
1 cup sugar
1/2 cup unsalted butter, room temperature
2 eggs
1 3/4 cups canned unsweetened pumpkin (one 15-oz. can)
1/4 cup buttermilk
3 cups all-purpose flour
1 tablespoon baking powder
1 teaspoon baking soda
1 teaspoon salt
1/4 teaspoon ground nutmeg
Topping
1 cup sugar
4 teaspoons ground cinnamon
1/2 cup butter, melted
Directions:
Heat oven to 350 degrees F.
Beat the sugar and butter together until fluffy. Add eggs, one at a time, beating after each addition. Beat in the pumpkin and buttermilk.
Sift flour, baking powder, baking soda, salt and nutmeg into the pumpkin mixture, beating until smooth. The batter will be thick.
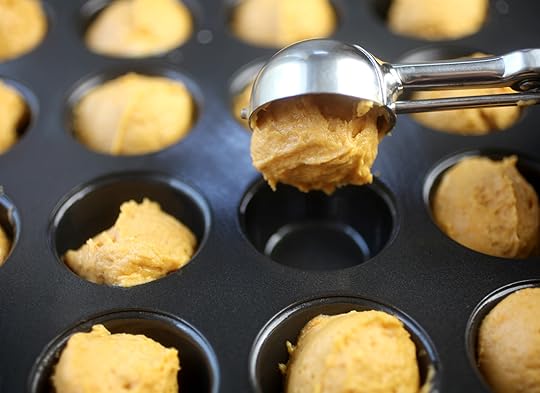
Coat two 24-cup mini muffin pans with non-stick cooking spray. Divide batter among cups and bake for 12-16 minutes, or until toothpick comes out clean. Cool muffins for a few minutes on a wire rack.
For topping, mix sugar and cinnamon. Dunk muffin in melted butter and then roll in cinnamon sugar.
Note: You can also make these at 24 regular-size muffins. Use baking cups and bake for about 18-20 minutes or until toothpick comes out clean. Reduce the topping mixture ingredients by half. Dip the tops in melted butter before rolling in cinnamon sugar.
The Pumpkin Cookbook by DeeDee Stovel
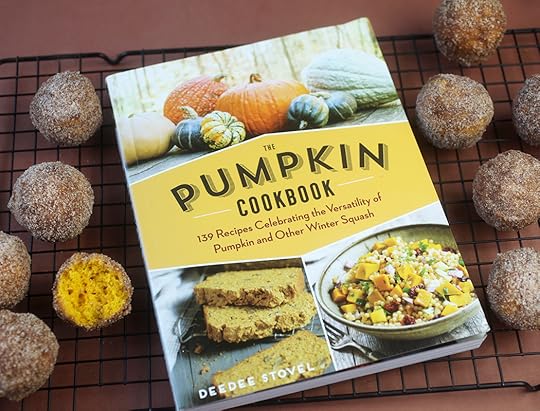
The Pumpkin Cookbook – check it out pumpkin lovers.
Enjoy!

September 29, 2017
Hooray for Halloween Treats!

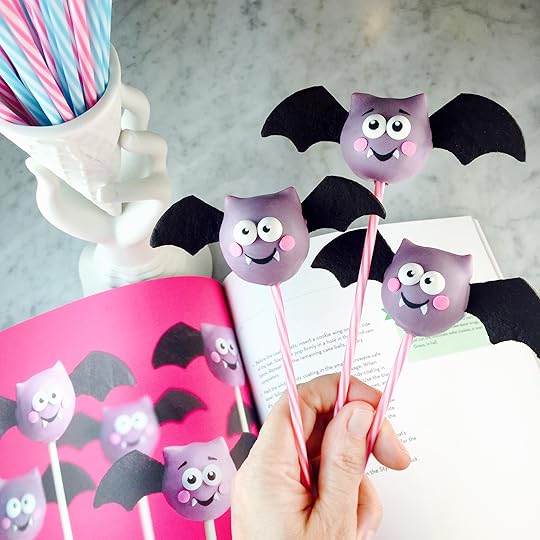
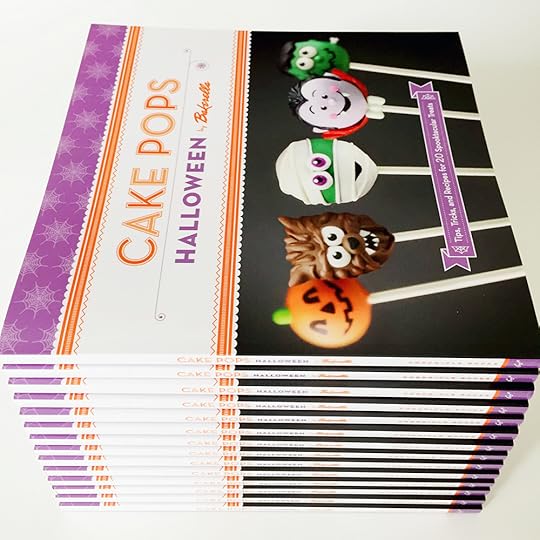
Hey Boo! It’s almost that time of year! October starts tomorrow and that means it’s time to start thinking about spooky cute treats. At least for me … I love baking and creating around Halloween. If you do too or need any ideas to trick out your treats, then check out my Cake Pops Halloween book.
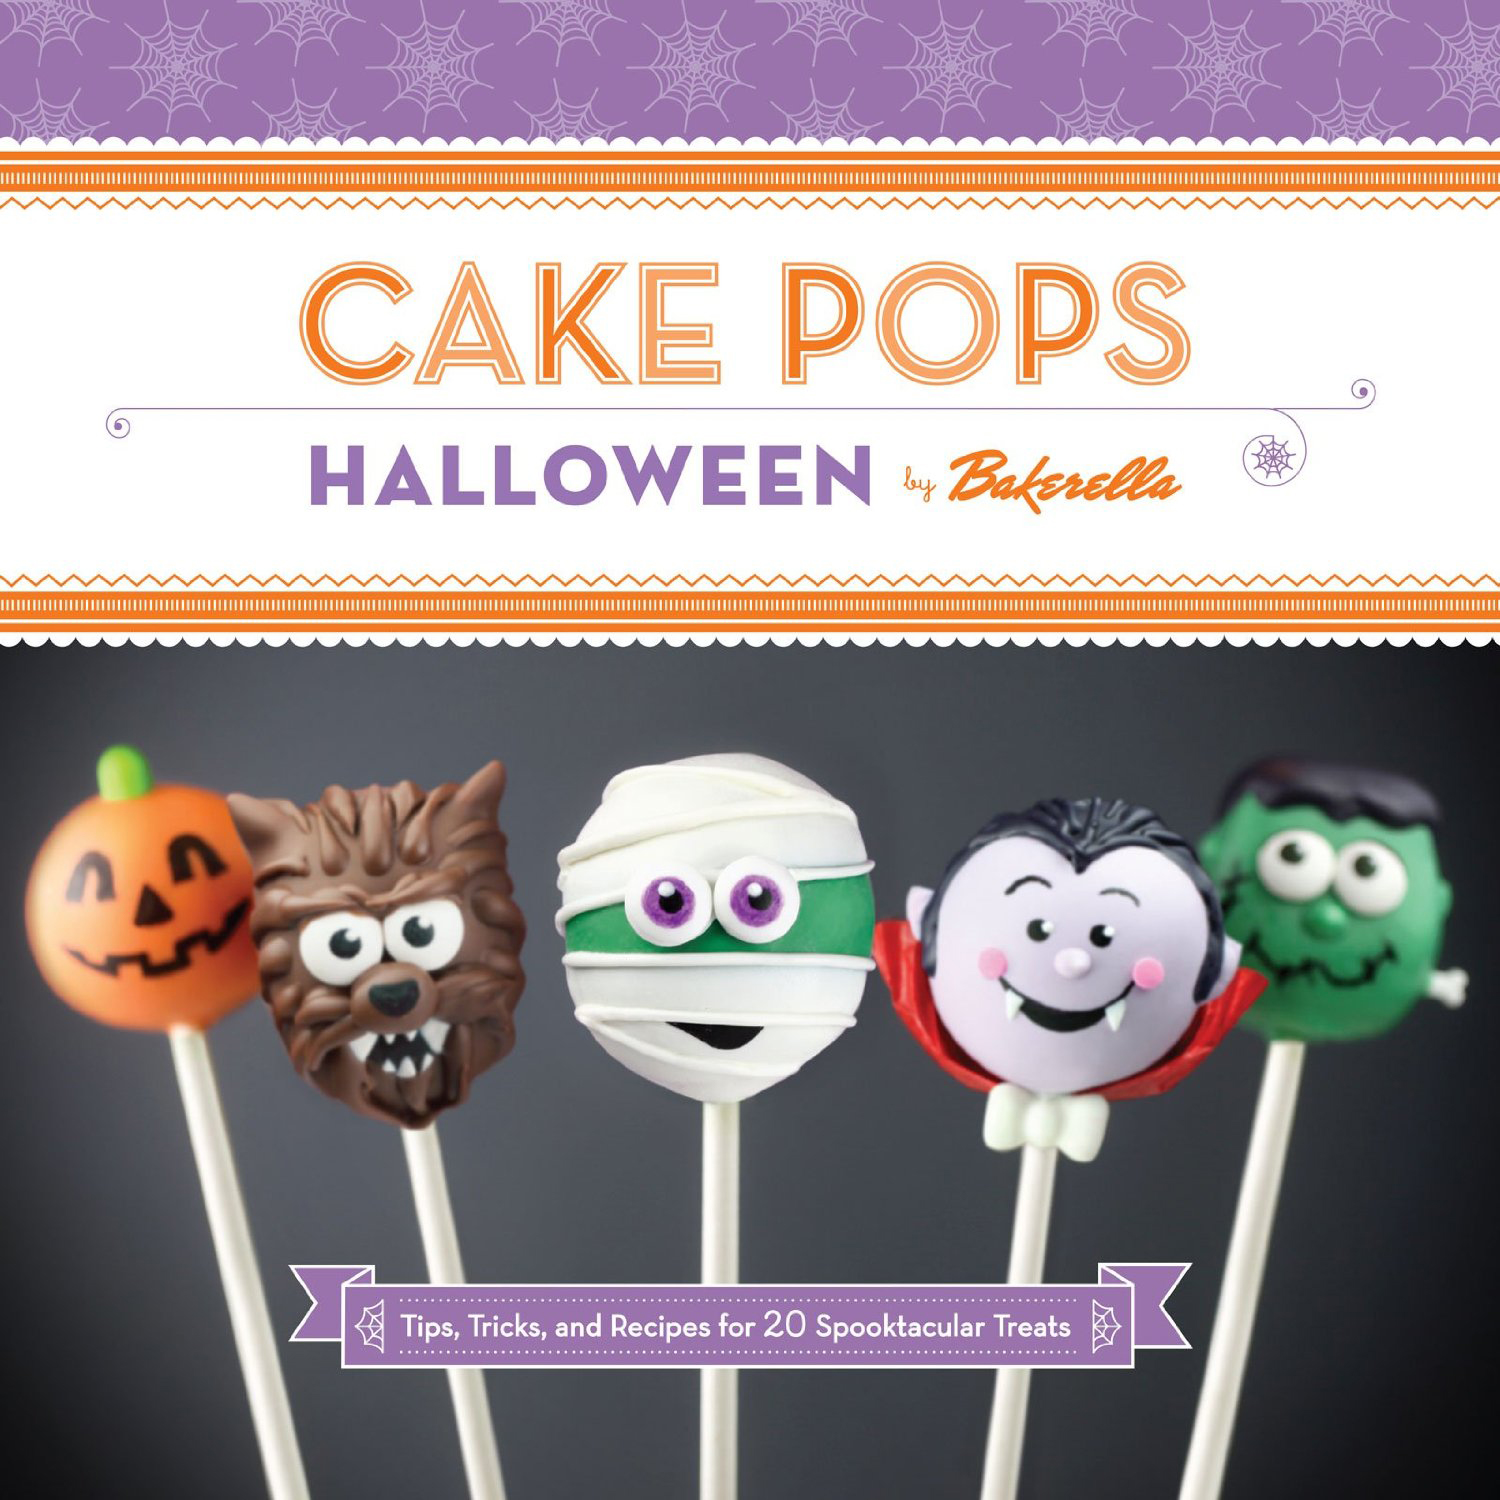
I created this book a few years ago, but I still like to share it on the blog around this time for anyone interested in making people smile for Halloween.
The book initially started as an ebook only. But my publisher, Chronicle Books, also created a special print edition for me, offered exclusively from them. You won’t find this one in bookstores so if you want a physical copy then order yours from the link below. (Note: Unfortunately, Chronicle only ships in the US.)
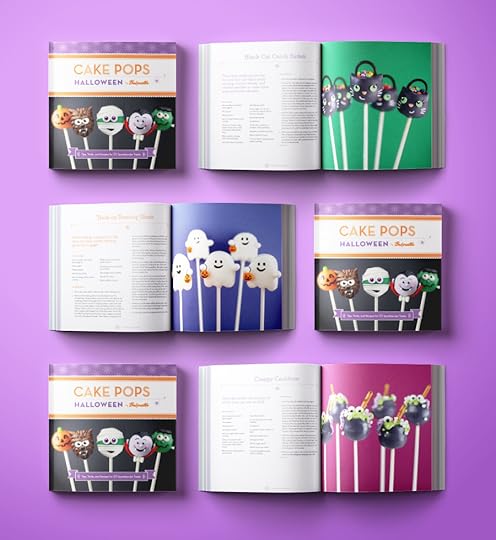
The book features spooktacular cake pop projects like the above black cat candy buckets (a fave), creepy cauldrons, trick-or-treating ghosts and more. They’re not all the spooky variety though, some are just fun and fall-inspired. You’ll want to check out the awfully cute owls, caramel apples, sweet scarecrows, and candy corn cuties.
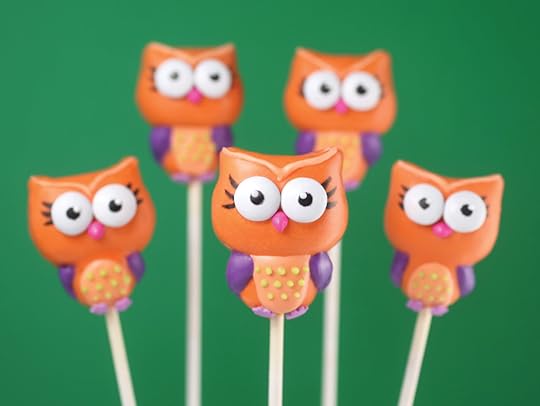
Yes… awfully cute!
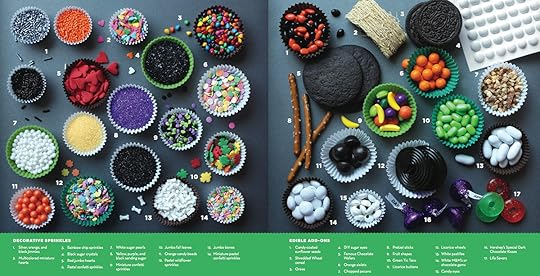
P.S. Now’s the time of year to scope out black sprinkles, jimmies, confetti quins, sunflower seeds and the like. They’ll come in handy all year long for tiny decorating details.
I still love these sweet striped sticks. You can find them here from Bakerella for Make’n Mold line.
PRINTED BOOK
You can get the printed book here from Chronicle Books.
EBOOK
Or get the ebook from one of the retailers below (and, hey, it’s on sale right now for 99¢:
Kindle
Apple iBookstore
Nook
Google Play
Kobo
Bookshout
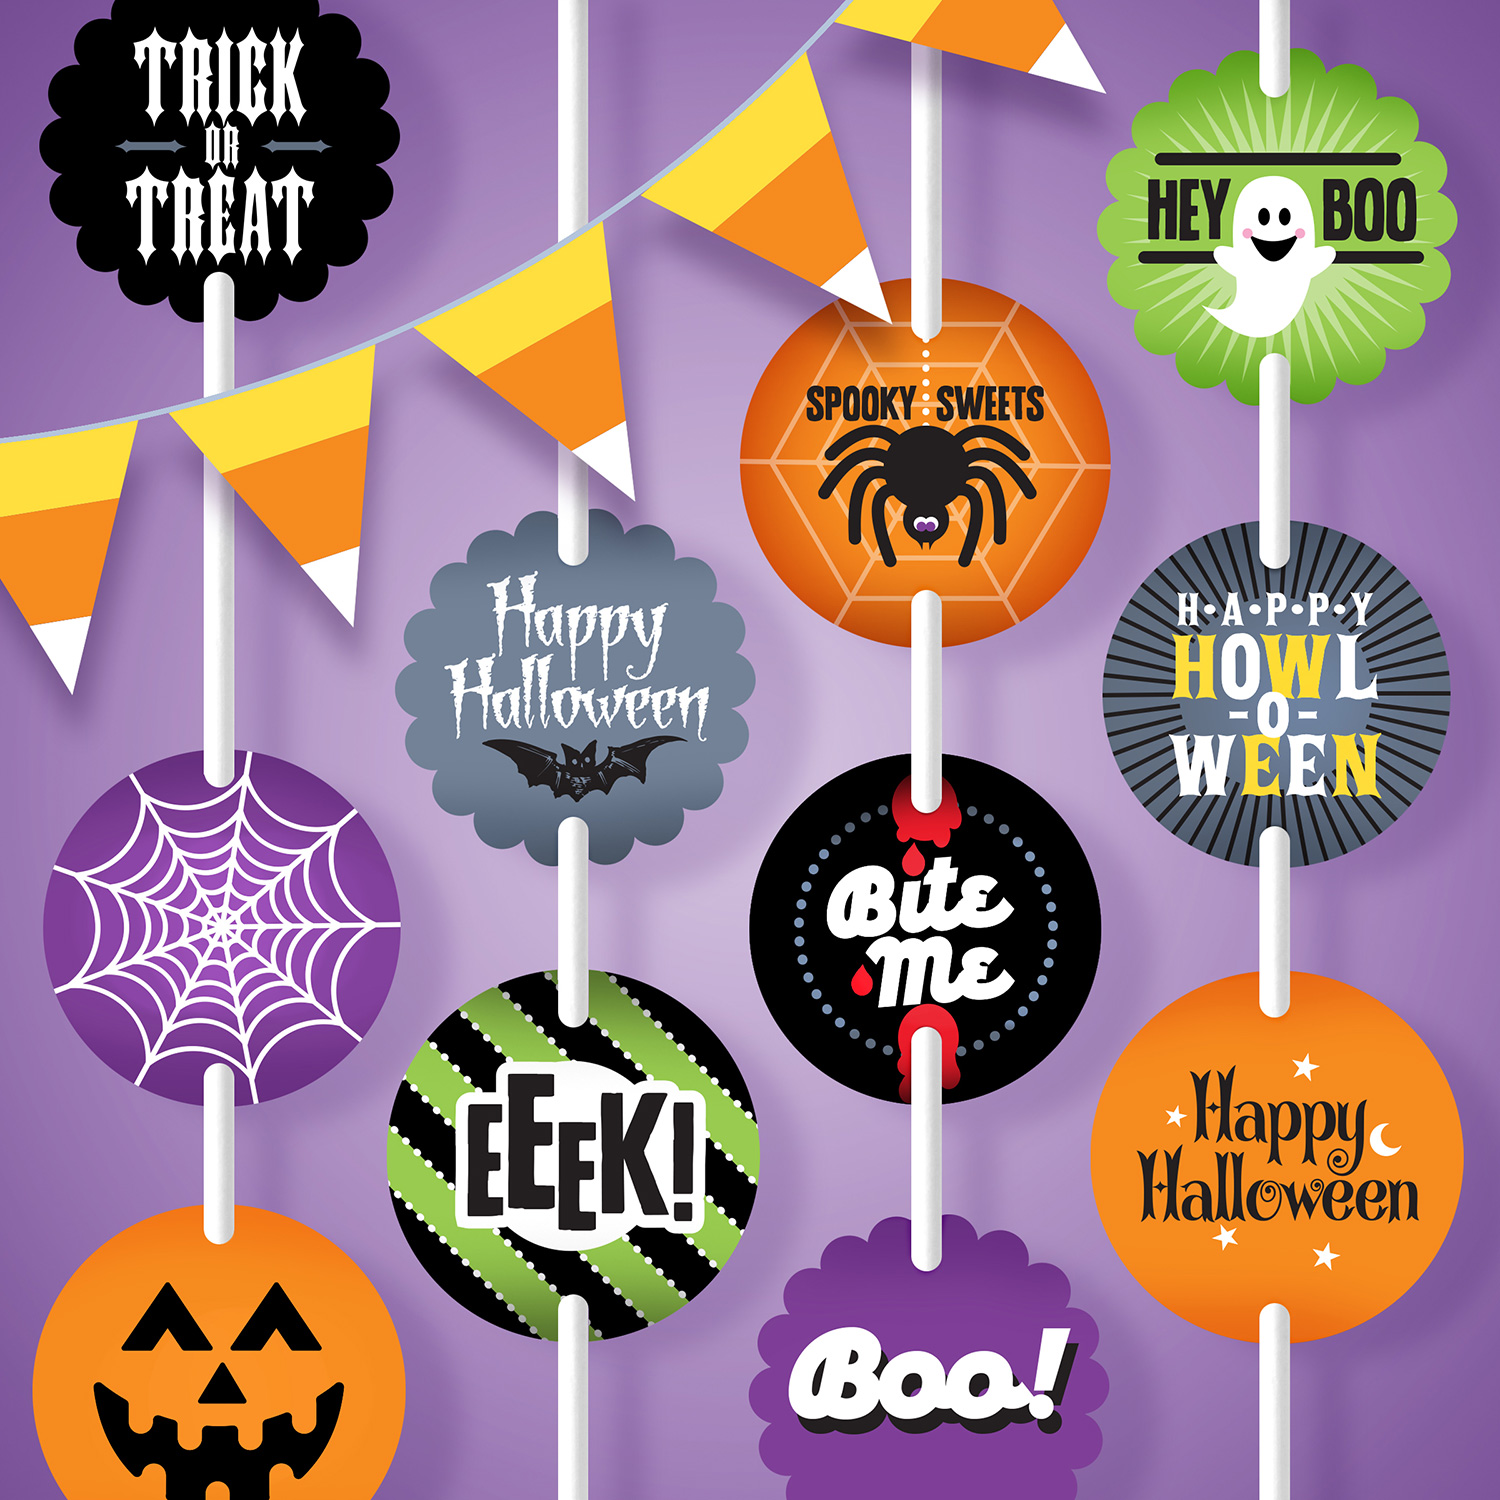
I also designed some printables that you can use for cake pop tags, cupcake toppers or labels … and you can download them for free. The pdf contains 12 different tag designs in different colors and… templates for a few projects from the book, too.
You can download the free printables here.
Enjoy!
I want to see your spooky sweets! If you make any treats from the book, please share and tag them with #CakePopsHalloweenBook on Instagram. I love seeing what you guys do.

September 17, 2017
Bravetart’s Homemade Nutter Butters
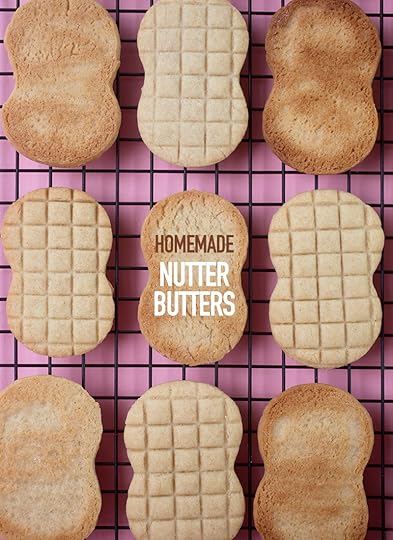
If you’re a peanut butter fan like me, you’ve eaten your fair share of Nutter Butter cookies. Crispy peanut butter wafers filled with a peanut butter creme center. Yes, please. I decided to make them when I opened BraveTart’s new book for the first time.
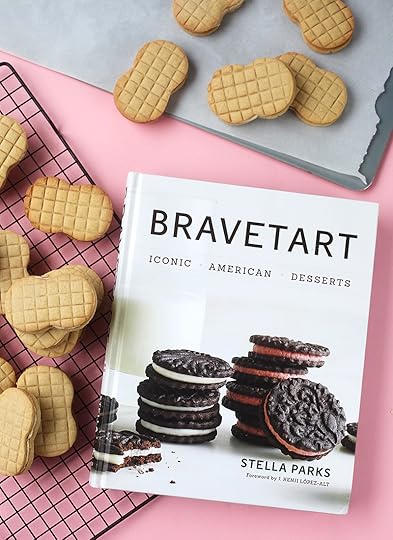
The pages fell open right to a picture of her Nutter Butters and I couldn’t get my mind off making them. And that’s after flipping through more than 300 glorious pages of her incredible book focusing on Iconic American Desserts. There’s so much yum to make. We’re talking tons of classic dessert recipes inside plus recipes (and their origin stories) to recreate your favorite American brands like Twinkies, Oreos, Cracker Jacks, Pop Tarts, Fig Newtons, Snickers, Thin Mints and so much more.
Bravetart: Iconic American Desserts is a classic itself from the seriously sweet-minded Stella Parks. Check out her book and if you’re on Twitter, I highly recommend following her there @bravetart. She is incredibly generous with her knowledge and she has the goodies to back it up, too!
Okay let’s get baking.
The cookie dough is quick to whip up with flour, butter, sugar, salt, peanut butter, egg whites and baking soda. Once you’ve formed a soft dough, you’ll knead it into two discs for rolling and cutting out cookies.
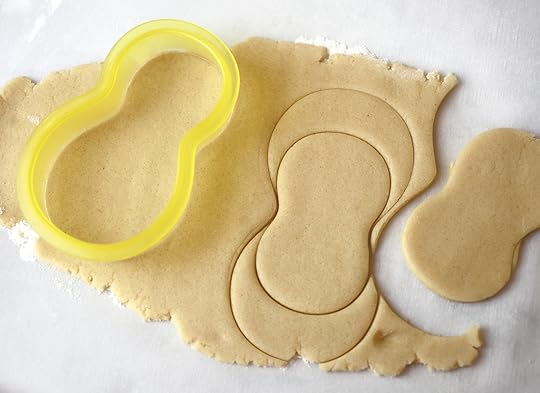
Stella recommends a bikini-shaped cookie cutter, but I didn’t have one. I did have this similar shape from Sweet Sugarbelle (above) that I made work though. I could have just stuck with the shape as is, but instead I made one cut and then rotated the cookie cutter 180 degrees and made a second cut right on top. The shape in the center then ends up being symmetrical and much more like a peanut. This method did leave me with a lot more scraps to use for re-rolling but I didn’t mind.
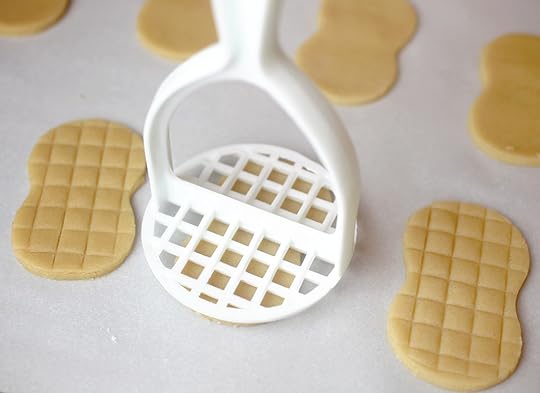
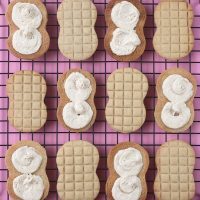
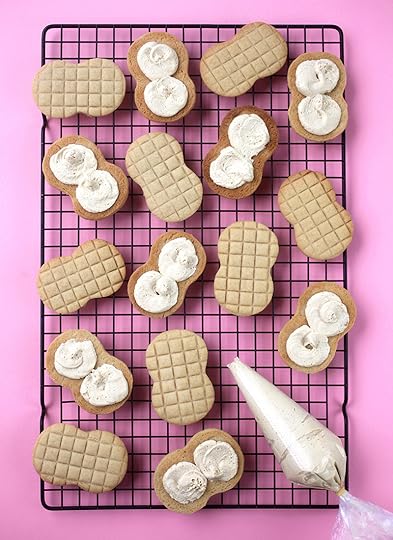
Once I had my cutouts made and transferred to a parchment paper-lined baking sheet it was time to make an impression. I found a plastic potato masher that coincidentally ended up being the exact size of my cut out cookies. The grid on the masher made the perfect design by gently pressing into the dough.
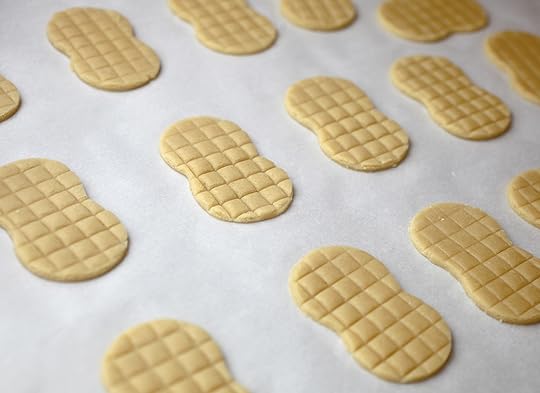
All lined up and ready for the oven.
Bake the cookies for about 15 minutes and let them cool completely before piping the middles with peanut butter cream.
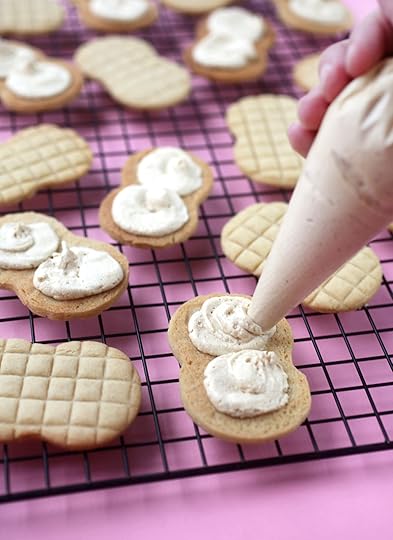
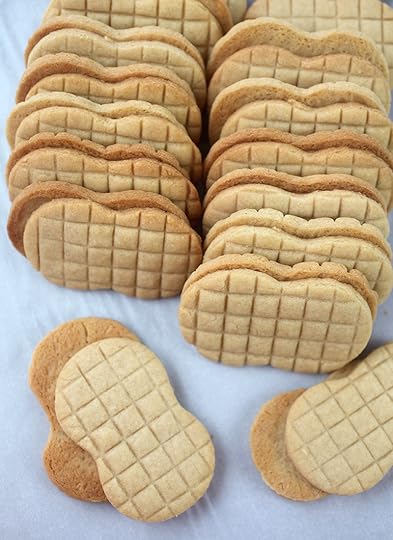
Pipe swirls of peanut butter creme on half of the cookies filling in each domed end of the peanut.
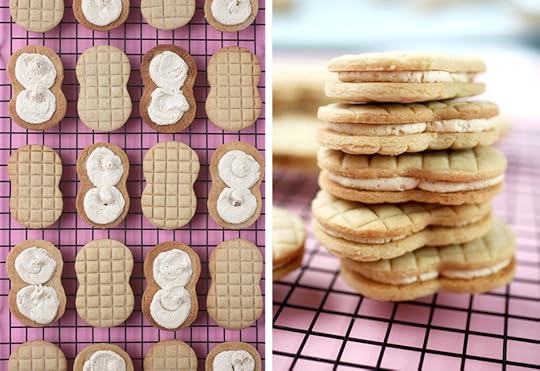
Sandwich them together for a classic cookie treat.
Print Recipe
Yield: 30 sandwich cookies
Bravetart’s Homemade Nutter Butter® Cookies
Ingredients:
Cookies
2 cup all-purpose flour, plus more for dusting
6 tablespoons unsalted butter, creamy and soft about 68 degrees F
1/3 cup creamy peanut butter
1 cup sugar
1/4 teaspoon baking soda
1/4 teaspoon Diamond Crystal kosher salt (half as much if iodized)
2 large egg whites
Peanut Butter Creme
2 tablespoons unsalted butter, creamy and soft about 68 degrees F
1/3 cup creamy peanut butter
1 tablespoon honey
1 teaspoon vanilla extract
1/4 teaspoon Diamond Crystal kosher salt (half as much if iodized)
1 cup powdered sugar, sifted
Directions:
Prepare the dough:
Sift 2 cups flour into a medium bowl and set aside.
Preheat oven to 350 degrees F and adjust oven rack to middle position.
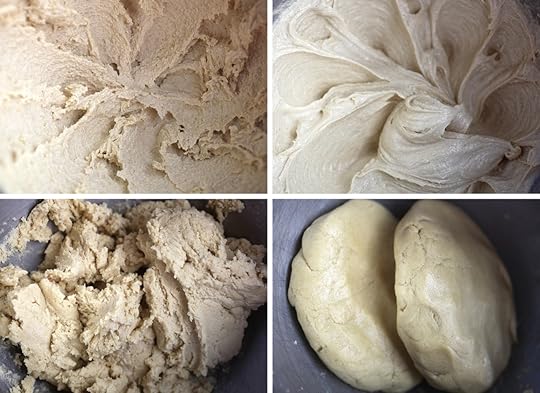
Combine butter, peanut butter, sugar, baking soda and salt in the bowl of a stand mixer fitted with a paddle attachment. Mix on low to moisten, then increase to medium and cream until light and fluffy, about 5 minutes.
Beat the egg whites with a fork until foamy and thin, then add to the butter and sugar in four additions, letting each incorporate before adding the next. Scrape the bowl and beater with a flexible spatula, then resume mixing on low.
Sprinkle in the flour, and mix to form a soft dough.
Knead dough against sides of the bowl to form a smooth ball. Divide in half and flatten into two discs.
On a flour-dusted work surface, roll the dough until 1/2 inch thick. Sprinkle with flour, flip, sprinkle again, and roll just shy of 1/8 inch.
Cut into peanuts with a 3-inch bikini cutter or simple 2 1/4 inch rounds. Gently lift with an offset spatula and arrange cutouts on a parchment-lined baking sheet. Gently score the cutouts in a criss-cross pattern. Gather scraps, re-roll and cut as before.
Bake wafers until firm and dry, about 13-15 minutes. Cool completely on the baking sheet.
Make the creme:
Combine butter, peanut butter, honey, vanilla and salt in the bowl of a stand mixer fitted with a paddle attachment. Mix on low speed to moisten, then sprinkle in the powdered sugar a little at a time. Once incorporated, increase to medium and beat until the creme is soft and light, about 5 minutes.
Transfer to a pastry bag fitted with a 1/2 inch plain tip. Pipe two teaspoons creme onto half of the cookies, filling each lobe of the peanut shape. Sandwich with remaining wafers.
Transfer to an airtight container and refrigerate until the filling is set, about 15 minutes. Store up to one week at room temperature or a month in the fridge. Serve at room temperature.
Shared with permission from © BRAVETART: Iconic American Desserts by Stella Parks, 2017
Hope you enjoy these perfectly peanutty cookies!

August 27, 2017
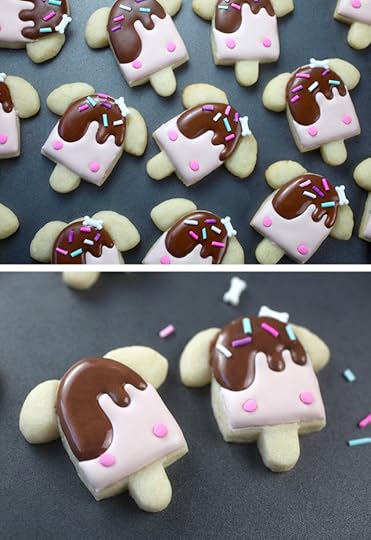
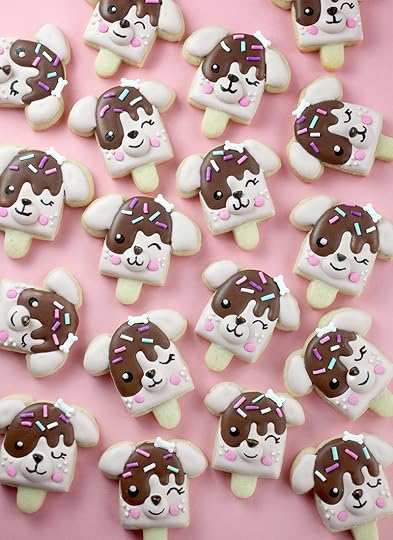
Pupsicles
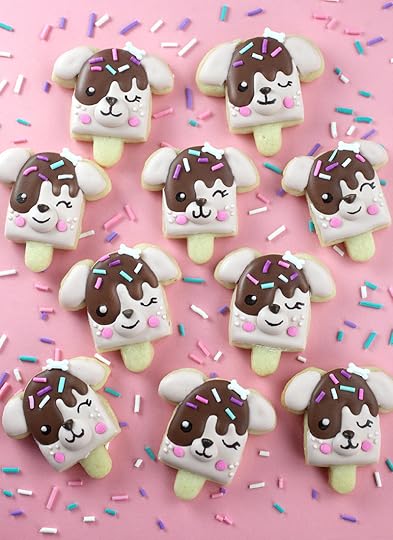
Cookie cuteness alert! These tiny puppy popsicles make me all kinds of happy. After the kitty cones I just made, I couldn’t help but give dogs their day, too … and these sugar cookies turned out darling.
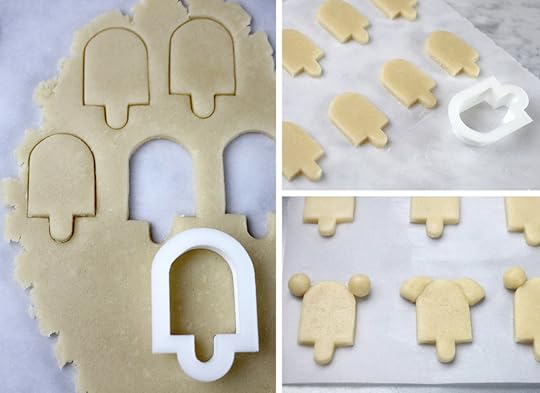
Here’s the cookie cutter I used. It comes in different sizes, but I bought the 2-inch size to make petite pops.
And here’s the cookie and royal icing recipe I used if you need one.
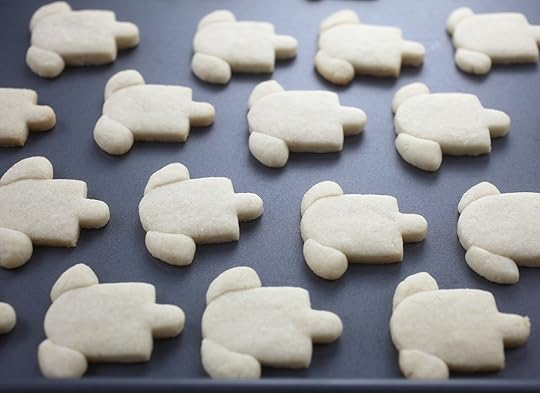
Place cut-out cookie dough shapes on a parchment-lined baking sheet and then make the ears. Just roll dough into small balls and place in position for the right sizing. About a pea size I guess. Then shape the dough into ears and press into the top curved sides of the popsicle to bake.
Voila!
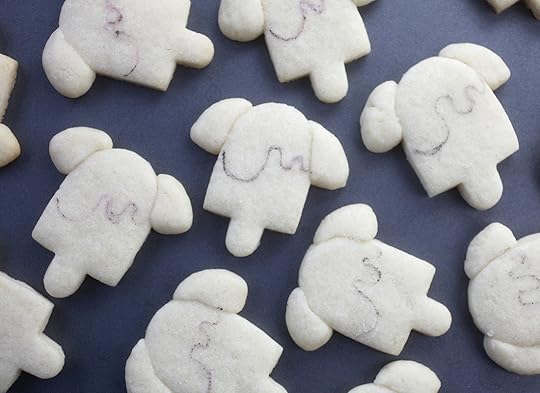
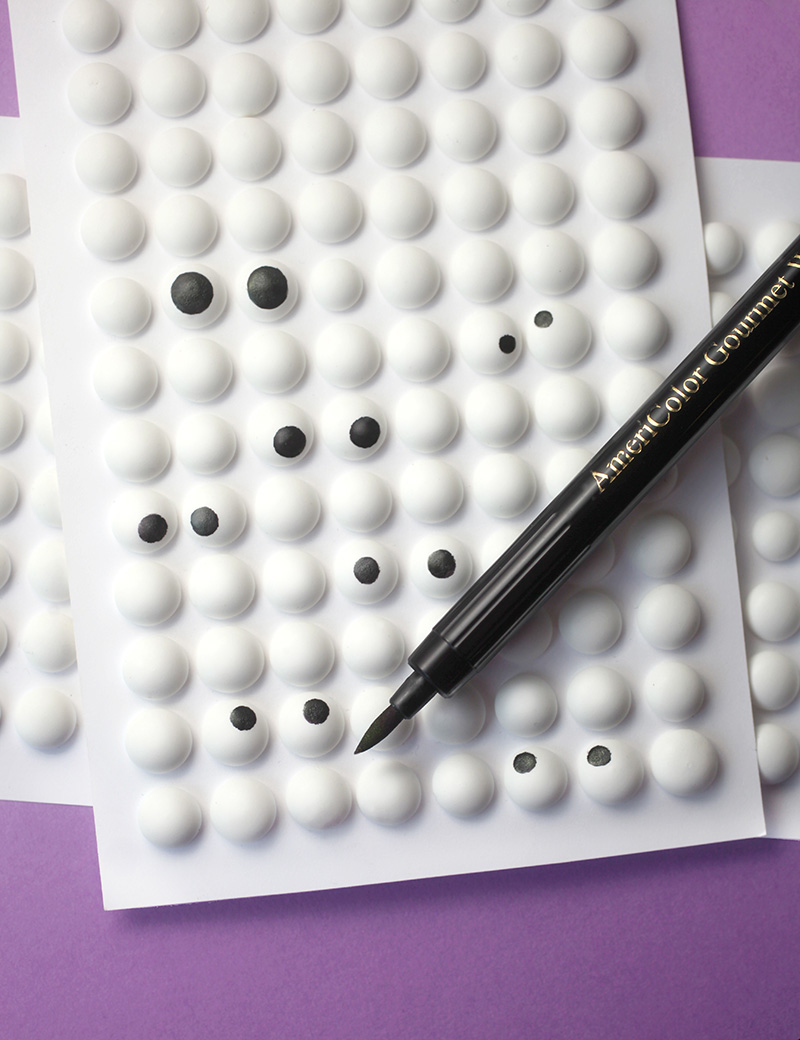
You can use an edible ink pen to draw a faint line as a guide for dripping chocolate. This helped a lot to make sure the curves are where I wanted them since the cookies are so small.
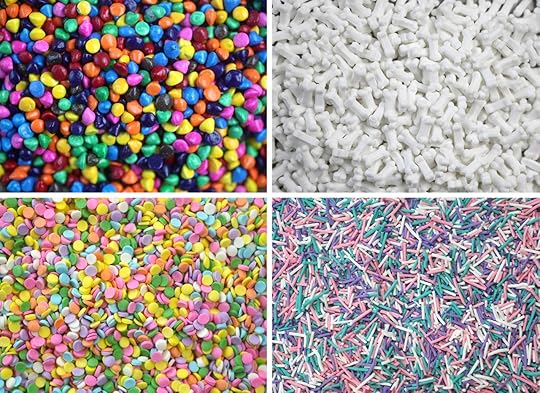
To decorate I used rainbow chip sprinkles for noses, mini confetti sprinkles for cheeks, tiny doggy bones for bows and some of these homemade sprinkles that I made.
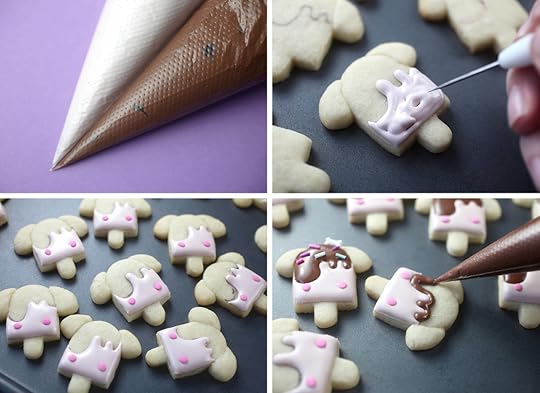
Tint your royal icing in two colors. Pipe the lighter color on the bottom of the cookie and use a food pick tool to smooth out and coerce the icing into the exact position.
Place pink mini confetti sprinkles in position for cheeks. When the first color is dry, pipe the chocolate icing color on top.
Instead of piping and then flooding the royal icing, I used a consistency in between that was just thick enough to hold it’s shape without outlining first.
Before the icing dries, carefully place sprinkles and any bows in position and let dry.

When dry, pipe a large dot of royal icing in position for the snout and then carefully place a brown rainbow chip sprinkle in position for the nose. You could also pipe the noses as well.

To finish, draw eyes and mouths with a black edible ink pen and then dot the eyes with a tiny drop of white royal icing.
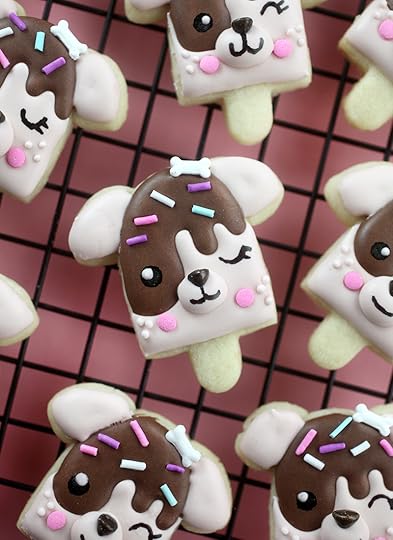
You can also pipe tiny dots around the cheeks to make them look extra adorable.
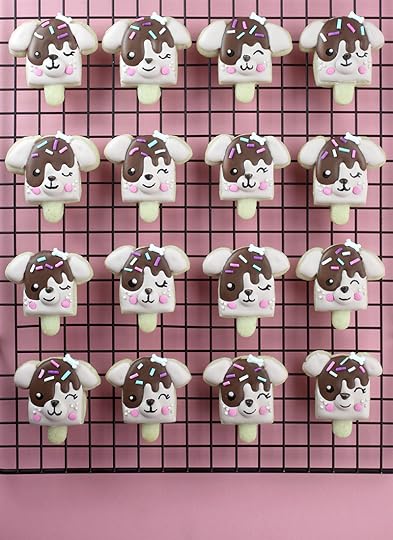
Pretty doggone cute!

Here’s one I’m holding for a better size reference.
BONUS BEARS:
I didn’t flatten or shape the ears for a few of the cookies when I baked them so I could try turning them into baby bears.
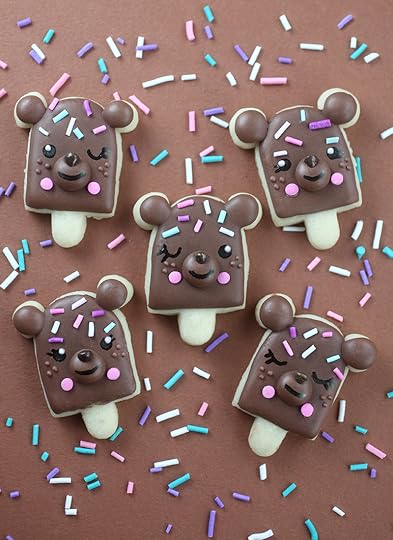
Now I want to make an entire batch of these cute little cubs. Cubsicles anyone?
Hope you enjoy!

Bakerella's Blog

- Bakerella's profile
- 9 followers

