
Kristina Seleshanko's Blog, page 12
April 21, 2021
How to Hard Boil Quail Eggs in an Instant Pot (with video)

This post may contain affiliate links. All opinions are my own. Please see FCC disclosure for full information. Thank you for supporting this site!
I am overrun with eggs this spring, not only from the chickens, but also from the quail. It's amazing how fast those little quail eggs fill up the refrigerator! But one way I've found to make them snack-able (and therefore get them out of the fridge faster) is to hard boil them.
Trouble is, truly fresh eggs can be difficult to peel after hard boiling. The shells come off, yes - but with bits of the egg white attached. With chicken eggs, this is easily remedied by using a pin or needle to poke a hole in the fat end of the egg, allowing more air in. (The reason store bought eggs peel so easily is that they are older and have more air between the shell and the egg.) But quail eggs have much tougher shells - so the pin trick doesn't work well.
Fortunately, my favorite modern appliance has come to the rescue! Quail eggs, it turns out, peel beautifully if hard boiled in the Instant Pot! (This is the Instant Pot I use.) Scroll down for step-by-step directions, or watch the video below for how-tos:
(adsbygoogle = window.adsbygoogle || []).push({});
How to Hard Boil Quail Eggs in an Instant Pot
1. Place 1 cup of water in the Instant Pot's stainless steel insert.
 Pour water into the Instant Pot's insert.
2. If you're only cooking a handful of eggs, place the Instant Pot trivet inside the insert. If you're cooking more than a few eggs, I recommend using a steamer basket, like this one, instead, because it will make removing the eggs and getting them into an ice bath much easier.
 The kind of steamer basket I recommend.
3. Place the quail eggs on the trivet or in the steamer basket. You can cook as little or as many as you like without changing the cooking times I give in this post. Just remember that if you overfill the trivet or steamer basket, it will be difficult to remove the hot eggs from the Instant Pot...and if the eggs sit in the appliance for a longer amount of time, they may overcook.
4. Place the lid on the Instant Pot and turn the valve to "sealing." Press "Manual" and then set the time to 2 minutes.
5. While the Instant Pot cooks the eggs, prepare the ice bath by pouring ice in a bowl. Fill the bowl with cold tap water.
 A bowl works well for an ice bath.
6. Once the Instant Pot beeps to tell you it has cooked the quail eggs for 2 minutes, allow it to release the steam naturally for another 2 minutes.
7. Next, turn the valve to manually release the remaining pressure in the Instant Pot. Remove the lid and, using an oven mitt, remove the steamer basket from the IP and place it in the ice bath. Do this promptly, or the eggs will overcook.
8. Tip the eggs out of the steamer basket and completely remove the basket from the ice bath. Allow the eggs to sit in the ice bath for at least 2 minutes.
 Tip the cooked eggs into the ice bath.
Now you may store the hard boiled quail eggs in the fridge, or you may peel them right away and use them in your favorite recipe.
 The quail eggs peel easily!


April 13, 2021
Teaching Kids to Grow Food
 This post may contain affiliate links. All opinions are my own. Please see FCC disclosure for full information. Thank you for supporting this site!
Young kids are naturally drawn to gardens, somehow. In fact, I always found it hard to keep my kids out of the garden while I worked. Believe me when I say I know this has its positive and negative side; toddlers and preschoolers are notorious for stomping - unintentionally - on seedlings, for example. Raised beds can help prevent mishaps, but giving your child her own garden will not only help protect the family's main garden, but it gives your child a superb learning experience.
The Benefits of Kids in the Garden
In one study, grade school students who gardened were better able to work in groups and were more likely to show characteristics like maturity, responsibility, and stronger interpersonal skills - including a stronger bond with parents. Kids who grow food are also more enthusiastic about eating fruits and vegetables, something many scientific studies have shown and I have witnessed personally. In addition, kids who garden score higher on science tests than kids who don’t. Gardening is also a great way to get kids outside for some exercise. (In fact, some studies link ADHD, a condition diagnosed in about 9% of American children, with too little time outdoors.) And, naturally, growing fruits and vegetables is one way parents can teach their children better self-sufficiency and how to be more in touch with food in general.
(adsbygoogle = window.adsbygoogle || []).push({});
How to Teach Young Kids to Garden
Fortunately, it doesn't take much effort to give young kids their own plot of land. It needn't be large. In fact, it shouldn't be large, or gardening may quickly become overwhelming. When my oldest was four years old, I gave her two or three square feet of soil - plenty for a young beginner. When my youngest started gardening, I just gave him two large pots. (But if you have two or more kids old enough to start gardening, do yourself a big favor and give them each equally-sized gardening areas. Don't make them share.)
 I recommend giving children a selection of plants to choose from; the first year, I highly recommend limiting your child's choices to things that are easy to grow, thereby feeding her enthusiasm for gardening. Peas, lettuce, carrots, green beans, chives, and radishes are all great choices for a child's first garden because they grow easily - and quickly. You might also consider some easy to grow flowers like nasturtiums (which are edible) and sunflowers. Since its important for young children to see quick results, plant both some small plants purchased from a local nursery and some seeds.
Even when you start them very young, there are lots of things kids can do on their own, including:
* Drawing up a garden plan.
* Helping add amendments to the soil.
* Putting soil in pots.
* Digging holes for plants.
* Counting out and planting seeds (even if they are clumsy about it).
* Adding mulch to the garden.
* Creating plant markers (with painted popsicle sticks or rocks).
* Weeding.
* Watering.
Depending upon the age of your child, you may have to supervise work time in their garden, but do your best not to take over. This garden is your child's, and he should be free to make a few mistakes. But do take advantage of those mistakes and turn them into science lessons. (For example, if your son over-waters the peas, give him an explanation of why too much water is bad for plants. Better yet, set up three plants for an experiment: One to water properly, one to over-water, and one to not water at all.)
For long-handles tools (like spades and hoes), you may need to purchase child-sized tools, but honestly, kids prefer to weed by hand. Otherwise, your kids ought to be able to use easy-to find adult tools like hand spades. I don't recommend purchasing gardening tools in the toy aisle, since they tend to be pretty useless in the garden.
Encourage your child to pick the food he grows whenever he likes, eating them fresh from his garden. If your child likes to cook, also think about purchasing a book like the Simply In Season Cookbook, which teaches kids a bit about seasonal food and has simple and yummy recipes they can prepare. Finally, try reading with your kids about gardening.These titles were big hits in our home, fueling my young kids' enthusiasm and making them shout, "Let's go tend our garden, Mommy!"
How Groundhog's Garden Grew[image error]
Up, Down, and Around
[image error]
Garden Partners
Wiggling Worms at Work
Are You a Ladybug?
(adsbygoogle = window.adsbygoogle || []).push({});
 What About Older Kids?
I think it is easier to start kids in gardening when they are young and want to be like Mom or Dad, but certainly all is not lost if your kids are tweens or teens. If you're fortunate, your older child is eager to learn and all you have to do is give her a small piece of land (or some pots) and let her have at it with a small amount of guidance. But if your child is not eager to learn gardening, that's okay, too. Just make gardening part of her chores - one of the list of things she does to contribute to the household.
With the under-eager gardener, a garden of his own is probably not the best choice. Instead, let your child work alongside you in the family garden. Let him complain, if he must, but trust me when I say he will pick up gardening skills along the way. I can't promise you'll turn your son into a person who loves gardening, but I can say that if you stick with it, your son will learn at least the basics of growing food. And that's really something in today's world.
A version of this post first appeared in March of 2010.
March 25, 2021
Spring Update
 Happy spring!
This post may contain affiliate links. All opinions are my own. Please see FCC disclosure for full information. Thank you for supporting this site!
Since late February, I've spent the majority of my time and energy working on my mother's estate, but of course, the homestead keeps moving along...and that's a good thing. There's nothing like spending time with the rabbits, for example, to make me smile. And it being spring, already I have many homestead happenings to share.
The biggest news is that our Soay sheep had their first lamb on the first day of spring! It was really difficult to tell if Shannon, our ewe, was pregnant or not. She gets REALLY fat when the grass is lush. In fact, she was so huge last year, I thought she might have a fall lamb. But...nothing. Later, I noted when Shaun, our ram, was obviously in the rut and counted forward about 148 days (the usual gestation period) and figured we might have a lamb in March or April. Every day, I looked for Shannon's udder to drop. And...nothing. And then one morning, my husband was down by the pasture and called me: "Come see the lamb!" The lamb was still wet.
 Brains (one of our roosters) with our hours-old lamb.
 Mama and baby, a few days after birth.
 Proud papa.
It's been interesting to see that Shannon birthed and kept her lamb in a forested area, rather than in open pasture or the sheep shelter. I immediately laid down fresh hay in the shelter, but they haven't been in it once, as far as I can tell. The lamb is perky, though, running around and wagging it's tail furiously when it nurses. The Shannon and Shaun are both protective and I haven't gotten more than 8 feet from the lamb yet.
Other fun news includes the addition of a new rabbit to the homestead. Meet Bluebelle (yes, with an "e" on the end, so I can call her "Belle" and have it mean "beautiful"). She is just a baby now, but will grow into a large New Zealand rabbit. Her fur color is somewhat unusual and is called "blue." Soon, we plan to add a blue New Zealand mate for her.
 Bluebelle.
The rabbitry is feeling busy right now, as I recently weaned Fiona's kits...and already she is pregnant again.
 A couple of the harlequin male kits.
The chickens and quail are overloading us with eggs (I've been giving as many away as I can) and our three barn cats are busy leaving us dead rodents on the porch. We also adopted my Mom's indoor cat. (I never thought I'd have an indoor cat again!) He is 10000% housecat, though, so he's the only animal we have who is not pulling his weight...haha!
This year, we'd planned to establish a large vegetable garden, but since I'm so busy with my mom's estate, I doubt that will happen. Maybe fall; we'll see. But that doesn't mean there aren't garden chores to do. My seedlings are nearly ready, and I recently pulled every remaining vegetable out of the ground. I manured the asparagus bed (bunny poop is a gold!) and now I really need to weed!
 Winter garden goodness!
 A lovely late winter sky over a few of our new fruit trees.
 Plum blossoms.
And speaking of gardening and food, did you know I have a lot of spring-themed books? Right now, my Ultimate Dandelion Cookbook and Ultimate Dandelion Medicine Book are popular, but there's also Starting Seeds, Grow the Dirty Dozen, and A Vegetable for Every Season, among others. Have you read them yet? :)

March 10, 2021
My Mom
 Two weeks ago, I received a dreaded phone call. It was my mother's neighbor and friend, saying my mom had just been whisked away in an ambulance.
 It wasn't the first time this had happened. Back in 2019, just a short time after I returned home after my father's death, several times Mom went to the ER via ambulance. Back then, she'd had a series of heart attacks followed by surgery to put in stents. But this time, I had a worse feeling about the situation. That feeling was exacerbated when I learned they'd rushed Mom into surgery...and then grew stronger when that surgery lasted for hours.
At midnight, her surgeon called me. A major artery in Mom's heart was clogged, and her stents were clogged, too. Her heart rate had dropped suddenly during surgery and they intubated her. The doctor hoped she'd rally. But at 4 AM, a nurse called to say they were having a difficult time keeping Mom alive. "Come right away," she said.
I woke up my family and we drove two hours to the hospital. We talked to Mom, though she was unresponsive. One of my sisters talked to her via my phone, asking her to pray for her salvation. Several times, my mom's lips moved.
Then it was time to turn off the machinery. It was very, very quick.
Mom died two days after the two year anniversary of my dad's death...and just four days before her 87th birthday.
Mom lead an interesting and varied life. Born to a World War I veteran and a woman who would later serve as a nurse's aid during the second World War, Mom spent her childhood dancing, singing, and modeling. She performed with the Meglan Kiddies - a performance troupe both Shirley Temple and Judy Garland belonged to at various times. (You can learn more about the Meglan Kiddies here.)
 Mom in one of her Meglan Kiddie costumes.
When Mom's parents divorced, she was sent to a convent, even though she wasn't Catholic. Although those were often lonely years for her, she told many amusing stories about life in the convent (including one where a priest taught the nuns the Conga, much to Mother's Superior's displeasure). Once, briefly, she considered becoming a nun. "Then I discovered boys," she used to say.
 Mom with her first husband.
She married young, to a once-forbidden neighbor boy who left love notes in her mailbox. He joined the Navy (during the Korean War) and was almost never home, while Mom suffered two miscarriages - including one at six months. While her husband was away, Mom worked (first at a cannery, then a five and dime store, and then at a title company, working as a draftsman - at a time when women didn't do that sort of thing). She saved enough money to build a small house of her own design. It was the first of several houses she built and only one of probably at least hundreds she designed.
When the marriage ended, Mom continued her work as a draftsman (never tell her it was more proper to say "draftswoman!"). Later, she met her second husband, with whom she had three children - my siblings.
 Mom with my siblings.
When that marriage ended, Mom took a variety of jobs, until she landed a position at the Unemployment Office, after marrying my dad. She liked the interaction with people, often finding the job amusing. (She once said a certain employee of a famous aquarium told her the orca whales spoke to him.) During my lifetime, Mom also worked as a teacher's aid, a Realtor, and an antiques dealer. And of course, there was always her art.
 Dad, me, and Mom.
She began painting in the 1970s, and regularly did sidewalk shows to sell her work. For years, she belonged to an art league that also sold her paintings. Over the years, her art varied as much as her life - sometimes leaning toward realism, other times toward impressionism, and even (in one painting that her children have always loved) toward 70s weirdness. Since I frequently performed in live theatre, she also painted backdrops, sets, stage floors, and even a local theatre's lobby counter. To say she had talent in the area of painting doesn't even begin to describe it. (To see a tiny sampling of her art, see the end of this post.)
Since my marriage, Mom lived alone (having been divorced from my dad for some years). For a time, she kept herself busy tending a gorgeous garden and teaching art therapy at assisted living facilities. In recent years, she had trouble doing these things, and even gave up painting entirely.
 Mom and me, Christmas 2020.
We'd planned to celebrate her birthday with a big chocolate cake with a gazillion candles, her favorite Subway meal (her choice!), and family time. It pains us that this never happened.
Hug your loved ones and tell them you love them every day!
A handful of Mom's paintings. I'm sure my photographs don't do them justice.


February 18, 2021
Why I (Still) Don't Use Homemade Laundry Detergent
 It was the early 2000s when I first heard about DIY laundry detergent. One "real life" friend told me she saved $10 with each batch of laundry soap she made at home. Other people I knew raved about the all-natural ingredients they used. Of course, as a frugal homesteading mama, I had to give it a try...But once I did make and use homemade laundry soap, I was less than thrilled.
Money Saving???
First, there was the challenge of finding the correct ingredients. I was unable to find them in my hometown, which was a huge drawback, since I tried to shop only locally. However, the next time I was in a larger town, I found everything but washing soda. I chose to use baking soda instead - even though I know there is a difference between the two. (Washing soda is stronger and more harsh than baking soda.) I was also unable to find Fels-Naptha bar soap, which I'd read was ideal, so I substituted Ivory bar soap, which people also commonly use when making laundry detergent at home. This was 2011, and my total cost was $6.17.
I then went home and prepared my homemade detergent. It took about 3 minutes, with interruptions from my kids, and when I was done, I had about half the detergent I'd normally purchase in one box. I'd also used up all the ingredients I bought, minus a small amount of Borax.
(adsbygoogle = window.adsbygoogle || []).push({});After using this DIY laundry soap, our clothes both looked and smelled clean. However, I noticed on subsequent loads that little bits of the grated Ivory soap did not dissolve during the washing (even when I used hot water). Instead, they stuck to the clothes and I ended up having to pick off these pieces of soap before putting the laundry in the dryer. What a pain...
 And I saved very little. At the time, I was paying $12.47 for a 14.4 lb. box of Arm & Hammer laundry detergent. By making my own laundry soap, I saved a whopping $0.07.
When I posted the results of my experiment on this blog, many people simply didn't believe it. They told me over and over that it was much cheaper to make laundry soap - and since my local Wal-Mart had begun to carry all the needed ingredients, I priced out the ingredients - again. This time, they came to $7.55. In other words, they cost more now, yet my Arm & Hammer detergent was still the same price. It was now cheaper to buy my laundry detergent. (Remember, the homemade recipe only made half of what was in the store bought box.)
Soap Scum Mess
Since that time, I've learned there are more problems with DIY laundry detergent. First, it contains soap. That might seem like a DUH! but while we (me included!) often use the words "detergent" and "soap" interchangeably, they are actually two distinct things.
Soap is fat-based and breaks down materials that dissolve in water and oil. However, because of its fat base, soap is difficult to wash away when exposed to textured surfaces (such as fabric). Detergent, on the other hand, is synthetic and captures dirt on fabric more readily - and then suspends it in water, which allows it to easily wash away.
So how did our ancestors get away with using soap for their laundry? Friction. They vigorously scrubbed their clothes on a washboard (or some similar surface). Today's washing machines, though, don't provide that kind of friction; they agitate clothes gently. Simply put, they are designed to work with detergent, not soap. Therefore, if you use soap in your washing machine, you're leaving your clothes soap-scummy...Plus, that scumminess gets into parts of your washing machine that you can't access to clean. Eventually, the build up can ruin your machine.
(adsbygoogle = window.adsbygoogle || []).push({});
So what if you leave out the soap in your homemade "detergent?" Unfortunately, all you're left with is Borax, washing soda, or maybe baking soda - and these are just water softeners.
But My Laundry Looks Clean!

If you've been using homemade laundry "detergent" for a while, and swear your clothes look and smell clean, I challenge you to strip your laundry. I think you'll be disgusted to see just how dirty your laundry water ends up being. (You'll find complete laundry stripping instructions here.)
So...How Do I Save Money on Laundry Detergent?
If you want to continue to use a washing machine, you may now wonder how you can save some money on laundry detergent. I recommend playing around with different brands...and also learning to use only what you need. According to Consumer Reports, most Americans use too much detergent. The Spruce offers some good tips on deciding how much to use, depending upon many factors, including the type of machine you own.
February 9, 2021
DIY Seed Vault (with a Video)

As an Amazon Associate, I earn from qualifying purchases. All opinions are my own. Please see FCC disclosure for full information. Thank you for your support!
2020 was an eye-opening experience for many people. We saw shortages in cleaning supplies, certain medical provisions, toilet paper, food, freezers, canning equipment, and yes - gardening supplies, including seeds. As 2021 opened, several seed suppliers stopped accepting new orders - and at least two popular suppliers closed their websites down, saying they could take no more orders until they'd caught up on the purchases customers had already placed. To say their clientele was shocked is an understatement. Not surprisingly, the shortages of 2020 and 2021 have many gardeners and homesteaders wonder just how to proceed. Many are considering whether or not it's possible to create their own seed storage vaults. The answer: It most certainly is.
Why a Seed Vault?
A seed vault is simply a ready supply of garden seeds typically used as a backup in case seeds are unavailable in stores. (You may also use your seed vault every year, as long as you have a means of replenishing the seeds.) There are no shortage of seed vaults available for sale (some claiming, rather dubiously, that the seeds will remain good for 25 years), but there are a few reasons you might want to make your own:
1. To customize the type of seeds in the vault. Ready-made seed vaults are generic and may contain seeds that won't grow well in your area. If you make your own seed vault, not only can you pick and choose which vegetable seeds to include, but you can ensure the seeds are suitable for your climate and growing conditions.
(adsbygoogle = window.adsbygoogle || []).push({});
2. To save money. You can spend as little or as much as you desire, but it isn't difficult to save money creating your own seed vault.
3. To more easily replenish your seed vault, ensuring that when you do need seeds, they are still viable. If it costs less, or if you supply your own seeds, it is easier and cheaper to keep your vault up to date.
Choosing SeedsThe first step in creating a seed vault is selecting the right seeds: Seeds that produce food your family will eat and seeds that grow easily in your location. Begin by looking at the seeds you already use on a seasonal basis. (If you aren't currently growing food from seeds, before you create a vault, you should make it a priority to begin doing so. All the book knowledge in the world about raising a successful food crop from seeds cannot replace actual experience doing it.) Ideally, you can simply buy or gather extra seeds that you already have experience with and pop them into your seed vault. But among the seeds you already use, ask yourself:
1. Is this open-pollinated? When you start seeds from open-pollinated plants, the "babies" will be the same variety as the parent plant. Heirloom seeds are always open-pollinated. Hybrid seeds are not; while you can collect seeds from hybrid plants, the baby plants will not be the same as the parent plant, often being weaker or having less desirable traits. For the best seed vault, stick with open-pollinated varieties so you can get a great garden out of your vault year after year. If you put hybrid seeds in your vault, you'll only have a great garden until your seed supply runs out.
(adsbygoogle = window.adsbygoogle || []).push({});
2. Is it suitable for your area? In other words, have you found the right variety of tomatoes (or zucchini or green beans or whatever) for your garden? Does the variety always mature before frost hits? Does it withstand pests in your area? Does it provide an abundant crop? Does it grow quickly? (I recommend, when possible, seeds that mature quickly so I can replant at least twice during the main growing season.) If the seeds you're planting don't meet these criteria, try growing some different varieties until you discover seeds that grow better in your location.
 Seeds saved from m garden.
3. Is it a food your family will eat? There's little point in spending time and garden space on foods few people want to eat. For instance, if nobody in your family likes kale, don't bother to store kale seeds. Or if you love pattypan squash but no one else in your family will eat it, perhaps it shouldn't be in your vault. (Or maybe it should; if pattypan squash is comfort food for you, possibly you should include it, anyway.)
4. Does it store well? You should also consider how you will store the crops you grow if there are shortages in canning supplies or you can't run your freezer. Some crops, like winter squash, store quite happily in a cool location; maybe they should receive priority in your seed vault.
For more tips on choosing seeds for your garden, check out this post.
(adsbygoogle = window.adsbygoogle || []).push({});
Getting Your Seeds DryMoisture greatly limits the life of seeds, so getting your seeds perfectly dry before storing them is a must. If you are saving seeds from your garden, be sure to collect them at the right time in the plant's life cycle. The book Seed to Seed by Suzanne Ashworth provides accurate information about when to optimally collect seeds from just about any plant you'd like to grow. (How to collect seeds is a topic that goes beyond the scope of this post; however, before you attempt it, I highly recommend reading Ashworth's book so you can understand how to isolate seeds to get baby plants that are true to the parent.)
If the seeds are growing in gelatinous sacks, as tomato and cucumber seeds do, fermenting them is the next step. This is as easy as putting the seeds in a Mason jar, covering them with water, and setting them aside in a cool, dark location. When the seeds sink to the bottom of the jar, remove them.
Next, dry the seeds, ideally at a temperature of 60 to 100 degrees F. Spread the seeds in a thin layer (I like to do this on waxed paper plates or parchment paper) and make sure they are in a well-ventilated location. Stir the seeds daily to ensure even drying. Some seeds take a week or longer to fully dry.
You may also use an electric food dehydrator for the drying step (this is the brand I use), but you'll want to ensure it accurately puts off heat in the correct temperature range. You'll also have to watch the seeds closely to ensure you pull them out as soon as they are dry. You don't want cooked, dead seeds.
Another option is to use silica gel to pull moisture from the seeds. (You can find silica gel here or possibly at local craft stores.) First, weigh the seeds using a digital scale. Now weigh out the same amount of silica gel. Place the weighed gel into the bottom of a glass jar. Lay a small piece of screening over the gel and then put a thin layer of seeds on top of the screening. Secure an air-tight, metal lid on the jar and set it in a cool, dark location for at least a week and up to 14 days.
(adsbygoogle = window.adsbygoogle || []).push({});
Choosing the Storage Method
 I prefer to store seeds in the fridge.
It helps to understand that the enemies of seed storage are light, heat, and moisture. If you simply stored your seeds at room temperature (but away from light and excessive moisture), they would last approximately this long:
1 year: onions, parsnips 2 years: corn, chives, leeks, okra, peppers, spinach
3 years: asparagus, beans, broccoli, carrots, celery, kohlrabi, peas, rutabaga, turnips
4 years: artichokes, beets, Brussels sprouts, cabbage, cauliflower, chard, eggplant, kale, radish, squash, watermelon
5 years: collards, cucumbers, lettuce, tomatoes
To extend the lifetime of seeds, there are three main possibilities:
1. Refrigeration.
2. Freezing.
3. Freeze-drying.
Refrigerating seeds is easy. If you plan to rotate your seed vault every year (or even every two or three years), this is probably the best and safest option available. To properly refrigerate seeds, place desiccant or dehydrated milk (both of which absorb excess moisture; find desiccant here) in the bottom of a large glass jar, put the seeds (in paper envelopes or old pill bottles) inside, and secure the jar's air-tight, metal lid. Store the seeds toward the back of the fridge, so they don't experience as many swings in humidity. (The door of the fridge is the worst place to store seeds since that part of the refrigerator sees a lot of humidity swings as the door opens and closes.) Ideally, you'd store your refrigerated vault in a fridge you rarely open - say, a mini-fridge kept just for storing seeds. If the power goes out, don't worry. Just leave the refrigerator closed. Longer power outages will slightly reduce the life of the seeds.
Official seed banks freeze their seeds, and this is considered the best method of keeping seeds viable for a long time - but unless you do it perfectly, you will destroy your seeds. Storage banks also flash-freeze their seeds and have generators to back up their freezers if the power goes out. For great at-home results, your freezer must stay at a constant -20 to -15 degrees F. and the seeds must be perfectly dry. (If you are going to freeze your vault, I recommend air drying your seeds, then using the silica gel method to remove any remaining traces of moisture.) A dedicated freezer (perhaps a small, apartment-sized one) that can reach the required temperature is a better option than a freezer you open regularly. If you choose to freeze your seeds, I recommend keeping them in paper envelopes which are then placed inside Ziplock-style bags. Seal the bags and place them inside an airtight container.
Another potential storage method is freeze-drying. Home freeze dryers are now on the market (click here for details), and while I wouldn't recommend buying one just for seed storage, if you already have one for preserving food long-term, you might wish to try running seeds through it. Consumers have had varying experiences freeze-drying seeds; some report success using the seeds the following year, while others testify that smaller or more delicate seeds turn to dust when removed from the freeze dryer. I am unaware of anyone who has home freeze-dried seeds and used them several years after doing so. Be aware that if you freeze-dry seeds, you'll need quality Mylar bags and oxygen absorbers to make them last more than a year.
 Fermenting tomato seeds.
An Off-Grid Seed Vault
What if you're off-grid...or will be during a time of need? Then your seed vault should be set up exactly as if you were refrigerating it. But instead of using the fridge as your storage location, you'll use the coolest, darkest spot in your house - like a cool closet or garage. Why can't you just store your seeds this way all the time? You certainly can. It's just important to understand that the seeds won't last as long using the "cool place" storage system as they would if you refrigerate or freeze them. If you choose the "cool place" method for your seed vault, I recommend using your seeds yearly and replacing them at least every two years.
Using Your Seed Vault Seeds
You might be tempted to pull your seeds out of the freezer or refrigerator and plant them right away, but this can diminish their viability. Instead, choose between two options:
Method 1: At least 24 hours before planting, remove the vault and allow it to come to room temperature. Do not open the container during this thawing time. Once the seeds are at room temperature, you may remove and plant them. The downside to this generally preferred method is that all your seeds will thaw, which is not ideal if you're not planting some of all the types you have stored. (Thawing and freezing repeatedly eventually reduces the life of seeds.) To work around this, serious seed savers store seeds according to the time of year they'll likely plant them. For example, you could have one vault for seeds you start in the early spring and another vault for seeds you start in summer, as prep for a fall garden.
Method 2: Briefly remove your vault and take out only the seeds you wish to plant right away. Replace the vault and allow the individual seed packets to thaw. The downside here is that you are still altering the temperature and humidity for all the seeds, plus you are thawing the seeds you want to use more quickly. All these things can reduce the life of your seeds. Nevertheless, if you are replacing your vault seeds every one to three years (which I recommend), either method is likely fine.
It's also not a bad idea to test the viability of your vault seeds before you plant them in the garden. Click here to see complete instructions for doing so.
(adsbygoogle = window.adsbygoogle || []).push({});
February 4, 2021
5 Homesteading Myths

As an Amazon Associate, I earn from qualifying purchases. All opinions are my own. Please see FCC disclosure for full information. Thank you for your support!
There are times when the common wisdom holds us back. We forget that what is true for one person, may not be true at all for another. We forget that where one person tried and failed, others tried and succeeded. Even in the world of homesteading, there are some persistent myths that may prevent our success - or even stop some people from trying at all. Here are the top five homesteading myths I hear and why I think they are wrong.
Myth #1: Growing your own food is more expensive than buying it.
Reality: First, let's cast aside the idea that homesteading is only about saving money. In truth, what compels most people to begin growing and raising their own food is things like avoiding animal cruelty from factory farms, obtaining healthier food, eating higher quality food, and better self-sufficiency. That said, it is a myth that growing your own fruits and veggies or raising animals for meat and eggs always costs more than buying that same food. Even if you're talking about buying that food from a cheap source, like a frugally-minded grocery store.
Periodically, I like to figure what our homegrown food costs us. Always, I'm delighted to discover our homesteading enterprise actually saves us money. Here's a recent example: After adding up store-bought feed costs, our quail cost about 64 cents per pound. I can't even find quail meat locally (it runs about $5 a pound or more online, plus shipping), but still - there is no meat I can buy in the store or the farmer's market that sells at so low a price per pound. Plus the quail give us lots of delicious eggs.
I haven't added up our gardening expenses since 2013. But back then, comparing our organic produce to conventionally grown store-bought stuff, we grew about $1,770 worth of fruits and veggies. After subtracting expenses, that meant we saved $1,492 in a single year. At the time, we were living in the suburbs; I grow much more food now that we live in a rural area - plus I now save many of my own seeds and have plenty of homemade soil amendments and so on. Our savings, in other words, have only increased.
 An entirely homegrown meal.
Of course, you can spend a lot of money raising food (read the book The $64 Tomato for a supposedly true example), but you certainly don't have to. Aim to make-do whenever you can, and never miss an opportunity to work a wee bit harder but save a little money. Example: Instead of buying fertilizer, collect and compost your chicken manure; compost vegetable and fruit scraps; use grass clippings as mulch; and otherwise scrounge up organic matter to fertilize your garden.
Myth #2: I can't homestead because I don't want to raise animals.
Reality: If you have no desire to raise livestock, you most certainly can still be a homesteader. Homesteaders, as individuals, have varying goals. Some want to live off-grid and try for complete self-sufficiency. Some just want to grow a few veggies to supplement what they buy at the farmer's market. And most homesteaders fall somewhere in between. Nobody has a rule book with a list of "musts" that need checking off before you can consider yourself a homesteader. If you don't eat meat, or just don't want to mess around with caring for critters, the homesteading police aren't going to come after you. (There are no homesteading police!) If all you want is to grow plants, by all means, that's what you should do...and have no hesitation in calling yourself a homesteader.
(adsbygoogle = window.adsbygoogle || []).push({});
 Homestead-grown veggies.
Myth #3: You need to own a lot of land to homestead.
Reality: A lot of people I meet are waiting to start homesteading. The most common reason for waiting is the belief that they must live in a rural area before they can begin. But the truth is, you can homestead anywhere. In fact, your future success as a homesteader will greatly improve if you start putting homesteading skills into practice right now.
If you live in the city, find (or create!) a community garden, grow food on your balcony, or see if you can get permission to grow food on your roof or in pots in a meager side yard. If you live in the suburbs, establish not just a traditional vegetable garden, but learn to add edibles to your ornamental garden, too. Plant food in window boxes, mow strips, side yards, and porches. Add a few fruit trees to your yard; you could train them to grow in espalier fashion along a fence or wall, or you could choose patio varieties that grow in pots. If you have room, you could even grow a few dwarf trees. Grow berries along your fence line. Raise chickens, quail, rabbits. There's a lot you can do in the suburbs. Some people even manage to grow or raise most of their food in the suburbs.
The Dervaes family of Pasadena, California are possibly the best-known suburban homesteaders on the Internet. Let them inspire you. On only 1/10th of an acre, they grow 6,000 lbs. of produce yearly, plus eggs and honey, and make $20,000 a year via porch sales and sales to local chefs.

Location matters a lot less than you think. Even if your ultimate goal is to homestead in the country, by starting your homesteading journey right now, not only will you reap the many benefits of the homestead life much sooner, but you'll be far ahead of someone who waits to learn and practice homesteading skills until they have "a lot of land."
Myth #4: Homesteading is the simple life.
Reality: Sometimes people refer to country or rural living as "the easy life" or "the simple life." I suppose in some ways it is easier or more simple...but it's also important to understand that it's a lot of hard work to homestead. Yes, you should definitely sit on the porch overlooking your garden, sipping sun tea as the day comes to a close; relax and appreciate what you have! But whether your goal is to raise some or all of your food, it takes time and work to accomplish this. It's easy to romanticize the work related to homesteading. Fetching eggs from the hens, harvesting fresh veggies from the garden, canning peaches...it all seems rather like a TV episode of Little House on the Prairie. But if you've read the Laura Ingalls Wilder books that television series is based on, you should know homesteading is less about simple, idyllic tasks and more about hard work.
(adsbygoogle = window.adsbygoogle || []).push({});
To homestead successfully, I think it's important to enjoy the work of the homestead - because instead of going out and playing, like your non-homesteading friends may do on the weekends, you'll likely be at home weeding, butchering, and repairing fences. There is always work to be done on a homestead.
Myth #5: It's impossible to homestead full time.
 Not all prolific homesteads are at the end of country roads.
Reality: I believe that if you can dream it, work smart, and work hard, you can probably achieve it. However, it's also important to look into heady dreams with your eyes wide open. And the truth is: Your dream of homesteading full time in the modern world is not easy to achieve. Most homesteaders will never live it. But some most definitely do.
Yet you shouldn't expect to suddenly set up a self-sustaining homestead. It costs money to buy livestock, to put up fences, to get tools, to get a woodstove, to buy land, and so on. It takes time and money to get that sawmill to turn your trees into lumber, to drill a well or pump water from a spring or pond, and to get set up so you can feed your livestock without shopping at Rural King. Even once your homestead is entirely set up the way you like, you will find that you still rely on others for some things...often things that must be purchased.
To achieve the dream of homesteading full time, you'll need to begin with land. Ideally, you'll buy that land inexpensively (which usually means it has no house - at least not a livable one - or a barn, fencing, etc.) because to homestead full time, you need a goal of zero debt. Land may be worth going into debt for, but likely nothing else is. As you establish housing for yourself, as you build animal shelters, as you put up fencing, and so on, you'll need a job (or considerable savings) to pay for it all. Slowly, you can add livestock, a garden, an orchard. Maybe once you reach this point, you can begin aiming for self-employment. That might mean working at a non-homesteading job or you might be fortunate enough to start a successful CSA, farmer's market stand, or Etsy shop with items derived from your homestead. Maybe you can even sell the offspring of your livestock or the meat derived from them. Likely, you'll need to do at least several of these things to continue paying for your dream.
Another way this dream of full time homesteading could work is if one spouse or partner works full time and the other stays home and works on the homestead. Money will likely be tight - but it is do-able, especially if you eschew many modern conveniences and money-suckers, like eating out, cable TV, more than one vehicle, etc. Be careful of burn out, though - especially if you have children. Raising kids, keeping the house reasonably tidy, and homesteading all by yourself isn't easy.
Homesteading full time is a dream that isn't instantly achieved. (Maybe that's part of what makes it so rewarding.) And if it's your dream, start working toward it today, right where you are. Even if you live in the city.
(adsbygoogle = window.adsbygoogle || []).push({});
February 2, 2021
Testing Older Seeds to See If They are Still Good (with video)
 Given that seed companies are shutting down their websites left and right this year (because they can't keep up with demand), there is no better time to learn how to test the viability of seeds you may already have on hand. Whether you've got a few seeds from last year or you have a stash of seeds many years old, it's easy to test whether or not they are still good. It surely can save a lot of hopin' and prayin' the seeds will sprout when in fact they are dead...and will also keep you from wasting perfectly good seeds by throwing them away.
How to Test Seeds for Viability
You will need:
paper towels
a spray bottle filled with water
seeds
Ziplock-style baggies
a pen
1. Lay a paper towel on a waterproof surface (like a kitchen counter) and spritz it with water. You want the towel pretty evenly moist, but not overly saturated.
2. Fold the paper towel in half, then sprinkle about 4 to 5 seeds on it. (Do not mix seed varieties. Only test one seed packet per paper towel.)

(adsbygoogle = window.adsbygoogle || []).push({});
3. Roll up the paper towel and place it inside a baggie. Seal the baggie shut. Write the name of the variety on the baggie, as well as the seed packet's information on how long it takes the seeds to germinate (which is usually given in a range of days, such as 5 - 15.)
4. Place the baggie in a warm location, like the top of your refrigerator.
5. After the minimum amount of days until germination have passed, open the baggie, unroll the paper towel, and see if the seeds have started sprouting.
 6. If some but not all of the seeds have sprouted, you may roll up the towel, place it back in the baggie, and put it on top of the fridge until the maximum number of days until germination have passed. This can tell you what approximate percentage of seeds are viable.
6. If none of the seeds have sprouted, roll the paper towel back up and put it back in the baggie. Put the baggie on top of the fridge and check again in a few days. If the maximum days until germination passes and the seeds still haven't sprouted, the seeds are not viable.
(adsbygoogle = window.adsbygoogle || []).push({});
January 27, 2021
How to Choose Vegetable Seeds (with Video)

 This post may contain affiliate links. All opinions are my own. Please see FCC disclosure for full information. Thank you for supporting this site!
 'Tis the season of seed catalogs - when gardeners everywhere dream of their best, most abundant vegetable gardens yet. But before you send off any orders, stop to consider whether you're falling into some common seed selection traps.
Choose Seeds that Suit Your Garden
Often newbies purchase their seeds cheaply from stores like Walmart or Home Depot, never realizing they may be inferior and less likely to thrive. As Steve Solomon, former owner of the successful Territorial Seed Company, once wrote, many seed companies consider home gardeners gullible. "You can sell the gardener the sweepings off the seedroom floor," a salesman once told Solomon. When seeds "germinate badly or fail to yield uniformly and productively...[home gardeners] wonder if it was their watering, their soil preparation, the depth they sowed at, or any of a handful of factors they are uncertain about. Almost never does the home gardener blame the seed," Solomon writes in Gardening When it Counts.
Many other gardeners purchase their seeds from well known, national seed companies like Burpee's. That might be a better choice, but I'd like to suggest that for most of us, there's an even better place to purchase your veggie seeds: From a regional seed supplier. Such companies grow and sell seeds that are most likely to thrive in your climate. For example, when I lived in the Willamette Valley of Oregon, a perfect place to shop was Territorial Seed. All their seeds were (and are) tested in the Willamette Valley - and therefore were (and are) well suited to that area. If you live in that general region, you might also consider purchasing your seeds from a company located in England or parts of Canada, where weather conditions are similar to those in the valley.
How do you find regional seed sources? An internet search will usually do the trick. Or, to find seed sources listed by state, check out Mother Earth News' Best Garden Companies. You can see how reliable a seed company is by reading the reviews over at Dave's Garden. Steve Solomon recommends the following:
(adsbygoogle = window.adsbygoogle || []).push({});
For short season climates ("This area comprises the northern tier of the...United States and that part of southern Canada within a few hundred miles of the U.S. border."): Stoke Seeds, Johnny's Select Seeds, Veseys Seeds, William Dam Seeds

For moderate climates ("The middle American states...this is where the summer gets hot and steamy...and the winter is severe enough to actually freeze the soil solid at least 12 inches deep."): Stoke Seeds, Johnny's Select Seeds, Harris Seeds, King Seeds
For warm climates ("This includes the southern American states...The soil here never freezes solid; the summers are long and hot. The climate may be humid or arid."): Park Seed
For maritime climates ("...This bio region is sometimes called Cascadia. It includes the redwoods of northern California, extends into Oregon, Washington, and the Lower Mainland and islands of British Columbia, always west of the Cascade Mountains. England, Ireland, Wales...have about the same climate...These regions usually have relatively cool summers. Rarely does the soil freeze solid in winter except at higher elevations and where is it isolated from the ocean's moderating influence."): Territorial Seed, West Coast Seeds, New Gippsland Seeds
Even though you've now chosen suppliers that cater to your general region, you'll also want to check that each variety of seed you buy will grow in your USDA gardening zone. (Find your zone by clicking here.)
(adsbygoogle = window.adsbygoogle || []).push({});
Choose Seeds According to Their Maturity
 How long it generally takes for seeds to go from germination to harvest is something every gardener should consider. Why? Real estate! If you choose veggies that take a long time to grow, you will, quite simply, get less food from your garden. For example, if I have a choice between a cabbage variety that takes 90 days to grow to maturity and one that matures in just 60 days, I'm going to plant the 60-day variety. That way, I can harvest the cabbage and then plant something else in the same location: maybe more cabbage, or maybe some other vegetable. Choose Seeds According to the Season
Seed catalogs should state whether the seeds are most suitable for early season, mid-season, or late season gardening. Some vegetables will only grow well in the cool of early spring or fall. Others require the heat of summer. There's little point in growing spinach, for example, during a hot Southern summer. It will taste awful and go to seed quickly.
Choose Seeds According to Growing Requirements Most vegetables need "full sun" - at least 6 hours of full sunlight daily, but there are a few that can tolerate more shade. Also, some plants have special growing requirements like acidic soil or soil heavily enriched with nutrients. Make sure the seeds you buy correspond with the growing conditions you have.
Choose Seeds According to Lingo
Some terms found in seed catalogs can be confusing. Understanding them will help you choose the best seeds for your garden.
Heirloom: All heirloom seeds are open pollinated, but not all open pollinated seeds are given the label heirloom. This is because "heirloom" is a loose term meaning a variety that has been around for several generations. Most date to the 1930s or 40s.

Hybrids: These are seeds created by crossing two varieties of plants. They can be purposefully made by humans or naturally created by the wind, birds, or insects. Hybrid seeds are not the same thing as GMO seeds. Hybrids are not ideal for seed saving; some hybrid seeds are sterile, but most simply are not true to the parent plant. On the other hand, hybrids can be more disease and pest resistant than non-hybrid varieties.
GMO: Patented seeds created by removing or adding DNA genes to the plant. GMOs can only be made in a laboratory and some contain non-plant material. GMO seeds are only sold to commercial farmers buying seed in bulk. Home gardeners cannot purchase GMO seeds. (See "Why You Shouldn't Worry About GMO Seeds in Your Garden.")
Organic seeds: These seeds are grown organically and are not sprayed with non-organic chemicals. Unless seeds are specifically marked organic, gardeners should assume they are grown by non-organic means and are sprayed with non-organic disinfectants.

A version of this post first appeared in January of 2012.
(adsbygoogle = window.adsbygoogle || []).push({});
January 21, 2021
The Best Way to Store Eggs (Short and Long Term - with video)
This post may contain affiliate links. All opinions are my own. Please see FCC disclosure for full information. Thank you for supporting this site!
In the past year or so, I've seen a lot of people experimenting with the best way to store eggs - short term and long term. I've also seen a lot of egg-preserving failures. So before you try that egg storing method you've seen people talking about on social media, check out this post. I've been storing eggs for many years and have a very good idea of what works - and what doesn't!
Scroll down to watch the video, or read the recap below.
3 Things to Know Before Storing Eggs
Whether we're talking chicken, duck, goose, turkey, quail, or some other type of edible bird egg, there are three important things to know before you store or preserve them.
#1. All bird eggs have a natural coating called a "bloom." This bloom prevents bacteria from entering the egg, protecting the embryo inside. It also keeps the egg fresher. Therefore, it's unwise to wash eggs that you want to store for any length of time. Washed eggs simply don't last as long and are more likely to develop bacteria that can make you ill.
This is even true with eggs that have barnyard soiling. It's better to store dirty eggs unwashed; washing opens up the eggs to bacteria. (Don't worry; unwashed eggs in your fridge do not contaminate other food, if stored in their own container.)
By the way, all store-bought eggs sold in the U.S. are washed in bleach. This makes them unsuitable for many forms of preservation. If you buy eggs from the farmer's market or from a friend who raises birds, be sure to ask if the eggs are washed or not.
#2. The rounded end of an egg contains a sack of air. If you store eggs rounded end down, the air travels upward to the yolk, making the egg goes bad faster. Always store eggs pointy end down.
#3. Eggs that are cracked or chipped should not be stored. Throw them away, or feed them immediately to your dog or chickens. (Remove the shells first.) Any breaks in the shell allow bacteria to enter.
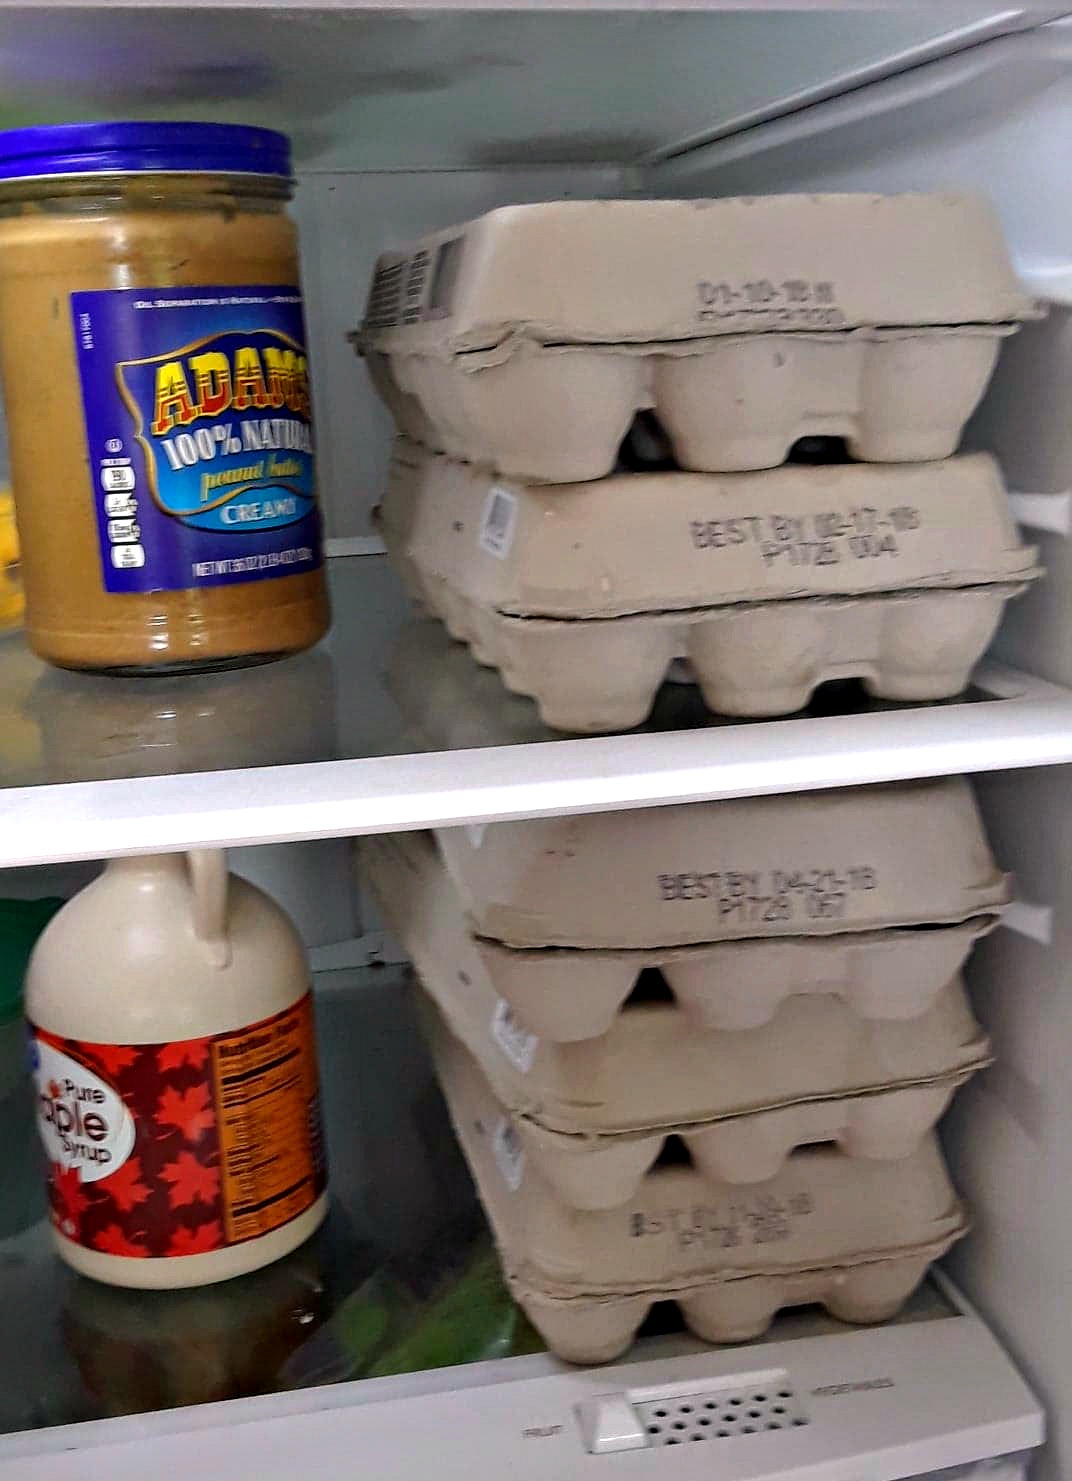
How I Store Most of My Eggs
I prefer to store our eggs in ordinary cardboard egg cartons. 18 count suits us best. (12 count cartons fill up too fast and larger sizes are cumbersome, in my experience.) I reuse these upcycled cartons over and over again and when they finally start breaking down, I compost them. You can also buy plastic cartons - including some that hold a great many eggs. Either type of carton is fine.
I keep one carton in a lone location in my fridge. When I gather eggs, I immediately pull out that carton and put the eggs in it. When the carton gets full, I transfer it to a separate area of my fridge, putting it on the bottom of a stack of cartons. When I'm ready to cook, I simply grab the carton on top of the stack, knowing I'm using the oldest eggs first.
You can also store unwashed eggs on the counter; I just prefer not to because they don't last nearly as long that way.
(adsbygoogle = window.adsbygoogle || []).push({});
How I Store Eggs Long Term
The great news is, I don't have to do anything special to make these refrigerated eggs last a long time. Unwashed, stored in the fridge, they last 6 months to a year.
Now you may be thinking, "Yes, but then the fridge is full of eggs." And that can happen. If you choose this method, you get to decide when enough is enough and either sell some eggs or preserve them some other way. I have a small, old fashioned fridge and this method still works for me. Ideally, though, I'd have a separate refrigerator that I could store eggs in. Used is fine - even a dorm-sized fridge works - and it can go in the garage or some other outbuilding.
And if the power goes out? No problem! Those eggs will still last just fine until the power comes back on.
Other Long Term Egg Storage Ideas
I have tried a number of methods for storing eggs long term. Other than refrigeration, the two best methods are, in my opinion, freezing and freeze-drying. But if you're off-grid, or just want to know more about various methods of storing eggs for longer than a year, check out the post below for details.

How Do I Know if Stored Eggs are Safe to Eat?
If you've stored eggs for a while (or if your hens have hidden their eggs and when you discover them you have no idea how old they are), it's easy to learn if they are still safe to eat. Just do a float test. You'll find complete egg float test instructions here.
Related Posts


