
UXpin's Blog, page 103
October 15, 2018
Introducing Variables and Conditional Interactions for More Interactive Prototyping
Your prototypes have officially gained superpowers. Now you can store or pass information using variables and add conditional interactions! Prototyping just got a whole lot more interactive. Get much closer to real, coded apps with these new features. They’ll be especially handy for user testing.
Fall 2018 has been a crazy time at UXPin for all the right reasons. We have many cool features on their way—stay tuned for Expressions, States and Data. But we digress… today, we’re excited to show you not one, but two new features closely tied together!
What are they?
Variables
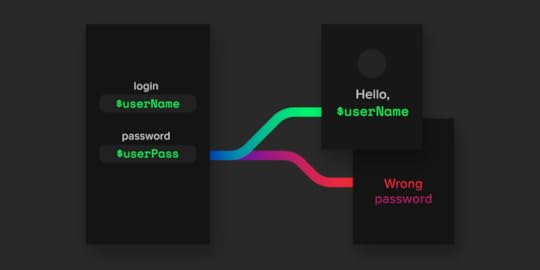
Variables allow different elements to “communicate” with each other even if spread across pages. This data persists from page to page as you click through the prototype. Meaning you can set a variable’s value on one page and then take action based on that value on a completely different page.
With variables, you’ll be able to build the relationships between elements in a prototype. To do that, you can simply set the same variable for the elements you want to pair together. For example, to collect user data in an input and then use “username” in a message in a different part of the prototype.
https://www.uxpin.com/studio/wp-content/uploads/2018/08/variables-video.mp4
Conditional Interactions
Conditional interactions give your prototypes a layer of logic—this is a very powerful feature that is characteristic to only a handful of prototyping tools. We’re very excited to be added to that list. With conditional interactions, you can set rules that make the interaction happen only if those rules are met.
When to use these features
To collect some information, like a name, and pass it to another page to display it as part of a greeting message
Easily store user-entered data and then reuse it across elements and pages in your prototype
To tailor prototype content and behavior to different scenarios for user testing
Why you want them in your life right now
Make prototypes feel like the real deal, operating on data or actions by users (especially when user testing)
Your prototypes will be more dynamic and less generic
Make it much easier to showcase (to developers, for example) how the solution should work in real life
Create more flexible prototypes and save a lot of time on creation, because you don’t have to re-do components to fit different use cases
How can you start using them right away?
All this is already live in your account (both web and desktop app) if you use UXPin.
Don’t use UXPin yet but want to try your hand at variables and conditional interactions?
Join the world's best designers who use UXPin.Sign up for a free trial.Your e-mailTry it for free!
The post Introducing Variables and Conditional Interactions for More Interactive Prototyping appeared first on Studio by UXPin.


October 12, 2018
Variables & conditional interactions

With our latest release you’ll be able to take prototyping to a whole new level! Use variables to store user input and take actions based on it within the prototype. And with conditional interactions you can even add a layer of logic to your prototypes!
Learn more about variables and conditional interactions
The post Variables & conditional interactions appeared first on Studio by UXPin.
October 2, 2018
Why it’s Time for Designers to Switch from Image-based to Code-based Design

Since the dawn of the digital product design, there’s been a big issue. Designers have been forced to work with software completely separated from the product development process.
Siloed from the rest of the organization, designers draw pictures with their raster graphics or vector design tools. Whether they work in Gimp, Photoshop, Fireworks or Sketch, the process looks identical: The designer renders her intent as a set of static images and sends them to the engineers. Showing different states of the interface with static artboards is very tedious. Thus, designers don’t detail everything. Now, the engineers must build the whole user interface from a set of incomplete, static images. All the interactive states need to be ironed out in an often lengthy back and forth communication.
The results? Tests with users are painfully basic as static designs don’t represent the experience accurately. The process is full of inefficiencies that lead to frustrated teams and unsuccessful products.
Fortunately, there’s a better way to design now. The code–based design tooling paradigm is rapidly replacing image–based design tools. Instead of drawing static representations of designs in a raster or vector design tool, designers can render their design intent directly in code… without knowing how to code. The new set of tools (notably UXPin!) provides a new workflow that:
– establishes a single source of truth for both designers and engineers
– empowers designers with the full power of code without any coding expertise
– connects them both in one collaborative, creative process.
It’s a workflow revolution, if you may. Speaking of, sign up for our upcoming webinar on the 25th of October to learn more about code-based design.
 UXPin’s upcoming Merge technology that’s helping bridge the gap between design and code.
What’s wrong with image-based design?
As you know, there are two paradigms of design tooling: image–based and code–based design tools.
The image–based paradigm is an old design tool approach used for many decades (most notably – Photoshop originally launched in 1988). The idea is that when designers draw something, they build raster or vector graphics. This approach allows for the most flexibility. Everything can be effectively drawn this way – from icons to advanced illustrations with the most beautiful level of details. However, it often breaks in professional digital product development. Here’s why:
Lack of interoperability: These graphics are never used to build the actual interface of a product, except illustrations, icons and photographs. Designers working on interface design in image–based design tools work outside of the constraints set up in code and therefore, unknowingly, can create things that are difficult and expensive to code.
Lack of accuracy: While they can create wonderfully detailed designs, image–based tools also lead to the most inaccurate results during the development process. They use completely different methods for rendering the result of the designers’ work. Therefore, text, gradients and colors chosen by a designer in their image–based tool looks different in code when an engineer applies the same specs. This causes massive misalignment between the teams. Check out this example. And this hilarious tweet that nails it.
Static designs: Image–based design tool workflow focuses on building static artboards for every state of the interface and then linking them together. This approach breaks in professional projects. Even simple patterns (e.g. a dropdown) quickly become unmanageable in the static workflow. Why? Due to a large amount of artboards and lack of ability to save interactive components for reusability. Moreover, these tools allow only very basic interactions without the ability to set states of elements, variables for content, conditional logic, etc.
Weak design–engineering collaboration: These tools are completely separate from the engineering processes and cannot be merged efficiently. The disconnect is in the very nature of the output of both worlds. While developers work in technologies actually experienced by users as the final product, users of image–based design tools introduce additional layers of abstraction which remain far off from the final user experience. Lack of real interactions, reusable interactive components, or the ability to import components from code keeps engineers and designers disconnected and frustrated with one another.
What’s so special about code-based design?
Glad you asked. With code–based design tools, when a user draws something, the tool creates relevant html/css/js and engages the browser, rendering the engine to show the result visually. It offers the most realistic fidelity (the same technologies are used by designers and developers), the most powerful interactions and the closest collaboration with engineers. There are many benefits for all parties involved, but today, let’s focus solely on designers:
Benefits for designers
The most realistic fidelity: Unlike image–based tools, the code–based approach provides 100% match between the intent of a designer and a code–able result. That’s because code–based tools use the same technology as those used in web development to render all of the design project! If you can make it in UXPin, you can definitely make it code!
The same constraints for designers and developers: With image–based tools, designers can create things that are difficult, even impossible to recreate in code. On the other hand, code–based tools allow for the exact same constraints for designers and developers (limits of the code!). This ensures they can truly stay synced.
Interactive components instead of artboards: Code-based design tools use the most advanced interactions on the components level, instead of link artboards. This approach mimics development and empowers designers to create highly reusable interactive design systems.
The most powerful, realistic interactions: Objects can move on the screen, interact with each other and create complex patterns. Just like in code, but without a need to know how to code. This is crucial for the collaboration with engineers (to actually experience the product before coding the final version) and for tests with users. Elements that are natural in the code–based paradigm, like real text inputs or checkboxes, don’t exist in image–based tools!
The strongest collaboration between designers and engineers: The code–based paradigm enables a completely new, revolutionary approach to the design and engineering collaboration.
And that’s just the designers’ side of things. Stay tuned for another article about the benefits of code-based design for both your company’s engineers and your entire organization.
Craving more? Attend our live webinar ‘Code-Based Design: The Workflow Revolution on October 25th. We’ll even show you new technology that will revolutionize code-based design forever.

The post Why it’s Time for Designers to Switch from Image-based to Code-based Design appeared first on Studio by UXPin.
September 13, 2018
Boolean operations

Boolean operations allow combining any set of basic shapes to create more complex ones. The best part – the individual shapes are still editable. Creating beautiful icons is going to be so much easier now!
The post Boolean operations appeared first on Studio by UXPin.
August 28, 2018
The Most Accurate Specs for Sketch on the Market
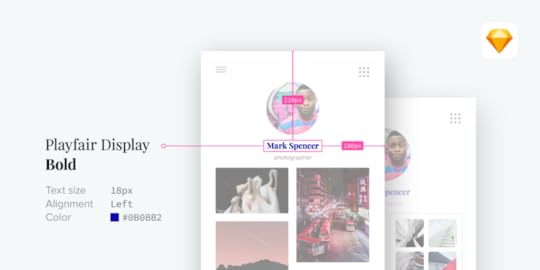
You asked, we listened. UXPin just unleashed the mother of all Sketch plugins. Now you can get the most accurate specs and code snippets available on the market for all of your Sketch designs. And it works faster than ever.
So, what’s the main reason for this update? Designers often work in Sketch and upload their designs to UXPin to get accurate specs for development and/or gather comments. Historically, our integration has had issues with speed and prototypes being a true match when switched to our platform. We needed to fix this STAT. So we did!
With UXPin’s new Sketch plugin, you can:
Get specs and code snippets for any element, even deeply nested
Import your Sketch files with all layers preserved for spec and collaboration
Generate assets for different platforms (iOS, Android, Web)
Export designs in one click between Sketch and UXPin
Full Spec Mode locked and loaded
Now when you create a prototype in Sketch and export it to UXPin for spec/comments, you don’t have to stitch the prototype again. We’ll import this information and link everything together.
If you’re using the UXPin Design System and sync symbols to UXPin and document them, we’ll present this information (documentation from Design System) on Spec as well. We’re also maintaining all the overrides for symbols from Sketch files. Gone are the days of time-consuming redlining of mockups. A new era of smoother collaboration between designer and developer has begun.

100% accuracy when you import from Sketch → UXPin
Yup, you read that right. Keep in mind that this is only single-directional for the time being. You can’t send these imports back to Sketch while maintaining that accuracy. We’re working on the ability to edit text on your Sketch imported designs in UXPin, so stay tuned. In the meantime, you can either:
Complete your designs in Sketch, then bring them into UXPin for prototyping and collaboration
Design completely in UXPin
UXPin users may have noticed some recent releases in the tool. We added more high fidelity design capabilities and have gotten great feedback about our new pen/path tool. You can do almost everything in UXPin that you can do in Sketch (except for masking, but we’ll add that too!). The biggest reason for some of the disconnect is that Sketch is vector-based, and UXPin is code-based.
We chose this path because there are many benefits of code-based design for both designers and developers, including:
The most realistic fidelity
The same constraints for both parties
Interactive components instead of artboards
The most powerful interactions
The strongest collaboration between design and code
Asset export for different platforms
Now you can generate and export assets from Sketch designs in appropriate sizes for all your iOS, Android and Web projects.This has been a frustration for our users, but no longer! As for most of our features, keep in mind that you need to be connected to the Internet to export things out of UXPin.
How can you start using this right away?
Already have the Sketch plugin? Simply update it
Don’t use the Sketch plugin yet? Download it in your UXPin account (available in the ‘integrations’ panel and linked from the main dashboard when users create a new project)
Don’t have either? It’s time to…
Join the world's best designers who use UXPin.Sign up for a free trial.Your e-mailTry it for free!
The post The Most Accurate Specs for Sketch on the Market appeared first on Studio by UXPin.
August 27, 2018
Export for Spec Mode with new Sketch plugin
 Use Sketch? Download our shiny new plugin and upload your Sketch designs to get the most accurate specs, code snippets and assets for different platforms (iOS, Android or web).
The post Export for Spec Mode with new Sketch plugin appeared first on Studio by UXPin.
August 2, 2018
UXPin Changelog July 2018 #10

In July, we’ve added a few features that allow building better high fidelity prototypes: new curve types for pen tool, loop for interactions, flipping elements. Also, we’ve released some enhancements to the UXPin Editor to improve the workflow. Details below.
Editor and Preview
[New] Asymmetric and disjointed curve types for pen tool.
[New] Possibility to switch elements height/width from the properties panel.

[New] Possibility to flip elements horizontally/vertically.
[New] Possibility to loop interactions.
[Improved] Updated icons for common elements on the layers list.
[Improved] Improved performance when dragging layers on the layers list.
[Improved] Elements added with shortcuts are placed so that their top left corner matches the cursor position.
[Improved] Moved distribute controls to alignment sections.
[Improved] Moved front/back controls to the top bar.
[Improved] More coherent shadows for all elements.
Desktop App 1.1.2
[New] More actions in the top bar menu.
Small bug fixes and visual improvements.
If you’re interested what we released in June, please check out Changelog 2018 #9.
Join the world's best designers who use UXPin.Sign up for a free trial.Your e-mailTry it for free!
The post UXPin Changelog July 2018 #10 appeared first on Studio by UXPin.
July 27, 2018
Loop interactions
 Create looped interactions in UXPin! Set them to be repeated a specific number of times or infinitely infinitely infinitely…
The post Loop interactions appeared first on Studio by UXPin.
July 17, 2018
Flip

It’s world emoji day today, and we celebrate it with a new feature that allows you to flip anything on your canvas!
The post Flip appeared first on Studio by UXPin.
July 12, 2018
New curves

Draw more complex shapes with our pen tool and new types of curves: asymmetric and disjointed.
The post New curves appeared first on Studio by UXPin.
UXpin's Blog

- UXpin's profile
- 68 followers

