
Becca Hillburn's Blog, page 30
April 24, 2017
2017 Potential Patreon Backer Survey
If you are a backer, I have a survey specifically for you, and prioritized to serve your needs.
This blog, HTBACA, and the sister Youtube channel are all very expensive to update, maintain, and run- research, writing, experience, materials all have time and monetary costs. For this reason, I run a Patreon to help defray costs of operation and to ideally, repay me for my time and energy.
In an attempt to attract more Backers and to better serve my band of Artnerds, I've released this Potential Backer Survey. Please answer honestly, so that I can tweak my Patreon to be more attractive.
2017 Potential Patreon Backer Survey
Loading...
Please consider donating to this blog or purchasing from Natto-shop (http://nattosoup.com/shop) if you want me to continue publishing quality content. All materials tested were purchased from my own pocket. Keep on Truckin' Nattosoup is not under any sponsorship.


April 23, 2017
Conventions, A Blessing and a Curse
Way back in 2010, when Heidi and I were attending SCAD as wee baby graduate students, the writing was pretty much on the wall. With the manga influence our styles shared, we'd be hard pressed to find work in the comic industry of the time. With our backs against the wall, it was Heidi who suggested we give anime cons a shot. Surely our styles would appeal to that audience?
Seven years and about a hundred conventions later, Heidi was right.
It wasn't a perfect start- I had to build up an audience by doing conventions in the same location, year after year, filling commissions and chatting up my comic, 7" Kara, over and over again. Conventions are work if you sell original products, and I've never minded a little hard work, especially when progress is apparent.
After five years of doing conventions, I really felt like I'd hit my stride. Copies of 7" Kara were selling well. People recognized my work from Tumblr and Instagram, even if they couldn't pin it to my brand name (Nattosoup). I had a steady influx of repeat customers and referrals. Teenage girls swooned over my comic. Although I, like so many comic artists, dreamed of this response, I'd never gotten it from my friends or while in grad school, and I'd leave conventions like Mechacon and MTAC feeling empowered- eager to make art, comics, and create educational content.
Conventions have worked so well for the both of us that it became tempting to lean on them as a income-crutch, assuming that they would be a fairly reliable source of money. We justified our increased focus in a number of ways- starting How to be a Con Artist to collect our tutorials and con recaps (community and audience building, right? Nope), we prepped as though editors were going to be there (spoiler: If it's outta NY or SF, aint likely, especially not at anime cons), we made promo materials to help promote our online projects.
Although we attended dozens of cons, filled hundreds of commissions, and met thousands of people, I found that there was a huge disconnect between my online audience and my convention audience. I went through box after box of business cards, going from Moo cards with several designs (people would take one of each, without a thought as to what that cost me), to cheap Overnight Print business cards with a single design (they brag to me about putting the cards up on their wall, with no intention of checking out my work online), to promotional postcards to even 7" Kara stickers. It seemed like no matter what I did- handwritten notes, enthusiastic endorsements, adorable promo materials, I couldn't get my con audience to engage me online. I began to worry that I was creating an unsustainable business model built on the impulsivity of convention attendees.
Despite those misgivings, I continued with my con prep, continued filling commissions, continued trying to make connections. I figured it was a numbers game, and perhaps the conversion rate for conventions is just abysmally low.
Unfortunately, the convention climate has changed in many ways. The Southern Con Circuit, which is my stomping grounds, has finally seen an influx of print walls, print Walmarts, and collectives where none of the artists are actually present to sell their prints. Last year's Mechacon was particularly pernicious, with attendees having a difficult time exploring the alley, as megabooths blocked out the sun...I mean view. The economy has been on shakey legs since 2009, and 2016 was a rough year for many families, which restricted the disposable income that constitutes most kids' allowances. This combination meant that at many cons, sales were lackluster, and the reliable source of income wasn't so reliable anymore.
Even at the best of times, convention work was pretty much convention only- that audience did not follow me back to my Twitter, Instagram, Tumblr, Youtube, or even my webcomic. While they were delighted, even enraptured sometimes, to see me at the show, and sales kept me so swamped I couldn't go to the bathroom for eight hours, those sales and that praise ended when the con closed Sunday afternoon. No matter how much promotion, prep, or panels were prepared, the conversion rate was embarrassing.
During this time, I had shifted my focus away from industry work (so many non responses and rejections) towards self employment, and this meant that the proverbial con floor dropping out from under me caused quite a bit of anxiety and stress. For awhile, I tried more impulse buy items- amped up sassy button production, more stickers, more mini prints, more ribbons and other cutesy knick-knacks, but the battle for the buck felt futile, as I spent more and more time on meaningless con assembly, and less time on comics or art.
Something had to give. I had no intention of competing with print-walls by upping my fanart print quota, no intention of treading in copyright waters with fanart charms or printed bags. I had to remember why I started doing conventions in the first place- to sell original art, to create commissions, and to engage others, and focus on pushing that in my daily non-con life.
In a way, the drop was beneficial- I launched my Patreon ), I launched 7" Kara as a webcomic, I launched a Youtube channel, I started pushing Amazon Affiliate links. Although all of these sources of income are fairly minor, they could earn money in the background while I put together a kidlit portfolio. I focused on working on 7" Kara, and a pitch comic for a publisher's contest. I stopped relying on the convention audience, who were so enthusiastic at the show, but so invisible after, to help me build a career, and started all over again, from scratch. The financial pinch is still ever present- conventions changing really hurt my bottom line, and none of the above have come close to bridging that gap, but I think I'm also in a better place to start a career.
If there's something you can take away from this, it's that if you enjoy art and illustration, if you want to make a career as a comic person, don't allow conventions to distract you away from your end goal. Don't allow one weekend of great sales to shift your focus from original content to nothing but fanart, because eventually, that floor may fall out from under you, and without original content, you have little to show for all those years of work.
Please consider donating to this blog or purchasing from Natto-shop (http://nattosoup.com/shop) if you want me to continue publishing quality content. All materials tested were purchased from my own pocket. Keep on Truckin' Nattosoup is not under any sponsorship.
April 20, 2017
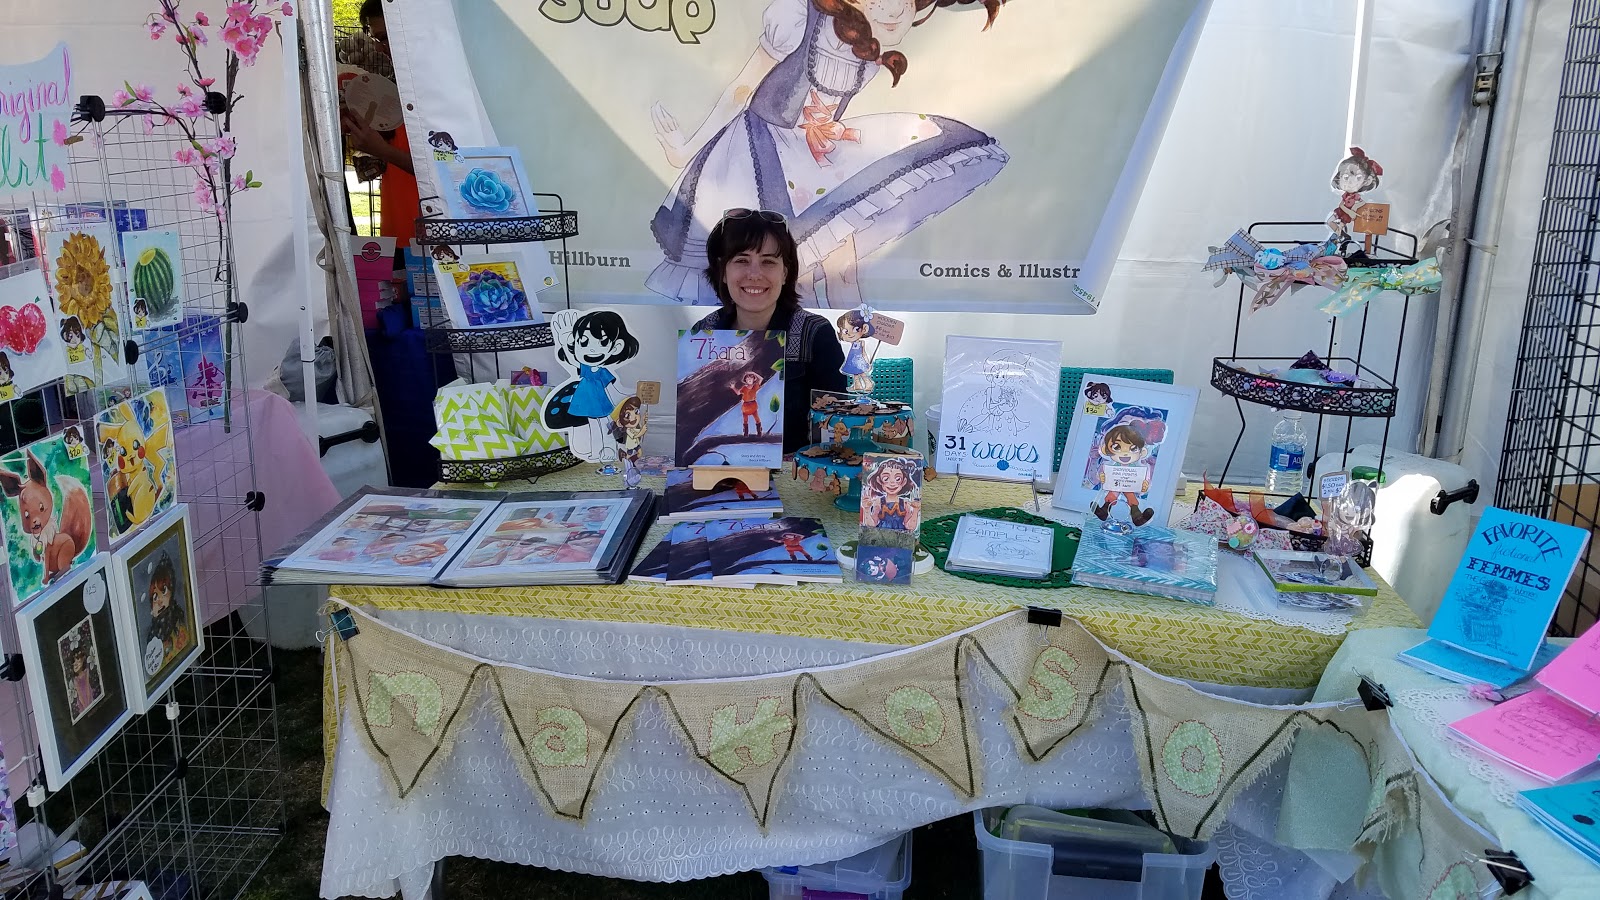
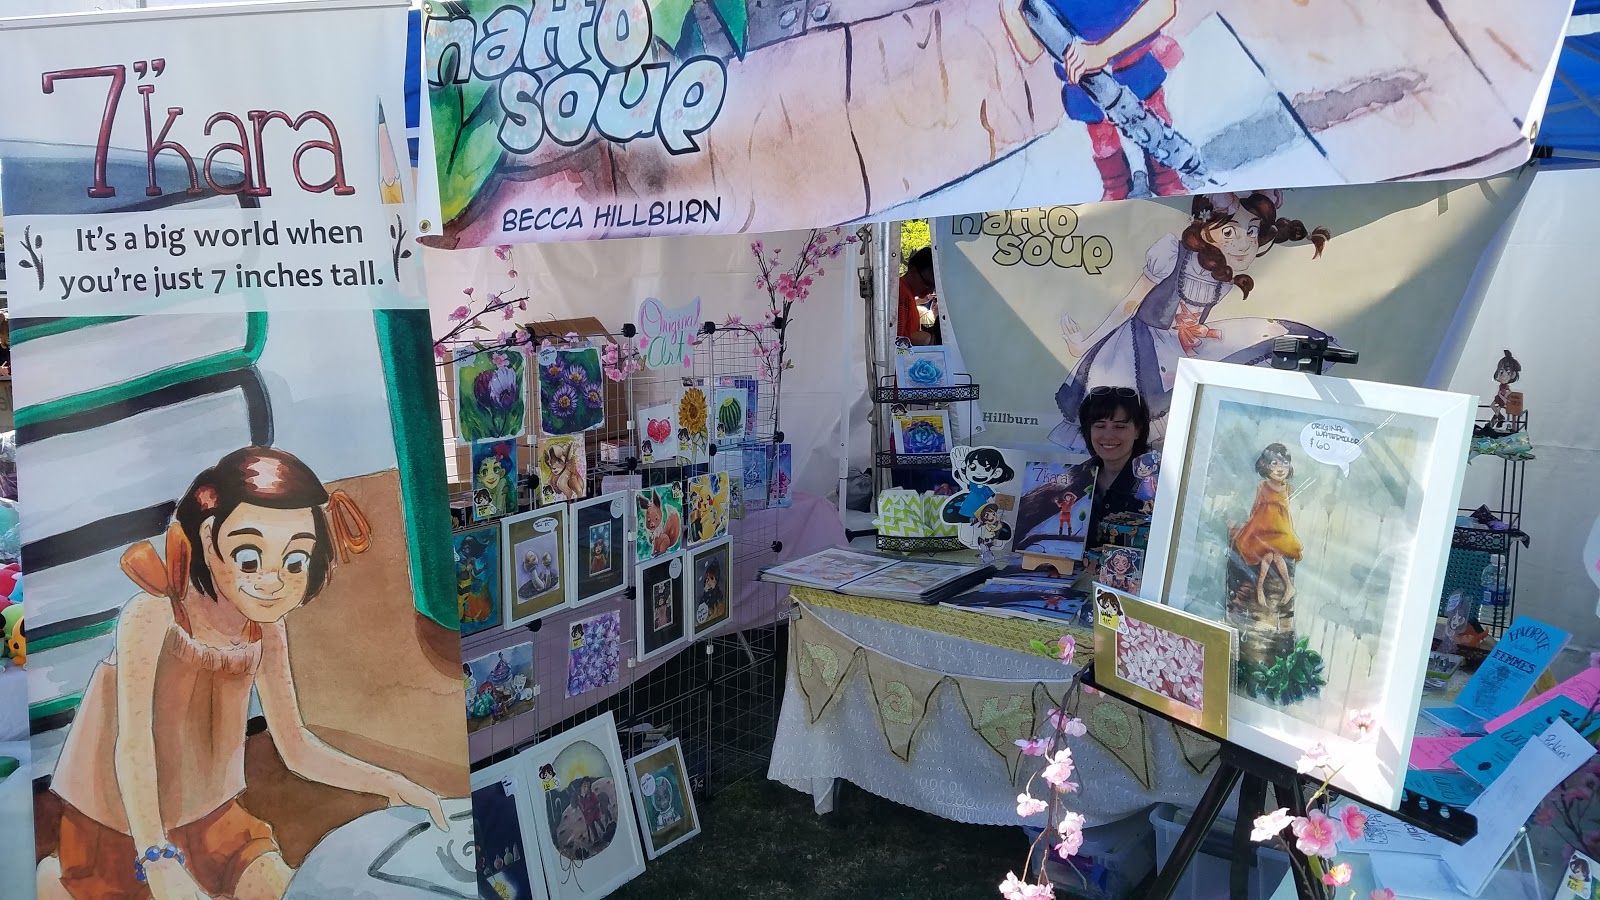
So You Want to Sell at Craft Fairs
I've done anime, gaming, comic, and even a few furry conventions over the years, but at my seven year mark, I feel like I've hit a bit of a dead end. Sales are GREAT at the show itself, but there's no follow up, no post con interaction, and I felt like I was burning myself out. These events usually run from one to three days, are indoors, and are limited to one table, and tend to only attract people interested in that niche. Most of these events also charge entry or badge fees, and many of the three day events encourage attendees to book a hotel room or pay for parking as well, making the cost of general attendance quite high.
Although I've had success at anime and comic conventions selling my comic, 7" Kara, and my mini comics, I wanted to try family events, as my focus is kid lit and kid friendly media.
This weekend, I broke out of my comfort zone, and tabled at the Nashville Cherry Blossom Festival. I wanted to reach a new audience- parents with small kids, grandparents, general art fans, and I wanted to start tabling at craft fairs.

I offered to share my tent, tables, and booth fee with a couple other Nashville artists, who shot the idea down as being too risky. We all sell paper goods, and they feared the weather would conspire against us, and that sales would be poor. Despite their misgivings, I carried on anyway, and I'm so glad I did.
I've stopped doing convention reviews on this blog due to the massive time it takes to compile the information, but if you enjoy posts like this, and would like to see more convention reviews, as well as convention tutorials, tips, and tricks from an expert, please consider backing my Patreon. My work for How to Be a Con Artist (Nattosoup) is pro bono.
Prep before the show:
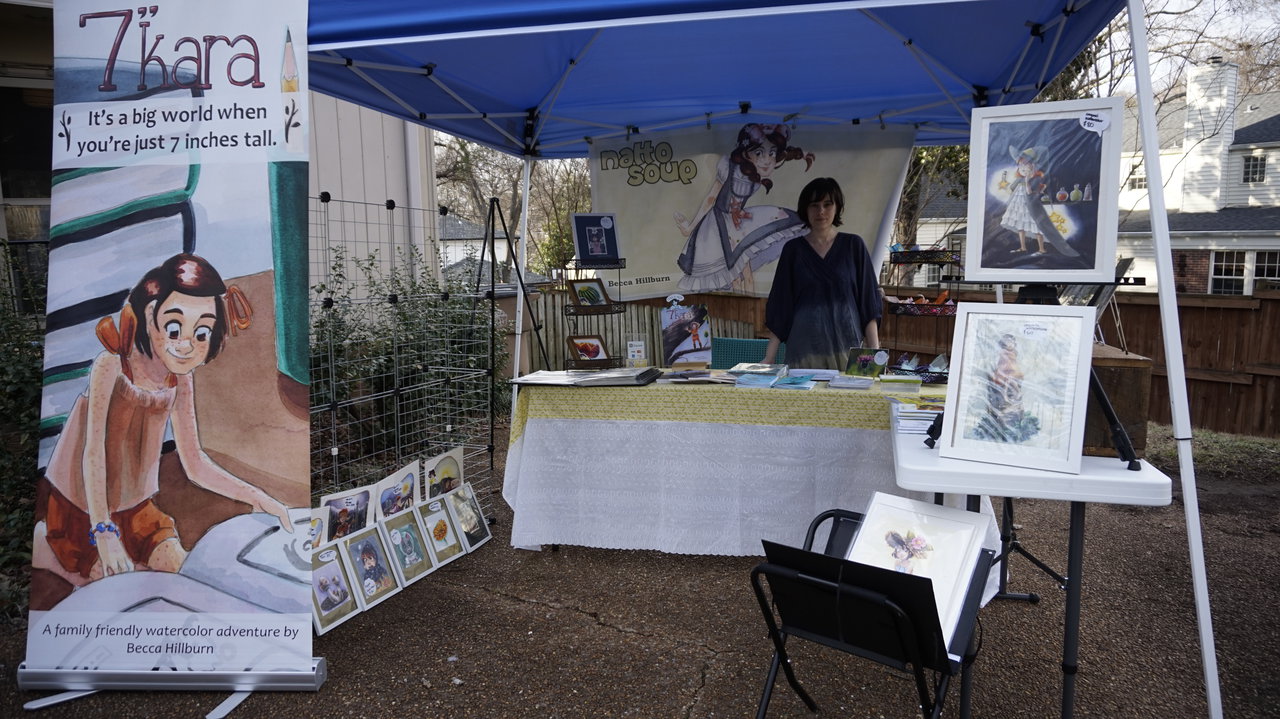
Before ever applying to Cherry Blossom Festival, I'd found a large beach tent for sale on Slick Deals- exactly the size I needed to do outdoor events. I already owned a 6' table as a 'demo table', and a 4' table had been purchased when I was planning on acquiring a laser cutter. I also had a couple folding outdoor chairs that were kept in storage.
I've applied to Tomato Arts Festival and TACA (as a paying member) for years, with no acceptance, so this year, I decided to create a demo setup on my driveway, to show proof of concept. The demo setup took an entire afternoon, but helped me solve many problems in advance, and provided a necessary blueprint for at show setup.
When applying to Cherry Blossom Festival, I added these photos to my convention portfolio and mentioned that they should focus their attention on the craft fair setups. I feel like this demo setup really helped me gain acceptance, as it showed that this little anime con artists was capable of more than just con commissions at indoor shows.
At the show:
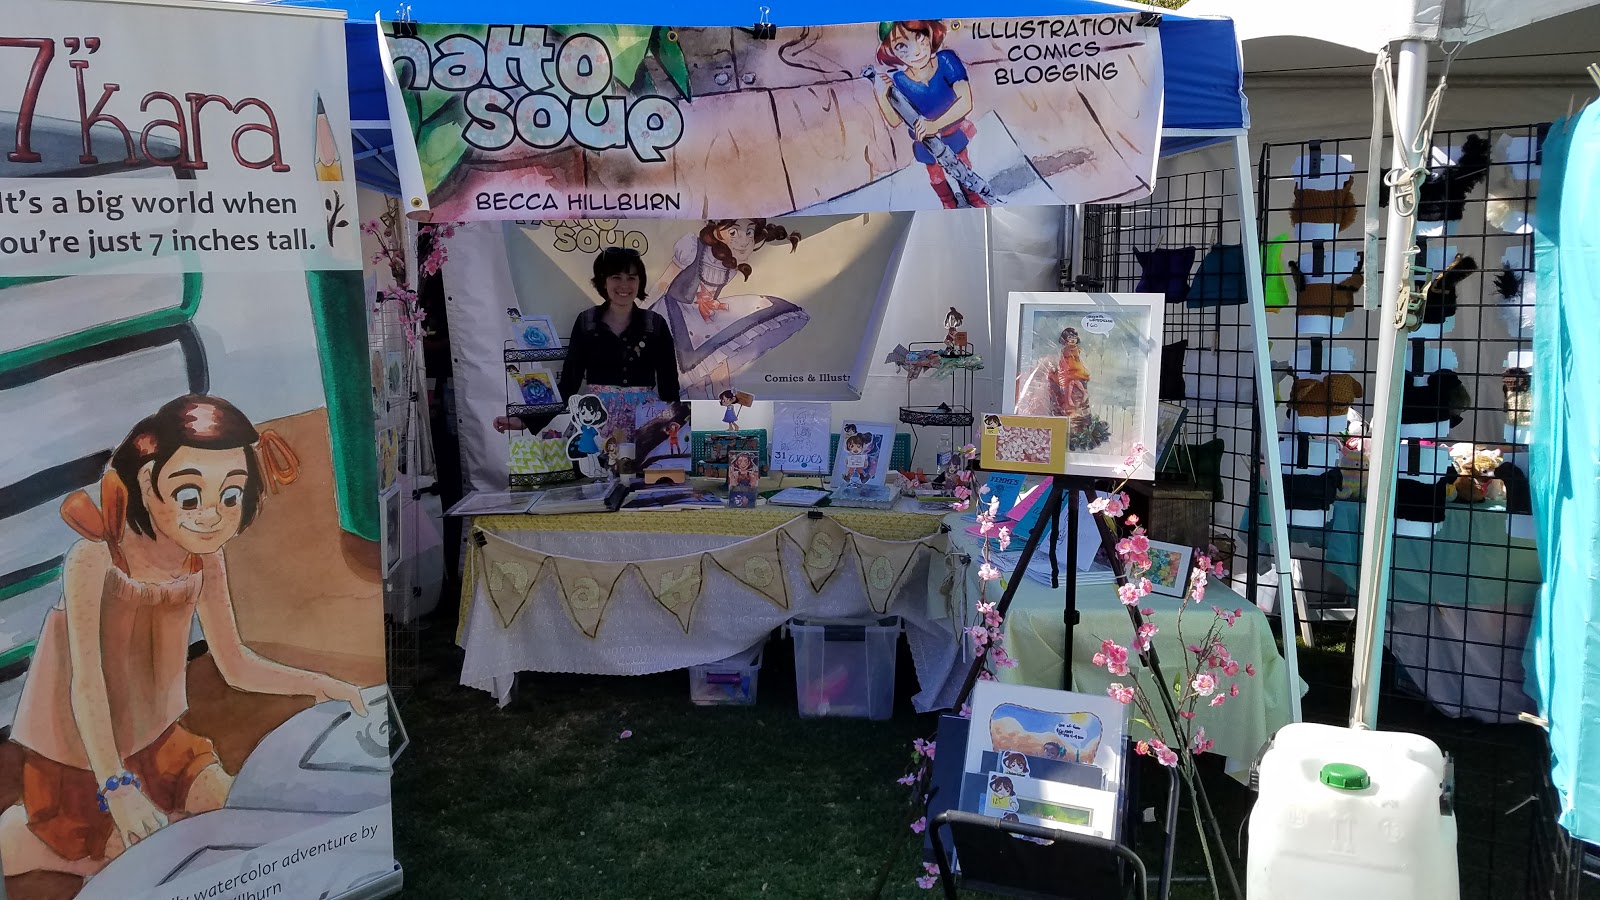
As you can probably see, I really amped my branding up. Banners, banners banners! There's a standing banner, my 6'x2' con banner, and my 6'x3' banner. Since Cherry Blossom wasn't providing maps, I wanted to make it crystal clear whose booth this was!

When applying for Cherry Blossom, tent walls were an option that wasn't offered for those who brought their own tent, but I lucked out- the tent behind me did pay for a tent wall, providing a nice backdrop! My modular gridwall helped me block off space from the next table (anime figurines), and helped define the space as a coherent whole.
I wish that I'd had time to plan out a themed booth a bit better (I had big plans!) but March and April have been a huge crunch for me. Next year, I'm going all out!
As you can see, I'm lost when I'm sitting, so I opted to stand, which allowed me to better engage customers.
The cute little shelves are actually matching shower shelves that I picked up from Marshall's!

Perhaps if the minis had been on the main table with me, customers would have been more likely to pick them up and flip through them.


Those of you familiar with my convention setup will recognize most of what's on the tabletop- the only real difference is that with the extended space, I can display more originals and give things a bit more space!
For Nashville Cherry Blossom Festival, you don't need to own your own tent, chairs, or tables- you can rent them, but owning them, especially if they're purchased in advanced on end of season sale, can really help cut down on your costs. Purchasing my blue tent for $85 cost less than renting a tent, although I was responsible for set up at the show (though there were wonderful volunteers to help!)
Setup was from 8:30-9:30, with the Cherry Blossom Walk beginning at 9:30. Sales didn't really start until around 10:30, but were steady until 5:30. Fortunately, Joseph was there to help- he handled sales while I ate, went to the bathroom, or was busy conducting other sales. Bringing an assistant who is familiar with your merchandise and your work methods can be a HUGE help.
Con Recap
What Worked:
Mini prints (both fanart and original)StickersCharms (all original)Original watercolors7" KaraJapantrip Pre-Sale CommissionsStanding for the majority of the day- otherwise I was lost behind the table!
What Didn't:
31 Days Under the Waves Coloring Packs (I think people didn't know what they were)
What I would change:
Load in-load out- I need a folding wagon, hauling stuff is for the birds!Better gridwall for gallery- the modular grids are a little too shakey for bigger showsHeavier signage- wood or laminateRaise tent higher
What Worked, but was out of my control:
The weather was amazing! Very mild all day longThe crowds were dense, and happy to be there. I've attended CBF for four years now, and this was the best crowd yetA lot of my MTAC kids were at the Cherry Blossom Festival, which allowed for con pre-ordersFree admission meant people were willing to spend a bit of moneyDifferences Between Indoor Comic Shows and Outdoor General Shows:Weather can make or break the event for outdoor shows!Admission cost comes out of your pocket too- free admission shows that are established mean people are often willing to spend more on vendorsScale your setup to fit your tentFor one day events, bring your A-Game from the get go! There's very little downtime, but your sales window is much smallerThere's a good chance you'll be setting up your own tent, tables, and chairs, so keep that in mind when planning your timeTent events tend to have larger spaces, so you can really spread out and maximize your display
Similarities:
A good setup can really help make your sales for youAlways. Have. Business. Cards (or postcards, or stickers)Bring an assistant if you can
Craft Fair Starter Kit:
Mass market merchandise (like my wooden charms, children's comics, or watercolors)- merch that appeals to a more general crowdTable+table clothFolding chairsDisplay supplies- easels, plate stands, tiered standsLarger display items- gridwall, floor easels, print racksYour change box, method of recording sales, commission book (if you offer commissions)Business cards!If you enjoyed this post, please share it with your friends, or to your favorite social network!
Please consider donating to this blog or purchasing from Natto-shop (http://nattosoup.com/shop) if you want me to continue publishing quality content. All materials tested were purchased from my own pocket. Keep on Truckin' Nattosoup is not under any sponsorship.

April 17, 2017
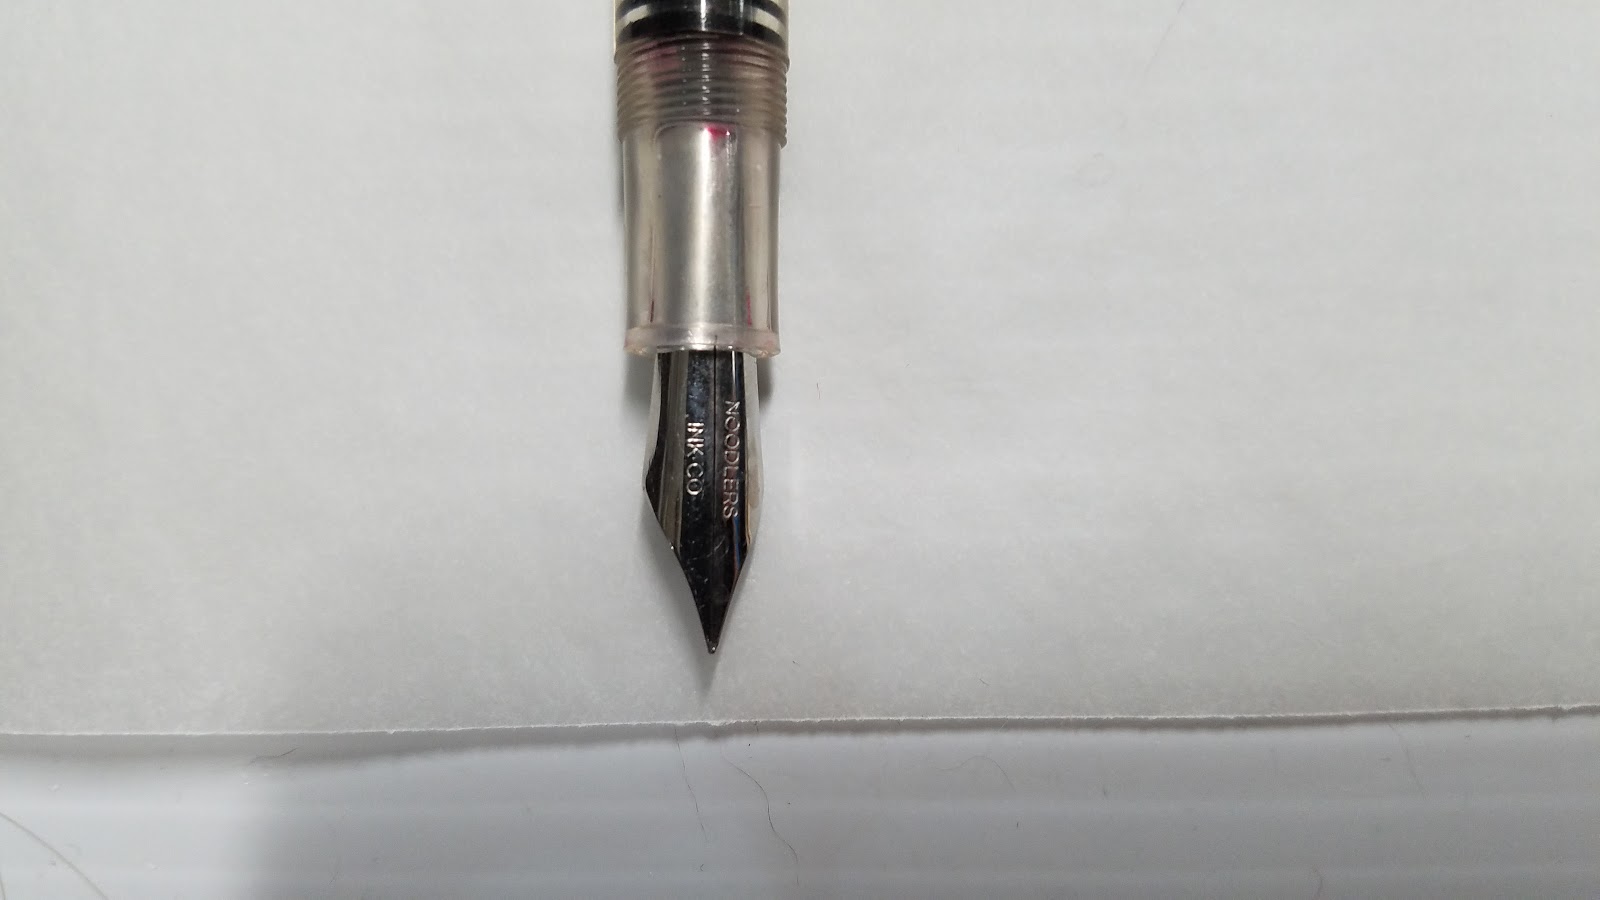
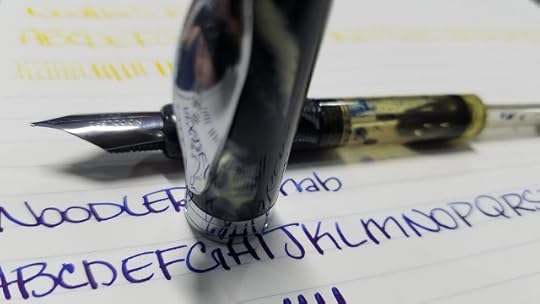
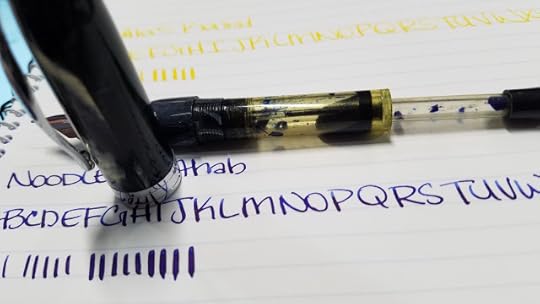
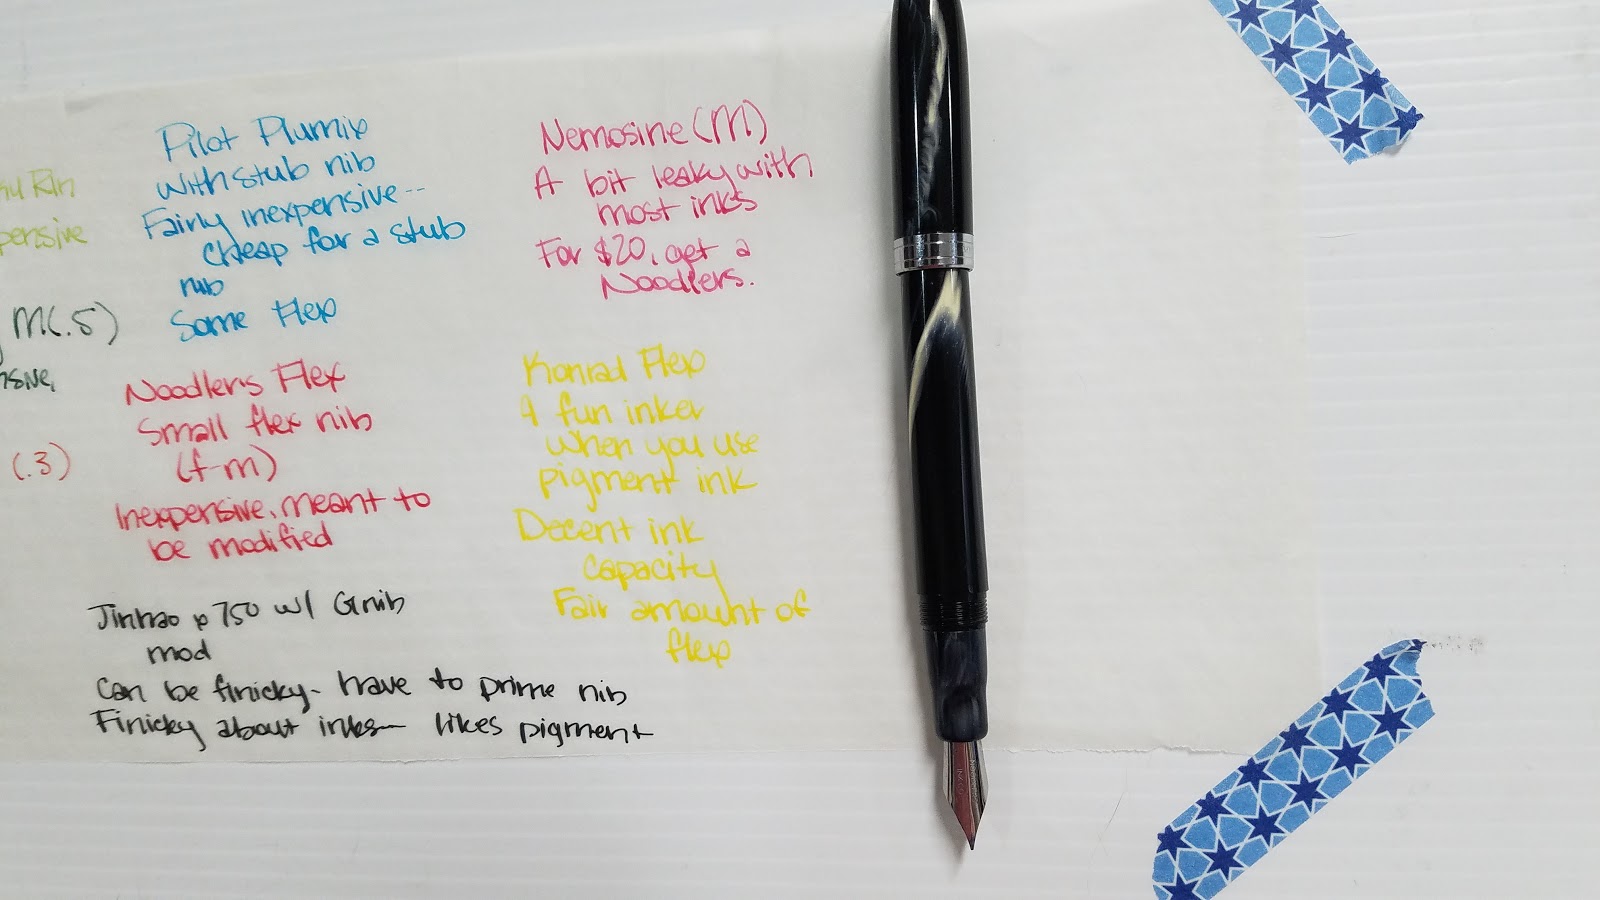
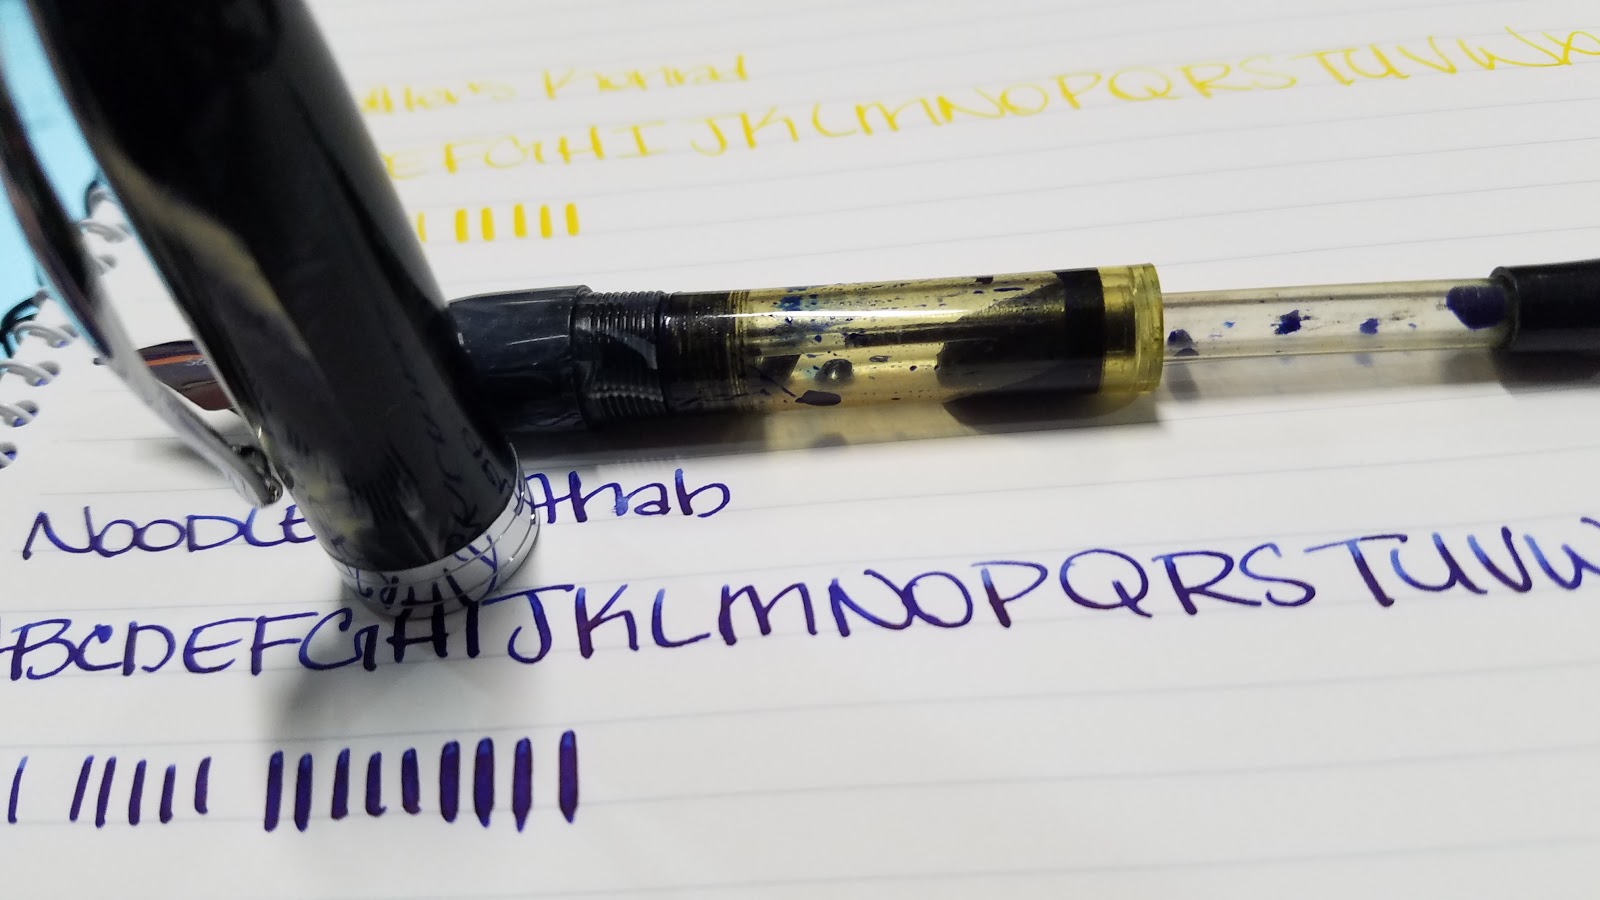
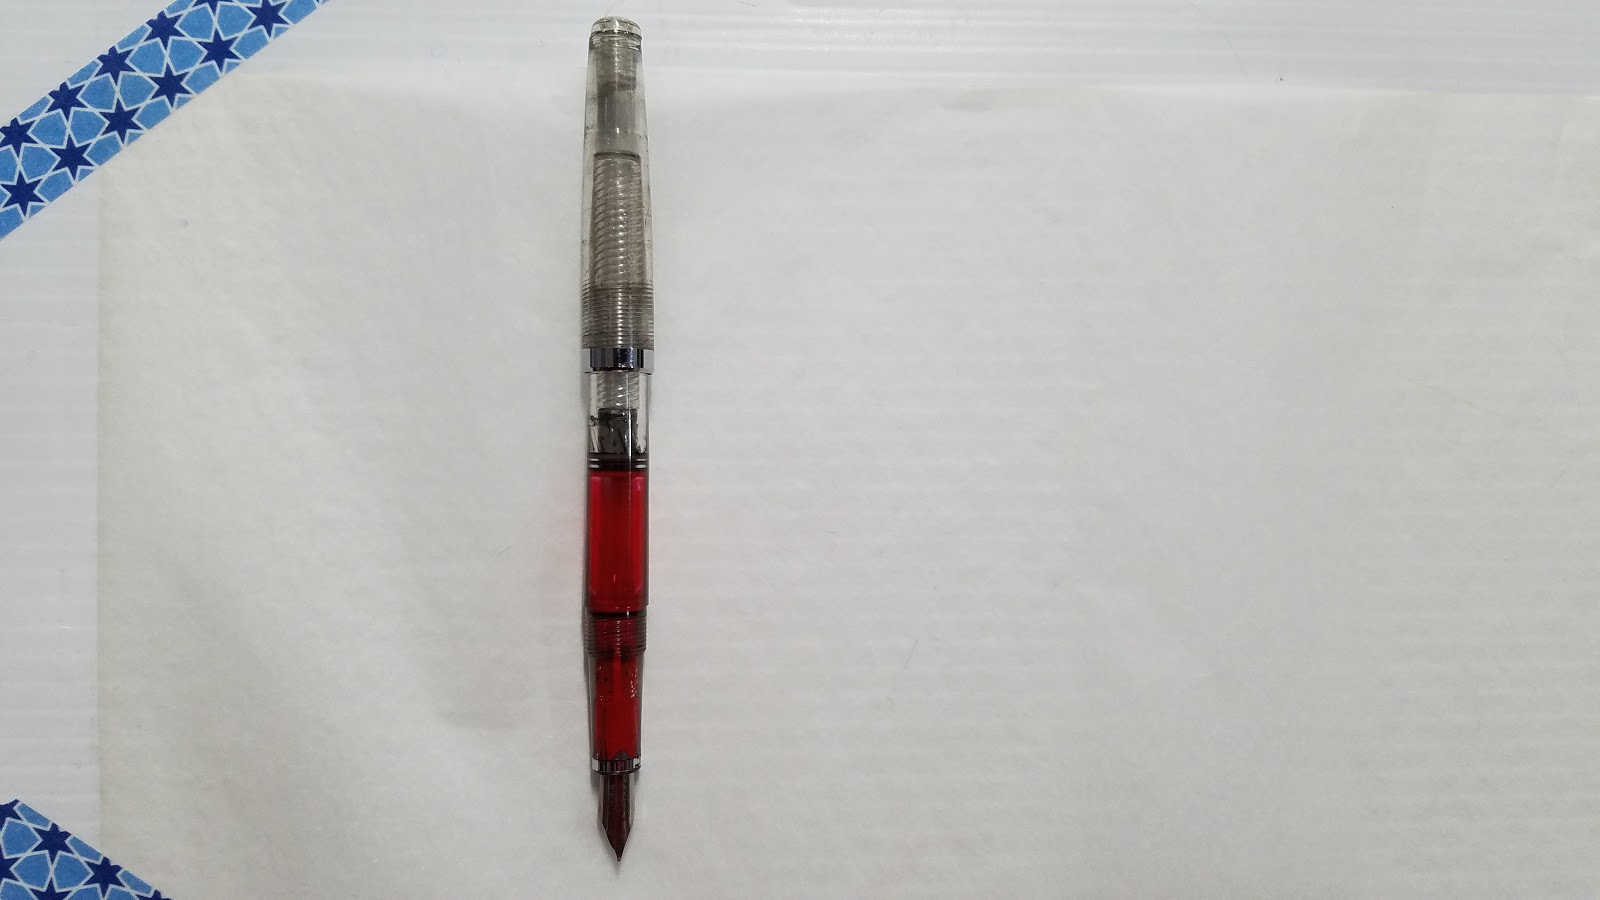
Fountain Pens for Artists: Noodler's Konrad
Last week we covered the Noodler's Flex and the Noodler's Ahab. This week, we're talking about the Noodler's Konrad. There's a lot in common between the Ahab and the Konrad, so if you're torn as to which one is right for you, keep reading!
Noodler's Flex: $16.55 on Amazon
Noodler's Ahab: $21-23 on Amazon
Noodler's Konrad: $21-25 on Amazon
Materials:
Acrylic
Feed:
Ebonite
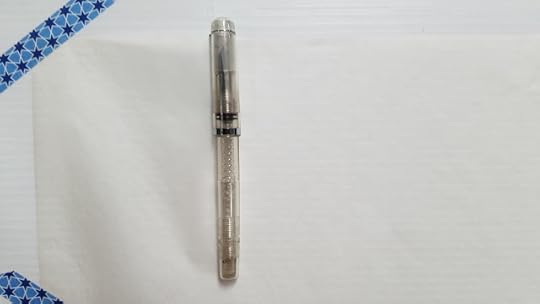 The Ahab and the Konrad are fairly similar- both hold a lot of ink, both feature a size 6 fountain pen nib, both have an ebonite feed. The real difference is that the Konrad is like a larger version of the Flex- so if you enjoy the Flex's more streamlined body and piston fill but would like a larger body, the Konrad might be the pen for you.

Unlike the Ahab, the Konrad has a piston fill system- remove the back cap by unscrewing it, then screw the knob on the back to extend and retract the piston mechanism to draw ink up into your pen.
 As with the Ahab and the Flex, the nib and feed are friction fit, meaning they are removable for cleaning your pen out thoroughly.
Noodler's sells replacement nibs and feeds through Anderson Pens and
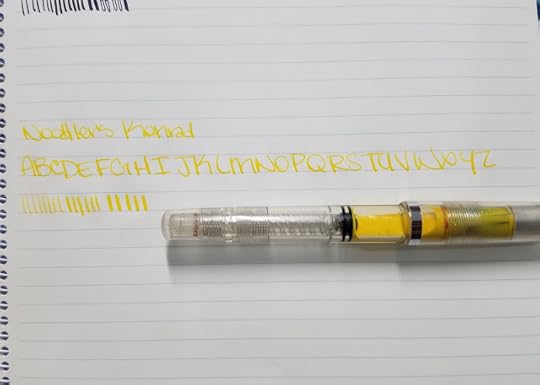 Like the Ahab, the Konrad is a generous writer, as they use the same nib and feed system. The piston fill can hold a fairly generous amount of ink, so it can more than keep up with the nib and feed.
Pros:
InexpensiveFlexible nibProduced by a very small company in the USEasy to find onlineFairly easy to maintainGreat way to learn about fountain pensCan hold a lot of inkProduces thicker lines than the FlexComfortable in the hand
Cons:
Strong smell may be repulsive to someMay require some tinkering/additional cleaning
Surfaces the Konrad can easily write on:
Cellulose based watercolor papers such as Maruman, Holbein, and Fluid
Tracing paper
Sketchbook paper such as Blick Studio and Strathmore
Japanese notebook papers

The Verdict:
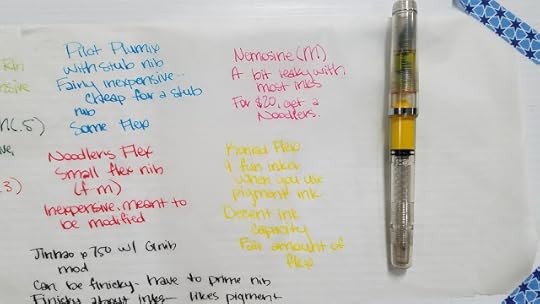
The Mama Bear of the Noodler's family- not too big, not too small. My Konrad is a bit more finicky of an inker than my Ahab, but still a pleasure to use. This is the third installment of my Noodler's fountain pen collection, and until I get a Neponset, probably the last, although honestly, I could quite happily own an entire pencase full of Flexes, Ahabs, and Konrads.
So which Noodler's Pen is right for you?
Fine lines, smaller lineart, delicate details: The Flex
Wide range of lines, huge ink capacity, ability to convert to eyedropper: The Ahab
Wide range of lines, easy to clean: The Konrad
More on the Konrad
PenPaperPencils
Gourmet Pens
Fountain Pen Network
Fountain Pen Network
Built from Ink and Tea
For more inky goodness, check out my Fountain Pens playlist !
Get Your Own
Please consider donating to this blog or purchasing from Natto-shop (http://nattosoup.com/shop) if you want me to continue publishing quality content. All materials tested were purchased from my own pocket. Keep on Truckin' Nattosoup is not under any sponsorship.
Noodler's Flex: $16.55 on Amazon
Noodler's Ahab: $21-23 on Amazon
Noodler's Konrad: $21-25 on Amazon
Materials:
Acrylic
Feed:
Ebonite
 The Ahab and the Konrad are fairly similar- both hold a lot of ink, both feature a size 6 fountain pen nib, both have an ebonite feed. The real difference is that the Konrad is like a larger version of the Flex- so if you enjoy the Flex's more streamlined body and piston fill but would like a larger body, the Konrad might be the pen for you.
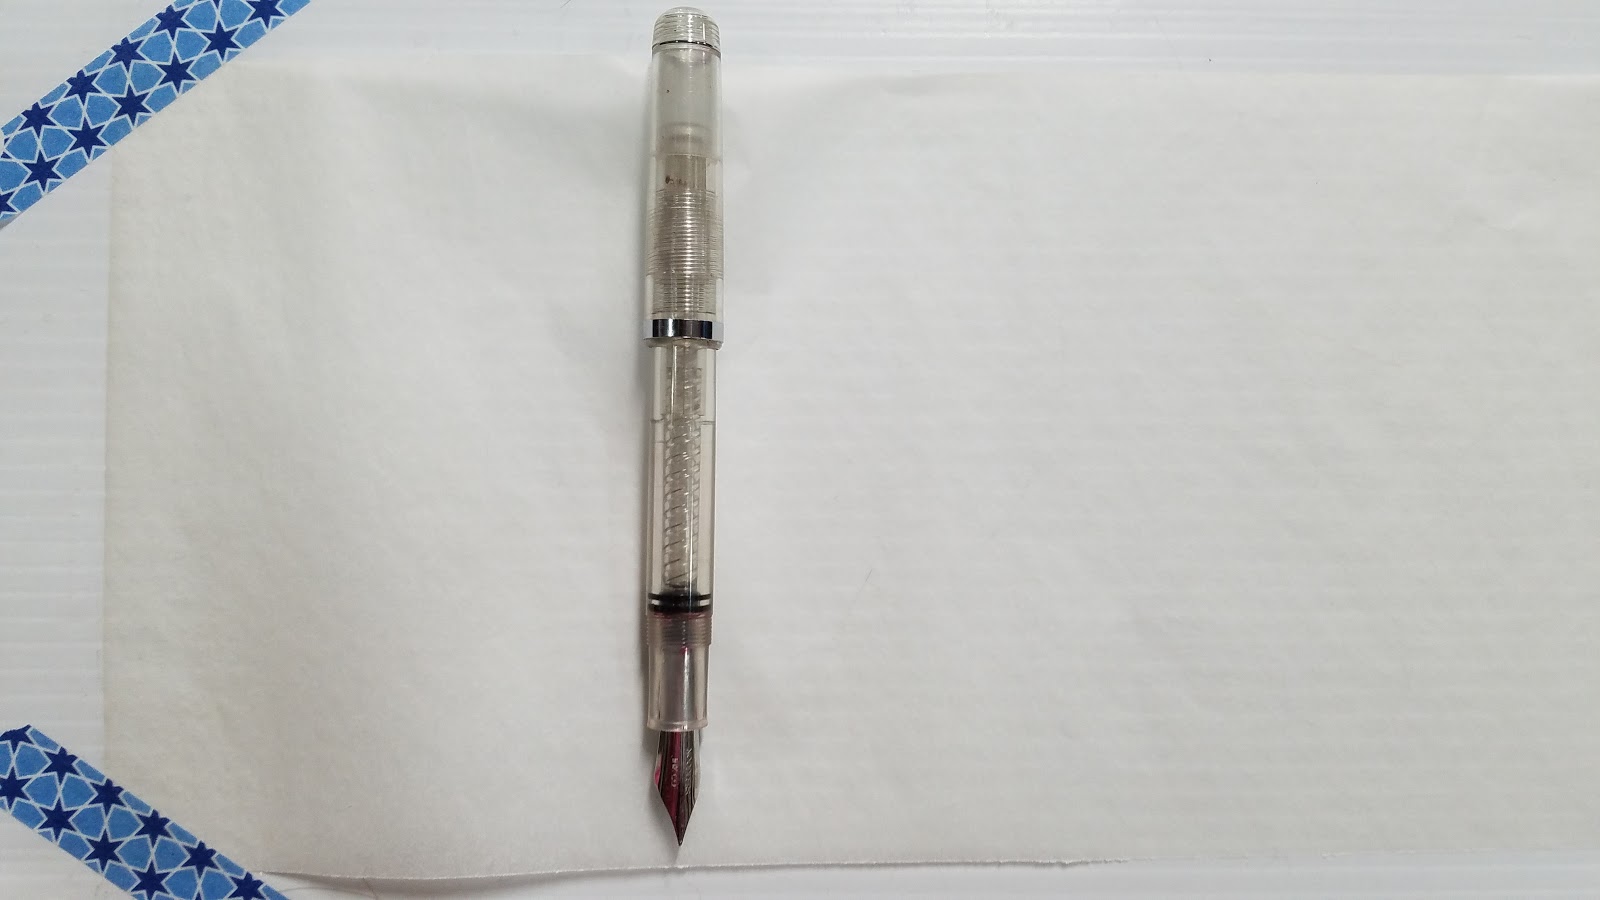
Unlike the Ahab, the Konrad has a piston fill system- remove the back cap by unscrewing it, then screw the knob on the back to extend and retract the piston mechanism to draw ink up into your pen.
 As with the Ahab and the Flex, the nib and feed are friction fit, meaning they are removable for cleaning your pen out thoroughly.
Noodler's sells replacement nibs and feeds through Anderson Pens and
 Like the Ahab, the Konrad is a generous writer, as they use the same nib and feed system. The piston fill can hold a fairly generous amount of ink, so it can more than keep up with the nib and feed.
Pros:
InexpensiveFlexible nibProduced by a very small company in the USEasy to find onlineFairly easy to maintainGreat way to learn about fountain pensCan hold a lot of inkProduces thicker lines than the FlexComfortable in the hand
Cons:
Strong smell may be repulsive to someMay require some tinkering/additional cleaning
Surfaces the Konrad can easily write on:
Cellulose based watercolor papers such as Maruman, Holbein, and Fluid
Tracing paper
Sketchbook paper such as Blick Studio and Strathmore
Japanese notebook papers


The Verdict:
The Mama Bear of the Noodler's family- not too big, not too small. My Konrad is a bit more finicky of an inker than my Ahab, but still a pleasure to use. This is the third installment of my Noodler's fountain pen collection, and until I get a Neponset, probably the last, although honestly, I could quite happily own an entire pencase full of Flexes, Ahabs, and Konrads.
So which Noodler's Pen is right for you?
Fine lines, smaller lineart, delicate details: The Flex
Wide range of lines, huge ink capacity, ability to convert to eyedropper: The Ahab
Wide range of lines, easy to clean: The Konrad
More on the Konrad
PenPaperPencils
Gourmet Pens
Fountain Pen Network
Fountain Pen Network
Built from Ink and Tea
For more inky goodness, check out my Fountain Pens playlist !
Get Your Own
Please consider donating to this blog or purchasing from Natto-shop (http://nattosoup.com/shop) if you want me to continue publishing quality content. All materials tested were purchased from my own pocket. Keep on Truckin' Nattosoup is not under any sponsorship.
April 14, 2017
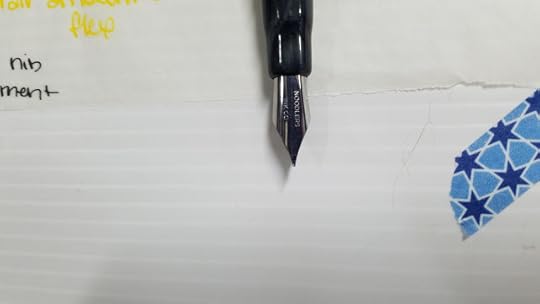
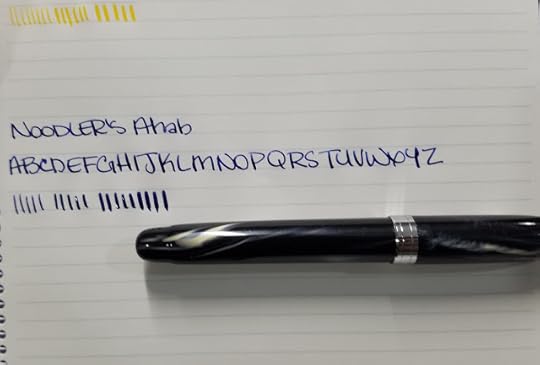
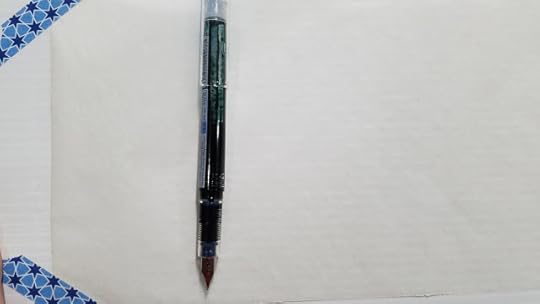
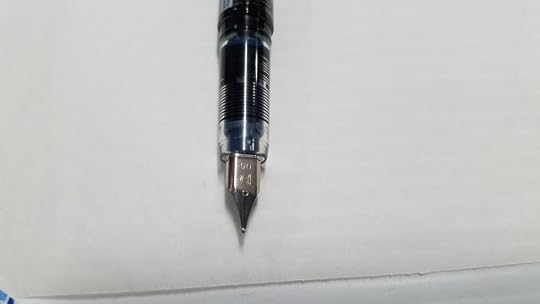
Fountain Pens for Artists: Noodler's Ahab
In our last fountain pen review, we started off strong with the Noodler's Flex- a nimble little number that's a perfect introductory pen. Today we're looking at the Noodler's Ahab, the Flex's older brother. Only slightly more expensive, the Ahab has a huge ink capacity to match it's far larger nib.
Noodler's Flex: $16.55 on Amazon
Noodler's Ahab: $21-23 on Amazon
Materials:
Vegetal Resin
Acrylic
Feed:
Ebonite

Like the Flex, the Ahab has a sturdy screw on cap (this is something that artists will have to get used to if they're going to use fountain pens) that posts and features a metal clip.

The nib is approximately a size 6 nib, which means with some finagling, you can swap the Noodler's flexible nib out for something even more flexible, like a G nib.
The Ahab is a piston filler- which means you depress the piston, and pull it up to draw ink into the body of the pen. The pistol holds a generous amount of ink but you can convert the Ahab's resin or acrylic (depending on the model) to an eyedropper filler for even more ink.
Noodler's sells replacement nibs and feeds through Anderson Pens and
The Ahab is a fairly generous writer- the larger nib is capable of wider strokes, and the ebonite feed can usually keep up with the flow. This is handy when using the Ahab for inking- this pen is capable of fairly fine lines, as well as wide strokes with a bit of pressure.
Pros:
InexpensiveFlexible nibProduced by a very small company in the USEasy to find onlineFairly easy to maintainGreat way to learn about fountain pensCan hold a lot of inkProduces thicker lines than the FlexComfortable in the hand
Cons:
Strong smell may be repulsive to someMany owners have difficulty getting the nib and feed back into the penMay require some tinkering/additional cleaningSome reviewers could not ever get the Ahab to work
Surfaces the Ahab can easily write on:
Cellulose based watercolor papers such as Maruman, Holbein, and Fluid
Tracing paper
Sketchbook paper such as Blick Studio and Strathmore
Japanese notebook papers

Shots of art inked with an Ahab
Inking over graphite with an Ahab is easy- and inking with the Ahab is very satisfying! Although I have small hands, the Ahab isn't too large, and it's much easier to ink with than the Flex.
The Verdict:
The Ahab was my second Noodler's pen, and my second flex, and if possible, I love it even more than my Flex. Very comfortable to write with, a joy to use for inking, a huge ink capacity, even easier to clean out than the Flex once you know what you're doing. I recommend the Ahab to anyone moderately familiar with fountain pens, who's looking for a good all-rounder, or someone with larger hands or arthritis problems. My Ahab LOVES pigment ink, and will put down enough ink that most lighter opaque inks (like Storia Lion) will shade a bit, for lovely effects.
More on the Ahab
PenInkcillin
Tyler Dahl Pens
Well Appointed Desk
For more inky goodness, check out my Fountain Pens playlist!
Get Your Own
Please consider donating to this blog or purchasing from Natto-shop (http://nattosoup.com/shop) if you want me to continue publishing quality content. All materials tested were purchased from my own pocket. Keep on Truckin' Nattosoup is not under any sponsorship.
Noodler's Flex: $16.55 on Amazon
Noodler's Ahab: $21-23 on Amazon
Materials:
Vegetal Resin
Acrylic
Feed:
Ebonite

Like the Flex, the Ahab has a sturdy screw on cap (this is something that artists will have to get used to if they're going to use fountain pens) that posts and features a metal clip.
The nib is approximately a size 6 nib, which means with some finagling, you can swap the Noodler's flexible nib out for something even more flexible, like a G nib.


The Ahab is a piston filler- which means you depress the piston, and pull it up to draw ink into the body of the pen. The pistol holds a generous amount of ink but you can convert the Ahab's resin or acrylic (depending on the model) to an eyedropper filler for even more ink.
Noodler's sells replacement nibs and feeds through Anderson Pens and

The Ahab is a fairly generous writer- the larger nib is capable of wider strokes, and the ebonite feed can usually keep up with the flow. This is handy when using the Ahab for inking- this pen is capable of fairly fine lines, as well as wide strokes with a bit of pressure.
Pros:
InexpensiveFlexible nibProduced by a very small company in the USEasy to find onlineFairly easy to maintainGreat way to learn about fountain pensCan hold a lot of inkProduces thicker lines than the FlexComfortable in the hand
Cons:
Strong smell may be repulsive to someMany owners have difficulty getting the nib and feed back into the penMay require some tinkering/additional cleaningSome reviewers could not ever get the Ahab to work
Surfaces the Ahab can easily write on:
Cellulose based watercolor papers such as Maruman, Holbein, and Fluid
Tracing paper
Sketchbook paper such as Blick Studio and Strathmore
Japanese notebook papers

Shots of art inked with an Ahab

Inking over graphite with an Ahab is easy- and inking with the Ahab is very satisfying! Although I have small hands, the Ahab isn't too large, and it's much easier to ink with than the Flex.
The Verdict:
The Ahab was my second Noodler's pen, and my second flex, and if possible, I love it even more than my Flex. Very comfortable to write with, a joy to use for inking, a huge ink capacity, even easier to clean out than the Flex once you know what you're doing. I recommend the Ahab to anyone moderately familiar with fountain pens, who's looking for a good all-rounder, or someone with larger hands or arthritis problems. My Ahab LOVES pigment ink, and will put down enough ink that most lighter opaque inks (like Storia Lion) will shade a bit, for lovely effects.
More on the Ahab
PenInkcillin
Tyler Dahl Pens
Well Appointed Desk
For more inky goodness, check out my Fountain Pens playlist!
Get Your Own
Please consider donating to this blog or purchasing from Natto-shop (http://nattosoup.com/shop) if you want me to continue publishing quality content. All materials tested were purchased from my own pocket. Keep on Truckin' Nattosoup is not under any sponsorship.
April 12, 2017
Fountain Pens for Artists: Noodler's Flex
In Cheap Thrills, I went over a handful of fountain pens that I enjoy using for my own art. For each pen covered, I gave a mini review. Hopefully in that post, I turned a few of you on to the idea of using fountain pens for your art.
I realized that if Cheap Thrills did its job, some of you might be interested in a bit more on using fountain pens for your art. The recommendations for an artist vs an enthusiast differ greatly, and as an artist who has amassed a small collection, I was in the privileged postion of being able to share the best of both worlds with my readers and friends.
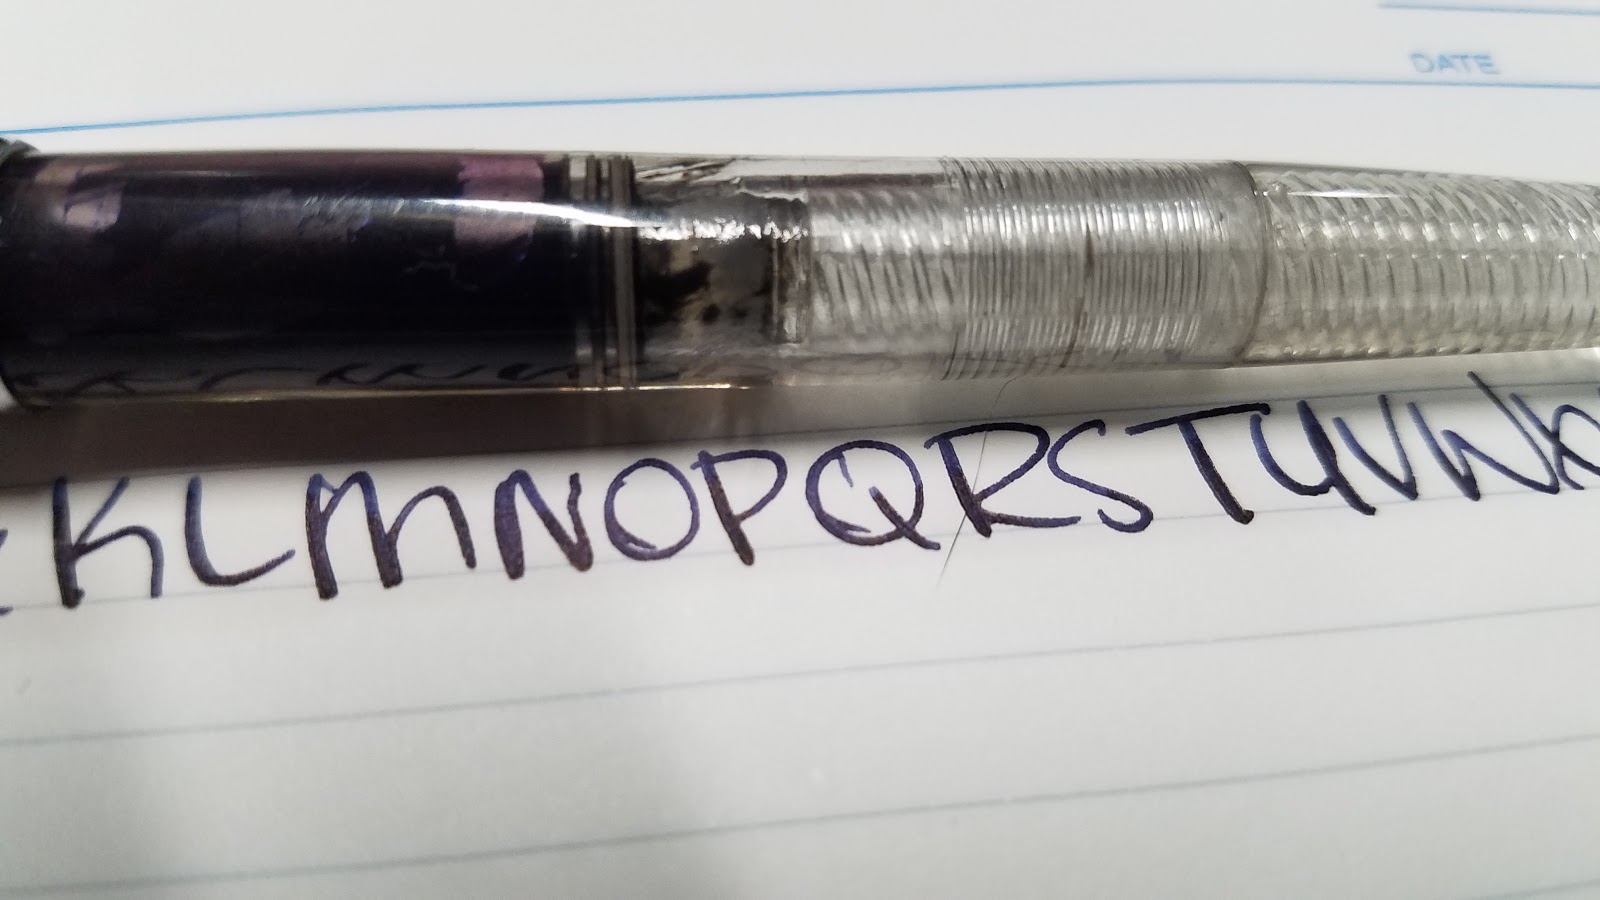
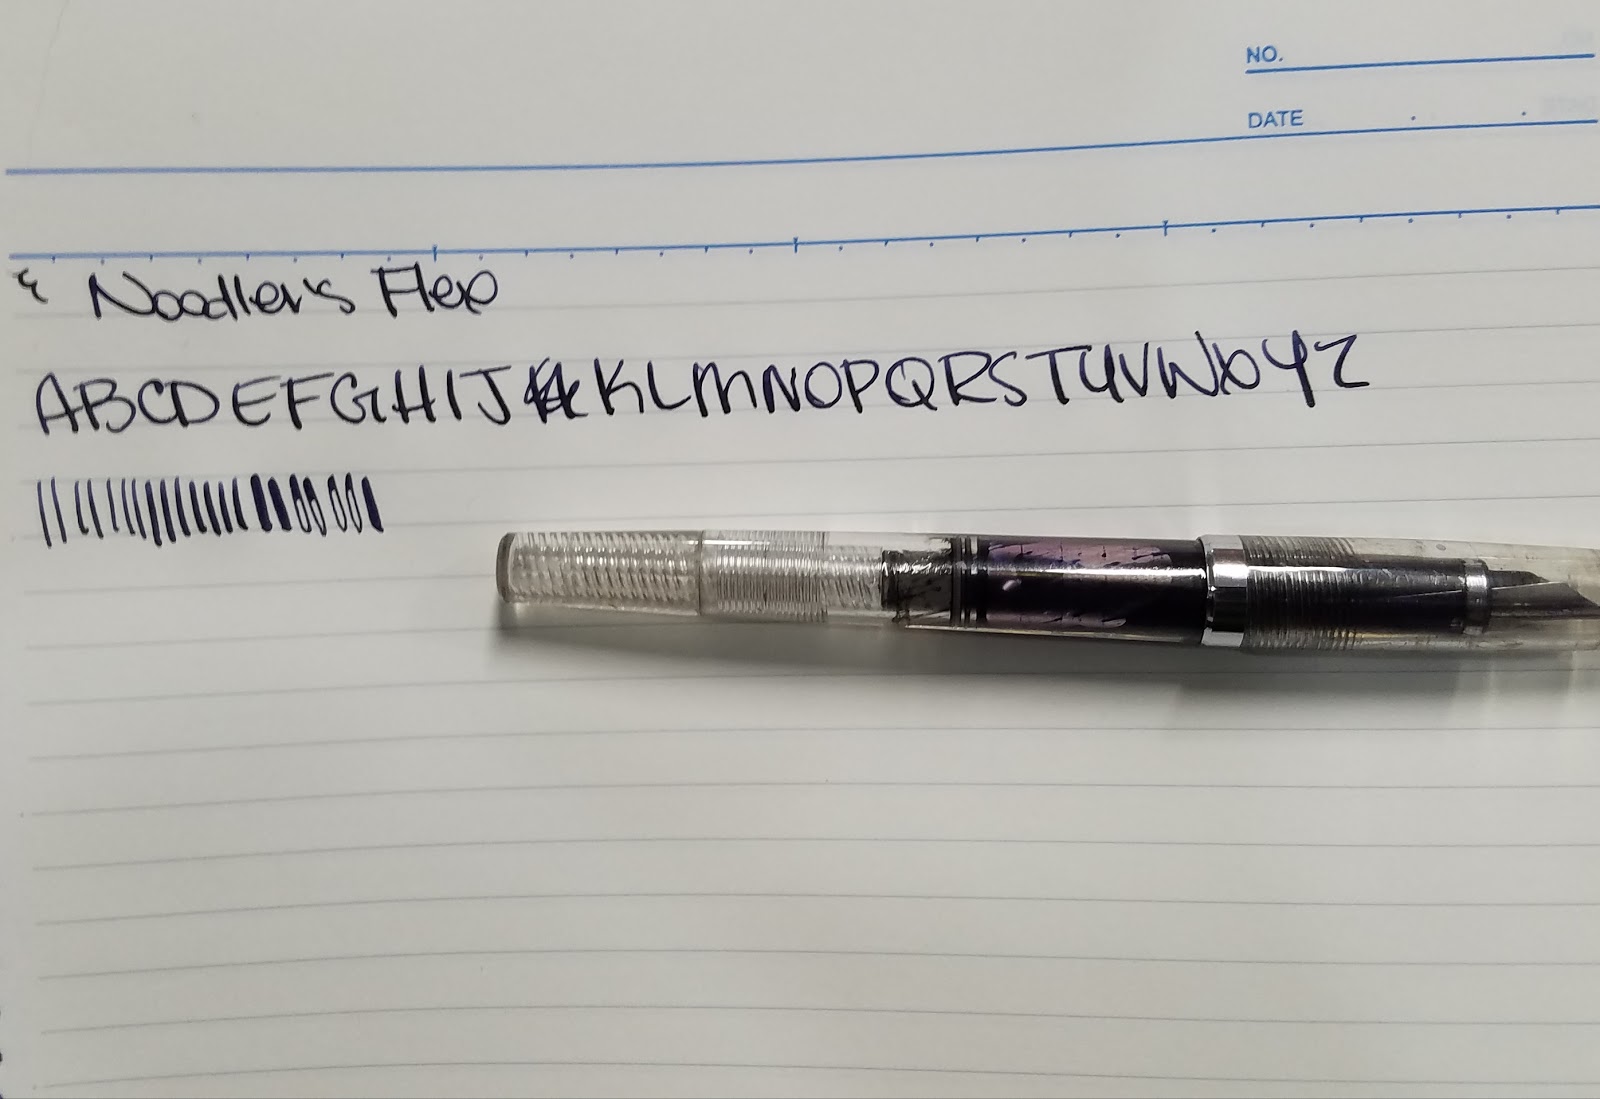
Today we're taking a look at the Noodler's Flex- the quick brown fox who jumped over the lazy dog. Small, flexible, and nimble, this little fountain pen is a great start for any artist looking for the pen to fit their needs.
The Noodler's Flex is a small pen- about five inches long, and approximately the same circumference as a technical pen. It has the potential to hold a fair amount of ink, and needs no additional accessories save the ink of your choice. It is piston filled, meaning you turn the screw on the back to raise and depress the plunger, has a removable nib and feed, and is perfect to pop into your pencil case for sketching on the go.

The cap screws on, which may take some getting used to for artists used to caps that snap on and off, and features a pen clip.

The cap posts to the back of the Flex, extending the length of the pen a bit, and may make it more comfortable for those of you with larger hands.

Noodler's sells replacement nibs and feeds through Anderson Pens and
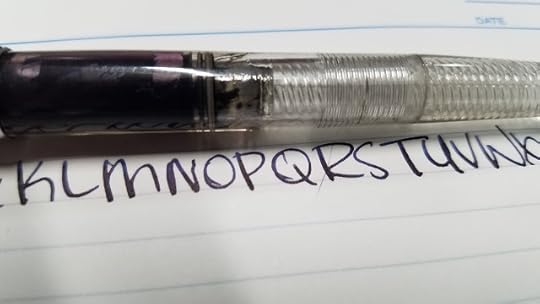
The Flex is a fairly small writer, with an estimated lineweight between .2mm and .5mm, you could achieve .7mm at the risk of permanently damaging your nib.
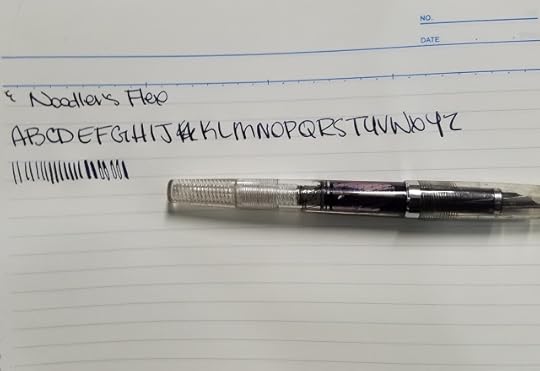
As you can see, on the heaviest stroke (requiring the most pressure) the flex began to railroad, as the ink couldn't quite keep up with the flex of the nib.
Pros:
InexpensiveFlexible nibProduced by a very small company in the USEasy to find onlineFairly easy to maintainGreat way to learn about fountain pens
Cons:
Strong smell may be repulsive to someVery small pen may cause crampingDifficult to clean all of pigment ink left in pen, as it settles behind piston
Surfaces the Flex can easily write on:
Cellulose based watercolor papers such as Maruman, Holbein, and Fluid
Tracing paper
Sketchbook paper such as Blick Studio and Strathmore
Japanese notebook papers
 I love the effect of fountain pen ink on tracing paper.
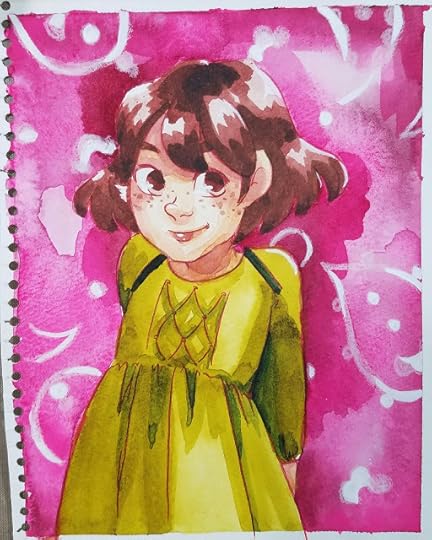
Inking over graphite with the Flex is easy- with pigment inks, there is no resist effect from the graphite. The above piece was inked with my Noodler's Flex filled with Platinum Pigment ink in Rose Red, and once the ink had fully dried, the graphite was erased and watercolor was applied.
The Verdict:
While I know the Flex is not for everyone, it's definitely for me. Not too big, not too small, can run through ink fairly quickly, so I'm not left with a huge barrel full of a color I'm done with. Loves pigment ink, easy to maintain- a great starter pen for any artist who enjoys the pen and ink arts.
More on the Flex:
Gourmet Pens
Wonder Pens
PenInkCillin
For more inky goodness, check out my Fountain Pens playlist!
Get Your Own
Today's Sponsor Today's sponsor is Shooting-Stars, a wonderful Photoshop brush resource! All brushes on Shooting-Stars are free to use, provided you follow the license.

Shooting-Stars is run entirely by the wonderful Kabocha, a fellow comic artist, art supply enthusiast, and friend of mine. You can check out more of her wonderful work by reading her webcomic, Linked.

Please consider donating to this blog or purchasing from Natto-shop (http://nattosoup.com/shop) if you want me to continue publishing quality content. All materials tested were purchased from my own pocket. Keep on Truckin' Nattosoup is not under any sponsorship.
I realized that if Cheap Thrills did its job, some of you might be interested in a bit more on using fountain pens for your art. The recommendations for an artist vs an enthusiast differ greatly, and as an artist who has amassed a small collection, I was in the privileged postion of being able to share the best of both worlds with my readers and friends.
Today we're taking a look at the Noodler's Flex- the quick brown fox who jumped over the lazy dog. Small, flexible, and nimble, this little fountain pen is a great start for any artist looking for the pen to fit their needs.
The Noodler's Flex is a small pen- about five inches long, and approximately the same circumference as a technical pen. It has the potential to hold a fair amount of ink, and needs no additional accessories save the ink of your choice. It is piston filled, meaning you turn the screw on the back to raise and depress the plunger, has a removable nib and feed, and is perfect to pop into your pencil case for sketching on the go.

The cap screws on, which may take some getting used to for artists used to caps that snap on and off, and features a pen clip.
The cap posts to the back of the Flex, extending the length of the pen a bit, and may make it more comfortable for those of you with larger hands.

Noodler's sells replacement nibs and feeds through Anderson Pens and
The Flex is a fairly small writer, with an estimated lineweight between .2mm and .5mm, you could achieve .7mm at the risk of permanently damaging your nib.
As you can see, on the heaviest stroke (requiring the most pressure) the flex began to railroad, as the ink couldn't quite keep up with the flex of the nib.
Pros:
InexpensiveFlexible nibProduced by a very small company in the USEasy to find onlineFairly easy to maintainGreat way to learn about fountain pens
Cons:
Strong smell may be repulsive to someVery small pen may cause crampingDifficult to clean all of pigment ink left in pen, as it settles behind piston
Surfaces the Flex can easily write on:
Cellulose based watercolor papers such as Maruman, Holbein, and Fluid
Tracing paper
Sketchbook paper such as Blick Studio and Strathmore
Japanese notebook papers
 I love the effect of fountain pen ink on tracing paper.
Inking over graphite with the Flex is easy- with pigment inks, there is no resist effect from the graphite. The above piece was inked with my Noodler's Flex filled with Platinum Pigment ink in Rose Red, and once the ink had fully dried, the graphite was erased and watercolor was applied.
The Verdict:
While I know the Flex is not for everyone, it's definitely for me. Not too big, not too small, can run through ink fairly quickly, so I'm not left with a huge barrel full of a color I'm done with. Loves pigment ink, easy to maintain- a great starter pen for any artist who enjoys the pen and ink arts.
More on the Flex:
Gourmet Pens
Wonder Pens
PenInkCillin
For more inky goodness, check out my Fountain Pens playlist!
Get Your Own
Today's Sponsor Today's sponsor is Shooting-Stars, a wonderful Photoshop brush resource! All brushes on Shooting-Stars are free to use, provided you follow the license.
Shooting-Stars is run entirely by the wonderful Kabocha, a fellow comic artist, art supply enthusiast, and friend of mine. You can check out more of her wonderful work by reading her webcomic, Linked.
Please consider donating to this blog or purchasing from Natto-shop (http://nattosoup.com/shop) if you want me to continue publishing quality content. All materials tested were purchased from my own pocket. Keep on Truckin' Nattosoup is not under any sponsorship.
April 9, 2017
Intro to Comic Craft: Step by Step: Environment In Roughs
This series is also made possible thanks to the generosity and interest of my Patrons on Patreon.
My Patrons have expressed interest in content on the comic making process, and I am happy to oblige. Comics are one of my passions, and they're the reason I began this blog in the first place. It isn't always easy to share comic content here, but their generosity has made it easier to set aside the time and resources necessary to doing so. Writing about comic craft in depth requires research, setting aside time during the comic creation process to document my progress, and a lot of thought, and I feel is best served through longform series such as the Intro to Comic Craft: Step By Step series. If you enjoy this series, please take a moment to share it with your friends and loved ones on the social network of your choice, leave me a G+ comment, or send me an email using the sidebar form- your feedback is important to me! If you have specific questions, please don't hesitate to ask via email.
As part of this series, my Patrons have exclusive access to behind the scenes comic creation content, including the entire plotform synopsis for 7" Kara, the 7" Kara beat sheet, the Chapter 7 Synopsis, the Chapter 7 tight script, and loads more. If you learn best from working example, joining my Patreon will give you access to those files.
In comics, backgrounds are sometimes an afterthought to the characters. It makes sense- if you're world is this world, and your time period is this time period, your readers will be able to fill in those blanks easily enough. But what if your world is fantasy, or viewed from the perspective of an outsider? Then environments are an important part of your story, and deserve the same attention you give your characters.
Think of your environment almost as you would your own characters. Your evironments need to be developed and populated. For 7" Kara, it's important that establish two different worlds- the world of Kara and other Lilliputians (mainly her parents), and the human world. These worlds have to be distinct- while there can be some similarities, you need to know at a glance which world we're in. I shift focus frequently in later chapters between a Lilliputian's eye view and a human eye view, and even both views have unique characteristics and set pieces that give the reader clues as to how the character sees that world.
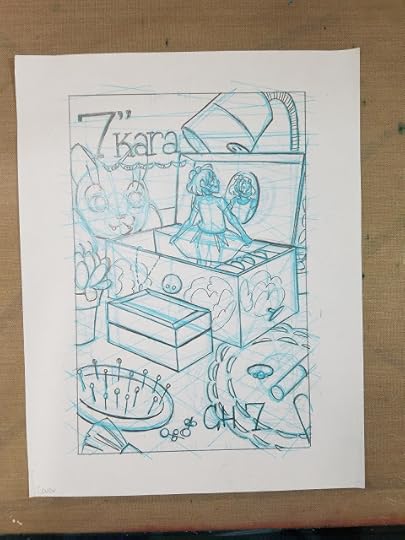
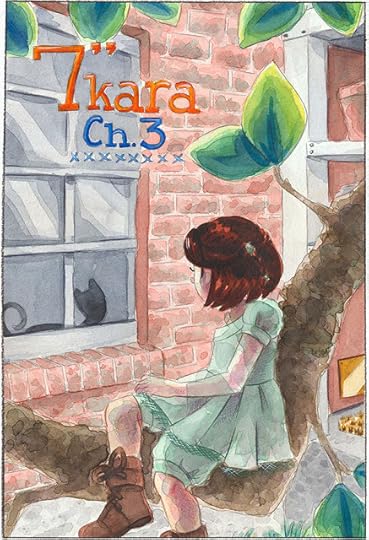
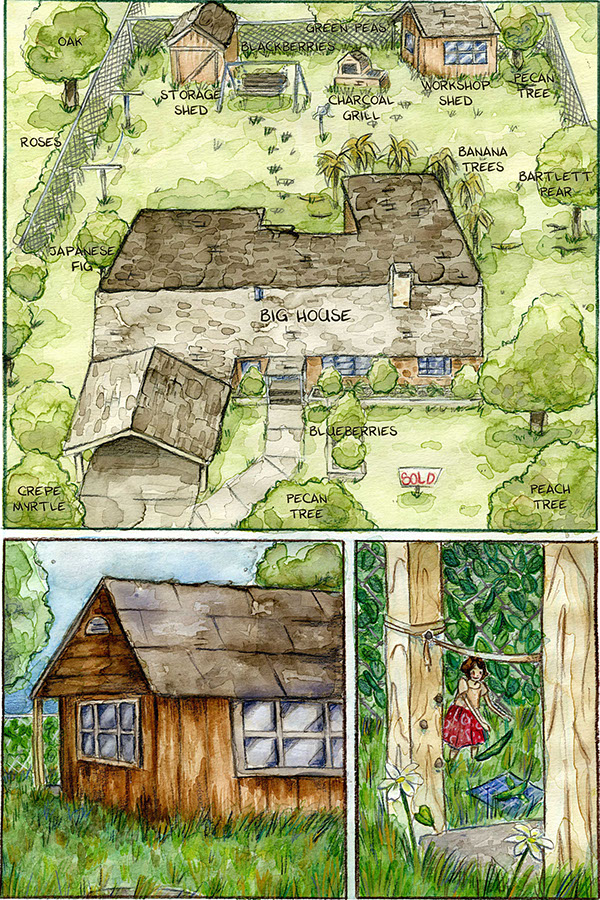
For 7" Kara, I've had to design numerous environments- the yard (from a human perspective and a Lilliputian perspective- very different views and feelings!), the sheds (one of which contains and protects Kara's home), two dollhouses as inhabitable spaces (a wooden Victorian inspired dollhouse, and a modern plastic Barbie dreamhouse), and a human sized home (gigantic to Kara).
Designing Naomi's home proved an interesting and fun challenge. The original house and yard are strongly based on the house my mother grew up in- a house her father designed in the early 50's. I don't have access to photos of that house, and I lived in Savannah, GA at the time, so I relied heavily on Google Streetview for reference for the exterior, and heavily on my own memories of the house for the interior.
Of course, since this is set in modern times, I did need to renovate a little. Naomi's room is a complete fabrication, as will be her father's bedroom and his home office.
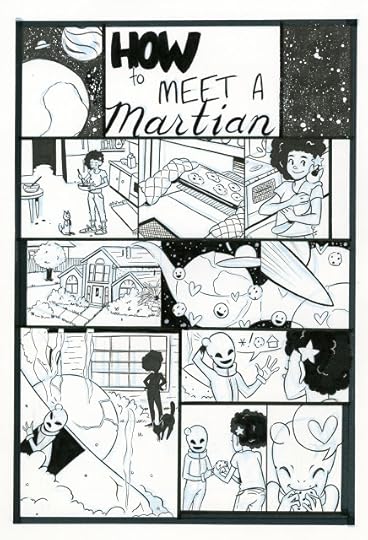
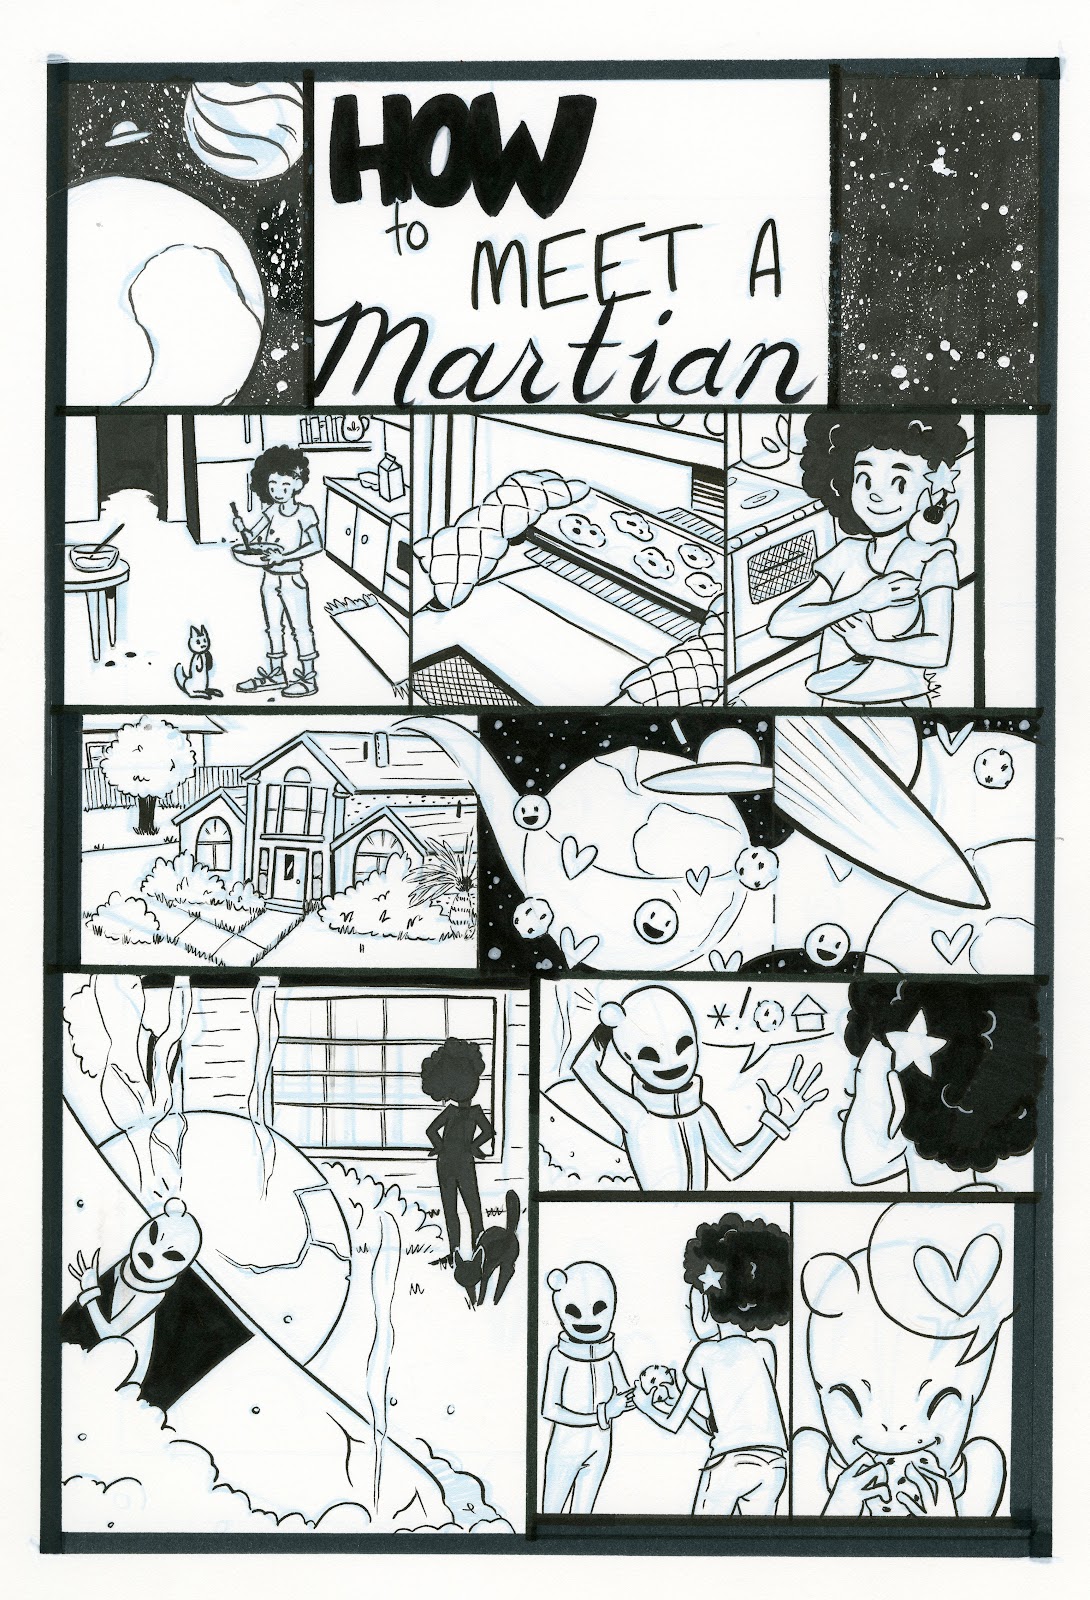
Whenever I'm designing environments for comics, I set the comic in a place I'm familiar with, and have some personal attachment to. The house in Foiled (link) and How to Meet a Martian is the house I spent my teenage years.
I highly recommend you don't wait to design your environments- its easiest to design them during the concept and planning phase of your comic creation. I cover environmental and worldbuilding in some detail in my Intro to Comic Craft: Step by Step Brainstorming and Character development post.
If you are a writer, providing your artist ample reference is highly recommend. There are a number of ways you can do this, but I've found setting up Pinterest boards specific to the project has been very helpful for me.
Here are my boards that are relevant to 7" Kara:
Character Driven
Kara Inspiration
Meldina Clothes
Kara Clothes
Male Lilliputian Clothes
Naomi Clothes
Environmental and World
Naomi's House
Naomi's Room
House Design (established in Chapter 1)
Referenced Images:
The house Naomi and her father live in is based on the house my mother grew up in- a house my grandfather designed. The house is no longer in family hands, so I relied on Google Streetview for enough reference to design the house. I will not share those images here, out of respect for the current owners.
Exterior Of House
When designing Naomi's home and yard, it needed to be the sort of environment that could support a Lilliputian family who refused to steal from humans to get by. My grandfather was an agricultural major who dabbled in farming his entire life, and every property he owned was scattered with fruit bearing trees, gardens for vegetables, and edible flowers- so this seemed a very natural setting for Kara's family.
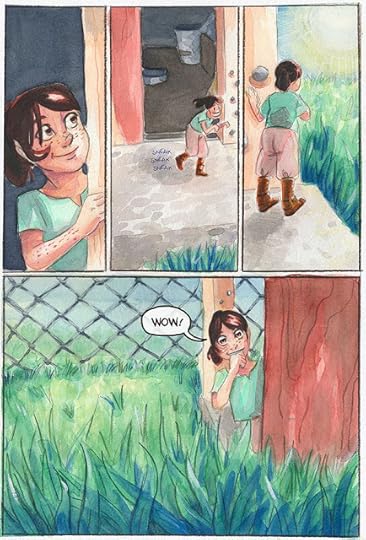
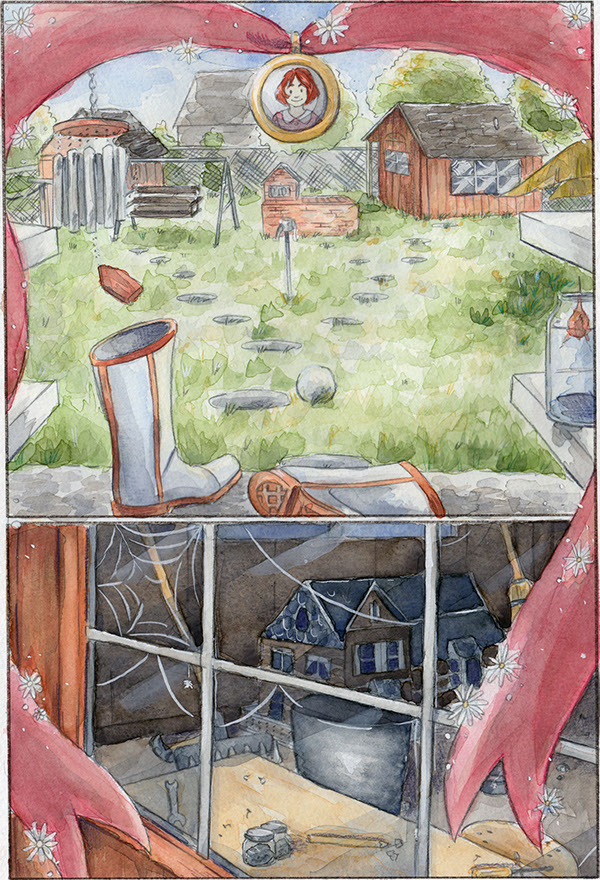
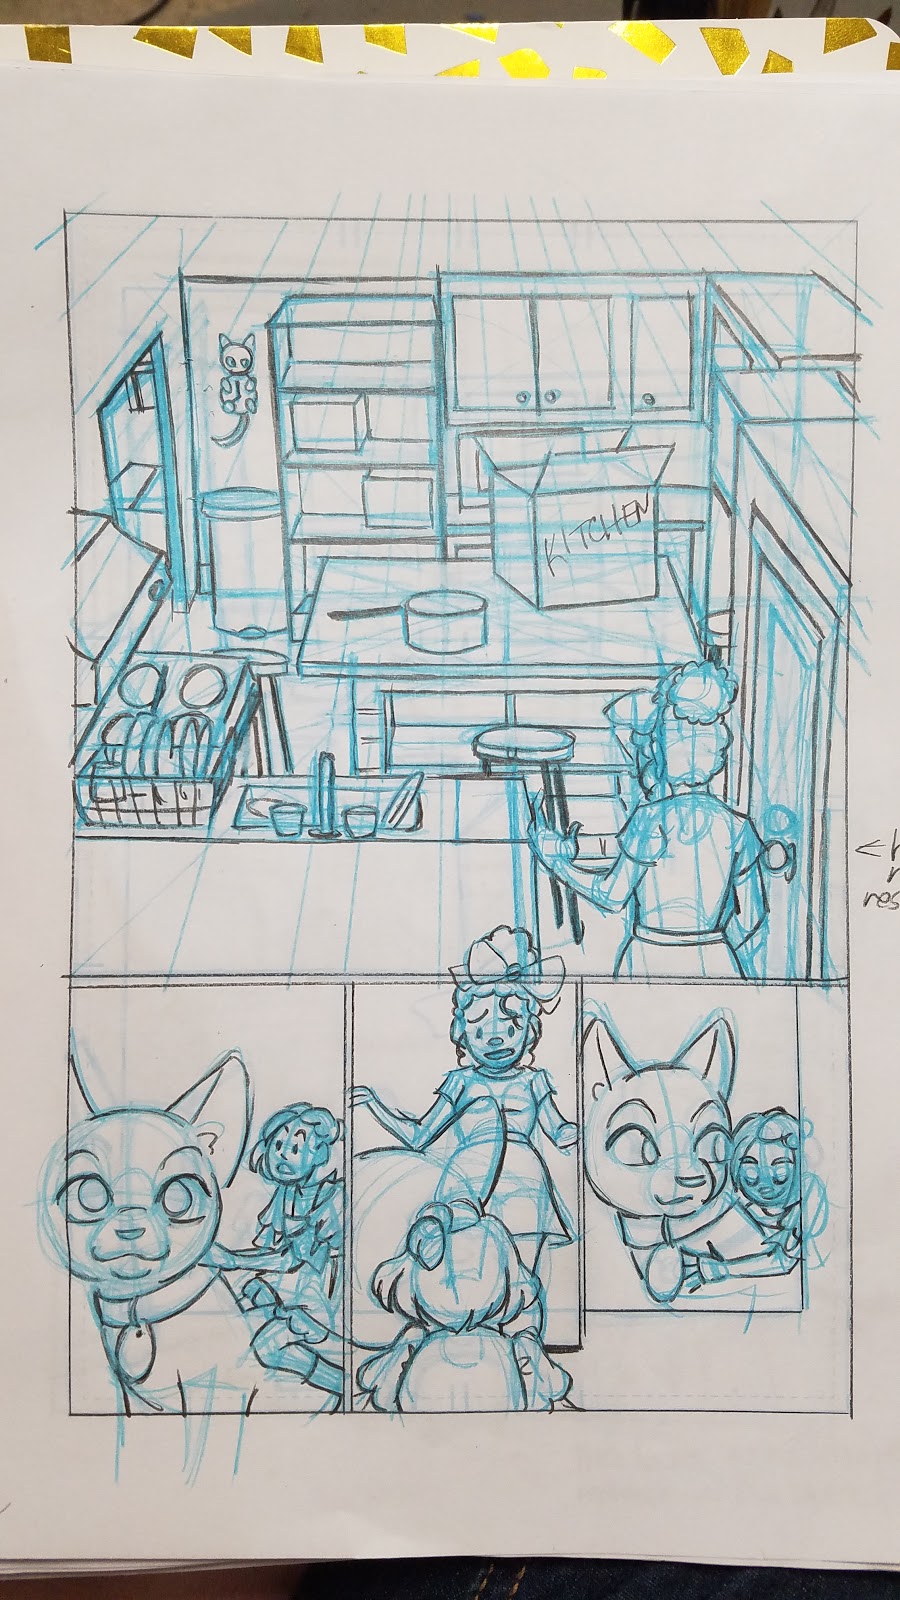
As it appears in the comic:
[image error]
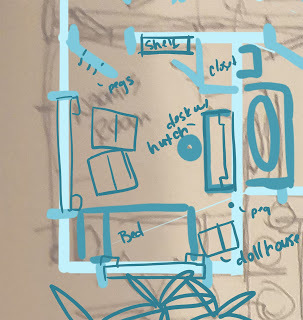
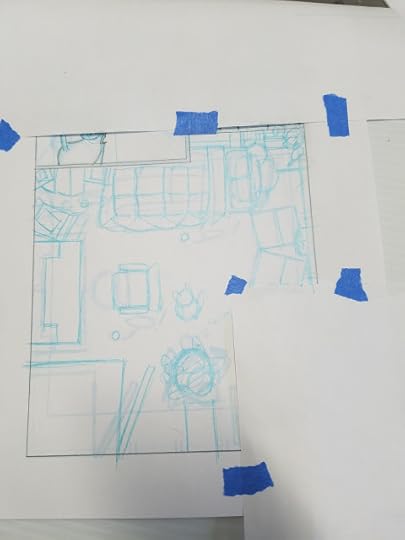
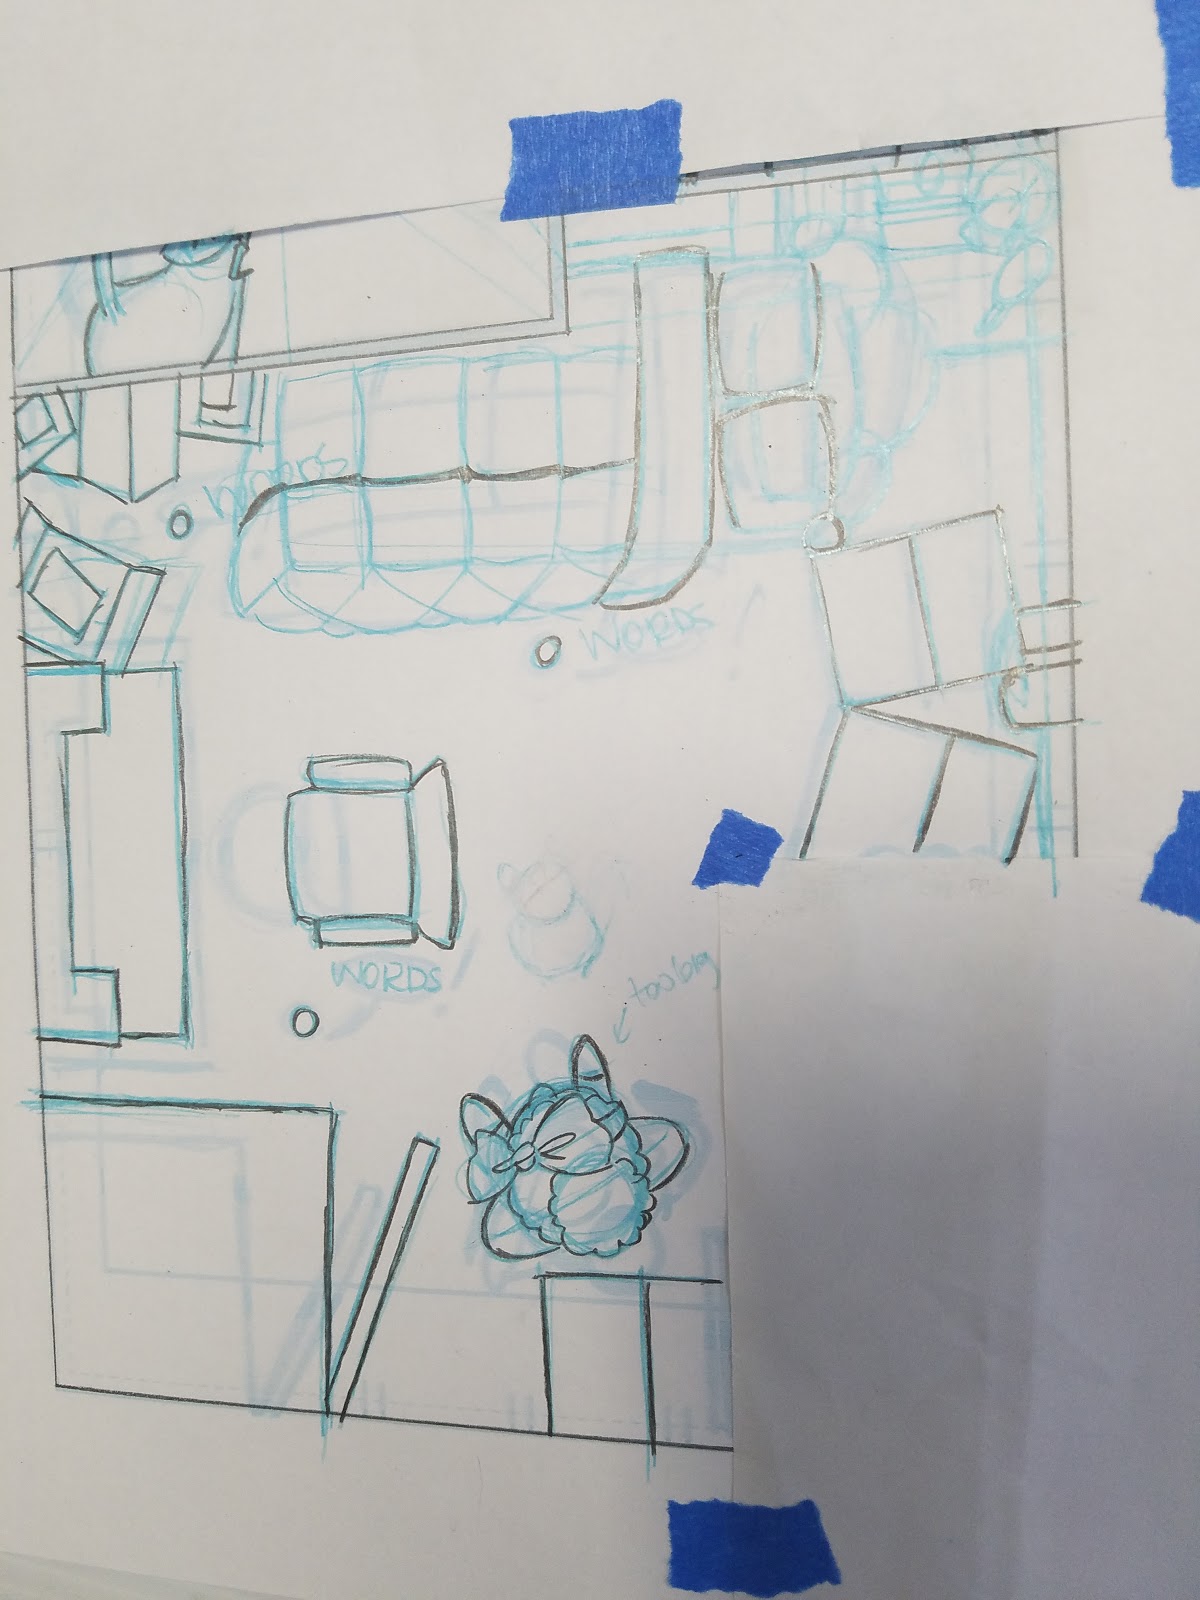
Floorplan Blueprint
Above are concept sketches of Naomi's house, the various sheds in the yard, and Kara's house. The two houses in this story reflect two different worlds, and I took that into account when designing the houses, the interiors spaces, and the objects within.
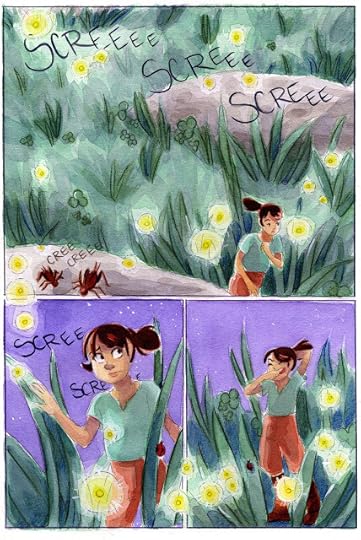
For Kara, the yard is scary but exciting- a representation of the intimidating outside world that she's curious but not prepared for. It's also where the majority of her food is grown- from the various trees around the yard to plants she and her mother cultivate.
For Naomi, the yard is fairly common place- it's just a backyard with grass, trees, and a couple old sheds. Until she meets Kara, there isn't much of interest in the backyard.
For Pancake, the kitten, the yard is a place to explore and play- his domain.
Back Porch
The back porch is the middle ground between Kara's world and Naomi's world- the first taste of a world purely intended for humans. The front porch is on steps (set apart from the yard, which Kara is somewhat familiar with) and concrete- an unnatural environment for a Lilliputian.
Back Yard
This is a shared space, and reflects two worlds- the world of Naomi, a Lilliputian, who sees the yard as a gigantic space that encompasses the majority of her needs, and the world of Naomi, a human girl, who sees the yard as just a greenspace.
As it appears in the comic
Kara's Dollhouse Home Vs. The Dollhouse Introduced in Chapter 7
Kara's Home:


 Made of wooden and chipboardVery lived inRepurposed human objects for furniture, decorationObjects are mainly utilitarian- for use and enjoymentAlthough this was originally a toy for human children, Lilliputians have made it their own
As is, it is located in a shed, and protected from the worst of the elements- does not get directly rained on, is in the shade, out of the sweltering Louisiana sun, mostly protected from the damp.
Naomi's Barbie Dreamhouse:
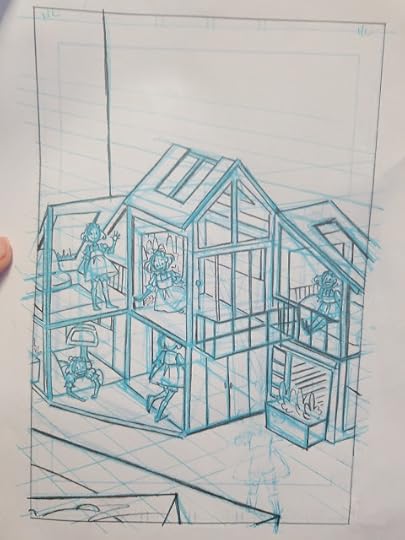 Very plasticLots of open spaces- no protection from elementsPlastic, scaled furnitureNothing actually works- all very fakeIt looks like a home, but is not- nothing has been changed or customizedClearly a toy
Interior of Naomi's House
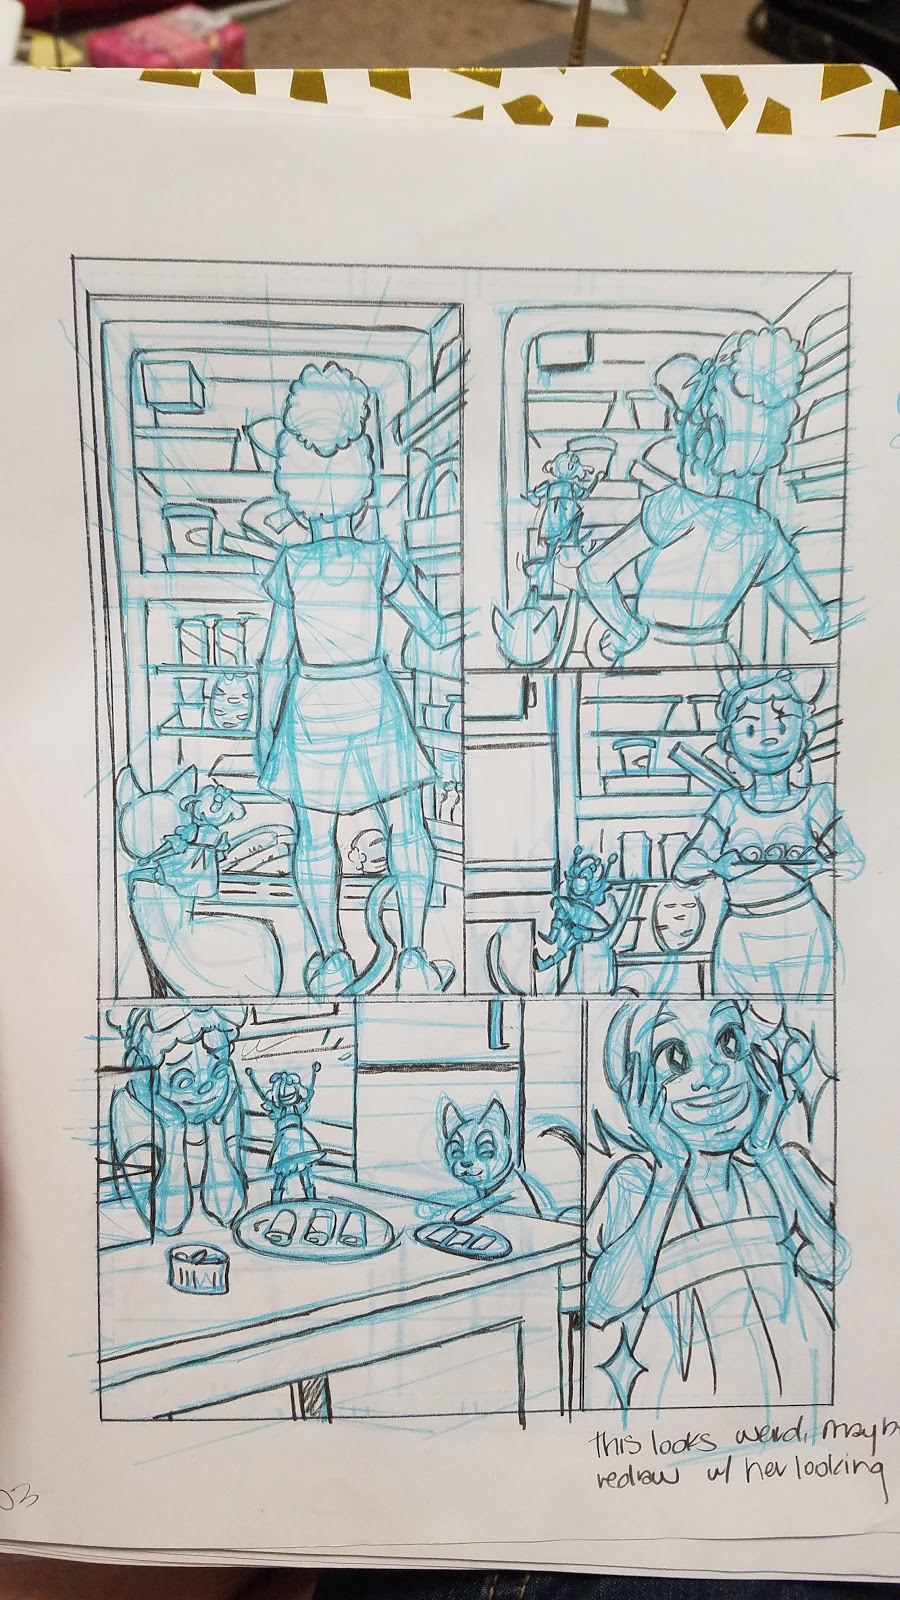
Kitchen Design
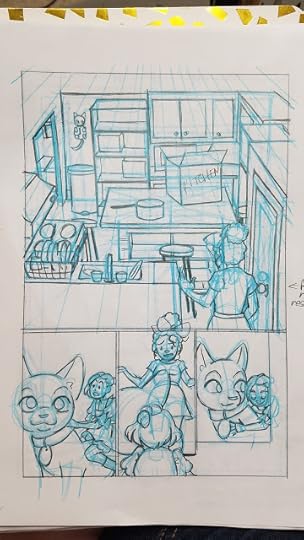

Given Kara's scale, even the refrigerator is an environment in chapter 7.
Living Room/Dining Room Design
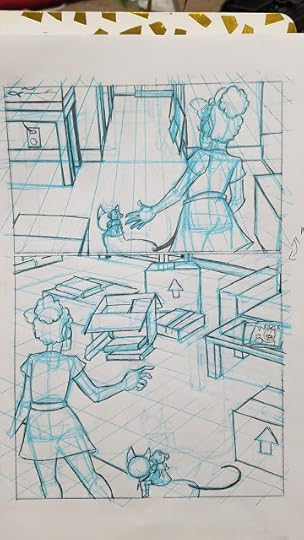
Before painting this page, both of these pages need to be pulled out to better show the environment. Shot choice can be particularly important in determining how your reader views the environment in your story.
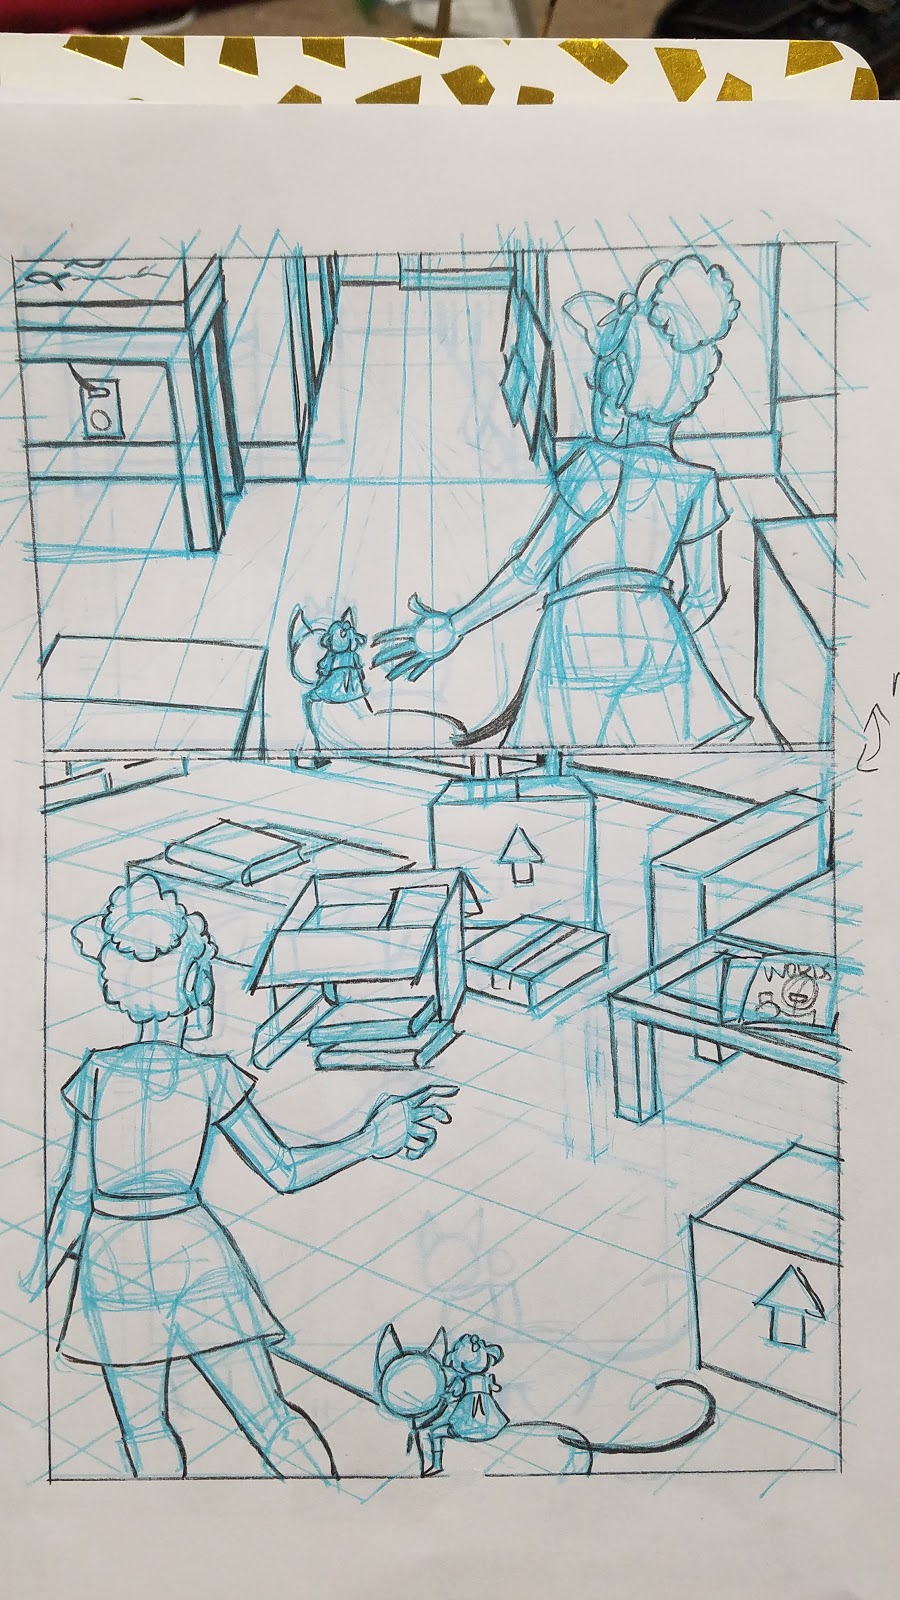
Hallway Design
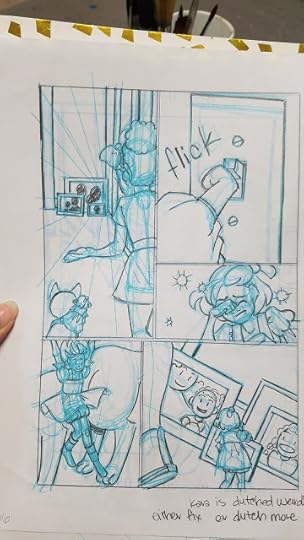
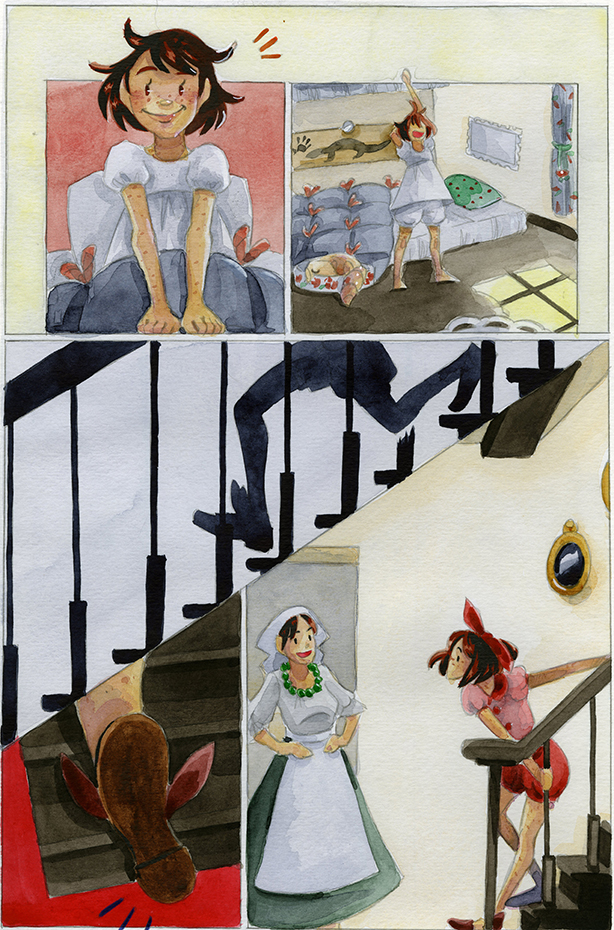
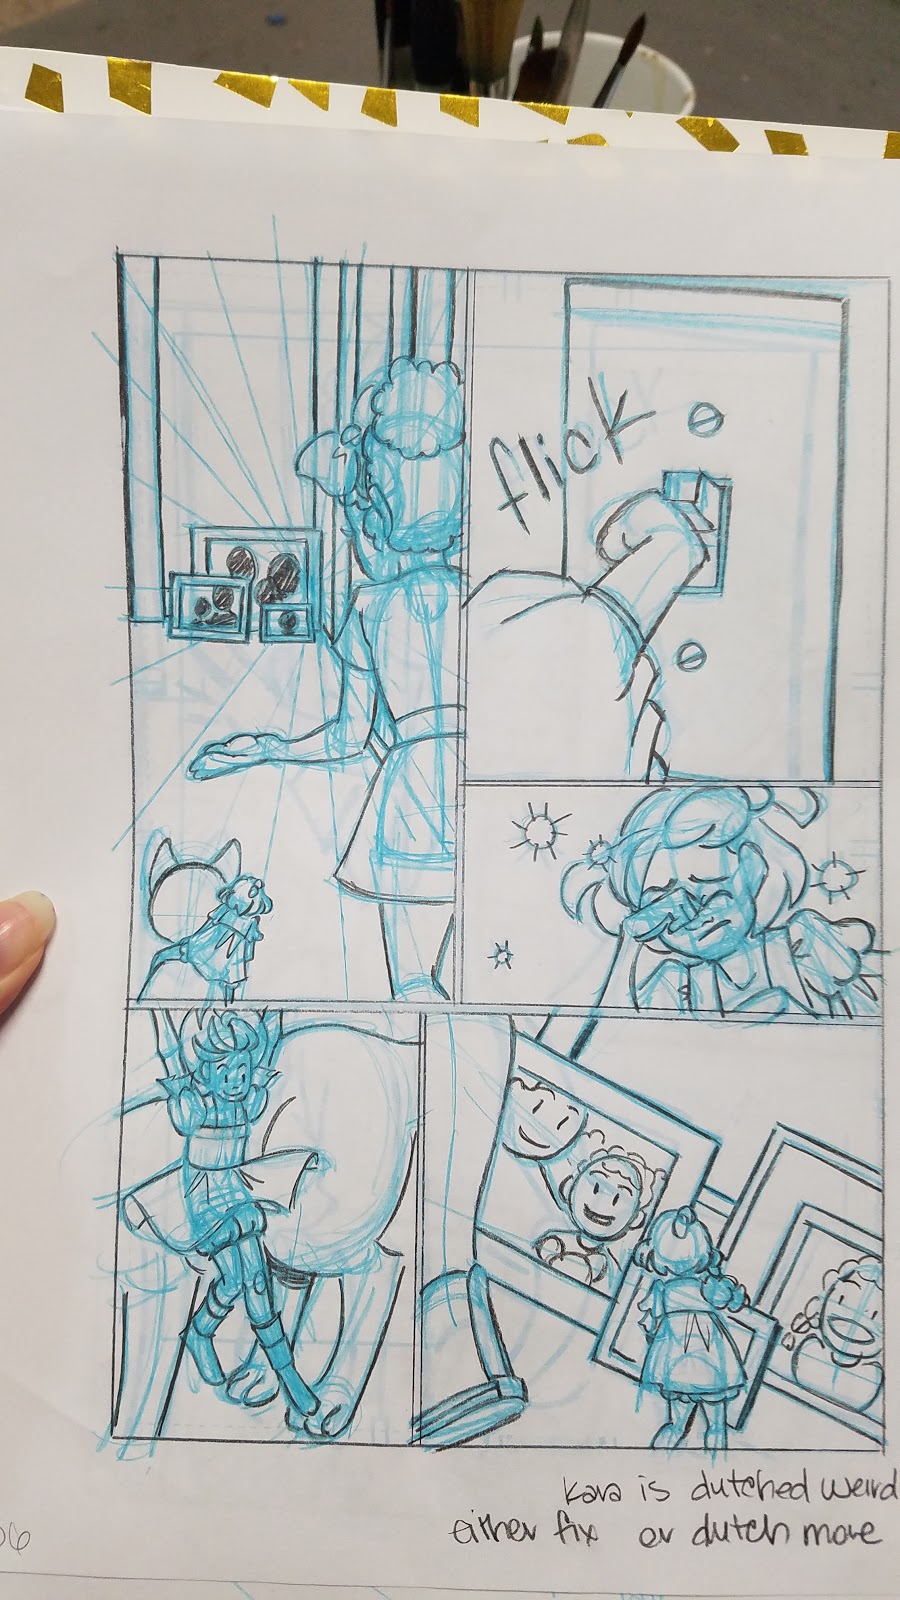
Naomi's Room
[image error]
When designing a bedroom for a 14 year old girl, it needs to reflect her character. For Naomi, it needs to reflect a major upheavel (the move from New Orleans to a small rural Louisiana town on the other side of the Mississippi River), the looming move into the world of adulthood, her reluctance to leave childhood and safety behind.
Initial Room Design
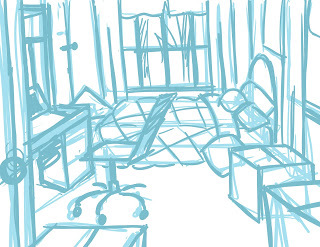
The Room as it appears in the comic
Naomi Scale:
Kara Scale
So as you guys can see, Naomi's bedroom would be a different experience for a 7" tall person, and it's important that I capture that experience to some degree in this chapter (although I will have the opportunity to continue it in later chapters as well). I need to show everyday objects in a new, exciting light, as Kara is encountering most of these things for the first time.
Setting Up Your Environment:
Perspective:
Commonly Used in 7" Kara:
1 Point
 Bottom Panel
2 Point
 Top Panel, Second Panel
Isometric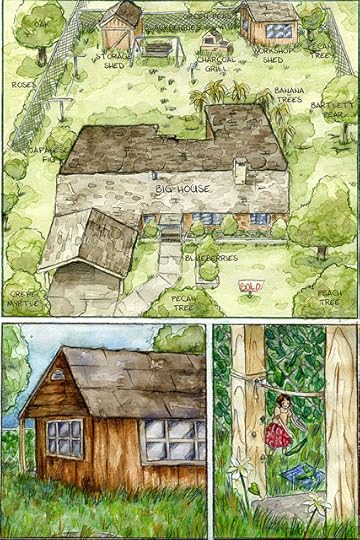 Top Panel3 Point

Atmospheric
 Bottom two panels
How I Set Up Perspective Grids
Intro to Comic Craft: You Need PerspectiveIntro to Comic Craft: Perspective in the Panels
Other Options for Setting Up Your Backgrounds and Perspective
Faking It:
Let's Make a Comic: Concept to Scripting to Thumbnails To Roughs
Manga Studio Grids:
Manga Studio 5 & 5 EX Tutorials: Perspective Rulers
How to 'Perspective" Manga Studio 5EX - Scribbles with Jonathan
Sketchup
Perspective For Comics: Google SketchUp Demo
Tips and Tricks for Setting Up Environments
High horizon line- shows mostly floorLow horizon line- shows mostly skyDraw your background tight in your thumbnails- it's easier to tighten up an existing background than to start from scratch
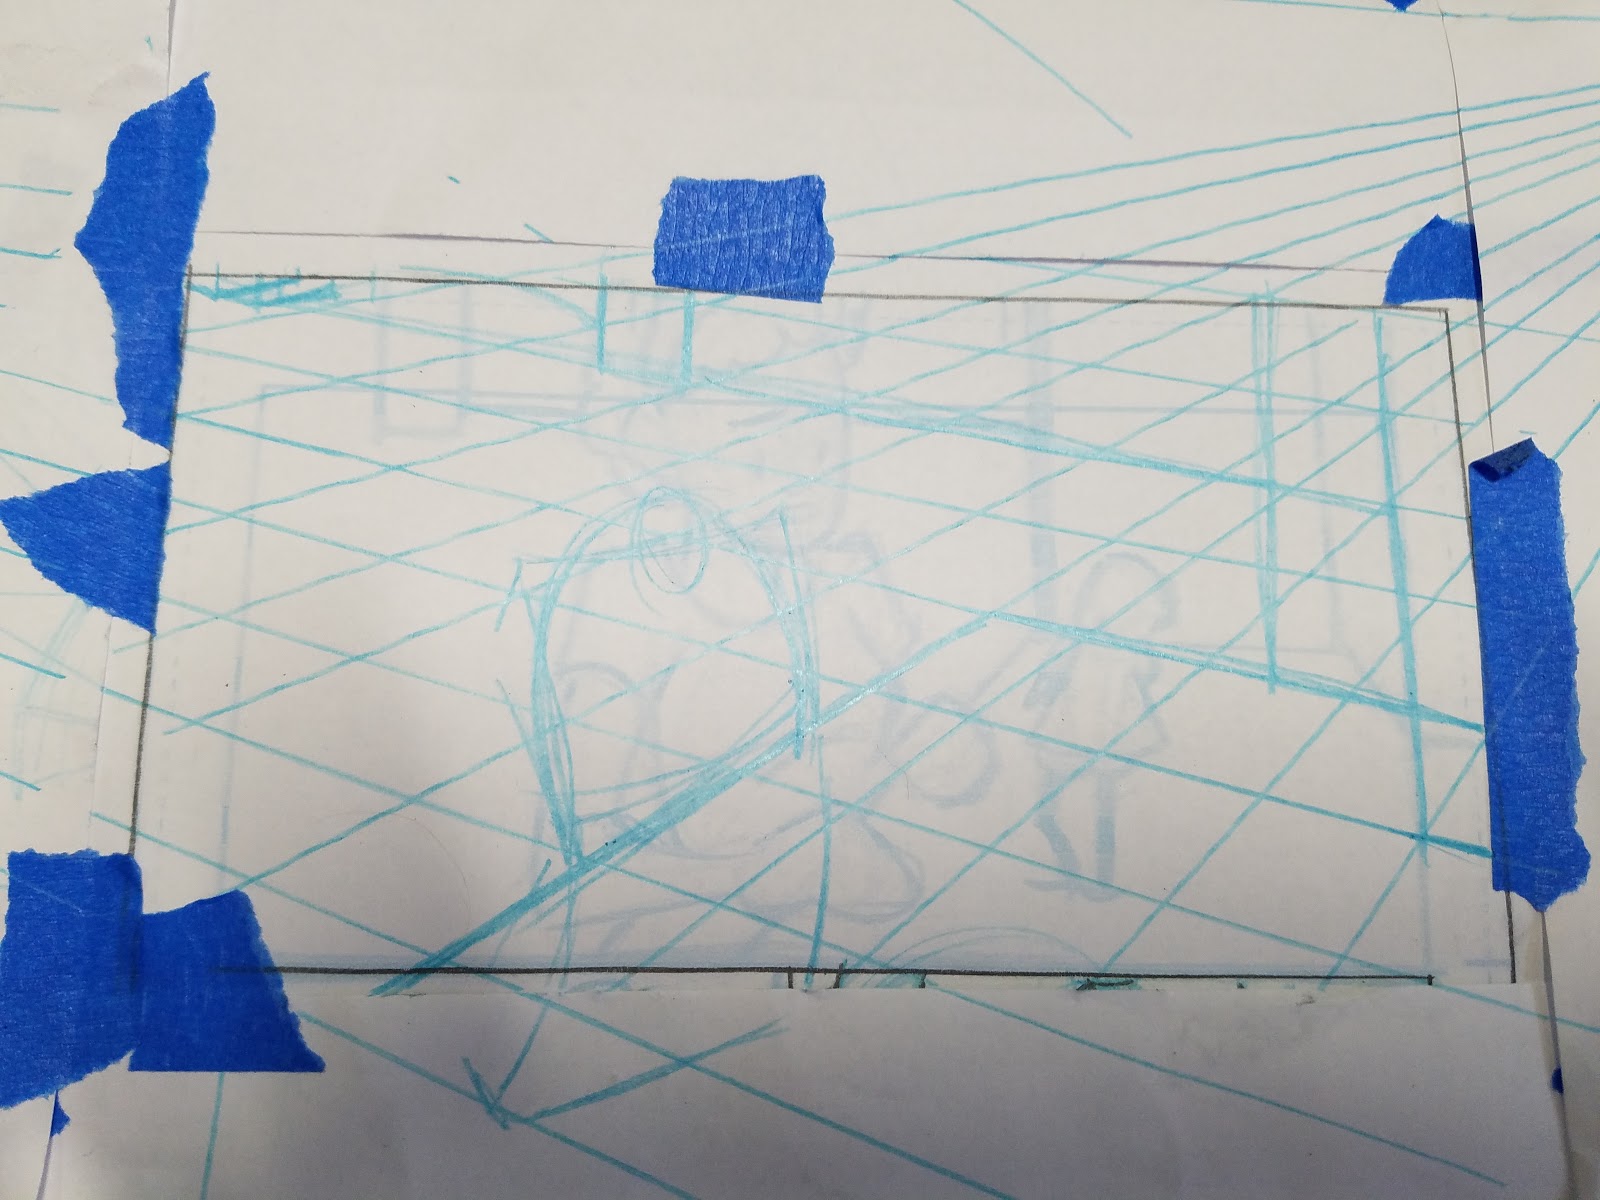
Blueline Sketching with a Non Photo Blue Pencil:
These roughs are enlarged copies of the thumbnails that have been converted to non photo blue and printed at draft quality. This makes using a non photo blue pencil to refine details fairly easy- I can see what I drew, and I can see what I'm drawing, and the two aren't confusing. Once I've tightened up my details, I finalize in graphite.
[image error]


Draw Through Your Objects

Environments are a fairly dense topic, as well worth exploring as character design and story creation, and I hope that you will explore the links provided in this post, as they cover specific topics in depth.
I hoped you enjoyed this focus on environments during the rough creation process! If you have any questions or requests, please feel free to email me using the form in the left hand sidebar. I hope I've convinced you to try something new, or to rethink the place environments have in your panels.
Resources for Set Design/Settings
Perspective Grids (blog post)
What is Perspective? (outside resource)
Perspective in the Panels: Intro to Comic Craft (video)
Intro to Comic Craft: You Need Perspective (video)
Creating Dynamic Backgrounds for Comics: Part 1: Drawing Thumbnails (outside resource, video)
Creating Dynamic Backgrounds for Comics: Part 2: Two-Point Perspective Images (outside resource, video)
Creating Dynamic Backgrounds for Comics: Part 3: Rules of Illusion (outside resource, video)
Creating Dynamic Backgrounds for Comics: Part 4: Implied Realism (outside resource, video)
Speaking of resources, if you make comics, you're going to want to check out Kabocha's Photoshop and Manga Studio Brushes:
[image error]
Kabocha's brushes are free for personal, comic, and illustrative use, and I regularly use them myself! There are loads of effects brushes, from rain to lace. And if you enjoy Kabocha's brushes, please check out Linked, her webcomic.

Please consider donating to this blog or purchasing from Natto-shop (http://nattosoup.com/shop) if you want me to continue publishing quality content. All materials tested were purchased from my own pocket. Keep on Truckin' Nattosoup is not under any sponsorship.

My Patrons have expressed interest in content on the comic making process, and I am happy to oblige. Comics are one of my passions, and they're the reason I began this blog in the first place. It isn't always easy to share comic content here, but their generosity has made it easier to set aside the time and resources necessary to doing so. Writing about comic craft in depth requires research, setting aside time during the comic creation process to document my progress, and a lot of thought, and I feel is best served through longform series such as the Intro to Comic Craft: Step By Step series. If you enjoy this series, please take a moment to share it with your friends and loved ones on the social network of your choice, leave me a G+ comment, or send me an email using the sidebar form- your feedback is important to me! If you have specific questions, please don't hesitate to ask via email.
As part of this series, my Patrons have exclusive access to behind the scenes comic creation content, including the entire plotform synopsis for 7" Kara, the 7" Kara beat sheet, the Chapter 7 Synopsis, the Chapter 7 tight script, and loads more. If you learn best from working example, joining my Patreon will give you access to those files.
In comics, backgrounds are sometimes an afterthought to the characters. It makes sense- if you're world is this world, and your time period is this time period, your readers will be able to fill in those blanks easily enough. But what if your world is fantasy, or viewed from the perspective of an outsider? Then environments are an important part of your story, and deserve the same attention you give your characters.
Think of your environment almost as you would your own characters. Your evironments need to be developed and populated. For 7" Kara, it's important that establish two different worlds- the world of Kara and other Lilliputians (mainly her parents), and the human world. These worlds have to be distinct- while there can be some similarities, you need to know at a glance which world we're in. I shift focus frequently in later chapters between a Lilliputian's eye view and a human eye view, and even both views have unique characteristics and set pieces that give the reader clues as to how the character sees that world.
For 7" Kara, I've had to design numerous environments- the yard (from a human perspective and a Lilliputian perspective- very different views and feelings!), the sheds (one of which contains and protects Kara's home), two dollhouses as inhabitable spaces (a wooden Victorian inspired dollhouse, and a modern plastic Barbie dreamhouse), and a human sized home (gigantic to Kara).
Designing Naomi's home proved an interesting and fun challenge. The original house and yard are strongly based on the house my mother grew up in- a house her father designed in the early 50's. I don't have access to photos of that house, and I lived in Savannah, GA at the time, so I relied heavily on Google Streetview for reference for the exterior, and heavily on my own memories of the house for the interior.
Of course, since this is set in modern times, I did need to renovate a little. Naomi's room is a complete fabrication, as will be her father's bedroom and his home office.
Whenever I'm designing environments for comics, I set the comic in a place I'm familiar with, and have some personal attachment to. The house in Foiled (link) and How to Meet a Martian is the house I spent my teenage years.
I highly recommend you don't wait to design your environments- its easiest to design them during the concept and planning phase of your comic creation. I cover environmental and worldbuilding in some detail in my Intro to Comic Craft: Step by Step Brainstorming and Character development post.
If you are a writer, providing your artist ample reference is highly recommend. There are a number of ways you can do this, but I've found setting up Pinterest boards specific to the project has been very helpful for me.
Here are my boards that are relevant to 7" Kara:
Character Driven
Kara Inspiration
Meldina Clothes
Kara Clothes
Male Lilliputian Clothes
Naomi Clothes
Environmental and World
Naomi's House
Naomi's Room
House Design (established in Chapter 1)
Referenced Images:
The house Naomi and her father live in is based on the house my mother grew up in- a house my grandfather designed. The house is no longer in family hands, so I relied on Google Streetview for enough reference to design the house. I will not share those images here, out of respect for the current owners.
Exterior Of House
When designing Naomi's home and yard, it needed to be the sort of environment that could support a Lilliputian family who refused to steal from humans to get by. My grandfather was an agricultural major who dabbled in farming his entire life, and every property he owned was scattered with fruit bearing trees, gardens for vegetables, and edible flowers- so this seemed a very natural setting for Kara's family.
As it appears in the comic:
[image error]
Floorplan Blueprint

Above are concept sketches of Naomi's house, the various sheds in the yard, and Kara's house. The two houses in this story reflect two different worlds, and I took that into account when designing the houses, the interiors spaces, and the objects within.
For Kara, the yard is scary but exciting- a representation of the intimidating outside world that she's curious but not prepared for. It's also where the majority of her food is grown- from the various trees around the yard to plants she and her mother cultivate.
For Naomi, the yard is fairly common place- it's just a backyard with grass, trees, and a couple old sheds. Until she meets Kara, there isn't much of interest in the backyard.
For Pancake, the kitten, the yard is a place to explore and play- his domain.
Back Porch

The back porch is the middle ground between Kara's world and Naomi's world- the first taste of a world purely intended for humans. The front porch is on steps (set apart from the yard, which Kara is somewhat familiar with) and concrete- an unnatural environment for a Lilliputian.
Back Yard
This is a shared space, and reflects two worlds- the world of Naomi, a Lilliputian, who sees the yard as a gigantic space that encompasses the majority of her needs, and the world of Naomi, a human girl, who sees the yard as just a greenspace.
As it appears in the comic
Kara's Dollhouse Home Vs. The Dollhouse Introduced in Chapter 7
Kara's Home:


 Made of wooden and chipboardVery lived inRepurposed human objects for furniture, decorationObjects are mainly utilitarian- for use and enjoymentAlthough this was originally a toy for human children, Lilliputians have made it their own
As is, it is located in a shed, and protected from the worst of the elements- does not get directly rained on, is in the shade, out of the sweltering Louisiana sun, mostly protected from the damp.
Naomi's Barbie Dreamhouse:
 Very plasticLots of open spaces- no protection from elementsPlastic, scaled furnitureNothing actually works- all very fakeIt looks like a home, but is not- nothing has been changed or customizedClearly a toy
Interior of Naomi's House
Kitchen Design
Given Kara's scale, even the refrigerator is an environment in chapter 7.
Living Room/Dining Room Design
Before painting this page, both of these pages need to be pulled out to better show the environment. Shot choice can be particularly important in determining how your reader views the environment in your story.
Hallway Design
Naomi's Room
[image error]
When designing a bedroom for a 14 year old girl, it needs to reflect her character. For Naomi, it needs to reflect a major upheavel (the move from New Orleans to a small rural Louisiana town on the other side of the Mississippi River), the looming move into the world of adulthood, her reluctance to leave childhood and safety behind.
Initial Room Design


The Room as it appears in the comic
Naomi Scale:

Kara Scale

So as you guys can see, Naomi's bedroom would be a different experience for a 7" tall person, and it's important that I capture that experience to some degree in this chapter (although I will have the opportunity to continue it in later chapters as well). I need to show everyday objects in a new, exciting light, as Kara is encountering most of these things for the first time.
Setting Up Your Environment:
Perspective:
Commonly Used in 7" Kara:
1 Point
 Bottom Panel
2 Point
 Top Panel, Second Panel
Isometric
 Top Panel3 Point
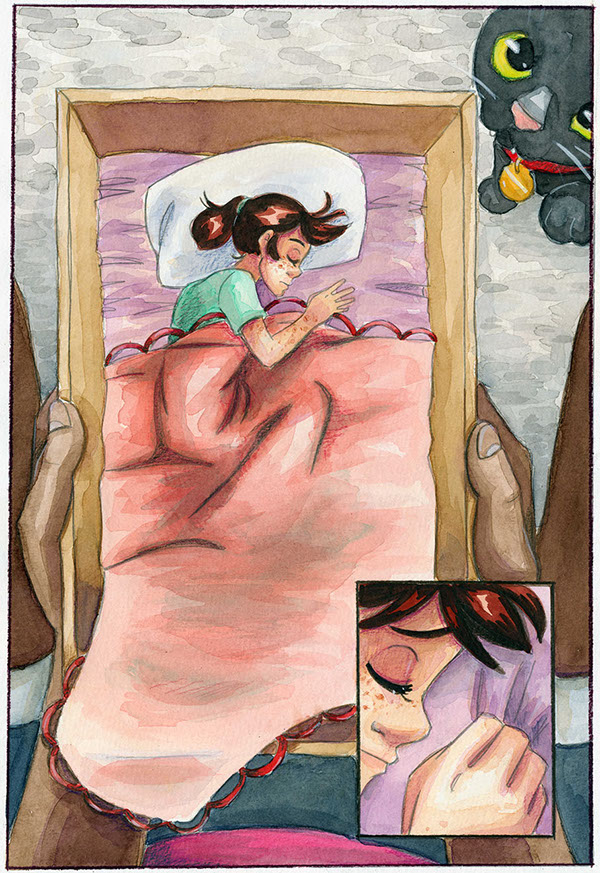
Atmospheric
 Bottom two panels
How I Set Up Perspective Grids
Intro to Comic Craft: You Need PerspectiveIntro to Comic Craft: Perspective in the Panels
Other Options for Setting Up Your Backgrounds and Perspective
Faking It:
Let's Make a Comic: Concept to Scripting to Thumbnails To Roughs
Manga Studio Grids:
Manga Studio 5 & 5 EX Tutorials: Perspective Rulers
How to 'Perspective" Manga Studio 5EX - Scribbles with Jonathan
Sketchup
Perspective For Comics: Google SketchUp Demo
Tips and Tricks for Setting Up Environments
High horizon line- shows mostly floorLow horizon line- shows mostly skyDraw your background tight in your thumbnails- it's easier to tighten up an existing background than to start from scratch
Blueline Sketching with a Non Photo Blue Pencil:
These roughs are enlarged copies of the thumbnails that have been converted to non photo blue and printed at draft quality. This makes using a non photo blue pencil to refine details fairly easy- I can see what I drew, and I can see what I'm drawing, and the two aren't confusing. Once I've tightened up my details, I finalize in graphite.
[image error]


Draw Through Your Objects
Environments are a fairly dense topic, as well worth exploring as character design and story creation, and I hope that you will explore the links provided in this post, as they cover specific topics in depth.
I hoped you enjoyed this focus on environments during the rough creation process! If you have any questions or requests, please feel free to email me using the form in the left hand sidebar. I hope I've convinced you to try something new, or to rethink the place environments have in your panels.
Resources for Set Design/Settings
Perspective Grids (blog post)
What is Perspective? (outside resource)
Perspective in the Panels: Intro to Comic Craft (video)
Intro to Comic Craft: You Need Perspective (video)
Creating Dynamic Backgrounds for Comics: Part 1: Drawing Thumbnails (outside resource, video)
Creating Dynamic Backgrounds for Comics: Part 2: Two-Point Perspective Images (outside resource, video)
Creating Dynamic Backgrounds for Comics: Part 3: Rules of Illusion (outside resource, video)
Creating Dynamic Backgrounds for Comics: Part 4: Implied Realism (outside resource, video)
Speaking of resources, if you make comics, you're going to want to check out Kabocha's Photoshop and Manga Studio Brushes:
[image error]
Kabocha's brushes are free for personal, comic, and illustrative use, and I regularly use them myself! There are loads of effects brushes, from rain to lace. And if you enjoy Kabocha's brushes, please check out Linked, her webcomic.

Please consider donating to this blog or purchasing from Natto-shop (http://nattosoup.com/shop) if you want me to continue publishing quality content. All materials tested were purchased from my own pocket. Keep on Truckin' Nattosoup is not under any sponsorship.
April 5, 2017
Birthday Reflection
This year, I skipped out on sharing my New Year's goals- both those from last year, and new ones for this year. That doesn't mean I didn't SET goals, just that the yearly practice of reflecting on my goals has become an exercise in depression for me. The issue lies in the fact that so many of my goals are honestly out of my hands- 100 followers for 7" Kara on Tumblr, 3000 followers on Youtube, 1,000 followers on Instagram- other than updating on a schedule and trying to share quality work, there's nothing else I can really do.
This year, one of my goals has been to focus on the aspect I can control- doing the work, making the effort, and talking to people.
So below are the goals I've hit that I could control rather than goals that were out of my control.
1. FINALLY launched 7" Kara as a webcomic
2. Helped form a community of comic artists focused on community growth- TWICE.
3. Stopped using ArtSnacks vs Sketchbox for content- those were so tiring!
4. Working on a comic to pitch outside of 7" Kara- these black and white pages will be hitting the Intro to Comic Craft buffer soon, so please look forward to them!
5. Completed my kidlit portfolio- both traditional media and digital media. As you guys know, I'm always looking for work, so if you know anyone who might be interested in a watercolor artist for a kidlit project, please pass my information along.
6. Found an artsy hobby that doesn't make me competitive, and that isn't tied in to my bread and butter
7. Created a craft fair demo setup, started putting in for craft fairs
8. Started putting in for more industry jobs
9. Stopped focusing on reviews so much (it is so expensive), and started focusing more on quality tutorials that I can be proud of
10. Consistently try to cross promote to WebComicChat, ComicArtistsUnite, Pinterest, G+, Facebook- trying to treat my hard work like it's actually worthwhile
11. Kept the pressure on 1001 Knights to deliver what backers paid for, while other artists kept silent.
12. Started using Manga Studio for inks, rather than Photoshop- so much easier
13. Started doing more digital art, rather than just digital art for con merch
14. Worked on a black and white comic- a huge change from my watercolor, and fairly uncomfortable
15. Updated my resume
16. Updated my convention portfolio
17. Rebranded my YouTube and Twitter to better reflect my art
18. Started keeping a journal
19. Consistently kept a calendar, which has helped significantly with scheduling
Please consider donating to this blog or purchasing from Natto-shop (http://nattosoup.com/shop) if you want me to continue publishing quality content. All materials tested were purchased from my own pocket. Keep on Truckin' Nattosoup is not under any sponsorship.
April 2, 2017
Cheap Thrills: Affordable Fountain Pens to Get You Started
Please note: I have only mentioned pens I have personally used and have experience with. There are plenty of Indian pens on the market that fall into these categories, loads of pens from China, and even the popular Pilot Metropolitan fits in the Around $20 category. Although I do write with my pens, I purchase pens more for art and art exploration. If you find this topic interesting, please check out my YouTube Channel's Fountain Pen playlist for frequent inky updates.

Other than ink samples obtained through sample exchanges with a friend, all samples shown in this review were either purchased from Goulet Pens, Massdrop, or Anderson Pens. All pens were purchased, save for one Pilot Preppy sent from a friend. None of these materials were provided free of charge (other than abovementioned exchanges), and this post was not sponsored. Strangely enough, it's difficult to find sponsors for art supply blogs, so if you know of any companies interested in partnership, please pass my information along!
This post, as with ALL posts since February 2016, WAS sponsored by my wonderful Patrons on Patreon. If you enjoy content like this, you can help make it possible by joining my art nerd community.

Their support ensures that this blog, and the sister Youtube continues, and the funds raised during the month go towards purchasing supplies for review, paying for guest content, and, should something be left over, compensating me for my time.
Back in November, I wrote about using fountain pens for lettering (as in comic lettering) and for sketching. Since then, intrepid readers may have noticed a distinct increase in fountain pen content on the YouTube channel and on my Instagram. Fountain pens have provided a fairly inexpensive art-tangential hobby that doesn't compete with my comic work- a colorful outlet that puts me in contact with writers who are as invested in quality reviews as I am.
While I've known for awhile that artists sometimes use fountain pens for urban sketching (though honestly, I still prefer Pigma pens for that), inking with fountain pens isn't quite as common. My friend, Candace, has used fountain pens to ink much of the beautiful art on her Instagram. Inspired by her amazing art, and egged on by my other fountain pen weilding artist friends such as Kabocha and Heidi, I've been working my way through a wealth of inexpensive fountain pens and beautiful inks.
One area that I found fountain pen reviews to universally lack is a bit of creativity. Reviews for pens, papers, have become so formalized that if you're an artist, you can't find information pertinent to your needs without a lot of research. I've decided to compile a few short pen reviews, some ink recommendations, and other suggestions that might be of interest to artists who would like to use fountain pens and fountain pen inks in their work. If you'd like more information, please check out my Fountain Pens playlist on Youtube- I have all sorts of interesting mini reviews and tutorials to inspire your art.
Today's pens are all under $40- you really do not need to spend a fortunate to acquire fountain pens that will suit an artist's needs. Although most of these pens come with their own ink cartridges, the real fun comes in using the ink of your choice, be it pigmented ink or shading ink.
Under $5
Platinum Preppy
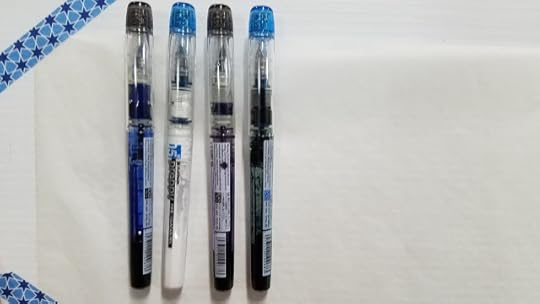
Cartridge Pen.3 line-No flex, dead lineCan be converted to an eyedropper filled pen with a little silicone grease. For a leak proof seal, use an O ringAvailable in F and M, and EF in select colors
Mini review:
The Preppy is the only full sized fountain pen on my list for under $5, so if your hand cramps up from using tiny pocket pens, the Preppy might be the pen for you! Japanese pens tend to run on the fine side, but the Preppy's Medium is a solid .5 nib, with the fine being a .3. These nibs have zero give, but it's a reliable writer, and great if you have a single line weight style, or are looking for an urban sketching pen that can hold A LOT of ink.
The Preppy is also available with a marker option that can be used as a highlighter.
Available on:
Amazon:
Set of 7, Fine
Individual, Fine
Individual, Extra Fine
Goulet Pens
Pilot Petit 1
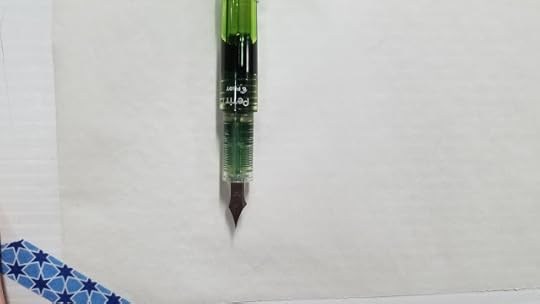
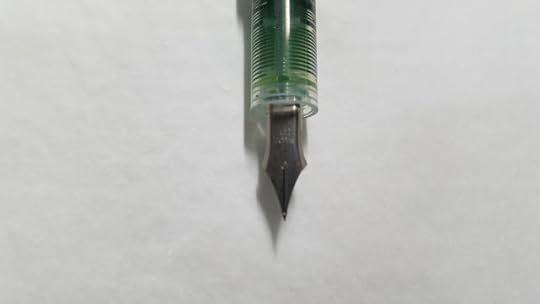
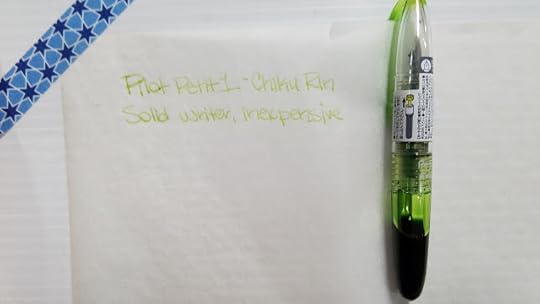
Cartridge pen.3 line- no flex, dead lineTakes awhile to get startedCan be converted to an eyedropper filled pen with a little silicone grease.
Mini review:
The Petit 1 is itty bitty- a pocket pen designed to slip into a pocket or purse. Although it comes with ink cartridges, the selection is fairly limited due to the pen's size, and you may find refilling the cartridges or converting to eyedropper fill to be preferable. I find pens this size to be a little too small for my hand, even posted, and find them fatiguing to use for too long.
The Petit 1 is actually part of a series- Pilot has a marker tip (or sign tip) and a fude tip as well. I reviewed the fude tip a few years ago while trying to find the perfect fude pen. Any pens in the Petit series can be converted to eyedropper pens and filled with the fountain pen ink of your choice.
Available on:
Amazon
Both the Platinum Preppy and the Pilot Petit 1 are handy pens for testing ink samples or inks that might potentially ruin more expensive pens.
Honorable Mention:
Jinhao x750
Between $4-$7, usually includes shipping and cost of converterStock nib is a size 6 nib-performs fairly decently out of the box, but really shines if you have the know how to convert it to a G Nib.Available in a wide range of colorsMetal bodied penFairly substantial pen
Mini Review:
I purchased a Jinhao x750 for the purposes of modifying it with a G nib, so I never inked it up with the stock nib. Please check the Second Opinions section for outside reviews.
Available on:
Amazon
Goulet
Under $10
Jetpens Chibi and Converter
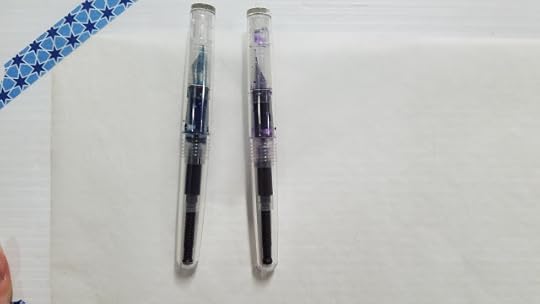
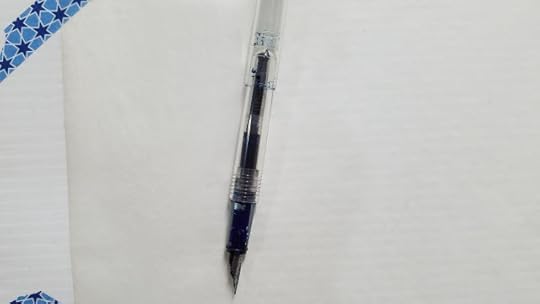
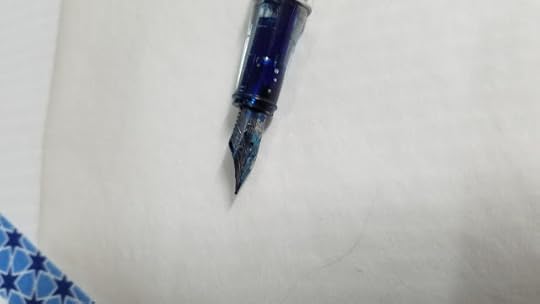
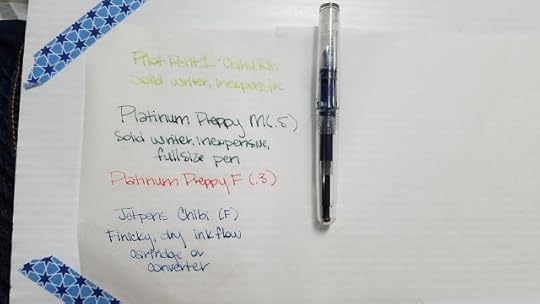
Cartridge penVery fine nib, around a .3 line. Handles a bit like a scratchy Hi Tec-C gel pen. No flex, dead lineOnly available in Japanese FineScratchy writerNeeds significant modification (fill the holes in the back of the body) before it can be converted to a eyedropper pen.
Mini review:
The Jetpens Chibi is intriguing- it's tiny, it's clear, and it's oh so cheap. Of course, once you add in the converter, it's not quite so cheap- $2.99 for the pen, $2.50 for the converter, pushing it just out of the Under $5 range. Due to the fine line, shading and shimmering inks are far less impressive in a Chibi, and shimmering and pigmented inks may clog your Chibi (more on all three types of inks below).
I recently bruised my hands doing ink tests with Jetpens Chibi fountain pens. I find them a bit scratchy in general, and sometimes the nib needs to be primed (push the converter's plunger to expel additional ink, should flow issues arise).
Available On:
Jetpens
Pilot Plumix
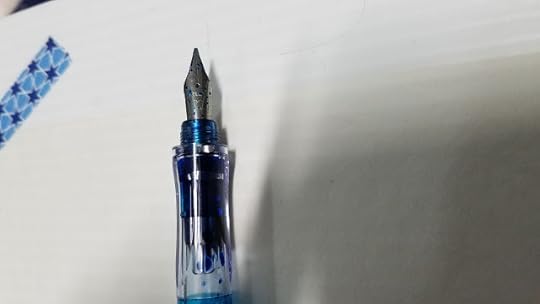

Can be converted to an eyedropper pen easilyAvailable in Fine, Medium, Medium handles like an italic (Goulet has it listed as a 1mm stub)Unlikely to railroad, but may sputter out mid wordNo real flex
Mini Review:
The Plumix is an interesting pen. The body is ergonomically designed- not too thick, not too small, so it's comfortable to hold, but the nib itself is like writing with a nail-absolutely no give. For cheap pens, its a bit of an oddity, in that you can get it with a Medium nib (cheaper pens tend to default to Fine) While you can purchase a converter for the Plumix, there's really no need, as you can easily fill this pen from an eyedropper, and it will hold a large capacity of ink.
I've had some minor leak issues with Bleu Parvence, but none on the page while writing. I have not tested this pen with Bulletproof Black or Platinum Carbon Black.
Available on:
Amazon
Goulet Pens
Jinhao x750 modded with a G nib
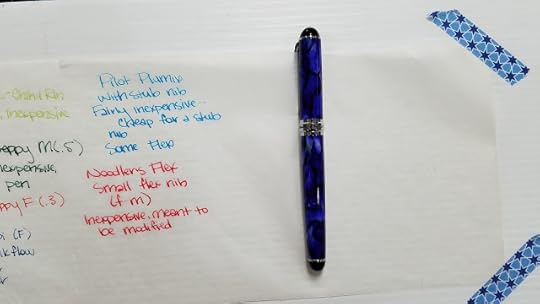
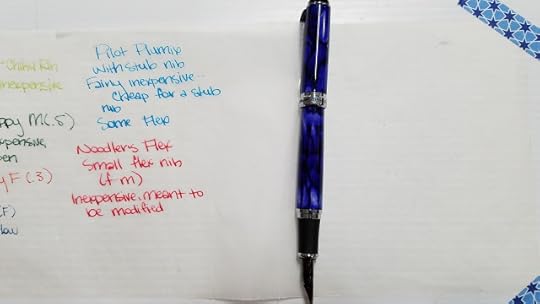
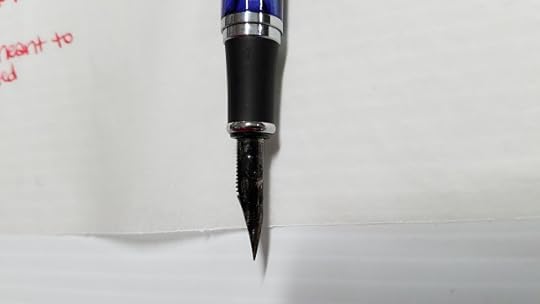
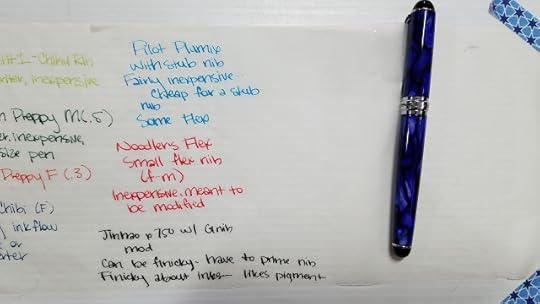
(only under $10 if you learn how to mod your own pens, but I promise, it's not too difficult)Converter penVariable lineweight because it uses a G nib- very flexibleProne to railroading, hard startsMay need significant modification and patience to get working
Mini review:
This is a bit disingenuous, as your modded Jinhao will vary with who modded it, and how handy you are with your own modifications. I modded my own Jinhao x750, and it took a lot of patience, a pair of stronger hands than mine, and heatsetting the feed a couple times to get it to work properly. My modded Jinhao x750 also improved with use, but it still requires coaxing to get it to work (dip the nib and feed under running warm water to remove dried ink and reactivate the flow, keep a cup of warm water nearby should your pen start railroading). I currently only use heavier pigment inks (discussed below) in my Jinhao x750.
Jinhao x750's are fairly hefty metal and enamel pens, and you may find them tiring to use if you have smaller hands.
If this sounds tantalizing, but somewhat frustrating, I recommend you consider an Ackerman pump action (or fountain pen, although I have not tried the fountain pen body) G-nib.
Read the Second Opinions section for information on how modify your own Jinhao.
Around $20
Noodler's Flex
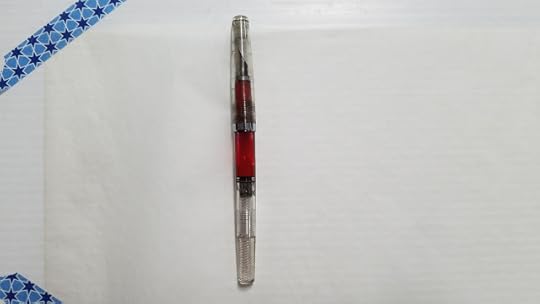
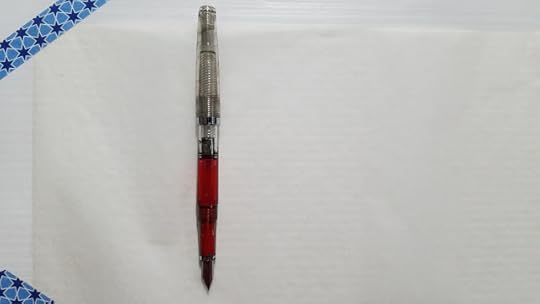
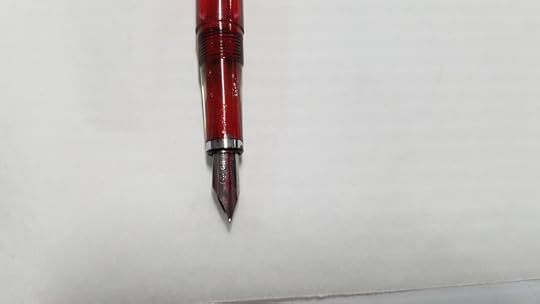

Piston filled penVegetable resinSmall flex nibFairly flexible nib, not as flexible as a dip pen
Mini review: If you're an artist and an inker, I highly recommend you try a Noodler's Flex, or it's bigger brother, the Noodler's Ahab for yourself. In the world of modern fountain pens, flexible pens are unusual, expensive, and often highly desired. The Flex and the Ahab are exceptions- they feature 'creeper' nibs (meaning the ink creeps towards the front of the nib, this isn't a flaw), with a fairly generous amount of flex. The Flex is much smaller than the Ahab, and people with large hands may find it difficult to use.
Noodler's pens are meant to be noodled with, and feature removable ebonite (hardened rubber) feeds and nibs. If you find your Flex isn't working quite to your liking, feel free to tamper with it! I recommend checking out the Goulet Pens (link) Youtube channel, or Fountain Pen Network for instructions on modding.
Available On:
Amazon
Nemosine Singularity
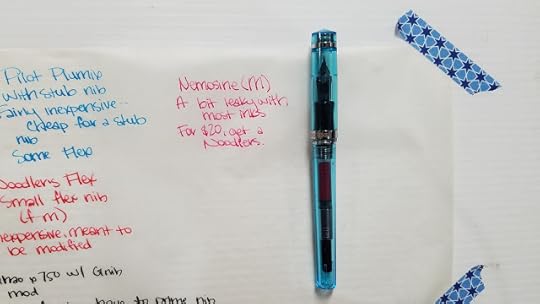
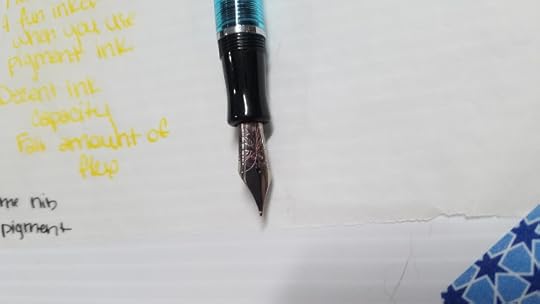
Writes great, but prone to leaking.Converter filledAvailable in Fine, Medium nibsEuropean nib- broader than Japanese nibsNon flexible nib
Mini review:
My Nemosine is a very leaky pen- very prone to dripping and dropping while I write. The only ink that works fairly well (that I've tested) has been Sailor Storia's Dancer, which is a bit too dry for my other pens anyway. Even inks recommended for the drippy Singularity have been too wet for the feed, so while I enjoy my Singularity, I cannot recommend it.
Available on:
Goulet Pens
Noodler's Ahab

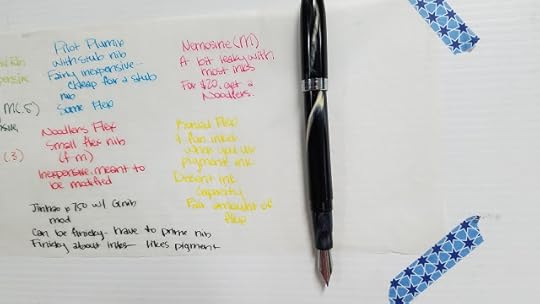

Larger than the Flex in all ways- larger ink capacity, larger flex nib, larger pen body. Piston filled.Large flex nibFairly flexible nib, not as flexible as a dip penCan be converted to an eyedropper fill for larger ink capacityVegetal resin
Mini review:
I LOVE my Ahab. It's given me very few issues, other than some minor fiddling to get the nib in place. It has loved every ink I've given it (save for Sailor Storia Dancer, which tends to run a bit dry in most pens), and is fun to ink lineart with, especially if you're using the Storia inks (might I recommend Lion?) The larger flex nib has a fair amount of variation and if you're using the Ahab for writing, I recommend trying Emerald of Chivor
Available on:
Amazon
Paper and Ink Arts
Goulet Pens
Noodler's Konrad:


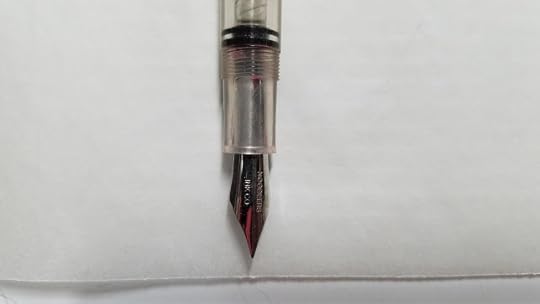
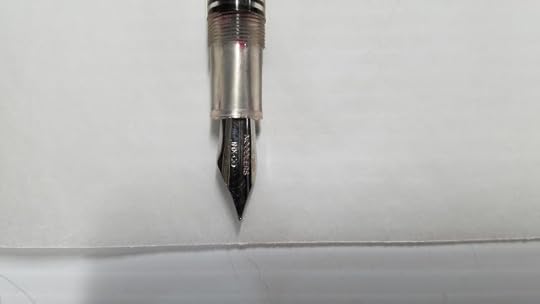

Piston filled Like a big version of the FlexLarger nib than flex (size 6)Can be converted to a G-Nib modSlightly smaller body than the AhabVegetal resin, more expensive models are acrylic
Available on:
Amazon
Goulet Pens
I know there are loads of great inexpensive fountain pens on the market- so if you have a favorite, feel free to tweet it at me (@Nattosoup) or email me using the side bar form! I'd love to hear your suggestions!
Materials Needed for Eyedropper Conversion
Silicone GreaseCotton BudsOptional: O RingsWhy convert:
For the right pen, it means an enormous ink capacity- in your choice of ink. This is a great way to use the ink samples you order from Goulet or Anderson Pens.
How to convert:
1. Clean out your pen using the method outlined beline
2. Liberally smear grease on your cotton bud or other application impliment
3. Liberally smear said grease onto the threads of your pen, both on the inside of the barrel, and the outside of the section
4. Fill your pen with the ink of your choice using an eyedropper
5. Screw the barrel to the section
Should your pen leak, you can reapply the silicone grease, or give O rings a shot!
Note: This is not really recommended for pens you plan on traveling with. I've had no issues with leaking, but I'd hate for these pens to ruin your bag or pocket.
Ink Samples:
Are a great way to try out new inks- new colors, formulas, and brands. Unlike with art supplies and art supply companies, many fountain pen stores are eager to convert new customers, and ink samples are a very affordable way to find your new favorite ink! Ranging from $1.25-$2, you can try before you commit to a whole bottle, so this is a perfect way to pair ink with pens.
Materials Needed to Clean Fountain Pens
Infant Nasal Flush (optional)
Dish Soap (just a drop)
Warm water
Pen Flush (optional)
Before first use:
I flush my pen with soapy water (one drop dishsoap to a cup of water) a few times, then flush it with clean water multiple times before first use.
After I've finished using my ink (it's run out, time to switch a color, or has been in the barrel a couple weeks), I flush it out under clean running water, drawing water into the body of the pen, and then allow the nib, feed, and body of pen to soak in soapy water overnight. I flush the pen with clean water multiple times afterwards.
For stubborn inks, like pigmented inks which can leave a residue, you may want to use a Q-tip to clean the inside of your pen after removing the nib and feed (when possible).
Recommended Inks for Artists
Pigmented Inks for Fountain Pens (water resistant)
Platinum Carbon Black
Platinum Rose Red
Platinum Blue Black
Sailor Storia
Sailor Nano
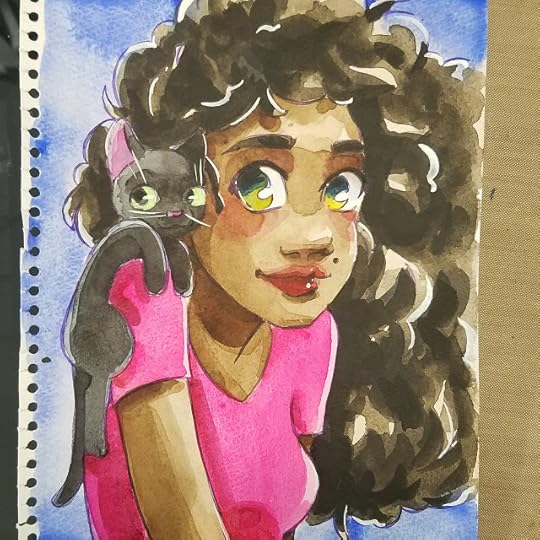 Inked with Sailor Storia in Magic (Purple)
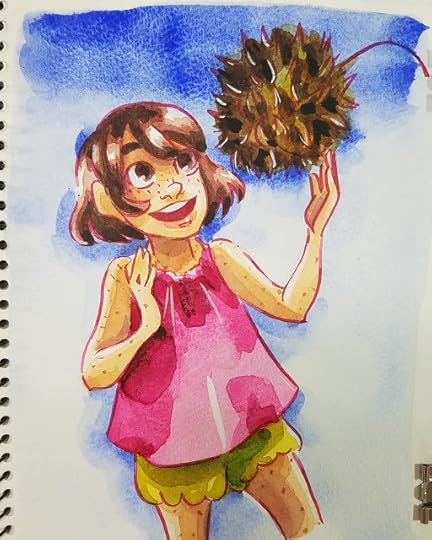 Inked with Sailor Storia in Dancer
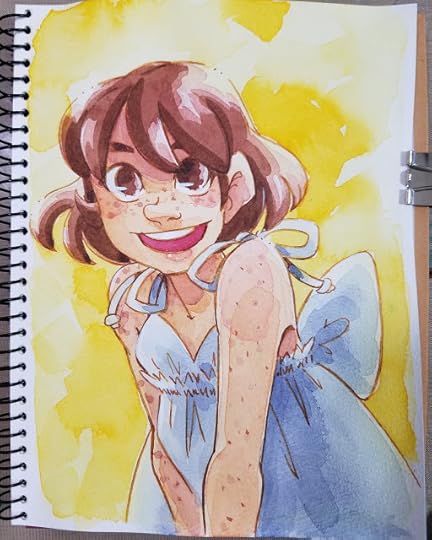 Inked with Sailor Storia in Lion
 Inked with Platinum pigment ink in Rose Red
What can Pigmented inks do for you:
Pigmented inks are more water resistant than dye based inks. Your average fountain pen ink is waterbased and dye based, and will bleed as soon as water hits the ink. Although pigment based inks are not 100% waterproof, they are more water resistant than most fountain pen inks.
Pigment inks are harder on your fountain pens than dye based inks, as the pigment can sediment out and are harder to clean. Pigment inks are more prone to hard starts (inkflow issues at start of writing) and to skipping, and take longer to dry than dye based inks.
Other waterproof inks:
This list is in progress, as I put these inks through their watercolor paces. These inks have been tested on at least two cellulose based watercolor papers- Fluid, Cotman, Holbein, or Maruman.
Noodler's Inks:
Kung te-Cheng
La Reine Mauve
54th Massachusetts
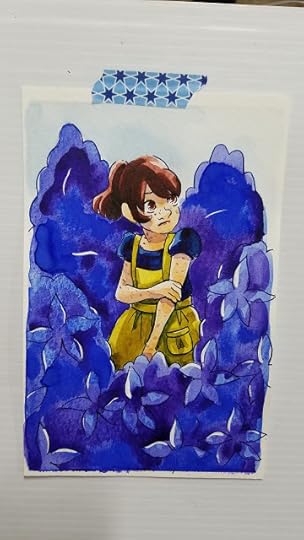

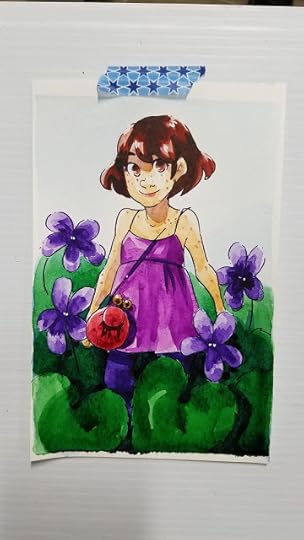
Iron Gall Inks:
These require special treatment in several ways, and may be worth playing with when you're more experienced with fountain pen inks.
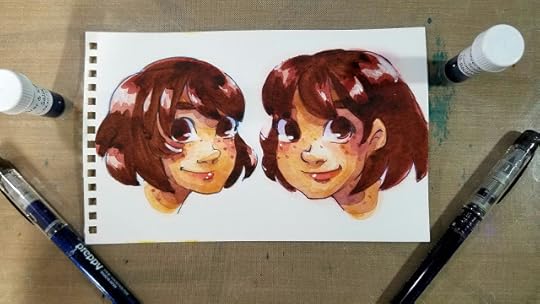
Shading Inks
Noodler's Apache Sunset
Sailor Storia Lion
J Herbin Vert Olive
What can Shading inks do for you:
Shading inks appear darker in some areas than others- this is an intended effect, and not a defect in the ink. This can be used to your advantage once you understand when your ink is prone to shading.
Most shading inks are dye based, although I did list one Pigment ink as a shading ink. The dye based shading inks can be used for interesting inkwash effects.
Shimmery inks for Interesting Water Effects
Emerald of Chivor
Diamine Shimmertastic Inks
What can Shimmering inks do for you:
If you like glimmer and glitter, shimmering inks are great for you! Most shimmering inks are dye based and include mica. Leftover ink (say, the last few drops remaining in your cartridge) can be added to a small spritzer of water for a shimmer spray mist. Shimmer mists are water reactive, and can be used for interesting ink washes, or as final accents on finished pieces.
Want more information about fountain pens for artists? Then head on over to my Youtube channel!

My Youtube channel is a fantastic resource for all sorts of arty things! From demonstrations to tutorials, from reviews to hacks, there's always something interesting up on the channel for you to enjoy! I have a fountain pen specific playlist intended to help fellow artists not only discover fountain pens, but hack their pens into useful and affordable art tools.
Today's Sponsor
Today's sponsor is Shooting-Stars, a wonderful Photoshop brush resource! All brushes on Shooting-Stars are free to use, provided you follow the license.
Shooting-Stars is run entirely by the wonderful Kabocha, a fellow comic artist, art supply enthusiast, and friend of mine. You can check out more of her wonderful work by reading her webcomic, Linked.
Second Opinions and Outside Resources:
Pen Reviews:
Platinum Preppy
Best Fountain Pen
Office Supply Geek
A Better Desk
Iron Ion
Leadfast
Pilot Petit 1
Tyler Dahl Pens
Office Supply Geek
Pen Habit
Inklode
Jetpens Chibi
Note: The Chibi has undergone quite a few modifications over the years, so your version may differ
Office Supply Geek (old version)
Fountain Pen Network
Gourmet Pens
sbrebrown
Plumix
Office Supply Geek
Pen Addict
East West Everywhere
Fountain Pen Network
Well Appointed Desk
Jinhao x740
Fountain Pen Network
Goulet Pens
My Pen Needs Ink
Nemosine Singularity
The Pen Habit
Hand over that Pen
The Serial Doodler
The Fountain Pen Network
Noodler's Flex
Gourmet Pens
Wonder Pens
PenInkCillin
Noodler's Ahab
PenInkcillin
Tyler Dahl Pens
Well Appointed Desk
Noodler's Konrad
PenPaperPencils
Gourmet Pens
Fountain Pen Network
Fountain Pen Network
Built from Ink and Tea
How to Modify a Jinhao x750Teoh Yi Chie (video)Parka BlogsRonnie Tuckersbrebrown
Other Artists on Fountain Pens
Teoh Yi Chie- Choosing a Fountain Pen for Art
TWSBI Mini: The Ideal Urban Sketching Pen?
Sharon Cullen- My Fountain Pens Used in Urban Sketching
Urban Sketching: Panoramas in Pen and Ink and Watercolor
How Do I Clean My Fountain Pen
Please consider donating to this blog or purchasing from Natto-shop (http://nattosoup.com/shop) if you want me to continue publishing quality content. All materials tested were purchased from my own pocket. Keep on Truckin' Nattosoup is not under any sponsorship.

Other than ink samples obtained through sample exchanges with a friend, all samples shown in this review were either purchased from Goulet Pens, Massdrop, or Anderson Pens. All pens were purchased, save for one Pilot Preppy sent from a friend. None of these materials were provided free of charge (other than abovementioned exchanges), and this post was not sponsored. Strangely enough, it's difficult to find sponsors for art supply blogs, so if you know of any companies interested in partnership, please pass my information along!
This post, as with ALL posts since February 2016, WAS sponsored by my wonderful Patrons on Patreon. If you enjoy content like this, you can help make it possible by joining my art nerd community.

Their support ensures that this blog, and the sister Youtube continues, and the funds raised during the month go towards purchasing supplies for review, paying for guest content, and, should something be left over, compensating me for my time.
Back in November, I wrote about using fountain pens for lettering (as in comic lettering) and for sketching. Since then, intrepid readers may have noticed a distinct increase in fountain pen content on the YouTube channel and on my Instagram. Fountain pens have provided a fairly inexpensive art-tangential hobby that doesn't compete with my comic work- a colorful outlet that puts me in contact with writers who are as invested in quality reviews as I am.
While I've known for awhile that artists sometimes use fountain pens for urban sketching (though honestly, I still prefer Pigma pens for that), inking with fountain pens isn't quite as common. My friend, Candace, has used fountain pens to ink much of the beautiful art on her Instagram. Inspired by her amazing art, and egged on by my other fountain pen weilding artist friends such as Kabocha and Heidi, I've been working my way through a wealth of inexpensive fountain pens and beautiful inks.
One area that I found fountain pen reviews to universally lack is a bit of creativity. Reviews for pens, papers, have become so formalized that if you're an artist, you can't find information pertinent to your needs without a lot of research. I've decided to compile a few short pen reviews, some ink recommendations, and other suggestions that might be of interest to artists who would like to use fountain pens and fountain pen inks in their work. If you'd like more information, please check out my Fountain Pens playlist on Youtube- I have all sorts of interesting mini reviews and tutorials to inspire your art.
Today's pens are all under $40- you really do not need to spend a fortunate to acquire fountain pens that will suit an artist's needs. Although most of these pens come with their own ink cartridges, the real fun comes in using the ink of your choice, be it pigmented ink or shading ink.
Under $5
Platinum Preppy
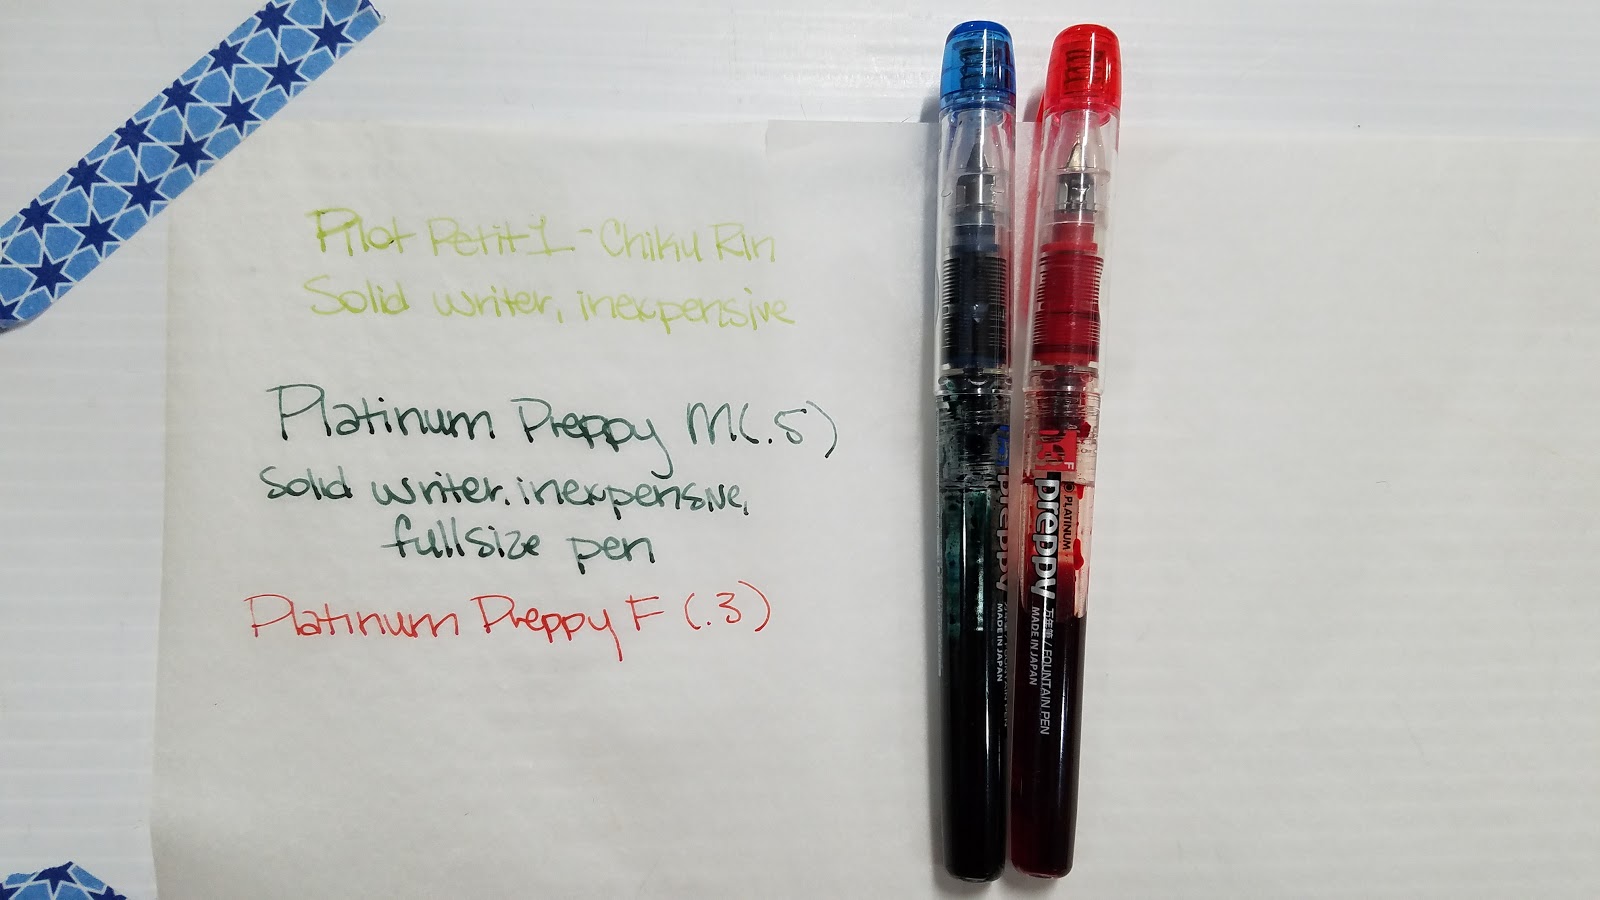


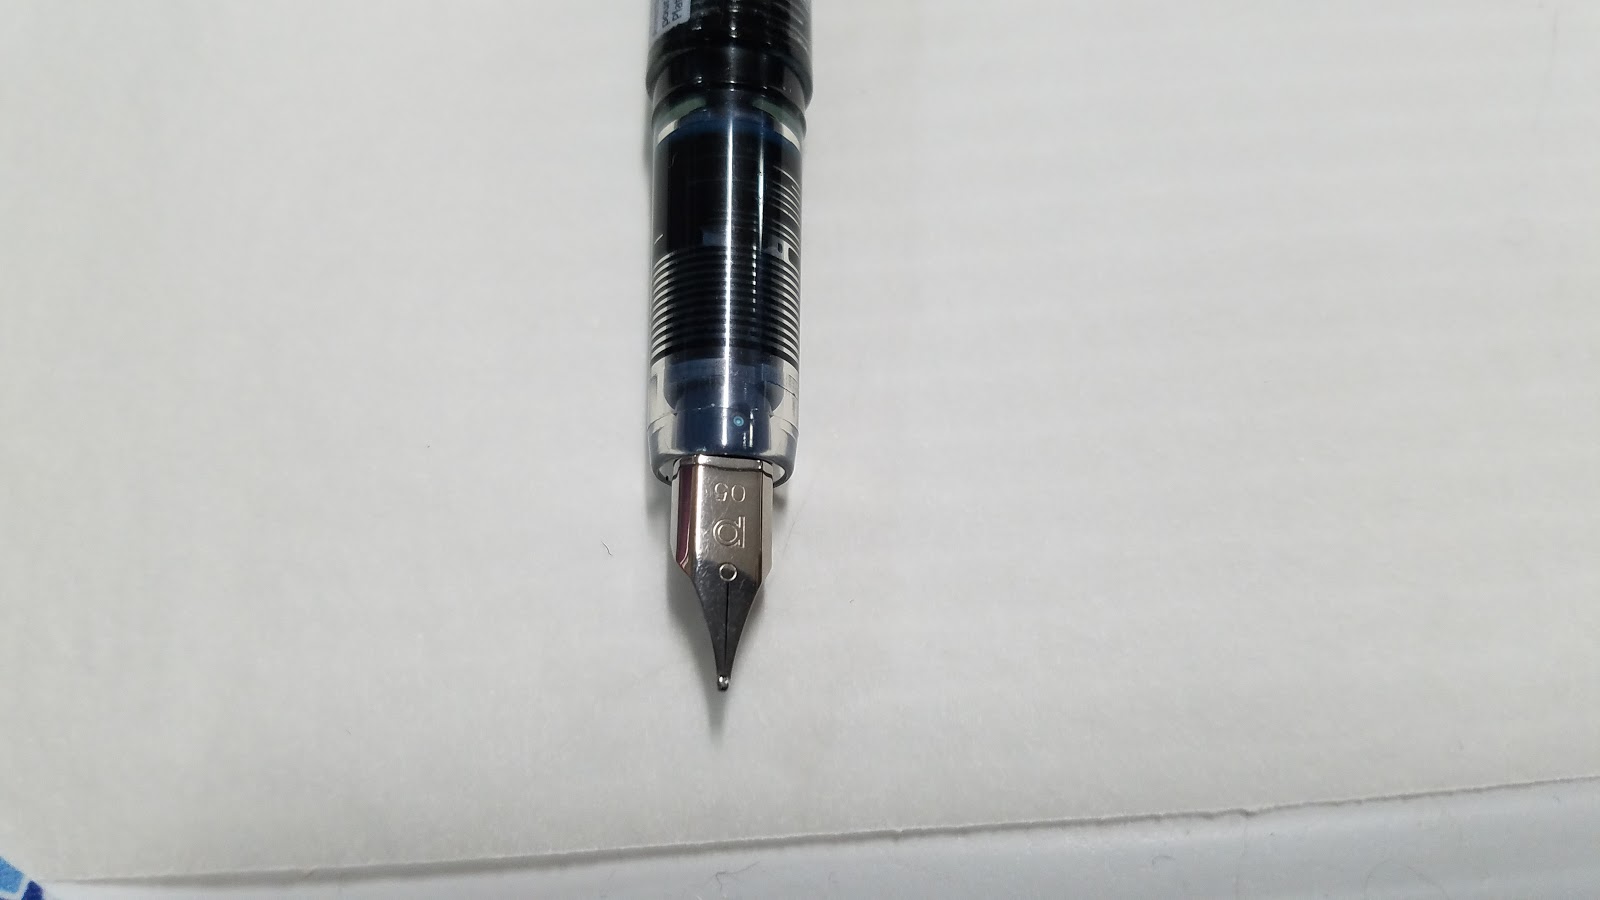
Cartridge Pen.3 line-No flex, dead lineCan be converted to an eyedropper filled pen with a little silicone grease. For a leak proof seal, use an O ringAvailable in F and M, and EF in select colors
Mini review:
The Preppy is the only full sized fountain pen on my list for under $5, so if your hand cramps up from using tiny pocket pens, the Preppy might be the pen for you! Japanese pens tend to run on the fine side, but the Preppy's Medium is a solid .5 nib, with the fine being a .3. These nibs have zero give, but it's a reliable writer, and great if you have a single line weight style, or are looking for an urban sketching pen that can hold A LOT of ink.
The Preppy is also available with a marker option that can be used as a highlighter.
Available on:
Amazon:
Set of 7, Fine
Individual, Fine
Individual, Extra Fine
Goulet Pens
Pilot Petit 1

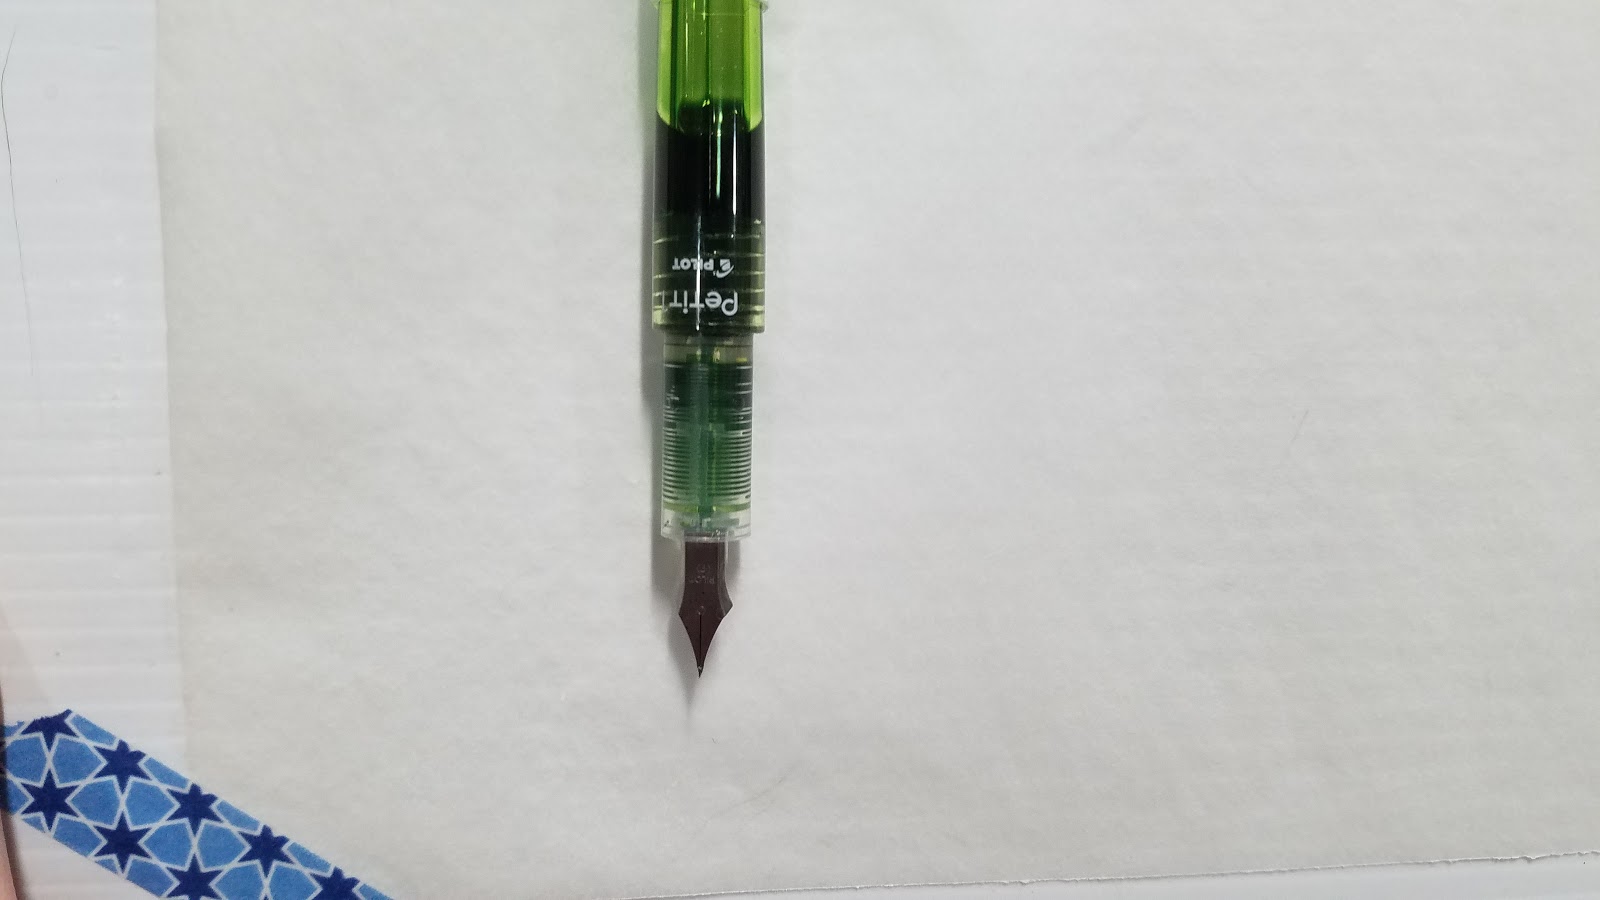

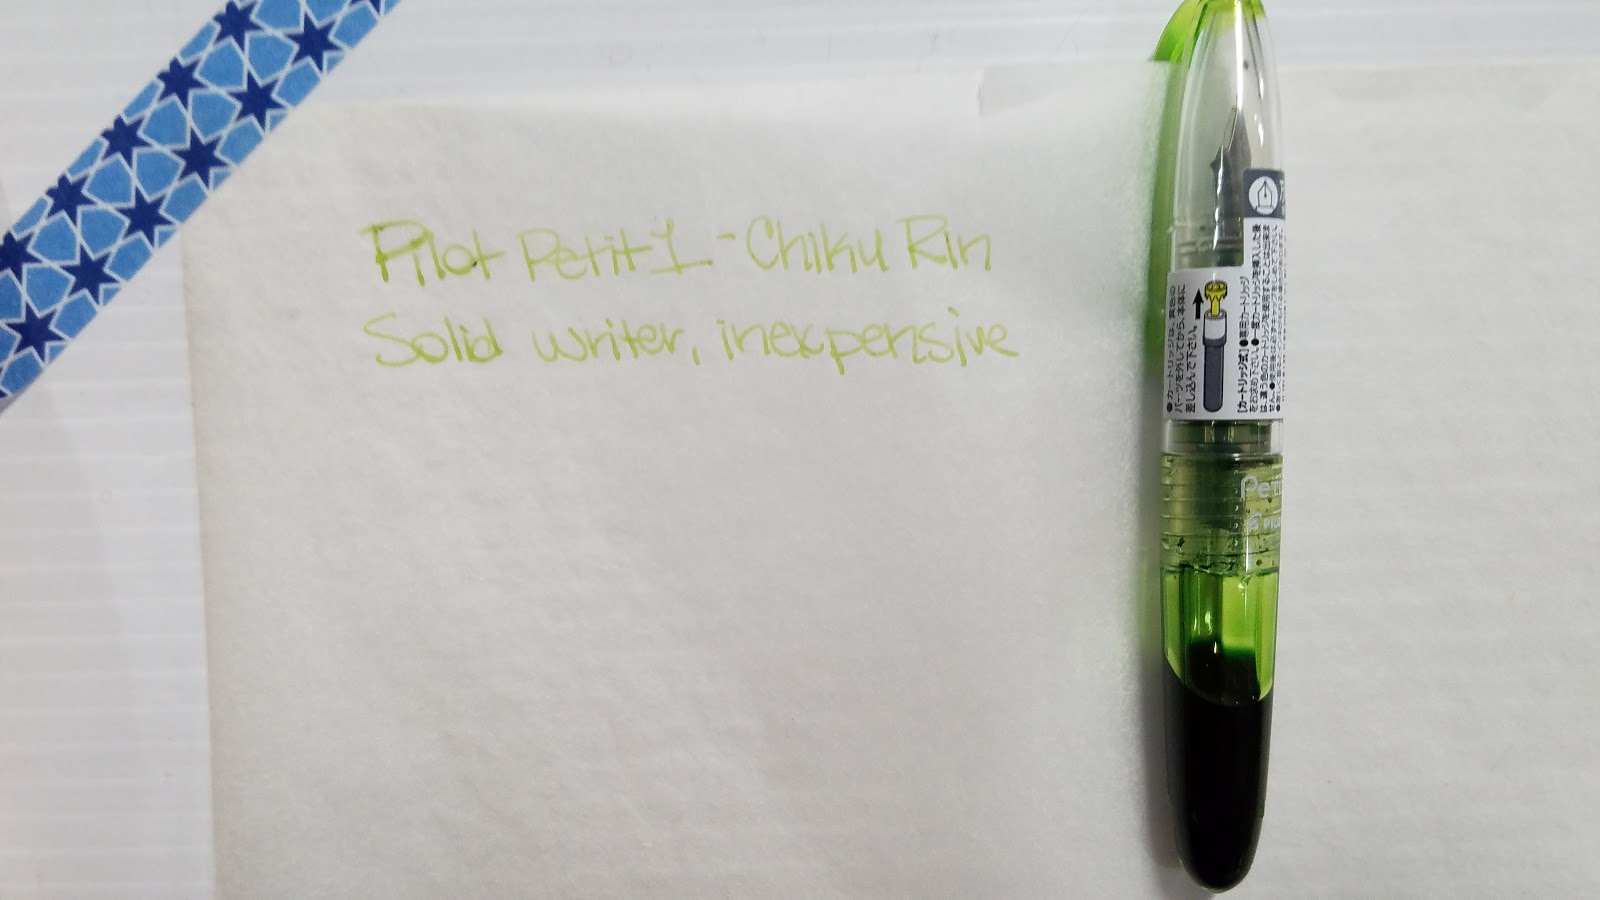
Cartridge pen.3 line- no flex, dead lineTakes awhile to get startedCan be converted to an eyedropper filled pen with a little silicone grease.
Mini review:
The Petit 1 is itty bitty- a pocket pen designed to slip into a pocket or purse. Although it comes with ink cartridges, the selection is fairly limited due to the pen's size, and you may find refilling the cartridges or converting to eyedropper fill to be preferable. I find pens this size to be a little too small for my hand, even posted, and find them fatiguing to use for too long.
The Petit 1 is actually part of a series- Pilot has a marker tip (or sign tip) and a fude tip as well. I reviewed the fude tip a few years ago while trying to find the perfect fude pen. Any pens in the Petit series can be converted to eyedropper pens and filled with the fountain pen ink of your choice.
Available on:
Amazon
Both the Platinum Preppy and the Pilot Petit 1 are handy pens for testing ink samples or inks that might potentially ruin more expensive pens.
Honorable Mention:
Jinhao x750
Between $4-$7, usually includes shipping and cost of converterStock nib is a size 6 nib-performs fairly decently out of the box, but really shines if you have the know how to convert it to a G Nib.Available in a wide range of colorsMetal bodied penFairly substantial pen
Mini Review:
I purchased a Jinhao x750 for the purposes of modifying it with a G nib, so I never inked it up with the stock nib. Please check the Second Opinions section for outside reviews.
Available on:
Amazon
Goulet
Under $10
Jetpens Chibi and Converter


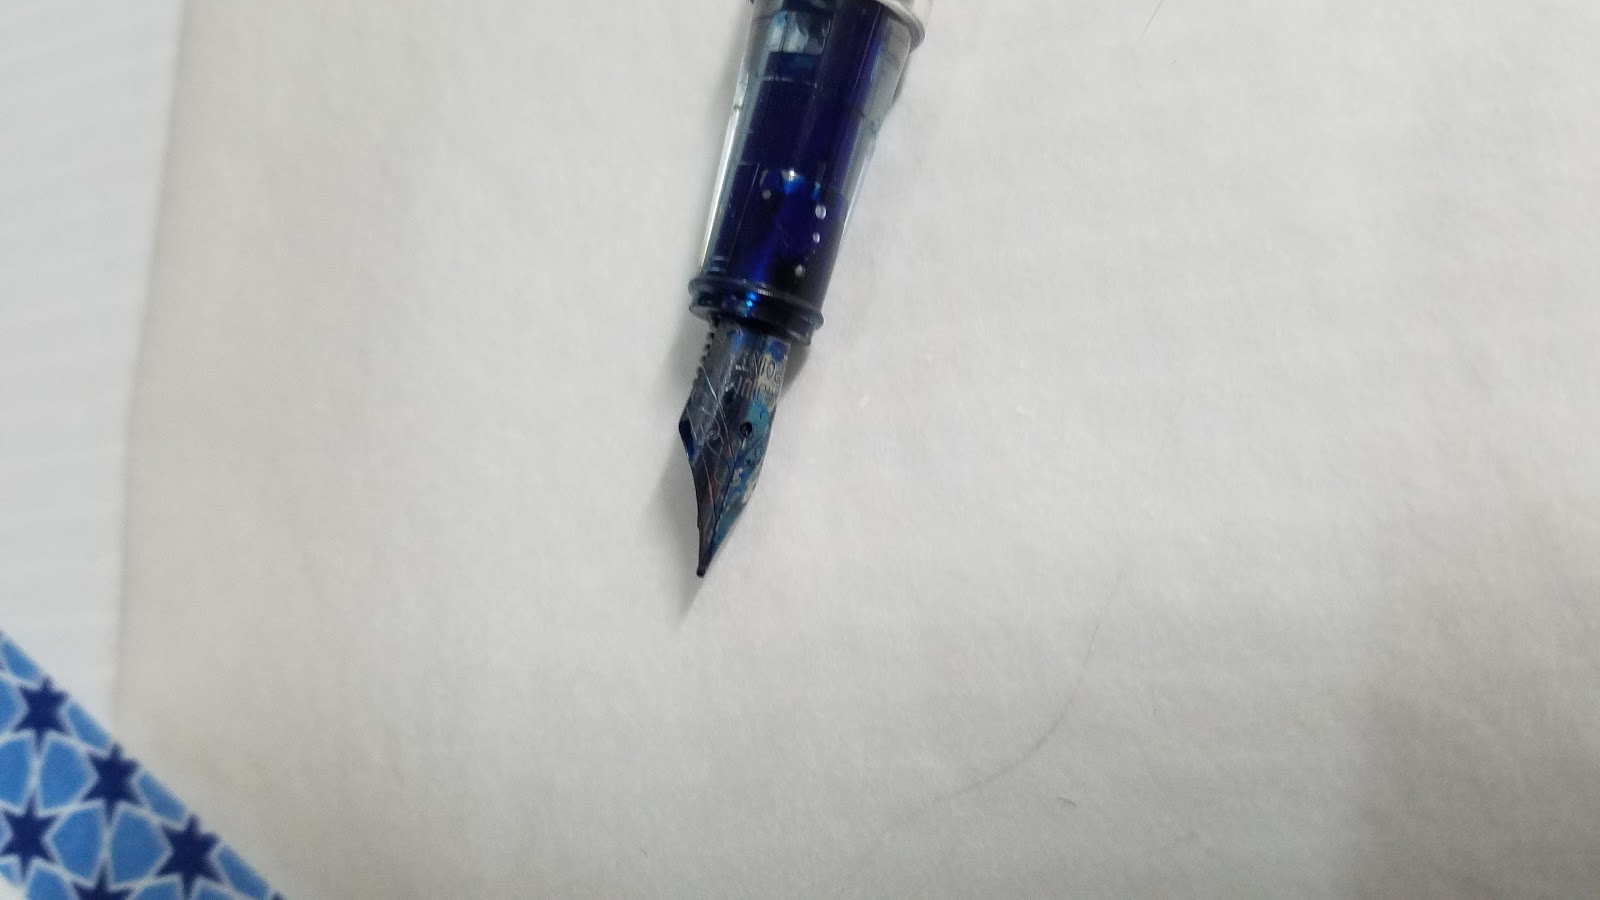

Cartridge penVery fine nib, around a .3 line. Handles a bit like a scratchy Hi Tec-C gel pen. No flex, dead lineOnly available in Japanese FineScratchy writerNeeds significant modification (fill the holes in the back of the body) before it can be converted to a eyedropper pen.
Mini review:
The Jetpens Chibi is intriguing- it's tiny, it's clear, and it's oh so cheap. Of course, once you add in the converter, it's not quite so cheap- $2.99 for the pen, $2.50 for the converter, pushing it just out of the Under $5 range. Due to the fine line, shading and shimmering inks are far less impressive in a Chibi, and shimmering and pigmented inks may clog your Chibi (more on all three types of inks below).
I recently bruised my hands doing ink tests with Jetpens Chibi fountain pens. I find them a bit scratchy in general, and sometimes the nib needs to be primed (push the converter's plunger to expel additional ink, should flow issues arise).
Available On:
Jetpens
Pilot Plumix


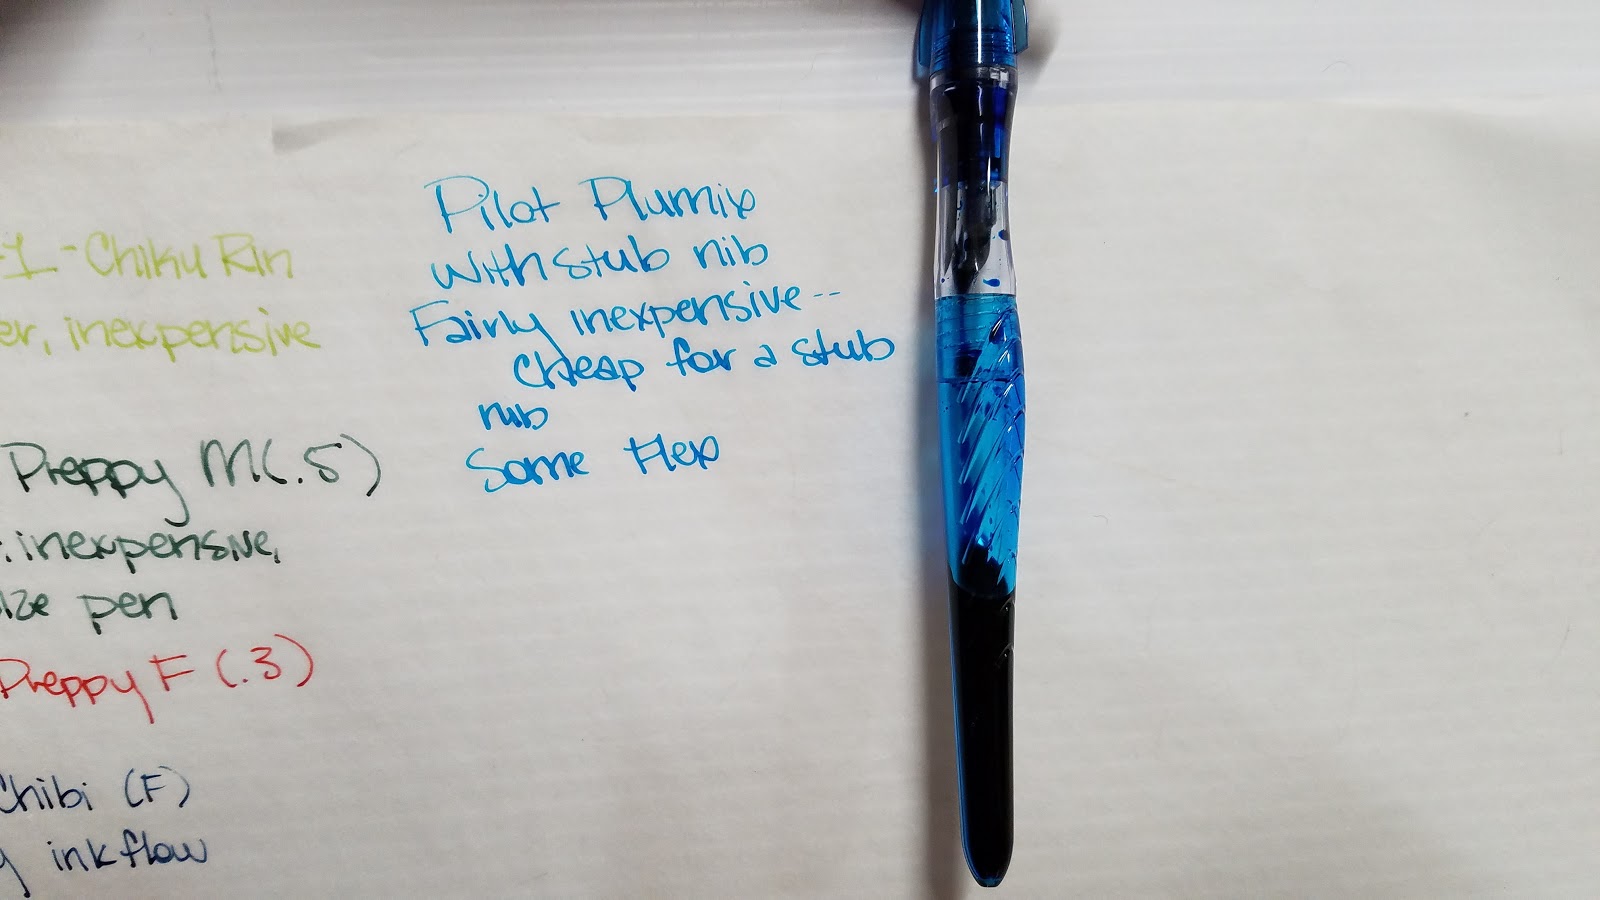
Can be converted to an eyedropper pen easilyAvailable in Fine, Medium, Medium handles like an italic (Goulet has it listed as a 1mm stub)Unlikely to railroad, but may sputter out mid wordNo real flex
Mini Review:
The Plumix is an interesting pen. The body is ergonomically designed- not too thick, not too small, so it's comfortable to hold, but the nib itself is like writing with a nail-absolutely no give. For cheap pens, its a bit of an oddity, in that you can get it with a Medium nib (cheaper pens tend to default to Fine) While you can purchase a converter for the Plumix, there's really no need, as you can easily fill this pen from an eyedropper, and it will hold a large capacity of ink.
I've had some minor leak issues with Bleu Parvence, but none on the page while writing. I have not tested this pen with Bulletproof Black or Platinum Carbon Black.
Available on:
Amazon
Goulet Pens
Jinhao x750 modded with a G nib
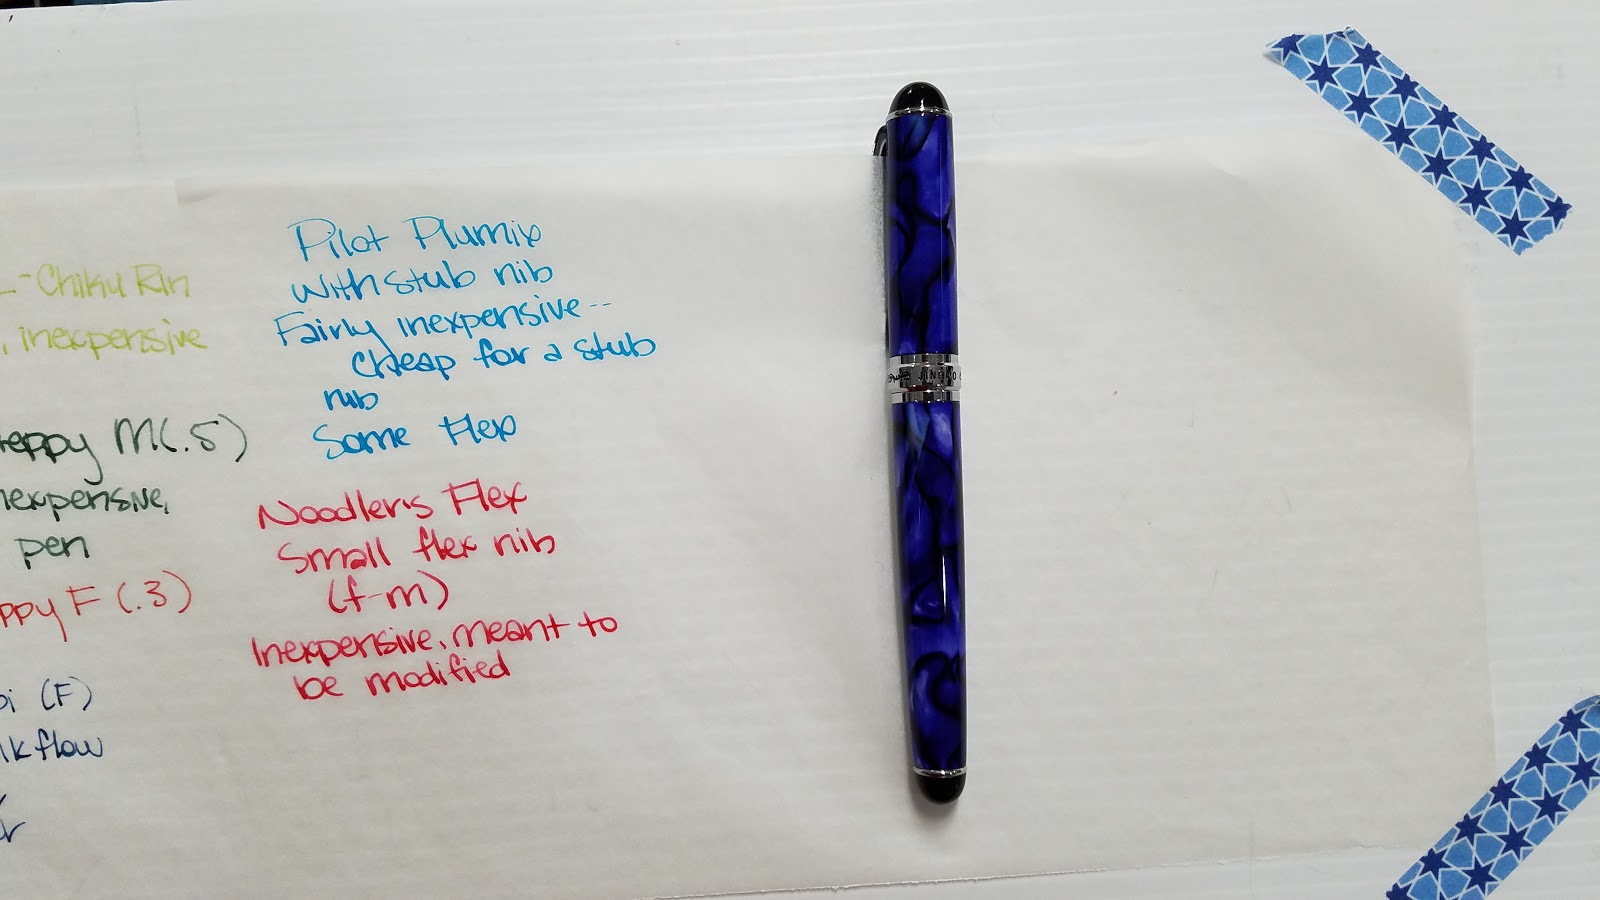


(only under $10 if you learn how to mod your own pens, but I promise, it's not too difficult)Converter penVariable lineweight because it uses a G nib- very flexibleProne to railroading, hard startsMay need significant modification and patience to get working
Mini review:
This is a bit disingenuous, as your modded Jinhao will vary with who modded it, and how handy you are with your own modifications. I modded my own Jinhao x750, and it took a lot of patience, a pair of stronger hands than mine, and heatsetting the feed a couple times to get it to work properly. My modded Jinhao x750 also improved with use, but it still requires coaxing to get it to work (dip the nib and feed under running warm water to remove dried ink and reactivate the flow, keep a cup of warm water nearby should your pen start railroading). I currently only use heavier pigment inks (discussed below) in my Jinhao x750.
Jinhao x750's are fairly hefty metal and enamel pens, and you may find them tiring to use if you have smaller hands.
If this sounds tantalizing, but somewhat frustrating, I recommend you consider an Ackerman pump action (or fountain pen, although I have not tried the fountain pen body) G-nib.
Read the Second Opinions section for information on how modify your own Jinhao.
Around $20
Noodler's Flex


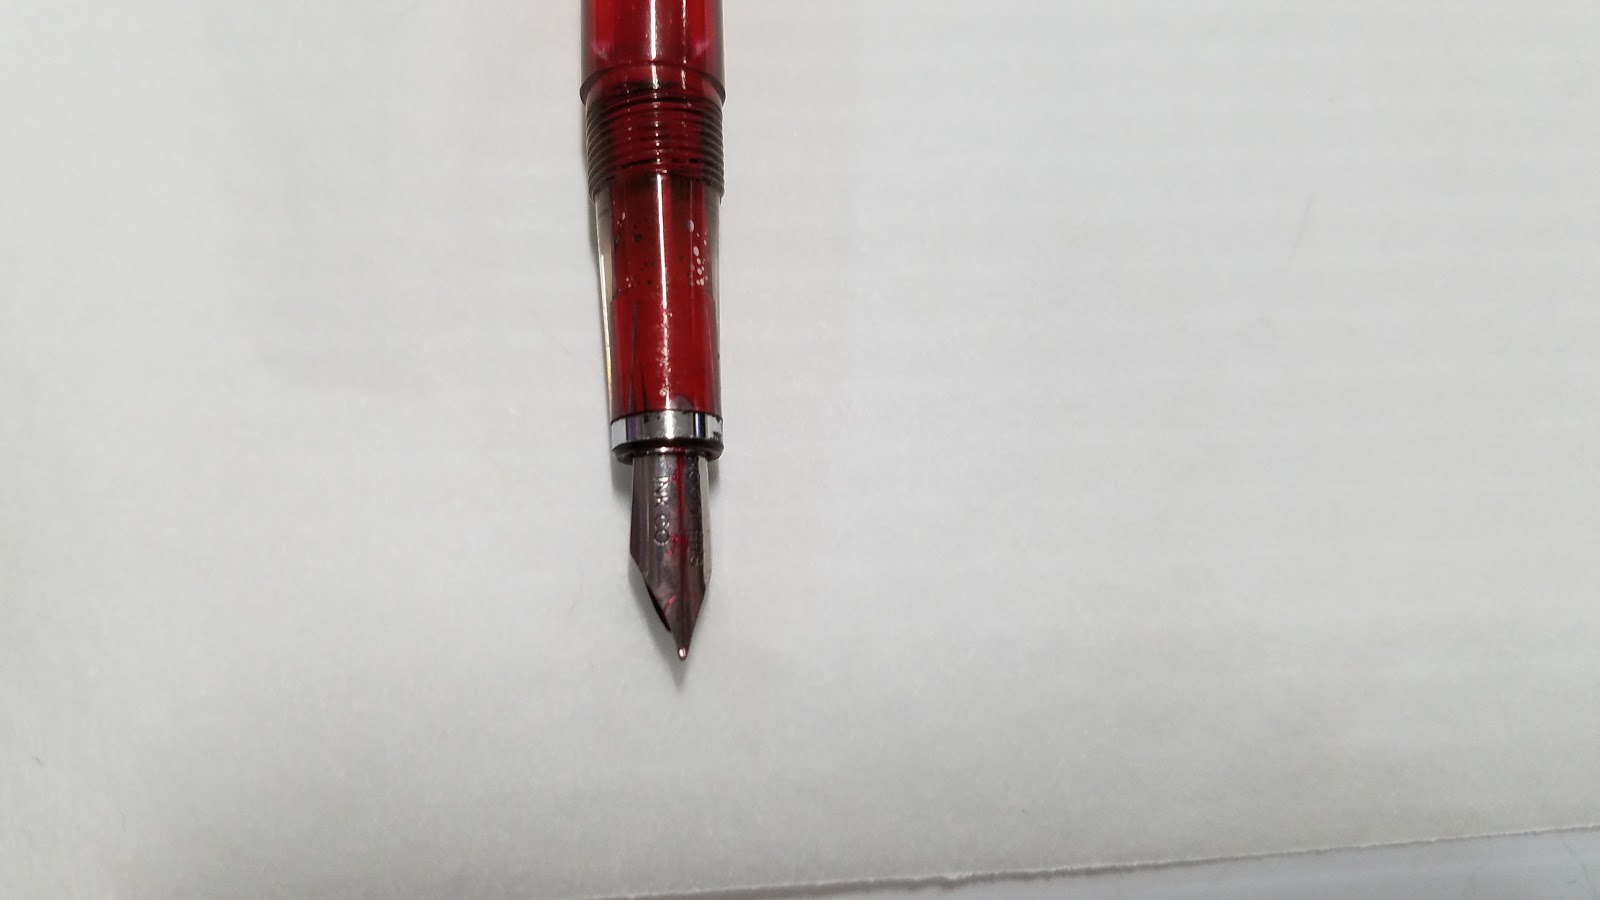

Piston filled penVegetable resinSmall flex nibFairly flexible nib, not as flexible as a dip pen
Mini review: If you're an artist and an inker, I highly recommend you try a Noodler's Flex, or it's bigger brother, the Noodler's Ahab for yourself. In the world of modern fountain pens, flexible pens are unusual, expensive, and often highly desired. The Flex and the Ahab are exceptions- they feature 'creeper' nibs (meaning the ink creeps towards the front of the nib, this isn't a flaw), with a fairly generous amount of flex. The Flex is much smaller than the Ahab, and people with large hands may find it difficult to use.
Noodler's pens are meant to be noodled with, and feature removable ebonite (hardened rubber) feeds and nibs. If you find your Flex isn't working quite to your liking, feel free to tamper with it! I recommend checking out the Goulet Pens (link) Youtube channel, or Fountain Pen Network for instructions on modding.
Available On:
Amazon
Nemosine Singularity
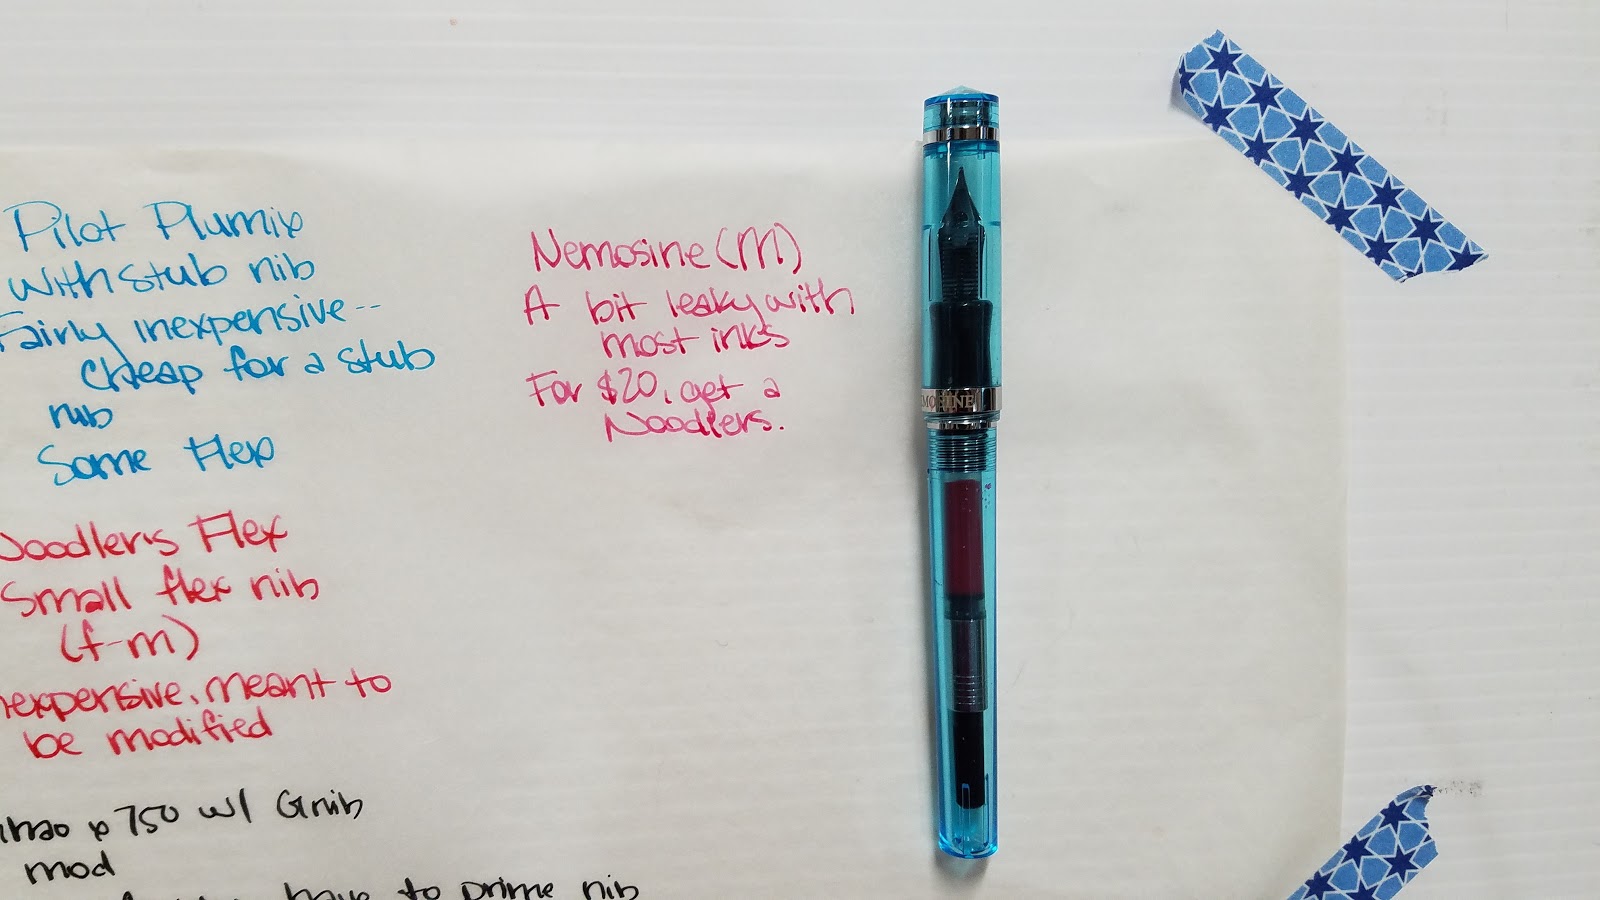

Writes great, but prone to leaking.Converter filledAvailable in Fine, Medium nibsEuropean nib- broader than Japanese nibsNon flexible nib
Mini review:
My Nemosine is a very leaky pen- very prone to dripping and dropping while I write. The only ink that works fairly well (that I've tested) has been Sailor Storia's Dancer, which is a bit too dry for my other pens anyway. Even inks recommended for the drippy Singularity have been too wet for the feed, so while I enjoy my Singularity, I cannot recommend it.
Available on:
Goulet Pens
Noodler's Ahab
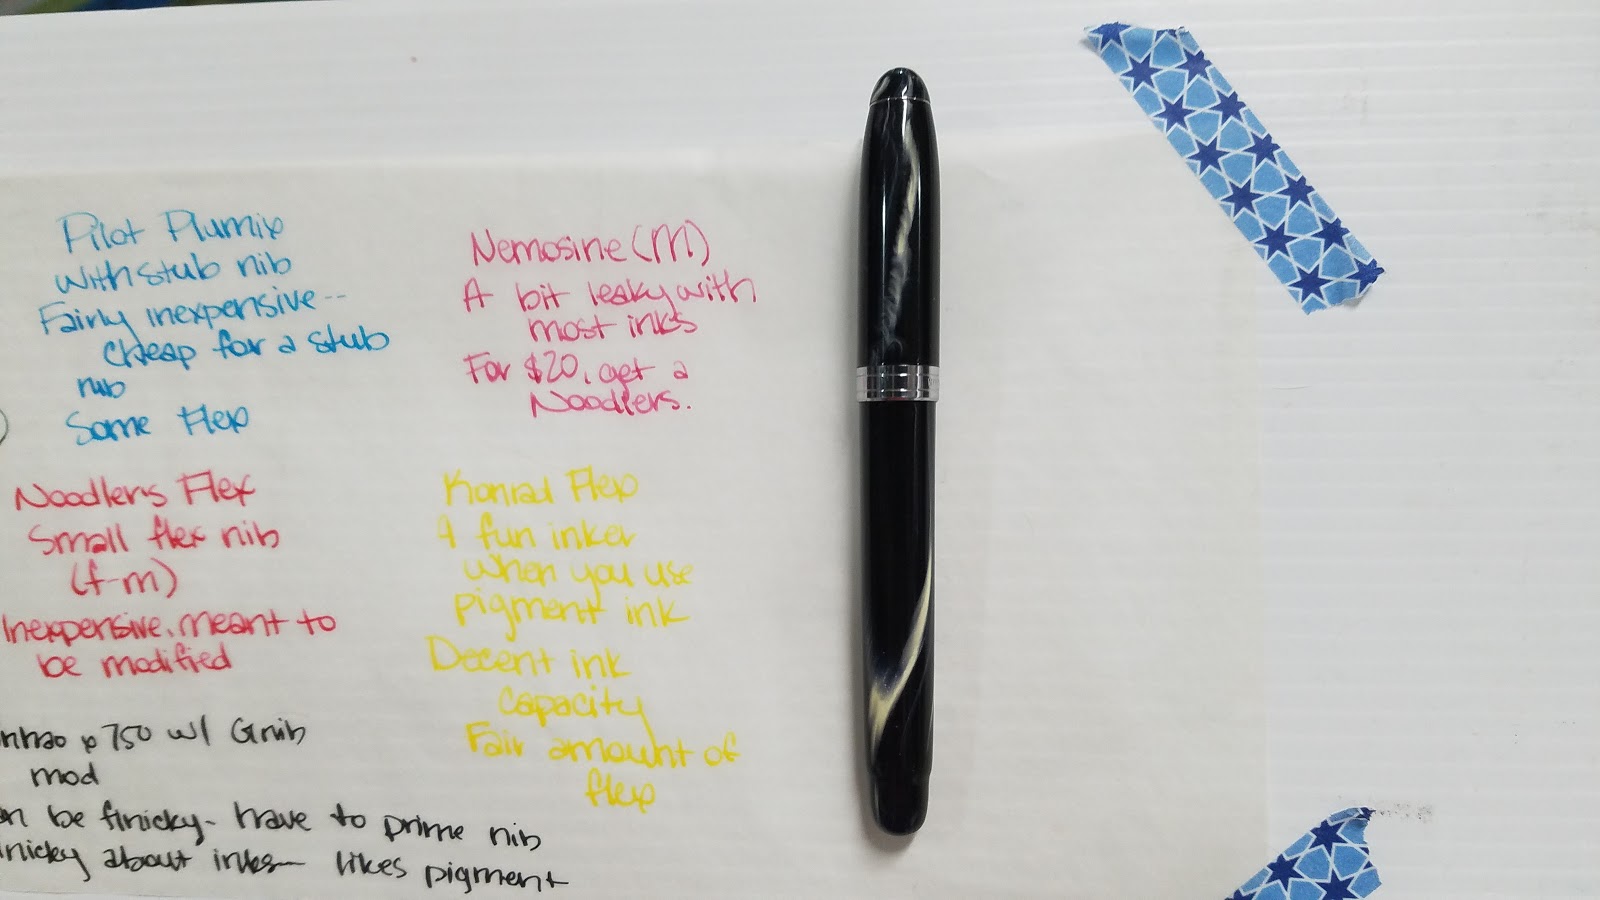


Larger than the Flex in all ways- larger ink capacity, larger flex nib, larger pen body. Piston filled.Large flex nibFairly flexible nib, not as flexible as a dip penCan be converted to an eyedropper fill for larger ink capacityVegetal resin
Mini review:
I LOVE my Ahab. It's given me very few issues, other than some minor fiddling to get the nib in place. It has loved every ink I've given it (save for Sailor Storia Dancer, which tends to run a bit dry in most pens), and is fun to ink lineart with, especially if you're using the Storia inks (might I recommend Lion?) The larger flex nib has a fair amount of variation and if you're using the Ahab for writing, I recommend trying Emerald of Chivor
Available on:
Amazon
Paper and Ink Arts
Goulet Pens
Noodler's Konrad:


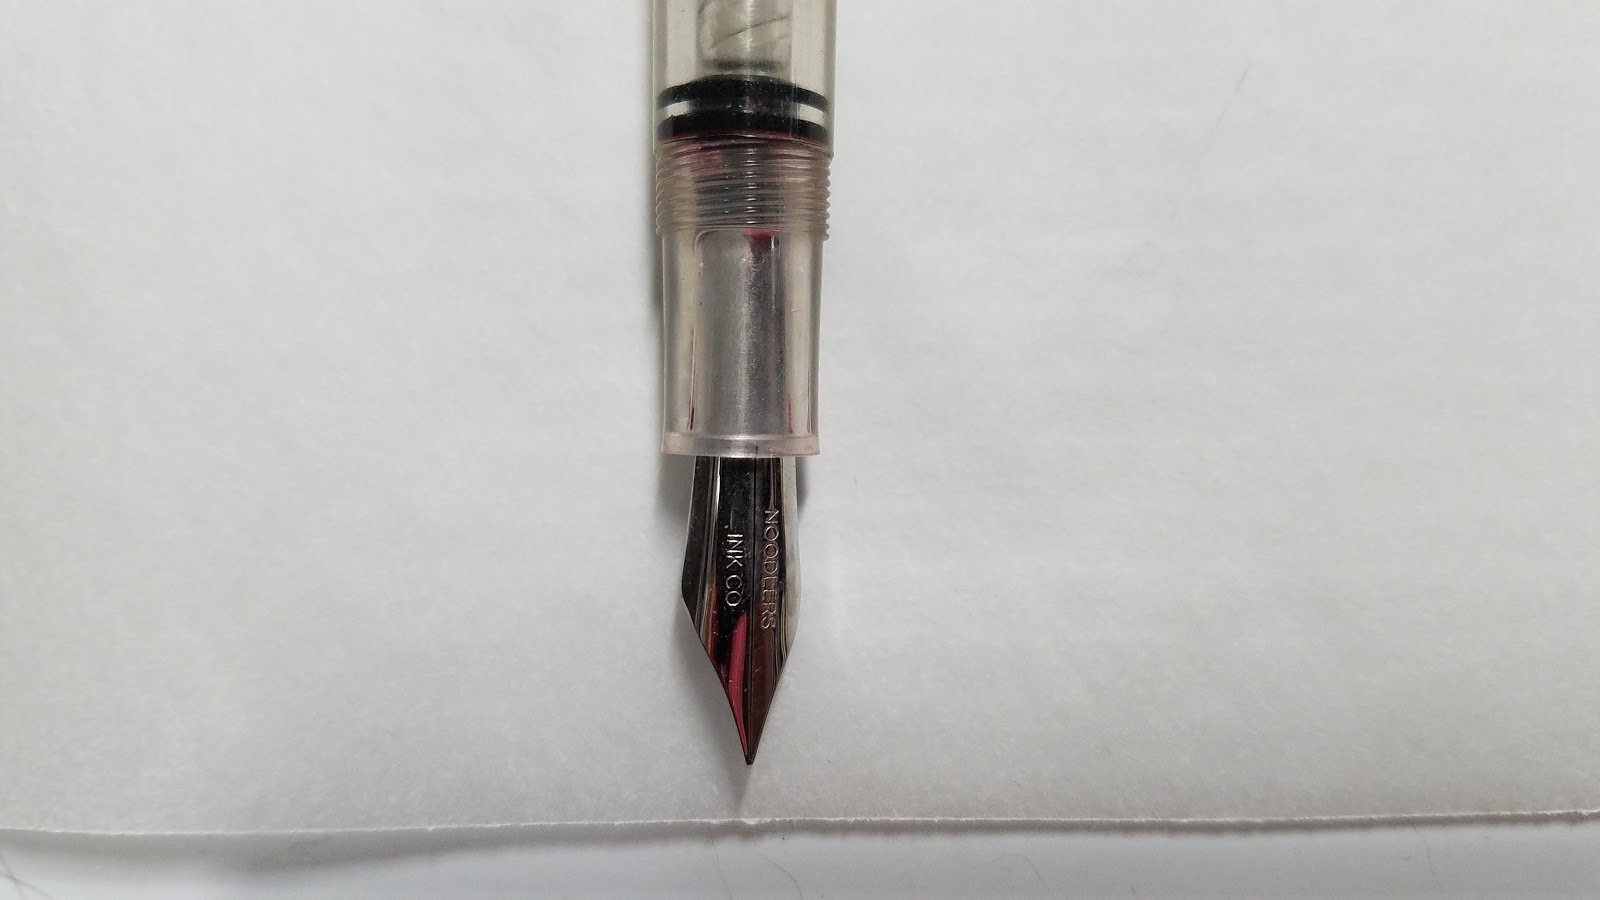


Piston filled Like a big version of the FlexLarger nib than flex (size 6)Can be converted to a G-Nib modSlightly smaller body than the AhabVegetal resin, more expensive models are acrylic
Available on:
Amazon
Goulet Pens
I know there are loads of great inexpensive fountain pens on the market- so if you have a favorite, feel free to tweet it at me (@Nattosoup) or email me using the side bar form! I'd love to hear your suggestions!
Materials Needed for Eyedropper Conversion
Silicone GreaseCotton BudsOptional: O RingsWhy convert:
For the right pen, it means an enormous ink capacity- in your choice of ink. This is a great way to use the ink samples you order from Goulet or Anderson Pens.
How to convert:
1. Clean out your pen using the method outlined beline
2. Liberally smear grease on your cotton bud or other application impliment
3. Liberally smear said grease onto the threads of your pen, both on the inside of the barrel, and the outside of the section
4. Fill your pen with the ink of your choice using an eyedropper
5. Screw the barrel to the section
Should your pen leak, you can reapply the silicone grease, or give O rings a shot!
Note: This is not really recommended for pens you plan on traveling with. I've had no issues with leaking, but I'd hate for these pens to ruin your bag or pocket.
Ink Samples:
Are a great way to try out new inks- new colors, formulas, and brands. Unlike with art supplies and art supply companies, many fountain pen stores are eager to convert new customers, and ink samples are a very affordable way to find your new favorite ink! Ranging from $1.25-$2, you can try before you commit to a whole bottle, so this is a perfect way to pair ink with pens.
Materials Needed to Clean Fountain Pens
Infant Nasal Flush (optional)
Dish Soap (just a drop)
Warm water
Pen Flush (optional)
Before first use:
I flush my pen with soapy water (one drop dishsoap to a cup of water) a few times, then flush it with clean water multiple times before first use.
After I've finished using my ink (it's run out, time to switch a color, or has been in the barrel a couple weeks), I flush it out under clean running water, drawing water into the body of the pen, and then allow the nib, feed, and body of pen to soak in soapy water overnight. I flush the pen with clean water multiple times afterwards.
For stubborn inks, like pigmented inks which can leave a residue, you may want to use a Q-tip to clean the inside of your pen after removing the nib and feed (when possible).
Recommended Inks for Artists
Pigmented Inks for Fountain Pens (water resistant)
Platinum Carbon Black
Platinum Rose Red
Platinum Blue Black
Sailor Storia
Sailor Nano
 Inked with Sailor Storia in Magic (Purple)
 Inked with Sailor Storia in Dancer
 Inked with Sailor Storia in Lion
 Inked with Platinum pigment ink in Rose Red
What can Pigmented inks do for you:
Pigmented inks are more water resistant than dye based inks. Your average fountain pen ink is waterbased and dye based, and will bleed as soon as water hits the ink. Although pigment based inks are not 100% waterproof, they are more water resistant than most fountain pen inks.
Pigment inks are harder on your fountain pens than dye based inks, as the pigment can sediment out and are harder to clean. Pigment inks are more prone to hard starts (inkflow issues at start of writing) and to skipping, and take longer to dry than dye based inks.
Other waterproof inks:
This list is in progress, as I put these inks through their watercolor paces. These inks have been tested on at least two cellulose based watercolor papers- Fluid, Cotman, Holbein, or Maruman.
Noodler's Inks:
Kung te-Cheng
La Reine Mauve
54th Massachusetts

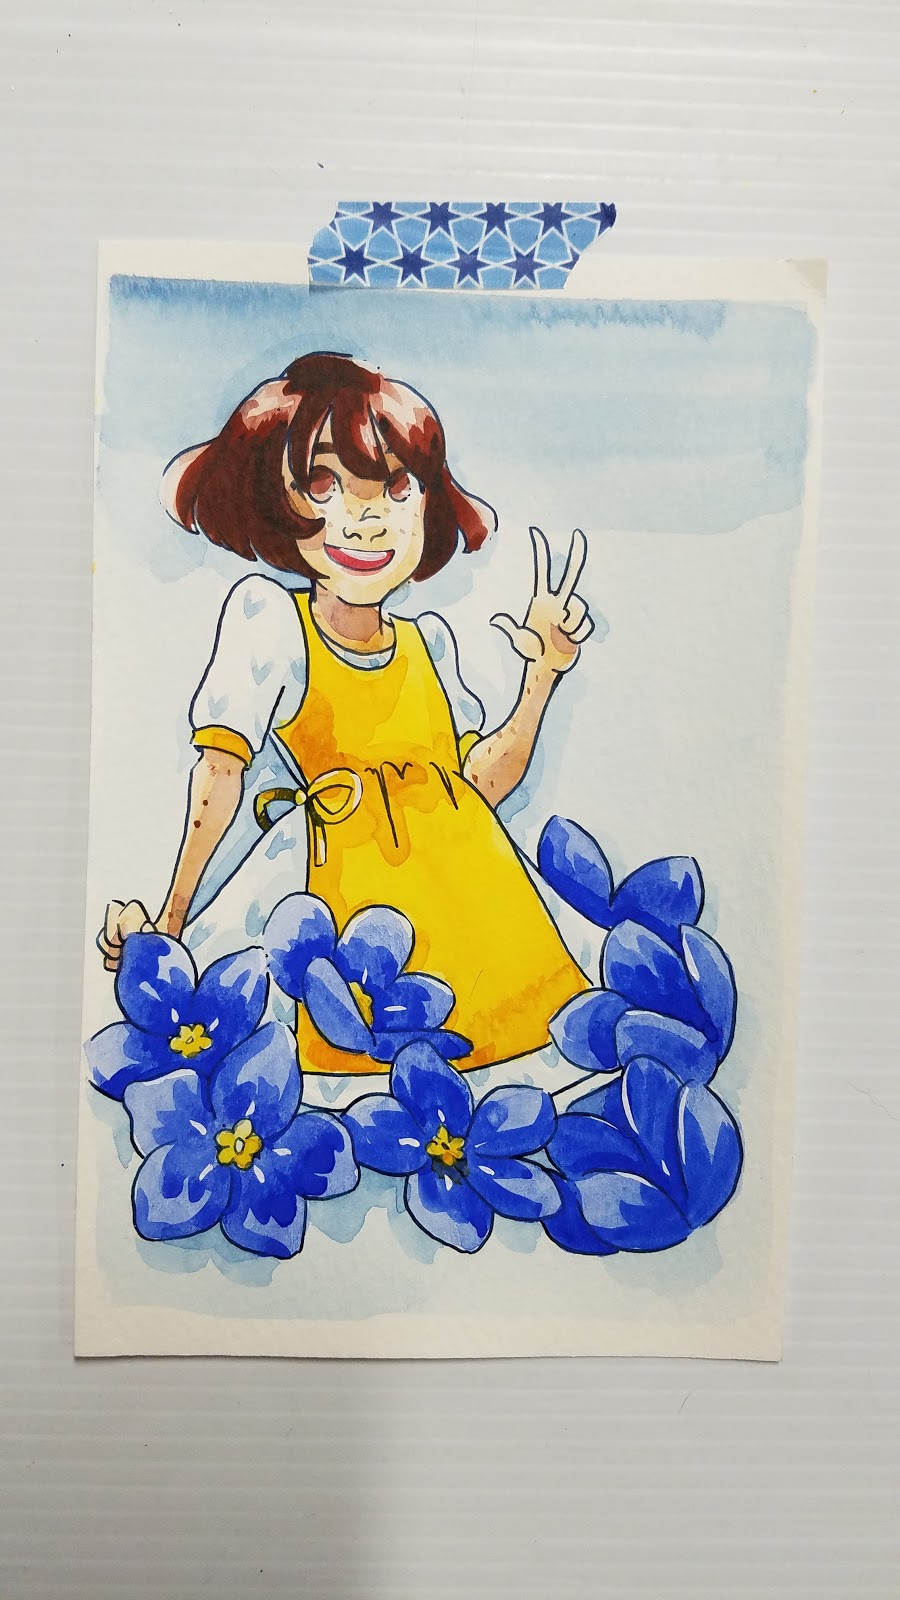

Iron Gall Inks:
These require special treatment in several ways, and may be worth playing with when you're more experienced with fountain pen inks.
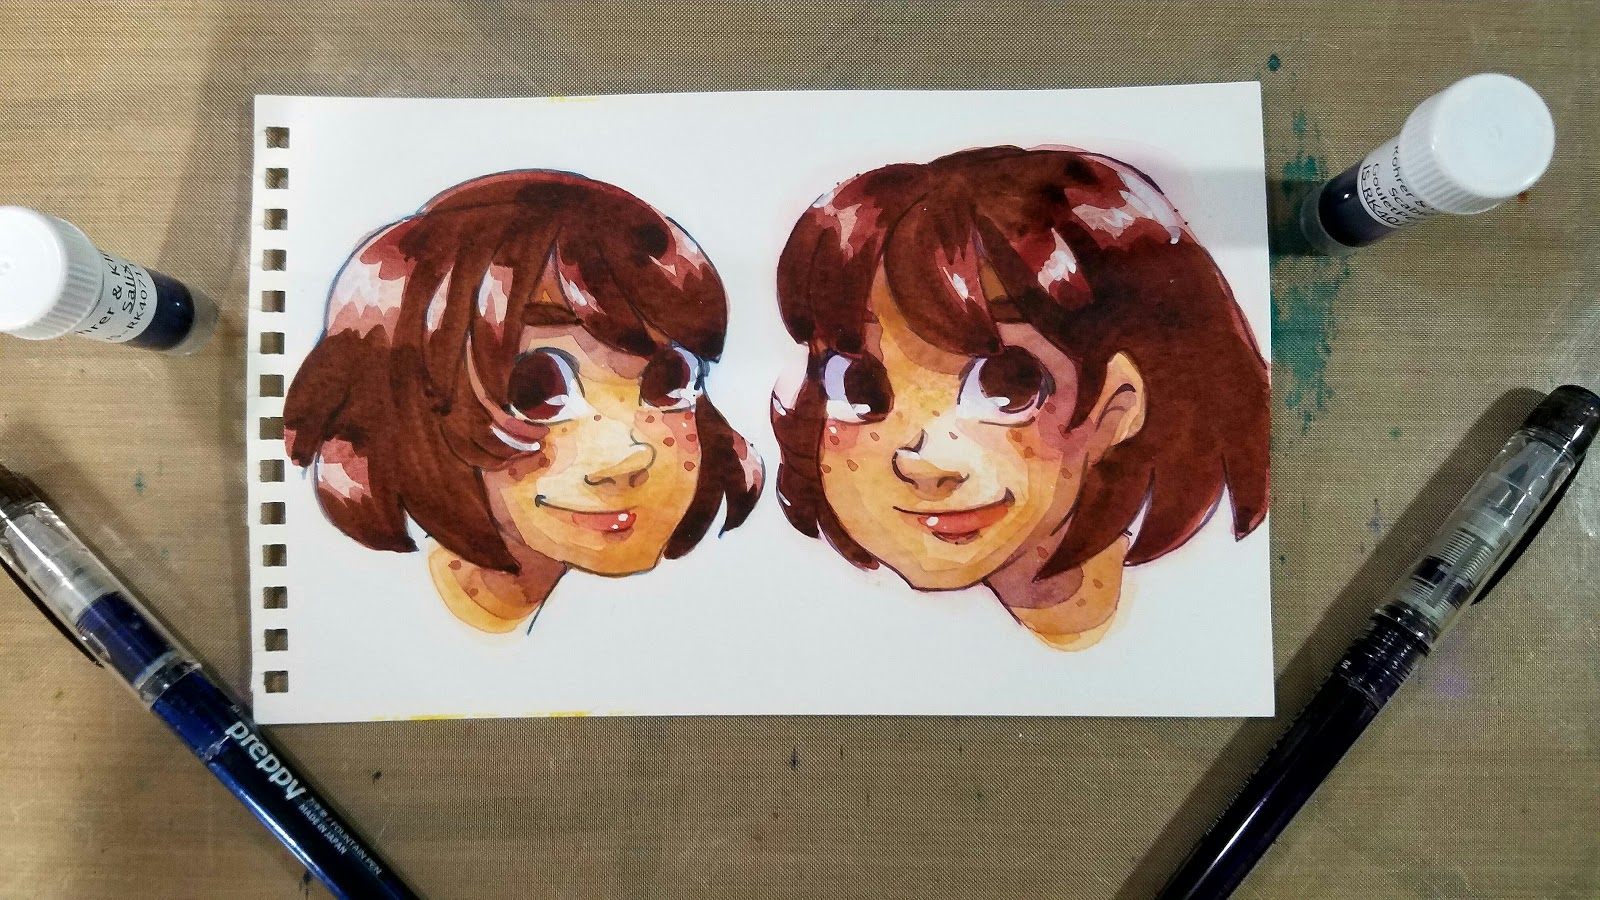
Shading Inks
Noodler's Apache Sunset
Sailor Storia Lion
J Herbin Vert Olive
What can Shading inks do for you:
Shading inks appear darker in some areas than others- this is an intended effect, and not a defect in the ink. This can be used to your advantage once you understand when your ink is prone to shading.
Most shading inks are dye based, although I did list one Pigment ink as a shading ink. The dye based shading inks can be used for interesting inkwash effects.
Shimmery inks for Interesting Water Effects
Emerald of Chivor
Diamine Shimmertastic Inks
What can Shimmering inks do for you:
If you like glimmer and glitter, shimmering inks are great for you! Most shimmering inks are dye based and include mica. Leftover ink (say, the last few drops remaining in your cartridge) can be added to a small spritzer of water for a shimmer spray mist. Shimmer mists are water reactive, and can be used for interesting ink washes, or as final accents on finished pieces.
Want more information about fountain pens for artists? Then head on over to my Youtube channel!

My Youtube channel is a fantastic resource for all sorts of arty things! From demonstrations to tutorials, from reviews to hacks, there's always something interesting up on the channel for you to enjoy! I have a fountain pen specific playlist intended to help fellow artists not only discover fountain pens, but hack their pens into useful and affordable art tools.
Today's Sponsor
Today's sponsor is Shooting-Stars, a wonderful Photoshop brush resource! All brushes on Shooting-Stars are free to use, provided you follow the license.
Shooting-Stars is run entirely by the wonderful Kabocha, a fellow comic artist, art supply enthusiast, and friend of mine. You can check out more of her wonderful work by reading her webcomic, Linked.
Second Opinions and Outside Resources:
Pen Reviews:
Platinum Preppy
Best Fountain Pen
Office Supply Geek
A Better Desk
Iron Ion
Leadfast
Pilot Petit 1
Tyler Dahl Pens
Office Supply Geek
Pen Habit
Inklode
Jetpens Chibi
Note: The Chibi has undergone quite a few modifications over the years, so your version may differ
Office Supply Geek (old version)
Fountain Pen Network
Gourmet Pens
sbrebrown
Plumix
Office Supply Geek
Pen Addict
East West Everywhere
Fountain Pen Network
Well Appointed Desk
Jinhao x740
Fountain Pen Network
Goulet Pens
My Pen Needs Ink
Nemosine Singularity
The Pen Habit
Hand over that Pen
The Serial Doodler
The Fountain Pen Network
Noodler's Flex
Gourmet Pens
Wonder Pens
PenInkCillin
Noodler's Ahab
PenInkcillin
Tyler Dahl Pens
Well Appointed Desk
Noodler's Konrad
PenPaperPencils
Gourmet Pens
Fountain Pen Network
Fountain Pen Network
Built from Ink and Tea
How to Modify a Jinhao x750Teoh Yi Chie (video)Parka BlogsRonnie Tuckersbrebrown
Other Artists on Fountain Pens
Teoh Yi Chie- Choosing a Fountain Pen for Art
TWSBI Mini: The Ideal Urban Sketching Pen?
Sharon Cullen- My Fountain Pens Used in Urban Sketching
Urban Sketching: Panoramas in Pen and Ink and Watercolor
How Do I Clean My Fountain Pen
Please consider donating to this blog or purchasing from Natto-shop (http://nattosoup.com/shop) if you want me to continue publishing quality content. All materials tested were purchased from my own pocket. Keep on Truckin' Nattosoup is not under any sponsorship.
March 30, 2017
Cicada Summer Inking Process
For the past month, I've been working on a semi-secret project. During the process, I decided to share a day's progress to my Twitter account. Below is a Storify of those tweets.
If you enjoy comic process and tutorials, make sure you keep an eye on this blog in the upcoming weeks, because there's a lot more Cicada Summer coming up! Patreon backers get access to process files from this project, from script to scanned pages, so if you enjoy seeing how a comic comes together, joining us on Patreon.
[View the story "Cicada Summer Inking Process" on Storify]
Please consider donating to this blog or purchasing from Natto-shop (http://nattosoup.com/shop) if you want me to continue publishing quality content. All materials tested were purchased from my own pocket. Keep on Truckin' Nattosoup is not under any sponsorship.


![[image error]](https://1.bp.blogspot.com/-6eAD1Vb3KmQ/WKt_mFL7R_I/AAAAAAABQJA/6WBx6i7iJEwV09WreOiCymqEF2NphUv2QCLcB/s1600/Chapter%2B1%2B001.JPG)
![[image error]](https://3.bp.blogspot.com/-X2KUKNFMy2w/WNiOXKzLqOI/AAAAAAABRyc/dekOuAT6ceEamdL1OgszCwPN7C-Ax_1pgCLcB/s1600/20170326_225514.jpg)
![[image error]](https://3.bp.blogspot.com/-dWuuRKZuYC8/WKyjzmKsAoI/AAAAAAABQKw/PgS6HBIOjXIqR-Unl8eZXrObXGVsFSgCACLcB/s1600/20170220_140301.jpg)
![[image error]](https://4.bp.blogspot.com/-FxOi7quM3RM/WB0PPgvakVI/AAAAAAABNNk/3NxvpOvhIpgy98mwG2ruwlIghoor64qwQCLcB/s1600/ss_logo.png)