
Becca Hillburn's Blog, page 32
March 3, 2017
Intro to Comic Craft: Step by Step: Introduction to Roughs
This series is also made possible thanks to the generosity and interest of my Patrons on Patreon.

My Patrons have expressed interest in content on the comic making process, and I am happy to oblige. Comics are one of my passions, and they're the reason I began this blog in the first place. It isn't always easy to share comic content here, but their generosity has made it easier to set aside the time and resources necessary to doing so. Writing about comic craft in depth requires research, setting aside time during the comic creation process to document my progress, and a lot of thought, and I feel is best served through longform series such as the Intro to Comic Craft: Step By Step series. If you enjoy this series, please take a moment to share it with your friends and loved ones on the social network of your choice, leave me a G+ comment, or send me an email using the sidebar form- your feedback is important to me! If you have specific questions, please don't hesitate to ask via email.
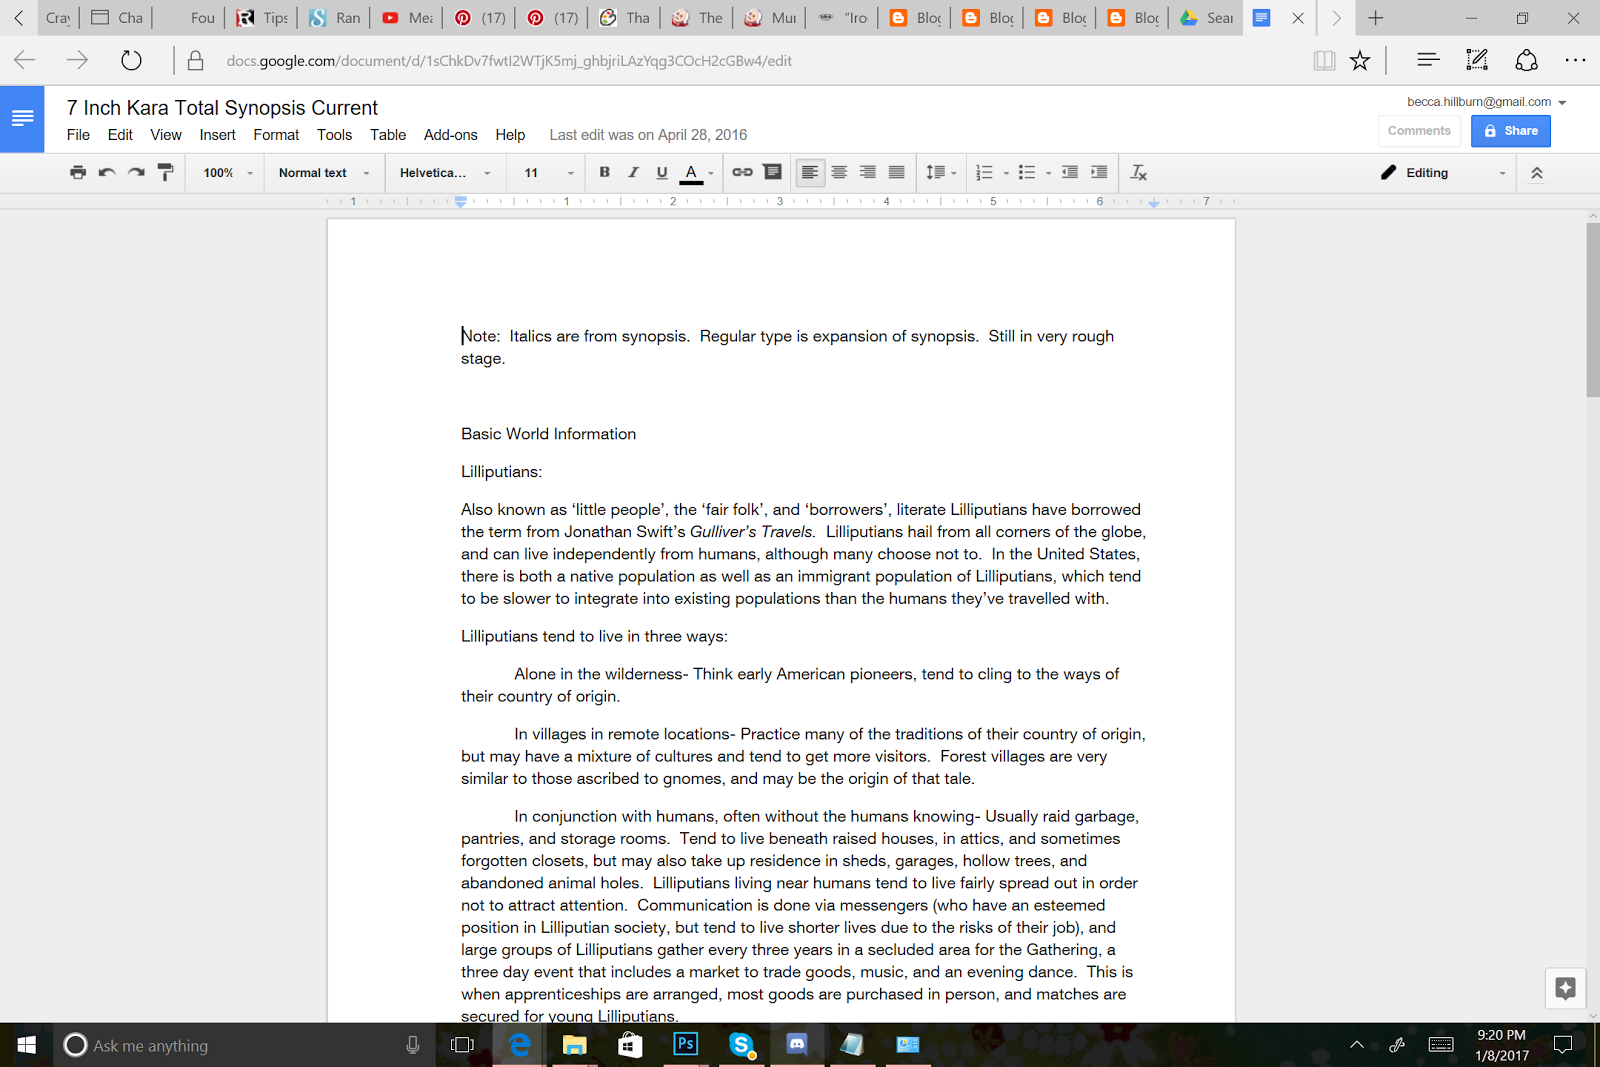
As part of this series, my Patrons have exclusive access to behind the scenes comic creation content, including the entire plotform synopsis for 7" Kara, the 7" Kara beat sheet, the Chapter 7 Synopsis, the Chapter 7 tight script, and loads more. If you learn best from working example, joining my Patreon will give you access to those files.

You can join Kara on her adventures by ordering a copy of Volume 1 from my shop, or reading the webcomic on Tumblr or on the site.
In this installment of Intro to Comic Craft, it's gonna get rough. Real rough.
What are roughs
Roughs are the stage between thumbnails and pencils- when most of the acting and stage direction have been determined, but not necessarily all expressions or environments. Roughs are an opportunity to tighten up acting, facial expressions, costumes, and your scenery- think of roughs as you would the rehearsals for a play. Perhaps the best actors can ad lib a performance, but if you're unsure of your work, why not give roughs a shot?
Why not go from thumbnails to pencils?
If your work is very cartoony, or your thumbnails very tight, or you tend to work clean, you can definitely go straight from thumbnails to pencils. Success in completing comic pages is about finding a process that works for you. If you have time restrictions, going from tight thumbnails to loose pencils is a great way to save yourself a step. In our last post, I showed you how to convert your thumbnail drawings into the building blocks of your roughs- the bluelines. In the next few posts, we're going to focus on key elements that you'll need to master in order to make your roughs useful.
Body LanguageFacial ExpressionsBackgrounds
In our thumbnails, we introduced the beginnings of all three elements, with the focus being on body language. In our roughs, we're going to work to refine all three elements, and make sure they read clearly to our audience.
As part of the Intro to Comic Craft: Step by Step series, I am going to focus on each step, one at a time, to explain my process in hopes that it inspires yours. But first, I want to give you a very brief introduction to how I use roughs, and provide some examples.
Examples from 7" Kara, Chapter 6
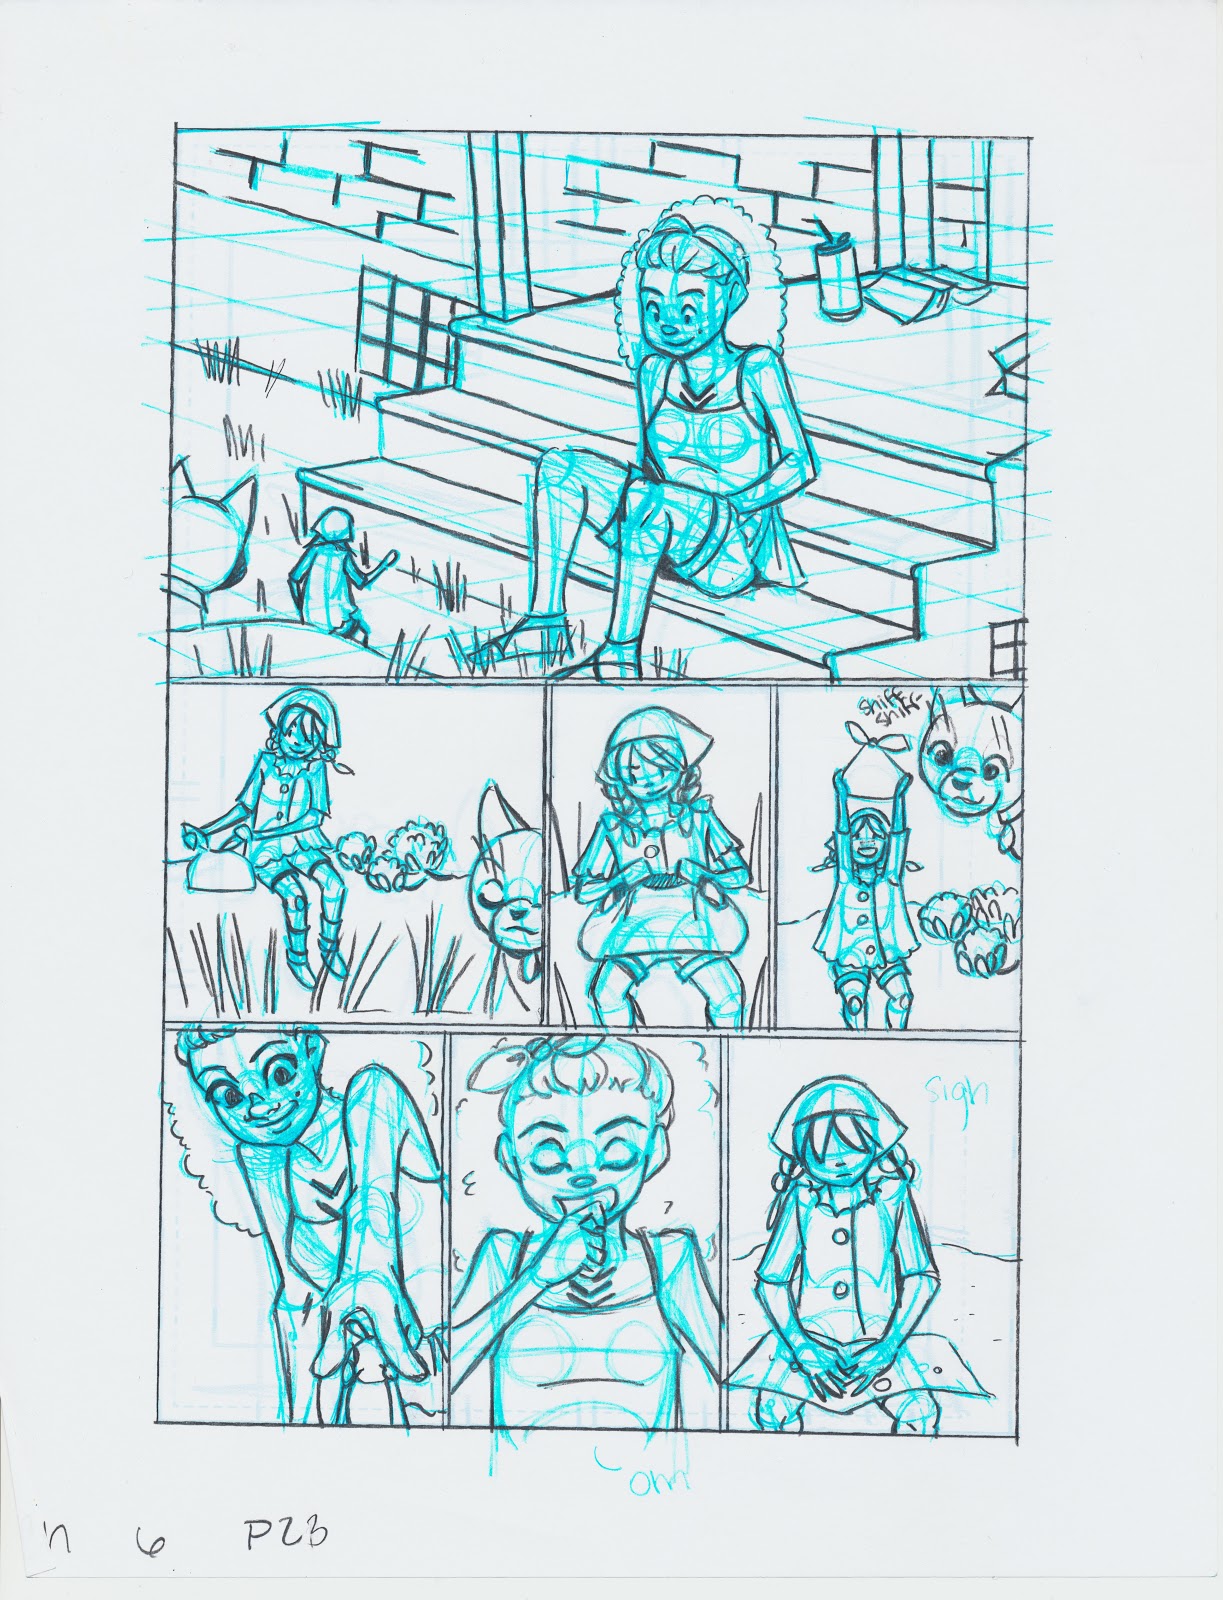
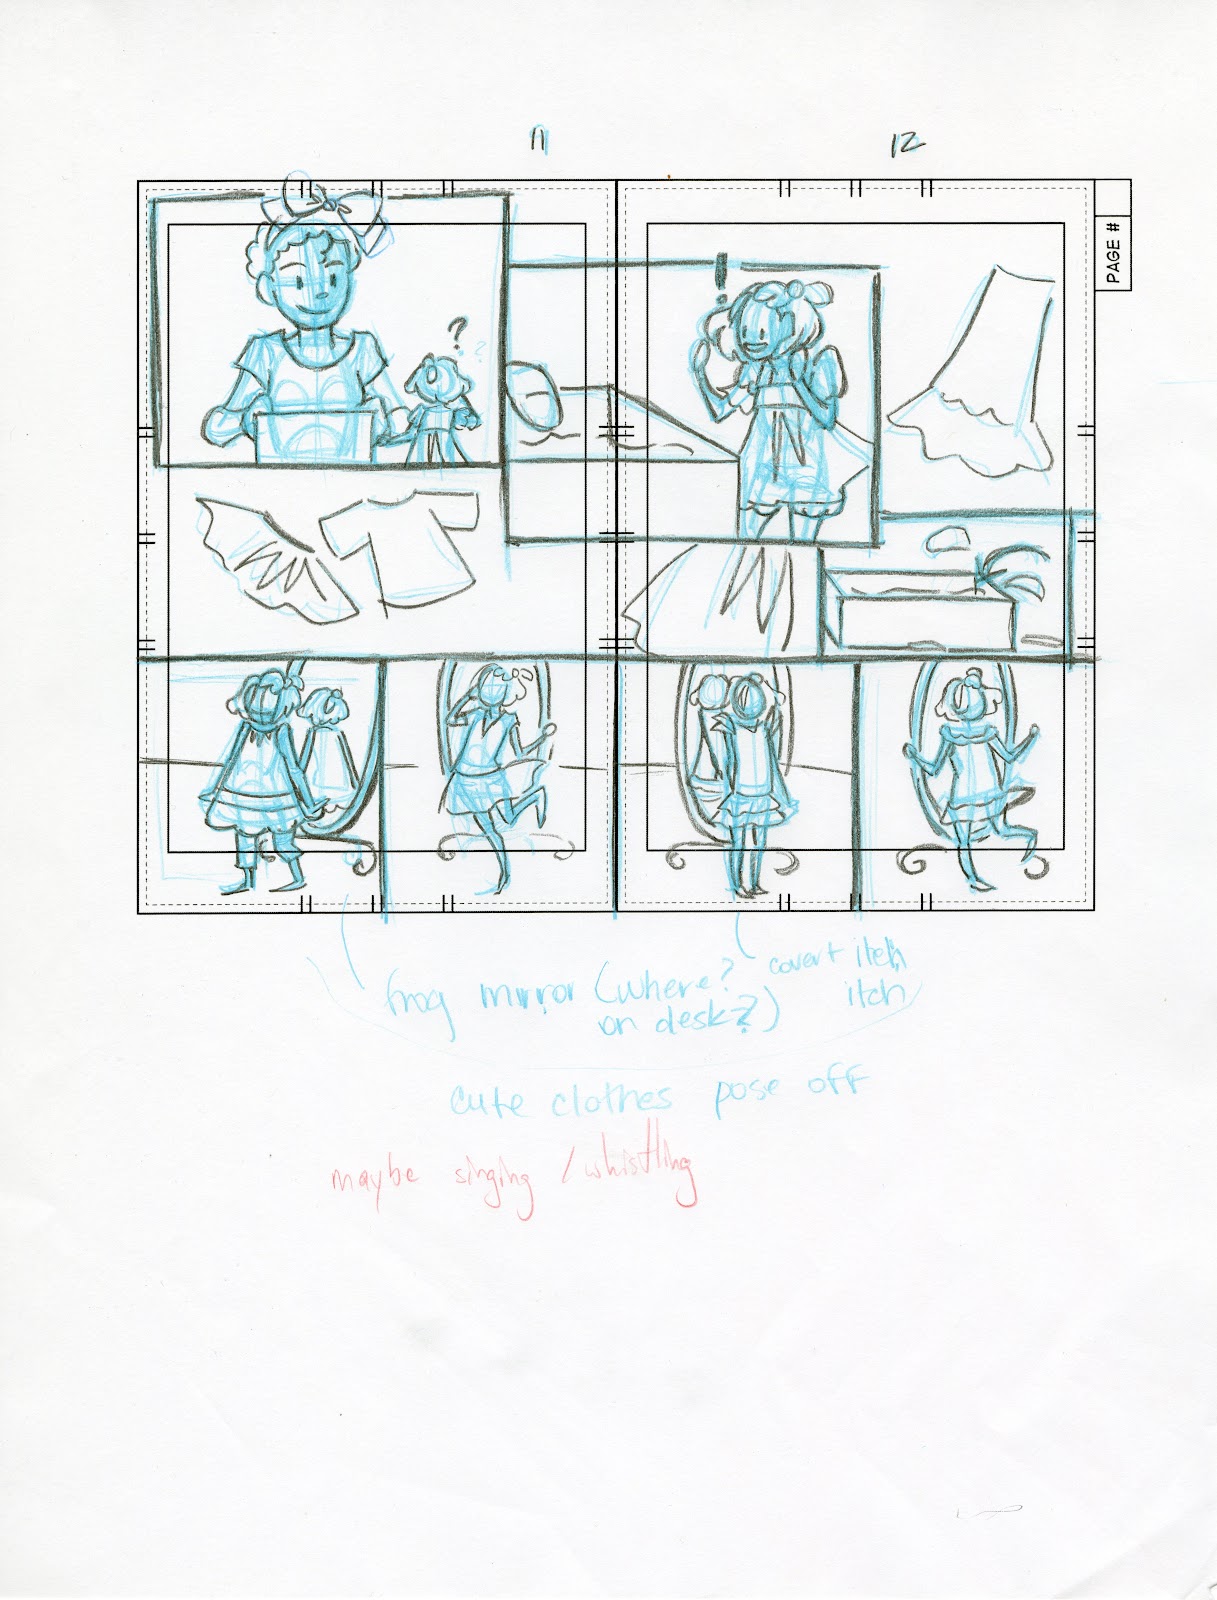
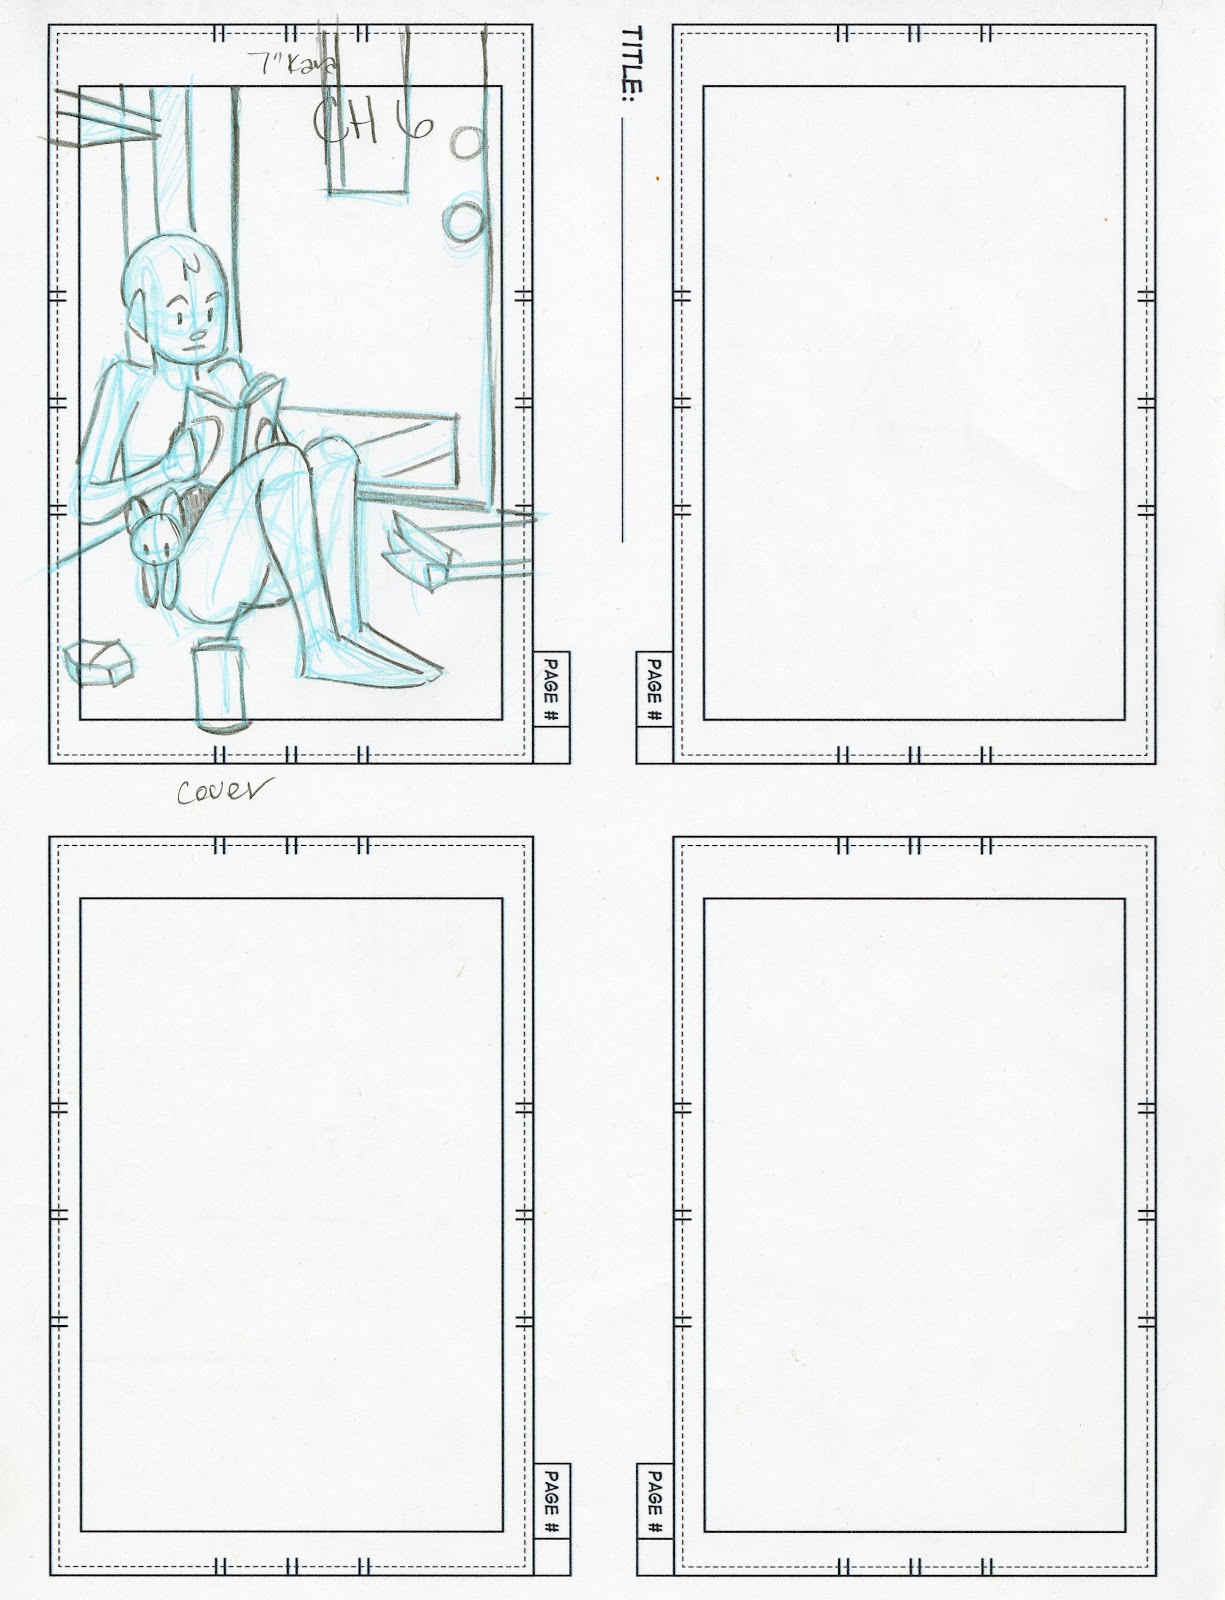
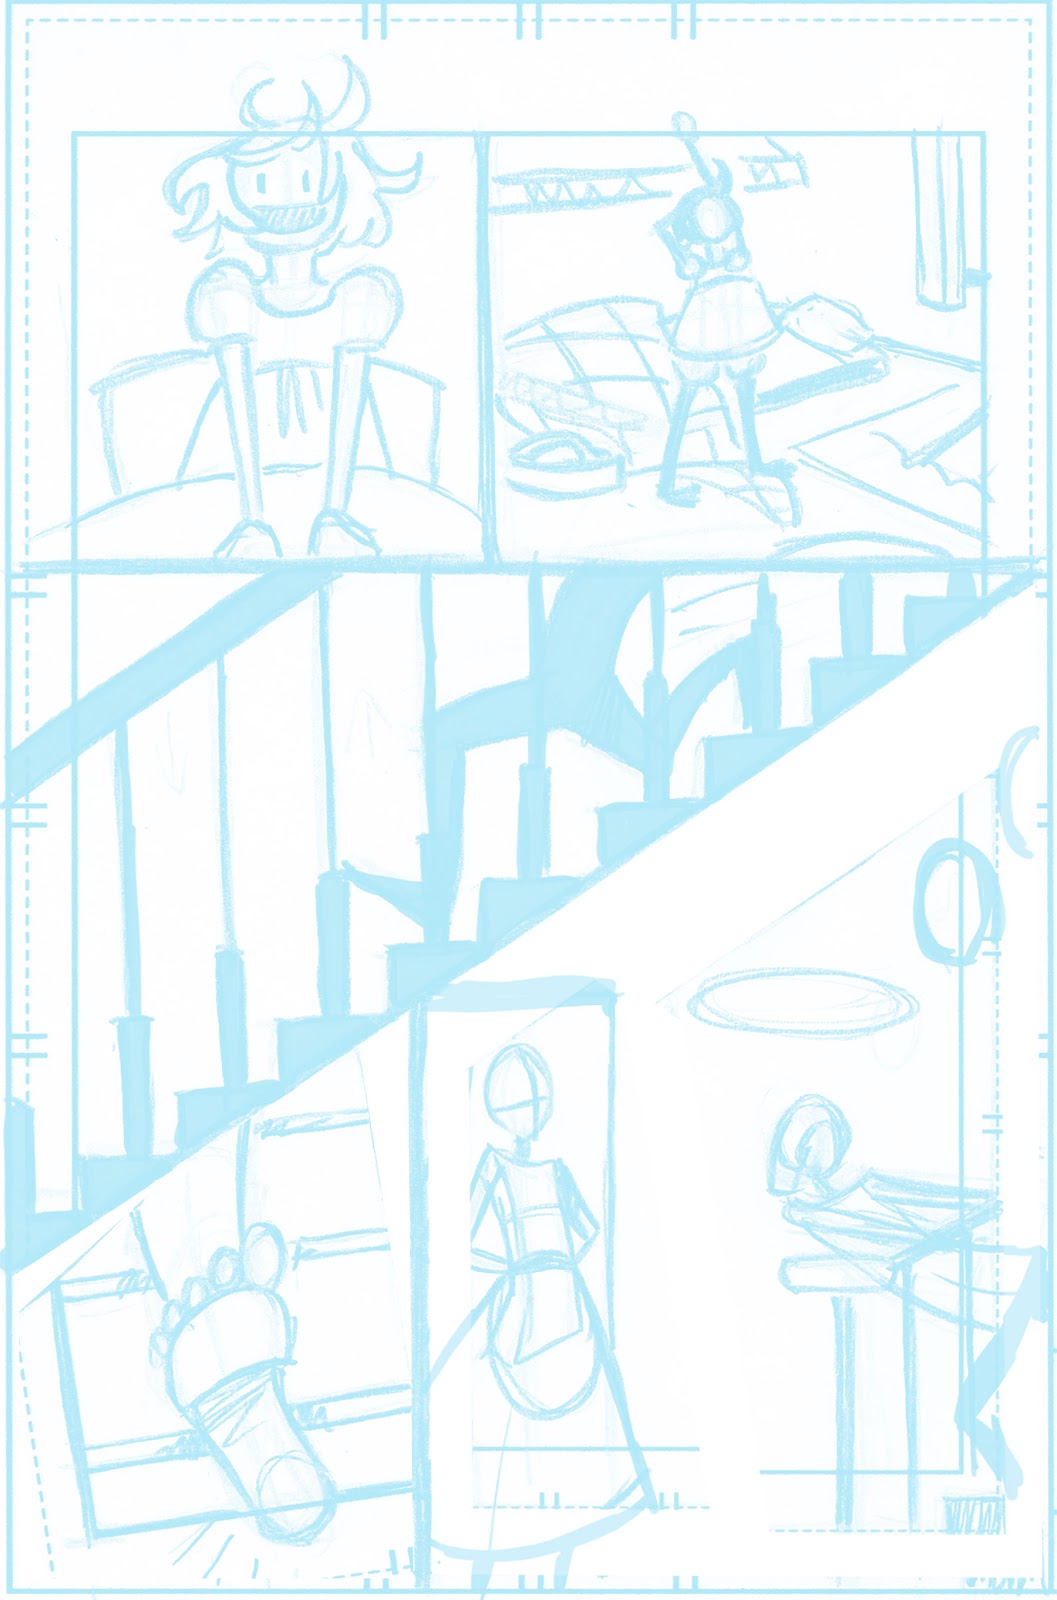
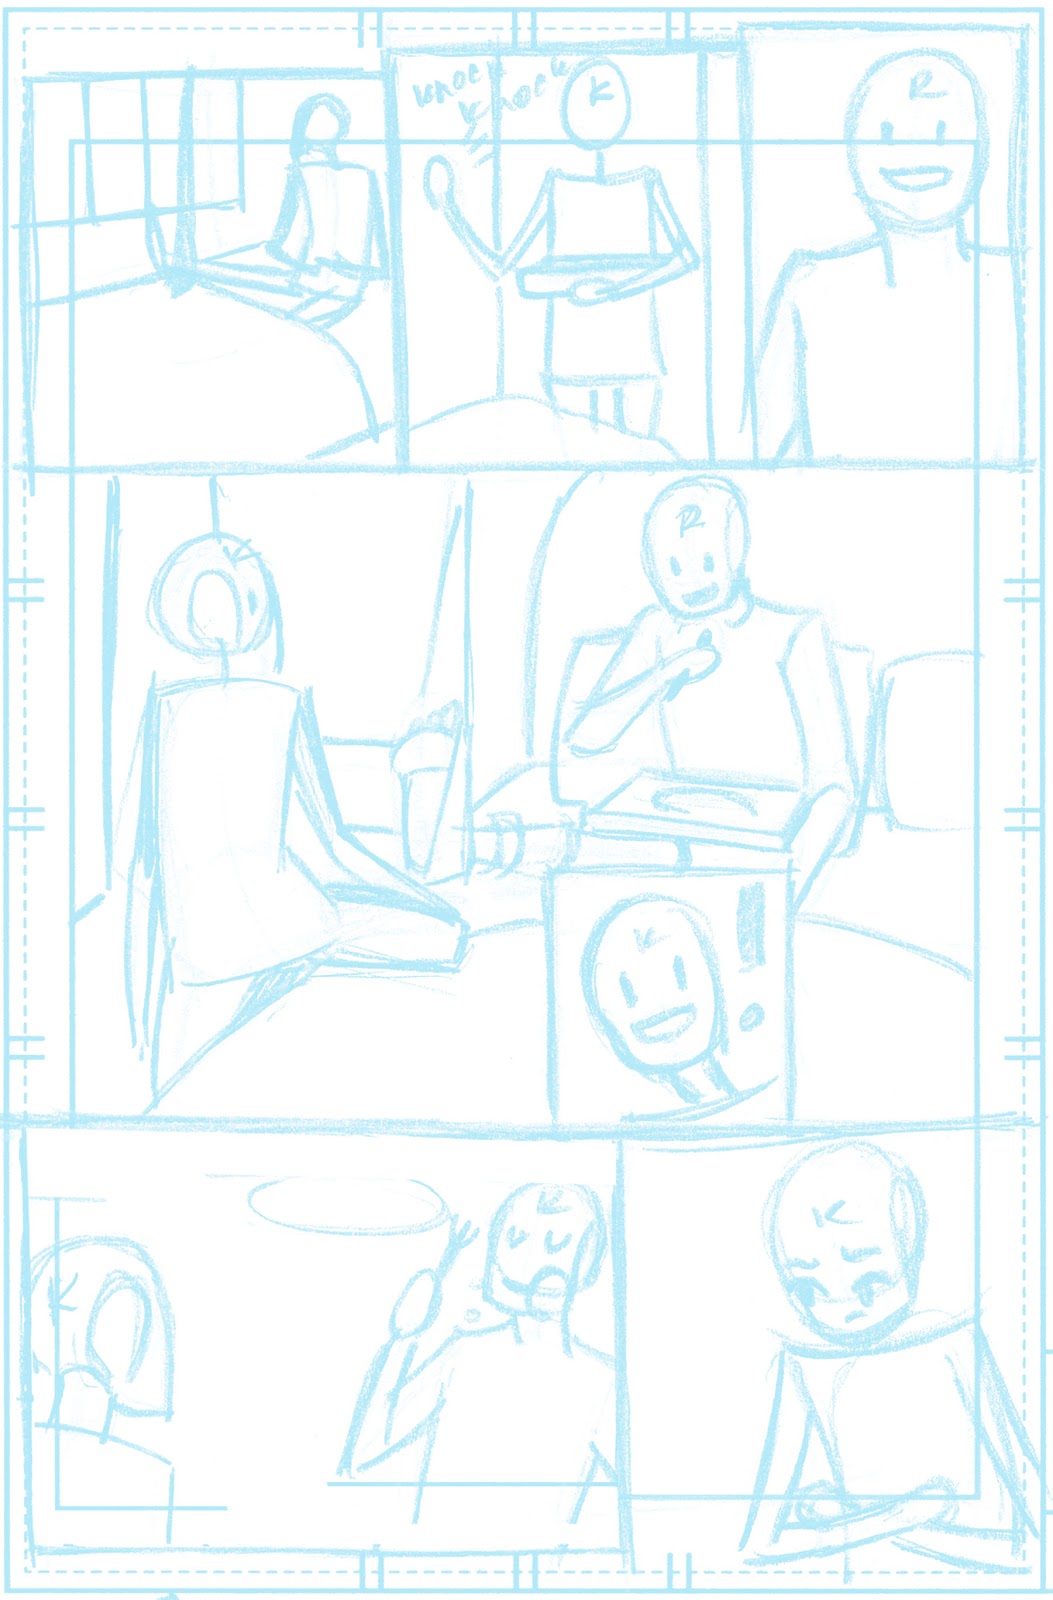
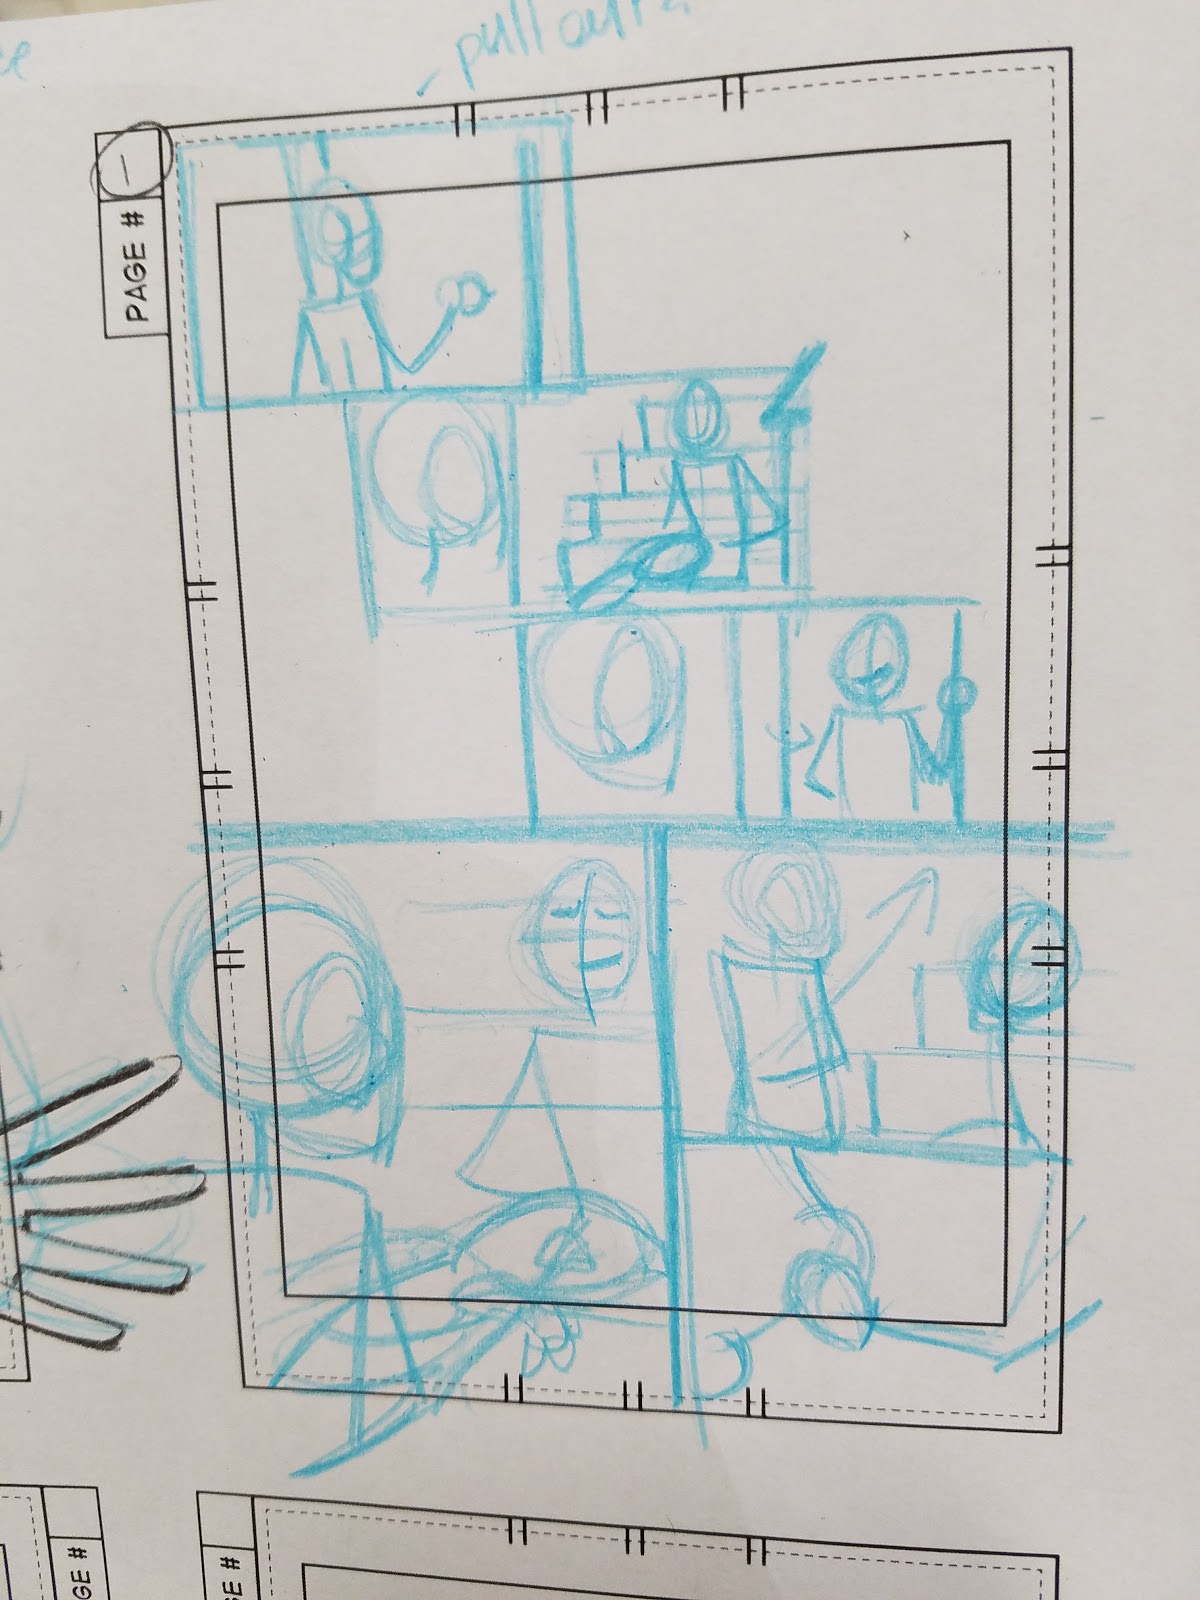
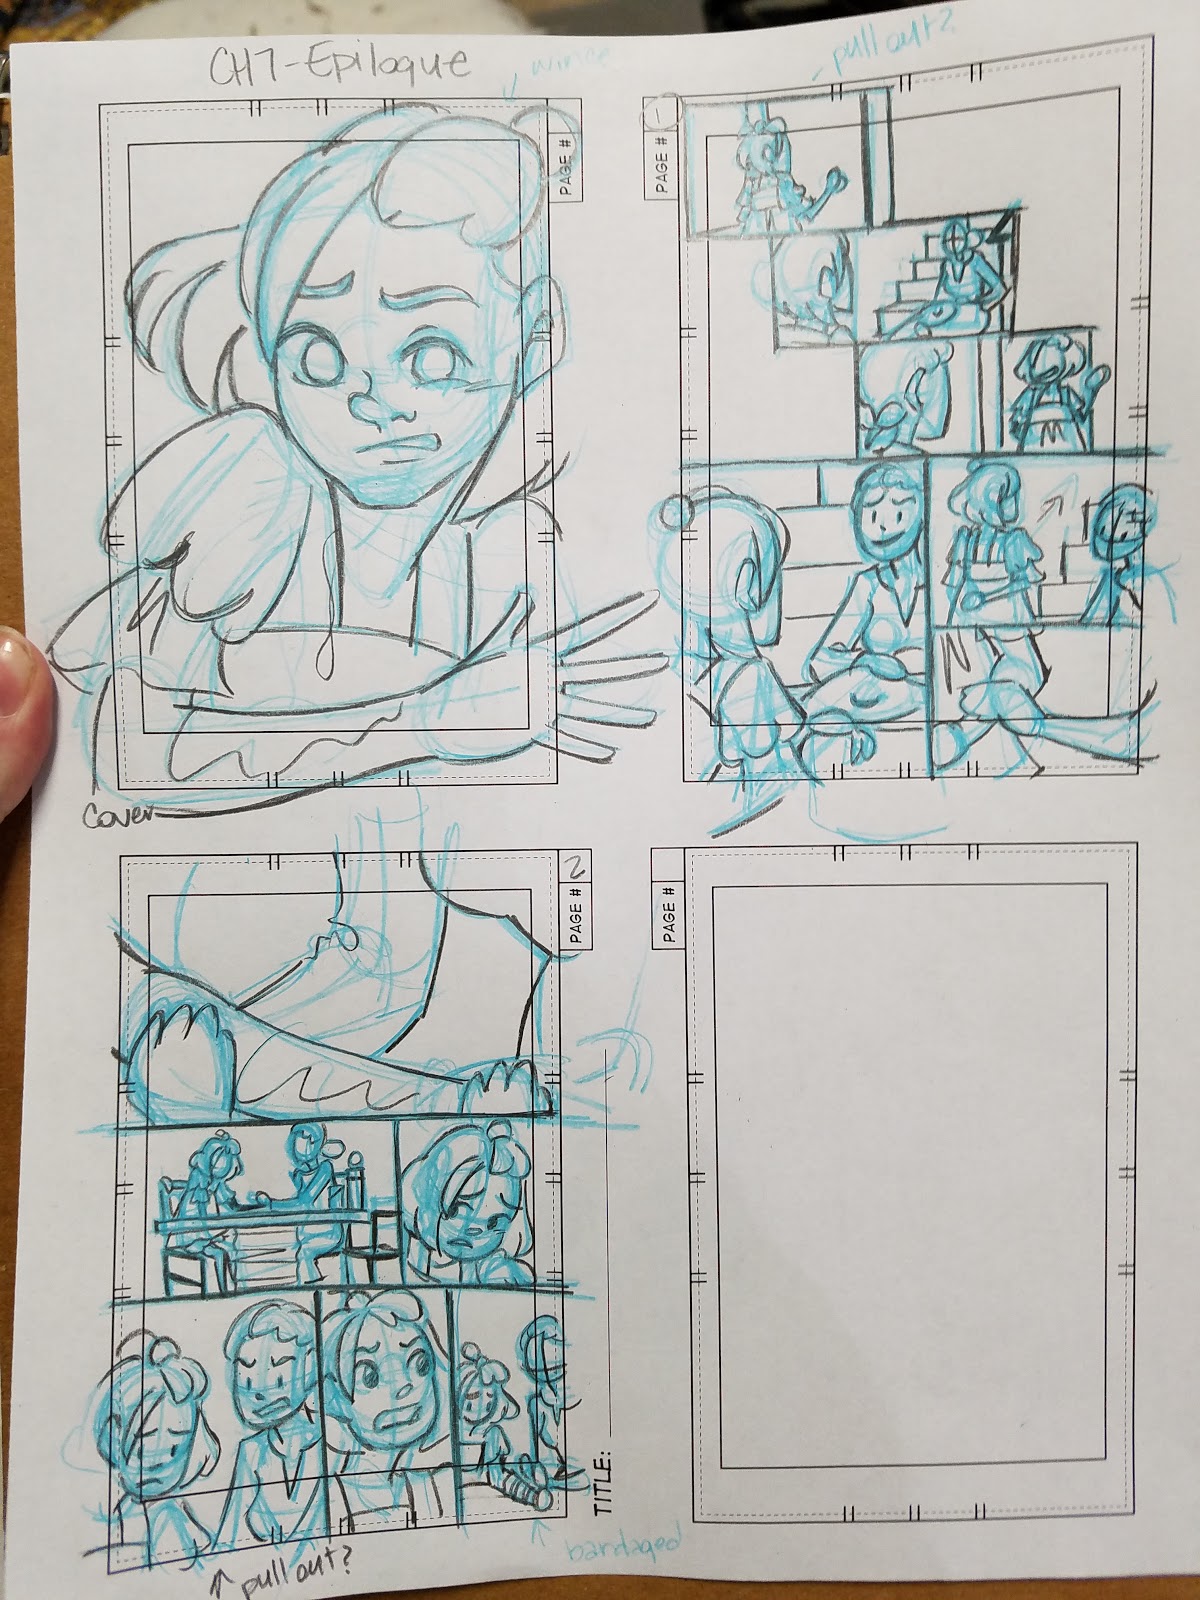
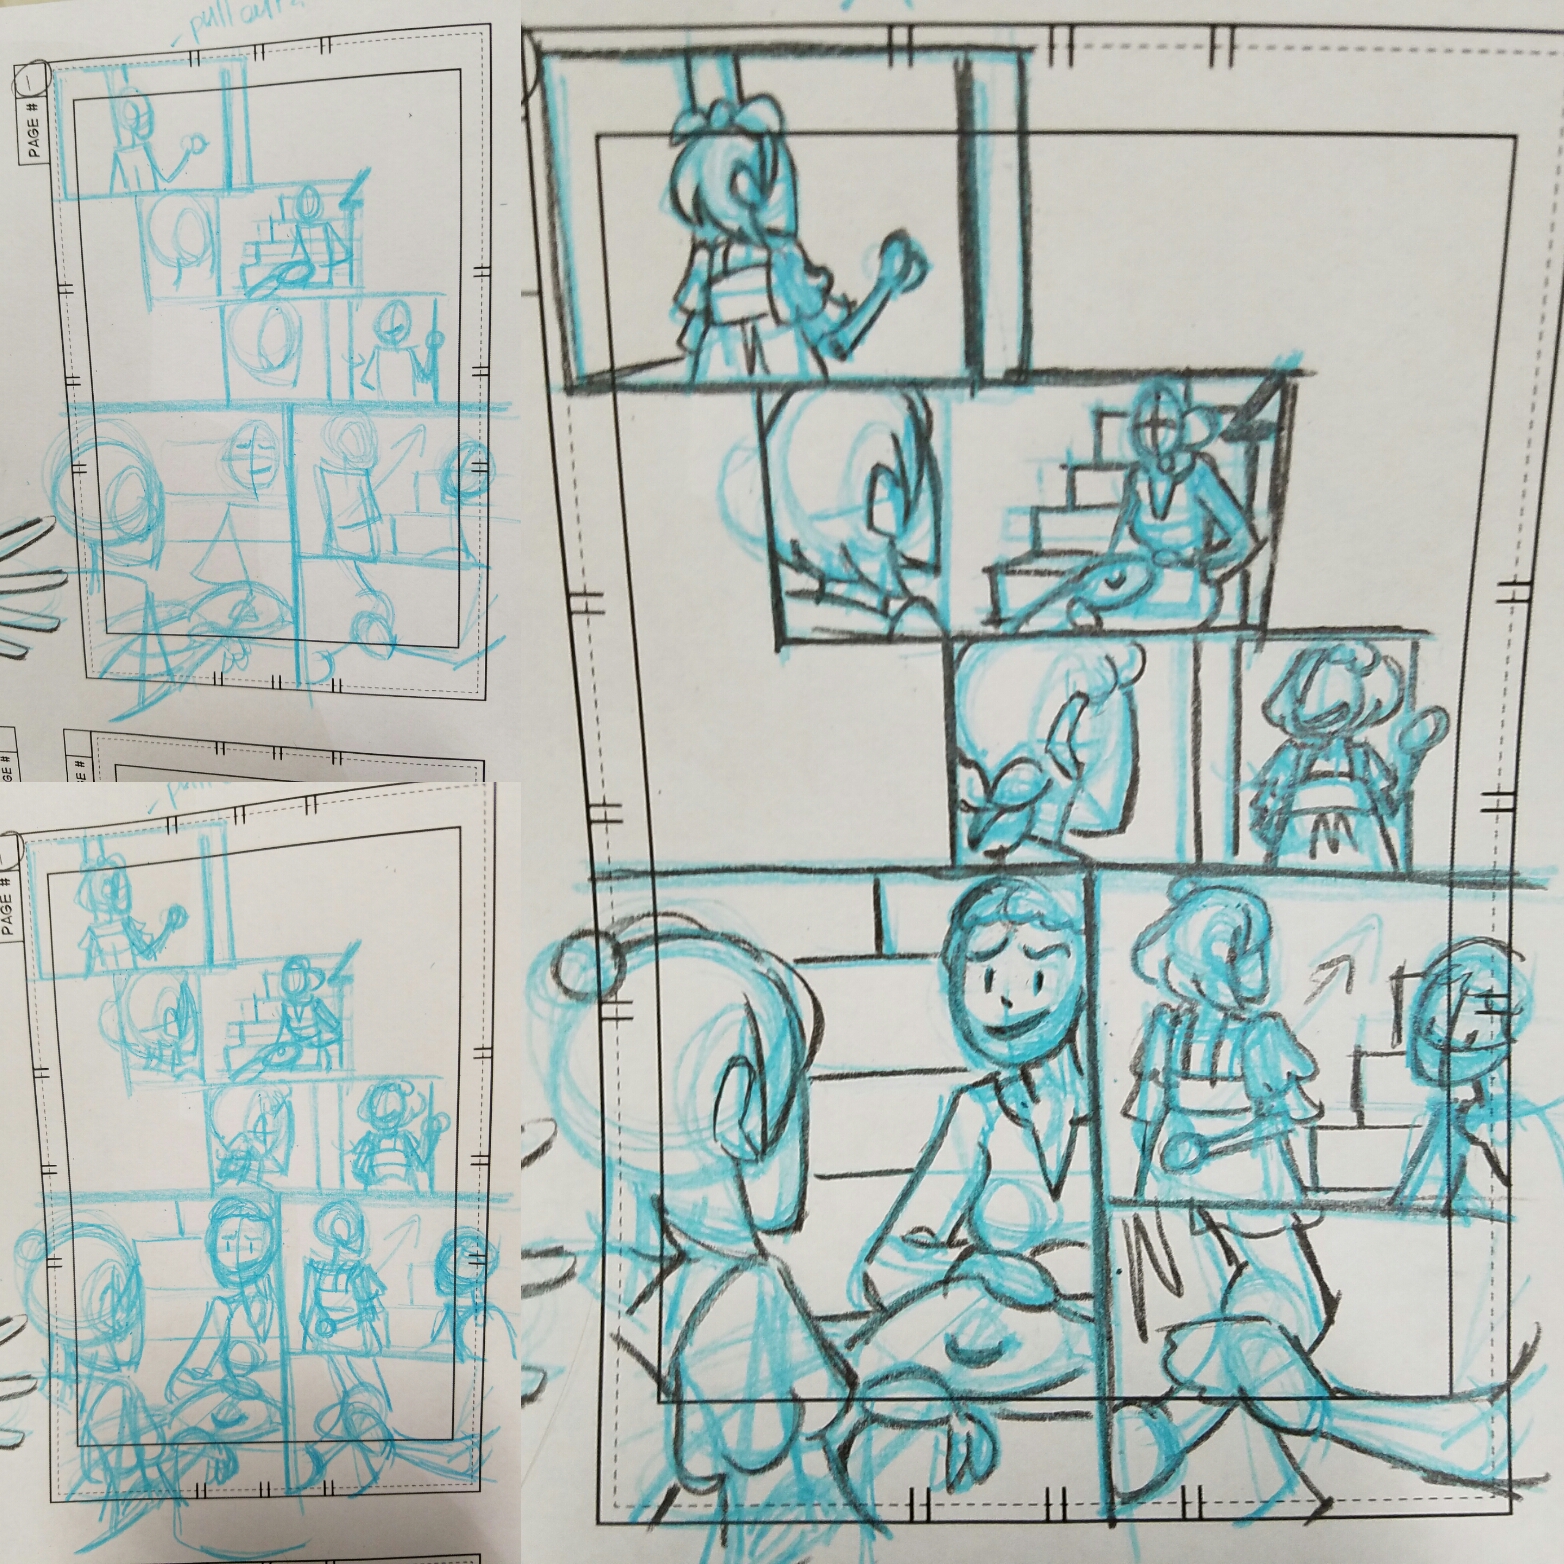
Thumbnails:
 My thumbnails are comparatively tight, but they're still too lose for me to go straight to pencils. Everything is approximate, meant to be a placeholder to remind a forgetful artist (me!) of body language, expressions, environment, and camera direction.
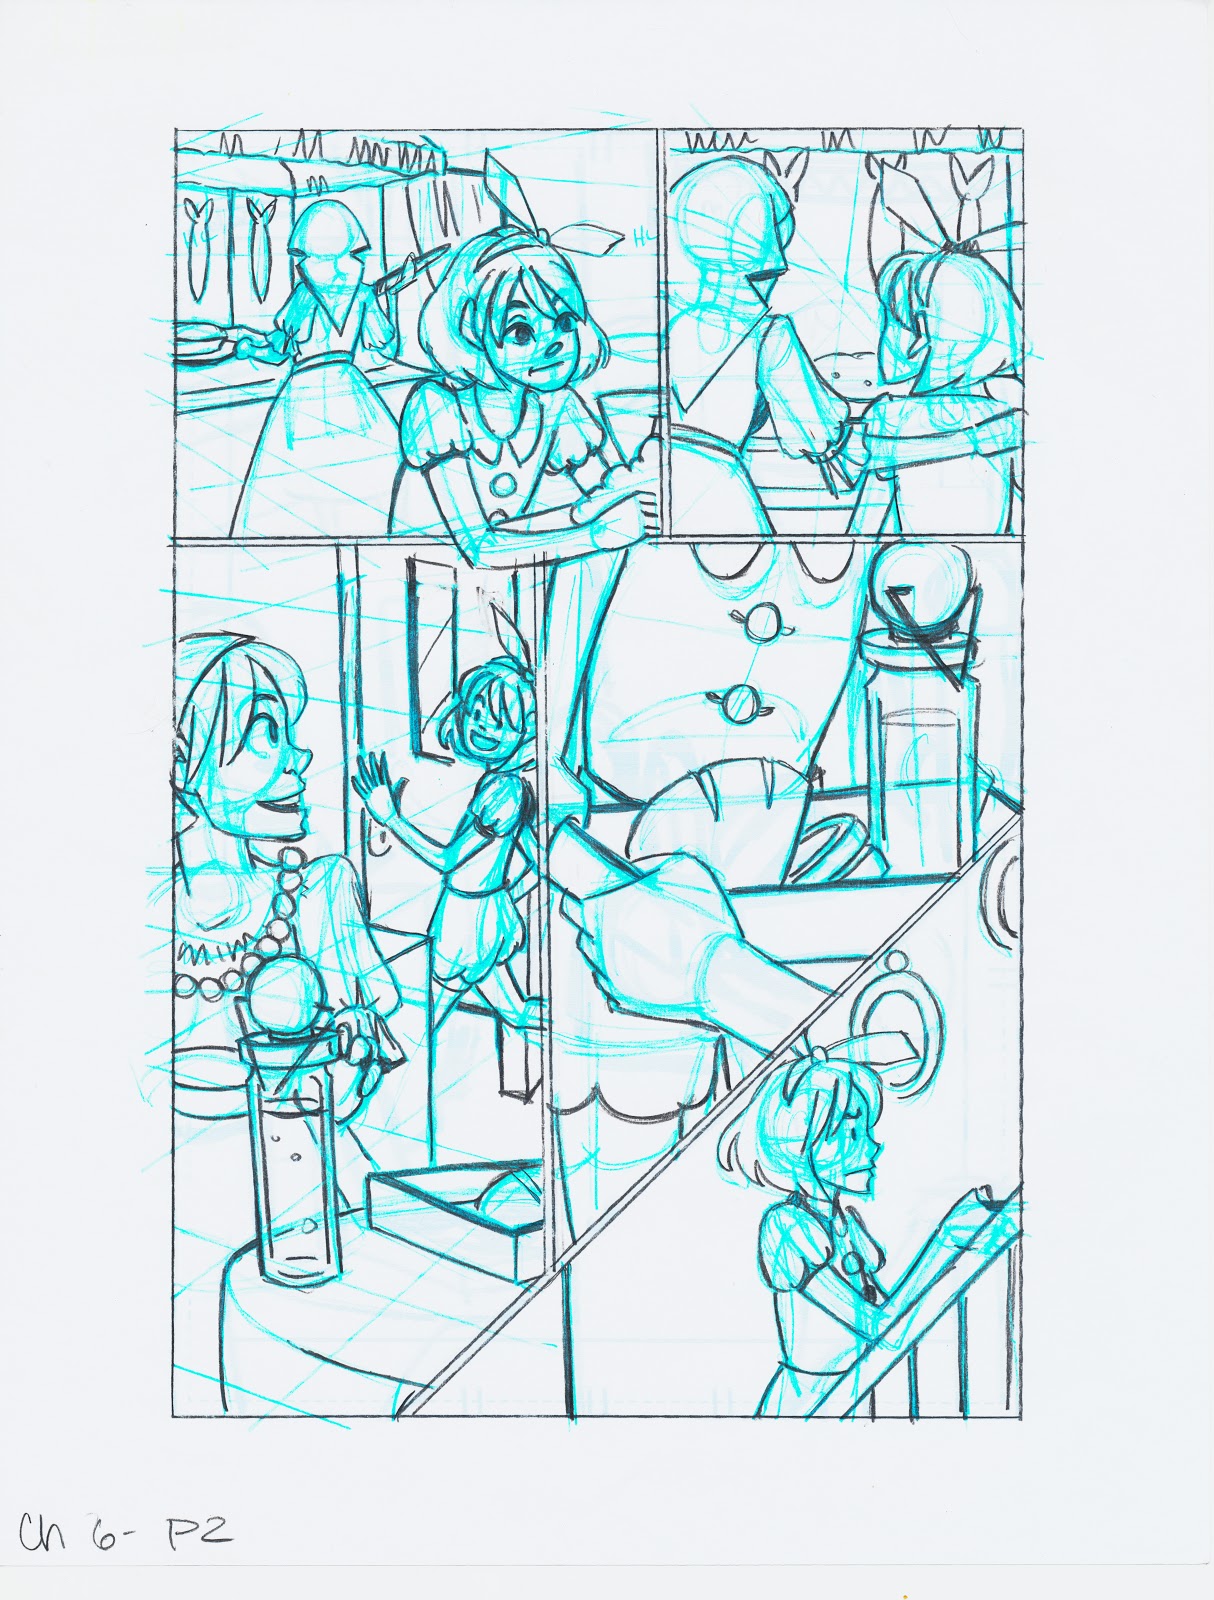
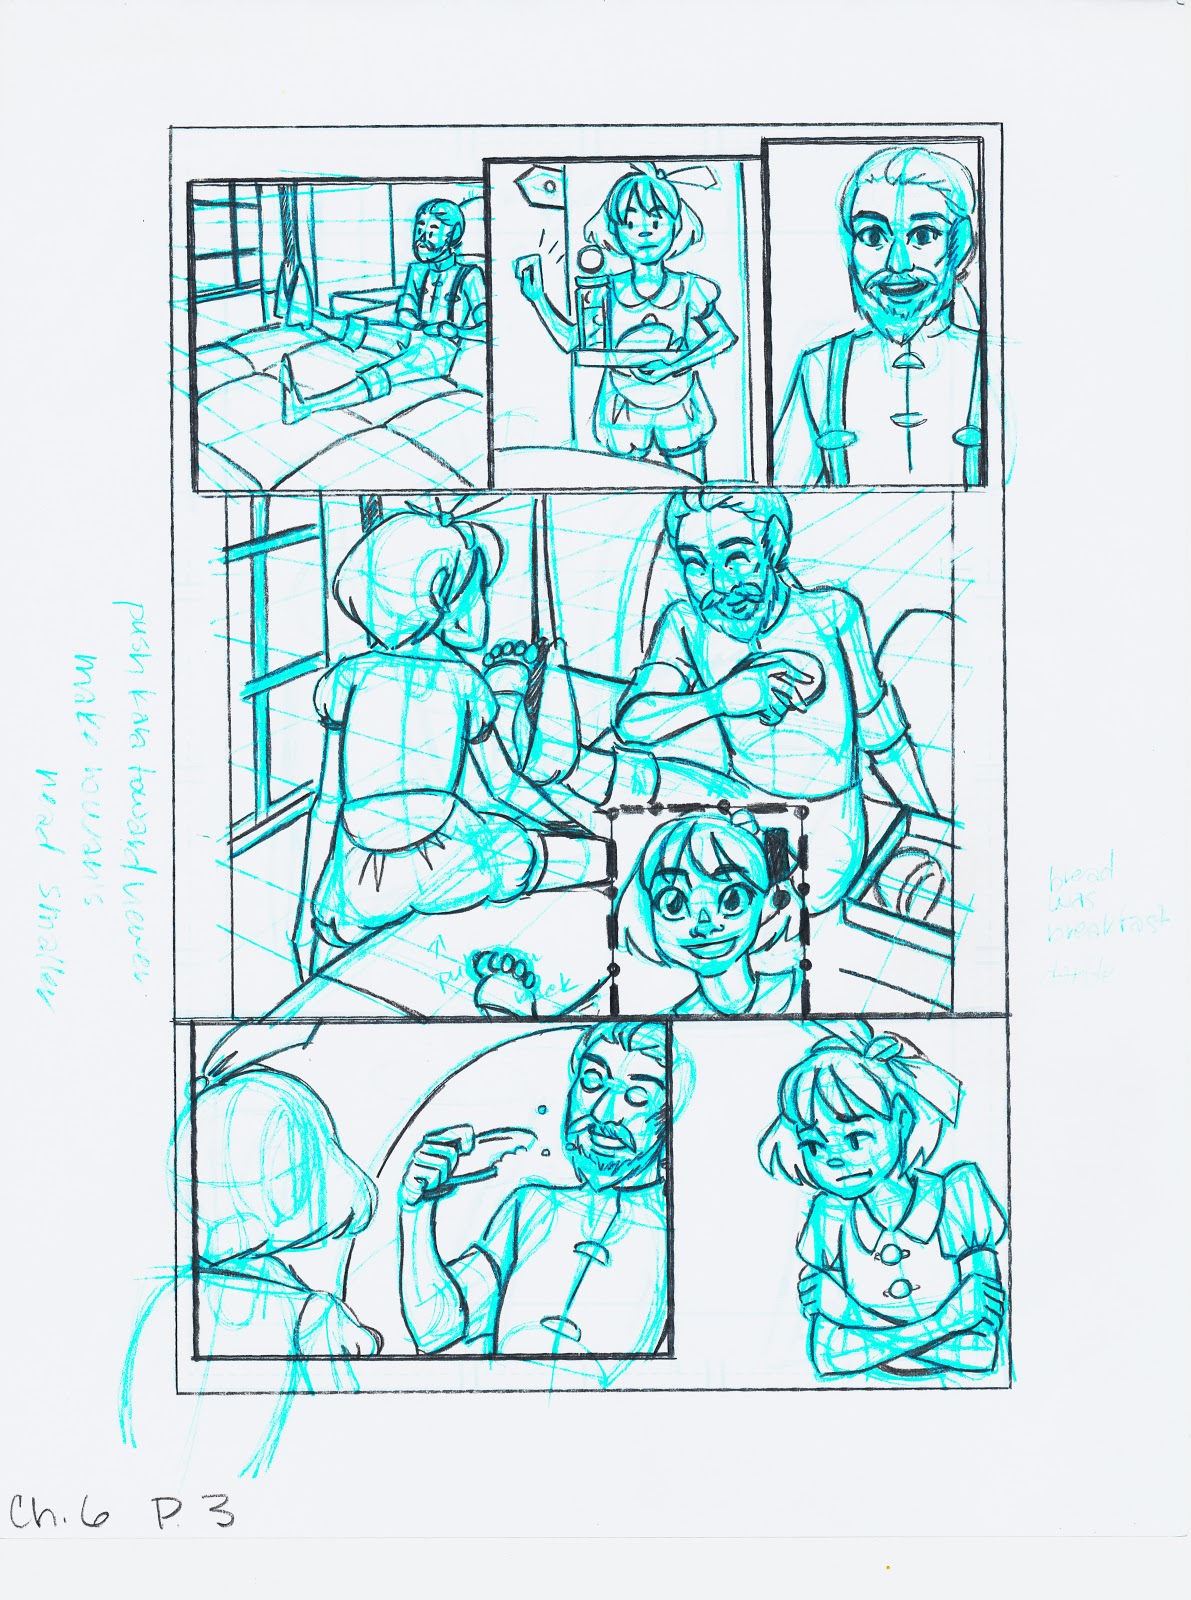
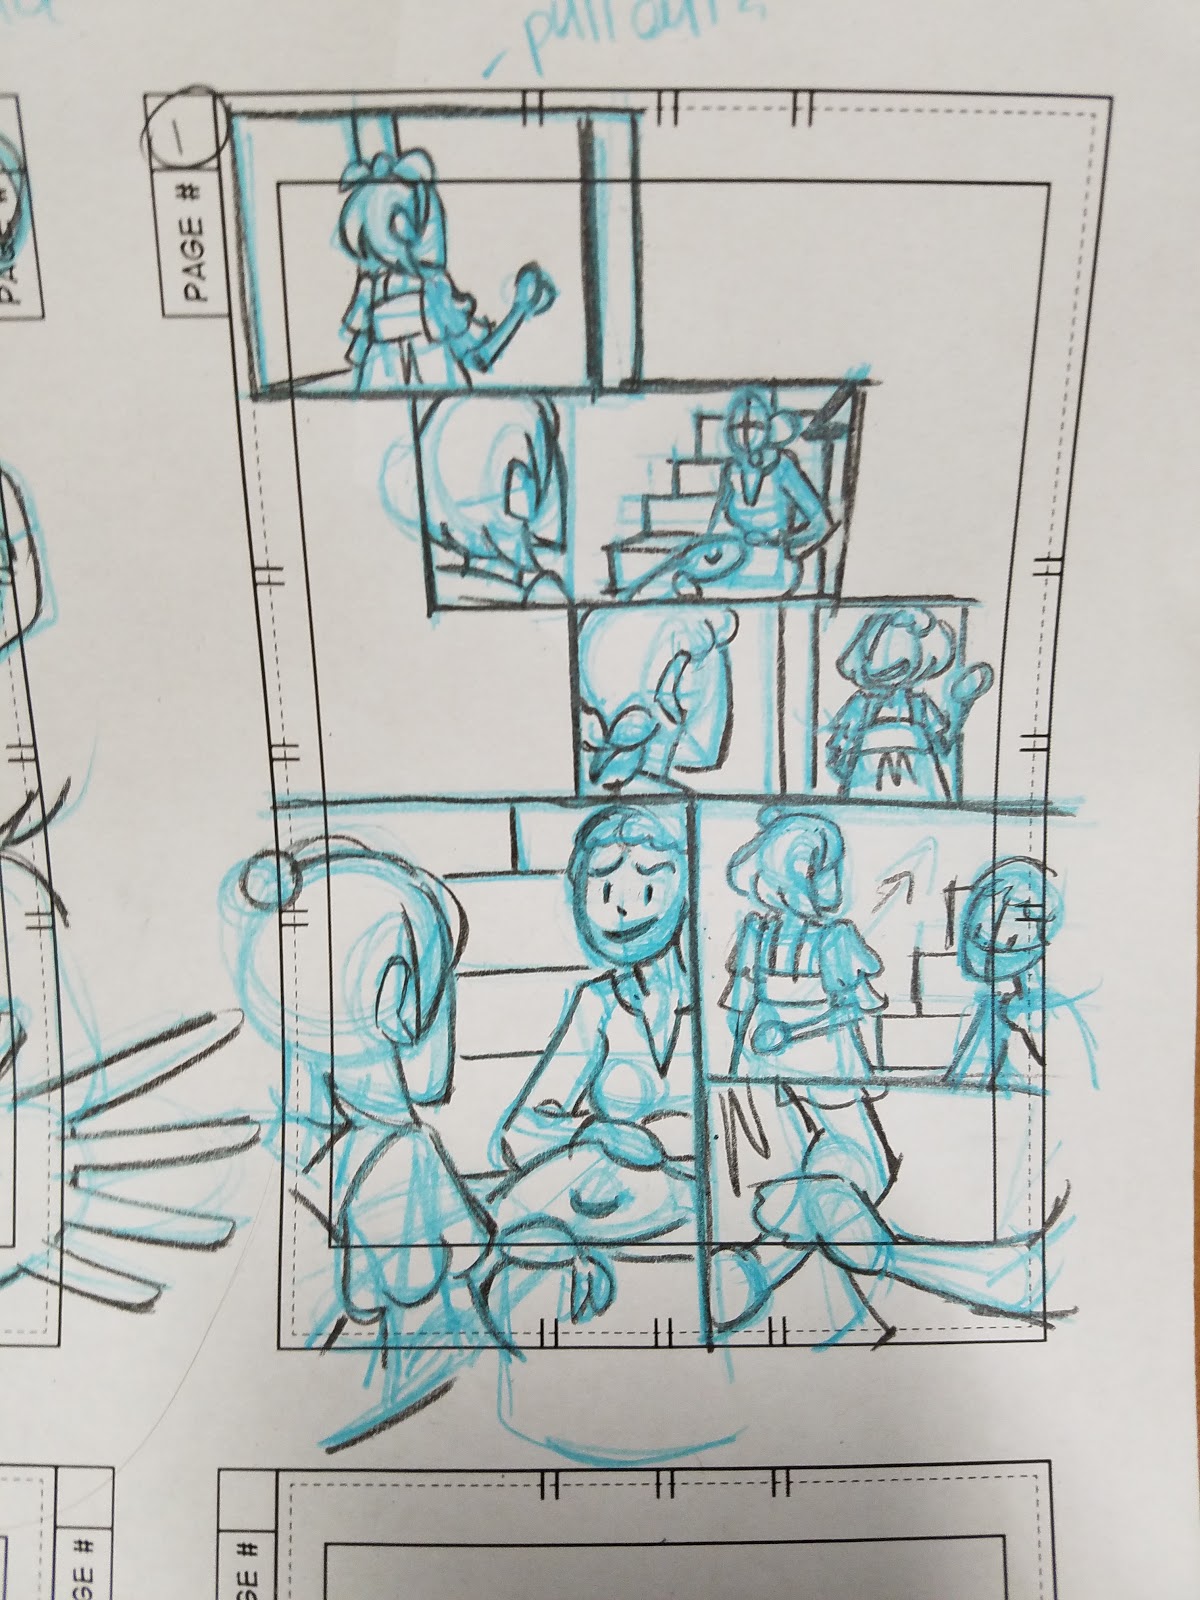
Roughs:
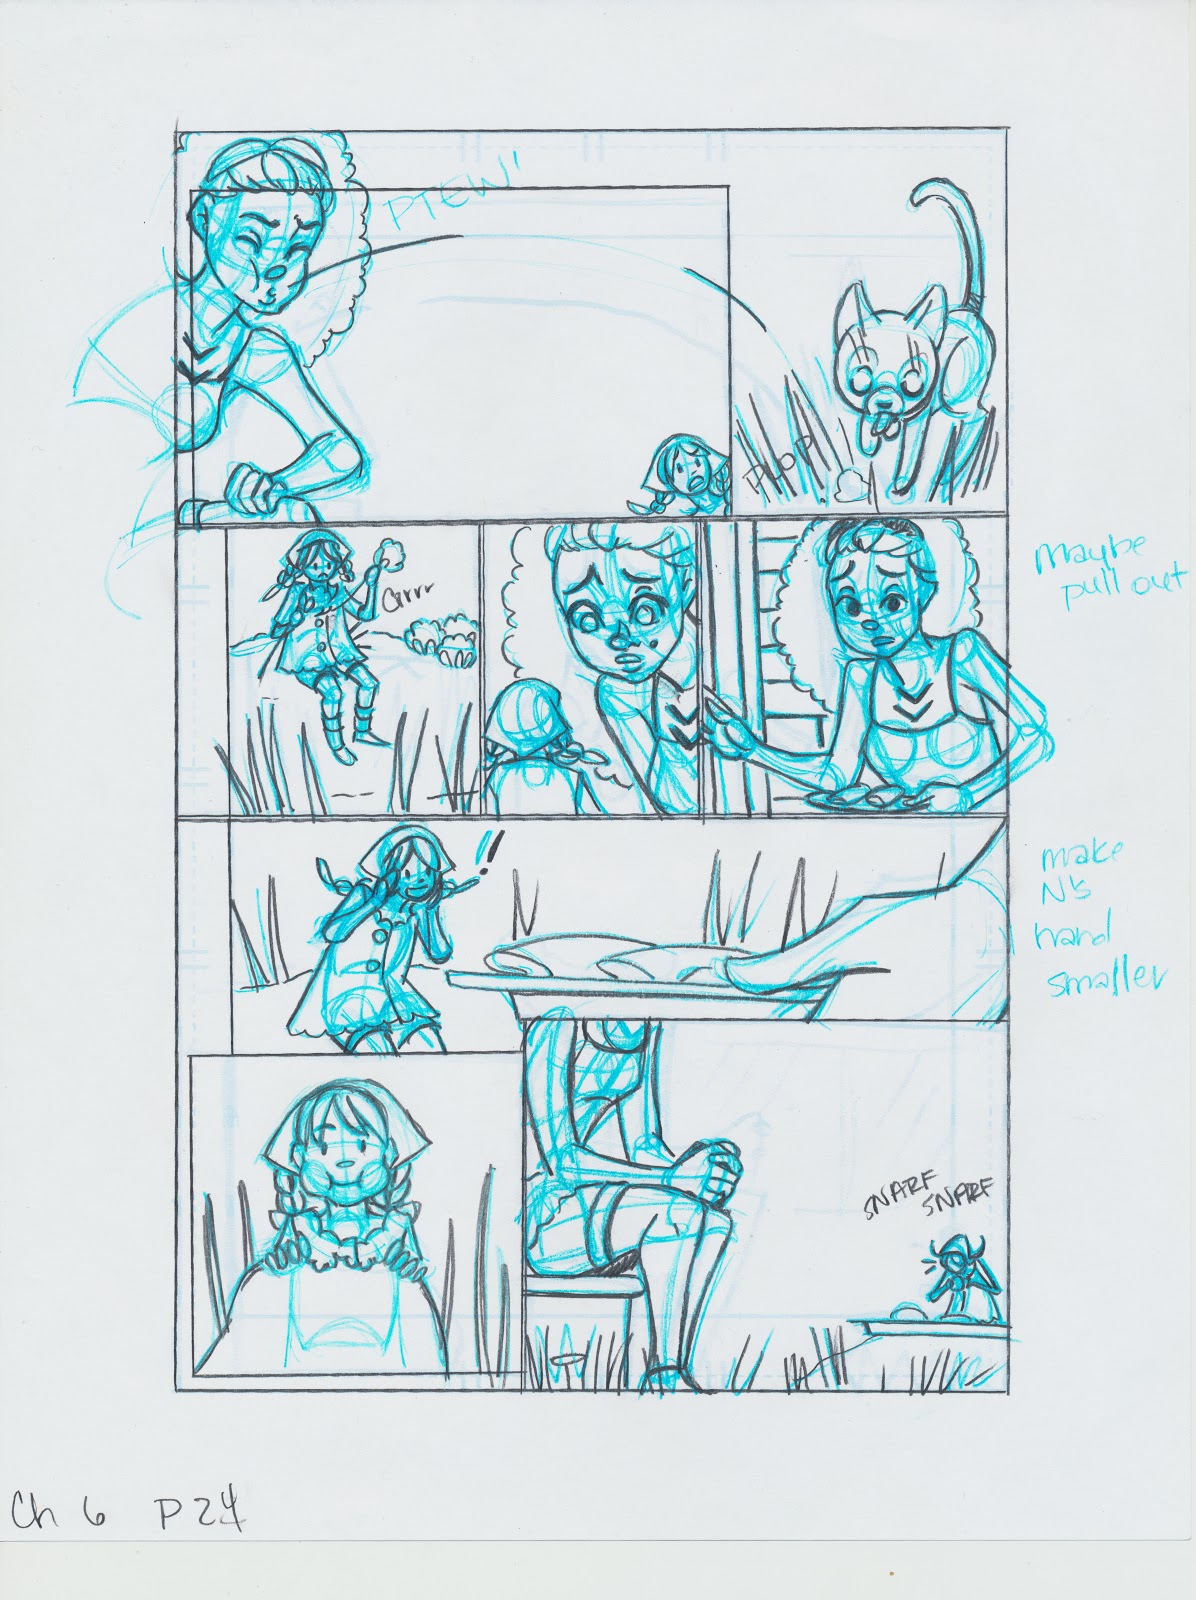


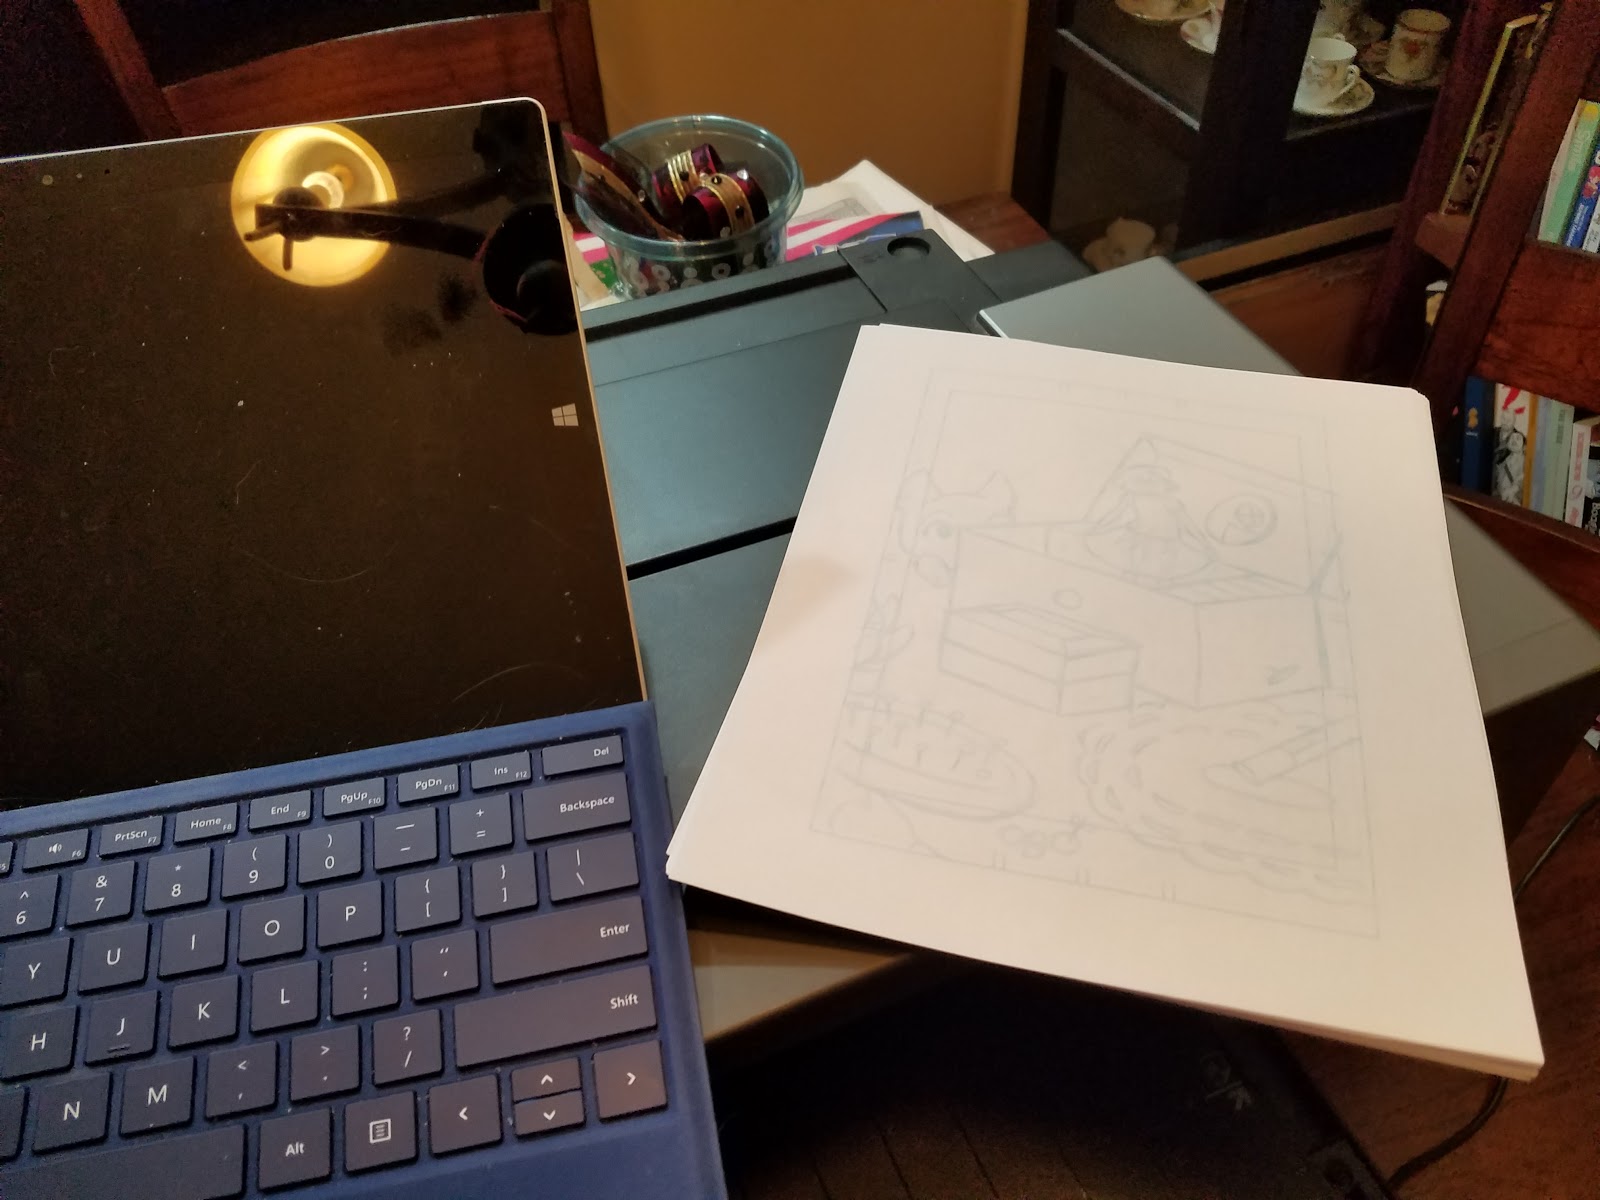
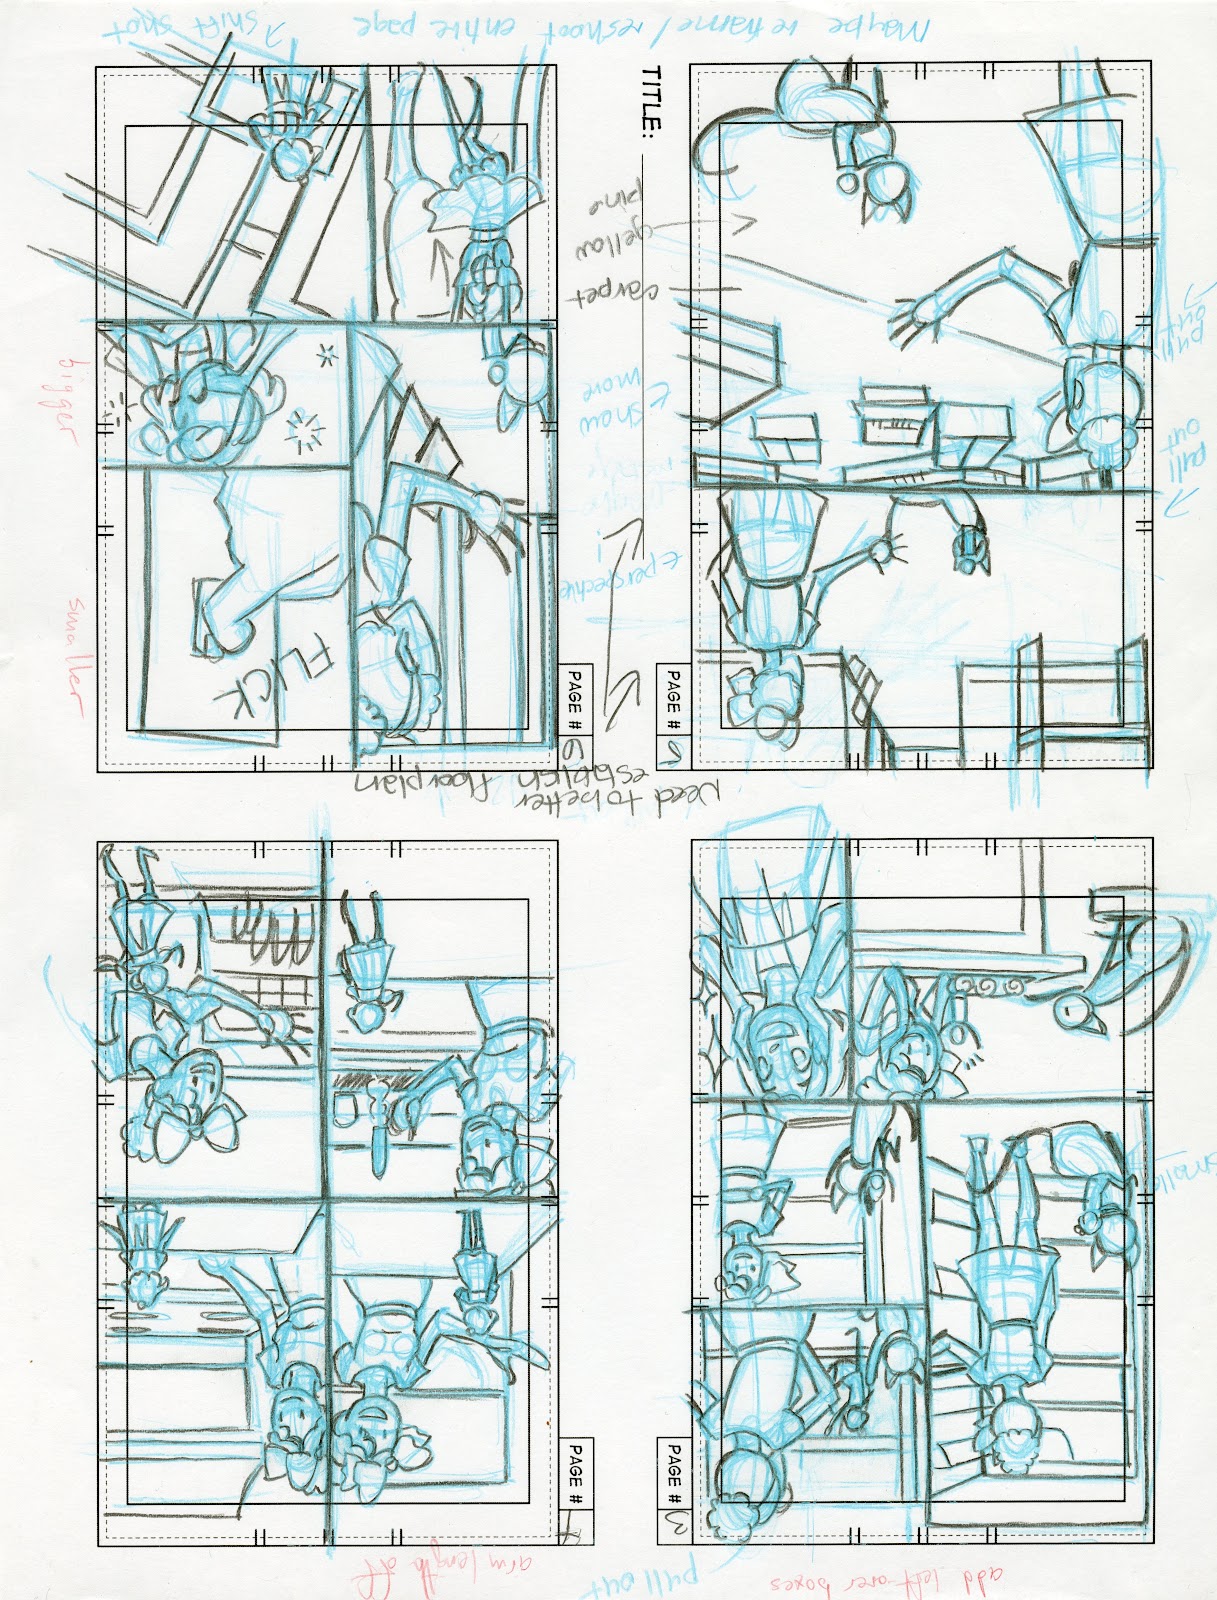
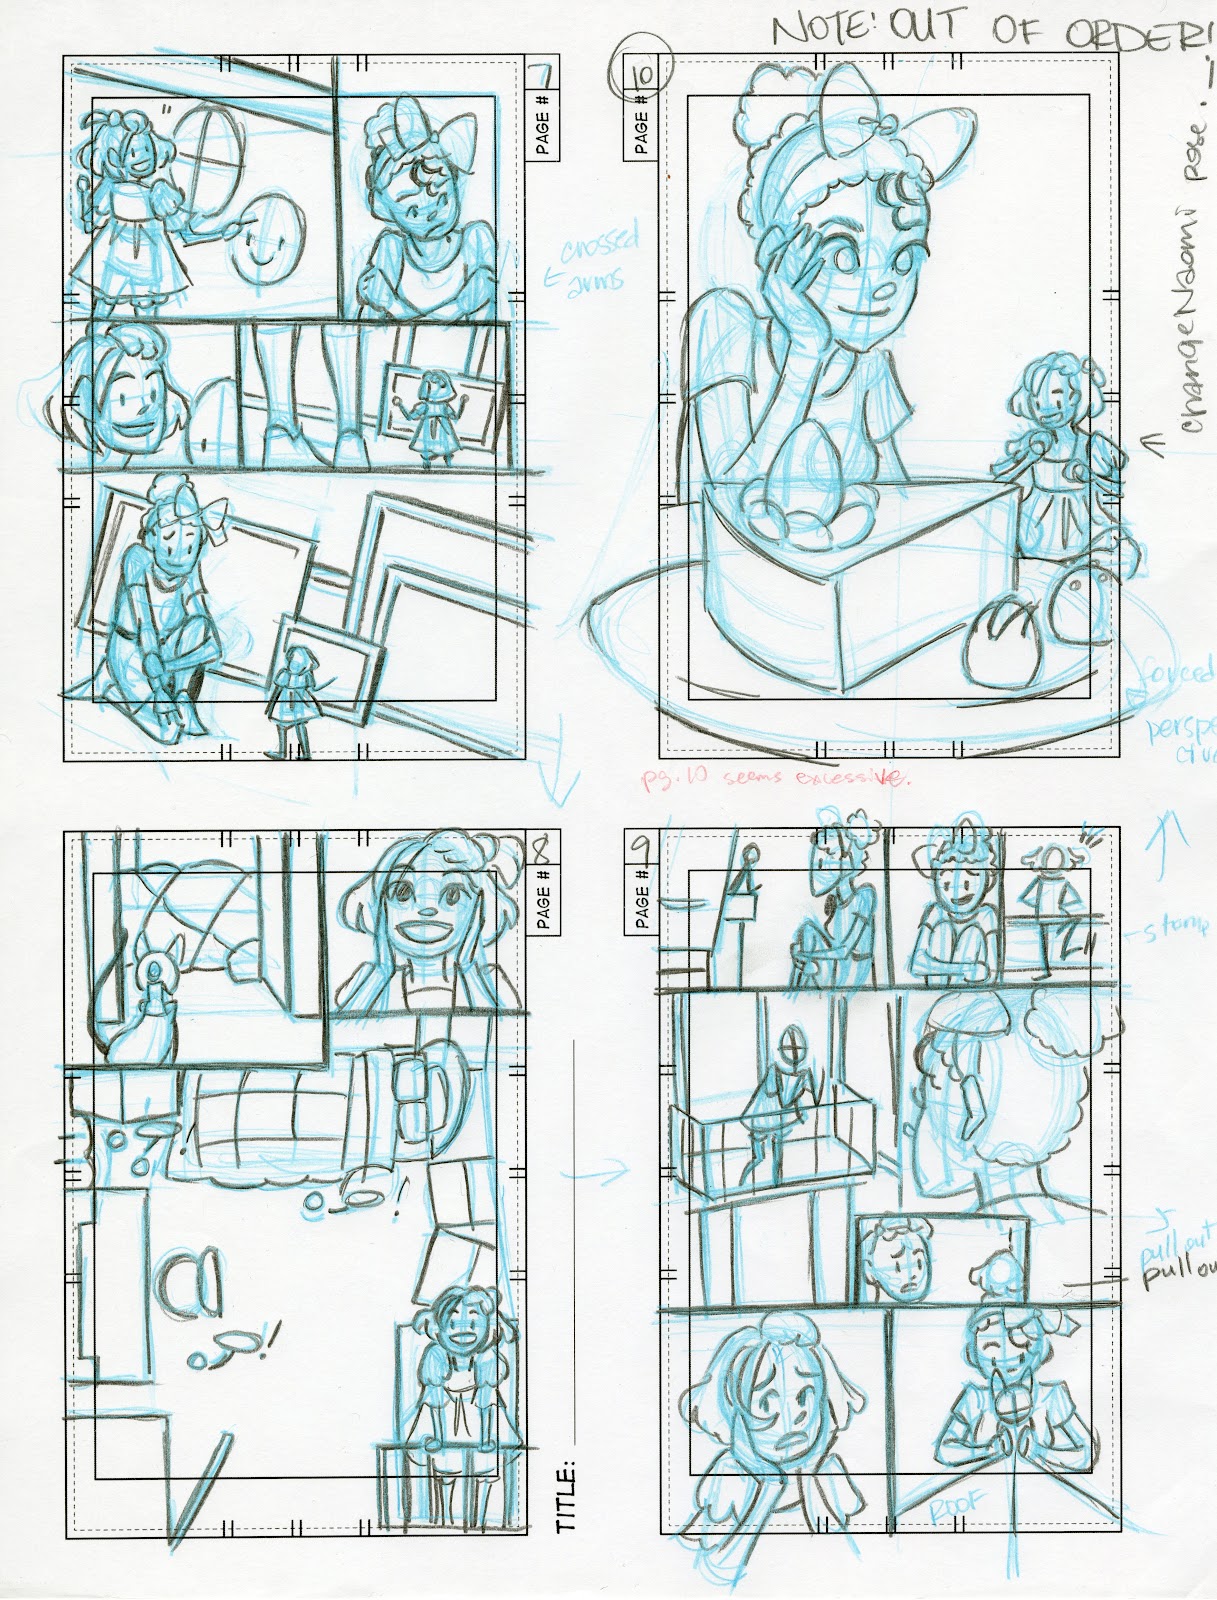
My roughs are tighter than my thumbnails in that I figure out environments, perspective, specific body language, and camera angles.
At this stage, I haul out the large ruler, the scrap paper, and the blue tape to lay down some perspective grids. This is also my opportunity to bust out the constructive anatomy, and make sure my pages not only read well, but look good.
When I've finished a chapter's worth of roughs, I scan them and send them on to friends for editing. My roughs may see a couple passes before I move on to pencils.
Pencils:
Unfortunately, I have no examples to show you, but while my roughs may be effective but ugly, my pencils are an opportunity to really clean things up and refine details.
For my pencils, I print my roughs out as bluelines onto Canson Montval watercolor paper (mentioned frequently in my Watercolor Basics series) using a waterbased printer (a Canon Pixma Pro 9000 Mk II, an inkjet printer capable of handling art papers and large formats. I go over these lines with a H or HB pencil (anything softer will smear when I stretch the paper).
This stage is far too late for any major revisions, but it's perfect for correcting issues in facial expressions, tightening up clothing details, or adding a little more detail to the background.
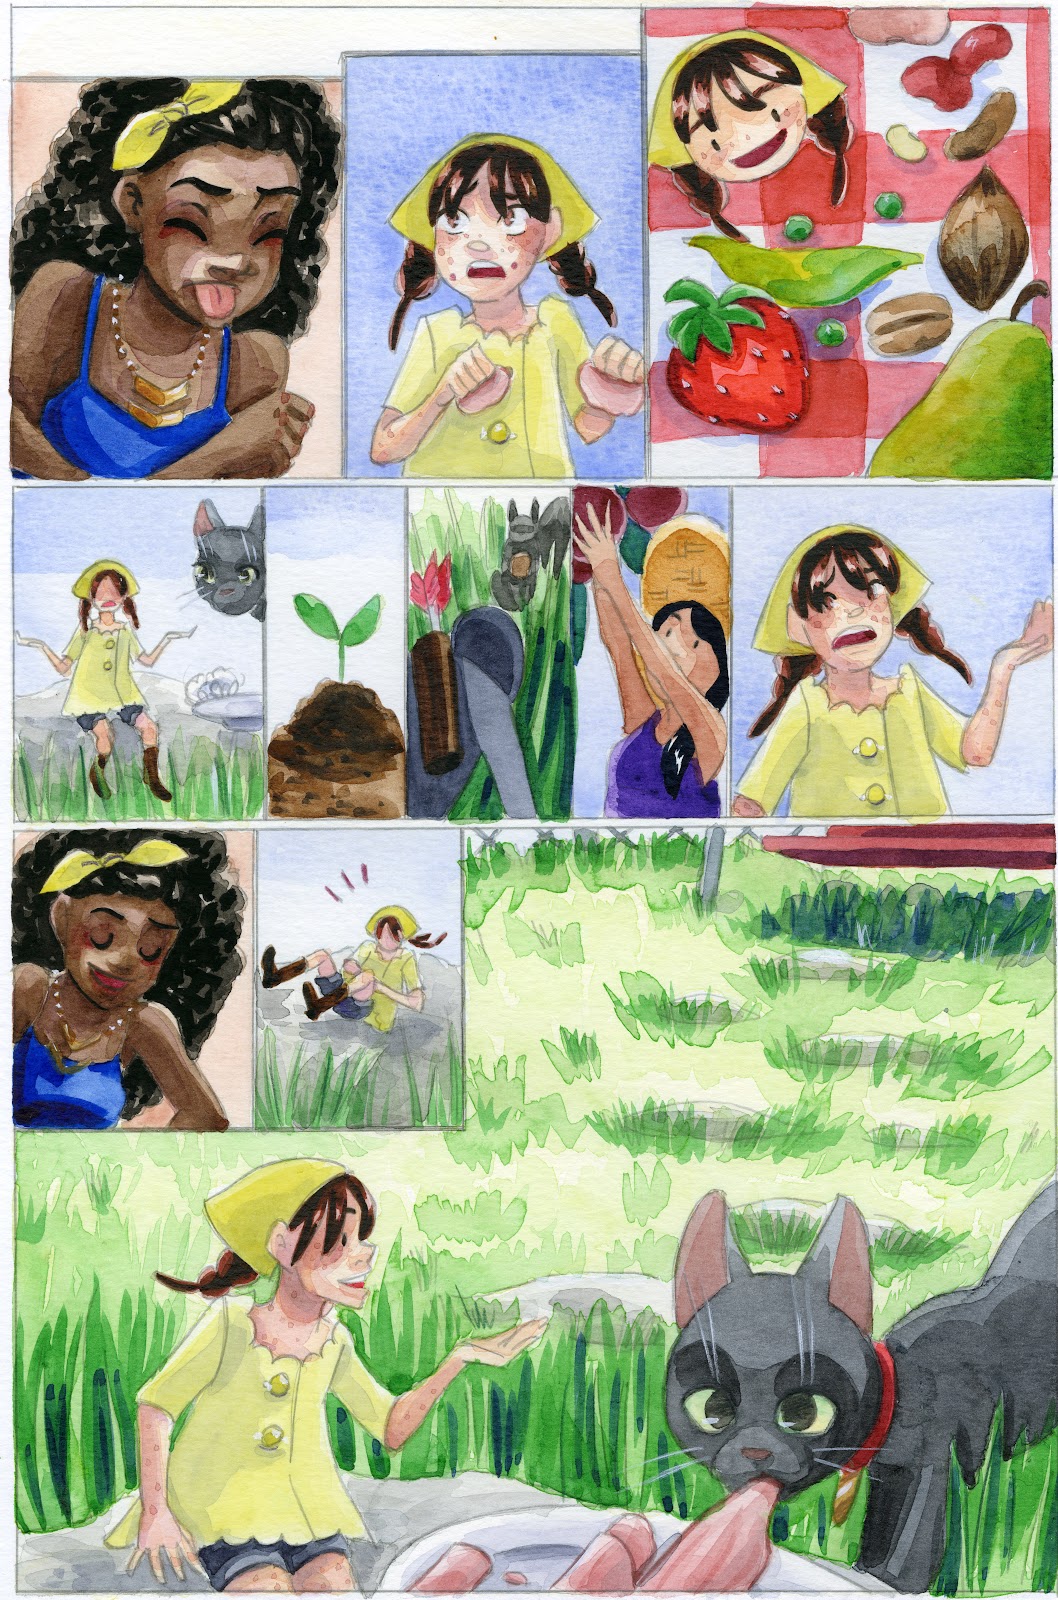
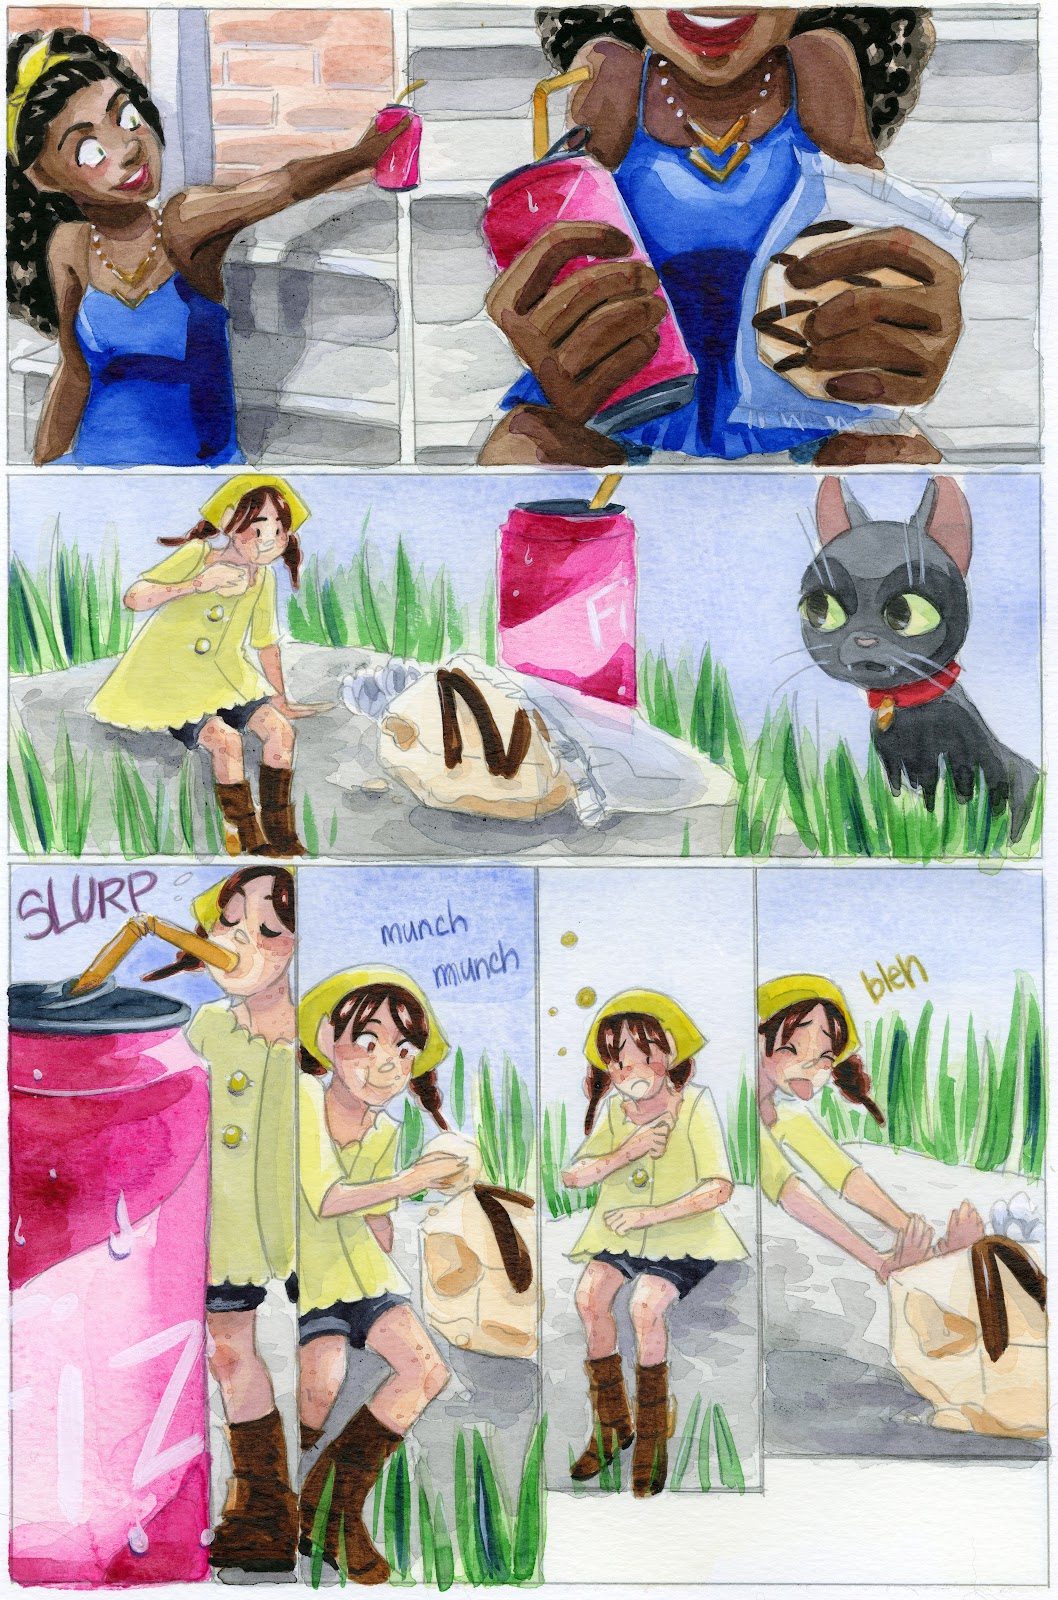
Painted Pages:
Art-wise, very little changes between roughs and the painted page, other than refinement. Roughs really are my best opportunity to clean things up and make sure things look right.


If you guys have any questions about this stage of comic production, don't hesitate to shoot me an email using the form on the left hand side of the blog! And if you'd like to see a particular topic covered in depth, that isn't covered here or on the Youtube channel, let me know!
Recommended Videos:
Roughin' ItYou Need PerspectivePerspective in the Panels
This installment of the Intro to Comic Craft: Step By Step series was sponsored by the launch of 7" Kara as a webcomic!
 If you enjoy my art and this blog, you'll definitely enjoy 7" Kara! Chapter 1 is available in completion, and Chapter 2 just started. Updates are every Friday on the Tumblr or on the site.
Please consider donating to this blog or purchasing from Natto-shop (http://nattosoup.com/shop) if you want me to continue publishing quality content. All materials tested were purchased from my own pocket. Keep on Truckin' Nattosoup is not under any sponsorship.


February 27, 2017
Intro to Comic Craft: Step by Step: Converting Thumbnails to Roughs
This series is also made possible thanks to the generosity and interest of my Patrons on Patreon.

My Patrons have expressed interest in content on the comic making process, and I am happy to oblige. Comics are one of my passions, and they're the reason I began this blog in the first place. It isn't always easy to share comic content here, but their generosity has made it easier to set aside the time and resources necessary to doing so. Writing about comic craft in depth requires research, setting aside time during the comic creation process to document my progress, and a lot of thought, and I feel is best served through longform series such as the Intro to Comic Craft: Step By Step series. If you enjoy this series, please take a moment to share it with your friends and loved ones on the social network of your choice, leave me a G+ comment, or send me an email using the sidebar form- your feedback is important to me! If you have specific questions, please don't hesitate to ask via email.
As part of this series, my Patrons have exclusive access to behind the scenes comic creation content, including the entire plotform synopsis for 7" Kara, the 7" Kara beat sheet, the Chapter 7 Synopsis, the Chapter 7 tight script, and loads more. If you learn best from working example, joining my Patreon will give you access to those files.

You can join Kara on her adventures by ordering a copy of Volume 1 from my shop, or reading the webcomic on Tumblr or on the site.
Now that we've thumbnailed an entire chapter of comic, its time to start refining those images into a comic others will want to read. For me, the next step in my process is to create roughs, but in between traditional thumbnails and traditional roughs, I work a little digital magic.
NOTE: This post is a little bit technical, and is heavily reliant on Photoshop for image cropping, resizing, and overall color changes. I understand that not everyone uses Photoshop, or has access to Photoshop, but there are many other programs available that can handle these tasks as well. In the future, I hope to have posts that cover other programs that can handle these tasks.
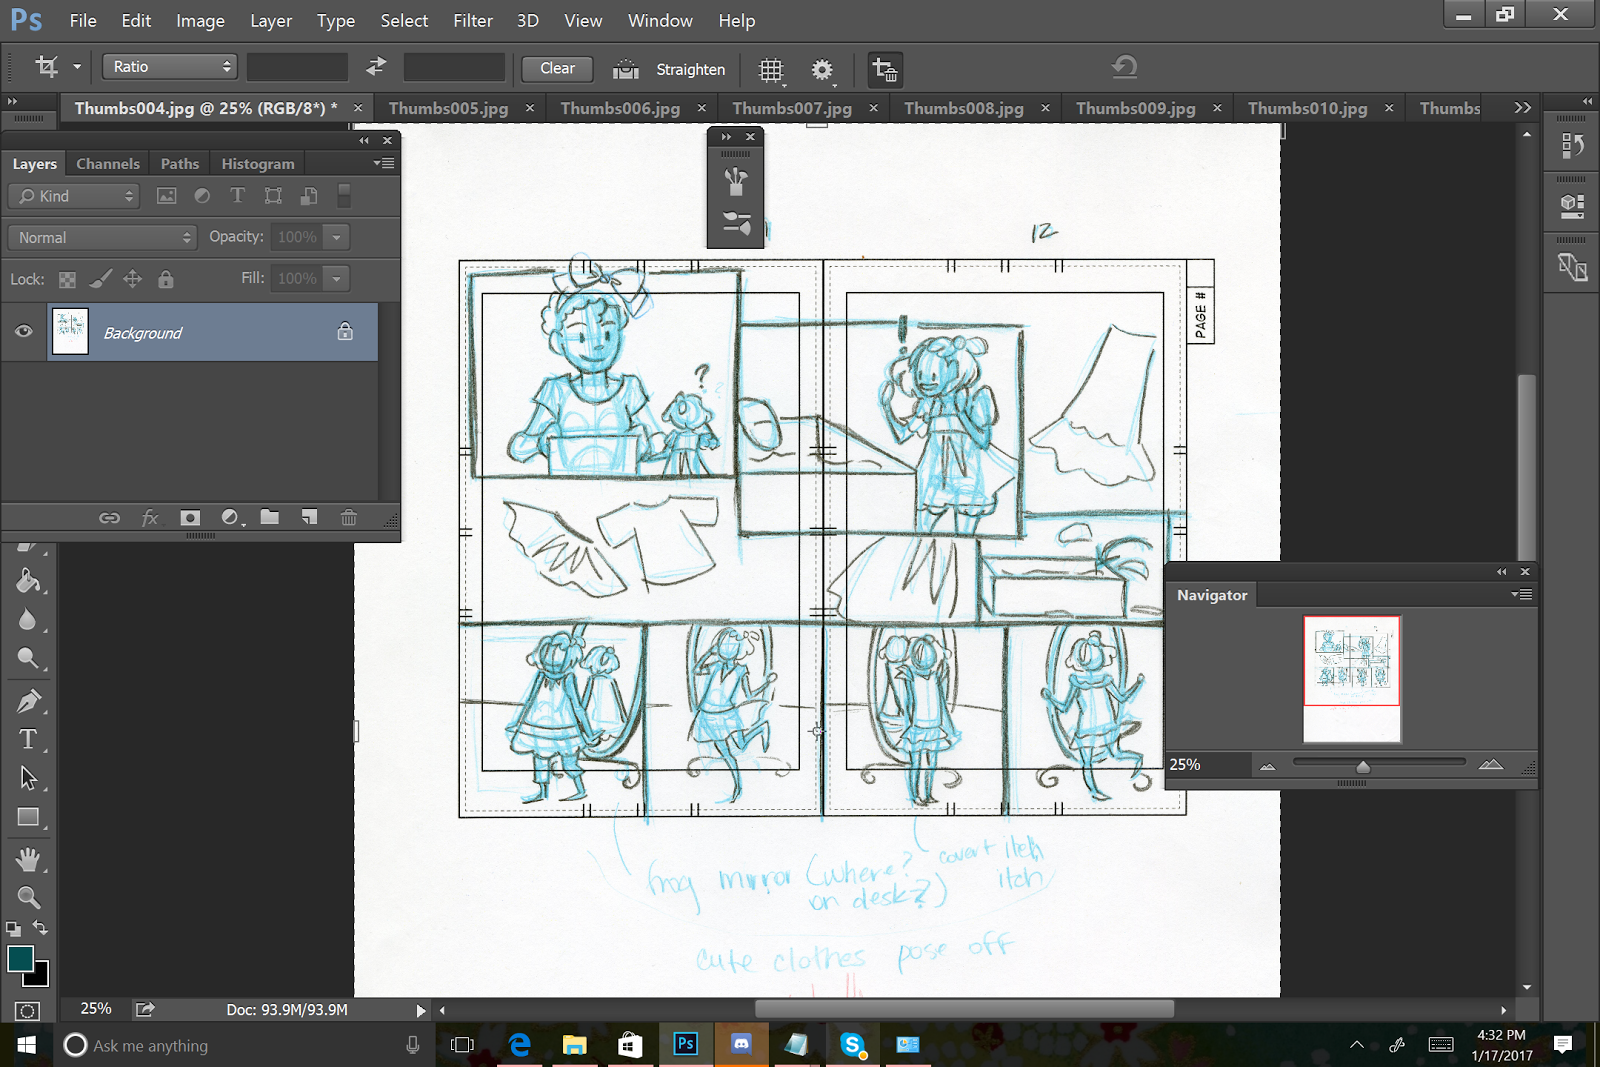
Scan Thumbnails
I scan my thumbnails at 300 DPI, in full color, but I recommend you play around with and find the settings that work best for you.


These are just a selection of the thumbnails from Chapter 7 of 7" Kara.
Once I've scanned all my thumbnails, I can send these off to my friends in computer land for revisions and editing suggestions. This step is a huge opportunity for revision and improvement, as they've read the script (so they know what I'm aiming for)
Patreon backers have access to all thumbnails from Chapter 7 (including correction notes), but access to all of Chapter 6, from script to painted pages. If you're interested in seeing how thumbnails progress on to finished pages, consider becoming a Patreon backer, so you can access these files.
Trim Individual Pages from whole, resize to 6"x9", save as individual pages


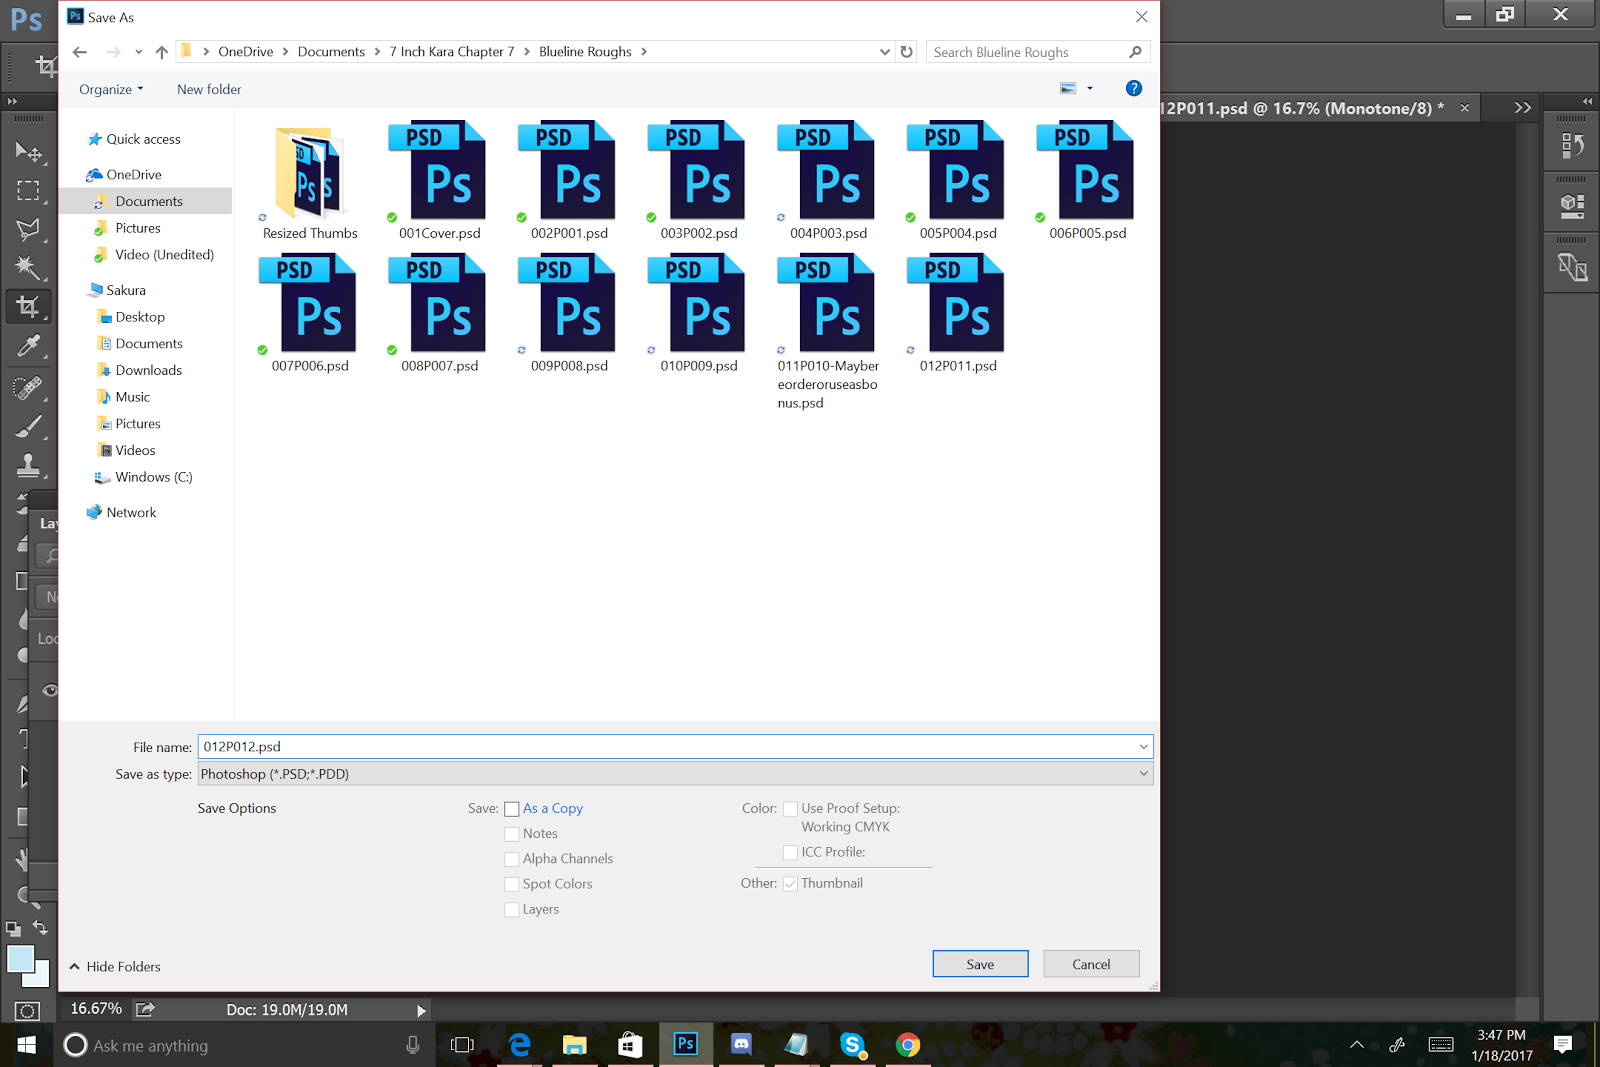
I save my roughs (in this case, proto-roughs) in a seperate folder, and I use a specific naming scheme.
001Cover (first scan, cover)
002P001 (second scan, first page of chapter)
For double page spreads


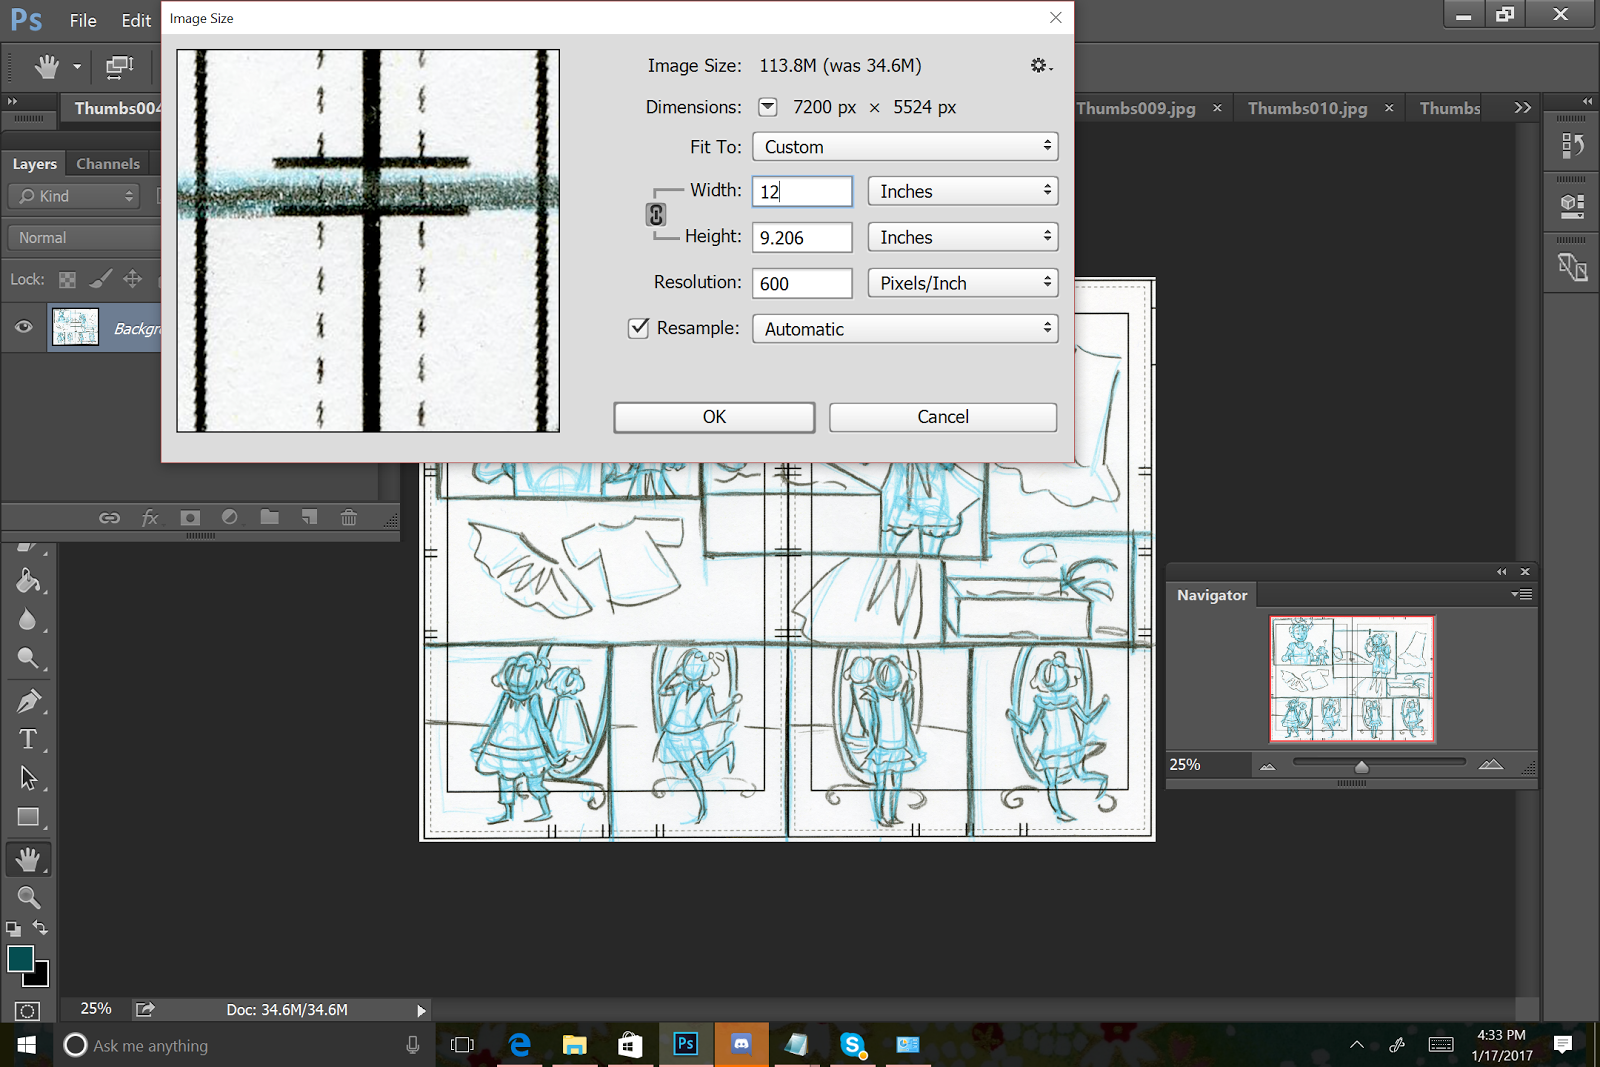
At this point, I'm just prepping the files, I haven't made significant corrections yet, so I want my spreads to remain whole. This means, I need to accommodate the two adjacent pages when resizing.
I resize for 12x9 for double page spreads that have not been separated.

The file is then saved as SCANNUMBERP(pagenumber)-(pagenumber)
Ex: 004P3-4
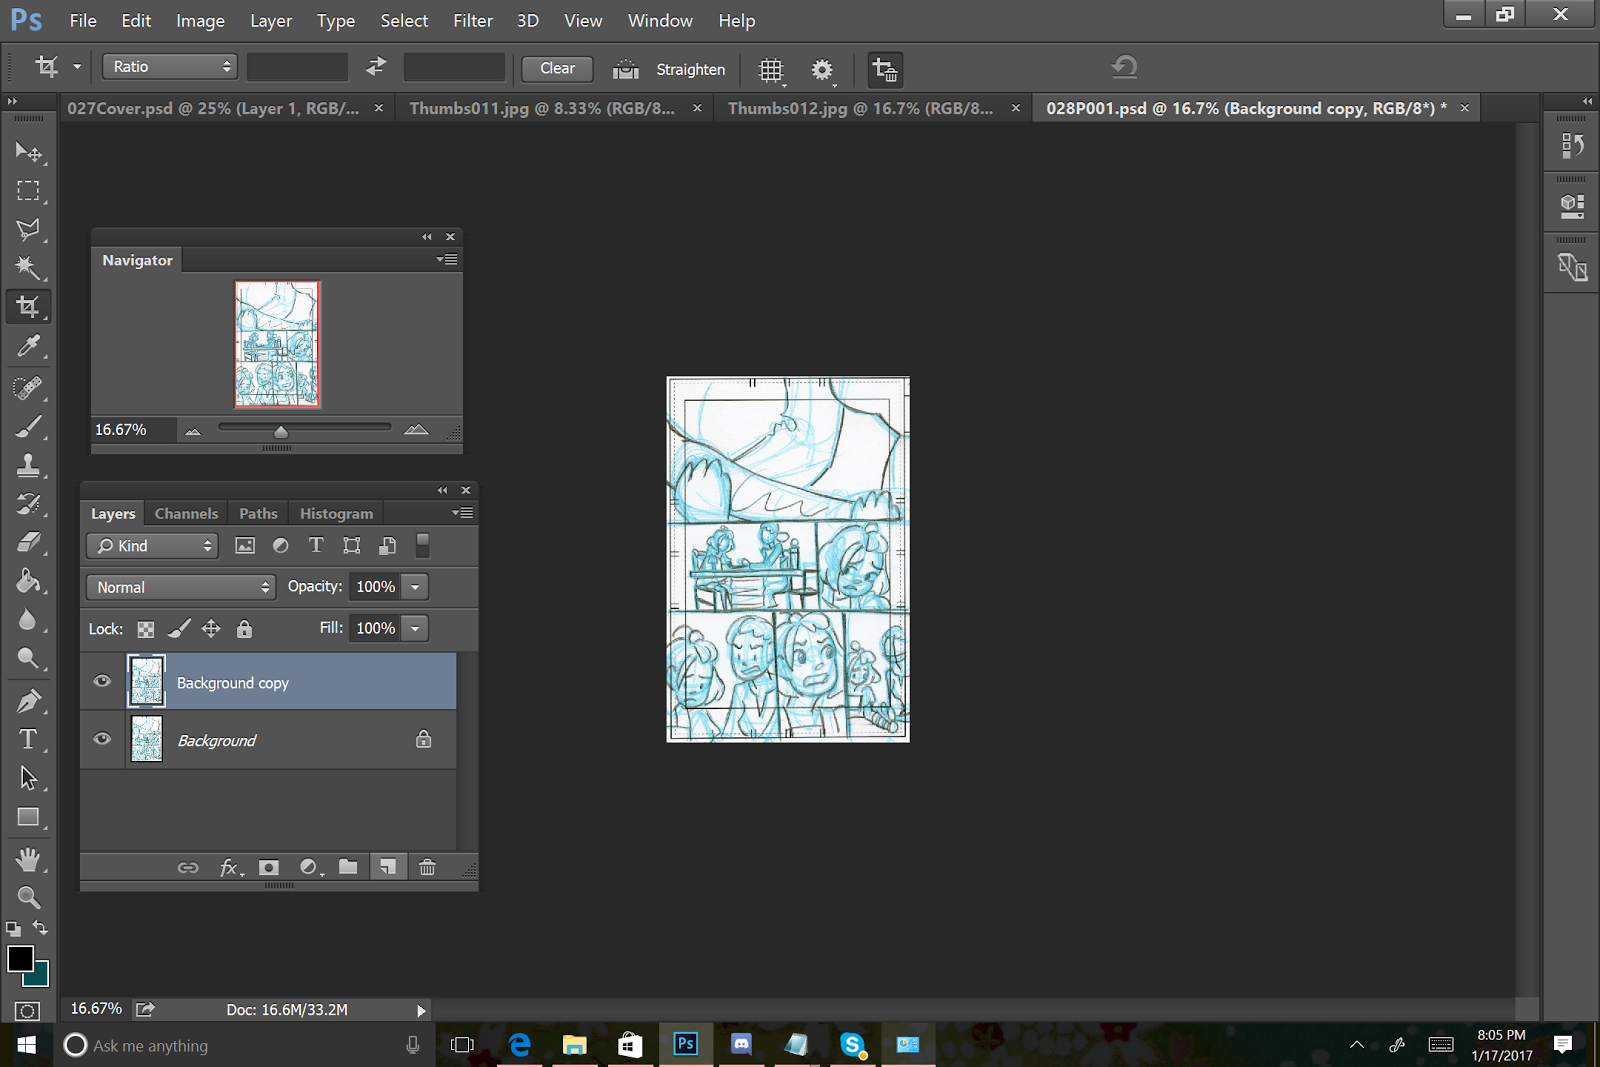
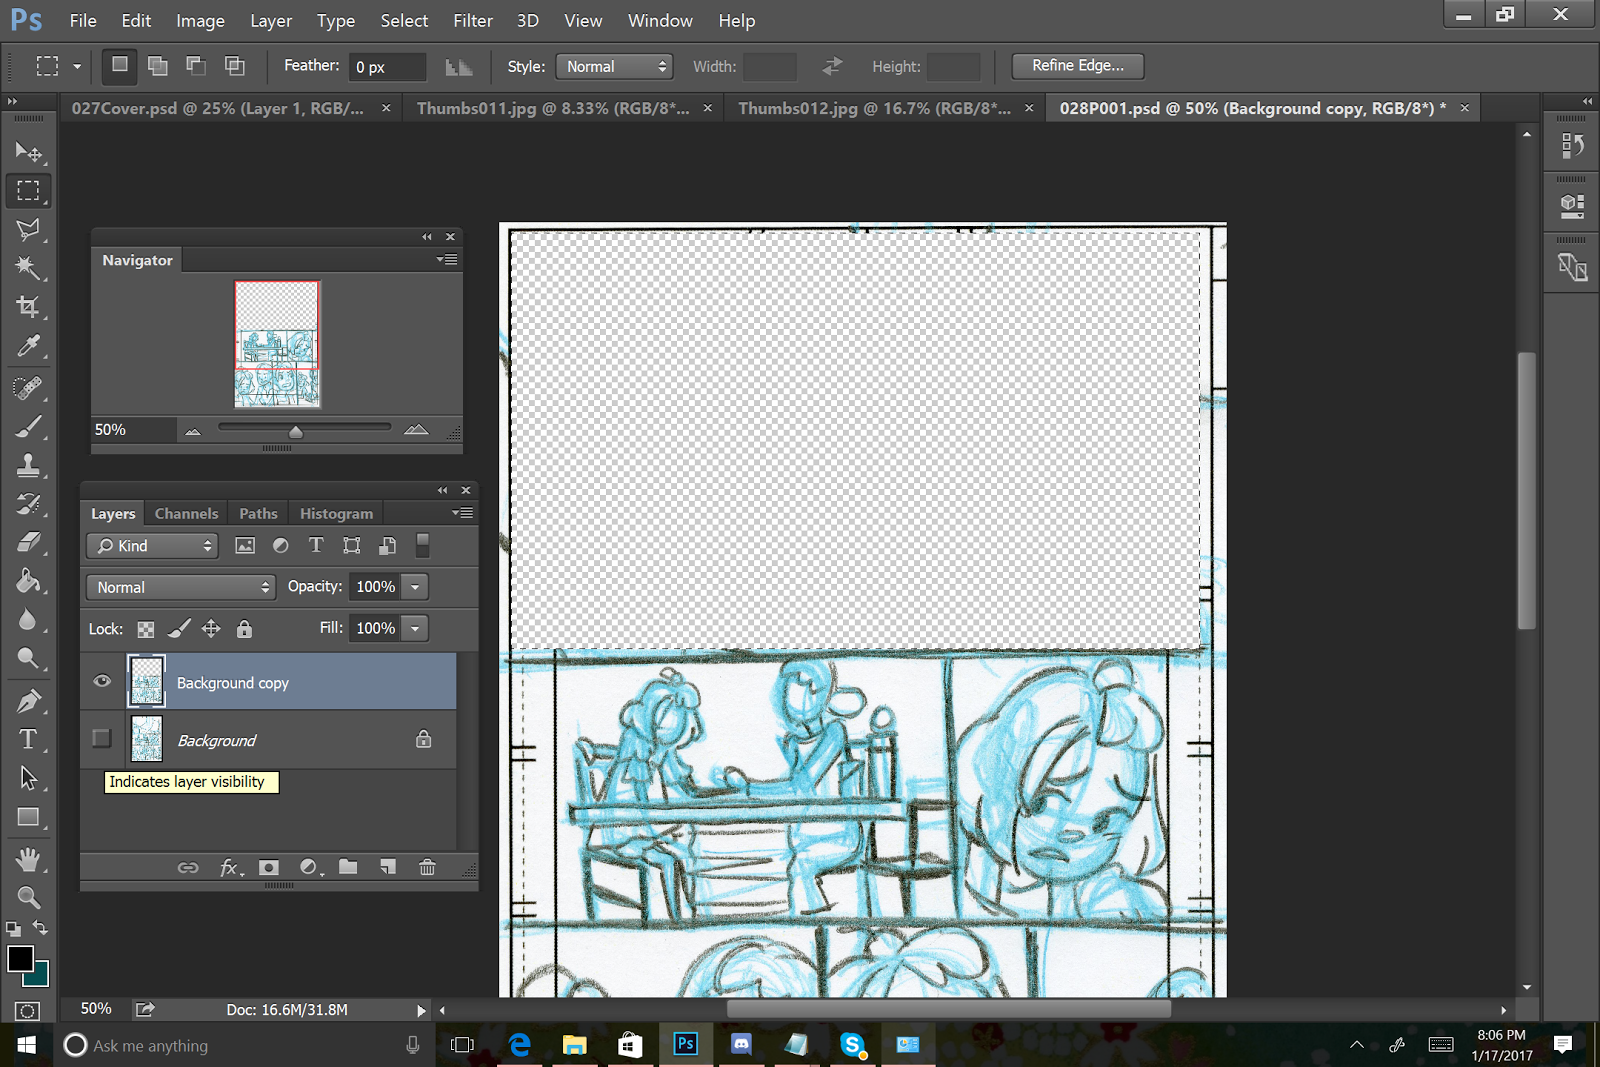
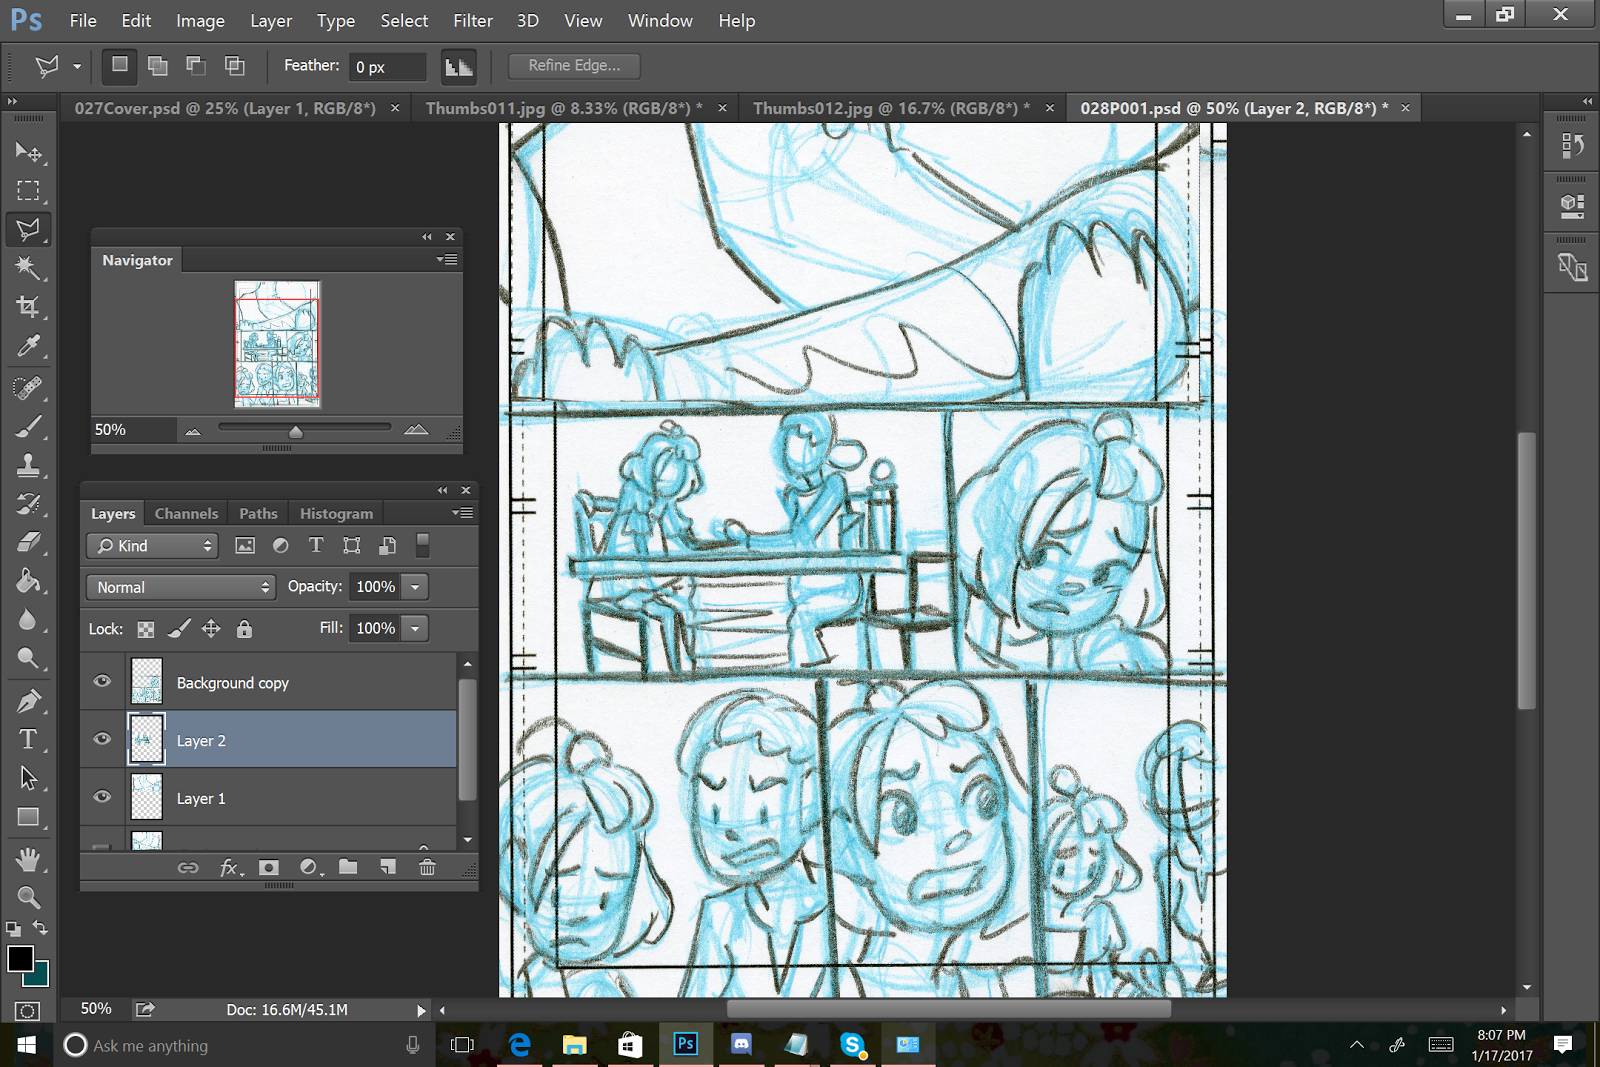
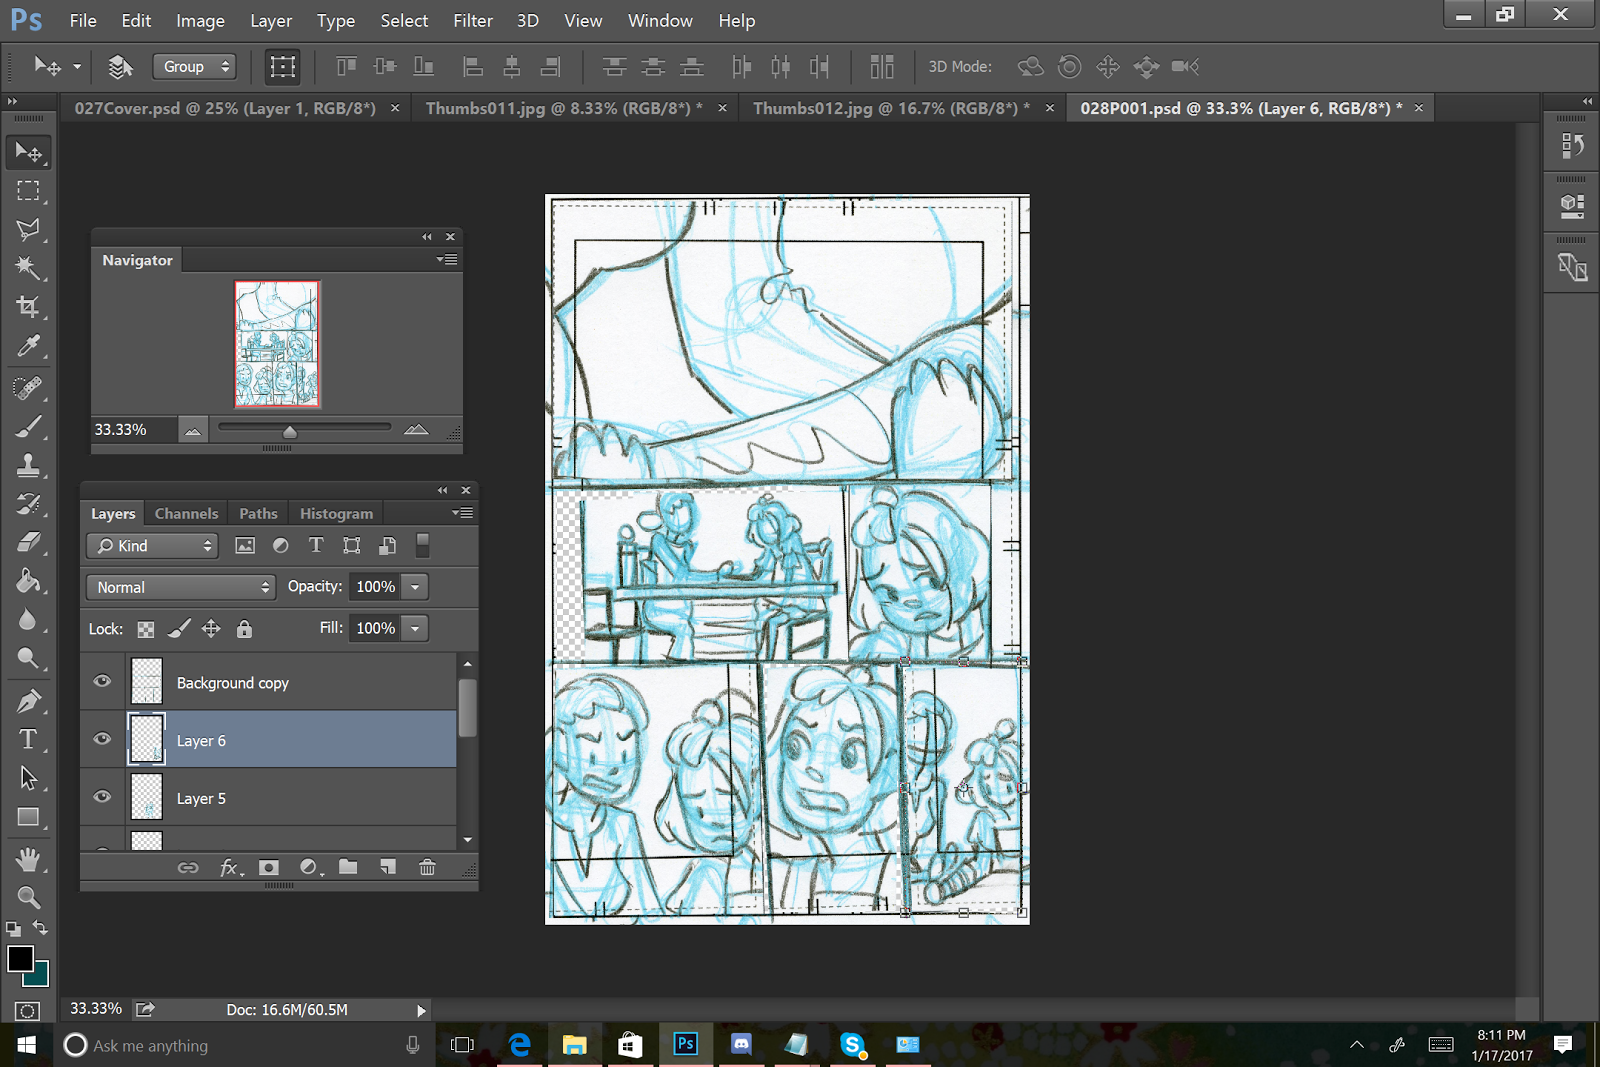
Resizing Images that Extend Past Page Borders
For some thumbails, I continued the gesture past the page borders, knowing that I might opt to resize for roughs.

I select the artwork that I want to resize, trying to leave the panel borders undisturbed.

And I resize while holding down Shift, which keeps elements in proportion as they shrink.

The panels are then drawn with the brush tool for my reference.
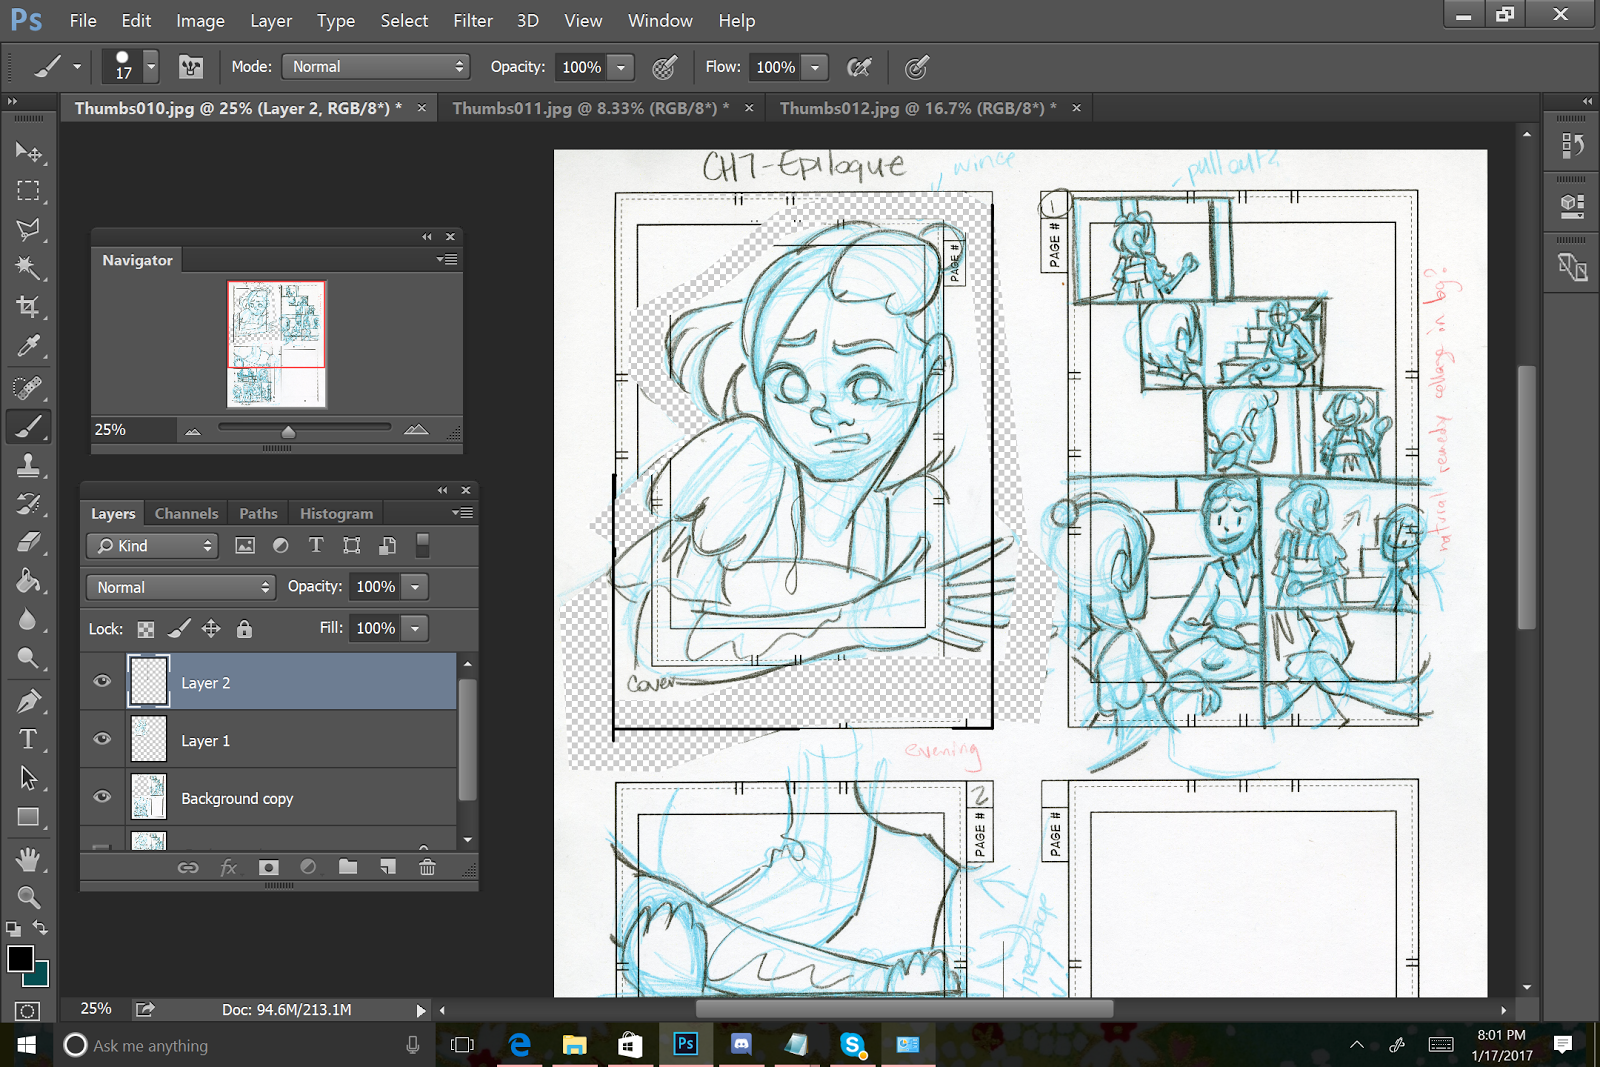
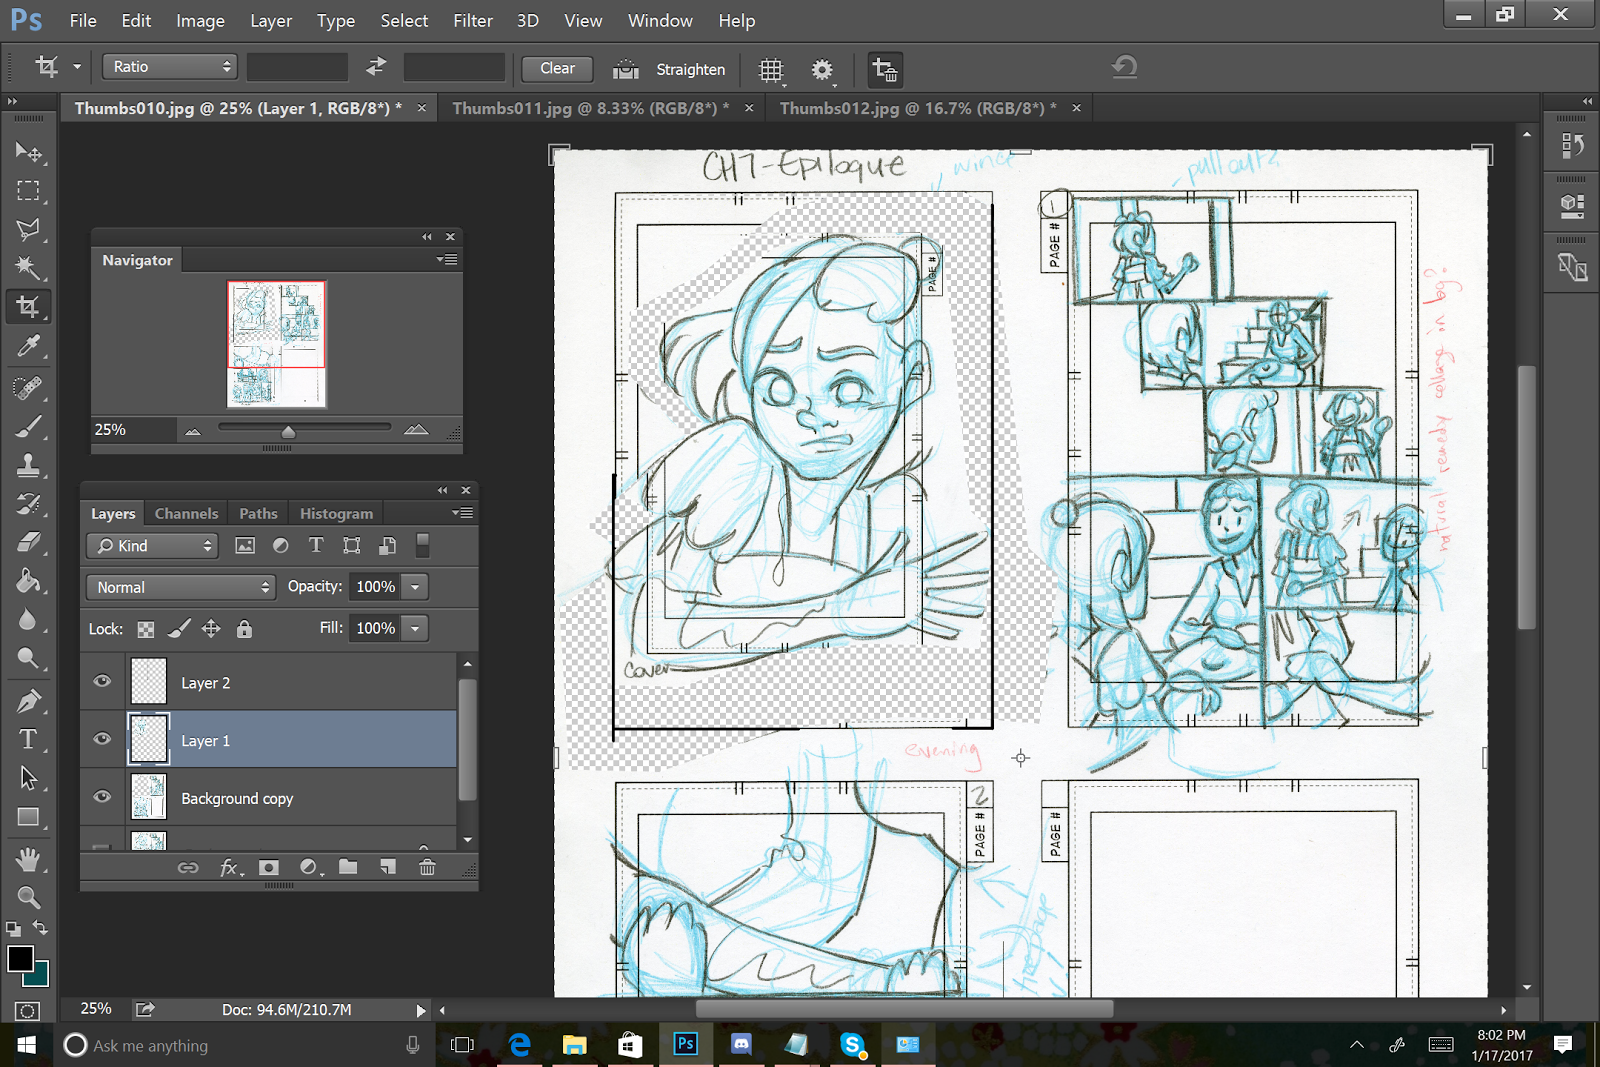
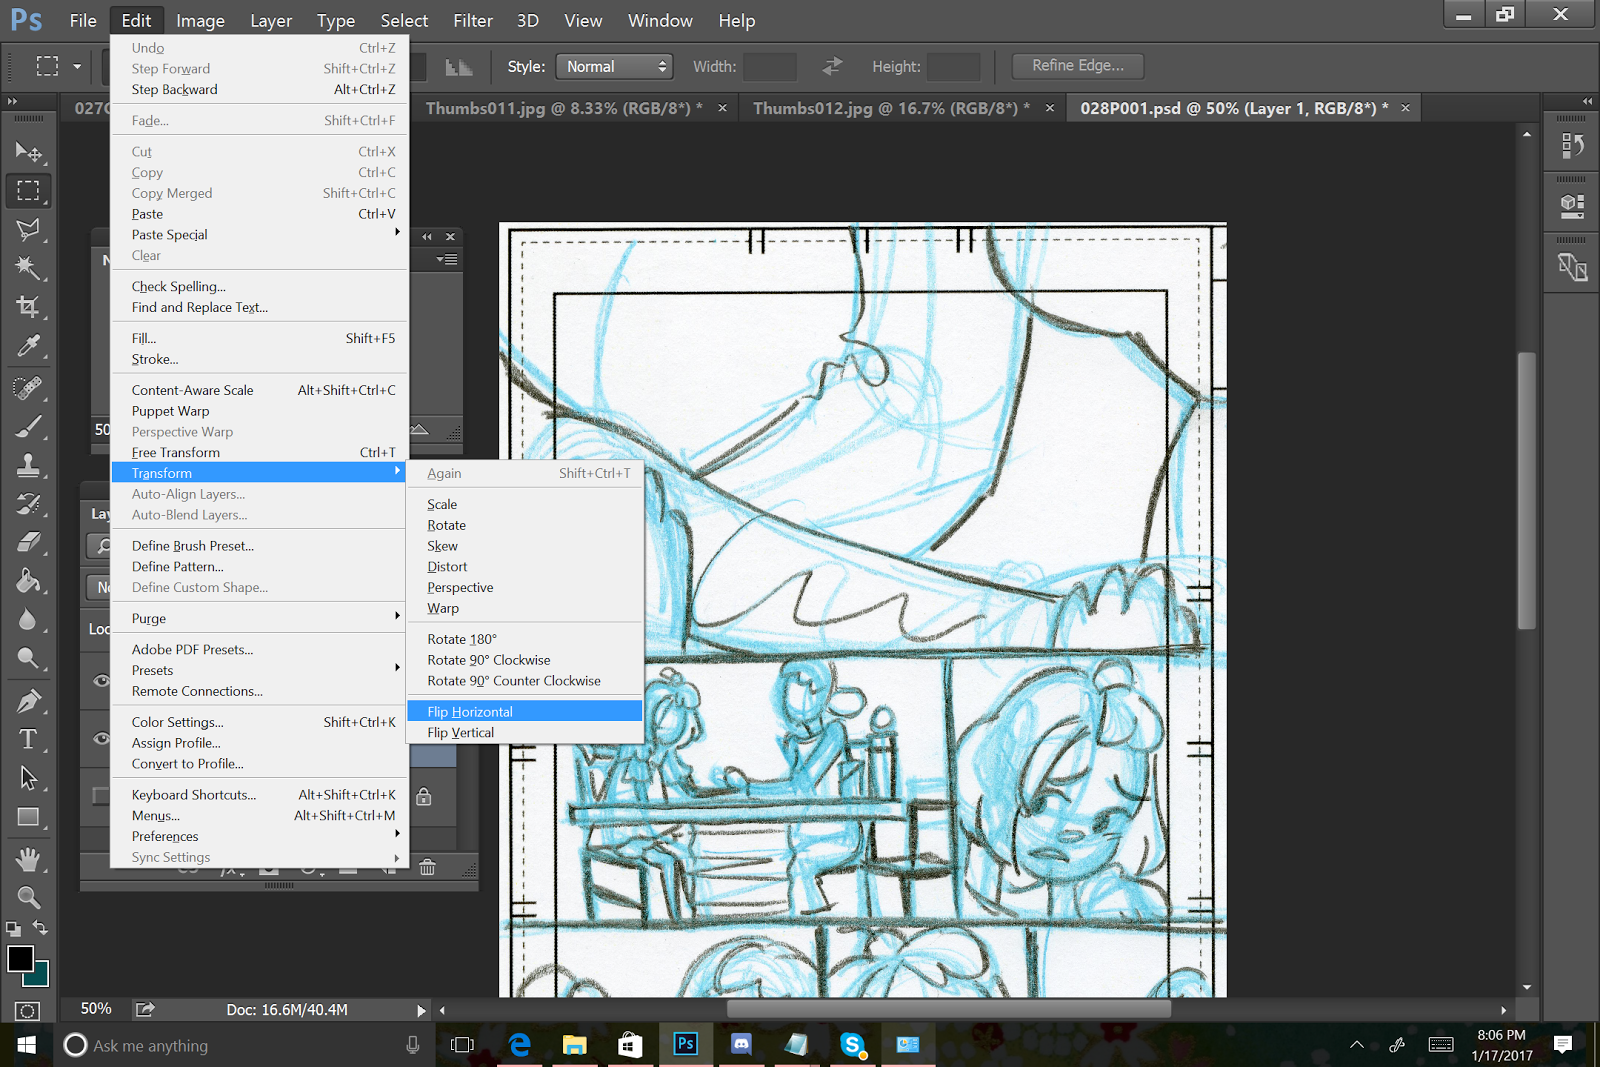
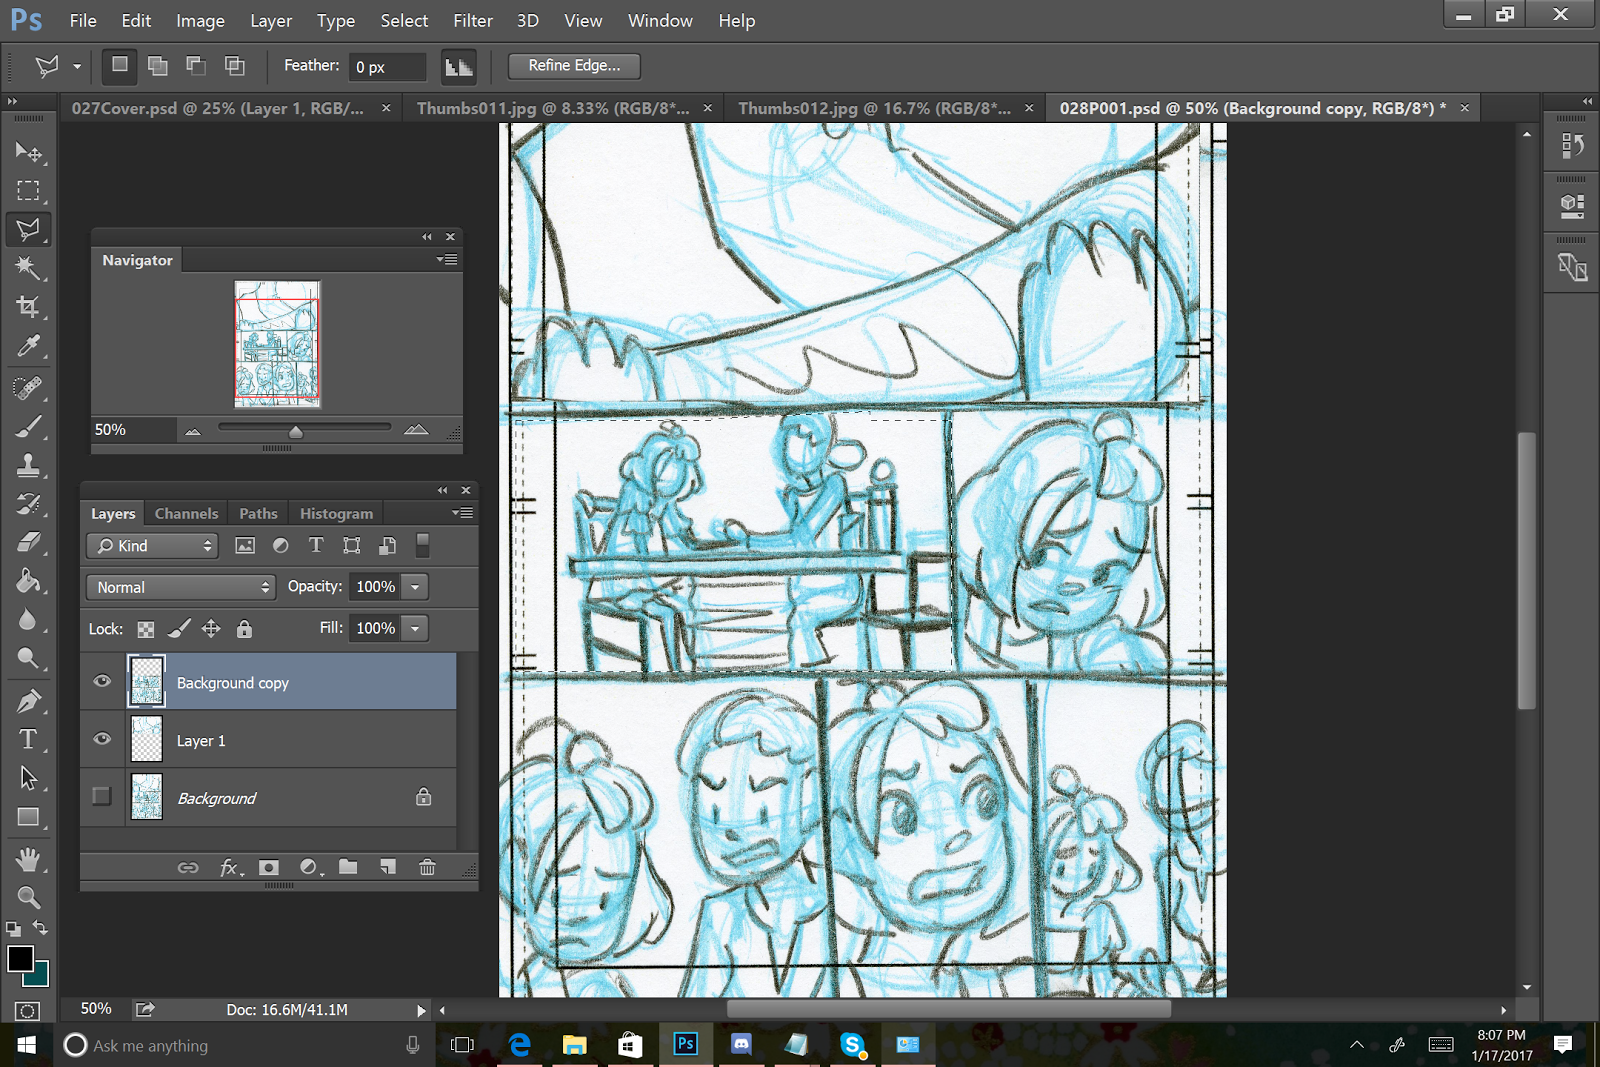
Flipping Panels without Flipping the Page
Sometimes panels need to be flipped for storytelling and continuity purposes. This is fairly easy to do.

S

I make a copy of the base page.

I select the panel I wish to flip using the rectangular marquee tool.

I cut it out of the page using copy and delete.

Paste that panel onto a new layer, beneath my page (the copied page creates a 'frame')

Go to Edit: Transform: Flip Horizontal

And continue this method for any other panels that need to be flipped.


The finished page:

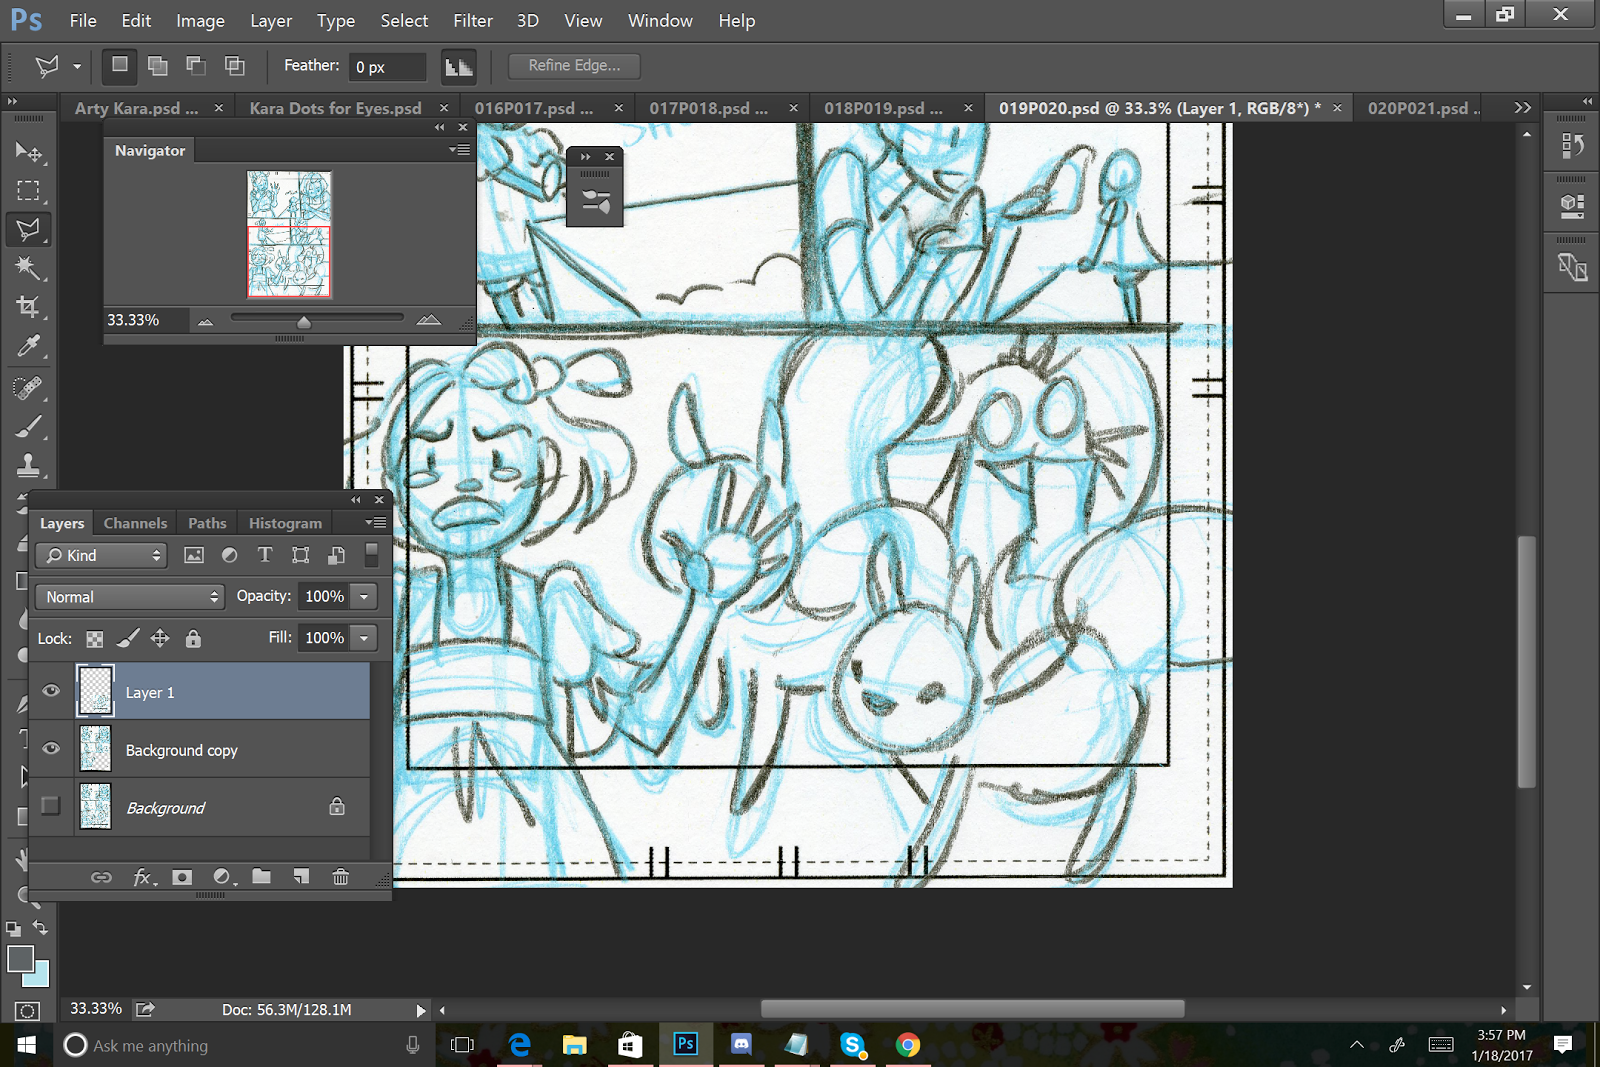
Making Necessary Corrections
Your thumbnails are really just a guide for how you want your comic to look, feel, and progress. They aren't a finished product, and shouldn't remain static- they're yours to change! Making changes digitally is faster than redrawing thumbnails over and over again.

In this panel, I want the squirrels to move towards the right, to the outside of the page.

So I cut them out using the method described above (copy, then delete)
 Paste them onto their own layer

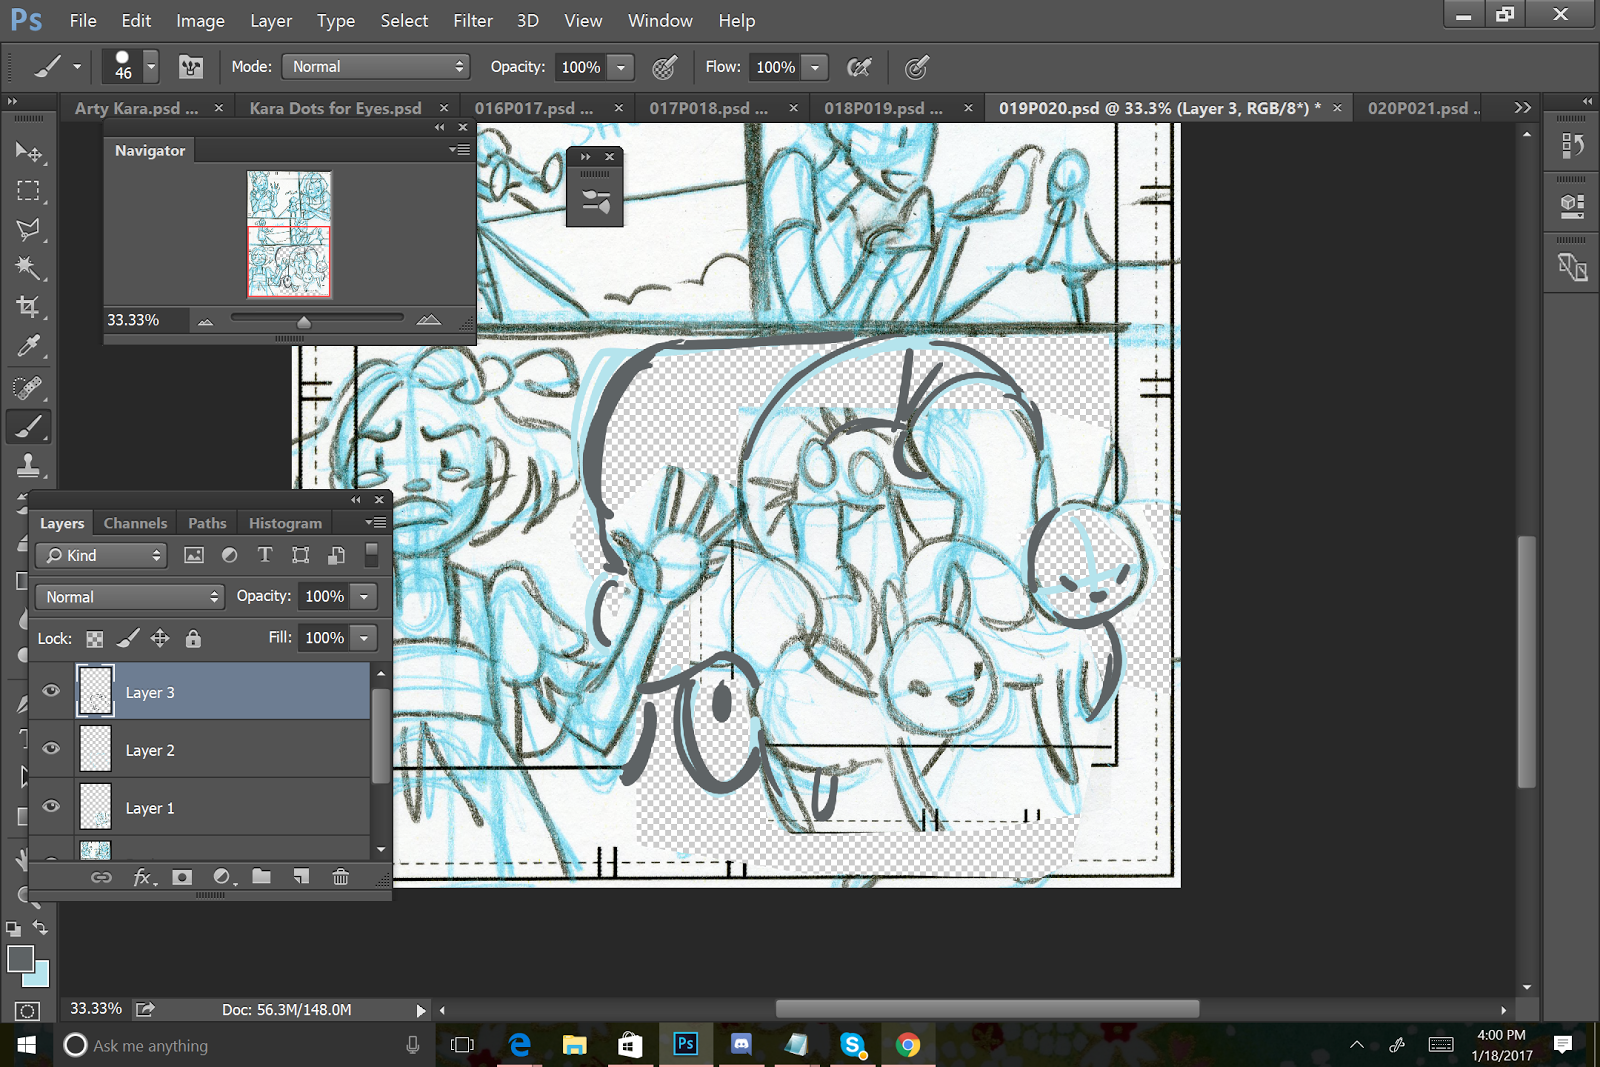
Turn my other layers off, so only the squirrels remain, and use edit/transform/horizontal flip to flip the squirrels to the other direction.

They're also a bit too large, so I go ahead and resize them.

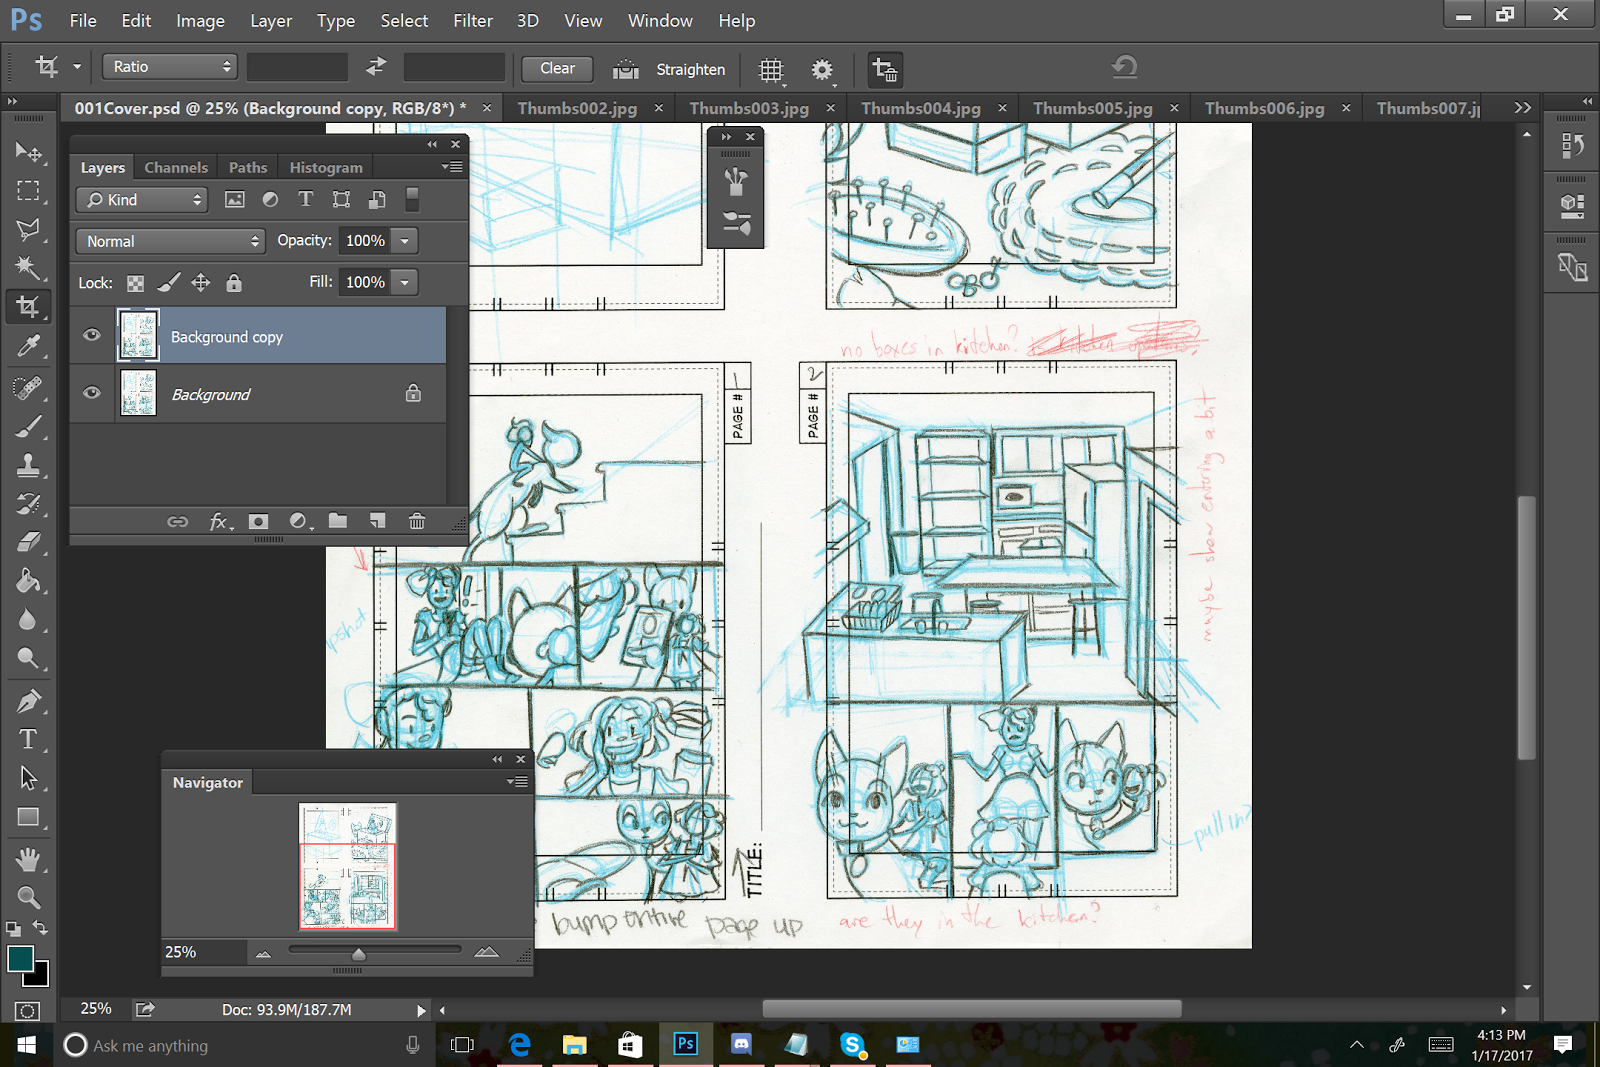
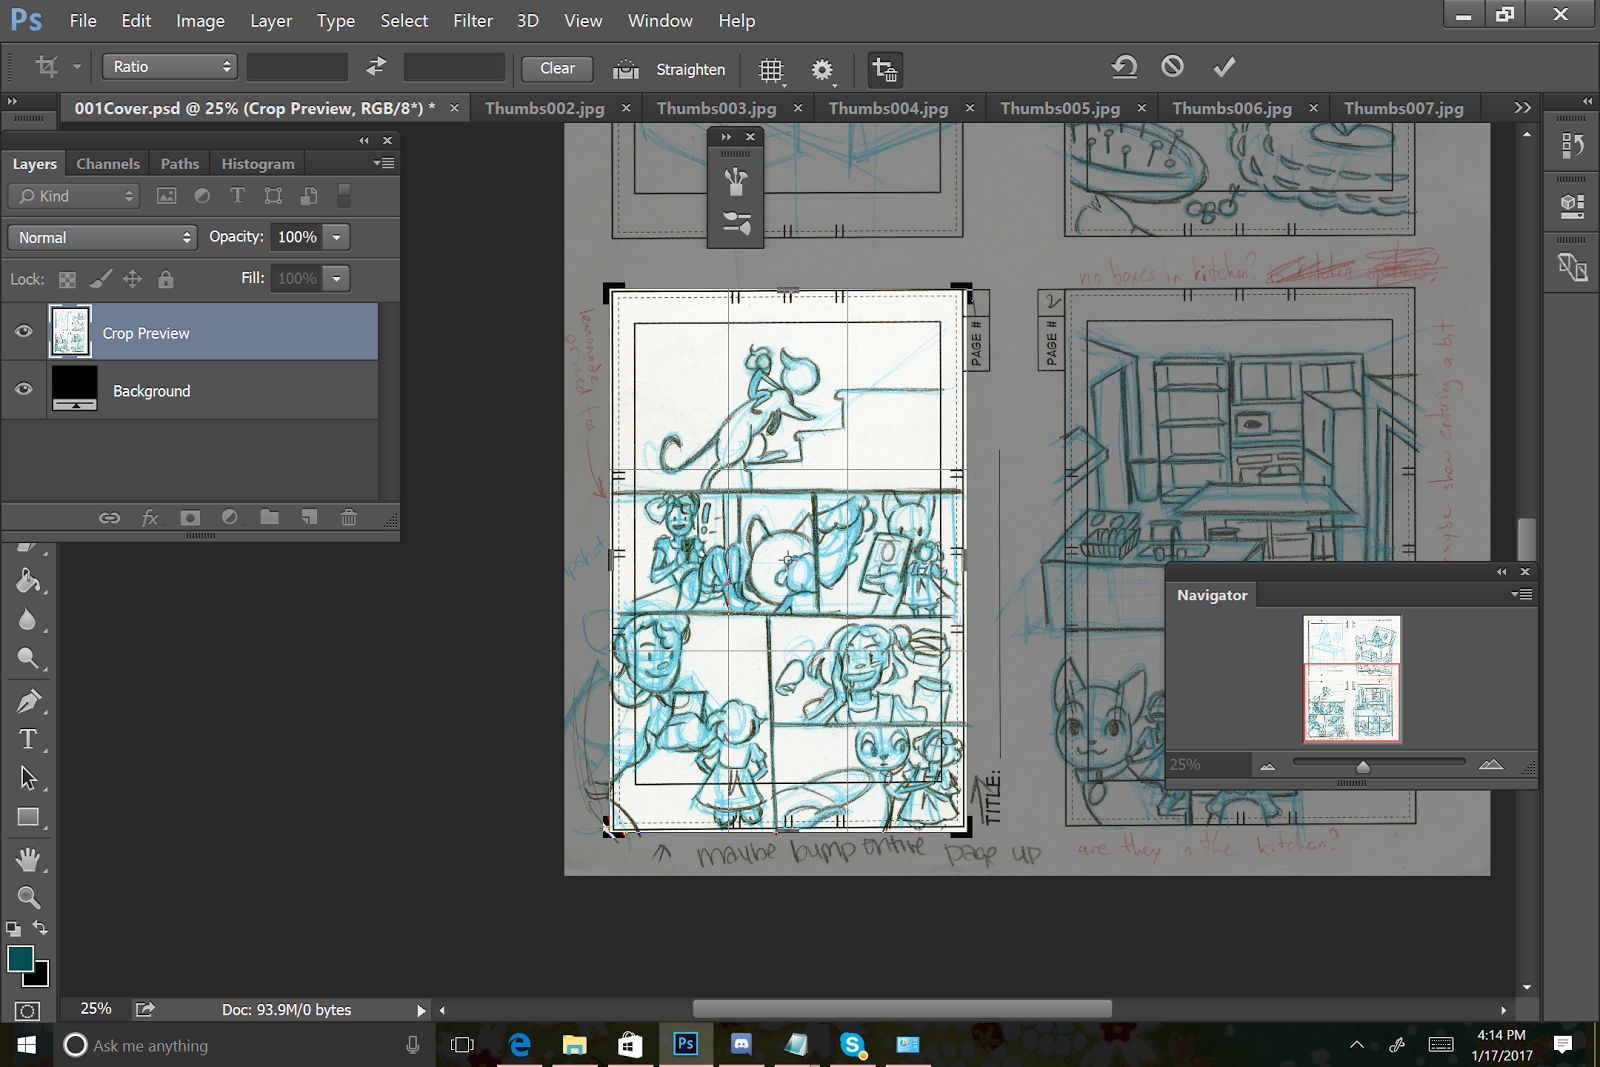
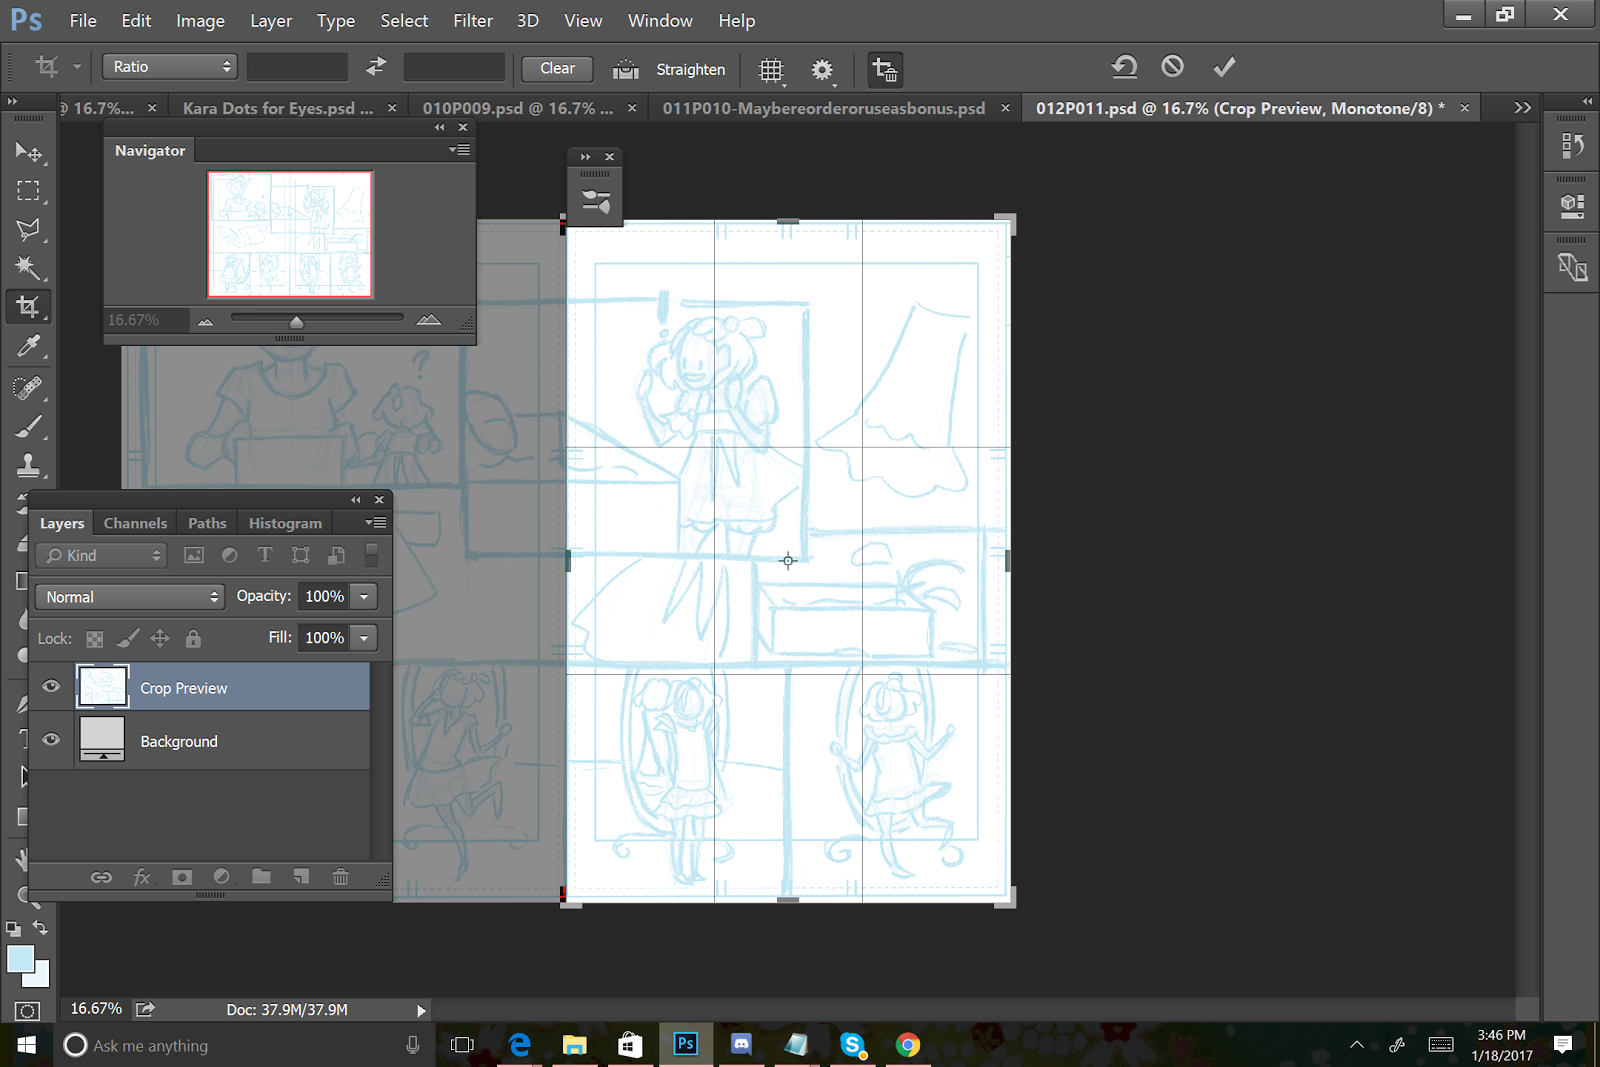
Split Up Spreads
For printing purposes, I prefer to split my spreads onto two pages- but if you're using a large format printer, and have legal-size sheets of copier paper, you can opt to keep your spreads together.
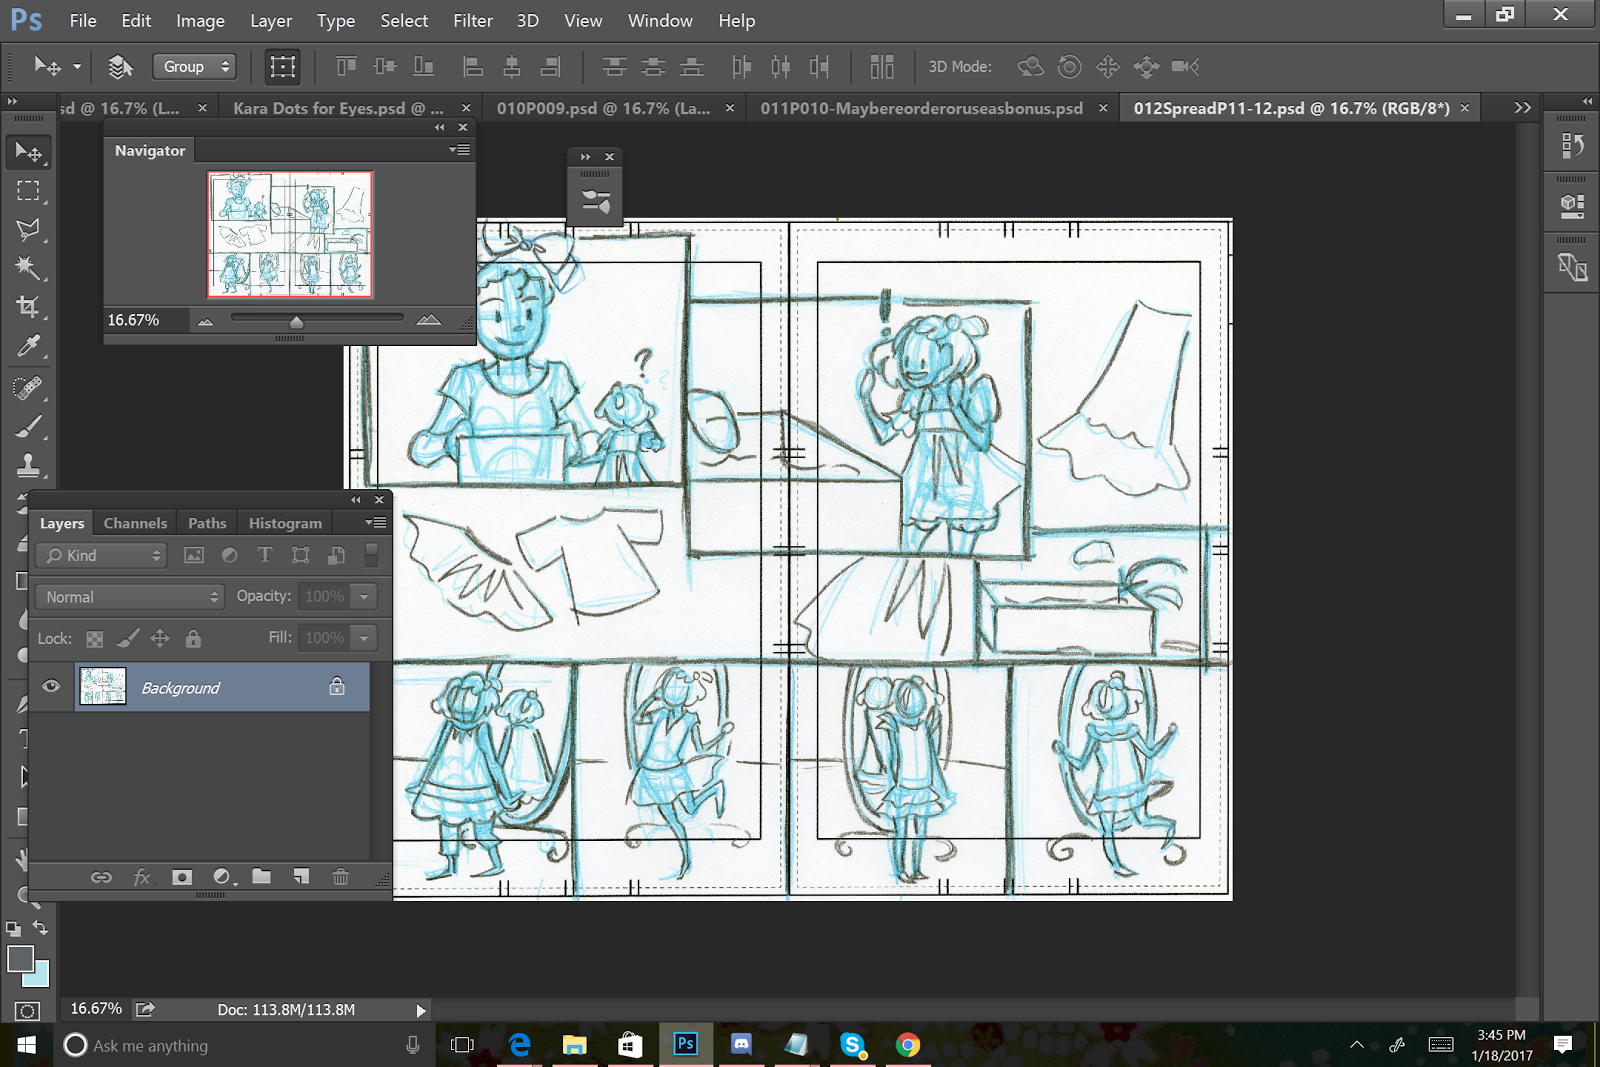
Splitting spreads is easy! I use the crop tool, and simply crop each page after converting the whole spread to bluelines (covered later in this post, fear not!).


Each spread page is saved individually at this point.
To get back to my spread, I just hit undo a couple times, until the spread is on the screen again, and repeat the process for the other page.


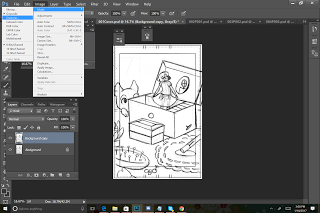
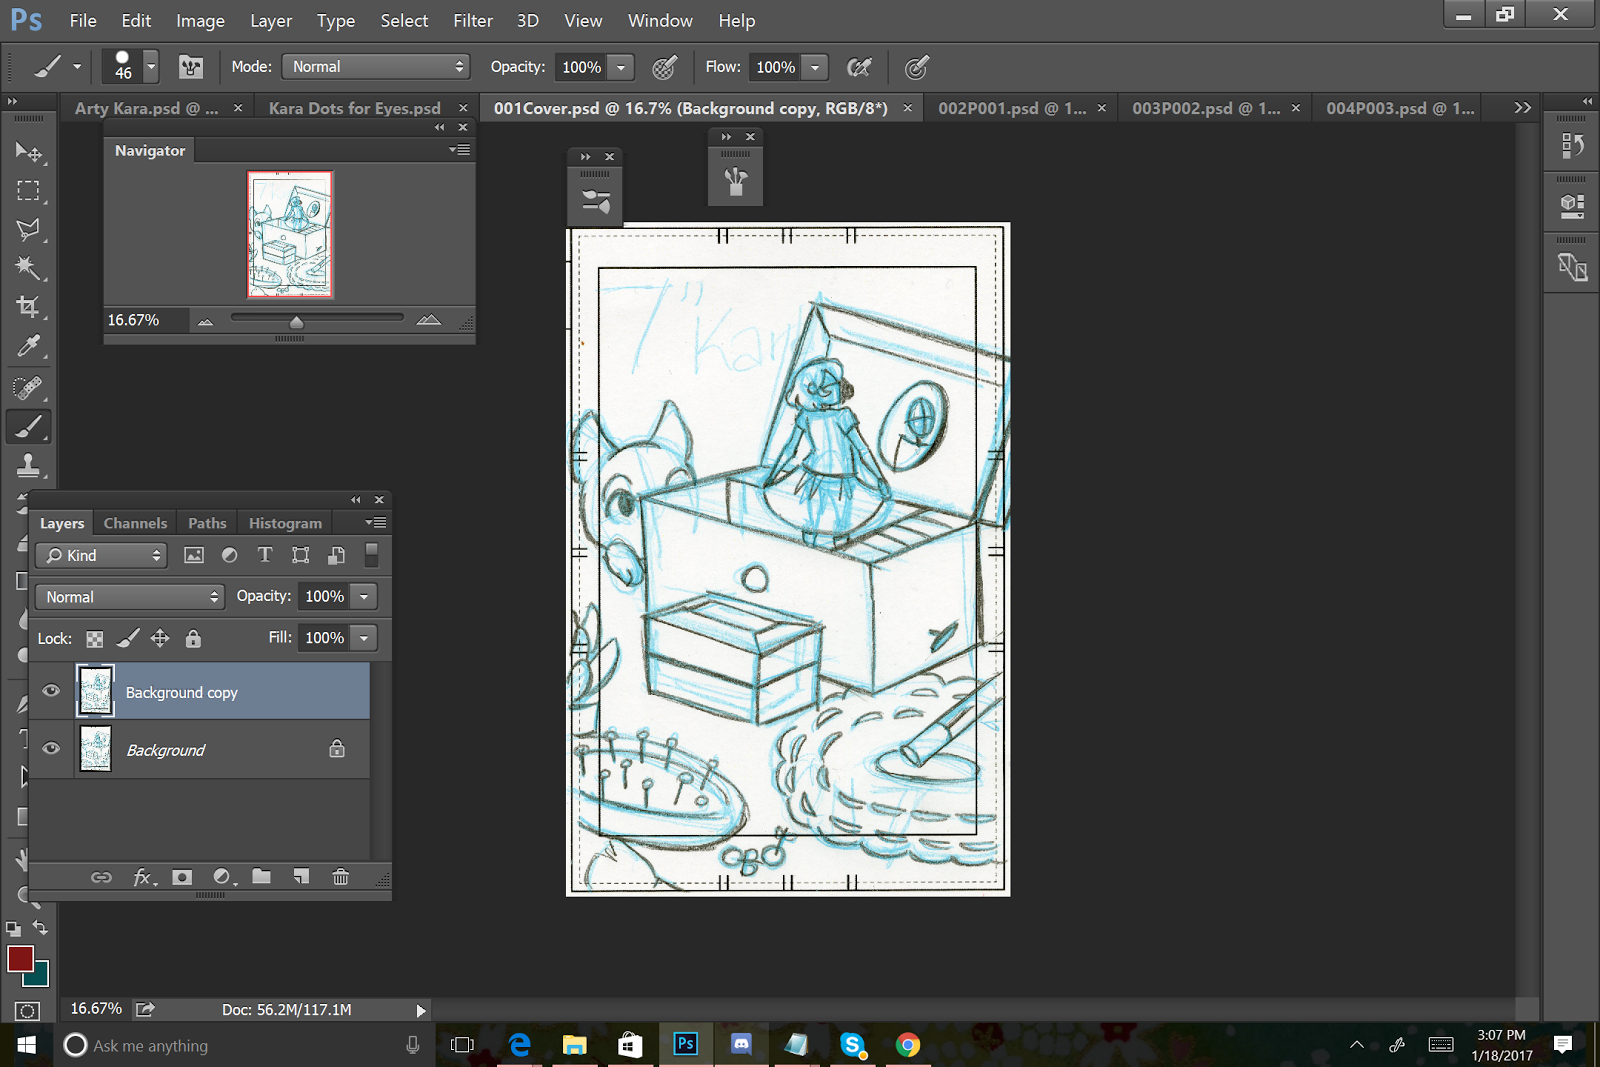
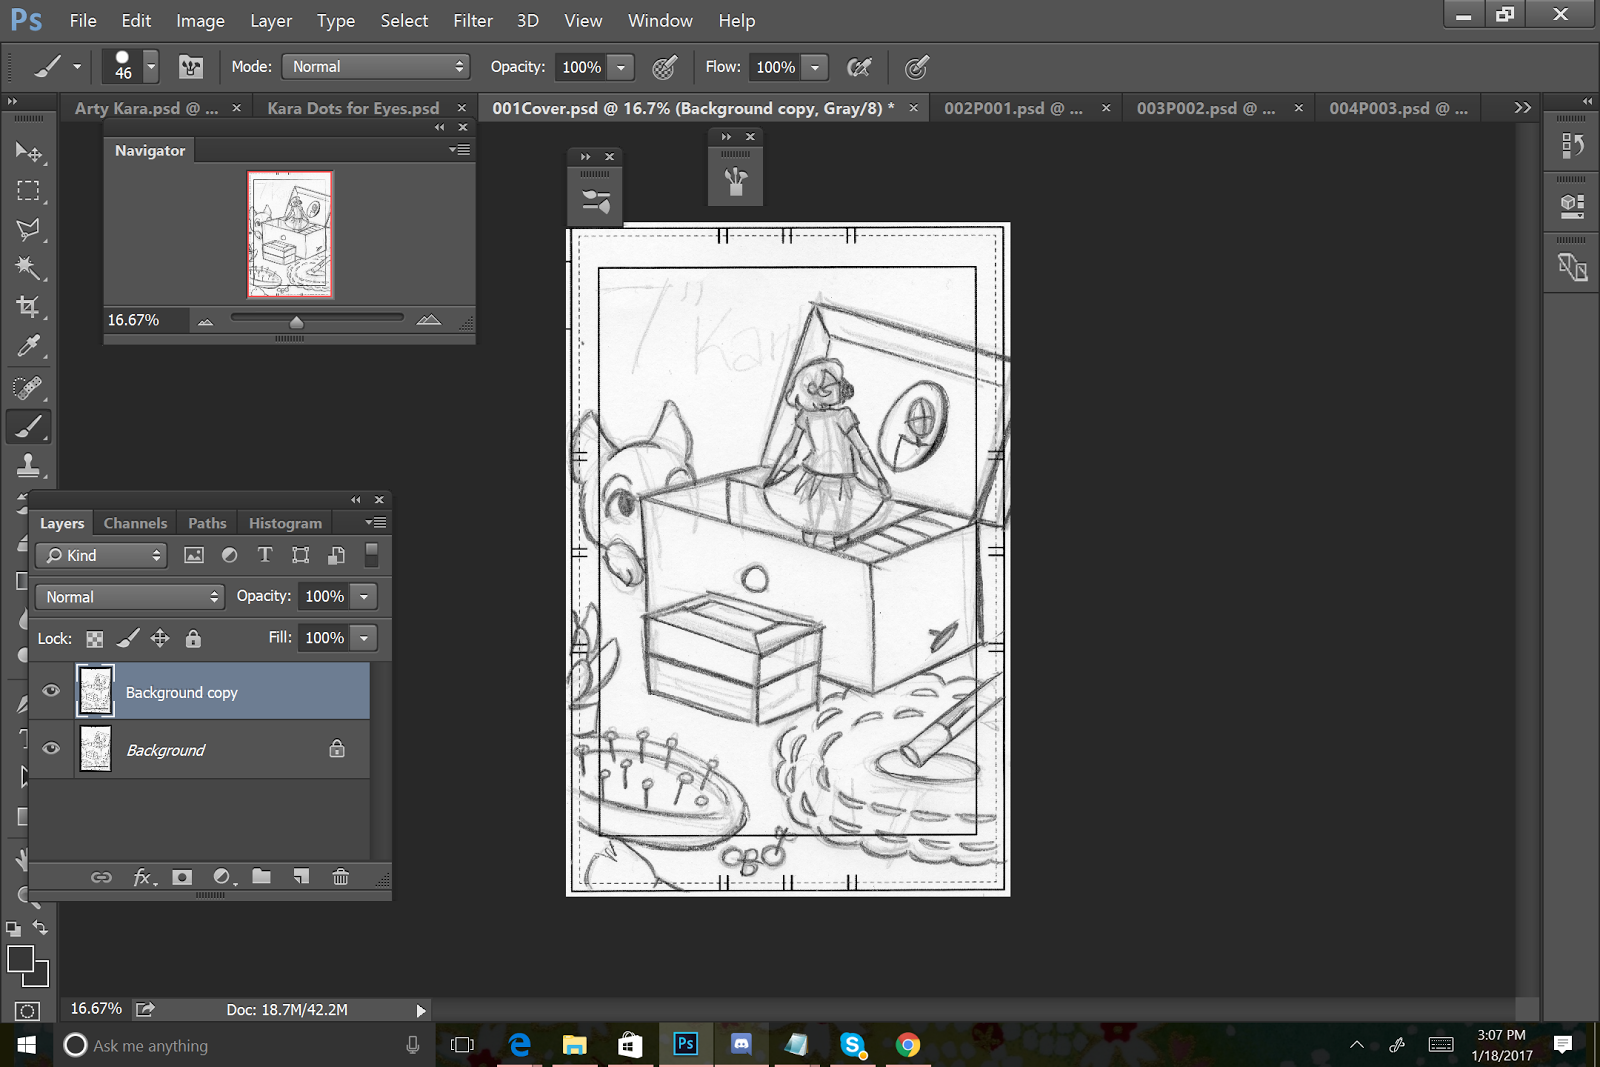
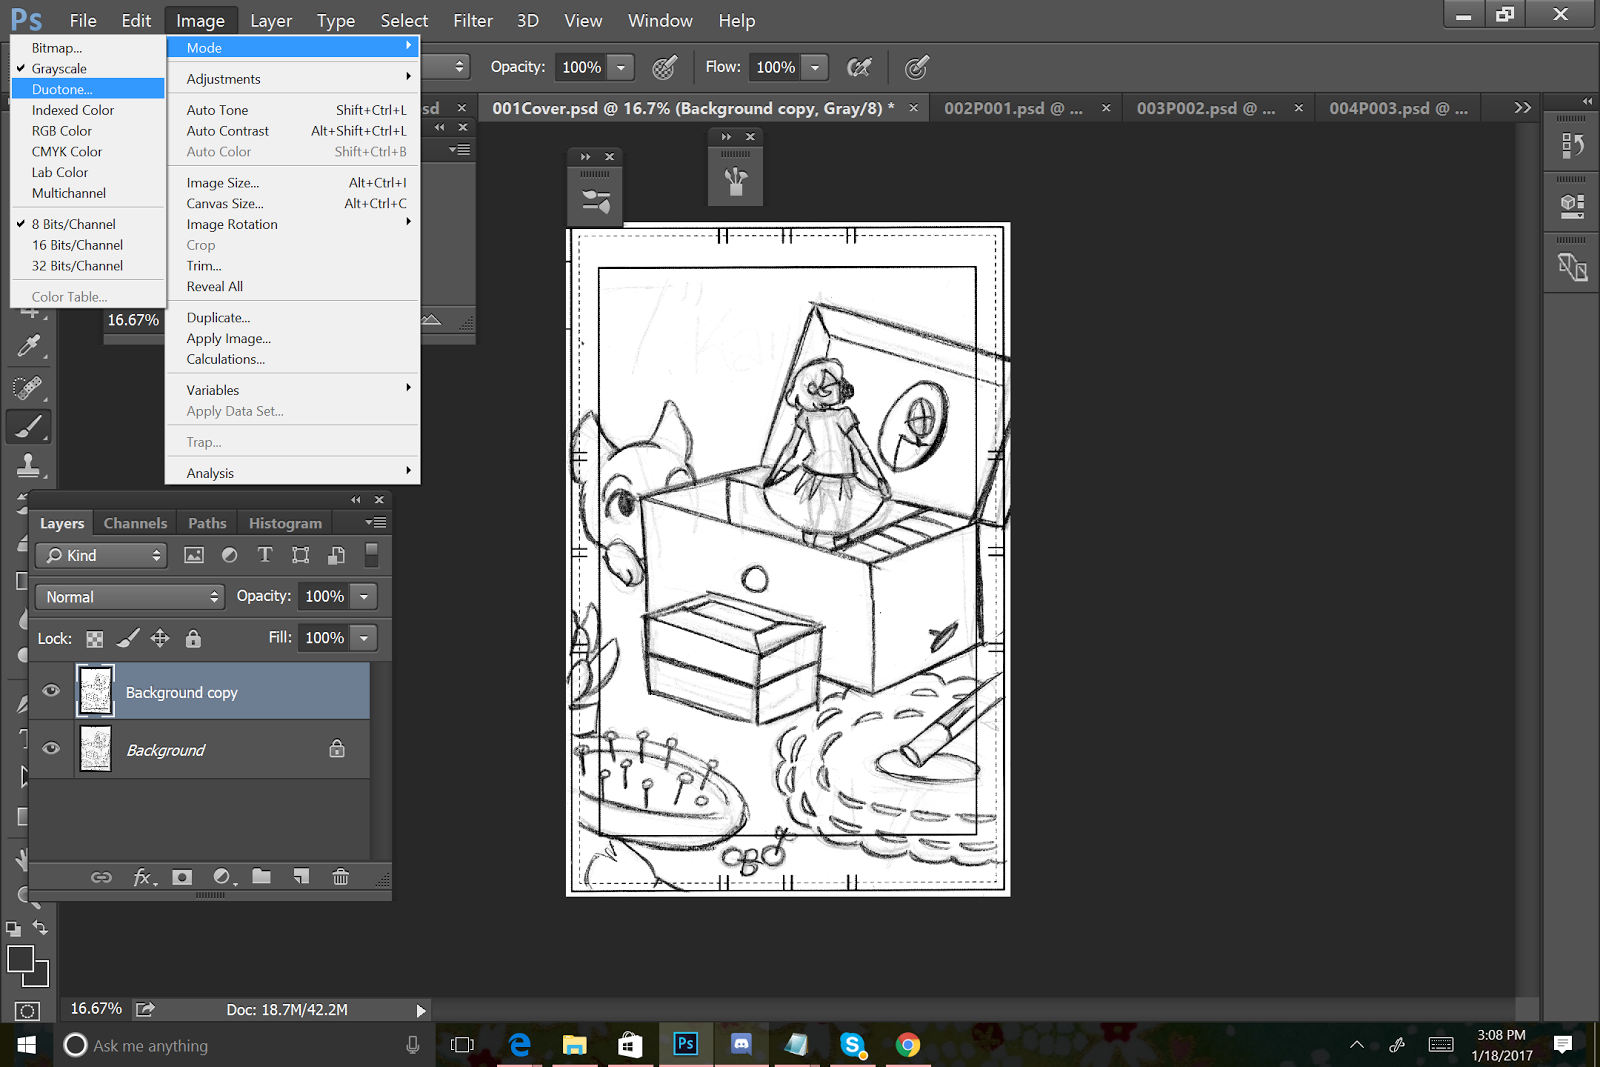
Convert thumbnails to grayscale


Go to: Image/Adjustments/Grayscale
When it asks about discarding coloring information, select ok.

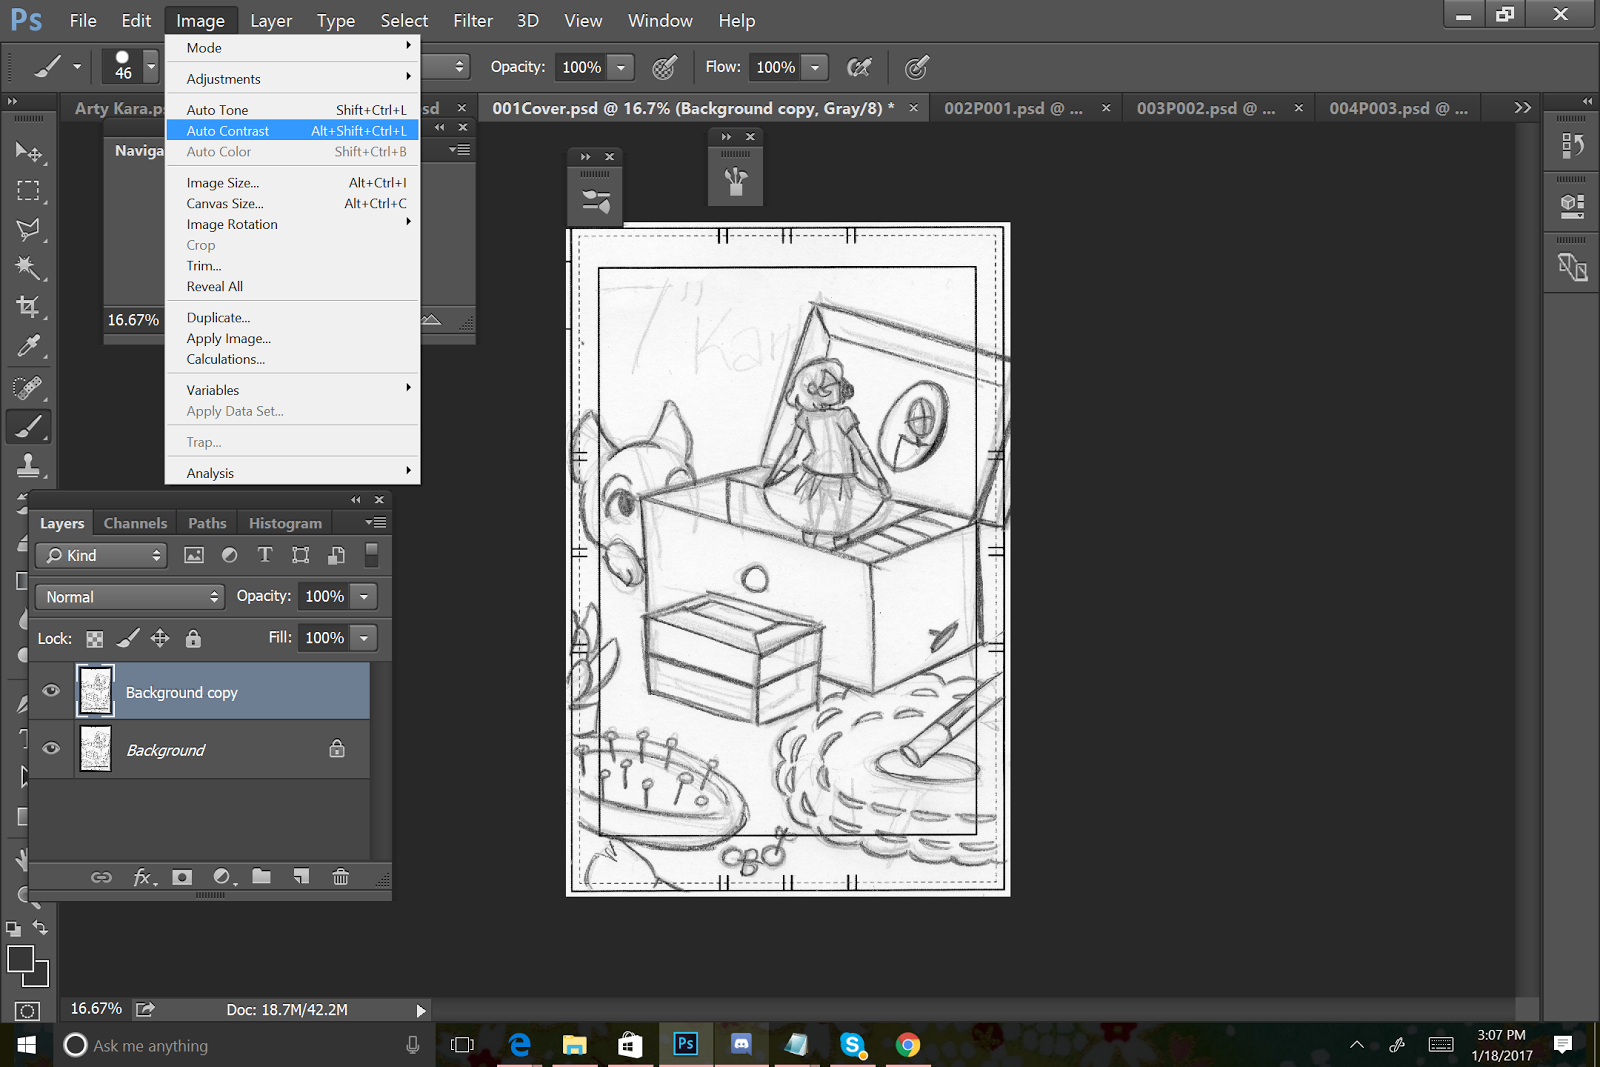
For minor bumps in contrast:
Image/AutoContrast


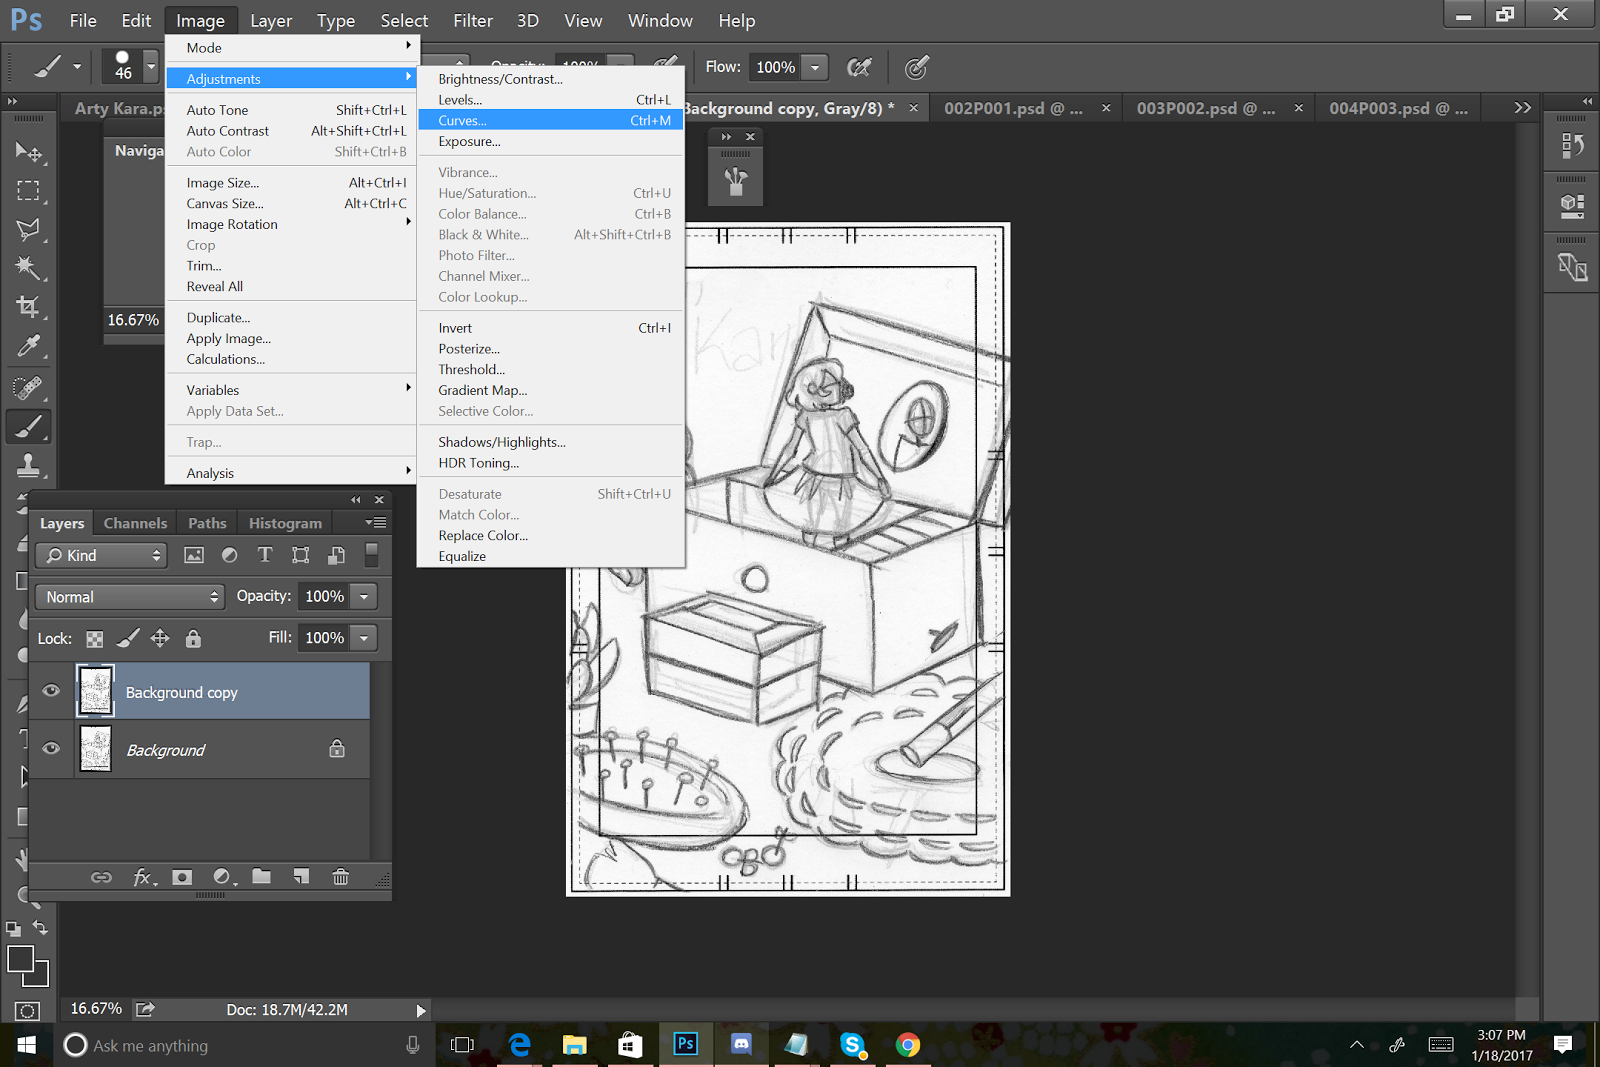
Bump Up Contrast
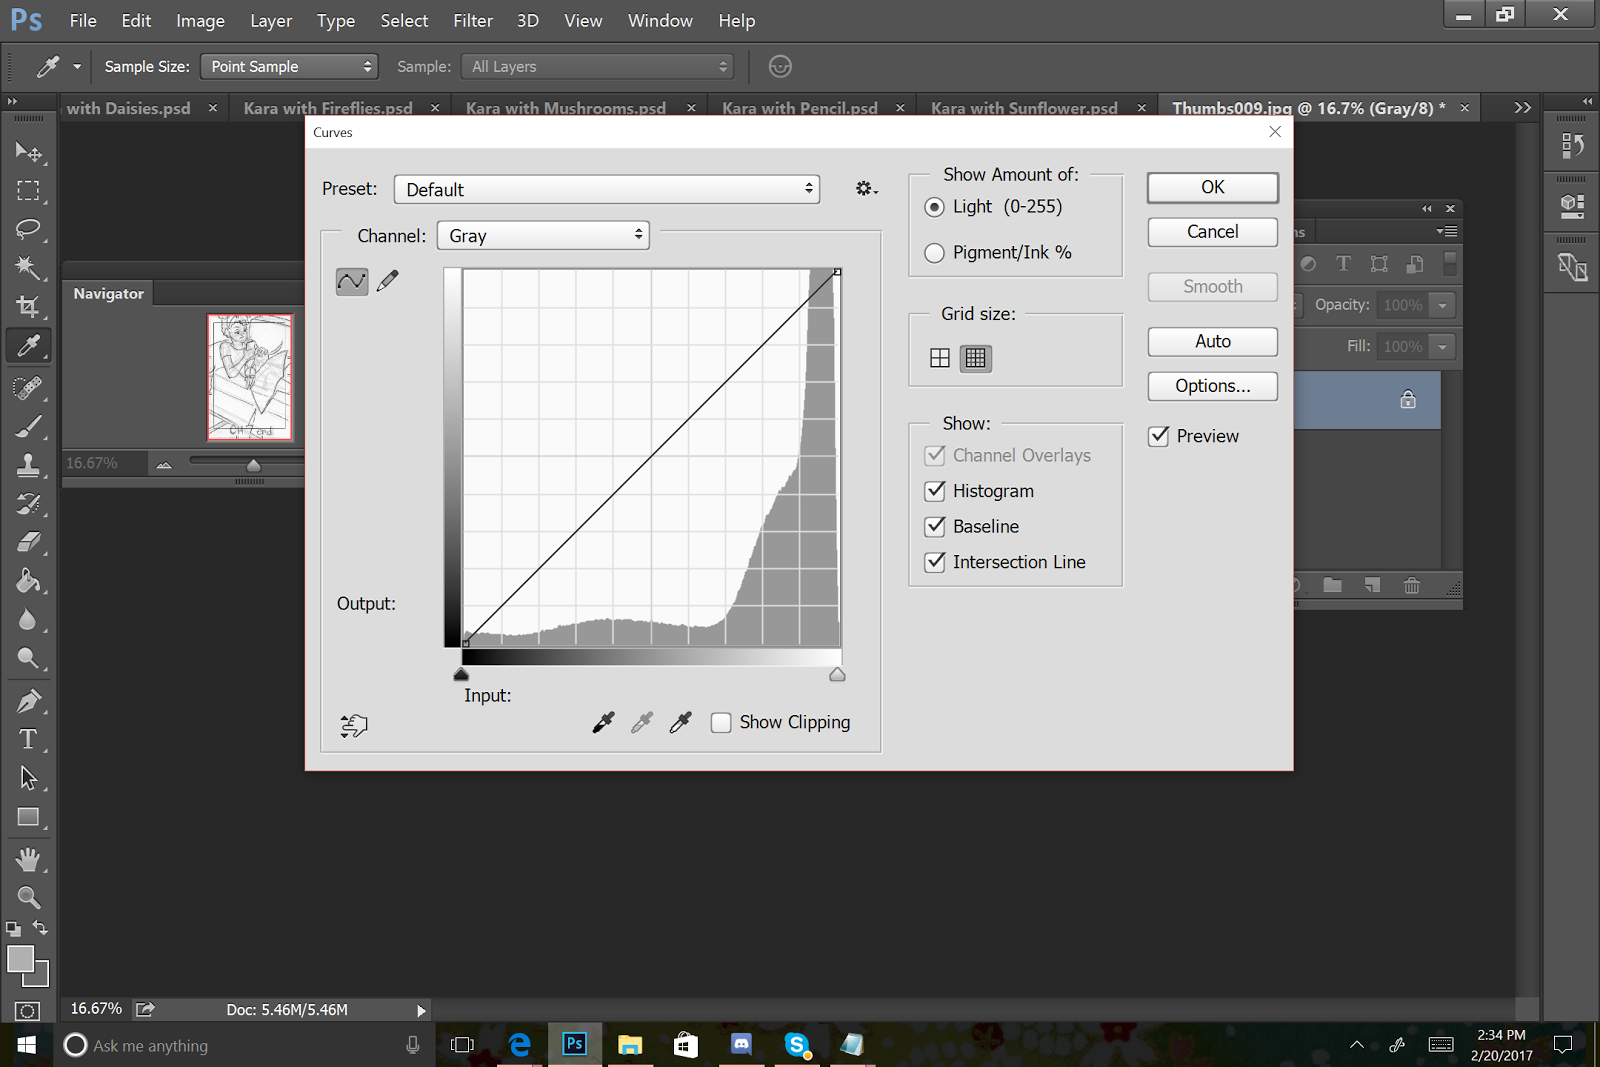
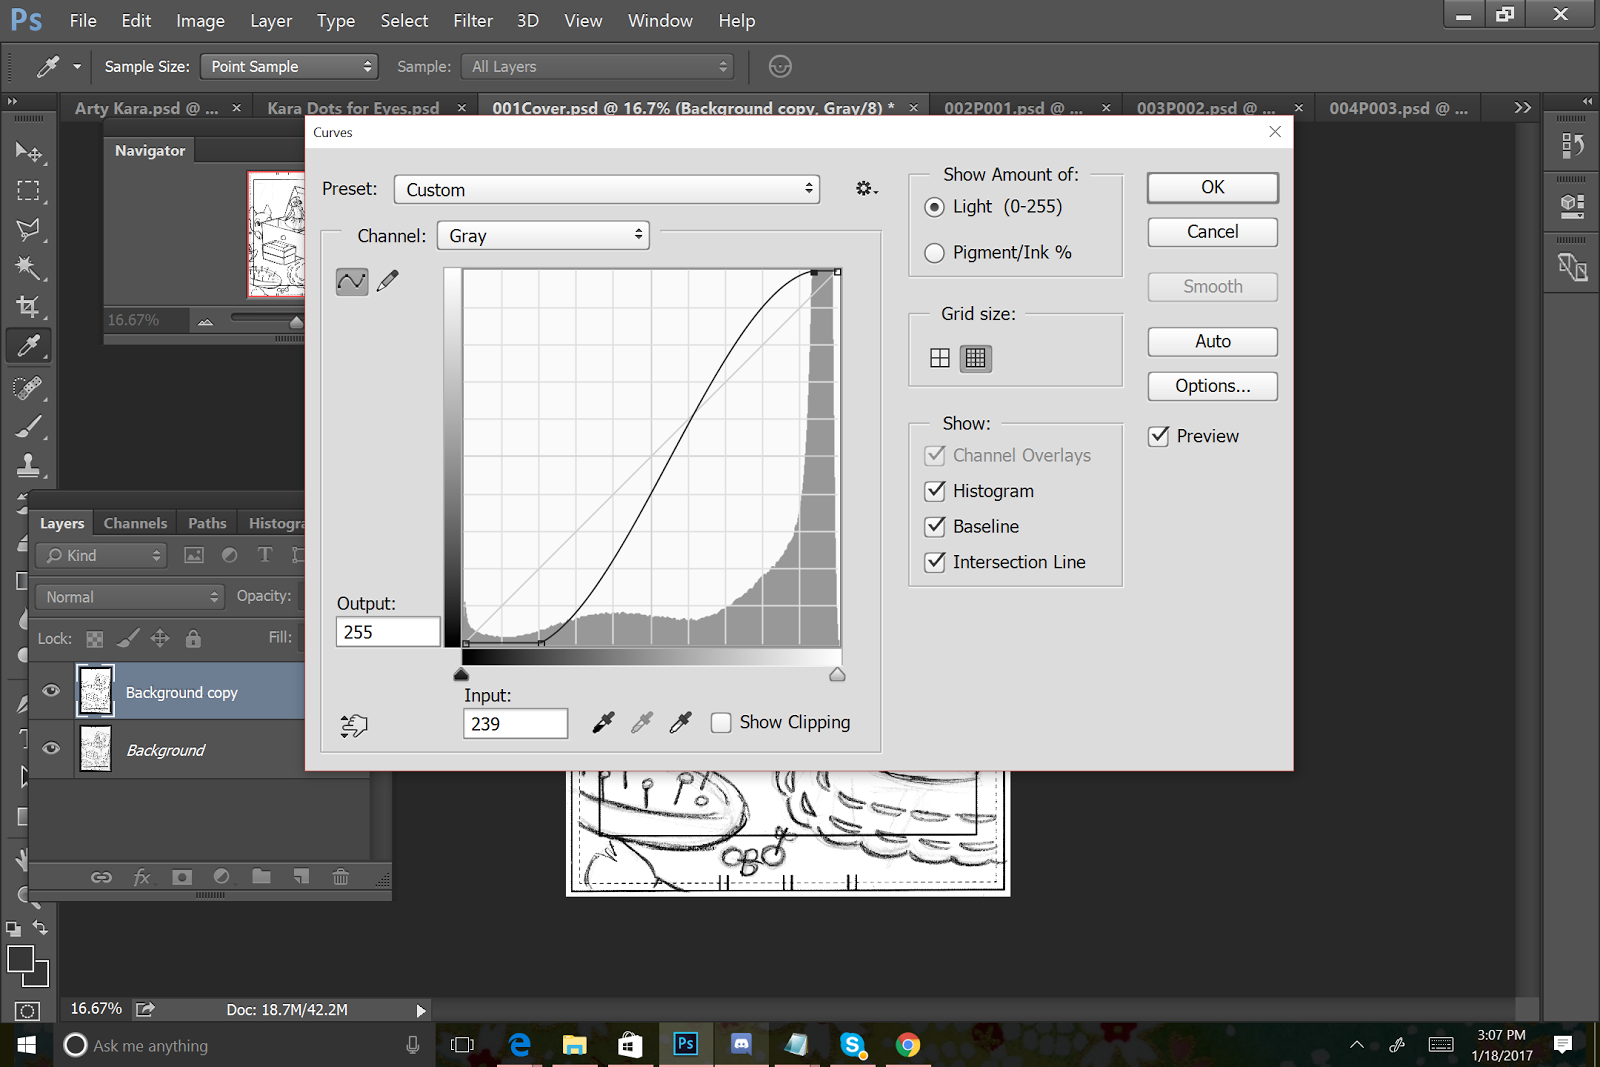
To really bump up the contrast and get rid of 'ghost lines', go to
Image/Curves while in Grayscale mode.
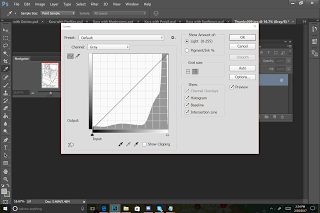
This graph will appear. Drag a point all the way down to the bottom on the left hand side, and a point all the way to the top on the right hand side.
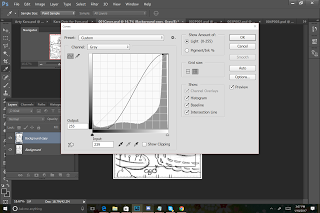
You're basically bumping the whites all the way up, and the darks all the way up. You may want to mess around with where your points are on the graph for optimal contrast.
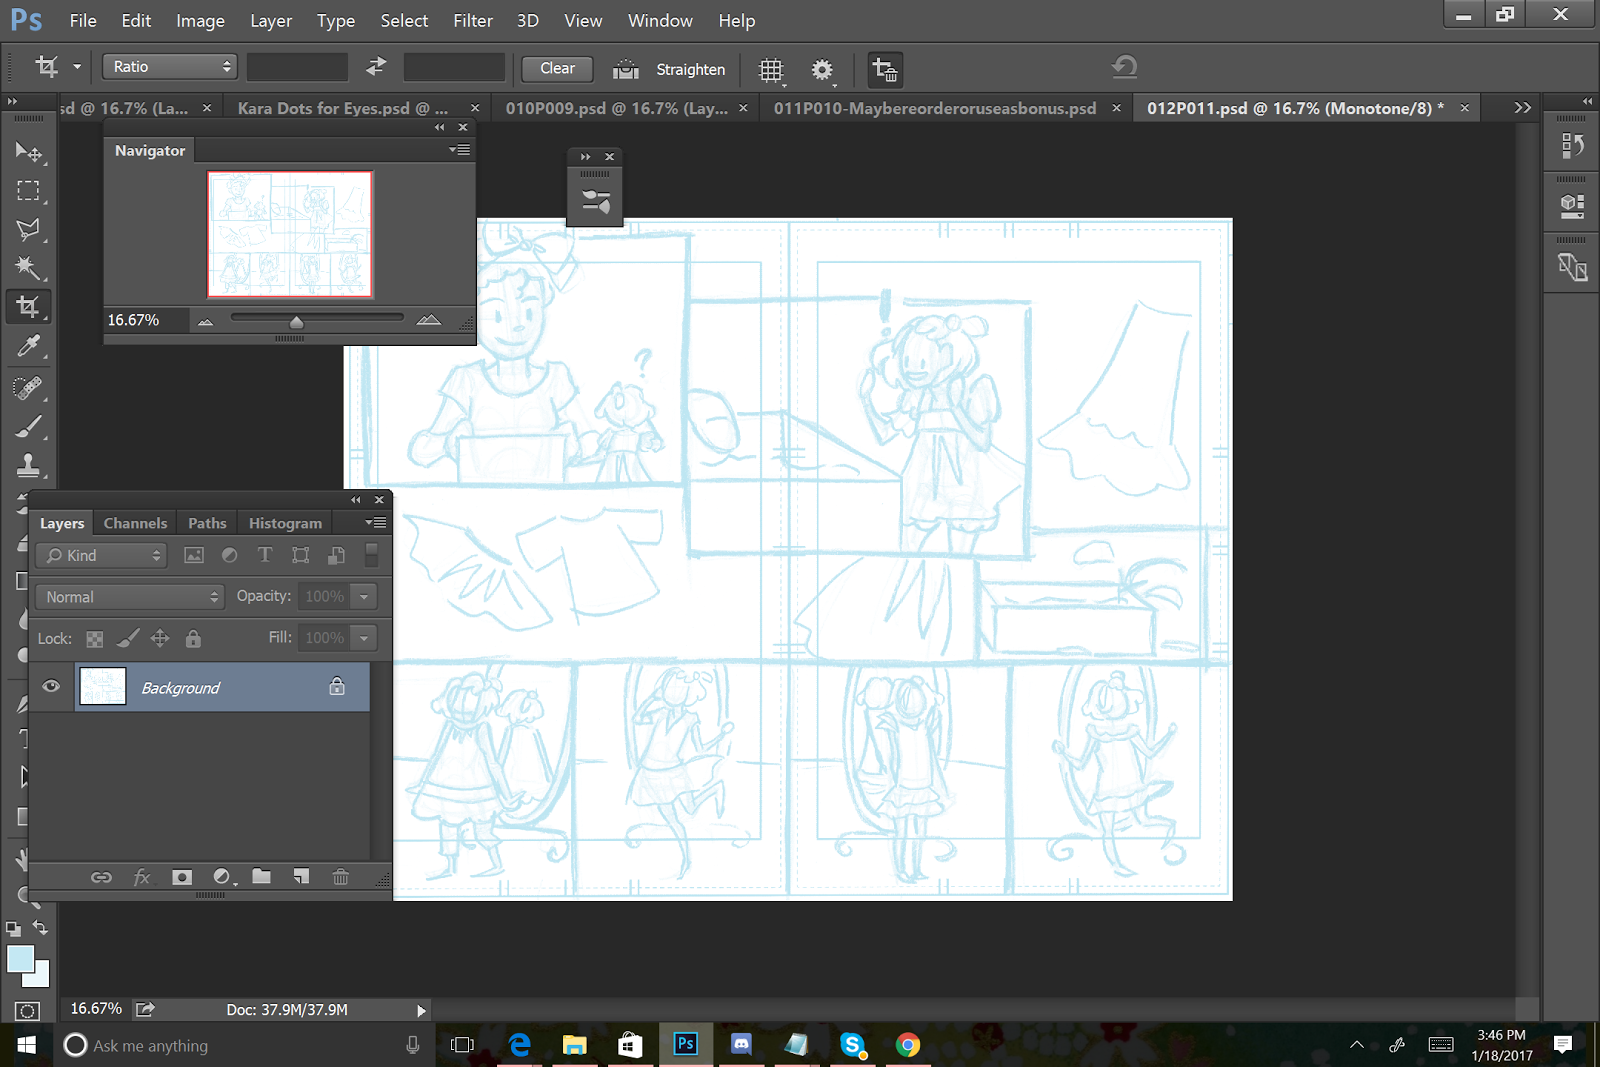
Convert to Bluelines
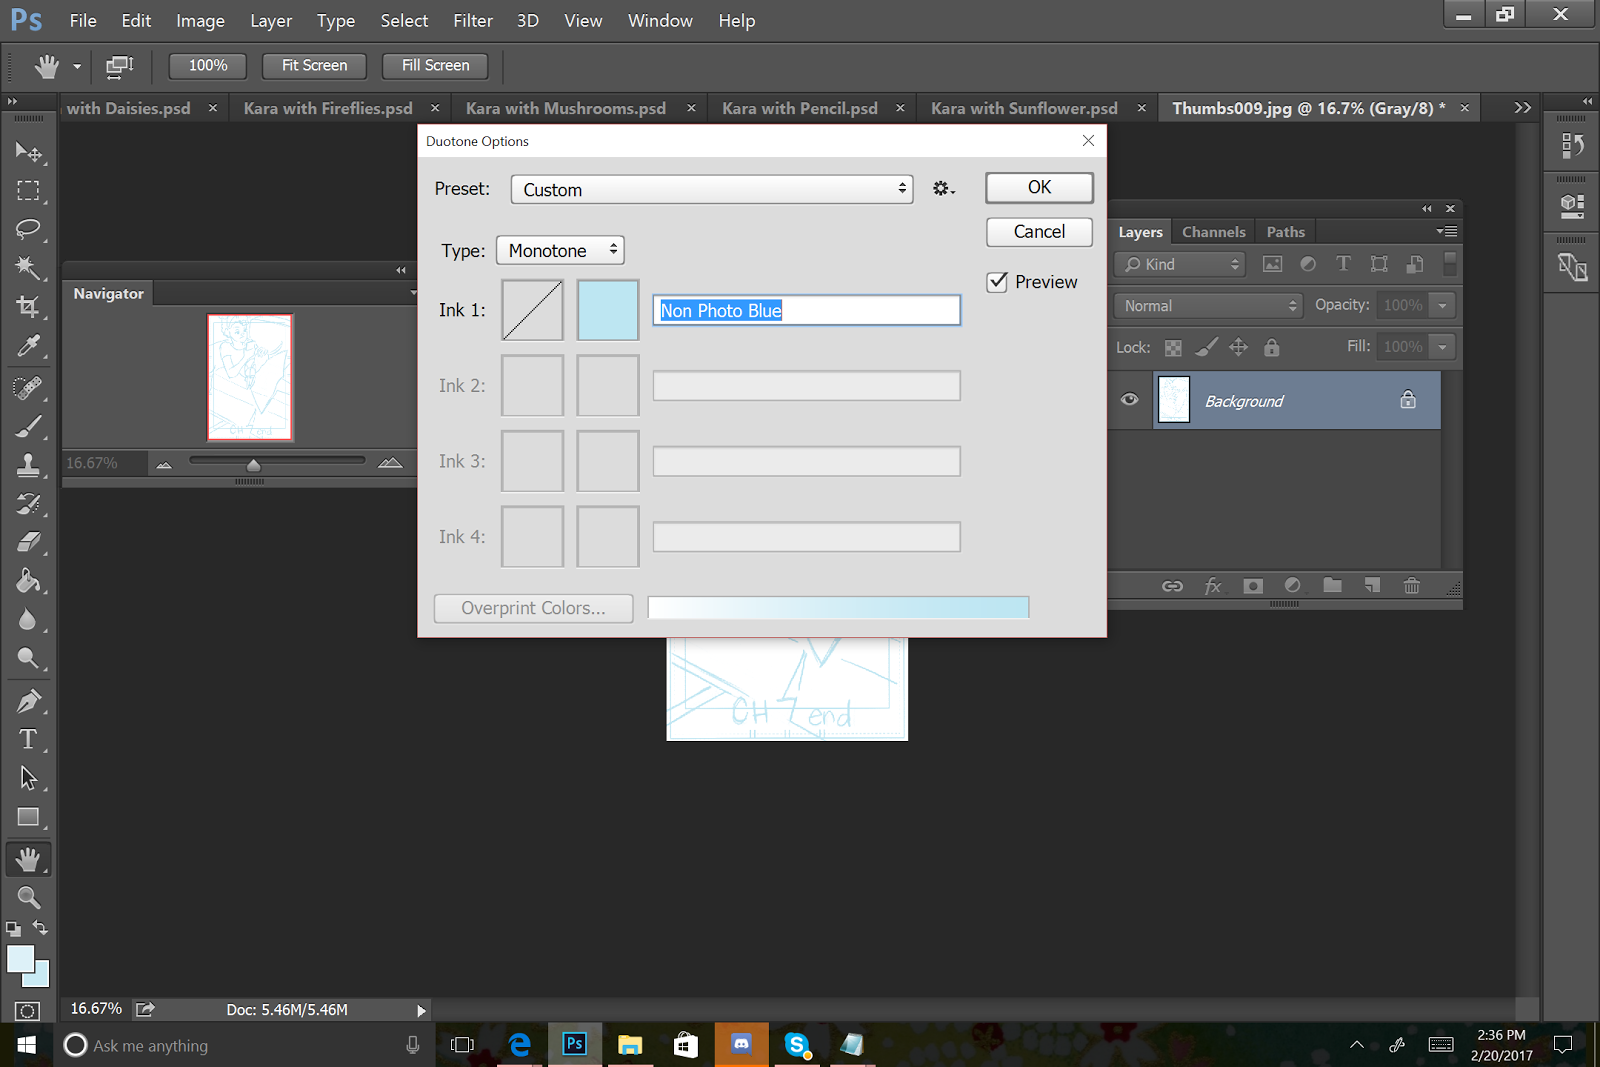
Before printing out my brand new, resized roughs, I need to convert the files to non photo blue.
Why bluelines?
My bluelines serve as a barely visible guideline that helps me redraw my images accurately and quickly. In the past, I used to redraw my images from scratch (thumbnails-roughs-pencils), and wound up frustrated that my thumbnails had the best compositions, and that I could not recreate those compositions. Bluelines allows me to keep the things that work (redrawing it in blue pencil and graphite, of course), and redraw the things that don't.
To convert your image to bluelines:
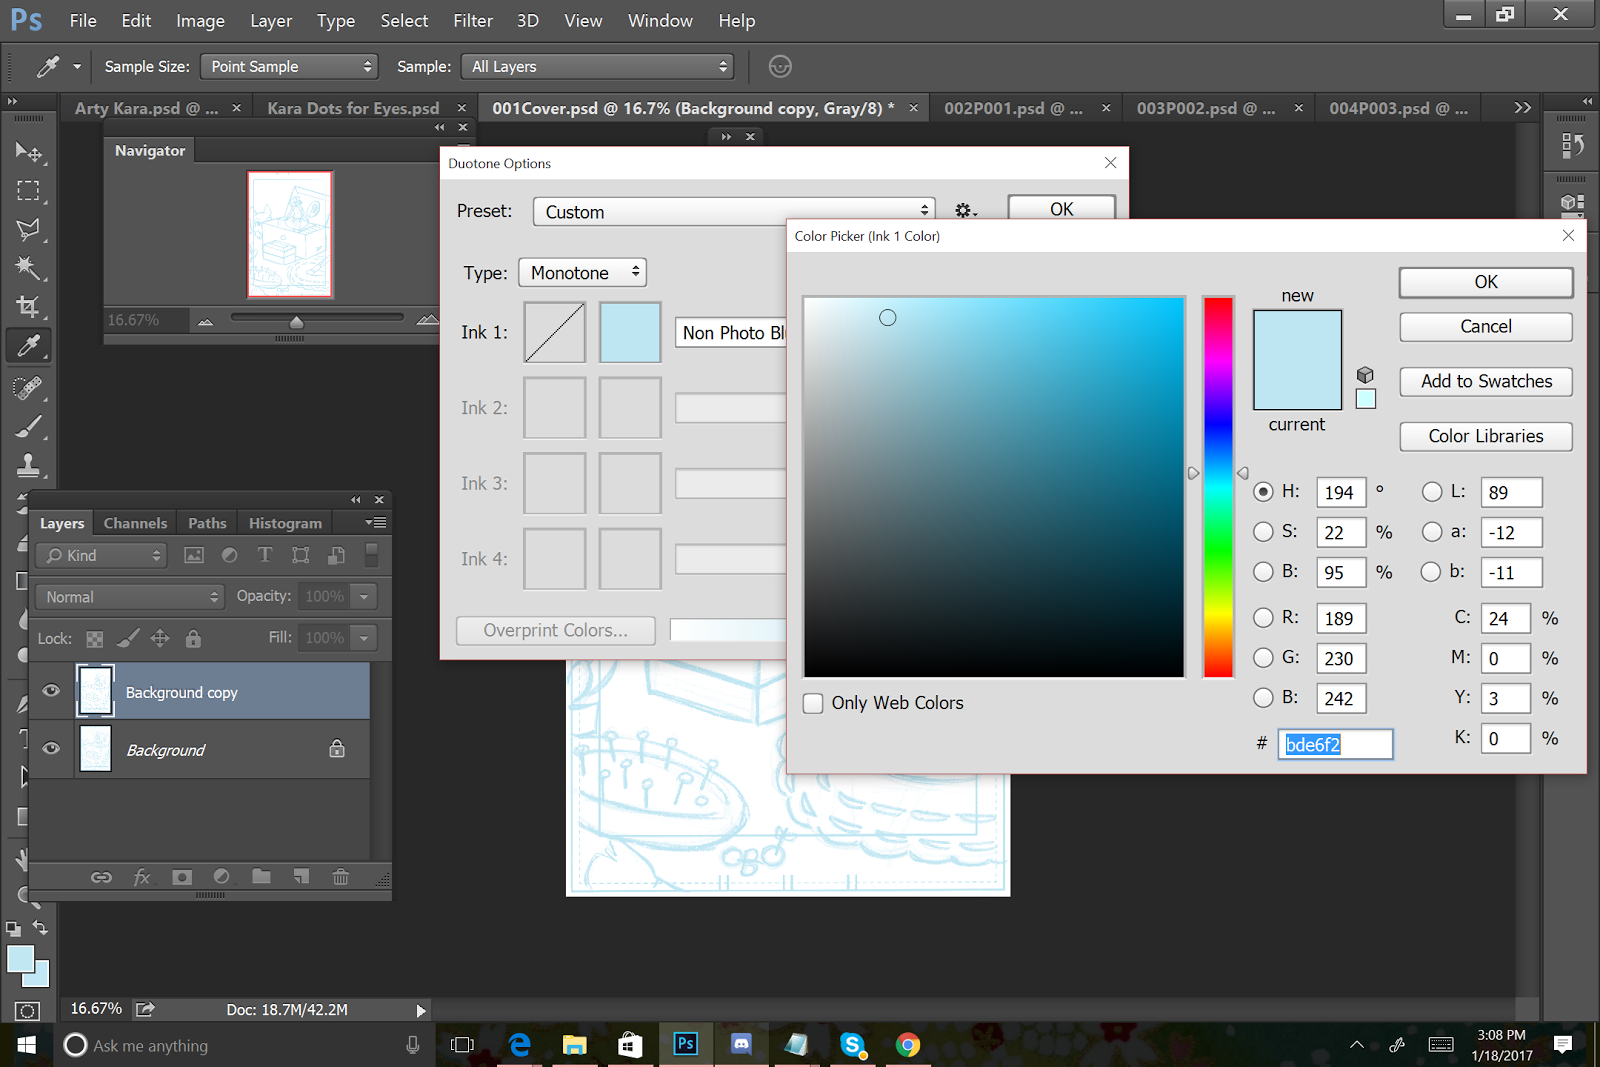
Go to Image/Mode/Duotone.
The first time you go to duotone, you're going to need to set it up for bluelines, but you can save the settings.
The most important values are your C, M, Y, and K values, shown on the bottom right.
You want your C to be anywhere from 20-24%, depending on visibility and your printer.Your M should be 0.Your Y should be 2-4%, again depending on visibility and your printer.K should be 0.


You can save your new duotone setting for future use.

Here's an example page converted to bluelines.
I save these as a separate file.
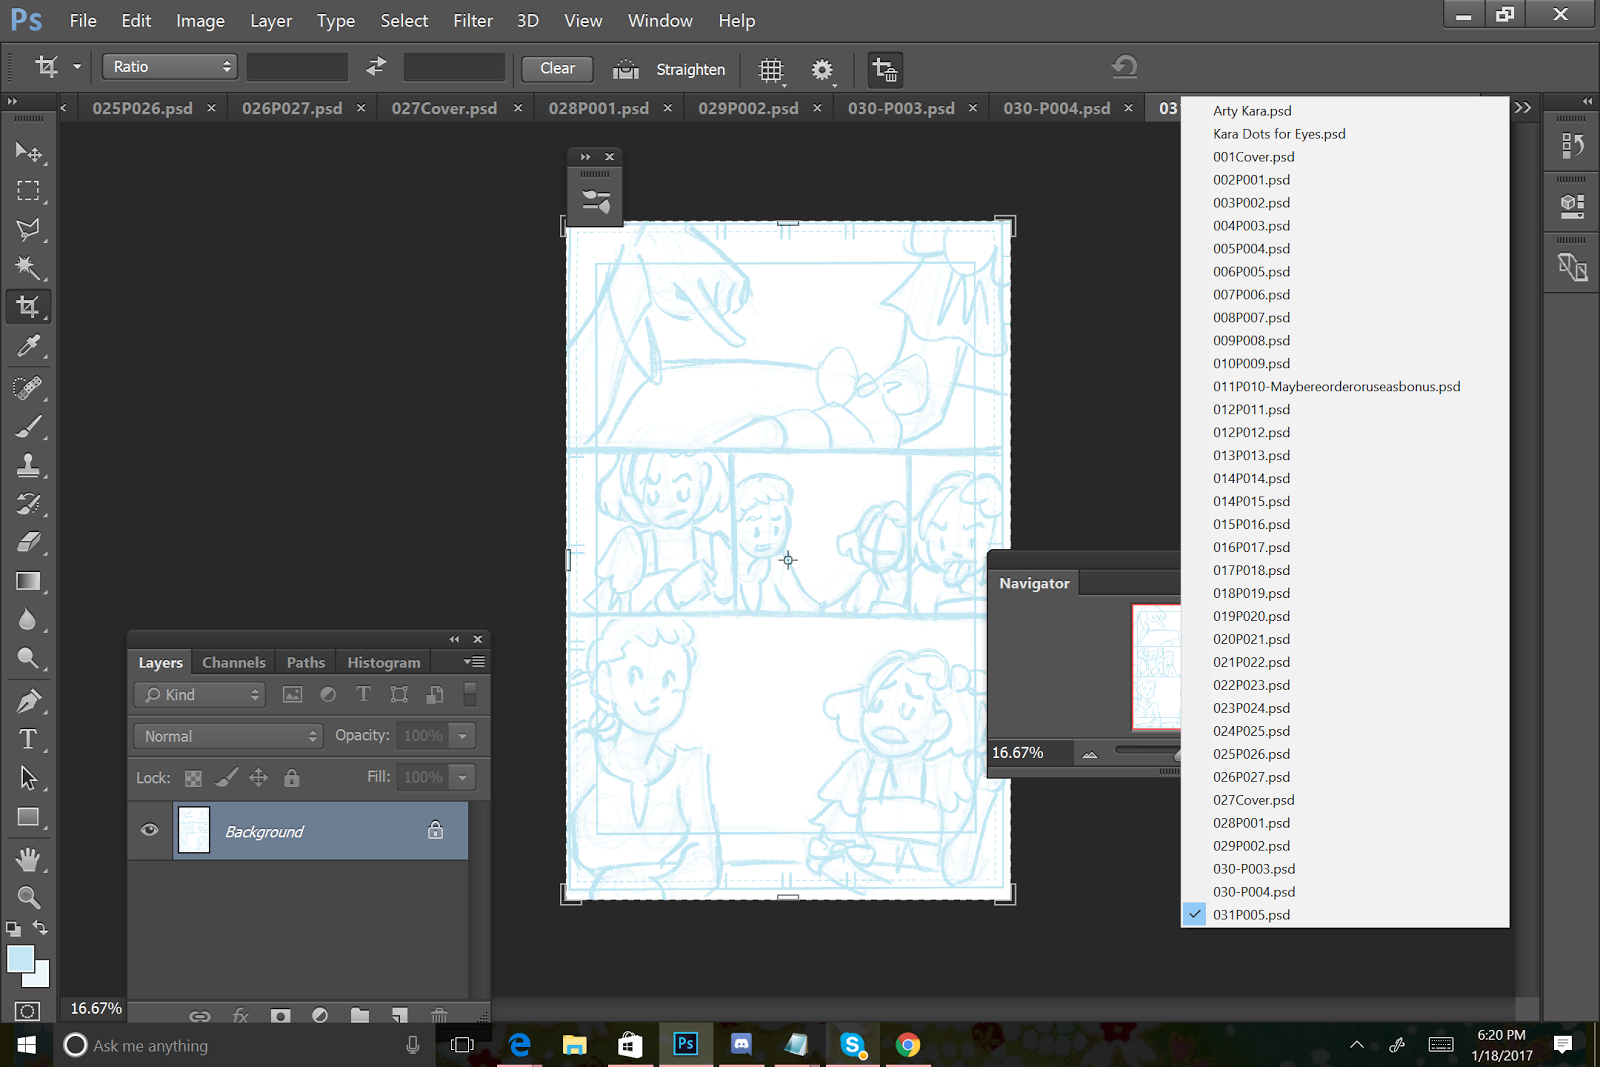
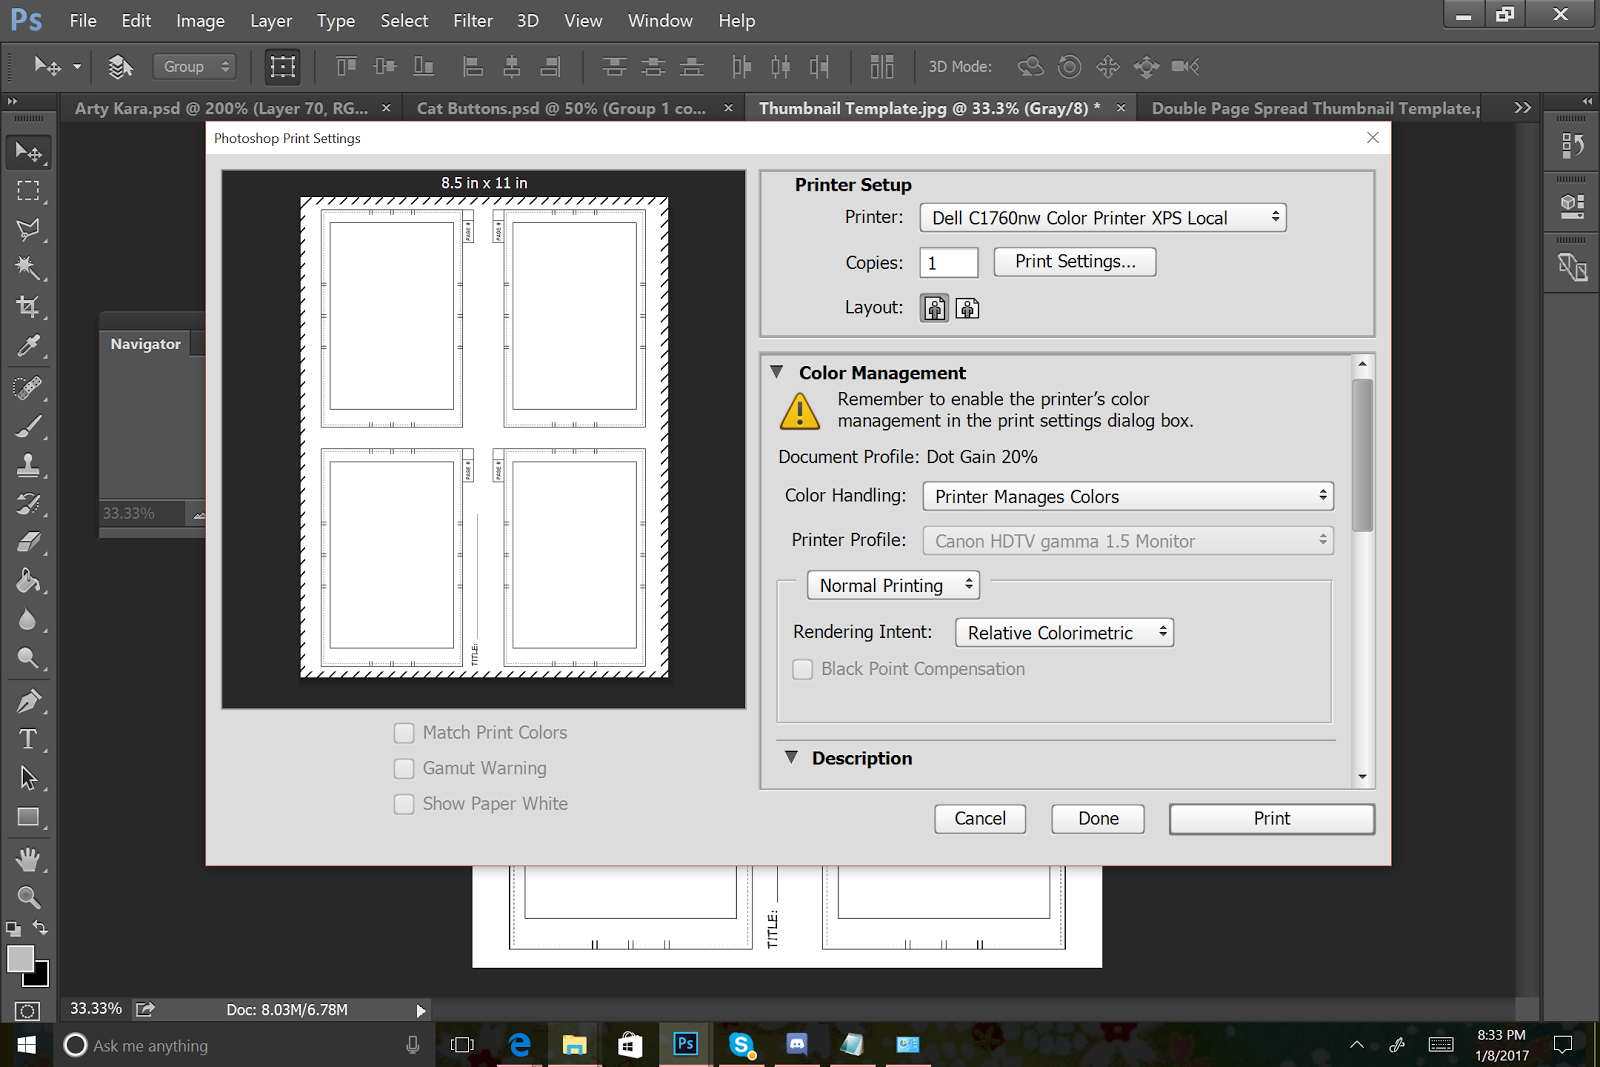
Print
When printing my chapter, I go ahead and pull up all my newly minted blueline roughs.


Make sure your page size is correct, and if you have a proof setting, or a fast setting, I recommend using that. No point in wasting ink.


And there we have it! A whole new chapter of bluelines, ready to be roughed.
Example from Chapter 6
Thumbnails:


Resized Thumbnails
These serve as the base for the roughs. Some feature digital corrections.


Uncorrected Roughs:


This installment of the Intro to Comic Craft: Step By Step series was sponsored by the launch of 7" Kara as a webcomic!
 If you enjoy my art and this blog, you'll definitely enjoy 7" Kara! Chapter 1 is available in completion, and Chapter 2 just started. Updates are every Friday on the Tumblr or on the site.
Please consider donating to this blog or purchasing from Natto-shop (http://nattosoup.com/shop) if you want me to continue publishing quality content. All materials tested were purchased from my own pocket. Keep on Truckin' Nattosoup is not under any sponsorship.
My Patrons have expressed interest in content on the comic making process, and I am happy to oblige. Comics are one of my passions, and they're the reason I began this blog in the first place. It isn't always easy to share comic content here, but their generosity has made it easier to set aside the time and resources necessary to doing so. Writing about comic craft in depth requires research, setting aside time during the comic creation process to document my progress, and a lot of thought, and I feel is best served through longform series such as the Intro to Comic Craft: Step By Step series. If you enjoy this series, please take a moment to share it with your friends and loved ones on the social network of your choice, leave me a G+ comment, or send me an email using the sidebar form- your feedback is important to me! If you have specific questions, please don't hesitate to ask via email.
As part of this series, my Patrons have exclusive access to behind the scenes comic creation content, including the entire plotform synopsis for 7" Kara, the 7" Kara beat sheet, the Chapter 7 Synopsis, the Chapter 7 tight script, and loads more. If you learn best from working example, joining my Patreon will give you access to those files.
You can join Kara on her adventures by ordering a copy of Volume 1 from my shop, or reading the webcomic on Tumblr or on the site.
Now that we've thumbnailed an entire chapter of comic, its time to start refining those images into a comic others will want to read. For me, the next step in my process is to create roughs, but in between traditional thumbnails and traditional roughs, I work a little digital magic.
NOTE: This post is a little bit technical, and is heavily reliant on Photoshop for image cropping, resizing, and overall color changes. I understand that not everyone uses Photoshop, or has access to Photoshop, but there are many other programs available that can handle these tasks as well. In the future, I hope to have posts that cover other programs that can handle these tasks.
Scan Thumbnails
I scan my thumbnails at 300 DPI, in full color, but I recommend you play around with and find the settings that work best for you.


These are just a selection of the thumbnails from Chapter 7 of 7" Kara.
Once I've scanned all my thumbnails, I can send these off to my friends in computer land for revisions and editing suggestions. This step is a huge opportunity for revision and improvement, as they've read the script (so they know what I'm aiming for)
Patreon backers have access to all thumbnails from Chapter 7 (including correction notes), but access to all of Chapter 6, from script to painted pages. If you're interested in seeing how thumbnails progress on to finished pages, consider becoming a Patreon backer, so you can access these files.
Trim Individual Pages from whole, resize to 6"x9", save as individual pages


I save my roughs (in this case, proto-roughs) in a seperate folder, and I use a specific naming scheme.
001Cover (first scan, cover)
002P001 (second scan, first page of chapter)
For double page spreads

At this point, I'm just prepping the files, I haven't made significant corrections yet, so I want my spreads to remain whole. This means, I need to accommodate the two adjacent pages when resizing.
I resize for 12x9 for double page spreads that have not been separated.

The file is then saved as SCANNUMBERP(pagenumber)-(pagenumber)
Ex: 004P3-4
Resizing Images that Extend Past Page Borders
For some thumbails, I continued the gesture past the page borders, knowing that I might opt to resize for roughs.
I select the artwork that I want to resize, trying to leave the panel borders undisturbed.
And I resize while holding down Shift, which keeps elements in proportion as they shrink.

The panels are then drawn with the brush tool for my reference.
Flipping Panels without Flipping the Page
Sometimes panels need to be flipped for storytelling and continuity purposes. This is fairly easy to do.

S
I make a copy of the base page.

I select the panel I wish to flip using the rectangular marquee tool.
I cut it out of the page using copy and delete.

Paste that panel onto a new layer, beneath my page (the copied page creates a 'frame')
Go to Edit: Transform: Flip Horizontal
And continue this method for any other panels that need to be flipped.


The finished page:
Making Necessary Corrections
Your thumbnails are really just a guide for how you want your comic to look, feel, and progress. They aren't a finished product, and shouldn't remain static- they're yours to change! Making changes digitally is faster than redrawing thumbnails over and over again.

In this panel, I want the squirrels to move towards the right, to the outside of the page.

So I cut them out using the method described above (copy, then delete)
 Paste them onto their own layer
Turn my other layers off, so only the squirrels remain, and use edit/transform/horizontal flip to flip the squirrels to the other direction.

They're also a bit too large, so I go ahead and resize them.
Split Up Spreads
For printing purposes, I prefer to split my spreads onto two pages- but if you're using a large format printer, and have legal-size sheets of copier paper, you can opt to keep your spreads together.
Splitting spreads is easy! I use the crop tool, and simply crop each page after converting the whole spread to bluelines (covered later in this post, fear not!).


Each spread page is saved individually at this point.
To get back to my spread, I just hit undo a couple times, until the spread is on the screen again, and repeat the process for the other page.
Convert thumbnails to grayscale

Go to: Image/Adjustments/Grayscale
When it asks about discarding coloring information, select ok.
For minor bumps in contrast:
Image/AutoContrast
Bump Up Contrast
To really bump up the contrast and get rid of 'ghost lines', go to
Image/Curves while in Grayscale mode.
This graph will appear. Drag a point all the way down to the bottom on the left hand side, and a point all the way to the top on the right hand side.
You're basically bumping the whites all the way up, and the darks all the way up. You may want to mess around with where your points are on the graph for optimal contrast.
Convert to Bluelines
Before printing out my brand new, resized roughs, I need to convert the files to non photo blue.
Why bluelines?
My bluelines serve as a barely visible guideline that helps me redraw my images accurately and quickly. In the past, I used to redraw my images from scratch (thumbnails-roughs-pencils), and wound up frustrated that my thumbnails had the best compositions, and that I could not recreate those compositions. Bluelines allows me to keep the things that work (redrawing it in blue pencil and graphite, of course), and redraw the things that don't.
To convert your image to bluelines:
Go to Image/Mode/Duotone.
The first time you go to duotone, you're going to need to set it up for bluelines, but you can save the settings.
The most important values are your C, M, Y, and K values, shown on the bottom right.
You want your C to be anywhere from 20-24%, depending on visibility and your printer.Your M should be 0.Your Y should be 2-4%, again depending on visibility and your printer.K should be 0.
You can save your new duotone setting for future use.

Here's an example page converted to bluelines.

I save these as a separate file.
When printing my chapter, I go ahead and pull up all my newly minted blueline roughs.

Make sure your page size is correct, and if you have a proof setting, or a fast setting, I recommend using that. No point in wasting ink.


And there we have it! A whole new chapter of bluelines, ready to be roughed.
Example from Chapter 6
Thumbnails:

Resized Thumbnails
These serve as the base for the roughs. Some feature digital corrections.


Uncorrected Roughs:


This installment of the Intro to Comic Craft: Step By Step series was sponsored by the launch of 7" Kara as a webcomic!
If you enjoy my art and this blog, you'll definitely enjoy 7" Kara! Chapter 1 is available in completion, and Chapter 2 just started. Updates are every Friday on the Tumblr or on the site.Please consider donating to this blog or purchasing from Natto-shop (http://nattosoup.com/shop) if you want me to continue publishing quality content. All materials tested were purchased from my own pocket. Keep on Truckin' Nattosoup is not under any sponsorship.
February 24, 2017
Intro To Comic Craft: Step by Step: Creating Thumbnails
This series is also made possible thanks to the generosity and interest of my Patrons on Patreon.
My have expressed interest in content on the comic making process, and I am happy to oblige. Comics are one of my passions, and they're the reason I began this blog in the first place. It isn't always easy to share comic content here, but their generosity has made it easier to set aside the time and resources necessary to doing so. Writing about comic craft in depth requires research, setting aside time during the comic creation process to document my progress, and a lot of thought, and I feel is best served through longform series such as the Intro to Comic Craft: Step By Step series. If you enjoy this series, please take a moment to share it with your friends and loved ones on the social network of your choice, leave me a G+ comment, or send me an email using the sidebar form- your feedback is important to me! If you have specific questions, please don't hesitate to ask via email.
As part of this series, my Patrons have exclusive access to behind the scenes comic creation content, including the entire plotform synopsis for 7" Kara, the 7" Kara beat sheet, the Chapter 7 Synopsis, the Chapter 7 tight script, and loads more. If you learn best from working example, joining my Patreon will give you access to those files.
What are thumbnails?
Thumbnails are a rough sketch (I really like to think of them as a map or guideline) for your entire comic page. They include the action from every panel, basic character acting, and basic background indications. Your thumbnails are your opportunity to play director and stage your comic- shot choices are made in the thumbnail stage.
For more information on shot choices, please read:
The 5 C's of Cinematography
Understanding Comics
Drawing Words and Writing Pictures
Why Create Thumbnails? Why not go straight to page?
Thumbnails are an opportunity for you to play around with your comic ideas. You can take risks with composition, set design, character placement, and more, and see immediately whether or not those risks worth, or are even worth it. Thumbnails are an opportunity to visually tell your story and solve problems, and to get some feedback on your storytelling skills from other artists.
For a long-term project like 7" Kara, I rely heavily on thumbnails to provide the framework for later stages. My thumbnails are the blueprint for my roughs, which are the blueprint for my pencils- each stage allowing for further refinement and improvement.
If you feel comfortable going straight to your final page, or if you create comics under a time crunch, by all means skip the thumbnail stage. But if you've never tried multi-stage comics, or if you're planning a comic that is longer than 1 page, I highly recommend you give thumbnails a try!
Find a thumbnail layout that works for you.
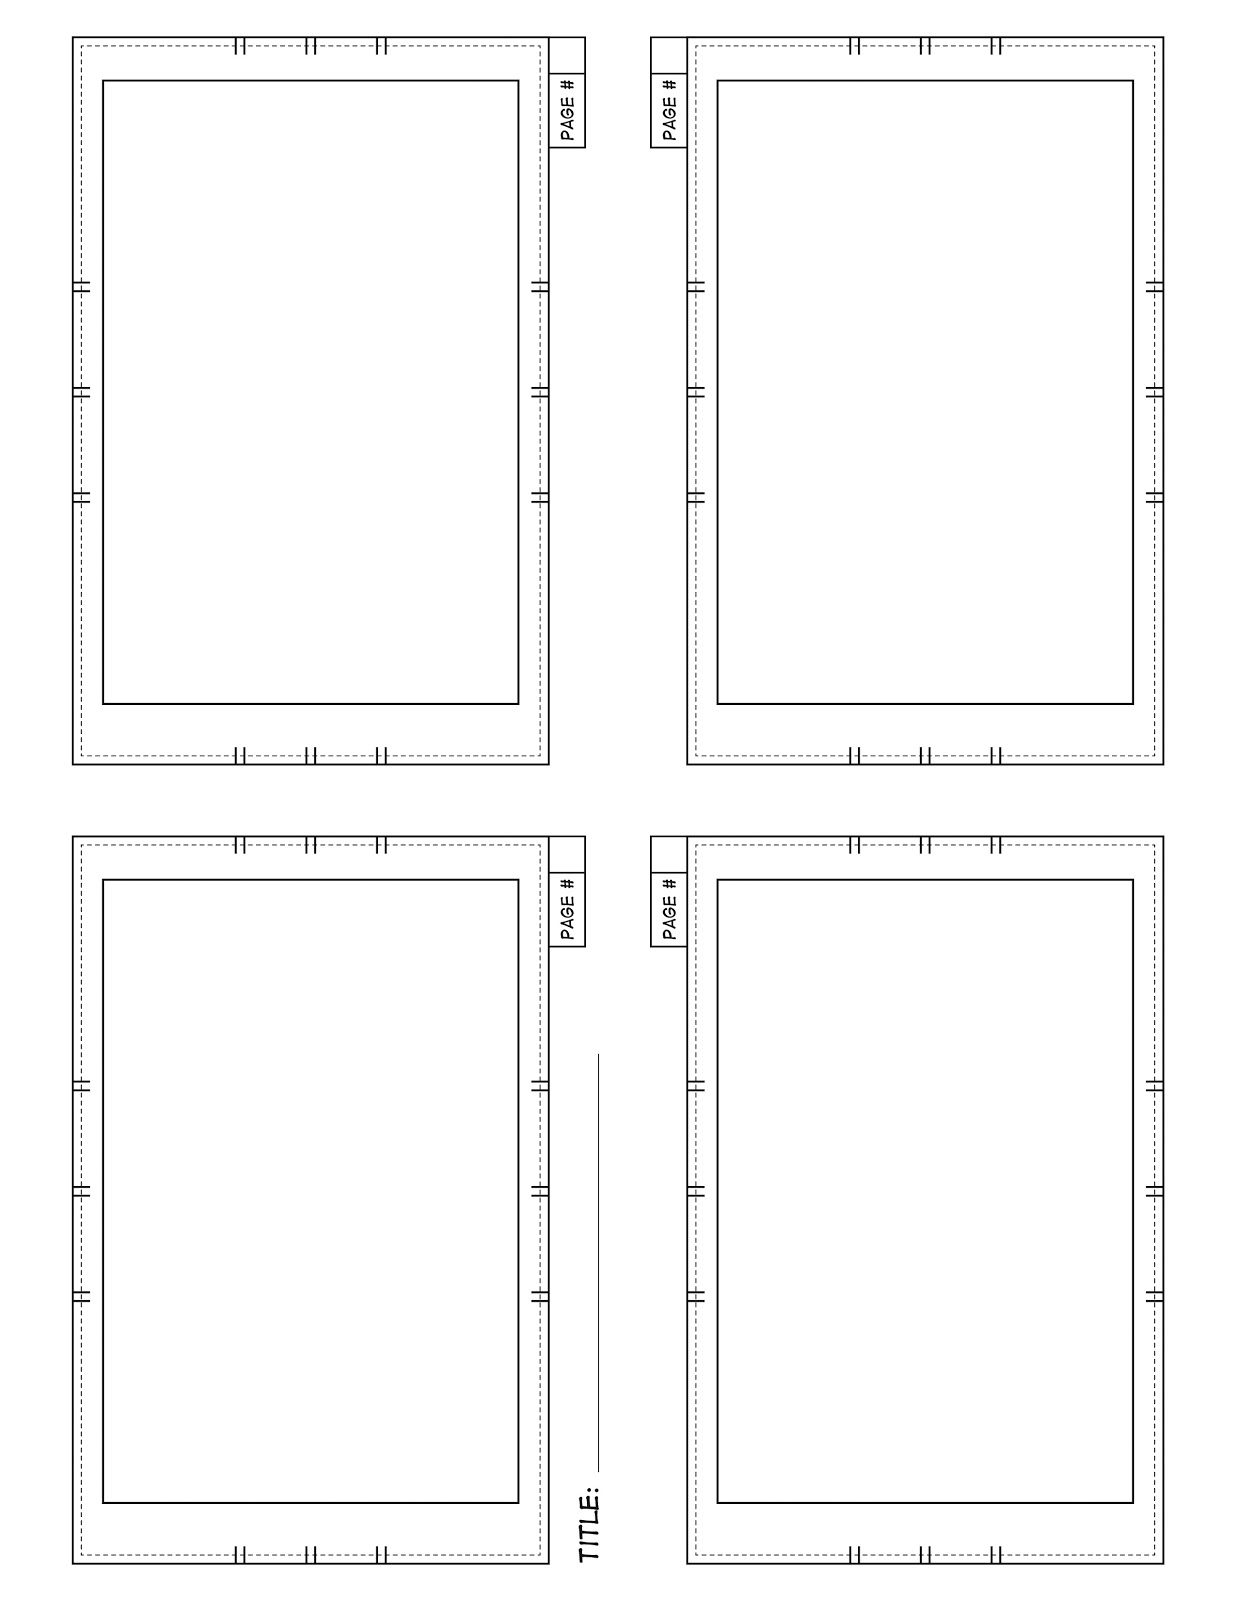
Below is the guideline I use

I like to work traditionally, so I print out enough thumbnails for an entire chapter. If I have a spread, I use the below template.
 Inner rectangle: Live area, no bleed. This is the area that, if you printed the full page, would not be cut off by the printer under any circumstance but catastrophic failure
Dotted Rectangle: Between the inner rectangle and dotted line, your artwork SHOULD be safe, but it's recommended that you don't place important faces or any dialogue in this area.
Solid outer rectangle: Full bleed. Very likely to get cut off to some extent. Do not put anything important past the dotted line.
Hash Marks: Recommendations for border placement.
With the first template, you should get four comic thumbnails per printed page. With the second, you should get a two page spread.
Print
Print enough copies to handle your entire chapter (divide your number of pages by 4)

I print my thumbnail templates on 8.5"x11" copy paper- cheap is fine. You want to avoid papers that have a finish or film, as that will make sketching more difficult.
Drawing:
Step 1: Sketch in Layout
We discussed layouts in our last Intro to Comic Craft: Step by Step post.
Step 2: Rough sketch for character placement, based on the sketches completed on my script

This is sketched using non photo blue lead. I have used Color Eno leads and mechanical pencils for years, and I recommend Soft Blue in .7.
Step 3: refine sketches, adding in pertinent information like background, facial expressions, clothing, and hair.

Step 4: Pencil sketches, finalizing artwork.
For my pencil sketches, I use a soft lead- B or softer, as it goes over the waxy blue lead and is easier for the scanner to pick up.

Set of day's allotment of tight thumbnails, on template:
When working on tight thumbnails like these, I try to parcel them out to three finished tight thumbs per day, to prevent burnout and to better distribute my workload.

 The 3 stages thumbnails undergo
To see everything in action, check out this Intro to Comic Craft: Thumbnails video:
Sample thumbnails:


Please note: Patreon backers have access to all Chapter 7 thumbnails. If you're interested in seeing how a chapter comes together, I recommend joining the artnerd community! For just $2 per month, you get access to Chapter 7 comic materials, early access to many videos, and much more!
Liked what you saw? Well I have great news for you!
This series is sponsored by:

The images used in this installment of Intro to Comic Craft are all from Chapter 7 of 7" Kara, the second chapter in Volume 2. To purchase your own copy of Volume 1, and help support my endeavors, please visit my shop for physical copies, or my Gumroad for PDF copies of Volume 1 or Chapter 5 (the first available chapter in Volume 2)
Please consider donating to this blog or purchasing from Natto-shop (http://nattosoup.com/shop) if you want me to continue publishing quality content. All materials tested were purchased from my own pocket. Keep on Truckin' Nattosoup is not under any sponsorship.
My have expressed interest in content on the comic making process, and I am happy to oblige. Comics are one of my passions, and they're the reason I began this blog in the first place. It isn't always easy to share comic content here, but their generosity has made it easier to set aside the time and resources necessary to doing so. Writing about comic craft in depth requires research, setting aside time during the comic creation process to document my progress, and a lot of thought, and I feel is best served through longform series such as the Intro to Comic Craft: Step By Step series. If you enjoy this series, please take a moment to share it with your friends and loved ones on the social network of your choice, leave me a G+ comment, or send me an email using the sidebar form- your feedback is important to me! If you have specific questions, please don't hesitate to ask via email.
As part of this series, my Patrons have exclusive access to behind the scenes comic creation content, including the entire plotform synopsis for 7" Kara, the 7" Kara beat sheet, the Chapter 7 Synopsis, the Chapter 7 tight script, and loads more. If you learn best from working example, joining my Patreon will give you access to those files.
What are thumbnails?
Thumbnails are a rough sketch (I really like to think of them as a map or guideline) for your entire comic page. They include the action from every panel, basic character acting, and basic background indications. Your thumbnails are your opportunity to play director and stage your comic- shot choices are made in the thumbnail stage.
For more information on shot choices, please read:
The 5 C's of Cinematography
Understanding Comics
Drawing Words and Writing Pictures
Why Create Thumbnails? Why not go straight to page?
Thumbnails are an opportunity for you to play around with your comic ideas. You can take risks with composition, set design, character placement, and more, and see immediately whether or not those risks worth, or are even worth it. Thumbnails are an opportunity to visually tell your story and solve problems, and to get some feedback on your storytelling skills from other artists.
For a long-term project like 7" Kara, I rely heavily on thumbnails to provide the framework for later stages. My thumbnails are the blueprint for my roughs, which are the blueprint for my pencils- each stage allowing for further refinement and improvement.
If you feel comfortable going straight to your final page, or if you create comics under a time crunch, by all means skip the thumbnail stage. But if you've never tried multi-stage comics, or if you're planning a comic that is longer than 1 page, I highly recommend you give thumbnails a try!
Find a thumbnail layout that works for you.
Below is the guideline I use
I like to work traditionally, so I print out enough thumbnails for an entire chapter. If I have a spread, I use the below template.
 Inner rectangle: Live area, no bleed. This is the area that, if you printed the full page, would not be cut off by the printer under any circumstance but catastrophic failure
Dotted Rectangle: Between the inner rectangle and dotted line, your artwork SHOULD be safe, but it's recommended that you don't place important faces or any dialogue in this area.
Solid outer rectangle: Full bleed. Very likely to get cut off to some extent. Do not put anything important past the dotted line.
Hash Marks: Recommendations for border placement.
With the first template, you should get four comic thumbnails per printed page. With the second, you should get a two page spread.
Print enough copies to handle your entire chapter (divide your number of pages by 4)
I print my thumbnail templates on 8.5"x11" copy paper- cheap is fine. You want to avoid papers that have a finish or film, as that will make sketching more difficult.
Drawing:
Step 1: Sketch in Layout
We discussed layouts in our last Intro to Comic Craft: Step by Step post.
Step 2: Rough sketch for character placement, based on the sketches completed on my script
This is sketched using non photo blue lead. I have used Color Eno leads and mechanical pencils for years, and I recommend Soft Blue in .7.
Step 3: refine sketches, adding in pertinent information like background, facial expressions, clothing, and hair.

Step 4: Pencil sketches, finalizing artwork.
For my pencil sketches, I use a soft lead- B or softer, as it goes over the waxy blue lead and is easier for the scanner to pick up.
Set of day's allotment of tight thumbnails, on template:
When working on tight thumbnails like these, I try to parcel them out to three finished tight thumbs per day, to prevent burnout and to better distribute my workload.
 The 3 stages thumbnails undergo
To see everything in action, check out this Intro to Comic Craft: Thumbnails video:
Sample thumbnails:


Please note: Patreon backers have access to all Chapter 7 thumbnails. If you're interested in seeing how a chapter comes together, I recommend joining the artnerd community! For just $2 per month, you get access to Chapter 7 comic materials, early access to many videos, and much more!
Liked what you saw? Well I have great news for you!
This series is sponsored by:

The images used in this installment of Intro to Comic Craft are all from Chapter 7 of 7" Kara, the second chapter in Volume 2. To purchase your own copy of Volume 1, and help support my endeavors, please visit my shop for physical copies, or my Gumroad for PDF copies of Volume 1 or Chapter 5 (the first available chapter in Volume 2)
Please consider donating to this blog or purchasing from Natto-shop (http://nattosoup.com/shop) if you want me to continue publishing quality content. All materials tested were purchased from my own pocket. Keep on Truckin' Nattosoup is not under any sponsorship.
February 22, 2017
Intro to Comic Craft: Turning Your Script Into Thumbnails and Layouts
This series is also made possible thanks to the generosity and interest of my Patrons on Patreon.
My Patrons have expressed interest in content on the comic making process, and I am happy to oblige. Comics are one of my passions, and they're the reason I began this blog in the first place. It isn't always easy to share comic content here, but their generosity has made it easier to set aside the time and resources necessary to doing so. Writing about comic craft in depth requires research, setting aside time during the comic creation process to document my progress, and a lot of thought, and I feel is best served through longform series such as the Intro to Comic Craft: Step By Step series. If you enjoy this series, please take a moment to share it with your friends and loved ones on the social network of your choice, leave me a G+ comment, or send me an email using the sidebar form- your feedback is important to me! If you have specific questions, please don't hesitate to ask via email.
As part of this series, my Patrons have exclusive access to behind the scenes comic creation content, including the entire plotform synopsis for 7" Kara, the 7" Kara beat sheet, the Chapter 7 Synopsis, the Chapter 7 tight script, and loads more. If you learn best from working example, joining my Patreon will give you access to those files.
Create a folder for your work
I use a physical folder, one for each chapter. This helps me stay organized, and I retain my chapter folders in storage once the chapter is done. Each chapter folder contains the script, thumbnails, notes, and the roughs.

Print out script
Working three pages per day, draw rough layout in margin, tighten as necessary

I go ahead and use a non photo blue pencil to create ticmarks bracketing each Tier. Once that's finished, I sketch in a rough layout (no staging, just the panel borders) to get an idea of how I want to frame the page.
Once I've settled on a layout, I begin populating my frames with characters and background, as described in the panels. If I make a mistake, I don't erase, I just draw a panel to the right of the thumbnail with the correct illustration. Stopping to erase often interrupts my train of thought.
I'm not worried about accuracy or readability, because these sketches are immediately transcribed to tight thumbnails on the thumbnail template once completed.


As I create these layouts, I usually go ahead and draw the final tight thumbnail on my thumbnail template, which will be covered in the next Intro to Comic Craft: Step By Step post.
To see this in action please watch
Intro to Comic Craft: Thumbnailing Your Comic- Becca Hillburn
I demonstrate the thumbnailing process for Chapter 6 of 7" Kara.
Outside Resources:
Comic Book Thumbnail Lesson- Scattered Comics
ReMind- Making Comics: Thumbnails
Sunnyville Stories- How to Make Comics: Thumbnails and Layouts
Lackadaisy: Making a Comic
Comic Page Layouts and Story Arcs- Jamie Noguchi
Digital Thumbnails:
Opening and Setting Up a Thumbnail in Manga Studio- Scribbles with Jonathan
Making Thumbnails in Manga Studio-Scribbles with Jonathan
Making Thumbnails for Comics- Ram Studio
This series is sponsored by:
The images used in this installment of Intro to Comic Craft are all from Chapter 7 of 7" Kara, the second chapter in Volume 2. To purchase your own copy of Volume 1, and help support my endeavors, please visit my shop for physical copies, or my Gumroad for PDF copies of Volume 1 or Chapter 5 (the first available chapter in Volume 2)
Please consider donating to this blog or purchasing from Natto-shop (http://nattosoup.com/shop) if you want me to continue publishing quality content. All materials tested were purchased from my own pocket. Keep on Truckin' Nattosoup is not under any sponsorship.
My Patrons have expressed interest in content on the comic making process, and I am happy to oblige. Comics are one of my passions, and they're the reason I began this blog in the first place. It isn't always easy to share comic content here, but their generosity has made it easier to set aside the time and resources necessary to doing so. Writing about comic craft in depth requires research, setting aside time during the comic creation process to document my progress, and a lot of thought, and I feel is best served through longform series such as the Intro to Comic Craft: Step By Step series. If you enjoy this series, please take a moment to share it with your friends and loved ones on the social network of your choice, leave me a G+ comment, or send me an email using the sidebar form- your feedback is important to me! If you have specific questions, please don't hesitate to ask via email.
As part of this series, my Patrons have exclusive access to behind the scenes comic creation content, including the entire plotform synopsis for 7" Kara, the 7" Kara beat sheet, the Chapter 7 Synopsis, the Chapter 7 tight script, and loads more. If you learn best from working example, joining my Patreon will give you access to those files.
Create a folder for your work
I use a physical folder, one for each chapter. This helps me stay organized, and I retain my chapter folders in storage once the chapter is done. Each chapter folder contains the script, thumbnails, notes, and the roughs.

Print out script
Working three pages per day, draw rough layout in margin, tighten as necessary
I go ahead and use a non photo blue pencil to create ticmarks bracketing each Tier. Once that's finished, I sketch in a rough layout (no staging, just the panel borders) to get an idea of how I want to frame the page.
Once I've settled on a layout, I begin populating my frames with characters and background, as described in the panels. If I make a mistake, I don't erase, I just draw a panel to the right of the thumbnail with the correct illustration. Stopping to erase often interrupts my train of thought.
I'm not worried about accuracy or readability, because these sketches are immediately transcribed to tight thumbnails on the thumbnail template once completed.

As I create these layouts, I usually go ahead and draw the final tight thumbnail on my thumbnail template, which will be covered in the next Intro to Comic Craft: Step By Step post.
To see this in action please watch
Intro to Comic Craft: Thumbnailing Your Comic- Becca Hillburn
I demonstrate the thumbnailing process for Chapter 6 of 7" Kara.
Outside Resources:
Comic Book Thumbnail Lesson- Scattered Comics
ReMind- Making Comics: Thumbnails
Sunnyville Stories- How to Make Comics: Thumbnails and Layouts
Lackadaisy: Making a Comic
Comic Page Layouts and Story Arcs- Jamie Noguchi
Digital Thumbnails:
Opening and Setting Up a Thumbnail in Manga Studio- Scribbles with Jonathan
Making Thumbnails in Manga Studio-Scribbles with Jonathan
Making Thumbnails for Comics- Ram Studio
This series is sponsored by:
The images used in this installment of Intro to Comic Craft are all from Chapter 7 of 7" Kara, the second chapter in Volume 2. To purchase your own copy of Volume 1, and help support my endeavors, please visit my shop for physical copies, or my Gumroad for PDF copies of Volume 1 or Chapter 5 (the first available chapter in Volume 2)
Please consider donating to this blog or purchasing from Natto-shop (http://nattosoup.com/shop) if you want me to continue publishing quality content. All materials tested were purchased from my own pocket. Keep on Truckin' Nattosoup is not under any sponsorship.
February 19, 2017
Intro to Comic Craft: Step by Step: Soliciting and Using Critique
Select a Group You TrustAnd don't kid yourself about who you trust. Actually pick people who's opinions you respect, because if they say harsh things, you don't want to automatically brush that off.Sometimes the artists whose work you admire are not the artists most qualified to critique your work- they may have difficulty articulating issues, they may be dismissive, they may find it difficult to find suggestions for early-stage issues. It helps to select people from a variety of backgrounds- not only creators of different types of comics, but people from other walks of life. Send files out early-early stage revisions (synopsis, script, thumbs) are the least painful to make, as they're the easiest on your part.Learn to critique your own work and catch mistakes- make notes on your thumbnails of things you personally want to change.Speaking from personal experience, if you can make notes of your mistakes early and available, you'll generally get better critique from your critique group.They're able to focus on other issues, rather than those most obvious.If someone is reading your thumbs in person, colored leads for notes can be helpful, or providing print outs that they can mark up may lead to really insightful critique. Colored pens are also good.Upload your files somewhere that everyone can easily access- I use Google Drive, and make sure you enable accessIf you're working on a large project, setting up a Trello board can be helpful to make sure everyone is on track, and to keep track of what people have done.Google Docs allows users to make comments, and keeps everything organized in one place.When discussing the critique, be open minded, take copious notes (I copy out relevant segments of the conversation for my later reference), and DONT take it personally!If you don't understand something, it's ok to ask for clarification.It's also ok to ask for suggestions on how to handle things better. Sometimes people forget to provide alternatives.Don't just write down the negative, make sure you write down what worked for them as well. By the time you get around to making corrections, you will have forgotten the positive, and will only be left with a list of what doesn't work. With this sort of list, its very easy to become discouraged.Don't try to make corrections right away- sleep on it, and let your brain solve the problems for you while you're dreaming.Be gracious, thank them for their time, regardless of how you personally feel. You may be a little tender right now, but after a couple nights' sleep, you may realize that they were spot on.Keep in mind that these people are doing you a favor- they want your work to be the best it can be. If you've selected your group carefully and honestly, then you know that even negative criticism is meant to help you grow.Make sure you're available to beta read for them in return.
When using groups for critique:I've found that if three people say the same thing independently, it tends to be true and needs addressing.If there's conflicting opinions, press for more information so you can gain a better understanding of the conflict.
Please consider donating to this blog or purchasing from Natto-shop (http://nattosoup.com/shop) if you want me to continue publishing quality content. All materials tested were purchased from my own pocket. Keep on Truckin' Nattosoup is not under any sponsorship.
February 18, 2017
November and December 2016 Sketchbook Tour
Sketchbook tours are so much easier to share than sketchbook dumps. There's no scanning, just a leisurely flip through filled pages. You even have the opportunity to talk about the content as ideas come to you, rather than trying to write something for every piece scanned and shared.
My sketchbook contains so much more than what's shared to Instagram or Twitter. It's a place for me to practice, to learn, and to make mistakes. With sketch dumps, I often selected my favorite pieces, leaving out the dozens of filled pages that didn't quite make the cut. Most of these neglected sketches are fine as sketches and studies, but a bit repetitive, and when scanning a sketchbook, it's easy to decide to skip 10 pages of gesture drawings, or 5 pages of figure studies.
That said, if you miss my sketch dumps, and enjoyed looking at my art and sketches at your own pace, please consider joining us on Patreon. The next goal for community pledges unlocks monthly sketchbook pdfs for all backers, which means you'll see the inside of my sketchbook every month.
Please consider donating to this blog or purchasing from Natto-shop (http://nattosoup.com/shop) if you want me to continue publishing quality content. All materials tested were purchased from my own pocket. Keep on Truckin' Nattosoup is not under any sponsorship.

February 16, 2017
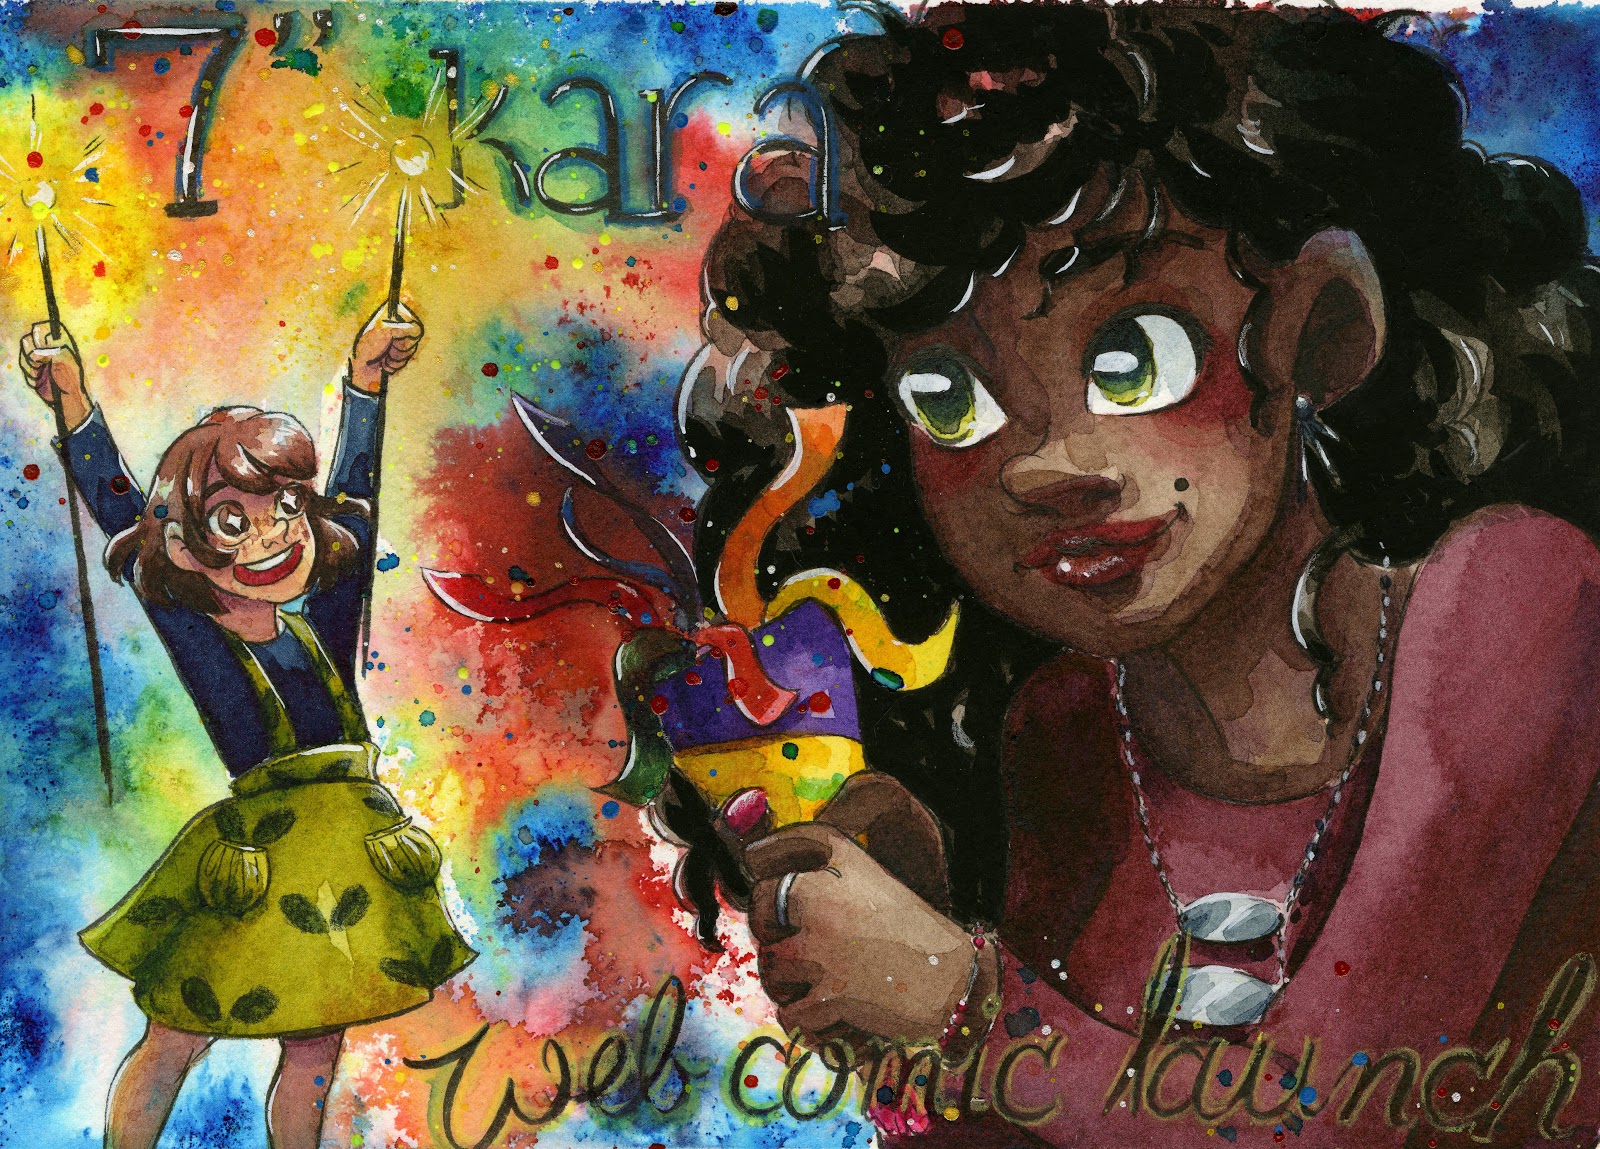
7" Kara Webcomic Launch
It's been a lot of hard work, but I am so delighted to announce that 7" Kara has begun its life as a webcomic!

You can find 7" Kara on Tumblr at www.7InchKara.tumblr.com or on it's own site at www.7InchKara.com. All of Chapter 1 is available to read, and 7" Kara will update one comic page per week every Friday.

In preparation for the site launch, I generated a lot of unique assets. While we continue to develop the standalone 7" Kara site, I will continue to create assets, but I wanted to share some of them here. This is a callback to the assets created when publishing Volume 1- my goal is always to create an environment for my comic that feels right.


While working on 7" Kara, my art has improved significantly over the years, so don't be surprised if early chapters look different from the work you've seen here or on my Instagram! I find the art evolution that's apparent in certain comics to be charming and encouraging, and I hope you feel the same.
 Sample page from Chapter 1
 Sample Page from Chapter 2
 Sample Page from Chapter 3
 Sample Page from Chapter 4
 Sample Page from Chapter 5
 Chapter 6
If you'd like to help support and promote 7" Kara, please make sure to share it with your friends! Below are some handy banners, if you're interested in doing a link exchange. Please set the link to www.7inchkara.com or www.7inchkara.tumblr.com. If you need a size not shown here, please don't hesistate to ask!
 468x60
 160x274


180x150

250x100 pix
Please consider donating to this blog or purchasing from Natto-shop (http://nattosoup.com/shop) if you want me to continue publishing quality content. All materials tested were purchased from my own pocket. Keep on Truckin' Nattosoup is not under any sponsorship.

You can find 7" Kara on Tumblr at www.7InchKara.tumblr.com or on it's own site at www.7InchKara.com. All of Chapter 1 is available to read, and 7" Kara will update one comic page per week every Friday.
In preparation for the site launch, I generated a lot of unique assets. While we continue to develop the standalone 7" Kara site, I will continue to create assets, but I wanted to share some of them here. This is a callback to the assets created when publishing Volume 1- my goal is always to create an environment for my comic that feels right.

While working on 7" Kara, my art has improved significantly over the years, so don't be surprised if early chapters look different from the work you've seen here or on my Instagram! I find the art evolution that's apparent in certain comics to be charming and encouraging, and I hope you feel the same.
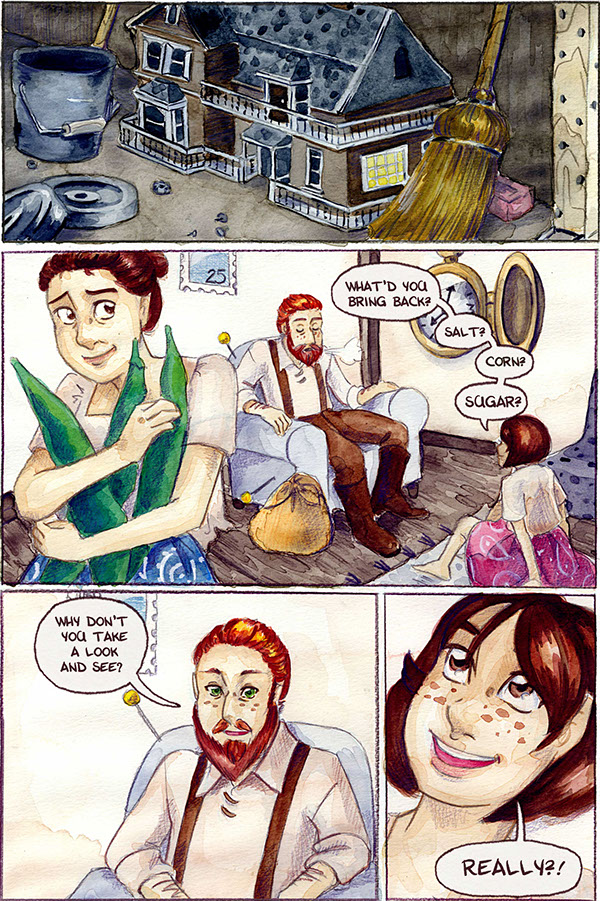 Sample page from Chapter 1
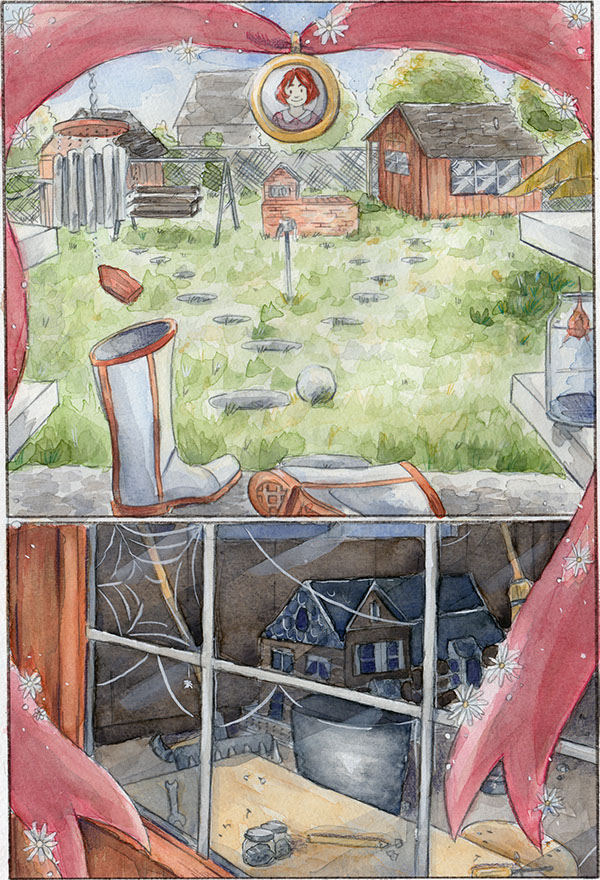 Sample Page from Chapter 2
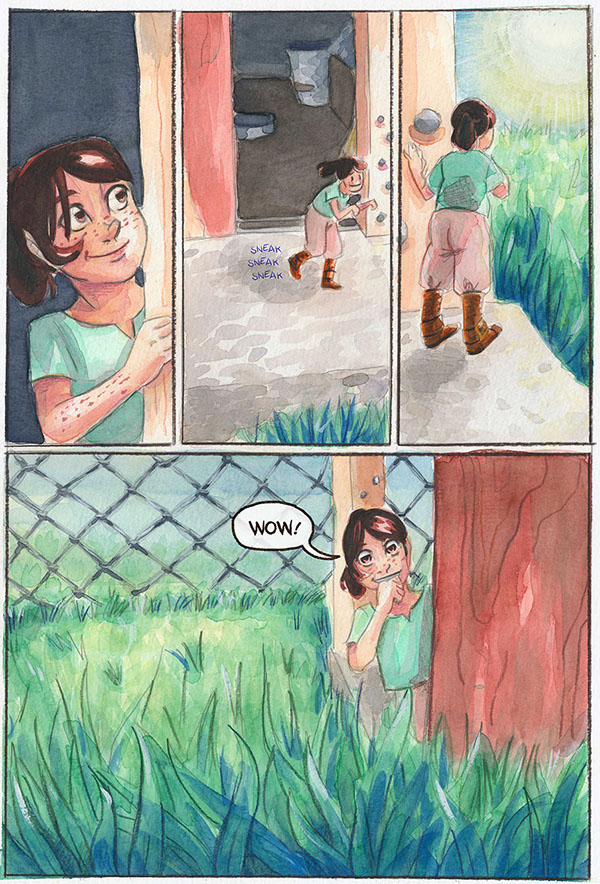 Sample Page from Chapter 3
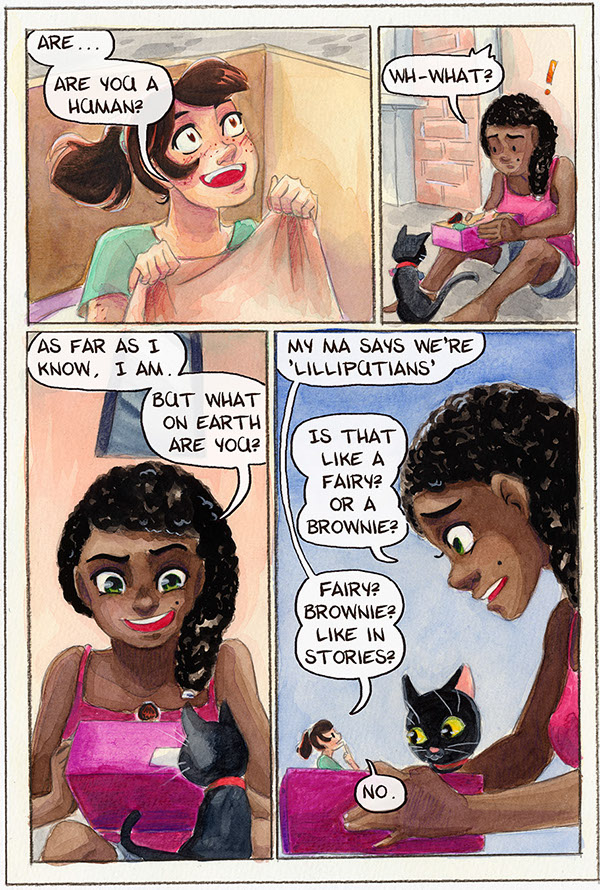 Sample Page from Chapter 4
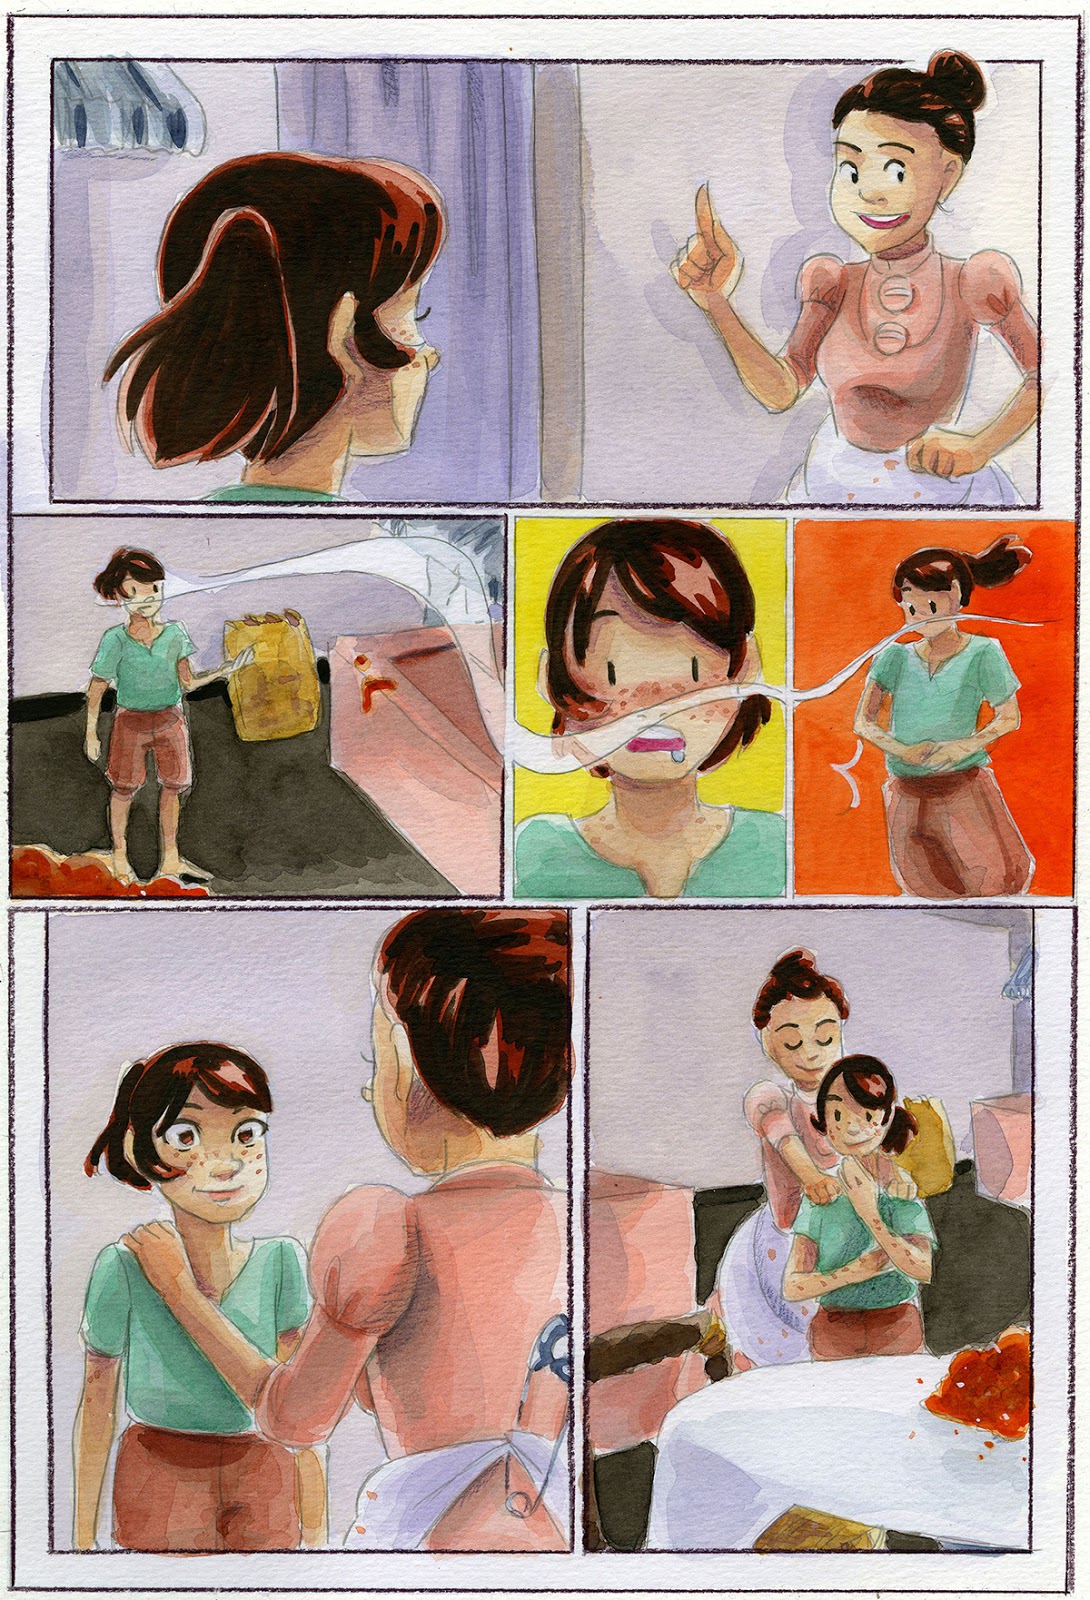 Sample Page from Chapter 5
 Chapter 6
If you'd like to help support and promote 7" Kara, please make sure to share it with your friends! Below are some handy banners, if you're interested in doing a link exchange. Please set the link to www.7inchkara.com or www.7inchkara.tumblr.com. If you need a size not shown here, please don't hesistate to ask!
 468x60
 160x274

180x150

250x100 pix
Please consider donating to this blog or purchasing from Natto-shop (http://nattosoup.com/shop) if you want me to continue publishing quality content. All materials tested were purchased from my own pocket. Keep on Truckin' Nattosoup is not under any sponsorship.
February 15, 2017
Intro to Comic Craft: Step by Step: Developing A Script
This series is also made possible thanks to the generosity and interest of my Patrons on Patreon.
My Patrons have expressed interest in content on the comic making process, and I am happy to oblige. Comics are one of my passions, and they're the reason I began this blog in the first place. It isn't always easy to share comic content here, but their generosity has made it easier to set aside the time and resources necessary to doing so. Writing about comic craft in depth requires research, setting aside time during the comic creation process to document my progress, and a lot of thought, and I feel is best served through longform series such as the Intro to Comic Craft: Step By Step series. If you enjoy this series, please take a moment to share it with your friends and loved ones on the social network of your choice, leave me a G+ comment, or send me an email using the sidebar form- your feedback is important to me! If you have specific questions, please don't hesitate to ask via email.
As part of this series, my Patrons have exclusive access to behind the scenes comic creation content, including the entire plotform synopsis for 7" Kara, the 7" Kara beat sheet, the Chapter 7 Synopsis, the Chapter 7 tight script, and loads more. If you learn best from working example, joining my Patreon will give you access to those files.
In comics, there are numerous ways of going from concept-comic, and multiple ways to write a script that works for you. Today I'm going to share my method for writing chapter scripts for my long form comic, 7" Kara, but you may find other methods suit your needs better. I recommend checking out the links in my Outside Resources section at the bottom of this post for more on scripting for comics. If you're interested in learning how to script for a short comic or a mini comic, please check out the below video, if you haven't already.
Lets Make a Comic Concept to Scripting to Thumbnails to Roughs-Becca Hillburn
For story and character development, please read Intro to Comic Craft: Step by Step: Brainstorming and Character Development.
Once I have a solid idea, and have done enough brainstorming to know the main beats of the story, it's time to start solidifying things into a synopsis.
Overall Plotform Synopsis

If you need a further example, here's a friendly reminder that Patrons have access to the full 7" Kara synopsis!
With the plotform synopsis, I start out pretty simple- beginning, middle, and end. After that has been established, I work on fleshing out the sections, based on the 3 Act structure mentioned in the Brainstorming post. Over the months, I've taken loads of story and worldbuilding notes, and this is a perfect time to weave them into a coherent whole.
My goal isn't to work particularly tight- as a story is drawn, it evolves, and I want to leave room for filling plotholes, new story ideas, and character development.
As mentioned in the Brainstorming post, it is key that you have an idea of how you want your story to end.
Once I've gotten a fairly fleshed out synopsis of my story, I begin to
Break synopsis down into arcs or books
This is more for my own benefit, so I have a reasonable idea of how much work is involved. Of course, with 7" Kara, this is really just an estimate, and it's very prone to change. That's ok! Be open and flexible with your webcomic projects.
Once I've broken my synopsis down into arcs or books, it's time to
Break the synopsis down into chapters
Again, this is really just an estimate, to give me an idea of how much content I'm working with, and how long each chapter will be.
I work on a chapter per chapter basis, and occasionally go back to the original plotform synopsis document and make additions, notes, and changes.
So when I'm ready to begin a new chapter:
When writing a chapter
Copy that chapter text into a new file/Google Doc
 Another friendly reminder that Patrons have access to all current 7" Kara Chapter 7 files, including the Chapter 7 synopsis and fleshed out script!
Chapters should have a beginning, middle, and end as well. For children's comics, I lead in with large establishing shots, to give the young reader time to adjust to the change in scenery, and an opportunity to immerse themselves in the world.
Begin fleshing that chapter out
Once I've established where the chapter is going (and this is usually already established by the synopsis segment I've copy and pasted into a new document), it's time to start adding details and flesh things out.
Get an outside view on the overall chapter

For me, this involves sending my chapter (via Google Docs) to a couple beta readers. The earlier I can get critique, the more I'm able to make necessary changes and improve the story.
Break chapter into page units
Control Enter for each page, so every page is a fresh page. Convert original text to italic, begin fleshing out page in normal font.
I break my pages down by:
Tiers
A row of panels, almost always related. Think call and response, question and answer. This is based off a technique demonstrated by Kiyohiko Azuma in Yotsuba&!.
Panels
Individual illustrations on the page, usually surrounded by borders. Try to limit your panel to ONE action, if possible, unless its a special shot.
Dialogue
In comics, dialogue is usually contained in speech balloons, narration is contained in boxes. Try to stick to one type per page, if possible. Dialogue can quickly overwhelm the page, covering up the background and characters, so limit it in scenes where you need to show action or scenery.

Include background and staging direction

For the full script, please join my Patreon for access to 7" Kara materials!
Send Google Docs link to Beta readers for comments

I enjoy using Google docs for writing as it allows for easy comments and editing. I can save specific versions of files as an archive if necessary, and have access to these files on any computer and via my phone. Google docs is free and is saved to cloud storage (although I can also download a PDF copy if I wish), so it's really a very handy way to work on comics when you're constantly traveling.
As with synopsis edits, script and dialogue edits are an important stage in refining my work. I try to stay consistent with who I ask to beta read my work, and am careful to pick artists/readers who are familiar with comics, familiar with my work, and feel comfortable being blunt with me.
I've found that, if you are careful with picking your beta readers, the comments that sting the most are usually the ones that have hit home, and definitely deserve your consideration. The sting often comes from the idea of having to cut your darlings- remove portions of the script that you love most, or edits that will take additional time to complete. While these are painful, they're well worth considering.
This is just my method of planning and scripting chapters for 7" Kara. What's important is that you try a variety of methods, and work with the methods that suit your comic best.
Tips on Writing:
Leave time for revision- from yourself and from others. This makes for a stronger story
Don't tight script (dialogue, panel descriptions) unless you know where the chapter is going, you'll script yourself into a hole.
Don't write checks your artist can't cash:Too much dialogue per page, no room for characters/settingToo many panels per page, for every single pageToo many characters per page, every pageMultiple actions in a single panel by a single character (this is just impossible)
Outside Resources:
Scripting Resources: Dark Horse Scripting GuidelinesDark Horse Sample ScriptWriting Comics: Scripting ProgramsChris Oatly: How to Write a Comic Script and Other More Important ThingsScript: How to Write a Comic Book Script (superhero biased)Sample Comic Book Scripts (superhero biased)Friends with Boys Comic Process (YA graphic novel by Faith Erin Hicks)The Comics Experience: Comic Script Archive
The Beat- Making Comics- Script Format
Scripting Programs
ScrivnerGoogle DocsMicrosoft Word
Final Draft- Screenplay and Script writing software
Templates
Oscar Wilde Comics- Word Template
How to Format a Comic Script- links to multiple templates
This series is sponsored by:
The images used in this installment of Intro to Comic Craft are all from Chapter 7 of 7" Kara, the second chapter in Volume 2. To purchase your own copy of Volume 1, and help support my endeavors, please visit my shop for physical copies, or my Gumroad for PDF copies of Volume 1 or Chapter 5 (the first available chapter in Volume 2)
Please consider donating to this blog or purchasing from Natto-shop (http://nattosoup.com/shop) if you want me to continue publishing quality content. All materials tested were purchased from my own pocket. Keep on Truckin' Nattosoup is not under any sponsorship.
My Patrons have expressed interest in content on the comic making process, and I am happy to oblige. Comics are one of my passions, and they're the reason I began this blog in the first place. It isn't always easy to share comic content here, but their generosity has made it easier to set aside the time and resources necessary to doing so. Writing about comic craft in depth requires research, setting aside time during the comic creation process to document my progress, and a lot of thought, and I feel is best served through longform series such as the Intro to Comic Craft: Step By Step series. If you enjoy this series, please take a moment to share it with your friends and loved ones on the social network of your choice, leave me a G+ comment, or send me an email using the sidebar form- your feedback is important to me! If you have specific questions, please don't hesitate to ask via email.
As part of this series, my Patrons have exclusive access to behind the scenes comic creation content, including the entire plotform synopsis for 7" Kara, the 7" Kara beat sheet, the Chapter 7 Synopsis, the Chapter 7 tight script, and loads more. If you learn best from working example, joining my Patreon will give you access to those files.
In comics, there are numerous ways of going from concept-comic, and multiple ways to write a script that works for you. Today I'm going to share my method for writing chapter scripts for my long form comic, 7" Kara, but you may find other methods suit your needs better. I recommend checking out the links in my Outside Resources section at the bottom of this post for more on scripting for comics. If you're interested in learning how to script for a short comic or a mini comic, please check out the below video, if you haven't already.
Lets Make a Comic Concept to Scripting to Thumbnails to Roughs-Becca Hillburn
For story and character development, please read Intro to Comic Craft: Step by Step: Brainstorming and Character Development.
Once I have a solid idea, and have done enough brainstorming to know the main beats of the story, it's time to start solidifying things into a synopsis.
Overall Plotform Synopsis
If you need a further example, here's a friendly reminder that Patrons have access to the full 7" Kara synopsis!
With the plotform synopsis, I start out pretty simple- beginning, middle, and end. After that has been established, I work on fleshing out the sections, based on the 3 Act structure mentioned in the Brainstorming post. Over the months, I've taken loads of story and worldbuilding notes, and this is a perfect time to weave them into a coherent whole.
My goal isn't to work particularly tight- as a story is drawn, it evolves, and I want to leave room for filling plotholes, new story ideas, and character development.
As mentioned in the Brainstorming post, it is key that you have an idea of how you want your story to end.
Once I've gotten a fairly fleshed out synopsis of my story, I begin to
Break synopsis down into arcs or books
This is more for my own benefit, so I have a reasonable idea of how much work is involved. Of course, with 7" Kara, this is really just an estimate, and it's very prone to change. That's ok! Be open and flexible with your webcomic projects.
Once I've broken my synopsis down into arcs or books, it's time to
Break the synopsis down into chapters
Again, this is really just an estimate, to give me an idea of how much content I'm working with, and how long each chapter will be.
I work on a chapter per chapter basis, and occasionally go back to the original plotform synopsis document and make additions, notes, and changes.
So when I'm ready to begin a new chapter:
When writing a chapter
Copy that chapter text into a new file/Google Doc
 Another friendly reminder that Patrons have access to all current 7" Kara Chapter 7 files, including the Chapter 7 synopsis and fleshed out script!
Chapters should have a beginning, middle, and end as well. For children's comics, I lead in with large establishing shots, to give the young reader time to adjust to the change in scenery, and an opportunity to immerse themselves in the world.
Begin fleshing that chapter out
Once I've established where the chapter is going (and this is usually already established by the synopsis segment I've copy and pasted into a new document), it's time to start adding details and flesh things out.
Get an outside view on the overall chapter

For me, this involves sending my chapter (via Google Docs) to a couple beta readers. The earlier I can get critique, the more I'm able to make necessary changes and improve the story.
Break chapter into page units
Control Enter for each page, so every page is a fresh page. Convert original text to italic, begin fleshing out page in normal font.
I break my pages down by:
Tiers
A row of panels, almost always related. Think call and response, question and answer. This is based off a technique demonstrated by Kiyohiko Azuma in Yotsuba&!.
Panels
Individual illustrations on the page, usually surrounded by borders. Try to limit your panel to ONE action, if possible, unless its a special shot.
Dialogue
In comics, dialogue is usually contained in speech balloons, narration is contained in boxes. Try to stick to one type per page, if possible. Dialogue can quickly overwhelm the page, covering up the background and characters, so limit it in scenes where you need to show action or scenery.

Include background and staging direction

For the full script, please join my Patreon for access to 7" Kara materials!
Send Google Docs link to Beta readers for comments

I enjoy using Google docs for writing as it allows for easy comments and editing. I can save specific versions of files as an archive if necessary, and have access to these files on any computer and via my phone. Google docs is free and is saved to cloud storage (although I can also download a PDF copy if I wish), so it's really a very handy way to work on comics when you're constantly traveling.
As with synopsis edits, script and dialogue edits are an important stage in refining my work. I try to stay consistent with who I ask to beta read my work, and am careful to pick artists/readers who are familiar with comics, familiar with my work, and feel comfortable being blunt with me.
I've found that, if you are careful with picking your beta readers, the comments that sting the most are usually the ones that have hit home, and definitely deserve your consideration. The sting often comes from the idea of having to cut your darlings- remove portions of the script that you love most, or edits that will take additional time to complete. While these are painful, they're well worth considering.
This is just my method of planning and scripting chapters for 7" Kara. What's important is that you try a variety of methods, and work with the methods that suit your comic best.
Tips on Writing:
Leave time for revision- from yourself and from others. This makes for a stronger story
Don't tight script (dialogue, panel descriptions) unless you know where the chapter is going, you'll script yourself into a hole.
Don't write checks your artist can't cash:Too much dialogue per page, no room for characters/settingToo many panels per page, for every single pageToo many characters per page, every pageMultiple actions in a single panel by a single character (this is just impossible)
Outside Resources:
Scripting Resources: Dark Horse Scripting GuidelinesDark Horse Sample ScriptWriting Comics: Scripting ProgramsChris Oatly: How to Write a Comic Script and Other More Important ThingsScript: How to Write a Comic Book Script (superhero biased)Sample Comic Book Scripts (superhero biased)Friends with Boys Comic Process (YA graphic novel by Faith Erin Hicks)The Comics Experience: Comic Script Archive
The Beat- Making Comics- Script Format
Scripting Programs
ScrivnerGoogle DocsMicrosoft Word
Final Draft- Screenplay and Script writing software
Templates
Oscar Wilde Comics- Word Template
How to Format a Comic Script- links to multiple templates
This series is sponsored by:
The images used in this installment of Intro to Comic Craft are all from Chapter 7 of 7" Kara, the second chapter in Volume 2. To purchase your own copy of Volume 1, and help support my endeavors, please visit my shop for physical copies, or my Gumroad for PDF copies of Volume 1 or Chapter 5 (the first available chapter in Volume 2)
Please consider donating to this blog or purchasing from Natto-shop (http://nattosoup.com/shop) if you want me to continue publishing quality content. All materials tested were purchased from my own pocket. Keep on Truckin' Nattosoup is not under any sponsorship.
February 12, 2017
Watercolor Basics: Working In Batch: Securing Your Paper
This post was brought to you due to the generosity of my Patrons on Patreon.

Enjoy the content on this blog? Want to help support the continued creation of longform series like Watercolor Basics and Intro to Comic Craft? Join us on Patreon! Your monthly contribution enables me to dedicate the time necessary to researching, purchasing, photographing, demonstrating, organizing, and writing everything that goes on this blog.
Membership starts at just $2 a month, and grants you access to all sorts of goodies, including comics, comic process, backer exclusive content, and early access to popular series.
In past Watercolor Basics posts, we've talked about conventional and unconventional ways to secure your watercolor paper while painting. We've talked about why stretching is beneficial, and the materials used in the process. In this post, we're going to talk about securing images in bulk for painting. These 5"x7" cards are too small for stretching to be worthwhile, but they still need to be secured to prevent buckling.
Materials Used:
Corrugated Plastic
Blue Painter's Tape
Bulldog Clips
Binder Clips
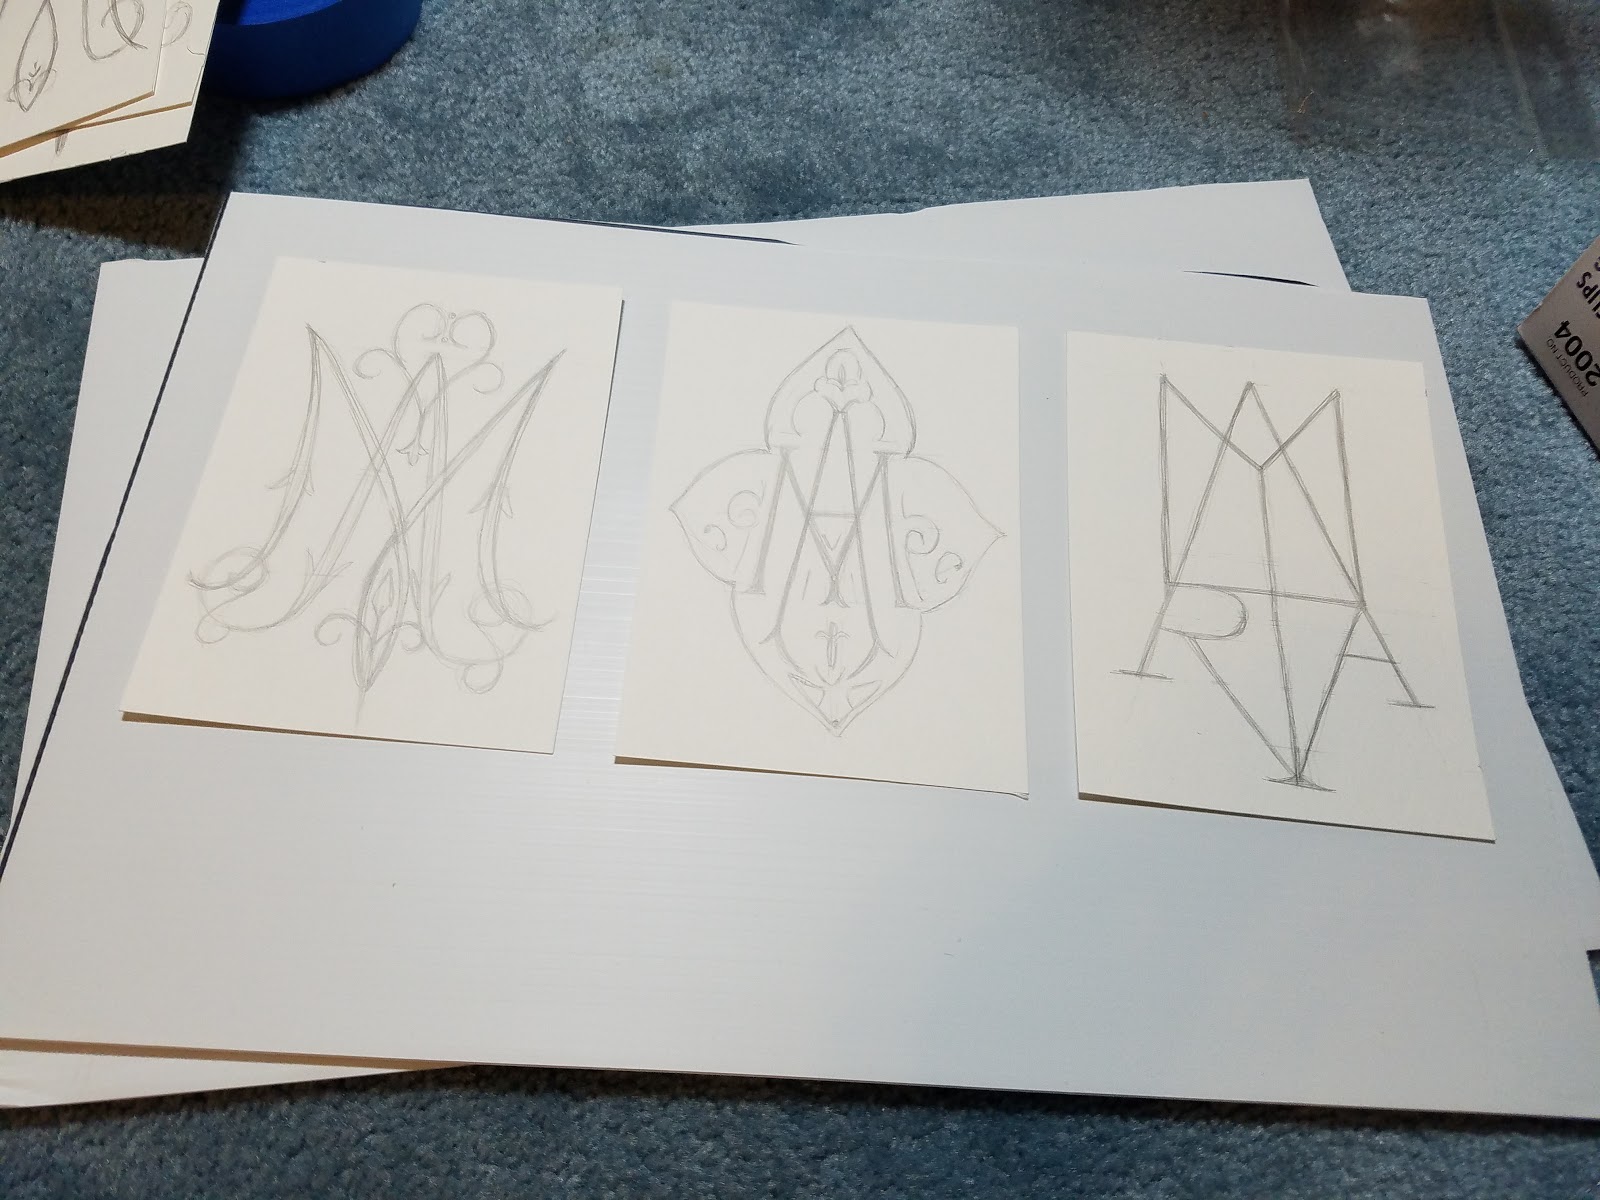
Step 1: Deciding on a Layout
I want to secure as many cards as possible to my pre-cut corrugated plastic, as I don't have much room for drying images.

I try out a couple demo layouts, and find one that works well.

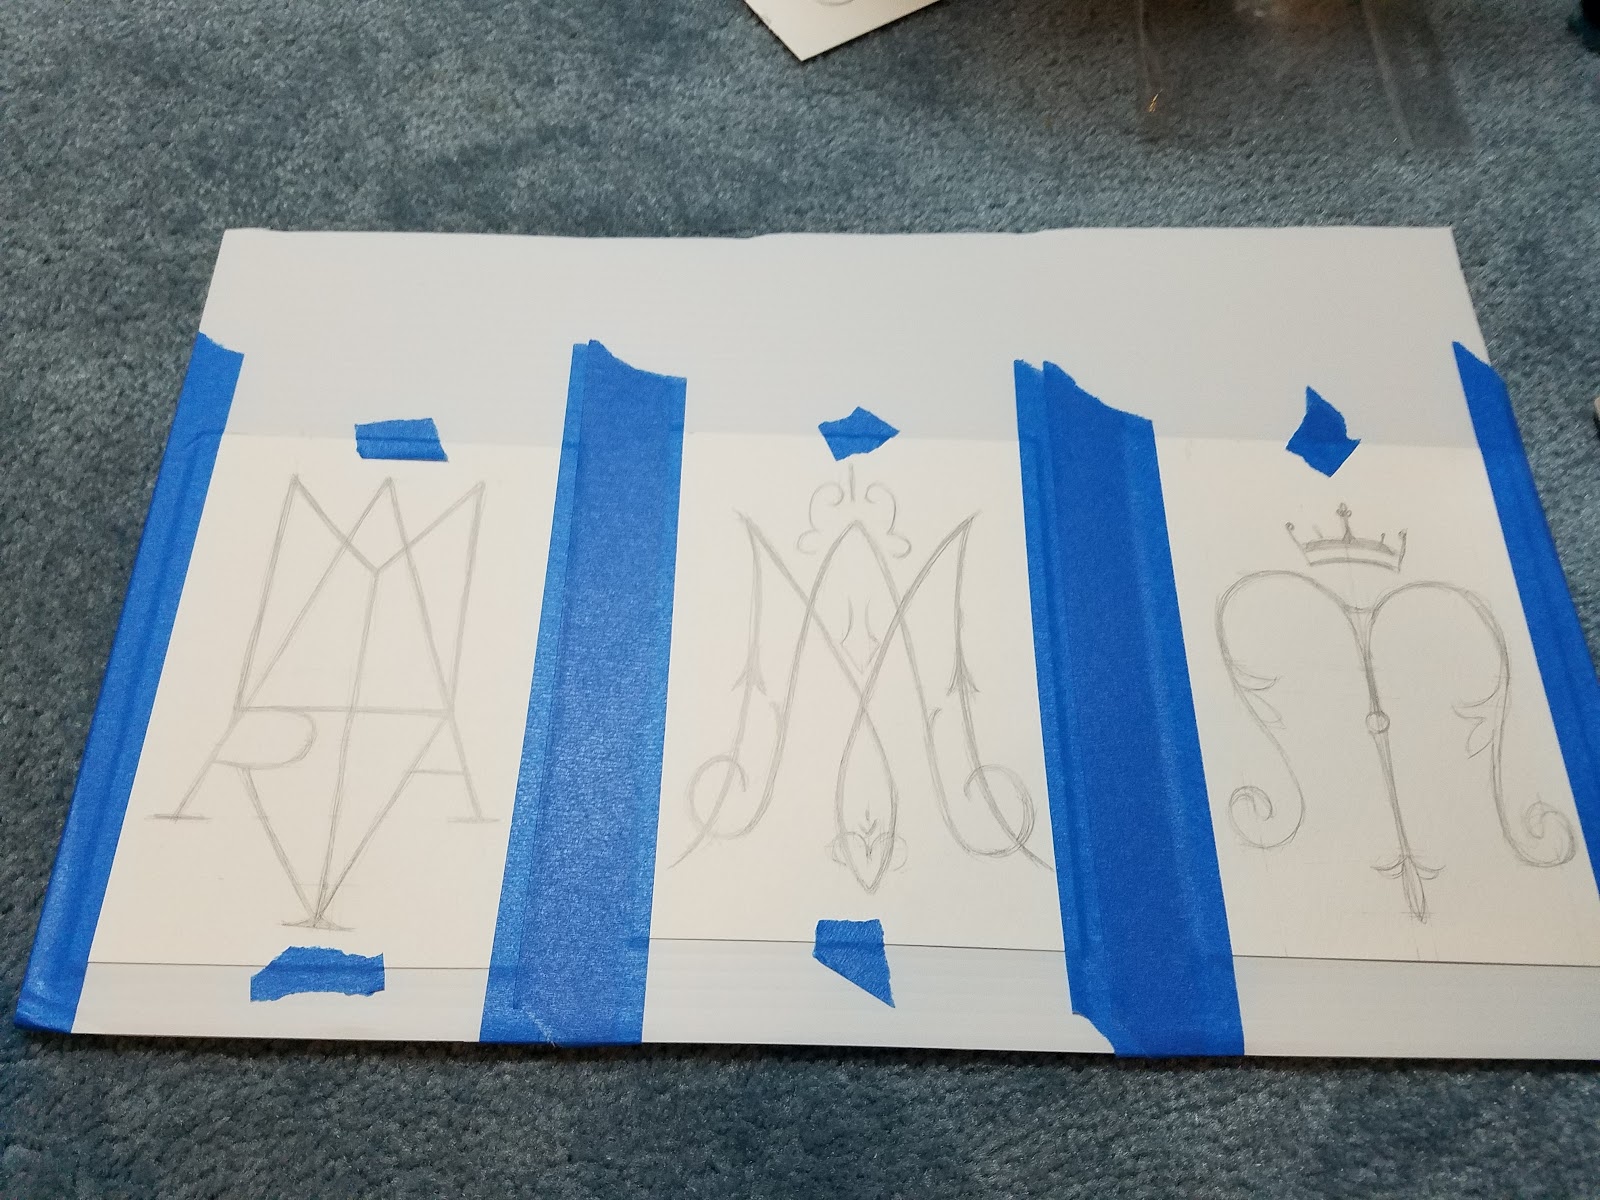
Step 2: Temporarily Secure Your Images
To prevent shifting while handling.

Step 3: Tape down the full length of the sides

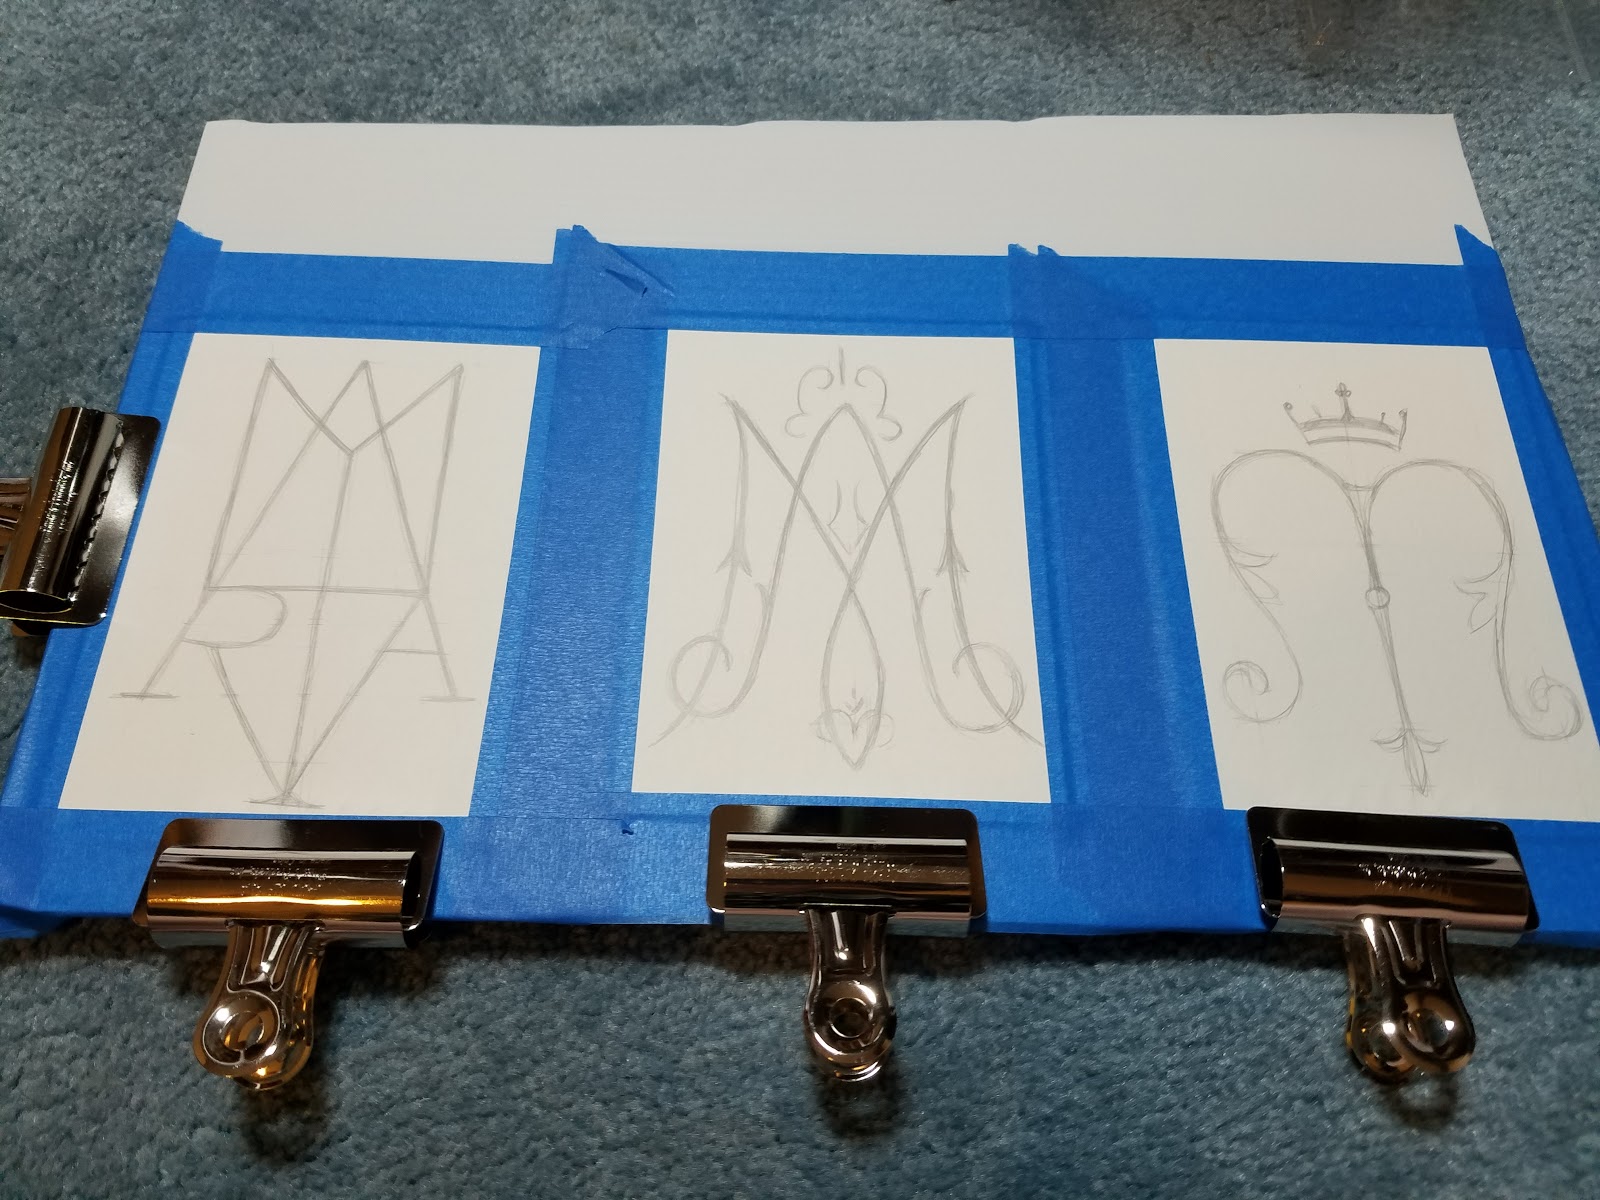
Step 4: Tape tops and bottoms
Along the edges of the corrugated plastic, I also use bulldog clips to help hold the watercolor paper in place.

Step 5: Repeat process as necessary

Step 6: Secure edges nearest edge of chloroplast with bulldog clips

Now your images are ready to paint!
Painting in batch can come in handy- I paint 7" Kara pages in batch, one scene at a time. Batch painting allows for color consistency, as you mix your colors in large batches using welled palettes.
The Watercolor Basics series is made possible thanks to the generosity of my friends on Patreon. Their support enables me to dedicate the necessary time and resources for creating quality tutorials such as those in this series. If you have enjoyed this post, or any other Watercolor Basics post, please consider joining our community of artnerds, and funding future content.

This particular post was sponsored by 7" Kara, a delightful watercolor comic for all ages. Join tiny Kara as she ventures into the large world beyond her dollhouse doors, meets humans, and rides cats. Volume 1, written and illustrated by me, and full of the art you see on this blog, is available for $15+shipping from my online store.
Please consider donating to this blog or purchasing from Natto-shop (http://nattosoup.com/shop) if you want me to continue publishing quality content. All materials tested were purchased from my own pocket. Keep on Truckin' Nattosoup is not under any sponsorship.

Enjoy the content on this blog? Want to help support the continued creation of longform series like Watercolor Basics and Intro to Comic Craft? Join us on Patreon! Your monthly contribution enables me to dedicate the time necessary to researching, purchasing, photographing, demonstrating, organizing, and writing everything that goes on this blog.
Membership starts at just $2 a month, and grants you access to all sorts of goodies, including comics, comic process, backer exclusive content, and early access to popular series.
In past Watercolor Basics posts, we've talked about conventional and unconventional ways to secure your watercolor paper while painting. We've talked about why stretching is beneficial, and the materials used in the process. In this post, we're going to talk about securing images in bulk for painting. These 5"x7" cards are too small for stretching to be worthwhile, but they still need to be secured to prevent buckling.
Materials Used:
Corrugated Plastic
Blue Painter's Tape
Bulldog Clips
Binder Clips
Step 1: Deciding on a Layout
I want to secure as many cards as possible to my pre-cut corrugated plastic, as I don't have much room for drying images.

I try out a couple demo layouts, and find one that works well.
Step 2: Temporarily Secure Your Images
To prevent shifting while handling.

Step 3: Tape down the full length of the sides

Step 4: Tape tops and bottoms
Along the edges of the corrugated plastic, I also use bulldog clips to help hold the watercolor paper in place.

Step 5: Repeat process as necessary
Step 6: Secure edges nearest edge of chloroplast with bulldog clips
Now your images are ready to paint!
Painting in batch can come in handy- I paint 7" Kara pages in batch, one scene at a time. Batch painting allows for color consistency, as you mix your colors in large batches using welled palettes.
The Watercolor Basics series is made possible thanks to the generosity of my friends on Patreon. Their support enables me to dedicate the necessary time and resources for creating quality tutorials such as those in this series. If you have enjoyed this post, or any other Watercolor Basics post, please consider joining our community of artnerds, and funding future content.

This particular post was sponsored by 7" Kara, a delightful watercolor comic for all ages. Join tiny Kara as she ventures into the large world beyond her dollhouse doors, meets humans, and rides cats. Volume 1, written and illustrated by me, and full of the art you see on this blog, is available for $15+shipping from my online store.
Please consider donating to this blog or purchasing from Natto-shop (http://nattosoup.com/shop) if you want me to continue publishing quality content. All materials tested were purchased from my own pocket. Keep on Truckin' Nattosoup is not under any sponsorship.
February 8, 2017
Watercolor Basics: Working In Batch: Construction for Icons
Logo and icon reproduction may not be a skill you utilize often, unless you are interested in illuminated letters or decorative handlettering. In this tutorial, I'll show you the very basics of copying iconography onto the paper of your choice.
Better options for reproduction:
Graphite transfer (tutorial)
Printed bluelines (tutorial)
Lightbox, computer screen, or bright window (for a cheap lightpad, try this)
Use of a projector (like this)
Transfer paper like this
Use of projecting equipment like this lettering guide
Unfortunately, none of these options were accessible to me at the time, so I had to reproduce my icons by hand. These were created as a Christmas present for my mother, and the icons were selected by her.
Materials:
Paper torn to sizeH-HB PencilsErasers
These images are really logos or icons, and as I'm reproducing them without computer assistance (or the aid of a copy machine), I needed to be as accurate as possible. These were reproduced from provided reference for the typefaces, so rather than freehand my images, I needed to setup guidelines.
Step 1: Divide your white paper in half vertically with pencil
Step 2: Divide your paper in half horizontally with pencil
Dividing your picture plane in this manner will help you align your icon.


I begin at the center line, choosing in the original that meet or are close to the center line. If necessary, I add more guidelines to help with placement. My goal is to keep everything in proportion, and ensure it fits the 5"x7" watercolor paper I've prepared.


Once I've drawn all the icons, and am satisfied with the result, I erase the guidelines.
The Watercolor Basics series is made possible thanks to the generosity of my friends on Patreon. Their support enables me to dedicate the necessary time and resources for creating quality tutorials such as those in this series. If you have enjoyed this post, or any other Watercolor Basics post, please consider joining our community of artnerds, and funding future content.
This particular post was sponsored by 7" Kara, a delightful watercolor comic for all ages. Join tiny Kara as she ventures into the large world beyond her dollhouse doors, meets humans, and rides cats. Volume 1, written and illustrated by me, and full of the art you see on this blog, is available for $15+shipping from my online store.
Please consider donating to this blog or purchasing from Natto-shop (http://nattosoup.com/shop) if you want me to continue publishing quality content. All materials tested were purchased from my own pocket. Keep on Truckin' Nattosoup is not under any sponsorship.
Better options for reproduction:
Graphite transfer (tutorial)
Printed bluelines (tutorial)
Lightbox, computer screen, or bright window (for a cheap lightpad, try this)
Use of a projector (like this)
Transfer paper like this
Use of projecting equipment like this lettering guide
Unfortunately, none of these options were accessible to me at the time, so I had to reproduce my icons by hand. These were created as a Christmas present for my mother, and the icons were selected by her.
Materials:
Paper torn to sizeH-HB PencilsErasers
These images are really logos or icons, and as I'm reproducing them without computer assistance (or the aid of a copy machine), I needed to be as accurate as possible. These were reproduced from provided reference for the typefaces, so rather than freehand my images, I needed to setup guidelines.
Step 1: Divide your white paper in half vertically with pencil
Step 2: Divide your paper in half horizontally with pencil
Dividing your picture plane in this manner will help you align your icon.

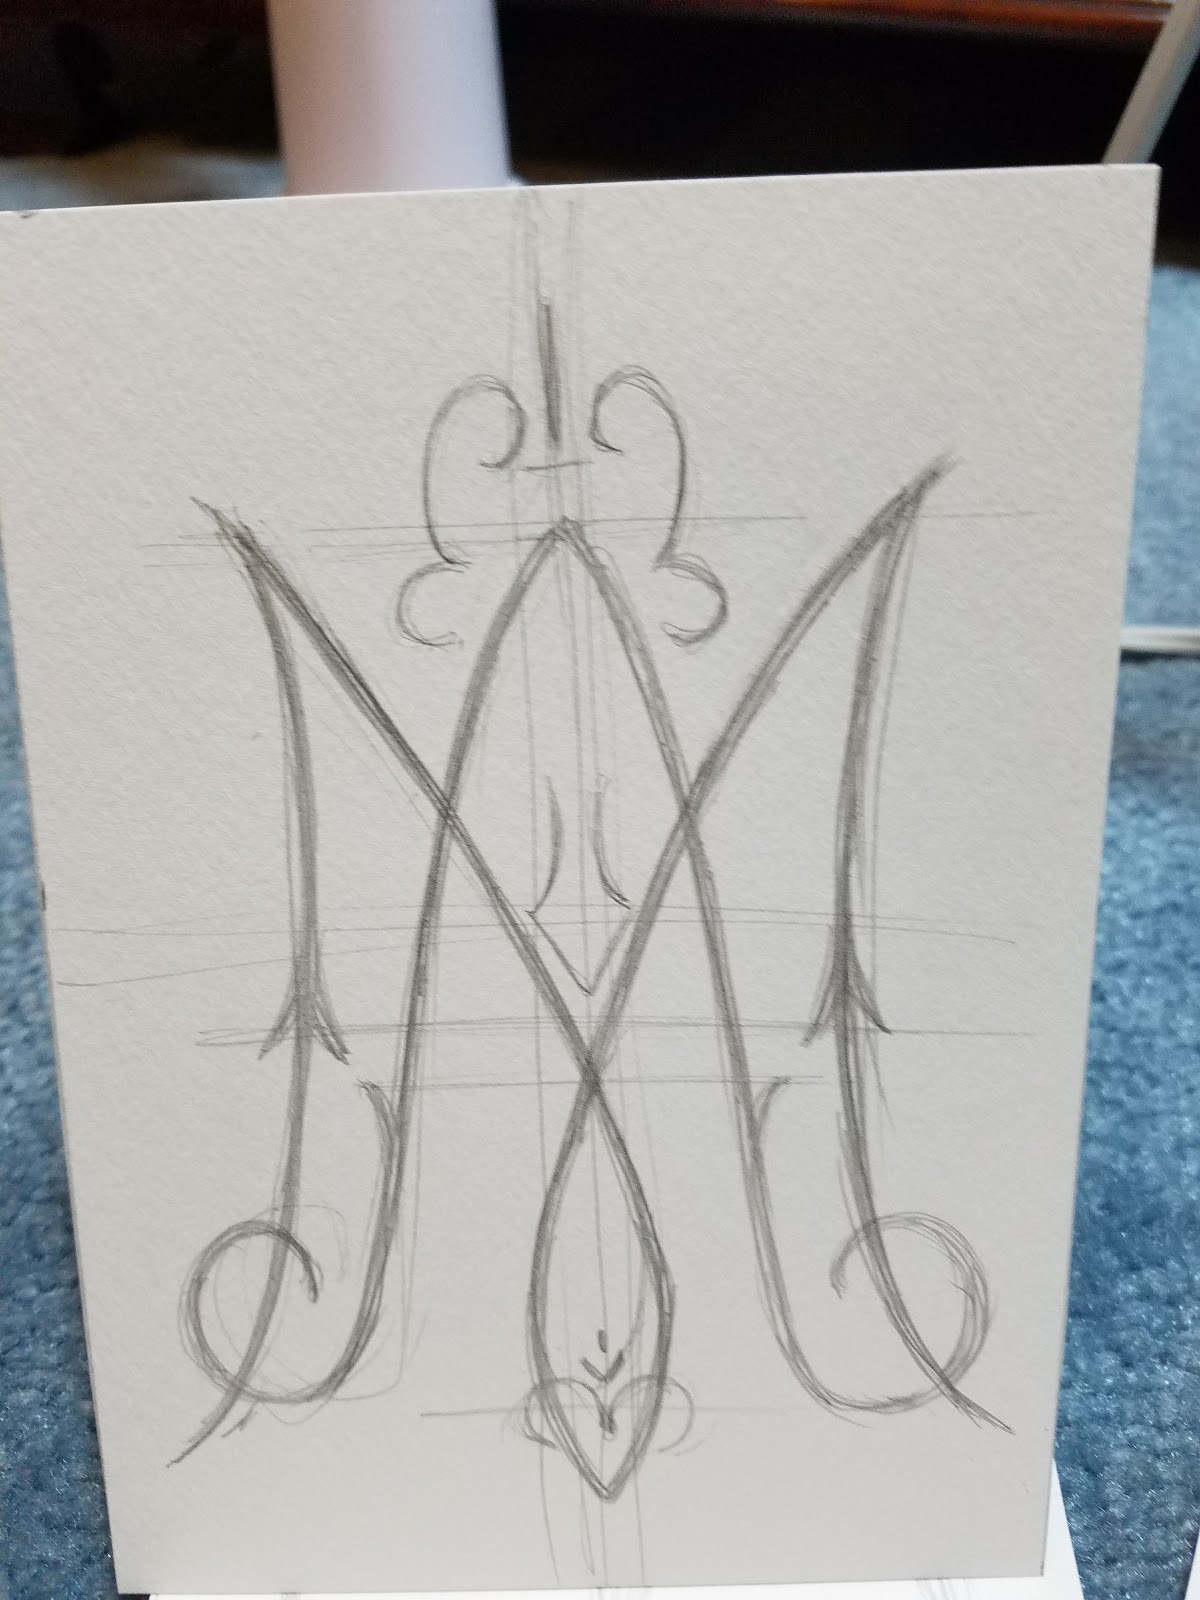
I begin at the center line, choosing in the original that meet or are close to the center line. If necessary, I add more guidelines to help with placement. My goal is to keep everything in proportion, and ensure it fits the 5"x7" watercolor paper I've prepared.
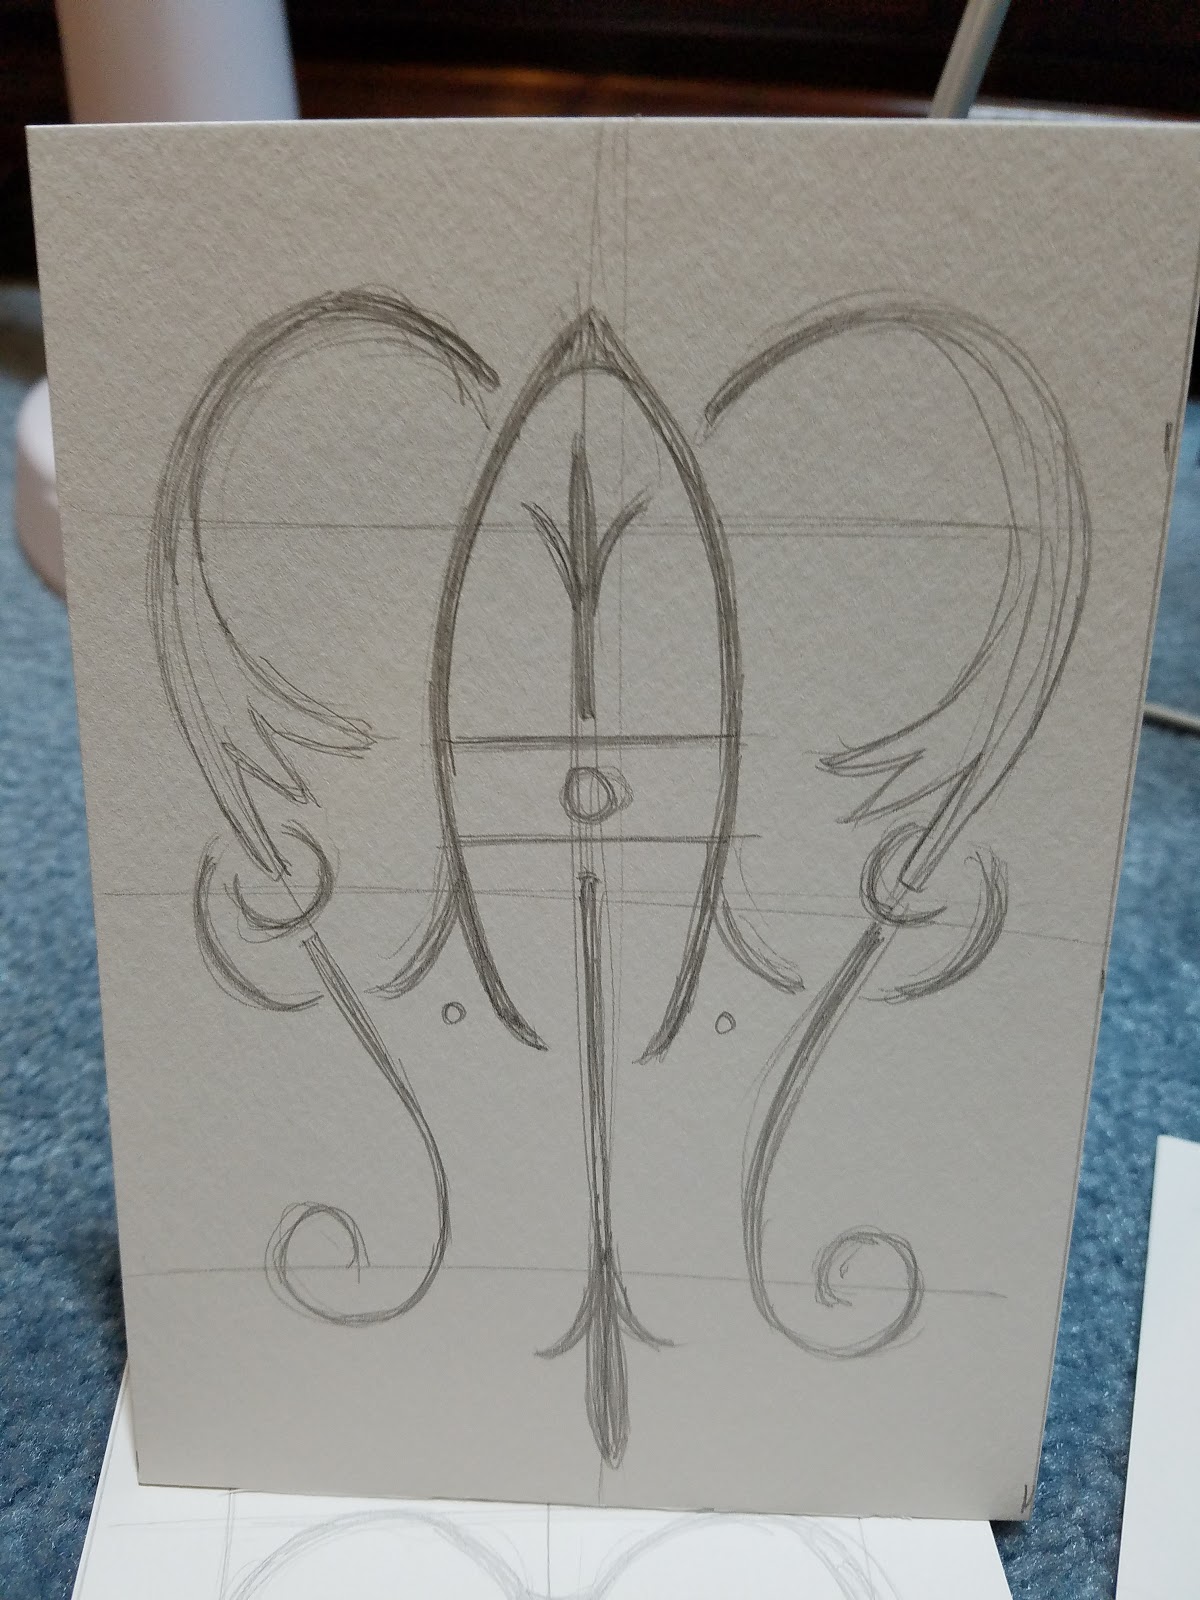

Once I've drawn all the icons, and am satisfied with the result, I erase the guidelines.
The Watercolor Basics series is made possible thanks to the generosity of my friends on Patreon. Their support enables me to dedicate the necessary time and resources for creating quality tutorials such as those in this series. If you have enjoyed this post, or any other Watercolor Basics post, please consider joining our community of artnerds, and funding future content.
This particular post was sponsored by 7" Kara, a delightful watercolor comic for all ages. Join tiny Kara as she ventures into the large world beyond her dollhouse doors, meets humans, and rides cats. Volume 1, written and illustrated by me, and full of the art you see on this blog, is available for $15+shipping from my online store.
Please consider donating to this blog or purchasing from Natto-shop (http://nattosoup.com/shop) if you want me to continue publishing quality content. All materials tested were purchased from my own pocket. Keep on Truckin' Nattosoup is not under any sponsorship.


