
Barb Drozdowich's Blog, page 45
January 25, 2015
How to add an Amazon Affiliate Link to a cover graphic (How to Hotlink a picture) in WordPress
In a previous post I described how to embed an Amazon affiliate link into a text link. Today we are going to talk about embedding an affiliate link in a graphic. We will use a cover graphic of a book as an example.
![]()
Many people add an Amazon Affiliate link to their post. It is a way of offering your readers an easy way to purchase the product that you are talking about. Let’s face it, most of us can’t support a family with affiliate money, but my Amazon affiliate supplies me with the odd book.
I have a pet peeve about the appearance of links in posts. I don’t want to see a nasty long Amazon link in the post like this:
and I don’t want to see a cover graphic that is obviously an affiliate graphic like this:
Although I often embed an affiliate link in a text link, I may also ‘hotlink’ a picture with an affiliate link. It may be a way of getting a few extra cents, I mainly use affiliate links to allow me to count the number of times a buy link is clicked on vs the number of times that link results in a purchase.
Let’s go through the process one step at a time.
Step 1) Log on to your Amazon affiliate account and hover over the Links & Banners menu item and choose Product Links from the dropdown list. That will bring up the screen below.

Step 2) Choose ‘Kindle Store’ in the drop-down (indicated by the red arrow in the graphic below) and type the name of the book in the field indicated by the second red arrow. Click on the orange Go button.

Step 3) This will bring up choices as you can see in the graphic below. Find the book that you are looking for in the list and then click on the Orange ‘Get Link’ button.

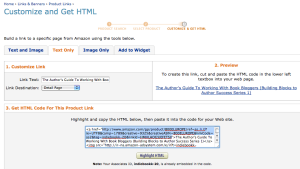
Step 4) The first screen that comes up shows the cover of the book that you are featuring. I just want the text link, so I click on ‘Text Only’ as indicated by the red arrow in the graphic below. That will bring up the screen that you see below. We will need part of the code that is in the red box as indicated below.

Step 5) If you look at the graphic below, you’ll see that I have highlighted part of the code. This is the portion that you want. It looks like this:
http://www.amazon.com/gp/product/B00E...

The portion of the code that I want is in quotes (but don’t include the quotes), starts with an ‘http’ and ends with my affiliate id. We are going to take that code and use it as the link to embed in a cover graphic like below:
Click on the cover graphic above and see where you go. Unless I told you, are you aware that you are clicking an affilate link? Isn’t it neater?
To actually put the affiliate link in place, just change the ‘link to’ field to ‘custom link’ and insert the link in the field below as you can see in the graphic below.

By the way, you can do this on Blogger – exactly as I’ve done it on WordPress.
~~~~~
Let me know if you have any questions about this post or anything else – I’m always happy to answer questions. If you want regular Tech Hint updates in your inbox, subscribe using the button in the sidebar to your right.
Make sure that you use the little share buttons below to share this post with your friends. I can be found on most social media and I’ve published 6 books designed to help authors and bloggers with various areas of concern. All available for less than the price of a latte!
The post How to add an Amazon Affiliate Link to a cover graphic (How to Hotlink a picture) in WordPress appeared first on Bakerview Consulting.


January 18, 2015
Wrangle your Images on WordPress – Part 4
Today we will finish up our series on wrangling pictures in WordPress.
If you are arriving late to the party as it were, you can catch up on what we’ve covered in previous weeks. The first week of our series, we covered some basics in picture handling HERE. The second week we ventured into how to display pictures using a plugin called Tiled Galleries. That post can be found HERE. The third week we talked about editing your pictures within WordPress, rather than editing the pictures first on your computer before uploading them. That post can be found HERE.
Today we are going to cover a few more tricks to manipulating pictures to finish up this series.
Have you ever wondered how people manage to get a nice row of pictures like we see below?

The trick to do this is to left-justify all the pictures.
To start the process of inserting your pictures, click on “Add Media” from your post or page and choose the picture that you want to start with. Once you have clicked on the first picture, make sure you choose Left-justified.

To put that picture into place on your post or page, you can click on the blue “Insert into post” button. Repeat this process for as many pictures as you want to show. As you can see from the screenshot below, I’ve chosen to include 4 pictures in a row.

Looks nice, doesn’t it? Click on ‘Save Draft’ and then look at the preview.

What you actually see will depend on several factors – the most important being the available space for the pictures to be displayed. As you can see, on my blog, the pictures more than fill up one line.

If you click on the ‘Text’ tab and look at the code, you’ll see at a glance that all the code is continuous, there are no blank lines or odd spaces. Sometimes when you try to insert pictures into a post or a page, you end up with an odd half space like below:

If that happens, the first thing to do is to look at the ‘Text’ view as you can see below.

As you can see by the red arrow, there is an odd blank line in the code. The easiest way to get your pictures back in line is to remove this blank line.
Have you ever had trouble inserting text into a post after a certain picture. A trick to doing that is to use characters as markers.

As you can see in the screenshot above, I’ve decided to insert text after the last picture. I simply put a series of ‘Xs’ at the end of the code (in the ‘text’ view) and then switch to the ‘Visual’ view.

On the ‘Visual’ view of your post or page, look for the series of Xs and that is where you can click your cursor and move it to where you want the text to appear.
I’m going to finish up with a reminder or two.
To edit a picture, click once on the picture and then click on the pencil to edit it.
That will lead you to the screen below:

Always fill in the Alternative Text field. When a picture is added to a post or page, the name of the picture is filled into the Alt. Text field but you can change it to something more meaningful. Since my example is a book cover, I can change the Alt.text field to the title and author of the book as you can see below:

Many people either don’t bother with Alt.Text fields. Many readers now read websites using a screen reader. Screen readers only read text – they can’t read pictures – so when you give your picture an Alt.Text the screen reader has something to read. You add extra value to your post!
Two more hints.
The first one is to make use of the ‘Link To’ field. In our current example, I’ve posted a book cover. Why not link it to an Amazon buy page. That way, when someone clicks on the cover graphic picture, they will be lead to Amazon so that they can buy a copy. Remember to make use of the ‘Open link in a new window/tab’ checkbox. That way your readers will be able to easily find their way back to your blog once they have bought a copy of the book.

I hope this series has helped you manage pictures a bit easier. Don’t hesitate to leave questions or find me on social media . I LOVE answering questions!
The post Wrangle your Images on WordPress – Part 4 appeared first on Bakerview Consulting.
January 11, 2015
Manipulating pictures Part 3 – Editing within the Media Library
Today we are continuing with our theme of manipulating pictures when using WordPress.
To keep you up to date, we have talked about basic manipulation of pictures in WordPress HERE, and last week we talked about using the Tiled Gallery plugin that has become so popular on WordPress HERE.
The topic we are going to attack today is how to edit pictures within WordPress. I find that most people edit pictures before they upload them to their Media Library, but that isn’t necessary.
Have you ever uploaded a picture that is upside down?

You get the picture into the Media Library and you see this:

To fix this picture, start by clicking on the ‘Edit’ button underneath the entry in your Media Library. The following screen will appear.

Scroll further down and look for the ‘Edit Image’ button as you can see in the graphic below:

Click on that button and following screen will appear:

We are going to look at two parts of this screen – indicated by the red rectangles.
First of all, we will deal with the functionality from the buttons above the picture with several examples. These buttons will allow you to Crop, Rotate Counter-Clockwise, Rotate Clockwise, Flip Vertically, Flip Horizontally, Undo, Redo respectively from left to right.
Let’s start with a simple rotation function to get the upside down picture looking right side up. If I click on the second button from the left I can rotate the picture counter-clockwise. Click on the button once, and I will see the following:

To use the ‘Crop’ button you need to select a portion of the picture as you see in the graphic below. The red arrow pointing to the numbers on the right will give you the size of the selected section.

Once you have selected the size that you want, click on the ‘Crop’ button as indicated by the top arrow. The will remove all the area of the picture not selected and display only the area that I want – see below:

If you are happy with the cropped section, look to the bottom for the ‘Save’ button as indicated by the red arrow in the graphic above and click to save the picture.
Next we are going to use the ‘Scale’ functionality.

The scale functionality allows you to increase or decrease the size of your picture in proportion. As you can see below, enter the new dimension – in this case 200 px – into the first box.

As soon as you tab out of the field, the second number will change so that the picture stays in proportion. Click on the blue ‘Scale’ button and the picture will visibly reduce in size as you can see below.

Once you are happy with the changes, click on the ‘update’ button to save the changes.
If you go through the process of rotating the picture, scaling it, or other changes, and then save, the changes will be saved in the Media Library as you can see in the graphic below.

Play with these functionalities on your blog. Have fun!
Don’t hesitate to ask any questions that may come up.
The post Manipulating pictures Part 3 – Editing within the Media Library appeared first on Bakerview Consulting.
January 4, 2015
How to make your graphics behave on WordPress using Tiled Galleries – A Tutorial
A few weeks back I created a post to help make your graphics behave on WordPress. This post got so much attention, that I am going to go one step further today. We are going to talk about some more ways to make your graphics behave on WordPress.
One of the questions that I got was how to make placing more than one picture in a row easier. I like using one of the Jetpack functionalities for this purpose.
Jetpack brings all sorts of cool functionality to a blog in one plugin. We are going to talk about one aspect of Jetpack called ‘Tiled Galleries.’ To make sure that your Tiled Galleries are activated, go to ‘Jetpack’ on the left menu of your blog (once you’ve logged in) and click on ‘Settings.’ Make sure that ‘Tiled Galleries’ is activated.

Once it is activated, you are ready to use it.
Go to ‘Posts’ and open a new post. Just to make it look like a real post, type something in, hit enter to go to another line and then we’ll put some pictures in place.
Click on the ‘Add Media’ button and you’ll see the usual ‘insert media’ screen pop up:

Next I want you to click on the ‘Create Gallery’ link on the left. The following screen will then pop up:

Use the shift key and click on all the pictures that you want to include in your gallery. I’ve clicked on 3 pictures. In the bottom right corner you will see a blue button labelled ‘Create New Gallery’ – click on it and you’ll get the following screen:

You’ll see that we now get to describe the orientation of the pictures. Choose the size and the type of gallery and then click on ‘Insert Gallery.’ For the first example, I chose the size of ‘Medium’ and the Type of ‘Tiled Mosaic.’ The following screen will appear:

What you see in the graphic above is NOT what it will look like  To see what this will look like, click on ‘save draft’ and then click on ‘preview.’ 3 pictures doesn’t do much in a Tiled Gallery, so I put 6 pictures in place and you can see what happens.

Kind of an interesting arrangement for pictures. When I was making choices, I clicked on ‘Tiled Mosaic.’ If I now click on ‘Thumbnail Grid’ I can get an arrangement that looks like this:

To add even more coolness to the orientation, I can add captions.

One last feature to talk about is the ‘circle’ type that is available. While it looks kind of weird for book covers:

I’m sure that this would have an application for a different graphic than the book covers that I am currently using for our example.
Next let’s talk about the specific functions of this plugin in terms of layout.

Looking at the graphic above, you can see that the graphic has an ‘X’ on it, as does the typical ‘Add Media’ function. Clicking on the ‘X’ will remove the graphic from the gallery. It is possible to link the gallery to an ‘attachment page’ which is a page on your blog, or a ‘media file’, but the one negative of this arrangement is that it isn’t possible to link each individual picture to a exterior link – such as a buy page on Amazon. Going back to the graphic above, you can determine how many pictures are listed across the page. You’ll see that the number is set at 4 in the example above. To see what 4 pictures in a row would look like, see the graphic below:

Keep in mind that the actual number of pictures that can be shown in a line across your posts relies on the size of the space available, and the size of the graphics you are using.
Going back to the previous graphic, it is possible to reverse the order of the pictures by clicking on the ‘reverse order’ button above the last graphic. I would also caution about using the thumbnail setting for book cover displays. The Thumbnail size is generally set to a square – around 150px by 150px. Most book covers are rectangular, not square, and do not display well.
To find out what your preset image sizes are, go to ‘Settings’ on your menu bar down the left side and then click on ‘Media.’ The sizes that you see are set by the theme that you have chosen for your WordPress blog. If you change any of these sizes, it will change the preset sizes for all the pictures on your blog.

I hope that you take a few moments and play with the Tiled Gallery plugin that is part of the Jetpack function on WordPress. See what you can do with it.
~~~~~
Let me know if you have any questions about this post or anything else – I’m always happy to answer questions. If you want regular Tech Hint updates in your inbox, subscribe using the button in the sidebar to your right.
Make sure that you use the little share buttons below to share this post with your friends. I can be found on most social media and I’ve published 6 books designed to help authors and bloggers with various areas of concern. All available for less than the price of a latte!
The post How to make your graphics behave on WordPress using Tiled Galleries – A Tutorial appeared first on Bakerview Consulting.
December 28, 2014
Who has been Naughty or Nice on Social Media? (Infographic)
How did you survive the holidays so far?
Always seems to be a time of stress for many, and those of you who were out in the malls, regardless of which side of the cash register you were standing on, I feel your pain!
I try to finish Christmas shopping before December even starts. I find that I lose my Christmas Spirit if I have to contend with too many grumpy people. This year, having a collection of retail employees at my dinner table, I heard hair-raising stories of bad behaviour in the local stores this year!
When I stumbled on this infographic created by friends at Hootsuite, I knew that I just had to share it! I hope you enjoy what it shares as much as I did!
The post Who has been Naughty or Nice on Social Media? (Infographic) appeared first on Bakerview Consulting.
December 8, 2014
Comparison of WordPress.org vs WordPress.com (Infographic)
Last week I talked about bloggers inadvertently breaking the rules for WordPress.com and having their blog shut down. During my research for that post, I discovered a wonderful infographic on a site that I frequently read, WP Beginner. For those of you that are interested in quality WP tips and guides, please drop by WP Beginner and subscribe to their feed! This site is filled with helpful information!
Something that is pointed out on the graphic below is the “upgrades” that are available for WordPress.com users. When one considers that the costs to host a WordPress.org blog is less than $100.00/year, I wonder why people end up paying so much money to WordPress.com for upgrades. Maybe they don’t know any better….
Enjoy this wonderful infographic and please sure with people that might find it helpful!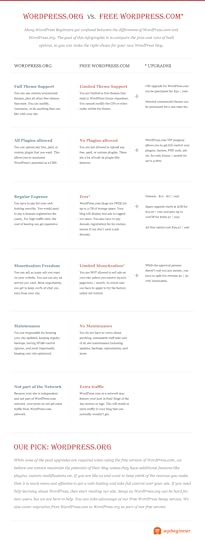
The post Comparison of WordPress.org vs WordPress.com (Infographic) appeared first on Bakerview Consulting.
November 30, 2014
Are You Following the Rules on WordPress.com?
Have you heard the stories on social media about bloggers that have been shut down by WordPress.com?
WordPress.com says they can’t post book blog tours…really?
How dare they….but wait….did you read the rules or the ‘Terms of Service’ when you started your blog?

I know that I didn’t 
Too often when we are signing up for accounts, we are asked to agree to a massive list of rules. Rather than read all the legal mumbo jumbo, we just click on OK.
Even if we did read SOME of the rules – do you actually get beyond the first paragraph before you start scanning? Here’s the first paragraph from WordPress.com:

Even if you did read the first paragraph, you probably knew that you wouldn’t be involved in publishing spam, viruses or hate content…if you are like me, you just want to share about books. I mean, really, spam is that stuff that appears in your comments from idiots who have nothing better to do. Isn’t it? Do you actually know the definition of spam?
According to the dictionary, the word Spam used as a verb means: send the same message indiscriminately to (large numbers of recipients) on the Internet.
More on that in a bit.
Let’s look at some more rules.

Frankly, I got to this rule and started thinking about some of the books that I read. Some of them are pretty racy. Do they qualify as pornographic…there was that issue with some erotica books being removed from various retailers some time ago…hhhmmm…let’s leave that one for a bit also.

If you continued to read, you would have found the above comment. Although I’m familiar with the Reblogging function available on WordPress.com, I’ve never been totally comfortable with it. It smacks of copyright infringement to me. But…if you decide to have a WordPress.com blog you have agreed to this function – people will and can reblog your posts without your consent. Hhhmmm.
A bit further down you will find WordPress.com’s paragraph on Copyright infringement.

This paragraph actually comforts me. If someone infringes on my copyright, they will be shut down. I’m still uncertain about the re-blogging function, but if someone out and out copies my material, WordPress.com will take action.
Onward down the page of rules…
Did you know that WordPress.com will and can advertise on your blog? Here’s the part of the Terms of Service that states that rule:

To stop WordPress.com from advertising on your blog, you can pay them $30.00USD/year. (or you can purchase a larger package that has no ads as one of the features)
Towards the end of the list of rules is the paragraph about Termination.

Pretty harsh. WordPress.com states that they have the right to terminate the access to any or all part of your website and any time – with or without cause, with or without notice.
But they wouldn’t do that, would they? I mean, it’s your blog, right?
It’s my impression that if you follow the rules and mind your Ps and Qs, your blog will chug along without ever attracting the attention of WordPress.com.
Being the overly cautious person that I am…I back up my blogs religiously…I don’t want to look all my work! And besides…I don’t break any of the rules…
Let’s go back to the top of the page of rules and look at the second paragraph:

Isn’t that just cheeky! They give you a link to the types of blogs that are not welcome on WordPress.com and then make the assumption that you won’t look.
Let’s look and see what they list:

There it is….last one on the list – Book Tour Blogs. Bummer…..
To repeat the rule – Blogs that consist primarily of pre-written publicity material, as opposed to original book reviews, for the purpose of promoting books and driving traffic to other promotional and giveaway sites are not welcome on WordPress.com. It seems that WordPress.com considers many blog tour posts spam.
What’s on your book blog? Do you host the odd tour and mostly post original content that you created? Or do you post blog tours the majority of the time?
If the majority of your content is supplied by blog tour companies or PR people, you might just find your blog deleted. Because, knowingly or unknowingly, you have just broken one of the rules that you agreed to follow when you opened your WordPress.com blog
Are you getting to this point and saying to yourself…”I have a Worpress.org blog….or I have a Blogger blog so this doesn’t apply to me?” Come back next Sunday and we’ll discuss WordPress.org!
The post Are You Following the Rules on WordPress.com? appeared first on Bakerview Consulting.
November 24, 2014
How to make your pictures behave in a WordPress blog post – A Tutorial
Welcome back to Bakerview Consulting!
I spend a lot of time explaining the finer points of manipulating graphics on WordPress Blogs. Everyone has trouble with pictures at one point or another, myself included! Today we are going to do an basic tutorial covering inserting pictures and editing them once they are there.
There are several ways of inserting a graphic into a WordPress blog today we are going to start from the Post edit screen.

As you can see from the graphic above, find the ‘Add Media’ button and click it.

This will bring up the ‘Insert Media’ popup screen. As you can see above, there are three sources of pictures – you can find pictures in your Media Library, you can Upload Files from your computer or you can Insert from a URL.
Today we are going to assume that your picture is already in your Media Library. Click on the Media Library tab (if it isn’t already highlighted)

Find the picture that you want to insert into your blog post and click on it. As you can see from the graphic above, the picture will then have a check mark on it, and the information about the picture will be displayed to the right of the screen.

Scroll down to the bottom of the Insert Media screen and you’ll see the above graphic. This section allows you to determine where the picture will be place, what size it will be and if it will be attached to any link. Let’s talk about each one individually.

The Alignment dropdown seen above will allow you to place the picture on the left, right or in the center of the blog post. If you choose left or right, the text will automatically wrap around the picture. If you choose center, the picture will be isolated and the text will continue after the picture as you can see from this post as all the pictures are center aligned.

The Link To dropdown allows you to ‘Hot-link” a picture. In other words, you can enter a Custom URL – such as an Amazon link and when your picture is clicked on, the reader will be taken directly to that link on Amazon. This is commonly used when displaying cover graphics of books.

Lastly, you can choose the size that the picture will be when inserted. The sizes that are seen here are determined by your WordPress theme. Once the picture is actually in your post, you can edit it and choose a different size.
Once you are finished with this screen, click on the ‘Insert into post’ button and the picture will be inserted into your blog post.

This is what your picture will look like when it is inserted into your post. Let’s say, you want to edit it – click once on the picture and you will see the graphic below.

You’ll notice that once you click on the picture, two icons appear in the upper left corner. To edit the picture, you need to click on the pencil icon. This brings up the ‘Image Details’ screen that you can see below.

Again you can see that you can adjust the Alignment of the picture and the Link To. Near the bottom of the graphic above, you can see that you can check the box to have the link (if your picture is linked) open in a new window/tab. Remember to check that little box – so important!
 The last thing to talk about is the ability to customize the size of your graphic. As you can see in screen shot above, if you choose custom size, you will be presented with a width and a height field. By changing one number the other will change in proportion.
Once you are done adjusting the size, click on the ‘Update’ button and changes will be included.
I hope this post helps you wrangle your pictures. Stay tuned for more tutorials on managing pictures in the future.
The post How to make your pictures behave in a WordPress blog post – A Tutorial appeared first on Bakerview Consulting.
November 9, 2014
How to Build a Social Media Marketing Funnel (Infographic)
Today’s infographic is on the technical side. Do you know what a funnel is? Have you considered your marketing efforts to be compared to a funnel or they look more like a scatter pattern? Or both, depending on the day and the amount of coffee you have ingested!
Today’s infographic will give you some things to think about as you make your marketing plans.
This graphic is from QuickSprout. Drop by and see what they have to say

The post How to Build a Social Media Marketing Funnel (Infographic) appeared first on Bakerview Consulting.
November 2, 2014
Twitter vs Facebook (Infographic)
I ran across today infographic when I was looking for some recent Facebook stats for my re-write of my Facebook book. Interesting tidbits of information!
Today’s thought is brought to us ultimately by Forbes, but I found this infographic posted on Online Social Media

The post Twitter vs Facebook (Infographic) appeared first on Bakerview Consulting.


