
Marisa McClellan's Blog, page 39
July 5, 2017
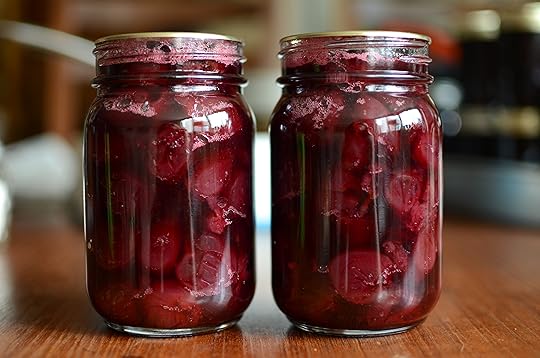
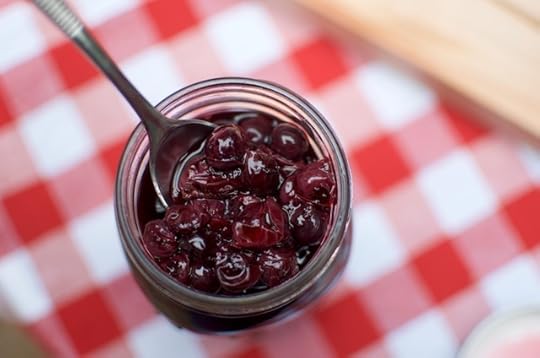
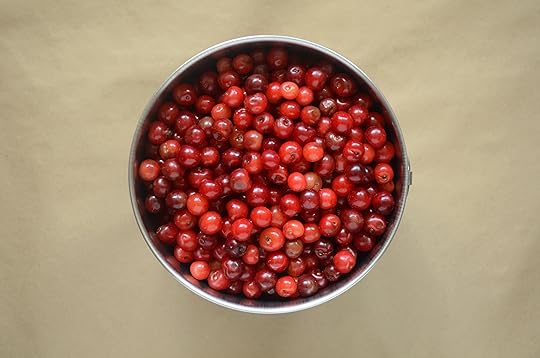
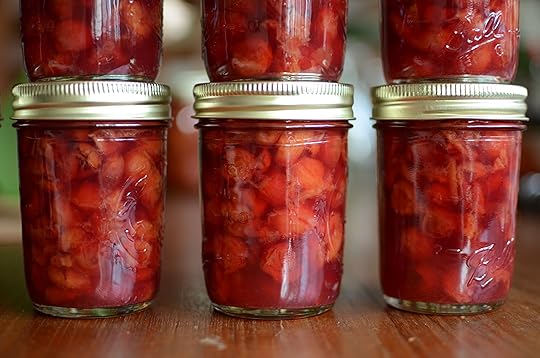
Hot Pack Spiced Cherry Preserves
These spiced cherry preserves are a tasty way to put up this most precious of summer fruit. Sweet, spicy, and tender, they’re a good companion for breakfast, cheese plates, and dessert!
Last Thursday, a big box of sweet cherries arrived from the nice folks from the Northwest Cherry Growers. I’ve slowly been working through them (look for black raspberry and cherry jam, cherry and meyer lemon marmalade, and more coming at you soon) and on Monday night, I used three pounds for my Facebook Live demo.
These preserved cherries (pitted but left whole) are simmered in a syrup that’s been spiced with cinnamon, cloves, star anise, and black peppercorns. They soften and slump, but retain enough texture that they’re a good companion for cheese plates, yogurt parfaits, and damp slices of buttery poundcake. I think you’ll like them!
PrintHot Pack Spiced Cherry Preserves
Yield: makes 2 pints
Ingredients
3 pounds cherries, washed, stemmed and pitted1 cup sugar
1 cup water
1 lemon, zested and juiced
1 teaspoon cinnamon stick bits (buy them from Penzeys or crush a cinnamon stick with a rolling pin)
1 teaspoon whole cloves
1 teaspoon black peppercorns
3 star anise pieces
Instructions
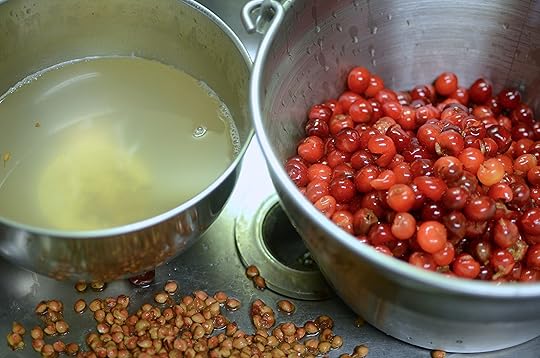
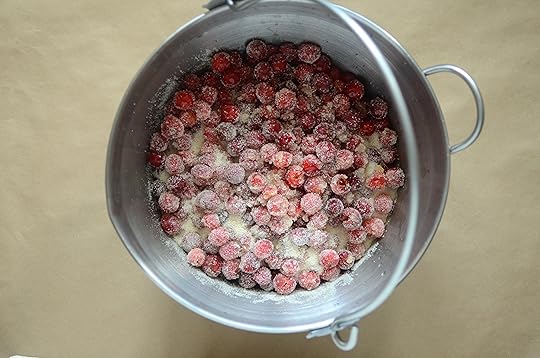
Prepare a boiling water bath canner and 2 pint jars.In a medium saucepan, combine the sugar, water, lemon zest and juice, cinnamon, cloves, peppercorns, and star anise. Place over high heat and bring to a boil.
Once the syrup reaches a boil and the sugar is fully dissolved, add the cherries. Return the liquid to a boil and reduce the heat to medium high.
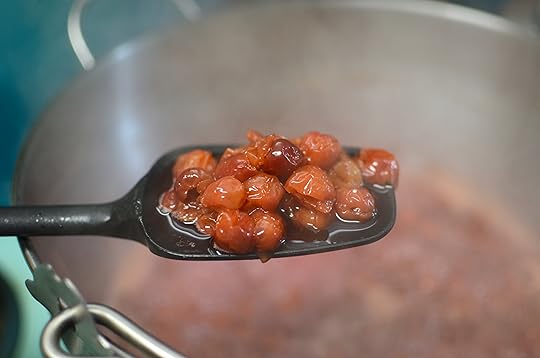
Cook the cherries for 8 to 10 minutes, until they are fully cooked with liquid.
Using a slotted spoon, evenly divide the cooked cherries between the jars. Take care to remove the star anise pieces as you work, so that they don't overwhelm the flavor of the cherries. Top with liquid, leaving 1/2 inch headspace. Use a wooden chopstick to remove any trapped air bubbles and adjust the headspace, as necessary.
Wipe the rims, apply lids and rings, and process the jars in a boiling water bath canner for 15 minutes.
When time is up, remove the jars from the canner and place them on a folded kitchen towel to cool. Let them rest for a few days before eating, so that the flavors can mellow and mingle.3.1http://foodinjars.com/2017/07/hot-pack-spiced-cherry-preserves/
Related Posts:
Nectarine Conserve with Lemon, Raisins and Walnuts
Peach Habanero Hot Sauce
Honey Sweetened Gingery Peach Butter


July 4, 2017
Hot Pack Preserving for the July Mastery Challenge
It is July and that means it’s time to introduce our Mastery Challenge skill. This month, we’re focusing on hot pack preserving. Let’s dig in.
What is hot pack preserving?
At it’s most basic, hot pack preserving is simply the act of putting food that is warm or cooked into jars and then processing them. When you pour jam, jelly, salsa, or tomato sauce into prepared jars, you are hot packing. However, the term is most often applied when a preserve or ingredients can either be packed hot or cold (if you missed it, we focused on cold pack preserving in May).
Why hot pack?
When you heat fruits and vegetables they soften and shrink a bit. In the context of canning, this is useful, because it means that you can fit more into each jar (often reducing the number of jars you need to can a volume of produce) and use less water or syrup.
The other thing that happens when you heat produce is that the heat helps release some of the air that is naturally contained in the flesh. Trapped air is a leading cause of fruit float and liquid siphoning. A brief cooking period can help your peaches, apricots, and tomatoes release that air, leading to a better quality finished product, with less floating and siphoning.
A pre-cooking stage gives you an opportunity to infuse additional flavor. I often utilize the heating stage of hot packing to add the flavors of vanilla, star anise or basil (in the case of tomatoes) to the product I’m preserving.
What are the downsides of hot packing?
Loss of texture. The more you heat your food, the softer it becomes. If texture is your main concern, think carefully before opting to hot pack peach slices or pickles.
Smaller yield. If you are canning to meet a particular yield goal, opting for a hot pack process will mean it will take longer to reach your final number. Personally, I always opt for quality over quantity, but we all have different factors that drive us to can.
For best results, process must be done from start to finish in one day. Often, people ask me if they can prep and cook their produce one day, chill it overnight and then reheat and can the next day. Unfortunately, with things like tomatoes, apples, and stone fruit, this breaks down the structure of the produce and leads to product separation (it’s not dangerous, just visually unappealing). If you want your diced tomatoes or applesauce to maintain a consistent appearance and not separate out into pulp and liquid, the cooking and preserving must be done in a single session.
For those of you who are canning at elevation may have particular challenges with hot pack preserving. Processing times are lengthened as we move up in altitude, which means that if you’ve simmered your peaches for ten minutes and then end up processing them for an hour or more, you may have nothing but peach mush in your jars by the end.
The goal for this month…
Is to explore this skill. If it’s something you feel familiar with, perhaps challenge yourself to try it with a new variety of produce or in a new context. It’s a useful technique to understand and have in your food preservation toolbox.
A few recipes…
Some from my archives:
Pickled fairy tale eggplant
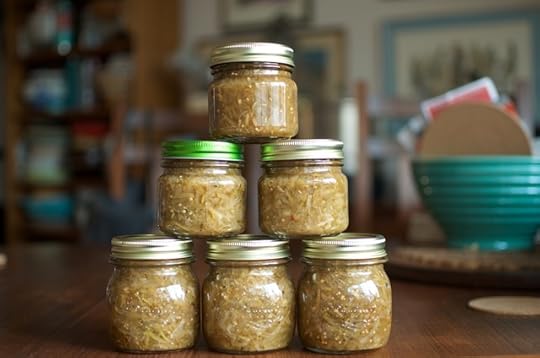
Grated fennel relish
Garlicky kohlrabi relish
Zucchini, fennel, and green pepper relish
Cucumber pepper relish
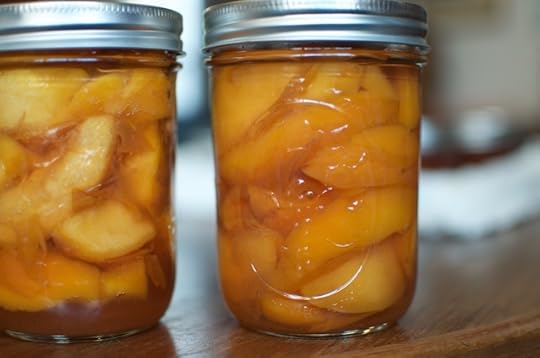
Canned peaches in fruit juice
Spiced blueberries
Lazy peach preserves
Ginger pickled peaches
Spiced apple pie filling
Whole peeled tomatoes
And some from around the internet:
Red onion and red cherry relish
Cherry walnut conserve
Bread and butter pickles
Tomatillo green salsa
Lemon, red onion, and oregano jam
Pickled red beets
Nectarine salsa
Related Posts:
June Mastery Challenge Round-Up: Jam
May Mastery Challenge Round-Up: Cold Pack Preserving
Cold Pack Canning for the May Mastery Challenge
July 3, 2017
Giveaway: Mrs. Wages Pickle Sampler Pack
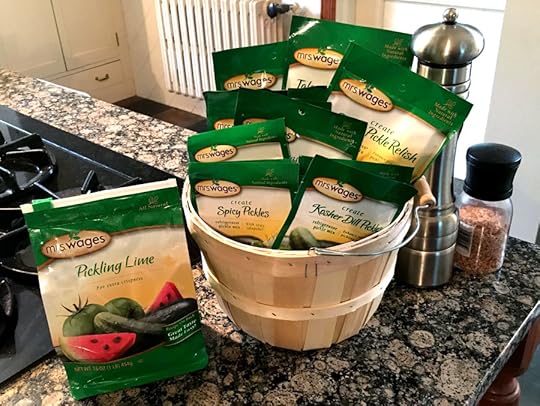
This week’s Pickle Sampler giveaway comes to us from long-time Food in Jars sponsor Mrs. Wages. I’ve been doing a bit of work with the folks from Mrs. Wages for the last seven(!) years and one element of our annual partnership is that they always offer up one or two awesome baskets of their mixes, spices, and starters for me to give away to my wonderful readers. This summer is no exception!
This is the first of two baskets of canning helpers that I’ll be giving away from Mrs. Wages this summer. This basket contains nearly every pickle product that Mrs. Wages makes, which should delight the pickle lovers. Here’s exactly what’s in the basket.
1 pound package of Pickling Lime
2 small packages of Kosher Dill Pickles Refrigerator Pickle Mix
1 small package of Pickled Beets Refrigerator Mix
2 small packages of Spicy Pickles Refrigerator Pickle Mix
2 small packages ofPickled Vegetables Refrigerator Mix
3 small packages of Bread & Butter Pickle Refrigerator Mix
2 large packages of Jalapeño Pickle Relish Quick Process Mix
2 large packages of Polish Dill Pickles Refrigerator Pickle Mix
2 large packages of Sweet Pickles Refrigerator Pickle Mix
2 large packages of Sweet Pickle Relish Quick Process Pickle Mix
To enter for a chance to win this basket of pickle making goodness, please use the widget below. Open to US and Canadian residents. Void where prohibited.
Disclosure: Mrs. Wages is a Food in Jars sponsor and so contributes to the ongoing operation of this site. This giveaway is part of our annual partnership.
Related Posts:
Links: Pickled Fruit, Lavender, and Winners
A Mrs. Wages Tomato Mix Giveaway
Giveaway: Mrs. Wages Perfect Pickle Sampler
July 2, 2017
July Sponsors: Cuppow, Fillmore Container, EcoJarz, Mason Jar Lifestyle, CanningCrafts, and Mrs. Wages
Happy July, friends and readers! It’s the start of the month and so is time to thank the businesses that help make this site possible. Please do show them your appreciation for their support with your time and attention! And if your company, shop, or family business is interested reaching the food-loving and engaged Food in Jars audience, you can find more details here. Leave a comment on this post or drop me a note to learn more!
In the top spot are our friends at Cuppow. They are the creators of the original mason jar travel mug topper and the BNTO, a small plastic cup that transforms a canning jar into a snack or lunch box. I love pairing their straw-ready drink lid with a 24 ounce mason jar for the perfect summer iced coffee vessel.
Lancaster, PA-based and family-owned Fillmore Container are next! They sell all manner of canning jars, lids, and other preservation gear. As always, their blog is an amazing resource for all things jar-related. Sign up for the salsa class I’m teaching in their space on August 19!
Our friends over at EcoJarz on board again this month. They make an array of products designed to fit on top of mason jars, including cheese graters, coffee brewers, and stainless steel storage lids. I’ve got a giveaway from them coming up later this month, so stay tuned!
Mason Jar Lifestyle is a one-stop shopping site for all the jar lovers out there. They sell all manner of mason jar accessories and adaptors. If you’re in the market for lids, straws, sprouting lids, and cozies to transform your mason jars into travel mugs, make sure to check them out!
Next up is CanningCrafts. Shop owner Alison sells an array of ready made and custom mason jar labels for all your various preserves, syrups, and backyard honey. I particularly love her line of labels encouraging people to return the jar! When next you need labels for a special project, check out CanningCrafts.
Our friends at Mrs. Wages are on the roster again this month. They make pectin, vinegar, and more canning mixes than I can count. Their website is an incredible preserving resource and I can’t say enough good things about their salsa mix. If you need a little help getting your produce into jars, remember to seek out their products! They’re also sponsoring the giveaway this week, make sure to enter!
Related Posts:
June Sponsors: Cuppow, Fillmore Container, EcoJarz, Mason Jar Lifestyle, CanningCrafts, and Mrs. Wages
March Sponsors: Cuppow, Fillmore Container, EcoJarz, MightyNest, Mason Jar Lifestyle, and CanningCrafts
December Sponsors: Cuppow, Fillmore Container, EcoJarz, iLids, MightyNest, Mrs. Wages, Hobby Hill Farm, & Mason Jar Lifestyle
July 1, 2017
June Mastery Challenge Round-Up: Jam
A post shared by Kristyn (@kayhey13) on Jun 29, 2017 at 7:52pm PDT
June is over (how this year is speeding by!) and so it’s time to put another skill to bed in our Mastery Challenge. This month, we focused on jam making and more than 170 of you reported in that you’d made a batch of jam (and some of you made many, many more than a single batch).
Starring jam ingredients included apricot, bacon, berries of all shapes and sizes, black currants, cantaloupe, calamansi, carrots, cherries (both sweet and tart), figs, grapes, peaches, pears, pineapple, plums, red onion, rhubarb, tomato, violets, and one lonely batch of watermelon rind jam. Strawberries were the very most popular ingredient this month, which makes sense since they are in season throughout much of the country during June.
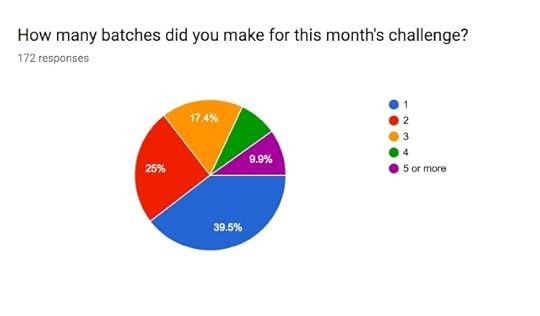
One of the things I enjoy is seeing how deeply people are digging into each month’s challenge. Since jam making is a skill many existing preservers already know and use, I was hoping that it might lead to further exploration of unfamiliar styles of jam. I think both these graphics bear that out.
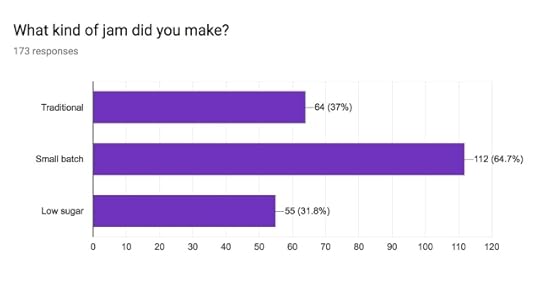
Up above, you can see that the majority of participants made more than one batch of jam. And judging from this second image, it looks like lots of people played with batch sizes and styles of preserving. I am entirely delighted.
A post shared by Subcultural Farmgirl (@subculturalfarmgirl) on Jun 27, 2017 at 5:07pm PDT
Berries
Raspberry Almond Jam (and more!) – BLDRNRPDX
Lavender Vanilla Bean Strawberry Jam – Fillmore Container
Classic Strawberry Jam – Thoughts and Reflections
Honey Rum Strawberry Jam – Feast in Thyme
Blueberry Jam with Crystallized Ginger – First Things First
Spiced Blueberry and Cherry Jam – For the Love of Shrubs
Strawberry Jam – Merry Meeting Menus
Strawberry Rhubarb Cheater Jam – Hip Roof Barn
Blueberry Maple Jam – Casula Mellita
Strawberry Orange Blossom Jam – Bubble Tea for Dinner
Strawberry Rhubarb Jam – My Savory Spoon
Small Batch Strawberry Balsamic Jam – Love & Wild Honey
Olallieberry Jam – East of Eden Cooking
Strawberry Margarita Jam – Cooking with Mary and Friends
Spicy Blackberry Merlot Jam – Cooking with Mary and Friends
Strawberry Rhubarb Jam with Vanilla – Les Campagnonades
Small Batch Strawberry Rhubarb Jam – mignyc
Strawberry Vanilla Jam (and more) – Carol Olsen
Strawberry Mango Jam (and so many more) – Genevieve Boehme
Mixed Berry Jam – The Yellow Apron
Wartime Strawberry Jam – Turnspit & Table
Strawberry Vanilla Jam – Grace Lee
Foraged Juneberry Jam – Celeste
Strawberry Banana Jam – Candice
A post shared by Will graves (@graves_will) on Jun 20, 2017 at 9:14am PDT
Stonefruit
Apricot Jam – She’s Almost Always Hungry
Apricot Anise Jam (plus several more!) – Jarla
Georgia Peach Jam – Brit in the South
Sour Cherry Jam – Heidi Graham
Apricot with Cherry Pit Liquor – Lindsay Murray
Sour Cherry Jam – Andrea Eat World
Cherry Butter – kelkerr
Cherry Mint Jam – Will Graves
Sour Cherry Jam – Jeanne-Marie Hagan
Apricot Cherry Jam – Kristyn
Peach Jalapeno Jam – Susie Bares
Apricot Jam – Katherine Dowdell
Apricot Moscato Jam – The Pit Stop BBQ
Sour Cherry Jam – Raya Samet
A post shared by jencooksvt (@jencooksvt) on Jun 13, 2017 at 11:24am PDT
Other Jammy Goodness
Mission Fig Jam with Orange Rind – Cookin Mum’s Culinary Adventures
Sable Black Grape Jam – Cookin Mum’s Culinary Adventures
Sunshine Jam – Cooking with Mary and Friends
Cantaloupe Vanilla Jam – Tesla Anomaly
Smoked Bacon Jam – Tandy Sinclair
Lilac and Violet Jams – Sustainable ME
Watermelon Rind Jam – My Bit of Earth
Vanilla, Rhubarb, and Earl Grey Jam – Subcultural Farmgirl
Red Onion Jam – Southern with a Twist
Tomato Jam – Shades of Bliss
Any Fruit Jam – Twice as Tasty
Vanilla Rhubarb Jam with Earl Grey Jam – Erin Woycik
Spicy, Smoky Skillet Tomato Jam – Jill Polsby
Rhubarb Ginger Jam – Ikebana Girl
Black Currant Jam with Cassis – Mauka Girl Creations
Rhubarb Vanilla Jam – Jen Cooks VT
Kiwi Pineapple Jam – Southern Fried Yankee
Mango Pear Jam – Will Graves
Black Currant Jam – Holly
Pecan Amaretto Jam – Nikki Carriere
A giant thank you to everyone who participated this month! We’re focusing on hot pack preserving in July. Stay tuned for more details soon!
Related Posts:
Cold Pack Canning for the May Mastery Challenge
Quick Pickles for the April Mastery Challenge
Raspberry Meyer Lemon Shrub
June 30, 2017
June Mastery Challenge: Foraged Berry Jam
Regular Food in Jars contributor Alex Jones is back to share the tale of a tiny batch of jam made from fruit grown right in her West Philly neighborhood. I do love a good forage! – Marisa
When it comes to gardening and foraging, I do my best to hit enough planting milestones in early spring so that I’m not missing out on a particularly delicious spring or summer crop. And I keep an eye on ripening berries and fruits in my neighborhood so I can forage goodies to enjoy and preserve, too.
This spring was a little different. It was my first working as a freelancer, and any hope that I’d have extra time and flexibility to spend on these pursuits quickly vanished — I felt busier and less in touch with what was growing around me than I had been when I was employed full time.
For example, I missed planting peas this year. On the other hand, I got in two good harvests of elderflower during a particularly busy May, a first for me. And yet, I just missed the height of my West Philly neighborhood’s flush of juneberries, mulberries, and sour cherries, which hit a little earlier than usual this month.
But on a sunny, suddenly free afternoon, I got a chance to grab a few takeout containers and see what the trees within a one-block radius of my apartment had left on their branches.
My original plan for this month’s challenge was to make juneberry (AKA serviceberry, AKA saskatoon berry) jam, but almost every berry within reach on the trees around the corner from me was dried up or already picked. Same with the mulberries to the west of me, which I usually catch at their peak — I barely harvested a handful.
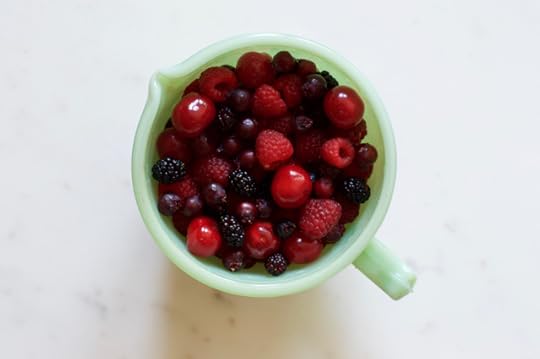
Luckily, the sour cherry tree in my community garden still had lots of fruit, so I grabbed as much as could before the heat got to me. The raspberry bush that grows on my fence was heavy with deep red fruit, so I harvested a cup or so on my way back home.
Putting it all together after pitting the cherries, I had just enough fruit from my microclimate — the one-block radius around my apartment — for a tiny batch of mostly-foraged jam.
I threw the two cups of the fruit into a small pot with a squeeze of lemon and a cup of wildflower honey, then let it cook down until it sheeted from the spoon — no pectin added.
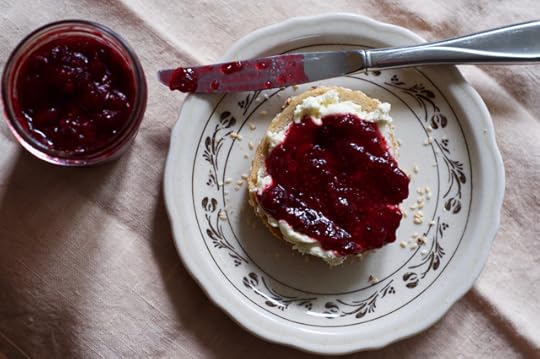
The result was a single eight-ounce jar of thick, red, pleasantly seedy jam. The raspberry flavor was rounded out by the cherries, and the juneberries added a dark berry note (I think the mulberries, whose flavor isn’t exactly strong, just provided a little extra texture).
I won’t be able to pull out a big stash of foraged jam to give to friends this winter as I’d hoped, but I was comforted by the fact that I could still put together a little something from my fruiting plant neighbors even though I missed the flush.
When life gets crazy, the things I love to do for myself — making jam, working in the garden — can feel like just another chore piling up. This little batch reminds me that biting off the little bit that you can realistically chew right now is an OK thing to do and proves that I can still find a little time to do what I care about even when things feel like too much.
Now that it’s in full swing, I wish everyone a stress-free canning season! How are you handling it? Share your tips for meeting your preserving goals and staying sane in the comments!
PrintJune Mastery Challenge: Foraged Berry Jam
Ingredients
2 cups mixed early summer berries (raspberries, sour cherries, juneberries, and mulberries, or any combination thereof, will work)1 cup honey
The juice of half a lemon
Instructions
Wash the fruit. Stem the mulberries and pit the cherries, if using.Combine fruit, honey, and lemon juice in a small, non-reactive saucepan over medium-high heat. Bring to a boil, then lower heat to medium.
Cook, stirring frequently, until the jam sheets off of your spoon or spatula.
Remove pot from heat.
For refrigerator jam, funnel the mixture into a half-pint jar, then seal, cool to room temperature, and refrigerate.
To can, prepare a one-jar water bath canner such as an asparagus pot and one half-pint jar, ring, and lid for canning. Funnel the mixture into the jar, then wipe the rim and seal fingertip tight with lid and ring. Process in the boiling water bath for 10 minutes.3.1http://foodinjars.com/2017/06/11974/
Related Posts:
Small Batch Strawberry Plum Jam
How to Make Apartment-Scale Hard Cider
Vanilla Yellow Plum Jam
June 29, 2017
Single Quart Muesli for Breakfast

About six weeks ago I decided to become someone who exercised in the morning. I’d long been an evening gym goer, but was finding it increasingly hard to muster the motivation in those later hours. While it was hard to convince myself to get up, dressed, and out the door in those first couple weeks, it’s become a pretty dependable habit and it working nicely for me.

There has been one unanticipated outcome of this morning exercise routine is that is has totally changed what I want to eat for breakfast. Cooked oatmeal, one of my regular breakfast items, has become totally unappealing. Enter muesli!
It requires no cooking, can be set to soak with a little milk to soften before I head out to run (slowly and not all that far), and much like my beloved hot oatmeal, is tasty with a heap of fresh fruit. And did I mention that it is blessedly cool?
The thing about muesli is that there really aren’t a whole lot of rules. It’s really just a combination of oats, nuts, and seeds, in whatever proportions you want. I added some puffed brown rice cereal to lighten it a little, but you skip that if you don’t want to invest in a box of cereal to make more cereal. My recipe is below, but you can really mix it up any way you’d like.
PrintSingle Quart Muesli for Breakfast
Ingredients
1 1/2 cups rolled oats1 cup puffed brown rice cereal
1/2 cup slivered almonds
1/4 cup pumpkin seeds
1/4 cup sunflower seeds
1/4 cup flaked coconut
1/4 cup dried blueberries
Instructions
Combine all the ingredients in a large bowl and toss well to combine. Funnel the muesli into a quart jar, gently tapping the jar to settle the cereal in.I like to set the muesli to soak with milk half an hour to an hour before I'm going to eat it.
Notes
I like to lightly toast the almonds, sunflower seeds, and pumpkin seeds. However, toasting the nuts and seeds can make the muesli go rancid more quickly, so if you're slow to eat through the batch, it's best to store it in the freezer, rather than at room temperature.
3.1http://foodinjars.com/2017/06/single-quart-muesli-breakfast/Related Posts:
Food in Jars Stickers for Sale!
The Cookbook Stall + Food in Jars = Signed Copies for the Holidays
Food in Jars on Facebook Live!
June 28, 2017
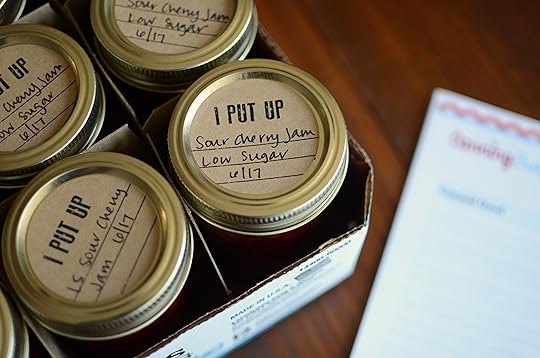
Low Sugar Sour Cherry Jam
Capture the fleeting tart cherry season with a batch of whole fruit, sweet and tangy low sugar sour cherry jam.
Last week, I made a small batch of low sugar sour cherry jam live on Facebook, using Pomona’s pectin for set. When people asked me about the recipe, I told them it was already up on the blog from last summer. Because I was absolutely convinced that this was a recipe I’d already published.
However, I started to hear from people that they couldn’t find it. Was I sure that it was on the blog?

Turns out, I never wrote a low sugar sour cherry jam recipe. It must have been a dream. I’ve made this style of preserve a bunch of times over the years and really thought I’d shared it. Oops!
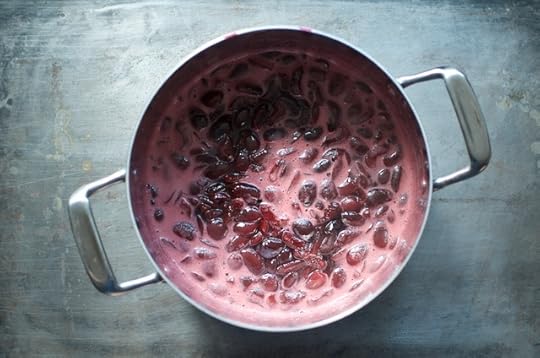
So, let’s dig in. Like so much of my jam making, the recipe you’ll find at the bottom of the post is built on a ratio. For these batches of low sugar jam, I use four parts fruit to one part sugar. You could always drop the sugar level a bit lower, but I find that this ratio leaves me with a jam that is nicely balanced between sweet and tart, and holds its color beautifully.
Two questions come up when I talk about making jam by ratio. The first is, are we talking about calculating by weight or by volume? Because I love my kitchen scale, I typically use weight to work out the proportions. But you can also use volume. The trick is to be consistent. If you start with weight for your produce, you use weight for your sweetener. Same goes for volume. Stick with what you start with.
Second question is about measuring before or after you prep your fruit. Here’s the honest truth. As long as you aren’t doing a massive amount of culling, your batch size is pretty generous, and you’re measuring by weight, it doesn’t matter too much. I weighed this batch of fruit before I started pitting and I had 5 pounds, two ounces. After pitting, I had 4 pounds, 15 ounces. In this large-ish batch, those three ounces won’t impact the finished outcome much.
Now, if you’re measuring by volume, prepping the fruit first is the best course of action, because it’s going to fill the measuring cup best. Additionally, if you’re using seconds and so need to do a lot of culling, doing all your necessary peeling, pitting, hulling, trimming, and chopping before you start measuring and calculating.
Now, for the pectin. I like to use less pectin that the Pomona’s packet instructions call for. Typically, I use between 1/2 and 3/4 teaspoon calcium water and pectin for every pound of fruit. Use less for a soft set and a bit more for a firmer set.
Once all the pitting, prepping, and calculating is done, I combine the fruit with the bulk of the sugar the jam will use. I save out about half a cup to use as the medium with which to integrate the pectin. Then it’s time to cook!
PS – Like the labels I used on my jars up at the top of the picture? Those are these kraft paper labels from Canning Crafts! Love them!
PrintLow Sugar Sour Cherry Jam
Yield: makes 4 pints
Ingredients
5 pounds sour cherries, pitted1 pound, 3 ounces granulated sugar
1 tablespoon + 1 teaspoon calcium water
1 tablespoon + 1 teaspoon Pomona's Pectin
Instructions
Prepare a boiling water bath canner and enough jars to hold 4 pints.In a low, wide, non-reactive pot, combine the pitted cherries, 1 pound of sugar, and all the calcium water.
Set pot over high heat and bring to a rolling boil. Reduce heat to medium-high and cook at a vigorous boil for 20 to 25 minutes, until the volume has reduced by at least one-third.
Stir pectin into the remaining sugar and stream it into the cooking jam, using a whisk to stir to help prevent clumps.
Return the contents of the pot to an active boil and cook for an additional 2 minutes and then start looking for signs of thickening (it should be pretty clear as Pomona's pectin sets quickly). Once you see some thickening, remove the pot from the heat.
Funnel the jam into the prepared jars, leaving 1/2 inch headspace. Wipe the rims, apply lids and rings, and process in a boiling water bath canner for 10 minutes.
When the time is up, remove the jars and set them on a folded kitchen towel to cool. When the jars have cooled enough that you can comfortably handle them, check the seals. Sealed jars can be stored at room temperature for up to a year. Any unsealed jars should be refrigerated and used promptly. 3.1http://foodinjars.com/2017/06/low-sugar-sour-cherry-jam/
Related Posts:
Low Sugar Strawberry Vanilla Jam
Sweet and Sour Cherry Jam
Sour Cherry Thumbprints for Valentine’s Day
June 27, 2017
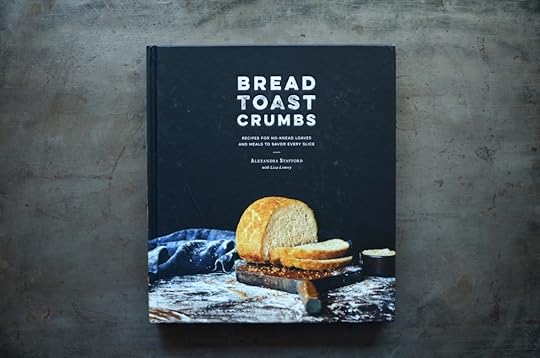
Cookbooks: Bread Toast Crumbs
I first discovered that it was possible to bake bread without kneading (along with much of the English speaking world) in 2006 when the Sullivan Street Bakery recipe ran in the New York Times. I embraced the concept wholeheartedly and have been something of a no-knead recipe collector ever since.
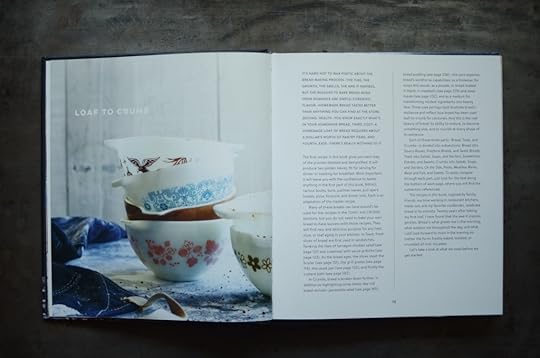
Four or five years ago, I stumbled across a recipe for peasant bread on Alexandra Stafford’s blog, Alexandra’s Kitchen, that didn’t need to be kneading, was baked up in some of the Pyrex bowls I already owned, AND could be ready to eat in just a couple of hours. I made a batch immediately and became a fan for life. It became THE thing I made to serve with leftover soup, to bulk out a meal for unexpected guests, or on weekends when we wanted sandwiches but didn’t feel like leaving the apartment.
As a food writer, it’s rare that I return to the same recipe over and over again (because I am always looking for new, interesting things to write about), but this one is simply too good and too reliable to leave behind (though I almost always make it with half whole wheat pastry flour and half white. I am what I am).

So, when Ali announced that she was writing a cookbook that used her peasant bread recipe as a starting place, I was delighted. More ways to make use of this recipe and its tasty results? Yes, please!
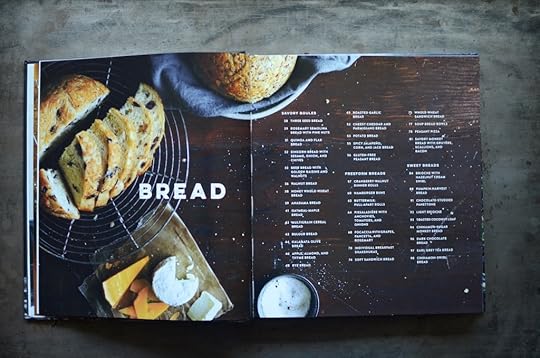
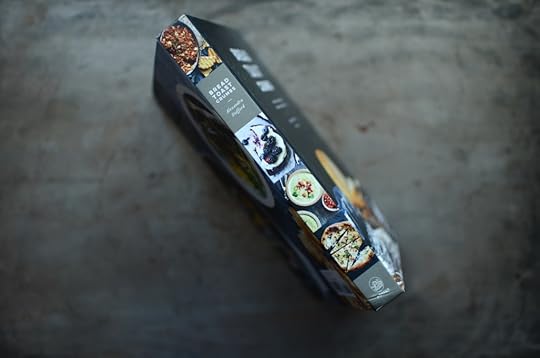
Bread Toast Crumbs came out back in April and is everything I hoped it would be. The title also serves as the organizational structure for the book. It opens with the master peasant bread recipe and then offers up more than 35 variations. I’ve only made the original recipe, but have plans to make the hamburger buns this weekend and have half a dozen other versions earmarked.
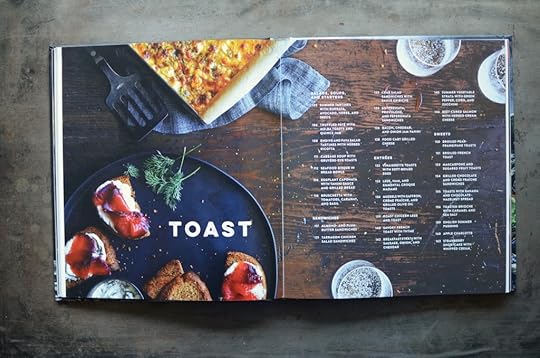
In the Toast section, you’ll find an array of soups, salads, starters, sandwiches, main dishes, and sweet things. I’ve got my eye on the Summer Vegetable Strata for the near-term and the Cabbage Soup with Gruyere-Rye Toasts for the fall (if you listen to Local Mouthful, you’ll know that my love for cabbage knows no bounds).
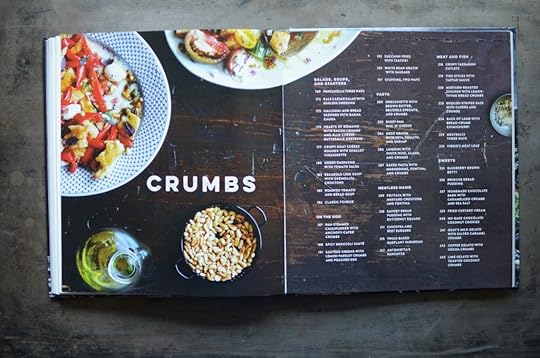
The Crumbs section takes the heels of your loaves, grinds them down, and makes delicious use. Someone needs to invite me to a potluck so that I can make the Sheet Pan Mac and Cheese or the Baked Pasta with Mushrooms, Fontina, and Crumbs. Seriously. How good do those dishes sound?
My bottom line on this book is that if you’re looking to up your bread baking game in an approachable way and then find some new ways to make good use of every last morsel of the bread you made, you should check it out.
Related Posts:
Cookbooks: Savory Sweet
Cookbooks: Fiery Ferments
Cookbooks: Green Plate Special by Christine Burns Rudalevige
June 26, 2017
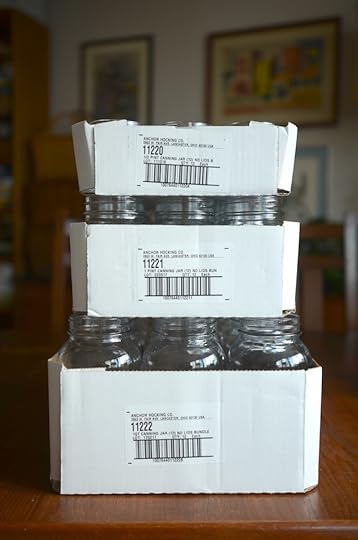
Giveaway: Anchor Hocking Jars from Fillmore Container
Love learning about new jars? Read on for details about the line of Anchor Hocking canning jars, available from our friends at Fillmore Container, as well as a chance to win a case to use in your own kitchen!
When it comes to gathering vessels for preserving, I have always been something of a magpie. I like to use jars of different shapes and from different makers. The result is a pantry that gives off a sense of happy, appealing chaos (of course, it’s only an appearance. I always know what’s in there, down to the very last item). It also allows for a preserves closet where you almost always have exactly the right sized jar for dinner prep, potluck preparations, or a gift basket.
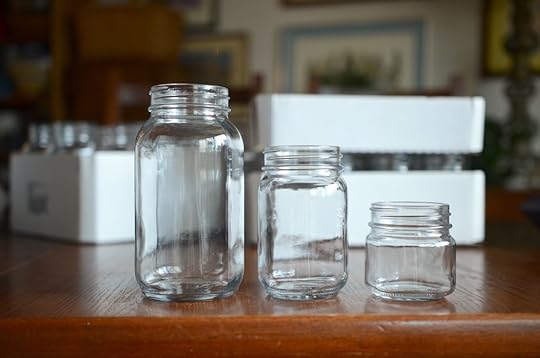
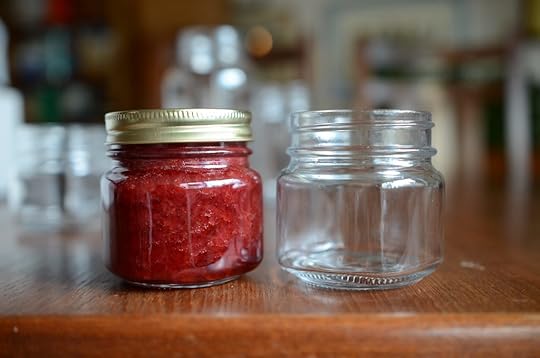
Thanks to our friends at Fillmore Container, I’ve recently added a new line of jars to my kitchen and I am quite pleased to have them. Made by Anchor Hocking, these sturdy, squared off jars are an affordable, pleasing option for any home canner. If you have any vintage Anchor Hocking jars in your collection, the shape and heft of these jars will be familiar (though sadly, these are not quite as graceful as the ones our grandmothers knew and used).

These Anchor Hocking jars come in three sizes – quarts, pints, and half pints. Fillmore sells them without closures, which allows you to choose from a world of possibilities. They have regular mouth openings and so can be sealed with Ball brand lids and rings, with open stock lids and rings from Fillmore, or with one-piece lids designed to be used on jars with continuous threads (if you’re curious how to can at home using one-piece lids, check out my tutorial).
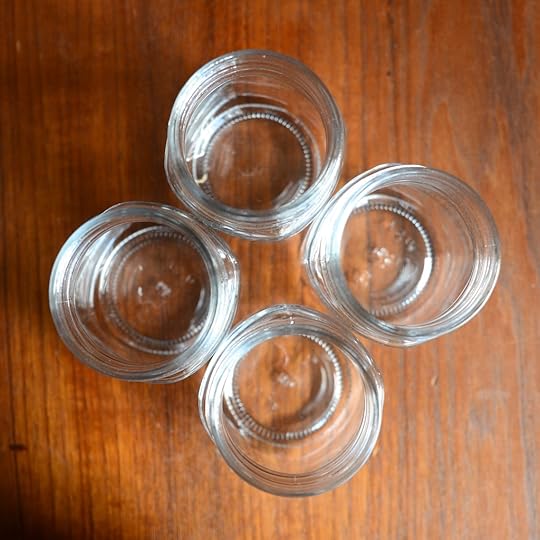
Having canned a bit in these jars over the last few weeks, I can tell you that they perform beautifully. They are true to size, strong, and seal well. I also really appreciate the fact that the slightly square shape offers up four smooth sides for labeling. If I were canning for a baby or wedding shower, I’d stock up on the half pint size, order some custom labels from CanningCrafts, and offer up the prettiest party favors this side of Pinterest.
This week, the folks at Fillmore are sponsoring our giveaway. One lucky winner will get a case of the Anchor Hocking jars (jar size is winner’s choice), a dozen lids and rings, and a $25 gift card, good on the Fillmore Container website (perhaps you’ll want to use it to get a copy of Naturally Sweet Food in Jars!). This giveaway is open to US and Canadian residents. Please use the widget below to enter.
Disclosure: Fillmore Container is a Food in Jars sponsor. Their participation my sponsorship program helps keep this website afloat. They sent the jars pictured in this post for review and photography purposes and are also contributing the prize, both at no cost to me. However, all thoughts and opinions expressed here remain entirely my own.
Related Posts:
Giveaway: Pint & Half Jars from Fillmore Container
Giveaway: BBQ Sauce Bottles & Store Credit from Fillmore Container
Giveaway: Round Collection Elite Jam Jars (sponsored by Fillmore Container)


