
Marisa McClellan's Blog, page 37
August 7, 2017
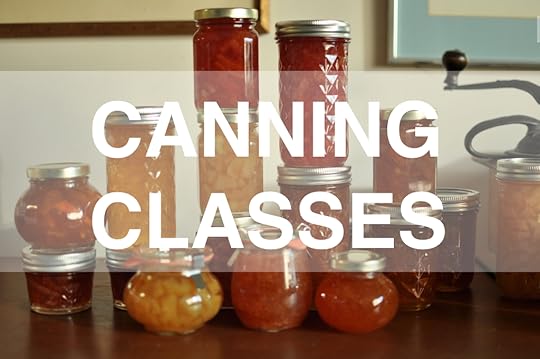
Upcoming Classes: Facebook! Glen Mills, PA! Sewell, NJ! Arundel, ME!
After a slow few weeks, event season is picking back up around these parts. Here’s where you’ll find me this week!
Monday, August 7
It’s a Facebook Live night! I’ll be streaming on my Facebook page from 9-10 pm Eastern Time. Tonight, I’ll be talking about steam canning, which is one of the skills we’re focusing on in this month’s Mastery Challenge.
Tuesday, August 8
I will be at the Rachel Kohl Community Library in Glen Mills, PA from 6-7:30 pm, offering a free small batch jam making demo. I will have a limited number of books with me and will offer up tastes of the jam at the end of the event.
Thursday, August 10
You’ll find me at the Margaret E. Heggan Free Public Library in Sewell, NJ from 7 to 8:30 pm for a free pickle making workshop. I’ll show you how to make both refrigerator pickles and shelf stable pickles and will have samples for tasting. I’ll also have a limited number of books with me for sale and signature.
Saturday, August 12
I’ll be at Frinklepod Farm in Arundel, ME for a four-hour, hands-on canning workshop. Participants will peel, chop, stir, pack, and can 3-4 delicious batches of jams, pickles, and chutneys. This empowering and fun workshop is appropriate for both beginners and experienced canners alike and all participants will go home with jars of preserves made in class. More details and registration information here.
For all my upcoming classes, head over to the classes and events page!
Related Posts:
Small Batch Bread and Butter Pickles
Facebook Livestream Summer Schedule
Upcoming Classes & Events: April, May, and June 2017


August 6, 2017
Skills for the August Mastery Challenge
It’s August and that means that for those of you participating in the Mastery Challenge (and remember, you can opt in or out each month), it’s time to try out a new skill. This time around, we’ve got two skill options to choose from. You can either try Low Temperature Pasteurization or Steam Canning (or both). Let’s split them apart and dig into each technique individually.
What is Low Temperature Pasteurization?
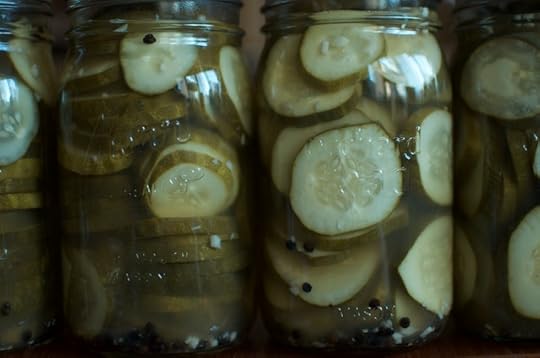
Low Temperature Pasteurization (LTP) is a process in which you simmer jars of pickles in water that’s between 180 and 185 degrees F rather than process them in a boiling water bath. You do this for a longer period of time (typically 25-30 minutes). The longer, lower temperature allows you to kill off bacteria while retaining a firmer finished texture.
This technique is used primarily for pickles, as a way to retain a crunchier, firmer texture (though don’t get too excited. They still soften a little. But it’s better than pickles from a boiling water bath canner). The pickles are prepared just as you would for a boiling water bath process and are fully submerged in water for best heat penetration.
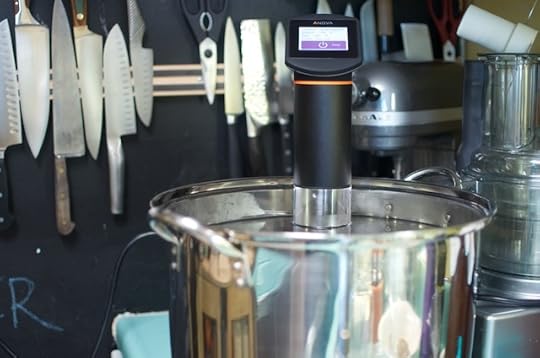
The trickiest bit of LTP is maintaining the proper temperature. I like to use an immersion circulator (as described in this post from last fall), but a reliable stovetop or portable induction burner will also do the trick. Just make sure to have a good digital candy thermometer that can clip onto the pot on hand to keep tabs on the temperature.
Currently, this process has only been tested on cucumber pickles, but adventurous canners might also try it on hot peppers (similar pH to cucumbers) or green tomatoes (lower pH) to create more textural finished pickles.
For more on this process, I recommend reading this piece on Healthy Canning and this one on The Babbling Botanist.
What is Steam Canning?
Before we dig in, let’s address the elephant in the room. Some of you might be thinking, “hey, isn’t steam canning a prohibited technique?” Well, for the longest time, steam canning wasn’t a process that was recommended by canning experts. This wasn’t because it was necessarily unsafe, but instead because there wasn’t funding available to do the research necessary to determine its safety. However, thanks to research done at the University of Wisconsin, it has been determined that it is now safe to use under certain circumstances.
Steam canning (also sometimes known as atmospheric steam canning so as to differentiate it from pressure canning, which also uses steam), is a process in which jars are enclosed in a large pot that contains a few inches of water and is in possession of a tight-fitting lid. The water is brought to a boil, which produces steam. The steam reaches 212 degrees F (same as the water would), and the jars are duly processed.
You typically see two different kinds of steam canners. There are those that look like old-fashioned cake tins, with a shallow base and a large domed lid. The second type looks like a traditional boiling water bath, but has a rack designed to elevate the jars and a thermometer in the handle, allowing you to see when the interior of the pot has achieved the proper temperature.
The benefits of steam canning are that you don’t need to use as much water (great for drought-stricken areas), you don’t need to keep your burner at full blast (once you’ve built up a head of steam, you don’t need as much heat to maintain it), and because you’re working with less water, it takes less time and energy to reach the proper temperature.
Steam canning can be used for any high acid preserve, provided it is processed for 45 minutes or less. Any longer and you run the risk of boiling the water reservoir dry, which isn’t good for your preserve or your cookware.
For more on steam canning, read this piece from the University of Wisconsin Extension, this article from Healthy Canning, and this one from canning doyenne Linda Ziedrich.
Recipes
I’m not going to recommend recipes this month, because the field is pretty wide open. You can do a small assortment of pickles with LTP and an almost endless array of recipes with steam canning. Try applying one of these techniques to an old favorite, or test drive them with something new and delicious. The choice is yours!
To be included in the monthly stats and round-up, please submit your finished project by Wednesday, August 30 using this form.
Related Posts:
Hot Pack Preserving for the July Mastery Challenge
June Mastery Challenge Round-Up: Jam
May Mastery Challenge Round-Up: Cold Pack Preserving
August 5, 2017
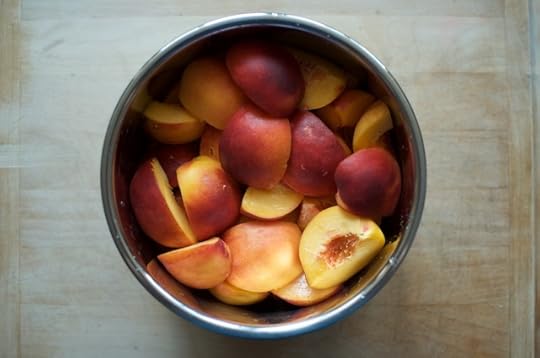
July Mastery Challenge Round-up: Hot Pack Preserving
A post shared by Genevieve Boehme (@genaboehme) on Jul 25, 2017 at 12:41pm PDT
We closed the books on July a few days ago and so it’s time finish up another skill to bed in our Mastery Challenge. This month, we focused on hot pack preserving and more than 130 of you reported in that you’d tried preserving something using this method.
Starring ingredients included apricots, apriums, artichokes, beets, black currants, blackberries, blueberries, cantaloupe, carrots, cherries (both sweet and tart), corn, cucumbers, eggplant, fennel, figs, gooseberries, green beans, jalapeños, kohlrabi, mangos, mushrooms, onions, peaches, plums, raspberries, rhubarb, shishito peppers, sour cherries, strawberries, watermelon rind, wineberries, and zucchini.
People made all sorts of products, including chutneys, fruit packed in syrup, jams, pickles, salsas, and tomato products.
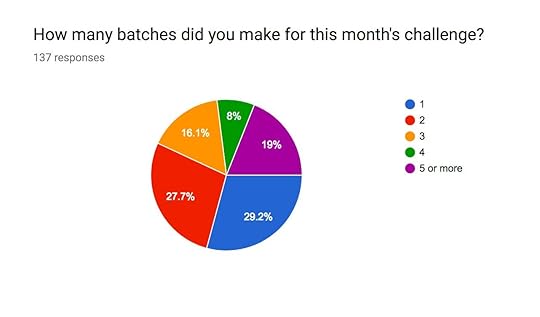
According to the survey, a lot of you made more than one batch, which is always delightful. I’m happy that so many of you were inspired to dig in more deeply.
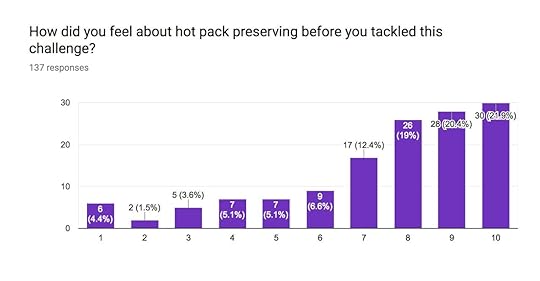
As far as satisfaction with skill goes, the results made me giggle. Most of you felt pretty friendly towards hot packed at the start of the month.
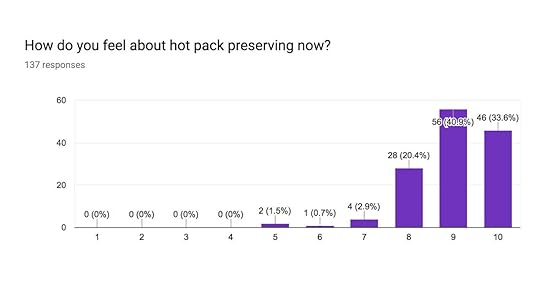
But, at the end of the month, those of you who participated were all in. Such happy, positive reactions!
A post shared by Andrea (@andreaeatworld) on Jul 31, 2017 at 1:24pm PDT
Jams, Chutneys, and Mostardas
Peach Lime Jam – Jarla
Cantaloupe Jam – Southern with a Twist
Peach Mostarda – Tesla Anomaly
Spicy Tomato Jam – Love & Wild Honey
Blueberry Basil Jam – My Savory Spoon
Peach Brandy Sauce – Tiffany Mitchell-Brewer
Peach Raspberry Jam – Heidi Graham
Sour Cherry Jam – tastycraft
Black and Blueberry Jam – Southern Fried Yankee
Mango Chutney – Southern Fried Yankee
Boysen Plum Jam – Will Graves
Pickles, Relish, and Salsa
Pickled Watermelon Rind – Putting up with Erin
Bread and Butter Pickles – She’s Almost Always Hungry
Corn Relish and Pickle Relish – Prospect the Pantry
Roasted Tomatillo Salsa – East of Eden Cooking
Tomato Rhubarb Ketchup – Gena Boehme
Peach Habanero Hot Sauce – Andrea
Tomatillo Salsa – Southern Fried Yankee
Curried Zucchini Pickles – Britt Mammenga
Jalapeno Dijon Mustard – Kim Lewandowski
Pickled Fairytale Eggplant – Jenn Spinosi
Classic Hotdog Relish – Laurie Kane
Bread and Butter Pickles – Will Graves
Roasted Salsa Verde – Candice
Cherry Chipotle BBQ Sauce – Will Graves
Sweet Cherry BBQ Sauce – Kim Lewandowski
A post shared by Kim Lewandowski (@ilemonyzest757) on Jul 22, 2017 at 12:22pm PDT
Tomatoes and Whole Fruit/Veg Preserves
Vanilla Bean Infused Peach Slices – Not Starving Yet
Pressure Canned Green Beans – Casula Mellita
Tomato Sauce and Tomato Paste – Cooking with Mary and Friends
Spiced Cherry Preserves – Stephanie Beauchamp
Preserved Artichokes – The Pit Stop BBQ
Sweet Cherries in Vanilla Honey Syrup – Seed to Pantry
Hot Pack Cherries – Grace Lee
Sour Cherries and Apricots – Ava George Stewart
Zucchini in Pineapple Juice – LeAnne
And finally, a few comments from the submission form:
Lisa from Aurora, Ontario said, “Interesting to see how the hot pack played out in practice, not just theory. Peaches are a lot more work than I thought they’d be!” So true! Peaches are a beast, but so worth the work!
Ann from Vashon, Washington said, “My time was limited and produce was lagging – but the Walla Walla sweets were in so I tried the onion relish. Definitely worth while! So glad I’m learning more about hot pack. Hope to do some tomatoes soon as they are now arriving in our local markets.” Onion relish is delicious!
Tesla from Memphis, Tennessee said, “I had already done a lot of hot pack preserving, but until this month I had no idea that’s what I was doing – or the reasons why you’d use a hot pack with a particular fruit or to get a particular result. This month was an example of how the Mastery Challenges are educational for me, even when I’m not making something new!” So glad it was useful!
Related Posts:
July Mastery Challenge: Pickled Blistered Shishito Peppers
Submit your July Mastery Challenge Projects!
Hot Pack Preserving for the July Mastery Challenge
August 4, 2017
Can-It Forward Day 2017
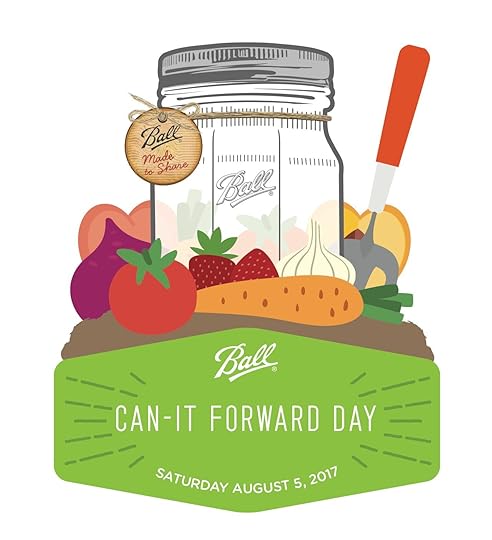
It’s August, and that means it’s time for the 7th annual #canitforward celebration with the folks at Ball Canning! Tune in tomorrow, Saturday, August 5 at 12 noon (eastern time) on the Ball Canning Facebook page for a live Can-It Forward canning demo with canning expert Jessica Piper and Kathryne Taylor of Cookie and Kate.
Then, tune in every Wednesday in August at 12 noon for the Ball Canning Preserving Summer Canning Series. You’ll see both experienced canners and newbies join Jessica in the Ball Test Kitchen to preserve peak summer flavors to enjoy throughout the year (my video will air on August 23, so mark your calendars).
Finally, make sure to head over to the Ball Canning Facebook page tomorrow, because they’ll be launching a fabulous giveaway. All you have to do to enter is share a picture of yourself holding or interacting with one of the new jars (Spiral, Smooth, or Sharing*).
*For every package of Ball Sharing Jars purchased, Newell Brands will donate four meals to Feeding America.
And for more canning inspiration and weekly sales (check back every Sunday for a new discount), head over to FreshPreserving.com.
Disclosure: I am a paid partner for Ball Brand. However, all thoughts and opinions expressed are entirely my own.
Related Posts:
Blackberry Lavender Jam on Freshly Preserved Ideas
Links: Asparagus Tarts, Potluck Nation, and Winners
Giveaway: New Ball Canning Products for 2017
August 2, 2017
Sweet Cherry Ketchup
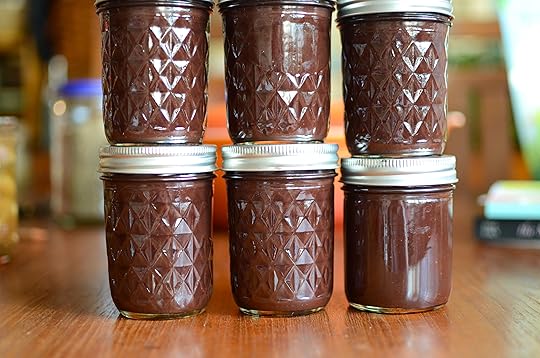
Last month, the folks from the Northwest Cherry Growers sent me 18 pounds of sweet cherries (it’s my 8th year participating in their Sweet Preservation Canbassador program). After eating a couple pounds in a single sitting, I got down to the work of preserving. I made some whole fruit preserves, cherry and Meyer lemon marmalade, a batch of cherry and black raspberry jam, some cherry ketchup, and used up the rest in a mixed fruit jam.
I managed to share the recipe for the Spiced Cherry Preserves and then totally lost my blogging mojo. So this week, I’m going to try and make up for lost time while fresh cherries can still be had. I’ll link up this post as I get the recipes published. Here’s the first one.
A few notes. The recipe calls for pitted cherries, but you can also use the technique described here if you want an easier route to getting those pits out. If you’re not sure what you would do with cherry ketchup, know that it’s delicious on burgers and with roasted sweet potatoes. And if you’ve got them, feel free to use fancy sauce bottles, as described in this post.
PrintSweet Cherry Ketchup
Ingredients
8 cups pitted cherries (approximately 5 pounds cherries, to start)1 cup apple cider vinegar
1 cup honey
1/2 cup brown sugar
1 tablespoon ground cinnamon
1 tablespoon freshly grated ginger
1 tablespoon salt
1/2 teaspoon ground cloves
1/2 teaspoon granulated garlic
1/2 teaspoon cayenne
1 lemon, zested
Instructions
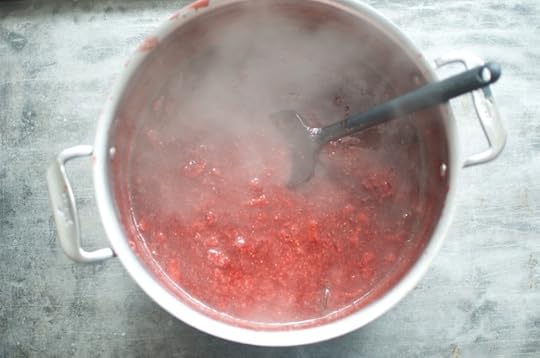
Prepare a boiling water bath canner and 8 half pint jars.Combine the cherries, vinegar, honey and brown sugar in a large pot and stir to combine. Place over high heat and bring to a vigorous boil.
Once it is bubbling madly, reduce the heat to a medium and cook at a low boil for approximately 30 minutes, until the fruit is quite soft.
Remove the pot from the heat and puree the fruit mixture. An immersion blender is the easiest way, but you can also transfer it to a blender. Take care not to splash yourself with hot liquid during this process.
Return the blended fruit to the pot and add the cinnamon stick, ginger, salt, cloves, garlic, cayenne, and lemon zest.
Cook, stirring regularly, for an additional 30-45 minutes, until the fruit seems quite thick (remembering that it will thicken more as it cools). Taste and adjust seasoning, if necessary.
Funnel the finished ketchup into the prepared jars.
Wipe the rims, apply the lids and rings, and process in a boiling water bath canner for 15 minutes.
When the time is up, remove the jars and set them on a folded kitchen towel to cool. When the jars have cooled enough that you can comfortably handle them, check the seals. Sealed jars can be stored at room temperature for up to a year. Any unsealed jars should be refrigerated and used promptly.
3.1http://foodinjars.com/2017/08/sweet-cherry-ketchup/
Related Posts:
Hot Pack Spiced Cherry Preserves
Nectarine Conserve with Lemon, Raisins and Walnuts
Peach Habanero Hot Sauce
How to Make Your Own Tonic Water
Regular Food in Jars contributor Alex Jones is here to with a how-to post designed to help you make tonic water syrup! A fun DIY project for an August weekend. – Marisa
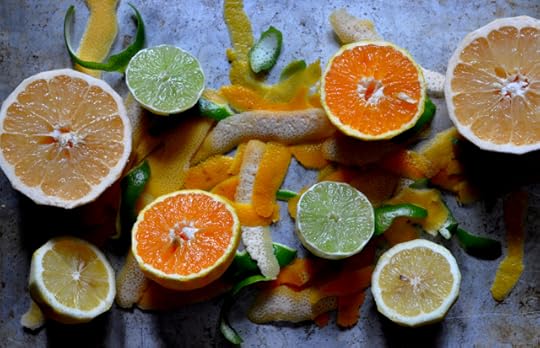
When hot weather comes to Philadelphia, that’s my cue to pick up a bottle of gin — because there’s no better quencher at the end of a long, hot bike commute or gardening session than a bright, herbaceous gin and tonic.
In recent years, I’ve started investing in better, locally produced gins to make my favorite summertime cocktail: bottles of Philadelphia Distilling’s Bluecoat and Palmer Distilling’s Liberty Gin are made in the city; Manatawny Still Works’ Odd Fellows Gin is produced about an hour outside Philly in Pottstown. All three are delicious in a crisp G&T.
With quality craft gin, homemade seltzer (thanks to my secondhand SodaStream), and fresh-squeezed lime juice, I found myself just one ingredient away from a truly bespoke cocktail: homemade tonic water.
While I’d had delicious homemade tonic water thanks to a fellow swapper at the Philly Food Swap, I’d never made it myself. Luckily, the indispensable David Leibovitz had a recipe.
Very important note: David’s recipe also includes a link to this essential guidance on how to make your own tonic and avoid cinchonism, an unpleasant condition caused by overconsumption of quinine, the compound in chinchona bark that gives tonic water its signature bitter flavor and tannic quality.
As far as I can tell, this recipe should be safe as long as you follow guidelines on selecting cut bark rather than powdered, strain well and let sediment settle, limit homemade tonic consumption to one cocktail’s worth per day and make sure to dilute the syrup with seltzer by at least 50%. That said, I’m not a doctor or a scientist, so be sure to read this information thoroughly and follow directions.
Or — to create a tonic water that you can consume with abandon — swap out the chinchona bark with a similar quantity of black tea, which can serve as a comparable bittering agent.
Warnings aside, this recipe is simple to make and delicious to enjoy. Zest and juice citrus fruits, select spices and herbs to customize the flavor, simmer it all together, and let the mixture steep for a few days in the fridge.
Strain the tonic well, let it sit overnight, and pour off (or, for a slightly higher yield, siphon off) the syrup, leaving the chinchona and spice powder that’s settled to the bottom behind.
With a mix of citrus, lots of lemongrass, some tropical spices and an extra limey kick from makrut lime leaves, the finished product smells and tastes delicious — like a really complex, fresh version of lime-flavored jellied citrus candies underlined by a hint of bitterness. Mix with an equal amount of simple syrup, then cut that by at least 50% with fizzy water to use in (occasional) cocktails.
As someone who tries to work in healthier habits without totally abandoning indulgence as I progress through my 30s, turning my favorite boozy quencher into something extra-delicious that should really only be consumed in occasional, moderate doses makes a lot of sense to me.
PrintHomemade Tonic Water
Ingredients
The zest and juice of an organic lemon, lime, orange, and grapefruit1 quart water
3 ounces lemongrass, chopped (fresh or frozen will work)
3 tablespoons citric acid
1/2 cup chinchona bark (cut, not powdered; available through Penn Herb Co.)
2 makrut lime leaves (fresh or frozen will work)
1/4 tablespoon whole black peppercorns
3 star anise
1 teaspoon Cape May Sea Salt or other coarse sea salt
Instructions
Be sure to consult these guidelines before making or consuming homemade tonic water.Combine all ingredients in a nonreactive saucepan over medium-high heat. Bring to a boil, reduce heat, cover loosely, and simmer for 15 minutes. Remove the pot from the heat, uncover, and let cool to room temperature.
Funnel the mixture into a half-gallon glass jar or a two-quart nonreactive vessel. Cover and refrigerate for two days, giving it a stir or a shake a few times each day.
Strain the mixture through a fine-mesh strainer and discard the solids. Strain again through several layers of cheesecloth, a coffee filter, or muslin into a nonreactive vessel. Cover and refrigerate overnight to allow sediment to sink to the bottom.
The next day, pour or siphon off the mixture into a new nonreactive vessel, taking care not to disturb or pour out any sediment at the bottom (you can strain once more through cheesecloth or a coffee filter after pouring off the mixture to be extra-sure that you've removed any remaining trace of cinchona powder if you like). Choosing to pour off the tonic water will result in a slightly smaller yield than siphoning.
Combine the tonic water with an equal amount of simple syrup and stir or shake gently to combine. Store in the fridge loosely covered for up to one year. To serve, cut the tonic syrup with seltzer water by at least 50%. Consume in moderation. 3.1http://foodinjars.com/2017/08/12160/
Related Posts:
How to Make Elderflower Cordial
How to Build a Summertime Cheese Board
June Mastery Challenge: Foraged Berry Jam
August 1, 2017
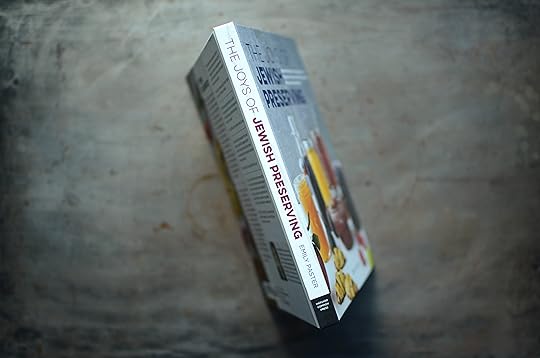
Cookbooks: The Joys of Jewish Preserving
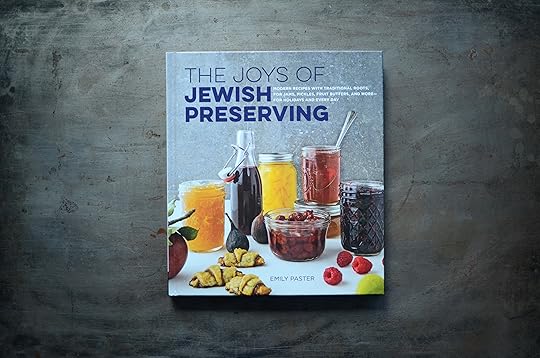
I met Emily Paster on Twitter sometime in the summer of 2010. In those days, she was a part-time law professor and full-time mom, just starting her canning and preserving journey. She would frequently reach out to ask a question or simply engage around our shared interest.
In the intervening years, our online conversations led to real-life friendship and it has been a treat to watch (and offer a little help when possible) as she has transitioned into a career as a food writer and cookbook author.
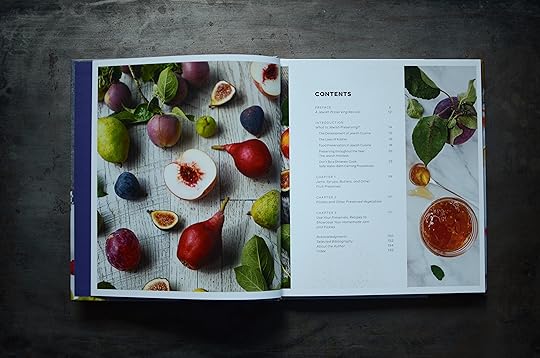
Earlier this summer, Emily published her second cookbook, called The Joys of Jewish Preserving was published (her first was last summer’s Food Swap!) and it is gorgeous, accessible, and perfect for preservers of all stripes.
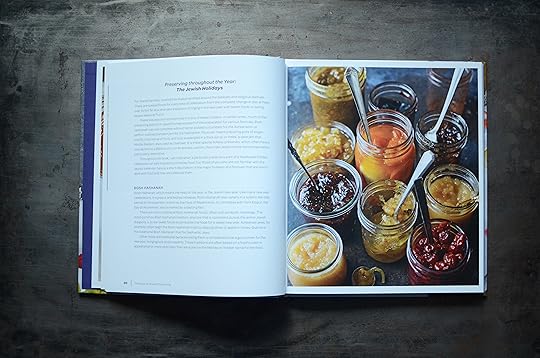
This lovely book celebrates the many aspects of traditional Jewish jams, pickles, fruit butters, and spreads. From your classic fermented deli pickle to lemon curd designed to use up extra egg yolks (common around Passover!), there’s a wealth of goodness here.
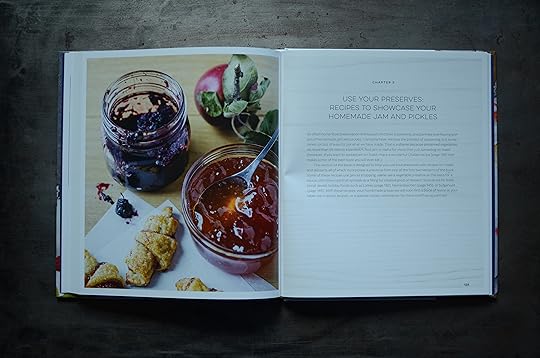
The other thing Emily does really beautifully in this book is that she gives you lots of ways to use up the preserves you’ve made. I’m hoping to make her Sweet Potato Latkes (page 132), the Chocolate Babka with Jam (page 139), and her Cream Cheese Rugelach.

For those of you who have enjoyed cooking from Plenty, Jerusalem, or Zahav, you’ll find much to love in this book. Make sure to check it out before the summer ends!
Related Posts:
Cookbooks: Homegrown Pantry
Cookbooks: Bread Toast Crumbs
Cookbooks: Savory Sweet
August Sponsors: Cuppow, Fillmore Container, EcoJarz, Mason Jar Lifestyle, CanningCrafts, and Mrs. Wages
Happy August, dear ones! It’s the start of the month and so is time to thank the businesses that help make this site possible. Please do show them your appreciation for their support with your time and attention! And if your company, shop, or family business is interested reaching the food-loving and engaged Food in Jars audience, you can find more details here. Leave a comment on this post or drop me a note to learn more!
In the top spot are our friends at Cuppow. They are the creators of the original mason jar travel mug topper and the BNTO, a small plastic cup that transforms a canning jar into a snack or lunch box. I love pairing their straw-ready drink lid with a 24 ounce mason jar for the perfect summer iced coffee vessel.
Lancaster, PA-based and family-owned Fillmore Container are next! They sell all manner of canning jars, lids, and other preservation gear. As always, their blog is an amazing resource for all things jar-related. And have you seen their new logo? It’s so cute!
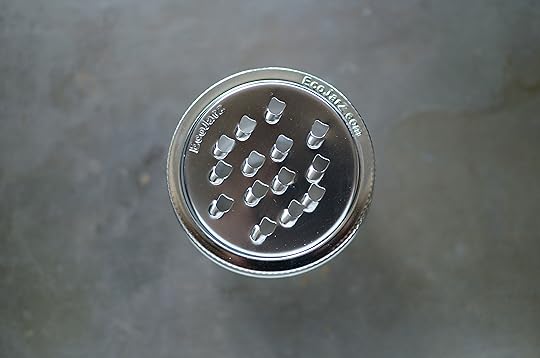
Our friends over at EcoJarz on board again this month. They make an array of products designed to fit on top of mason jars, including cheese graters, coffee brewers, and stainless steel storage lids. Don’t miss their back-to-school sale August 7-14. Use the code SUMMER2017FIJ to get 20% off!
Mason Jar Lifestyle is a one-stop shopping site for all the jar lovers out there. They sell all manner of mason jar accessories and adaptors. If you’re in the market for lids, straws, sprouting lids, and cozies to transform your mason jars into travel mugs, make sure to check them out!
Next up is CanningCrafts. Shop owner Alison sells an array of ready made and custom mason jar labels for all your various preserves, syrups, and backyard honey. I particularly love her line of labels encouraging people to return the jar! When next you need labels for a special project, check out CanningCrafts.
Our friends at Mrs. Wages are on the roster again this month. They make pectin, vinegar, and more canning mixes than I can count. Their website is an incredible preserving resource and I can’t say enough good things about their salsa mix. If you need a little help getting your produce into jars, remember to seek out their products! They’re also sponsoring the giveaway this week, make sure to enter!
Related Posts:
Check the recipe index for more tasty preserves!
July 31, 2017
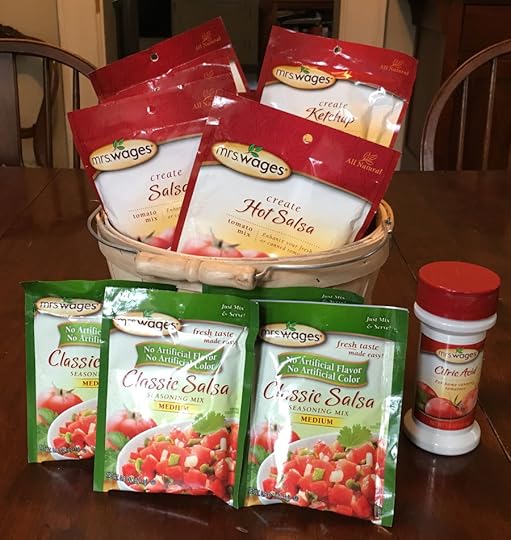
Giveaway: Mrs. Wages Tomato Prize Pack
I look forward to tomato season all year. Because I don’t have a garden, it always starts for me when the hot house tomatoes appear at my local farmers market. Then, there comes a trickle of small tomatoes like sungold and cherry tomatoes. And then finally, the torrent. Tables heaped with heirlooms, slicers, and sturdy paste tomatoes.
Because I know that tomato season is fleeting, I make a point of canning at least 100 pounds of tomatoes each season (and sometimes more!). I can them whole, make puree, and cook pans of tomatoes down into thick, flavorful pastes. I also like to employ a little help and so occasionally turn to a package of Mrs. Wages salsa or pasta sauce. Made from spices, dehydrated herbs, citric acid, and salt, these packets are such a time saver and create a finished product that makes my home cooking delicious.
This week, I’m giving away a whole assortment of Mrs. Wages Tomato seasoning mixes. The basket will contain an assortment of mixes, including classic salsa, ketchup, and much more. If you’re interested in a chance to win this giant package of tomato canning goodness, use the widget below.
Related Posts:
A Mrs. Wages Tomato Mix Giveaway
Giveaway: Mrs. Wages Pickle Sampler Pack
Links: Pickled Fruit, Lavender, and Winners
July 27, 2017
July Mastery Challenge: Pickled Blistered Shishito Peppers
Regular Food in Jars contributor Alex Jones is here to with a recipe to preserve delicious shishito peppers. They’re one of my summer favorites! – Marisa
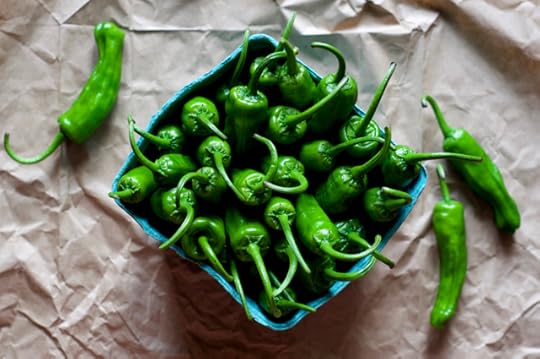
One of my favorite moments of summer eating doesn’t involve handfuls of blueberries, icy-cold slices of watermelon, or peaches so juicy you have to eat them over the sink. (Although those firsts fruits are up there on the list.) It’s when I spy the first shishito peppers at the farmers’ market.
When I first see those wrinkly, electric green peppers heaped in a basket or bursting out of a fiber pint container, I know I have to have them.
Back my kitchen with my market bounty, I’ll get my cast iron pan ripping hot with a glug of grapeseed oil and add the peppers, cooking for a few minutes on each side until the skin is blistered deep brown and the flesh is just tender. Then, they go into a bowl with a big three-finger pinch of flaky sea salt. A few flicks of the wrist to toss, and then I’ll sit down and eat them all, one by one.
But inevitably, shishito season ends, and it’s rare to find them off-season in supermarkets, so I have to wait for that smoky, salty experience until next year’s pepper feast…unless I can preserve it.
After cooking and devouring the first pint of the peppers I brought home from the Urban Girls Produce stand in Clark Park last week, I knew what my hot-pack project for July’s Mastery Challenge would be: those precious shishitos, with some of that irresistible charred goodness and plenty of bright, tart flavor from the pickling liquid.
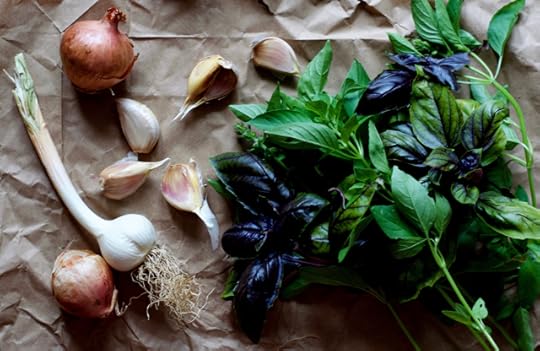
I picked a basic brine recipe and decided I’d pack the jars out with garlic, shallots, and black peppercorns for bite. (While I’ve read that one in 10 shishitos can pack a little heat, I’ve never had one like that — they’re quite mild.) And since it’s bursting out of my front yard garden plot, I ran down and picked a nice big handful of basil — lime and opal — to infuse their flavor.
First, I prepped a water bath canner, lids, and jars and set my cast iron to get nice and hot. Then, I snipped the long stems off of the peppers and sorted them into two batches, slightly smaller and slightly bigger, to help them cook evenly.
When the pan just started to smoke, I added the peppers, letting the skins blister for about three minutes so that the skin was nice and brown before flipping them over for another two. (You don’t want to cook them through, just blister the skin enough to tenderize them and add flavor.)
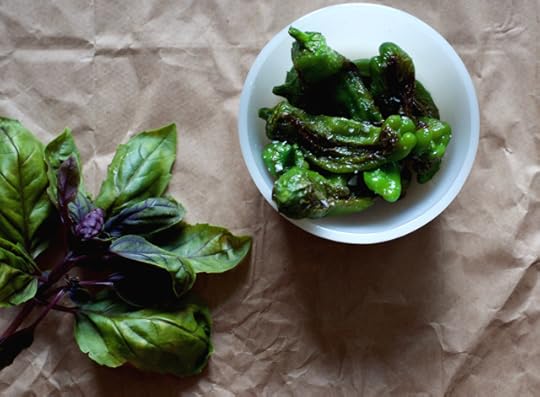
I put a little pot of brine on to boil, packed my jars, topped them off, and processed them for 10 minutes. Of course, I kept a few of the cooked peppers to snack on while my the canner bubbled away.
The next day, I opened one jar to find out if my experiment had worked. The aroma when I popped the lid was amazing — and while the peppers are a little softer than they would be fresh out of the pan, that smoky flavor I crave was there, plus lots of zing from the aromatics and vinegar.
These peppers would be amazing on an antipasti board, served alongside a rugged sharp cheddar or savory Manchego, or on a sandwich loaded with cold cuts and crisp lettuce. Or, as is my preference, all for me and straight out of the jar.
PrintPickled Blistered Shishito Peppers
Ingredients
1 dry quart shishito peppersGrapeseed or canola oil
1 cup apple cider vinegar
1 cup water
1 tablespoon pickling salt
4 cloves garlic
2 shallots
1 teaspoon black peppercorns
A handful of fresh basil leaves (I used lime and opal)
Instructions
Prepare a water bath canner and two pint jars and lids.Wash and dry peppers and trim stems if necessary. Sort peppers into two bowls, one for larger-sized peppers and one for smaller peppers.
Heat a medium-sized cast-iron skillet on high. When the pan is hot, add a tablespoon or two of the oil and swirl to coat the bottom of the pan.
When the oil just begins to smoke, add one of the two bowls of peppers, taking care not to crowd them (you may need to do this in a few batches). Let the peppers cook for two to three minutes on high, checking the skins occasionally. When most of the peppers have blistered dark brown, flip and cook on high for another two minutes. Using tongs or a slotted spoon, put the peppers back in the empty bowl to cool. Repeat with the other bowl of peppers, then set aside to cool.
Put vinegar, water, and pickling salt in a small saucepan over high heat and bring to a boil.
Crush and peel garlic and add two cloves to each jar. Peel shallots, slice in half, and add two halves to each jar. Distribute peppercorns and a few springs of the basil evenly between the two jars.
Once peppers have cooled, pierce each one with a knife so that pickling liquid can penetrate. Pack the peppers into the jars — they should be pretty soft by this point and easy to pack tightly.
When brine has boiled, remove from heat and carefully pour over the peppers in the jars. Wipe rims, apply lids and rings, and process in water bath canner for 10 minutes.
3.1http://foodinjars.com/2017/07/pickled-shishito-peppers/
Related Posts:
Submit your July Mastery Challenge Projects!
Spicy Pickled Green Beans
Small Batch Bread and Butter Pickles


