
Marisa McClellan's Blog, page 33
October 24, 2017
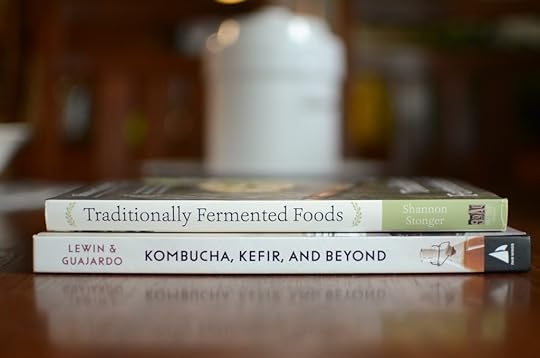
Traditionally Fermented Foods and Kombucha, Kefir, and Beyond
Over the last couple of months I’ve done a poor job staying on top of the precarious stack of review copies teetering on my desk. In order to give these books the love they deserve, I’m planning on grouping them in sets of two or three (always trying to remain thematic) and blogging about those little collections throughout the next several weeks.
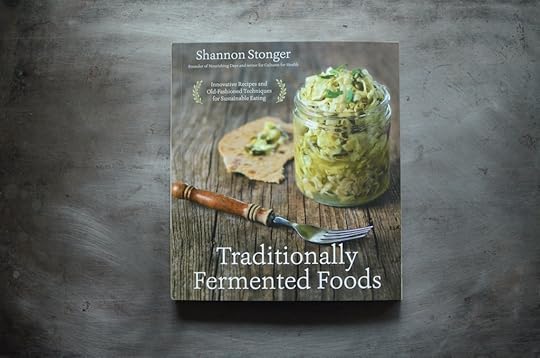
The first book in today’s pair is Traditionally Fermented Foods by Shannon Stonger. As you might guess from the title, the book focuses on a wide spectrum of classic fermented foods. It is divided into chapters that delve into the process of fermenting vegetables, grains, dairy, beverage, and condiments. As someone who recently revived a sourdough starter, I’m spending a lot of time with the grain section.
Shannon writes the blog Nourishing Days from her family’s small Texas farm and her book feels very much like an extension of her site. It’s friendly, helpful, and comes from a place of deep experience and expertise.
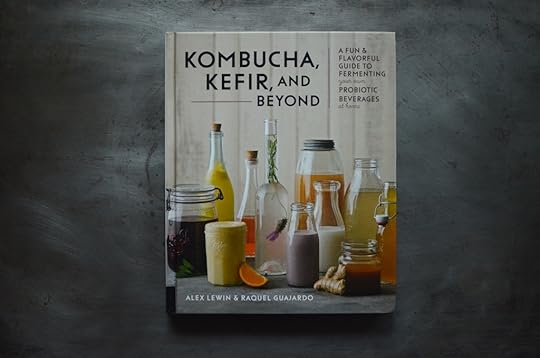
The second book in today’s short stack is Kombucha, Kefir, and Beyond from Alex Lewin & Raquel Guajardo. Alex is the author of Real Food Fermentation and Raquel has a school in Monterray, Mexico where she teaches fermentation classes (among other things).
This book offers an array of approaches to fermented drinks. In 13 wide-ranging chapters, they hit on everything from kombucha to fermented cocktails. There are sodas, vegetable drinks, and even traditional Mexican fermented drinks that date back to the pre-Hispanic era. The recipes are relatively simple, intriguing, and entirely approachable.
I plan on starting with the salty lemonade on page 73, as it starts with salt-preserved lemons. I’ve got plenty of those in the back of the fridge!
Related Posts:
Cookbooks: Modern Cider
Giveaway: Slow Cook Modern by Liana Krissoff
Cookbooks: Artisanal Preserves


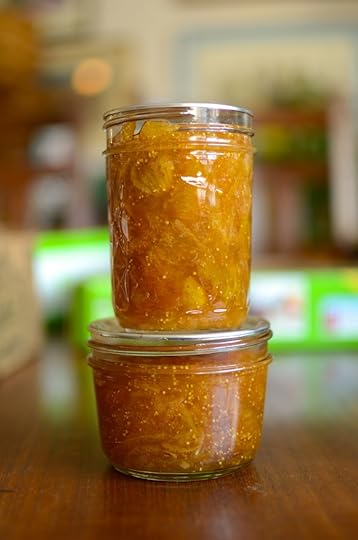
Fig Meyer Lemon Marmalade Recipe
This Fig Meyer Lemon Marmalade is a flavor combination made possible by California Figs and Lemon Ladies Orchard. While this isn’t a sponsored post, all the fruit was given to me by west coast friends.
Back in early September, the folks from California Figs sent me some figs. And when I say some figs, I don’t mean they just sent a few. They sent me an abundance of figs. A delightment of figs. A true embarrassment of fig riches.
I took some to a friend’s party that was happening that very night. I packed up some and brought them with me to the Omega Institute for my weekend long canning workshop (we turned them into this Chunky Fig Jam). When I got back, I simmered and pureed a bunch into a version of the Gingery Fig Butter from my Naturally Sweet Food in Jars book (I used vanilla bean rather than ginger).

The remaining portion because this Fig Meyer Lemon Marmalade. Around the same time that these figs arrived, my friend Karen (owner of the Lemon Ladies Orchard) sent me a handful of late season lemons as encouragement to get well (I’d had a rotten cold and a bout of the flu in rapid succession).
After making myself a series of bracing honey and lemon drinks to combat my various ailments, I had enough lemons to make this preserve. Much like the sweet cherry version I made earlier in the season, I approached this recipe over the course of a couple of days.
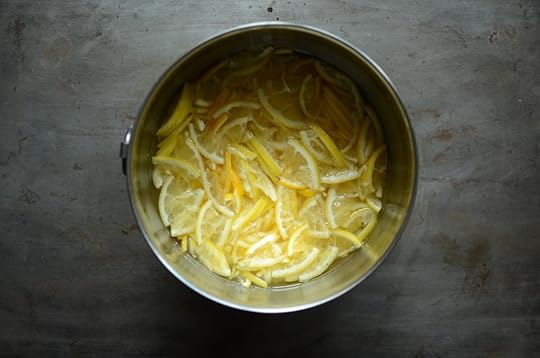
I sliced, deseeded, and soaked the lemons overnight at room temperature. I also quartered the figs, mixed them with sugar and let them macerate overnight in the fridge (it was still hot then and I didn’t want them to turn boozy while I slept).
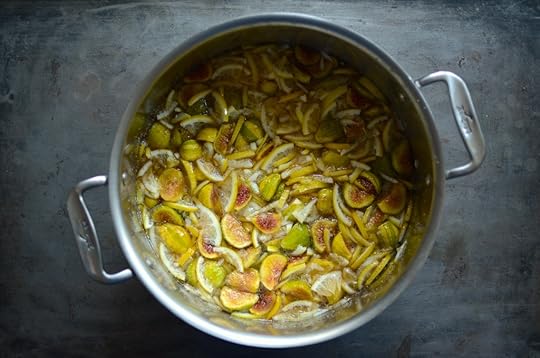
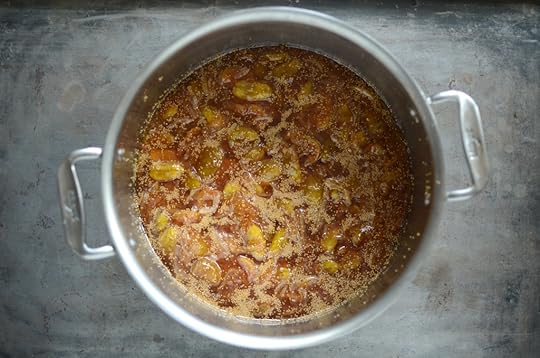
The next day, I combined the soaked lemons (and their water), the figs, and the sugar and brought it to a rapid, rolling boil. After about 35 minutes of cooking and stirring, the marmalade was sheeting off the spoon nicely and was approaching the critical 220F.
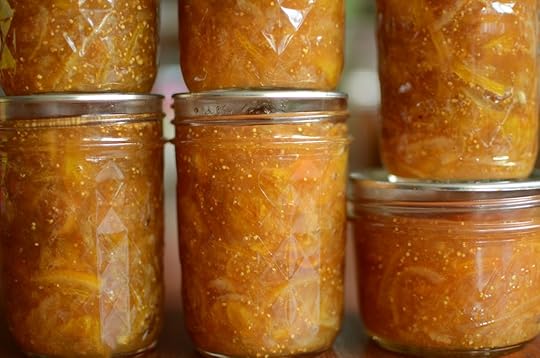
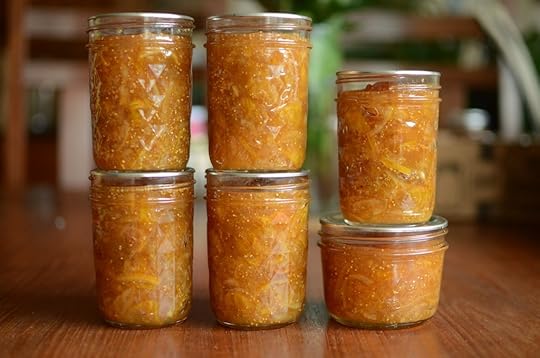
In the end, I was left with six half pints of marmalade that marries the qualities of the two fruits beautifully. The fig flavor sings and the lemons bring more than enough acid to supplement the figs lower levels. This is one that I am only sharing with my very favorite people and I’m doing my best to hold onto at least two jars (I tend to be quite generous with my preserves).
Should you find yourself with similar sets of ingredients (this may only be possible if you live in California), I highly encourage you to try a batch.
Print
Fig and Meyer Lemon Marmalade
Yield: 6 half pints
Ingredients
1 3/4 pounds figs
4 cups granulated sugar
1 3/4 pounds Meyer lemons
2 cups water
Instructions
Wash the figs and trim away any hard bits of stem. Cut them into quarters and place them in a container. Add the sugar, stir to combine, and let them macerate in the fridge overnight.
Wash the lemons. Cut away both the stem and blossom ends and slice each lemon into quarters. Cut away the thin strips of white pith from the interior of the wedges and use the tip of your knife to poke out the seeds. Cut each quarter into thin slices from top to bottom.
Once all the lemons are sliced, place them in a bowl (along with any of their liquid that you were able to capture) and add 2 cups of water. Let the sliced lemons soak overnight.
The next day, combine the figs, sugar, lemons, and soaking water in a large, non-reactive pan.
Place the pan on the stove and set the burner to high.
Bring the contents of the pot to a boil and cook, stirring regularly, until the fig and lemon mess has reduce by at least half and is starting to shape up into marmalade. You may need to reduce the heat as cooking progresses so that you maintain a low boil without scorching the bottom of the pot.
While the marmalade cooks, prepare a boiling water bath canner and 6 half pints.
Test for set using both the plate and temperature tests (required temp is 220F).
When you deem that the marmalade is done, remove the pot from the heat.
Funnel the finished marmalade into the prepared jars, leaving 1/4 inch headspace.
Wipe the rims, apply the lids and rings, and process in a boiling water bath canner for 10 minutes.
When the time is up, remove the jars and set them on a folded kitchen towel to cool. When the jars have cooled enough that you can comfortably handle them, check the seals. Sealed jars can be stored at room temperature for up to a year. Any unsealed jars should be refrigerated and used promptly.
4.14
http://foodinjars.com/2017/10/fig-meyer-lemon-marmalade/
Related Posts:
Giveaway: Meyer Lemons from Lemon Ladies Orchard
Fig Mostarda
Canning 101: How to Make Jam With Frozen Fruit + Apricot Meyer Lemon Jam
October 23, 2017
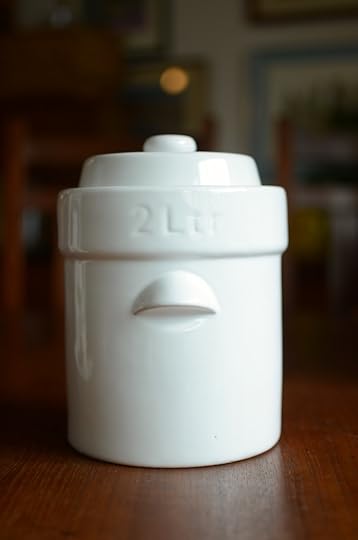
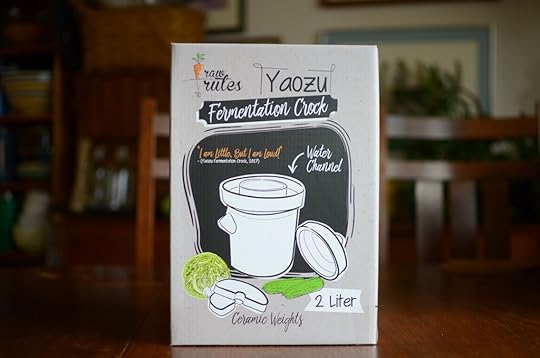
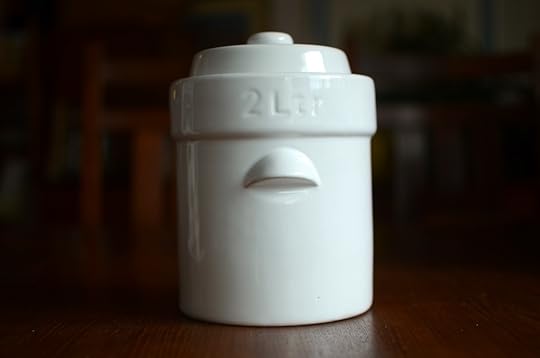
Giveaway: Raw Rutes Yaozu 2 Liter Fermenting Crock
Longing for a mini fermenting crock to call your own? Read on to learn about a charming little fermentation vessel and enter for a chance to win one as well! (This is a sponsored post!)
When it comes to fermenting, small batch is the name of my game. As much as I admire the folks who make sauerkraut 25 pounds of cabbage at a time, my space constraints mean that my very largest batches of kraut, kimchi, or brined dilly beans top out at no more than five pounds of total ingredients (and often, much less than that!).
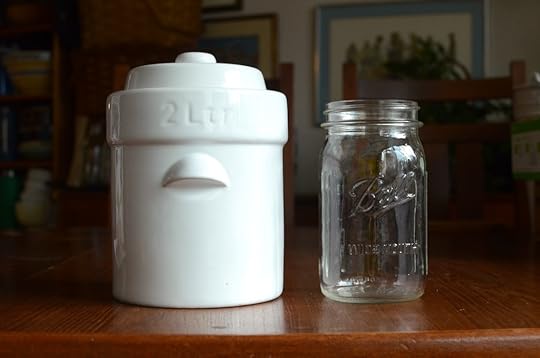
Over the years, this small batch approach has meant that mason jars have been my vessel of choice for fermentation. I do have a 10L crock that I was given years ago, but it’s just too darn big for my workflow (it sits next to my desk and holds my collection of airlocks and jar-sized pickle weights).

Still, I’ve often gazed upon the various large pickle crocks out there with a good deal of envy, wishing that there was one that would work for my small batch life. Amazingly, the folks at Raw Rutes sensed that I was pining for a petite pickling crock and created one (okay, so they didn’t make it just for me. But it’s the perfect size and is so adorable that it feels like the answer to my wish!).
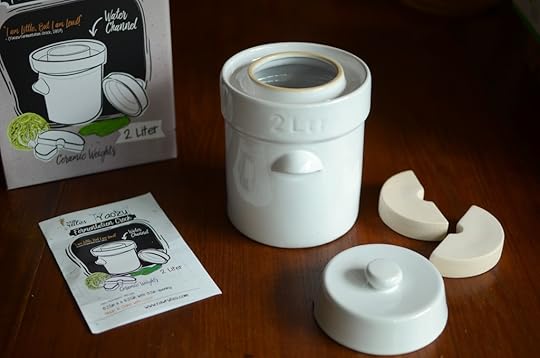
The Raw Rutes Yaozu fermenting crock is small enough to fit on the counter of even the smallest kitchens. Made from natural clay and finished with food-safe white glaze, this little crock feels solid and is easy to use. It comes with a pair of clay weights and a built-in water channel (which means you don’t have to mess around with airlocks).
Best of all, this crocks holds the perfect amount for my household. When the fermentation phase is done, you’ve got between one and two quarts of tasty kraut, kosher dills, or sauerruben to decant into jars, tuck into the fridge, and fork up alongside any number of sandwiches, salads, and soups. As you can see in the picture below, it’s actually not even that much bigger than a quart jar!
At this point, you’re probably thinking, “This all sounds great, Marisa. But how do I get my hands on one of these sweet mini crocks?” You could either head over to the Raw Rutes website and get your order in before the rush. OR, you can take your chances and try to win one of two crocks I’m giving away this week!
Use the widget below to enter the blog giveaway and then head over to Instagram to enter the second giveaway I’m hosting over there. So many chances to win!
Disclosure: This is a sponsored post. The folks at Raw Rutes have compensated me for my time and efforts. However, I only accept sponsored posts from businesses that jive with the mission of Food in Jars (to educate and inspire people to pickle, preserve, and cook from scratch) and Raw Rutes is most decidedly in line with that mission. The thoughts and opinions expressed here are honest and entirely my own.
Related Posts:
Giveaway: Bake Your Bundt Off with MightyNest
Plum Cardamom Jam and a Anolon Advanced 11-Piece Cookware Set Giveaway [sponsored]
Giveaway: Rachael Ray Lazy Spoon and Ladle
October 17, 2017
Homemade Quark from Slow Cook Modern
About a month ago, I wrote about Liana Krissoff’s most excellent book, Slow Cook Modern. In that blog post, I promised to share the recipe it contained for homemade quark. I finally here to make good on my promise (I’m only a bit later than intended).
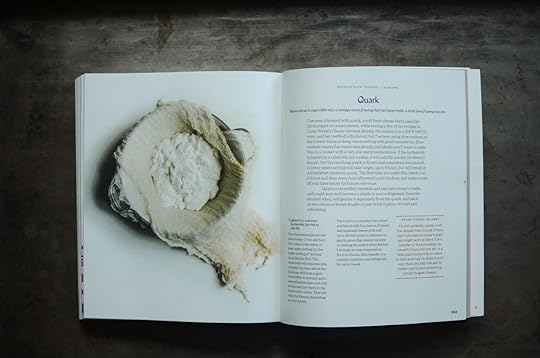
I know that some of you are probably reading this and are thinking, what exactly is quark? Well, it’s a soft set cheese of European origin that is made with acid rather than rennet. It has a bright, tangy flavor and can be cooked, baked, or spread on toast.
It’s also one of those things that seems like it should be quite complicated to make, but is quite easy (particularly if you have a slow cooker or Instant Pot handy).
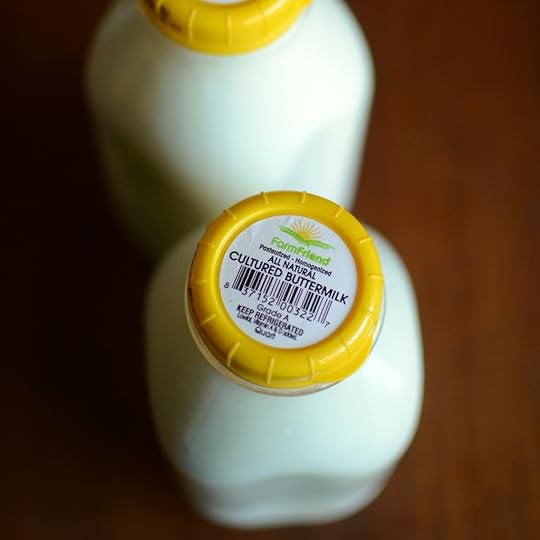
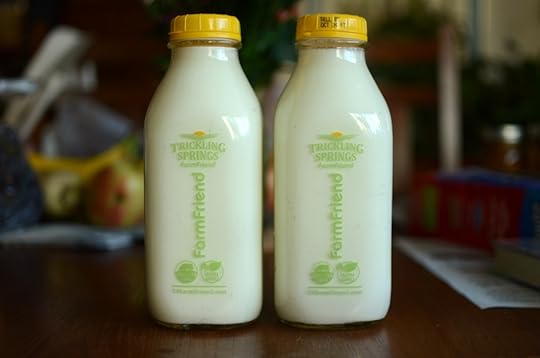
You start with half a gallon of cultured buttermilk (this is the nice, thick stuff you buy at the store, not the liquid leftover from making butter). Once you’ve procured your buttermilk, you pour it into the vessel of your choosing.
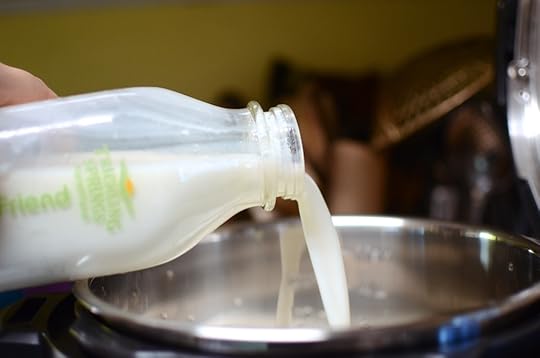
I opted for my Instant Pot set to run on the yogurt setting (I borrowed a tip I spotted on the internet and ran the pot at high pressure for 1 minute with a little water in it before adding the buttermilk, to sterilize the pot and ensure that the quark turned out well). Once the buttermilk was in the pot, I set the yogurt setting to run for 8 hours and walked away.
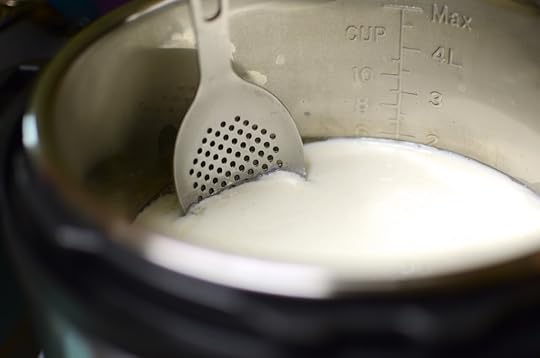
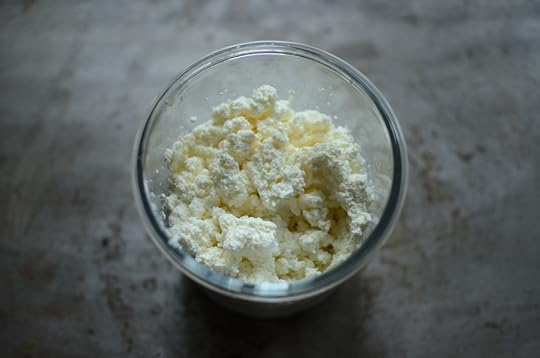
When the time was up, it was time to separate the cheese curds from the remaining liquid. I lined a fine mesh sieve with cheesecloth, perched it above a bowl, and used a slotted spoon to lift the solids out of the pot.
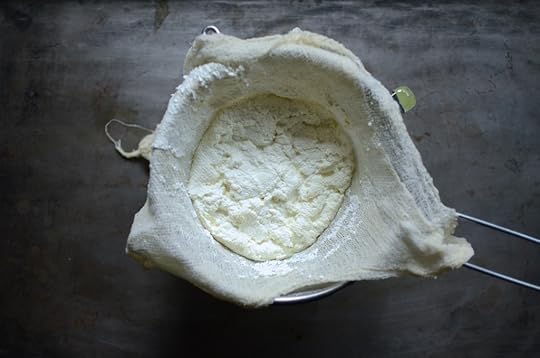
Once all the cheese solids were in the cheesecloth, I let it drain. It was evening when I started the draining process, so I ended up letting my quark sit and drain all night. I ended up with fairly dry cheese as a result. If you want something a bit more tender, shorten that draining process.
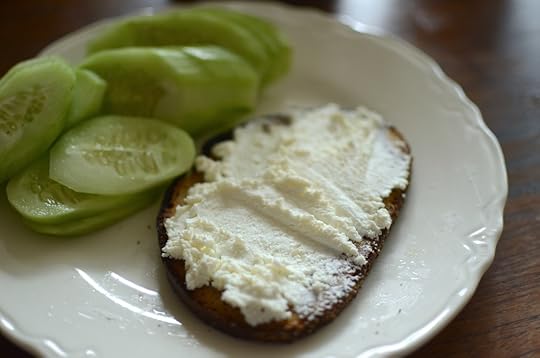
I ate the finished cheese on toasted rye bread, and heaped on slices of cucumber. It was a tasty treat that I will most certainly make again!
Print
Homemade Quark from Slow Cook Modern
Yield: Makes 2-3 cups
Ingredients
1/2 gallon (2 L) cultured buttermilk, full-fat or low-fat
Instructions
Pour the buttermilk into the slow cooker. Cover and turn the cooker to the warm or keep-warm setting (or the yogurt setting at "normal" on an Instant Pot).
The buttermilk will separate into a creamy top layer about the thickness of Greek yogurt (but fluffier in texture) and a watery bottom layer and will be firm and just warm to the touch in the center. This will take 2 to 8 hours, depending on your cooker.
Put a sieve or colander over a bowl and line it with four layers of rinsed and squeezed cheesecloth and use a slotted spoon or skimmer to gently spoon the creamy top layer in, leaving the watery whey behind.
Let drain at room temperature for 2 to 4 hours, then transfer to a sealable container and refrigerate for up to 1 week.
Notes
Recipe reprinted with permission from Slow Cooker Modern by Liana Krissoff.
4.14
http://foodinjars.com/2017/10/homemade-quark-slow-cooker-modern/
Related Posts:
Giveaway: Slow Cook Modern by Liana Krissoff
A Canning Tee-Shirt to Benefit Seed Life Skills
Homemade Quark from Slow Cooker Modern
About a month ago, I wrote about Liana Krissoff’s most excellent book, Slow Cook Modern. In that blog post, I promised to share the recipe it contained for homemade quark. I finally here to make good on my promise (I’m only a bit later than intended).
I know that some of you are probably reading this and are thinking, what exactly is quark? Well, it’s a soft set cheese of European origin that is made with acid rather than rennet. It has a bright, tangy flavor and can be cooked, baked, or spread on toast.
It’s also one of those things that seems like it should be quite complicated to make, but is quite easy (particularly if you have a slow cooker or Instant Pot handy).
You start with half a gallon of cultured buttermilk (this is the nice, thick stuff you buy at the store, not the liquid leftover from making butter). Once you’ve procured your buttermilk, you pour it into the vessel of your choosing.
I opted for my Instant Pot set to run on the yogurt setting (I borrowed a tip I spotted on the internet and ran the pot at high pressure for 1 minute with a little water in it before adding the buttermilk, to sterilize the pot and ensure that the quark turned out well). Once the buttermilk was in the pot, I set the yogurt setting to run for 8 hours and walked away.
When the time was up, it was time to separate the cheese curds from the remaining liquid. I lined a fine mesh sieve with cheesecloth, perched it above a bowl, and used a slotted spoon to lift the solids out of the pot.
Once all the cheese solids were in the cheesecloth, I let it drain. It was evening when I started the draining process, so I ended up letting my quark sit and drain all night. I ended up with fairly dry cheese as a result. If you want something a bit more tender, shorten that draining process.
I ate the finished cheese on toasted rye bread, and heaped on slices of cucumber. It was a tasty treat that I will most certainly make again!
Print
Homemade Quark from Slow Cook Modern
Yield: Makes 2-3 cups
Ingredients
1/2 gallon (2 L) cultured buttermilk, full-fat or low-fat
Instructions
Pour the buttermilk into the slow cooker. Cover and turn the cooker to the warm or keep-warm setting (or the yogurt setting at "normal" on an Instant Pot).
The buttermilk will separate into a creamy top layer about the thickness of Greek yogurt (but fluffier in texture) and a watery bottom layer and will be firm and just warm to the touch in the center. This will take 2 to 8 hours, depending on your cooker.
Put a sieve or colander over a bowl and line it with four layers of rinsed and squeezed cheesecloth and use a slotted spoon or skimmer to gently spoon the creamy top layer in, leaving the watery whey behind.
Let drain at room temperature for 2 to 4 hours, then transfer to a sealable container and refrigerate for up to 1 week.
Notes
Recipe reprinted with permission from Slow Cooker Modern by Liana Krissoff.
4.14
http://foodinjars.com/2017/10/homemade-quark-slow-cooker-modern/
Related Posts:
Giveaway: Slow Cook Modern by Liana Krissoff
A Canning Tee-Shirt to Benefit Seed Life Skills
October 14, 2017
Submit your October Mastery Challenge Here!
Hello Mastery Challenge participants! I know it seems a little strange that I’m posting this submission form right on the heels of the monthly intro. The truth of the matter is that because of my busy-ness, we’re well into October and I wanted to make sure the form was here for those folks who are more on top of things that I am!
This month, we’re focusing on both drying/dehydrating and pressure canning. You can choose one topic or tackle them both, depending on your time, equipment and motivation!
The reporting form is below! Deadline submission deadline is Monday, October 30 to be counted in the tally and included in the round-up.
Loading…
Related Posts:
Dehydrating and Pressure Canning for the October Mastery Challenge
October Sponsors: Cuppow, Fillmore Container, EcoJarz, Mason Jar Lifestyle, CanningCrafts, and Mrs. Wages
September Mastery Challenge Round-up: Fruit Butters
October 10, 2017
Dehydrating and Pressure Canning for the October Mastery Challenge
Happy October, folks! So sorry that it’s taken me a little bit to get this post up. I spent most of last week in Austin co-babysitting my nephews with my mom and I’m working on a new book, so my attention has been a bit splintered.
Like our challenge back in August, this month is two-pronged. We’re focusing on both drying/dehydrating and pressure canning. The reason for two topics this time around is that I didn’t want to have a whole month dedicated to something that required the purchase of a specialized piece of equipment.

Entry level pressure canners aren’t that expensive (the 16 quart Presto that I use is currently $72 on Amazon), but it’s still a cost. The barrier to entry just needed to be lower. And while lots of people have dedicated dehydrators, drying food is something that be done just about anywhere, with nothing more than a length of string or a rubber band with which to tie and hang a bundle of herbs. So here we are, with two topics.
To participate this month, you can pick just one of the skills, or if you have access to a pressure canner, can be bold and do both. Finally, remember that the goal of this challenge is to help you expand your skills while creating something that you’ll actually use. So choose accordingly.
Drying/Dehydrating
This is one of the oldest food preservation approaches known to humans. Since the dawn of time, we’ve been drying fresh fruits, vegetables, herbs, and meats in order to make them last from one season to the next. In the past, we had nothing more than sun, wind, and smoke to effect drying. These days, we’ve added countertop dehydrators, microwave ovens, freeze dryers, and ovens with dedicated dehydrating settings to our toolbox.
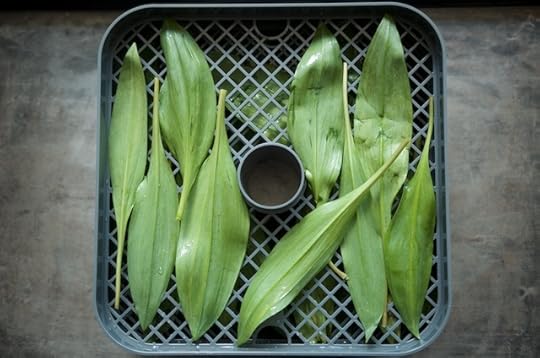
For the purposes of this month’s challenge, any homemade dried food will count. I do ask that if you opt for making jerky that you take care and use proper food handling techniques to prevent spoilage (Hank Shaw is always my first stop for jerky info).
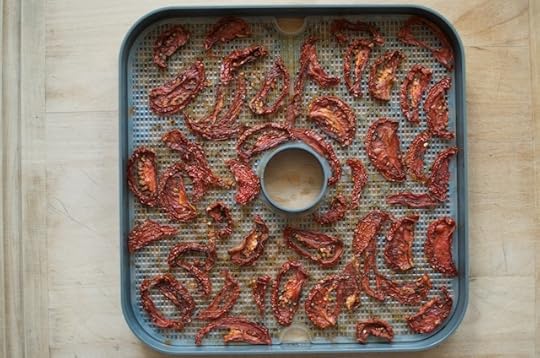
I am partial to these marinated and dried tomatoes, these dehydrated tiny tomatoes, and these sprouted and dried almonds.
For ease of prep and use, nothing beats these air dried lemon peel slices.
Making fruit leather with a jar of applesauce spiked with some elderly jam is always a nice way to go, particularly if you have kids with a fruit leather habit (though having just spent a week with a very pick three-year-old, I could see him turning up his nose at fruit leather without a wrapper. Your mileage will vary on that front).
This weekend, hit the farmers market and buy a few bundles of herbs. Tie them with string and hang them upside down someplace where they can just be for a week or two. When they’re dry, rub them, tuck them into a jar, and label them for winter cooking.
There’s also a bunch of good information on drying food on the National Center for Home Food Preservation website, should you need more detail.
Pressure Canning
Whereas drying has an element of the loosy-goosy about it, there’s no messing around with pressure canning (though truly, there’s nothing to be afraid of). The reason some foods needs to be canned with the help of a pressure canner is that they are low in acid. Without an ample volume of acid, there’s nothing to check the germination ability of any botulism spores that might be present and you could potentially end up with a jar full of danger. For more the role of acid in canning, read this post.
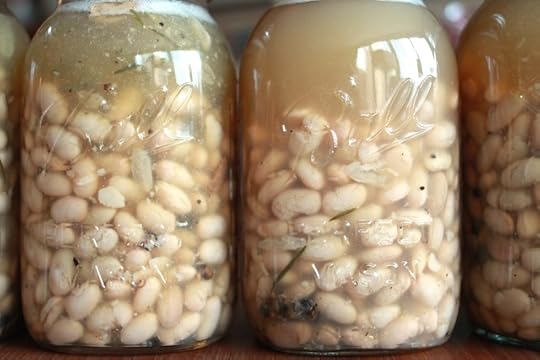
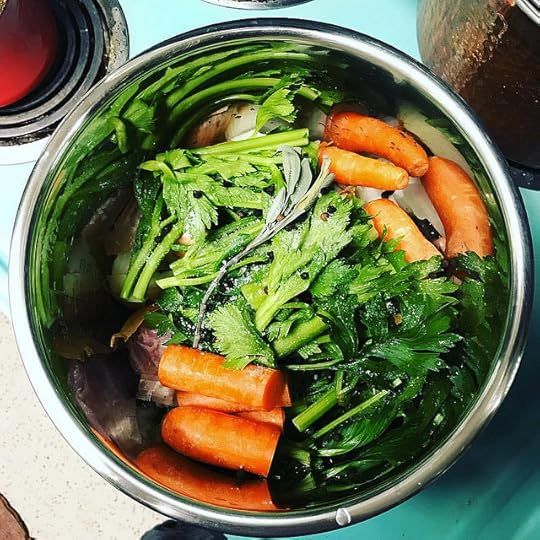
And so, whenever we want to preserve things like unpickled vegetables, meats, stocks and broths, and beans, we call on a pressure canner. A well-vented pressure canner typically reaches 250F, which is enough to kill botulism spores. The amount of time different foods are processed in a pressure canner is typically calculated based on the volume of the jar and the density of the food.

One thing to note is that when you start considering pressure canning, you will need to get your hands on a dedicated pressure canner. Consumer pressure cookers are not designed for pressure canning and cannot be used to preserve low acid foods. Additionally, no electric countertop pressure cooker has been approved for canning (no matter what the infomercials tell you).
For more detail on pressure canning, read the following posts:
How to can turkey stock
How to can ham stock (this documents my first pressure canning experience)
Pressure canning beans in Weck jars
Canning cubed pumpkin
Rosemary white bean soup starter
Related Posts:
September Mastery Challenge Round-up: Fruit Butters
Fruit Butter for the September Food in Jars Mastery Challenge
August Mastery Challenge Round-Up: LTP and Steam Canning
October 8, 2017
October Sponsors: Cuppow, Fillmore Container, EcoJarz, Mason Jar Lifestyle, CanningCrafts, and Mrs. Wages

We are well into October and so it is high past the time when I like to thank the businesses that help make this site possible. Oops! Please do show them that you appreciation their support with your time and attention!
First up are our friends at Cuppow. They are the creators of the original mason jar travel mug topper and the BNTO, a small plastic cup that transforms a canning jar into a snack or lunch box. Right now, you can get five of the wide mouth lids for just $40. Pair one with a jar and a bag of locally roasted coffee for a really terrific teacher gift.
Lancaster, PA-based and family-owned Fillmore Container are next! They sell all manner of canning jars, lids, and other preservation gear. As always, their blog is an amazing resource for all things jar-related. Don’t miss this recipe for Gingery Honey Pear Butter (I bet it’s fabulous in oatmeal!).
Our friends over at EcoJarz are on board again this month. They make an array of products designed to fit on top of mason jars, including cheese graters, coffee brewers, and stainless steel storage lids. And though it’s not directly jar related, I love this Stainless Steel Straw Set that they’re selling. It comes with a linen bag and a straw cleaner and is an awesome thing to tuck into your bag if you’re trying to avoid single-use plastic straws.
Mason Jar Lifestyle is a one-stop shopping site for all the jar lovers out there. They sell all manner of mason jar accessories and adaptors. If you’re in the market for lids, straws, sprouting lids, and cozies to transform your mason jars into travel mugs, make sure to check them out. Their cork jar stoppers continue to be one of my all-time favorite jar accessories.
Next up is CanningCrafts. Shop owner Alison sells an array of ready made and custom mason jar labels for all your various preserves, syrups, and backyard honey. I particularly love her line of labels encouraging people to return the jar! When next you need labels for a special project, check out CanningCrafts.
Our friends at Mrs. Wages are on the roster again this month. They make pectin, vinegar, and more canning mixes than I can count. Their website is an incredible preserving resource and I can’t say enough good things about their salsa mix. Look for a post next week in which I make their Pepper Jelly! Such a good one for those holiday gift baskets!
And if your company, shop, or family business is interested in reaching the food-loving and engaged Food in Jars audience, you can find more details here. Leave a comment on this post or drop me a note to learn more!
Related Posts:
September Sponsors: Cuppow, Fillmore Container, EcoJarz, Mason Jar Lifestyle, CanningCrafts, and Mrs. Wages
July Sponsors: Cuppow, Fillmore Container, EcoJarz, Mason Jar Lifestyle, CanningCrafts, and Mrs. Wages
June Sponsors: Cuppow, Fillmore Container, EcoJarz, Mason Jar Lifestyle, CanningCrafts, and Mrs. Wages
October 4, 2017
Hot Pepper Hoagie Relish
Regular Food in Jars contributor Alex Jones drops in this week with a recipe for sweet and spicy pepper hoagie relish (for those of you not in the Philadelphia region, hoagies are our version of a sub sandwich). I can imagine lots of delicious ways to serve up this spread! -Marisa
As a kid, I was weird about sandwiches. I didn’t like mayo, and I didn’t like tomatoes. My sandwich of choice in middle school was wheat bread, yellow mustard, and Tofurky slices, with nothing else.
Fast forward 20 years and my tastes have changed — partially, I suspect, because I now live in a city with a strong sandwich culture. Hoagies, whether you get them from Wawa or the corner store, are standard fare here in Philly.
And while I’ll still pick off (or ask my sandwich artist to omit) slices of sad, pink, industrial tomato from my sandwiches, I’ve come to appreciate the components of a good hoagie: slices tender turkey and cheddar cheese, sweet onion, a ruffle of lettuce, just the right amount of tangy mayo. And those juicy sweet and hot peppers, which add a ton of flavor and set off the other ingredients perfectly.
When a whirlwind of late summer travel meant that I had three weeks’ worth of sweet and hot peppers from my Taproot Farm vegetable CSA stashed in the fridge, I knew I wanted to make something that would help recreate my typical sandwich order without walking the 200 feet to my corner deli.
Rather than pickled peppers, I decided to make a hot pepper spread or relish for my hoagies, with the idea that a uniform paste will help keep the bread from getting soggy. I decided to roughly halve this basic hot pepper relish recipe from the National Center for Home Food Preservation as my guide and got to work.
I had big, red cubanelle-style sweet peppers, a few orange sweet peppers, and a mixed bag of jalapenos and fiery green long hots to work with. I donned a pair of gloves and got to chopping.
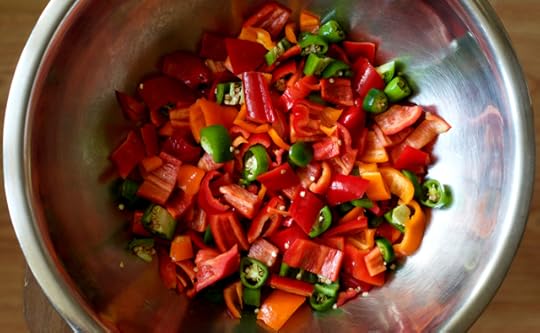
Out of around three pounds of peppers, about a half pound were hot, with the rest sweet. I seeded and stemmed the sweet peppers and gave them a rough chop. When I got to the hots, I chopped off the stems and cut the peppers into chunks, leaving the seeds that fell on the cutting board out of the mix but including the ones that stuck to the inside of the fruit. This gave me a pleasantly spicy mixture for my taste — hot but not overkill.
After chopping up a few onions from the CSA and grinding up the ingredients in the food processor, I had around five cups of ground veggies to work with. I decided to swap out the mustard seed in the original recipe for two full bulbs of garlic, pressure-cooked to a soft texture and mild, sweet flavor under high pressure in my Instant Pot for 10 minutes.
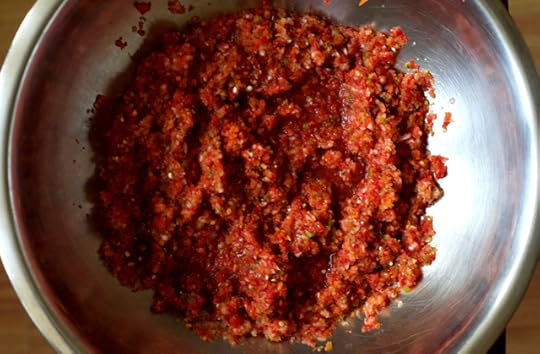
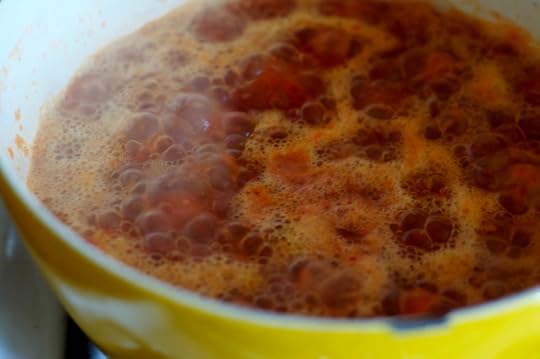
I added apple cider vinegar, sugar, several grinds of black pepper, and pickling salt, then let the whole thing come to a boil in my Dutch oven and simmer for half an hour before water bath canning. I ended up with a pint jar (which skipped the water bath and went straight into the fridge for immediate use), three half pints, and a quarter pint — not bad for a few bags of peppers that would have taken me weeks to get through otherwise.
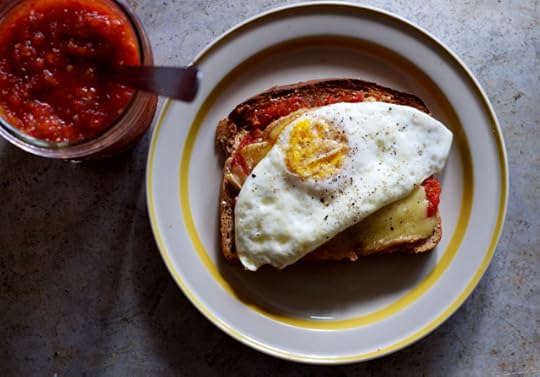
The resulting spread is very tasty, although I’d love to tweak future versions (safely!) to see how I might be able to dial back the sweetness a bit. Still, the spread is tangy, peppery, and spicy — just the thing to offset the ingredients in your favorite sandwich, mix into cream cheese for your morning bagel, or slather onto broiled cheese toast before topping the whole thing with a fried egg. I bet it would be delicious with buttermilk in a salad dressing, too.
So I want to know: How are you all preserving your hot and sweet peppers before their season slips away? What are your favorite sandwich toppings that can be preserved? Share yours in the comments!
Print
Hot Pepper Hoagie Relish
Ingredients
3 1/2 cups ground hot and sweet peppers, around 3 pounds before chopping (I use around 20% hot peppers, but you can tweak this according to your taste/what you have)
1 1/2 cups ground sweet onion (2 medium onions)
2 bulbs garlic, roasted and peeled
1 1/4 cups white or apple cider vinegar (5% acidity)
1 cup sugar
3 teaspoons pickling salt
2 teaspoons mustard seed (optional)
Instructions
Prepare a water bath canner and five half-pint canning jars, bands, and lids.
Wear protective gloves to wash, stem, seed, and roughly the sweet peppers. Do the same for the hot peppers, leaving some or all of the seeds in depending on the heat level you want. Pulse with the chopping blade in a food processor until the peppers are finely chopped and look like a thick paste. Measure out 3 1/2 cups and put this in a large, heavy-bottomed pot.
Peel and roughly chop the onions, then grind in the food processor as well. Measure out 1 1/2 cups and combine with the ground peppers. Mash the peeled roasted garlic with a fork or blend it up in the food processor and add to the pot. Add remaining ingredients and stir to combine.
Bring the mixture to a boil over high heat, then cook at a low boil for 30 minutes, stirring frequently to prevent scorching. You may want to open windows or turn on your vent fan, as the air in your kitchen may get a little spicy during cooking.
Fill hot jars with the mixture, wipe rims, seal with softened lids and bands, and process in the water bath canner for 10 minutes. Remove jars and let sit for 24 hours to cool, then check seals, remove bands, label, and store.
4.14
http://foodinjars.com/2017/10/hot-pepper-hoagie-relish/
Related Posts:
Roasted Seedless Grape Jam
How to Make Fresh Tulsi Tea
Red Currants, Dry Canning, and Family Traditions
September 30, 2017
September Mastery Challenge Round-up: Fruit Butters
A post shared by Genevieve Boehme (@genaboehme) on Sep 22, 2017 at 1:04pm PDT
September is over and so it’s time for our monthly Mastery Challenge accounting. This was a good month for the challenge, with 73 people reporting in that they cooked up a batch or two of fruit butter in order to meet the goals of the challenge.

The array of fruits used was nice and broad. Folks made butters out of apples, apricots, blueberries, cherries, cranberries, figs, muscadine grapes, nectarines, pawpaws, peaches, pears, plums, pumpkins, rhubarb, tomatoes, and zucchini. Those butters were flavored with aleppo pepper, bourbon, cardamom, chai, chipotle, cinnamon, ginger, lavender, lemon, rosewater, rum, and vanilla. And they were sweetened with brown sugar, cane sugar, honey, maple, and sorghum.
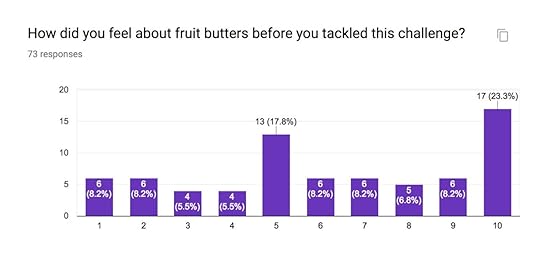
Going into the challenge, the feelings about fruit butters were scattered across the spectrum, with a number of folks feeling ok and then really positive about the style of preserve.
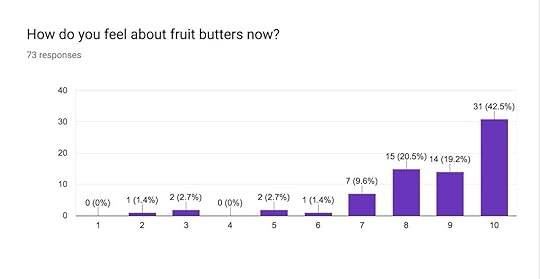
Happily, after completing the challenge, nearly everyone who participated feels pretty darn good about fruit butters. That always warms my heart. Sadly, I forgot to include a field for people to leave comments about this month’s challenge on the submission form (oops), so I don’t have any words of wisdom or excitement from participants to share. 


