
Marisa McClellan's Blog, page 31
December 5, 2017
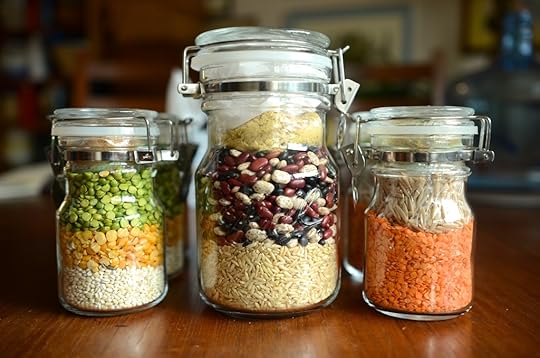
Ball Fresh Preserving Products Secret Santa – Soup Mix Jars
Most years, much of my holiday giving to friends, neighbors, and colleagues falls into a pretty predictable pattern. I buy a bunch of plain brown paper kraft bags and then fill them up with mix and match assortments of jam and pickles. Sometimes I really shake things up and add a jar of granola or some scone mix.
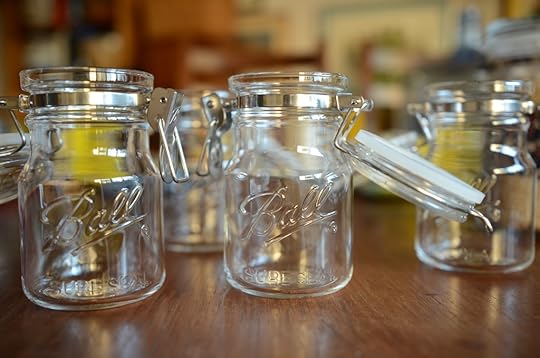
However, this year my habitual patterns are getting a big old shake up, thanks to my friends at Newell Brands, makers of Ball® Fresh Preserving Products. They asked me to come up with a delicious, crafty gift for a Secret Santa program that made good use of their Sure Seal Bail Storage Jars. Since these jars aren’t designed for canning, I couldn’t rely on my stable of friendly canning recipes.
I did some soul searching and came to the realization that I wanted to make soup mixes and I wanted them to be in the spirit of those classic Manichewitz soup mix tubes that my mom always kept in the pantry when I was growing up. Nostalgia and a dinner time helper, all in one handy package!
And so, I got down to work. I borrowed inspiration from the contents of those Manichewitz tubes and from this post on making five bean soup kits over on Wholefully and ended up with three soup mixes I am delighted to send off to my Secret Santa swap partner and share with you guys.
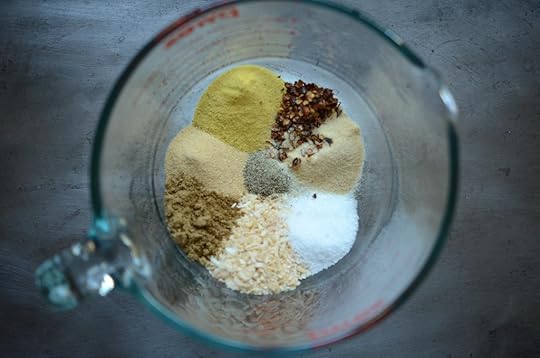
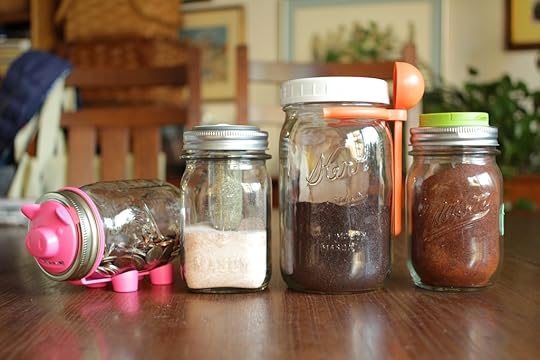
There’s split pea and barley, triple bean and rice, and red lentil and pasta. I also included a spice packet in each jar to make the process of cooking up a pot of soup as easy as possible. Each jar also comes with a slip of paper that walks you through how to go from jar to a steaming bowl of soup (I do recommend that folks start the cooking process with some fresh onion, celery and carrot for maximum deliciousness).

I used a scale to portion out my soup ingredients to ensure consistency. If you don’t have a scale, you can eyeball the quantities as you divide them between the jars.
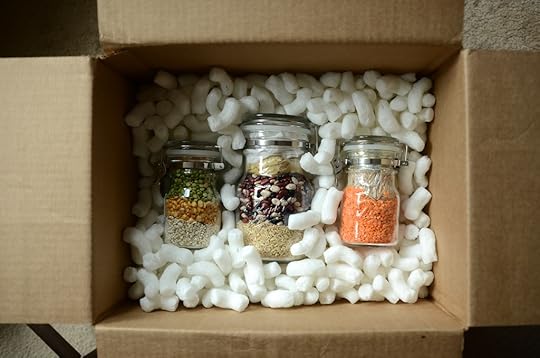
If you’re shipping your soup mixes, make sure you have a sturdy box and plenty of packing material. In the picture, I make it look like I relied entirely on packing peanuts, but after I took that photo I had second thoughts. I ended up swaddling each jar in a length of bubble wrap, to ensure that it arrived safely.

And while it’s good to gift, it’s also delightful to receive. My Secret Santa sent me a DIY Bread and Butter Pickle kit. I was charmed by it, though I do wish they’d have identified themselves in the box! Alas, it remains a mystery!
Related Posts:
Check the recipe index for more tasty preserves!


Triple Bean and Rice Soup Mix
This recipe is part of my Secret Santa partnership with Newell Brands, makers of Ball® Fresh Preserving Products.
Print
Triple Bean and Rice Soup Mix
Ingredients
1 1/3 pounds pinto beans
1 1/3 pounds black beans
1 1/3 pounds kidney beans
2 pounds brown rice
1/2 cup dehydrated minced onions
2 tablespoons garlic powder
2 tablespoons granulated chicken bouillon
1 tablespoon onion powder
1 tablespoon cumin
1 tablespoon red chili flakes
1 tablespoon kosher salt
1 teaspoon ground black pepper
Instructions
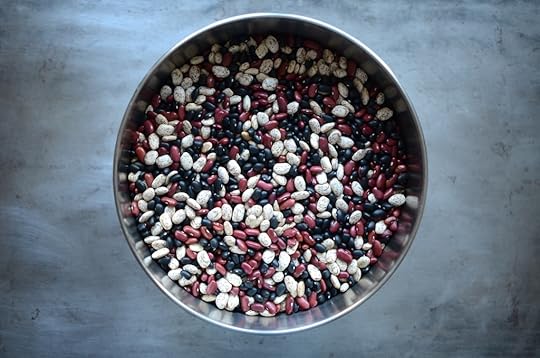
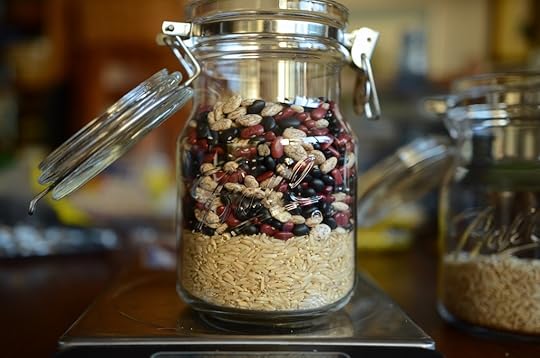
In a large bowl, combine the beans. Layer four 38 OZ. Ball® Sure Seal Bail Storage Jars with 8 ounces brown rice and 1 pound 4 ounces of the mixed beans.
Measure the spices into a bowl and whisk them well to combine. Divide them evenly into four small zip top baggies. Close the baggies and tuck them into the top of the jar. If the jars aren't entirely full, use some crumpled parchment paper to fill the empty space. Seal the jars.
Directions to make triple bean and rice soup. Remove the spice packet. Heat 3 tablespoons of olive oil in a large soup pot (go for at least 8 quarts). Dice 1 onion, 2 carrots, and 3 garlic cloves and add them to the pot. Once they smell fragrant, add the beans. Add the spice packet and 4 quarts of water and bring to a boil over high heat. Reduce the heat to medium-low, cover, and cook for 2-3 hours, until the beans are soft. In the last 45 minutes of cooking, add the rice. Taste and adjust seasoning to taste. Serve with sour cream, shredded cheese, and tortilla chips.
4.20
http://foodinjars.com/2017/12/triple-bean-rice-soup-mix/
Related Posts:
Red Lentil and Orzo Soup Mix
Split Pea and Barley Soup Mix
Giveaway: New Ball Canning Products for 2017
Red Lentil and Orzo Soup Mix
This recipe is part of my Secret Santa partnership with Newell Brands, makers of Ball® Fresh Preserving Products.
Print
Red Lentil and Orzo Soup Mix
Ingredients
1 1/2 pounds red lentils
1 pound whole wheat orzo
1/4 cup dehydrated minced onions
2 tablespoons garlic powder
2 tablespoons granulated chicken bouillon
2 tablespoons dried parsley
1 tablespoon salt
1 tablespoon Italian seasoning
1 teaspoon red chili flakes
1 teaspoon ground black pepper
Instructions
Divide the orzo into four equal portions and tuck each portion into a small sandwich bag or length of plastic wrap. Tuck the pasta packages into the bottoms of four 14 OZ. Ball® Sure Seal Bail Storage Jars.
Layer 6 ounces of red lentils on top of each package of pasta.
Measure the spices into a bowl and whisk them well to combine. Divide them evenly into four small zip top baggies. Close the baggies and tuck them into the top of the jar. Seal the jars.
Directions to make red lentil and orzo soup. Remove the spice packet. Heat 2 tablespoons of olive oil in a soup pot. Dice 1 onion, 2 carrots, 3 celery ribs, and 1 fennel bulb and add them to the pot. Once they smell fragrant, add the red lentils. Add the spice packet and 2 quarts of water and bring to a boil over high heat. Reduce the heat to medium-low, cover, and simmer for 40-45 minutes, until the lentils are soft. Add a 15 ounce can of diced tomatoes and the orzo and cook for an additional 10 minutes. Taste and adjust seasoning to taste. Stir in a bag of baby spinach and serve with garlic toast.
4.20
http://foodinjars.com/2017/12/red-lentil-orzo-soup-mix/
Related Posts:
Triple Bean and Rice Soup Mix
Split Pea and Barley Soup Mix
Giveaway: New Ball Canning Products for 2017
Split Pea and Barley Soup Mix
This recipe is part of my Secret Santa partnership with Newell Brands, makers of Ball® Fresh Preserving Products.
Print
Split Pea and Barley Soup Mix
Ingredients
1 1/4 pounds yellow split peas
1 1/4 pounds green split peas
1 pound pearl barley
1/4 cup dehydrated minced onion
2 tablespoons kosher salt
2 tablespoons garlic powder
2 tablespoons dried parsley
1 tablespoon celery seed
1 tablespoon paprika
1 tablespoon turmeric
1 teaspoon black pepper
Instructions
Layer four 14 OZ. Ball® Sure Seal Bail Storage Jars with 4 ounces barley, 5 ounces yellow split peas, and 5 ounces green split peas.
Measure the spices into a bowl and whisk them well to combine. Divide them evenly into four small zip top baggies. Close the baggies and tuck them into the top of the jar. Seal the jars.
Directions to make split pea and barley soup. Remove the spice packet. Heat 2 tablespoons of olive oil in a soup pot. Dice 1 onion, 2 carrots, and 3 celery ribs and add them to the pot. Once they smell fragrant, add the split peas and barley. Add the spice packet and 2 quarts of water and bring to a boil over high heat. Reduce the heat to medium-low, cover, and simmer for 40-45 minutes, until the barley plumps and the split peas soften (depending on the freshness of your peas and barley, you may need a splash more water). Taste and adjust seasoning to taste (a splash of lemon juice or red wine vinegar is always nice in soup). Serve chunky or puree smooth.
4.20
http://foodinjars.com/2017/12/split-pea-barley-soup-mix/
Related Posts:
Triple Bean and Rice Soup Mix
Red Lentil and Orzo Soup Mix
Can-It Forward Day 2017
December 4, 2017
How to Make Homemade Maple Cream
Regular Food in Jars contributor Alex Jones is here today to share her family recipe for homemade maple cream. She transforms some real maple syrup into a gorgeous, spreadable cream that is perfect for your morning toast or a holiday cheese board. If this post doesn’t want to make you leap up and head to the kitchen, I don’t know what will! -Marisa
I have a confession to make: I’m a maple snob.
Growing up, my house always had real maple syrup to top pancakes, French toast, and ice cream. I didn’t even know that “pancake syrup” (typically an artificially flavored, corn syrup-based imitation of the real thing) was different from what my family used until I was a teenager, when I unwittingly poured it all over my breakfast at a friend’s house after a sleepover. Imitation just doesn’t compare.
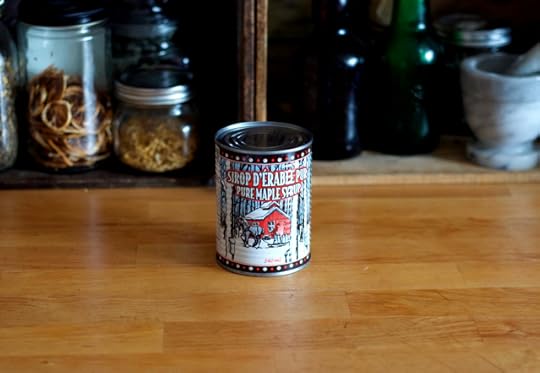
We kept real maple syrup in the house not just because it’s incredibly delicious and we could to afford it, but because my mother’s family in Quebec would have disowned her — or sent a care package — if we hadn’t.
As an American-born cook with Canadian dual citizenship, maple syrup is part of my culinary heritage. My gaggle of aunts up Quebec, whose preserving habits and big gardens I’ve written about before, always give me a can of sirop d’erable pur to take home on my visits — if not a coveted bottle of homemade maple syrup, the really good stuff boiled down over a wood fire in my uncle’s sugar shack.
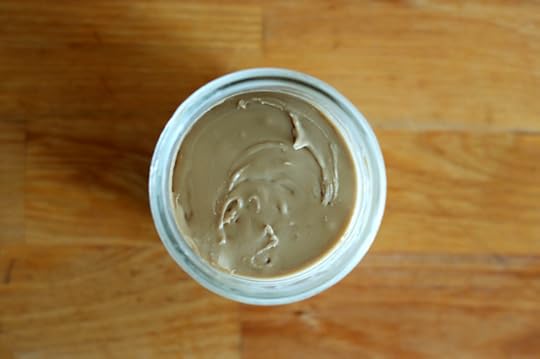
And just about the only thing more delicious than maple syrup is maple cream, a spreadable, velvety smooth maple reduction with a super-concentrated maple flavor. When I spied a spare can of syrup in my pantry while hunting for another ingredient, I decided to try making this pricey, hard-to-find treat myself.
The good news is that maple cream, also called maple butter, is very simple to make. It requires just two ingredients, maple syrup and a tiny dab of butter, cream, or oil. Equipment-wise, a sturdy saucepan with high walls, a wooden spoon, a silicone spatula, a bowl of ice, a candy or instant-read thermometer (my preference), and a jar are all you need.
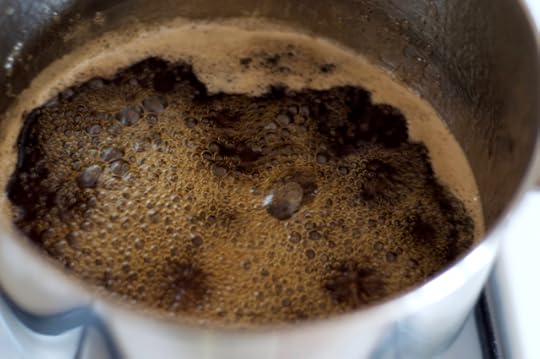
To make homemade maple cream, simply heat your maple syrup over medium (not medium-high) heat — no stirring, just checking the temperature. Keep a watchful eye on the pot during this recipe, as your hot syrup could boil over in an instant.
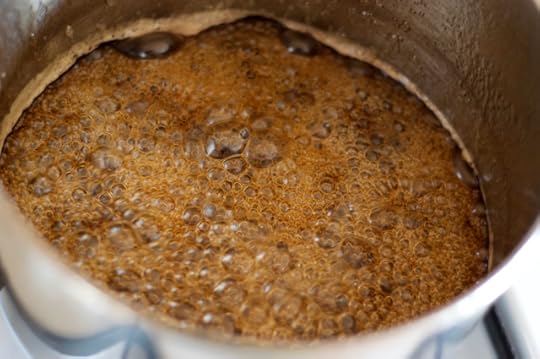
Once the syrup reaches 235oF, place the pot directly into a large bowl containing ice cubes and water. Allow the mixture to cool to 100oF (this will happen more quickly than you think). Then simply remove the pot from the ice bath, grab your wooden spoon, and stir the thickened maple syrup.
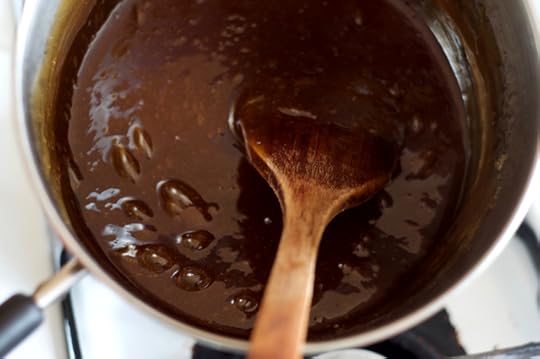
And stir. And stir some more — for up to 30 minutes, by hand, as constantly as you can. I recommend switching hands frequently, using a pot with a long handle that you can grab for leverage, and gripping the pot between your knees so you can stir with one hand while giving the other a break. Or make sure a willing accomplice is around when you set out to make the recipe and trade off when your arms get tired.
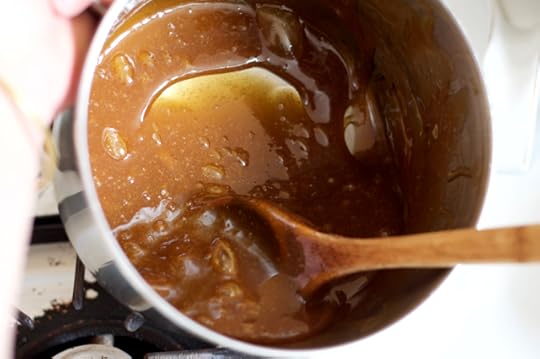
You’ll see the maple cream lighten as you stir; eventually, it will become the color and texture of nut butter, and you can finally stop. The first photo of the mixture with the wooden spoon is the cream after 10 minutes of stirring, the second after 20, the last when it’s finished. I still managed to take some quick snapshots of the maple cream during this time, so a moment or two here and there of rest is ok.
At the end of the marathon of stirring, though, you’ll be rewarded with utterly smooth, ultra-maple-y cream that you can spread on bread, pancakes, waffles, cookies, crackers, pretzels, apple slices, whatever. I may have enjoyed it with nothing but the spoon.
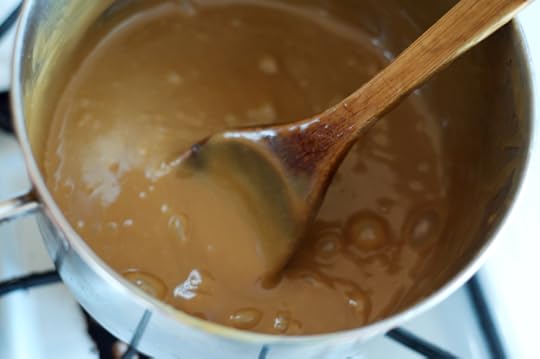
As soon as the maple cream reaches that tahini-colored stage, pour it quickly into your jar or jars. I can see this being perfect for a four-ounce gift size, decorated with some twine and maybe a colorful fall maple leaf, if you’ve got one growing nearby.
A note about the stirring: while I encountered some recipes that said that homemade maple cream could be made with a stand mixer — a tempting prospect after just a few minutes of stirring by hand — it’s dissuaded by other sources, such as America’s Test Kitchen, which cautions that you may burn out your mixer’s motor churning maple cream for up to half an hour.
Not wanting to break my beautiful Kitchen Aid, I decided to give my arms a workout instead. If you feel up for the risk, you should be able to use a stand mixer with the paddle attachment for the stirring step, but be sure to monitor carefully so that you don’t overmix and miss the window to fill your jars while the mixture is still pourable.
Print
Homemade Maple Cream
Ingredients
1 pint maple syrup
1/4 teaspoon heavy cream, butter, or oil
Instructions
Pour your maple syrup into a heavy-bottomed pot with high walls. Add the cream, butter, or oil.
Prepare a heatproof bowl and fill it about one-third full of ice and a little water. Be sure the bowl is large enough to fit the ice water and the pot together.
Heat the pot over medium, checking the temperature frequently with a candy or instant-read thermometer, until the syrup reaches 235 degrees F. Do not stir.
When the mixture reaches 235 degrees F, immediately turn off the heat and place the pot into the ice bath. Monitor the temperature carefully. Remove the pot from the ice when the mixture is around 100 degrees F.
Stir the thick mixture constantly until the contents of the pot are the color and texture of tahini (this means that fine crystals have formed). You don't need to stir particularly fast, just keep the mixture moving constantly. This may take up to 30 minutes.
Once the tahini color and texture has been reached, immediately funnel the mixture into clean jars. (I got about 12 ounces of maple cream from a little over a pint of syrup.) Seal, label, and store in the refrigerator.
4.20
http://foodinjars.com/2017/12/make-homemade-maple-cream/
Related Posts:
Hot Pepper Hoagie Relish
How to Make Homemade Quince Butter
How to Brew Bracing Homemade Fire Cider
December 1, 2017
December Sponsors: Cuppow, Fillmore Container, EcoJarz, Mason Jar Lifestyle, CanningCrafts, and Mrs. Wages
Happy December, dear readers! It’s the start of the month, which means it’s time to thank the businesses that help make this site possible. Please do show them that you appreciation their support with your time and attention!
In the top are our friends at Cuppow. They are the creators of the original mason jar travel mug topper and the BNTO, a small plastic cup that transforms a canning jar into a snack or lunch box. Their Glass Travel Mug would make an excellent holiday gift for anyone looking to reduce their use of disposables!
Lancaster, PA-based and family-owned Fillmore Container are next! They sell all manner of canning jars, lids, and other preservation gear. As always, their blog is an amazing resource for all things jar-related. For some good suggestions for holiday giving, take a peek at some of their past gift guides.
Our friends over at EcoJarz are on board again this month. They make an array of products designed to fit on top of mason jars, including cheese graters, coffee brewers, and stainless steel storage lids. Right now, they’re running an awesome giveaway that includes a vintage stainless steel Vitamix (no joke, this is the same model that my mom has been using since 1970) and two of the EcoJarz smoothie kits. Make sure to enter.
Mason Jar Lifestyle is a one-stop shopping site for all the jar lovers out there. They sell all manner of mason jar accessories and adaptors. If you’re in the market for lids, straws, sprouting lids, fermentation weights, airlocks, tea light converters, cozies, and more, make sure to check them out. They’ve recently expanded their selection of silicone jar sleeves and make them for nearly every size jar. If you like to drink out of mason jars, make sure to get some!
Next up is CanningCrafts. Shop owner Alison sells an array of ready made and custom mason jar labels for all your various preserves, syrups, and backyard honey. As you plan ahead for holiday gift giving, make sure to check out all of fabulous CanningCrafts Christmas and holiday-themed labels.
Our friends at Mrs. Wages are on the roster again this month. They make pectin, vinegar, and more canning mixes than I can count. Their website is an incredible preserving resource and I can’t say enough good things about their salsa mix.
And if your company, shop, or family business is interested in reaching the food-loving and engaged Food in Jars audience, you can find more details here. Leave a comment on this post or drop me a note to learn more!
Related Posts:
November Sponsors: Cuppow, Fillmore Container, EcoJarz, Mason Jar Lifestyle, CanningCrafts, and Mrs. Wages
October Sponsors: Cuppow, Fillmore Container, EcoJarz, Mason Jar Lifestyle, CanningCrafts, and Mrs. Wages
September Sponsors: Cuppow, Fillmore Container, EcoJarz, Mason Jar Lifestyle, CanningCrafts, and Mrs. Wages
November 30, 2017
Celebrating National Mason Jar Day with Jarware
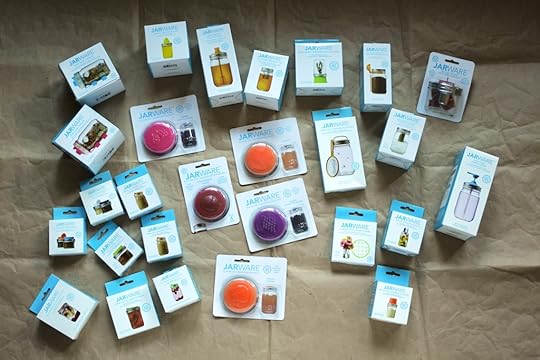
Did you know that according to the National Day Calendar, today is the first official National Mason Jar Day? And what better way to celebrate a holiday devoted to the handy canning jar than with a giveaway with Jarware!
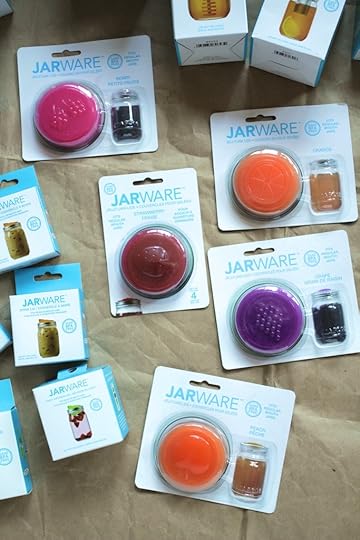
Jarware is a company based right here in Pennsylvania that is devoted to creating an array of lids, wands, toppers, and accessories designed to make using and reusing your mason jars as intuitive and practical as possible. All the products are made from recycled, BPA-free, food-safe and dishwasher safe plastic.
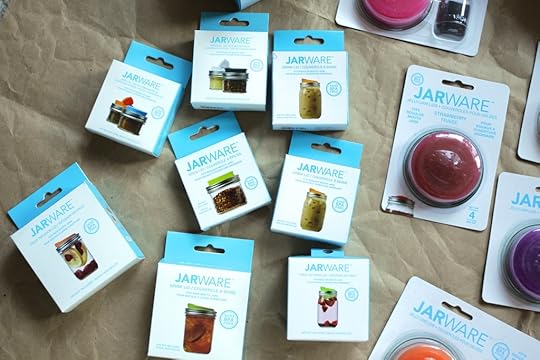
The Jarware accessories break down into three categories. The first is the Bevware category, where you’ll find drink toppers, tea infusers, cocktail shakers, and fruit infusers. There’s also a Tea Time set that groups together everything you need to make and serve tea right out of your mason jars.
Next up are the Kitchenware accessories. These include snack cups, oil cruets, clip-on coffee spoons, honey dippers, citrus juicers, salt and pepper shakers, and spice lids.
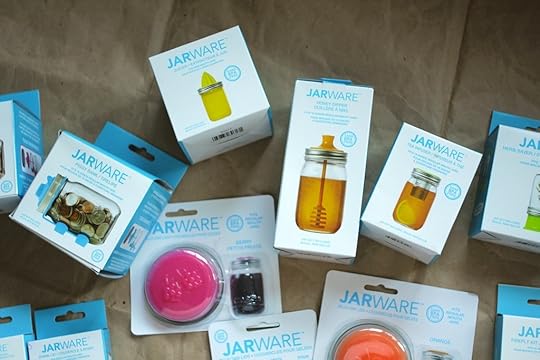
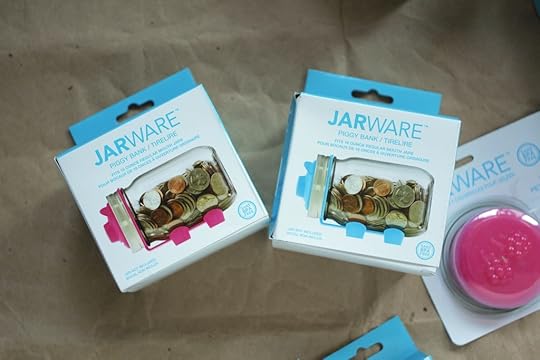
Last up is the Storeware category. This is where you’ll find things like soap pumps, piggy banks, firefly kits, flower frogs, herb savers, tea light holders, and all sorts of novelty jelly and jam lids.
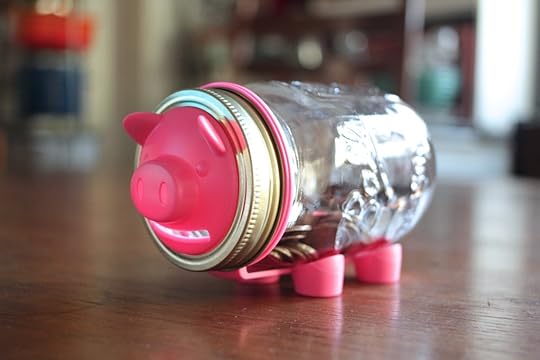
I think the thing I like best about the Jarware products is that they combine function and whimsy. They all serve a useful purposed, but do it with plenty of style and bright color. The piggy bank is also just cute.
Now, for the giveaway. One lucky winner will everything that Jarware makes (which, save the oil cruet and the snack cups, is everything pictured above). Your mason jars will be tricked out for years to come! Just use the widget below to enter for a chance to win.
And, for a second chance to win, make sure to head over to my Instagram account. I’m giving away a second prize pack there as well this week!
Disclosure: This is a sponsored post. The folks at Jarware have compensated me for my time and efforts. However, I only accept sponsored posts from businesses that jive with the mission of Food in Jars and Jarware is most decidedly in line with that mission. The thoughts and opinions expressed here are honest and entirely my own.
Related Posts:
Giveaway: Fermentation Kit from Fillmore Container
Giveaway: Primo Manual Water Pump + Water Coupons
Giveaway: Raw Rutes Yaozu 2 Liter Fermenting Crock
Blue Apron During a Busy Work Season
Today’s post is sponsored by Blue Apron.
In a little less than three months, I will be turning in the manuscript for my 4th(!) cookbook. This book focuses on cooking, baking, and otherwise transforming homemade preserves. Over the last month or so, I’ve been deep in the recipe development phase. This means that I might spend a full day in the kitchen and end up with nothing that can be eaten for dinner
Occasionally, I pre-cook strategically for those days when the recipe development schedule leans sweet and have some leftovers ready to go. Other nights, a bag of salad and a grocery store chicken is the answer. And during one recent busy week, Blue Apron swept in and saved the day by delivering three meals directly to my doorstep, so that I could easily cook dinner without having to plan, shop, or waste a drop of food.
You might think I’d be tired of being in the kitchen after a day of recipe testing, but as long as I don’t have to make any additional decisions or hit the grocery store, I don’t mind it a bit. Blue Apron does all the choosing and thinking for me, which transforms the process of making dinner into something pleasurable. Each week, they offer up eight new recipes that are designed to satisfy eaters of all stripes (including vegetarians!).
We can just add this to the list of ways that Blue Apron meal kits have saved my bacon. They’ve also helped me be a good houseguest, avoid take-out while preparing for a conference, bumped me out of my weeknight dinner rut, and made it possible for me to hand off dinner prep to my husband.
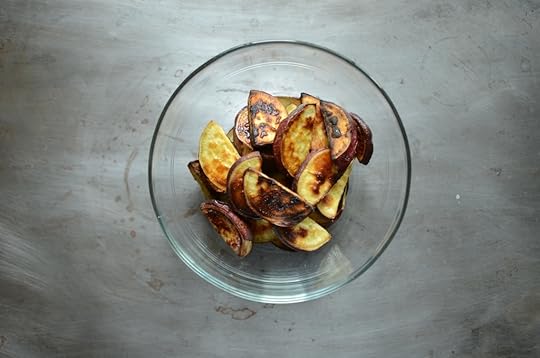
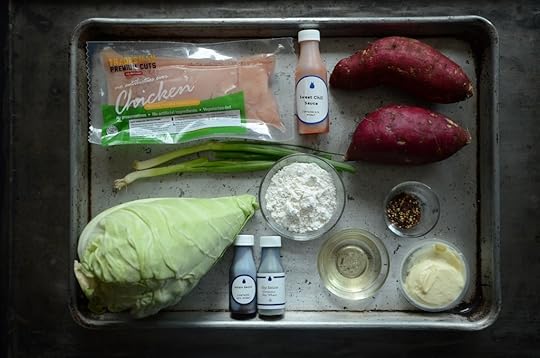
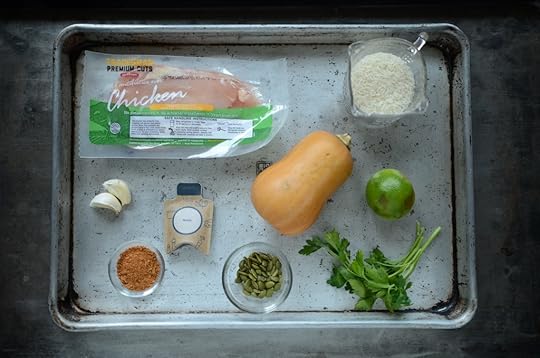
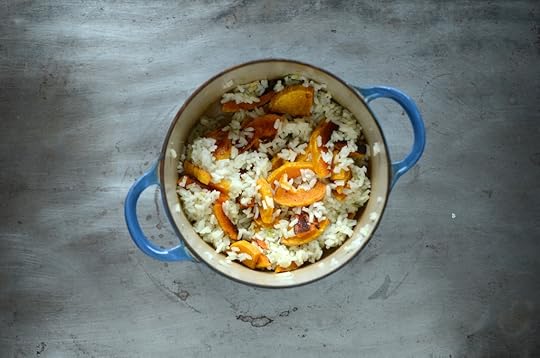
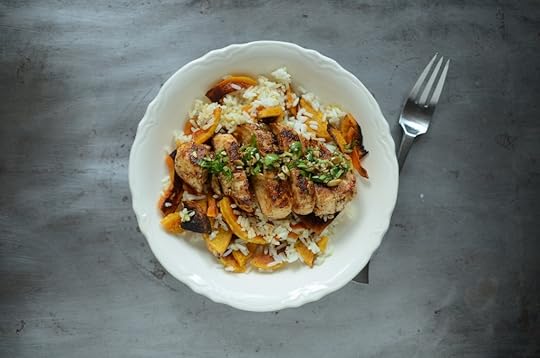
This time around, our 2-person box (there’s also a family plan) included ingredients for Seared Steaks and Mashed Potatoes (cheesy mashed potatoes!), Soy-Marinated Chicken Tenders (yellow sweet potatoes! delicious!), and Spiced Chicken and Garlic Rice (I loved how the roasted squash was tossed with the rice before plating).
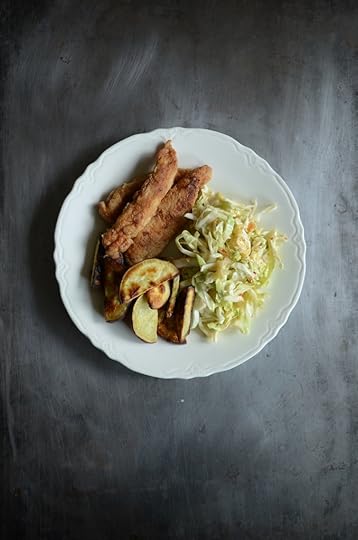
As always, I was impressed by the food I found in the box. The quality of the ingredients was top notch, the portion sizes are perfect for two people, and the chef-designed recipes were approachable, educational, and delicious.
One of the concerns that people often have about Blue Apron is the amount of packaging involved. I continue to be impressed with how the amount of packing materials seems to reduce with every order I receive (and most of it is recyclable). If you can’t recycle the materials in your area, you can also opt to return the packing materials through the mail for reuse and recycling.
This blog post is the last one in my formal blogging partnership with Blue Apron, but I plan on continuing on as a Blue Apron customer. I don’t plan on ordering every week, but will opt in during my busy times because it allows me to skip the grocery store and still eat high quality, home cooked food. They add dishes to the rotation on a regular basis, so there’s always something new to try.
If you’re intrigued by my experience with Blue Apron, they’ve got an offer for you, too! The first 50 readers to use this link to sign up for the service will get $30 off their first Blue Apron order.
Disclosure: This post is sponsored by Blue Apron. They sent me a 2-Person box, containing three meals for two people. They’ve also compensated me for my time and attention. However, all thoughts and opinions expressed are entirely mine.
Related Posts:
The Dinnertime Hand-off with Blue Apron
Early Summer Cooking with Blue Apron
A Late Winter Cooking Reset with Blue Apron
November 27, 2017
Glazed Turkey Breast and OXO Roasting Gear
A month or so ago, I signed on to participate in a blogger campaign with OXO that had a roasting theme. My intention was to use the goodies and get the post up well in advance of Thanksgiving, because that would have made a whole lot of sense. Best laid plans.
Instead, there was a dab of travel. The cookbook I’m working on continues to expand and absorb my every waking hour. And I’ve been fighting a cold that will not end. So I am behind.
Instead of throwing in the towel or trying to find something else to roast before the campaign deadline, I am going to talk about apricot-glazed turkey breast. A few days after Thanksgiving. Perfectly appropriate, right?
My argument is that there are plenty of roasting opportunities still to come in the coming weeks. And I firmly believe that turkey breast is a really good option for holiday parties and gatherings (easier than a whole turkey! But just as festive and delicious!). At least, that’s my story and I’m sticking to it.
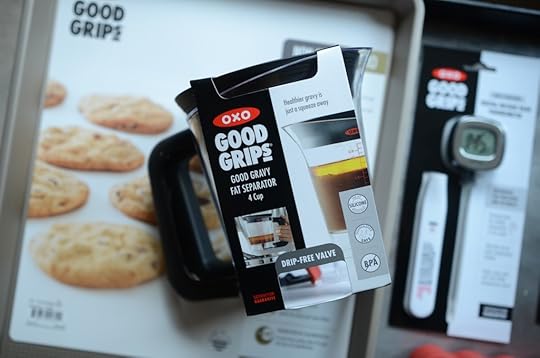
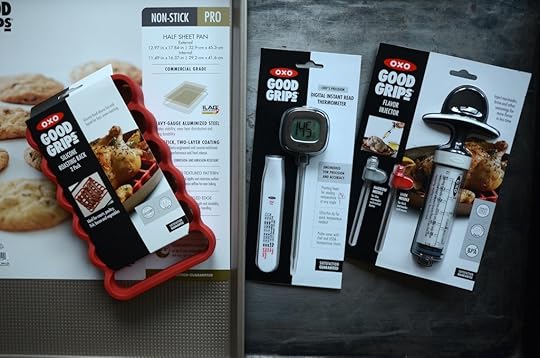
Before I dig into the roasting and glazing technique, let’s talk about the OXO gear. They sent…
Non-Stick Pro Half Sheet Jelly Roll (The non-stick surface made cleaning up the drippy jam so easy)
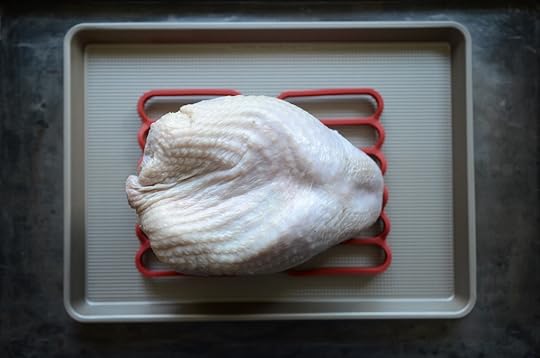
Two Silicone Roasting Racks (A little elevation helps the heat circulate and the turkey cooks faster)
Precision Digital Instant Read Thermometer (A key tool anytime you’re roasting meat)
Good Gravy Fat Separator (A really useful tool!)
Flavor Injector (I didn’t use this one for this project, but my Aunt Doris would have loved it)
For the juiciest and most flavorful finished roast, you want a whole, bone-in turkey breast. This isn’t something you typically find in the poultry case, but it’s something specialty butchers will have and you can always have your grocery store arrange one for you. Here in Philadelphia, you can almost always get a bone-in turkey breast at Godshall’s in Reading Terminal Market.
Now, if you’ve struggled with roasting turkeys in the past, know that you’re going to have a much easier time when you roast just the breast (the big issue with whole turkeys is that dark meat needs more time in the oven than the white meat, making it hard to get white meat that isn’t woefully overcooked).
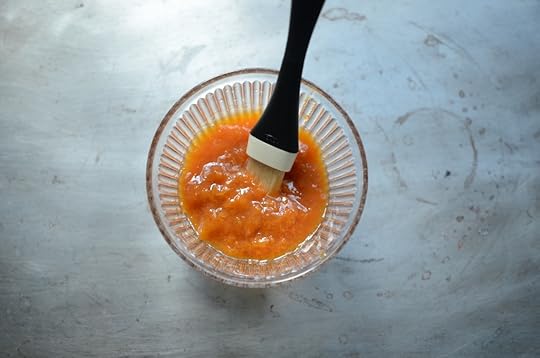
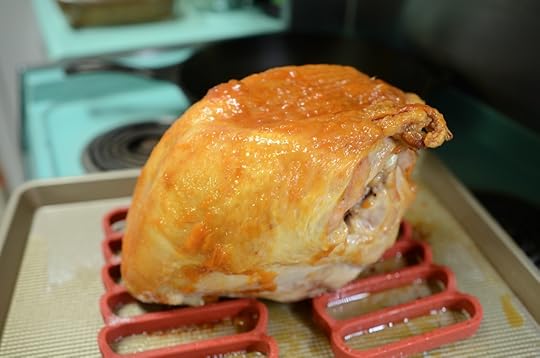
You just salt the turkey breast well, pop it on the roasting rack, and get it into a 325F oven. It roasts for about two hours, until the skin is crisp and the internal temperature is around 150F. Once you reach that threshold, you paint on a generous layer of jam (I used apricot, but peach or cherry would also be good).

The temperature gets reduced to 300F and you roast for another 25-30 minutes, until the internal temperature is close to 165F (you want the final temp to be 165F, but the turkey will continue to cook after you take it out of the oven, so you want to remove it a few degrees shy of that).
The jam will darken into a gorgeous, sticky, flavorful crust. It makes a lovely addition to a holiday party spread (pair it with slices of good bread and homemade cranberry mustard for DIY sandwiches).
Print
Glazed Turkey Breast
Ingredients
1 bone-in, whole turkey breast (about 5 1/2 to 6 pounds)
salt
1/2 cup apricot, peach, or cherry jam
Instructions
Preheat the oven to 325F.
Set the turkey breast on a roasting rack set on a pan. Blot the turkey breast with paper towels to dry and salt generously.
Roast the turkey breast for approximately 2 hours, until an instant read thermometer reads 150F.
Paint the jam on the turkey breast to coat. Reduce the oven temperature to 300F. Continue roasting the turkey breast until the jam darkens into a sticky glaze.
When the temperature of the turkey breast is a few degrees below 165F, remove it from the oven. Tent it lightly with aluminum foil and let it rest. The meat will continue to cook for a while outside of the oven, so the internal temp should rise to 165F during the resting period.
After 20-30 minutes of resting, the turkey is ready to carve and serve.
4.20
http://foodinjars.com/2017/11/glazed-turkey-breast-oxo-roasting-gear/
Related Posts:
Bake a Difference with OXO For Cookies for Kids’ Cancer + Oatmeal Muffins
Quick Pickled Apple Matchsticks & OXO Chef’s Mandoline
New Year, New Breakfast with OXO
November 24, 2017
Black Friday and Small Business Saturday Deals
Hello friends! For those of you in the US, I hope you had a lovely Thanksgiving. We were just four for dinner last night, with a bigger family gathering still to come.
I wanted to take a moment to round up some of the Black Friday and Small Business Saturday deals that some of my favorite jar and canning-centric shops are offering.
Cuppow: Use the code Holiday2017 for 25% off your purchase through Monday, November 27.
Ecojarz: Discounts of up to 30% throughout the site. They’re also currently giving away a vintage Vitamix.
Mason Jar Lifestyle: Use the code thankful for 30% off your purchase through Monday, November 27 (I highly recommend the cork jar stoppers).
Mason Tops: Use the code save25 for 25% your purchase
Intelligent Lids: Use the code Holiday2017 for 15% off and free shipping through Tuesday, November 28.
W&P Designs: Use the code hotpotato for 25% off (I suggest the Mason Tap Kit).
reCAP: Use the code freeship for free shipping on orders of $49 or more.
Fresh Preserving: Appliances and Transform Mason products are 10% off.
If I spot any other deals throughout the weekend, I’ll update this post. Happy shopping!
Related Posts:
Small Business Saturday Deals for Jar Lovers
January Sponsors: Cuppow, Fillmore Container, EcoJarz, iLids, MightyNest, and Mason Jar Lifestyle
Duralex Snack Set from the MightyFix by MightyNest


