
Marisa McClellan's Blog, page 30
December 21, 2017
Mastery Challenge: Apple-Quince Fruit Cheese
Our intrepid contributor Alexandra Jones returns again, with a recipe for apple-quince fruit cheese. This homemade fruit paste (this month’s mastery challenge topic) is the perfect thing to make your holiday cheese board stand out from the crowd! -Marisa
I confess that over the past few months, I’ve fallen off the Mastery Challenge train. The contents of my kitchen and the time I have to devote to preserving just didn’t add up. But I’m excited to finish out the year strong with December’s topic: fruit pastes, one of my favorite ways to preserve seasonal fruits.
I canned a spreadable version of the typically sliceable quince paste last month. I had a few more quinces than would fit in my Dutch oven when I made that recipe, and they sat patiently in my fruit bowl while I figured out what to do with them.
Since I’ll be entertaining friends with a cheese-centric holiday party next week, I decided to combine my remaining quinces with a few apples and whip up a concentrated, sliceable apple-quince fruit paste that would combine both flavors, with this recipe as my framework. And since I’ll be serving this paste with cheese, I’m choosing to call it a fruit cheese, but it’s basically a pate de fruits.
The beautiful thing about fruit pastes is that they’re pretty forgiving. The thing you want to avoid when making jam and jelly — a firm, overly-set preserve — is exactly what you’re going for in this case. It’s also quite easy, as there’s no peeling necessary, thanks to a food mill or fine mesh strainer.
But there is a trick to it: the goal is to cook down the milled fruit puree until it’s as stiff as possible while still being spreadable, but there’s even a trick for that — if you’ve got a programmable dehydrator or an oven that goes nice and low.
After cooking my fruit till it was thick and mounding, spreading the mixture into a pan, and letting it sit overnight, the paste was still soft and moist. Mine spent several hours in the dehydrator at 150 degrees F, which firmed up the surface quite a lot.

However, because the paste wasn’t spread perfectly evenly, some areas were firm on top but soft underneath. No problem: I put the pan in the fridge to firm up for a few hours, then simply pulled the block paste out of the pan by hand and flipped it over. The pan went back into the dehydrator for a few more hours until the paste achieved a more uniform consistency.
At this point, all that’s left to do is slice and serve with a wedge of something pungent. (You could also cut the paste into cubes or squares, tossed them with sugar, and serve as a dessert treat.) I like to pair this paste a cave-aged cheddar, but Alpine cheeses, blues, tangy fromage blanc, and other cheeses will all work this its sweet-tart, slightly floral flavor.
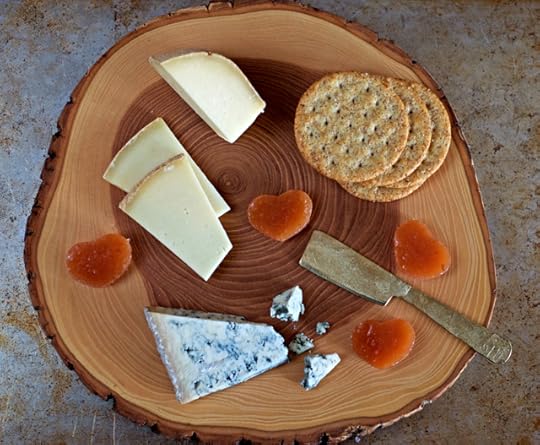
While you can simply slice the paste into cubes, batons, or squares, I think this recipe is a great excuse to bust out your cutest cookie cutter. It’s the holidays, after all.
Print
Apple-Quince Fruit Cheese
Ingredients
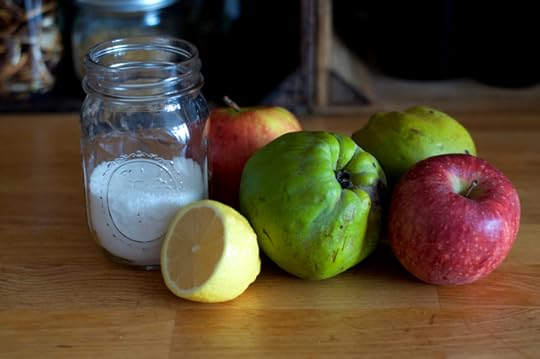
2 apples
2 quinces
1 cup water
3/4 cup sugar
Juice of 1/2 lemon
Pinch of salt
Instructions
Brush an 8" x 8" pan with a small amount of neutral oil and line with parchment paper. Brush the parchment paper with oil.
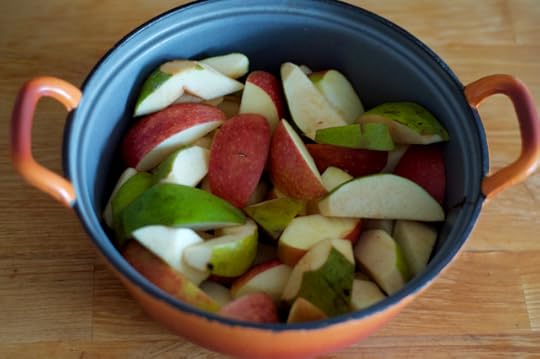
Core and roughly slice the fruit. Place slices and water in a heavy-bottomed pot with a lid.
Cover and cook the fruit over medium heat for 20 minutes. Uncover and cook for an additional 10 to 15 minutes or until the fruit is very tender and falling apart. (The quince will take a little longer to get tender than the apples will.) If the mixture dries out before the fruit is tender, add another splash of water and put the cover back on the pot.
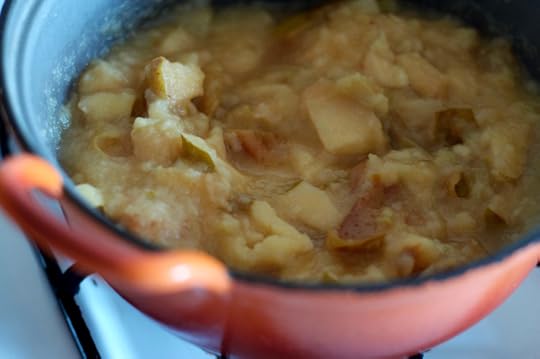
Remove the pot from the heat. Pass the mixture through a food mill or press it through a fine mesh strainer until skins are removed.
Return the fruit puree to the pot and add the remaining ingredients. Simmer for an hour or more, stirring frequently to keep the bottom of the pot from burning. Keep an eye out for when the mixture begins to mound up. You want the mixture to be as sturdy and thick as possible while still being spreadable.
Once the puree has thickened, spread it into the prepared pan, doing your best to achieve a smooth surface and uniform thickness. Allow to dry overnight.
The next morning, gently touch the surface of the fruit paste. If it's still wet or tacky and the paste is soft, put the pan into a 150 degree F oven or dehydrator. Check every hour or so and remove the paste when the surface is dry to the touch.
Press gently around the pan, especially on any areas that may be thicker than others. If the underside of the paste is still soft and spreadable, put the pan into the fridge to cool for an hour or two. Once it's cooled, you should be able to gently pull up the square of paste and flip it back into the pan, soft side up. Return the pan to the dehydrator or oven, checking every hour or so. Remove when the surface feels dry and the texture has firmed up.
Cut into shapes using a knife or cookie cutters and serve with cheeses, or cut shapes, toss in granulated sugar, and serve immediately as a sweet. Store in an airtight container in the refrigerator.
4.20
http://foodinjars.com/2017/12/mastery-challenge-apple-quince-fruit-cheese/
Related Posts:
How to Make Homemade Quince Butter
Roasted Quince Butter with Warm Winter Spices
How to Make Homemade Maple Cream


December 20, 2017
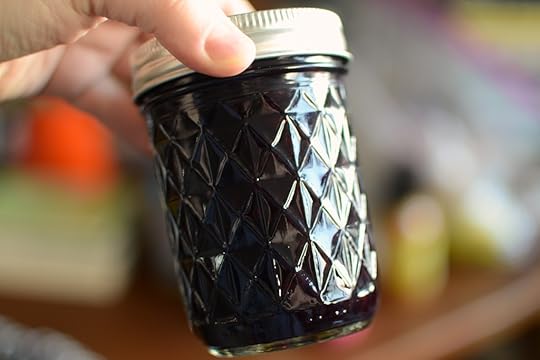
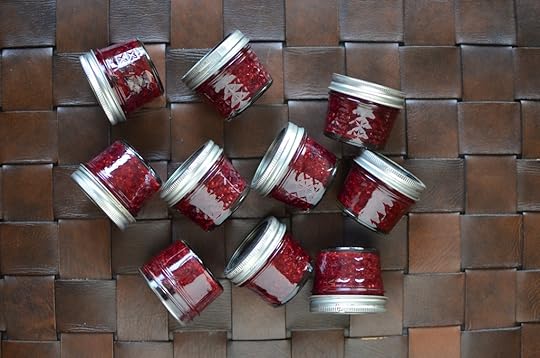
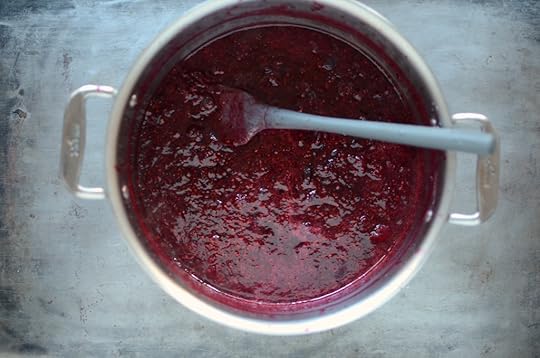
Cranberry Blueberry Jam
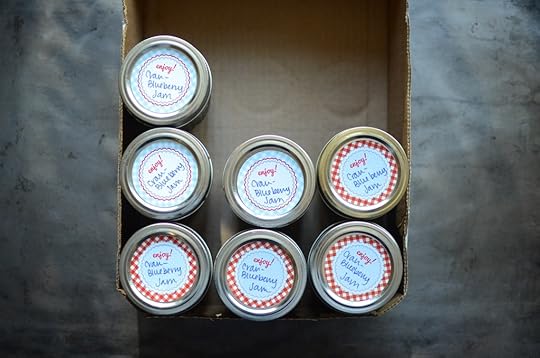
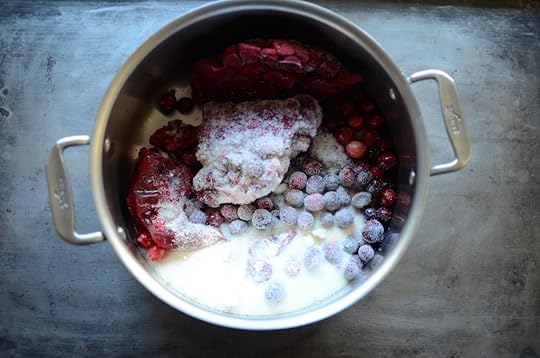
On Monday night, I did my final live demo of the year. I talked about fruit pastes, answered questions, and made a batch of cranberry blueberry jam using fresh cranberries and frozen wild blueberries (though regular frozen blueberries would also work).
This recipe uses the same technique as the raspberry version I posted over the weekend. You combine frozen fruit with fresh cranberries to get a preserve that is flavorful, not-too-sweet, and perfectly set (cranberries are magical in the setting ability).
If you want to watch me making this jam, you can see the full video after the jump (or, if you navigated directly to this post, you should see the player below).
Print
Cranberry Blueberry Jam
Yield: makes 7 half pints
Ingredients
3 pounds frozen blueberries
12 ounces fresh cranberries
2 1/4 cups sugar
Instructions
Prepare a boiling water bath canner and enough jars to hold 7 half pints of product.
Combine the berries and sugar in a large, non-reactive pot. Stir to combine. Let sit for 30 minutes or so, until the berries are mostly defrosted.
Place the pot on the stove over high heat and bring to a boil. Reduce the heat to medium-high and cook, stirring regularly, until the jam thickens. This should take between 20 and 25 minutes. Because of the presence of the cranberries, this jam will pass the sheet test on a spatula.
When the jam is finished, remove the pot from the heat.
Funnel the jam into the prepared jars, leaving 1/2 inch headspace.
Wipe the rims, apply the lids and rings, and process in a boiling water bath canner for 10 minutes.
When the time is up, remove the jars and set them on a folded kitchen towel to cool. When the jars have cooled enough that you can comfortable handle them, check the seals. Sealed jars can be stored at room temperature for up to a year. Any unsealed jars should be refrigerated and used promptly.
4.20
http://foodinjars.com/2017/12/cranberry-blueberry-jam/
Related Posts:
Cranberry Raspberry Jam
Upcoming Classes: Facebook! Glen Mills, PA! Sewell, NJ! Arundel, ME!
Small Batch Bread and Butter Pickles
December 19, 2017
Turkey Party Meatballs with Habanero Apricot Jelly Glaze
This recipe for turkey meatballs features the Habanero Apricot Jelly from Ball® Canning. This sweet and spicy jelly is the perfect condiment for all manner of holiday cheese boards, relish trays, and buffets.
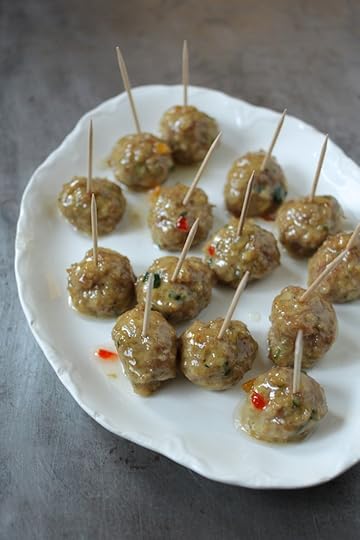
Sweet and spicy glazed meatballs are a classic component of a holiday party spread. They’re reliable, easy to prepare, and are generally a crowd favorite. They’re also an excellent recipe to keep in mind if you’re a home canner. A half pint of pepper jelly, a couple tablespoons of butter, and a little lime juice is all you need to make a killer meatball glaze.
I often bring homemade party meatballs to gatherings when I’m asked to bring a dish. I know that they’ll typically be well-received and they satisfy one of my mother’s essential rules of potlucking*. That rule states that you should always bring a dish that can serve as the backbone of your own meal, just in case everyone else defaulted to bread, wine, and dessert. On more than one occasion, I have made a very pleasant meal out of these meatballs.
In general meatballs aren’t hard to make, but they do take a bit of time. I sometimes make a double batch on a weekend afternoon, bake them off, and freeze some for the busy holiday season. With a jar of homemade sauce and a big salad, they also make a terrific meal for new parents and neighbors who need a little extra care.
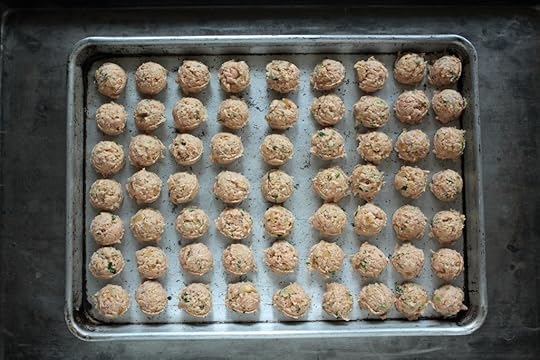
Now, for a equipment plug. If you make meatballs in any kind of quantity, get yourself a one tablespoon meatball scoop. I’ve had this one for the last decade (Amazon tells me I ordered it in 2007) and it is still going strong. It has scooped many thousands of meatballs with it and I believe it will continue to do so for many more years to come.
One thing that all meatballs need is a good sauce or glaze. It can be a simple dish of ketchup set alongside your platter or slow cooker, a jar of smoky tomato jam, a tasty oven-roasted tomato sauce, or a sweet, spicy, and sticky homemade glaze.
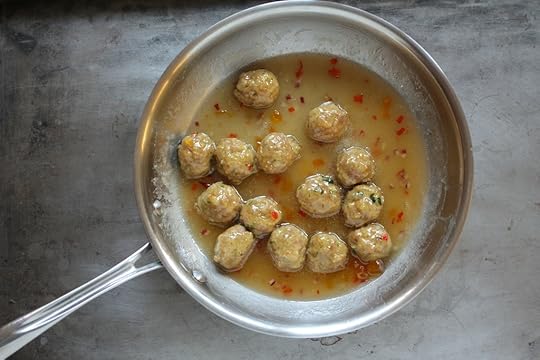
Lately, one of my favorite glaze builders has been the Habanero-Apricot Jelly from Ball® Canning. It’s a sweet, tangy, spicy jelly that is made with dried apricots, so it can be made any time of year (it’s also a good one for holiday gift baskets for just that reason).
I first encountered this jelly last summer while in Fishers, Indiana for the Ball® Can-It Forward festivities (you can see me making it here). In that demo, we shared how the jelly can be transformed into a glaze for wings, but I’ve kept it in the back of my head for meatball dressing ever since.

Whatever else you’re making for holiday gatherings, I bet these turkey party meatballs with the habanero-apricot glaze will charm your guests!
*My mother’s other potlucking rules are that you should always bring a serving utensil and your dish should be able to stand at room temperature for at least an hour without food safety concerns.
Print
Turkey Party Meatballs with Habanero-Apricot Jelly Glaze
Yield: makes 100 meatballs
Ingredients
2 tablespoons olive oil
1 large onion, finely diced
4 large garlic cloves, minced or pressed
1/2 cup chopped flat leaf parsley
2 teaspoons salt
1/2 teaspoon freshly ground black pepper
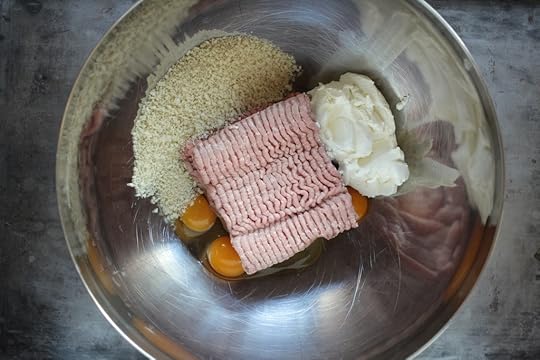
3 eggs
1 cup part skim ricotta cheese
1 cup panko bread crumbs
2 pounds lean ground turkey
1 cup apricot habanero jelly
4 tablespoons butter
2 tablespoons lime juice
Instructions
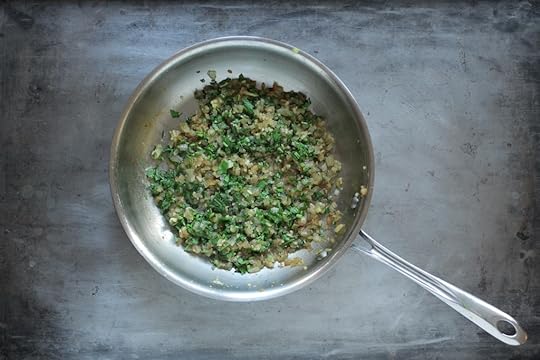
Heat the olive oil in a medium skillet set over high heat. When the oil shimmers, add the onions, and garlic and cook for 4-5 minutes, until the onions are tender, brown, and fragrant (add a splash of water if the onions are cooking too quickly). In the last minute of cooking, add the parsley, salt and pepper. Remove from the heat and allow to cool.
In a large bowl, combine the eggs, ricotta, bread crumbs, and ground turkey. Use your hands to knead the ingredients together. Add the onion and parsley mixture and work it into the meat.
Preheat the oven to 400F.
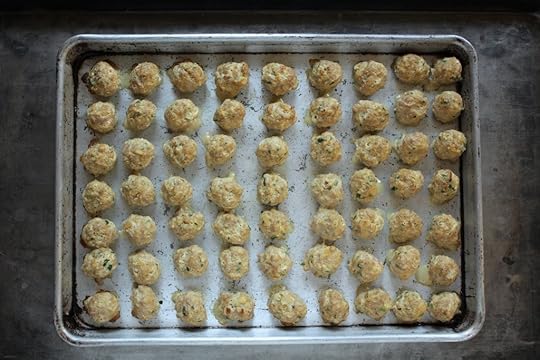
Portion the meat mixture out into 1 tablespoon balls and set on a rimmed cookie sheet. Bake at 400F for 12-15 minutes, until the meatballs have an internal temperature of at least 170F.
Remove meatballs from the oven.
To make the glaze, melt the jelly, butter, and lime juice together in a skillet. Once the glaze is simmering, add the meatballs in batches to glaze and place them on a plate to serve. Or, heap the meatballs in a slow cooker and pour the glaze over top.
4.20
http://foodinjars.com/2017/12/turkey-party-meatballs-habanero-apricot-jelly-glaze/
Related Posts:
Triple Bean and Rice Soup Mix
Red Lentil and Orzo Soup Mix
Giveaway: New Ball Canning Products for 2017
December 18, 2017
Marshall’s Haute Sauce Canning Kit – Instagram Giveaway
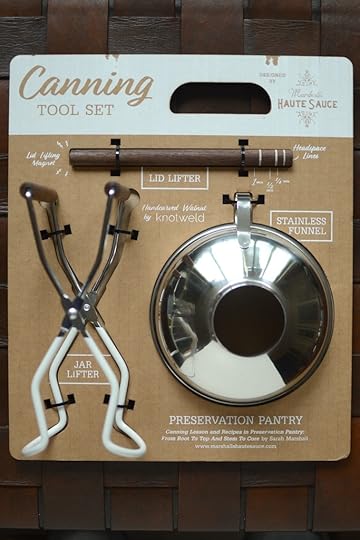
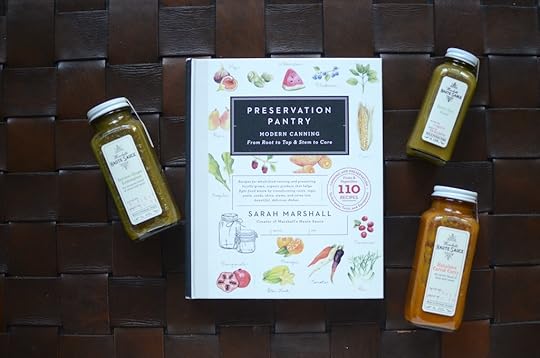
For years now, I have dreamed about designing a canning kit. It’s a space where the tools are often functional but not particularly beautiful. Happily, I learned recently that I wasn’t alone in wishing for more beautiful tools. Sarah Marshall, author of Preservation Pantry and maker at Marshall’s Haute Sauce has put together the most lovely wooden canning tools set.
The jar lifter has walnut handles. The wide mouth funnel is made from sturdy, gleaming stainless steel. And the lid lifter (also made out of walnut finished with beeswax) also has headspace markers. The whole thing feels sturdier and more durable than your typical set of tools. If you want another glimpse at it, you can see me holding it and talking about it in this Facebook video.
I am totally in love with this gorgeous set and I’m happy to say that thanks to Sarah, I have one of them to give away to my readers. We’re running the giveaway over on Instagram, so here’s what you need to do.
Head over to this Instagram post (make sure you’re logged into your account). Like that post. Make sure you’re following @spicymarshall, @marshallshautesauce, and @foodinjars (that’s me!). Then, tag up to five of your Instagram friends in separate comments. I will post the winner on Sunday, December 24, 2017 at 12 noon. Good luck!
Disclosure: Sarah Marshall from Marshall’s Haute Sauce sent me two of these canning sets (one to keep and one to share), along with a few jars of her haute sauce. No additional payment was received. All opinions and thoughts expressed are entirely mine.
Related Posts:
Celebrating National Mason Jar Day with Jarware
Giveaway: Fermentation Kit from Fillmore Container
Giveaway: Primo Manual Water Pump + Water Coupons
December 17, 2017
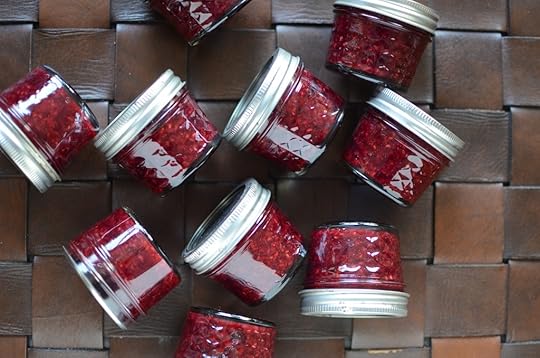
Cranberry Raspberry Jam
In need of a quick batch of jam for holiday gift baskets? This Cranberry Raspberry Jam, made from fresh cranberries and frozen raspberries, is just the ticket!
Of all the tricks I’ve come up with in my years as a jam maker, none please me as much as this one for making really terrific preserves with frozen fruit. For years, I struggled to get frozen fruit to turn into anything worth eating and sharing. And then last year around this time, I hit upon the idea of adding fresh cranberries to frozen fruit and everything changed.

The beauty of the cranberry is that it brings both acid and pectin to the jam making party. That means that it can perk up berries that taste flat from months in the deep freeze AND it helps with the inevitable increase in wateriness that occurs when you defrost previously frozen fruit. It’s a win all the way around.
One of the best and highest uses of this technique is quick holiday gift making. Perhaps you’ve moved through your stash faster than you intended. Or you need a uniform set of something for a group (rather than the hodge podge of jams I took to my family’s Hanukkah gathering on Saturday). That’s when a quick batch of this jam shines.
Like so many jams, this recipe does not double well. If you need more than one batch, run two pots side by side for a quick cook all around. And if you’re struggling with how to use up a leftover dollop, may I suggest the rice pudding I posted on Friday? They are happy partners.
Print
Cranberry Raspberry Jam
Ingredients
30 ounces frozen raspberries
12 ounces fresh cranberries
2 cups sugar
Instructions
Prepare a boiling water bath canner and enough jars to hold 5 half pints of product.
Combine the berries and sugar in a large, non-reactive pot. Stir to combine. Let sit for 30 minutes or so, until the berries are mostly defrosted.
Place the pot on the stove over high heat and bring to a boil. Reduce the heat to medium-high and cook, stirring regularly, until the jam thickens. This should take between 20 and 25 minutes. Because of the presence of the cranberries, this jam will pass the sheet test on a spatula.
When the jam is finished, remove the pot from the heat.
Funnel the jam into the prepared jars, leaving 1/2 inch headspace.
Wipe the rims, apply the lids and rings, and process in a boiling water bath canner for 10 minutes.
When the time is up, remove the jars and set them on a folded kitchen towel to cool. When the jars have cooled enough that you can comfortable handle them, check the seals. Sealed jars can be stored at room temperature for up to a year. Any unsealed jars should be refrigerated and used promptly.
4.20
http://foodinjars.com/2017/12/cranberry-raspberry-jam/
Related Posts:
Holiday Berry Jam for Gift Giving
Spiced Pear Jam
Gift Guide 2016: Stocking Stuffers
December 15, 2017
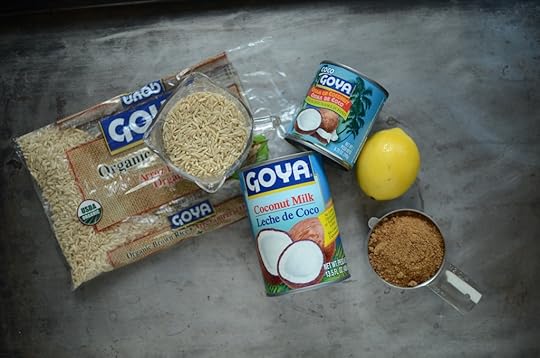
Coconut and Cracked Brown Rice Pudding
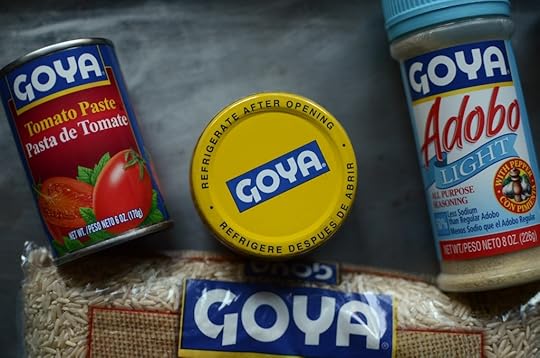
Earlier in the fall, I got an email from the folks at Goya. They were writing to tell me about one of the ways that they’re working to reduce hunger and asked if I’d be interested in helping spread the word. You see, every time someone has bought a can of Goya Coconut Milk in November and December, Goya has been donating products to Feeding America.
The donated food is then distributed to hungry families through local food banks across the country. This ‘Can Do’ campaign is part of Goya Gives, a national initiative committed to supporting local communities through social and environmental causes. By the end of the year, Goya will donate at least 600,000 pounds of food (the more you buy, the more they give).
They asked if they could send me a few ingredients with which I would develop a recipe featuring coconut milk. Of course I said yes (anything to help feed more people). The only problem is that I missed one word in the email. Savory. They wanted me to create a savory dish that could be served for dinner (makes sense, since Meatless Mondays was also part of the partnership). I blame the amount of space my new book is currently taking up in my head.
I made rice pudding before I reread the email and realized my mistake. And I just didn’t have time to create something new. So I’m here with a recipe that’s only in partial keeping with the campaign. But if it encourages you to head out and buy some Goya coconut milk, then I will still have done my job. And if savory is what you want, here are some other recipes to try.
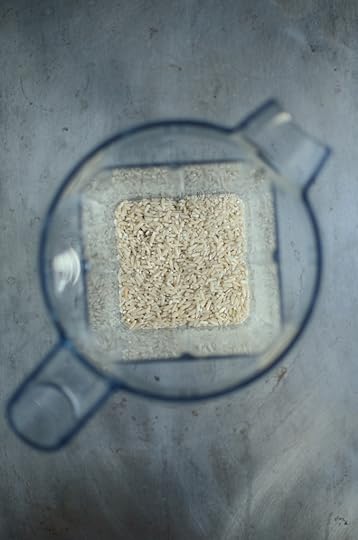
I still encourage you to try this recipe. It’s lush, not-too-sweet, and is the perfect foil to bright, tangy jams. It’s cooked in the oven and only stirred occasionally, so it’s wonderfully hands off. The only trick is that you need to blitz the rice in a blender or food processor before combining it with the rest of the ingredients, to ensure a truly creamy texture.
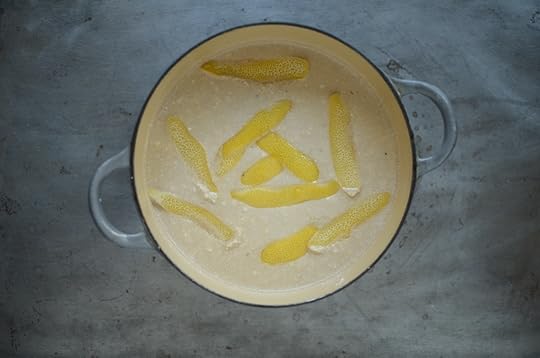
This oven cooked technique borrows from recipes published by Laurie Colwin, Jane Grigson, and others. I use lengths of lemon peel to help balance the richness of the coconut milk, but you could also try lime or even cardamom pods. This time of year, a few cloves and some clementine peel would also be nice.
Print
Coconut and Cracked Brown Rice Pudding
Yield: makes 6 4-ounce servings
Ingredients
3/4 cup brown rice
2 cans coconut milk
1/2 cup coconut sugar (brown sugar also works just fine)
1 lemon
pinch of salt
Instructions
Preheat the oven to 250F.
Put the rice into a blender or food processor and pulse until most of the grains are cracked, but not so much that the rice is pulverized.
Combine the rice, coconut milk, and coconut sugar in an oven-safe pan or casserole.
Using a vegetable peeler, take strips of peel off the lemon (avoiding going too deeply. You don't want the white pith). Add the strips to the pot, along with a pinch of salt.
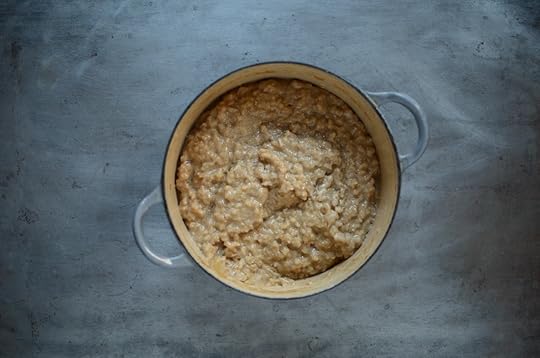
Place the pan in the oven and cook for 2 to 2 1/2 hours, stirring every half hour or so.
The time is up when you try a few grains of rice and they're all tender (careful, it will be hot).
Remove the pot from the oven. The pudding will still be a little liquidy, but it will thicken as it cools.
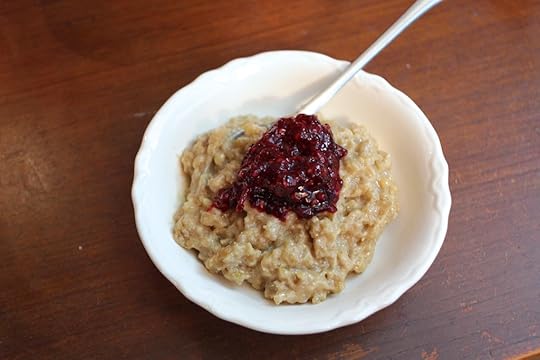
Serve with a dollop of jam, fruit butter, or leftover cranberry sauce.
4.20
http://foodinjars.com/2017/12/coconut-cracked-brown-rice-pudding/
Related Posts:
Giveaway: New Ball Canning Products for 2017
December 13, 2017
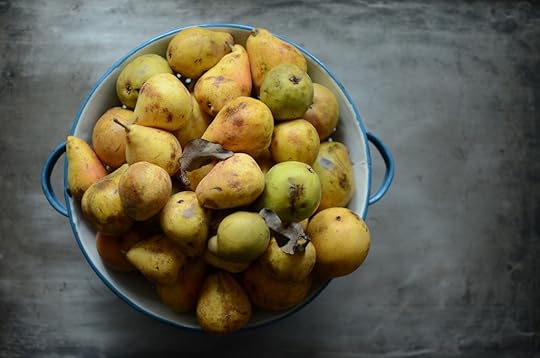
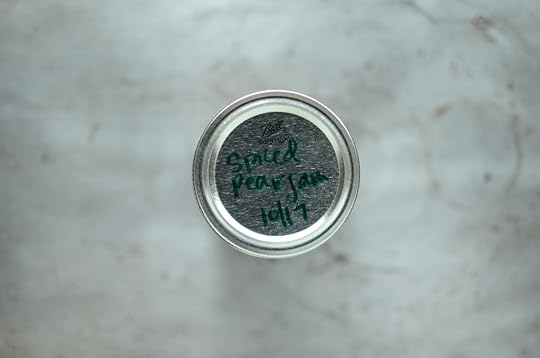
Spiced Pear Jam
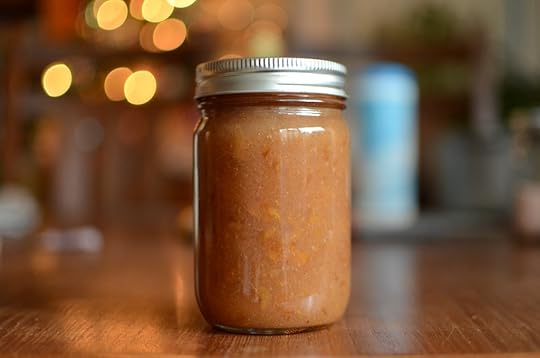
Earlier this fall, I found myself in possession of a lot of pears. I frozen some. I made a big batch of pear butter. And I made this jam, which I never managed to tell you about. Part of the reason it’s taken me so long is that I had some inner conflict going on about it. You see, I initially developed it for a demo event at which I called it Pumpkin Pie Spiced Pear Jam.

Now, I’m not someone who goes crazy for pumpkin pie spice in the fall (I’ve never even had a pumpkin spice latte, but that’s mostly because I don’t really dig sweetened coffee). But I’m not a hater either. In fact, when it comes to canning and baking, having a little jar of pre-mixed pumpkin pie spice is one of my favorite short cuts (I’ll often put a dash in my oatmeal as it cooks).
However, with Hanukkah upon us and Christmas hurtling ever closer, I came the realization that I’ve not posted a single new thing that you could make and share with your friends, neighbors, teachers, and family members. And in all the years that I’ve written this blog, not one has gone by where I didn’t serve up at least one holiday-centric preserve. So I’m getting over my hesitations and offering up this one.
Just to clarify, my reluctance wasn’t about the flavor (it was really whether to wade into the pumpkin spice pool). I gave a jar to a neighbor, who told me that it was the best jam she’d ever had. Everyone at the demo raved about it as well. It’s good. It’s easy. It’s quick. And if you can’t bring yourself to use the pumpkin pie spice, use a few dashes of cinnamon, nutmeg, ginger, and clove (just go light on the clove!).
Print
Spiced Pear Jam
Yield: Makes 6-7 half pints
Ingredients
4 pounds pears, cored and chopped (no need to peel thin skinned pears like Bartlett or Bosc)
4 cup granulated sugar
4 tablespoons pectin powder
1 1/2 tablespoons pumpkin pie spice
Instructions
Prepare a canning pot and 8 half pint jars.
In a low, wide non-reactive pot, combine chopped pears, sugar, pectin, and pumpkin pie spice over high heat. Bring the fruit to a boil and then reduce the heat to medium-high
Cook at a low boil for 20 to 25 minutes, until the fruit can easily be smashed with the back of a spoon. If you want a smoother jam, use a potato masher or immersion blender to break the fruit down once the cooking process it finished.
Funnel finished jam into the prepared jars, leaving 1/2 inch headspace. Wipe the rims to remove any residual jam, apply the lids and rings, and process jars in a boiling water bath canner for 10 minutes (start the timer when the pot has returned to a boil).
When the time has elapsed, remove jars from pot and place the jars on a towel-lined countertop. Let them cool undisturbed for at least two hours. During this time, the lids should seal.
Once jars have cooled enough handle, check to ensure the jars have sealed by pushing down on the center of the lid. If it feels solid and doesn’t move, it is sealed. Any unsealed jars should be refrigerated and used promptly.
Sealed jars will keep for up to a year if stored in a cool, dark place.
4.20
http://foodinjars.com/2017/12/spiced-pear-jam/
Related Posts:
Gift Guide 2016: Stocking Stuffers
Holiday Berry Jam for Gift Giving
Salted Maple Walnut Granola
December 10, 2017
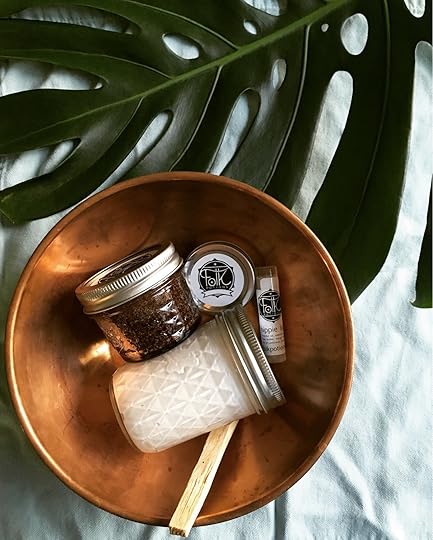
Folk Potions for the Holidays
One of the things that runs in my family is the drive to etch a fresh path and create something that is uniquely ours. At various times in their lives, my parents have made films, opened toy stores, published volumes of poetry, recorded albums, and run music-centric businesses.
My own career path over the last nine years has been one of writing, teaching, making, and inventing the roadway with each step. And my sister is much the same. She’s been a working folk singer and song writer for over 15 years. She spent the bulk of her twenties travel, playing music, and collaborating with fellow musicians.
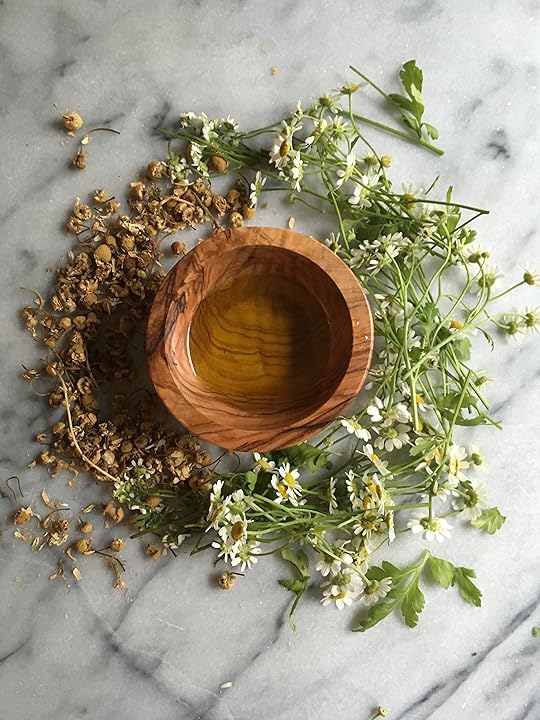
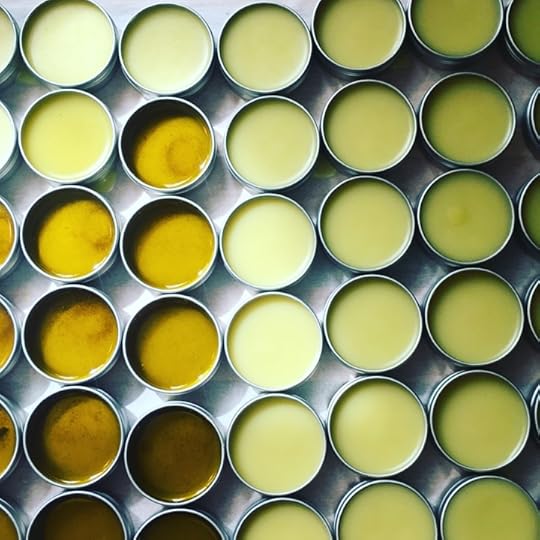
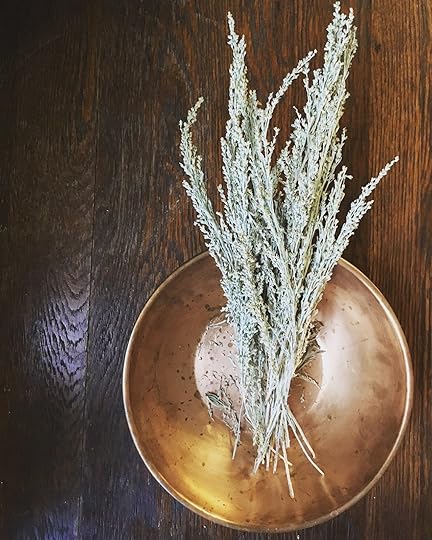
Since having her babies (now three and six!), Raina hasn’t been able to travel as much. While she’s still playing music, last year she started up a little business that allows her to satisfy her need to make and engage with others while staying closer to home. It’s called Folk Potions and she sells an array of handmade, organic body butters, salves, balms, and deodorants.
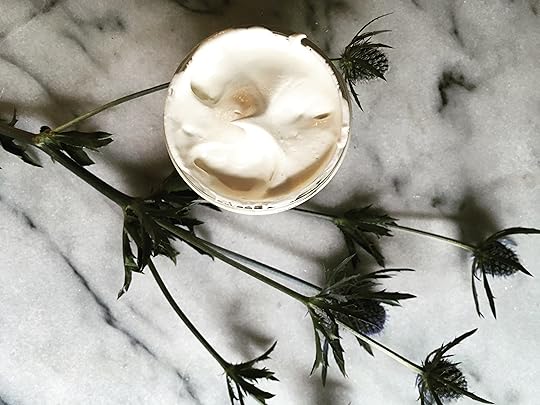
Everything Raina sells is made by hand in small batches in her kitchen in Austin, Texas. I use her Lavanilla Body Butter on my hands and feet nearly every day and swear by her Melty Minty Lip Balm.
If you’re still on the hunt for holiday gifts, you have until December 20th to place a Folk Potions order! I highly recommend the five piece Natural Skincare Gift Pack for an easy, sure-to-be-appreciated present! Oh, and make sure to follow Folk Potions on Instagram. She often posts about new products and announces when beloved items come back into stock!
Disclosure: Folk Potions is a business created and run by my baby sister. She did not pay me to post this (though occasionally she will drop her new products into the mail for me to try). Her stuff are simply so good that I had to share.
Related Posts:
Links: End of Season Stonefruit and Winners
Canning 101: Use a Splatter Guard for Thick Products
A Raina Rose Kickstarter With Food in Jars Rewards
December 7, 2017
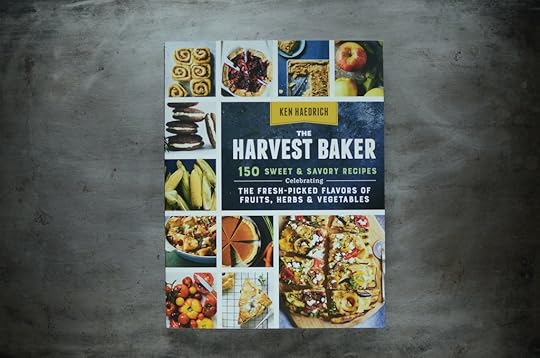
Tomato Jam Pizza from The Harvest Baker
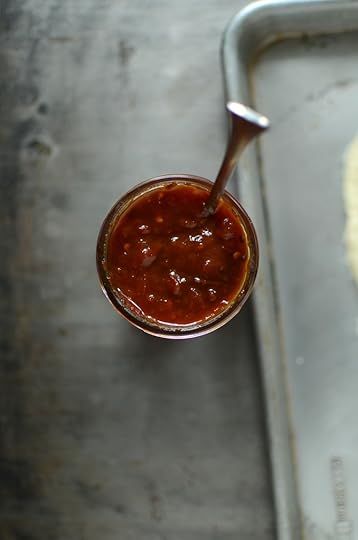
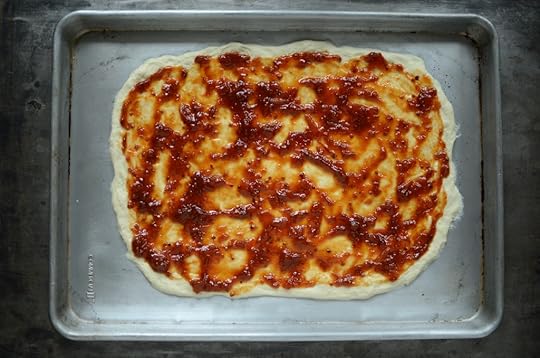
The Tomato Jam Pizza from Ken Haedrich’s The Harvest Baker is a tasty way to transform a jar of homemade tomato preserves into a dish worthy of a dinner party!
Tomato jam is one of my favorite homemade condiments. I serve it with cheese. I use it as a dip for roasted sweet potato chunks. I spread it on egg sandwiches. I stir it into vinaigrettes. I use it to glaze baked chicken. However, until a few days ago, one of the few things I hadn’t done with it is spread it on pizza in place of a more traditional sauce. And what an absolute shame that was!
This brilliant idea comes from The Harvest Baker, a gorgeous book by Ken Haedrich about baking with fresh fruits, vegetables, and herbs. Every time I pick up my copy, I find myself flagging more recipes to add to my to-make list. It’s a volume that feels entirely fresh and new, while also maintaining a familiarity that keeps it accessible and welcoming.
When the folks from Storey asked if I might be interested in participating in the virtual book tour for this book, I said yet immediately. The only struggle I faced was choosing just one recipe to feature. However, when I spotted the aforementioned Tomato Jam Pizza, I knew it was the recipe for me (thought the Double Crusted Cabbage Pie regularly haunts my culinary dreams).
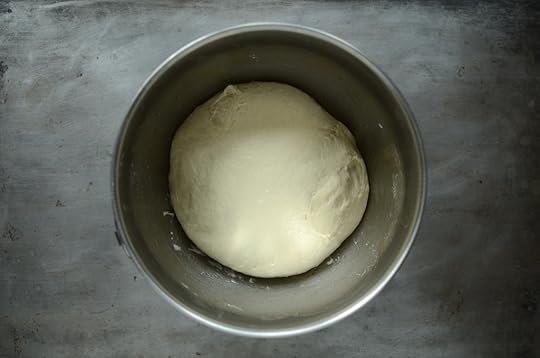
The recipe starts by instructing you to make a batch of pizza dough. There are two options in the book, one made my hand and another made in a food processor. I opted for the food processor version and was really pleased with it (I plan on adopting the technique moving forward, as it was so easy).
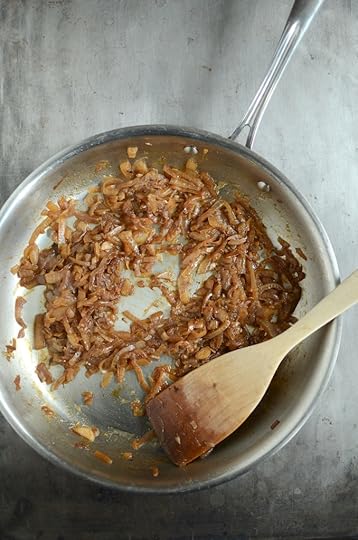
While the dough rises (of course, you can also use store bought dough if that’s easier), you caramelize some onions. Ken says it should only take about 12 minutes, but I prefer a much longer cook and let mine go for about 45 minutes, until they were honey-hued and nearly as spreadable as room temperature butter.
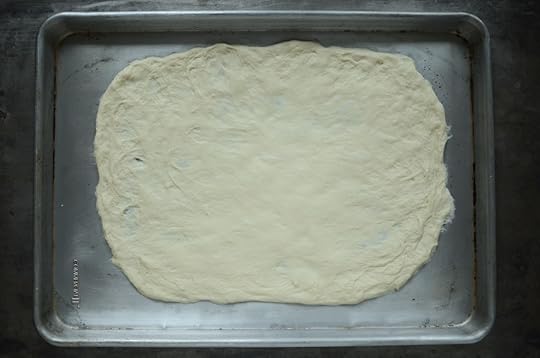
Once the dough has had a chance to rise and the onions are cooked, it’s time to make some pizza. Take a half batch of the dough (most recipes, including the ones in this book, make enough for two pies) and work it out as thin as you can on a sheet pan.
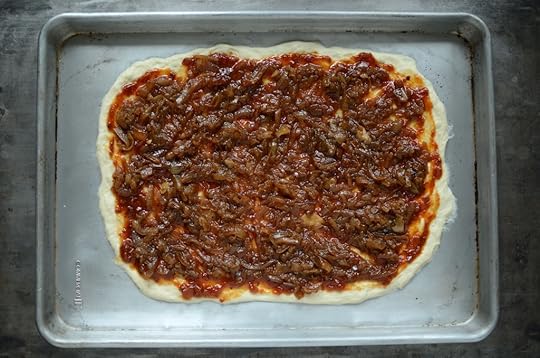
Top the flattened dough with a thin layer of tomato jam, a more generous layer of caramelized onions, and goat cheese (you can also use a combination of goat cheese and feta, if you prefer something a bit zippier in flavor).
To make the process of getting the goat cheese onto the pizza neatly, I let it come to room temperature, worked it a little with a fork to fluff it up, and then used my meatball scoop to portion it out onto the pie. Then, I used a damp fork and pressed those lumps of cheese down, the same way you would a peanut butter cookie. Worked like a charm.
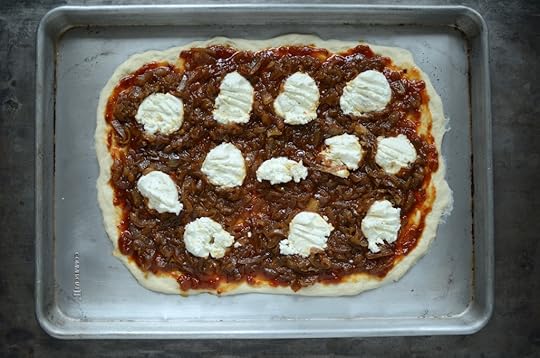
Once the pizza is fully dressed, you bake it for 18-22 minutes in a 450F oven, until the crust is brown and the cheese bubbles.
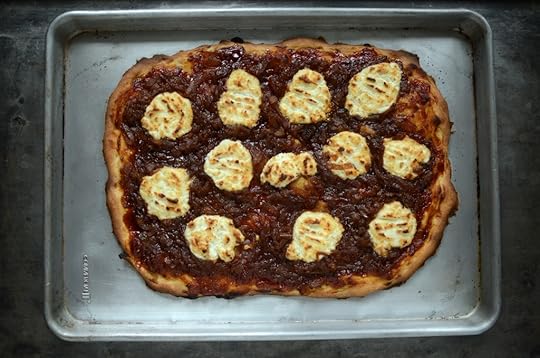
I could see making this pizza as an appetizer for a party (just cut into small squares for easy eating) or adding ribbons of prosciutto just before serving. I ate a hearty corner with a pile of kale salad for lunch the day I made it and have been rationing out the leftovers ever since. There’s one, lonely piece left that is destined to be warmed and topped with a fried egg and eaten for breakfast tomorrow.
Related Posts:
Check the recipe index for more tasty preserves!
December 5, 2017
A Trio of Cookbooks – Smorgasbord, The Simple Bites Cookbook, and Bravetart

I have a big round-up of this year’s canning cookbooks coming next week, but I have a few favorite cookbooks from this year that I wanted to call out before the holiday shopping season wraps up. These three are worthy of gifting or getting for yourself and would each bring fresh inspiration to your December table.
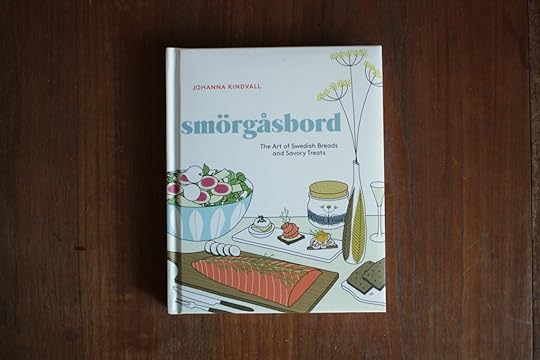
First up is Smorgasbord by Johanna Kindvall. I was a huge fan of Fika, Johanna’s first book (co-written with Anna Brones) I am just as delighted with this one. Much like the first book, it unpacks a beloved Swedish culinary tradition. We in the US think of a smorgasbord as a giant buffet, but it translates more specifically to open sandwich table.
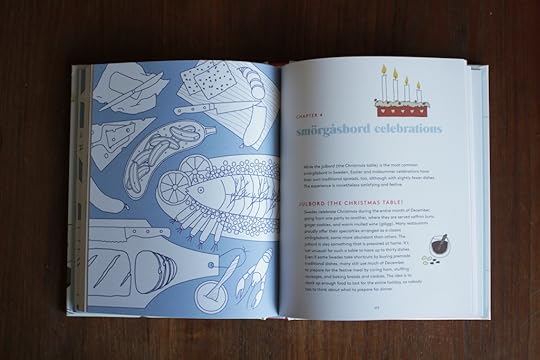
If you’re looking to liven up your holiday gatherings this year, make sure to open Smorgasbord up to the celebrations chapter. Bake up a loaf of Christmas Malt Bread (page 40), set a batch of Gravlax with Fennel (page 124) to cure, and cook up some Creamed Kale (page 154).
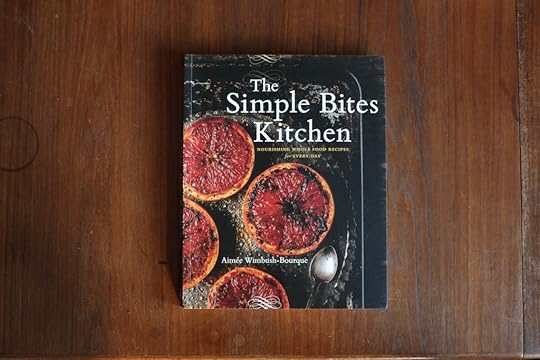
Readers of the blog Simple Bites will know that no one sets a more appealing table or makes cooking with the whole family seem more delightful than Aimee Wimbush-Bourque. Her new book, The Simple Bites Kitchen, packages up all that I love about her site and lets me carry it right up to the stove.
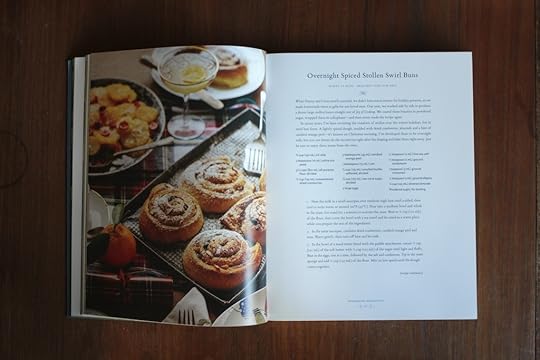
There’s a lot about this book that makes it worth the price of admission, but a few recipes you should not miss are the Spelt Date Scones (page 35), the Overnight Spiced Stollen Swirl Buns (page 37 and pictured above), the Roast Chicken with Bay Leaf and Barley (page 199), and the Fig, Rosemary, and Pistachio Crisps (page 239).
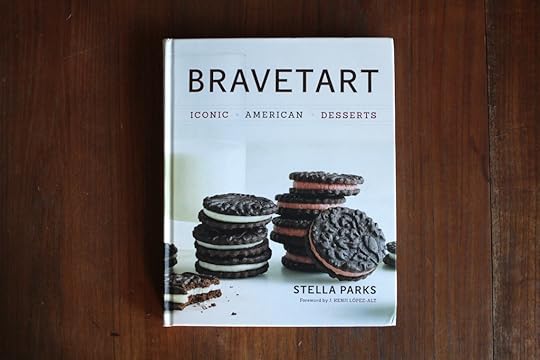
Last up is Stella Parks’ Bravetart. I have long been a fan of Stella’s work on Serious Eats and am so happy to have her wisdom gathered up in a book because she is truly a baking genius. This book serves up classic American treats, from cookies and cakes, to pies and ice creams.
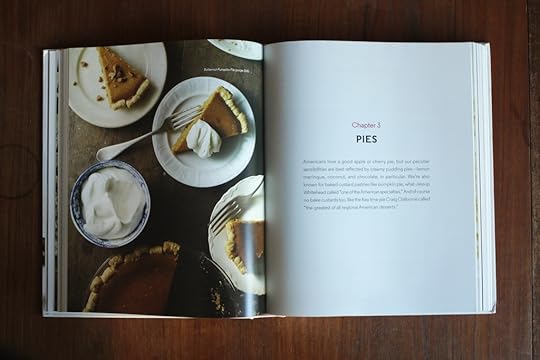
This whole book is a worthy investment, but the pie section is the one I find myself turning to most often. I’ve been using Stella’s pie crust recipe since she shared it on SE last year and love it for its flexibility, durability, and crazy flakiness. I have a feeling you will too.
Related Posts:
Traditionally Fermented Foods and Kombucha, Kefir, and Beyond
Cookbooks: Modern Cider
Giveaway: Slow Cook Modern by Liana Krissoff


