
Marisa McClellan's Blog, page 27
April 17, 2018
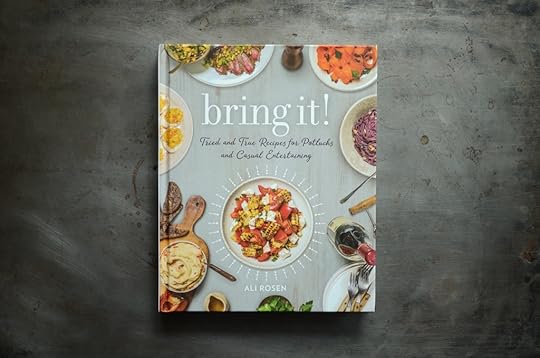
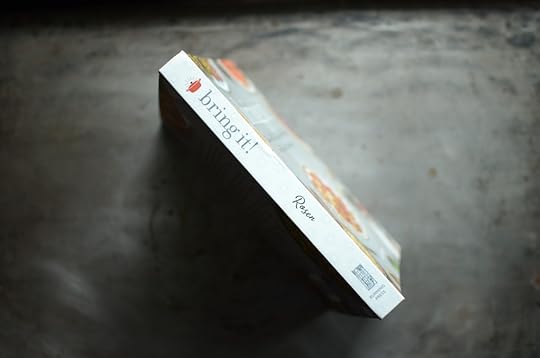
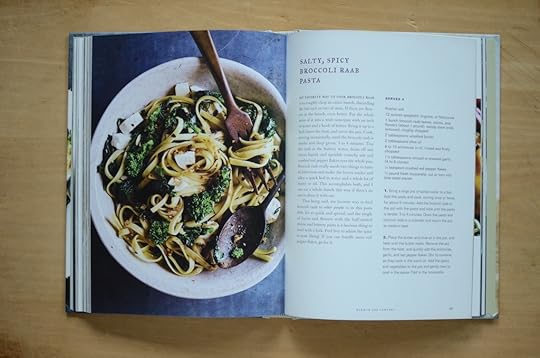
Cookbooks: Bring It!
I have long believed that when it comes to entertaining, most people can roughly be broken down into two groups. There are potluck people and dinner party people. My friend Cindy is most decidedly a dinner party person. She likes to control the menu and create an experience for her friends. I am more of a potluck person. I love the uncertainty of inviting people to bring with them whatever they’re moved to make.
I have definite opinions of what makes a good potluck dish (ideally something that can be served at room temperature and can be eaten from a plate with a fork). I’m forever curious about the recipes that other people prefer for potlucks and so make a point of checking out new potluck cookbooks whenever one is published.
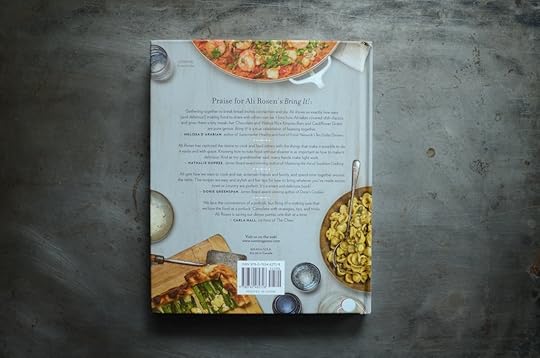
The latest book on the topic to come to market is Ali Rosen’s Bring It! Ali is the force behind Potluck Video, a video series that you can find online and on NYC Life on Thursday nights.

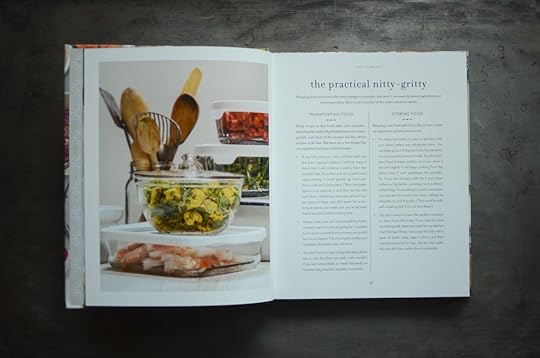
This book is broken up into seven chapters. It opens with an introductory section that offers tips on How to Bring It. From there, it moves into Hors d’Oeuvres and Dips, Salads, Casseroles/Pastas/Tarts, Meats and Fish, Veggies and Grains, and Desserts.
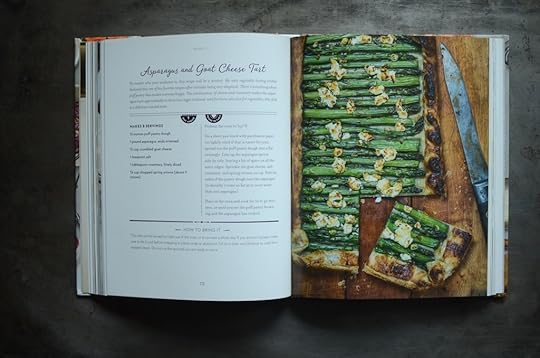
There’s plenty of appealing food in this book (though I find the photography style a little unsettling. The lighting feels excessively artificial). In addition to the dishes pictured throughout this post, I’ve marked the Grits Casserole (page 106), the Cherry Tomato Tart (page 117), and the Farro with Charred Vegetables (page 188) as things I hope to make.
If you’re someone who attends regular potlucks and needs new inspiration, this book will certainly be of use!
Related Posts:
Cookbooks: Eating From the Ground Up
The 2017 Class of Canning, Preserving, and Culinary DIY Books
A Trio of Cookbooks – Smorgasbord, The Simple Bites Cookbook, and Bravetart


April 11, 2018
How to Make Paneer Cheese
Regular Food in Jars contributor Alex Jones is here today to show us how to make homemade paneer cheese with just two simple ingredients – milk and lemon juice! Reading this post immediately makes me crave dairy products! -Marisa
We often preserve to capture height-of-season flavors or produce we can’t get for most of the year. But oftentimes in my kitchen, preserving happens in an effort to curb food waste.
That’s how I first learned to make paneer, the springy, fresh cheese that shows up as the protein in some of my favorite Indian dishes. It’s one of the quickest dairy products to make, and also one of the easiest. All you need is milk, lemon juice or vinegar, and a little salt.
One of the reasons to make cheese like this is to use up milk that’s right at or even a tiny bit past its sell-by date. Just make sure to give it a good sniff and then use your good sense and best judgment.
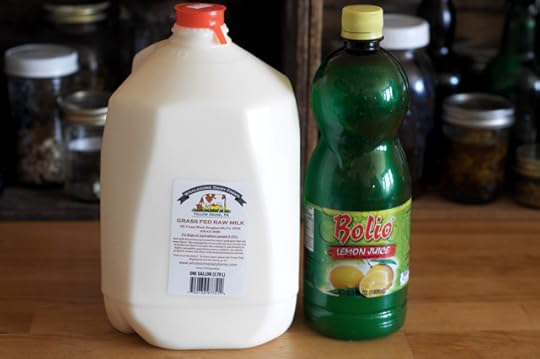
That said, when the list is so short, using the best ingredients you can afford is always a good idea. I source whole raw Ayreshire milk from a small grass-fed dairy here in southeast Pennsylvania, Wholesome Dairy Farms, for both drinking and making value-added dairy products.
I find that even when I’m pasteurizing the milk for a recipe, the yields on items like yogurt, whole-milk ricotta, and paneer are higher, and the product just tastes better when I’ve started with raw milk. We’re lucky that raw milk is so available in Pennsylvania. If you can get your hands on it from a reputable source in your state, I recommend doing so, even if you plan to pasteurize it in your recipe.
While we’re heating the milk for this recipe far past the pasteurization point, it’s still a good idea to remember that the very young, the elderly, and those with compromised immune systems carry a greater risk when consuming unpasteurized milk products.
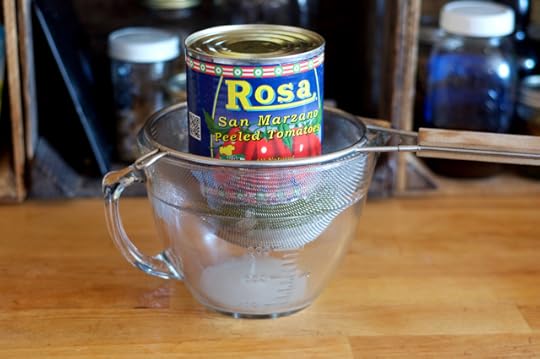
To start your cheese, pour one half gallon of milk into a four-quart, heavy-bottomed pot (I use my enameled Dutch oven). Heat the milk over medium-low heat, stirring occasionally and feeling along the bottom of the pot with your spoon to make sure that it isn’t scorching. Keep a close eye on the pot so that it doesn’t boil over.
You want to get to a little below the boiling point, about 200oF. You can use an instant-read or milk thermometer for this, or you can watch for when tiny bubbles start to form on the surface of the milk. When you see the bubbles, immediately remove the pot from the heat.
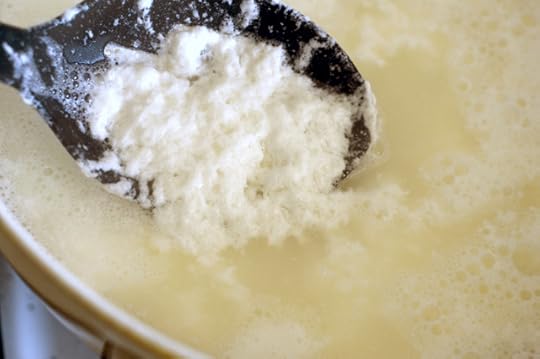
Once you’ve reached the proper temperature, stir in lemon juice. This will cause the milk solids to immediately begin separating out. As the milk sits, the solids will continue to coagulate.
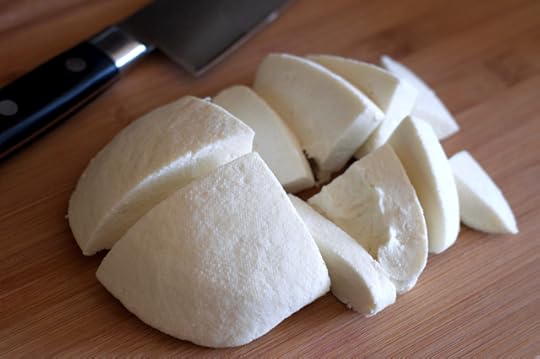
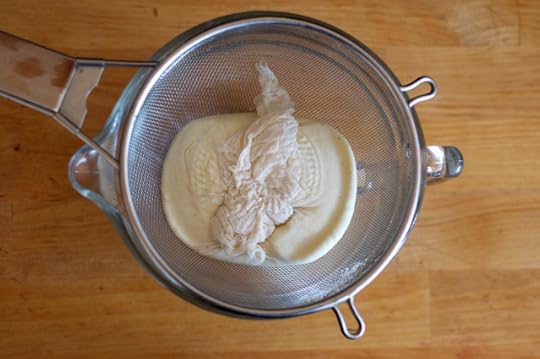
Strain the curds, then press out the remaining liquid in cheesecloth or butter muslin (I prefer butter muslin for home cheesemaking since it’s washable and reusable; cheesecloth is one-time use only). Press and refrigerate the cheese for at least a half an hour or overnight.
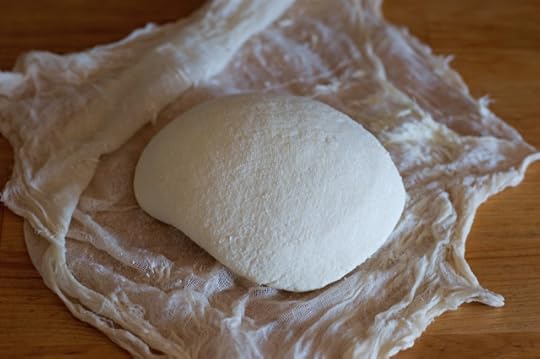
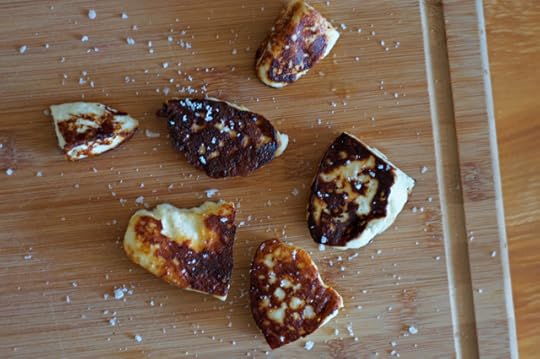
Once the cheese is full drained, unwrap the bundle. Now you’re ready to add chunks of paneer to a curry or other dish, or — my favorite — fry slices up in some ghee and enjoy them with flaky sea salt and maybe a dollop of tomato jam or a slab of quince paste.
Print
Homemade Paneer Cheese
Ingredients
1/2 gallon of whole milk, preferably raw from grass-fed cows
1/4 cup of lemon juice (fresh or bottled is okay) or white vinegar
Salt to taste
Ghee for frying (optional)
Instructions
Pour the milk into a 4-quart, nonreactive pot with a heavy bottom and heat over medium-low, stirring occasionally. Heat the milk until it's just below boiling (around 200 degrees F) and little bubbles begin to form on the surface. Watch closely to make sure the pot doesn't boil over.
When the milk has come up to temperature, immediately remove the pot from the heat and stir in the lemon juice. Let the pot sit for five minutes or so to allow the curds to form.
While the pot is resting, fit a strainer with a few layers of cheesecloth or a sheet of butter muslin and place it over a 2-quart bowl.
Using a slotted spoon or ladle, spoon the curds into the cheesecloth-lined strainer. When you have mostly whey left in the pot, pour the contents of the pot over the curds in the strainer — this will help you get the last bits of curd and help the curds knit together. Make sure the catch bowl is large enough so that whey won't overflow.
Drain the whey and put the strainer back over the empty bowl. Stir gently to work out any remaining whey puddles, then add a few pinches of salt and stir that into the curds.
Tie the opposite corners of the cheesecloth together tightly, then put a small plate on top of the little pouch of curds. Put a heavy object like a can of tomatoes on top and refrigerate like this for at least 30 minutes or overnight.
Remove the weight and plate from the strainer and untie the pouch. Cut the paneer into cubes or slices and use in Indian dishes, or fry in ghee or olive oil a nonstick or well-seasoned cast-iron pan over medium-high heat on both sides until golden brown and crisp. Finish with flaky salt and serve with preserves as a snack or appetizer. Any uncooked paneer can be stored in an airtight container or zip-top baggie for a few days in the fridge.
4.26
http://foodinjars.com/2018/04/how-to-make-paneer-cheese/
Related Posts:
How to Make Homemade Grassfed Ghee
How to Make Fromage Fort
Homemade Yogurt in Mason Jars
April 9, 2018
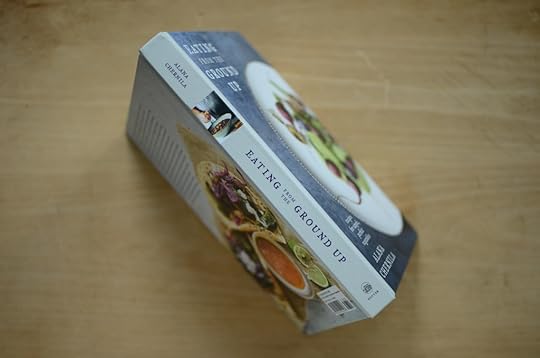
Cookbooks: Eating From the Ground Up
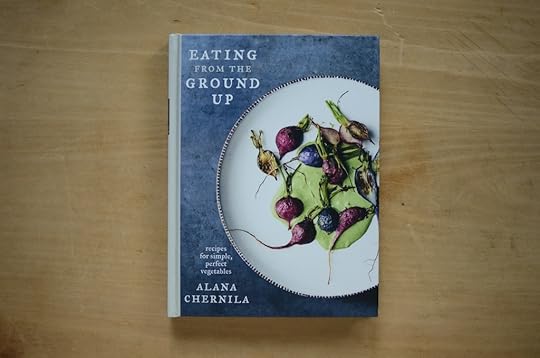
I the kind of cook who tucks vegetables into nearly everything I cook. My turkey chili always includes wilted Swiss chard. I prefer my eggs perched on a bed of sauteed spinach or zucchini. And if I’m making a sandwich, I pile it high with sliced cucumber, lettuce, and ribbons of carrot. This habit of mine doesn’t always thrill my husband (he grew up with a mother who was less of a produce pusher than mine), but after 10+ years together, he’s gotten used to it.
All that said, I confess to having a somewhat limited repertoire of vegetable dishes. I rotate through steaming, roasting, and sauting most things. This gets the job done, but can lead to a certain weariness. However, recently my vegetable cookery has received a much-needed shot in the arm.
This is all thanks to Alana Chernila’s gorgeous new book, Eating From the Ground Up. Many of you might be familiar with Alana’s previous books, The Homemade Pantry and The Homemade Kitchen, as well as her blog (it shares a name with this new book).
What I love about this book is that it tackles vegetables from a number of different directions, all with delicious results. The book opens with a section entitled Barely Recipes. These are ideal for busy weeknights, when you need to get dinner on the table and value speed and flavor.
After that, you’ll find A Pot of Soup (filling and deeply savory), Too Hot to Cook (perfect for deep summer, when it doesn’t take much to make a flavorful meal), Warmth and Comfort (many of these make a main dish out of veg), and the final chapter, Celebrations and Other Excuses to Eat With Your Hands (with a title like that, it needs no additional description).
This book should be on your shelf if you keep a backyard garden, shop farmers markets, subscribe to a CSA share, or simply love vegetables. It’s one that I know I’ll turn to again and again.
Thanks to Clarkson Potter, I have a copy of this lovely book to giveaway this week. Please use the widget below to enter.
Disclosure: I received a review copy of this book and the giveaway copy at no cost to me. No additional compensation was provided and all opinions are entirely my own.
Related Posts:
Giveaway: Alana Chernila’s The Homemade Kitchen + Prize Pack
Giveaway: Slow Cook Modern by Liana Krissoff
Giveaway: Will It Skillet by Daniel Shumski
April 8, 2018
Links: Stewed Rhubarb, Wilted Greens Pesto, and Winners

By the time you read this, Scott and I will be on a plane to Ireland! We’re heading off on a bit of vacation and I could not be more excited for the break from real life. I have some posts scheduled to run while I’m away and I’ll be dropping in now and then with some pictures from our travels. Additionally, thanks to the purchase of Irish SIM cards, I’ll be sharing snippets on Instagram (both in my feed and the Stories), so make sure to follow if you want to see some of our adventures. Now, links!
Because we’re having a long, cold spring, local rhubarb hasn’t appeared in any stores or markets yet. But I know it’s coming. When it does, I will make some of this gorgeous braised rhubarb.
Creamy date caramel. I’m making a “date” with this one as soon as I get back from my trip.
Wilted greens pesto. Deliciously preventing food waste is the best.
Nothing helps unify leftovers and make them feel like a fresh meal than a tasty sauce. This trio of sauces would all make your refrigerator proud.
Add some pickled red onions or tomato jam to this savory Dutch baby and I’m all in.
In anticipation of Ashley English’s new book (Southern from Scratch!), you should make a batch of her pickled eggs.
Wild garlic soda bread. I bet you could make this with ramps or even scallion greens to similar effect.
Last week, I ran a giveaway of silicone jar sleeves from Mason Jar Lifestyle. The winners on the blog are Annie Wyatt and Kelly Kerr. The Instagram winner is #1129/Meg Myers. Congratulations!
Related Posts:
Links: Rhubarb, Blueberries, and a Winner
Links: Plum Ketchup, Roasted Tomatoes, and Winners
Links: Strawberries, Rhubarb, and Winners
April 6, 2018
How to Make Beet Raisins
Food in Jars contributor Alex Jones drops in to show us how to simmer and dry beet slices into beet raisins. It’s a great project for this in-between time, when we’re waiting for spring produce to arrive! -Marisa
I’m not much of a cooking competition show watcher. The exceptions are the original Japanese Iron Chef, which I followed voraciously back in high school, The Great British Baking Show (of course), and a brief foray into MasterChef Junior — all shows that avoid the cutthroat, stressful nature of most reality TV.
So I can’t really blame myself for not knowing about beet raisins, with which chef Carrie Baird of Denver’s Bar Dough wowed the judges during an episode of Top Chef last year.
A poster on the Food in Jars Community Facebook group mentioned them recently, and I was instantly fascinated. Beets are the kind of veggie I always wish I used more often. Now that I have an Instant Pot, it’s easy to quickly prep a bunch for a week of salads, but that’s as about as creative as I’ve gotten with them lately.
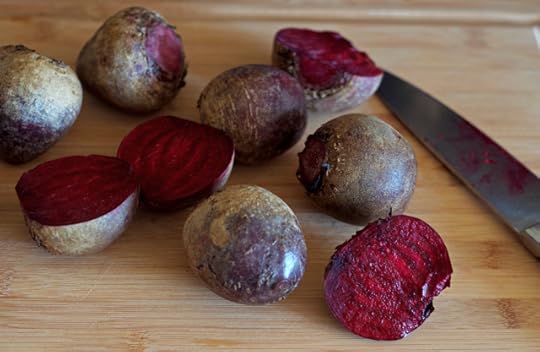
And while I’m waiting for the ever-so-slow unfolding of spring here in Philly, farmers’ market stands still have tons of sturdy storage beets in red and gold, harvested months ago. With strawberries still weeks away and grapes for actual raisins not available until high summer, I had to try this recipe.
Baird’s recipe calls for melon balling the raw beets into uniform spheres, which is far more work than I wanted to put in. (A melon baller is also not one of the many culinary tools in my kitchen, and if I’ve managed to avoid getting one for this long, it’s not gonna happen now.)
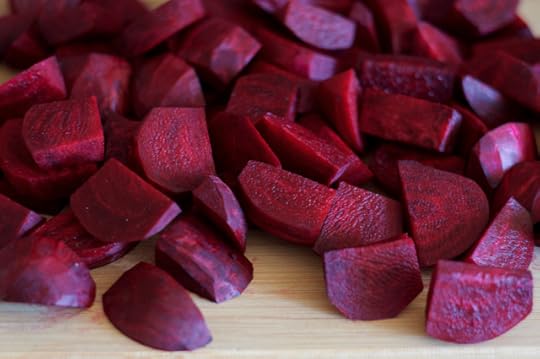
So I peeled and trimmed my organic red beets, then halved them and cut each halves into five roughly equal slices, about half an inch thick and an inch or so long — cutting the pointy end, then slicing the remainder into quarters.
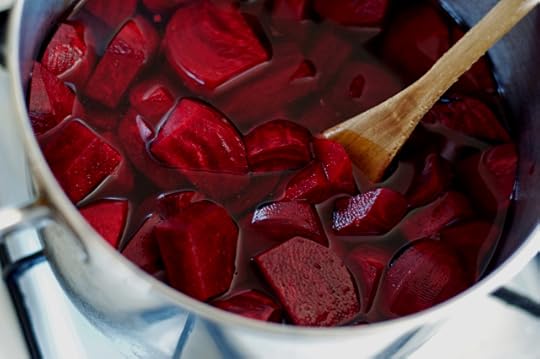
Slices rather than balls also reduces waste, giving you more beet raisin for your buck. The slices went into a pot with vinegar, sugar, water, and a pinch of salt.
Baird uses champagne vinegar, which you’re welcome to do; I used apple cider vinegar, because that’s what I had on hand (and I’m not trying to win a high-stakes cooking competition).
The slices simmered till they were very soft but not disintegrating, about two hours. Then, I drained the liquid — which you could use to make salad dressing, or add a little more salt and use it to quick-pickle some thinly-sliced hakurei turnips, for example — and let the slices cool for a bit.
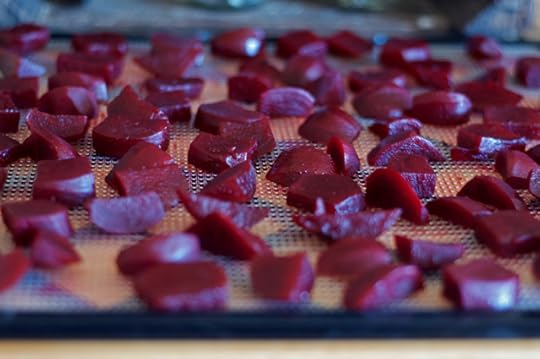
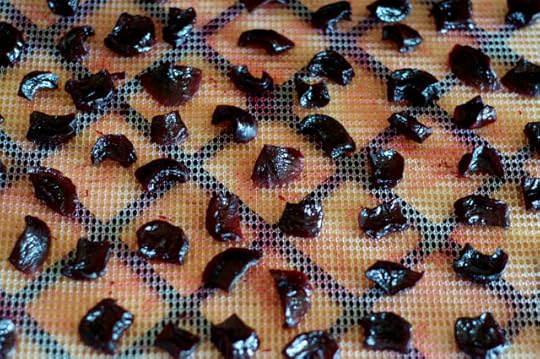
The cooked beet “grapes” then went into my Excalibur dehydrator at at 135oF, which is the setting recommended for fruit. After two hours, the beets were showing signs of dehydration, but their texture was still more like beets than raisins.
I upped the temperature to 145oF, which is the temperature I include in the recipe below. The beets took another three hours or so until they were sufficiently raisinlike for me to pull them out — next time, I might just turn the dehydrator up all the way to 155oF and see if that helps to shorten the dehydration time without overdrying.
When I did, they were wrinkly, chewy and toothsome, and pleasantly sweet and a little tart — just like real raisins! They’re super snackable and would be delicious in a bowl of yogurt with granola, or on a kale salad, as Baird served them on Top Chef. I could also see using them to top a tzatziki-esque cucumber salad along with lots of dill, toasted slivered almonds, and a pillowy pita.
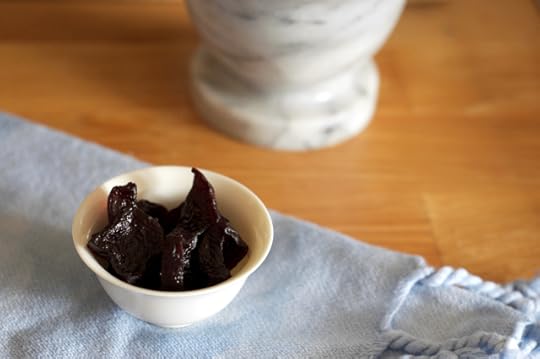
They’re not quite as simple as stemming grapes and tossing them onto a dehydrator rack, but I’ll definitely be making these beet raisins again. Would you give them a try? Tell us in the comments!
Print
How to Make Beet “Raisins” (Adapted from Bar Dough's Carrie Baird)
Ingredients
2 pounds small beets
1 cup water
1 cup apple cider vinegar
2/3 cup granulated sugar
Pinch of kosher salt
Instructions
Trim and peel the beets. Halve each beet and cut into roughly equal pieces that are about 1/2" by 1".
Put the beets in a non-reactive 2-quart pot along with the water, vinegar, sugar, and salt and simmer gently, covered, until the beets are very soft but not falling apart, about 2 hours.
Drain the beets of their liquid and allow them to cool. Place the beets on the rack of a dehydrator and dehydrate at 145 degrees F until chewy and raisinlike, 4 to 5 hours.
4.26
http://foodinjars.com/2018/04/how-to-make-beet-raisins/
Related Posts:
Getting Your Kitchen Ready for Spring
How to Make Meyer Lemon Confit
How to Make Crispy Shiitake Mushroom Snacks
April 2, 2018
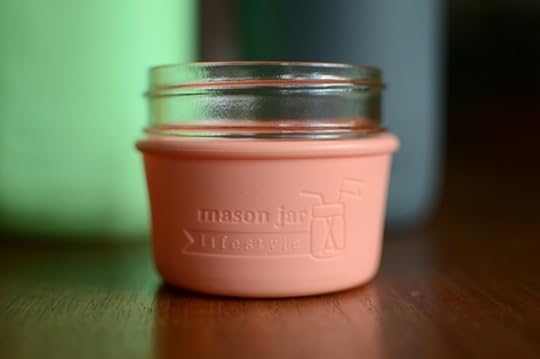
Giveaway: Silicone Sleeves from Mason Jar Lifestyle
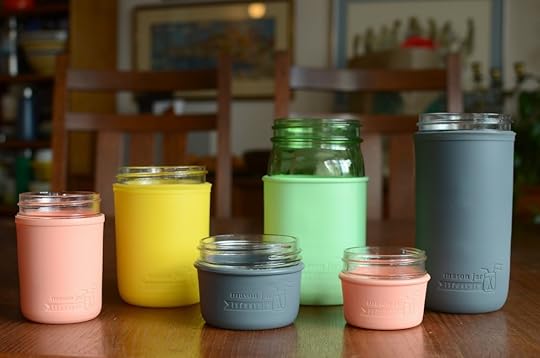
Mason jars serve play many roles in my life. Of course, I use them for canning. But I also put them to work holding pantry staples, vinaigrettes and sauces, leftovers, and a wide array of drinks. I often brew loose leaf tea in a quart jar and when the weather gets warmer, a Pint & Half jar filled with ice coffee is my vessel and beverage of choice.
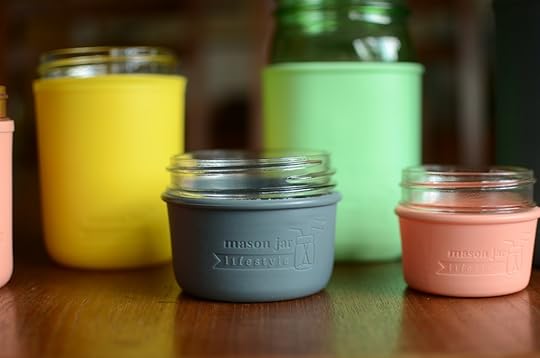
The one problem with using mason jars as drinking glass/travel mug is the breakability factor. Happily, thanks to the folks at Mason Jar Lifestyle, I now have a collection of silicone sleeve for every size jar possible. They help cushion my jars, they serve as a heatproof barrier when I fill a jar with coffee or tea, and they prevent the jars from sweating when I use them for cold drinks. All in all, it’s a really awesome accessory.

Mason Jar Lifestyle make silicone sleeves that fit quarter pints (so adorable!), wide mouth half pints (these are great for those times when you use your jars to pack snacks), regular mouth half pints, pint jars (both regular and wide mouth), my beloved Pint & Half jars, and even for quart jars. They also come in an array of fun colors.
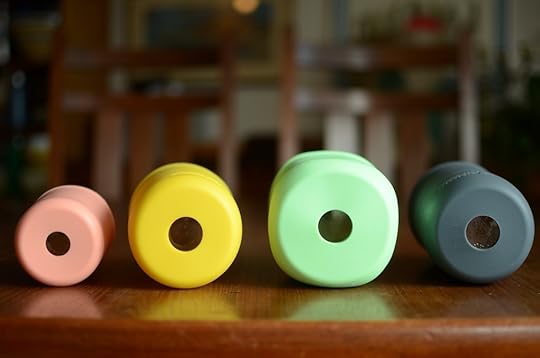
All the larger sleeves have small holes in the bottom, to make it easier to slide the sleeves on and off the jars (the little ones don’t, but they’re still pretty easy to put on and then remove for cleaning). My sister has a stash of these sleeves that she keeps on a set of regular mouth half pints for her kids, and she leaves them on the jars and runs them through the dishwasher with the sleeves in place.
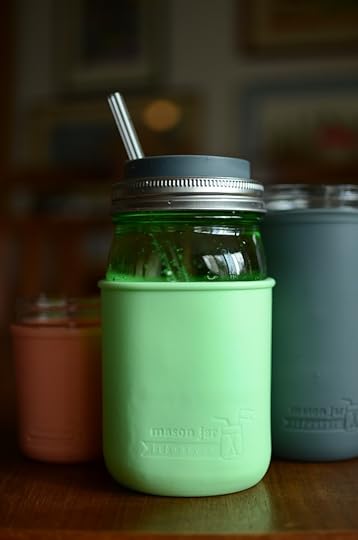
I like to pair these silicone sleeves with a drink topper and a glass straw when I’m sitting at my desk, to prevent messes and potential spills.
This week, I’m giving away two full sets of silicone sleeves here on the blog and another set over on Instagram. Make sure to enter in both places to increase your chances of winning!
Related Posts:
Giveaway: Halloween-themed Jar Gear from Mason Jar Lifestyle
Giveaway: The All New Ball Book of Canning and Preserving + Mason Jar Lifestyle
Giveaway: Mason Jar Lifestyle Mother’s Day Coffee Gift Set
April Sponsors: Cuppow, Fillmore Container, EcoJarz, Mason Jar Lifestyle, and CanningCrafts
Happy April, dear readers! It’s the start of the month and that means that it’s time to thank the businesses that help make this site possible. Please do show them that you appreciate their support with your time and attention!
In the top spot are our friends at Cuppow. They are the creators of the original mason jar travel mug topper and the BNTO, a small plastic cup that transforms a canning jar into a snack or lunch box. There’s nothing better for iced coffee season (hopefully soon!) than a Pint & Half jar with a wide mouth Cuppow.
Lancaster, PA-based and family-owned Fillmore Container are next! They sell all manner of canning jars, lids, and other preservation gear. We’re planning some fun collaborations for later this month, so stay tuned for that!
Our friends over at EcoJarz are another stalwart sponsor. They make an array of products designed to fit on top of mason jars, including cheese graters, coffee brewers, and stainless steel storage lids. If you’re looking to get into fermentation this spring, their fermenting kit is a useful and affordable option!
Mason Jar Lifestyle is a one-stop shopping site for all the jar lovers out there. They sell all manner of mason jar accessories and adaptors. If you’re in the market for lids, straws, sprouting lids, fermentation weights, airlocks, tea light converters, cozies, they are there for you. Look for a fun giveaway from them later today!
Next up is CanningCrafts. Shop owner Alison sells an array of ready made and custom mason jar labels for all your various preserves, syrups, and backyard honey. Make sure to subscribe to the CanningCrafts newsletter, because you’ll get a 10% off coupon code!
And if your company, shop, or family business is interested in reaching the food-loving and engaged Food in Jars audience, you can find more details here. Leave a comment on this post or drop me a note to learn more!
Related Posts:
March Sponsors: Cuppow, Fillmore Container, EcoJarz, Mason Jar Lifestyle, and CanningCrafts
February Sponsors: Cuppow, Fillmore Container, EcoJarz, Mason Jar Lifestyle, and CanningCrafts
January Sponsors: Cuppow, Fillmore Container, EcoJarz, Mason Jar Lifestyle, and CanningCrafts
April 1, 2018
Links: Rhubarb Compote and Homemade Harissa
Happy April, friends! Happy Easter and Passover, as well! I hope you’ve all had lovely weekends, filled with family and celebratory meals. I’ve spent most of the weekend with my extended family, first on Saturday night for our annual Seder and then today for brunch and an extended hang out at my cousin Angie’s house.
Angie is starting the process of cleaning out after 50 years in her home, and so none of us left empty-handed. Scott and I came home with a terracotta fish baker that once belonged to my Aunt Doris, and a five branch candelabra that was originally part of the decoration in the Russian tea room that my family ran in Philadelphia many years ago. We’re all set if the power goes out!
I’m really sorry that it’s been so quiet around here lately. After nine years of writing here, my creative well seems to be running a little dry. I’m hoping that the return of warmer days will help me regain my footing. In the meantime, I’ve got some links for you!
I’ve yet to spot any rhubarb around these parts, but when I do, I’m sure to make some of this hot pink rhubarb compote.
While we wait for spring produce, there’s always candied grapefruit peel!
My food processor makes a terrible noise when I ask it to make almond butter, but with the help of earplugs, it does turn into the most gorgeous, spreadable paste.
I love Alexandra Stafford’s Instagram Stories because she’s always making the most wonderful dishes. I’ve been particularly jealous about her homemade harissa and overnight focaccia lately.
It has nothing to do with canning or preserving, but doesn’t this vegan alfredo sauce look good?!
This olive oil cake speaks to me.
I love the idea of building a zero waste grocery kit. Whenever I go grocery shopping, I do try to think through my list and determine what bags and containers I can bring with me to reduce the amount of packaging I consume, but this takes it a step further!
Also, a reminder! I’ve restarted my Facebook Live series. This month, I’ll be doing a live stream demo on Monday, April 2 at 9 pm eastern (6 pm pacific). I’m going to make a batch of the Strawberry Cocoa Jam from Naturally Sweet Food in Jars (if you have the book, you can follow along!). Just head over to the Food in Jars Facebook page to join the fun!
Related Posts:
Links: Pickled Strawberries, Green Onion Kimchi, and Winners
Where I’m Going, Where I’ve Been – March 2018
Links: Quick Pickles, Granola Bars, and Jewish Food
Links:
Happy April, friends! Happy Easter and Passover, as well! I hope you’ve all had lovely weekends, filled with family and celebratory meals. I’ve spent most of the weekend with my extended family, first on Saturday night for our annual Seder and then today for brunch and an extended hang out at my cousin Angie’s house.
Angie is starting the process of cleaning out after 50 years in her home, and so none of us left empty-handed. Scott and I came home with a terracotta fish baker that once belonged to my Aunt Doris, and a five branch candelabra that was originally part of the decoration in the Russian tea room that my family ran in Philadelphia many years ago. We’re all set if the power goes out!
I’m really sorry that it’s been so quiet around here lately. After nine years of writing here, my creative well seems to be running a little dry. I’m hoping that the return of warmer days will help me regain my footing. In the meantime, I’ve got some links for you!
I’ve yet to spot any rhubarb around these parts, but when I do, I’m sure to make some of this hot pink rhubarb compote.
While we wait for spring produce, there’s always candied grapefruit peel!
My food processor makes a terrible noise when I ask it to make almond butter, but with the help of earplugs, it does turn into the most gorgeous, spreadable paste.
I love Alexandra Stafford’s Instagram Stories because she’s always making the most wonderful dishes. I’ve been particularly jealous about her homemade harissa and overnight focaccia lately.
It has nothing to do with canning or preserving, but doesn’t this vegan alfredo sauce look good?!
This olive oil cake speaks to me.
I love the idea of building a zero waste grocery kit. Whenever I go grocery shopping, I do try to think through my list and determine what bags and containers I can bring with me to reduce the amount of packaging I consume, but this takes it a step further!
Also, a reminder! I’ve restarted my Facebook Live series. This month, I’ll be doing a live stream demo on Monday, April 2 at 9 pm eastern (6 pm pacific). I’m going to make a batch of the Strawberry Cocoa Jam from Naturally Sweet Food in Jars (if you have the book, you can follow along!). Just head over to the Food in Jars Facebook page to join the fun!
Related Posts:
Links: Pickled Strawberries, Green Onion Kimchi, and Winners
Where I’m Going, Where I’ve Been – March 2018
Links: Quick Pickles, Granola Bars, and Jewish Food
March 23, 2018
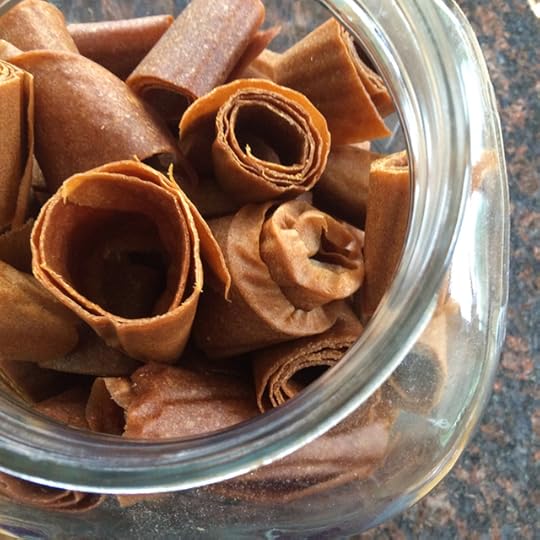
Guest Post: Fruit Leather from the Mid-winter Pantry
Today’s guest post comes to us from Janet Reich Elsbach. Based in Western Massachusetts, Janet writes wildly beautiful things about food and life at A Raisin and a Porpoise. Her first cookbook, called Extra Helping: Recipes for Building Community One Dish at a Time, will be out this fall (and is available for pre-order now!). I also highly encourage you to follow her tiny dog Sylvester on Instagram. He is delightful.
There’s a poem by Wendell Berry that I keep taped up inside my closet so I can see it every day, because it helps me feel calm and serene when the circumstances of the world around me are not conducive to that state of being.
The Peace Of Wild Things
When despair grows in me
and I wake in the night at the least sound
in fear of what my life and my children’s lives may be,
I go and lie down where the wood drake
rests in his beauty on the water, and the great heron feeds.
I come into the peace of wild things
who do not tax their lives with forethought
of grief. I come into the presence of still water.
And I feel above me the day-blind stars
waiting for their light. For a time
I rest in the grace of the world, and am free.
What this has to do with canning is that a similar feeling of calm, also rooted in gratitude for the natural world and thoughts of what my life and my children’s lives may be, can be switched on in me by going down to the basement and into the pantry where I keep the jars of fruit that I have preserved from the summer harvest. I have the great good fortune of living next to my parents’ prolific orchard, and most years there is more fruit streaming out of it than I can tackle, even with the help of my canning coven.
My daughter lines up the jams and sauces and so forth in her very tidy way, sorting by color and type and size of container. If I have done it correctly, the sealed jars produce no aroma or other emission. But standing in the narrow, windowless alcove, between the skinny little shelves and among the crates of empties and other supplies that line the floor, I might as well be standing in the forest, inhaling the negative ions that wild places are said to give off to great tonic effect. I just feel a little bit safer, seeing the peaches and plums and tomatoes and apples lined up so neatly.
Possibly because a healthy population of jars is connected to my sense of calm, I struggle with the math that governs the pace at which the jars are opened. Ok, let’s be clear: I don’t do any math. I vacillate between periods of hoarding and bouts of lid-popping. By this point in the winter, it’s usually clear that we can probably increase consumption and I can stop being quite so careful. And nobody seems to eat as much applesauce as they once did. And I don’t like to keep anything more than two years from its canning date. So around this time of year, once holiday giving has cleared what it is going to clear from the inventory, I start making fruit leather.
Or rather, I continue making fruit leather. We (and by “we,” I primarily mean my son, though he does get a good bit of help) eat a lot of fruit leather. Given the yardage of fruit leather I have produced for this child in his 13 years of life, I’ve had a lot of opportunity to experiment and to refine my thinking. The main refinement is this: What is fruit leather, really, but dried applesauce? And now that I have determined that the tenderest texture derives from both adding some sticky sweetener (honey, for example) and using a blender to grind everything super-fine (think baby food consistency), I’m all set to experiment wildly.
Some of you in the audience may have already figured out that these wild, adventurous experiments I allude to basically take the form of adding different things to applesauce. Winter in New England, people! CRAZY TIMES UP IN HERE.

My usual formula involves zipping the applesauce up with a handful of the peaches or strawberries I’ve frozen, then adding lime juice, honey and a little heat from cayenne or some other type of chile. Tossing a piece of preserved lemon into the mixture as well makes a very complex and mysteriously delicious leather that reminds me of those wildly sweet-tart-hot mango chile pops you can find in Mexican markets.
But lately when I am breathing deeply in the canning closet, I see there is a good amount of jam that also needs to be deployed before its sell-by date. Honey and jam are not all that different, as you know if you have ever run out of one and used the other in your tea or on your pancakes.
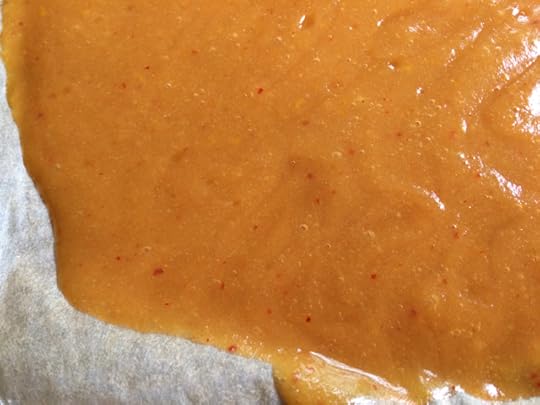
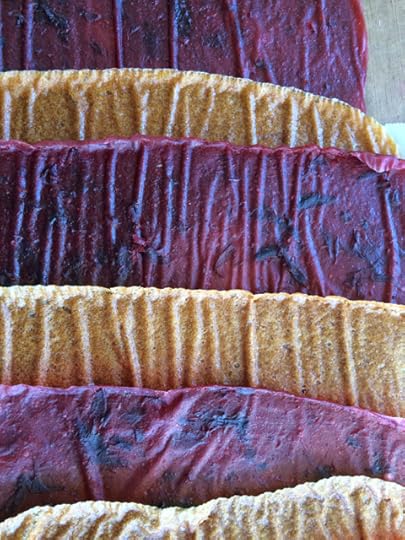
In the fruit version here, I paired a jar of plum preserves with some fresh lemon juice, which adds a little tang and generally brightens the flavors, and included some fresh ginger to give it a little kick. Any fruit jam can substitute for the plum.
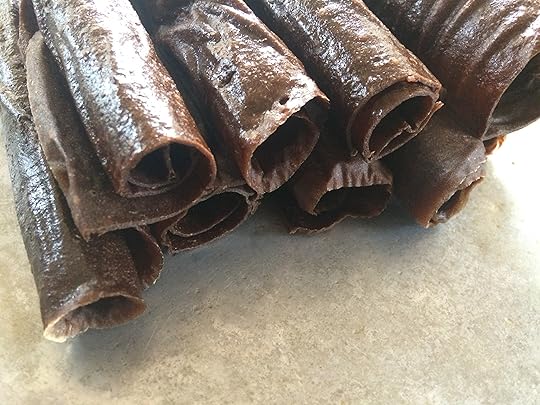
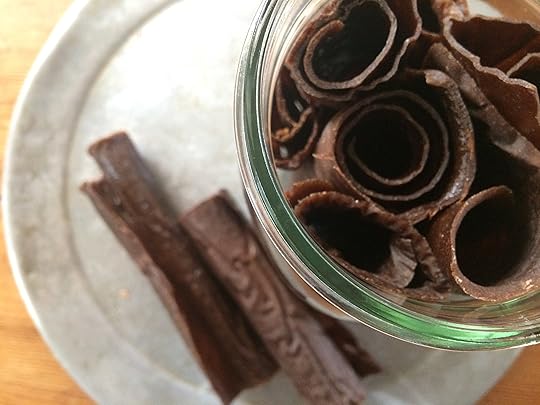
For the chocolate leather, I combined a jar of pear butter with the applesauce base. Pears and chocolate play so well together, as do strawberry or raspberry if you have a surplus of either of those.
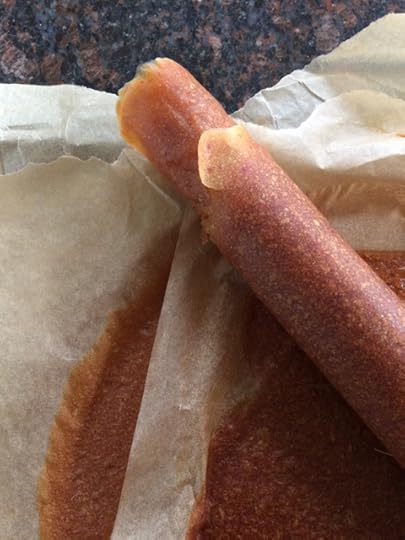
My dehydrator is an ancient old workshorse that I inherited. In lieu of tray liners, which it does not possess, I use parchment paper. If you have a more modern appliance, by all means use the liners it probably came with. Fruit leather can also be made on lined cookie sheets in an oven that has a very low setting, which mine does not (and I’ve made the fruit shards to prove it).
Odds are you’ll soon be off on your own wild experiments. However you mix it up, it’s a new life for the jars lingering in the pantry and definitely not your standard lunchbox snack.
Print
Jammy Fruit Leather and Chocolate Fruit Leather
Yield: Makes 2-3 sheets
Ingredients
For Jammy Fruit Leather
4 cups unsweetened applesauce
1 cup fruit jam
1/4 cup fresh lemon juice
1-2 teaspoons finely grated fresh ginger
For Chocolate Fruit Leather
4 cups unsweetened applesauce
1 cup pear jam or pear butter
2 tablespoons maple syrup
2 teaspoons unsweetened cocoa
Instructions
Choose the variety of fruit leather you want to make.
Combine all the ingredients in a blender and puree until quite smooth.
Pouring and spreading to a depth of a fat ¼”, divide among lined trays in a food dehydrator, set at approximately 120º, and dry at least 8 hours, or until it is thoroughly dry but still pliable and peels easily from the paper.
Roll or cut into sections and store in an airtight jar at room temperature.
4.26
http://foodinjars.com/2018/03/guest-post-fruit-leather-from-the-mid-winter-pantry/
Related Posts:
Guest Post: Ginger and Turmeric Preserved in Alcohol with Heather Francis
How to Create Homemade Honey Candy
Red Currants, Dry Canning, and Family Traditions


