
Marisa McClellan's Blog, page 32
November 22, 2017
How to Make Homemade Quince Butter
Regular Food in Jars contributor Alexandra Jones is here today with a recipe for homemade quince butter. Quince is one of my favorites and I loved this glimpse into her process! -Marisa
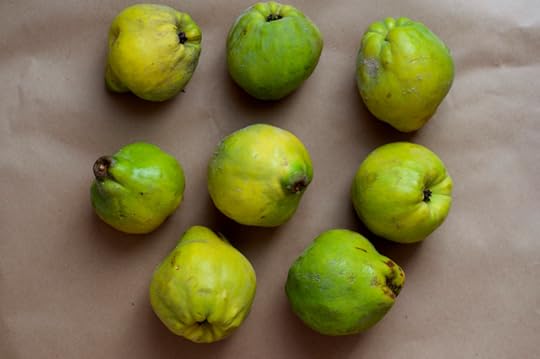
Quince is one of my favorite fruits to preserve — and where I am in Pennsylvania, it’s also one of the hardest to find.
Luckily, I happened on a farmers’ market in Old City Philadelphia recently where Beechwood Orchards, the only farm I know to offer quince at retail, happened to have a single crate on their stand. After sending out a quick alert over social media — quince spotted! — I promptly bought several pounds.
It may seem silly to go so wild over a fruit that, when grown in a temperate climate, you can’t even eat raw, although its floral scent will perfume any room in which you stash your fruit. Quince flesh is dry, tannic, and unpalatable until you poach slices in syrup or cook it down with sugar into a thick paste, when it becomes tender, toothsome, vibrant and bright, with that unmistakable floral note.
The traditional way to prepare quince is as quince paste, or membrillo — cooking down the mixture so long with sugar that it becomes a firm, sliceable brick after refrigeration, still tender in texture but more like a fruit cheese than a spread.
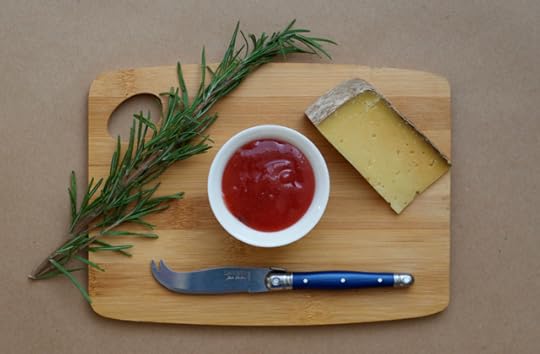
But knowing that I might not come upon quince again for another few years, I decided to find a way to can it, with visions of giving some away to It’s delightful to serve on a cheese board alongside aged wedges made the traditional way. I found a Williams-Sonoma recipe for inspiration and set to work.
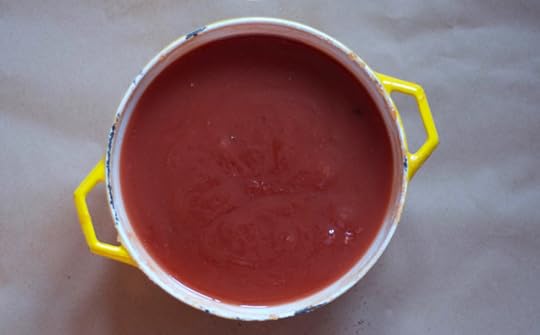
While parts of the recipe were really out-of-whack — the quince were supposed to redden in 20 minutes, according to the recipe, but this took closer to three hours in my kitchen, and resting the pot off the heat didn’t help redden them at all — I ended up with a dreamy finished product.
It isn’t a chunky jam nor a runny compote, and it’s not a firm-set fruit cheese more reminiscent of membrillo. The best way I can describe it is quince butter — despite the sugar added.
It’s lush, smooth, and stands up on a spoon in a way that’s reminiscent of my favorite long-cooked, no-sugar butters made with sweeter fruits. Spread it on a thick slice of toast with good cultured butter, drizzle it over drop biscuits with whipped cream or ice cream, or spoon an artful dollop onto your next cheese board.
While it might take a little effort to track down quince in your area, those of you in the northeast may still be able to track some down (I assume you may also have luck in California, though I’m not sure of the fruit’s season out there.) I’ve also seen specimens grown overseas at Asian markets here in Philly. But once you get your hands on some and get a taste , you’ll know if was worth it.
My four pounds of quince cooked down into six pints of supple, rosy butter over a few hours on low heat, but you should be able to halve (or double) this recipe without issue. I canned mine in a mix of half-pints and quarter-pints, perfect for gifting or bringing to a party — or hoarding all to yourself.
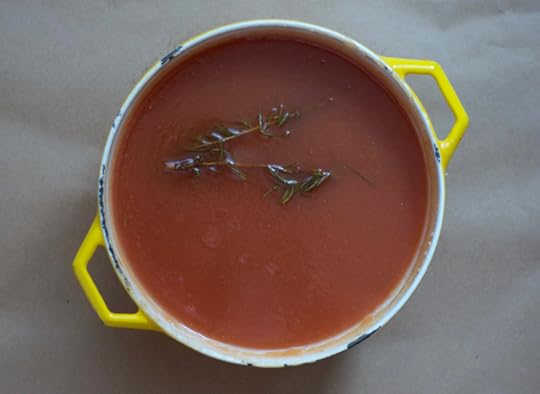
I also swapped out the spices in the original recipe with a few long sprigs of rosemary from my garden. I might add another the next time I make this, hopefully sooner than later.
Print
How to Make Quince Butter
Ingredients
4 pounds quince
7 cups sugar
2 large sprigs fresh rosemary
Water
Instructions
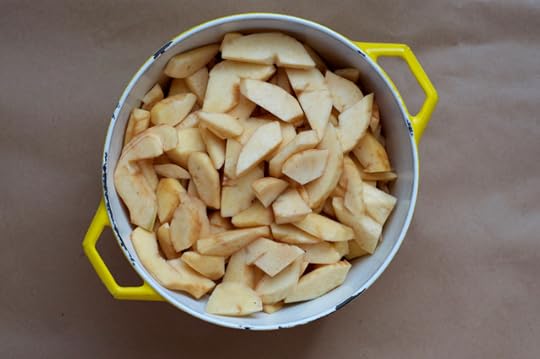
Wash and remove fuzz from the quinces. Peel, core, and slice them, reserving the cores and peels.
Place the cores and peels into the center a large square of cheesecloth, then tightly tie the corners together to create a secure bundle. Put the slices in a large, heavy-bottomed pot, add water to cover the slices, and then add the bundle of scraps. (With the bundle added, my batch barely fit into a 4-quart Dutch oven; I’d recommend using an 8-quart pot for a recipe this size.)
Bring the pot to a boil over high heat, then bring the heat down to low and cook gently, uncovered, until the quince slices are very tender.
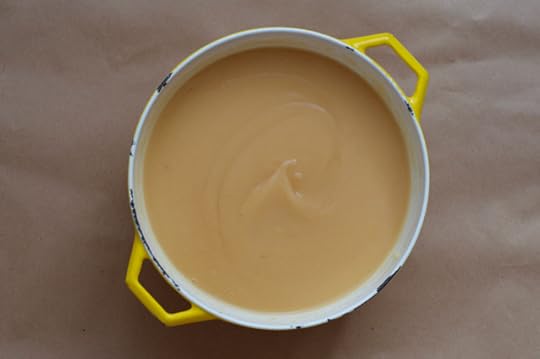
When the slices are falling-apart tender, remove and discard the bundle of scraps. Puree the quince and cooking water in the pot using an immersion blender until very smooth, with no lumps remaining. (If need be, you can do this in a few batches using a regular blender, then pour the puree back into the pot.)
Add the sugar and the rosemary to the pot and cook over low heat, stirring frequently, until the mixture turns a deep rosy pink and thickens to coat the back of a spoon. While you’re waiting, prepare a large water bath canner and enough half-pint or quarter-pint jars, bands, and lids for 6 pints of quince butter. For me, it took around 3 hours to get to the right stage; I removed the pot from the heat when the mixture was starting to firm up (not quite wrinkling when poked) when I did the plate test.
Ladle the quince butter into the hot jars, leaving ¼ inch headspace. Wipe rims, apply lids and rings, and process in a boiling water bath canner for 10 minutes. Allow the jars to cool undisturbed for 24 hours before checking seals, removing bands, labeling, and storing.
4.20
http://foodinjars.com/2017/11/make-quince-butter/
Related Posts:
Roasted Quince Butter with Warm Winter Spices
How to Brew Bracing Homemade Fire Cider
How to Create Homemade Honey Candy


November 17, 2017
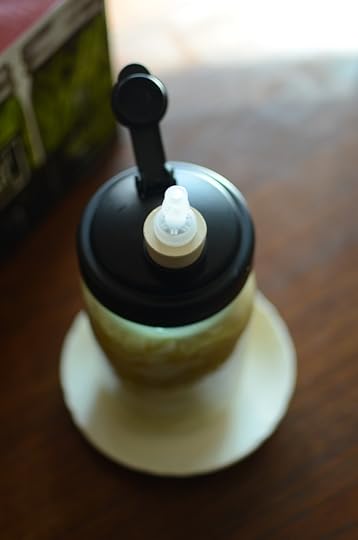
Giveaway: Fermentation Kit from Fillmore Container
This month in the Mastery Challenge, we’re focusing on fermentation. In honor of our topic and in celebration of their brand! new! website!, long-time FIJ partner Fillmore Container is sponsoring a ferment-focused giveaway here on the blog.
Before we dig into the details of the giveaway, let’s talk a little about the new Fillmore Container site. First of all, it’s faster, mobile-friendly (so important for those emergency jar orders!) and so much easier to navigate. They’ve improved shopping, ordering, and reordering experience and have lowered their shipping rates!
The Fillmore Container blog is also brand new and ready for visitors. There’s an easy-to-use navigation bar at the top that makes it simple to find the information you want. Seasonal content is featured at the top of the page and as you scroll down, you’ll see thumbnails and links from the eight most recent posts.

Now, on to the giveaway! This time, one lucky winner will receive…
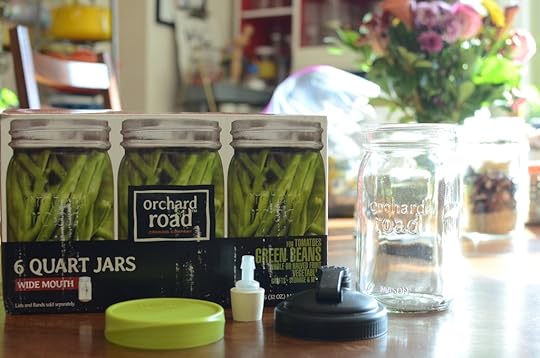
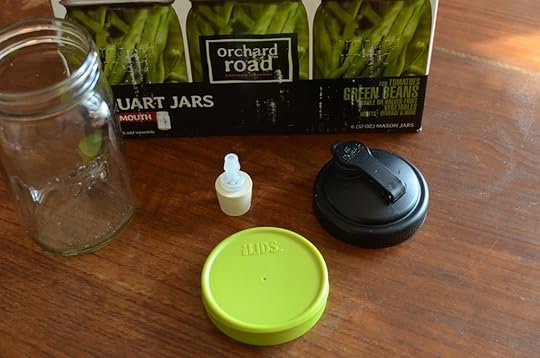
One box of wide mouth quart jars from Orchard Road (a wide mouth quart is my favorite vessel for small batch fermentation)
One reCAP wide mouth lid
One reCAP Fermenter (it fits into the spout of the reCAP lid)
One wide mouth iLid for stashing your finished ferment in the fridge
To enter the giveaway, use the widget below!
Disclosure: Fillmore Container is a Food in Jars sponsor and buys a monthly banner ad on this site. This giveaway is being offered as part of our partnership agreement. However, all thoughts and opinions expressed here are entirely mine.
And one more thing! Fillmore Container is also hosting a giveaway on their blog in conjunction with CanningCrafts over the same week that this giveaway will be live. Make sure to head over there and enter that as well!
Related Posts:
Giveaway: Anchor Hocking Jars from Fillmore Container
Giveaway: Pint & Half Jars from Fillmore Container
Giveaway: The Art of Aperitivo Set from reCAP Mason Jars
November 15, 2017
A Gravy Story in the Fall Issue of Edible Philly
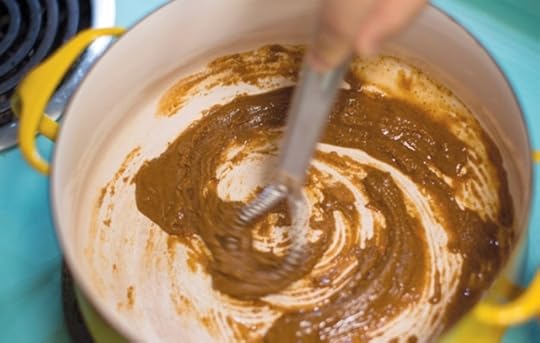
Photo by Courtney Apple for Edible Philly
Apart from the bird, the most important element on my family’s Thanksgiving table is the gravy. I learned the art of gravy making watching and working alongside my dad. His skill came from his mother in similar fashion. I’ve written tidbits about our particular obsession with turkey gravy in the past and this year, I brought the story together with the recipe for a piece in the fall issue of Edible Philly.
If you’ve been looking to improve your gravy situation, the recipe I shared in the article will help. It is scaled to make just a quart, but depending on how many guests you plan on serving (and how much leftover gravy you want to have), you can ramp up your production as is needed.
While we’re on the topic of Thanksgiving, if you’re in the market for cranberry options for the upcoming holiday, I have you covered.
Faux “Canned” Cranberry Sauce
Honey Maple Cranberry Sauce
Spiced Cranberry Jam
Pear Cranberry Jam
Low-sugar Pear Cranberry Jam
Apple Cranberry Jam
Apple Cranberry Compote
Pickled Cranberries
Finally, there’s a trio of sweet potato recipes I wrote for Table Matters five years back that are so good that they’re worth revisiting.
For those of you who are in the US, how’s your Thanksgiving planning going? What are the classics that you serve year after year? And are there any recipes you’re trying for the first time this year?
Related Posts:
Honey Maple Cranberry Sauce for Thanksgiving
My Imaginary 2016 Thanksgiving Menu
In Praise of Seconds + Other Good Things
November 10, 2017
Fermentation for the November Mastery Challenge
For the November Mastery Challenge, we’re digging into fermentation. This a huge topic and you can go a number of different directions. Kimchi, sauerkraut, hot sauce, yogurt, sourdough, apple cider vinegar, kombucha, ginger bugs, brined pickles, and anything else you can think of are fair game!
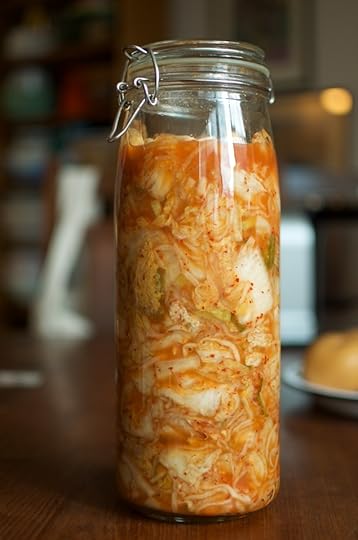
If you’ve never done any fermentation, I suggest sauerkraut as a good starting place. It’s an easy entry point and can be done with just a wide mouth quart jar, a 4 ounce jelly jar, a piece of clean kitchen towel, and a rubber band.
If you’re looking for a little more detail on sauerkraut making, make sure to watch the Facebook video I did recently. I also talk about various airlocks and fermentation helpers in the video.
As far as fermentation resources go, there is no better source than Phickle. Written by Amanda Feifer (who also wrote the excellent book Ferment Your Vegetables).
To have your project including in the tally and round-up for this month, please submit your finished project using this form by Thursday, November 30.
Related Posts:
Submit your October Mastery Challenge Here!
Dehydrating and Pressure Canning for the October Mastery Challenge
September Mastery Challenge Round-up: Fruit Butters
November 8, 2017
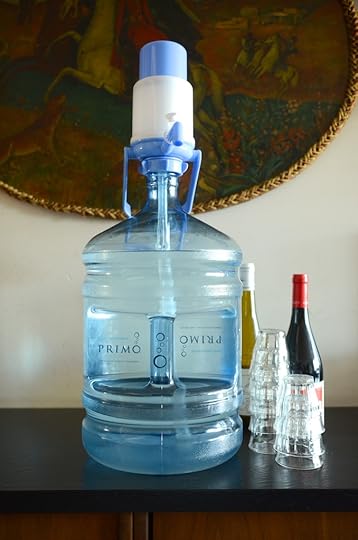
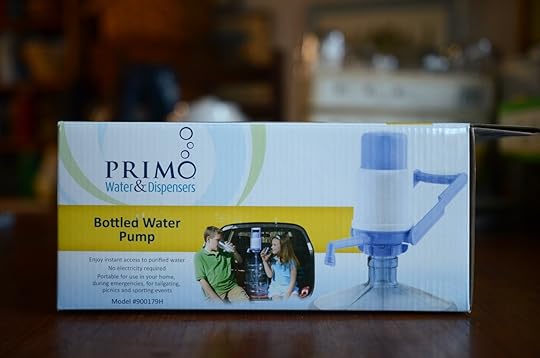
Giveaway: Primo Manual Water Pump + Water Coupons
This post is sponsored by Primo Water.
When I was in college, I boldly declared to my friends that I was never going to live in a city that didn’t have good tasting tap water (I believe that my thinking was that water flavor would be an indicator of the quality of the municipality). And then I proceeded to make my home in Philadelphia, a city with many fine qualities, but decidedly lackluster water.
Happily, I’ve learned that much like judging books by their covers, cities shouldn’t be judged by the flavor of their municipal water supply because there are a number of relatively easy fixes. In my case, my easy fixes for water flavor are an in-sink water filter and the occasional purchase of a jug of Primo Water.
When I first considered Primo Water, I thought that it wasn’t actually an option for me because I didn’t have the space to dedicate to one of their dispensers (though I do love the looks of their Ceramic Water Dispenser). However, then I spotted the Manual Water Pump and realized that this was the perfect solution to my space limitations.
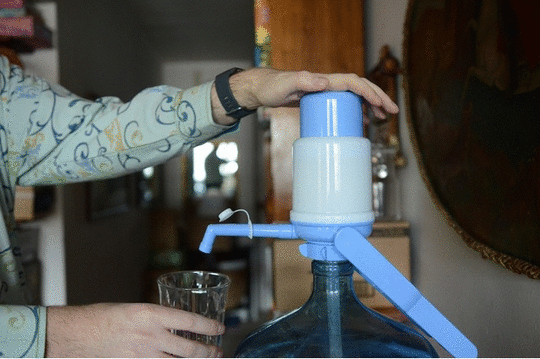
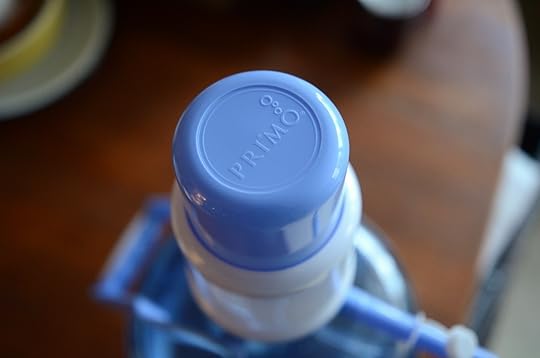
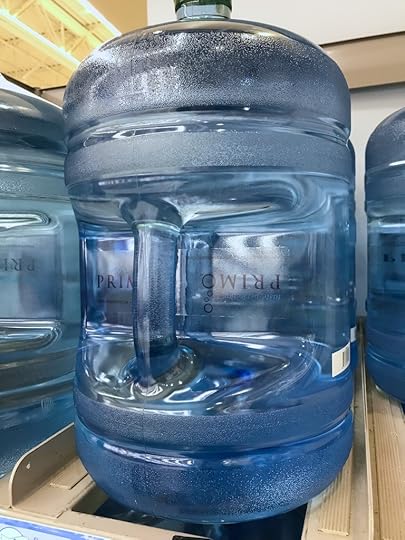
The manual pump allows me to buy a bottle of water when I need one for canning workshops, picnics, and parties without having to commit space to a larger dispenser. The plastic bottles (they come in either 3 or 5 gallon sizes) hold plenty of water for my events and when they’re empty, can be refilled or returned (with tons of locations, there’s bound to be one near you). Best of all, the water always tastes great.

The water goes through a careful, multi-step filtering process that leaves you with water that you’re excited to drink, use, and share. Another thing to note is how Primo Water can serve as the perfect blank slate for homemade syrups and pickling brines. It’s a really good option if you find that your tap water is giving your preserves a funky flavor.
As we head into the holiday entertaining season, instead of picking up a case of individually bottled water for your guests (so much disposable plastic!), consider a refillable/reusable bottle of Primo Water, a manual pump, and a stack of dishwasher safe glasses. It’s an easy way to ensure that everyone has access to plenty of tasty, clean water, no monitoring and refilling necessary. When the party is over, return the bottle and tuck the pump away until the next event!

Thanks to the good folks at Primo Water, I have five of these manual pumps to give away this week. Each winner will also receive 2 coupons 5 gallon jugs of water. Please use the widget below to enter.
Disclosure: This is a sponsored giveaway. Primo Water sent me the pump you see pictured here, as well as a pair of coupons to cover the cost of the water. They also compensated me for my time and attention. However, alll thoughts and opinions expressed here are entirely my own.
Related Posts:
Giveaway: Raw Rutes Yaozu 2 Liter Fermenting Crock
Giveaway: Bake Your Bundt Off with MightyNest
Plum Cardamom Jam and a Anolon Advanced 11-Piece Cookware Set Giveaway [sponsored]
November 6, 2017
How to Brew Bracing Homemade Fire Cider
Regular Food in Jars contributor Alexandra Jones is dropping in today with a recipe for homemade fire cider. This invigorating tonic is said to help boost your immune system and keep you healthy throughout the winter cold and flu season! -Marisa
Where I am in Philadelphia, the leaves are changing, the air is getting cooler after a warm start to fall, and root crops are ready to harvest.
That means it’s time to start a batch of homemade fire cider.
This spicy, bracing infusion has been used for centuries as a way to preserve herbs and vegetables that also have medicinal value. Whipping up a big batch at the end of the growing season means that you’ve got a tasty tonic to sip on or use in recipes like sauces, marinades, and salad dressings.
I first tried making this recipe years ago, when I was a CSA manager tasked with finding with a handful of new and interesting recipes to include with each share of vegetables. One week, we included horseradish in the boxes, and I came upon the now familiar recipe.
I loved the ritual, the acidic flavor, and the kick — a powerful whoosh of horseradish, garlic, and onion straight to the nose. I’m not sure whether it was thanks to the homemade fire cider or something else, but I didn’t get sick that winter.
Fire cider has been used for centuries, but it wasn’t called that until the 1970s, when herbalist Rosemary Gladstar coined the name. Herbal practitioners and crunchy folks everywhere recommend taking doses throughout the day when you first feel a winter cold or flu coming on, or you can take a spoonful each morning to help stave off those pesky infections before they start.
And in recent years, it’s even become mainstream — so much so that one company tried to trademark the term, much to the chagrin of the herbal community. This is sort of like trademarking the idea of pizza, or jam — especially because one key characteristic of fire cider is that it doesn’t have a set recipe.
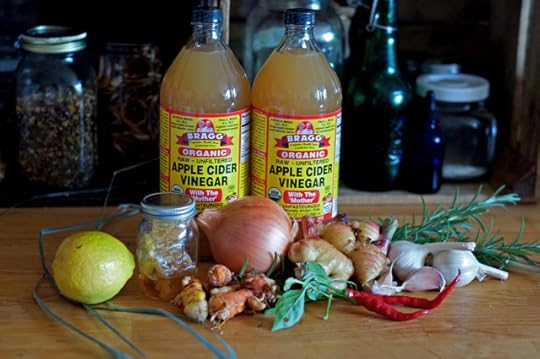
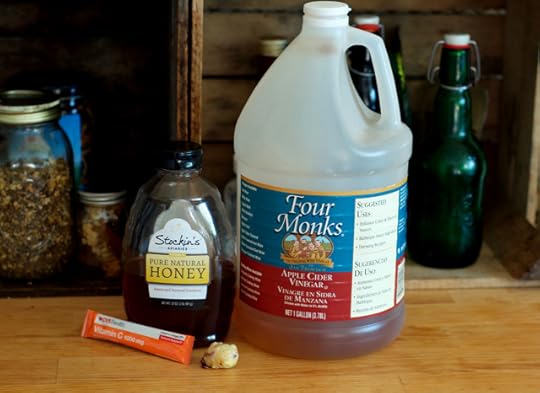
In fact, you’ll notice that horseradish — a staple of every fire cider recipe I’ve seen — isn’t in the photo of my batch. That’s because I couldn’t find a single root. I was too early for the farmers in my area, and none of the larger stores, even Whole Foods and Wegman’s, had it in stock when I looked.
Since I had fresh young ginger and turmeric on hand, I decided to go ahead and make my annual batch of fire cider anyway. If I can get ahold of some horseradish root in the next few weeks, I’ll simply chop it up and add to the infusion then, maybe giving the mix a little extra time to infuse. No big deal!
The tonic is typically a combination of hot peppers, alliums and roots like garlic, onion, horseradish, turmeric, and ginger, plus citrus, herbs, and spices, infused into apple cider vinegar. Chop up the veggies and herbs and mix with the vinegar, then stash the recipe in a dark place for at least a month.
Strain, add honey, bottle, and take as needed — Rosemary Gladstar’s recommendation is a few tablespoons at the first symptoms of a cold, then another dose every few hours until you’re feeling better. Or take a tablespoon or so each day as a winter tonic.
That’s the basic template, but the variations are endless. Rosemary and black pepper are considered standard, but echinacea root, lemongrass, and thyme can also be added for extra immune-boosting power. Or throw some tulsi (a.k.a. holy basil, one of my favorite herbs for cooking and for medicine) into the mix to help you handle wintertime stress, too.
Take a look at the recipe below for this year’s version here in my kitchen. Have you made or tried fire cider before? Do you use any immune-boosting foods or herbal remedies to keep yourself feeling good through winter? Let us know in the comments!
Print
How to Make Fire Cider
Yield: 1 quart
Ingredients
1 quart raw apple cider vinegar (Bragg's is a good brand)
1 yellow onion
2 bulbs garlic
1 organic lemon, sliced
A few inches each fresh young turmeric root and fresh young ginger root OR 1 tablespoon dried powdered turmeric and 2 tablespoons dried ginger (you can also use mature fresh turmeric and ginger root, just peel before chopping)
2 sprigs fresh rosemary OR 2 tablespoons dried rosemary
2-3 cayenne peppers, a few jalapenos, or 1 habanero pepper, chopped OR 1/2 teaspoon cayenne powder
1 tablespoon whole black peppercorns
1/4 cup honey (optional)
Optional additions:
1 sliced orange, a few inches of chopped horseradish root, a few teaspoons fresh or dried thyme, lemongrass, parsley, echinacea root, or tulsi
Instructions
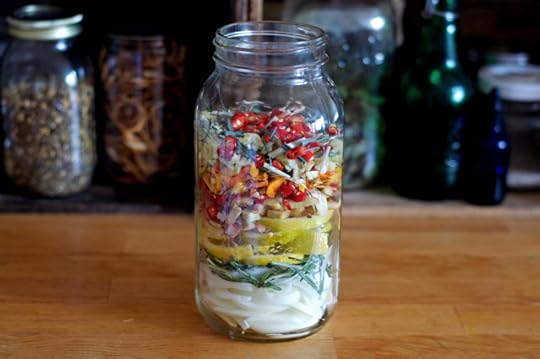
Peel and chop the onion and garlic. Chop the other vegetables, roots, and herbs, taking care to wear gloves when handling fresh turmeric (it will stain surfaces, including hands) and hot peppers.
Add the chopped vegetables to a half-gallon jar (you can also roughly halve this recipe and make it in a quart jar; you'll end up with about a pint of fire cider). Add the spices to the jar.
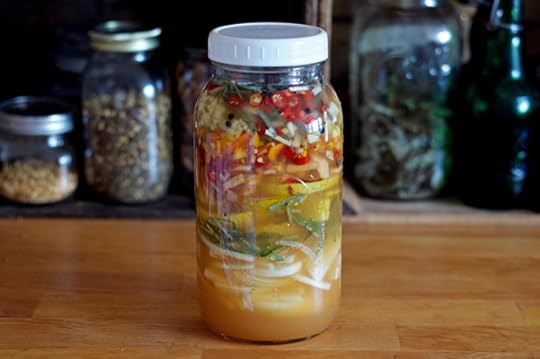
Add apple cider vinegar until the jar is full. Cover with a plastic or glass lid, or place a piece of parchment paper or wax paper between the top of the jar and a metal lid before sealing so the vinegar doesn't corrode the metal.
Label with the date and store in a cool, dark place for 1 month. After 1 month, strain the mixture, pressing the vegetables well to capture all the infused vinegar. Add honey to taste if desired, then shake or stir well to mix. Bottle and store in the refrigerator.
Take a spoonful or so each day as a winter tonic, or take 1-2 tablespoons when you first feel cold symptoms, then another dose every 3-4 hours until symptoms subside.
4.14
http://foodinjars.com/2017/11/homemade-fire-cider/
Related Posts:
Hot Pepper Hoagie Relish
How to Create Homemade Honey Candy
Roasted Seedless Grape Jam
November 1, 2017
November Sponsors: Cuppow, Fillmore Container, EcoJarz, Mason Jar Lifestyle, CanningCrafts, and Mrs. Wages
Happy November, dear readers! It’s the start of the month, which means it’s time to thank the businesses that help make this site possible. Please do show them that you appreciation their support with your time and attention!
In the top are our friends at Cuppow. They are the creators of the original mason jar travel mug topper and the BNTO, a small plastic cup that transforms a canning jar into a snack or lunch box. Right now, you can get five of the wide mouth lids for just $40. They also have a few signed copies of my second book, Preserving by the Pint, should you want to give one to a friend or family member for the holidays!
Lancaster, PA-based and family-owned Fillmore Container are next! They sell all manner of canning jars, lids, and other preservation gear. As always, their blog is an amazing resource for all things jar-related. And stayed tuned, as I have a fabulous fermentation-themed giveaway from them coming up next month.
Our friends over at EcoJarz are on board again this month. They make an array of products designed to fit on top of mason jars, including cheese graters, coffee brewers, and stainless steel storage lids. They have a ton of giveaways, specials and sales coming your way this month, including a blow-out Black Friday sale, so keep your eyes peeled.
Mason Jar Lifestyle is a one-stop shopping site for all the jar lovers out there. They sell all manner of mason jar accessories and adaptors. If you’re in the market for lids, straws, sprouting lids, and cozies to transform your mason jars into travel mugs, make sure to check them out. Their cork jar stoppers continue to be one of my all-time favorite jar accessories.
Next up is CanningCrafts. Shop owner Alison sells an array of ready made and custom mason jar labels for all your various preserves, syrups, and backyard honey. As you plan ahead for holiday gift giving, make sure to check out all of fabulous CanningCrafts Christmas and holiday-themed labels.
Our friends at Mrs. Wages are on the roster again this month. They make pectin, vinegar, and more canning mixes than I can count. Their website is an incredible preserving resource and I can’t say enough good things about their salsa mix.
And if your company, shop, or family business is interested in reaching the food-loving and engaged Food in Jars audience, you can find more details here. Leave a comment on this post or drop me a note to learn more!
Related Posts:
October Sponsors: Cuppow, Fillmore Container, EcoJarz, Mason Jar Lifestyle, CanningCrafts, and Mrs. Wages
September Sponsors: Cuppow, Fillmore Container, EcoJarz, Mason Jar Lifestyle, CanningCrafts, and Mrs. Wages
July Sponsors: Cuppow, Fillmore Container, EcoJarz, Mason Jar Lifestyle, CanningCrafts, and Mrs. Wages
October 31, 2017
Giveaway: How to Instant Pot
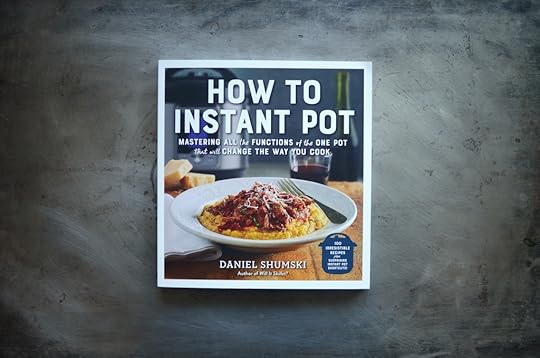
I bought my Instant Pot in the summer of 2016 and it quickly became one of my favorite appliances. It had the power to turn out flawless batches of beans, braises, stocks, and batches of rice and didn’t need to be tended the way that a stove top pressure cooker did.
However, I often found myself wishing that the IP had come with a really great manual that would unlock more of its secrets. Sadly, as any IP user knows, its accompanying instruction booklet leaves a great deal to be desired.
Happily, Daniel Shumski, author of Will It Waffle and Will It Skillet, has leaped into the void that the IP manufacturers left and has written a book that I believe will become the defacto user’s guide to this valuable little appliance. It’s called How to Instant Pot and has already vastly expanded my Instant Pot horizons.

The book opens with a chapter designed to demystify the machine itself. You’ll discover what all the buttons do (I’ll confess that up until the moment I opened this book, I had only ever ventured to used the yogurt, manual, and cancel buttons), how to set it up, the best ways to clean the devise, and even how to convert your favorite recipes to use the IP.
From there, the book is broken down by devise functions. Instant Pots are designed to pressure cook, slow cook, make rice, make yogurt, and steam. Dan addresses each one of those functions, teaches you how to use that setting, and then serves up a bevy of tasty recipes that utilize that IP feature. (He even makes blueberry jam in the IP, using the slow cook setting. I will definitely be trying that.)

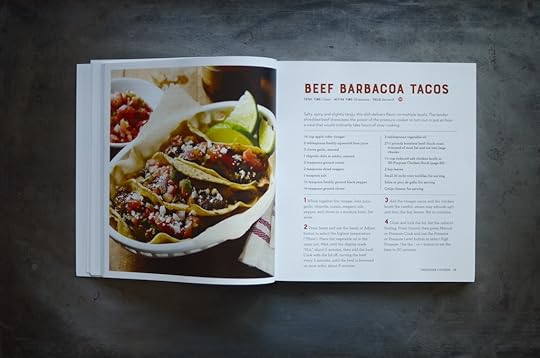
From the Fragrant Lamb and Chickpea Stew (page 47) to the Parmesan Bread Pudding with Bacon and Broccoli (page 190), there is so much in this book that I want to try. It has opened up a world of IP possibilities and I can’t wait to dig in.
Thanks to Dan and Workman Publishing, I have a copy of this handy book to give away this week. Use the widget below to enter!
Disclosure: Workman Publishing provided the copy you see pictured here and the copy I’m giving away, both at no cost to me. No additional compensation was provided. All thoughts and opinions expressed are entirely my own.
Related Posts:
Giveaway: Will It Skillet by Daniel Shumski
Cookbooks: Will It Waffle + Giveaway
Links: Ramps, Rhubarb, and Winners
October 27, 2017
How to Create Homemade Honey Candy
Happy Friday! Our regular contributor Alex Jones is dropping in with a recipe for homemade honey candy. These are perfect for soothing a sore throat or any time you need a virtuous sweet treat. If you’re in the Philly area, there’s also an opportunity to learn to make these candies in person this Sunday. Details at the bottom of the post! -Marisa
Since I don’t have kids and I live in a multi-unit building that’s not conducive to trick-or-treating, I don’t typically think of Halloween as a time to stockpile candy. (Wait till the day after when it’s on sale — that’s the real trick).
But this time of year is when I start thinking about preparing for winter — making fire cider, stockpiling local root veggies that will last me through the end of the year, planting garlic.
And thanks to a fellow member of my Philly food community, I have a recipe to share with you that’s great for this time of year, whether you’re looking to make some naturally sweet candies or prepare for winter cold season.
I first met Ailbhe Pascal — known as Al — while I was at the farmers’ market, where they were looking for mushrooms and cheese to add to the sourdough breads they make and sell through Fikira Bakery.
Since then, I’ve had the pleasure of enjoying their work — delicious, sustainably sourced foods made and shared with radical justice in mind — as a Fikira bread share member, at the PHL Assembled Kitchen, an offshoot of the Philadelphia Museum of Art’s current exhibit made by and for Philadelphia’s most resilient communities, and through supporting projects like Fikira’s Thanksgiving fundraiser benefitting the Ramapoo Lenape tribe’s Split Rock camp in New Jersey, which has been fighting to stop pipeline construction on their indigenous land.
When Al offered me a taste of honey candy they had made and told me it required just two ingredients, I knew I wanted to share it with the Food In Jars community. The candy tasted like honey, of course, but a little more complex and darker, with a hint of acid to balance out the sweetness.
At my request, Al generously agreed to share this special recipe. These honey candies make a tasty, simple, naturally sweet treat — or, as I do, you can make them to use as a portable, tasty throat soother for winter colds.
To make these candies, you just need two ingredients: honey and an acidic liquid, like apple cider vinegar, lemon juice, or orange juice. You can also swap out the honey for maple syrup to create a vegan (and equally delicious) candy.
You can add in grated or ground ginger for the flavor and a medicinal oomph, but other flavors like lavender, citrus, or rosemary would make delicious combinations, too. It also helps to have something sweet and powdery — like confectioner’s sugar or vitamin C powder like Emergen-C — to toss the candies in before you wrap them to keep them from sticking to the paper.
While the ingredient list is short, the technique — cooking the honey mixture to the softball stage (for a taffylike texture) or hard-crack stage (for hard candy) — can be a little tricky. The most important thing is to keep an eye on the mixture, stir it frequently as detailed in the recipe below, and use an instant-read or candy thermometer, if you have one, to check progress.
If you don’t have a thermometer handy, you can still use visual cues and tests: watch for when the mixture can’t be stirred down, when it coats the back of the spoon, and when a small spoonful dropped into a cup of ice water forms into a ball.

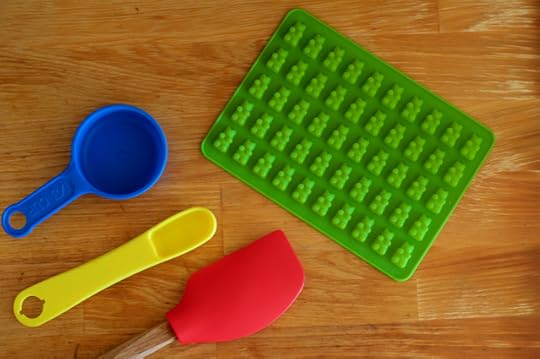
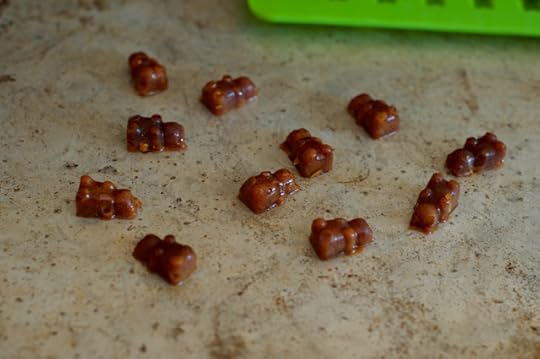
Once the honey mixture is ready, carefully spoon it into silicon candy molds or ice cube trays. I used gummi bear molds, since that’s what I had on hand, but other shapes and sizes will work too. When I unmolded them after about an hour of cooling, they kept their shape perfectly, with a hard, slightly taffylike texture. As you unmold, be sure to pick off (and snack on) the stray edges on the shapes.
Next, simply toss your candies in a little powdered sugar, or, if you’re going the medicinal route, vitamin C powder. Then wrap in candy foil or (my choice) little twists of wax paper, taffy style. In the end, the flavor was not unlike that of a ginger chew, backed by a pleasantly complex, not-too-sweet honey caramel flavor — a tasty treat or a throat soother, depending on what you need in the moment.
One important note: If you’ve got any kind of honeybee population nearby, keep your windows closed while you make this recipe! They will want to pay you a visit while the honey is bubbling away on your stove.
The day I made these candies in my kitchen was warm, and I had the windows open with screens in. After 10 minutes or so of cooking, I noticed a bee that had come in through a tear in the window screen. And then I noticed a half dozen or so of its friends, crawling the windows looking for a way in.
While I completely understand their excitement and appreciate their presence — my neighbor down the block keeps a few hives — I got a little concerned that the whole swarm was on the way looking for candy, so I turned on some fans and turned off the stove. (This is why the finished product is just slightly darker than I’d like — I was shooing bees when I should have been checking the pot!)
If you’re in the Philly area this weekend and would like to meet Al and learn this recipe in person, they’ll be offering a sliding-scale workshop at Franny Lou’s Porch this Sunday, October 29th.
Print
Fikira Honey Candy (courtesy of Ailbhe Pascal)
Ingredients
1/2 cup honey or maple syrup
3 tablespoons lemon juice, orange juice, apple cider vinegar, or another acidic liquid of your choice
Grated fresh or powdered dried ginger to taste (optional)
1 packet powdered sugar or vitamin C powder (optional)
Instructions
Whisk honey with lemon juice in a medium saucepan off-heat until thinned into a syrup. Add ginger (powdered or grated) if desired.
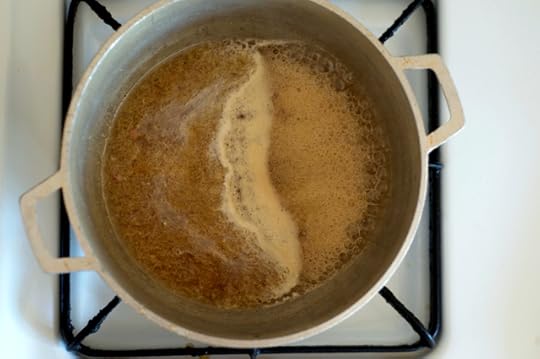
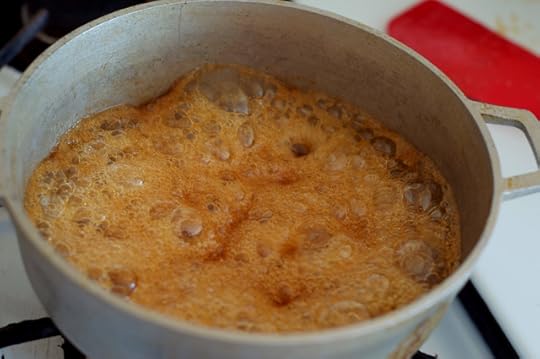
Turn stove on to medium-high heat and casually stir with spatula. As foam appears around the edges, turn heat off, stirring until foam is incorporated. You’ll see the clear, viscous honey become creamy and opaque.
Repeat step 2 until the honey visibly thickens. It’ll become darker and harder to stir. If you have a candy thermometer, watch for the “hard-crack point” or 300º F. (You can also stop cooking the honey at around 250º to get a taffy-like candy.)
You’ll know you’ve reached the hard-crack stage when the honey can’t help but bubble up, it coats the back of a spoon, and/or it hardens into a ball when dropped into ice water. Honey burns easily, so take care to check temperature/spoon coat/ice water test often.
Pour candied honey into silicone molds and leave to cool for about 1 hour.
Carefully press mold cavities from the bottom to release candy.
To keep honey candies from being too sticky, drop them from the mold into either a bowl of powdered sugar or powdered Vitamin C and cover them liberally before wrapping.
Put candies in wax paper or candy foils and twist shut to store.
4.14
http://foodinjars.com/2017/10/how-to-create-homemade-honey-candy/
Related Posts:
Red Currants, Dry Canning, and Family Traditions
Hot Pepper Hoagie Relish
Roasted Seedless Grape Jam
October 25, 2017
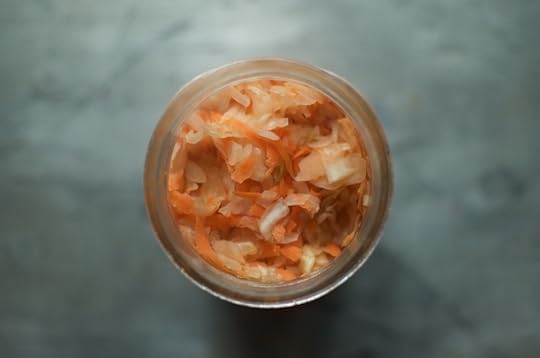
Red Cabbage Apple Ginger Kraut Recipe
An approachable, easy going sauerkraut, this red cabbage apple ginger kraut fits the bill for anyone in the market for a mellow, delicious ferment.
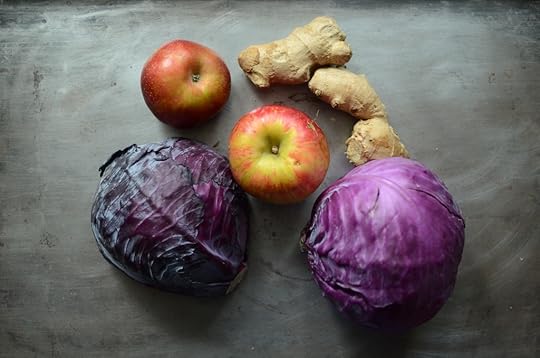
I spent a goodly amount of time pondering what I’d make in my Yaozu 2L Fermenting Crock for its maiden voyage. First I considered a basic batch of kraut (but I already have multiple jars that I’m working through). I thought about kimchi (but again, there’s a surplus in the fridge). Eventually, I settled on the combination of red cabbage, apples, and ginger.
At least three days out of seven, I eat some kraut for breakfast. And while I enjoy spicy, garlicky, pungent cabbage with my eggs, sometimes I’d like a slightly gentler ferment to have alongside a piece of toast or some oats. This bright pink red cabbage apple ginger concoction, made just a little bit sweet with the apples, seemed like it would fit the bill.

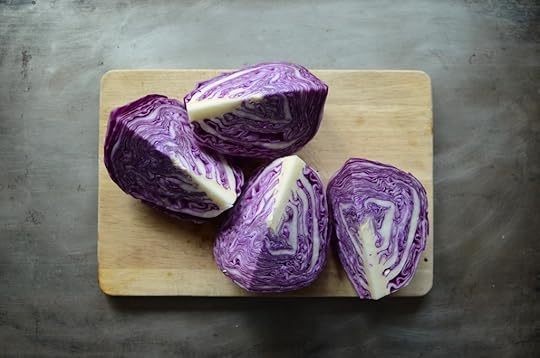
This is an incredibly quick kraut to prep, particularly if you have a food processor to help with the slicing. I fitted my wide mouth Magimix with the slicing blade and ran the cabbage through in less than a minute. I swapped in the shredding blade and made quick work of the apples and ginger.
Once all the produce was prepped and in my biggest mixing bowl, I added 2 1/2 tablespoons of salt, mixed it in well and let the whole thing sit for about half an hour. If I wanted to get the cabbage into the crock more quickly, I could have worked and kneaded it to speed things along, but I had the time and so let it wilt under the influence of the salt.
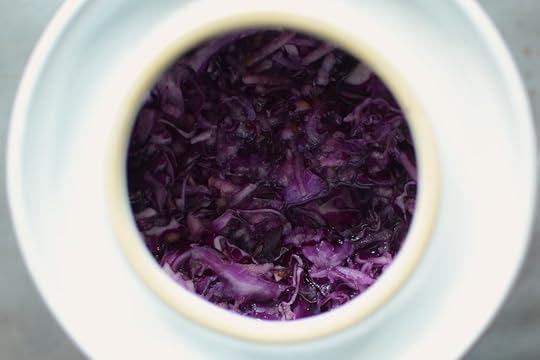
Half an hour later, the cabbage had released a whole bunch of liquid and was ready to go into the crock (which I’d washed earlier in warm, soapy water). When it was all in the crock, I tucked a couple of large leaves in on top of the shreds, and used the weights to keep things tamped down. Then I filled up the water channel about half way, set the lid on, and put the whole thing on a plate in case there was any leakage.
It’s been bubbling on my dining room table (since it’s a ceramic crock, there’s no worry about sunlight). I’ve already snuck a taste and even young and half-fermented, and it’s delicious. Perfect for eating alongside breakfast.
If you haven’t done so already, make sure to enter the Yaozu 2L Fermenting Crock giveaway I’m hosting!
Print
Red Cabbage, Apple, and Ginger Kraut
Ingredients
3 1/2 pounds red cabbage, shredded
1 pounds apples, shredded
4 ounces peeled ginger, shredded
2 1/2 tablespoons kosher salt
Instructions
Combine the cabbage, apples, ginger, and salt in a large bowl and rub them together until you have a goodly amount of liquid in the bowl. Or let them sit until soft and liquidy.
Pack the wilted veg into a crock (or a wide mouth jar if you don't have a crock) a handful at a time (press each layer down firmly. If you push it all in at once, you won't get it all in).
Once you have all the veg into the jar, weigh it down with pickling weights.
Set the crock/jar on a plate. Cover it and place it somewhere that's out of direct sunlight.
Check the kraut every couple of days and push it back down if it expands.
When it tastes tangy and good, it's done! Put it into the fridge and enjoy.
4.14
http://foodinjars.com/2017/10/red-cabbage-apple-ginger-kraut/
Related Posts:
Giveaway: Raw Rutes Yaozu 2 Liter Fermenting Crock
Mastery Challenge February Round-up: Salt Preserving
Quart Jar Cabbage and Carrot Kraut


