
Marisa McClellan's Blog, page 42
May 19, 2017
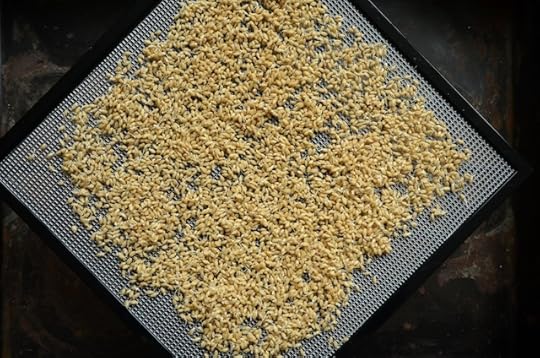
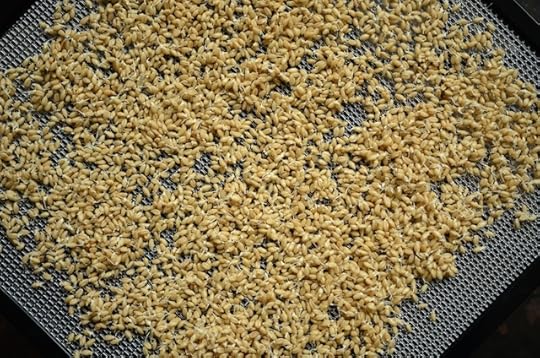
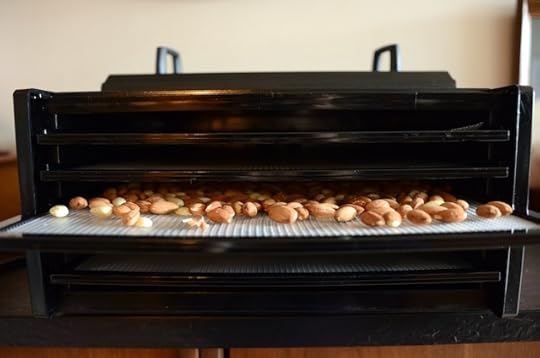
Sprouted Wheat Berries in Excalibur 5-Tray Dehydrator

Some months back now, my friend Audra spread the word that she was ordering bulk grains and other dry goods from her favorite organic suppler. Her hope was to spread the word about this very good way to get high quality food and to get the total weight of the order high enough to qualify for discounted shipping.
I took her up on the call and ordered 25 pounds of hard winter wheat berries. My goal was to improve my bread baking habit with the addition of sprouted and freshly ground flour. Of course, when I committed to 25 pounds of wheat berries, I’d never sprouted or ground my own flour before. But I had enthusiasm, a vast array of cookbooks, and all the internet at my disposal. What could go wrong?
The truthful answer is that actually, there’s not a whole lot that can go wrong, but as is the case with many new things, I did have a few missteps. The first time I tried to sprout a batch of wheat berries, I left them in the soaking water too long and they developed a funky smell, akin to stinky feet.
And I’ve also learned that I really need to get a few of these non-stick sheets to prevent the wheat berries from falling off the dehydrator trays as they dry and shrink a little. Both are relatively low prices to pay in pursuit of greater knowledge and understanding!
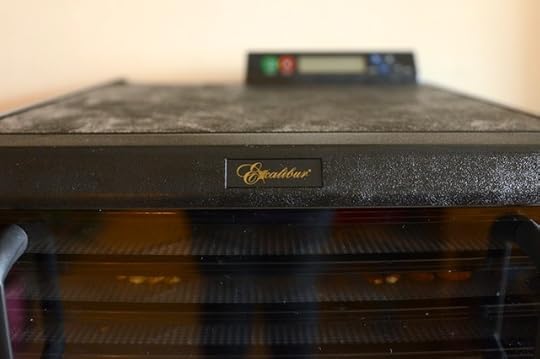
I’ve been using my new, fancy 5-tray Excalibur to dehydrate the berries once they’ve been soaked and sprouted and that part couldn’t be easier. I love that I can set both the time and temperature so precisely. I run it at 112F to preserve the enzymatic activity of the wheat (a useful thing if you’re working with a sourdough starter), so appreciate how easy it is to dial in that exact temperature.
Now, you might be wondering why I’d take the time to soak, sprout, and dehydrate my wheat before grinding it into flour. The primary reason is that it helps make it easier to digest. Secondarily, I find that it grinds more readily (which is good, since I’m using the KitchenAid Grain Mill, and the unsprouted grain made the motor work really hard).
If you find yourself intrigued by the idea of homemade sprouted wheat flour, here’s how you do it.
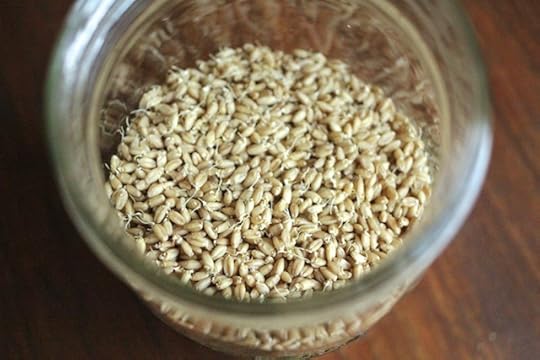
Measure out a pound of wheat berries and put them into a bowl or jar with some clearance. Cover them with water, making sure that they’re submerged by a couple of inches. Let them soak for 8-12 hours (overnight is good).
Drain the wheat berries and return them to the bowl or jar. Rinse and drain 2-3 times a day.
After 2-3 days of rinsing and draining, you should notice that the wheat berries are beginning to sprout (look for little white shoots). At this point, they are ready to dehydrate.
Arrange the sprouted wheat berries on several dehydrator trays. Dehydrate for 12-24 hours, until the berries are completely dry.
Grind into flour in a grain mill or a Vitamix dry container. Use as you would any other flour.
Related Posts:
Sprouted Almonds in an Excalibur 5-Tray Dehydrator
Marinated Dehydrated Tomatoes
Preserving Ramps and Dehydrator Thoughts


May 18, 2017
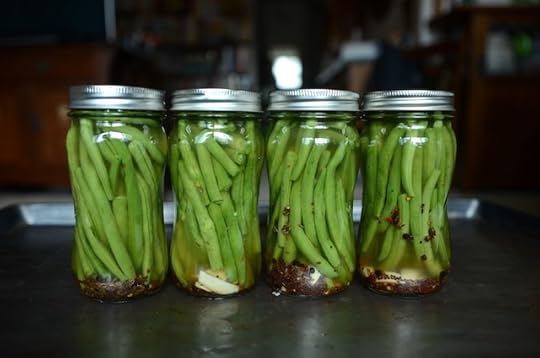
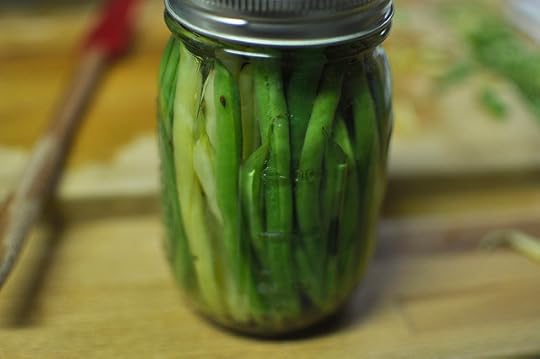
Spicy Pickled Green Beans
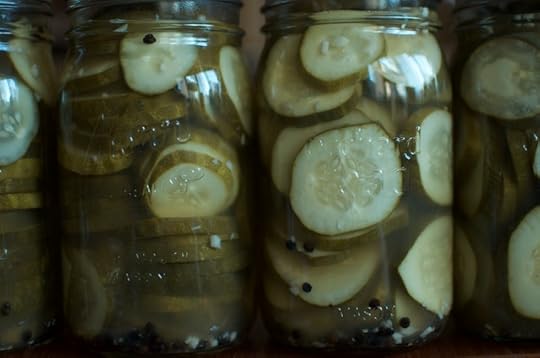
Flex your cold pack preserving skills with a batch of Spicy Pickled Green Beans. They’re good along side a sandwich and even better pressed into stirring service in a Bloody Mary.
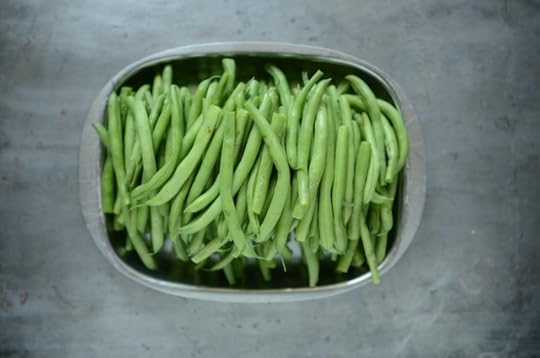
We’re focusing on cold pack preserving this month in the Mastery Challenge and one of my favorite examples of the form is the pickled green bean. I make a lot of these during the summer months when beans are abundant, both because I love them and because they make a really good thing to give to pickle loving friends and family. They also retain their crunch beautifully, which is not something I can say for most processed cucumber pickles.
Pickled green beans are also something of an affordably luxury to my mind. When you make them yourself they’re quite cheap, but they can be outrageously expensive at farmers markets and small grocery stores (you don’t often see them in larger supermarkets). I love when a little time and effort can yield something that feels special.
Green beans are not quite in season yet, so don’t judge the quality of the beans you see before you. I’m sure that the finished pickles will still taste good, but they can be downright sublime when you use those perfect, downy beans available only in high summer.
I typically make them assembly line style, doling out spices and garlic cloves (the more you slice, the more garlic flavor you get) to the jars and then going down the line with beans. Holding the jar at an angle as you pack makes quick work of the initial fill and a wooden chopstick helps ease the way for the last few beans. It’s also an excellent tool for wiggling out air bubbles that get trapped deep in the jar.
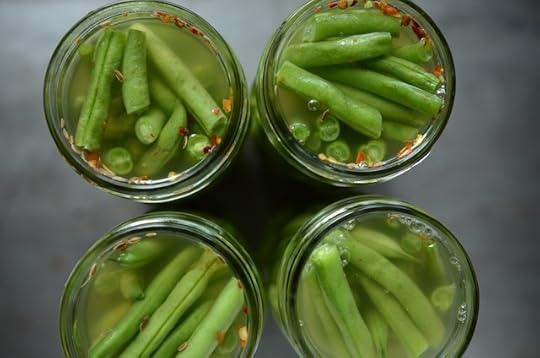
Once the jars have spices and green beans, it’s time to fill them up with brine. Apple cider is my vinegar of choice for most things, though some prefer white or red wine vinegar in its place. Any vinegar is fine as long as it has 5% acidity. The spices can also be adjusted to suit. For this batch, I called on brown mustard seeds, dill seed, black peppercorns, red chili flakes for heat, and slivered garlic. Sometimes I make them with cayenne, which tints the brine a pleasing red and makes for bracing eating.
These pickles need just a quick trip through the canner (10 minutes for pints and 15 minutes for anything larger). They often lose a little brine during their bath, but it’s not typically enough to cause distress.
Oh, and just a note on the jars. I used the new pint-sized spiral jars that Ball Canning released this year. I thought they would be awesome for pickles because they’re slightly taller than your average pint. However, I found that their narrow middle was absolutely incensing when it came to thoroughly packing the jars. If you have some of these, use them for your jams, sauces and chutneys and save yourself the annoyance.
PrintSpicy Pickled Green Beans
Ingredients
2 pounds green beans2 cups apple cider vinegar
2 cups water
2 tablespoons pickling salt
12-16 garlic cloves, peeled and sliced
4 teaspoons dill seed, divided
4 teaspoons red chili flakes
3 teaspoons brown mustard seeds
2 teaspoons black peppercorns
Instructions
Prepare a boiling water bath canner and 4 pint jars.Wash and trim your beans so that they fit in your jar and leave about half an inch of headspace.
Combine vinegar, water, and salt in a medium saucepan and bring to a boil.
Divide the garlic clove slivers, dill seed, red chili flake, mustard seeds, and peppercorns evenly between the four jars.
Pack the beans into the jars over the spices.
Pour the boiling brine over the beans, leaving approximately 1/4 inch headspace.
Gently tap the jars on the counter to loosen any trapped air bubbles. For stubborn air pockets, use a chopstick to wiggle them free.
Wipe rims, apply lids and rings, and process in a boiling water bath canner for 10 minutes.
When the time is up, remove the jars and set them on a folded kitchen towel to cool. When the jars have cooled enough that you can comfortably handle them, check the seals.
Sealed jars can be stored at room temperature for up to a year. Any unsealed jars should be refrigerated and used promptly. 3.1http://foodinjars.com/2017/05/spicy-pickled-green-beans/
Related Posts:
Mastery Challenge: Rhubarb Pickles
Cold Pack Canning for the May Mastery Challenge
April Mastery Challenge Round-Up: Quick Pickles
May 16, 2017
Giveaway: Will It Skillet by Daniel Shumski
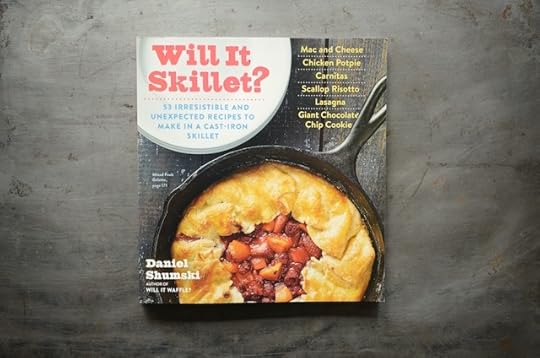
My grandma Bunny was devoted to her cast iron skillets. They sat in a graduated stack on her stovetop, always ready to be pressed into service. She kept them seasoned through regular use and claimed that nothing was better for restoring their glossy black finish than cooking up a batch of bacon.
Bunny’s collection of cast iron remains in her hillside California home, where my aunt, uncle, and cousins now live. I’ve had to amass my own heap of skillets, and have done so through thrifting, eBay (my beloved square skillet, used almost exclusively for eggs), Kickstarter, and inheritance.
Despite having a hearty collection, I confess that I rarely do anything truly exciting with my skillets. However, thanks to Dan Shumski’s new book, Will It Skillet, that all changes now. He’s got me seeing my cast iron skillet as the ideal vessel for so much more than just eggs, bacon, burgers, flat broiled chicken, and the world’s most perfectly burnished roasted potato cubes.
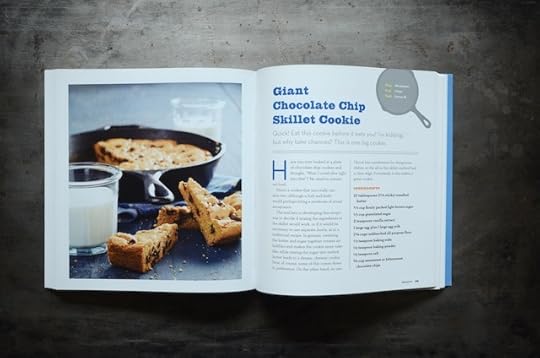
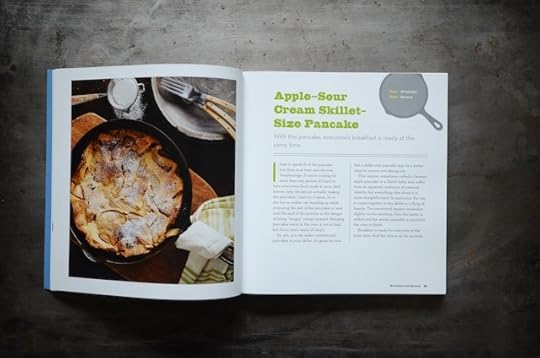
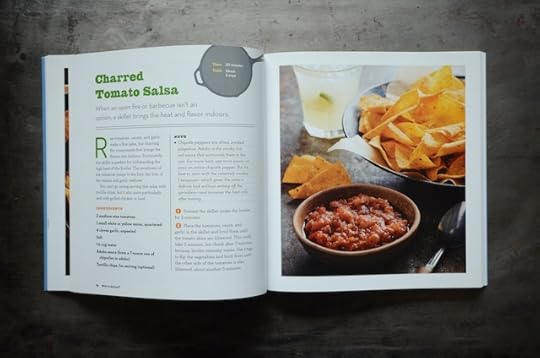
There is so much in this book that speaks to me, but here are a few that are on my immediate wish list. Giant Cinnamon Bun (page 37). Spinach and Feta Dip (page 64). Mac and Cheese – you make the whole thing in the skillet! (page 106). Giant Chocolate Chip Skillet Cookie (page 153). Are you hungry yet?
I have one copy of this tasty book to give away this week and we’re doing it the old fashioned way (I know that there are those among you who hate Rafflecopter).
Leave a comment on this post and tell me about your favorite thing to make in a cast iron skillet.
Comments will close at 12 noon eastern time on Sunday, May 21, 2017. A winner will be chosen at random and will be posted to the blog later that day.
Giveaway open to all. Void where prohibited.
One comment per person, please. Entries must be left via the comment form on the blog at the bottom of this post.
Disclosure: Workman Press sent me two copies of this book at no cost to me. One was for review and photography purposes and the other was to give away.
Related Posts:
Giveaway: Broth & Stock from the Nourished Kitchen
Giveaway: Whiskey by Michael Dietsch
Giveaway: Foolproof Preserving from America’s Test Kitchen
May 11, 2017
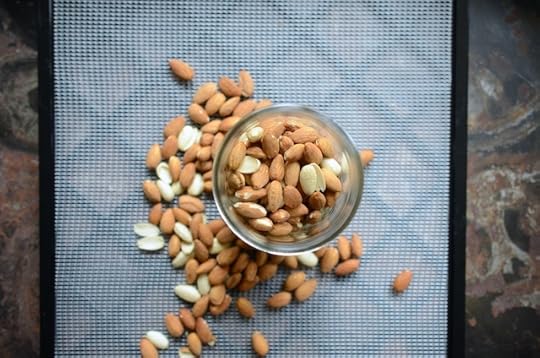
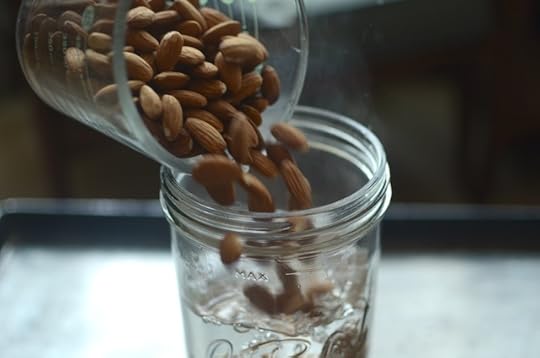
Sprouted Almonds in an Excalibur 5-Tray Dehydrator
Dehydration has long been one of the tools in my food preservation toolbox. I like to dehydrate herbs and ramp leaves, make tasty marinated and dried tomatoes, and put up some of my precious Meyer lemons by drying slices for future rehydration.

Recently, my dehydration game improved by several notches. The folks at Excalibur sent me one of their 5-tray dehydrators. It’s a huge step up from the stackable models I’ve used for so long. I’m totally delighted by it and have spent the last few weeks drying all the things.
It’s got five large trays that slide in and out (meaning no more working around a central column!) and that add up to a total of eight square feet in drying space. It has a digital control panel that allows me to set both the precise temperature (between 95◦F to 165◦F) and the duration of the drying session. And it’s relatively quiet (as far as dehydrators go, at least).
Truly, the only issue I have with it is that it’s kind of a beast in terms of its footprint. I don’t mind that, but it does mean that I’ve had to start running it in my living room, because it doesn’t fit comfortably in my kitchen. However, it’s a trade-off I’m very happy to make.
One of the first things I made with my fancy new Excalibur was a batch of sprouted almonds. I first tasted such a thing six years ago when I was staying with my sister in Texas and we were waiting for her first baby to be born. We were doing laundry at her friend’s house and while we waiting, she headed for their pantry and brought out a jar of almonds.
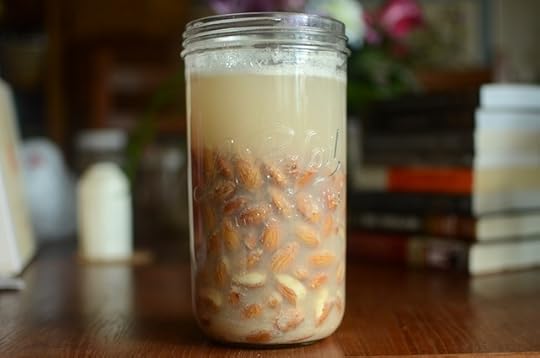
Different from almonds I’d eaten, these were crunchy and hollow on the inside. Raina explained that they were sprouted (and were wickedly expensive at their local co-op). I hurried to put the jar away before we ate all of them and filed the idea away to try and make them myself someday.
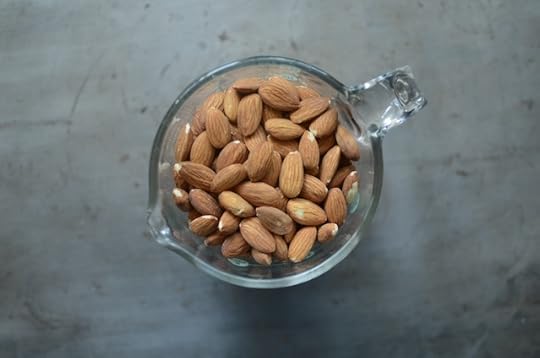
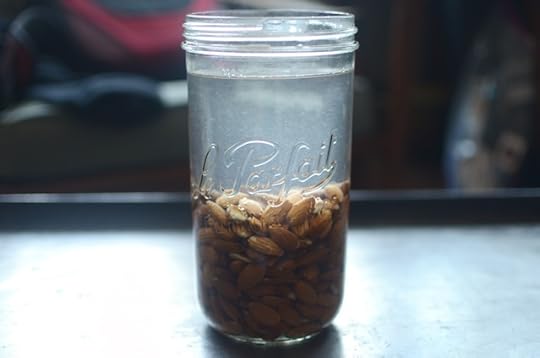
Fast forward six years and they’re a regular homemade favorite. They’re not hard to make (and truly, can be done even if you don’t have an dehydrator. But they’re better and easier this way because you can set them up and forget them for most of a day) and are so very delicious. You start by combining one tablespoon of salt with four cups of warm water and letting the salt dissolve.
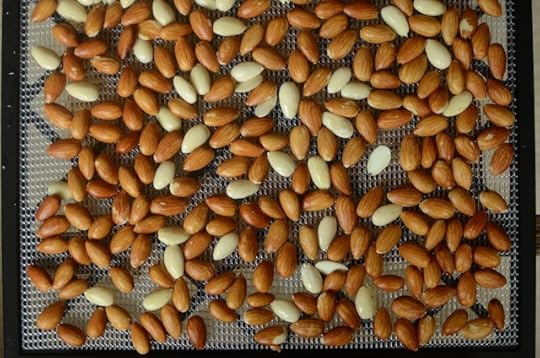
Then you add two cups of raw almonds and let them soak overnight (don’t let them soak more than about 12 hours. After that, they start to ferment and get a little sour). The next day, you drain the almonds and arrange them on a dehydrator tray. Then you set it to 150◦F and let them do for 12-24 hours, until the almonds are completely dry. Once they’re dry, you funnel them into a jar and snack away.
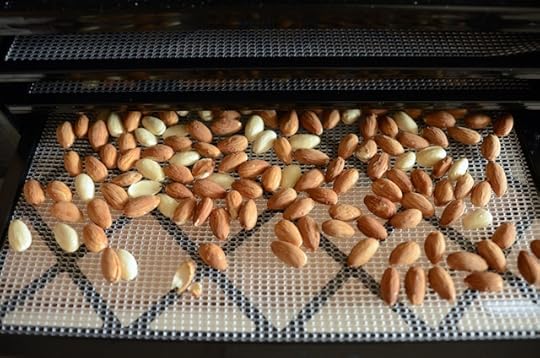
Now, soaking and dehydrating almonds does also have the added benefit of making the almonds more nutritious and easily digested. But my primary motivation is the fact that it makes them so delicious.

Next week, I’m going to show you guys how I soak, sprout, dehydrate, and grind wheatberries into flour! But for now, I’d love to hear about your dehydrating experiences! Do you have one? What’s your favorite thing to make in it?
Related Posts:
Preserving Ramps and Dehydrator Thoughts
May 10, 2017
Mastery Challenge: Rhubarb Pickles

When I see the first harvests of rhubarb hitting farmers’ market tables among still-puny bunches of kale and last season’s root crops, I feel a surge of hope: spring is really, actually happening.
I also think of my maternal grandmother, an almost-nun turned feminist firebrand and mother of 11 who kept a huge vegetable garden — including a big patch of rhubarb — at her house in Quebec when I was a kid. Granny is the reason I turn my nose up at strawberry-rhubarb anything: her lip-puckering, sweet-tart treatment of the ingredient served straight up in pie, cobbler, and roly-poly became my standard and favorite for fruity baked goods.
As an adult, I’ve tried to do more with rhubarb than dessert, but no recipe I’ve come across that didn’t involve sweet, buttery dough has ever really seemed like it would be worth the trouble to try. So when this month’s Mastery Challenge came around during rhubarb season, I decided to give it the cold-pack pickle treatment.
Cold-pack preserving — popping produce into your prepared jar and adding hot brine, juice, water, or syrup before sealing and processing — is some of the simplest, most versatile preserving one can do. Pickles and whole or cut fruit have endless uses in the kitchen, and many types of fruits and vegetables can be preserved this way. Why had I never tasted a rhubarb pickle before? I set out to try making my own.

While I own several preserving cookbooks, my first impulse when looking for a new recipe is to search what’s out there online. Lo and behold, a 2012 Serious Eats recipe from our fearless Food in Jars leader Marisa was the top result.
With a trusted source recipe and a pound of crisp, ruby-red stalks in hand, I considered my options. I decided these pickles would look (and taste) steller alongside some crumbly raw milk blue and lush, savory Brie on a springtime cheese board.
Having recently worked a veggie-centric cooking gig that gave my knife skills lots of practice, I pictured an angular, artsy arrangement bias-cut rhubarb sticks alongside the cheeses in my mind’s eye. I decided to cut the rhubarb into long sticks, similar to Marisa’s in her original post but with a long, saucy diagonal on the end. And to show the pickles off, I chose one of my favorite jars, a long and lean straight-sided 12-ounce, in which to pack them.

So I set about following the recipe — sticking to it closely, in fact, since this was my first time making it and I wanted to try the original before going crazy with variations. I knew the method by heart, of course, and these pickles came together super quickly.
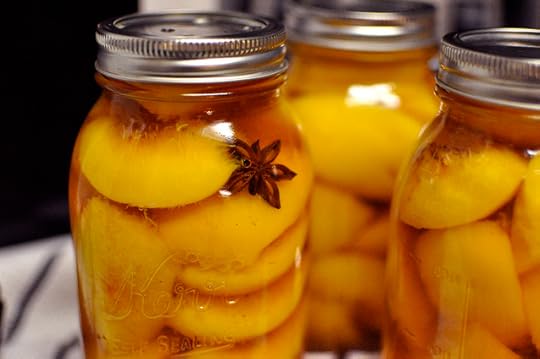
After letting them sit for a few days to cure, I tasted the final product. What I ended up with was sweet and tart, just like good rhubarb should be, with a pleasant amount of spice from mustard, clove, black pepper, and star anise. While the texture is decidedly not crispy, the pieces keep their shape when you spear them with a fork but are soft and almost spreadable, perfect for eating on a crispy rice cracker with a smear of pungent, creamy artisan cheese.

What I didn’t love was the way the pickles looked in the jar — which inspired one of those maddening “Why didn’t I think about this earlier?” moments. The beautiful angled ends of my rhubarb made it through the processing step just fine. But they hovered a few inches above the bottom of the jar and looked, well, a little silly to me.
Luckily, these pickles were for personal consumption, not special occasion gifts or wedding favors or anything, so no big deal. But this experience did underscore for me how important it is to pull back and consider everything you know about a technique like pickling before plowing ahead with a recipe like it’s second nature. A good reminder to give oneself early in preserving season!

Of course I know that jars with shoulders are better at keeping pieces of fruit or vegetable in place. Of course I know that a smaller cut of rhubarb with a less steep angle (or perhaps a whimsical roll cut) may have stayed in place a little more easily. I was just so confident that I didn’t think about it. Even in Marisa’s photos from her original recipe, the long, straight stalks of rhubarb are floating slightly above the bottom of the jar (hers were simply longer than mine, with straight ends, so it’s way less obvious).
Next spring, I’ll remake this same pickle, cut into long, straight sticks or smaller segments, and maybe even packed into jars with shoulders to keep the contents ready for gifting or glamour shots. For now, I’ll just have to enjoy my pickled rhubarb for how good it tastes.
How are your cold pack projects going so far? Are you experimenting with any new produce, jar styles, or cuts? Let us know in the comments!
PrintRhubarb Pickles
Ingredients
1 pound rhubarb1 cup water
1 cup apple cider vinegar
1 cup sugar
1/2 teaspoon fine sea salt
2 teaspoons mustard seeds
1/2 teaspoon whole cloves
1/2 teaspoon whole black peppercorns
3 star anise
Instructions
Wash and prepare three 12-ounce jars. Prepare a boiling water bath canner and fresh lids and set it on the heat to boil.Trim leaves and ends from rhubarb, then cut into sticks about 1/2 inch shorter than the height of your jar. Leave ends straight or give them a slightly angled bias cut.
Combine water, vinegar, sugar, and salt in a small, non-reactive saucepan and bring to a boil.
Distribute spices evenly between jars. Pack rhubarb sticks into jars. The tips of the sticks should come to about 1/2 inch below the top of the jars.
When the brine is boiling, remove it from the heat and carefully ladle the hot brine into the jars, leaving 1/2 inch headspace. Wipe rims, seal with prepared lids and rings until fingertip-tight.
Place jars gently into the canner, allow the water in the canner to come back to a boil, and then process for 10 minutes.
Remove jars to a folded dish towel on the counter and allow to cool undisturbed for several hours.
Allow the pickles to cure for at least 48 hours before eating.3.1http://foodinjars.com/2017/05/mastery-challenge-rhubarb-pickles/
Related Posts:
How to Make Homemade Grassfed Ghee
Pantry Management: Get Yours in Shape for the Upcoming Season
Mastery Challenge: Sour Cherry Elderflower Jelly, Made Two Ways
Canning Demo at Haddon Township Library on Thursday, May 11
Attention South Jersey friends and readers! I am going to be doing a small batch jam demo on Thursday, May 11 from 6:30-8 pm at the William G. Rohrer Memorial Library (Haddon Township Branch of the Camden County Library System). I’ll be making honey-sweetened strawberry jam, answering questions, and selling/signing books.
This is my final event in May (I think I mentioned that I’m not doing as many classes and events this year as I have in the past), so if you’re in the region and want to get your canning season started off right, please do come out to Haddon Township to ask me questions, taste some jam, and pick up a book! Walk-ins are welcome, but if you know you’re going to come, please do sign up here (mostly so they know how many chairs to set up).
Hope to see some of you there!
Related Posts:
Check the recipe index for more tasty preserves!
May 9, 2017
Giveaway: A Year of Picnics by Ashley English

When I turned ten, my mom’s best friend Maria gave me a wicker picnic basket. Inside, it was stocked with sturdy, reusable plastic cups, plates, and utensils. I was completely thrilled and spent the next couple days packing and unpacking those wicker walls.

So powerful was the pull of the basket that I even made temporary peace with my sister (it took us growing up and living in different places to finally become friends) so that she would accompany me on trips to the neighborhood playground, where I’d plate up peanut butter and jelly sandwiches in order to make best use of my picnic gear.
While I’m not quite as enamored of picnics as I was in 1989, I still believe that there’s no better way to make an ordinary day special than to pack up lunch or dinner and take it to the park (and when there’s something to celebrate, an outdoor gathering is my favorite way to make merry).
Thanks to Ashley English‘s gorgeous new book, A Year of Picnics, I am once again filled with picnic inspiration (in the past, Ashley’s books have also motivated me to bake pies, blend my own tisanes, and gather up friends for seasonal celebrations).

Organized by season, this book makes an excellent case for the concept that dining well and beautifully in the outdoors is possible all year round. During spring and summer, some of the picnics Ashley suggests include those for breakfast, while seated near the water, and for a movie night gathering.
Some of the fall and winter picnics are those to celebrate the falling leaves, for tailgating, and for when perched on a rooftop. Each picnic includes suggestions for choosing your picnic site and activities appropriate for all ages, as well as tidbits tailored specifically to theme.
You’ll also find between three and five recipes for each picnic. I’m particularly looking forward to trying the Cardamom, Rose Water, and Berry Coffee Cake (page 24), the Moroccan Apple Salad (page 93) and the Mason Jar Apple Cardamom Crumbles (page 187).

For those of you hoping to be inspired to pack a picnic, I’ve got two copies of this book to give away. This giveaway is open to everyone (though it is void if giveaways are prohibited where you live). Please use the widget below to enter.
PS – As you enter the giveaway, please do take a moment to send Ashley and her family good thoughts. She recently gave pre-mature birth to a sweet but tiny baby named Alistair. Everyone seems to be healing and growing, but well wishes are never unwelcome. May they all picnic as a family together soon!
Disclosure: Roost Books sent me three copies of this book for review and giveaway purposes. No additional funds were provided and all opinions expressed here are entirely my own.
Related Posts:
Giveaway: Quench by Ashley English
Giveaway: Ashley English’s Homemade Living Series
Cookbooks: A Year of Pies
May 5, 2017
Instant Pot Pulled Chicken Tacos + Goya Foods
This post is sponsored by Goya Foods. Celebrate Cinco de Mayo with authentic Mexican flavor!
While I readily acknowledge the problematic nature of Cinco de Mayo as it is celebrated around these parts, I also admit to the reality that I am a human who is entirely steeped in U.S. culture. That means that while I am wary of stereotyping and cultural appropriation, come the beginning of May, I begin to crave tacos, spicy salsas, and fresh corn tortillas. It’s weirdly Pavlovian.
Recently, the nice folks at Goya asked me if they could sent me a box of ingredients, in the hopes that I might create my own festive Cinco de Mayo meal. Never one to turn down a challenge, I was happy to play along (though painful conscious of the opportunities to be offensive).
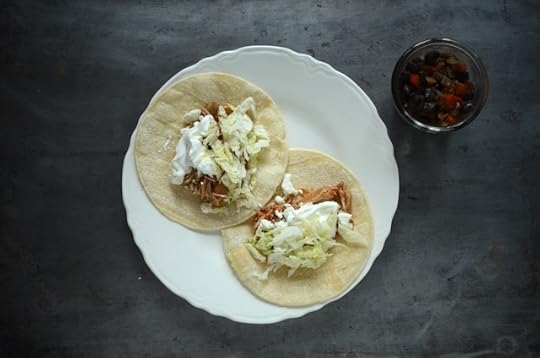
After a bit of mulling, I decided that the best thing I could do would be to show you my favorite pulled chicken taco trick and let you determine how and when to serve it. Because truly, this chicken is easy, everyday food that is hugely flexible and quite delicious (on any day of the year).
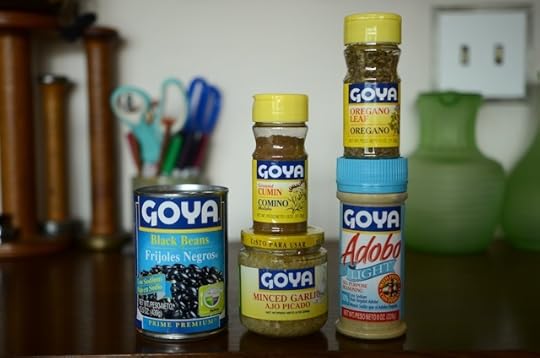
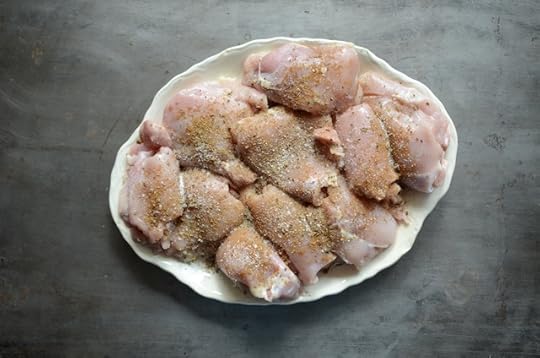
You start with about three pounds of boneless skinless chicken thighs. Because my mother taught me to be compulsively thorough about such things, I like to spend a little time cutting away pockets of fat (this step isn’t entirely necessary, but makes me feel better). Then I season the meat on both sides with salt, pepper, ground cumin, and dried oregano (opening the bottle of cumin from Goya made me realize that the jar on my shelf needs to be thrown out. Theirs was so much more flavorful!).
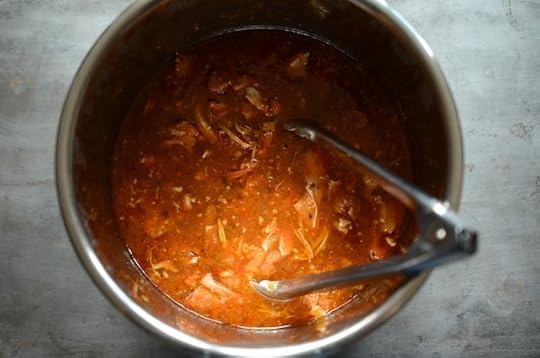
Once the meat is seasoned, I heap it into the Instant Pot. Then I pour two pints of homemade salsa* and a generous tablespoon of crushed garlic into the blender and puree until mostly smooth. The salsa slurry goes into the pot and the lid goes on. I run the Instant Pot on manual for 30 minutes.
If you don’t have an Instant Pot, you can also do this in a stove top pressure cooker for 25-30 minutes, in a regular sauce pan for a couple of hours, or in a slow cooker for 5-6 hours.
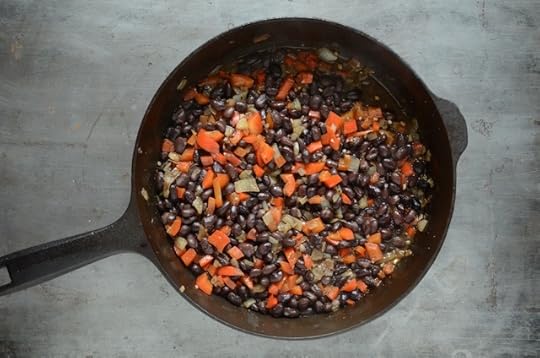
While the chicken cooks, I dice an onion and a red pepper and cook them until tender. Once they’re sweet and have lost their crunch, I add a can of black beans (love the easy pull tabs on the Goya cans. I weirdly hate can openers, so these cans spare me that annoyance) and season it with salt, pepper, garlic, cumin, and a little lime juice.
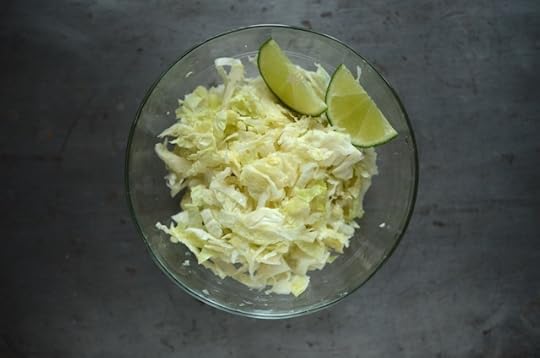
I also shred a little cabbage and toss it with salt, lime juice, and olive oil for a little taco crunch.
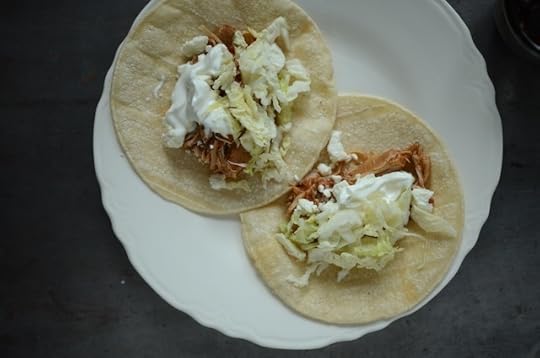
When the chicken is done, it’s time to assemble the tacos. Toast a couple corn tortillas until warm and pliable. Using a pair of tongs, squeeze a portion of the pulled chicken until you think it won’t saturate your tortilla with juices and lay it down. Top it with a few crumbles of cojita cheese, a dollop of sour cream, and some of the shredded cabbage (a slice of avocado and some fresh cilantro would be good, but I didn’t have any).
Serve with a side of the beans (or heap those into their own tortillas).
Oh, and if you have leftover pulled chicken, try using in a enchilada casserole or thin the cooking liquid out and turn it into tortilla soup. It’s also good stirred into a pot of homemade chili.
*You can also use store bought salsa. You just want to have between 28-32 ounces of liquid go into the pot. I’ve also done with peach salsa to delicious effect. Truly, it’s hard to go wrong with boneless skinless chicken thighs!
Related Posts:
IMUSA Kitchen Tools for Cinco de Mayo
May 4, 2017
Cold Pack Canning for the May Mastery Challenge
It is the start of May, and that means it’s time to tackle a new food preservation skill. This month, we’re turning our focus to cold pack preserving.
What is a cold pack?
Also known as raw pack, to cold pack something simply means something that it put into jars while cold and uncooked. If you’ve made dilly beans or garlic dill pickle spears, you’ve already tried your hand at a cold pack. Other things that get cold packed a lot are peaches, pears, and tomatoes that are peeled but uncooked, pickled vegetables where you’re trying to retain their crunch, and much of what goes into a pressure canner.
Why cold pack?
The primary reason to choose this style of preservation is to retain texture. When fruits and vegetables go into the jars raw, they don’t spend as much time in contact with heat, which means that they don’t cook as much. That leads to a crisper, firmer texture.
The secondary appeal of the cold pack is speed. Food gets peeled, pared, packed into the jars, topped with either water, brine, fruit juice, syrup, and goes into the canning pot.
What are the downsides?
There is often some likelihood of liquid loss. Raw produce often contains tiny pockets of air. As the produce cooks while undergoing the canning process, some of that air is released into the jar. That air then heads for top of the jar in order to escape the container (physics at work!). But because it often has to travel the length of the jar, it often pushes liquid out with it in its rush to escape the vessel. It’s frustrating but entirely normal.
Product shrinkage. You worked so hard to squeeze as many peach halves into the jar as possible, but now having taken the jars out of the canner, you see that what had been a tightly packed jar now has two inches of liquid at the bottom. The fruit has reduced in mass and is floating up towards the lid. It’s not dangerous and as long as the lids are tightly sealed, the fruit is safe to eat. They’re just not as pretty for displaying on your kitchen shelves.
Surface discoloration. When you have some liquid loss and product shrinkage, you will often also see some surface discoloration occur over time. This typically manifests as a generalized darkening of the product that is un-submerged or that is in contact with the empty portion of the jar. It’s not dangerous, but that darkened portion does lose flavor more rapidly than the balance of the jar. If I find a jar in this state, I scrape, trim or otherwise discard the darkened portion before tucking in.
The goal for this month is…
Simply to get to know the cold pack technique and figure out where it functions best. We’ll be exploring hot packing in July (which I think of as the other side of the jar packing coin), so hopefully you’ll start to see how the two styles work together and can serve in equal measure.
Recipes
Here are a handful of recipes from this site’s archives that use this technique.
Pickled Pearl Onions
Garlic Dill Cucumber Pickles
Dilly Beans
Pickled Asparagus Spears
Unfancy Pickled Jalapeno Peppers
Pickled Green Tomatoes
Plums in Honey
Whole Peeled Tomatoes
And here are some options from elsewhere.
Orange and Grapefruit Sections
Raw Pack Whole Berries
Pickled Okra (one of the best ways to eat okra, as far as I’m concerned)
Pickled Garlic Scapes
Pickled Brussels Sprout Halves
Pickled Seckel Pears (you could also use this same technique with asian pear quarters)
Pickled Chinese Long Beans
Finally, use this challenge as a chance to read through a preserving cookbook or two. You’ll find cold pack preservation at play in any number of different recipes, so do a little exploring!
The deadline for this challenge is Tuesday, May 30. Submission link coming soon!
Related Posts:
Quick Pickles for the April Mastery Challenge
Raspberry Meyer Lemon Shrub
How to Submit Your Salt Preserve for the February #fijchallenge
May 2, 2017
April Mastery Challenge Round-Up: Quick Pickles
A post shared by Christina (@icewerks) on Apr 28, 2017 at 12:12pm PDT
April is over and so it’s a wrap for our quick pickle challenge! This month, 202 people submitted their projects and lots more joined the conversation in the Facebook group and on Instagram. As always, it was so much fun for me to see everyone trying new recipes and finding ways to create interesting flavor combinations.
As is so often the case in these monthly challenges, there was a huge amount of space to move and explore within the confines of the topic. And while it appears that the most popular things to quick pickle were cucumber, cauliflower, eggs, and red onions, you guys managed to pickle more than 30 different fruits, vegetables, and protein (primarily chicken and quail eggs).
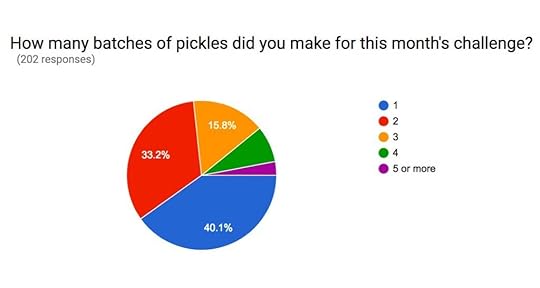
As you can see in the image above, a little less than half of you made just one batch of pickles. The remainder of you let the challenge inspire you throughout the month and you made many more batches. It’s a lot of quick pickles and I couldn’t be more pleased!
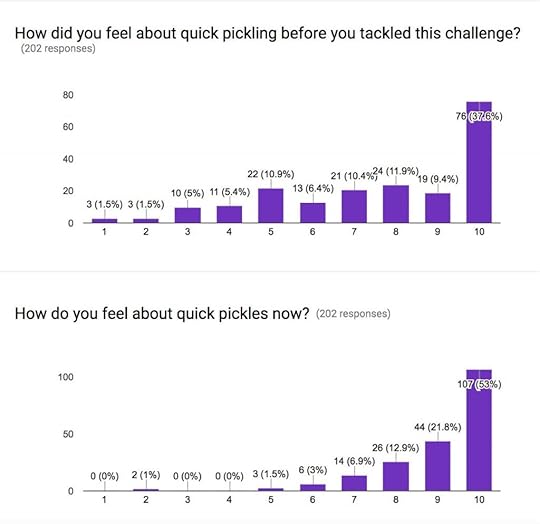
This pair of images tells us that while many of you were already feeling quite friendly towards quick pickling, even more participants are happy with the way their projects turned out.
A post shared by Marisa McClellan (@foodinjars) on Apr 7, 2017 at 4:47pm PDT
Alliums
Pickled Red Onions – Merry Meeting Menus
Quick Pickled Red Onions – First Things First
Quickly Pickled Onions – Les Campagnonades
Quick Pickled Garlic – Southern with a Twist
Quick Pickled Ramps – jencooksvt
Quick Pickled Red and Cocktail Onions – Jeanne-Marie Hagan
Quick Pickled Red Onions – Candace
Quick Pickled Red Onion – Southern with a Twist
Pickled Red Onions – Cathy Samko
Quick Pickled Red Onion Slivers – Hungry, Hungry, Happy
Mexican Quick Pickled Red Onions – mignyc
Taco Topper Pickled Red Onions – southern fried yankees
Quick Pickled Red Onions (in a pretty Weck jar!) – Hannah Sanford
Pickled Pearl Cocktail Onions – Will Graves
A post shared by Jen Carr (@jadcarr) on Apr 15, 2017 at 7:33pm PDT
Brassicas
Pickled Cauliflower, Two Ways – My Bit of Earth
Quick Pickled Broccoli – Cooking with Mary and Friends
Pickled Red Cabbage – Hip Roof Barn
Broccoli and Carrots – Lauren Penney
Red Cabbage Quick Pickled Salad – The Pit Stop BBQ
Cloud Pickles – Jen Carr
Cucurbits
Quick Cucumber Pickles – Cookin Mum’s Culinary Adventures
Zucchini Bread and Butter Pickle Chips – My Imperfect Kitchen
Overnight Refrigerator Pickles – One Hungry Mama
Quick Pickled Cucumbers – Love & Wild Honey
Quick Pickles with Fresh Dill – My Savory Spoon
Spicy Quick Pickled Cucumbers – Sidewalk Shoes
Refrigerator Dill Pickles – Casula Mellita
Refrigerator Pickles – Katherine Dowdell
Quick Cucumber Pickle Spears – Abbiecooks
Garlic Dill Pickle Chips – Subcultural Farmgirl
Sweet and Spicy Squash Pickle – quantumhollapena
Basic Cucumber Dills – Stephanie Beauchamp
Big Bowl of Pickles (in a jar) – PDX Leslie
Spicy Quick Pickled Cucumbers – Danita
Grasses and Asparagus
Quick Pickled Corn – uncanny_preserves
Quick Pickled Corn Salad – The Pit Stop BBQ
Quick Asparagus Pickles – Grace Lee
Old Bay Asparagus – Putting Up with Erin
Quick Pickled Asparagus – sam8371
Fruit
Quick Pickled Mandarin Segments – BLDRNRPDX
Quick Pickled Strawberries – East of Eden Cooking
Green Almond Pickle – Bubble Tea for Dinner
Pickled Pineapple – Kate Locke
Quick Pickled Strawberries – Melissa Palmer
Indonesia-style Spicy Pickled Pineapple – Southern Fried Yankees
Pickled Apples with Honey, Ginger, and Cinnamon – Kim Lewandowski
A post shared by Lindsay Murray (@uncanny_preserves) on Apr 19, 2017 at 11:07am PDT
Legumes
Refrigerator Dilly Bean – The Scholarly Redneck
Quick Pickled Dilly Beans – My Catholic Kitchen
Three Bean Super Quick Pickle Salad – The Pit Stop BBQ
Quick Pickled Green Beans – mrileyesh
Mung Bean Sprout Quick Pickle – Food Swap Silicon Valley
Mixes and Medleys
Quick Pickled Vegetables – Thoughts and Reflections
Quick Pickled Vegetables – Merry Meeting Menus
Vegetables Pickled à la Grecque – Prospect the Pantry
Quick Pickled Leftover Veg – victrola242
A post shared by Tanya (@breakfastquest) on Apr 25, 2017 at 3:43pm PDT
Nightshades
Pickled Peppers and Onions – Cookin Mum’s Culinary Adventures
Quick Pickled Cherry Tomatoes – Gone Walkabout 2
Quick Pickled Sweet Peppers – Brit in the South
Pickled Green Tomatoes – Love & Olive Oil
Italian Pickled Eggplant – Heidi Graham
Pickled Peppers – Laurie Salmon
Honey Pickled Eggplant – breakfast quest
Taqueria-style Jalapenos and Carrots – Shelly Bee
Proteins
Red Beet Eggs – The Artisanry of Acorn Cottage
Pickled Eggs – Knit at Nite
Beet Juice Pickled Eggs – Merry Meeting Menus
Jalapeno Pickled Eggs – Beverly Calhoun
Multi-colored Pickled Eggs – She’s Almost Always Hungry
Turmeric and Beet Pickled Eggs – Prospect the Pantry
Quick Pickled Quail Eggs – Tesla Anomaly
Beet and Turmeric Eggs – Purlewe An
Mustard and Beet Pickled Eggs – Brianna
Red Beet Egg Pickles – Lindsay L
A post shared by Cathy Kempf (@cskempf) on Apr 28, 2017 at 3:13pm PDT
Roots & Umbelifers
Quick Pickled Peas and Carrots – Cooking with Mary and Friends
Pickled Fennel with Orange – RuyaSonic
Pickled Radishes (and onions) – Knittygirl2
Pickled Golden Beet Slices – cskempf
Quick Pickled Chioggia Beets – icewerks
Quick Pickled Radishes – Southern with a Twist
Quick Pickled Ginger Carrots – Lynne Curry
Ginger and Carrot Quick Pickles – Mauka Girl Creations
Quick Pickled Carrots (and asparagus) – Shades of Bliss
Radish Slices with Scallions and Ginger – Boudreaux Hund
Orange & Thyme Beets – Leslie-Ann Miller
Quick Pickled Roasted Beets – The Pit Stop BBQ
Lemony Pickled Carrots – Seed to Pantry
Spicy Root Veg Pickles – Victory Canning
Quick Pickled Radishes and Roasted Carrots – Sandra Guillory
Dueling Quick Root Vegetable Pickles – Jenn Spinosi
Do Chua – Will Graves
Related Posts:
Submit your April Mastery Challenge Projects!
Quick Pickles for the April Mastery Challenge
Quick Pickled Balsamic Strawberries


