
Marisa McClellan's Blog, page 46
March 21, 2017
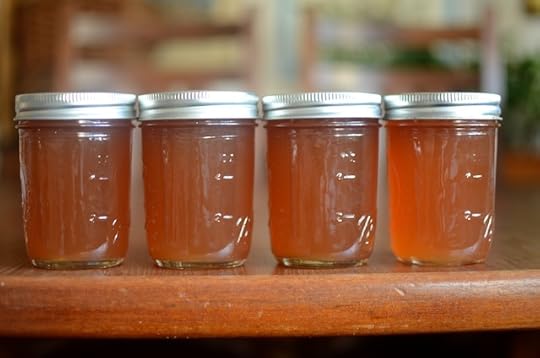
Apple Ginger Jelly
This small batch of apple ginger jelly is delicious in a PB&J and would be even better served with fresh ricotta and crostini.
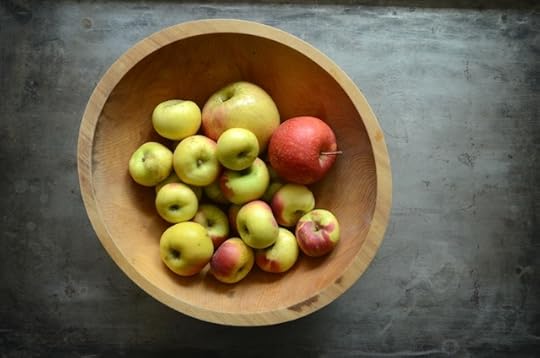
I bought these cute little lady apples back in January, thinking I would make a clever pickle or a preserve them in a cinnamon-spiked syrup. I tucked them into my produce drawer and the days went by.
As I started thinking about this month’s challenge, those apples leapt to mind and I knew that their destiny lay elsewhere. Along with a couple other apples, they were meant to become jelly. Apple ginger jelly, to be precise.
I love using apples to make jelly because while they make a respectable preserve all on their own, they have a neutral enough flavor that they can take on a wide array of other flavors as well. I combined my apples with fresh ginger, but you could go with a fresh herb or a trio of warm winter spices.
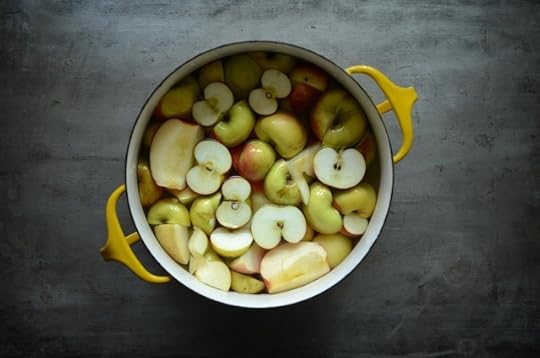
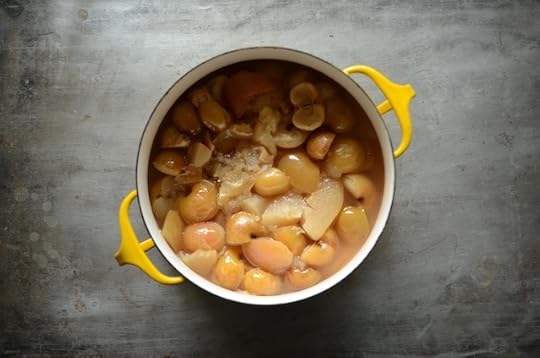
The process of making jelly from apples is easy enough. Cut them into halves or quarters. Cover them with water (start with about a cup more water than you need for your finished recipe). Add your flavor enhancers if you’re using something that appreciates a longer infusion. And simmer until the fruit is very soft.
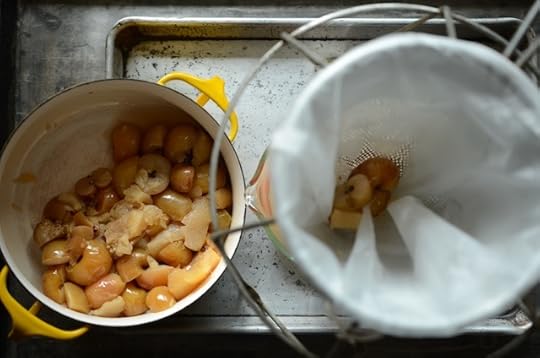
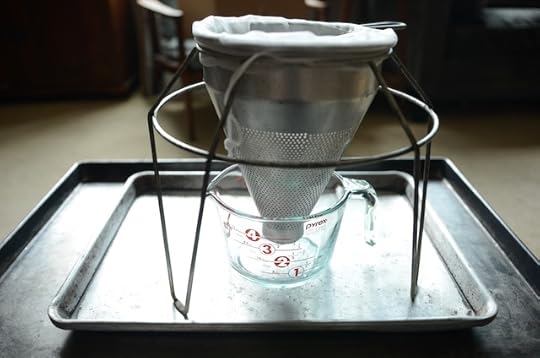
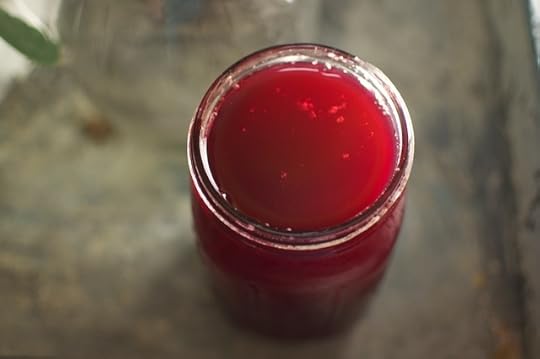
Once the fruit is soft, it’s time to strain. I line old china cap and stand that I inherited from my great-aunt Flora with a nut milk bag (sturdier than a jelly bag), but you can also use a traditional jelly bag stand, or even a colander lined with cheesecloth that you perch on top of a tall bowl.

Best practice is to give your fruit at least 6-8 hours to drain so that you don’t introduce any pulp into the juice that could make your jelly cloudy. However, if you don’t really care about having a batch of a slightly opaque jelly, go ahead and squeeze. I got an additional half cup of juice from my fruit thanks to some vigorous squeezing.
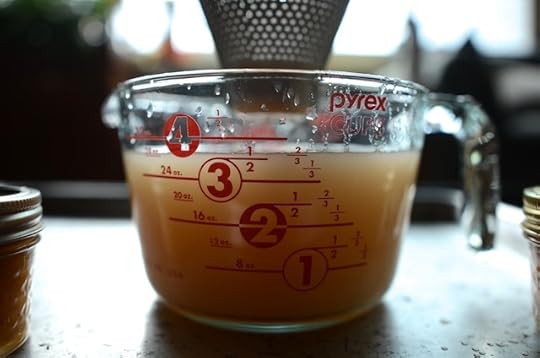
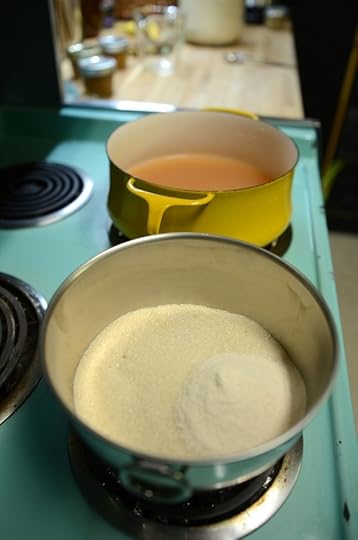
Once you’ve got all the juice extracted from your apples, it’s time to make the jelly. Bring the juice to a boil. As it heats, whisk the sugar and pectin together. Once the juice boils, whisk in the the pectin-spiked sugar and stir. Add some fresh lemon juice for balance. And start checking for set.
Once you get some nice, thick sheeting on the back of your spoon or the jelly passes the plate test, it is done. Pour it into jars, leaving 1/4 inch of headspace (the thinner the product, the less headspace you need).
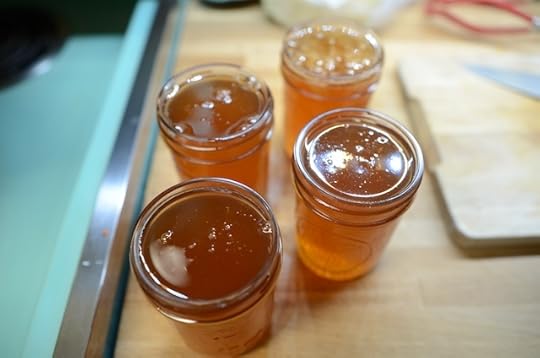
The finished flavor of this jelly is bright from the apples and just a little bit spicy from the ginger. I ate the last couple teaspoons that wouldn’t fit into the jars on peanut butter toast and felt very much like all was right with the world. I could also see it tasting very good spread thinly inside a grilled cheese sandwich.
For those of you who made jelly for this month’s challenge, how has it gone for you? Any favorites to share?
PrintApple Ginger Jelly
Yield: 4 half pints
Ingredients
2 pounds apples, roughly chopped3 ounces fresh ginger, chopped
5 cups water
3 cups granulated sugar
2 tablespoon powdered pectin
1 lemon, juiced
Instructions
Combine the chopped apples and ginger in a pot with a tight-fitting lid. Add water, cover and bring to a boil. Once the pot boils, reduce the heat to medium and simmer for 40-45 minutes. Once apples are very soft, remove the pot from the heat and let the apples cool a little.Strain the juice from the pulp, until you have approximately 3 1/2 or 4 cups.
Prepare a boiling water bath canner and four half pint jars.
Pour the juice into non-reactive pot and bring to a boil. Whisk the pectin into the sugar and whisk into the boiling jelly. Add the lemon juice and stir.
Continue to boil until the jelly sheets thickly off your spoon and/or passes the plate test. This can take anywhere from 15 to 30 minutes.
Once the jelly shows signs that it will set, remove the pot from the stove.
Pour the jelly into the prepared jars, leaving 1/4 inch headspace.
Wipe the rims, apply the lids and rings, and process in a boiling water bath canner for 10 minutes.
When the time is up, remove the jars and set them on a folded kitchen towel to cool. When the jars have cooled enough that you can comfortably handle them, check the seals. Sealed jars can be stored at room temperature for up to a year. Any unsealed jars should be refrigerated and used promptly. 3.1http://foodinjars.com/2017/03/apple-ginger-jelly/
Related Posts:
Mastery Challenge: Sour Cherry Elderflower Jelly, Made Two Ways
Submit your March Mastery Challenge Projects Here!
Facebook Live Jelly Demo this Thursday


March 20, 2017
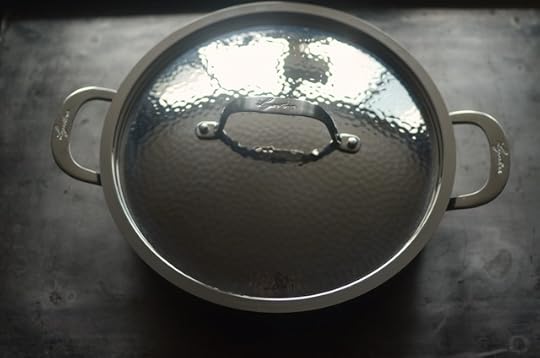
Chicken, Leek, & Preserved Lemon Pasta + Lagostina Nera Hard Anodized 5 Quart Casserole Giveaway
It’s become popular in recent years to keep a gratitude journal. Often no more than a simple notebook, this practice allows one to list and enumerate the many things for which they feel grateful. I’ve often considered adopting this habit, but have never quite managed to commit to that kind of journaling (sometimes it’s all I can do to keep up this website).
However, I have much that for which I am grateful. And if I were to start making lists, near the top would be my gratitude for my dinner making abilities. It might sound silly, but I am grateful that it’s something I have both the means and the skills to do without a whole lot of heartache or struggle.
Throughout my adult life, I’ve picked up an assortment of know-how related to making dinner. How to make soup. How to roast vegetables. How to toast grains in a little bit of butter before adding water to increase their deliciousness. And how to make a one-pot pasta dish.
I’ve made a number of these pasta dishes over the years (here’s a memorably delicious one) and their original inspiration is always the single skillet pasta recipe from Martha Stewart that took the internet by storm a several years back. This one takes a bit longer than the Martha version, but most of the time is hands off, so it still manages to feel blessedly simple.
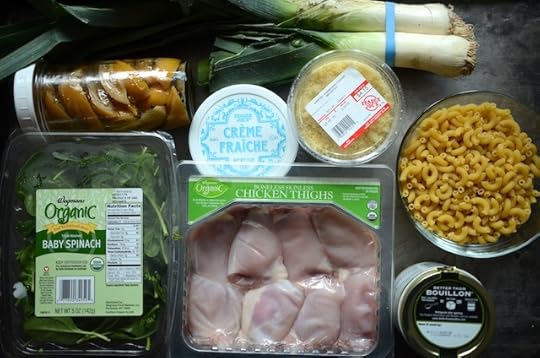
This particular one-pan pasta dish features a whole bunch of leeks, braised boneless, skinless chicken thighs, baby spinach, creme fraiche (for creaminess), and several tablespoons of diced preserved lemon peel (about three-quarters of a small preserved lemon).
The resulting meal is hearty, bright, and really comforting. It reminds me of the casseroles of my childhood, only without a can of cream of mushroom soup.
I made this dish this weekend particularly to feature the Lagostina Nera Hard Anodized 5 Quart Casserole. A few months back, a rep from Lagostina emailed and invited me to participate a promotion/giveaway to show off the goodness that is this pan.
And it is good. The wide cooking area and non-stick surface makes for quick cooking and even speedier clean-up. The tight-fitting lid makes a nice braising environment. It’s oven safe (in case you want to crisp the top of your pasta). And it’s pretty enough to go straight from stovetop to the table.
The Lagostina Nera Hard Anodized 5 Quart Casserole is valued at $49.99 (a steal for such a sturdy pan) and can be found exclusively at Macy’s. For more information about Lagostina, check out their social accounts and visit their website.
Facebook | Twitter | Instagram | Pinterest
Thanks to the kind folks at Lagostina, I have one of these lovely casseroles to give away. Please use the widget below to enter.
Disclosure: Lagostina sent me this casserole to use and write about. No additional compensation was provided. All opinions expressed are entirely my own.
PrintChicken and Leek Pasta
Serving Size: serves 6 to 7 as a main dish, more as a side
Ingredients
1 tablespoon olive oil2 large leeks, well washed, trimmed of the tough ends and sliced into half moons
2 pounds boneless skinless chicken thighs
4 cups chicken broth
12 ounces baby spinach
12 ounces small pasta
4 ounces crème fraiche
1/4 cup grated parmesan cheese
3-4 tablespoons diced preserved lemon peel
Instructions
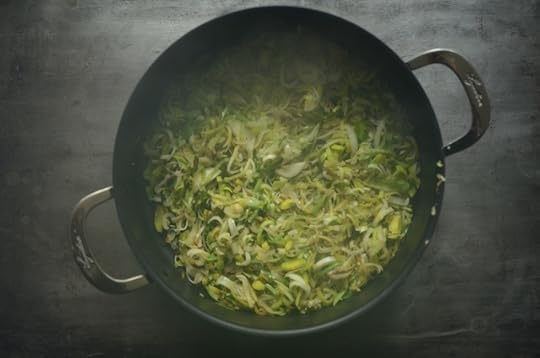
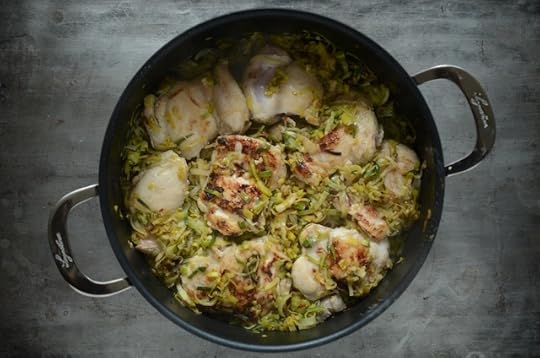
Heat the olive oil over high heat in a five quart casserole like the one pictured above. Add the cleaned and sliced leeks and cook for 3 to 4 minutes over medium-high heat, until they wilt and reduce.Season the chicken with salt and pepper. Push the cooking leeks to one side of the pan and arrange the chicken among the leeks. Cook the chicken until brown and flip.
Add the chicken stock to the pan (I dissolved a couple spoonfuls of Better Than Bouillon into 4 cups of boiling water) and cover. Reduce heat to medium and braise for 30 minutes.
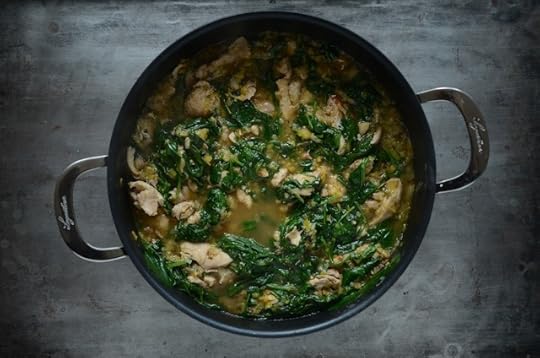
When time is up, add the baby spinach to the pan. Cover and cook for five minutes.
Stir the wilting spinach into the chicken and use your spatula to break up the chicken into shreds.
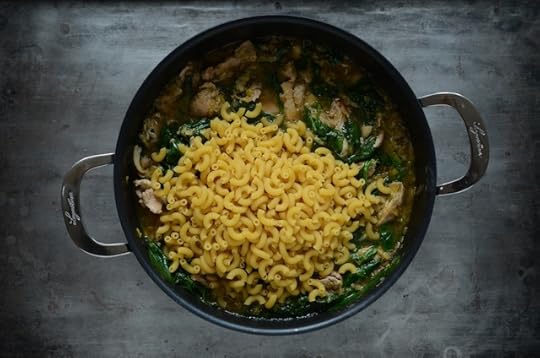
Add the pasta (if the pan is looking dry, add a bit more water). Cover and cook for 12-14 minutes, until pasta is tender.
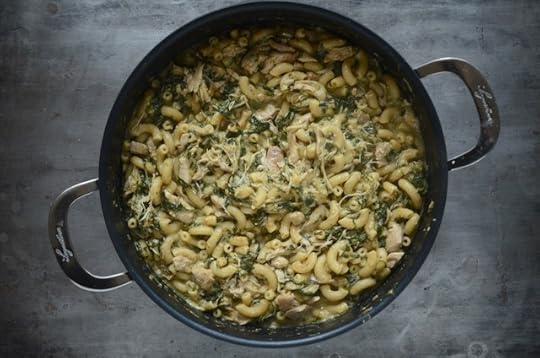
Stir in the creme fraiche, parmesan cheese and preserved lemon peel. If the pan looks dry, add a splash of water to loosen the pasta.
Serve hot. 3.1http://foodinjars.com/2017/03/chicken-leek-preserved-lemon-pasta-lagostina-nera-hard-anodized-5-quart-casserole-giveaway/
Related Posts:
Winter Squash Risotto with Leeks and Greens + Lagostina Risotto Pot Giveaway
Giveaway: New Ball Canning Products for 2017
Giveaway: Jar Labels from CanningCrafts
Links: Asparagus Tarts, Potluck Nation, and Winners
Spring tiptoed in this morning at 6:28 am. While I know intellectually that it’s a mostly arbitrary dividing line, I can’t help but imagine that the air smells sweeter and that the quality of the light is warmer and more substantial. While I dream about local strawberries and asparagus (still weeks away), some links.
Sweet violet jelly
Strawberry sangria jam
That’s My Jam spring edition now available!
Homemade flavored nut milks
Apple soda bread
One bowl crackers
Goose egg pasta
Mustard walnut vinaigrette
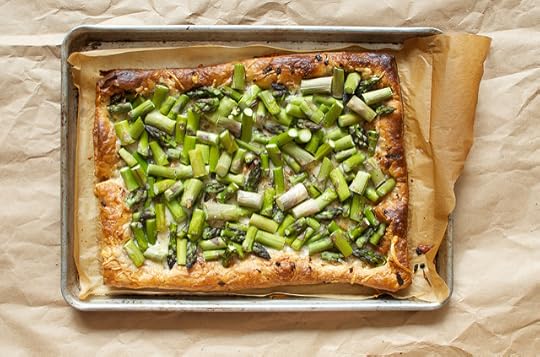
My friend Kristin has launched a lovely movement called Potluck Nation. She’s the author of the book Modern Potluck and is hoping to use the power of the potluck to bring people together heal some of what’s been fractured in this country over the recent months and years. As an avowed lover of potlucks myself, I am fully on board and hope to host a few potlucks of my own (I plan on making the asparagus tart pictured above. It’s one I developed for a column I wrote many moons ago. I’ve reprinted the recipe below). Perhaps some of you will be inspired to do the same!

Here’s the winner of the Ball Canning giveaway I hosted last week!
PrintAsparagus and Gruyere Tart
Ingredients
1 package puff pastry, defrosted1 tablespoon olive oil
1/2 cup minced shallots
4 ounces Gruyere cheese, shredded
1 pound asparagus, cleaned and chopped into 1 1/2 inch lengths
1 teaspoon fresh thyme leaves
salt
pepper
Instructions
Preheat oven to 400°F.Place puff pastry on a flour-dusted countertop or large cutting board. Using a rolling pin, roll the pastry into a rectangle approximately 10 by 16 inches (some packages will already be a rectangle, others you’ll need to pinch together).
Transfer pastry to a baking sheet and brush with olive oil. Spread the minced shallots over the pastry in a thin, evenly distributed layer.
Season with a sprinkle of salt and pepper (the salt helps draw out the moisture in the shallots, so that they soften instead of browning). Bake for 6-8 minutes, until the pastry just begins to brown and puff.
Once the pastry has baked for 6-8 minutes, remove it from the oven.
Sprinkle the cheese and thyme over the shallots and spread the asparagus out over the tart base, making sure to leave a rim of uncovered crust all the way around.
Return to the oven and bake for 10-15 minutes, until the edges of the pastry have browned and puffed up, and the asparagus is tender.
Let cool for 10-15 minutes prior to cutting. Serve warm or at room temperature.
3.1http://foodinjars.com/2017/03/links-asparagus-tart-potluck-nation/
Related Posts:
Links: Pickles, Trifles, and Winners
Links: Quick Pickles, Creamy Nut Butters, and a Winner
Links: Blood Oranges, Apricot Glazes, and Winners
March 16, 2017
Submit your March Mastery Challenge Projects Here!
Hello #fijchallenge folks! From the looks of things on Facebook, Twitter, and Instagram, you’ve all been keeping quite busy making jellies and shrubs this month. I love seeing all the creative flavor combinations that so many of you have come up with!
We’re past the mid-point of the month, so it’s high time for me to give all your jelly and shrub makers a way to submit your March projects.
Instead of embedding the form, I’m going ask that you click here to access it. For some reason, the Google form made the blog behave oddly last time, so by leaving it off the front page, I’m hoping to avoid any functionality issues!
Submit your March Projects here!
This month, there are just three required fields on the form. I’m asking you tell me is your name, where you live, and to mark a check-box telling me what you made.
Those are the only details I need to count you among the participants, but like last month, more fields do exist on the form. Because the challenge was two-pronged this month, there are questions relating to both jellies and shrubs. If you made one and not the other, skip the questions that do not apply.
There’s also a space in the form to share a link to your project. That link can go to a blog post, a specific picture on Instagram, a Tweet, a post on Tumblr, or to a picture on Flickr or Google Photos. Just remember that you need to set your privacy settings so that wherever your post is, it is publicly available. And remember, sharing a link is not a requirement.
With nearly than 1,800 people signed up for this challenge, I cannot do a comprehensive round-up. However, just like last month, I will do my very best to link out to as many people as I can, though.
Please remember that the deadline to submit your March project in order to be counted in the monthly total is Wednesday, March 29.
And if you haven’t made either a jelly or a shrub yet this month, there’s still time! All the details about this month’s challenge are here.
Related Posts:
Jellies and Shrubs for the March Mastery Challenge
Mastery Challenge: Sour Cherry Elderflower Jelly, Made Two Ways
Facebook Live Jelly Demo this Thursday
March 15, 2017
Mastery Challenge: Sour Cherry Elderflower Jelly, Made Two Ways
Regular Food in Jars contributor Alex Jones drops by today to share her experience making jelly using both Pomona’s Pectin and homemade gooseberry pectin. Read on for her tale of experimentation!

Ah, jelly month. It’s time for me to reckon with pectin.
If I recall correctly, this Mastery Challenge is only my second time making jelly. The first was a few years ago when I worked as the buyer for an all-local foods store here in Philly, Fair Food Farmstand. We got some Japanese knotweed in early April, and I set to work making a tart, pale-pink jelly out of this invasive plant as a way to preserve it. But the set was unappealing and too firm for me, so I gave the still-sealed jars that were left to a friend excited about foraged foods.
For every time I’ve made jam or other preserves with pectin, I can count a time when set didn’t occur or occurred too well. So in recent years, I’ve avoided it, eschewing recipes using pectin for the whole-fruit preserves and confitures found in Mrs. Wheelbarrow’s Practical Pantry, one of a select number of preserving books I own. These fruit preserves manage to be thick and spoonable, and I love them — but it was time to tackle working with pectin.
When it came time to consider this month’s challenge, I had a freezer full of fruit to work with (and thanks to the time I spent organizing my chest freezer last month, I knew exactly how much and where it all was). There were three gallon bags of West Philly-grown sour cherries in there that needed to become something great — so I pulled out two of them to thaw in the fridge. I’d also use the dregs of a bottle of St. Germain elderflower liqueur, since those flavors go so well together.
And, since I like to do things the hard way sometimes, I searched online for homemade pectin alternatives to the packaged stuff that had vexed me in the past. Mrs. Wheelbarrow came through yet again, this time with a post about how to make and use pectin from green gooseberries — a bag of which, harvested from my community garden two summers before, also languished in my freezer.
Roughly a quart of gooseberries, simmered with water, strained through a jelly bag, and cooked down again until the pectin formed a mass that could be picked up with a fork when dropped into alcohol, yielded me two four-ounce jars, one to use now and one to stash away for later.

Along with an unopened box of Pomona’s Pectin that had been in my pantry for a couple years — according to the manufacturer, it will last indefinitely if stored cool and dry — I had what I needed to find out (a) if I could be trusted to make something tasty from the packaged stuff and (b) if my woo-woo homemade method could be used for jelly made with low-pectin fruit.
The results? Yes, surprisingly, and sort of!
Here’s how the experiment went.
First, I cooked up a little over six pounds of my frozen, pitted sour cherries with about three and a half cups of water. (Note that you don’t need to pit cherries to make jelly — a tip I’ll keep in mind when I’m short on time in cherry season in the future.)
I gave the mixture a mash and strained the fruit and juice through a jelly bag, making sure to give the juice at least six hours to drain out and taking care to not squeeze the bag, which could create a cloudy jelly. Keep in mind that, if working from whole fruit rather than pre-made juice, you may want to start your jelly making the day or night before to give the juice a chance to drain properly.

Next, I watched Marisa’s awesome jelly-making live video on the Food In Jars Facebook page, where she tackles tart cherry jelly made from Pomona’s Pectin and bottled juice (definitely a time-saver). I wanted to make sure I had the recipe for working with Pomona’s down before I attempted it — I have always found the directions included in the packet to be sort of unclear (what do the daggers next to certain ingredients mean? Why is lemon juice listed twice??).
I pulled three and a half cups of juice — the same amount Marisa used in her demo — for each trial recipe. Then I subtracted two tablespoons of the juice from each quantity and added two tablespoons of St. Germain elderflower liqueur for a fancy, floral note.
For the Pomona’s recipe, I prepared my calcium water and separated the sugar — only one and a quarter cups total — so I’d be able to combine some of it with the pectin before mixing it into the boiling juice. For the gooseberry pectin recipe, I pulled the sugar — equal to the amount of juice, nearly three times as much as the other recipe — and juiced a lemon, reserving the seeds in a tea ball to add a pectin boost.

First, I made the Pomona’s batch. Everything went according to plan: Boil juice and sugar, add calcium water, combine pectin powder and reserved sugar, whisk into juice, boil for a few minutes until it sheets from the spoon.

The jelly went into my water bath canner for 10 minutes, and the jars thickened up as they cooled over the next few hours. What was left in the jelly pot also thickened quickly, so I knew I’d achieved some kind of set.

Well, that was easy — with a little extra instruction, I had used Pomona’s Pectin and made something that preliminary tasting indicated would be quite palatable. But how did the gooseberry pectin perform?
I started the same way, heating my scant quart of juice and the sugar, a whopping three and a half cups, along with the lemon juice and tea ball full of lemon seeds. Once it came to a boil, I added four ounces of the gooseberry pectin. Then I proceeded to watch and wait.
Once the mixture started boiling furiously, I put a small plate in the freezer and started checking temperature with my ThermoPop. The mixture hit 220 degrees F after about 15 minutes, but it didn’t pass the plate test until 25 minutes had elapsed and the thermometer was showing 225 degrees. I probably could have let it go even longer for a slightly firmer set.

This recipe went into jars and was processed for 10 minutes; despite the increased quantity of sugar, I had to boil this one down so much that I only had an additional eight ounces over the Pomona’s recipe (which, since I’m short on jars, went into a 12-ouncer and into the fridge to eat first).
The next morning, I checked the set of both batches. The Pomona’s recipe was like Jell-O: clear and jewel-like, decidedly jelled but not quite chewable. I would have preferred a slightly softer set here — maybe I just don’t really like jelly? — but I’d feel good giving this preserve as a gift and writing “jelly” on the label.
The gooseberry pectin batch that sat in the fridge overnight had definitely jelled, but I’d call that texture more appropriate for a spoon than a knife — still spreadable, but softer and saucier.

The photo below shows a spoonful of the gooseberry pectin batch on top and the Pomona’s batch on the bottom. See how much firmer the Pomona’s one is?

There was also a difference in flavor: The Pomona’s recipe tasted a little milder, with the cherry flavor coming through more strongly. The lemon flavor really came through in the gooseberry pectin batch; while you could still taste the cherry, it wasn’t up front like in the other batch, and the elderflower endnote was a little harder to detect.
In the end, I liked the flavor of the Pomona’s recipe better. In terms of set, something in between the two jellies I made would be ideal — something I’ll keep in mind when using gooseberry pectin with low-pectin recipes in the future. With a longer cooking time, I think it would be possible to get closer to the elusive set I’m searching for.
Since Marisa will be posting her tart cherry jelly recipe, I’ve included the recipe for this jelly made with gooseberry pectin here — and I hope to do a more involved post on making gooseberry pectin when my local bush is full of green berries in midsummer.
What’s your ideal jelly texture? Have you tried working with Pomona’s Pectin? What about homemade pectins made from gooseberry or unripe apple? Share your tips and tribulations with us!
PrintSour Cherry Elderflower Jelly Made with Gooseberry Pectin
Ingredients
3 1/2 cups minus 2 tablespoons of tart cherry juice (bottled or made at home are both fine)2 tablespoons St-Germain elderflower liqueur
3 1/2 cups white sugar
1 lemon, juiced, and its seeds, reserved and placed in a tea ball or tied in cheesecloth
1/2 cup gooseberry pectin
Instructions
Prepare a water bath canner and four half-pint jars, lids, and rings for canning. Place a small ceramic plate or bowl in the freezer.Combine the cherry juice and St-Germain, then add to a large, heavy jam pan or pot. Heat to boiling, then add sugar and lemon juice. Once sugar is dissolved, add the gooseberry pectin.
Continue to boil the mixture, stirring occasionally and skimming foam as it collects on the surface. Check temperature and begin plate testing when the mixture reaches 220 degrees F. Be sure to stir well and watch for signs of scorching; the temperature may hit 225 degrees F or slightly higher before the mixture passes the plate test.
Once the mixture passes the plate test, remove the pot from the heat.
Ladle the mixture into prepared jars, wipe rims, add lids and bands, and process for 10 minutes after the canning pot returns to a boil.
Remove jars from the canner to a folded tea towel on the counter and leave undisturbed for 24 hours so that jars can seal and the mixture can set properly. 3.1http://foodinjars.com/2017/03/mastery-challenge-sour-cherry-elderflower-jelly-made-two-ways/
Related Posts:
Mastery Challenge: Meyer Lemon Grapefruit Marmalade
Facebook Live Jelly Demo this Thursday
Jellies and Shrubs for the March Mastery Challenge
March 14, 2017
How to Make Tart Red Cherry Jelly
Itching to make cherry jelly but don’t want to wait months? Try making a small batch of low sugar Tart Red Cherry Jelly using a bottle of juice from the store!
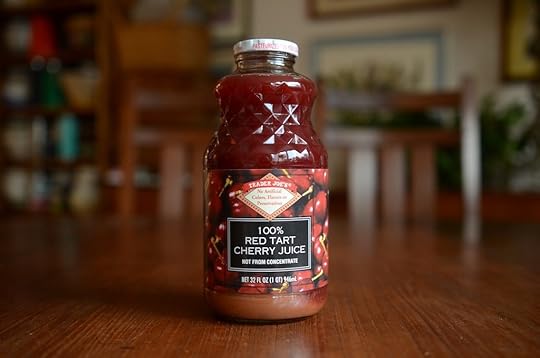
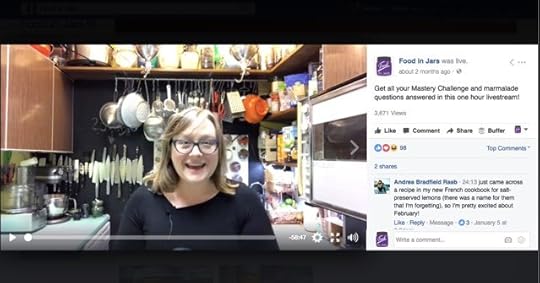
Last Thursday night, I did an hour-long live broadcast on Facebook Live. A bunch of you tuned it, I showed you how to make Tart Red Cherry Jelly using store bought juice, we talked about the various ways to make shrubs, and I answered a whole bunch of questions.
During the broadcast, I promised to post the recipe I used to make the jelly. It’s taken me a little longer than anticipated, but here it is. I demonstrated how to do it using a bottle of tart cherry juice from Trader Joe’s, but you can use any bottle of 100% fruit juice that you’d like. In the past, I’ve done this with Concord grape juice and blueberry juice, both to good effect.
This recipe also works with honey. If you go in that direction, reduce the amount by approximately one-third. Oh, and before you put the jelly into jars, taste it. Some batches of juice are sweeter than others, and so occasionally a bit of fresh lemon juice is needed to help balance the flavors.
PrintTart Red Cherry Jelly
Yield: 3 half pints
Ingredients
3 1/2 cups tart cherry juice1 1/4 cups granulated sugar, divided
1 tablespoon calcium water (part of the Pomona's Pectin system)
1 tablespoon Pomona's Pectin powder
Instructions
Prepare a boiling water bath canner and 3 half pint jars.Pour the juice into a low wide non-reactive pan that can hold at least five quarts (this jelly bubbles up a lot during cooking, so you need the room for expansion).
Bring the juice to a boil. Once it boils, add 1 cup granulated sugar and the tablespoon of calcium water and continue to boil for another five minutes.
Whisk the pectin powder into the remaining sugar.
Once the five minutes are up, slowly whisk the pectin-spiked sugar into the boiling juice. I do this with a whisk in one hand and the vessel with the pectin in the other, to ensure that the pectin gets integrated into the juice smoothly and doesn't clump.
Once the the pectin is fully integrated, boil for another minute and then remove the jelly from the heat.
Funnel the jelly into the prepared jars, leaving 1/4 inch headspace.
Wipe the rims, apply the lids and rings, and process in a boiling water bath canner for 10 minutes.
When the time is up, remove the jars and set them on a folded kitchen towel to cool. When the jars have cooled enough that you can comfortable handle them, check the seals. Sealed jars can be stored at room temperature for up to a year. Any unsealed jars should be refrigerated and used promptly.
Notes
I use 3 1/2 cups of tart cherry juice rather than the full 4 cups that come in the bottle because that last portion is sediment from the pressing process. The sediment is sort of bitter and tannic, and will also make your jelly cloudy. I just carefully pour the juice out, but if you're more of a perfectionist than I, you could strain it through a coffee filter.
3.1http://foodinjars.com/2017/03/tart-red-cherry-jelly/Related Posts:
Facebook Live Jelly Demo this Thursday
Spicy Heirloom Tomato Chutney for International Can-It-Forward Day
Yellow Plum Apricot Jam + Facebook Live
March 13, 2017
Giveaway: New Ball Canning Products for 2017
Despite the fact that most of the Eastern seaboard is hunkering down for a massive storm (they’re predicting 11-17 inches for Philadelphia!), spring is really just around the corner. And in anticipation of the coming canning season, I thought today would be the perfect time to feature all the new goodies the folks from Ball Canning are rolling out this year.
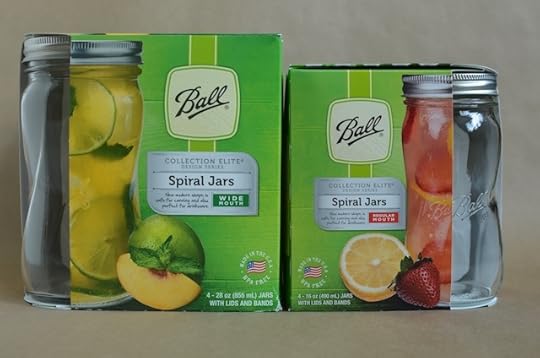
First up are the new Spiral Jars. I’d seen a sneak peek of these a month or two ago on Facebook, but was uncertain whether I liked them or not (my initial thought was, why do we need our jars to spiral? What’s wrong with the classic shape?).
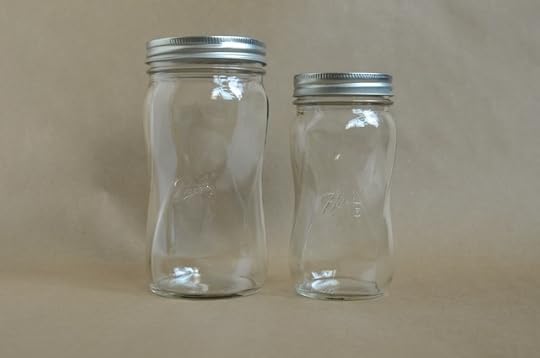
However, having now seen them in person, I’ve changed my tune. These are really great jars. The twisting shape feels good in the hand and I like how simple the branding is. The sizing on these jars is a little different from what we’re used to. The smaller jar is a traditional 16 ounce pint, but the larger jar clocks in at just 28 ounces rather than a full quart.
I can already tell that place where these jars are really going to shine is when it comes to to canning slightly taller things. I can’t wait to can up a batch of dilly beans or pickled carrot spears in these jars, knowing that there won’t be as much trimming involved.
I took a picture of the spiral jars side by side with a regular pint and quart so that you can get a better idea of the new height. And if you do plan on canning in the taller spirals, make sure to measure your canning pot to ensure that you’ll be able to keep them fully submerged during the canning process.

Next up are the new Sharing Jars. I’d not seen any previews of these jars before I opened up the box for this post and so they were a really fun surprise. These eight-sided jars are a charming addition to the Ball Canning line-up and they have a charitable component. Newell Brands (the new Ball Canning parent company) will donated four meals to Feeding America for every package of these jars purchased.

The sharing jars are only available in a regular mouth 16 ounce pint size and come with a little Feeding America ribbon tied around the neck of the jar.
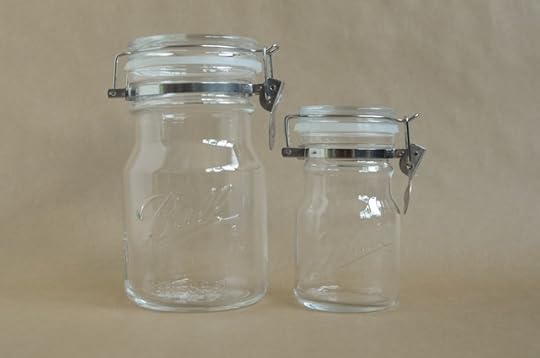
Last up are the new Sure Seal Bail Storage Jars. Designed to hold dry goods, these jars seal tightly with a lid that locks into place. They come in two sizes, 14 ounce and 38 ounce. I must confess that in comparison to the rest of the new jars, these feel a little clunky. Jars from Ball normally have a certain elegance that these two are just missing.
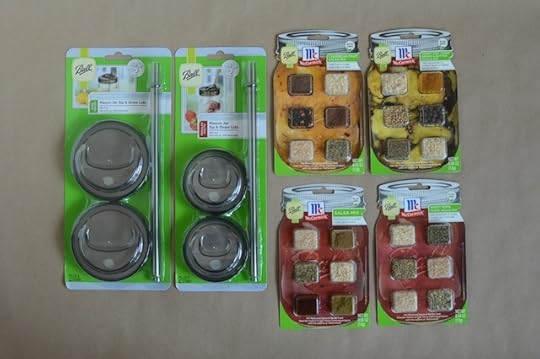
Finally, the spices and accessories. The drink lids are a one-piece devise that screw onto jars without the aid of a ring (they’re more like those made by iLids and less like the ones from Cuppow). A package comes with two lids and two straws and you can get them to fit either regular or wide mouth jars.
The spices are particularly fun. Made in partnership with McCormick, they are designed to make it easy for home canners to make and preserve things like tomato salsa, bread and butter pickles, fruit salsa, and pasta sauce.
Now, for the giveaway! One lucky winner will get a set of everything featured in today’s blog post! Please use the widget below to enter.
Related Posts:
Giveaway: Canning Gear & Jar Accessory Grab Bag
Giveaway: Smooth Sided and Mini Jars from Ball Canning
freshTECH HarvestPro Sauce Maker Giveaway
Links: Citrus, Taproot Mag, and the Yohann iPad Stand
I hope you all had a really lovely weekend. It’s been so fun to see all the pictures the March Mastery Challenge folks have been posting on Facebook and Instagram of their jellies and shrubs. And thanks to everyone who tuned in for the live broadcast on Facebook last Thursday. If you missed it, you can still watch it here. Now, links!
Citrus smash jam
Candied orange peel (the perfect way to use the whole fruit if you’re making citrus jelly)
Sweet preserved kumquats
Smoked lemons preserved in salt
Roasted carrot jam
Pickled red onions
Mason jar mayo
Jam roll cookies
Sorghum sweetened bread pudding
Fermented buckwheat crunch
Small batch focaccia
Chocolate sunbutter cookies
Recently, I participated in a conversation with Maggie Battista and Domenica Marchetti about citrus and preserving. It’s a fun read and one that shows off our similarities and differences in the kitchen.

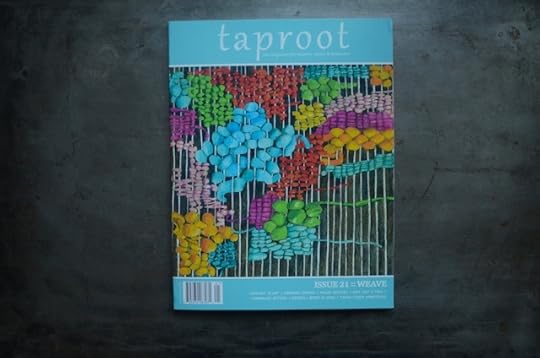
In other news, the latest issue of Taproot Mag hit newsstands and mailboxes in the last week. The theme of this issue is Weave and I contributed a piece on woven baked goods. The cinnamon braids included in the story was one of the very first things I ever made and it is dear to me because it’s something I would make with my Aunt Doris.
If you spot a copy in the wild, please do pick it up. In addition to my story, you’ll find other recipes, a pattern for a lovely knitted hat, and much, much more.

And finally, let me tell you about the best iPad stand I’ve ever used. I often bring an iPad into the kitchen when I need to reference an online recipe. In the past, I’ve used little tripods or the folding cover that attaches via magnets to prop up the iPad in order to read the recipe. However, they’ve never felt particularly secure and they didn’t really keep the iPad out of the fray of my workspace.
Then, a couple months ago, the folks from a Swiss company asked if they could send me one of their stands. Because this was an area where I have been looking for a better solution, I said yes and I’m so glad I did. I love this stand. It holds my iPad Air securely and is able to display the screen in three different orientations. Though I yearned for their wooden stand, I opted for the black plastic one because I knew that it would clean up better (and that’s always a concern in the kitchen). I have nothing but good things to say about this sleek and useful stand. If you’re in the market for something similar, I suggest you take a look at the Yohann.
(The unit you see above was sent to me at no cost. I was not obligated to write about it, but have chosen to do so because I really like it and thought some of you would find a similar item useful. I was not compensated for this post beyond the sample unit.)
Related Posts:
Links: Blood Oranges, Apricot Glazes, and Winners
Links: Grapefruit Jam, Soup Class, and a Winner
Links: Marmalade, Pickles, and Winners
March 9, 2017
A Late Winter Cooking Reset with Blue Apron
Today’s post is sponsored by Blue Apron.
In the fall, when the days first begin to turn cold and crisp, I am elated. I cannot wait to pull out my biggest soup pots and braising pans to start making hearty, weather-appropriate food.
However, by the end of the winter season, I am weary of my regular dinners and am hungry for fresh inspiration. Often I turn to cookbooks to help break up the routine. When that doesn’t work, I call on Blue Apron and their chef-designed meal kits.

My first encounter with Blue Apron came last year, when Scott got a 2-person box as part of his podcast’s sponsorship. Thanks to the photo-filled recipe cards, he was able to make a trio of tasty dinners without a lick of help from me.
I wrote about my second go-round with Blue Apron back in September. That time, I had the family-sized box sent to my sister’s house while I would be there visiting. I cooked dinner for them and scored some major houseguest points.
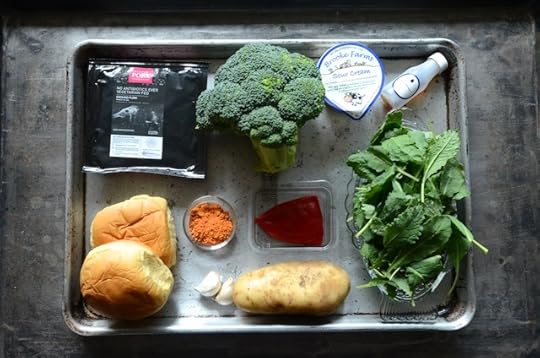
This time, I planned the box for the week before I was leaving town for a four-day conference. Busy and lacking inspiration is almost always the perfect formula for a week of takeout, but not this time. Blue Apron to the rescue!
Another reason why getting Blue Apron just before leaving town was such a good idea is that is prevented food waste. Scott isn’t one to do a lot of cooking for himself, so if I’d left a fridge full of ingredients for him to use, they would have withered and wilted while I was away. The perfectly portioned Blue Apron meals meant that there was nothing to throw out.
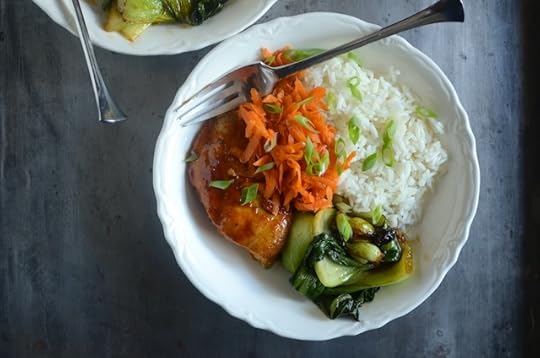
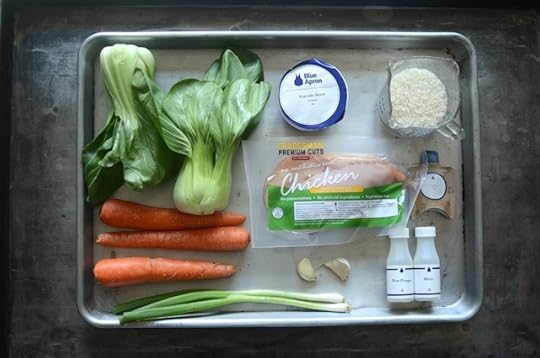
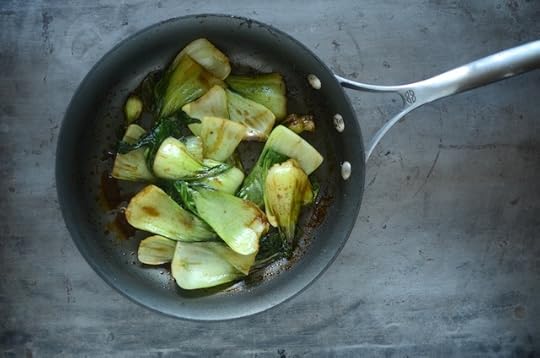
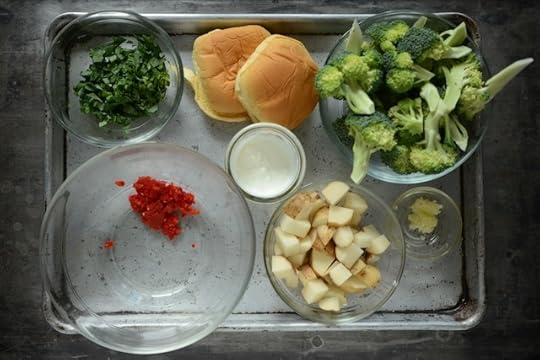
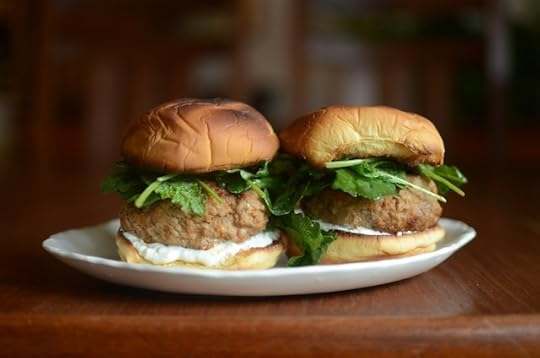
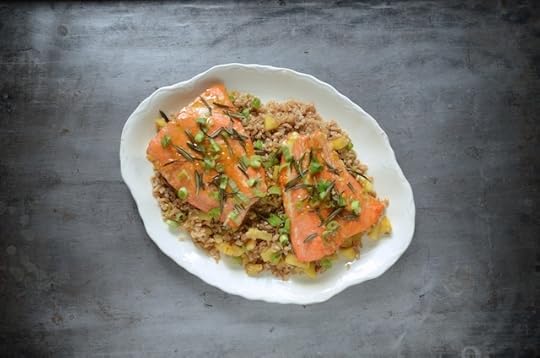
We had Chicken Yakinuki (I particularly loved the simple shredded carrot salad), Tangelo & Honey Glazed Salmon (remind me to use cooked apples in savory applications more often), and Smokey Pork Burgers (why aren’t pork burgers more of a thing? They were so delicious!).
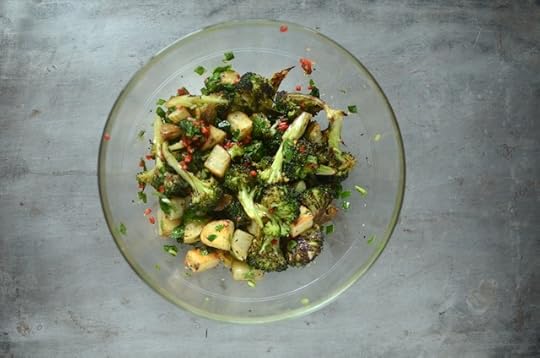
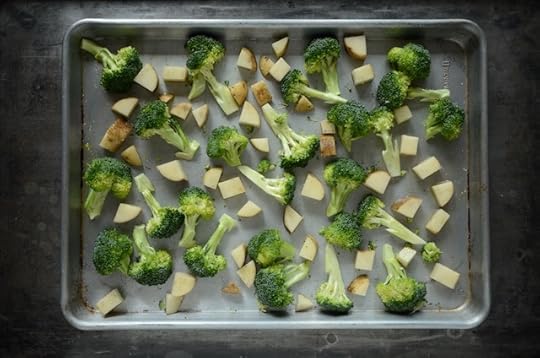
One of the things I like most about Blue Apron is the fact that the I always take away some new culinary tidbit when I cook my way through a box. Going forward, I’ll be cooking my farro like pasta and will always roast broccoli at 475F (my typical temperature had been a lazy 400F, but no more!). I also appreciate that you can access all their recipes online.
One of the worries that people often have about Blue Apron is the amount of packaging involved. I was pleased to see that there was less packaging this time than in past orders, and that all users can now return the packing materials through the mail for reuse and recycling.
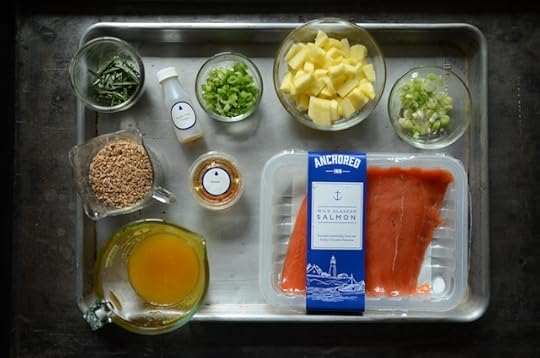
The fried rosemary garnish in this salmon dish was another tidbit I will take with me. I always thought that frying herbs was a fussy step, best reserved for restaurant meals, but I am converted. Quickly pan-fried in a shallow puddle of olive oil, the rosemary became fragrant and crisp.
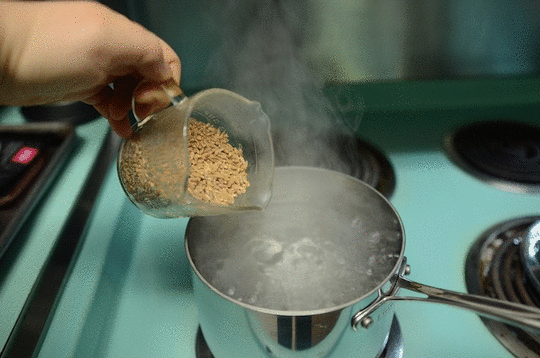
The aforementioned farro! When you cook it in ample water, you don’t have to worry about the pot boiling dry. When the farro is tender, you just drain and dress.
If you’re intrigued by my experience with Blue Apron, they’ve got an offer for you, too! The first fifty readers to use this link to sign up for the service will get three meals for free on their first Blue Apron order.
Oh, and if you want to take a peek at more of the possible meals you’ll get from Blue Apron, check out their recipe page.
Disclosure: This post is sponsored by Blue Apron. They sent me a 2-Person box, containing three meals for two people. They’ve also compensated me for my time and attention. However, all thoughts and opinions expressed are entirely mine.
Related Posts:
Cooking Dinner with Blue Apron
Glass Spray Bottle with Soap Flakes from the MightyFix by MightyNest
Mason to Go Launching on Kickstarter Tomorrow!
March 8, 2017
Facebook Live Jelly Demo this Thursday
Friends! Join me on Thursday, March 9 at 9 pm eastern/ 6 pm pacific for an hour-long Facebook livestream over on the Food in Jars Facebook page. I’ll show you how to make a batch of tart cherry jelly using store bought juice, we’ll talk about shrubs, AND I’ll answer all your questions about this month’s Mastery Challenge.
Also, as we move further into the canning season, I plan on doing more of these livestreams and hope to get on a regular schedule with them. I’m hoping that you guys will give me a little insight as to what you’d most like to see from these broadcasts. If you have a minute or two, please do fill out the questionnaire below. Thank you!
Loading…
Related Posts:
Yellow Plum Apricot Jam + Facebook Live
Jellies and Shrubs for the March Mastery Challenge
How to Submit Your Salt Preserve for the February #fijchallenge


