
Marisa McClellan's Blog, page 47
March 7, 2017
Cookbooks: Composing the Cheese Plate
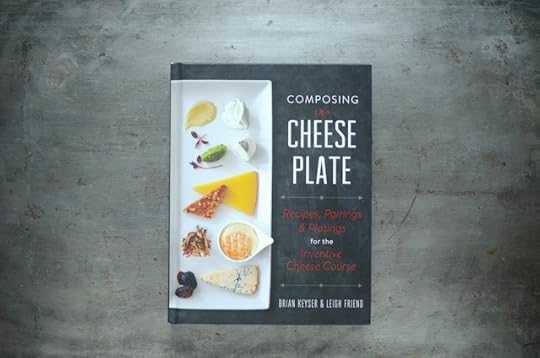
I love cheese plate books, because in many cases, they’re really preserving books in disguise. Because what goes better with all manner of cheese that interesting jams, spreads, chutneys, mostardas, and jellies? Nothing, that’s what!

Published last fall, Composing the Cheese Plate is a perfect example of preserving-centric cheese book. Written by cheese evangelist Brian Keyser and pastry chef and condiment maker Leigh Friend, this book is bursting with an array of bright, creative, and unusual things to spread, smear, and dollop on cheese.

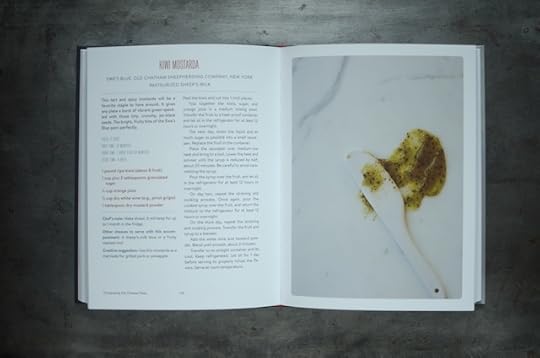
I have markers sticking out of this book in every direction. In addition to the recipes I’ve shared via photography here, I’m hoping to make the Balsamic Rosemary Cherry Mustard (page 63), Cardamom Poached Butternut Squash (page 89), Spiced Carrot Chutney (page 131), and the Pineapple Mostarda (page 198).
There is one downside to working with a book like this and that’s that none of the recipes are designed for boiling water bath canning. However, the batch sizes are small enough that you can easily tuck them into the fridge and use them up. I confess that I will probably borrow flavor elements from this book and will marry them with recipes I know to be safe for the canning pot.
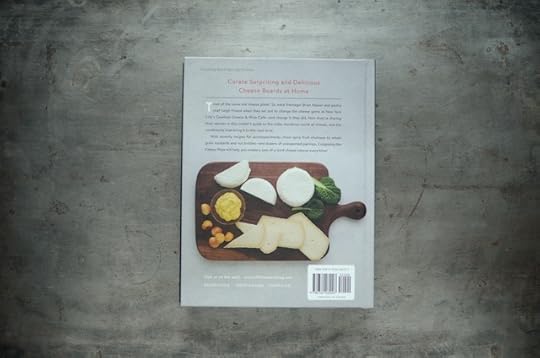
One final note. This book comes to us from the same publisher that produces my books and as a result, this book shares the same size and binding as those in the Food in Jars series. It would fit quite nicely on a shelf next to my trio of books!
Related Posts:
Books to Take You Further on the Salt Preserving Path
Cookbooks: Eat It Up by Sherri Brooks Vinton
Cookbooks: The Perfect Blend by Tess Masters


March 6, 2017
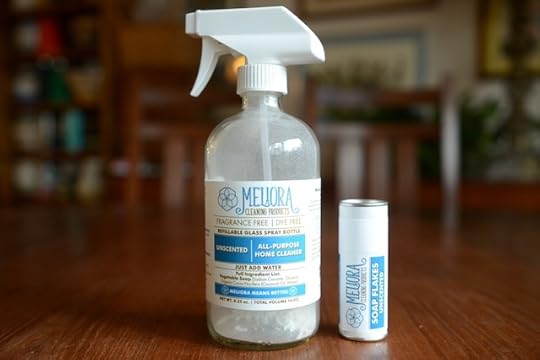
Glass Spray Bottle with Soap Flakes from the MightyFix by MightyNest
I have always had an affinity for things made from glass. Even in the days before this jar-focused website wasn’t even a glimmer in my eye, I opted for things made out of glass whenever possible. It feels good in the hand, has a pleasing heft, and never, ever absorbs the smell of the thing you’ve kept in it. Plus, it is easily recycled when you decide that an object has reached the end of its useful life.
In recent years, I’ve really enjoyed seeing the increased availability of glass spray bottles. Once just the domain of Martha Stewart home shoots, it’s now quite easy to get one’s hands on a lovely, refillable glass spray bottle. One such delightful bottle is the Meliora K. Glass Spray Bottle with Soap Flakes available from MightyNest.
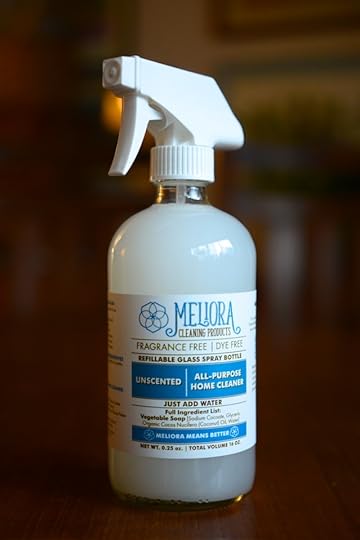
This spray bottle comes with a tablespoon of unscented soap flakes inside. You fill up the bottle with warm tap water, give it a good shake, and have the perfect all-purpose cleaning spray that is safe and effective for every corner of your home. MightyNest also sells soap flake refills.

For the rest of this month, new subscribers to the MightyFix from MightyNest will get their very own glass spray bottle with soap flakes as their first month of the FIX for just a buck. If this deal interests you, just click here to place the bottle (with discount attached!) into your cart! And if the code doesn’t work for you, just use the code FIJGLASSBOTTLE at check-out.
Just to recap, if you use this link or the code, you’ll get your first fix for just $1. New folks only. Canadian and Australians are welcome to join the Fix for a small shipping surcharge.
Disclosure: This is a sponsored post. MightyNest is a Food in Jars sponsor and helps keep this blog afloat.
Related Posts:
March 5, 2017
Jellies and Shrubs for the March Mastery Challenge
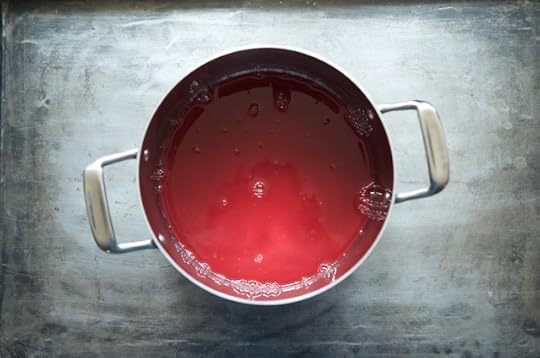
We’re five days into March, and so it’s high time to start digging into this month’s challenge (I’ve been at a conference for the last couple days, which accounts for the delay). We’re going to be focusing in on both jelly and shrubs this time around.
The reason for the double topics is that jelly making has much in common with marmalade making. For those of you who wearied of achieving set during January’s challenge, you have another option. What’s more, shrubs are fun.
What is Jelly?
There are a lot of preserves that get called jelly, but for the purposes of this challenge, we’re defining it as a sweet or savory preserve that is made primarily with a flavorful liquid like fruit juice, vinegar, or wine (other spirits do sometimes come into play with jellies as well). Fruit jellies should be clear and without any bits or pieces of fruit or fruit pulp. Things like pepper jellies can include bits of pepper material. Jellies should be well-set enough to be spread on toast without dripping down your hand.
There are several ways to go about getting your jelly to set up.
High Pectin Fruits – Some fruits are so naturally high in pectin that you don’t need to add commercial pectin to achieve set (a good example is the red currant jelly I wrote about last summer). Those jellies just need enough sugar to help elevate the temperature to reach the set point (to read more about why sugar aids in set, read this). Occasionally, people will also extract pectin from these high pectin fruits to use in combination with lower pectin fruits.
Commercial Pectin – Other fruits don’t have a ton of natural pectin and require additional pectin in order to set up. These days, my go-to pectins are the Classic Ball Flex Pectin (for higher sugar batches) and Pomona’s Pectin (for lower sugar and alternative sweeteners).
Reduction – Some fruit juices have the ability to set up into jelly with no more than a nice, long boil. Chief among these juices are apple cider. When I first made this apple cider syrup, I accidentally cooked it to 220F and it set up into a nice, spreadable preserve.
The world of jellies really broad, but the thing that unifies them is the fact that they have a solidly spreadable set. If you didn’t read this post on using the plate test to check for set back in January, I recommend you give it a look now.
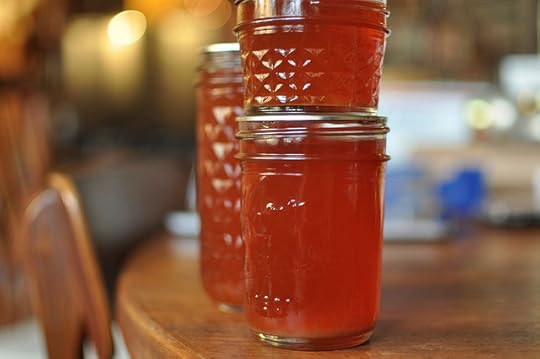
Here are some jelly recipes to help get you started. Of course, this is just a starting place. There’s a world of jelly recipes out there in books and online for you to choose from.
Rhubarb Prosecco Jelly
Creamsicle Jelly
Apple Jelly with Lavender and Lemon
Lavender Rosé Jelly
Mint Jelly
Wine and Herb Jelly
Four Pepper Jelly
Parsley Jelly
What is a Shrub?
I’ve been smitten with shrubs since I made my first one back in 2011. Shrubs are a combination of fruit, sugar and vinegar. Left to sit for a few days (or even longer), they develop a deep, sweet-tart flavor that is a wonderful addition to a glass of sparkling water, a batch of salad dressing, a fancy homemade cocktail, a marinade for meat or vegetables, or to a pan sauce.
There is better writer on the topic of shrubs than Michael Dietsch. He started in on the topic back in 2011 with this post on Serious Eats and has subsequently written a whole book about them. Emily Han‘s book, Wild Drinks and Cocktails, is also contains a lot of tasty shrubs.
I’ve got four shrub recipes here on the blog and there are far more out there online. However, if you remember the essential ratio of one part sugar, one part vinegar, and a generous handful of fruit of some kind, you’ll be good.
As always, I’ll be sharing more recipes, tips and tricks around the topic of jellies and shrubs on the blog all month long. The deadline to submit your project to be counted in the final tally is Wednesday, March 29 (I’ll put the form up soon).
I’m also doing a Facebook Live session on the topic on Thursday, March 9 at 9 pm Eastern/6 pm Pacific. Make sure to tune in!
Related Posts:
March 3, 2017
How to Make Apartment-Scale Hard Cider
Our intrepid Food in Jars contributor Alex Jones is back again. This time, she’s telling the tale of her journey to becoming a home hard cider maker. You small batch home brewers are going to love this one! -Marisa

My first flirtation with home brewing happened back in 2010, before my penchant for collecting food-related hobbies and weird old stuff outgrew my life and space.
I was living with six friends in a big renovated West Philadelphia Victorian, complete with servants’ staircase coming up from the kitchen, a substantial back deck, and a south-facing backyard where I made my first attempts at raised bed gardening.
That winter, my job was managing the CSA program at Greensgrow Farms, a longtime local food oasis in Philadelphia’s Kensington neighborhood, and we often had a few crates of leftover local apples that I could buy at cost.
So when I saw a vintage wooden cider press for sale on Craigslist, I jumped at the chance to haul that huge, heavy thing home, got some apples from work, and made my first batch—after a snowstorm, it looks like. (I’m the one in the green boots.)

Since I only used one kind of apple, and a sweet one at that, the cider had an uninteresting, ricelike flavor, almost like a mild, fruity sake. Soon, our little collective house dissolved, and having nowhere to store the ungainly cider press, I passed it along to another urbanite with a love of DIY projects who had more space.
Now, with a small apartment and an already-full preserving schedule and pantry for most of the year, I thought my cider-making days were long gone. But when I was recently given a gift card to Philly Homebrew Outlet, my neighborhood supplier of all things fermentation, I found myself back in the game. (Philly-area readers can visit PHO locations in Southwest Philly and Kensington; others can shop online.)
I picked up this adorably compact cider-making kit, which contains instructions and all the supplies you need but the starter juice and yeast, which I selected with the advice of a helpful staffer. (Cider and mead are good options for the small-space homebrewer, since the fermentation vessel doesn’t need to have as much extra air space as it does for beer.)
For the starter juice, I picked up a gallon of Eden Garden Farm’s excellent fresh apple cider, made at the Bermudian Springs Cider Mill in Dillsburg, PA. It’s UV pasteurized, which helps to preserve the bright, sweet-tart flavor of farmer Lem’s specially selected blend of half a dozen apple varieties.
Using a fresh-pressed cider whose sweet-tart taste you love should yield a well-balanced end product. But any fresh or pasteurized cider or juice will work as long as it doesn’t contain preservatives like sodium benzoate or potassium sorbate. If you do want to select and press or juice your own apples, be sure to use a mix of sweet and tart varieties to get the best flavor.

Before you begin your mini-batch, you’ll want to decide if you’d like to add sugar to the recipe. Additional sugars like honey (which I used), white or brown sugar, or dextrose will boost the alcohol content of the finished product, so be sure to check the alcohol tolerance of the yeast you’re using and calculate how much sugar to add based on that range. Otherwise, a too-boozy brew could kill the yeast and halt fermentation before the full process is completed.
When you’re ready to make your cider, sanitize any equipment that will come into contact with the mixture using a bleach water solution. Add your optional additional sugars, dissolved in a little cider, to the two-gallon bucket that comes with the kit. Dissolve the pectic enzyme, which will make your finished product clear, in a little cider and add that to the bucket.
Next, add the full gallon of cider, sprinkle on the yeast, close up the bucket, pop on the airlock, and stash in a cool, dark place for at least a week and up to three. Calculating how much yeast to add wasn’t something I had discussed with my homebrew guru and online research was inconclusive, so I played it safe and added half the packet. This is something I want to learn more about before I brew my next batch.

That’s primary fermentation. Secondary fermentation is where the fun (and plastic tubing) begins.
Once again, sanitize all vessels, utensils, and other equipment that will come into contact with the cider. You’ll be transferring the cider from the two-gallon bucket into the one-gallon jug. My apartment-size movable dishwasher was the perfect height to be the siphoning surface once I propped up the jug with an apple crate.

Your siphon and tubing, also included in the kit, are the perfect tools to get the cider from vessel A to vessel B without disturbing the yeasts that have settled at the bottom of the bucket, which we want to leave behind.
To move the cider, you’ll pump the auto-siphon, which will move cider from the first vessel to the second one below. It can be a little tricky to do at first without spilling cider all over yourself or the floor; PHO recommends practicing with sanitizer until you get the hang of it. The goal here is to make sure that the tube end stays in the jug and the siphon end doesn’t stir up the yeast at the bottom of the bucket.

Once the cider (minus the sediment) has been siphoned, replace the airlock and stash your jug in a cool, dark place for anywhere from two weeks to up to a month.
After that, you’ll have drinkable, boozy cider—huzzah!
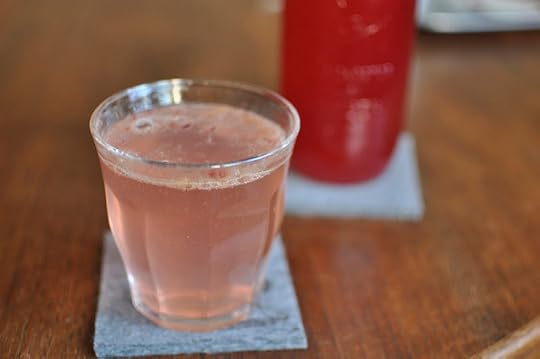
I ended up with two liter bottles and one quart bottle, about ¾ gallon yield after starting with one gallon of fresh cider.
You can stop here and keep your cider still—simply siphon into any bottle with a tight-fitting lid (a growler is great for this, but wine bottles work too) and store in the refrigerator.
At this stage, mine was very light-tasting, slightly sweet and slightly tart. It left the slightest hint of fizz on the tongue and smelled, improbably, of jasmine—a far cry from the unappealing result of my first effort years ago. I’d hoped for something a little drier, with bigger flavors, but I’m pretty pleased with this initial result.
To add carbonation to your hard cider, you’ll need to take one more step and wait a few more weeks. (I’m still in this waiting stage as I write this—but I’ll be back in a few days with an update on my sparkling cider results.)

Additional carbonation requires a little more sugar; a bottle priming calculator can help you determine how much sugar to add based on the volumes of carbon dioxide typical for the style of beer or cider you’re making and the amount of cider you’re working with.
Rather than siphoning from the jug directly into bottles, as you would with still cider, dissolve the amount of sugar you need in a little water and add to your sanitized brewing bucket. Siphon the cider (minus any sediment at the bottom of the jug, of course) into the bucket.
Then, siphon the cider-sugar mixture into sanitized bottles appropriate for carbonation. (PHO’s kit recommends doing this with the siphon; I admit I simply poured my still cider, pretty sediment-free and mixed with sugar, through a sanitized funnel into the bottles.) You can use swing-top bottles, cappable beer bottles, or plastic soda bottles to carbonate. Be sure to leave one inch of headspace between the top of the liquid and the bottle stopper.
When using glass bottles, I like to play it safe and keep them in a plastic cooler with a tight-fitting lid in case of any freak explosions while this last stage of fermentation is taking place. Let your bottles carbonate for two weeks at room temperature, then chill and enjoy.
There you have it—a way to make your own cider that won’t take up more room in your kitchen than, say, your food processor or crock pot.
Have you tried making your own hard cider before? What about other small-scale boozy projects? How did it go? Share your hopes, fears, and experiences in the comments!
PrintHow to Make Apartment-Scale Hard Cider (adapted from Philly Homebrew Outlet)
Ingredients
1 gallon of fresh-pressed or store-bought juice (no preservatives like sodium benzoate or potassium sorbate)Yeast (I used about half of a 9g packet of Mangrove Jack's M02, specifically for cider making; your friendly homebrew supplier can help you choose a good strain)
1/2 teaspoon pectic enzyme
6 ounces wildflower honey or 4.4 ounces white or brown sugar (by weight; this quantity of additional sugar should boost the booziness by about 2% ABV to around 6%-8%)
Optional: 12 grams white sugar (for carbonation step)
Special equipment (all included in the Philly Homebrew Outlet 1 Gallon Cider Making Kit):
Two-gallon food-grade plastic bucket with lid and hole for airlock
One-gallon glass jug
Jug stopper with hole for airlock
Airlock
Auto-siphon and plastic tubing for racking
Growlers or wine bottles with corks (for still cider)
Swing-top bottles, cappable beer bottles, or PET soda bottles with caps (for sparkling cider)
Instructions
Primary FermentationMake sanitizer solution by mixing bleach and cool water at a ratio of 1 tablespoon bleach to 1 gallon water. Sanitize all equipment that will come into contact with your cider by letting it sit in the sanitizer solution for two minutes, then wipe with a clean towel or air dry.
If adding sugars, heat a small amount of cider in a sanitized vessel and dissolve the sugar. Add to the two-gallon bucket.
Dissolve the pectic enzyme in a small amound of cider and add to the bucket, then add the remaining cider.
Once the temperature of the cider in the bucket is below 75 degrees F, sprinkle on the yeast. Close the lid, fill the airlock to the line with water, and insert the airlock snugly in the hole in the lid.
Allow cider to ferment at room temperature for one to three weeks.
Secondary Fermentation
Move the bucket of cider to an elevated location, like a tabletop or counter, 48 hours before you plan to rack so that any sediment disturbed in the process has time to settle before racking.
When you're ready to rack, sanitize all equipment that will come in contact with the cider. Run hot water over one end of the plastic tubing until it's pliable enough to fit over the short end of the racking cane. Attach the long end of the racking cane to the auto siphon and practice siphoning using sanitizer until you feel confident moving liquid with the siphon.
Place the gallon jug lower than the bucket (on the floor or, if that's too low, on a stable chair, stool, apple crate, etc.) so the liquid will siphon efficiently. Put the plastic tubing end of the siphon into the jug, ensuring that you won't pull it out of the jug when pumping the siphon. Place the siphon end halfway into the bucket of cider, taking care not to disturb or suck up the sediment at the bottom of the bucket. Pump the siphon a few times to start the action, carefully lowering the siphon into the bottom of the bucket as the liquid level drops, taking care not to disturb or agitate the sediment while doing so.
Once siphoning is completed, place the stopper and the airlock (filled with water to the line) onto the jug and allow to ferment at room temperature for another two to four weeks.
Bottling
To make still cider, sanitize siphoning equipment, bottles, and caps. Move the jug to an elevated surface, then siphon as described above into growlers or wine bottles, taking care to pinch off the siphon when the liquid level in the bottle is 1 inch away from the stopper. Cap and store in the refrigerator; plan to drink any bottles that are not full first, as additional headspace in the bottle will cause the cider to oxidize quickly.
To make sparkling cider, sanitize bucket, siphoning equipment, bottles, and all other equipment that will come into contact with the cider.
Calculate how much additional sugar to add based on the volume of cider you're brewing. Aim for approximately 2.5 volumes of carbon dioxide. In this recipe, I used 12 grams of white sugar. Dissolve this amount of sugar in a small amount of water and add to the bucket.
Siphon the cider from the jug into the bucket to allow the sugar to mix with the cider.
Elevate the bucket with the cider and additional sugar and place the tube end of the siphon into a sanitized bottle below. Place the siphon into the elevated bucket and start the siphon. Keep a close eye on the liquid level in the bottle and pinch the tube to stop the flow of cider when the level is one inch below where the bottle stopper will be.
Remove the siphon tube, keeping it pinched shut, and insert into the next bottle. Repeat this process until bottles are filled with one inch of headspace.
Cap your bottles and store in a cooler (to contain any popped bottles) at room temperature for two more weeks to carbonate.
If any have more than one inch of headspace, chill and drink those now or refrigerate so that oxidation from too much headspace doesn't damage the cider. 3.1http://foodinjars.com/2017/03/make-apartment-scale-hard-cider/
Related Posts:
Pantry Management: Organizing Your Freezer for the Year Ahead
Mastery Challenge: Meyer Lemon Grapefruit Marmalade
Yellow Plum Apricot Jam + Facebook Live
March 1, 2017
March Sponsors: Cuppow, Fillmore Container, EcoJarz, MightyNest, Mason Jar Lifestyle, and CanningCrafts
Happy March, friends! It’s the start of the month and so is time to thank the businesses that help make this site possible. Please do show them your appreciation for their support with your time and attention!
In the top spot are our friends at Cuppow. They are the creators of the original mason jar travel mug topper and the BNTO, a small plastic cup that transforms a canning jar into a snack or lunch box. Parents and kids love their EIO set, with its grippy silicone sleeve and a lid that makes for easy sipping. And make sure to check out their Cup Club, to see if using a mason jar and cuppow can earn you free coffee at a shop near you!
Lancaster, PA-based and family-owned Fillmore Container are next! They sell all manner of canning jars, lids, and other preservation gear. As always, their blog is an amazing resource for all things jar-related. I love their post on how to make milk kefir. And don’t miss the the JarBox giveaway they’re hosting right now.
Our friends over at EcoJarz on board again this month. They make an array of products designed to fit on top of mason jars, including cheese graters, coffee brewers, and stainless steel storage lids. Make sure to follow them on social, because they host a weekly EcoJarz Fan Pic of the Week giveaway!
MightyNest is an amazing resource for non-toxic, natural, and organic products for homes and families. I’m a big fan of the MightyFix, their monthly product subscription program. Right now, you can get a year’s subscription to the MightyFix for just $99 (it regularly costs $10 a month, so that’s a great deal). Look for a post featuring a MightyFix product in this space next week.
Mason Jar Lifestyle is a one-stop shopping site for all the jar lovers out there. They sell all manner of mason jar accessories and adaptors. If you’re in the market for lids, straws, and cozies to transform your mason jars into travel mugs, make sure to check them out!
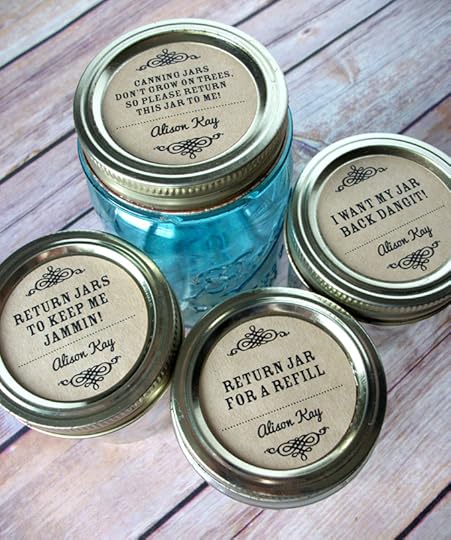
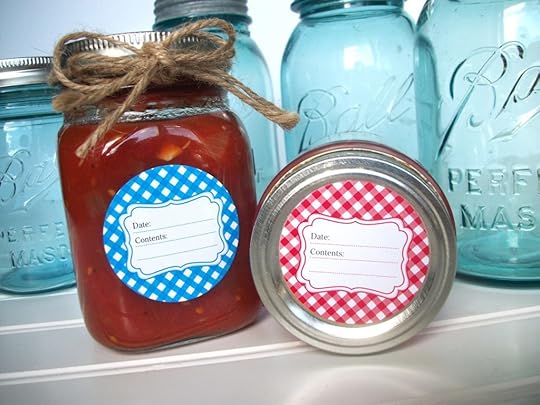
New to the sponsorship family this month is CanningCrafts. Shop owner Alison sells an array of ready made and custom mason jar labels for all your various preserves, syrups, and backyard honey. When next you need labels for a special project, check out CanningCrafts. Oh, and to give Alison feedback on her labels, make sure to fill out the CanningCrafts survey!
If your company or small business is interested in becoming a sponsor, you can find more details here. I offer discounts for multiple month purchases and am always happy to work with your budget. Leave a comment on this post or drop me a note to learn more!
Related Posts:
February Sponsors: Cuppow, Fillmore Container, EcoJarz, MightyNest, and Mason Jar Lifestyle
January Sponsors: Cuppow, Fillmore Container, EcoJarz, iLids, MightyNest, and Mason Jar Lifestyle
December Sponsors: Cuppow, Fillmore Container, EcoJarz, iLids, MightyNest, Mrs. Wages, Hobby Hill Farm, & Mason Jar Lifestyle
February 28, 2017
Mastery Challenge February Round-up: Salt Preserving
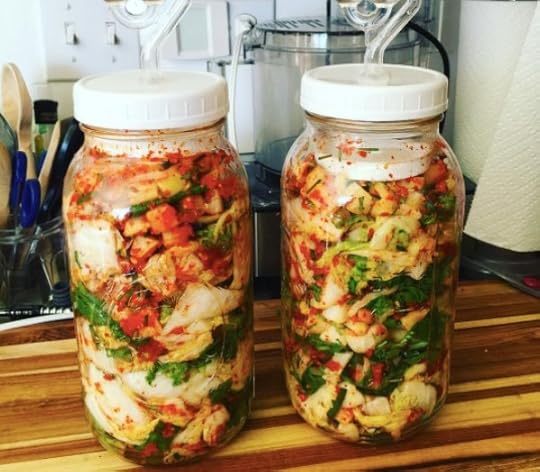
Grace Lee’s gorgeously vivid kimchi.
February has drawn to a close and so it’s time to wrap up the second round of the Food in Jars Mastery Challenge. I continue to be so honored and delighted that so many of you are going along with me on this crazy journey!
This month, we focused on preserving with salt and so many of you spent your time exploring the many options. There were 325 of you that submitted projects to the spreadsheet (down from last month’s 600-ish number, but still great). I think it’s safe to say that even more of you attempted preserved citrus, gravlax, cured eggs, soup base, herbes salées, sauerkraut, and more than reported it.
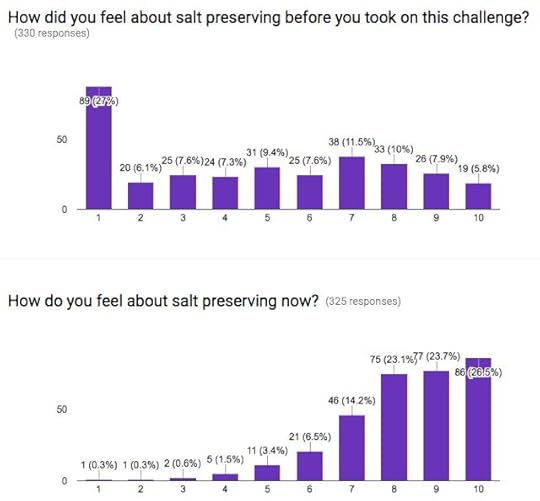
I loved seeing the positive trend in feelings about salt preserving. We only scratched the surface of a very deep food preservation tradition and I do hope that some of you keep exploring this area.
Dried Herb Salt, Herbes Salées, & Soup Base
A trio of garlic herb salts – Les Campagnonades
Szechuan peppercorn salt – wlmich
Salt preserved dill – A Forager’s Home
Cilantro salt – The Scholarly Redneck
Preserved salmon with nettles – Just Another Day on the Farm
Lemon herb garlic salt – She’s Almost Always Hungry
Lemon garlic salt – Southern With a Twist
Orange coriander salt – The Pit Stop BBQ
Citrus, shiitake, and parsley, lemon and garlic salt – My Savory Spoon
Southeast asian herb salt – A Plateful of Happiness
Herbes salées in Weck – blytheandpark
Homemade vegetable stock concentrate – Cookin Mum
Layered citrus salt – East of Eden Cooking
Finally dry herb salt – he4lthybody
Cilantro lime salt – genaboehme
Herb salts and preserved lemons – breezycukale
Stock base – First Things First
Herb salt and preserved lemons – subculturalfarmgirl
Herb salt and preserved citrus – Mindy Friedmann Duff
Sauerkraut & Kimchi
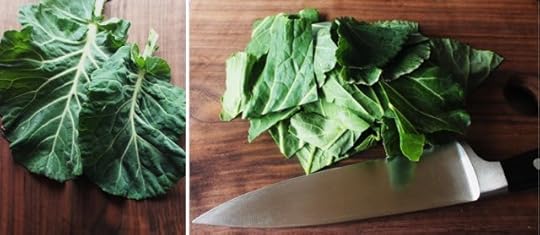
Chopping collards from Brit in the South
Klakdugi – graves_will
Kraut, yolks, and more – Elaine Meep
Kraut, preserved lemons, and more – Canarella
Vivid kimchi – knitatnite
Carrot and cabbage kraut – Destination Unknown
Kraut and preserved lemons – roguewrld
Sauerkraut and preserved lemons – Miles Away Farm Blog
Rosy kraut – Dona Gomez
Collard kimchi – Brit in the South
Bacon kimchi – mnhappyhappy
Polish salted mushrooms – Yarnivorous
Purple kraut – lisakjimenez
Colorful kimchi – gdlee9270
Pineapple daikon mak kimchi – Gin’s Kitchen
Lemon curtido and more – Food Swap Silicone Valley
Preserved Citrus
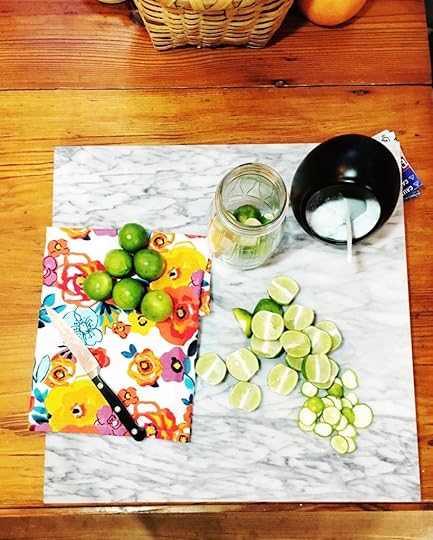
Photo from Cheese and Cracker Jacks
Preserved lemon chunks – jmagooza
Preserved lemons and limes – Tiffany Mitchell-Brewer
Moroccan preserved lemons – GraversParadise
Preserved lemons for days – Maura Sharp
Early morning preserved lemons – Amy Weltner Realtor
Salt preserved blood oranges – Sandra Guillory
Sunny salt preserved lemons – LeAnn Locher
Salt cured lemons – The Basket
A Moroccan preserved lemon video – Leslie-Ann Miller
Two quarts of preserved lemons – Spinstah
Spiced preserved lemons – muffinlady01
Preserved lemons, before and after – carololsen14
Preserved citrus in a fabulous vintage jar – Cheese and Cracker Jacks
Homemade preserved lemons – Sidewalk Shoes
Preserved meyer lemons with Corfiot bay leaves and Kampot pink peppercorns – Victory Canning
Preserved lemons in blue jars – rachelegger
Preserved lemons – sam8371
Salt preserved limes – tatertate85
Historical recipes for preserved lemons – Turnspit & Table
Salt preserved Meyer lemons – msroest
Pretty preserved lemon – Feast in Thyme
Preserved lemons and limes – Bubble Tea for Dinner
Preserved lemons with bay and black pepper – Beth Sternheimer
Preserved lemons – snowmonkeyplum
Preserved grapefruits and oranges – Boudreaux Hund
Limes in salt – tameyourheart
Salt preserved lemons – Shades of Bliss
Salty oranges – Jams and Chutney
Gochugaru preserved lemons – 215kate
Salt preserved lemons and oranges – Gone Walkabout 2
Sweet preserved kumquats – Prospect the Pantry
Salt preserved grapefruit – heartstenciled
Preserved lemon how-to and history – Love & Wild Honey
A row of preserved lemons – Cathy Samko
Gravlax & Cured Egg Yolks
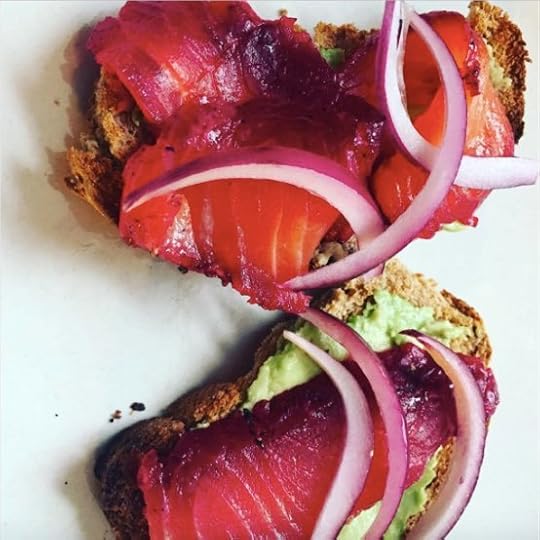
Laurie Kane’s gorgeous beet gravlax
Gravlax – isabellangevin
Gravlax on toast – icewerks
America’s Test Kitchen gravlax – Mauka Girl Creates
Cured egg yolks – Start Now Wellness
Grated cured egg yolks – Anna Knapp
Muffin tin cured yolks – brooklesprouts
Gravlax and more – Thoughts and Reflections
Dreamy gravlax – Laura Shellaburger
Beet cured gravlax – lauriehkane
Egg yolks and preserved lemons – Sustainable ME
Gravlax on a bagel – Jen Carr
Related Posts:
Mastery Challenge: Cured Duck Egg Yolks
How to Use Salt Preserved Citrus
Salt Preserving for the February Mastery Challenge
New Year, New Breakfast with OXO
My father is a master breakfast maker. When he was very young, he did some time as short-order cook at IHOP and learned things like the difference between basted eggs and those cooked over easy. He became comfortable with poached eggs (and passed his worry-free poaching skills along to me). And he became a master pancake maker (evidence here).
Having spend a lifetime training at his elbow, I value breakfast time and take at least a few moments each day to make myself a morning meal (often, I post pictures of such creations to Instagram!).
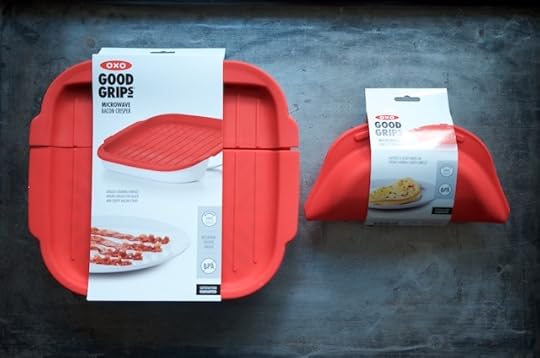
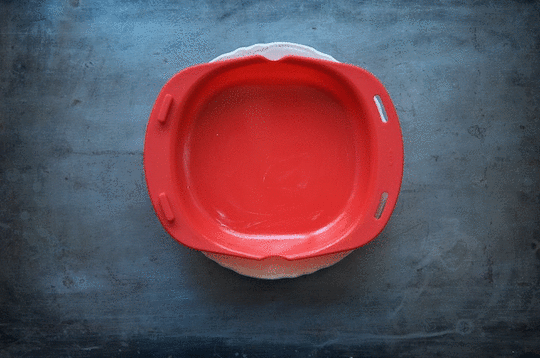
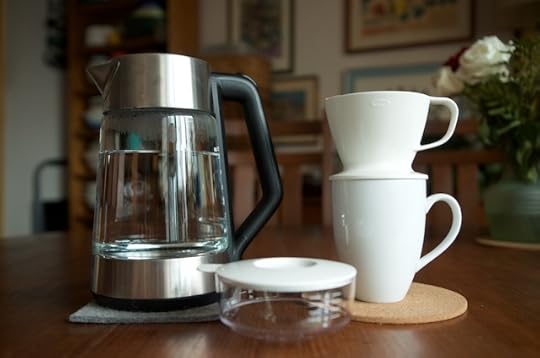
Recently, my breakfast game got a serious upgrade thanks the to folks at OXO. They sent their Microwave Bacon Crisper, a snazzy Microwave Omelet Maker, an Adjustable Temperature Kettle, and a Pour-Over Coffee Maker with Water Tank. I’ve been making easy omelets, boiling water in no time, and making perfect cups of coffee.
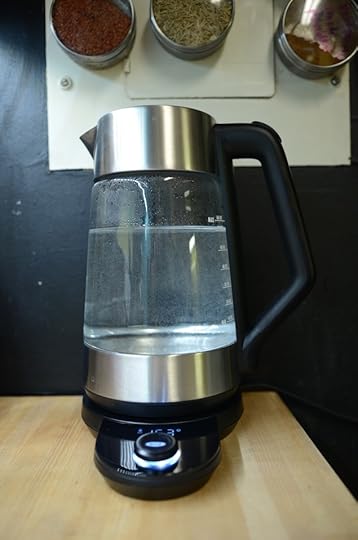
The kettle was the biggest upgrade to my morning routine that they sent. It’s not my first variable temperature kettle, but it’s the most intuitive and easy to use that I’ve had. It’s also incredibly speedy. I feel like I switch it on, turn my back for a moment, and just a minute later, it’s ready. I also didn’t realize how much I’d enjoy having a glass kettle. I so enjoy watching the swirl of bubbles as the water reaches a boil.
I really love the omelet maker for its ease and speed. Grease the silicone pan (I use a dab of butter that I scoot around with my fingers), lay out your omelet ingredients, add the egg and microwave for a few minutes (timing depends on the amount of egg in the pan and the age/power of your microwave). Tuck a piece of cheese inside, fold over, and wait a few seconds. Done.
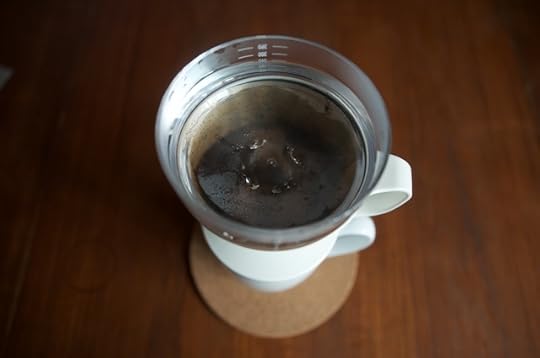
I’m also in love with the pour over coffee maker. I’m the only coffee drinker in my household, so I’ve always used a pour over system of some kind. But as an impatient person, I would just dump the water in and then end up drinking a mediocre cup. This brewer slows me down, removes the guess work, and prevents lousy coffee.

Finally, the bacon crisper. I must confess, this is the only piece of gear that didn’t rock my world. I’d never cooked bacon in the microwave before and the finished results left something to be desired. I can see using this tool to quickly crisp some bacon for a sandwich, but if it’s playing a staring role in the meal, I feel like the stovetop would serve better.
If you’re curious about the products I’ve mentioned, Microwave Bacon Crisper, Microwave Omelet Maker, Adjustable Temperature Kettle, and Pour-Over Coffee Maker with Water Tank, head over to the OXO site to check them out!
Disclosure: OXO sent me the products you see pictured here for review and photography purposes. No additional compensation was provided. All opinions are entirely my own.
Related Posts:
Babka for Now, Sticky Buns for Later + OXO Glass Bakeware
Mary’s Maine Bars & Bake a Difference with OXO For Cookies for Kids’ Cancer
Farro, Kale, and Feta Salad + OXO SNAP Glass Round Containers
February 27, 2017
Links: Blood Oranges, Apricot Glazes, and Winners
Happy Monday, friends! I hope you all had lovely weekends! I’m gearing up to go to a conference in Louisville later this week, so I’m going to do my best to get plenty of tasty things lined up for the blog while I’m away. Now, links!
Vanilla blood orange marmalade
Berry chia seed jam (not safe for canning, but delicious nonetheless)
Meyer lemon and vanilla jam
Kahlua from scratch
Homemade harissa
Pickled carrots with saffron and star anise
Sesame chicken with plum sauce (the sauce uses a cup of plum jam!)
Apricot glazed chicken
A giant linzer cookie
Linzer cookies with blood orange curd
Carrot pear loaf
Coconut cashew granola bars
A guide to baking with ancient grains
How to become a forager
A canning challenge for absolute beginners
Some thoughts on steam canning
The winners of last week’s CanningCrafts giveaway are listed in the widget below! Congratulations Jamie, Alison, and Shelby! For those of you who didn’t win, don’t forget that Alison from CanningCrafts is offering all Food in Jars readers 10% off their order with the code FOODINJARS-MARCH2017. This coupon code expires on March 31, 2017, so go pick out your labels!
Related Posts:
Links: Grapefruit Jam, Soup Class, and a Winner
Links: Marmalade, Pickles, and Winners
Links: Pickles, Trifles, and Winners
February 24, 2017
Krauty the Vampire Slayer from Ferment Your Vegetables
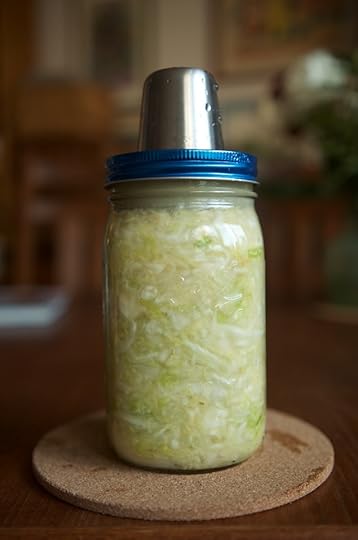
One of the things I’m enjoying about the Mastery Challenge is that it’s motivating me to try new recipes and different preserving techniques right along with you all. This month, in addition to doing a batch of garlic herb salt and some preserved lemons, I pulled down my copy of Amanda Feifer‘s Ferment Your Vegetables in search of something new to try that would meet the perimeters of the February project.
There’s so much to love in Ferment Your Vegetables, but nothing delights me more about this book than the fact that so many of the krauts and kimchis are scaled to make just one quart’s worth. It means that you can explore flavors and styles without overwhelming your kitchen with bubbling crocks.

I settled on Amanda’s recipe for Krauty the Vampire Slayer, because it sounded delicious and also felt like it served as a useful reminder that kraut is essentially a blank slate. You can always combine just cabbage and salt for a traditional batch, but why not mix it up with shredded beets, macadamia nuts, or as you do in this recipe, a whole head of roasted garlic cloves?
The recipe is simple. You cut a head of garlic in half across the equator, tuck it into an oven-safe dish, and roast until caramelized and tender. Once it is cool, shred two pounds of green cabbage and massage it with a tablespoon of salt (keep squeezing and kneading until there’s a goodly bit of liquid in the bottom of the bowl. Pack the garlicky cabbage into a wide mouth quart jar, weigh it down, cover the jar, set it on a small plate or saucer and let it ferment until you like the flavor.
My batch has been humming along since Wednesday afternoon and already smells deliciously funky (I’m going to let it go until at least the two week mark). I’m so happy to have been reminded of the world of krauts that exist out there beyond my beloved carrot and cabbage variety and plan on exploring more of Amanda’s single quart creations in the coming weeks!
If you’re looking for one more project for this month’s challenge, I highly recommend this kraut!
PrintKrauty the Vampire Slayer from Ferment Your Vegetables
Yield: 1 quart
Ingredients
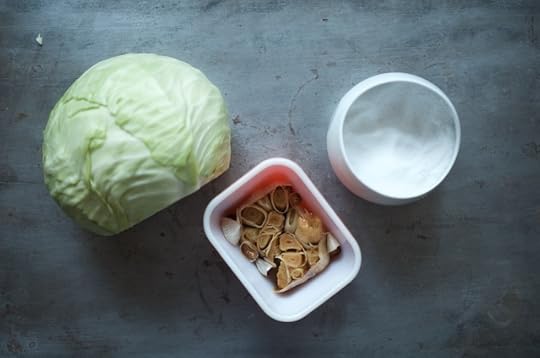
2 pounds (900 g) green cabbage1 tablespoon (18g) kosher salt
1 bulb of garlic, peeled and roasted until soft but not browned
Instructions
Remove any unattractive or wilted outer leaves from the cabbage, reserving one. Cut out the core and rinse cabbage.Grate the cabbage into a large bowl and add the salt. Gently massage and squeeze the cabbage, or let it sit for a bit to make the work easier, until there is a visible puddle of water in the bottom of the bowl and the cabbage pieces stay in a clump when squeezed.
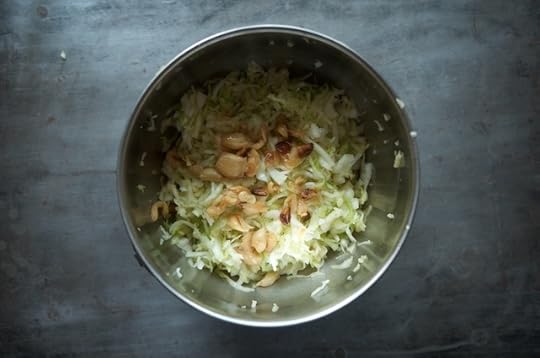
Break the roasted garlic cloves into pieces and drop them into the cabbage mixture. Toss and knead the mixture, distributing the garlic as evenly as possible.
Pack the kraut into a clean quart (1L) jar. First, pack it along the bottom using the top of your fist or your fingers. Continue packing in this fashion, pressing along the sides and bottom, until it comes to 1 1/2 to 2 inches (4 to 5 cm) below the rim. If you need more space, press down on the cabbage and tilt the jar to pour the cabbage liquid back into the bowl.
Use the reserved cabbage leaf to create a cabbage shelf. Pour the cabbage liquid from the bowl into the jar to cover the cabbage. Leave 1 to 1 1/2 inches (2.5 to 4 cm) of headspace at the top of the jar. Using your preferred method, weight the cabbage down and cover your jar.
Place your jar on a small plate or bowl and allow to ferment at room temperature for 2 to 6 weeks. Check weekly to make sure that the brine level is still above the top of the cabbage. If it isn't, press down on your weight to bring some brine up to the top.
Once you're happy with the acidity, remove the weight, secure the lid, and place the jar in the fridge. Enjoy chilled.
Notes
"Recipe reprinted with permission from Ferment Your Vegetables © 2015 by Amanda Feifer, Fair Winds Press, an imprint of the Quarto Publishing Group."
3.1http://foodinjars.com/2017/02/krauty-vampire-slayer-ferment-vegetables/Related Posts:
Mastery Challenge: Cured Duck Egg Yolks
How to Submit Your Salt Preserve for the February #fijchallenge
Meyer Lemon, Garlic, & Cilantro Salt
February 21, 2017
Books to Take You Further on the Salt Preserving Path
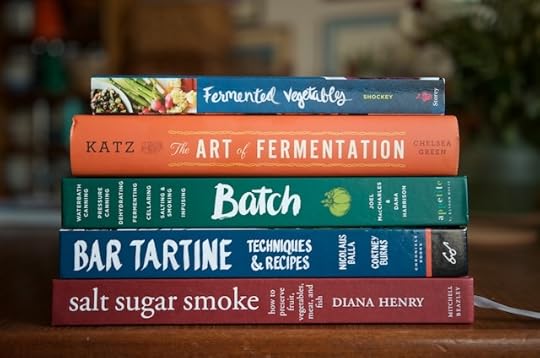
Judging from the happy posts on Instagram and Facebook, most of you who are participating in this month’s Mastery Challenge are really enjoying your exploration of salt preserving (and for those of you who haven’t loved this month, March and its jelly and/or shrub topic is just around the corner).
I thought it would be really useful to recommend some books for those of you who are finding yourself really engaged with the salt preserving and want to keep going after this month is up. Here are the five books I turn to most often when I’m looking for inspiration and answers around the topics of salting, curing, and fermenting.
1. Fermented Vegetables by Kirsten and Christopher Shockey. This book never lets me down. It turn to it any time I’m contemplating trying a new ferment, because I know that Kirsten and Christopher always share honestly about what works and what isn’t worth my time. I appreciate the step-by-step pictures for the basic ferments as well as the more exotic combinations.
2. The Art of Fermentation by Sandor Katz. If you only have space for one book on this topic, this is the one to have. It’s not limited to salty ferments, but covers the entire fermentation canon. It can be dense at times, but as long as you approach it with patience, it will never let you down.
3. Batch by Joel MacCharles and Dana Harrison. The brilliance of this book is in its range. It’s got something for every food preserver, and there’s plenty here for those who want to zero in on salting. Joel and Dana also go beyond the preserves and show you how to make the most of everything you salt, cure, can, smoke, and infuse. The introductions to fermenting and salting are worth the price of admission alone.
4. Bar Tartine by Nicolaus Balla and Cortney Burns. The restaurant is closed, but the book lives on! The sub-title is Techniques & Recipes and it’s the combination of those two that makes this volume so useful. Within each section, they lay down a technique and then over up a handful of recipes that riff on that technique. This allows curious readers to crack open the offered skills and journey towards working knowledge.
5. Salt Sugar Smoke by Diana Henry. This is an intensely beautiful book and the chapter entitled “Salted, Cured, and Potted” is particularly useful to those looking to deepen their salting knowledge (it includes multiple takes on gravlax). Diana is a UK-based author, and so does make storage recommendations that are in contrast with those we’re guided to in the states. In the case of her sweet preserves, I will often use her recipes and then apply a water bath.
If you have other books that you turn to for salt preserving instruction, please share them in the comments!
Disclosure: I got my copy of Fermented Vegetables as a free review copy. All other books listed here were ones I bought because I knew my library wouldn’t be complete without them.
Related Posts:
Cookbooks: Batch
Cookbooks: Fine Preserving, Salt Sugar Smoke, and Whole Larder Love
Cookbooks: Eat It Up by Sherri Brooks Vinton


