
Marisa McClellan's Blog, page 51
January 2, 2017
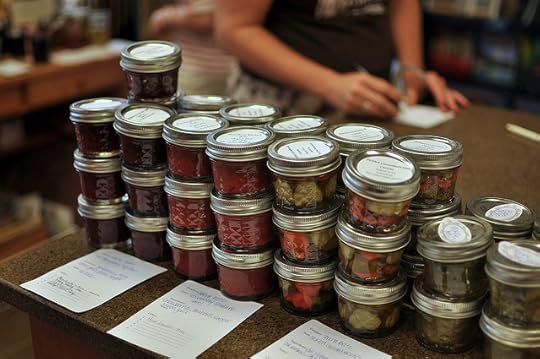
The Food in Jars Mastery Challenge
Join the Food in Jars community for a year-long food preservation mastery challenge. Each month brings a different skill on which to focus and explore!
Happy New Year, friends! And welcome to the Food in Jars Mastery Challenge!
Back in 2010, the blogger we all knew as Tigress hosted a year-long canning challenge known as the Can Jam. Each month, she’d announce a new category of ingredients and we’d all head out and make a preserve featuring that particular food. It was fun to be pushed to try new things and I so loved the sense of community that the Can Jam created.
There have been other challenges in more recent years (Mrs. Wheelbarrow’s Charcutepalooza is one such memorable project) and after much pondering, I’ve decided to host one in 2017.
This challenge will be skill-based. Each month, we’ll all focus on a different pickling or preserving skill, with the intention that we end this calendar year with a greater level of expertise and comfort with a wide range of food preservation techniques than when we started.
At the beginning of each month, I’ll publish a blog post sharing tips on how to be successful with that skill and then will ask you to go forth and try it out. We’ll be talking in greater depth about each challenge in the Food in Jars Community on Facebook and I’ll be popping in regularly to answer questions.
If you have a blog or an Instagram account, I invite you to post the results of your project by the 25th of the month so that I can include it in a round-up (I’ll provide a monthly Google Forms link that you can use to submit your name and URL). However, you don’t have to have any kind of blog or social presence to participate. This challenge is about learning and sharing above all else.
Calendar of Preserving Skills
January – Marmalade
February – Salt Preserving
March – Jelly
April – Quick Pickles
May – Cold Pack Preserving
June – Jam
July – Hot Pack Preserving
August – Low Temperature Pasteurization
September – Fruit Butter
October – Drying and Dehydration OR Pressure Canning
November – Fermentation
December – Fruit Pastes
If you’d like to join the challenge, please use the form below to sign up. If you have any questions, please leave them in the comments and I’ll try to be quick with my replies. Oh, and if you post to Instagram or tweet about the challenge, please use the hashtag #fijchallenge
Loading…
Related Posts:
Giveaway: Smooth Sided and Mini Jars from Ball Canning
December Can Jam: Cranberry Marmalade with Dried Apricots
November Can Jam: Rosy Quince Jelly


December 29, 2016
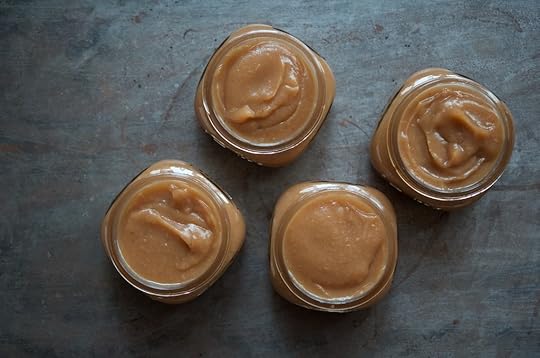
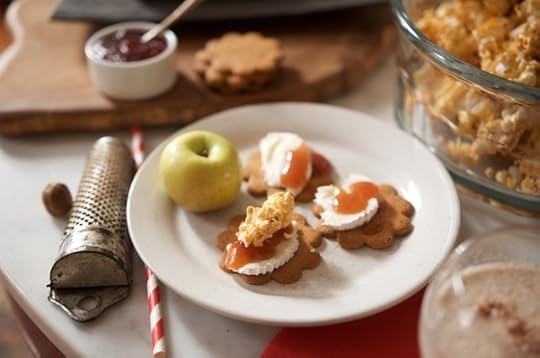
Apple Cinnamon Caramel, Goat Cheese, and a Cocktail
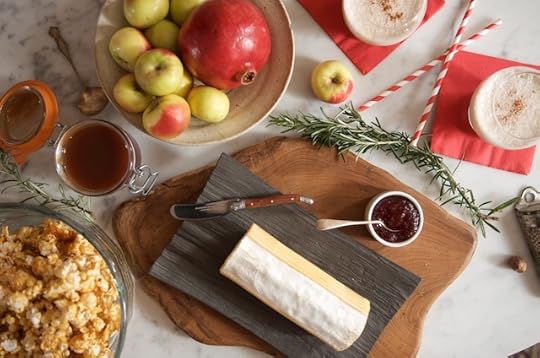
Every so often, my friend Tenaya and I get together and build a cheese board. She brings the cheeses and I come bearing preserves and other treats. A few weeks ago, we had a little mid-afternoon party for two in which we paired a log of downy goat cheese with apple cinnamon caramel, cranberry caramel, and crunchy caramel popcorn.

The cranberry caramel essentially a version of this strawberry caramel I made for Simple Bites many moons ago (8 ounces of cranberries cooked with 1 1/2 cups of water, and then pureed until very smooth). The only change I made was to cook the caramelizing sugar to 285F rather than 250F (for a deeper caramel flavor).
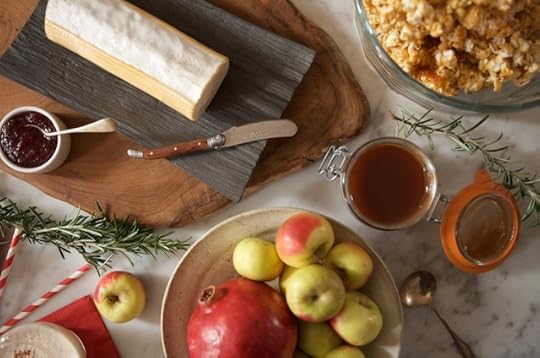
I made a batch of this oven toasted caramel corn to go along with the cheese and preserves. In our minds, this array would be a fun spread for New Year’s Eve, and that’s the perfect night for a sweet, crunchy treat.
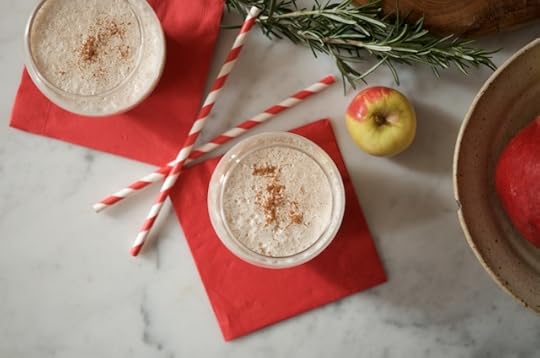
Tenaya and her brother Andre have had two cocktail-centric books come out this year (The New Cocktail Hour and Turner Classic Movies: Movie Night Menus) and so she whirred up a creamy, nutmeg flecked cocktail. Make sure to check out Tenaya’s post about our board.
However you celebrate the arrival of the New Year, I hope it’s a very happy turn of the year!
PrintApple Cinnamon Caramel
Ingredients
For the apple puree:2 pounds apples
1/2 cup water
1 tablespoon ground cinnamon
For the caramel:
3 cups granulated sugar
1 1/2 cups water
Instructions
Prepare a boiling water bath canner and four half pint jars.Wash the apples. Quarter and core them. Place them in a saucepan with the water and simmer for 20-25 minutes, until the apples are quite soft.
Pour the cooked apples into a blender carafe and add the cinnamon. Puree until very, very smooth. You should have about three cups of apple puree.
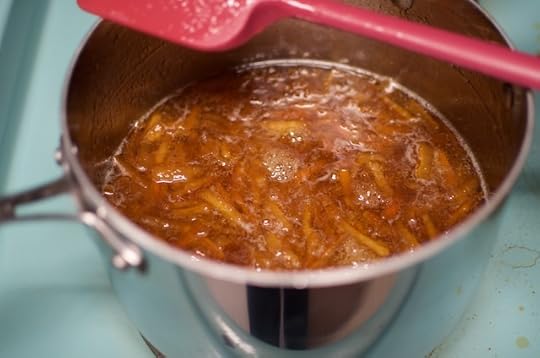
Combine sugar with water in a small sauce pan. Place over medium-high heat and simmer for 10-15 minutes, until the sugar reaches 285°F and darkens to the color of a tarnished copper penny.
Do not stir the cooking syrup, instead hold the handle of the pot and gently swirl it to move things around.
Once the syrup has reached 285°F, remove the pot from the heat and stir in the apple puree. It will bubble, spatter, and appear to seize up, so take care.
Stir puree into the sugar until it is a smooth sauce and return the pot to the heat. Continue stirring and cooking, until the sauce reaches 218°F.
Remove caramel from heat and funnel into prepared jars, leaving 1/2 inch headspace. Wipe rims, apply lids and rings and process in a boiling water bath canner for 10 minutes.3.1http://foodinjars.com/2016/12/apple-cinnamon-caramel-goat-cheese-cocktail/
Related Posts:
Holiday Giving: Oven Toasted Caramel Corn
December 23, 2016
Jammy Oatmeal Pecan Bar Cookies
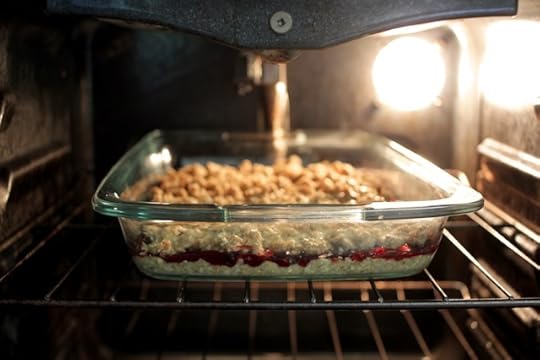
I’m at my sister’s house in Austin for the holiday. I’ve done a bunch of cooking and baking since I’ve been here and one of the break-out hits was this pan of oatmeal pecan bar cookies. The recipe is based on one that my friend and former intern Olivia turned me on to. It started life as a thumbprint and I’ve translated it to work as 13 x 9 inch bar.
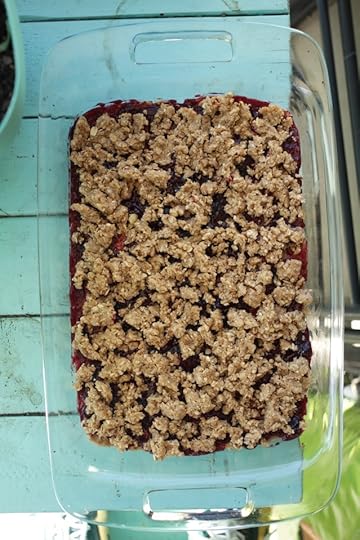
These not-too-sweet cookies are a good afternoon snack and the presence of nuts and oatmeal makes them even feel appropriate for breakfast. We’ve slowly been chiseling away at the pan, taking a sliver or two when the mood strikes.
May your holidays be merry!
PrintJammy Oatmeal Pecan Bar Cookies
Ingredients
1 1/2 cups pecans1 1/2 cups rolled oats
1 1/2 cups whole wheat pastry flour
1 teaspoon fine sea salt
3/4 cup coconut oil
3/4 cup maple syrup
3/4 cup jam
Instructions
Preheat the oven to 350 degrees F.Put the pecans and oats in a food processor and pulse into a rough meal.
Add the flour and salt and pulse to combine.
Finally, add the coconut oil and maple syrup and pulse a few more times.
Scrape the dough into a large bowl and push it into a ball with your hands (if the coconut oil didn't integrate all the way, work it in now).
Take 2/3 of the dough and press it into an even layer in the bottom of a 13 x 9 inch baking pan.
Spread the jam on top of the dough.
Take the remaining dough and crumble it loosely top of the jam, forming an even layer.
Bake for 45 to 50 minutes, until the topping has browned a bit (it won't darken dramatically) and the bars are set.
Remove from the pan from the oven and let bars cool. Cut into squares and serve. 3.1http://foodinjars.com/2016/12/jammy-oatmeal-pecan-bar-cookies/
Related Posts:
December 20, 2016
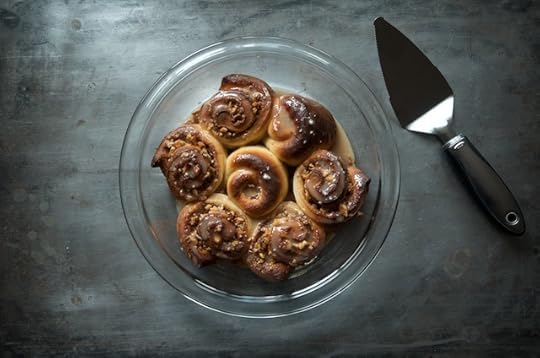
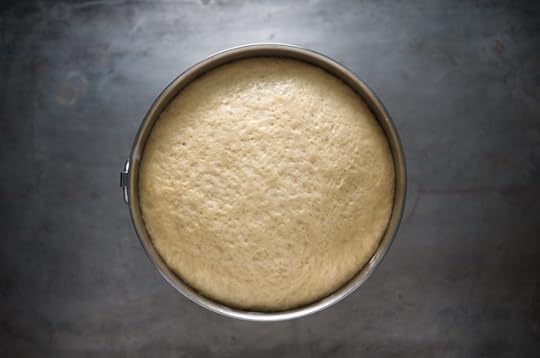
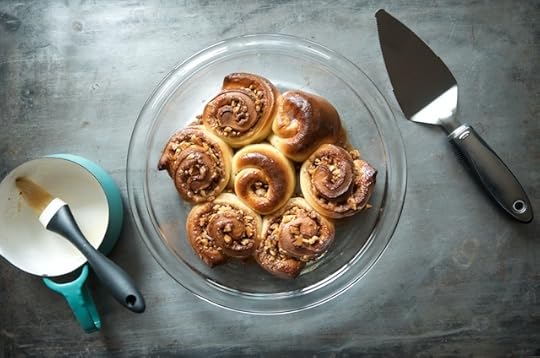
Babka for Now, Sticky Buns for Later + OXO Glass Bakeware
Use this sweet, yeasted dough to make a batch of apricot walnut babka for now, and a batch of sticky buns that can be par-baked and popped into the freezer for another day. It’s perfect do-ahead baking for the upcoming holiday.
Back in November, I got an email from OXO looking for bloggers to participate in a campaign designed to feature their sturdy glass bakeware. The idea was to create something that could be made ahead, frozen, and then either baked off or reheated later. Their glassware is particularly good for these fridge or freezer to oven situations, because it’s made from sturdy resistant borosilicate glass.
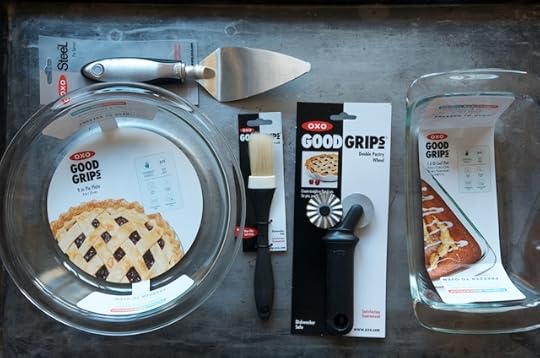
They sent out a Glass 9″ Pie Plate, a Glass 1.6 Qt Loaf Baking Dish, one SteeL Pie Server, a nifty Double Pastry Wheel, and 1″ Pastry Brush. I spent a little time pondering what I might make that would fit the assignment, make good use of these tools, and would also allow for a liberal application of jam.
What I came up with was a single dough that allowed me to both have a relatively immediate treat, as well as one to freeze and finish baking on another day. I’m calling this concept babka for now, sticky buns for later. Because who wouldn’t want that?

I started by searching out recipes for a sweet, yeast-risen dough. After a bit of internet searching and book scanning, I found what I was looking for in Tammy Donroe Inman’s fabulous book Wintersweet (it’s a favorite of mine for holiday baking).

I made Tammy’s dough the day before I wanted to bake. After its first rise, I punched it down, tucked it into a glass storage container, and popped it into the fridge (a handy trick any time you need to make yeasted doughs work for your schedule). The next day, I divided it up into two balls and began to turn one into babka. I opted for a filling of apricot jam and toasted walnuts.
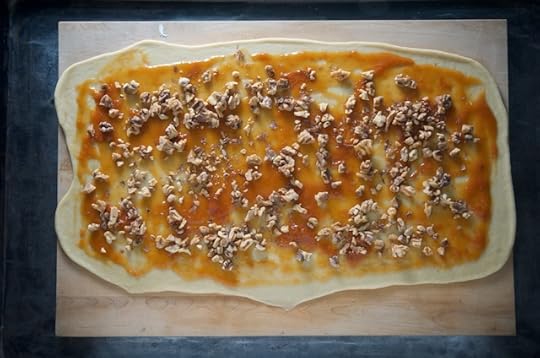
Once the dough was rolled out into a large rectangle (about 18 x 12 inches), I brushed it with melted butter, spread out a half pint of apricot jam, and sprinkled the whole things with those toasted and chopped walnuts.
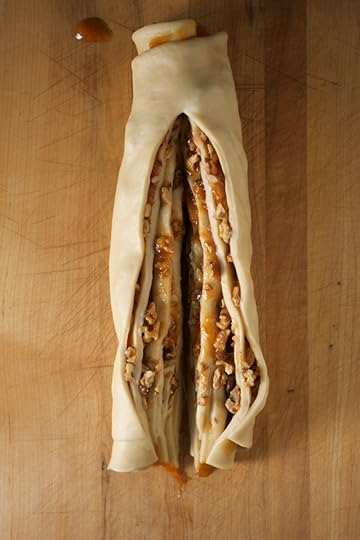
As far as I can tell, the thing that makes a babka a babka is that it’s a slightly sweet, buttery, yeasted dought that’s filled, rolled, sliced and twisted. And so that’s what I did. Starting with the short side, I carefully rolled until I had a fat tube of filled dough. Then, taking a sharp knife, I cut the roll down the middle, taking care to leave the top inch (or so) intact.
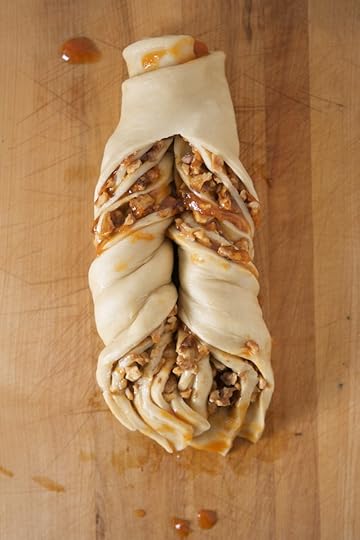
After slicing the dough, I took a deep, steadying breath, firmly grasped the two ends and twisted them outward in opposite directions. There was some filling loss, but not enough to be particularly worrisome.
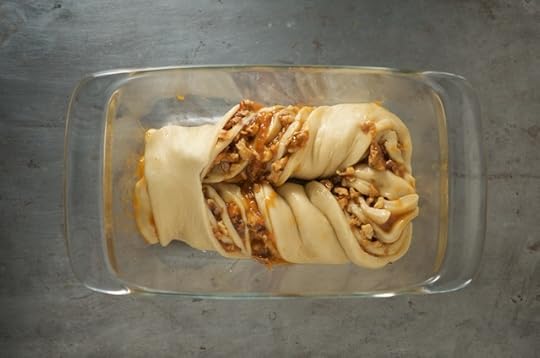
Once sliced and twisted, it was simply a matter of nestling the dough in the loaf pan and letting it rise in a warm place before baking.
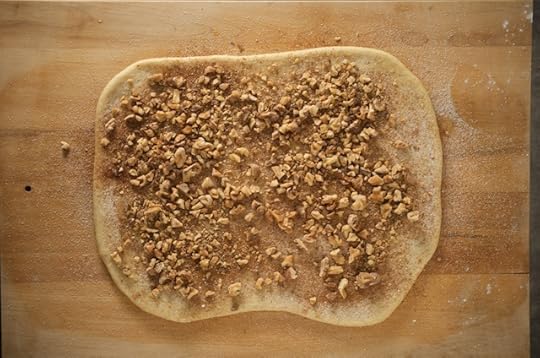
While the babka took its time rising, I turned my attention to that second ball of dough. Much like the babka, it needed to be rolled out into a generous rectangle. I brushed the dough with melted butter. However, instead of applying jam, I dusted the dough with cinnamon and sugar (using OXO’s tea ball to ensure even distribution) and used the rest of the walnuts.
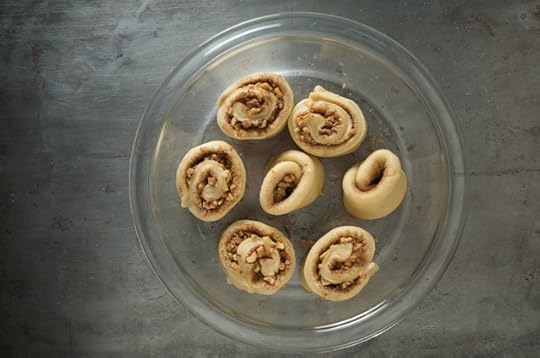
I rolled up the dough (starting with the long side, rather than the short one) and sliced it into rounds. I set them into the pie plate and let them rise (at this point, the babka was ready for the oven, since I actually ate dinner in between working with the two sets of dough).
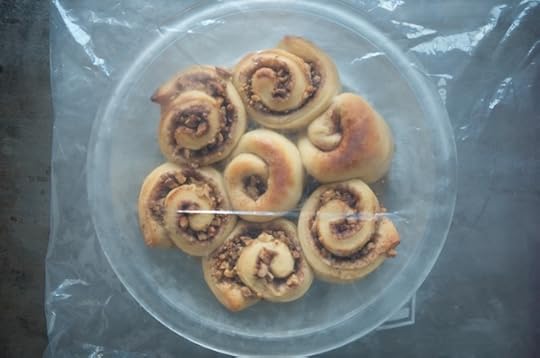
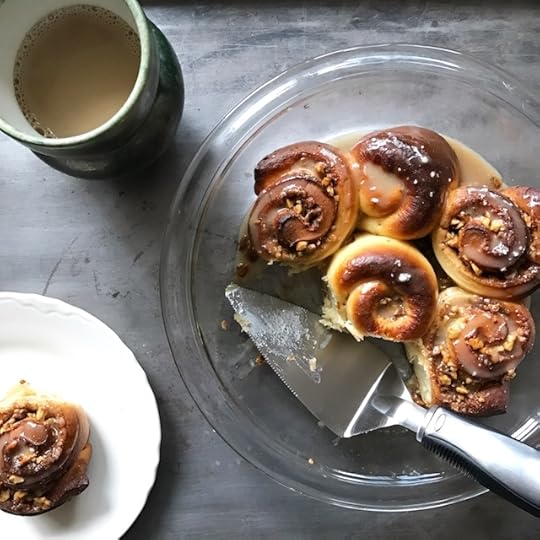
When the babka was done (it should be around 200 degrees F inside when finished. If the exposed jam seems to be getting too done, perch a sheet of foil on top of the pan) and the sticky buns had risen, I popped that pan into the oven. However, instead of cooking them to completion like the babka, I only baked them for 12 minutes. This is just long enough to get a little color and set their shape. Once they are cool, pop the pan into a big ziptop bag and nestle it into the freezer.
The night before you want to eat your sticky buns (perhaps when the babka is all gone?), pull the pan out of the freezer and make room for it in the fridge so that they can defrost slowly. The next morning, heat the oven to 350 degrees and slide in your pan of sticky buns. They’ll only need a 15 minutes in the oven and they’ll be ready to eat.
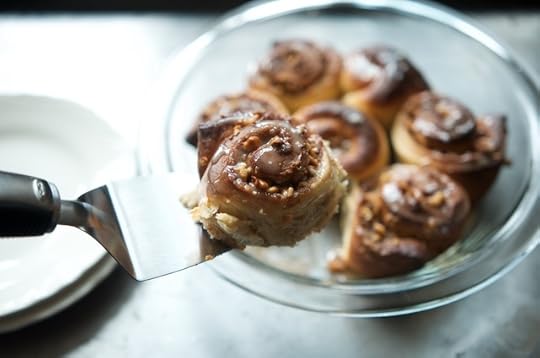
Brush the finished sticky buns with a little melted butter to help them stay soft, and then drizzle them with a little glaze made from powdered sugar, milk, vanilla extract, and a dusting of cinnamon.
As we head into the frenzy of this week, wouldn’t it be nice to have a loaf of babka on the counter and a pan of sticky buns ready to go in the freezer?
PrintBabka for Now, Sticky Buns for Later + OXO Glass Bakeware
Ingredients
3/4 cup milk2 tablespoons active dry yeast
6 tablespoons butter, at room temperature (plus a bit more for greasing the bowl)
1/3 cup granulated sugar
2 large eggs
2 tablespoons maple syrup
1 teaspoon vanilla extract
1 teaspoon salt
4 cups unbleached all-purpose flour
For the Filling:
2 tablespoons butter, melted
1 1/2 cups walnuts, toasted and chopped
1 cup apricot jam
1 egg, beaten with a little water
1/4 cup granulated sugar
1 tablespoon cinnamon
To finish the sticky buns:
1 tablespoon melted butter
1/4 cup powdered sugar
1 tablespoon milk
1/2 teaspoon cinnamon
1/4 teaspoon vanilla extract
Instructions
Measure out the milk and heat until lukewarm (I like to do this in a glass measuring cup in the microwave). Sprinkle the yeast on top of the warm milk and let it sit for five minutes, until it is foamy.Combine the butter and sugar in the bowl of a stand mixer and beat with a paddle attachment until light and fluffy. Add the eggs and maple syrup and mix until well-integrated.
Measure out the flour and whisk in the salt.
With the mixer running on low, alternate between adding the flour and the milk, until both are incorporated.
Stop the mixer and switch to the dough hook. Knead for 4 to 6 minutes on low, until the dough comes together and forms a soft, smooth ball.
Butter a large bowl and set the dough in it. Cover with plastic wrap and set the bowl in a warm spot to rise for about two hours, or until the dough has doubled (remember that if your ingredients were quite chilly, the rising time might be even longer).
Once the dough has doubled, gently deflate it. At this point, you can either refrigerate your dough and pick up the following day, or you can proceed.
Divide the dough into two equal sized portions.
To make the babka, roll out the dough into a 18 x 12 inch rectangle. Brush with melted butter, apply a thin layer of apricot jam, and evenly scatter half the walnuts (trying to leave about an inch margin on one short edge).
Starting with the other short edge, carefully roll the dough into a tight log, working towards the bare margin.
Once the dough is rolled, slice it in half down the middle, leaving top inch of the roll uncut and still attached.
To twist the babka into its traditional shape, grab the ends and twist them opposite one another towards the outsides of the loaf.
Nestle the twisted loaf into a loaf pan, cover it with plastic and let it rise. While it rises, preheat the oven to 350 degrees F. Brush the babka with the egg wash and bake for 35 to 40 minutes, until an instant read thermometer says that the loaf is approximately 200 degrees F inside.
To make the sticky buns, roll out the dough into a 12 x 10 rectangle. Brush with melted butter, sprinkle evenly with the sugar and cinnamon, and then spread out the remaining walnuts.
Starting with the long side, roll the dough. Cut it into buns about 1 1/2 inches thick and arrange them in a pie plate.
Let the buns rise and then par-bake at 350 degrees F for 10-12 minutes.
Remove pan from oven and let cool. Tuck it into a large ziptop bag and freeze.
The night before you want to eat the sticky buns, move the pan from the freezer to the fridge to defrost.
In the morning, heat the oven to 350 degrees F. Bake the buns for 15 or so minutes, until they're quite golden. While they bake, melt the butter and combine the powdered sugar, milk, cinnamon, and vanilla.
Brush with melted butter while the buns are still hot. Once they've cooled just a bit, drizzle on the glaze.
Serve warm or room temperature.
Notes
The yeast dough in this recipe is very lightly adapted from Tammy Donroe Inman's book Wintersweet.
3.1http://foodinjars.com/2016/12/babka-now-sticky-buns-later-oxo-glass-bakeware/Related Posts:
Mary’s Maine Bars & Bake a Difference with OXO For Cookies for Kids’ Cancer
Farro, Kale, and Feta Salad + OXO SNAP Glass Round Containers
Maple Bourbon Apple Butter + OXO On Illuminating Digital Immersion Blender
December 18, 2016
Links: Linzer Cookies, Dorie’s Jammers, and Winners
This weekend was all about finishing up gift shopping, making a bit of candy for sharing, and finally getting the tree decorated (it’s been up for about a week, and just had a few lonely ornaments hanging about for all that time). I fly away to Austin on Tuesday for some merry making with my family. Now, links!
Alpine cider jelly.
Grapefruit pomegranate jelly.
Hot pepper relish.
Oven-cooked stock.
Soup mixes in jars.
. Linzer bars. Boozy linzers.
Rugelach ring.
Dorie’s jammers.
Gingerbread fruitcake.
Chocolate panettone.
That’s My Jam, winter edition.
Upcoming classes at the Learning Kitchen.
Time for some winners! You’ll find the EcoJarz winners in the widget below. The winner of Wusthof giveaway I hosted a couple weeks ago is #98/Louise.
Related Posts:
Links: Pickled Figs, Cinnamon Simple Syrup, and Winners
Links: Wild Jams, Homemade Crackers, and a Winner
Links: Nectarine Ketchup, Hot Fudge, and a Winner
December 17, 2016
Gift Guide 2016: Stocking Stuffers
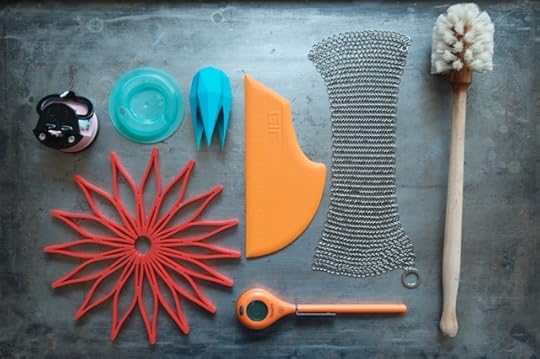
We’re in the final stretch before Christmas and the start of Hanukkah. Thus far in my series of short gift guides, I’ve featured a couple upgrades for the canner who has it all, things I give to my favorite coffee lovers, and lovely things for your favorite home cook. In this, the final gift guide, we’re talking stocking stuffers. These are all relatively small, useful, affordable items that I reach for all the time.
1. AnySharp Pro – This is a small, powerful knife blade sharpener that suctions to your countertop and makes quick work of your knives and scissors. It doesn’t entirely replace occasionally professional sharpening, but it’s a huge help on busy cooking days.
2. Cuppow – The classic Cuppow is perfect for any jar lover looking to expand the utility of their jar stash. Pair one with a skinny glass straw for a waste-free way to drink more water.
3. GIR Wine Stoppers – These low-profile silicone wine stoppers make a leak-proof seal on all manner of bottles and look good doing it.
4. GIR Scraper – The best tool for easing sticky bread doughs and batters out of mixing bowls. I use mine nearly every time I bake.
5. The Ringer – Made from stainless steel chainmail, this scrubber is designed to remove tough bits of food from cast iron while leaving your seasoning intact.
6. Bürstenhaus Redecker Bottle Brush – I have used a lot of bottle brushes in my day, but this the best one ever. You can tell I use it a lot, because when I grabbed it for this picture, it hadn’t had time to dry between uses.
7. ThermoPop – The best little instant read thermometer money can buy.
8. Blossom Trivet – Good for canning and for protecting your surfaces from hot dishes.
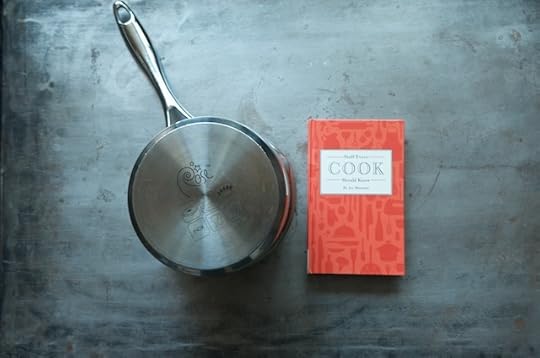
9. Caramel Pot – Years ago, a PR firm sent me this little pot from Rose Levy Beranbaum’s cookware line. I use it all the time. It’s great for caramel sauces, but is also magical for homemade bechamel and cheese sauces.
10. Stuff Every Cook Should Know – Written by my friend and Local Mouthful co-host Joy Manning, this little book is packed with useful tips and information for home cooks of all skillsets.
And that wraps up my gift guide series for another year. May your holiday celebrations be joyous!
Related Posts:
Gift Guide 2016: For the Coffee Lovers
Gift Guide 2016: Things for Your Favorite Home Cook
Gift Guide 2016: Things for the Canner Who Has Everything
December 15, 2016
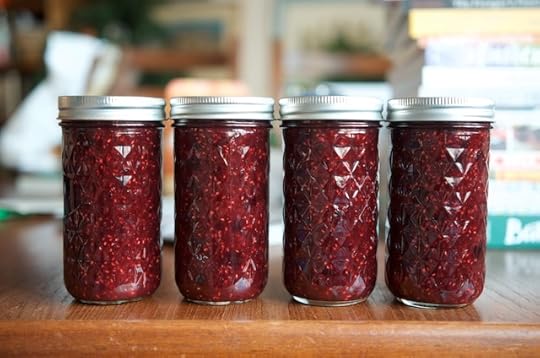
Holiday Berry Jam for Gift Giving
This holiday berry jam combines frozen strawberries, raspberries, and blueberries with fresh cranberries. The result is a bright, flavorful jam that works beautifully for holiday gift bags and baskets.
No matter how much jam making I do during the summer season, I almost always find myself a little short on the desirable jams come gift giving time. Now, don’t get me wrong. I have mountains of preserves. But many of them were experimental batches that just don’t work for neighbors and Scott’s coworkers.
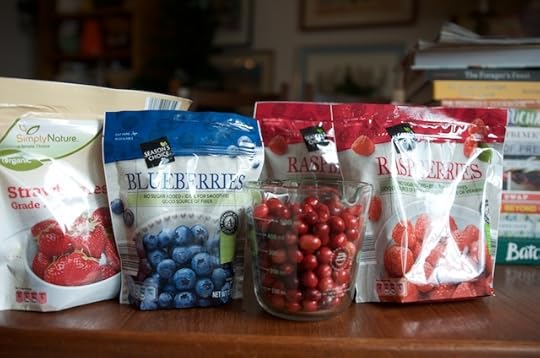
This year, instead of relying only on pears and apples to make up the shortfall, I headed for the freezer section at the grocery store. In the past, I’ve been hesitant to make giftable jam exclusively with frozen fruit, because I find it almost always ends up with a softer set and a slightly dull flavor.
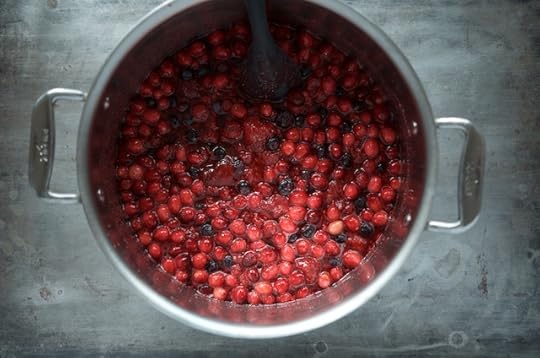
But last week, the solution came to me in a flash. Cranberries. Combine frozen berries with a small portion of cranberries and you get perfect jam every time. The cranberries provide both ample pectin and welcome acidity to ensure that the jam sets and tastes terrific. Holiday berry jam is born!

I made this jam with 24 ounces of raspberries, 12 ounces of strawberries, 12 ounces of blueberries, and 8 ounces of cranberries. You can easily change up the frozen fruit, but maintain the basic ratio of three pounds frozen berries to 8 ounces of cranberries.
The yield on this sucker was just a little bit more than 6 cups. I canned it in four 12 ounce jelly jars because those were the easiest jars to put my hands on. You could also do six half pints or even a dozen 4 ounce jelly jars. Make it work for you.
Oh, and one last thing. If you have an Aldi near you, know that it’s an excellent spot to pick up your frozen fruit. Their prices are awesome and they often have organic options.
PrintHoliday Berry Jam
Ingredients
24 ounces frozen raspberries12 ounces frozen strawberries
12 ounces frozen blueberries
8 ounces fresh cranberries
3 cups sugar
Instructions
Prepare a boiling water bath canner and enough jars to hold six half pints of product.Combine the berries and sugar in a large, non-reactive pot. Stir to combine. Let sit for 30 minutes or so, until the berries are mostly defrosted.
Place the pot on the stove over high heat and bring to a boil. Reduce the heat to medium-high and cook, stirring regularly, until the jam thickens. This should take between 20 and 25 minutes. Because of the presence of the cranberries, this jam will pass the sheet test on a spatula.
When the jam is finished, remove the pot from the heat.
Funnel the jam into the prepared jars, leaving 1/2 inch headspace.
Wipe the rims, apply the lids and rings, and process in a boiling water bath canner for 10 minutes.
When the time is up, remove the jars and set them on a folded kitchen towel to cool. When the jars have cooled enough that you can comfortable handle them, check the seals. Sealed jars can be stored at room temperature for up to a year. Any unsealed jars should be refrigerated and used promptly. 3.1http://foodinjars.com/2016/12/holiday-berry-jam-giving/
Related Posts:
Salted Maple Walnut Granola
Holiday Giving: Oven Toasted Caramel Corn
Holiday Giving: Pumpkin Seed Brittle
Guest Post: Transforming Your Jamming Fails
We’ve all been there.
Staring with glazed and uncomprehending eyes at a dozen pints of our favorite “jelly” sitting on the counter: a jelly that never jelled.
How could this have happened?
We followed the recipe to the letter. We didn’t fall into the “a little less sugar won’t hurt” trap. Our choice of pectin was impeccable. We gave up most of a Saturday, standing over a pot of boiling, staining fruit that spattered our bare arms with specks of magma while our friends hit the beach or the bar.
The seal is tight; there’s nothing wrong with the preserves inside. Still, the truth is staring us in the face: our jam or jelly didn’t get the message it wasn’t supposed to turn out like maple syrup. After all, it wasn’t pancakes you wanted to eat it with; it was toast, darn it!
Well, buck up, canners! Here’s what to do next:
File this one under the “A rose by any other name smells as sweet” category! Did you think you were making marmalade? Surely you meant ‘marinade’! Through bitter experience, I’ve discovered that runny preserves work marvelously well as meaty accompanists. Use the old standbys as your guide: citrus and cranberry paired with poultry, for instance, or apple or rhubarb with pork. One of my family’s favorite recipes, the cheekily-titled “Becky’s Breasts” is basically runny cranberry sauce whisked up in equal parts with bottled Italian dressing. Souse your chicken with the above, leave in the fridge a few hours, bake, and serve!
2. Skip the sugar! Planning on whipping up the weekly apple crisp for supper? Be my guest, but why not sub in some of that failed jam or jelly as a sweetener? Some favorite failures: strawberry-rhubarb, raspberry un-jelly, and the blueberry-peach jam experiment that wound up tasting like cough syrup, but was vastly improved in its fruit crisp setting. Mix and match!
3. Your favorite neighborhood watering hole. Didn’t think that’s where you worked, did you? Now look at all of that black currant syrup you just put up. Are you going to throw out all that work, or are you going to go out shopping for some vodka and soda water and throw yourself a party? Doesn’t that feel better?
Life is a lot like canning, friends. Some relationships are going to jell beautifully, while others may require some serious adjustments in outlook. Canning pros like Marisa will tell you that it’s those willing to be flexible who enjoy the most delicious success.
Elizabeth Peirce writes books about how busy people can grow, prepare and preserve their own food. Exhausted parents get extra empathy and free pep talks at her blog, C.O.O.K. (creativeorganiconlinekitchen.com), along with recipes, how-to’s, and book links.
Related Posts:
Guest Post: Aged Persian Garlic Pickles from Stefanie Kulhanek
Guest Post: Sailboat Canning and Mango Chutney from Heather Francis
Guest Post: Honey-Vanilla Bean Quince Preserves from Camille Storch
December 13, 2016
The 2016 Class of Canning, Preserving, and Culinary DIY Books
In need of a new canning, preserving or DIY book for the holiday season? Look no further than this list of books published in 2016!
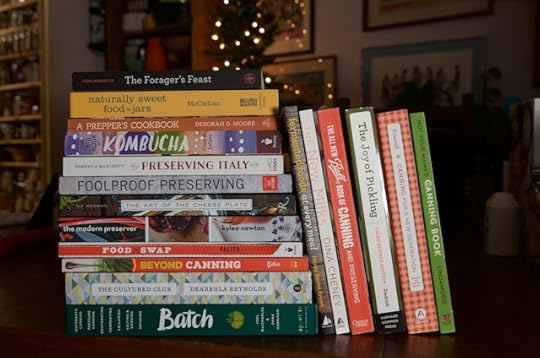
Oh friends, this last year was a very good one for canning and preserving books. I’ve done a thorough search of my shelves and stacks and have come up with 18 lovely volumes that came out in 2016. Let’s flip through the stack!
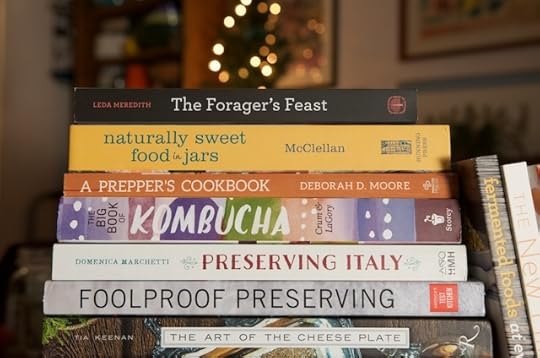
The Forager’s Feast – Written by Leda Meredith, this book contains everything you need to know about foraging wild edibles and transforming them into all manner of tasty things. If I can ever find enough rose hips, I plan on making the Rose Hip Freezer Jam. (Amazon | Powell’s)
Naturally Sweet Food in Jars – My third canning book, this volume features recipes sweetened with honey, maple, agave, coconut sugar, fruit juice concentrates, and dried fruits. It makes a fabulous gift for anyone who is looking to reduce the amount of refined sugar in their home cooking. (Amazon | Powell’s)
A Prepper’s Cookbook – While not specifically a canning or preserving book, this slim paperback by Deborah D. Moore is an incredibly useful volume for those of us who have a homemade pantry that we’re trying to put into better use. (Amazon | Powell’s)
The Big Book of Kombucha – I’ve been a semi-regular kombucha brewer for years with mixed success. It wasn’t until a copy of this hefty book by Hannah Crum and Alex LaGory came my way that I actually starting having consistent success with my finished product. (Amazon | Powell’s)
Preserving Italy – This book by Domenica Marchetti is the best one on the market about canning, preserving, curing, and infusing in the Italian style. If you’re looking to make jams, cured meats, pickles, and liqueurs like the ones your nonna used to make, this volume should be on your shelf. More here. (Amazon | Powell’s)
Foolproof Preserving – Written by a team from America’s Test Kitchen, this book is a nice addition to the small batch canon. I don’t love that so many of the recipes aren’t safe for a water bath, but the flavor combinations are spot-on and recipe variety is appealing. More here. (Amazon | Powell’s)
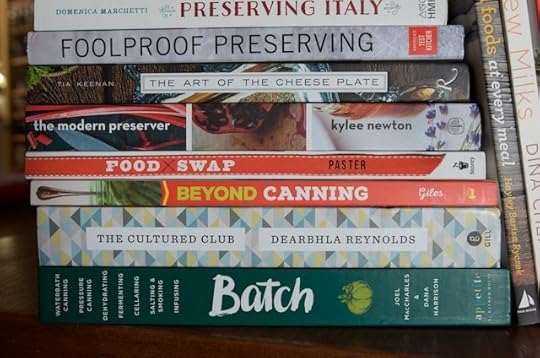
The Art of the Cheese Plate – On the face, this book by Tia Keenan doesn’t much look like it belongs in this stack. But any cheese plate book worth its salt contains a trove of recipes for tiny batches of fabulous condiments and boy, does this one deliver. There’s sweet potato butter, apple chutney, pickled blueberries, and so much more. (Amazon | Powell’s)
The Modern Preserver – This charming book by UK-based professional preserver Kylee Newton bursts with appealing recipes and beautiful pictures. There is nothing in this volume that I don’t want make and many things I wish I’d thought of first. More here. (Amazon | Powell’s)
Food Swap – Whether you’re an active food swapper or not, there is so much in Emily Paster’s useful and clever book to like. It’s got jams, pickles, syrups, and baked goods, all that travel well, are easy to create, and make great gifts. (Amazon | Powell’s)
Beyond Canning – Smoky carrot coins. Banana ketchup. Hibicus lime jelly. You’ll find those things and so much more in this creative and varied book by Autumn Giles. If you’re tired of the same old thing, this book will breathe new life into your canning practice. More here. (Amazon | Powell’s)
The Cultured Club – I picked up this book while in Ireland in October. Written by fermentation expert Dearbhla Reynolds, it contains a wild range of ferments (fermented potato mash and lacto-fermented pestos!) and I can’t wait to explore it even more than I already have. (Amazon)
Batch – This massive book by Joel MacCharles and Dana Harrison is the most comprehensive preserving book that we saw this year. It contains more than 200 recipes for jamming, pickling, dehydrating, infusing, and fermenting as well as cooking, baking, using, and serving those varied preserves. It’s a must-have for avid canners. More here. (Amazon | Powell’s)
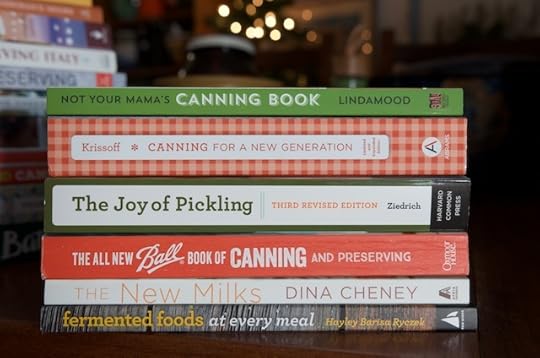
Not Your Mama’s Canning Book – This book by Rebecca Lindamood is totally brilliant. When I first opened it up and flipped through the recipes, I found myself wished fervently that I’d thought of the Instant Hummus-In-A-Jar or the Maple Bourbon Pecan Pie filling first. The recipes are unusual, approachable, and unlike anything else you have on your shelves. (Amazon | Powell’s)
Canning for a New Generation – The updated and expanded edition of this now-classic book by Liana Krissoff was published this summer and it’s even better than the original. If you don’t have the first edition on your shelf already, make sure to seek out this new one. (Amazon | Powell’s)
The Joy of Pickling – Another new edition of an old favorite, this volume by Linda Ziedrich is another must-have for an avid canner. An earlier version of this book was my first pickling primer and I’m delighted to have this edition, with its expanded section on pickling theory. (Amazon | Powell’s)
The All New Ball Book of Canning and Preserving – This new giant Ball book is gorgeously photographed and exhaustively tested. I’ll confess that I didn’t manage to use any of the recipes this summer, but everytime I flip through its pages, something catches my eye and I add it to my to-make list. (Amazon | Powell’s)
The New Milks – It’s a tiny bit of a stretch to include this book by Dina Cheney on this list, but its sneaking through on its DIY cred. I like it because I dig the non-dairy milks and I appreciate all the ideas for how to use them in my cooking and baking. (Amazon | Powell’s)
Fermented Foods at Every Meal – You’ve got a fridge full of fermented foods, but you struggle to use them up. Hayley Barisa Ryczek is here to help you weave those ferments into every meal of the day. So smart! (Amazon | Powell’s)
Related Posts:
Links: Roasted Carrots, Rhubarb, and a Winner
The Ball Blue Book of Preserving
Gift Guide 2016: Things for Your Favorite Home Cook
December 12, 2016
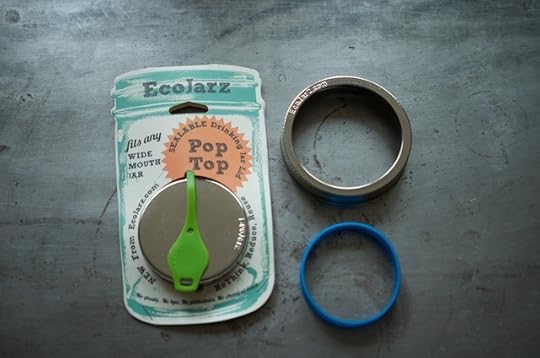
Giveaway: EcoJarz PopTop and Jar Band Gripper
Let’s chat about our friends over at EcoJarz! They make a wide variety of jar accessories out of high quality stainless steel and sturdy silicone. I rely on their stainless steel band when fermenting in mason jars (because it doesn’t rust or corrode like the conventional bands) and have been known to take my Dose (a little jar-based pour over coffee set-up) on vacation with me to help meet my caffeine needs.
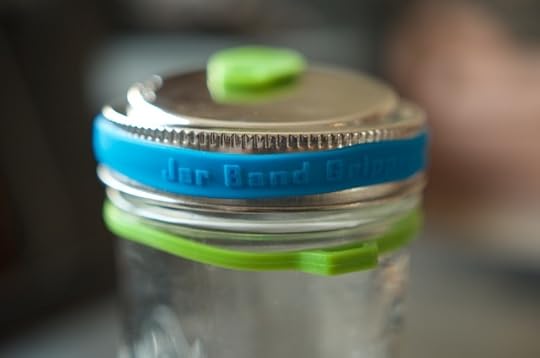
The nice folks at EcoJarz offered up three sets of their PopTop lid, along with a wide mouth stainless steel band, and a silicone Jar Band Gripper (which snugs onto the band, making it easier to twist off when it’s time to clean out the jar) for this week’s giveaway. This drink topper is easy to use and is the perfect thing if you find yourself on the move with a smoothie or a big jar of water.
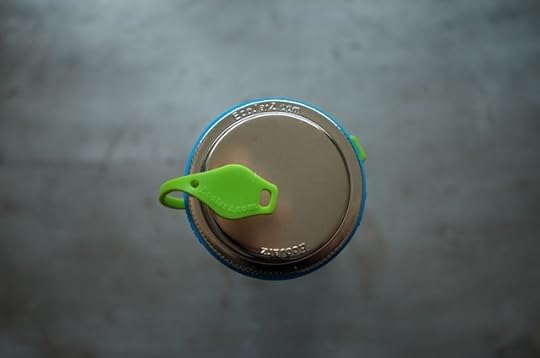
To enter the giveaway, use the widget below. However, if you think this topper would make a great gift for someone on your list and you don’t want to wait and see who wins the giveaway, use the coupon FOODINJARS2016 to get 20% off your order. Enjoy!
Related Posts:
Giveaway: EcoJarz Fermenting Kit
Giveaway: EcoJarz Jar Hugger Handle and Green Pop Top
Giveaway: New Products from EcoJarz


