
Renee Wilkinson's Blog, page 23
June 18, 2012
Do What You Can
On a recent tour of gardens, the phrase I heard most often was “it’s a work in progress.” To which I replied, “every garden is.” It reminded me of a phrase I heard lately from the principal of my nephew’s elementary school. She asks the kids recite the following:
Do what you can
with what you have
in the time you have to do it
in the place you are
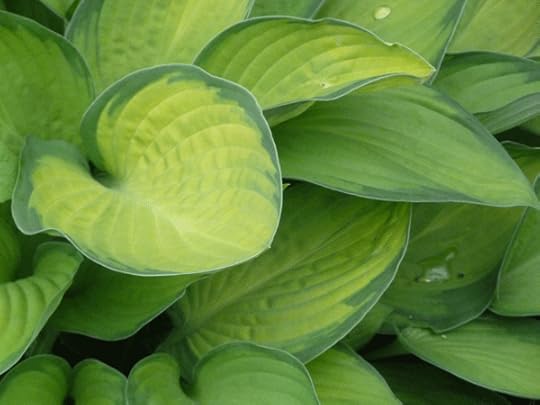
Hostas that need to be moved. The ducks devoured them soon after this photo was taken.
Gardens are not places to feel ashamed, embarrassed or inadequate. They are not places of apology or excuses. They are alive and always growing and changing. Plants will always need to be added, moved, cut back, or removed altogether. Share your garden with confidence and love, not reluctance.
There are ugly spots in my garden, just like in your garden. I’m losing battles with pests here and there, but winning big in other spots. My garden is a wild jungle of projects that vary in quality and lessons learned that range from big to small.

My continual battle with aphids
This summer, as you invite friends and family into your garden spaces, erase the phrase “it’s a work in progress” from your vocabulary. Celebrate the wild, untamed spaces rather than apologize for them.


June 14, 2012
Apricot Blight
Our Puget Gold apricot was planted three or four years ago and has quickly grown into a lovely tree. About a month ago, it appeared like an insect was bothering the tree. The leaves had little pin holes on them. But then I noticed the fruit was looking funny as it ripen on the tree.
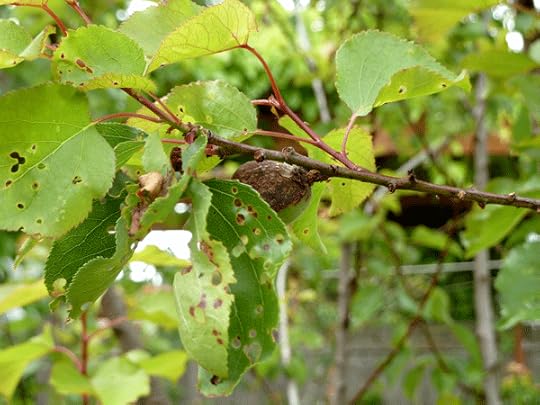 It turns out our lovely little tree has Coryneum Blight – a nasty fungal disease that effects both fruit and foliage. Once blight has found the tree, it will overwinter and continue to re-infect the tree. The best strategy is typically to spray the tree with a copper application or other fungicide in the fall and perhaps again in early spring before it blooms.
But what can I do now? The answer is not much. Pests and disease will go after weaker plants, so I can try to give the apricot tree a boost with some organic fruit tree fertilizer. I will have to baby it this summer though, as the fertilizer will encourage new, tender growth right as we approach the hot season.
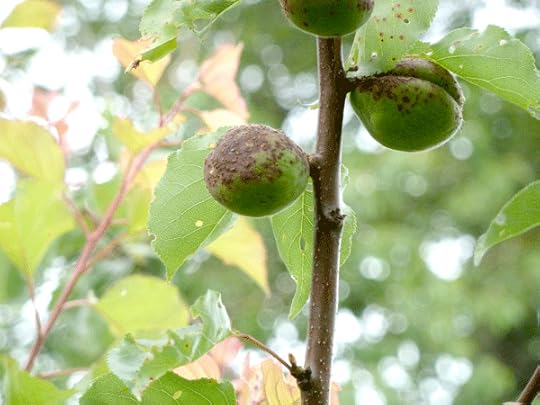 Another strategy: remove the tree and start over with something hardier. Obviously I don’t like this idea. The apricot has been a gorgeous addition to our backyard with early spring flowers, a lovely vase-shape and has quickly grown into the homestead.
I will continue my quest for finding a solution, but spraying our trees every year is a level of maintenance I would rather avoid. I am trying to enjoy the tree as much as possible this season as I mull over our options. Our apricot friend may not be around next year.
June 12, 2012
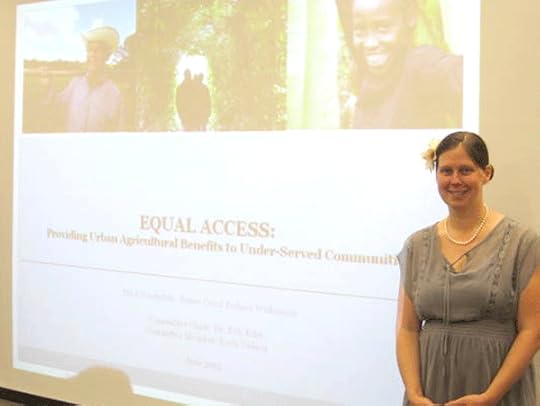
My Graduate Thesis: Equal Access
For three years I have been diligently working toward a masters in landscape architecture degree. This past week I had the pleasure of presenting my masters thesis to the department. Next week I will walk across the stage during commencement and accept my degree.
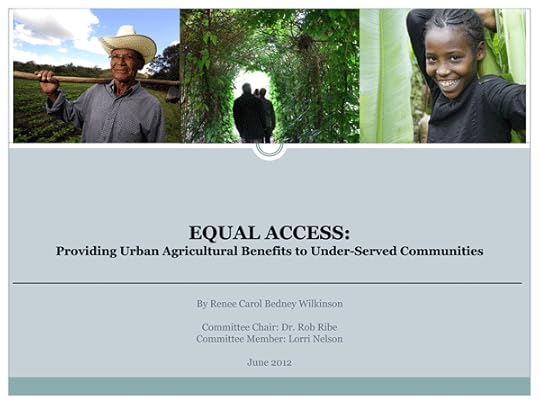 My thesis is titled Equal Access: Providing Urban Agricultural Benefits to Under-Served Communities. It will be available through interlibrary loan, so even if you attend another school you can still borrow my thesis from your library. It will also be available soon through Google Scholar. In addition, I am posting the thesis in its entirety through the link above for people to easily access. It combines my interest in urban farming with my desire to help under-served communities.
Substantial research identifies access to healthy foods as a significant barrier for under-served communities. Urban farm locations could be more strategically planned to connect healthy food access to these vulnerable communities. In this study, under-served communities are those at highest risk for food insecurity, childhood obesity and poor community cohesion (high crime and few public gathering spaces).
Studies have shown that urban farms contribute to the surrounding community by increasing:
Nutrition: easily accessible, practical experience with healthy foods
Food security: flexible payment options, affordability
Community Cohesion: lower crime, catalyst for change, civic participation
In addition to these three primary benefits, urban farms also offer these secondary benefits:
Work Opportunities
Stronger local economy
Farmer stability
Mentorship for next generation farmers
Preservation of historic (now urban) farm sites
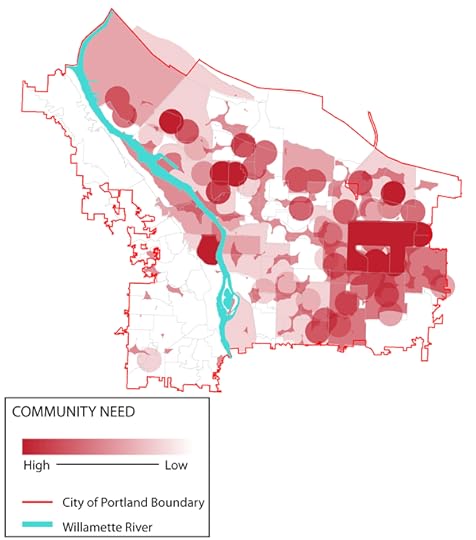 I used a program called GIS to map where under-served communities live in Portland. The areas at highest risk of food insecurity, childhood obesity and poor community cohesion were the areas most in need of increased access to an urban farm (shown above).
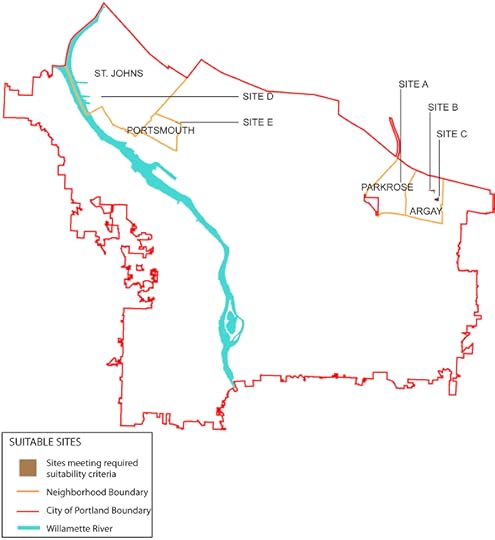 The final step of my project was looking at sites in those neighborhoods that could be suitable for large-scale farming. I created a set of criteria of what makes a good urban farm site and used GIS to find sites in these at risk neighborhoods. The final five sites that met my criteria are shown above. My project examined the challenges and opportunities associated with each site.
 I am really proud of the work I produced and am excited for it to be available for others to review. I never got tired of my thesis topic, despite months and months of working away at it. You and I are doing our part to put healthy food on our tables. This project was my way of making a contribution toward putting healthy food on many more people’s tables.
June 8, 2012
Aaaaand collapse…
Juniper and I just returned from a long week in Eugene. I presented my graduate thesis yesterday to a great crowd of faculty, classmates and friends. The feedback I received was all very positive – almost surprisingly positive – and it felt great to share my research with the outside world.
 I’m pretty under the weather, as I came down with a horrible virus promptly upon arrival in Eugene earlier this week (which I think Junebug has as well). It was challenging to juggle being so sick with being a single parent for a week and putting together a massive presentation. But I pushed through, kept my eye on the prize, and pulled off a great presentation despite feeling like a shell of a person.
With that behind me, the next couple days will be full of rest and recovery as I continue to fight this monster off. I am so excited to share my research with you since it’s all about urban farming and how it can benefit communities. However, it needs to wait until next week. I have a date with my bed, some coconut water, and a snugly baby.
Until next week my friends…
June 4, 2012
Product Review: Naturalyards Raised Beds
Recently I was approached by a local company, Naturalyards, about doing a product review. After careful consideration, I agreed to it because they met my criteria: 1) they are a great company, 2) they make a quality product 3) it’s a product we need for our homestead and 4) it’s a product you might actually be interested in. In exchange for receiving their product, I am writing an honest review about my experience with it.
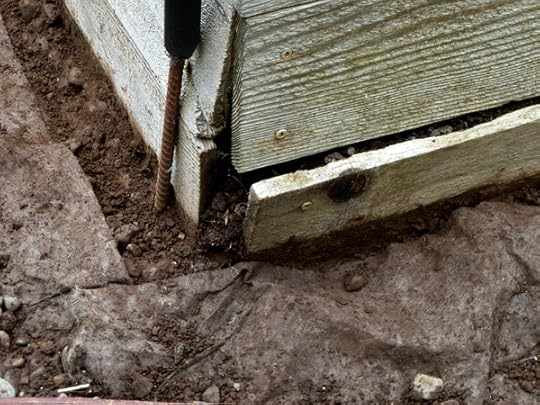
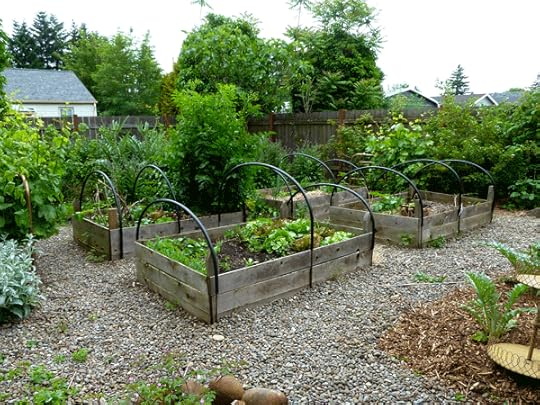 Our raised beds have been in need of replacement for some time. I built them six years ago using leftover cedar fence boards. It wasn’t such a horrible idea – I was re-purposing some naturally rot-resistant cedar – but the wood was really thin and my budding construction skills very poor. Over time, the weight of the soil has been pushing the boards to the breaking point. The corners need continual mending and at some point the bowing sides will simply bust apart.
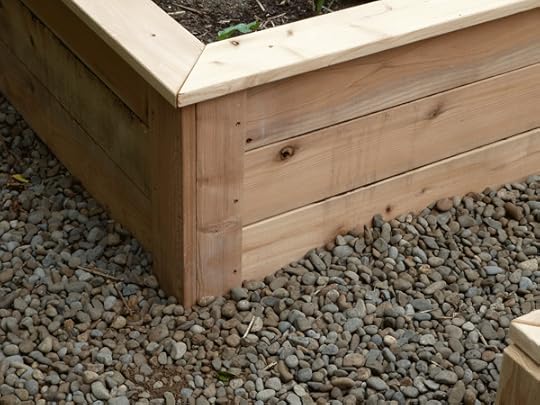
 The raised beds from Naturalyards seemed like an excellent replacement option. First off, they are made with sustainably-harvested cedar. That means they are not using old growth, but rather second-growth wood from native California Incense Cedars. Second, the manufacturing happens in Talent, Oregon – so everything in the process is done locally.
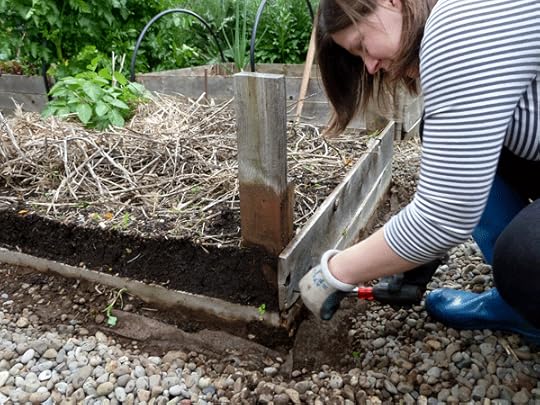 Our challenge was installing these slick new beds to an already planted out garden. We began by carefully removing the old, beat up fence boards. The new beds were a few inches smaller than our old ones, so we also had to trim the soil edges back a bit to fit the new beds around them.
 What a fiasco! It took several hours to deconstruct the beds and reposition the soil. Every time some garden soil spilled on the pathway, a little part of me died. That soil is SO valuable and it pained me to see any of it get wasted.
 The new beds took literally ten minutes a piece to assemble. I actually did most of it myself while Jay held baby Juniper. The folks from Naturalyards told me it would be easy to install, but I guess I didn’t realize it would be THAT easy.
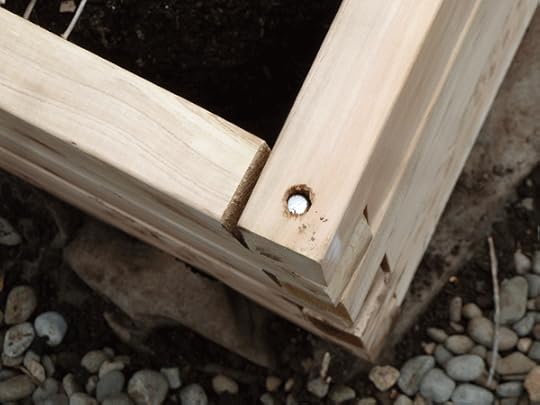 The corners dove-tail together and a metal rod gets slipped into the holes in the corners to hold them in place. You don’t even need a hammer. Seriously? That is pretty dang clever. And it seems to me like you could easily take these beds with you when you move, so it could be a good option for renters and homeowners a like.
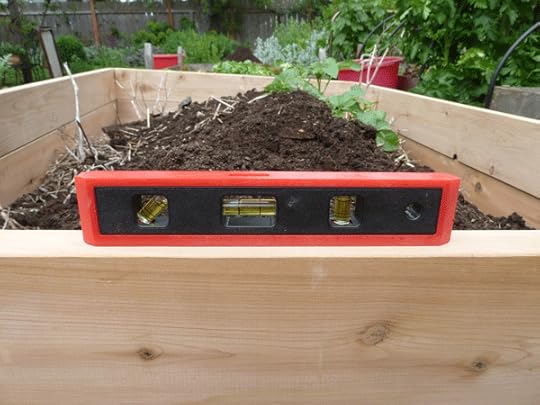
 We didn’t know which box the instructions were in, so I tried an experiment to see how far I could get with assembly before needing them. They were simple enough to install without reading anything, but when I found the instructions they offered some good tips like making sure the beds are level before positioning them into their final place.
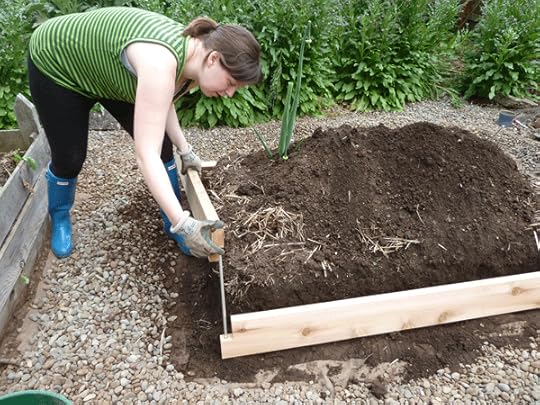
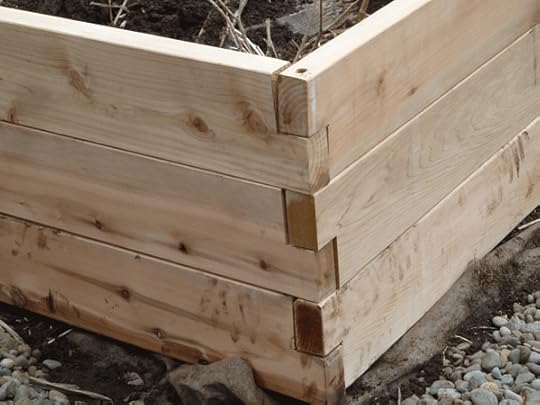
 The beds look great as-is once assembled. The corners look kind of like a jigsaw puzzle and there are some small gaps that soil could work its way through. I assume the wood expands and contracts with weather changes, so those gaps won’t really be noticeable later.
 You can order an optional “trim pack” that gives the beds a more finished look, which is what we installed next. The trim pack includes corner pieces to cover up those dove-tailed ends and top pieces to create a sharp looking ledge just wide enough to sit on. Our hiccup here was that some pieces from the trim pack were missing with our order.
You can tell a lot about a company from how they handle customer service. I contacted Naturalyards and they apologized for the oversight and sent the missing parts out overnight. I appreciated the quick response and interacting with a real, live human being – something that is rare these days.
 The trim pack took about 15 minutes per bed to install. You need a drill for this part and it’s easier with two people to fit the top pieces together. That said, I did it fine on my own with some light cursing. The trim pack makes it harder to disassemble, but the trade off is a really polished final look.
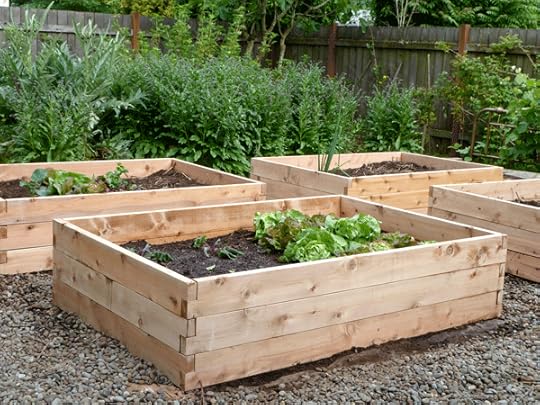
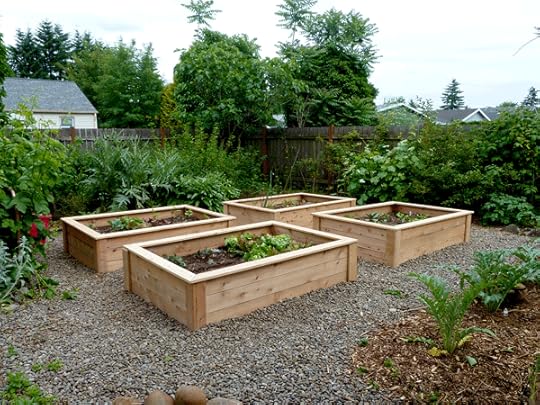 My beds are 4′ x 6′ and 22″ high – just high enough so the ducks can’t gobble everything up. They were about $350 bucks a piece and another roughly $90 bucks for each trim pack. So the big question is: was it worth it?
In short, yes. The beds come with a 15-year warranty, but I bet they’ll last much longer. I love that they could be disassembled and moved, which I plan to do if/when we ever move. I could see skipping the trim pack to save some bucks if you didn’t mind the jigsaw puzzle corners. And finally, this is a family-owned company with excellent customer service that is keeping people employed in my fair state. I love supporting companies I believe in.
 With gardening season upon us, Naturalyards is offering a sale of 40-50% off some raised beds. If you are in the market, this would be a great time to give them a call. They make beds in all sizes and configurations, plus they ship for free nationwide – awesome.
I feel like our garden got a gorgeous facelift and would love to hear what you think. What kind of garden projects have you invested in on your homestead? Are there certain projects you have bought vs. built yourself? What kinds of projects have transformed your homestead?
June 1, 2012
May in Review
A look back at May shows a lot of life and budding fruit on the homestead. This is a photo-heavy post of the spring sights I have been enjoying: flowers, veggies and Baby Junebug!
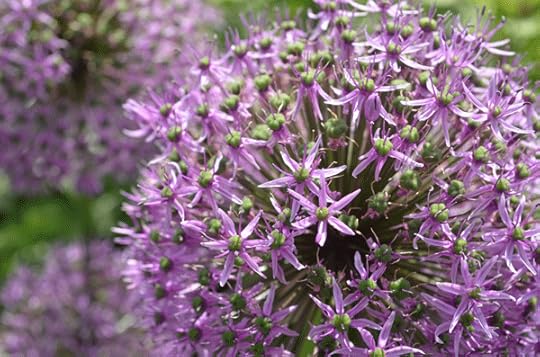
Flowering Allium
My favorite spring flowering bulbs, Allium giganteum, came out in full force. The purple petals are fading away leaving what looks like a green pincushion behind. They will dry out and stand tall through the fall.
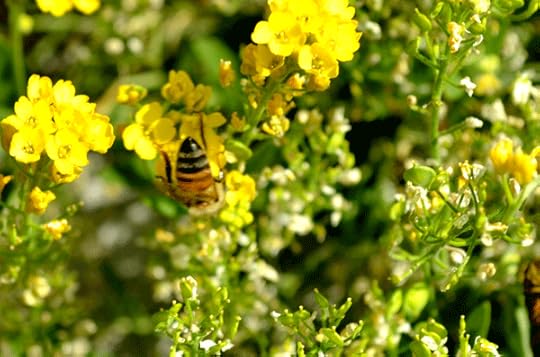
Yellow Alyssum
Bees are buzzing all over the garden! That is a good sign for my fruit trees, shrubs and vines. They favorite the comfrey and alyssum in particular.
 Oh my goodness, irises! My grandmother gave me huge cuttings from her bearded irises a few years ago. They have put on a spectacular show this spring. Looking forward to dividing them in the fall and spreading them out in the garden.
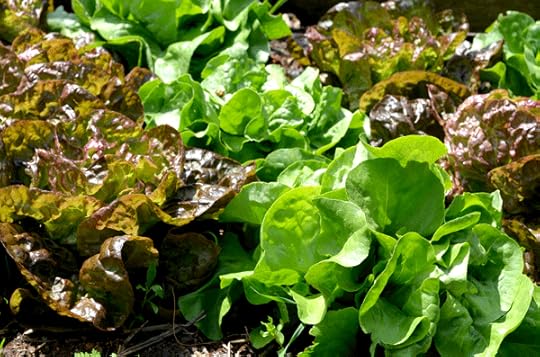
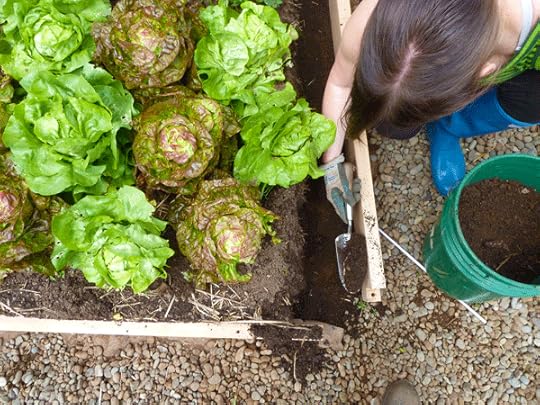
Buttercrunch and Merveille des Quatre Saisons lettuces
We are eating salad at every meal now. I planted two of my favorites this year: Buttercrunch and Merveille des Quatre Saisons. Nom, nom, nom…
 Artichokes! My favorite vegetable is ready for harvesting left and right. I planted about eight more artichokes this season, in addition to the eight we have already growing.
 A special thanks to darling, Juniper, who wins the award for Most Patient Baby Ever. Mama is getting a good hour of gardening in while she enjoys her underwater adventureland – which is the more exciting way to describe her playmat thing.
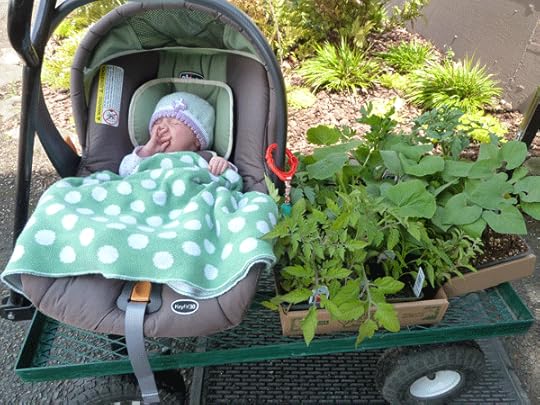 She has also accompanied me on many trips to the nursery to get the garden jump started this season. I enjoy poking through the varieties of tomatoes while she enjoys munching on her hand – a new discovery for her.
Anyone keeping you company during your spring planting? Would love to hear what flowers are currently knocking your socks off and what veggies are filling your harvest basket!
May 30, 2012
Our Family Hike
My family has been enjoying the same hike through the Columbia River Gorge, a national scenic area, for decades now. My parents began hiking this easy trail in the early 70′s and continued to use it as the family grew. Years are marked in family photos with each child taking our turn riding in the baby backpack carrier and up through our restless teenage years.
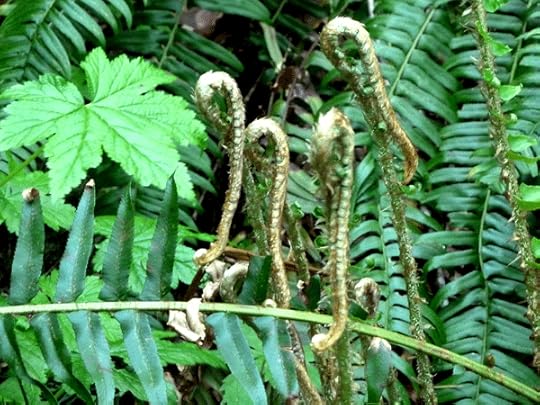
Western Sword Fern
The trail is referred to by most hiking sources as Upper McCord Creek, which is just east of Multnomah Falls. It is an easy up and down hike with a total elevation gain of 600 feet and only a couple miles long.
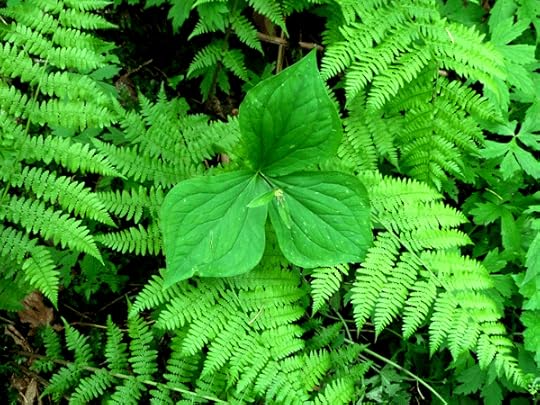
Trillium
What I love about the hike is how you get to experience the many different microclimates of the Pacific Northwest. The hike begins in a wet forest through a series of switchbacks. Western Sword Ferns carpet the mountainsides and Trillium pokes it’s head up here and there.
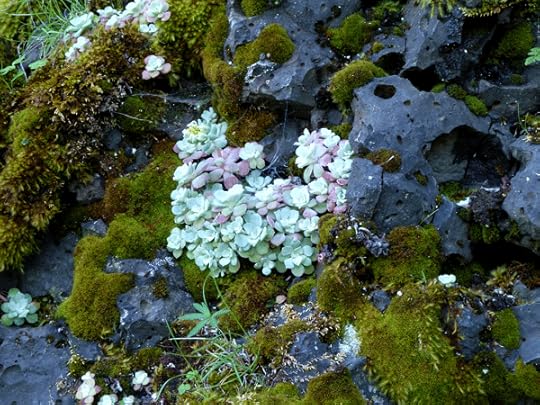
Succulents growing along basalt cliffs
As the elevation increases, the landscape shifts to a rocky, basalt area. There are gorgeous succulents growing in the crevices of the rock, should you slow down enough to look. An almost shrine-like bench is carved into the rock next to the trail – our family’s regular photo spot.
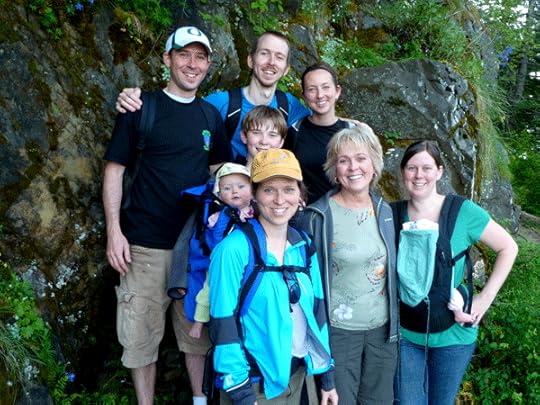
Stopping for the family hike photo
We took my mom for a hike on our trail to celebrate her sixtieth birthday. It was one of Juniper’s first hikes and her head is barely visible in the front pack. Her cousin Lily has already graduated to the backpack carrier.
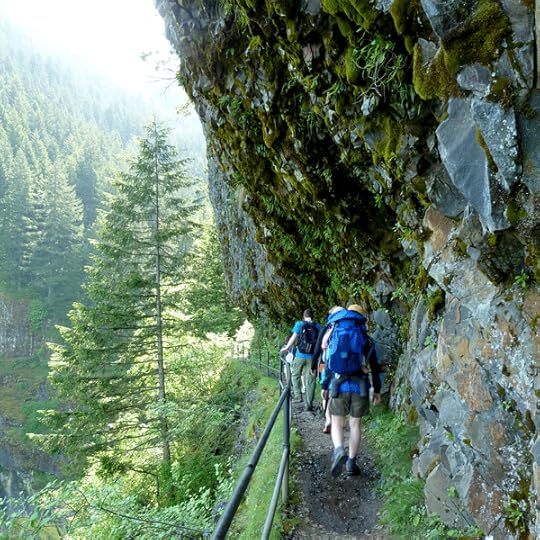
Hiking along the basalt cliffside
The trail cuts into the side of the basalt and there are some sketchy railings to keep you from falling over the side. Believe it or not, even as little kids we carefully walked this trail. Water droplets fall down the hillside and onto your head as you pass this part.
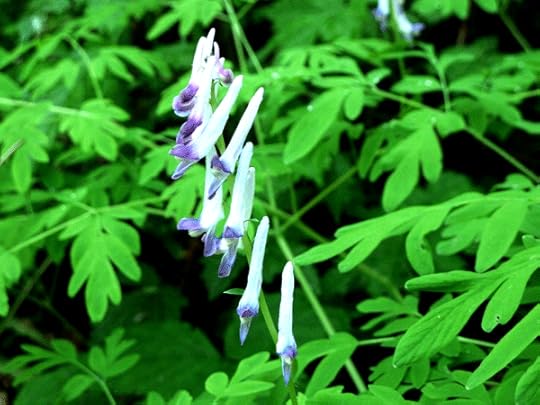
Scouler's Corydalis
Lovely Scouler’s Corydalis surrounds you when you begin to notice the sound of falling water. Not too much further and the beautiful double falls comes into view. My mother-in-law, who was visiting this month, posed for a picture with me here.
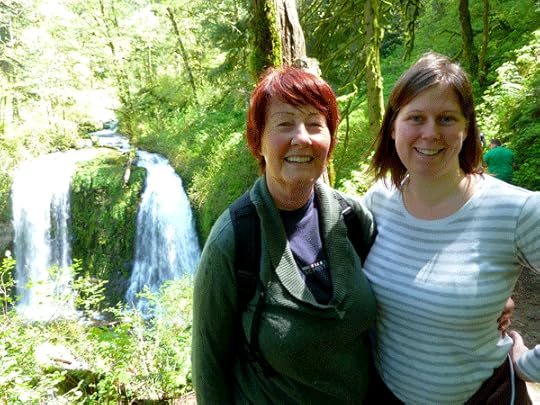
Me & my mother-in-law at the double falls
In dry months, it can be possible to skip along large rocks above the falls and picnic at the top. This time of year though the water level was far too high to try it. Instead, we took in the sights, turned around and hiked back down. We talked about the many years of enjoyment the hike has given us over food and beer at nearby Edgefield in Troutdale.
Have any favorite spots of your own to share? Better yet, have any of those favorite spots turned into family traditions?
May 25, 2012
What Is a Weed?
“Is this a weed?” I get asked that question a lot from gardeners and my answer is always the same: A weed is simply a plant in the wrong place. So before you get out for this long holiday weekend and start pulling everything in sight, here a few weeds you might want to reconsider throwing in the compost bin.
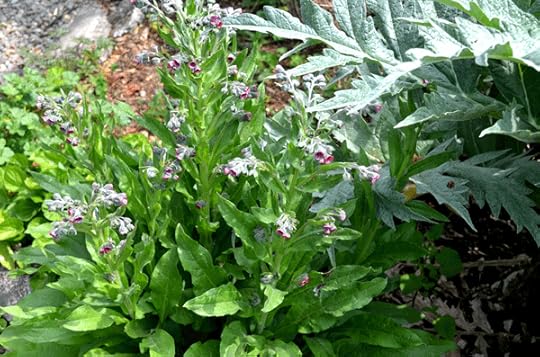 Comfrey is a noxious weed that seems to pop up everywhere on our homestead. The plant gets huge very quickly and can be difficult to pull. The long tap root usually breaks off before you can get the full plant out. But comfrey has some good qualities to offer, in moderation.
The plant has been used medicinally to heal wounds. Harvest the root, clean, let it dry, then mix with vodka. In a few weeks, you will have a tincture that you can apply to open cuts for fast healing. Don’t drink the tincture! It’s for external use only.
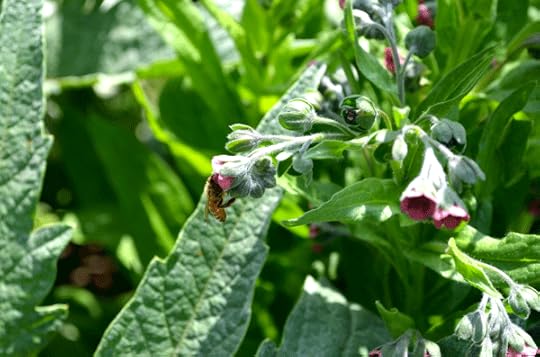 Comfrey also produces beautiful pinkish-purple flowers, which look gorgeous in our garden among the other purple flowering plants like echinaea, artichoke, irises and flowering alliums. The bees love the blossoms and the plant blooms fairly continuously through the summer.
Lemon balm is an incredibly persistent weed for us. The plant comes up vigorously and forms into a dense, huge clump in the garden. It can be extremely difficult to pull up. To remove it, I usually end up digging it out and losing a lot of soil tangled in the root ball. I smell like furniture polish by the time the ordeal is over, from the strong scent of the plant.
 As much as I dislike having it all over my garden, the plant does have some good qualities. You can make it into a minty, citrus tea or use the leaves in cooking for fish and egg dishes. It has been used medicinally as a tea to help with depression and anxiety as well. If you want lemon balm in your garden, plant it in a pot as mints tend to be really aggressive.
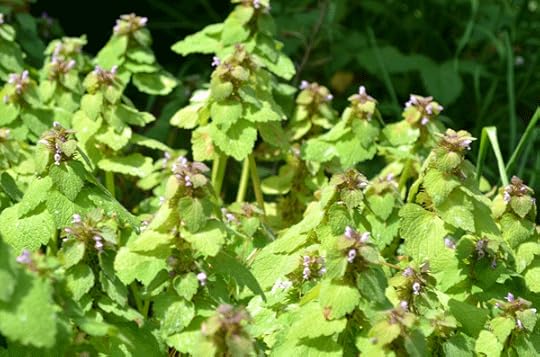 Red Deadnettle is another plant we consider a weed around here. You can pull and pull, but it pops up again whenever there is a bare patch of soil. The bees love the flowers that emerge in early spring, when food is limited, and there are certainly uglier weeds out there. Wild foragers have even started experimenting with ways to eat the plant, like HunterGatherCook. Be flattered by its presence – it usually shows up in places with excellent soil.
What plants do you consider weeds? Are there certain ones you tolerate while others you pull? Are you finding resourceful ways to eat or use the plants medicinally? I would love to compare notes!
May 23, 2012
Favorite Tomato Varieties
There are three general categories of tomatoes: sauce, slicer and cherry. Sauce tomatoes have thicker, meater fruit with less water which makes them ideal for marinara. Slicers are the big beef steak types that you want on sandwiches. And cherries are the little, sweet gems that are great for popping in your mouth while you water the garden.
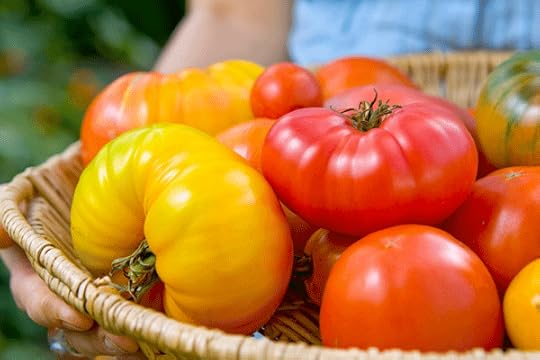
Photo by Issac Viel
There are hundreds, probably thousands, of tomato varieties to choose from. I have grown many of the years and want to concentrate this year on growing just a few of my favorites, and lots of them. We typically focus on sauce tomatoes, since we can up the harvest to get us through winter.
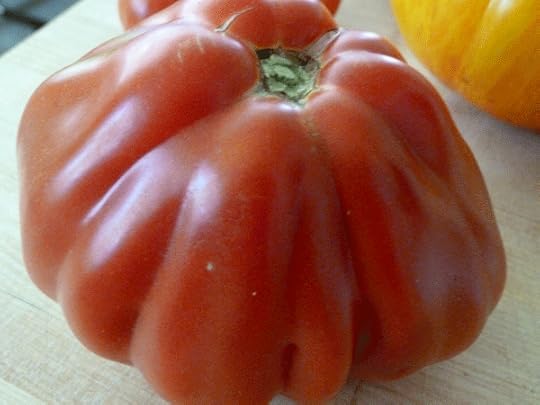 I discovered this fantastic heirloom last year at the Urban Farm, Cuor di Bue. It is a heart-shaped, rose colored tomato with deep lobes along the sides. It makes a rich marinara and tastes equally divine on sandwiches. The flavor is deep and the versatility between being excellent for sauce and for slicing earns it a spot in the garden this year.
Another favorite is the old standby, classic, best-ever sauce tomato: San Marzano. This Italian heirloom is in such demand for the home gardener that sometimes the nurseries just can’t keep it in stock. We will be planting several of these this season.
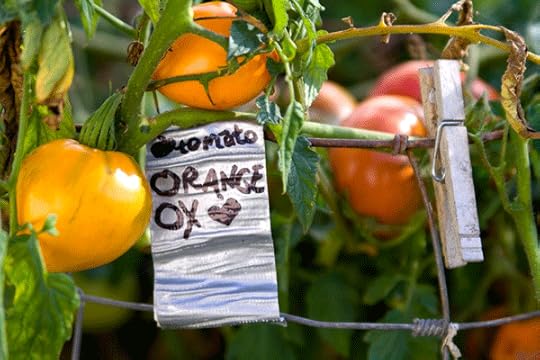
Photo by Isaac Viel
Orange Oxheart tomato is another fantastic heirloom – meaty and rich. The fruit grows in a heart shape and turns golden when ripe. They can get huge too, with the big ones weighing upwards of a pound a piece. They look beautiful in the jar when we can whole tomatoes – another nice bonus.
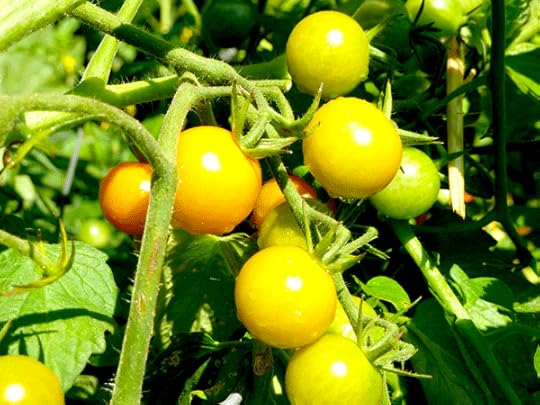 We like to grow just one token cherry tomato – something to cut into salads or munch on while harvesting other veggies outside. Of all the cherry varieties out there, Sungold is my favorite. They are sweet and prolific! They turn a deep orange when ripe. Black cherry is another of my favorites and would look stunning in a salad with the bright Sungolds.
Early June is safe to plant them outside in the Pacific Northwest without cover. Which varieties are you pining for this season?
May 18, 2012
Herb Spiral Update
It was years and years ago that I built an herb spiral in our backyard, but a reader recently asked me for an update on the project. But first, what the heck is an herb spiral?
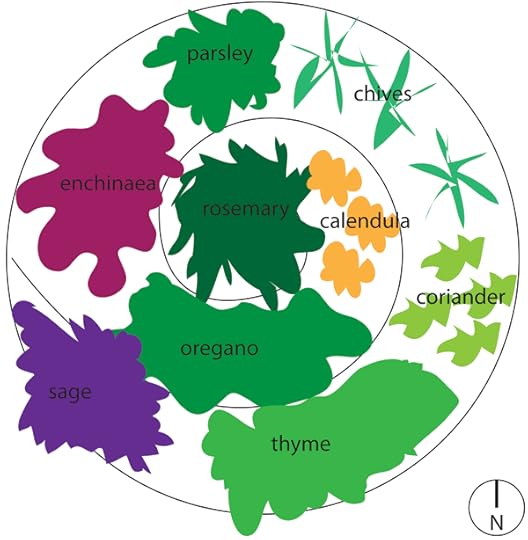
Our original herb spiral design
An herb spiral is a popular permaculture project that incorporates micro-climates into the design. You begin by creating a mound of soil and then spiral rocks up the mound. Herbs get placed according to their micro-climate needs. Coiling the plants up into a spiral also saves space. Our original design is pictured above, but read my past post for specific details about the project.
Heat-loving herbs should be planted on the western side of the mound where they can get hot afternoon sun. Cooler, shade-tolerant herbs like chives should get planted on the back, north-facing side where they get indirect light. Some people create a small pond on the north side to grow watercress.
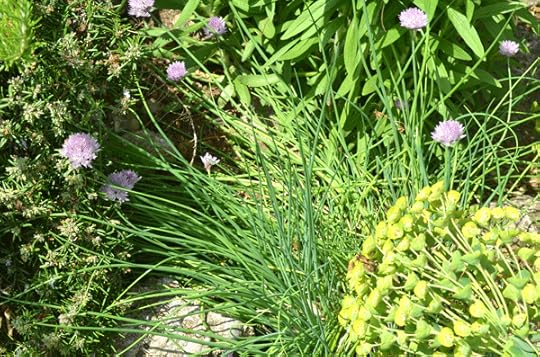
North side chives
The mounds I made initially for our herb spirals seemed huge! But after five years, you hardly notice any height difference in the garden. What you do notice is a wild jungle of plants that has devoured the rocks that were once visible.
I kept the herbs watered for the first couple years to get them established. Once the perennial herbs took hold, they are drought-tolerant and very hardy. Almost no maintenance has been done since, except for some light pruning when we need to harvest the herbs for cooking.
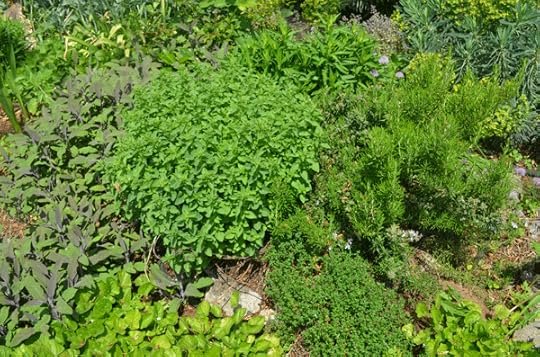
East side: oregano, thyme, rosemary
The annual herbs, like calendula and coriander, were pushed out by the perennials over time. A heavy trim on the herb spiral would make room for those annuals again. The herb spiral has become a great evergreen component to our garden that requires very little maintenance, but provides us with delicious herbs all year.
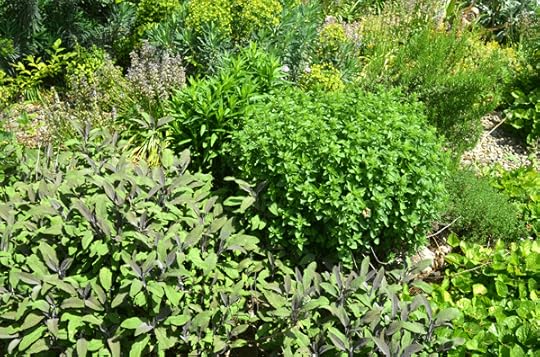
West side: purple sage, echinacea, oregano
Thanks Amanda for asking for an update! Are you guys incorporating any permaculture techniques into your homestead? Are there other updates you have been dying to read about?


