
Renee Wilkinson's Blog, page 19
January 9, 2013
Spraying Fruit Trees
Last year, I was disappointed to learn that my gorgeous Puget Sound Apricot tree had a terrible case of blight. Early spring leaves looked like they had been pricked all over with tiny pin holes. Then the fruit began to develop with a thick scab. Still, the tree managed to put on some nice growth later in the season. I ate the fruit despite it’s awkward appearance, skinning the apricots and making them into a delicious tart.

Puget Gold apricot fruit developing with a scab from blight
Portland can often have late, wet springs which encourage this disease that thrives in damp conditions. My choices are simple: begin spraying the tree twice a year or remove the tree. It’s a gorgeous tree and the fruit is absolutely amazing, so I have chosen to spray the tree.

New growth last summer on the apricot, showing health and vigor despite the blight
There are some organic spray options on the market, most notably a copper spray that was recommended to me from my local nursery. I was bracing myself for something expensive and time-consuming, but was surprised on both accounts. The product I used was only about $8 bucks, and you only use a few tablespoons at a time. The cheap-o sprayer I needed for applying the solution was $5 bucks – not bad at all.
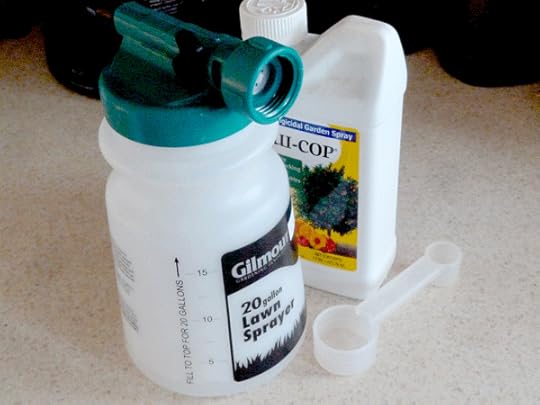
Organic copper tree spray and a small spray applicator – about $13 bucks
To treat the apricot tree for blight, it needs to be sprayed in late fall/early winter (when it is dormant) and again in the early spring (right before flowering). You need a dry day to apply the spray, which came for me on a sunny afternoon around Christmas.
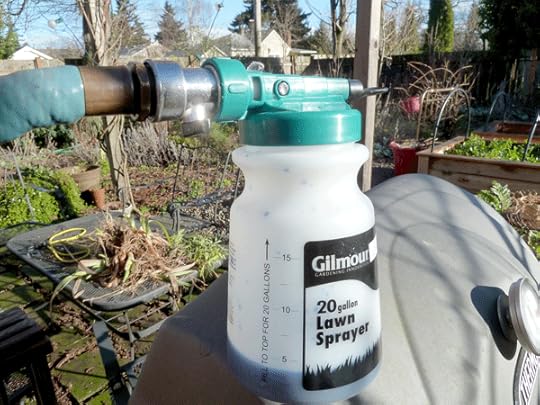
Ready to spray the tree for blight, with hose attached to the applicator
I have to admit – it was kind of fun. I miss being outside more at this time of year, and this was a welcomed reason to be in the garden. Juniper joined me in the baby wrap thing and was pretty fascinated with the process.

My garden helped, Juniper, along for the ride in the baby wrap
I put the recommended amount of solution in the sprayer, then attached the hose and turned it on. The hose mixes water with the solution, then pushes it out the sprayer onto the tree. I walked around the tree applying an even coat, making sure I got the highest branches as well as the low ones. It took about 15 minutes from start to finish. Jay wasn’t even done changing the bedding in the coops before I was all done – now that’s fast!
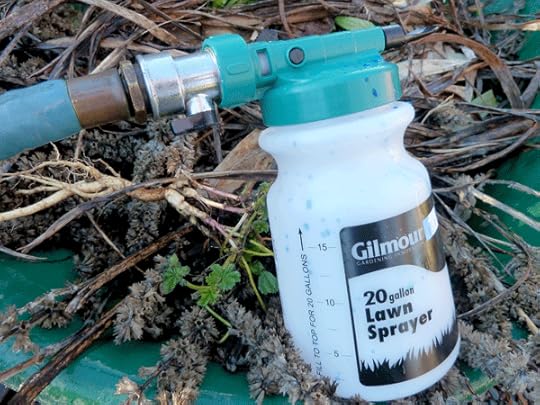
Empty sprayer after about 15 minutes spent applying the copper blight spray
I am happy to make a commitment to see this beautiful tree continue to do well and provide us with amazing fruit, although it does feel weird to need to intervene twice a year to make that happen. However, I bet any “organic apricot” I buy at the market has been treated with a copper spray as well. I see it as the price you pay for wanting a productive and diverse home orchard. And at a cost of $13 bucks and 15 minutes of time twice a year, that doesn’t seem like too high a price for deliciously homegrown apricots this summer.


December 31, 2012
More of the same, please
This has been a year of nesting, growing our family, expanding the garden, sinking our roots deeper down into our homestead and savoring where we are at in life.
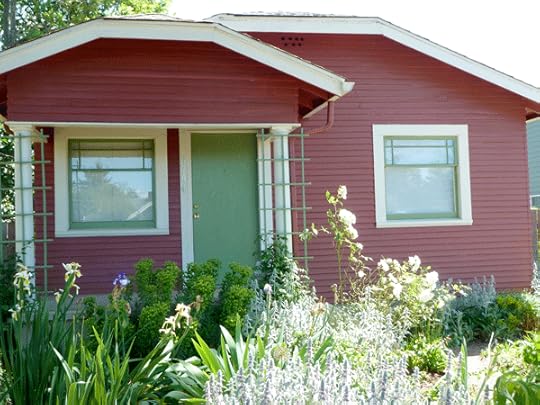
Our tiny, cozy home
Our tiny 700 square foot house is just the way we want it. Cozy, warm, and designed to fit our style.
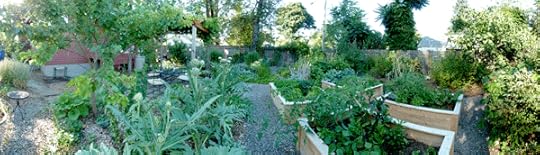
Backyard 2012
The garden just grows and grows by leaps and bounds with every season. Our winter beds are keeping some fresh food on the table while the packed cellar brings us memories of seasons passed.

Mama & Junebug
Juniper has turned our life upside down in the most terrific way. Every day there is something new to learn, discover and explore. I can’t remember what life was like before her, and don’t really want to.

Accepting my degree with Juniper tucked into my gown
After completing my masters in landscape architecture degree, I am working as a landscape designer in Portland turning people’s garden visions into realities. I’m looking forward to a lifetime of building on my plant knowledge and honing my design skills. It is so exciting to get started down the career path.

Cuddling Juniper on Christmas Eve
There are no crystal-clear goals for the year ahead. The seeds have already been planted in our garden, with my garden writing, our family and my profession. I would love 2013 to bring me more of the same please. Just keep it comin’…
December 20, 2012
Protected Raised Beds
Vegetables and herbs grow all around the homestead, but a big portion of the harvest is grown in our four raised beds. They are as attractive as they are functional, but unfortunately we are not the only ones who feel that way. Neighbor cats and our backyard chickens also love the raised beds. The cats think it’s their communal litter box and the chickens would love to chew everything to shreds if left unsupervised.
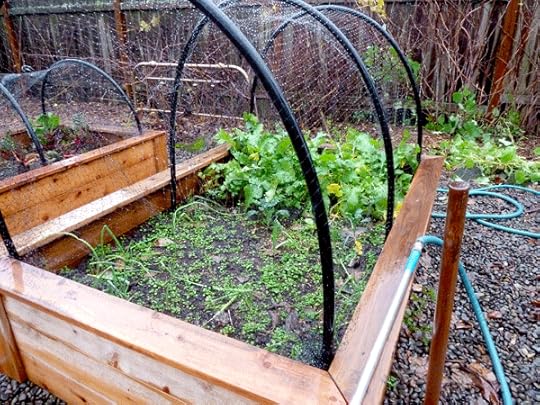 The solution I have come up with is to rig plastic hoops over the beds, secured in place with rebar. Bird netting is fixed to them in the spring, summer and fall. Clear plastic is fixed to them in winter, to create mini greenhouses over each raised bed. The process is super simple and the materials are cheap-cheap-cheap.
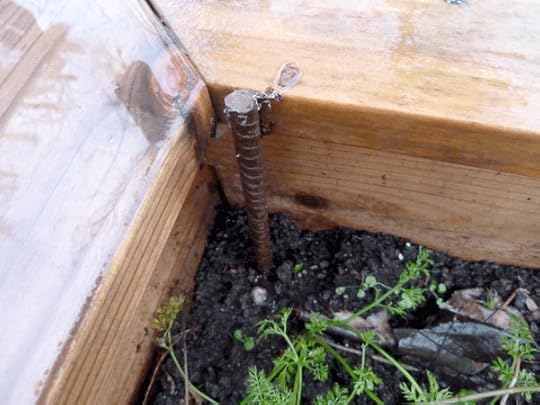
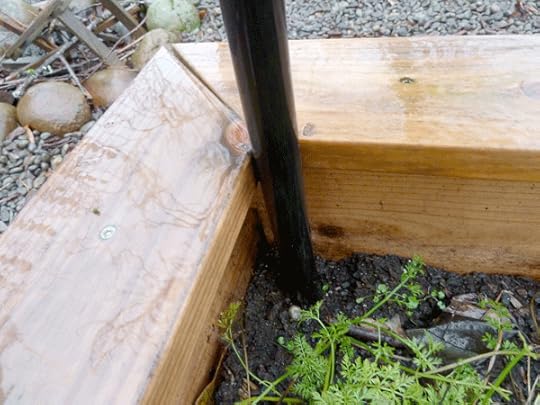
Rebar hammered into place inside the corner of the raised bed
First, I used three foot thin rebar and hammered them into place on the inside of the raised beds – six total per 4′ x 6′ bed. Hammer one in each corner, then one about halfway down the length of the bed on either side. Mine are hammered down so only about 4-6″ is visible above the soil line. You can’t see them unless you look closely inside the bed.
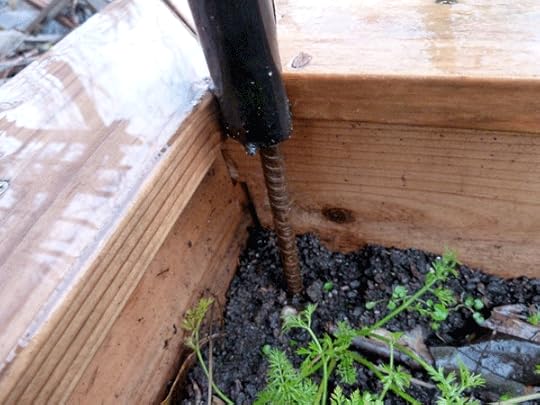
Placing scrap irrigation pipes over the rebar on either side of the beds, making a hoop
Next, I used some salvaged irrigation pvc piping to create the hoops. I placed either end over the exposed rebar, creating a hoop over the 4′ width of the beds. I did this three times per bed.
Rebar in place securing irrigation pipes, creating hoops over the beds
The final step is attaching bird netting to the hoops. I tie mine in place with whatever is handy: garden twine, twist ties from bread bags, etc. Make sure it is nice and taut, securing the ends of the beds as well so no critters can crawl in any openings.
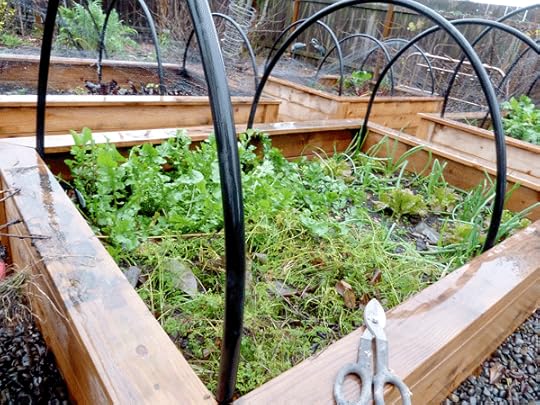
Hoops in place, ready for bird netting/greenhouse plastic
If you are using greenhouse plastic or contractor plastic, you can clip them onto the hoops without puncturing the plastic. Just cut some smaller pieces of plastic irrigation, maybe 2-3″ in length. Then cut them in half lengthwise, cutting out about 1/4″ strip. Place the plastic over the hoop, then use the cut piece of plastic to place over the top. It should clap on to the hoop below, holding the plastic in place. It’s basically a DIY version of clamps you could otherwise buy.
I leave the bird netting all year, so the chickens can free-range without causing too much destruction. The plastic I place on top of the bird netting. That means the hoops are there year round providing protection to all my vegetable goodies growing in the raised beds. How easy is that?
December 11, 2012
Recipe: Apple Almond Tart
This fabulous apple almond tart recipe walked into my life recently a la All Recipes and has become a new favorite. I love it’s rustic appearance and understated sweetness. In a sea of decadent holiday desserts, this one won my heart with it’s restraint.

Apple almond tart assembled with mixture of apples
You could use any combination of good cooking apples, although I used half Granny Smith and half Honey Crisp. The color variation looked cool once assembled, but you really can’t see it once baked. Notice I left the skins on for simplicity.
In addition to modifying the recipe for the filling, I opted to use the tart dough recipe from Alice Water’s book The Art of Simple Food. If you haven’t read it, add it to your holiday gift list. It is equal parts cooking lessons as it is a recipe book. Although I fancy myself a good home cook/baker, my skills have improved by leaps and bounds with the well worn pages of this book.

Apple almond tart sprinkled with sugar for caramelizing in the oven
Pastry Dough (from Alice Waters, The Art of Simple Food)
Mix 2 cups all purpose flour with 1/2 teaspoon of salt.
Using a pastry knife, cut in 12 T of cold butter so there are still some large, irregular pieces. It’s important that the butter is cold. She explains more about that in the book, so for now just take my word for it.
Pour in almost 1/2 cup ice-cold water and fluffy with a fork to combine until it just starts to come together in a clump. Add more if needed, a little at a time.
Roll into a ball, wrap with plastic wrap, flatten into a disk and pop in the fridge to keep it cool.
Apple Almond Tart
1/2 cup unsalted butter, softened
1/2 cup white sugar
2 eggs, beaten
1 T brandy
1 cup almonds, ground
2 T flour
1 tsp almond extract
4 apples, cored and cut into thick slices
1 tsp white sugar
Cream butter and sugar until fluffy, about five minutes. Mix in egg. Then add brandy and almond extract. Add ground almonds and flour until combined. Set aside
Remove pastry dough from fridge and roll out to 1/8″ thickness. Line pie pan and prick the dough all over. Cover and return to fridge to chill.
Preheat over to 400 degrees placing baking sheet in oven while it preheats.
Spoon almond mixture into pie dough, spreading evenly. Starting at the outside, arrange apple slices in a spiral pattern so one side touches the almond mixture. The apples will overlap each other slightly.
Place tart in over on baking sheet and bake for 15 minutes. Reduce temperature to 350 degrees and continue to bake for 10 minutes. Sprinkle 1 tsp sugar over the tart and bake 10 more minutes. Cool on wire rack.

Finished apple almond tart ready for serving
We served the tart with some freshly whipped cream – the real stuff, not that junk from a spray can. The addition of the brandy and almond extract elevated the dessert. With all the sugar-overload dishes during the holidays, try to make a place for this subtle, rustic dessert at your table.
December 4, 2012
A Very Special Persimmon
Persimmon trees are valued as much for their brilliant fall color as they are for their delicious, flavorful fruit. They are said to be the most popular fruit in the world because they are the most popular fruit in China. In fact, persimmons are very popular in most countries outside the US.

My friend Erika helping me plant the persimmon, circa 2007
We planted a gorgeous persimmon tree about five years ago, just outside the south-facing second bedroom. It is an astringent variety, meaning the fruit needs to soften once picked before you can eat it. It is self-fertile, meaning you only need one to get fruit. The tropical, leafy foliage shades the house in the summer time and the brilliant scarlet leaves put on a show in the fall, all visible from the nursery room window.
This year, after many years of waiting, we got a little something extra from our tree: the first fruit! Once ripe, the flesh is sweet and spicy, soft enough to eat with a spoon. But before digging right in, we must first honor how truly special this persimmon is.
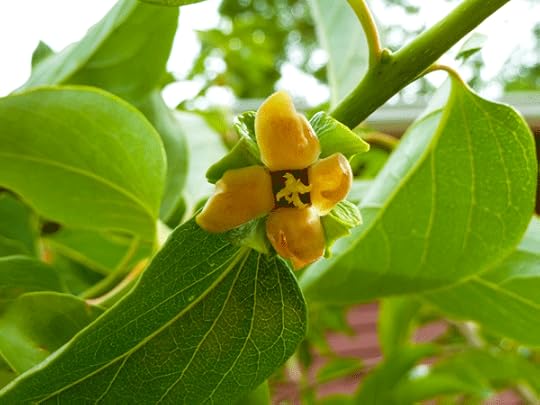
Persimmon tree flowering
The persimmon tree is perfectly visible from the rocking chair in Junebug’s room, making it my daily companion for these past nine months. Not only is this the first fruit, but I watched the tree wake from winter slumber, slowly leaf out in spring, bloom in summer and ripen through the fall.
It is true that persimmon trees do bloom, but they are inconspicuous. You wouldn’t see them unless you are looking hard. The leaves will already be on the tree when the bright green flower forms, turning a chartreuse-yellow.
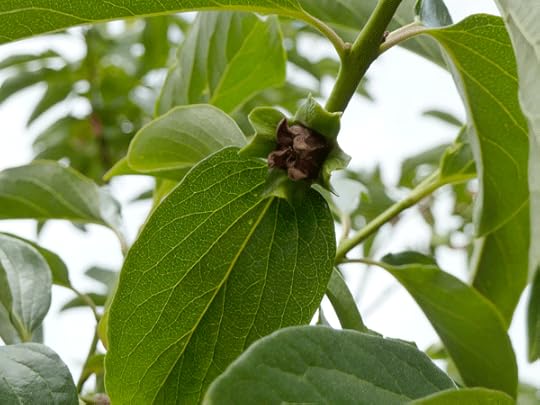
Persimmon turning from flower to fruit
A couple weeks later, it will turn brown as it transforms from flower to fruit. Keep watching it closely and you will see the fruit swell over the summer.
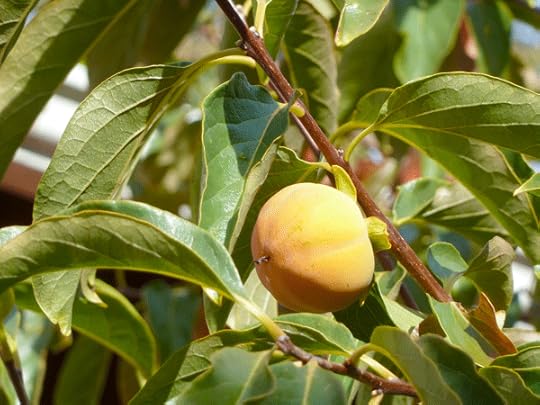
Persimmon fruit ripening in late summer
By late summer, the persimmon fruit was turning from light green to blush. The days were getting shorter and soon the leaves changed from green to scarlet.

A very special persimmon
Cold winds blew all the leaves off the persimmon tree, but what remained is this gorgeous, precious fruit. It marks the passage of time for me. I remember gazing out the window at this tree when my baby was brand new, wrinkly and tiny. She now crawls, stands, eats food, plays peek-a-boo and says her first words. My, what a gardening season can bring us.
So now the biggest question of all: how to eat it? Do I dig in with a spoon? Make a mini fruit tart? Mince it up to share with Juniper? Help me decide by leaving your suggestion in the comments below!
November 30, 2012
Plants for Winter Interest
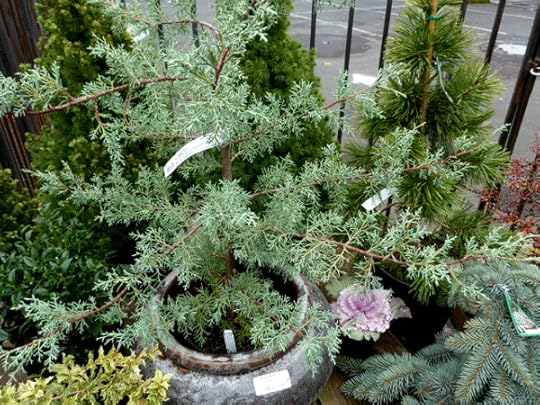
I took a stroll through my local plant nursery recently and was impressed with their collection of plants for winter interest. It can be a dreary time of year, but the following plant jewels will make your garden still seem alive and kicking.
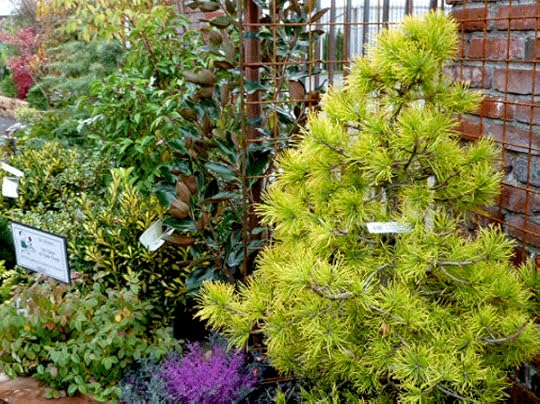
Winter plant display at my local nursery
A design key to keep in mind is the balance of color with green. In this gorgeous display above, they used some good green anchor plants to set off the light yellows and purples of other plants. A rookie mistake is to always go for the variegated, yellow or silver varieties of plants – leaving you with no green canvas to show them off against.

Irish Bell Bosnian Pine
This Irish Bell Bosnian Pine could be a great choice for a strong evergreen backdrop in the garden. The color is a nice rich green and the texture is amazing. I couldn’t resist running my fingers along the pine needles.
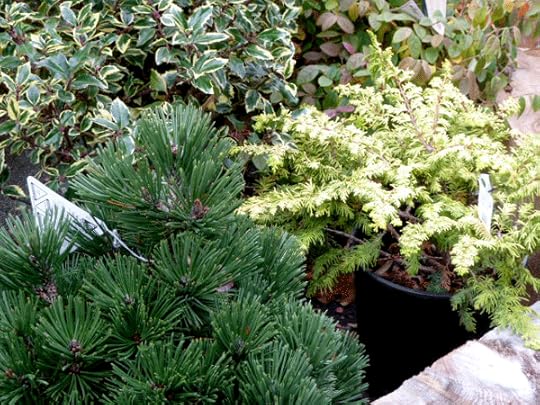
Irish Bell Bosnian Pine planted with variegated winter plants
You can see above how a plant that might seem boring on first glance can sing when planted with some others of different textures and colors. The grouping would look bare without the green of the pine.
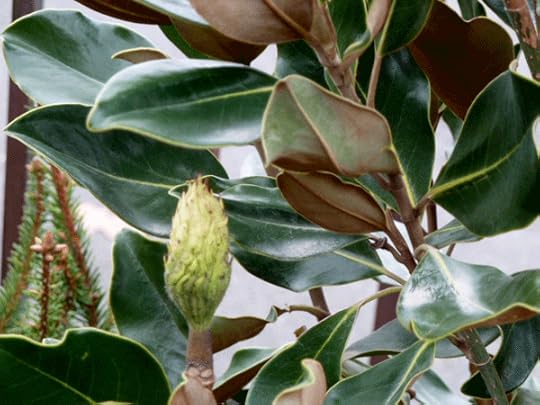
Southern Magnolia
If you are looking for something bigger, this Southern Magnolia can be a good winter option. It’s something different than the typical conifer and the broad leaves take on a rust hue in the winter months. You will get some gorgeous magnolia blossoms in summer.
Cypress Arizona Blue Ice
This Cypress Arizona ‘Blue Ice’ is a tall, lanky tree that would be gorgeous in front of a tall evergreen or possible a structure, like the house. That blue-grey foliage is balanced by warm browns along the branches. Both the color and structure would stand out in the winter garden.

Gingko
Gingko! Who doesn’t love gingko trees? They are also tall and lanky in their grown habit. The leaves fall when the first hard frost hits, but that bold yellow looks amazing against an evergreen background. Make sure you get a male tree, as the females produce stinky fruit that you don’t want in your garden.
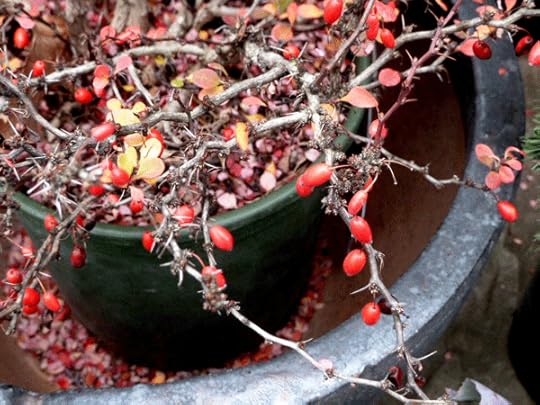
Barberry Green Hornet
Now here is a hard working garden plant: Barberry. This particular one is called Barberry ‘Green Hornet’. The spindly branches do have thorns, so plant it in a spot you don’t need to walk through. It stays pretty small, about three feet, and produces red berries that look quite merry in the winter. In spring time you will get some vibrant yellow flowers.
Do you have some favorite winter plants? Or is your garden in desperate need of winter life? Hope you are feeling inspired to explore ways to stretch your garden life into the cold months ahead!
November 27, 2012
Front Yard Design
It’s time to divide and conquer. Flowering bulbs and perennial shrubs are going to sleep for winter – the perfect time to split them apart and replant. With a couple sunny fall days this past weekend, I managed to divide and replant the entire front yard.
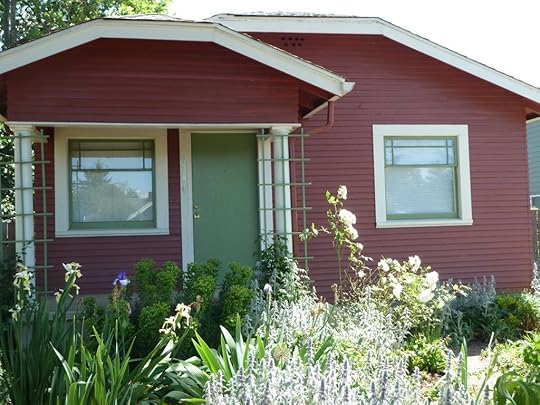
Front yard circa summer 2011
Our front yard has always been the forgotten garden corner. My attention, and pocketbook, have always prioritized the private retreat in our backyard. Unfortunately that means the curb appeal at our place is based almost exclusively on free plants: cuttings from ones in the backyard, excess bulbs and tubers from friends and family, clearance rack starts.
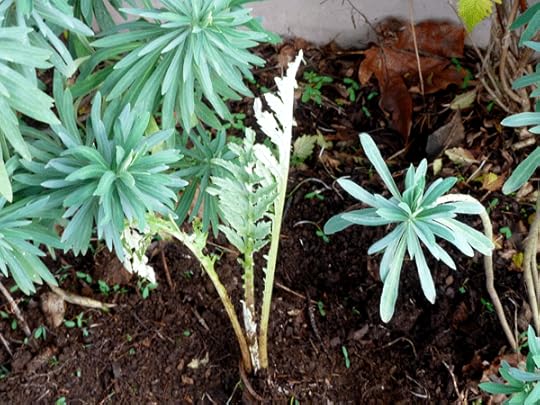
New plant starts: Euphorbia and artichokes
One general rule of thumb with planting design is to arrange the plants like a kindergarten photo: tallest in back and shortest up front. Euphorbia and artichokes were the largest evergreens and semi-evergreens, so these became my foundation shrubs to place closer to the house. They will provide great contrasting hues of green and a mix of texture. Euphorbia is vigorous, almost invasive, so I merely plucked up offshoots and shoved them into place.
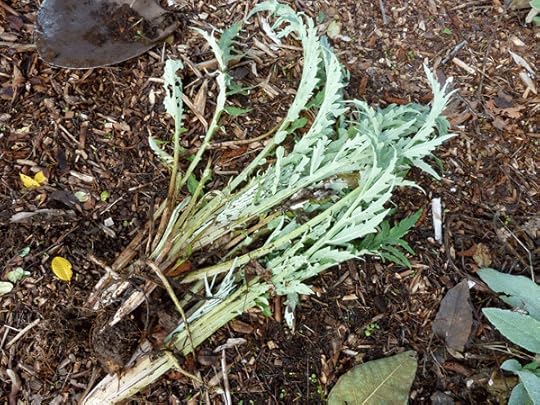
Artichoke starts dug up from existing plants
Artichokes are easy to divide for starting new plants, but they need a little help. I dug up small pieces from healthy plants in the backyard, trying to get ones with a little root already started. Then I dipped the ends in rooting hormone and carefully planted. They now have a few months of rain to grow more roots and get settled in.
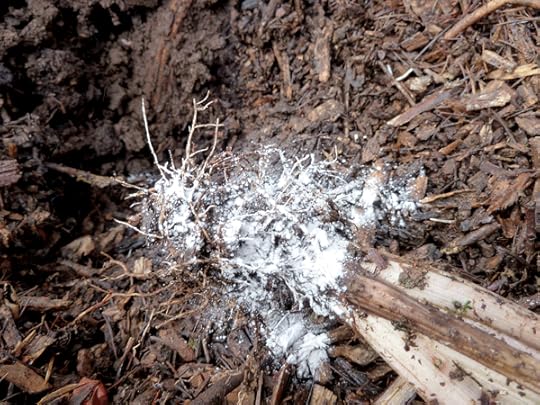
Rooting hormone sprinkled on artichoke roots. A little goes a long way.
I kept my focus on the evergreens in the front garden design, as these are really the skeleton for the whole space. My mid-level evergreen plant is sage. It’s nothing fancy, but it is easy to cut and divide. The fuzzy grey-green leaves will add some nice year-round color to the garden, not to mention the culinary value.
Lamb’s ear is another plant that borders on invasive in our garden. It is so easy to cut and divide, so no rooting hormone was needed to help it along. I just cut out pieces that had a strand of root attached and tucked them into place. These are my low-level evergreen plants, along with some oregano for contrasting foliage.

Rudbeckia starts
With my evergreen structure in place, it is time to work in some color. I bought a couple Rudbeckia plants on clearance recently and managed to cut two plants with a sharp spade into six plants. I wove them toward the front of the garden for some late summer seasonal yellow flowers.
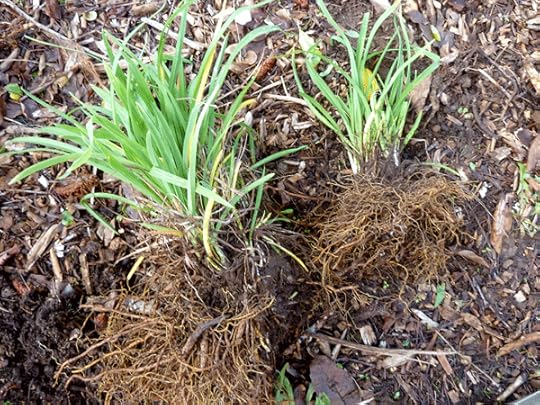
Separating tubers from daylilies and irises to replant
Finally, I dug up and divided heaps of bulbs and tubers. Some were small daylilies, but most were irises I received from my grandmother’s garden. There are smaller, purple ones and huge bearded irises. The large ones were positioned toward the back of the garden, but right in front of my taller evergreen shrubs. This ensures they have a green backdrop to show off their gorgeous blooms. The smaller irises were planted closer to the front. I imagined they were like little waterways snaking through the garden.
 The garden looks only slightly changed since my day of planting. But as spring comes around the corner in a few months, a couple weeks of sunshine following months of rain will make these plants spring to life. I’ll plant lavender up and down the walkway at the end of winter. The front garden should look like a well-designed, beautiful space by springtime. But give it another year and it will be mature and bursting with life!
November 20, 2012
Thanksgiving Menu
Oh boy – it’s time for one of my favorite holidays: Thanksgiving. A time for family, friends and absolutely amazing food. I prefer simple table settings and love the excuse to break out the fine china.
 A couple years ago we started our holiday meal out with a celery bisque. I know what you’re thinking – a whole course focused on celery sounds about as exciting as a bag of rocks. Well, my friend, get ready for a surprise. Celery is one of those veggies that tastes bland from the store, but amazing when it’s homegrown or from the farmer’s market. It is as elegant as it is flavorful and can be made a day ahead and rewarmed before serving.
 Last year a friend made this fabulous cornbread-sausage-apricot stuffing from Sunset Magazine. It was the perfect combination of savory and sweet. I know cornbread breaks tradition a bit for stuffing, but it’s worth every bite.
 We go traditional on the turkey itself since we use the leftovers for so many other things. I have found this herb-roasted shallot recipe from Epicurious to be delicious.
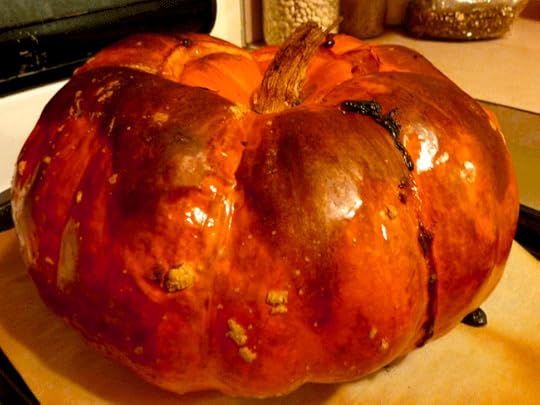 Looking for an impressive side dish/veggie? Try this stuffed pumpkin recipe. It has everything indulgent and decadent crammed into one dish. It is also impressive to see on the table when you let guests just scrape what they need out of the whole pumpkin.
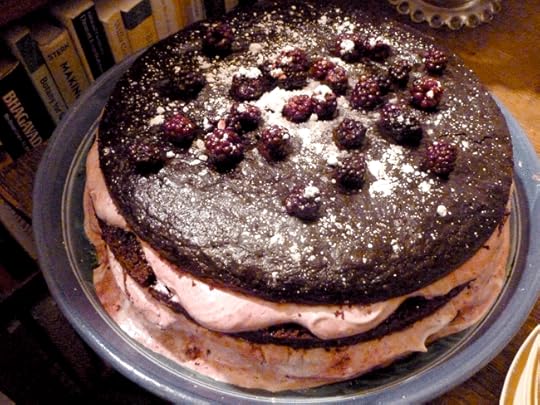 Dessert is always hard to decide on. The traditional pumpkin pie is fine, but I prefer a new twist on that old classic like this Pumpkin Mousse or this Pumpkin-Bourbon Cheesecake. You could also say to hell with pumpkin and go straight for the chocolate. Last year a friend made their favorite chocolate cake, cut it into 3-4 layers, then filled with blackberry cream – lovely.
Best wishes to you on Thanksgiving. I hope you are somewhere warm and toasty, eating amazing food with some of your favorite people. I would love to hear about the special things you are making!
November 13, 2012
Homestead Baby Care
Adding a baby to the homestead has presented new challenges in our quest to live simply. When it comes to baby care, I ask myself the same questions I ask about other homestead care: how can we create the least amount of waste, save some money and minimize our environmental impact? Here are some of our strategies for natural, simple baby care.
Disclaimer: I’ll mention a few specific brands in this post, but these are not the only good options nor am I receiving any incentive (monetary or otherwise) for mentioning them.

Reusable cloth baby wipes using two pieces of scrap flannel
Instead of disposable diaper wipes, my sister made us some cute reusable cloth ones. Since we use cloth diapers, it’s no added work to throw them in the bin with the used diapers and wash them all together. My sister made them with a flannel material so it’s soft on baby’s bum. Excellent baby shower gift idea and requires only the most basic sewing skills.
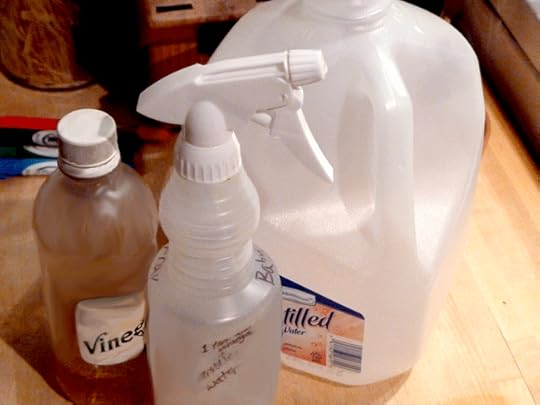
Homemade baby wipe solution ingredients
Every few weeks I make a batch of baby wipe solution, which takes about five hot seconds. I put it in a sprayer and mist it onto her reusable flannel diaper wipes. It’s all natural and works great.
Homemade Baby Wipe Solution
1 tsp. apple cider vinegar
16 oz. distilled water
Directions: In a reusable sprayer, combine vinegar with water. Mix gently. How easy is that?

Homemade baby wash ingredients
I was overwhelmed with all the bath wash options and spent a lot of time scratching my head when reading the ingredient lists. This seemed like a great place to simplify things by making our own. We would know exactly what’s in it and save lots of money by making our own. Here is the recipe I am making every month or so.
Homemade Baby Wash
1/4 c. baby castille liquid soap
3/4 c. distilled water
Directions: In a reusable foamer, mix one part soap to three parts water. Mix gently. The soap won’t lather quickly, which is why using a foamer will help greatly. It’s not tear-free, so use caution when rinsing baby’s hair. Tip: write the ingredients on the back of the foamer for easy reference when you need to make more.

Homemade baby wash directions
I used distilled water for the first few months when her skin was so sensitive and new to the world. Since then, I mix the castille soap with regular tap water. She’s getting rinsed with tap water, so I don’t really know that using distilled water in her soap made any difference.
Dr Bronner’s sells a nice, unscented liquid baby castille soap. It runs about $30 bucks for a 32 oz. container. That would be enough to make 128 ounces of baby wash from the recipe above, or sixteen batches of baby wash. You will be hard pressed to find a cheaper natural baby wash.

One-month old Juniper having a bath
Do you have any secret or not-so-secret recipes you use for your family? Any tips or tricks for keeping life simple with little ones? Tell me about it in the comments below!
November 7, 2012
November Harvest
How did it get to be November? The trees are looking half empty of their leaves and telling us it’s time to spend more time inside than out. Thankfully, my winter garden vegetables are ready to start harvesting.
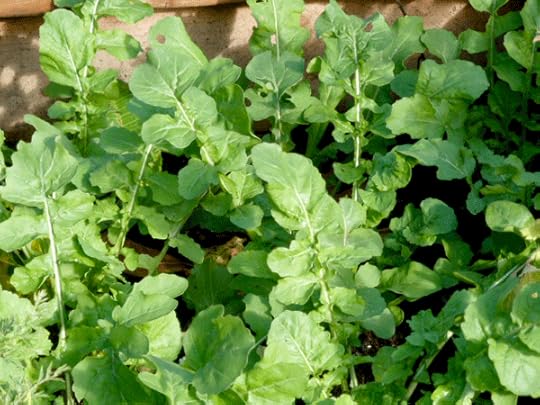 Arugula! I love this meaty salad green, especially in the colder months when we could use something thicker and more substantial in our salads. This veggie has grown great without a cold frame so far this season.
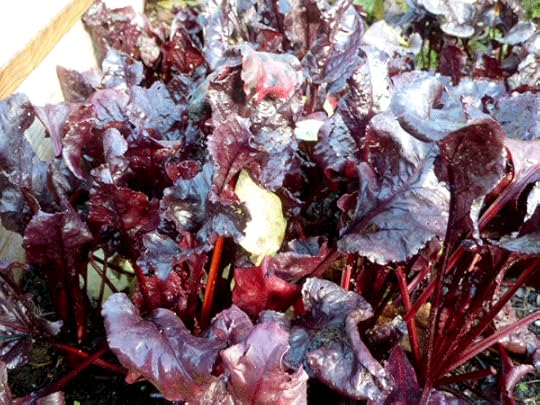 We are still harvesting our beet greens and beet bulbs. They were planted in the summer, giving us a nice long harvest. The winter beet crop I planted in a separate bed are still weeks away from being ready.
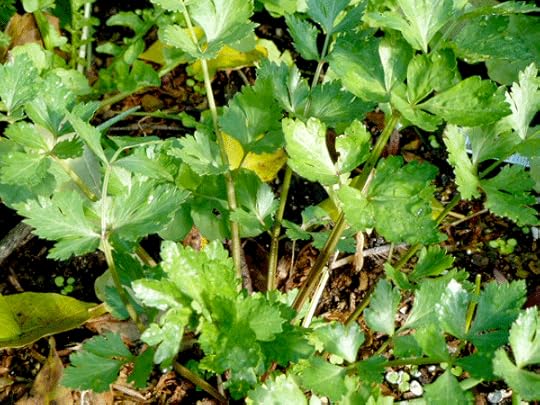 Homegrown celery puts that bland grocery store version to shame! We should have stalks big enough to harvest for Thanksgiving.
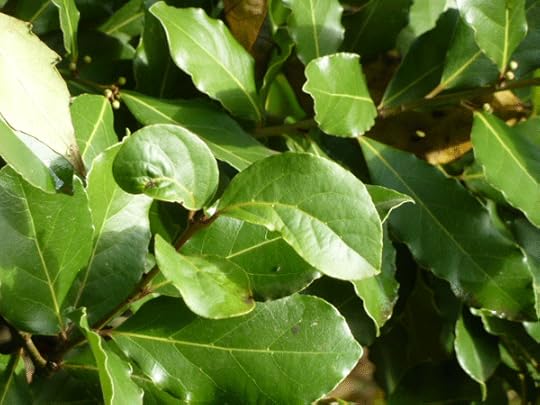 Bay trees are evergreen, providing year round garden structure as well as year round access to their culinary leaves. I have been snipping here and there for winter stews.
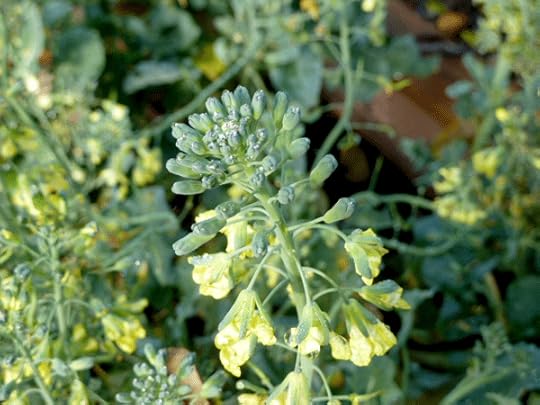 The spring/summer broccoli is still hanging on! We are getting some nice side shoots and I’m planning to leave the plants in the ground through winter.
 Our summer swiss chard is also hanging on. We are getting some glossy new leaves shooting up.
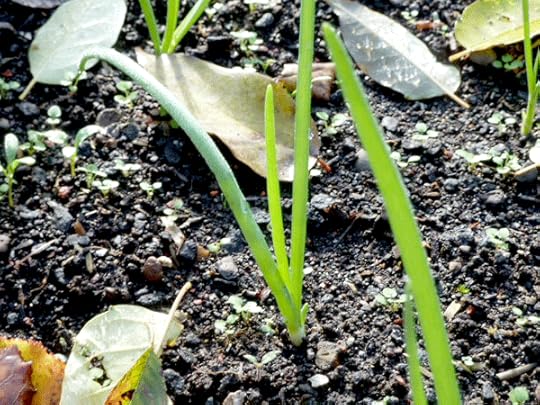 And finally, all those onions I planted are sending up shoots. It will be months before the bulbs are ready to harvest, but we can snip some of the green shoots here and there to use as scallions.
What is growing in your garden? Does your climate lend itself to winter gardening or is there snow on the ground already? Tell me about it in the comments below!


