
Renee Wilkinson's Blog, page 22
July 27, 2012
Battling Aphids
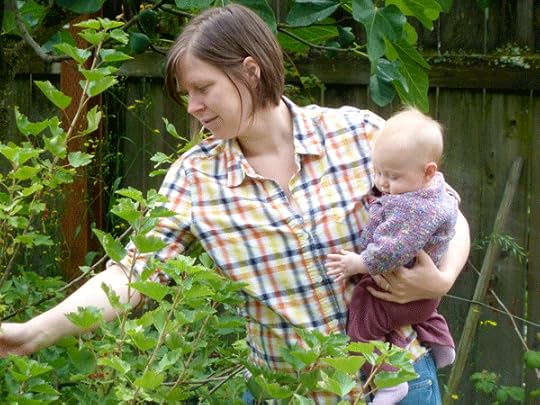
Aphids suck – literally. These pesky garden pests will poke their mouths into your beloved plants and suck out their liquid. It weakens the plant and reduces your harvest – not to mention the unsightly appearance a massive, black mound of aphids can be on your plants. What can be done on the organic homestead to remedy the problem?

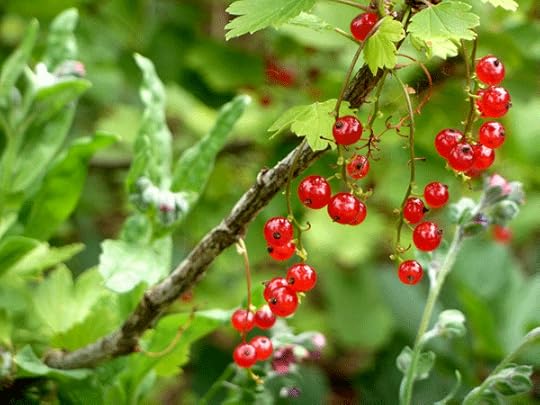
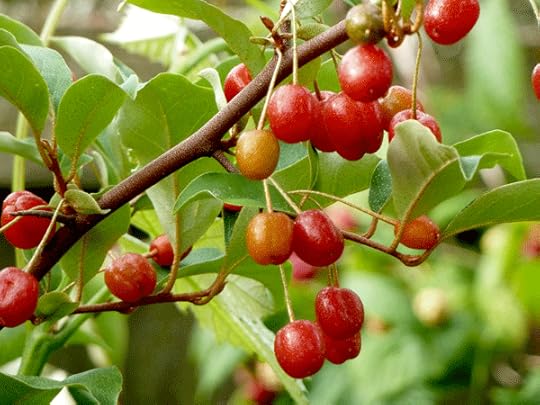
Aphid larvae on currant leaves
The answer: lots! To prevent aphids from taking hold to begin with, place aphid-repelling plants throughout the garden like garlic, onions, chives, and radishes. You can also plant aphid attracting plants, like nastursium, to draw the aphids toward one area and away from your beloved vegetables.
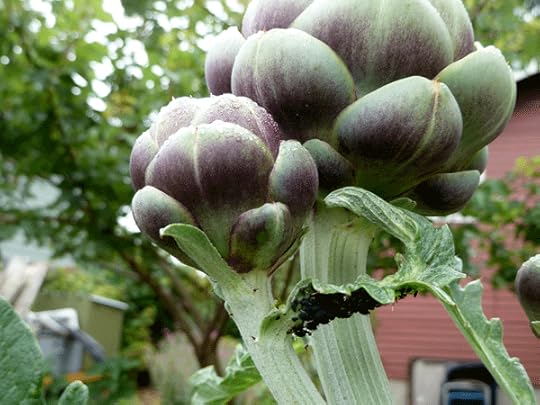
Aphids massing under an artichoke leaf
When aphids show up, there a number of strategies for getting rid of them:
Apply tomato leaf or garlic spray (check out this link for recipes)
Spray with diluted dish soap (1 tsp. per pint of water) – this dries out their soft-bodies
Spray off with a strong hose
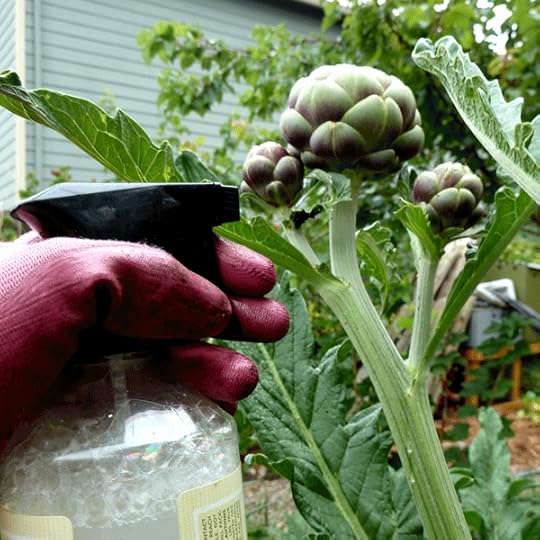
Spraying aphids with diluted dish soap. This dries out the soft-bodies insects, killing them.
Another strategy is to attract beneficial insects to the garden to feast on these pests. Ladybugs and lacewings love to eat aphids. Here are some flowering plants that will bring the good guys into the garden and keep the bad guys out:
Bugleweed
Coriander
Cosmos
Dandelion
Dill
Fennel
Yarrow
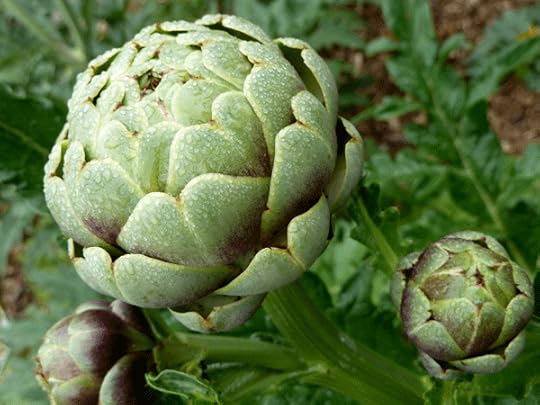
Unfortunately I didn’t get a handle on our aphid problem until too late. The plants most effected this year are our artichokes and currants. We’re always going to be fighting one thing or another in the garden, so I guess this is the battle this year.
Aphids hiding in the folds of an artichoke head
What are you struggling to keep on top of in the garden? What tried and true solutions have worked to keep aphids under control on your homestead? Share in the comments below!


July 25, 2012
Apricot Tart
Apricots are little fruit jewels of the home orchard. They only last a day or two once picked, which is why you rarely see either apricots (or figs) fresh in the store. Their sweet, delicate flavor earned them a spot in our garden in the hopes that we could enjoy these treasures at their height of ripeness.
July harvest
Unfortunately, in the Pacific NW it is really hard to grow apricots and peaches without running into blight issues. Starting late spring, the leaves on our apricot tree were looking pock-marked and the fruit developed scab. The tree has been bouncing back with new growth and the fruit all ripened. So what to do with a juicy harvest of scabbed fruit?
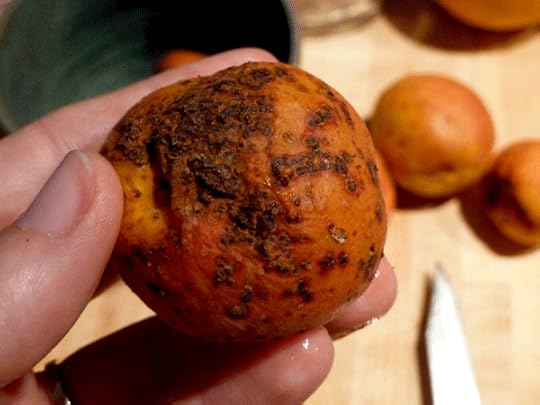
Apricot effected with blight
After searching and searching for information online, I couldn’t find anything that said you should not eat scabbed fruit. I decided to cook the tender apricots into a fruit tart – something simple that could show off the flavor of the apricots. Cooking them also made me feel like that would make eating blight-effected fruit a little safer.
The Art of Simple Food, by Alice Waters, has a lovely section of making tarts (and is one of the best cookbooks I’ve ever owned). She walks you carefully through the process of making dough where I learned the following tips:
cold butter should be used to prevent the dough from becoming oily
chunks of butter in the dough will steam when baked, creating a flakey dough
overworking the dough will develop more gluten, making the dough tougher
 Here is the basic process for making Alice Waters’ tart dough:
Mix 2 cups of all purpose flour with 1/2 tsp. of salt
Add 12 T. cold, unsalted butter (cut into 1/4″ cubes)
Use a pastry knife or fingertips to gently combine. This takes 1-2 minutes and the dough should form into large peas.
Sprinkle in up to 1/2 cup of ice-cold water, adding just a little at a time and fluffing the dough with a fork to gently combine.
Divide the dough into two, flat disks. Wrap with plastic and chill in the fridge for at least an hour.
To make this delicious apricot tart, here is the basic process based on the guidance of Alice Waters:
Roll the chilled dough to about 1/8″ thickness and arrange on your baking dish (we used a pizza pan). Cover with plastic and place back in the fridge to chill
Meanwhile, peel the apricots gently and slice into 1/4″ wedges
Remove the dough from the fridge and sprinkle on 1-2 T. flour, leaving a 1 1/2″ border
Arrange the fruit onto the dough, then fold up the border over the edges. Sprinkle with 2-3 T. sugar
Bake for about 45 minutes at 400 degrees. When the crust is lightly browned, you should be done.
 The finished tart was an amazing way to show off the simple flavor of these fabulous apricots. You can use this basic recipe for any kind of fruit tart – just vary the baking time off the doneness of the fruit. You can also sprinkle on some berries on the tart after has already baked for 30 minutes.
How are you enjoying the fruits of summer? Any tips and tricks to share? Or how about sharing your favorite fruit combinations?
July 19, 2012
Planting Fall & Winter Crops
It is difficult to think about fall and winter crops when the tomatoes are just starting to ripen on the vine. Alas, that is the life of an urban farmer – always looking ahead to the coming season. It’s time to start plugging seeds in here and there to make sure we have good food to harvest through winter.
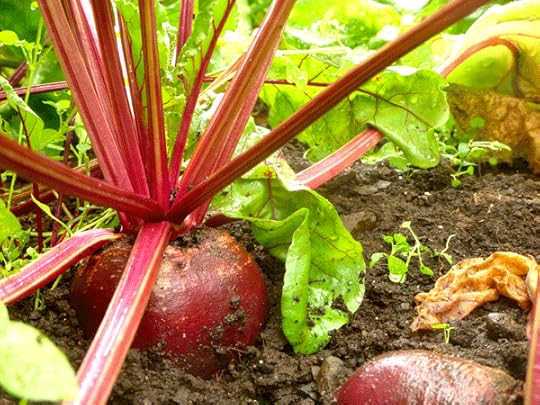
Over-wintering beets
There are some tricks to working in fall crops without removing too much from the summer garden. One strategy is to replace something removed with something planted. For example, anytime I pull a beet I replace it with a beet seed. That way I’m staggering the planting for a continual harvest. Beets are an excellent, hardy choice for the fall and winter garden.
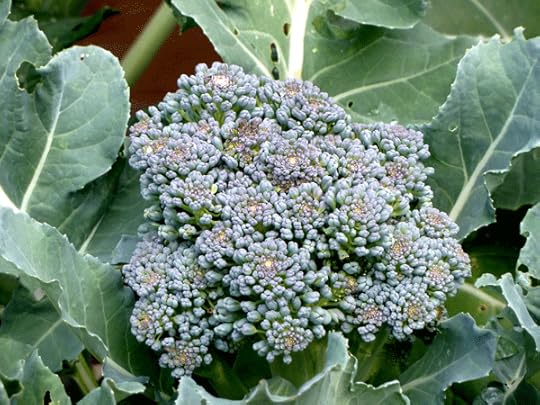
Over-wintering broccoli
Selecting cultivars well-suited for over-wintering is key to year-round gardening. Carrot varieties like Napoli is a Nantes-type that is particularly well-suited for winter harvesting. Other good winter crop choices are Santee broccoli, Dolce Vita spinach, and Italian Rustic arugula.
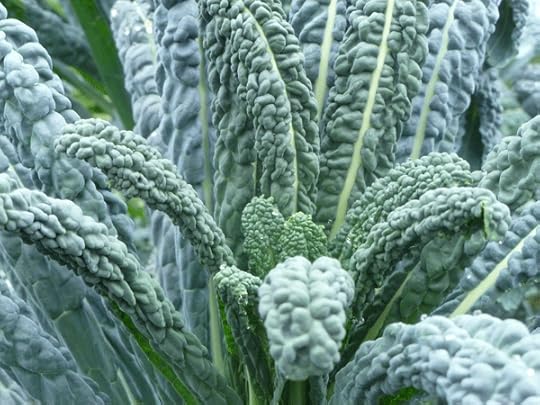
Over-wintering Lacinato kale
Vegetables like kale, collard greens and swiss chard are staple crops we live off of during the darkest months of the year. We grow those in open beds. But another winter gardening strategy is to use row covers for the more tender plants, like lettuces. I use pvc pipes to hoop over our beds and secure greenhouse plastic over them. You’ll need to water them throughout the winter, but I can extend the fall harvest through winter in these warmer environments.

Over-wintering collards
Other fall and winter crops to consider: cabbage, leeks, onions, cauliflower, rutabaga, turnips, brussel sprouts and parsnips. Your local garden shop should be a great resource for more winter gardening tips specific to your region.

Winter cabbage – as pretty as it is delicious!
What have you successfully harvested through the winter and what part of the country do you live in? We have milder winters here in Portland, but I love hearing strategies from really cold-weather gardeners!
July 17, 2012
4th of July
It’s a family tradition on my husband’s side for everyone to gather together for the 4th of July in Oklahoma. We squeeze into the log cabin on the banks of Lake Eufala for some major relaxation. The post oak and pecan forest shade us from the 100+ degree heat while we sip iced tea.
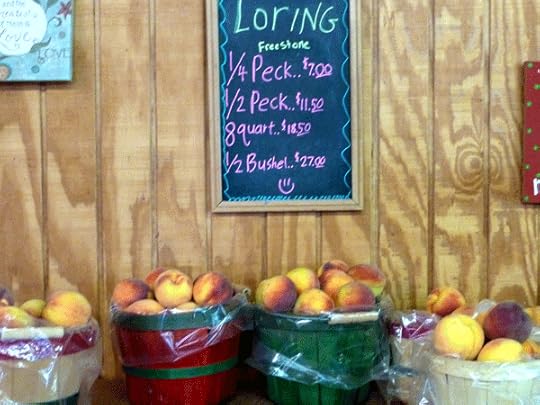
 We have one mandatory task prior to arriving at the cabin: get Porter peaches. These are the best peaches in the region, perfectly ripe at this time of year. We pulled into The Peach Barn in Porter, Oklahoma and stocked up.
 I learned the difference between a “peck” and a “bushel”. We left the store with locally grown peaches, nectarines, green beans, red potatoes and sweet onions. The fruit was perfectly sweet for cobblers, tarts and fresh eating with the family.
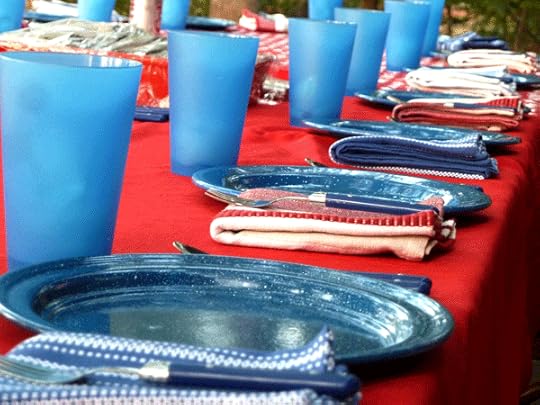
We pulled tables together to make one long enough for us to all gather outside near the lake. If we ever have a cabin of our own, I will insist on having these blue speckled tin plates.
 The dinner on the 4th of July was outstanding, as always. It was lovingly prepared by Aunt Emily and her daughters. In clockwise order from the upper left: Greek salad, brisket, pork ribs, pork sausage, baked beans, corn fritters. For dessert: peach cobbler and homemade ice cream.
 Juniper was too little for the lake, so she had a mini-pool party with her cousin Sam. She splashed her arms like bird wings and was fascinated by the whole experience.
 We spent some family time in the hammock – reading, napping and talking about how fortunate we are.
 Having a baby slows you down in some ways, but Juniper slowed us down in the best ways. We didn’t cram too much into our schedule – just relaxing and visiting with family.
 We took time to admire the trees, water, laughter, kindness and breezes more than in years past. It was a trip like the Cimarron River – slowly meandering, wandering and taking it’s time.
How did you spend your 4th of July? Was it cooking for a crowd or taking it easy? What was your favorite dish from the holiday? Leave your response in the comments!
July 11, 2012
How to Hard Boil Fresh Eggs
Four ducks and three chickens makes for a constantly full egg basket. We use them in baked goods or cook them into savory frittatas, scrambles and tortillas. Hard-boiling the eggs is one method we often don’t use though. Fresh eggs will stick to the shells once boiled. When you go to peel the shell, the whites peel off as well. It wastes eggs and makes a mess – until now.
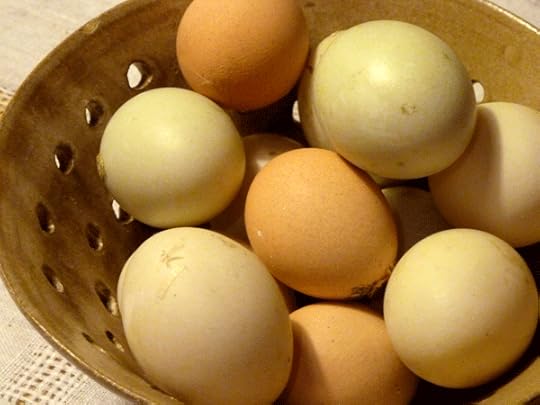 Our friend K is a bit obsessive (in the best sense) and did some experiments recently with hard-boiling our fresh eggs. He tried cooking them with vinegar, but it changed the taste of the eggs. Soaking them in cold water after boiling didn’t do the trick either.
What did work? Cooking them with baking soda! It didn’t change the taste of the eggs and all but the freshest eggs were easy to peel.
 To hard-boil fresh eggs, place them in a pot and cover with water. Add baking soda – a teaspoon for just a couple eggs up to a tablespoon for a dozen – and stir to dissolve. Bring the pot to a boil and let the eggs simmer for ten minutes. Rinse them in cool water, peel and enjoy. (If the yolks are green, you overcooked them!)
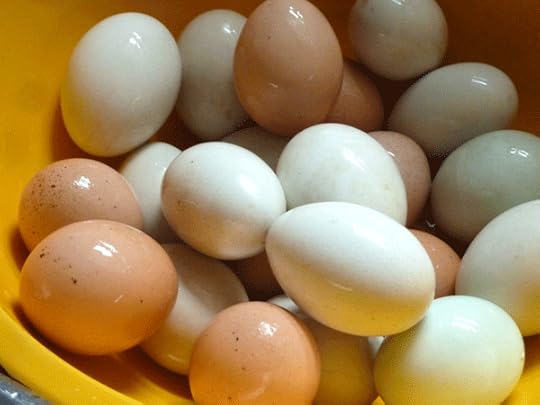
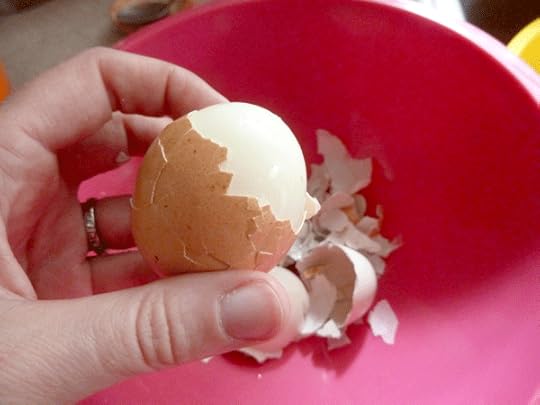 Finally, finally, finally! We can enjoy soft-boiled eggs for breakfast, egg salad sandwiches for lunch, and deviled eggs for parties. I sure hope every backyard chicken or duck-keeper out there discovers this easy way to enjoy hard-boiled, fresh eggs. We can never, never have too many options when it comes to using what’s in the egg basket.
July 5, 2012
Backyard for Entertaining
We all dream of having the garden where you can do it all: relax and retreat, entertain friends, grow some veggies, and the list goes on. But it’s a real challenge to do it all in one small urban lot. The garden I am sharing with you is a great example of how a well-planned space can accomplish your long must-have list. It sure doesn’t hurt that the two home owners are both landscape architects.
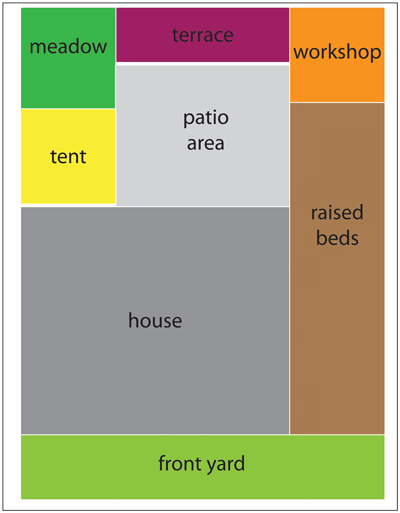
Diagram of the outdoor mini spaces from Danae and Marks’ garden – perfect places for entertaining
When Danae and Mark moved into this house in the FoPo neighborhood, the backyard was a complete mess! They called it a “garden of sheds” because there was a hodgepodge of workshops and sheds crammed together like a little gnome village. Dismantling the mess left them with a huge heap of materials: broken concrete, lumber from an old carport and bricks from the driveway they tore up.

Grassy meadow planted over buried broken concrete
Concrete can be expensive to get rid of, so instead the homeowners used it to create topography in the backyard. A huge mound was made with the concrete in one corner of the yard. They covered it with topsoil and planted grass seed. The grass isn’t mowed, so it creates this whimsical, wavy meadow – the perfect place for kids to run up and down or grown ups to soak up the sun.
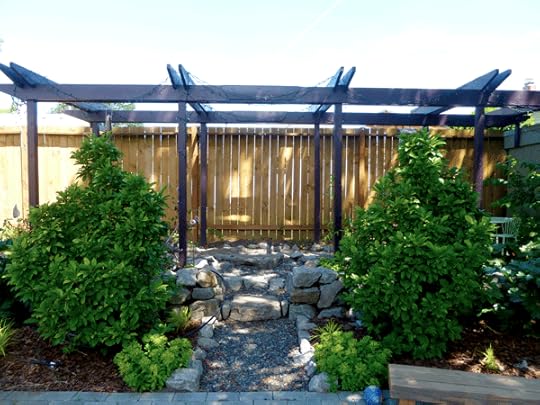
Terrace built over buried broken concrete with stone facade and recycled lumber pergola
Additional concrete buried at the back of the yard to create a terraced seating area. Lumber from the dismantled carport was used to construct a gorgeous pergola, creating a shaded retreat. They painted the wood black and hung adorable outdoor lights from the beams. They purchased some nice stones to create a facade against the terrace, hiding the ugly concrete.

Driveway becomes a place for raised beds
A long driveway was taking up prime real estate in full sun, so they dug it up. The driveway was replaced with raised beds for growing veggies. The bricks were careful re-laid in the backyard to form a large patio with a central fire pit. The patio is surrounded by planting beds to soften the edges. Mark constructed a cover for the fire pit, so it can function as additional seating when not in use.

Central patio with fire pit. Fire pit cover provides additional seating.
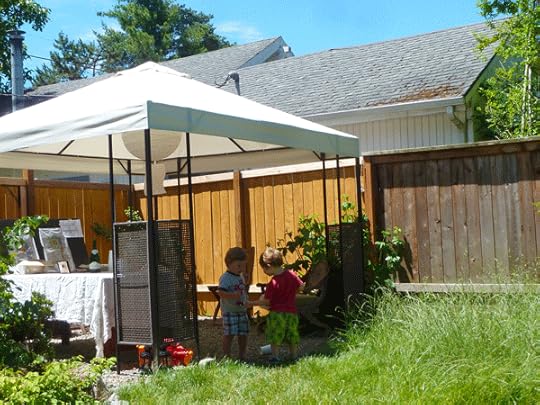
Where does all the food and drink go when they throw a big shindig? They came up with a really simple solution by including a tented area in one corner of the garden. It also provides some refuge from the rain – something always needed here in Portland.
 The resourcefulness didn’t stop at the backyard either. The homeowners planted drought-tolerant lavender, rosemary and wooly thyme. The palette is simple and showcases some great hues and textures. No grass means a lot less maintenance and lot more beneficial insects. It’s an inviting welcome to this gorgeous Portland home.

Low maintenance front yard with plants for texture and repetition
Overwhelmed with how to carve out these mini spaces in your garden? Start your design process with a list of spaces you want and begin to diagram them out. Circle areas of the garden (front yard and back!) that have potential to become hideaways or large gathering spaces. Having a loose plan for what goes where is a good starting place to build from.
July 2, 2012
June in Review
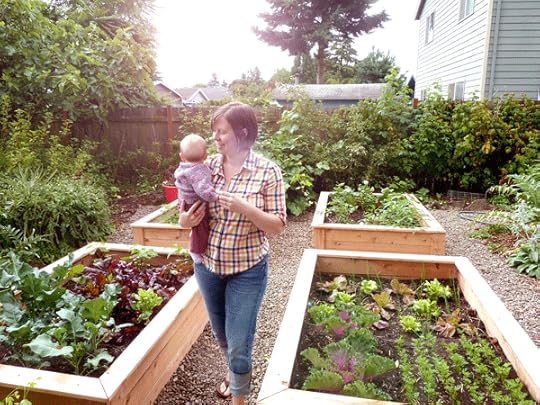
June was the first month that I finally felt like our homestead was back in full swing after being away for a couple years. With Juniper clinging in my arms, we would walk the garden to harvest and tend our little slice of heaven.
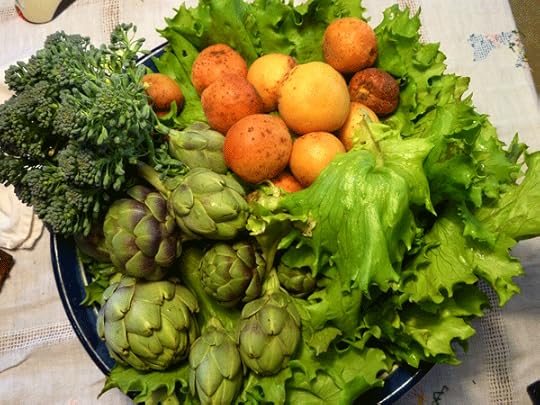
 Several delicious veggies filled our plates at mealtime including kale, chard, spinach, lettuces, and piles and piles of artichokes.
 When Jay would get home from the work, we took family walks to “graze” before dinner on red currants, goumi berries, raspberries and plump strawberries.
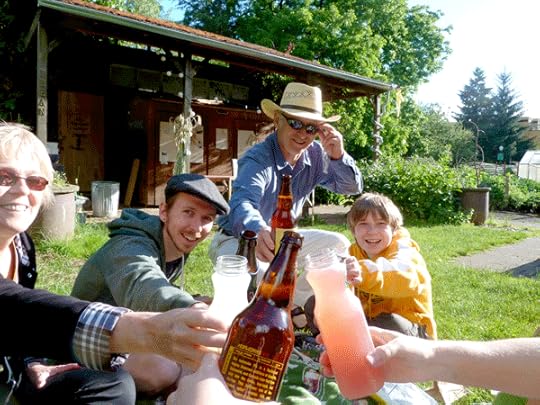
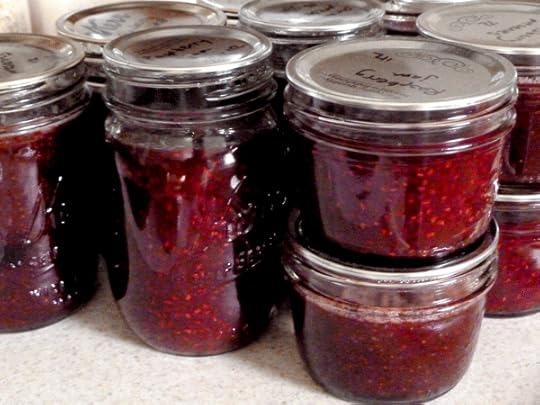 I canned about a half dozen jars of raspberry jam and another half dozen of strawberry. Three bags of goumi syrup are packed in the freezer. If this is a sign of things to come, I predict this will be the best harvest year on our homestead yet.
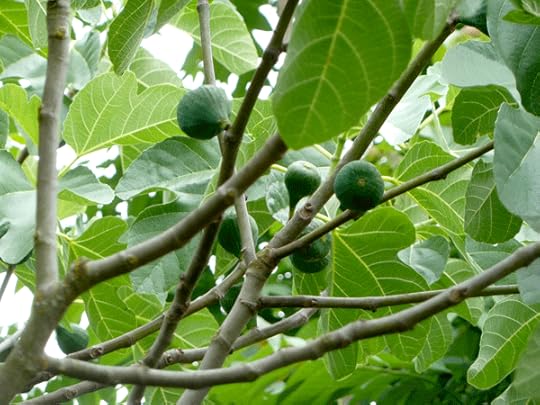 Lots of fruits are on the horizon. The fig tree is PACKED with fruit and we are foaming at the mouth, waiting for late July when those jewels will be ripe for the taking. We dream of fig pizza, fig preserves, roasted figs with blue cheese and honey, and the list goes on…
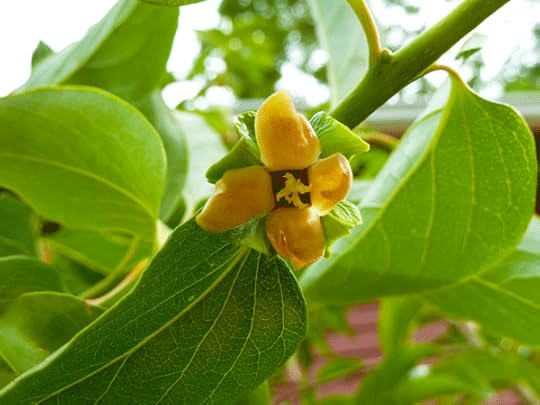
Asian persimmon flower
The pear tree and hardy kiwi have fruit growing – the first time we’ve seen them bear fruit. Even our Asian persimmon has fruit this year!
 At the beginning of the month, Juniper learned how to roll over and we heard her first chuckle. She is now full of smiles and laughs. She continues to be one of the strongest babies I’ve ever seen. It won’t be long til she’s crawling, and then we’re in for it!
 Every day the garden grows more and more productive. And everyday feels like another gift, another day in our own urban paradise.
June 28, 2012
Harvesting Goumi Berries
Goumi is a medium-sized shrub from Asia that is gaining popularity in western gardens. The berries are used medicinally and sweeter varieties are great for eating fresh. Goumi shrubs are nitrogen fixers, benefiting the plants around them with higher nitrogen soil – great for leaf growth. The shrub has long thorns that are easy to spot and avoid.
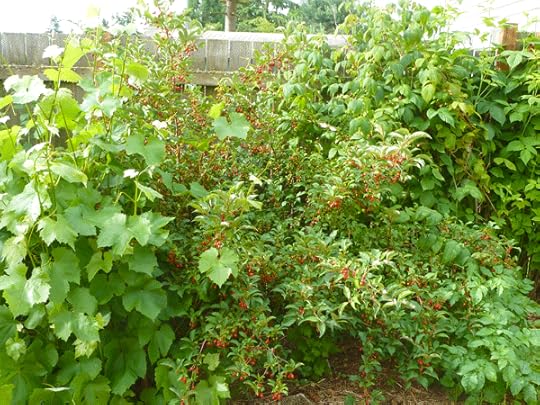
Sweet Scarlet Goumi tucked between some grapes and raspberries
We have two varieties planted on the homestead: Sweet Scarlet and Red Gem. The former has larger, plump, sweet tasting fruit while the later has smaller, more tart berries. Red Gem is planted near our birdbath and we are fine with those guys harvesting the berries. The Sweet Scarlet is planted further away and seems to get missed by the birds, leaving tons of sweet fruit for us.
 Harvest time is in June for goumi shrubs and the branches on our plants were bent over from the weight of fruit. With Juniper supervising, I harvested about fifteen pounds of berries from our Sweet Scarlet shrub. As the weight of berries was lifted, the branches began to spring back upward. That showed off the lovely grey underside of the leaves.
 What to do with fifteen pounds of goumi berries? The fruit is said to be low in acid, which makes me nervous about canning it. Instead, I decided to juice the berries and preserve them in the freezer. That way I don’t have to worry about acidity level – just flavor. Here was my process:
Rinse the berries. Don’t worry about separating the thin stems from the fruit.
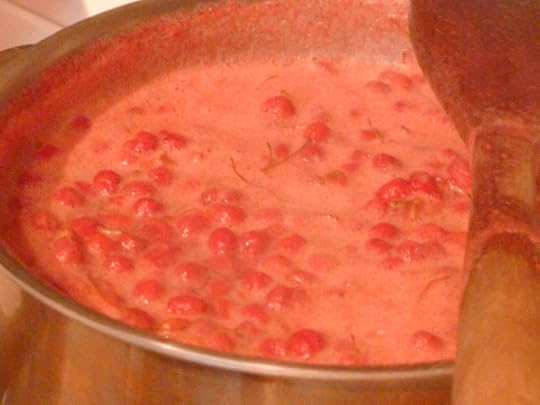
Simmer three parts goumi berries with one part strawberry, raspberry or other sweet berry. This gave my mixture a lift in flavor without masking the goumi taste too much. For every two cups of berries, add one cup of water.
Meanwhile, in a separate pot make a simply syrup by combining one cup water with one cup sugar. Bring to a boil and simmer for 10-15 minutes. Set aside.
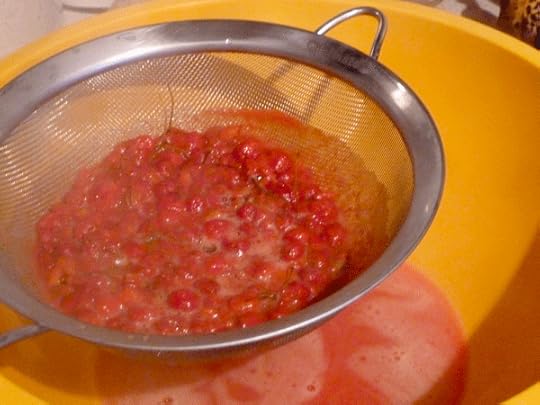 Strain berries through a sieve, cheesecloth or a food mill. This separates the juice and pulp from the stems and large fibrous seeds. Compost the stems and seeds.
Combine simple syrup with berry juice. I used three parts juice to one part syrup, but do this slowly and keep tasting until it is sweet enough for your preference.
Pour goumi syrup into freezer containers, label and tuck away.
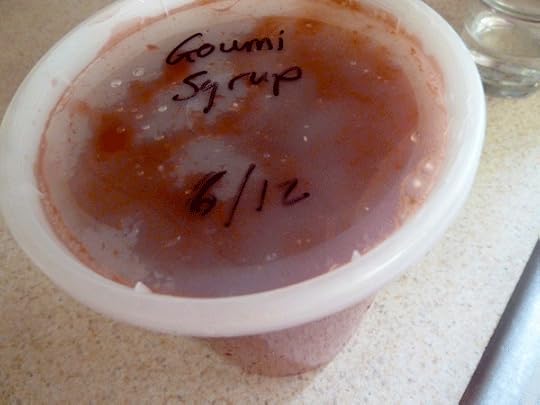 Preserving goumis as a syrup leaves the door open for versatility later. When I want a pancake or waffle topping, I will simmer some syrup with cornstarch until it’s thickened. I can add a goumi syrup to iced tea or mix with club soda for a cool summer drink. It can also be drizzled onto baked goods as desired.
June 26, 2012
Graduation
Four years ago I was spending 40+ hours a week at “work” and 40+ hours a week getting my hands dirty somewhere – digging in our garden, helping friends with garden designs, volunteering for the farmers market, etc. It was clear that I needed to make a choice between those two lives. I chose the one with dirt under my nails.

2009: Turning in my application to the department
I turned in my application to the University of Oregon’s masters in landscape architecture program. The department accepted my application and the three year adventure in graduate school began! I learned about public park design, ecological design, river restoration, historic landscape preservation, park trail design, master planning, urban planning and how urban farming can increase community food security.

2012: Accepting my masters degree with Junebug in tow
I walked across the stage to accept my degree with little Junebug tucked into my robe. The announcer said my name and then added “…and child” and the crowd exploded in applause and cheers. That felt great! Because, yes, it was damn hard to finish a masters degree with a baby – but I did it!
 My family was there to cheer me on, which meant the world. We headed over to the Urban Farm for a picnic afterwards to celebrate – the place where it all began.
 The Urban Farm was where I made the decision to enter graduate school. I had been touring the campus and talking with the department – it seemed like a really great fit. But when I toured the Urban Farm, I could really see myself there. I decided then and there to bravely follow my heart.
 The farm became my home-away-from-home for three years as we temporarily moved off our homestead and into a series of Eugene rentals. With family all around me, it felt like my worlds had finally come together. They got to see why this place was so special to me.
 It’s amazing what my life has looked like over those three years. I had red punk-rock hair and wrote a book. I drove 10,000 miles all over the country. I was lonely at times and claustrophobic with people at others. I was pregnant and watched my body and mindset transform in a few short months.
 It was a time of personal growth when I learned just as much about myself as I did about landscape architecture. I met some great lifelong friends through my program who I will miss dearly. But it is time to move on and I am ready. The next chapter is waiting to be written.
June 21, 2012
Fo-Po Garden Tour
This past weekend I had the pleasure of touring several gardens during the annual Foster-Powell Garden Tour. It was a relaxing way to spend a sunny Saturday and find some garden inspiration. Here is a sampling of the gems I observed.
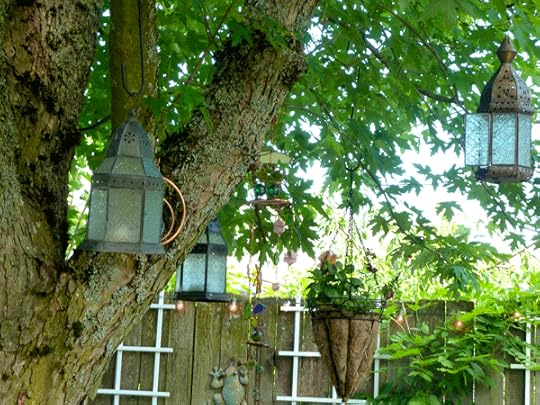 There were surprises up in the trees in many gardens. These lanterns would make a garden feel so magical if little tea lights were placed in there at night.
 I am such a fan of grass-less front yards. This one was filled with perennial flowers and shrubs. I am not sure they have enough evergreen structure to make this hold up over winter, but I think it was only planted a year ago. The mulch ground cover likely keeps it low-maintenance.
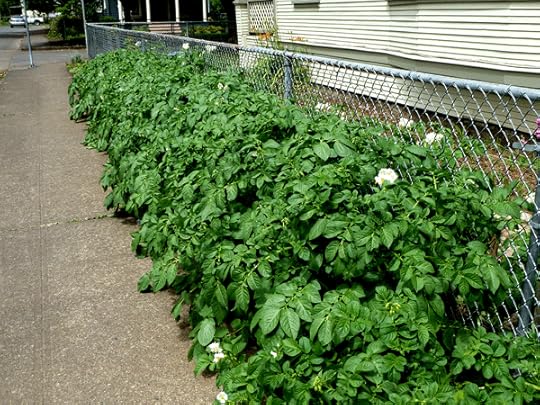
This house was not on the tour, but I loved their use of potatoes as a sidewalk plant. It hides some of the ugly chainlink fence and is a great use of narrow, sunny space. If you don’t have the time or money to finish every corner of the garden, think about filling it temporarily with easy edibles like these guys did.
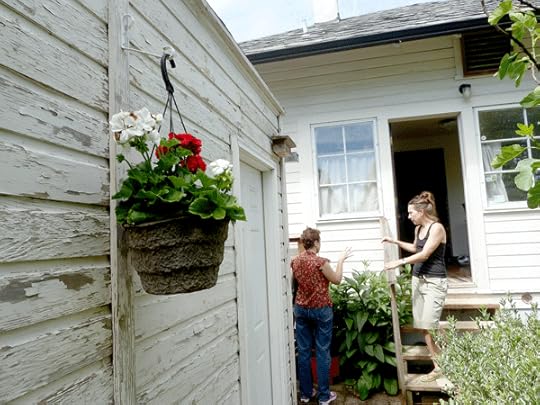
I can be too utilitarian in our garden, forgetting to make room for ornamentals here and there. The geraniums in this hanging pot reminded me of traveling through Italy. Sometimes a simple little touch can add so much.
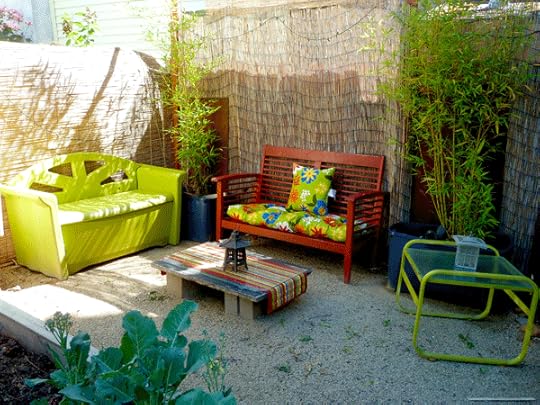
What a simple and gorgeous gathering space! Grass mats hid the drab fence and screened the space from the neighbors. Outdoor furniture was painted bright colors. I’m not sure how much maintenance goes into the pea gravel ground cover, but it looks great.
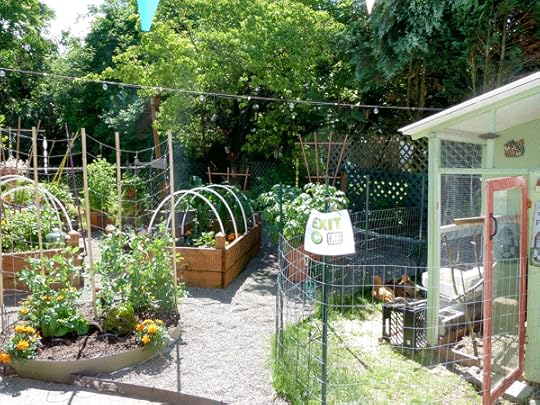
Chickens and veggies! Two of my favorite things to see in a garden. The chickens had room to lounge with the vegetable beds out of reach. This colorful homestead also had a kids play area and a cozy gathering space. I loved the outdoor lights they had strung up over the garden – gotta get those!

Someone had a front yard garden run by garden gnomes. Gotta love the occasional fearless gardener who just lets their whimsy run wild.
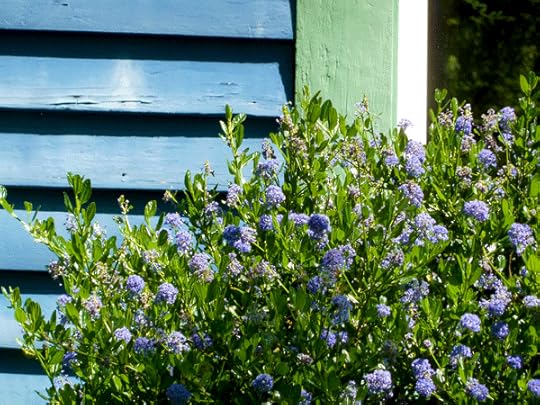 There were little details here and there that I adored, like the way the blue flowers on this Ceanothus played off the blue house color. It gave the garden a calm, cool and relaxed vibe.
 This gal had her work cut out for her: full shade backyard with a huge Doug Fir. Over a few years though, she cultivated a gorgeous four-cornered, English shade garden. There were lots of subtle colors and textures. Not many vegetables, but herbs and flowers really made it dreamy.
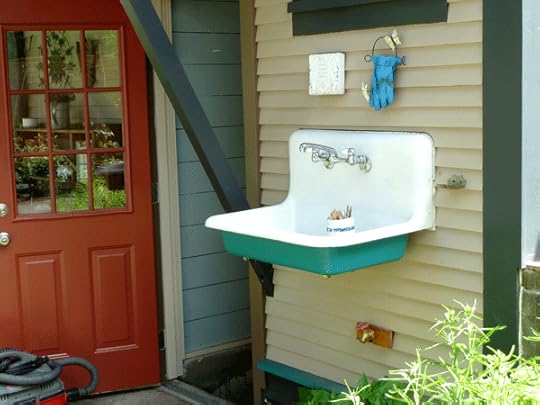 There were some major renovations being done on this house, which I am guessing this outdoor sink was part of. Imagine doing all your produce cleaning outside, where it’s fine to make a mess. I can dream…
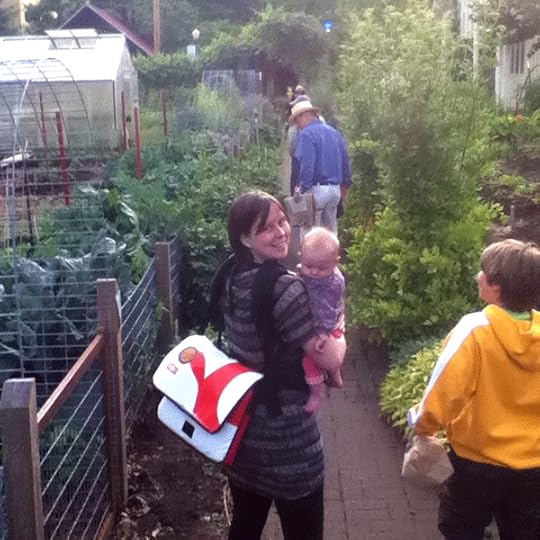
 I found the garden tour thrilling, but Juniper was not so interested. She slept through the whole tour while I wore her in a baby carrier, running from one garden to another. I walked away with some great ideas and I can’t wait til next year!


