
Renee Wilkinson's Blog, page 24
May 16, 2012
Propagating Grapevines
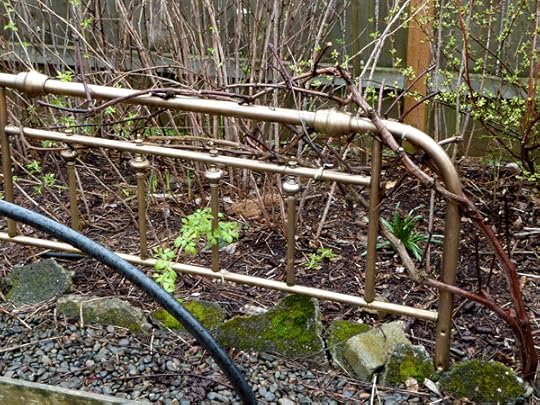
Springtime means pruning and our grapevines were more than overdue for their annual haircut. We love the Glenora and Himrod grapes growing on old bed frames on either ends of our raised beds. But each year they grow so long that they get tangled into the nearby trees and shrubs.
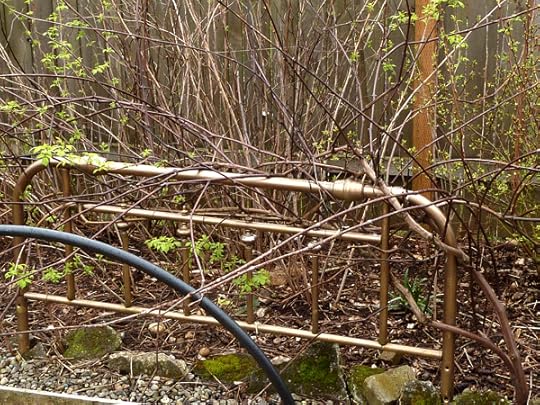 Pruning them back keeps their growth under control and also gives me the chance to propagate new grapevines. The supplies are simple – just grab some sharp pruning shears, water and some rooting hormone. Rooting hormone can be purchased from your local garden shop and one small jar will last forever.
 After pruning off the excess vines, examine the cuttings for the best candidates for propagation. I looked for vigorous vines that were thick, rich in color and had good buds on them. I cut the best ones into about two feet increments.
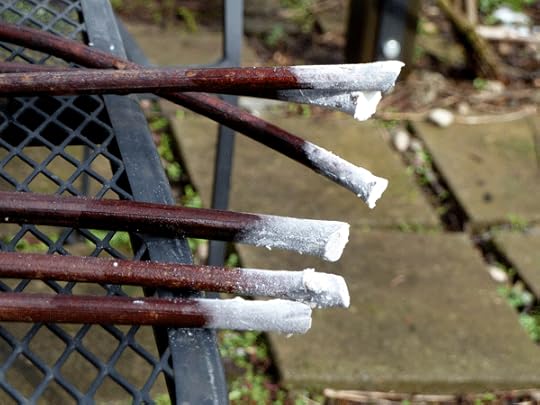
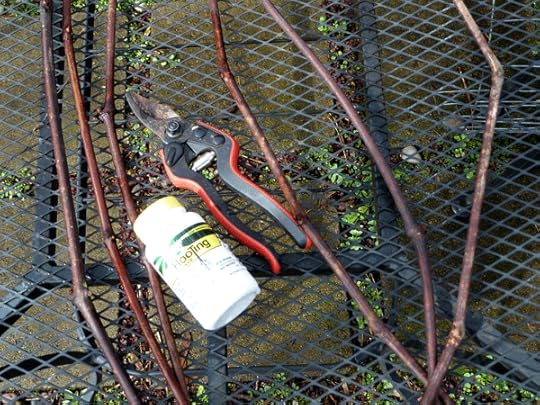 Next, I dipped the ends into water and then dusted them with rooting hormone. I picked spots around the garden against the fence where I would like to eventually trellis the vines, then essentially shoved the vine cuttings in the ground and hoped for the best.
 It’s been about a month and my efforts have paid off! The grape vines are leafing out!
The secret to propagating grapevines is to baby them as they begin to root. Water the new vines every other day when it has been dry outside. For added insurance, take some willow cuttings and soak them in a bucket of water overnight to extract some of their powerful rooting hormone. Pour the “willow water” onto the newly propagated plants periodically to encourage rooting.
It sounds almost too easy, but it works. The temperatures are warming, so best to get out in the garden to try propagating plants now before it’s too hot. Just keep a close eye on them and you should be able to make some plant babies this season!


May 10, 2012
Planting Potatoes: The Double Dig Method
St Patrick’s Day is usually my cue that potatoes need to be planted. You can still get your spuds in and have a decent harvest, but it needs to happen soon! Potatoes can be easily grown in something as simple as a bucket full of soil with drainage holes in the bottom. Although they are adaptable to lots of growing methods, the double-dig method has given me the highest yields.
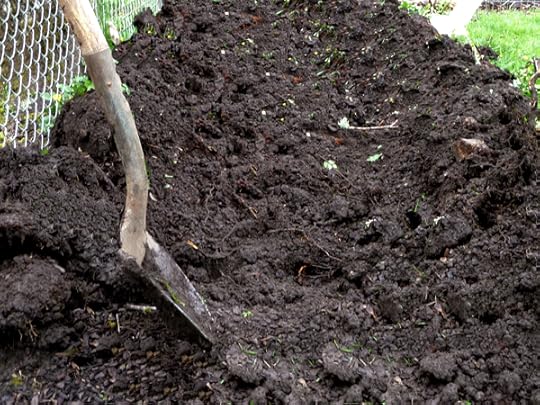 The method works by first digging a nice, long trench. Keep the soil you dig out somewhere handy, as you will need it later in the season to mound up your spuds. The second step is to dig a second, deeper trench in the one you have just cleared out. Don’t remove the soil in this deeper trench though. Instead you are just loosening the soil to give the potatoes an easy place to grow and multiply in the soil.
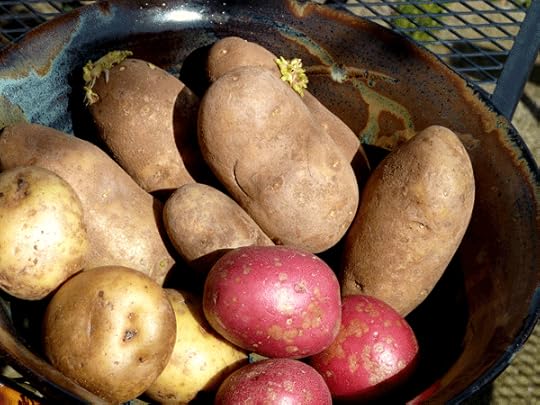 Plant your spuds in this loosened soil anywhere from 1-2 feet apart. You can use seed potatoes from a garden store or grocery store-bought spuds. The seed potatoes will likely be well adapted to your climate and free of disease. These days I often use organic potatoes from my local market. They are grown nearby, so I know they will do well in my climate. Because they are organic, they should not have been sprayed with an anti-rooting agent.
What’s an anti-rooting agent? Surely you have grabbed a potato from the sack to cook and found it sprouting. Annoying, right? Non-organic farms will often spray potatoes with an anti-rooting agent to slow down the sprouting.
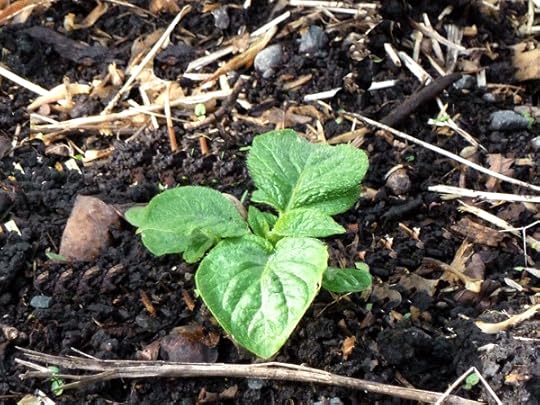 As the potato greens grow, use the soil you removed to mound the trench little by little. Just leave at least 4 inches of greens showing. If you are battling weeds, you can dress the top lightly in mulch. Just don’t overdue it – you want the potatoes growing in soil, not mulch.
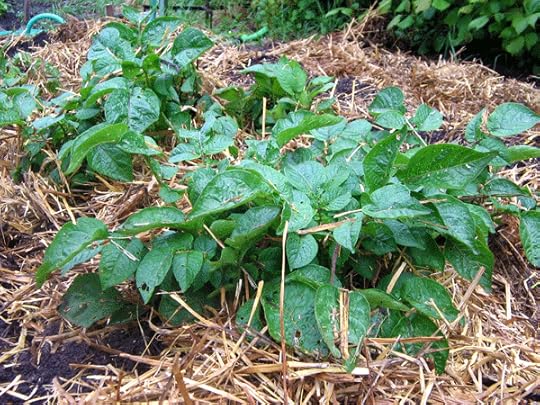 Around late summer or early fall, the greens will begin to die. That is your cue that the potatoes have multiplied as much as they will that season. Harvest them all at once or do what we do and just dig out what you need as you need them. We haven’t had issues with any going mushy on us since our soil drains well.
The other methods I have tried include growing potatoes in chicken wire (not a great yield), straw (mushy and some rotten spuds), and even recycled tires (great yield, but ugly in the garden and potential leeching issues). After several years of experimentation, the double-dig method has given me the best results. What has been working for your potato patch? Are your spuds already in the ground?
May 8, 2012
Egg Recipe: Garden Fritatta
Four ducks plus three chickens equals a huge amount of eggs on the homestead. Surprisingly, we are keeping up with the supply pretty well. The secret? Garden frittatas.
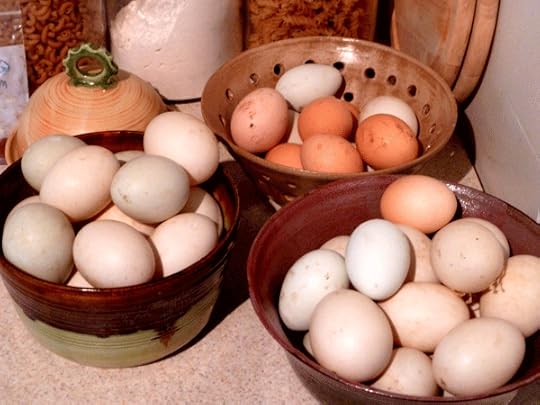 Frittatas are the perfect egg dish. They use at least a half dozen eggs at a time, are quick to make, you can put anything in them and they are great at any meal.
Alice Waters gives a great, versatile recipe for making frittatas in her book The Art of Simple Food. Over the years, I have come up with my own variation on her basic recipe:
Garden Frittata
olive oil
6-8 eggs
1 onion, thinly slices
4 cloves garlic, chopped
salt, pepper, cayenne pepper
garden goodies
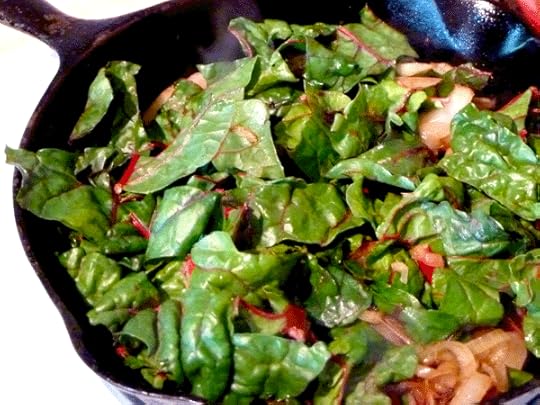
Warm about 1-2 T olive oil in a wide, cast iron saucepan over medium heat. Add the onion and saute five minutes. Meanwhile, heat the oven to 350 degrees.
Add your garden goodies along with 1 tsp salt and cook until just ready. If you are cooking kale or chard, cook the stems first for four minutes. Then add the leaves and cook for four more minutes. If you are cooking summer squash, mushrooms, or sweet peppers, cook until the liquid evaporates.
In a bowl, beat the eggs. Mix in 1 tsp. olive oil, garlic, a hearty dash of cayenne pepper and black pepper to taste.
Add the cook garden goodies to the beaten egg mixture. Stir to combine.
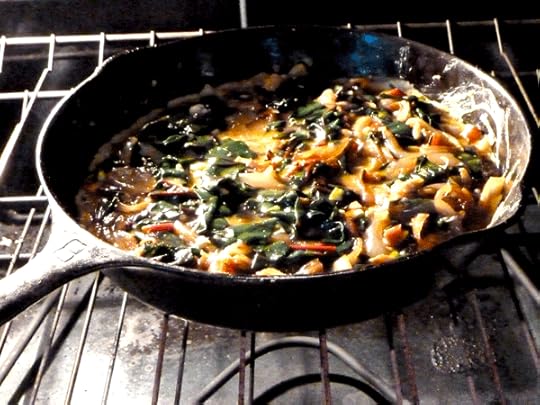
Add 2 T. olive oil to the cast iron pan and warm over medium heat. Add the egg mixture. Gently slide a plastic spatula under the frittata, allowing the uncooked egg to get underneath it.
After a couple minutes, as the frittata is semi-cooked through, pop the cast iron pan into the oven. Let it bake for about 7-8 minutes, or until it’s set on the top. I poke a knife into the frittata to check that it’s cooked through.
For breakfast, serve warm with sausage and scones. For lunch, place a thick slice of cheese on top and place between two slices of thick bread. Eat like a sandwich. For dinner, serve warm with hot marinara sauce poured on top. Pair with a huge green salad, crusty french bread and a glass of red wine.
 This is a great way to use up whatever veggies you have an abundance of – just adjust the recipe so you cook the veggies enough before you combine everything.
 We are eating about 2-2 frittatas a week now. We are also hosting brunch with friends at our place pretty often, cooking up 2-3 different kinds of frittatas: roasted red pepper & bacon, swiss chard & leek, mushroom & kale, etc.
 For company, cook up to the point when you are ready to pour everything back into the pan for the final cooking. Company arrives, chat, sip coffee and wander the garden. As you start to get hungry, finish off the frittata and sit down to a hot brunch. Et voila!
May 7, 2012
Anniversary Winner
Thank you all for your great comments on the post last week about the fifth anniversary of Hip Chick Digs! It was SO fun to read all of your comments about your homesteading journey and get to know you all better – especially you quiet ones who have been with me for several years!
 Thanks to a random number picker, Kat is the winner of a copy of my book Modern Homestead. I wouldn’t have known how to choose among the comments because they were all so good. Kat, I’ll follow up with you and get a copy of the book out to Wisconsin!
Some of you are just beginning your homesteading journey and some are old hands now. I am so happy to be sharing our adventure with you guys – the highs and the lows. Homesteading is about more than self-sufficiency – it’s also about coming together as a community. I’m happy to have you all as a part of this community!
May 4, 2012
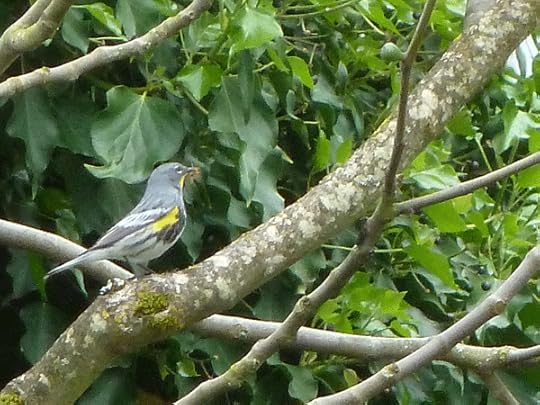
Inviting Birds into the Garden
The sounds of birds and the buzzing of insects in springtime is a reminder for me that our homestead supports more than just our own sustenance. Here are some tips on making sure your garden offers an open invitation for birds.
 Give Them Water. Birds need a place to stop for a drink or a bath. We were gifted a heavy, old, concrete bird bath that I keep filled year round. It is a common occurrence to sip tea on the patio while watching a major pool party happen in the bird bath.
Reclaimed items can be transformed into great bird baths. Large stones with a depression in the middle will naturally pool water. The large ceramic saucers used under pots can be placed in the garden to make shallow pools. Start keeping your eyes peeled for reclaimed materials and you’ll be surprised how easy it is to find something that works.
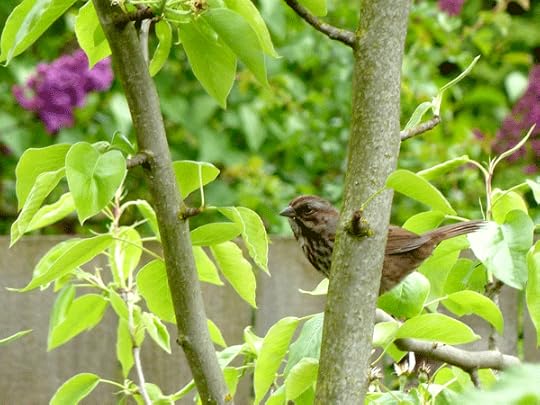 Give Them Food. Plant native trees and shrubs that give birds food, especially during the winter months. Birds will munch on ornamentals, but they will not be as nutrient-rich for native birds as native plants will be. A wide range of options will offer something for a wide range species. In the Pacific NW, good options include Snowberry, Indian Plum, Nootka Rose, Oceanspray, Oregon Grape, and Huckleberry.
A messy yard can be a great place for birds! Allow fall leaves to stay in the garden. It will encourage insects and some bird species to feed there. A small pile of twigs and pruned branches in the garden will also be a good spot to find birds picking out nesting material.
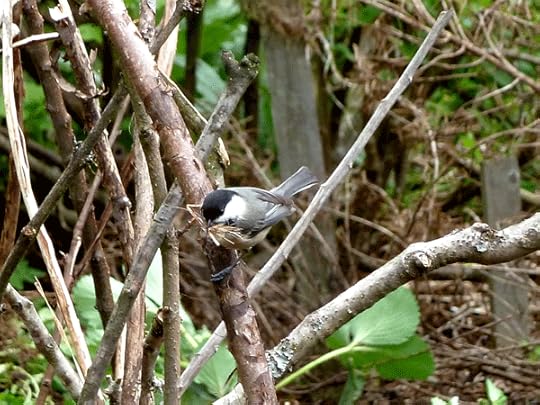 Give Them Shelter. Some bird species prefer to nest in hollow trees, which can be hard to find in urban areas. Instead, construct a simply nesting box to replicate the hollow tree environment. Plant native trees that can grow in an open area, allowing their branches to spread out horizontally. This creates little hollows for birds to tuck nests into.
Provide some good hiding places. There are lots of hungry cats in the city, among other predators. Incorporating some evergreens will give birds a safe place to run and hide in if they are threatened.
 I was surprised at how quickly our urban plot turned into a home for wildlife. A bird bath here, some evergreen shade there and a few berry-producing plants was apparently all they needed to come in droves. We don’t mind sharing some of the fruits of our labor in exchange for the cheerful company. Who is inviting themselves into your garden this spring?
REMINDER: Don’t forget to leave a comment about your homesteading journey on my anniversary post earlier this week! I am giving away a copy of my book Modern Homestead to one lucky winner. I will announce the winner next week!
May 2, 2012
Taking Down the Snag
Gather round kids as I tell you a story of a snag and a homestead…
A snag is a dead tree that is still standing. We urban dwellers see them as an eye sore, but wildlife see them as a valuable place for nesting and finding food. In fact, some native birds in the Pacific NW will only make nests in snags. No snags means no babies, which means some native bird species have populations putting them at risk for extinction.
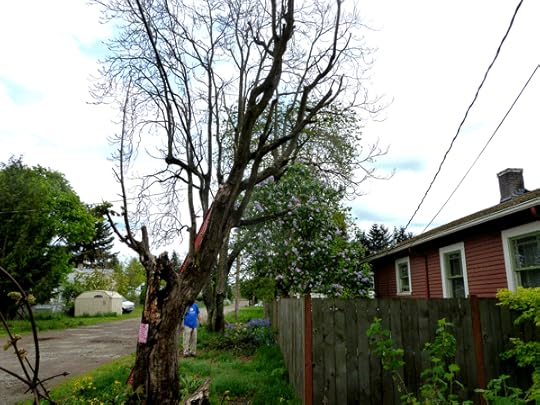 We have a large snag next to our house along an unimproved road. It’s a Bigleaf Maple, a native tree, and we left it there for years because it wasn’t causing any harm. One recent spring day there was a light wind – nothing real strong – and half the tree fell, no longer able to support its own weight. Luckily, it fell away from the house and no one got hurt. That left the other half standing, which is the half that leans toward our house.
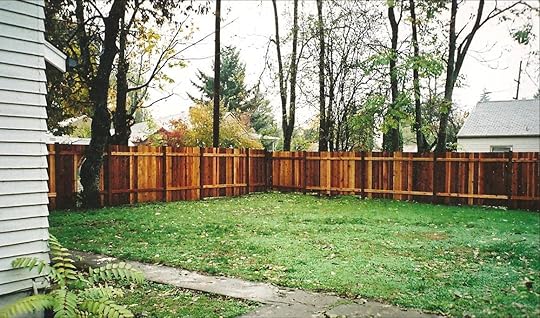
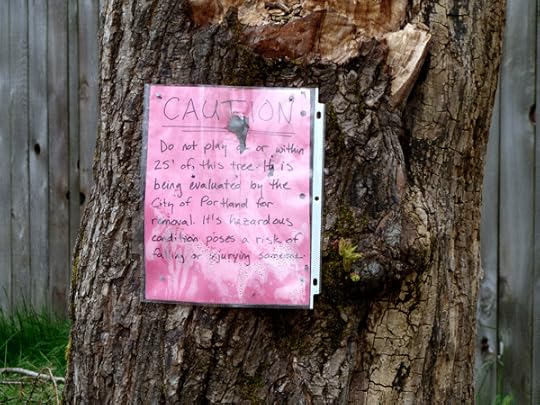 Sadly, it was time for the tree to come down. This is no easy feat as power lines are on each side of the tree. Our fence is also next to the tree, with the duck coop next to that and of course our house next to that. My crazy dad was game to help, so we made a plan to remove the tree on the next available dry day. My plan was to leave about eight feet of snag remaining as habitat.
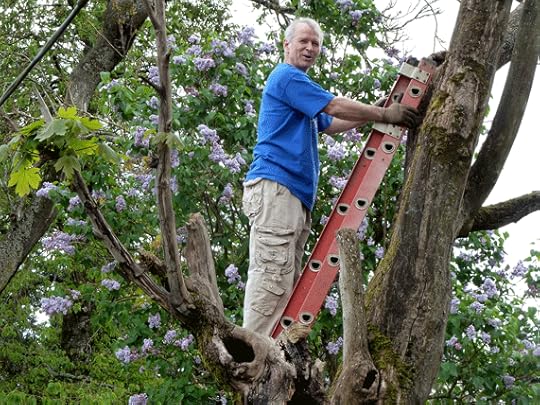 I wasn’t allowed on the ladder, much to my chagrin. Dad and Jay overruled me, since I am nursing and therefore another human being is too dependent on me to let me end up in the hospital. So instead I watched from below, hands gripped with terror, as my husband and father took turns gently climbing up the brittle, dry snag.
 They made cuts halfway through the limbs leaning over the house, threw ropes around the branches, and tugged them off from below. It worked pretty well. The biggest branches closest to the house came cleanly off. Just a few more branches to go and we could safely pull the whole trunk over, away from the house.
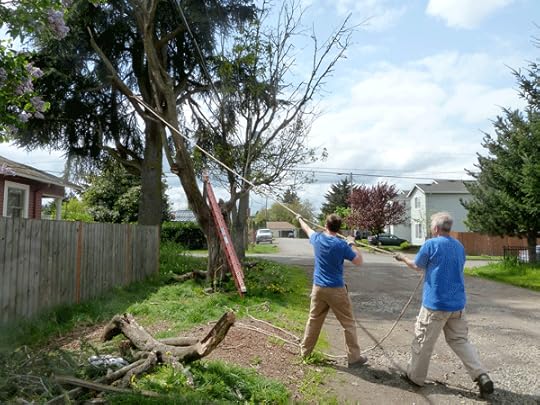
 Our luck ran out when they were getting those last branches down. There were some tugs on the rope and I heard a huge crack, then watched as the huge trunk came crashing down.
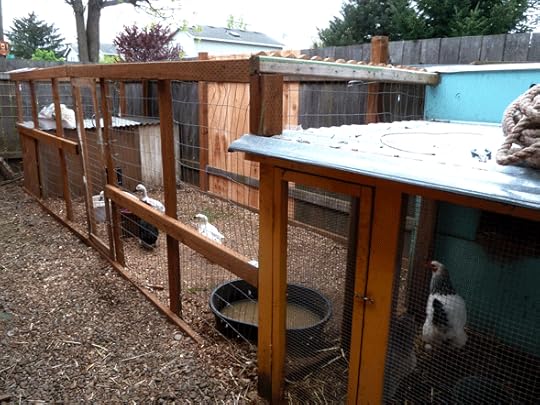
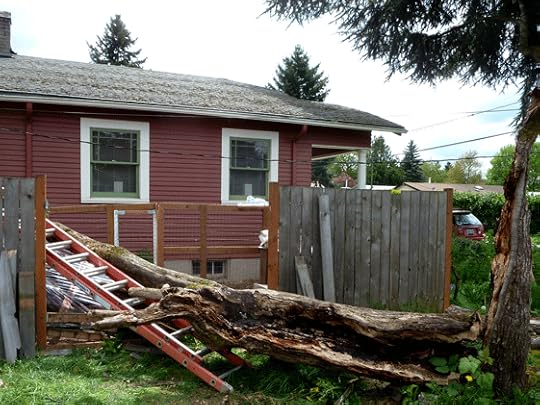 Only one branch hit the house damaging the gutter. A portion of the fence was broken. The duck coop roof was knocked down. AMAZINGLY, no one was hurt. The ducks were fine. The chickens were fine. My dad and husband were all in one piece. The house was fine. Holy expletive.
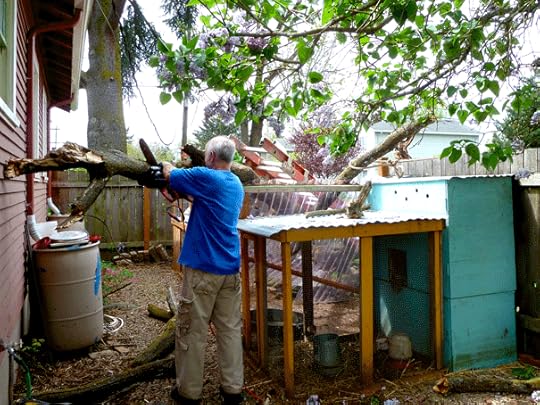
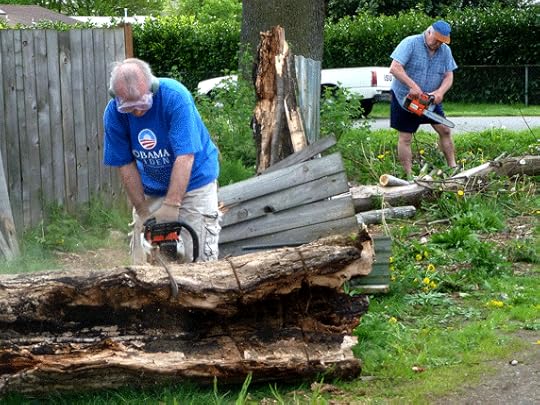 Like moths to a flame, the neighbors appeared. Some came to gawk, but most came to help. Stefan offered to saw the wood and take away to heat his home. Randy brought over his tools and spare plastic roofing. Dan came down the road with more tools and spare lumber. I went to the lumber yard to get more fence boards.
 A couple hours later, the snag was cut for firewood. The fence was repaired. The duck coop frame was fixed. Beers were distributed. A couple days later, the plastic roofing was replaced on the duck coop.
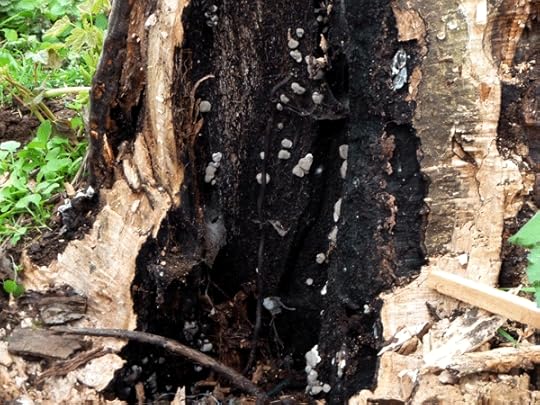
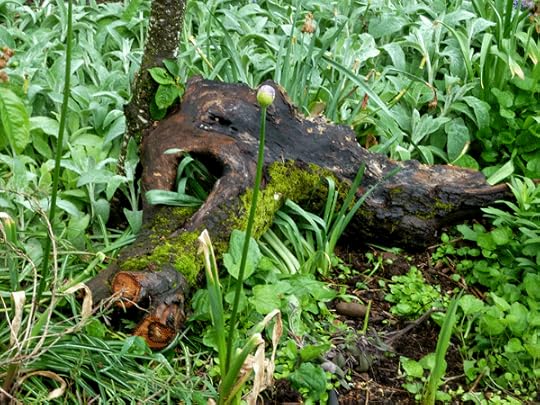
 Part of the rotten stump remains for wildlife to pick at, although most fell off.
 I got a nice souvenir for the garden as well. A little token to remind me of our foolish endeavor that put us out $22 bucks for fence boards and brought the whole neighborhood together.
 And in case you are wondering, I don’t recommend you try this at home.
REMINDER: Don’t forget to leave a comment about your homesteading journey on my anniversary post from earlier this week! I’m giving a copy of my book Modern Homestead away to a winner that I will announce next week.
April 30, 2012
HipChickDigs Turns Five + Giveaway!
Hip Chick Digs turns five today! I wrote my first blog post about nine months after we moved into this teeny 1927 bungalow on a tenth of an acre covered with lawn.
Backyard in 2006
It’s easy to lose sight of how far I’ve come amongst the weeds and planting chores. But marking this anniversary is a time to acknowledge how hard work combined with fertile Willamette Valley soil and the passage of time can create an urban oasis. (The plastic roofing in the picture below is a long story I’ll write about later this week…)
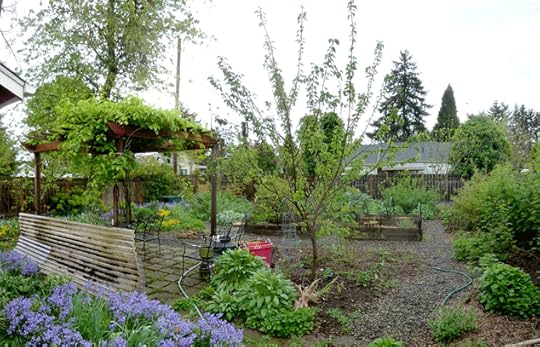
Backyard 2012
This is also the one year anniversary of my book Modern Homestead making it onto bookshelves across the country. I set out to write the book I wish I had when my homesteading adventure began – something unpretentious, approachable and empowering. I wanted to write a book that took the mystery out of homesteading and made it accessible for renters and homeowners alike.
To celebrate, I want to give away a copy of my book to one lucky reader! Tell me about where you are in your homesteading journey. What are you most proud of on your homestead? What plans are on the horizon for you? Leave a comment in response to these questions sometime this week. Next week I will announce the winner and send you a copy of my book.
Five very busy years that have included a masters degree in landscape architecture and a new baby… what will the next five years look like? I’m not quite sure, but I bet it will involve a lot of dirt under my nails.
April 25, 2012
Spring Signs of Summer Fruit
Junebug and I were taking a morning stroll through our backyard oasis noticing little signs of budding fruit. It’s looking more and more like this will be the best season yet on the homestead. Here is a little background on when I planted the trees and shrubs that are showing signs of summer fruit.
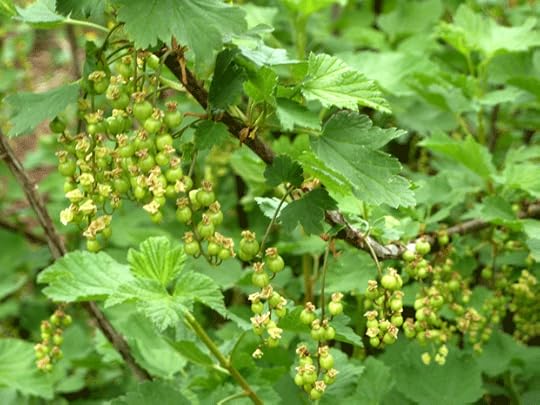 The currant bushes, both red and black, fruited the second year they were planted. Six years later, they just drip with fruit every season. Come June there will be currant muffins, pancakes, syrup and preserves for mornings on end.
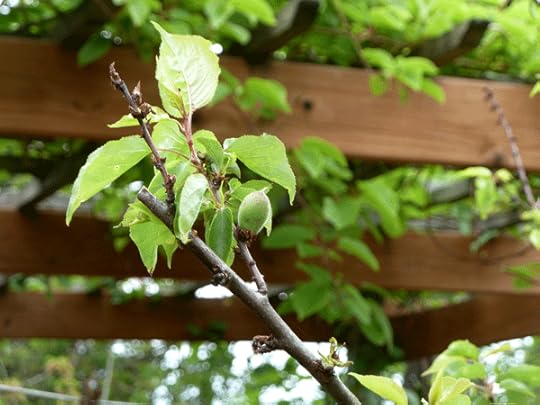
The Puget Gold apricot tree is a great choice for the Pacific Northwest. Apricots bloom and fruit early, sometimes too early for our moist and cool springs. This late bloomer is usually a winner in the backyard and, sure enough, we began getting fruit from the tree after the second year. Like figs, apricots don’t keep more than a day or two once picked so it’s rare to find them available fresh in the store. Growing your own is the best way to enjoy the delicate fruit.
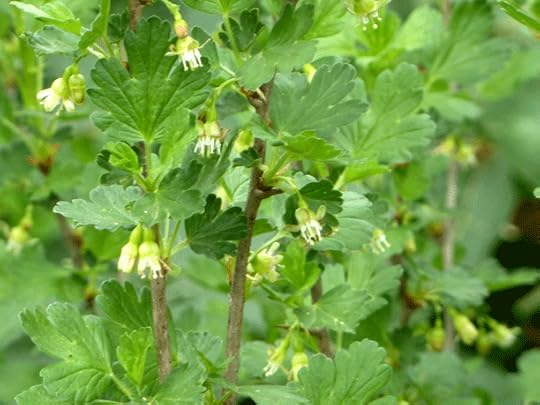
 Gooseberries were planted on the homestead right before I moved to Eugene temporarily for grad school. They are covered with blooms and it looks to me like the base of the flowers are swelling to make fruit. I can’t wait to experiment this season with gooseberry jam and pies!
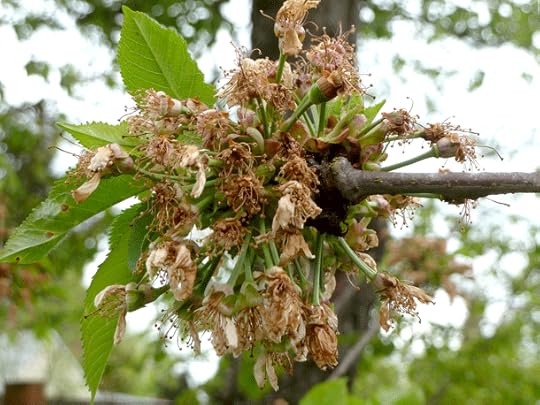
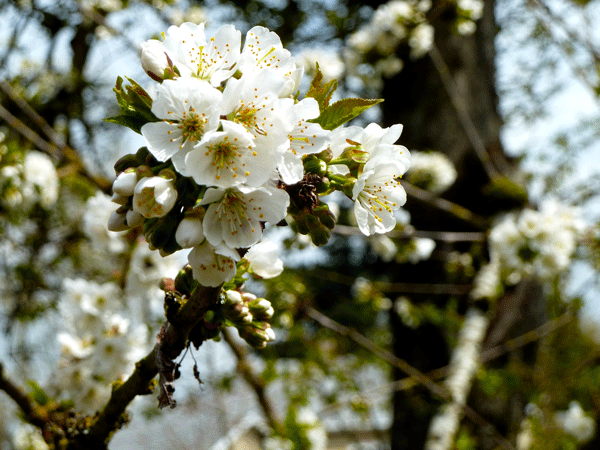
 Our cherry tree blossoms are spent, but the dried flowers are beginning to swell at the base. It will be a race between us and the squirrels to harvest the fruit.
 We have two varieties of goumi bushes – one tastes sweet and the other a bit tart. They are both exploding with blossoms and fruit heavily each season. If you look just below the flowers, you can see a place where the brown stems bulge. I think those may be the early berries.
 These spring mornings are just full of promise! Are there signs of fruit on your homestead? Are you also already dreaming about preserving in just a few short months? I would love to hear what is exploding in your garden!
April 20, 2012
Becoming A Parent: What I’ve Learned So Far
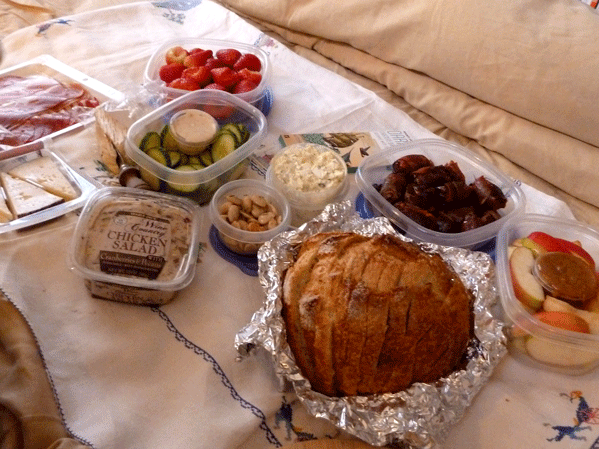
It is a pretty steep learning curve when you become a parent for the first time. After a month and half, I wanted to share some of the lessons I have learned so far. 1. Bring new parents food. Our friends organized a meal train. You pick the nights you could use a meal and people sign up online for different nights. Great way for them to meet the new baby for a short visit while you eat something warm and delicious. That frees you up to rest, work on laundry and try to get a regular shower. Don’t forget dessert and the occasional six pack. We enjoyed a range of thoughtful meals from hearty homemade dishes to picnics in bed with tapas.
2. Clean the new parents’ house. Arrange a time to come by, tell them to take a nap while you work and systematically clean their house room-by-room. Be insistent – no one wants to ask a friend to scrub their floors, but they will be forever grateful to you for doing it. My Mom came by those first few weeks to mop, vacuum, scrub the bathroom, do my laundry and dishes. It was like the heavens parted and sent a cleaning angel to me.
3. Family becomes incredibly important overnight. Even if they were important before, it’s more so when the baby comes. We had family visit from Oklahoma and it meant the world to us to have them bond with Juniper so early on.
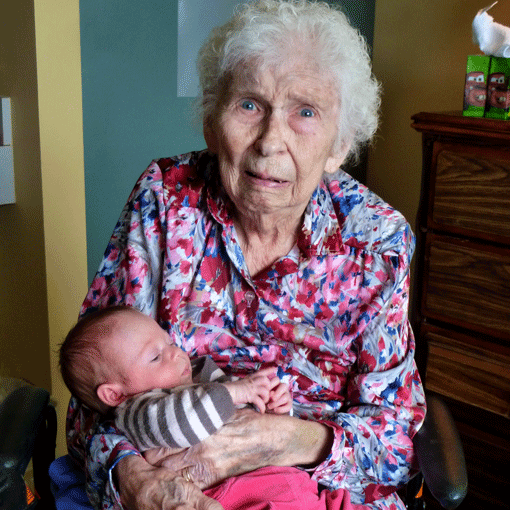
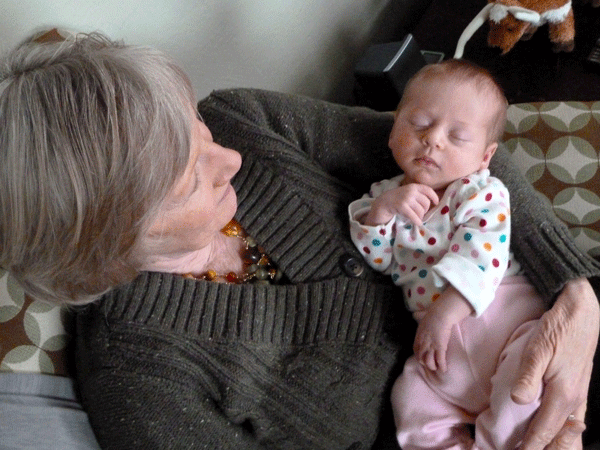 4. The life and vigor of babies is contagious. Walking down the halls of an assisted living center draws coos from the staff and residents. After ten kids of her own, 30+ grandchildren and 50+ great-grandchildren, my 98-year old Nana is still baby crazy.
 5. Have a network of support. Perhaps the biggest lesson learned. Most of our friends don’t have kids, but our midwife clinic puts together mama groups for women due around the same time. It has been invaluable to swap stories, share advice, and continually ask the question “is this normal” with other people in the same boat. We got together for a potluck recently with our partners and winter babies – such fun!
 6. The tiniest person you have ever seen will bring you the greatest joy you’ve ever known. I find myself being more cautious with my own safety because I now have someone completely dependent on me. My neck was sore the first few weeks from just staring down at her.
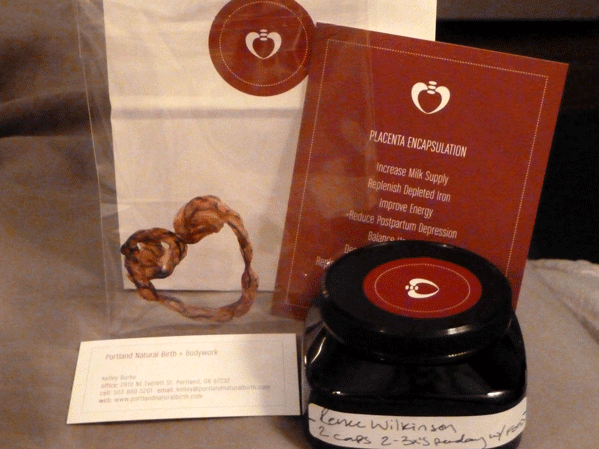
 7. You will find yourself doing things you never quite imagined. I ate my own placenta. Okay, not with a fork and knife. But I had it dried and encapsulated so I could take it as a supplement. I know, ew. Yet it is amazing for increasing milk supply, helping with postpartum depression, replacing nutrients lost in labor for healing, etc.
8. Their littlest milestones are huge victories. It seemed so incredibly when Juniper first became fascinated with her black & white book. Yes! She can focus on something! It’s totally entertaining her for five minutes!! Lately she has begun to smile socially, meaning in reaction to you and not gas. Yes! Another huge victory! She’s becoming a person with preferences and opinions on things!

9. Each side of the family will claim traits from your baby. Her nose, hair color, eyelashes, mouth, fingers and feet have all been “claimed” by each side of our family as being clearly inherited from that side of the family. You do the math on that one.
 10. Your baby won’t look like any other baby you have ever seen before. You know how sometimes all babies look the same? Well, not your baby. The moment she entered my arms I knew she was mine. She didn’t look like any other baby I had ever seen. Even now, I see something familiar to me in her face.
 So many more things to learn. Everyday is new – sometimes a struggle but most of the time not. I’m getting enough sleep, getting mostly regular showers, eating mostly well. But most importantly, I am still blissed out beyond belief with this new chapter in my life.
April 17, 2012
Emerging Spring
Spring is emerging from the sleepiness of winter and showing signs all over the homestead. What seeds are popping up in your garden? The snow peas above won the race on first to emerge.
 Our cherry tree is in full bloom and the squirrels are all licking their paws waiting for the fruit to set. The tree is in decline and barely scrapes through each season. We’ll see if it can bounce back with a little extra TLC from us this year.
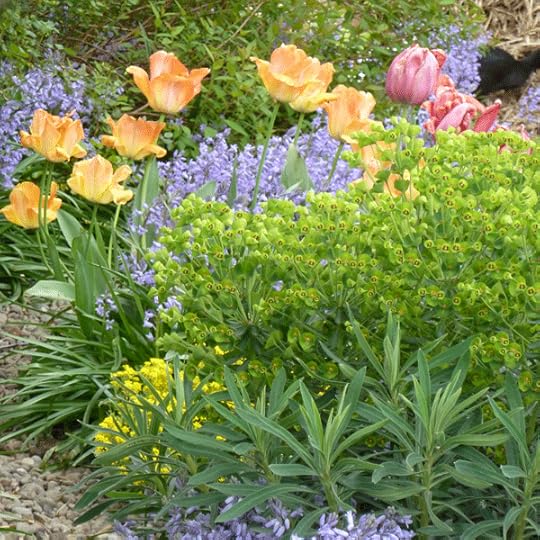
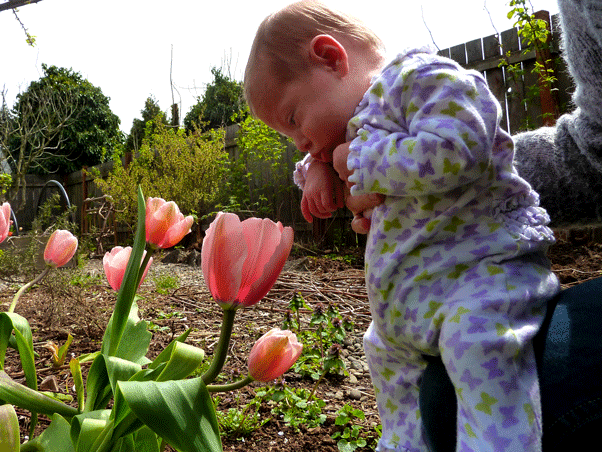
 Tulips!! Is there anything prettier? My favorite springtime flower has multiplied all over the garden in the couple years we were away from the homestead. The bulbs were leftover party favors from our wedding years ago.
 Naturally Juniper needed to meet these beloved, delicate friends of mine. Balancing the baby on the knee while taking pictures is not graceful, although no one got hurt.
 Our European pear is starting to take cues from the cherry. The buds are beginning to swell. Maybe this will be the first year of fruit from the tree we planted five years ago?
 Goodness, so much to juggle! Thesis, baby, an exploding garden… What are you juggling? What is blooming on your homestead? So much to do, but it’s so crazy beautiful outside at this time of year!


