
Amy Tangerine's Blog, page 22
March 2, 2018
5 For Friday
1. I want to remember our family hike from last Sunday where Jack hiked most of the 5.4 miles in Temescal Canyon. It took us 3 hours and there were a few falls and tears, but minimal whining and the view was perfection.
2. In case you missed the article I wrote on Bullet Journaling for Carrie Colbert's blog, you can check it out here. And yes, I promise I am going to film a video very soon about my bullet journal set up for this year. I totally appreciate your patience!
3. I cannot believe it's March 2nd already. We are en route to PlannerCon as I type this and I feel like I haven't fully recovered from the fun that was Planners Rock (did you see the epic video and prize that West Coast Planners so generously gave?), then Create & Cultivate, and Alt Summit. It was so fun to be in Palm Springs for Alt Summit hanging with this colorful crew of ladies. Hoping to do a recap and video from the fun even though I know I didn't capture quite as much as I had hoped. I was really focused on being present and forgot to capture much of it. And then I was home for one full day and I have a strong feeling the rest of this month is going to fly right by.
4. Our planner pouches are selling quickly - so if you're thinking about getting one, a little birdie told me to do it pretty soon before they are all gone!
5. Really think I need to get back into more of a blogging rhythm and try and do more features and fun things like I used to. I miss Currents and Friday Favorites and all that stuff. Going to make more time for it this month and hopefully it will turn into a habit that will carry through Spring and the rest of the year! What are your plans for the weekend?


February 28, 2018
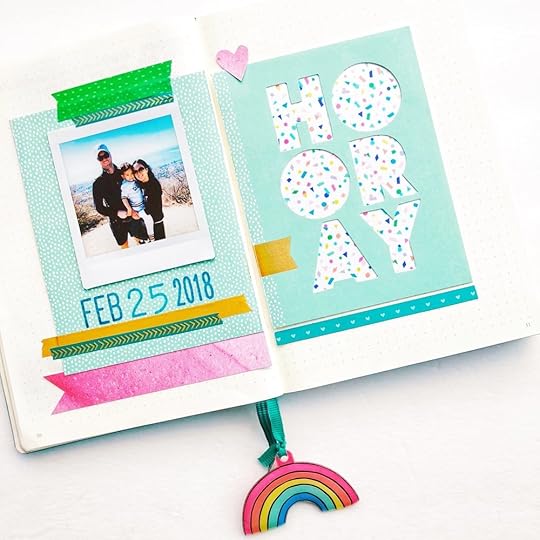
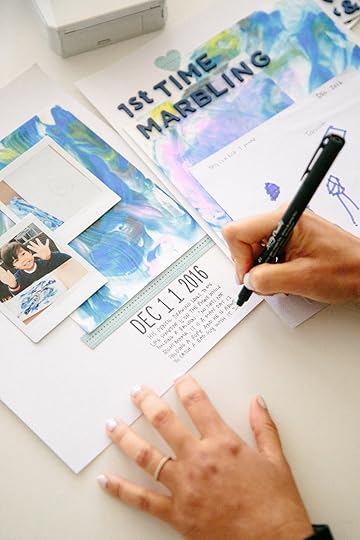
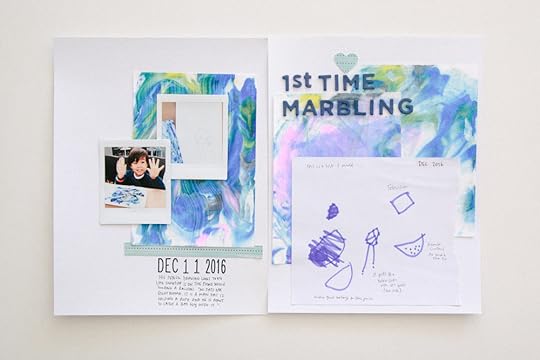
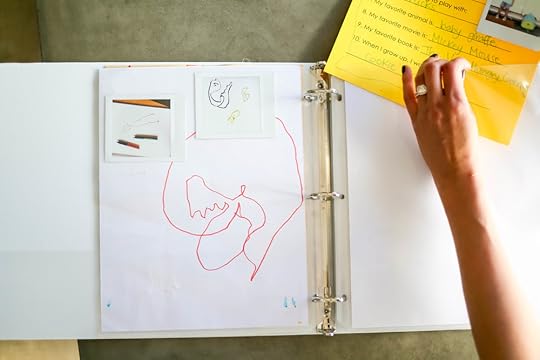
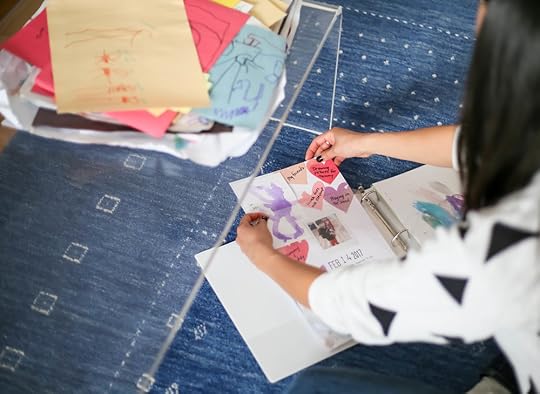
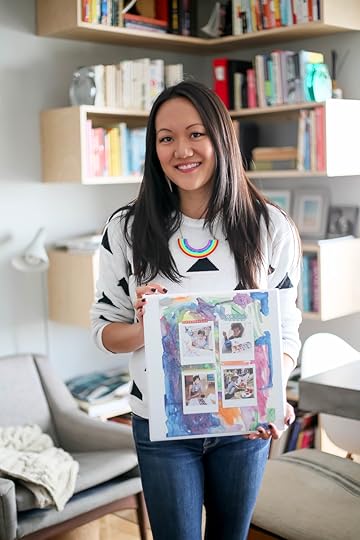
DIY Kids Art Binder

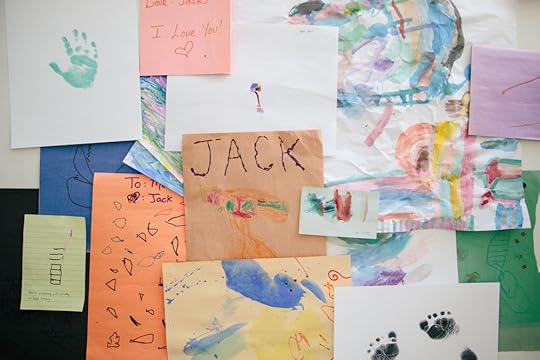
Since becoming a mom and being inundated with not only baby + kid gear but also plenty of paper + art, I’ve realized that I cannot save it all. My son is now in preschool and has already created a vast collection of artwork in his short four years of life. As much as I want to preserve every last bit of it, there’s just not enough room in our home to properly showcase it all. That’s where the Instax art binder comes into play!
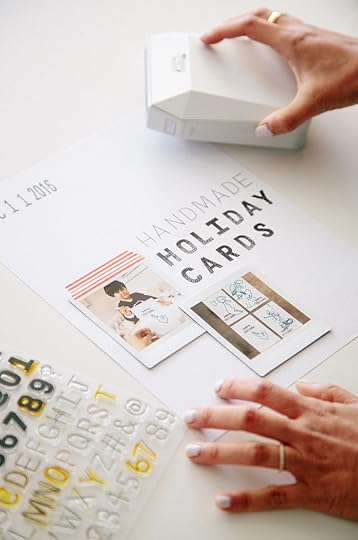
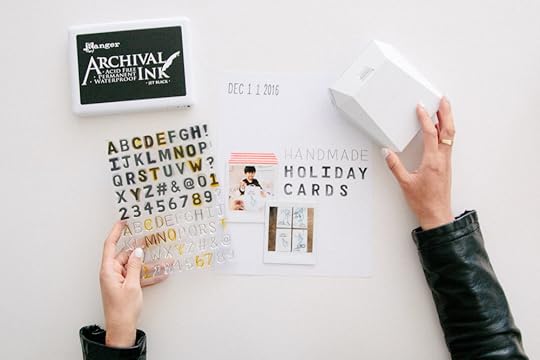
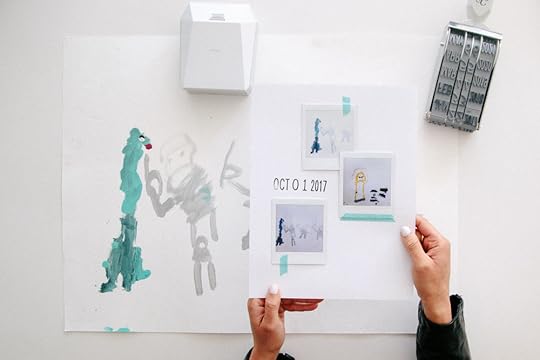
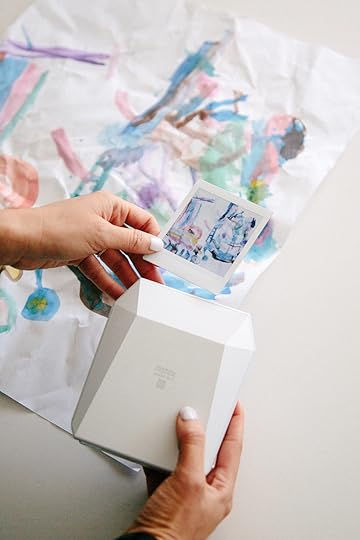
I recently pulled Jack’s art that we were storing in a plastic bin and gathered together all of our favorite pieces and paired them with corresponding photos of Jack creating the masterpiece or simply photographed the artwork with my phone and printed it with the FUJIFILM Instax® SHARE SP-3 SQ printer. The whole process took a few hours and minimal supplies, but the end result is a handmade book that my whole family will treasure forever. Here are some of my best tips for creating an Instax art binder:
- Don’t overthink it. Start with your very favorite pieces of art; don’t worry about documenting your child’s entire portfolio. Grab a small handful of crafting supplies (I only used white cardstock, a large date stamp, some alphabet elements and washi tape) and limit yourself to using those items only. The key is to get it done (while having fun, of course!) so you can document your child’s masterpieces while freeing up valuable space in your home.
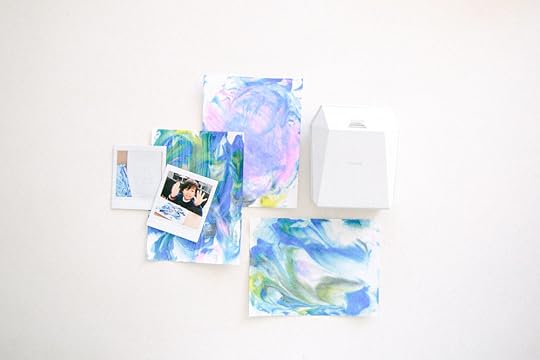
- Tackle the oversized. For all of those extra large or dimensional pieces of artwork that just don’t seem to fit anywhere, take a photo with your phone (in my case I am using an iPhone X) of the art in natural lighting. You could also trim the piece down to fit the parameters of the binder while still capturing the essence of your child’s creativity. Print the photo out with the Instax SP-3 printer wirelessly from your phone. Note that you’ll need to download the Instax SHARE app from iTunes or Google play. You can also edit photos or add text to the photos before printing. Back to the options for oversized pieces, the Instax printer has a “split” feature so you can get creative and print one photo on two prints! Once you have documented the art, consider using the oversize original for wrapping paper!
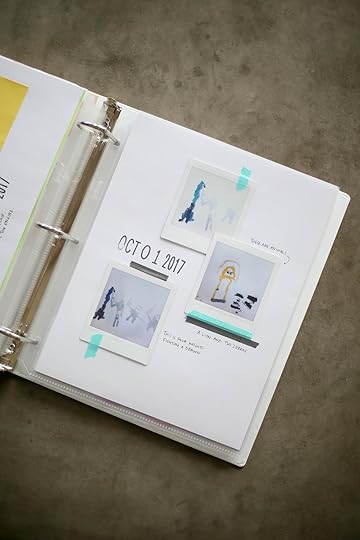
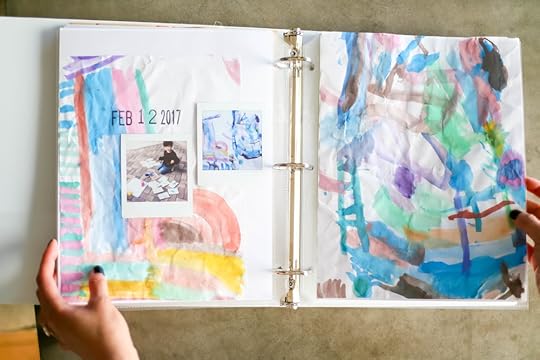
- Curate the best parts. One of my favorite aspects of creating an art binder is that I get to showcase my favorite elements of Jack’s artwork by cutting them out of the original and gluing them to the cardstock background paper. Then I ask Jack for a little insight into the meaning behind the art and I write down his thoughts next to each piece, if it wasn’t there already.

- Use the front and the back. You know when your child is really feeling inspired and they express their creativity on the front and backside of a single sheet of paper? That’s where the Instax comes in handy. You can take a photo of one side and then glue that side down in the book. Then you pair the photo with the reverse side of the art and now you can treasure the entire masterpiece in a single, one-dimensional space.
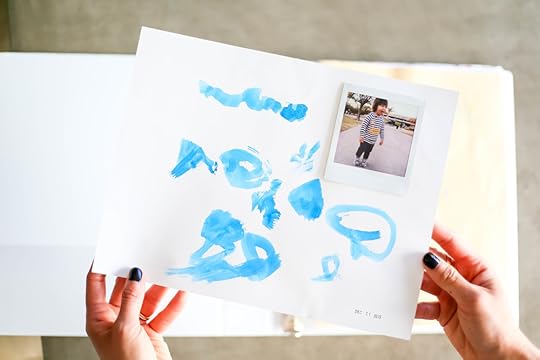
- Take photos that represent the era. As much as I would love to have images of Jack creating every single piece of art, I just don’t. One of my most beloved pages features a questionnaire from Jack’s very first day of preschool that I paired with a photo of him taken on the same day. Being able to read his answers to basic questions (i.e. what’s your favorite movie?) and compare it to what he would say now is invaluable, plus his cute little baby face on the first day of school makes me swoon. If you don’t have the corresponding images to every piece of art, simply use a photo of them from that general time period and include it with the artwork. Remember that it’s more important to capture the essence of a moment rather than getting hung up on everything being exact.
- Make the book accessible. I love to think of my Instax art binder in the same way that I think of coffee table books; I want it to be readily available to anyone who wants to look at it.
SUPPLIES: FUJIFILM Instax® SHARE SP-3 SQ printer | Binder | Page Protectors | Alphabet Stamps | Mega Date Stamp
This post is in collaboration with FUJIFILM, all ideas and opinions are my own. As always, my creative partners and I appreciate the support.
February 27, 2018
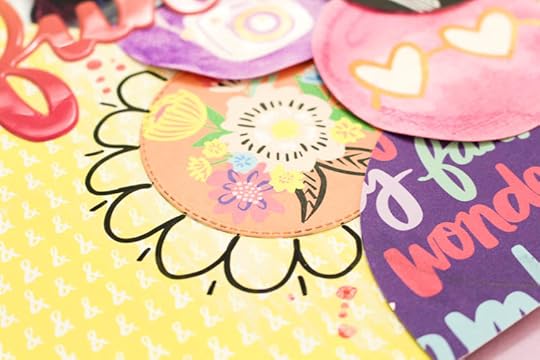
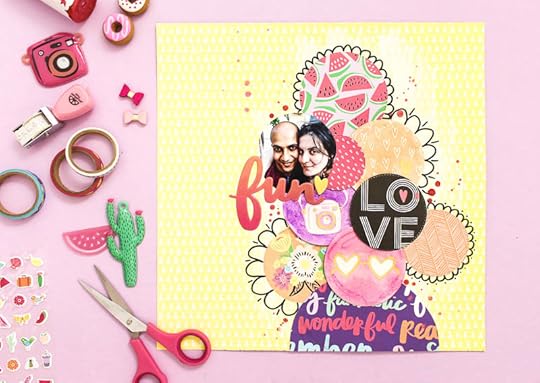
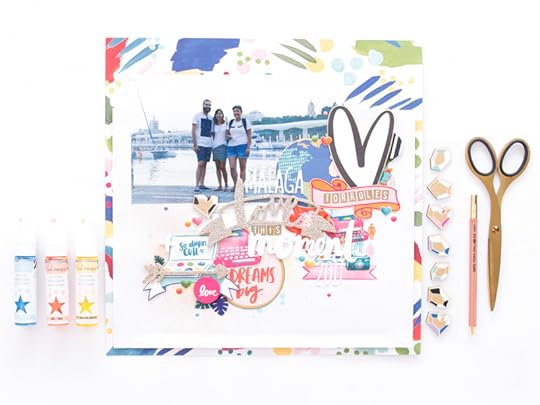
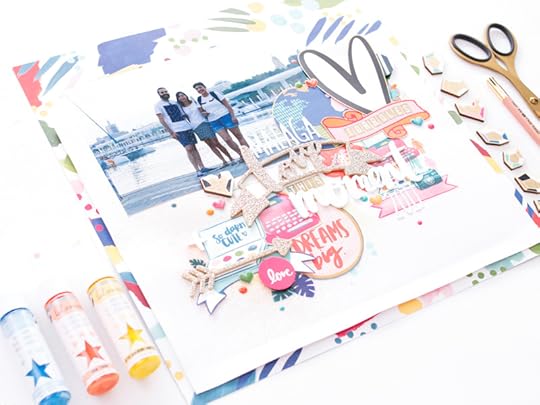
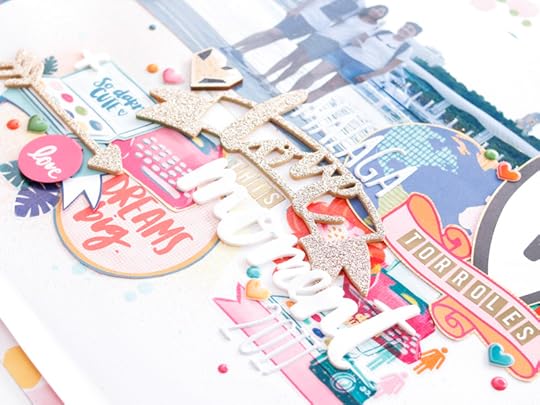
Zinia's Funky Circles Layout
Hello friends! It’s Zinia here once again and today I have a really funky and somewhat artful layout to share with you today. The techniques I’m using on this page are perfect if you are a beginner in mixed media and you are intimidated to get your hands dirty.
Of course I’m using Amy’s latest collection Sunshine & Good Times which has a perfect mix of fun colors and modern patterns. The idea for this design came from the beautiful watercolor resist tags that are included in this line. I grabbed the circle tags and colored them using water-soluble art crayons by Vicki Boutin (make sure to watch the process video cause I have some more tips on coloring these tags).

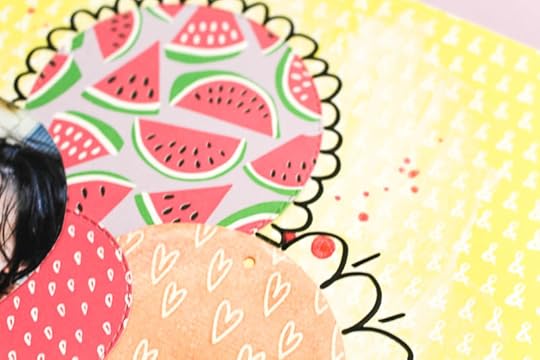
To go along with the circle tags, I die cut a bunch of different circles from the pattern papers. I made sure to use different sizes of dies to have many options when I start building the design.
Before I started sticking the circles on the page, I added a thin layer of gesso on my background. You can totally skip this step if you want as we won’t do a lot of mixed media. But although priming the page is not necessary, gesso creates a nice highlight on the background that will help the rest of the design pop against the bright background.
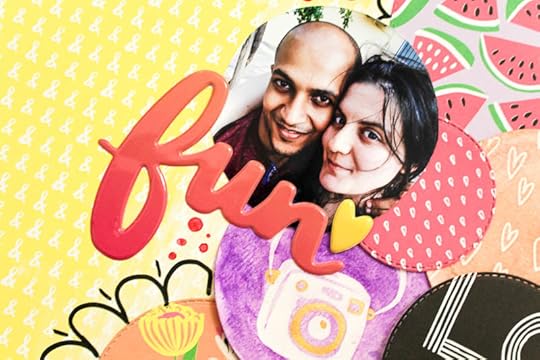
Once the gesso is dry, I started sticking the circles on the page, overlapping them to create a fun structure. To make my page more whimsical I used a permanent marker and added some doodles around the circles. That also helped me balance the black color from the “love” circle I placed in the middle of my page.
I cut my photo into a circle to go along with the rest of the elements and stuck it close to the middle along with the beautiful puffy thickers I decided to use for my title.
You could stop here but I always like adding a finishing touch with colorful ink splatters on my layouts. I brought in some lovely pink shades of Heidi Swapp color shine and sprinkled them all around. That’s a really subtle mixed media technique you can add to your pages if you don’t want things to get messy.
That’s it! We turned a bunch of regular circles into a mixed media masterpiece in a few easy steps and without creating a mess at our workspace!
I really hope you will give this a go and experiment with your favorite mixed media supplies. Until next time, happy crafting!
Zinia
Abstract Inspiration Blog | Instagram | Twitter | Facebook
SUPPLY LIST: 345688 Boba Buddy, 345696 Flower Power, 345698 Yesss Please, 345702 Be Happy, 345705 Slice of the Good Life, 345707 Bloom Big Time, 345684 Officially Obsessed, 345713 THICKERS Let's Dance, 345718 WATERCOLOR RESIST TAG
Thanks so much for sharing this fun layout, Zinia! Other Design Team member posts can be found here. Shop HUSTLE & HEART now! Check your local retailer and online at Simon Says Stamp and Scrapbook.com
Disclosure: Some of the links above are affiliate links. I receive a small percentage of sales at no cost to you. My creative partners and I really appreciate your continued support and every little bit helps me to bring you consistent content!
February 22, 2018
I don't always match...
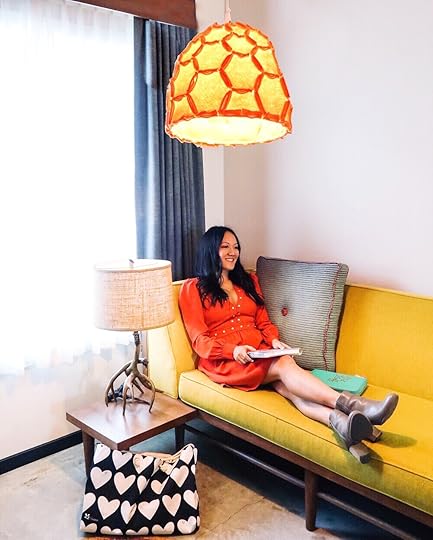
I don’t always match the lampshade but when I do... it’s while crafting on the go at the insanely cute Lone Star Court on their super cool sofa. In addition to this awesome furniture, there’s a SMEG fridge in every room! I recently had the pleasure of visiting Erin Condren's new flagship store so of course I had to bring all of my favorite planner supplies. Since everyone always asks, my dress is from Rent the Runway, which I have been loving as I have had an Unlimited membership for a few months. It's the Rachel Zoe Orange Neda dress and the fit is perfection.
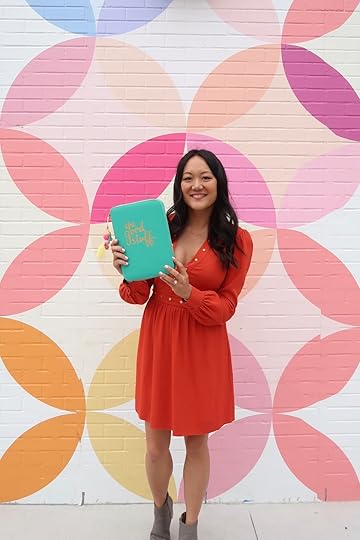
The boots I have been loving lately seem to match everything I have been wearing and they are SO comfortable. I can walk around all day and into the night in them. Also some go-to items to travel with alongside my Planner Pouch which so many of you have already started to receive! Check out all the details of my favorites and what I am wearing here.
February 19, 2018
Violeta's Love This Moment Layout
Hello! I am Violeta Scrap and I am going to show you a Layout I made with a bunch of elements from the “Hustle & Heart” collection. As they are very colorful, they are perfect for any photograph.
For this project I have used one of my favourite papers from the collection “Hustle & Heart”. It is the “Oh so lovely” paper. I love the different elements drawn in the paper and the color combinations. Over this paper, I have glued a basic cardstock paper of 9”x11,5”, and then I have added at the bottom part some splashes of colors, with some spray inks, in yellow, orange and blue tones.
I have used a 5”x8” photograph that I have placed in the left top part of the project, and in the bottom part of the project I have put a great amount of elements to decorate this layout.

I have cut different elements from different papers to create the vast decoration of the Project. Some elements that I have cut are from “The Little Things” paper and some others from “Fit to be square! Paper, both from the “Hustle & Heart” collection.
Besides, I have used lots of transparent stickers from the “Hustle & Heart” collection that I have placed under the elements that I have cut from the papers.
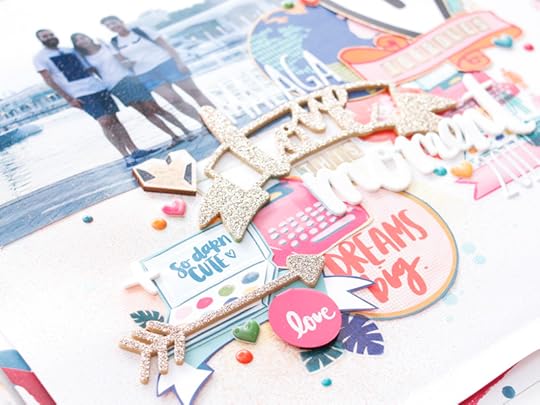
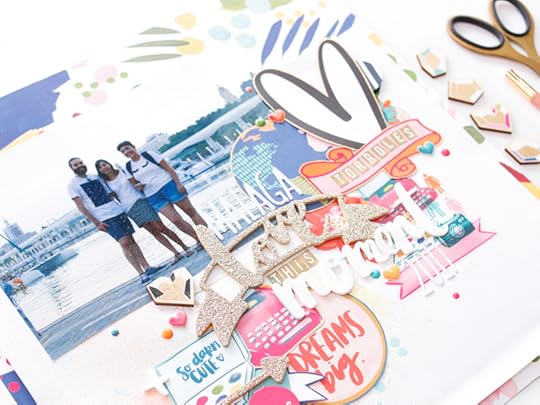
For the title of this project I have used some foam words from the Thickers of “Hustle & Heart” collection as they look great with the white alphabet Thickers from the same collection and which with I have used to include the date and the place of the photograph.
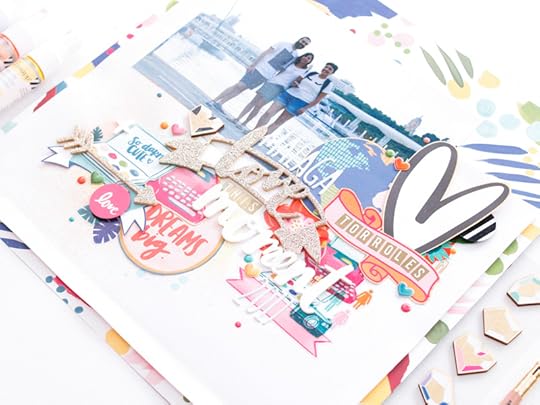
Lastly, I have put some enamel dots, a Wood veener sticker in white, gold and black color. Also, there are some glossy puffy stickers in different colors and some museum pins. All of them as decorative elements of the project.
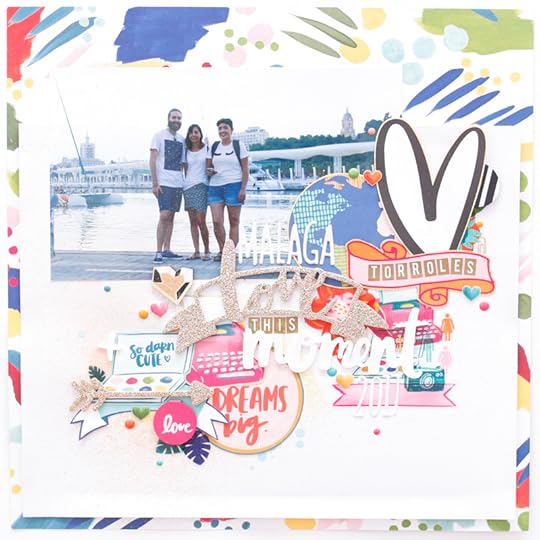
As you can see, you can place lots of elements in a same layout, even if you have a big photograph.
Violeta Scrap
Blog | Instagram | Twitter | Facebook | YouTube
Supplies: Hustle & Heart- 12x12 Double Sided Paper – Oh so lovely (341868), Hustle & Heart- 12x12 Double Sided Paper – Fit to be square (341869), Hustle & Heart- 12x12 Double Sided Paper – The little things (341861), Hustle & Heart - Thickers – The Lucky Ones (341887), Hustle & Heart - Thickers – Memento White (341886), Hustle & Heart - Sticker Book (341884), Hustle & Heart – Glossy Puffy Stickers (341889), Hustle & Heart – Museum pins (341894), Hustle & Heart – Wood veneer stickers (341892)
Thanks so much for sharing this layout with us, Violeta! Other Design Team member posts can be found here. Shop HUSTLE & HEART now! Check your local retailer and online at Simon Says Stamp and Scrapbook.com
Disclosure: Some of the links above are affiliate links. I receive a small percentage of sales at no cost to you. My creative partners and I really appreciate your continued support and every little bit helps me to bring you consistent content!
February 16, 2018
Happy Chinese New Year!
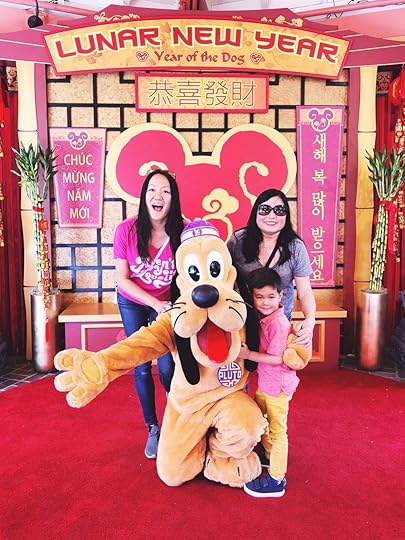
Happy Chinese New Year from our crew and Pluto too ✨❤️
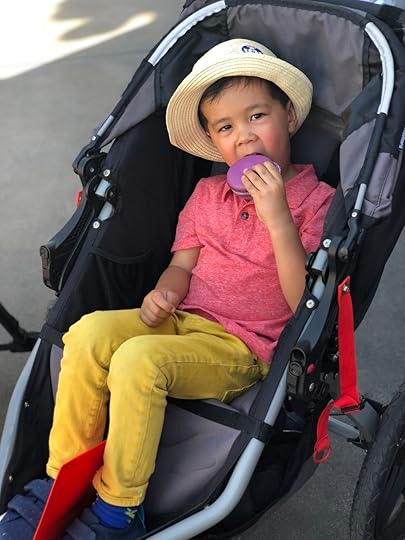
We were invited to check out the Lunar New Year celebrations at California Adventure and we had a wonderful time! Wrote a recap of the fun for Disney Family. Check out the size of that macaron that Jack had! I think it’s so cool to have him experience these things because when I was younger, I didn’t see many opportunities to celebrate my heritage. Even though I was born and raised in a diverse suburb of Chicago and we got red envelopes every year, it’s amazing to see how the traditions are being shared in so many creative ways for everyone to enjoy.
February 10, 2018
DIY Valentine's Cards
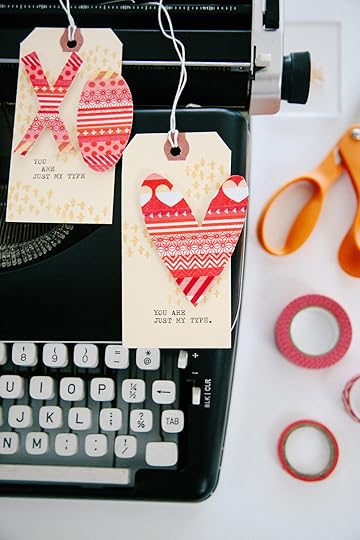
One of my fondest memories of Valentine's Day when I was a kid was exchanging cards with everyone in my class at school. I love encouraging Jack to make cards for all occasions and will have him add his handwriting to the back of these super simple Valentine's Day cards to share with his preschool pals! In collaboration with Fiskars, this DIY can easily be replicated no matter how many friends and family you are sharing the love with.
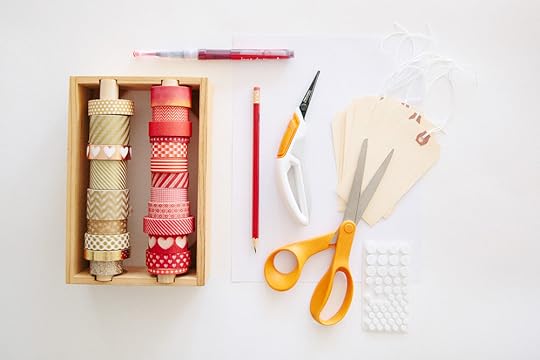
You will need: white cardstock, several rolls of washi tape (red and gold used here), shipping tags, foam pop dots, pencil, typewriter, stamps, gold ink, red brush marker and scissors. I used both the Fiskars Original orange-handled scissors as well as the Total Control Precision scissors (great for curves and details).
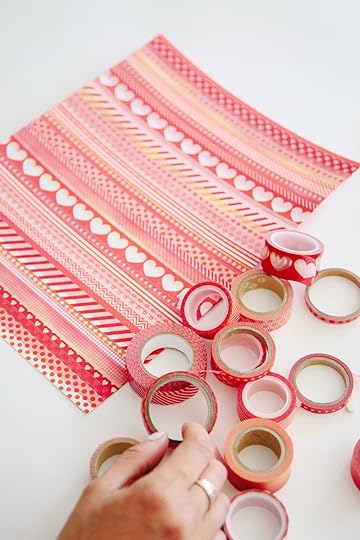
Begin by placing varying patterns of washi tape over the sheet of white cardstock until it is completely covered.
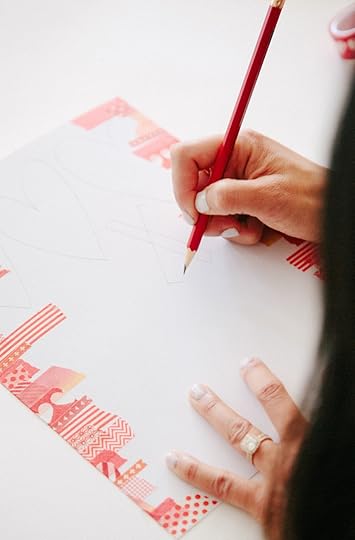
Next, flip the cardstock sheet over and freehand sketch hearts and the letters "X" and "O" with a pencil.
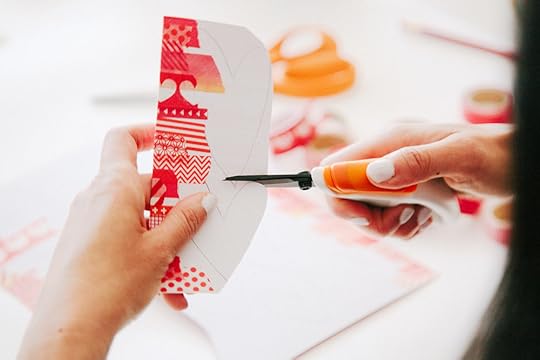
Take your scissors and cut out each of the traced shapes. The non-stick blades make it easy to be precise when cutting through the layers, and the thumb-activated cutting motion maximizes control and limits fatigue.
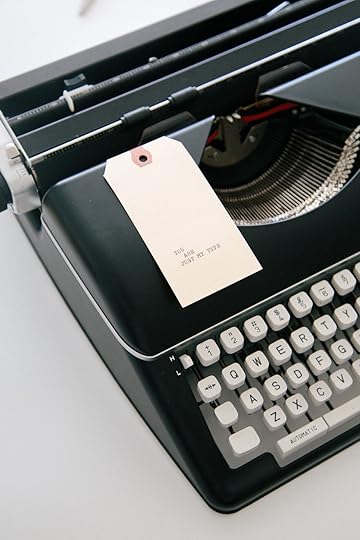
From there, type out a sweet sentiment like "You are just my type" onto the shipping tags using a typewriter.
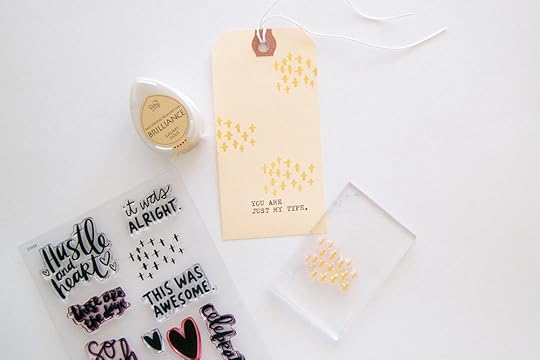
Using my cross pattern stamp, add texture to each of the cards by stamping the design a few times using gold ink.
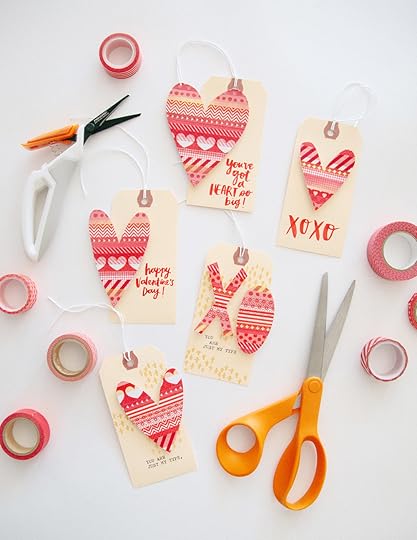
Finally, adhere each of the shapes using the pop dots for dimension to the shipping tags.
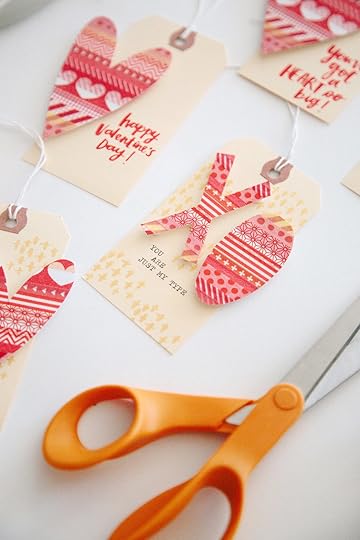
Jack can't wait to pass these out to his friends on Valentine's Day!
This post is in collaboration with Fiskars, all ideas and opinions are my own. As always, my creative partners and I appreciate the support.
February 7, 2018
Planner Pouch Pre-Sale is on!
We are bursting with excitement over here
February 5, 2018
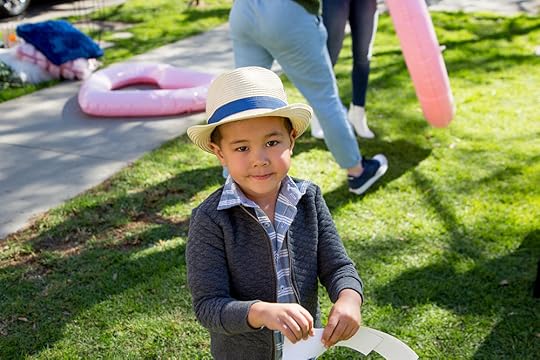
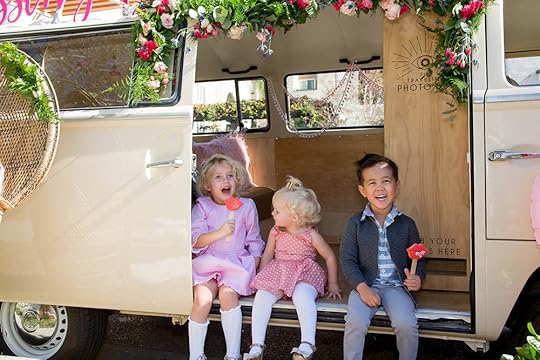
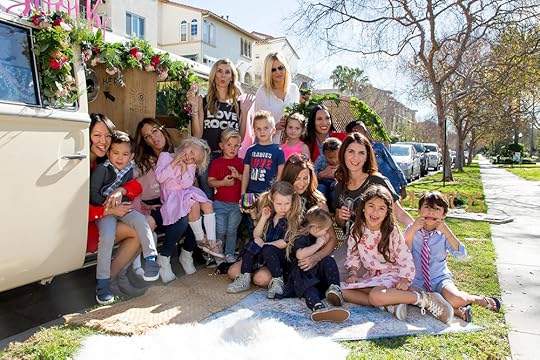
Kissing Booth
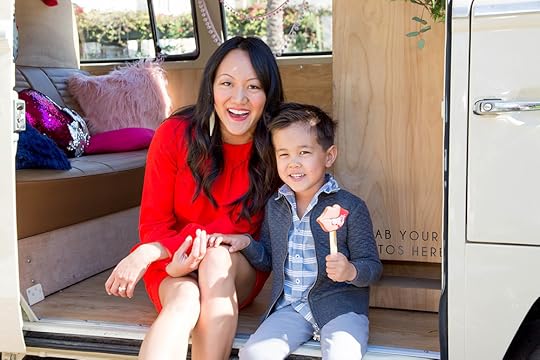
Recently we got to attend the cutest pop-up hosted by my friend Pamelyn from Bashery & Co in Playa Vista as an early Valentine's Day celebration. Of course I'm always looking for any excuse to get dressed up and smooch my favorite little guy!
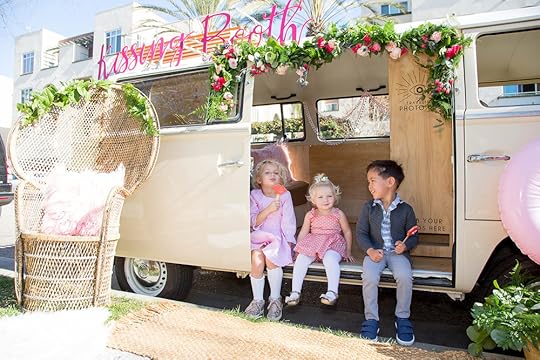
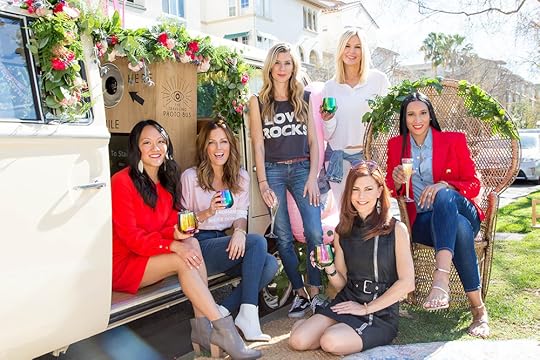
There were so many great vendors including The Traveling Photo Bus, Eventive Moments, Funky Letter Boutique, and the coolest group of mamas!
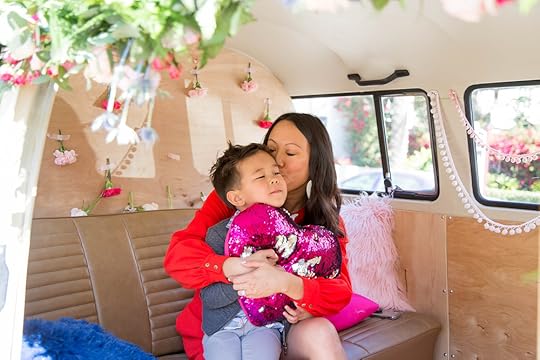
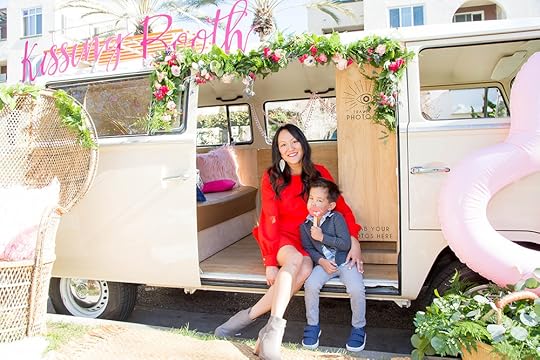
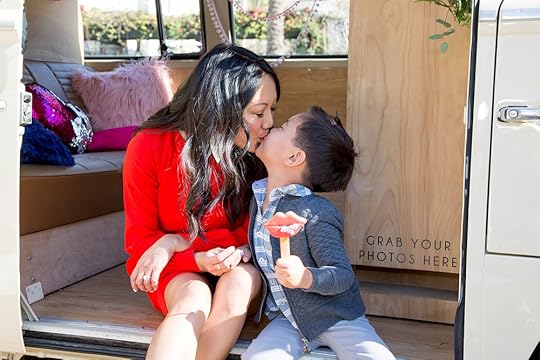
I wore a dress from Rent The Runway (I'm obsessed right now with their unlimited subscription - more on that soon). Jack's clothes are from Kidbox. To receive 20% off your first order, use the code JACK20 at checkout. Would make an awesome present for Valentine's Day!
Photos by Ographr
February 1, 2018
Creativation 2018!
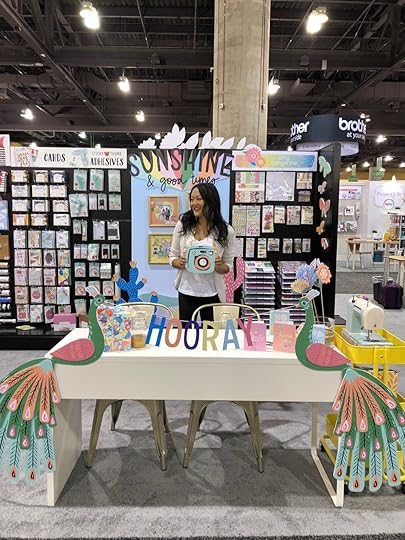
Happy February! I feel like I say this all the time, but man is time just flying, or what?! I'm still not completely unpacked from Creativation, but at least part 1 of the video is done! How funny is this thumbnail?!
Hope you feel like you were right there with us! I went on live TV on Fox10 to talk really quickly about bullet journaling - you can check that out here.
To see the whole collection, be sure to watch Scrap Time's video.
Amy Tangerine's Blog

- Amy Tangerine's profile
- 62 followers

